


s
Be inspired
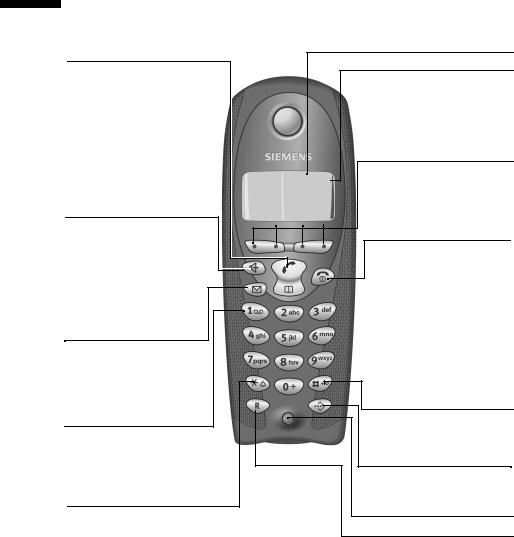
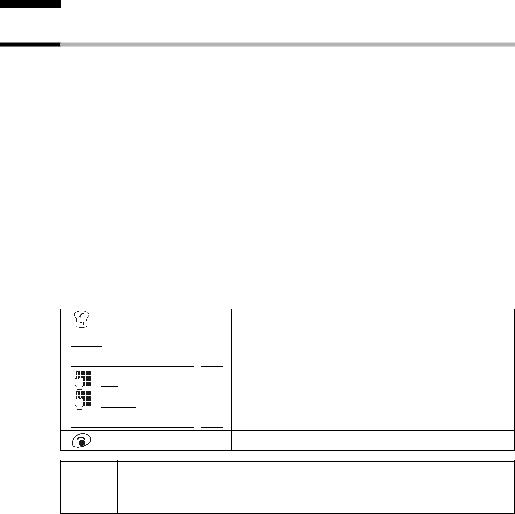
The handset at a glance
The handset at a glance
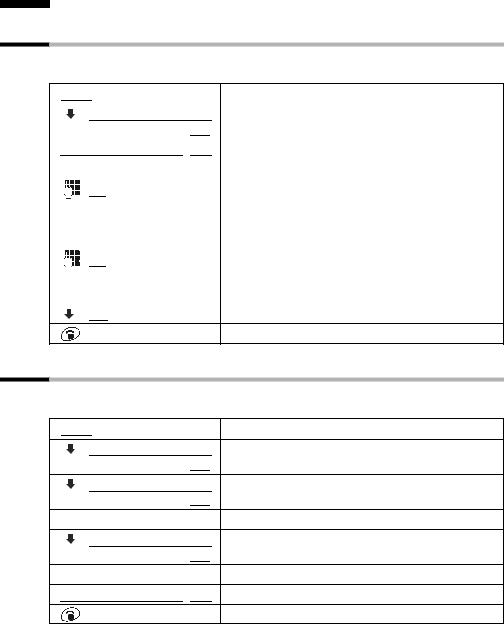
Talk/ directory key:
Top half:
Answer a call
Initiate dialling
Switch from handsfree to "earpiece" mode
Bottom half:
Open directory
Handsfree key:
Switch from "earpiece" to handsfree mode
Lights up: Handsfree is activated
Flashes: Incoming call
Message key
Accesses the lists of SMS, network mailbox, caller list/answering machine (C 150 only)
Key 1
Select answering machine (C 150 only)/network mailbox (press for approx. 2 seconds)
Star key
Ringer on/off
(press for around 2 seconds)
When texting: Toggles between upper/lower case and digits
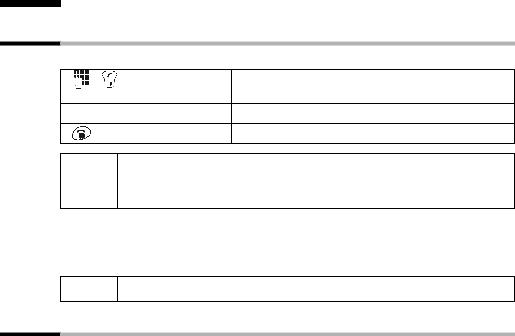
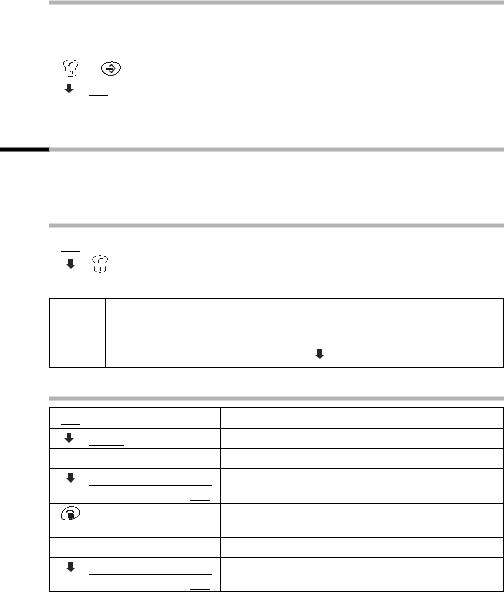
Display (display screen)
Charge status |
|
=flat |
Ufully |
charged
=flashes: battery is almost flat or is charging
Current functions and display keys
UThe display keys give you access to the functions shown in the display.
Ûu vMENU End call key and
On/Off key
End call
Cancel function
One menu level back (press briefly)
Back to idle status (press for approx.1 second)
Handset on/off (press for approx. 2 seconds)
Hash key
Keypad lock on/off (press for approx. 1 second)
Speed dial key
Open speed dial list (press briefly)
Microphone
Recall key
Insert a dial pause (hold key down)
1

Table of Contents
Table of Contents
The handset at a glance . . . . . . . . . . . . . . . . . . . . . . 1 Safety Precautions . . . . . . . . . . . . . . . . . . . . . . . . . . . 5
Preparing to use your phone . . . . . . . . . . . . . . . . . . 6
Installing the base . . . . . . . . . . . . . . . . . . . . . . . . . . . . . . . . . . . . . . . . . . . . . . . . . . . . . 6 Connecting the base . . . . . . . . . . . . . . . . . . . . . . . . . . . . . . . . . . . . . . . . . . . . . . . . . . . 7 Preparing to use the handset . . . . . . . . . . . . . . . . . . . . . . . . . . . . . . . . . . . . . . . . . . . . . 8 Activating/deactivating the handset . . . . . . . . . . . . . . . . . . . . . . . . . . . . . . . . . . . . . . 10 Activating/deactivating the keypad lock . . . . . . . . . . . . . . . . . . . . . . . . . . . . . . . . . . . 10
Operating the telephone, menu guidance . . . . . . 11
Keys . . . . . . . . . . . . . . . . . . . . . . . . . . . . . . . . . . . . . . . . . . . . . . . . . . . . . . . . . . . . . . . 11 Correcting wrong inputs . . . . . . . . . . . . . . . . . . . . . . . . . . . . . . . . . . . . . . . . . . . . . . . 12 Idle status . . . . . . . . . . . . . . . . . . . . . . . . . . . . . . . . . . . . . . . . . . . . . . . . . . . . . . . . . . . 12 Menu operation, with "Setting Handsfree Volume" as an example . . . . . . . . . . . . . . 13
Date and Time . . . . . . . . . . . . . . . . . . . . . . . . . . . . . 14
Setting the date and the time . . . . . . . . . . . . . . . . . . . . . . . . . . . . . . . . . . . . . . . . . . . |
14 |
Changing the time mode . . . . . . . . . . . . . . . . . . . . . . . . . . . . . . . . . . . . . . . . . . . . . . |
14 |
Making calls . . . . . . . . . . . . . . . . . . . . . . . . . . . . . . . 15
Making external calls and ending a call . . . . . . . . . . . . . . . . . . . . . . . . . . . . . . . . . . . . 15 Answering a call . . . . . . . . . . . . . . . . . . . . . . . . . . . . . . . . . . . . . . . . . . . . . . . . . . . . . . 15 Calling Line Identification . . . . . . . . . . . . . . . . . . . . . . . . . . . . . . . . . . . . . . . . . . . . . . 16 Handsfree . . . . . . . . . . . . . . . . . . . . . . . . . . . . . . . . . . . . . . . . . . . . . . . . . . . . . . . . . . . 17 Activating/deactivating open listening (call screening at the base) (C 150 only) . . . 18 Handset muting . . . . . . . . . . . . . . . . . . . . . . . . . . . . . . . . . . . . . . . . . . . . . . . . . . . . . . 18
Using the directory and other lists . . . . . . . . . . . . 19
Directory and speed dial list . . . . . . . . . . . . . . . . . . . . . . . . . . . . . . . . . . . . . . . . . . . . . 19 Last number redial list . . . . . . . . . . . . . . . . . . . . . . . . . . . . . . . . . . . . . . . . . . . . . . . . . 22 Opening lists with the Message key . . . . . . . . . . . . . . . . . . . . . . . . . . . . . . . . . . . . . . 23 Caller list and answering machine list (only C 150) . . . . . . . . . . . . . . . . . . . . . . . . . . 23
SMS (Text Messages) . . . . . . . . . . . . . . . . . . . . . . . . 27
General . . . . . . . . . . . . . . . . . . . . . . . . . . . . . . . . . . . . . . . . . . . . . . . . . . . . . . . . . . . . . 27 Before you can send and receive text messages . . . . . . . . . . . . . . . . . . . . . . . . . . . . . 28 Sending and receiving text messages . . . . . . . . . . . . . . . . . . . . . . . . . . . . . . . . . . . . . 28 Text message sending and the draft message list . . . . . . . . . . . . . . . . . . . . . . . . . . . . 30 Receiving text messages and the incoming message list . . . . . . . . . . . . . . . . . . . . . . 34 Text messages to PABX's . . . . . . . . . . . . . . . . . . . . . . . . . . . . . . . . . . . . . . . . . . . . . . . 37 Errors when sending and receiving a text message . . . . . . . . . . . . . . . . . . . . . . . . . . 38
2
Table of Contents
Using the answering machine in the
C 150 Base . . . . . . . . . . . . . . . . . . . . . . . . . . . . . . . . 40
Operating the answering machine from the base . . . . . . . . . . . . . . . . . . . . . . . . . . . 40 Operating the answering machine from the handset . . . . . . . . . . . . . . . . . . . . . . . . 41 Operating the answering machine while you are away from home
(remote operation) . . . . . . . . . . . . . . . . . . . . . . . . . . . . . . . . . . . . . . . . . . . . . . . . . . . 46
Setting the Answering Machine of the |
|
C 150 Base . . . . . . . . . . . . . . . . . . . . . . . . . . . . . . . . |
48 |
Ring delay and charge saving function for remote operation . . . . . . . . . . . . . . . . . |
. 48 |
Setting the recording time . . . . . . . . . . . . . . . . . . . . . . . . . . . . . . . . . . . . . . . . . . . . . |
49 |
Activating/deactivating call screening . . . . . . . . . . . . . . . . . . . . . . . . . . . . . . . . . . . . . |
49 |
Resetting fast access on the answering machine . . . . . . . . . . . . . . . . . . . . . . . . . . . . |
50 |
Using the network mailbox . . . . . . . . . . . . . . . . . . 51
Configuring the network mailbox for fast access . . . . . . . . . . . . . . . . . . . . . . . . . . . . 51 Viewing a message from the network mailbox . . . . . . . . . . . . . . . . . . . . . . . . . . . . . . 51
Registering and de-registering handsets . . . . . . . 52
Automatic registration: Gigaset C 1 on Gigaset C 100 or C 150 . . . . . . . . . . . . . . . . . 52 Manual registration: Gigaset C 1 on Gigaset C 100 or C 150 . . . . . . . . . . . . . . . . . . . 53 Manual registration:
Gigaset 1000 to 4000 and other handsets with GAP functionality . . . . . . . . . . . . . . 54 De-registering handsets . . . . . . . . . . . . . . . . . . . . . . . . . . . . . . . . . . . . . . . . . . . . . . . 54 Page handset . . . . . . . . . . . . . . . . . . . . . . . . . . . . . . . . . . . . . . . . . . . . . . . . . . . . . . . . 54
Using several handsets . . . . . . . . . . . . . . . . . . . . . |
55 |
Internal calls, ending a call . . . . . . . . . . . . . . . . . . . . . . . . . . . . . . . . . . . . . . . . . . . . . 55 Changing the name of a handset . . . . . . . . . . . . . . . . . . . . . . . . . . . . . . . . . . . . . . . . 55 Changing a handset's internal number . . . . . . . . . . . . . . . . . . . . . . . . . . . . . . . . . . . . 56 Internal consultation calls . . . . . . . . . . . . . . . . . . . . . . . . . . . . . . . . . . . . . . . . . . . . . . 57 Accepting/rejecting call waiting during an internal call . . . . . . . . . . . . . . . . . . . . . . . 57
Handset settings . . . . . . . . . . . . . . . . . . . . . . . . . . . 58
Changing the display language . . . . . . . . . . . . . . . . . . . . . . . . . . . . . . . . . . . . . . . . . . 58 Activate/deactivate Auto Answer . . . . . . . . . . . . . . . . . . . . . . . . . . . . . . . . . . . . . . . . 58 Adjusting the loudspeaker volume . . . . . . . . . . . . . . . . . . . . . . . . . . . . . . . . . . . . . . . 59 Changing the ringer tone . . . . . . . . . . . . . . . . . . . . . . . . . . . . . . . . . . . . . . . . . . . . . . 59 Activating/deactivating advisory tones . . . . . . . . . . . . . . . . . . . . . . . . . . . . . . . . . . . . 61 Restoring the handset factory settings . . . . . . . . . . . . . . . . . . . . . . . . . . . . . . . . . . . . 62
3
Table of Contents |
|
Setting the base . . . . . . . . . . . . . . . . . . . . . . . . . . . |
63 |
Protecting the telephone from unauthorized access . . . . . . . . . . . . . . . . . . . . . . . . . . 63 Changing the loudspeaker volume of the base (C 150 only) . . . . . . . . . . . . . . . . . . . 63 Changing the ringer volume and the ringer melody . . . . . . . . . . . . . . . . . . . . . . . . . . 64 (C 150 only) . . . . . . . . . . . . . . . . . . . . . . . . . . . . . . . . . . . . . . . . . . . . . . . . . . . . . . . . . 64 Activating/cancelling the key click on the base: (C 150 only) . . . . . . . . . . . . . . . . . . . 64 Repeater support . . . . . . . . . . . . . . . . . . . . . . . . . . . . . . . . . . . . . . . . . . . . . . . . . . . . . 65 Restoring the base factory settings . . . . . . . . . . . . . . . . . . . . . . . . . . . . . . . . . . . . . . . 65
Connecting the base to a PABX . . . . . . . . . . . . . . . 67
Dialling modes and recall . . . . . . . . . . . . . . . . . . . . . . . . . . . . . . . . . . . . . . . . . . . . . . . 67 Setting pauses . . . . . . . . . . . . . . . . . . . . . . . . . . . . . . . . . . . . . . . . . . . . . . . . . . . . . . . 68 Switching temporarily to tone dialling (DTMF) . . . . . . . . . . . . . . . . . . . . . . . . . . . . . . 68
Appendix . . . . . . . . . . . . . . . . . . . . . . . . . . . . . . . . . |
69 |
Care . . . . . . . . . . . . . . . . . . . . . . . . . . . . . . . . . . . . . . . . . . . . . . . . . . . . . . . . . . . . . . |
. 69 |
Contact with liquid . . . . . . . . . . . . . . . . . . . . . . . . . . . . . . . . . . . . . . . . . . . . . . . . . . |
. 69 |
Questions and Answers . . . . . . . . . . . . . . . . . . . . . . . . . . . . . . . . . . . . . . . . . . . . . . . |
. 69 |
Service (Customer Care) . . . . . . . . . . . . . . . . . . . . . . . . . . . . . . . . . . . . . . . . . . . . . . |
. 71 |
Specifications . . . . . . . . . . . . . . . . . . . . . . . . . . . . . . . . . . . . . . . . . . . . . . . . . . . . . . . |
. 73 |
Answering machine remote operation (C 150 only) . . . . . . . . . . . . . . . . . . . . . . . . |
. 74 |
Character set table . . . . . . . . . . . . . . . . . . . . . . . . . . . . . . . . . . . . . . . . . . . . . . . . . . . |
. 74 |
Accessories . . . . . . . . . . . . . . . . . . . . . . . . . . . . . . . . 76
Menu Tree . . . . . . . . . . . . . . . . . . . . . . . . . . . . . . . . 78
Main menu . . . . . . . . . . . . . . . . . . . . . . . . . . . . . . . . . . . . . . . . . . . . . . . . . . . . . . . . . . 78 Directory key and speed dial list key . . . . . . . . . . . . . . . . . . . . . . . . . . . . . . . . . . . . . . 80 Caller List/Answering Machine List (C 150 only) . . . . . . . . . . . . . . . . . . . . . . . . . . . . . 80
Index . . . . . . . . . . . . . . . . . . . . . . . . . . . . . . . . . . . . . 81
4

Safety Precautions
Safety Precautions !
$ Only use the power supply unit supplied, as indicated on the underside of the device.
Fit only the recommended rechargeable batteries (page 73) of the same type! Use no other types of batteries or non-rechargeable batteries, as they could damage health and cause personal injury.
‹ Ensure correct polarity when fitting rechargeable batteries, and use the battery type according to these instructions (you will see polarity symbols in the
Πhandset's battery compartments).
The operation of medical appliances may be affected. Be aware of the technical conditions within the particular environment (e.g. doctor's practice).
The handset may cause an intrusive 'hum' in hearing aids.
Do not install the base in bathrooms or shower rooms (page 69). The handset and base are not watertight.
Do not use the phone in environments subject to explosion hazard (e.g. auto paint shops).
ƒEnsure that your Gigaset is accompanied by these instructions when you give it to others to use.
Dispose of the batteries and phone in accordance with environmental regulations.
i |
Not all of the functions described in these instructions are available in all |
|
countries. |
||
|
||
|
|
5

Preparing to use your phone
Preparing to use your phone
The pack contains:
one Gigaset C 100 or C 150 base
one Gigaset C 1 handset,
one power supply unit with power cord,
one telephone cord,
two batteries,
one set of operating instructions.
Installing the base
Hints on installing
The base is designed to be operated in enclosed, dry areas at temperatures ranging from +5 °C to +45 °C. Instal the base at a central location in your home, e.g. in the hall.
|
|
Never expose the telephone to heat sources, direct sunlight, other |
W |
|
electrical appliances. |
|
Protect your Gigaset from moisture, dust, corrosive liquids and |
|
|
|
vapours. |
|
|
|
Range
The base has a range of approx. 300 m outdoors and up to 50 m indoors.
6
Preparing to use your phone
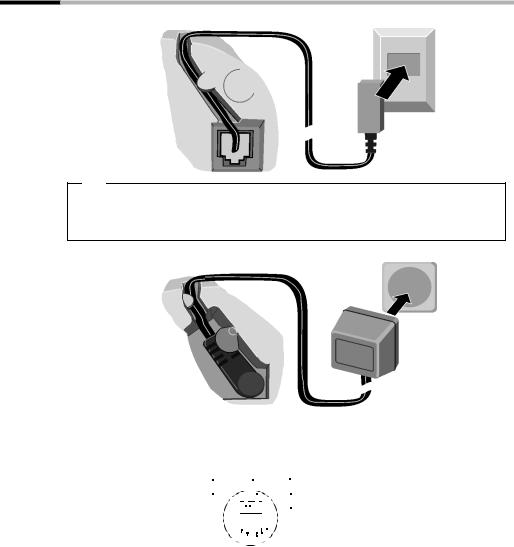
Connecting the base
Phone outlet
|
Cable recess |
|
|
1. |
|
Underside of |
Phone jack with |
|
phone cord |
||
base (enlarged |
||
|
||
view) |
|
1.
Fit the small jack on the phone cord into the socket in the base (it clips into place),Place cord in cable recess,
Fit phone jack into phone outlet.
Outlet
Cable recess
|
2. |
Underside of |
Power supply unit |
base (enlarged |
230 V with power |
view) |
cord |
|
2. |
|
|
|
|
Insert the small jack on the power cord into the socket on the underside of the base, |
||
|
Place cord in cable recess, |
|
|
Plug the power supply unit into your power outlet. |
|
|
|
|
Internal phone jack con- |
3 |
|
|
|
|
4 |
1 |
unassigned |
||||
nections: |
2 |
|
|
|
|
|
|
|
|
5 |
2 |
unassigned |
|
1 |
|
|
|
|
|
|
|
|
6 |
3 |
a |
|
|
|
|
|
|
|
|
|
4 |
b |
||
|
|
|
|
|
|
|
|
|
|
|
||
|
|
|
|
|
|
|
|
|
|
|
5 |
unassigned |
|
|
|
|
|
|
|
|
|
|
|
||
|
|
|
|
|
|
|
|
|
|
|
6 |
unassigned |
|
|
|
|
|
|
|
|
|
|
|
||
|
|
|
|
|
|
|
|
|
|
|
||
|
|
Keep the power supply unit plugged in at all times to ensure your |
i |
|
phone is ready for use whenever you need it. |
|
If ever you purchase a phone cord from a store, ensure that the phone |
|
|
|
conductors are correctly connected (3-4 connection). |
|
|
|
7
Preparing to use your phone
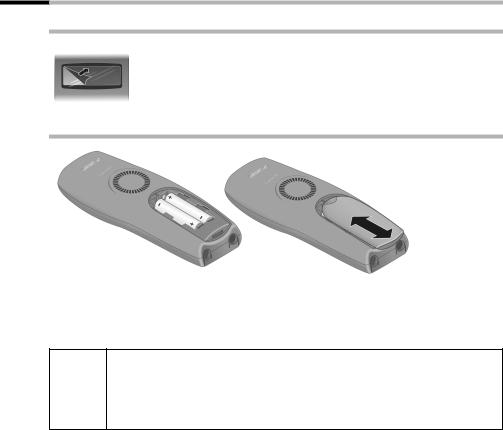
Preparing to use the handset
Removing protective film
The display is protected by a plastic film.
Remove the protective plastic film!
Inserting the batteries
Insert the batteries ensuring correct polarity – see figure on left.
Position the battery cover so that it is open by around 3 mm, then slide up until it closes with a click,
To open the battery cover, press on the checkered area and slide down.
Use only the rechargeable batteries recommended by Siemens on page 73! Never use conventional batteries (non-rechargeable) or other
W battery types as this may cause significant damage to health and property. For example, the jacket of the battery could be destroyed (hazardous). The phone could also malfunction or be damaged.
8

Preparing to use your phone
Placing the handset into the base and charging the batteries
When you place the handset into the base, the handset will register automatically to the base. Proceed step by step as follows:
1.Place the handset in the base with the display up.
2.Wait till the handset has registered automatically to the base (page 52): This operation takes around one minute. While registration is in progress the screen displays Anmeldevorgang: and Basis 1 flashes. After registration, you will see a '1' in the top left of the display – this means that the handset has been assigned the first internal number.
3.Now leave the handset in the base for the batteries to charge – the batteries are sup-
plied uncharged. Battery charging is indicated in the top right of the display by the battery icon =flashing:
= |
Batteries flat |
V |
Batteries 2/3 charged |
e |
Batteries 1/3 charged |
U |
Batt. fully charged |
Should automatic registration be interrupted, register the handset manually as described starting on page 53. You can get help from a table containing basic questions and answers (page 69).
i |
To register additional handsets , refer to page 53. |
For the initial charge we recommend a continuous, uninterrupted charg- W ing period of five hours, whatever charge status is indicated. After a while
the charge capacity of the batteries will decrease for technical reasons.
The battery charging status is correctly displayed only after uninterrupted charging/ discharging . You should therefore avoid removing the batteries unnecessarily and ending the charging process prematurely.
|
|
Once initial charging is complete, you can replace your handset in the |
i |
|
base after each call. Charging is controlled electronically. This ensures |
|
that the batteries are charged in a way that optimizes their life. |
|
|
|
The batteries heat up during charging. This is normal and not danger- |
|
|
ous. |
|
|
|
Note
Your telephone is now ready for operation. With the Gigaset C 150, the answering machine with pre-recorded announcement is also activated. To correctly record the time of calls and messages (C 150) you should now set the date and time (page 14).
9
Preparing to use your phone
Activating/deactivating the handset
To activate the handset, press the 'end call' key aand hold. You will hear a confirmation tone (rising tone sequence).
To deactivate the handset, press the 'end call' key again ain the idle status and hold (confirmation tone).
i The handset activates automatically when placed in the base or charger.
Activating/deactivating the keypad lock
You can 'lock' the keys on your handset, e.g. when carrying the unit in your pocket or bag. This protects the keypad against inadvertent activation.
Press the hash key and hold (confirmation tone).
The Øicon appears in the display
To deactivate the keypad lock, press the hash key Ragain and hold (confirmation tone).
|
|
The keypad lock deactivates automatically when you receive a call. It |
i |
|
re-activates when the call is finished. |
|
When the keypad lock is active, you cannot even call emergency num- |
|
|
|
bers. |
|
|
|
10
Operating the telephone, menu guidance
Operating the telephone, menu guidance
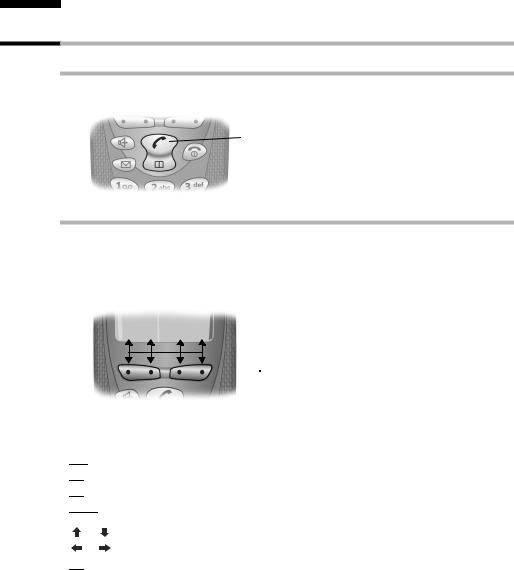
Keys
Talk/directory key
The talk/directory key cis a rocker key that has two functions. You press the top half of this key to initiate a call. You press the bottom half of the key to open the directory.
Rocker key:
 Top half of the key = Talk key
 Bottom half of the key = Directory key
Display keys
The display keys are the horizontal rocker keys just below the display. Depending on the particular operating situation, their function changes according to whether you press the left or right side of the key. The current function is shown in the display directly above the key to which it relates.
Example
Û u vMENU
|
|
|
Display keys |
|
|
|
|
The various functions are explained below: |
|||
|
|
||
Display icon |
Meaning when key is pressed |
||
[•] |
|
|
|
|
Last number redial key: Open the list of the last 10 numbers you dialed. |
||
|
|
||
[INT] |
INT key: Open the list of handsets when in idle status. |
||
[OK] |
OK key: Confirm menu function or confirm an input and store. |
||
[MENU] |
Menu key: Open the main menu when in idle status |
||
|
Open a status-dependent menu while making a call. |
||
|
Scroll up/down. |
||
|
|
||
[Û] |
Move cursor left/right. |
||
|
|
|
|
|
Delete key: Delete input from right to left one character at a time. |
||
|
|
|
|
11

Operating the telephone, menu guidance
Correcting wrong inputs
After a correct input you will hear a confirmation tone (rising tone sequence), an incorrect input is indicated by an error tone (falling tone sequence). You can repeat the input.
If you have entered incorrect characters in the text, you can correct this as follows:
Deleting characters to the left of the cursor with Û
To correct a telephone number or text, use the display keys uvto move the cursor to the right of the incorrect character. Now press the display key Û. The character is deleted. Now enter the correct character.
Inserting characters on the right of the cursor
If you have omitted a character, use the display keys uvto go to the place where you want to insert the character, and key it in.
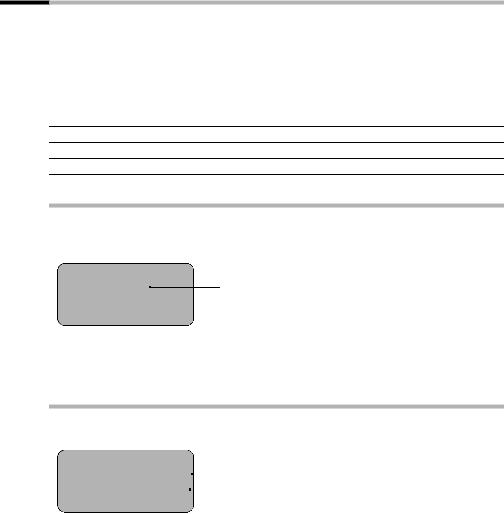
Idle status
Display in idle status
Gigaset C 100
1 |
V |
12:50 |
Time and date |
12.04.03 |
already set |
|
|
INT Þ |
MENU |
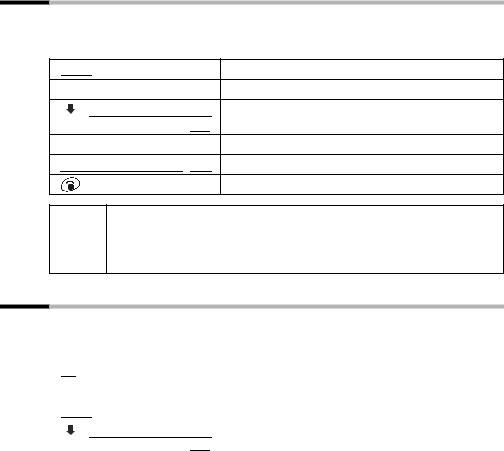
or
Gigaset C 150 |
V |
|
1 |
× |
|
|
12:50 |
Time and date |
|
12.04.03 |
already set |
|
|
|
INT |
Þ |
MENU |
Reverting to idle status from anywhere in the menu
Press the end call key afor around 1 second, or
Press no key: The display automatically reverts to the idle status after 2 minutes. Changes which you have not confirmed/stored by pressing OK will be rejected.
12

Operating the telephone, menu guidance
Menu operation, with "Setting Handsfree Volume" as an example
1.MENU Press the display key. The menu opens.
2.s Press the display key repeatedly until Audio Settings appears on the
screen.
3.OK Confirm with the display key.
4.s Press the display key repeatedly until Handsfree Volume appears on the
screen.
5.OK Confirm with the display key.
6.uv Press the left or right display key to select the required volume (1–5).
7.OK Now press the display key to confirm the setting.
8.a Press and hold the 'end call' key to return to the idle status.
13
Date and Time
Date and Time
Setting the date and the time
Correct date and time settings are essential if you want to know exactly when calls/messages (C 150) were received.
[MENU] |
|
Open the menu. |
|
|
|
[__________] [Calender/Clock |
] |
Select the menu item and confirm. |
|
[OK ] |
|
|
|
|
[Date/Time |
] [OK ] |
Confirm. |
|
|
|
|
|
Enter the date: |
|
|
|
[OK ] |
|
Enter the day/month/year and confirm. |
|
|
Example: For the 20.05.2003, enter |
|
|
2QQ5QI. |
|
|
Enter the time: |
|
|
|
[OK ] |
|
Enter hours/minutes and confirm. |
|
|
Example: For 9.35 a.m., enter QOI5. |
|
|
Only when the 12-hour display is selected: |
|
|
|
[_________] [OK ] |
|
Select the half of the day and confirm. |
Long press (back to idle status).
Changing the time mode
You can choose between the 12 hour and the 24 hour display (factory setting) for the time (a.m. = 1st half of the day; p.m. = 2nd half of the day).
Open the menu.
] Select the menu item and confirm.
[OK ]
] Select the menu item and confirm.
[OK ]
] Select the menu item and confirm (‰= On).
[OK ]
] [OK ] Confirm (‰= On).
Long press (back to idle status).
14
Making calls
Making calls
Making external calls and ending a call
External calls are calls into the public telephone network.
|
Enter the telephone number and press the top half of |
|
the key. The number is dialled. |
|
End the call: |
|
Press the end call key. |
i |
You can also press the top half of the ckey first (you hear a ringback |
tone) and then enter the number. |
|
|
You can use the end call key ato cancel the dialling operation. |
Inserting a dialling pause
You can insert a dialling pause between the prefix and the actual telephone number. To do this, press Sfor around 2 seconds. Now enter the telephone number.
i To call another handset, see the description on page 55.
Answering a call
Your handset rings, the call is displayed on the screen and the handsfree key dflashes. Press the top half of the ckey to take the call. If the handset is in the base/charger and the Auto Answer function is activated (page 58), then you just need to lift the handset out of the base/charger to take the call.
i |
If the ringer is intrusive, press Pfor around 1 second. You can take the |
call so long as it is displayed on the screen. |
|
|
|
15
Making calls
Calling Line Identification
When you get a call, you will see the caller's number and/or name displayed on the screen.
Preconditions:
1.You have asked your network provider for the caller's number (CLIP) or name (CNIP) to be displayed on your handset screen.
2.The caller has asked the network provider for his number to be identified (CLI).
3.Your network provider supports CLIP, CLI and CNIP.
CLIP |
Calling Line Identification Presentation |
CNIP |
Calling Name Identification Presentation |
CLI |
Calling Line Identification |
Screen display with CLIP/CLI
With calling line identification, the caller's telephone number is displayed on the handset screen. If you have stored an entry for this number is your directory, then that entry will be displayed instead of the number, e.g. 'Anna'.
ÅRinger symbol
1234567890 |
|
Telephone number or 'Anna' |
|
The screen displays External Call if the number is not identified.
The screen displays Withheld if the caller withholds his number (page 19), or Unavailable if he has not requested CLI.
Screen display with CNIP
If you have CNIP, then the name (town) that is registered with your network provider for the calling number will also be displayed on your handset.
Anna Lechner, Berlin
1234567890 |
|
|
Name and town |
|
|||
MENU |
|
|
Telephone number |
|
|
The screen displays External Call if the number is not identified.
The screen displays Withheld if the caller withholds his number, (page 19) or Unavailable if he has not requested CLI.
i |
You may have to pay a charge to use calling line identification. Please ask |
your network provider for details. |
|
|
|
16

Making calls
Handsfree
Activating/deactivating handsfree
Activate while dialling:
Enter the number and press the handsfree key.
Activate during a call:
Press the handsfree key.
Deactivate handsfree:
Press the top half of the key.
As soon as you terminate the handsfree mode you switch to 'earpiece mode' and continue the call on the handset.
|
|
If you wish to place the handset in the base during a call you must |
i |
|
press the handsfree key dand hold it down while you position the |
|
handset in the base. |
|
|
|
You should inform your caller that you intend to use the handsfree |
|
|
function before you activate it. |
|
|
|
Adjusting the volume while in handsfree mode
A call is in progress and handsfree is activated.
Press the handsfree key again.
Decrease or increase the volume.
Now press the display key to store the setting.
17
Making calls
Activating/deactivating open listening (call screening at the base) (C 150 only)
You can activate the built-in base loudspeaker to allow other people in the room to hear what your external caller is saying.
Precondition: A call is in progress.
[MENU] |
|
Press the display key to open the menu. |
either ... |
|
Activate open listening: |
[__________] [Open Listening On |
] |
Select the menu item and confirm. |
|
[OK ] |
|
or ... |
|
Deactivate open listening: |
[Open Listening Off |
] [OK ] |
Confirm. |
|
|
Long press (back to idle status). |
You should inform your caller that you intend to use the open
ilistening function before you activate it.
You can adjust the volume on the base with the ðand ñkeys (page 64).
Handset muting
You can mute your handset during external calls, e.g. if you wish to talk confidentially to another person in the room. The external caller cannot hear your conversation during this time (hold melody). You do not hear your caller either.
[INT] |
|
Open list of handsets. The call is 'held' (wait melody). |
|
|
|
|
|
Cancel muting: |
|
|
|
[MENU] |
|
Press the display key to open the menu. |
|
|
|
[__________] [******Back****** |
] |
Select and confirm, or press the end call key a. |
|
[OK ] |
|
18
Using the directory and other lists
Using the directory and other lists
Directory and speed dial list
You can store up to 50 entries max. in the directory and the speed dial list (depending on the size of individual entries).
The directory makes dialling easier for you. To open the directory, press the bottom half of the hkey.
The speed dial list is a special directory in which you can store particularly important numbers such as private telephone numbers and prefixes of network providers (so-called"call-by-call numbers"). You open the speed dial list with the Ckey.
The speed dial list is operated in just the same way as the directory.
|
|
Please refer to the Character Set Table (page 74) to see how to enter |
||
i |
|
|
text correctly. |
|
|
|
You can enter up to 32 digits for a number and up to 16 letters for a |
||
|
|
|
name. |
|
|
|
Turn to page 15 for instructions on how to insert a dial pause. |
||
|
|
|||
Storing a telephone number in the directory |
||||
|
|
|
|
|
|
|
|
|
Open directory. |
|
|
|
|
|
[MENU] |
|
|
Press the display key to open the menu. |
|
|
|
|
|
|
[New Entry |
|
] [OK ] |
Confirm. |
|
|
|
|
|
|
[OK ] |
|
|
Enter the number and confirm. |
|
|
|
|
||
[MENU ] |
|
Enter the name and press the display key. |
||
|
|
|
|
|
[Save Entry |
|
] [OK ] |
Confirm. The entry is stored. |
|
Long press (back to idle status).
If your phone is connected to a PABX you may have to enter the access i code (outside line code) as the first digit of your directory entry (refer to
the operating instructions of your PABX).
19
Using the directory and other lists
Storing a telephone number in the speed dial list
You can assign a digit (0, 2–9) to up to nine entries on your speed dial list. When you press and hold one of these digits, e.g. '3', and press the top half of the ckey you are immediately connected to the telephone number that is assigned '3'.
|
|
Open the speed dial list. |
|
|
|
[MENU] |
|
Press the display key to open the menu. |
|
|
|
[New Entry |
] [OK ] |
Confirm. |
|
|
|
[OK] |
|
Enter the number and confirm. |
|
|
|
[MENU] |
|
Enter the name and press the display key. |
|
|
|
[Save Entry |
] [OK ] |
Confirm. The entry is stored. |
|
|
|
[MENU] |
|
Press the display key to open the menu. |
|
|
|
[__________] [Shortcut |
] |
Select the menu item and confirm. |
|
[OK ] |
|
|
|
|
[__________] [Shortcut: 2 |
] |
Select the digit and confirm. |
|
[OK ] |
|
|
|
|
|
|
Long press (back to idle status). |
|
|
|
i Speed dial digits cannot be assigned more than once at a time.
Dialling with the directory/speed dial list
or |
Open directory or speed dial list |
|
|
either ... |
Scroll to the entry: |
|
|
|
Select entry. |
|
|
|
Press the top half of the key. The number is dialled. |
|
|
or ... |
Enter the first letter: |
|
|
|
Enter the first letter of the name. |
|
|
|
Select the desired entry. |
|
|
|
Press the key. The number is dialled. |
|
|
20

|
|
Using the directory and other lists |
|
Changing an entry in the directory/speed dial list |
|||
|
|
|
|
|
|
|
|
or |
|
Open directory or speed dial list |
|
|
|
|
|
[__________] [MENU ] |
|
Select the entry and press the display key. |
|
|
|
|
|
[__________] [Edit Entry |
] |
Select the menu item and confirm. |
|
|
[OK ] |
|
|
|
|
|
|
[OK] |
|
Change the number and confirm. |
|
|
|
|
|
[MENU ] |
|
Change the name and press the display key. |
|
|
|
|
|
[Save Entry |
] [OK ] |
Confirm. The entry is stored. |
|
Long press (back to idle status).
Deleting a single entry or directory/speed dial list
or |
|
Open directory or speed dial list |
|
|
|
[__________] [MENU ] |
|
Select the entry and press the display key. |
|
|
|
either ... |
|
Delete a single entry: |
|
|
|
[__________] [Delete Entry |
] |
Select the menu item and confirm. |
|
[OK ] |
|
|
|
|
or ... |
|
Delete the entire directory/speed dial list: |
|
|
|
[__________] [Delete List |
] |
Select the menu item and confirm. |
|
[OK ] |
|
|
|
|
[OK] |
|
Press the display keyto confirm the prompt. |
|
|
|
... then |
|
|
Long press (back to idle status).
Adding a displayed telephone number to the directory
When a telephone number appears in the display (CLIP) you can add it to your directory. This can be done while dialling from the last number redial list, from the caller list/answering machine list (only C 150) or during a call.
[MENU] |
|
Press the display key to open the menu. |
|
[__________] |
[Copy to Directory |
] |
Select the menu item and confirm. |
|
|
[OK ] |
|
[OK] |
|
|
Confirm the telephone number. |
|
[MENU] |
|
If required, enter the name and press the display key. |
[Save Entry |
] [OK ] |
Confirm. The entry is stored. |
|
|
|
|
Long press (back to idle status). |
i |
If you have CNIP (page 16) as well as CLIP, then the name that goes with |
||
the telephone number will also be displayed (up to 16 characters). |
|||
21
Using the directory and other lists
Picking a phone number from the directory/speed dial list
If you are prompted to enter a telephone number while you are operating your telephone, you can use the directory to do this.
Precondition: The entry field for external telephone numbers is displayed.
or |
Open directory or speed dial list |
|
|
[_________] [OK ] |
Select the entry and confirm. |
|
|
The telephone number is added to the entry field.
Last number redial list
The last number redial list contains the ten last dialed numbers. If names have been stored for these numbers in the directory, then both the names and the numbers will be displayed. You can use the last number redial list to redial the telephone numbers.
Dialling telephone numbers from the last number redial list
|
|
[•] |
Open the last number redial list. |
[_________] |
Select an entry and press the top half of the key. |
|
The number is dialed. |
|
|
To add or change the telephone number, press MENU and confirm
iDisplay Number with OK.
To add a telephone number from the last number redial list to the
directory (page 21), press MENU, |
Copy to Directory OK. |
Deleting a single telephone number or the entire last number redial list
[•] |
|
Open the last number redial list. |
[_________] [MENU ] |
|
Select an entry and open the menu. |
either ... |
|
Delete a single telephone number: |
[__________] [Delete Entry |
] |
Select the menu item and confirm. |
|
[OK ] |
|
|
|
If there still entries on the list, press the key and hold |
|
|
(back to idle status). |
or ... |
|
Delete the entire last number redial list: |
[__________] [Delete List |
] |
Select the menu item and confirm. |
|
[OK ] |
|
22

Using the directory and other lists
Opening lists with the Message key
You can use the Message key fto open the following lists:
1.SMS list,
2.Answering machine list (only C 150),
3.Messages in the network mailbox (if your network provider supports this function and the network mailbox is configured for fast access, page 51),
4.Caller list.
You hear an advisory tone as soon as a new entry (SMS, messages on the built-in answering machine) arrives in one or more lists. The Ûicon appears in the display.
When you press the fkey and open one of the lists, the Ûicon disappears after you quit the list even though there are still new entries in one of the other lists.
The following lists are displayed when you press f:
If only one list has new entries, you will see the first new entry in that list.
If several lists have new entries, those lists are offered for your selection.
If there are no new messages in any of the lists, then all the lists are offered for your selection.
If calls are stored in the network mailbox, you will see a message if the correct setting has been made (refer to the network mailbox operating instructions).
Caller list and answering machine list (only C 150)
The numbers of the last 10 calls are saved in the caller list. The oldest entry is deleted when the caller list is full and new entries are added.
Precondition: The caller's number has been identified (page 16).
Here is an example of how the caller list (Calls List: ) appears in the display:
Number of new entries in the list
Calls List: 01+05  Number of old, read entries in the list
You can use the answering machine list to listen to the messages that are on the answering machine on the Gigaset C 150 . Provided they were transmitted, the date and time of arrival of each message and the caller's number are displayed.
Once you have listened to them, the new messages are added after the old messages in the answering machine list.
Here is an example of how the answering machine list (Answering Mach.: ) appears in the display:
Number of new entries/messages in the list
Answering Mach.: 01+05
Number of old, played entries/messages in the list
23
Using the directory and other lists
Opening the caller list/answering machine list (only C 150)
New calls (caller list) and new messages (answering machine) are shown on screen by the letter icon Û, messages are indicated by an advisory tone as well.
|
Open the caller list. |
|
|
either ... |
Open the caller list: |
|
|
[__________] [Calls List: 01+02 |
] Select the menu item and confirm. |
[OK ] The entry received last is displayed.
|
|
|
Select entry. |
|
|
|
|
or ... |
Open the answering machine list: |
||
|
|
|
|
[__________] |
[Answering Mach.: 01+02 ] |
Select the menu item and confirm. The entry of the |
|
|
|
[OK ] |
first new message to arrive is displayed. The loud- |
|
|
|
speaker activates. Message playback begins. |
|
|
|
|
|
|
|
Scroll to the next or previous message. The entry of |
|
|
|
the message appears in the display. Message play- |
|
|
|
back begins. |
|
|
|
|
|
|
|
|
i |
|
An entry or a message is deleted by pressing MENU, |
|
|
|
Delete Entry OK. |
|
Calling back a caller
Precondition: The caller's number has been identified (page 16).
Open the caller list/answering machine list (only C 150) and select an entry. Now:
Press the top half of the key.
The telephone number is entered in the last number redial list.
24
Using the directory and other lists
Viewing an entry in the caller list/answering machine list (only C 150), adding a number to the directory
You can view the time when a call arrived and add the telephone number to your directory. Open the caller list/answering machine list and select an entry. Now:
[MENU] |
|
Press the display key to open the menu. |
|
|
|
either ... |
|
Copy telephone number to the directory: |
|
|
|
[__________] [Copy to Directory |
] |
Select the menu item and confirm. |
|
[OK ] |
|
|
|
|
[OK] |
|
Confirm the number. |
|
|
|
[MENU ] |
|
Enter name and open the menu. |
|
|
|
[Save Entry |
] [OK ] |
Confirm. The entry is stored. |
|
|
|
or ... |
|
View the date and time of arrival: |
|
|
|
[__________] [Date and Time |
] |
Select the menu item and confirm. |
|
[OK ] |
|
|
|
|
or ... |
|
View information whether new or old: |
|
|
|
[__________] [Status |
] |
Select the menu item and confirm (page 25). |
|
[OK ] |
|
|
|
|
... then |
|
|
|
|
|
|
|
Long press (back to idle status). |
|
|
|
The entry's status is displayed like this: :
2 |
V |
1234567890
New
OK
The following status messages are used:
New call |
The call is new in the list. |
Old call |
The call is old in the list. |
Calls received |
The call was answered. |
Answer Machine |
C 150 only: The answering machine answered the call but the |
|
caller did not leave a message. |
New Msg. |
C 150 only: The message is new in the list. |
Old Msg. |
C 150 only: The message is old in the list, it has already been |
|
played. |
Gigaset C 150: When picking a telephone number from the answering i machine list, message playback is interrupted when you press MENU.
Playback will resume when the telephone number has been stored in the directory.
25
Using the directory and other lists
Deleting the caller list
Open the caller list (page 24). Now:
[MENU] |
|
Press the display key to open the menu. |
[__________] [Delete List |
] |
Select the menu item and confirm. Caution: All old |
|
[OK ] |
and new entries will be deleted. |
|
|
Long press (back to idle status). |
Deleting old messages from the answering machine list is explained on page 45.
Deleting a single entry from the caller list
Open the caller list and select an entry (page 24). Now:
Press the display key to open the menu.
] [OK ] Confirm.
Long press (back to idle status).
26
 Loading...