


ELECTRONIC ORGANIZER |
YO-515 |
OPERATION MANUAL Instrucciones abreviadas en español
CONTENTS |
|
Using the Organizer for the First Time .................................................. |
1 |
When Abnormal Conditions Cause a Malfunction ................................. |
1 |
Auto Power Off Function ...................................................................... |
1 |
Backlight .............................................................................................. |
1 |
Adjusting the LCD Contrast .................................................................. |
2 |
Turning the “beep” On and Off .............................................................. |
2 |
Selecting the Guidance Language ......................................................... |
2 |
Part Names ................................................................................................. |
3 |
Display Symbols ......................................................................................... |
4 |
Entering Characters .................................................................................... |
4 |
Note on the Description of the MENU Key Operations ................................ |
5 |
Notes for the Built-in Calendar and the Time .............................................. |
5 |
Clock Mode ................................................................................................ |
6 |
Telephone Mode ......................................................................................... |
8 |
Calendar Mode ........................................................................................... |
9 |
Schedule Mode ........................................................................................... |
9 |
To Do Mode .............................................................................................. |
12 |
Memo Mode ............................................................................................. |
12 |
Expense Mode .......................................................................................... |
13 |
Anniversary Mode .................................................................................... |
14 |
Checking the Memory Storage ................................................................. |
15 |
Freeing Up Memory .................................................................................. |
15 |
Recalling the Listings ............................................................................... |
15 |
Editing the Listings ................................................................................... |
17 |
Deleting the Listings ................................................................................. |
17 |
Calculator Mode ....................................................................................... |
18 |
Conversion Mode ..................................................................................... |
19 |
Secret Function ........................................................................................ |
21 |
Battery Replacement ................................................................................ |
23 |
Specifications ........................................................................................... |
24 |
Instrucciones abreviadas en español ...................................................... |
S-1 |
YO-515 (E0426E)

NOTICE
•SHARP strongly recommends that separate permanent written records be kept of all important data. Data may be lost or altered in virtually any electronic memory product under certain circumstances. Therefore, SHARP assumes no responsibility for data lost or otherwise rendered unusable whether as a result of improper use, repairs, defects, battery replacement, use after the specified battery life has expired, or any other cause.
•SHARP assumes no responsibility, directly or indirectly, for financial losses or claims from third persons resulting from the use of this product and any of its functions, such as stolen credit card numbers, the loss of or alteration of stored data, etc.
•This Organizer is not designed to transfer/receive e-mails by using the E-mail addresses you will store.
•The information provided in this manual is subject to change without notice.
•All company and/or product names are trademarks and/or registered trademarks of their respective manufacturers.
CAUTIONS
•Do not carry the Organizer in the back pocket of slacks or trousers.
•Do not drop the Organizer or apply excessive force to it.
•Do not subject the Organizer to extreme temperatures.
•Since this product is not waterproof, do not use it or store it where fluids can splash onto it. Raindrops, water spray, juice, coffee, steam, perspiration, etc. will also cause malfunction.
•Clean only with a soft, dry cloth.
•Use only a SHARP approved service facility.
YO-515 (E0426E)
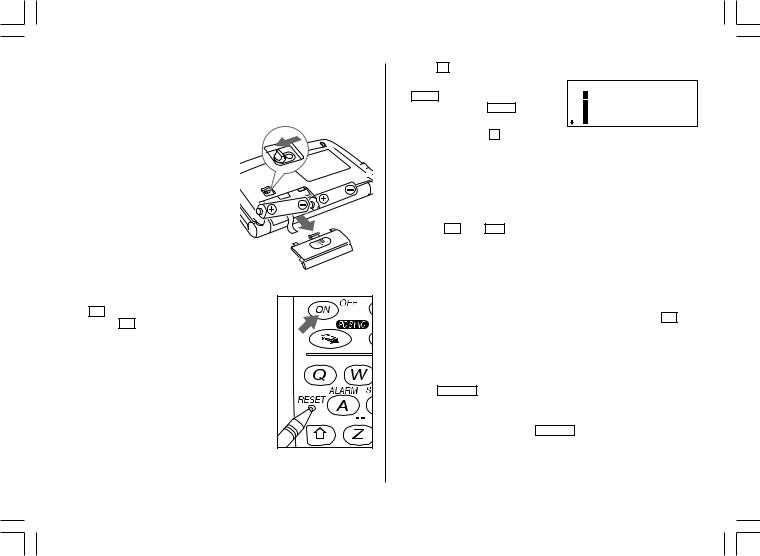
Using the Organizer for the First Time
Be sure to perform the following operations before using the Organizer for the first time.
(1) Installing the batteries
1. Set the battery replacement switch on the bottom of the Organizer to
REPLACE BATTERIES.
2. Slide off the operating batteries cover.
3. Insert the two batteries on the top of the ribbon tab, as shown in the diagram.
4. Replace the operating batteries cover.
5. Set the battery replacement switch to
NORMAL OPERATION.
(2) Initializing the Organizer
1. Press the RESET switch while holding down ON . Release the RESET switch and then
release ON .
“CLEAR ALL DATA OK(Y/N)?” is displayed.
• Press the RESET switch with a ball-point pen or similar object. Do not use an object with a breakable or sharp tip.
• Under certain conditions the message may appear as “Data has been impaired! Press [Y] to CLEAR ALL memory”. Proceed to the next step in either case.
2. Press Y to initialize the memory of the Organizer.
3. Select the desired language. Press NEXT to move to the next language screen, then press PREV to move to the previous language screen.
For example, press 2 to select English.
< LANGUAGES > 1 DEUTSCH
2 ENGLISH
3 ESPAÑOL
4 FRANÇAIS
•Then the Home Clock is displayed. Proceed to set the date and time of the clock. (Refer to page 6.)
When Abnormal Conditions Cause a Malfunction
If the Organizer is subjected to strong, extraneous electrical noises or shocks during use, an abnormal condition may occur in which no keys (including ON and OFF ) will respond. If this happens, press the RESET switch.
Noises or shocks may erase some or all of the Organizer’s memory.
Auto Power Off Function
When none of the keys has been pressed for approximately 7 minutes, the Organizer automatically turns the power off to save the batteries. (The actual time may vary depending upon the condition of use.) Press ON to resume operation.
Backlight
The Organizer is provided a built-in Backlight, which allows you to view the display and use the Organizer even in low-light conditions.
Pressing BackLight once illuminates the display for as long as you continue to use the Organizer, until you have not typed any key for 15 seconds.
• To turn the Backlight off, press BackLight again.
1
YO-515 (E0426E)

•The Backlight may remain on for less than 15 seconds or it may not function if the battery level is very low.
The backlight turns off automatically if you carry out the following operations with the Organizer.
•Storing any listings in the Organizer
•Deleting any listings from the Organizer
•Marking any completed TO DO listings as done with 


•Freeing up memory
•Exchanging data with a personal computer
Do not use the Backlight unnecessarily.
•Since the Backlight drains power from the operating batteries, excessive use of the Backlight will significantly reduce the life of your batteries.
•Do not continue using the Organizer after it has automatically turned itself off while the backlight was being used. Even if it can be turned on again, the clock time will be incorrect and other functions may not work properly until the batteries are replaced.
Adjusting the LCD Contrast
1. |
Press |
MENU |
2 to select “2 CONTRAST”. |
|
|||
2. |
Press |
or |
to darken or lighten |
|
|
||
|
< CONTRAST > |
||||||
|
the display. |
|
|
|
–DARK |
||
• |
The amount of contrast changes |
|
|||||
|
–LIGHT |
||||||
|
continuously while either |
or |
|
|
|||
|
|
|
|||||
|
is held down. |
|
|
|
|
||
3. |
Press |
|
|
after adjusting the contrast. |
|
||
C•CE |
|
|
|||||
Turning the “beep” On and Off
While “  ” is displayed, a “beep” will sound when a key is pressed. To turn the “beep” on and off, press 2nd


 ( 2nd
( 2nd 


 ). The “beep” will not sound when “
  ” is turned off.
Selecting the Guidance Language
The Organizer can give messages and guidance during operation in seven different languages.
<Example> Change the guidance language from English to Italian. 1. Press MENU 
 NEXT
NEXT 
 3 to select “3 LANGUAGES”.
2. Press NEXT 
 1 to to select “1 ITALIANO”.
All messages and guidance will now appear in Italian.
•In this manual explanations are based on a guidance language set to English.
2
YO-515 (E0426E)

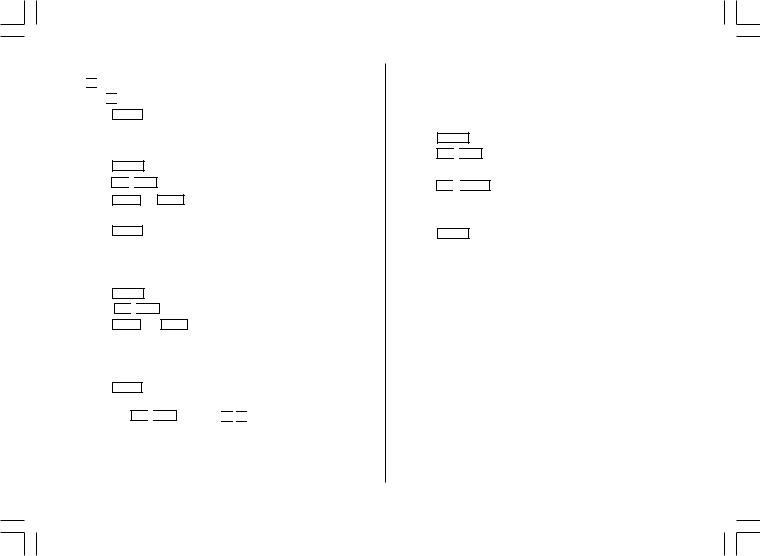
Part Names
|
q Display |
|
w MENU key |
|
e Power ON/OFF key |
6 |
r PC-LINK key (PC SYNC) |
|
t RESET switch |
|
1 |
y Clear/Clear entry key |
|
u MODE keys |
||
|
||
|
i Cursor movement keys |
|
|
o SEARCH keys |
|
|
!0Option port (COMPUTER LINK) |
2 |
7 |
In this manual the keys are represented by symbols, for |
|||||
|
|||||||
|
8 |
||||||
|
example: |
|
|
|
|
|
|
|
|
|
|
|
|
|
|
3 |
9 |
|
→ |
& |
: Indicates the & key. |
|
|
4 |
|
|
→ |
7 |
: Indicates the numeric 7 key. |
||
; |
|
|
|
|
|
|
|
|
|
→ SCHEDULE |
: Mode key with only one |
||||
|
|
|
|||||
5 |
|
|
|
|
|
function. |
|
|
The |
key |
|
: These keys are used to select capital |
|||
|
|
|
|||||
|
|
|
|
|
(uppercase) or small (lowercase) |
||
|
|
|
|
|
letters or to access the symbols above |
||
|
|
|
|
|
the number key and “:” and “;”. |
||
|
|
|
|
|
While holding down |
, press the |
|
|
|
|
|
|
desired key to be entered. |
||
|
|
Numbers, letters and space for operation are shown in |
|||||
|
|
italic and bold. |
|
|
|
|
|
3
YO-515 (E0426E)
Display Symbols
|
: A “beep” will sound when a key is pressed. |
|
||||
|
: The schedule alarm will sound. |
|
||||
CAPS |
: Capital (uppercase) letters will be entered. To enter small |
|
||||
|
(lowercase) letters, turn “CAPS” off by pressing |
CAPS |
. |
|
||
EDIT |
: The listing on the display can be edited. |
|
||||
2nd |
: Indicates that |
|
has been pressed. |
|
||
2nd |
|
|||||
|
: More information exists above the current display. (Press |
.) |
||||
|
: More information exists below the current display. (Press |
.) |
||||
S: Secret function is in effect. (Secret listings cannot be recalled without a password.)
: Indicates that the recalled listing is secret.
: Indicates that the operating battery level is low.
•In the display examples of this manual, only the symbols necessary for explanation will be shown.
NOTES:
•The symbol “  ” shown by setting the LCD contrast to DARK is not used in this product.
•The “  ” mark indicates the alarm sound for the scheduled listings is turned on.
Entering Characters
1.Moving the Cursor
The cursor ( _ , |
|
or |
) can be moved by pressing (or holding down) |
||
, |
, |
, or |
|
. |
|
2.Entering Characters
(1) Entering letters and numbers
The cursor ( _ ,  or
or  ) indicates the position to enter a character or number. After initializing the Organizer, the default setting for entering letters will be capital (uppercase) letters. To enter small (lowercase) letters, turn “CAPS” off by pressing CAPS .
(2) Entering graphic symbols and special characters
Press SMBL to display the symbol entry mode, allowing a total of 140 symbols and characters to be selected. To select the symbol display
containing the desired symbol/special character, press |
NEXT |
(or |
) or |
|||
|
|
(or |
), then press the corresponding number. |
|
|
|
|
PREV |
|
|
|
||
•The first display is determined by your previous choice. The 10 most recently used symbols/special characters are stored and displayed on this display.
Press SMBL to exit the symbol entry mode.
You can also enter the following symbols/special characters by pressing


 and an appropriate key (q) or directly from the numeric keys (w) located next to the LCD display:
q &,  , (, $, /, ^ , !, @, #, ) w ÷, ×, –, +, =, ±, %
• You cannot enter “ ” symbol.
4
YO-515 (E0426E)
(3) Entering non-English characters
Press 2nd followed by the corresponding keys.
Enter “Ä”, “ü’, “é” and “ô” in MEMO mode, for example.
Press |
MEMO |
|
A |
Äüéô– |
|||
|
|
|
|||||
|
2nd |
|
¨ |
|
|||
|
|
|
|
|
¨ u |
|
|
|
CAPS |
|
|
2nd |
|||
|
|
|
|
|
e |
||
|
2nd |
|
` |
||||
|
|
^ o |
|||||
|
2nd |
|
|||||
• “ç” is entered by pressing 2nd 
 ç . Non-English characters can also be entered as symbols.
3.Making Corrections
(1) Inserting characters
Press |
|
INS |
to change the cursor from “ |
|
” (replace) to “ ” (insert). |
||||
|
|
||||||||
Press |
|
|
|
|
again to change the cursor from “ ” to “ |
|
”. |
||
|
|
|
|
|
|||||
|
INS |
|
|||||||
|
|
||||||||
(2) Deleting characters |
|||||||||
Press |
|
DEL |
to delete the character at the cursor position. |
||||||
Press |
|
|
to delete the character to the left of the cursor. |
||||||
|
BS |
||||||||
•DEL and BS will not operate in some cases such as when you input
the time in Schedule mode or you are in Calculator mode. In these
cases, press |
C•CE |
and reenter. |
||
• Press |
|
|
to clear all characters on the current display. |
|
C•CE |
||||
Note on the Description of the MENU Key Operations
This Organizer offers a variety of functions which you choose from the menus (see the following table).
To switch or scroll the menu screens displayed by pressing |
MENU |
, press |
||||||
|
|
(or ) to move to the next screen, or |
|
(or |
) to move to |
|||
|
NEXT |
PREV |
||||||
the previous screen. |
|
|
|
|
|
|
||
Menu |
See page... |
|
|
|||||
|
|
|
|
|
|
|
||
Checking the Memory Storage |
15 |
|
|
|
|
|
||
Adjusting the LCD Contrast |
2 |
|
|
|
|
|
||
Deleting the Listings |
17 |
|
|
|
|
|
||
Designating the File Names |
8 |
|
|
|
|
|
||
Selecting the Date Format |
8 |
|
|
|
|
|
||
Selecting the Weekly Format |
9 |
|
|
|
|
|
||
Freeing Up Memory |
15 |
|
|
|
|
|
||
Selecting the Guidance Language |
2 |
|
|
|
|
|
||
Notes for the Built-in Calendar and the Time
•Calendar, Schedule, Expense, and Clock modes allow you to enter the desired date and time between Jan. 1, 1901 and Dec. 31, 2099.
•If an attempt is made to store an invalid time or date, you cannot move the cursor to date entering, or store the time and date by pressing ENTER . Enter the correct value and press ENTER again.
5
YO-515 (E0426E)
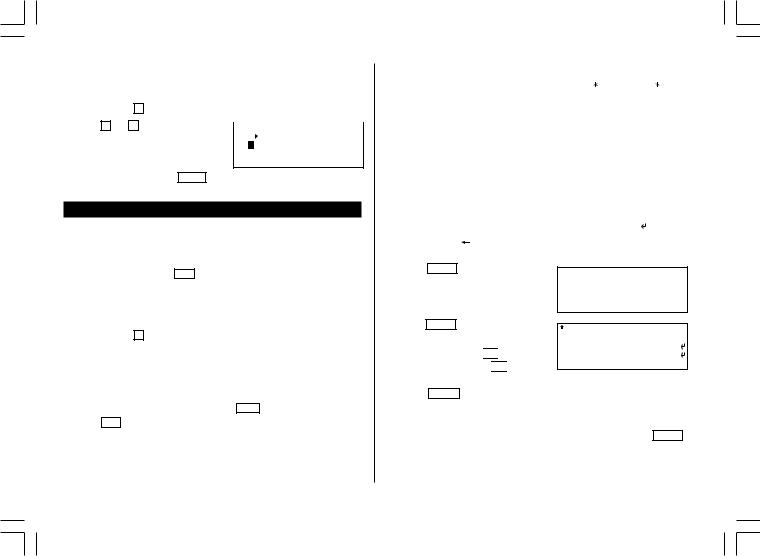
Clock Mode
The Organizer has both Home and World clocks. The display switches
between Home and World clock each time |
|
CLOCK |
|
is pressed. |
||||||||||||||||
|
|
Home clock |
World clock |
|||||||||||||||||
Home |
|
|
|
|
|
|
|
|
|
|
|
|
|
|
|
|
|
|
|
|
|
|
NYC |
|
|
|
|
LON |
( + 5:00) |
||||||||||||
city |
|
|
|
MON JAN 1,2001 |
|
|
|
|
|
|
|
MON JAN 1,2001 |
|
|||||||
|
|
|
|
|
12:00AM |
|
|
|
|
|
|
5:00AM |
||||||||
|
|
|
|
|
|
|
|
|
|
|
|
|
World |
|
|
|
|
|
|
|
|
|
|
|
|
|
Time |
|
|
|
Time |
||||||||||
|
|
|
|
|
|
|
city |
|
|
|||||||||||
|
|
|
|
Day of the week/ |
|
Day of the week/ |
||||||||||||||
|
|
|
|
|
|
|
||||||||||||||
|
|
|
|
Month/Day/Year |
|
|
|
Month/Day/Year |
||||||||||||
“(+ 5:00)” indicates the time difference from the Home city.
1.Setting the Home Clock
(1) Setting and changing the Home city
Set your local city as the Home city by selecting its zone number.
Zone numbers are based on the distance of the zones from the international date line (zone number zero). For example, there is a 13-hour difference between the date line and London (London is 13 hours behind), so the zone number for London is 13. Honolulu is 23 hours behind the date line, so its zone number is 23.
The names and zone numbers of 27 cities are stored in the Organizer's memory. (See the following table.)
1. |
Press |
CLOCK |
once or twice to display the Home clock. |
|||||||
2. |
Press |
|
|
|
|
. |
|
|||
2nd |
|
EDIT |
||||||||
• |
The zone number is displayed on the right side. |
|||||||||
3. |
Press |
|
|
|
|
or |
|
to display the desired city which corresponds |
||
|
NEXT |
|
|
PREV |
||||||
|
to your local zone from the cities stored in the Organizer. |
|||||||||
6
4. Press ENTER to set the Home city.
• Zone numbers 0, 14, and 15 have no city name on the display.
Zone |
Display |
City |
Zone |
Display |
City |
No. |
|
|
No. |
|
|
0 |
|
|
10 |
MOW |
MOSCOW |
1 |
AKL |
AUCKLAND |
11 |
CAI |
CAIRO |
2 |
NOU |
NOUMEA |
12 |
PAR |
PARIS |
3 |
SYD |
SYDNEY |
13 |
LON |
LONDON |
3.3 |
ADL |
ADELAIDE |
14 |
|
|
4 |
TYO |
TOKYO |
15 |
|
|
5 |
HKG |
HONG KONG |
16 |
RIO |
RIO DE JANEIRO |
6 |
BKK |
BANGKOK |
17 |
CCS |
CARACAS |
6.3 |
RGN |
YANGON |
18 |
NYC |
NEW YORK |
7 |
DAC |
DHAKA |
19 |
CHI |
CHICAGO |
7.3 |
DEL |
NEW DELHI |
20 |
DEN |
DENVER |
8 |
KHI |
KARACHI |
21 |
LA |
LOS ANGELES |
8.3 |
KBL |
KABUL |
22 |
ANC |
ANCHORAGE |
9 |
DXB |
DUBAI |
23 |
HNL |
HONOLULU |
9.3 |
THR |
TEHRAN |
24 |
MID |
MIDWAY |
(2) Setting the Clock
<Example> Set the date and time to April 12, 2001, 10:05 PM (or 22:05).
1. Press CLOCK once or twice to display the Home clock.
2. |
Press |
2nd |
|
EDIT |
. |
NYC |
|
|
|
|
[18.0] |
|||
• |
The cursor will flash. |
|
|
|
|
|||||||||
|
MON |
JAN |
1,2001 |
|||||||||||
3. |
Press |
|
|
|
to select the 12-hour |
|
|
|
12:00AM |
|||||
12 |
|
24 |
|
|
|
|||||||||
|
|
|
|
|
||||||||||
|
or 24-hour clock. |
|
|
|
|
|
|
|
||||||
• |
The display switches between the two clocks each time |
|
|
|
|
is |
||||||||
|
12 |
24 |
||||||||||||
|
pressed. AM or PM is displayed for the 12-hour clock (default). |
|||||||||||||
|
(Note: 12:00PM: noon, 12:00AM: midnight) |
|
|
|
|
|
|
|||||||
4. |
Enter the hour and minutes. |
|
|
|
|
|
|
|
||||||
|
1005 |
|
|
(For the 24-hour clock, press 2205) |
|
|
|
|
|
|
||||
|
|
PM |
|
|
|
|
|
|
||||||
(Enter 2 digits each for both hour and minutes.)
YO-515 (E0426E)
5.Enter the month, day, and year.


 04122001
Use 

 to skip entering a number that needs no change.
6.Press ENTER . The clock starts from 0 second.
2.Using the World Clock
Changing the city for the World clock
1. Press CLOCK once or twice to display the World clock.
2. Press 2nd 
 EDIT .
3.Press NEXT or PREV to display the city which corresponds to the desired zone.
4.Press ENTER .
3.Registering a City Name not Found in the List
If you want to set the city for the World clock to Rome, for example (Rome belongs to zone number 12, but is not included in the city list):
1. Press CLOCK once or twice to display the World clock.
2. Press 2nd 
 EDIT .
3.Press NEXT (or PREV ) to set the zone number to 12.
(Initially the city is “PAR” (PARIS).)
4.Enter the city name (up to 8 characters).
ROME
5. Press ENTER to store the new name.
• To register a city name for the Home clock, first display the Home clock then press 2nd 
 EDIT and press


 to move the cursor to the city name line.
•Only one changed city name can be stored in each of the Home and World clocks.
•Each changed name is stored until you next change the zone number.
4.Setting Daylight Saving Time/Summer Time
If DST (daylight saving time/summer time) is used, the local time is advanced one hour during the summer. Both the Home clock and World clock can be set for DST as follows:
(1) Home clock
1. Press CLOCK once or twice to display the Home clock.
2. Press 2nd 
 EDIT .
3. Enter the correct daylight saving time/summer time.
4. Press 2nd 
 ENTER to set the time as DST.
A “  ” appears on the display and DST is now set.
(2) World clock
1. Press CLOCK once or twice to display the World clock.
2. |
Press |
|
2nd |
|
|
EDIT |
. |
||
3. |
Press |
|
|
|
|
|
. |
||
|
2nd |
|
|
ENTER |
|||||
A “  ” appears on the display and DST is now set. Setting DST in the World clock automatically sets the time one hour ahead.
•When DST is set for one World city, it is used for all cities displayed in the World clock.
•DST can be set independently in either the Home or the World clock.
(3) Clearing DST
To clear DST, follow steps 1 to 4 for Home clock, or follow steps 1 through 3 for World clock.
The “  ” disappears.
7
YO-515 (E0426E)
5. Selecting the Date Format
The date format can be switched between MONTH/DAY/YEAR and DAY.MONTH.YEAR.
1. |
Press |
MENU |
5 |
to select “5 DATE FORMAT”. |
||||
2. |
Press |
1 or |
2 |
to select “MONTH/ |
|
|
|
|
|
|
|
< DATE FORMAT > |
|||||
|
DAY/YEAR” or “DAY.MONTH.YEAR”. |
|
1 |
|
MONTH/DAY/YEAR |
|||
|
|
|
|
|
2 |
DAY.MONTH.YEAR |
||
•A “  ” mark moves to your selection and you return to the mode in which you were before pressing MENU .
Telephone Mode
In Telephone mode, a listing consists of 4 entries: name, number, E-mail address, and postal address.
Further, Telephone listings provide 3 files (TEL1, TEL2, TEL3). The files are cycled each time you press TEL . You can switch them for convenience by keeping business, private and other listings separate.
1.Designating the File Names
You can change each file name in up to 10 characters long as follows:
1. |
Press |
MENU |
|
4 to select “4 TEL FILE NAME”. |
|
|
|
|
|||||
2. |
Enter the new name for TEL1, then |
|
|
|
|
|
|||||||
|
< TEL FILE |
NAME > |
|||||||||||
|
press |
ENTER |
. |
|
|
1 |
[ |
|
TEL |
1 |
] |
||
• |
You can skip changing a file name by |
|
2 |
[ |
|
TEL |
2 |
] |
|||||
|
3 |
[ |
|
TEL |
3 |
] |
|||||||
|
pressing |
|
|
|
. |
|
|
|
|
|
|
|
|
|
ENTER |
|
|
|
|
|
|
|
|||||
• To cancel entering the file names, press C•CE twice.
3. Press TEL to check the new file name(s).
8
2.Storing the Telephone Listings
1. |
Press |
TEL |
to display the TEL1 entry |
|
|
|
TEL 1 |
|||
|
prompt. |
|
NAME? |
|
||||||
2. |
Enter the name. For example, |
|
|
|
|
|||||
|
|
|
|
|||||||
|
Johns, |
Pat– |
||||||||
|
Johns, Pat |
|
||||||||
|
|
|
|
|
||||||
3. |
Press |
|
. |
|
|
|
|
|
||
ENTER |
|
|
|
|
||||||
|
The number entry prompt is |
|
|
|
|
|||||
|
|
|
|
|
||||||
|
displayed. |
|
|
|
|
|||||
4. |
Enter the phone and fax numbers. |
|
|
|
||||||
|
Johns, |
Pat |
||||||||
|
For example, |
|
201–265–5600 |
|||||||
|
201-265-5600 |
|
|
|
|
F |
265–1234– |
|||
|
|
|
|
|
||||||
|
F 265-1234 |
|
|
|
|
|||||
|
|
|
|
|
||||||
5.Press ENTER , then enter the E-mail address. For example,
johns-P@sharpsec.com
6.Press ENTER , then enter the address. For example,
Box G, Sharp Plaza, 

 Mahwah, New Jersey,

 07430-2135, U.S.A.
7.Press ENTER .
Johns, Pat 201–265–5600 johns–P@sharpsec.com
–
201–265–5600
johns–P@sharpsec.com Box G, Sharp Plaza, Mahwah, New Jersey, 07430–2135, U.S.A.–
“STORED!” will be displayed briefly, then the listing will be displayed. The telephone listing is now stored.
• To skip entering the number, E-mail address, or address, press ENTER when “NUMBER?”, “E-MAIL?”, or “ADDRESS?” is displayed. However, the name entry cannot be skipped.
YO-515 (E0426E)
•To enter the next telephone listing, continue to enter in the same manner.
•The Telephone listings are stored in alphabetical order.
See also ...
Recalling the Listings ................ |
15 |
Checking the Memory Storage .. |
15 |
Editing the Listings .................... |
17 |
Entering Characters .................... |
4 |
Deleting the Listings .................. |
17 |
|
|
Calendar Mode
1.Controlling the Monthly Calendar Display
The Organizer has a 5-line display and 4 weeks of a month and day of the week can be displayed. Use the following keys to control the display status.
NEXT 
 PREV : displays the following or previous month.
• Hold down either of these keys for rapid recall.
: moves the cursor or scrolls the calendar up or down one week.
1.Press CALENDAR to display the Calendar mode.
•“ ” indicates the 5th or 6th week of the month is hidden below. To display
the 5th or 6th week, press 
 until the cursor scrolls into the next screen.
Year |
|
Day of the |
|
||
Month |
|
week |
2001 S M T W T F S APR 1 2 3 4 5 6 7
8 9 10 11 12 13 14
15 16 17 18 19 20 21
22 23 24 25 26 27 28
2.Press NEXT (or PREV ) to display the calendar for the next (or previous) month.
• When you reset the Organizer, the calendar defaults to Jan. 1, 2001.
2.Selecting the Weekly Format
The weekly format can be switched between SUN-SAT and MON-SUN.
1. |
Press |
CALENDAR |
to display the Calendar mode screen. |
|||
2. |
Press |
|
|
|
1 to select “1 WEEKLY FORMAT”. |
|
MENU |
|
NEXT |
||||
3. |
Press |
1 or 2 |
to select “SUN-SAT” or “MON-SUN”. |
|||
•A “ ” mark moves to your selection and you return to the mode in which you were before pressing MENU .
3.Returning the Calendar to the Current Date
Press 2nd 
 CALENDAR in Calendar mode.
•The current monthly calendar will be displayed, and the current date will flash.
See also ...
Recalling the Listings ................ |
15 |
Schedule Mode
A schedule listing consists of 3 entries: date, time, and detail. In the date entry, 4 digits can be entered for the year and 2 digits each for the month, day, hour, and minute.
1.Storing the Schedule Listings
There are 3 ways to enter the desired date:
(1) Enter the desired date in Calendar mode
(2) Enter the desired date with NEXT (or PREV )
(3) Enter the desired date directly
After the date has been entered, the entry of time and detail is the same for all 3 ways.
9
YO-515 (E0426E)
 Loading...