


HI FI COMPONENT SYSTEM
MODEL
XL-HF200PH(S)
XL-HF200PH(BK)
OPERATION MANUAL
Thank you for purchasing this SHARP product. To obtain the best performance from this product, please read this manual carefully. It will guide you in operating your SHARP product.
●XL-HF200PH(S) Hi Fi Component System consisting of XL-HF200PH(S) (main unit) and CP-HF200H (speaker system).
●XL-HF200PH(BK) Hi Fi Component System consisting of XL-HF200PH(BK) (main unit) and CP-HF200H (speaker system).
iPhone, iPod, iPod classic, iPod nano, and iPod touch are trademarks of Apple Inc., registered in the U.S. and other countries.
“Made for iPod” and “Made for iPhone” mean that an electronic accessory has been designed to connect specifically to iPod or iPhone, respectively, and has been certified by the developer to meet Apple performance standards. Apple is not responsible for the operation of this device or its compliance with safety and regulatory standards.
Special Note
Supply of this product does not convey a license nor imply any right to distribute content created with this product in revenue-generating broadcast systems (terrestrial, satellite, cable and/or other distribution channels), revenue-generating streaming applications (via Internet, intranets and/or other networks), other revenue-generating content distribution systems (pay-audio or audio-on-demand applications and the like) or on revenue-generating physical media (compact discs, digital versatile discs, semiconductor chips, hard drives, memory cards and the like). An independent license for such use is required. For details, please visit http://mp3licensing.com
MPEG Layer-3 audio coding technology licensed from Fraunhofer IIS and Thomson.
Special Notes
WARNINGS
●When the ON/STAND-BY button is set at STAND-BY position, mains voltage is still present inside the unit. When the ON/ STAND-BY button is set at STAND-BY position, the unit may be brought into operation by the timer mode or remote control.
●This unit contains no user serviceable parts. Never remove covers unless qualified to do so. This unit contains dangerous voltages, always remove mains plug from the socket before any service operation and when not in use for a long period.
●To prevent fire or shock hazard, do not expose this appliance to dripping or splashing. No objects filled with liquids, such as vases, shall be placed on the apparatus.
●Do not turn the volume on to full at switch on. Listen to music at moderate levels. Excessive sound pressure from earphones and headphones can cause hearing loss.
Note for users in Australia:
Copyright may exist in material you wish to record. Copying or broadcasting such material without permission of the relevant licensees or owners of the copyright is prohibited by law. SHARP is not in a position to authorise the copying or broadcasting of copyright materials and nothing in this OPERATION MANUAL should be implied as giving that authority.
For other countries:
Audio-visual material may consist of copyrighted works which must not be recorded without the authority of the owner of the copyright. Please refer to the relevant laws in your country.
CAUTION
●This product is classified as a CLASS 1 LASER PRODUCT.
●Use of controls, adjustments or performance of procedures other than those specified herein may result in hazardous radiation exposure.
As the laser beam used in this compact disc player is harmful to the eyes, do not attempt to disassemble the cabinet. Refer servicing to qualified personnel only.
Laser Diode Properties Material: AIGaAs Wavelength: 790 nm Emission Duration: continuous Laser Output: max. 0.7 mW
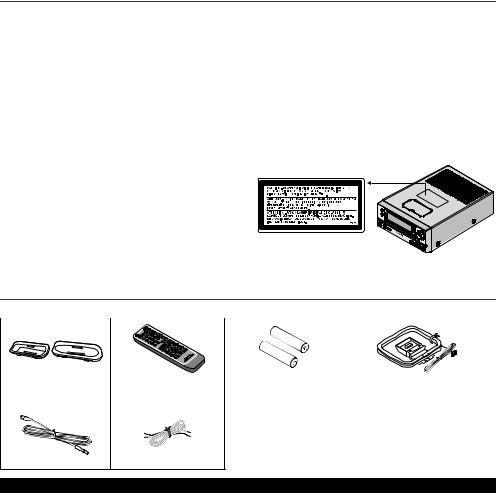
Accessories
Please confirm that the following accessories are included.
iPhone adaptors x 2 |
Remote control x 1 |
“AAA” size battery |
AM loop aerial x 1 |
|
|
(UM/SUM-4, R3, HP-16 or |
|
|
|
similar) x 2 |
|
|
|
|
|
FM aerial x 1 |
Speaker wires x 2 |
CONTENTS
Page
General Information
Precautions . . . . . . . . . . . . . . . . . . . . . . . . . . . . . . . . . . . . . . . . 2 Controls and indicators . . . . . . . . . . . . . . . . . . . . . . . . . . . .2 - 3
Preparation for Use
System connections . . . . . . . . . . . . . . . . . . . . . . . . . . . . . . .4 - 5 Remote control . . . . . . . . . . . . . . . . . . . . . . . . . . . . . . . . . . . . . 5
Basic Operation
General control . . . . . . . . . . . . . . . . . . . . . . . . . . . . . . . . . . . . . 6 Setting the clock (Remote control only). . . . . . . . . . . . . . . . .6 - 7
iPod and iPhone
Listening to the iPod or iPhone . . . . . . . . . . . . . . . . . . . . . . .7 - 8
CD or MP3/WMA disc Playback
Listening to a CD or MP3/WMA disc . . . . . . . . . . . . . . . . . . . . 9 Advanced CD or MP3/WMA disc playback . . . . . . . . . . . .10 - 11 MP3/WMA folder mode
(only for MP3/WMA files). . . . . . . . . . . . . . . . . . . . . . . . . .11 - 12
Page
USB
Listening to USB mass storage
device/MP3 player. . . . . . . . . . . . . . . . . . . . . . . . . . . . . . .12 - 13 Advanced USB playback . . . . . . . . . . . . . . . . . . . . . . . . . . . . 13
Radio
Listening to the radio . . . . . . . . . . . . . . . . . . . . . . . . . . . . . . . 14
Advanced Features
Using the Radio Data System (RDS) . . . . . . . . . . . . . . . 15 - 17 Timer and sleep operation
(Remote control only) . . . . . . . . . . . . . . . . . . . . . . . . . . . 18 - 19 Enhancing your system . . . . . . . . . . . . . . . . . . . . . . . . . . . . . 20
References
Troubleshooting chart . . . . . . . . . . . . . . . . . . . . . . . . . . .20 - 21 Maintenance . . . . . . . . . . . . . . . . . . . . . . . . . . . . . . . . . . . . . . 21 Specifications . . . . . . . . . . . . . . . . . . . . . . . . . . . . . . . . . . . . . 22
1
Precautions
■General
●Please ensure that the equipment is positioned in a well ventilated area and ensure that there is at least 10 cm of free space along the sides, top and back of the equipment.
10 cm |
10 cm |
|
10 cm |
10 cm
●Use the unit on a firm, level surface free from vibration.
●Place the speakers at least 30 cm away from any CRT TV to avoid colour variations across the TV screen. If the variations persist, move the speakers further away from the TV. LCD TV is not prone to such variation.
●Keep the unit away from direct sunlight, strong magnetic fields, excessive dust, humidity and electronic/electrical equipment (home computers, facsimiles, etc.) which generate electrical noise.
●Do not place anything on top of the unit.
●Do not expose the unit to moisture, to temperatures higher than 60°C or to extremely low temperatures.
●If your system does not work properly, disconnect the AC power lead from the wall socket. Plug the AC power lead back in, and then turn on your system.
●In case of an electrical storm, unplug the unit for safety.
●Hold the AC power plug by the head when removing it from the wall socket, as pulling the lead can damage internal wires.
●The AC power plug is used as a disconnect device and shall always remain readily operable.
●Do not remove the outer cover, as this may result in electric shock. Refer internal service to your local SHARP service facility.
●The ventilation should not be impeded by covering the ventilation openings with items, such as newspapers, tablecloths, curtains, etc.
●No naked flame sources, such as lighted candles, should be placed on the apparatus.
●Attention should be drawn to the environmental aspects of battery disposal.
●This unit should only be used within the range of 5°C - 35°C.
Warning:
The voltage used must be the same as that specified on this unit. Using this product with a higher voltage other than that which is specified is dangerous and may result in a fire or other type of accident causing damage. SHARP will not be held responsible for any damage resulting from use of this unit with a voltage other than that which is specified.
■Volume control
The sound level at a given volume setting depends on speaker efficiency, location, and various other factors. It is advisable to avoid exposure to high volume levels. Do not turn the volume on to full at switch on. Listen to music at moderate levels. Excessive sound pressure from earphones and headphones can cause hearing loss.
Controls and indicators
1 |
2 |
3 |
6
7 |
4
15
8 |
9 |
10 |
11 |
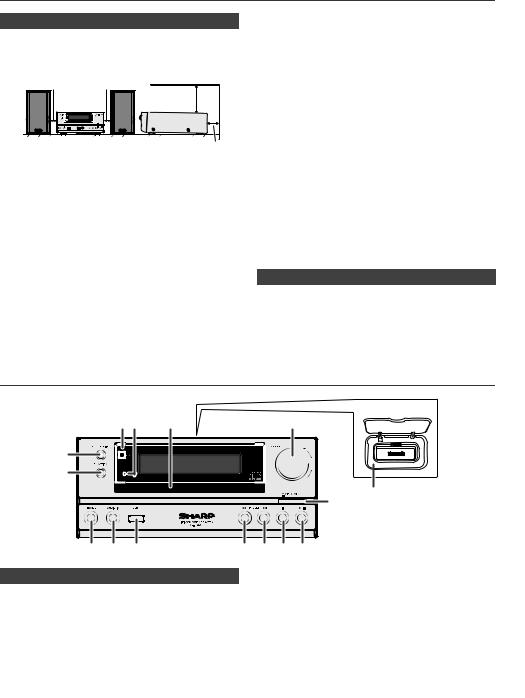
■Front panel
Page 1. Remote sensor. . . . . . . . . . . . . . . . . . . . . . . . . . . . 5 2. Timer indicator. . . . . . . . . . . . . . . . . . . . . . . . . . . 18 3. Disc Tray. . . . . . . . . . . . . . . . . . . . . . . . . . . . . . . . . 9 4. iPod or iPhone Docking Station . . . . . . . . . . . . . . 7 5. Volume Control . . . . . . . . . . . . . . . . . . . . . . . . . . . 6 6. On/Stand-by Button. . . . . . . . . . . . . . . . . 6, 8, 9, 14 7. FUNCTION Button . . . . . . . . . . . . . . . . . 8, 9, 12, 14 8. Headphone Socket . . . . . . . . . . . . . . . . . . . . . . . 20 9. Audio In Socket . . . . . . . . . . . . . . . . . . . . . . . . . . 20
12 13 14
Page
10. USB Terminal . . . . . . . . . . . . . . . . . . . . . . . . . . . . 12 11. Tuner Preset Down, CD/USB Track Down,
iPod/iPhone Skip Down . . . . . . . . . . . . . . . . . . . 8, 9 12. Tuner Preset Up, CD/USB Track Up,
iPod/iPhone Skip Up . . . . . . . . . . . . . . . . . . . . . 8, 9 13. Disc/USB Stop Button . . . . . . . . . . . . . . . . . . . . . . 9 14. Disc/USB/iPod/iPhone Play or
Pause Button . . . . . . . . . . . . . . . . . . . . . . . . . . . 8, 9 15. Disc Tray Open/Close Button . . . . . . . . . . . . . . . . 9
2
Controls and indicators (continued)
|
|
|
|
1 |
|
|
|
|
|
|
■ |
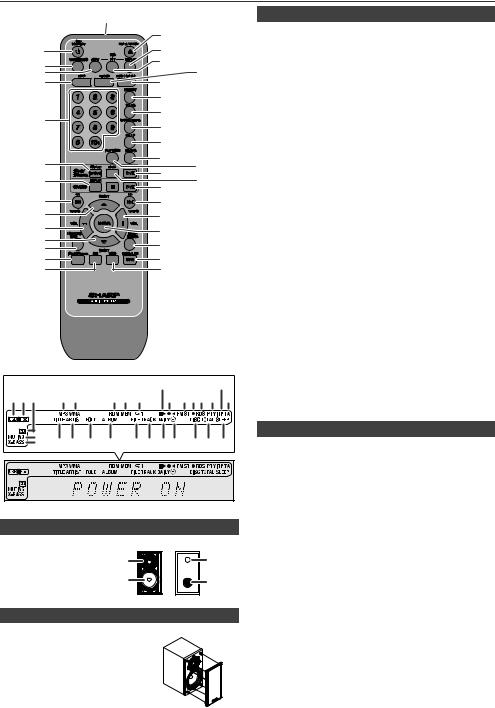
Remote control |
|
|
|
|
|
|
|
|
|
|
|
|
|
|
|
|
|
|
|
|
|
|
|
|
16 |
|
|
|
|
Page |
||
|
|
|
|
|
|
|
|
|
|
1. Remote Control Transmitter . . . . . . . . . . . . . . . . . 5 |
||||
2 |
|
|
|
|
|
|
17 |
|
|
|
||||
|
|
|
|
|
|
|
|
|
2. On/Stand-by Button . . . . . . . . . . . . . . . . . 6, 8, 9, 18 |
|||||
3 |
|
|
|
|
|
|
18 |
|
|
|
3. Tuner (Band) Button . . . . . . . . . . . . . . . . . . . 14, 15 |
|||
|
|
|
|
|
|
|
|
19 |
|
4. RDS ASPM Button . . . . . . . . . . . . . . . . . . . . . . . . |
15 |
|||
4 |
|
|
|
|
|
|
|
|
|
|||||
|
|
|
|
|
|
20 |
|
|
5. |
Mute Button . . . . . . . . . . . . . . . . . . . . . . . . . . . . . . |
6 |
|||
5 |
|
|
|
|
|
|
|
|
|
|||||
|
|
|
|
|
|
|
|
|
6. |
Direct Search Buttons . . . . . . . . . . . . . . . . . . . . . |
10 |
|||
|
|
|
|
|
|
|
21 |
|
|
|
7. iPod/iPhone Display (TV OUT) Button . . . . . . . . . 8 |
|||
|
|
|
|
|
|
|
22 |
|
|
|
8. Disc/USB Display Button. . . . . . . . . . . . . . . . . . . 12 |
|||
6 |
|
|
|
|
|
|
|
|
|
9. Tuning Down, Skip Down, Fast Reverse, |
|
|
||
|
|
|
|
|
|
23 |
|
|
|
|
Time Down Button . . . . . . . . . . . . 6, 8, 9, 12, 14, 18 |
|||
|
|
|
|
|
|
|
|
|
|
|
||||
|
|
|
|
|
|
|
24 |
|
|
|
10. Tuner Preset Up Button, |
|
|
|
|
|
|
|
|
|
|
|
|
|
|
iPod Cursor Up. . . . . . . . . . . . . . . . . . . . . . 8, 12, 14 |
|||
|
|
|
|
|
|
|
25 |
|
|
|
11. |
Volume Down Button . . . . . . . . . . . . . . . . . . . . . . . 6 |
||
7 |
|
|
|
|
|
|
|
26 |
|
12. Tuner Preset Down Button, |
|
|
||
|
|
|
|
|
|
27 |
|
|
|
|
||||
8 |
|
|
|
|
|
|
|
28 |
|
13. |
iPod Cursor Down . . . . . . . . . . . . . . . . . . . 8, 12, 14 |
|||
|
|
|
|
|
|
29 |
|
|
Equalizer Mode Button . . . . . . . . . . . . . . . . . . . . . 6 |
|||||
|
|
|
|
|
|
|
|
30 |
|
14. iPod/iPhone Button . . . . . . . . . . . . . . . . . . . . . . . . |
8 |
|||
|
|
|
|
|
|
|
|
|
|
|||||
9 |
|
|
|
|
|
|
31 |
|
|
|
15. |
CD Button . . . . . . . . . . . . . . . . . . . . . . . . . . . . . . . . |
9 |
|
10 |
|
|
|
|
|
|
32 |
|
|
|
16. |
Open/Close Button . . . . . . . . . . . . . . . . . . . . . . . . |
9 |
|
|
|
|
|
|
|
|
|
|
17. |
RDS Display Button . . . . . . . . . . . . . . . . . . . . . . |
15 |
|||
11 |
|
|
|
|
|
|
33 |
|
|
|
18. |
RDS PTY Button. . . . . . . . . . . . . . . . . . . . . . . . . . |
15 |
|
12 |
|
|
|
|
|
|
34 |
|
|
|
19. |
X-Bass Button . . . . . . . . . . . . . . . . . . . . . . . . . . . . |
6 |
|
13 |
|
|
|
|
|
|
|
|
|
20. |
Bass/Treble Button . . . . . . . . . . . . . . . . . . . . . . . . |
6 |
||
14 |
|
|
|
|
|
|
35 |
|
|
|
21. |
Memory Button. . . . . . . . . . . . . . . . . . . . . . . . 10, 14 |
||
15 |
|
|
|
|
|
|
36 |
|
|
|
22. |
Clear Button . . . . . . . . . . . . . . . . . . . . . . . . . . . . . |
10 |
|
|
|
|
|
|
|
|
|
|
|
|
23. |
Clock/Timer Button . . . . . . . . . . . . . . . . . . . . . 6, 18 |
||
|
|
|
|
|
|
|
|
|
|
|
24. |
Sleep Button. . . . . . . . . . . . . . . . . . . . . . . . . . . . . |
19 |
|
|
|
|
|
|
|
|
|
|
|
|
25. |
Folder Button . . . . . . . . . . . . . . . . . . . . . . . . . . . . |
12 |
|
|
|
|
RRMCGA225AWSA |
|
|
|
|
|
|
26. |
Play Mode Button. . . . . . . . . . . . . . . . . . . . . . . . . |
10 |
||
|
|
|
|
|
|
|
|
|
|
|
27. iPod/iPhone Play/Pause Button . . . . . . . . . . . . . . 8 |
|||
|
|
|
|
|
|
|
|
|
|
|
28. iPod/iPhone Menu Button . . . . . . . . . . . . . . . . . . . 8 |
|||
|
|
|
|
|
|
|
|
|
|
|
29. Disc/USB Play/Pause Button . . . . . . . . . . 9, 10, 12 |
|||
|
|
|
|
|
|
|
|
|
|
|
30. Disc/USB Stop Button . . . . . . . . . . . . . . . 9, 12, 13 |
|||
|
|
|
|
|
|
|
|
|
|
|
31. Tuning Up, Skip Up, Fast Forward, |
|
|
|
|
|
|
|
|
|
|
|
|
|
|
|
Time Up Button . . . . . . . . . . . . . . 6, 8, 9, 12, 14, 18 |
||
|
|
|
|
|
|
|
|
|
|
|
32. |
Volume Up Button . . . . . . . . . . . . . . . . . . . . . . . . . |
6 |
|
|
|
|
|
|
|
|
9 |
|
15 |
33. |
Enter Button . . . . . . . . . . . . . . . . . . . . . . . . . . . 8, 18 |
|||
1 2 3 |
4 5 |
|
6 |
7 |
8 |
|
34. |
Demo/Dimmer Button . . . . . . . . . . . . . . . . . . . . 4, 6 |
||||||
|
10 11121314 |
16 |
35. Audio/Line (INPUT) Button . . . . . . . . . . . . . . . 5, 20 |
|||||||||||
|
|
|
|
|
|
|
|
|
|
|
36. |
USB Button . . . . . . . . . . . . . . . . . . . . . . . . . . . . . |
12 |
|
17 |
|
|
|
|
|
|
|
|
|
|
■ |
Display |
|
|
19 |
20 |
21 |
22 |
|
23 |
24 25 26 |
27 |
28 29 |
|
|
|
|
||
18 |
|
|
Page |
|||||||||||
■ |
Speaker system |
|
|
1. |
Dome-Tweeter |
|
|
2. |
Woofer |
1 |
|
3. |
Bass Reflex Duct |
||
|
|||
4. |
Speaker Terminal |
2 |
|
|
|
■Speaker grilles are removable
Make sure nothing comes into contact with the speaker diaphragms when you remove the speaker grilles.
|
1. USB Indicator . . . . . . . . . . . . . . . . . . . . . . . . . . . . |
13 |
|
|
2. iPod Indicators . . . . . . . . . . . . . . . . . . . . . . . . . . . |
. 8 |
|
|
3. CD Indicator . . . . . . . . . . . . . . . . . . . . . . . . . . . . . |
10 |
|
|
4. MP3 Indicator . . . . . . . . . . . . . . . . . . . . . . . . . . . . |
11 |
|
|
5. WMA Indicator . . . . . . . . . . . . . . . . . . . . . . . . . . . |
11 |
|
|
6. RDM (Random) Indicator . . . . . . . . . . . . . . . . . . . |
10 |
|
|
7. MEM (Memory) Indicator . . . . . . . . . . . . . . . . . . . |
10 |
|
|
8. Repeat Indicator. . . . . . . . . . . . . . . . . . . . . . . . . . |
10 |
|
|
9. Play/Pause Indicator . . . . . . . . . . . . . . . . . . . . . . . |
9 |
|
|
10. Tuning FM/AM Indicator . . . . . . . . . . . . . . . . . . . |
14 |
|
3 |
11. FM Stereo Mode Indicator . . . . . . . . . . . . . . . . . . |
14 |
|
12. Stereo Station Indicator . . . . . . . . . . . . . . . . . . . |
14 |
||
|
13. RDS Indicator . . . . . . . . . . . . . . . . . . . . . . . . . . . . |
15 |
|
4 |
14. PTY Indicator . . . . . . . . . . . . . . . . . . . . . . . . . . . . |
15 |
|
15. TP Indicator |
15 |
||
|
|||
|
16. TA Indicator . . . . . . . . . . . . . . . . . . . . . . . . . . . . . |
15 |
|
|
17. Muting Indicator . . . . . . . . . . . . . . . . . . . . . . . . . . . |
6 |
|
|
18. X-bass Indicator . . . . . . . . . . . . . . . . . . . . . . . . . . . |
6 |
|
|
19. Title Indicator . . . . . . . . . . . . . . . . . . . . . . . . . . . . |
12 |
|
|
20. Artist Indicator . . . . . . . . . . . . . . . . . . . . . . . . . . . |
12 |
|
|
21. Folder Indicator . . . . . . . . . . . . . . . . . . . . . . . . . . |
12 |
|
|
22. Album Indicator . . . . . . . . . . . . . . . . . . . . . . . . . . |
12 |
|
|
23. File Indicator. . . . . . . . . . . . . . . . . . . . . . . . . . . . . |
12 |
|
|
24. Track Indicator . . . . . . . . . . . . . . . . . . . . . . . . . . . |
12 |
|
|
25. Daily Timer Indicator . . . . . . . . . . . . . . . . . . . . . . |
18 |
|
|
26. Once Timer Indicator . . . . . . . . . . . . . . . . . . . . . . |
18 |
|
|
27. Disc Indicator . . . . . . . . . . . . . . . . . . . . . . . . . . . . |
10 |
|
|
28. Total Indicator. . . . . . . . . . . . . . . . . . . . . . . . . . . . |
12 |
|
|
29. Sleep Indicator . . . . . . . . . . . . . . . . . . . . . . . . . . . |
19 |
3

System connections
Make sure to unplug the AC power lead before making any connections.
|
Installing the AM loop aerial |
|
|
AM loop |
< Attaching |
TV |
|
aerial |
< Assembling > to the wall > |
||
Video cable |
|||
|
|
||
Right |
wall |
(not supplied) |
|
speaker |
|
||
|
screws (not supplied) |
To video input socket |
Left speaker
FM aerial

 Red
Red

 Black
Black
Wall socket
(AC 220 - 240 V ~ 50/60 Hz)
■Aerial connection
Supplied FM aerial:
Connect the FM aerial wire to the FM 75 OHMS socket and position the FM aerial wire in the direction where the strongest signal can be received.
External FM aerial:
Use an external FM aerial (75 ohms coaxial cable) for better reception. When an external FM aerial is used, disconnect the supplied FM aerial wire.
Supplied AM loop aerial:
Connect the AM loop aerial to the AM terminal. Position the AM loop aerial for optimum reception. Place the AM loop aerial on a shelf, etc., or attach it to a stand or a wall with screws (not supplied).
Note:
Placing the aerial on the unit or near the AC power lead may cause noise pickup. Place the aerial away from the unit for better reception.
■Speaker connection
●Connect the black wire to the minus (–) terminal, and the red
wire to the plus (+) terminal.
● Use speakers with an impedance |
|
of 4 ohms or more, as lower |
|
impedance speakers can damage |
|
the unit. |
Incorrect |
● Do not mistake the right and the |
|
left channels. The right speaker is |
|
the one on the right side when you |
|
face the unit. |
|
●Do not let the bare speaker wires touch each other.
●Do not allow any objects to fall into or to be placed in the bass reflex ducts.
●Do not stand or sit on the speakers. You may be injured.
■Demonstration mode
●The first time the unit is plugged in, the unit will enter the demonstration mode.
●To cancel the demonstration mode, press the DEMO/ DIMMER button (remote control) during power standby mode. The unit will enter the low power consumption mode.
●To return to the demonstration mode, press the DEMO/ DIMMER button again.
■Connecting iPod or iPhone to TV
Photo and video files from iPod or iPhone can be viewed by connecting the system to TV/monitor.
If the TV/monitor has a video input, connect it to the VIDEO OUT socket at the back of the unit and set the TV Out on the iPod or iPhone unit to “ON” position.
Note:
Please make sure to set iPod unit to either NTSC or PAL to match your TV signal. Please visit Apple’s homepage for further information.
■AC power connection
After checking all the connections have been made correctly, plug the AC power lead of this unit into the wall socket.
Note:
Unplug the AC power lead from the wall socket if the unit will not be in use for a prolonged period of time.
4

System connections (continued) |
|
Remote control |
■Using other subwoofer
You can connect a subwoofer with an amplifier to the SUBWOOFER PRE OUT socket.
Audio cable |
Commercially available subwoofer |
|
(amplifier built in) |
||
(commercially |
||
Audio signal |
||
available) |
||
|
To audio input |
|
|
socket |
|
Main |
To SUBWOOFER PRE |
|
OUT socket |
||
unit |
||
|
Notes:
●No sound is heard from the subwoofer without a built-in amplifier.
●Subwoofer Pre-out (audio signal): 200mV / 10k ohms at 70 Hz.
■Connecting a TV, etc.
Connect to the TV using an audio cable.
TV
Main unit
To audio output sockets
Audio cable  (commercially available)
signal Audio
To LINE  input
input
sockets
To select Line In function:
● On main unit: Press FUNCTION button repeatedly until Line In is displayed.
● On remote control: Press AUDIO/LINE (INPUT) button repeatedly until Line In is displayed.
■Battery installation
1Open the battery cover.
2Insert the supplied batteries according to the direction indicated in the battery compartment.
When inserting or removing the batteries, push them towards the (–) battery terminals.
3Close the cover.
Caution:
●Replace all old batteries with new ones at the same time.
●Do not mix old and new batteries.
●Remove the batteries if the unit will not be used for a long period of time. This will prevent potential damage due to battery leakage.
●Do not use rechargeable batteries (nickel-cadmium battery, etc.).
●Installing the batteries incorrectly may cause the unit to malfunction.
●Batteries (battery pack or batteries installed) shall not be exposed to excessive heat such as sunshine, fire or the like.
Notes concerning use:
●Replace the batteries if the operating distance is reduced or if the operation becomes erratic. Purchase 2 “AAA” size batteries (UM/SUM-4, R3, HP-16 or similar).
●Periodically clean the transmitter on the remote control and the sensor on the unit with a soft cloth.
●Exposing the sensor on the unit to strong light may interfere with operation. Change the lighting or the direction of the unit if this occurs.
●Keep the remote control away from moisture, heat, shock, and vibrations.
■Test of the remote control
Check the remote control after checking all the connections. Point the remote control directly at the remote sensor on the unit. The remote control can be used within the range shown below:
Remote sensor 
0.2 m - 6 m
5
General control
Volume
Illuminator
■To turn the power on
Press the ON/STAND-BY button to turn the power on.
After use:
Press the ON/STAND-BY button to enter the power stand-by mode.
■Display brightness control
To dim the display brightness, press the DEMO/DIMMER button on the remote control.
Dimmer 1 (Display is dim).
Dimmer 2 (Display gets dimmer).
Dimmer off (Display is bright).
■Volume illuminator
●When the power is turned on, volume illuminator lights up.
●To turn on/off the light, hold down the DEMO/DIMMER button on the remote control for more than 2 seconds.
■Volume auto fade-in
If you turn off and on the main unit with the volume set to 27 or higher, the volume starts at 16 and fades in to the last set level.
■Volume control
Turn the volume knob towards VOL +/– (on main unit) or press VOLUME +/– (on remote control) to increase or decrease the volume.
■Auto power on function
When you press any of the following buttons, the unit turns on.
●iPod / iPhone, CD, USB, AUDIO / LINE (INPUT), TUNER (BAND) on the remote control: Selected function is activated.
●/ button on the main unit: The unit turns on and playback of the last function will start (CD, TUNER, USB, iPod, AUDIO IN, LINE IN)
■Auto power off function
The main unit will enter the stand-by mode (when iPod/iPhone is not docked) after 15 minutes of inactivity during:
iPod/iPhone: No connection.
AUDIO IN / LINE IN: No detection of input signal or very low sound audibility.
TUNER: No reception of broadcast signal. CD / USB: In the stop mode.
Note:
However, if iPod/iPhone is docked, the unit will begin charging. “Charge Mode” will be displayed.
■Muting
The volume is muted temporarily when pressing the MUTE button on the remote control. Press again to restore the volume.
■X-Bass control
When the power is first turned on, the unit will enter the extra bass mode which emphasises the bass frequencies, and “X-BASS” will appear. To cancel the extra bass mode, press the X-BASS button on the remote control.
■Bass control
1Press the BASS/TREBLE button to select “BASS”.
2Within 5 seconds, press the VOLUME (+ or –) button to adjust the bass.
■Treble control
1Press the BASS/TREBLE button to select “TREBLE”.
2Within 5 seconds, press the VOLUME (+ or –) button to adjust the treble.
■Equaliser
When the EQUALIZER MODE button is pressed, the current mode setting will be displayed. To change to a different mode, press the EQUALIZER MODE button repeatedly until the desired sound mode appears.
 Flat Equaliser off.
Game For game.
Classic For classical music. Pops For pop music.
Vocal Vocals are enhanced. Jazz For jazz.
■Function
When the FUNCTION button on main unit is pressed, the current function will change to different mode. Press the FUNCTION button repeatedly to select desired function.
CD  FM STEREO
  FM MONO
  AM
AM
Line In Audio In
  iPod
iPod  USB
USB 
Note:
The backup function will protect the memorised function mode for a few hours should there be a power failure or the AC power lead becomes disconnected.
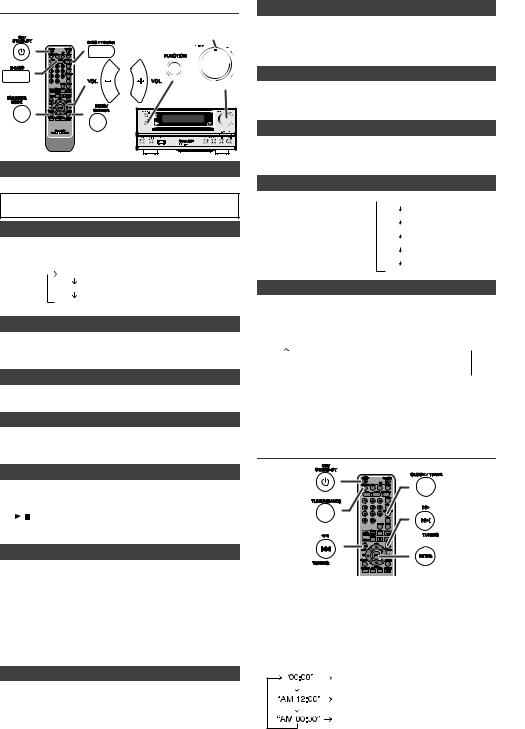
Setting the clock (Remote control only)
In this example, the clock is set for the 24-hour (00:00) display.
1Press the ON/STAND-BY button to turn the power on.
2Press the CLOCK/TIMER button.
3Within 10 seconds, press the ENTER button. To adjust the day, press the  or
or  button and then press the ENTER button.
4Press the  or
or  button to select 24-hour or 12-hour display and then press the ENTER button.
The 24-hour display will appear. (00:00 - 23:59)
The 12-hour display will appear. (AM 12:00 - PM 11:59)
The 12-hour display will appear. (AM 00:00 - PM 11:59)
6
Setting the clock (Remote control only) (continued)
5To adjust the hour, press the  or
or  button and then press the ENTER button. Press the
  or
or  button once to advance the time by 1 hour. Hold it down to advance continuously.
6To adjust the minutes, press the  or
or  button and then press the ENTER button. Press the
  or
or  button once to advance the time by 1 minute.
To confirm the time display:
Press the CLOCK/TIMER button. The time display will appear for about 5 seconds.
Note:
When power supply is restored after unit is plugged in again or after a power failure, reset the clock (pages 6-7).
To readjust the clock:
Perform “Setting the clock” from step 1. If the “Clock” does not appear in step 2, step 4 (for selecting the 24-hour or 12-hour display) will be skipped.
To change the 24-hour or 12-hour display:
1Clear all the programmed contents. [Refer to “Factory reset, clearing all memory” on page 21 for details.]
2Perform “Setting the clock” from step 1 onwards.
Listening to the iPod or iPhone
Supported iPod and iPhone models:
●iPod nano
●iPod mini
●iPod (5th generation) (Dock connector equipped Click Wheel model)
●iPod (4th generation) (Dock connector equipped Click Wheel model)
●iPod nano (2nd generation)
●iPod nano (3rd generation)
●iPod nano (4th generation)
●iPod classic
●iPod touch
●iPod touch (2nd generation)
●iPhone
●iPhone 3G
Caution:
Please update your iPod and iPhone unit to the latest software version before using it. Please visit Apple’s homepage to download the latest version for your iPod and iPhone.
Notes:
●Once the iPod or iPhone is connected to the unit it will begin charging.
●Error message “This accessory is not made to work with iPhone” may appear on the iPhone screen when iPhone battery is low.
●The message “This accessory is not made to work with iPhone” or “This accessory is not supported by iPhone” may appear on the iPhone screen when the iPhone is not properly docked (eg. slanting) on this product. If this occurs, please remove and re-dock the iPhone.
●This product is made for iPhone. To prevent random interference when iPhone is docked, the headphone output is disabled.
You may also experience brief audio interference during incoming calls.
■iPod and iPhone adaptor connection
Notes:
● Please use the adaptor supplied with your iPod or iPhone unit.
● You can use an audio cable to connect your iPod to the
AUDIO IN socket if: |
|
|||
1. |
your iPod adaptor does not fit into the iPod dock on the |
|||
|
main unit. |
|
||
2. |
you have an iPod that does not have an iPod adaptor. |
|||
3. |
you have an iPod that does not have an iPod 30 pin |
|||
|
connector. |
|
||
|
|
|
||
iPhone |
iPhone |
Capacity |
||
Adaptor No. |
Description |
|||
|
||||
|
|
|
|
|
|
12 |
iPhone |
4GB & 8GB & 16GB |
|
|
|
|
|
|
|
15 |
iPhone 3G |
8GB & 16GB |
|
|
|
|
|
|
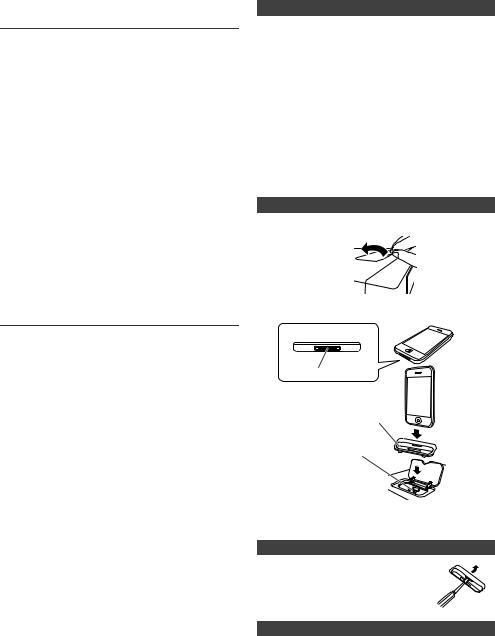
■ To insert iPod or iPhone adaptor
1 Open the iPod cover by pulling up.
2Insert the iPod or iPhone adaptor into unit and connect your iPod or iPhone.
iPhone (bottom) |
iPhone |
|
|
Dock connector |
|
iPhone adaptor
iPhone dock
iPhone connector 
Caution:
Unplug all accessories from the iPod or iPhone before inserting it into the dock.
■To remove iPod or iPhone adaptor
Insert the tip of a screwdriver (“–” type, small) into the adaptor hole as shown and lift upward to remove.
■iPod or iPhone playback
1Press the ON/STAND-BY button to turn the power on.
2Press the iPod/iPhone button on the remote control or FUNCTION button repeatedly on the main unit to select iPod function.
3Insert iPod or iPhone unit in iPod dock of main unit.
4Press the  /
/ (iPod/iPhone
  /
/ ) button to start playback.
7
 Loading...