


|
|
|
|
|
|
|
|
|
|
|
|
|
|
|
|
|
|
|
|
|
|
|
|
|
|
|
|
|
|
|
SJ-WS360T |
SJ-RP360T |
|||
|
SJ-WP360T |
SJ-RM360T |
|||
Device of this mark is a trademark of Sharp Corporation.
Plasmacluster is a registered trademark or a trademark of Sharp Corporation.
Un appareil de cette marque est une marque déposée de Sharp Corporation. Plasmacluster est une marque déposée inscrite ou une marque déposée de Sharp Corporation.
SJ-WS320T SJ-RP320T SJ-WP320T SJ-RM320T SJ-WS360T SJ-RP360T SJ-WP360T SJ-RM360T
REFRIGERATOR-FREEZER
OPERATION MANUAL . . . . . . . . . . . . . . . . . . . . 4
FRIGORIFICO-CONGELADOR
MANUAL DE MANEJO.. .. .. .. .. .. .. .. .. .. .. .. .. .. .. .. .. .. .. 15
FRIGORIFERO-FREEZER
MANUALE DI ISTRUZIONI.. .. .. .. .. .. .. .. .. .. .. .. .. .. .. .. 26
REFRIGERATEUR-CONGELATEUR
MODE D’EMPLOI . . . . . . . . . . . . . . . . . . . . . . . 37
FRIGORÍFICO-CONGELADOR FUNCIONAMENTO MANUAL . . . . . . . . . . . . . . 48
ΨΥΓΕΙΟ - ΚΑΤΑΨΥΚΤΗΣ ΕΓΧΕΙΡΙΔΙΟ ΛΕΙΤΟΥΡΓΙΑΣ .. .. .. .. .. .. .. .. .. .. .. .. .. .. .. 59
KÜHLSCHRANK MIT TIEFKÜHLFACH BEDIENUNGSANLEITUNG .. .. .. .. .. .. .. .. .. .. .. .. .. .. .. 70
KOELKAST-VRIEZER GEBRUIKSAANWIJZING.. .. .. .. .. .. .. .. .. .. .. .. .. .. .. .. .. 81
CHŁODZIARKO - ZAMRAŻARKA INSTRUKCJA OBSŁUGI. . . . . . . . . . . . . . . . . . 92
HŰTŐSZEKRÉNY-FAGYASZTÓ
HASZNÁLATI UTASÍTÁS .. .. .. .. .. .. .. .. .. .. .. .. .. .. .. .. 103
FRIGIDER-CONGELATOR
MANUAL DE UTILIZARE . . . . . . . . . . . . . . . . 114
CHLADNIČKA-MRAZÁK
NÁVOD K OBSLUZE. . . . . . . . . . . . . . . . . . . . 125
CHLADNIČKA-MRAZNIČKA
NÁVOD NA OBSLUHU . . . . . . . . . . . . . . . . . . 136
ŠALDYTUVAS - ŠALDIKLIS |
|
EKSPLOATAVIMO INSTRUKCIJA .... .. .. .. .. .. .. .. |
147 |
LEDUSSKAPIS – SALDĒTĀJKAMERA |
|
ROKASGRĀMATA . . . . . . . . . . . . . . . 158. . . . . . |
|
KÜLMIK-SÜGAVKÜLMIK
KASUTUSJUHEND . . . . . . . . . . . . . . . . . . . . . 169
HLADILNIK-ZAMRZOVALNIK
PRIROČNIK Z NAVODILI ZA DELOVANJE.. .. 180
 ХОЛОДИЛЬНИК-МОРОЗИЛЬНИК ІНСТРУКЦІЯ З ЕКСПЛУАТАЦІЇ.. .. .. .. .. .. .. .. .. .. .. 191
|
ХЛАДИЛНИК – ФРИЗЕР |
|
|
РЪКОВОДСТВО ЗА РАБОТА.. .. .. .. .. .. .. .. .. .. .. .. |
202 |
BY |
ХАЛАДЗІЛЬНІК-ЛЯДОЎНЯ |
|
|
ІНСТРУКЦЫЯ ПА ЭКСПЛУАТАЦЫІ.. .. .. .. .. .. .. |
213 |
CONTENTS |
|
••DUAL SWING DOOR................................................ |
4 |
••WARNING................................................................. |
5 |
••CAUTION.................................................................. |
5 |
••INSTALLATION......................................................... |
6 |
••DESCRIPTION.......................................................... |
7 |
••OPERATION............................................................. |
8 |
••STORING FOOD.................................................... |
13 |
••CARE AND CLEANING.......................................... |
14 |
••BEFORE YOU CALL FOR SERVICE..................... |
14 |
CONTENIDO |
|
••PUERTA DE APERTURA DUAL............................ |
15 |
••ADVERTENCIA....................................................... |
16 |
••PRECAUCION........................................................ |
16 |
••INSTALACION........................................................ |
17 |
••DESCRIPCION....................................................... |
18 |
••FUNCIONAMIENTO............................................... |
19 |
••PARA ALMACENAR LOS ALIMENTOS................. |
24 |
••CUIDADOS Y LIMPIEZA........................................ |
25 |
••ANTES DE LLAMAR AL SERVICIO TECNICO...... |
25 |
SOMMARIO |
|
••PORTA A DOPPIA ANTA....................................... |
26 |
••AVVERTENZE........................................................ |
27 |
••ATTENZIONE......................................................... |
27 |
••INSTALLAZIONE.................................................... |
28 |
••DESCRIZIONE........................................................ |
29 |
••COMANDI............................................................... |
30 |
••CONSERVAZIONE DEGLI ALIMENTI.................... |
35 |
••MANUTENZIONE E PULIZIA................................. |
36 |
••PRIMA DI CHIAMARE IL SERVIZIO DI |
|
ASSISTENZA.......................................................... |
36 |
TABLE DES MATIERES |
|
••PORTE AUTO-REVERSIBLE................................. |
37 |
••AVERTISSEMENT.................................................. |
38 |
••ATTENTION............................................................ |
38 |
••INSTALLATION....................................................... |
39 |
••DESCRIPTION........................................................ |
40 |
••UTILISATION.......................................................... |
41 |
••CONSERVATION DES ALIMENTS........................ |
46 |
••ENTRETIEN ET NETTOYAGE............................... |
47 |
••AVANT D’APPELER LE SERVICE APRES-VENTE.... |
47 |
ÍNDICE |
|
••PORTA DE ROTAÇÃO DUPLA.............................. |
48 |
••AVISO..................................................................... |
49 |
••CUIDADO................................................................ |
49 |
••INSTALAÇÃO......................................................... |
50 |
••DESCRIÇÃO........................................................... |
51 |
••FUNCIONAMENTO................................................ |
52 |
••CONSERVAÇÃO DE ALIMENTOS........................ |
57 |
••CUIDADOS E LIMPEZA......................................... |
58 |
••ANTES DE CHAMAR PELO SERVIÇO DE |
|
ASSISTÊNCIA TÉCNICA........................................ |
58 |
ΠΕΡΙΕΧΟΜΕΝΑ |
|
••ΠΟΡΤΑ ΔΙΠΛΗΣ ΤΑΛΑΝΤΩΣΗΣ............................. |
59 |
••ΠΡΟΣΟΧΗ.............................................................. |
60 |
••ΠΡΟΦΥΛΑΚΤΙΚΑ ΜΕΤΡΑ....................................... |
60 |
••ΕΓΚΑΤΑΣΤΑΣΗ....................................................... |
61 |
••ΠΕΡΙΓΡΑΦΗ............................................................ |
62 |
••ΛΕΙΤΟΥΡΓΙΑ........................................................... |
63 |
••ΔΙΑΤΗΡΗΣΗ ΤΡΟΦΙΜΩΝ....................................... |
68 |
••ΣΥΝΤΗΡΗΣΗ ΚΑΙ ΠΕΡΙΠΟΙΗΣΗ............................ |
69 |
••ΠΡΙΝ ΖΗΤΗΣΕΤΕ ΤΟ ΣΕΡΒΙΣ................................ |
69 |
INHALT |
|
••DUAL-SWING TÜRÖFFNUNG............................... |
70 |
••VORSICHT.............................................................. |
71 |
••ACHTUNG.............................................................. |
71 |
••AUFSTELLEN......................................................... |
72 |
••BESCHREIBUNG................................................... |
73 |
••BEDIENUNG........................................................... |
74 |
••AUFBEWAHRUNG VON LEBENSMITTELN.......... |
79 |
••PFLEGE UND REINIGUNG.................................... |
80 |
••BEVOR SIE DIE SHARP-SERVICESTELLE RUFEN... |
80 |
INHOUDSOPGAVE |
|
••DUBBEL OPENSLAANDE DEUR........................... |
81 |
••WAARSCHUWING................................................. |
82 |
••LET OP................................................................... |
82 |
••INSTALLATIE.......................................................... |
83 |
••BESCHRIJVING...................................................... |
84 |
••GEBRUIK................................................................ |
85 |
••OPBERGEN VAN VOEDSEL................................. |
90 |
••ONDERHOUD EN SCHOONMAKEN..................... |
91 |
••ALVORENS VOOR REPARATIE TE BELLEN....... |
91 |
SPIS TREŚCI |
|
••DRZWI OTWIERANE NA DWIE STRONY............. |
92 |
••OSTRZEŻENIE....................................................... |
93 |
••ŚRODKI OSTROŻNOŚCI....................................... |
93 |
••INSTALACJA.......................................................... |
94 |
••OPIS CZĘŚCI......................................................... |
95 |
••OBSŁUGA............................................................... |
96 |
••PRZECHOWYWANIE ŻYWNOŚCI....................... |
101 |
••CZYSZCZENIE LODÓWKI................................... |
102 |
••ZANIM WEZWIESZ SERWIS............................... |
102 |
TARTALOMJEGYZÉK |
|
••KÉTIRÁNYÚ AJTÓNYITÁS.................................. |
103 |
••FIGYELMEZTETÉS.............................................. |
104 |
••VIGYÁZAT............................................................ |
104 |
••ÜZEMBE HELYEZÉS........................................... |
105 |
••LEÍRÁS................................................................. |
106 |
••MŰKÖDTETÉS..................................................... |
107 |
••ÉLELMISZER-TÁROLÁS...................................... |
112 |
••ÁPOLÁS ÉS TISZTÍTÁS....................................... |
113 |
••MIELŐTT SZERVIZHEZ FORDULNA.................. |
113 |
2
CUPRINS |
|
••UŞĂ CU DESCHIDERE DUBLĂ........................... |
114 |
••AVERTISMENTE.................................................. |
115 |
••PRECAUŢII........................................................... |
115 |
••INSTALARE.......................................................... |
116 |
••DESCRIERE......................................................... |
117 |
••FUNCŢIONAREA.................................................. |
118 |
••PĂSTRAREA ALIMENTELOR.............................. |
123 |
••ÎNGRIJIRE ŞI CURĂŢARE................................... |
124 |
••ÎNAINTE DE A CHEMA SERVICIUL DE DEPANARE.... |
124 |
OBSAH |
|
••DVEŘE S OBOUSTRANNÝM OTVÍRÁNÍM.......... |
125 |
••BEZPEČNOSTNÍ POKYNY.................................. |
126 |
••UPOZORNĚNÍ...................................................... |
126 |
••INSTALACE.......................................................... |
127 |
••POPIS................................................................... |
128 |
••OBSLUHA............................................................. |
129 |
••ULOŽENÍ POTRAVIN........................................... |
134 |
••PÉČE A ČIŠTĚNÍ.................................................. |
135 |
••NEŽ ZAVOLÁTE OPRAVÁŘE.............................. |
135 |
OBSAH |
|
••OBOJSTRANNE OTVÁRATEĽNÉ DVERE.......... |
136 |
••UPOZORNENIE.................................................... |
137 |
••POZOR................................................................. |
137 |
••INŠTALÁCIA......................................................... |
138 |
••POPIS................................................................... |
139 |
••PREVÁDZKA........................................................ |
140 |
••SKLADOVANIE POTRAVÍN................................. |
145 |
••STAROSTLIVOSŤ A ČISTENIE........................... |
146 |
••SKÔR NEŽ ZAVOLÁTE DO SERVISU................. |
146 |
TURINYS |
|
••IŠ DVIEJŲ PUSIŲ ATIDAROMOS DURYS.......... |
147 |
••ĮSPĖJIMAS........................................................... |
148 |
••ATSARGUMO PRIEMONĖS................................ |
148 |
••INSTALIAVIMAS................................................... |
149 |
••APRAŠYMAS........................................................ |
150 |
••APTARNAVIMAS.................................................. |
151 |
••MAISTO LAIKYMAS............................................. |
156 |
••PRIEŽIŪRA IR VALYMAS.................................... |
157 |
••PRIEŠ SKAMBINANT Į APTARNAVIMO SKYRIŲ.... |
157 |
SATURS |
|
••DIVĒJĀDI ATVERAMAS DURVIS........................ |
158 |
••BRĪDINĀJUMS...................................................... |
159 |
••UZMANĪBU........................................................... |
159 |
••UZSTĀDĪŠANA..................................................... |
160 |
••APRAKSTS........................................................... |
161 |
••DARBĪBA.............................................................. |
162 |
••PĀRTIKAS UZGLABĀŠANA................................. |
167 |
••KOPŠANA UN TĪRĪŠANA..................................... |
168 |
••PIRMS ZVANĪT APKALPES DIENESTAM............ |
168 |
SISUKORD |
|
••KAHEPOOLSELT AVATAV UKS.......................... |
169 |
••ETTEVAATUST.................................................... |
170 |
••TÄHELEPANU...................................................... |
170 |
••PAIGALDAMINE................................................... |
171 |
••KIRJELDUS.......................................................... |
172 |
••TÖÖTAMINE......................................................... |
173 |
••TOIDUAINETE HOIDMINE................................... |
178 |
••HOOLDUS JA PUHASTAMINE............................ |
179 |
••ENNE MEHAANIKU KUTSUMIST........................ |
179 |
VSEBINA |
|
••VRATA Z ODPIRANJEM V OBE SMERI.............. |
180 |
••OPOZORILO......................................................... |
181 |
••PREVIDNOST....................................................... |
181 |
••NAMESTITEV....................................................... |
182 |
••OPIS...................................................................... |
183 |
••DELOVANJE......................................................... |
184 |
••SHRANJEVANJE HRANE.................................... |
189 |
••VZDRŽEVANJE IN ČIŠČENJE............................. |
190 |
••PREDEN POKLIČETE SERVISNO SLUŽBO....... |
190 |
ЗМІСТ |
|
••ДВЕРЦЯТА ЩО ВІДЧИНЯЮТЬСЯ ВЛІВО/ВПРАВО... |
191 |
••ПОПЕРЕДЖЕННЯ............................................... |
192 |
••УВАГА................................................................... |
192 |
••ВСТАНОВЛЕННЯ................................................ |
193 |
••ОПИС.................................................................... |
194 |
••ЕКСПЛУАТАЦІЯ................................................... |
195 |
••ЗБЕРІГАННЯ ПРОДУКТІВ................................... |
200 |
••ДОГЛЯД І ПРИБИРАННЯ.................................... |
201 |
••ПЕРЕД ТИМ ЯК ЗАТЕЛЕФОНУВАТИ ДО |
|
СЕРВІСНОГО ЦЕНТРУ....................................... |
201 |
СЪДЪРЖАНИЕ |
|
••ДВУСТРАННО ОТВАРЯЩА СЕ ВРАТА............. |
202 |
••ПРЕДУПРЕЖДЕНИЕ........................................... |
203 |
••ВНИМАНИЕ.......................................................... |
203 |
••МОНТАЖ.............................................................. |
204 |
••ОПИСАНИЕ.......................................................... |
205 |
••РАБОТА................................................................ |
206 |
••СЪХРАНЕНИЕ НА ХРАНИ.................................. |
211 |
••ГРИЖИ И ПОЧИСТВАНЕ.................................... |
212 |
••ПРЕДИ ДА ПОВИКАТЕ ТЕХНИК........................ |
212 |
BY ЗМЕСТ |
|
••ДВУХБАКОВЫЯ ДЗВЕРЫ................................... |
213 |
••ПАПЯРЭДЖАННЕ............................................... |
214 |
••УВАГА................................................................... |
214 |
••УСТАНОЎКА......................................................... |
215 |
••АПІСАННЕ............................................................ |
216 |
••КІРАВАННЕ.......................................................... |
217 |
••ЗАХОЎВАННЕ ПРАДУКТАЎ................................ |
222 |
••ДОГЛЯД І ЧЫСТКА.............................................. |
223 |
••ПЕРШ, ЧЫМ ЗВЯРТАЦЦА Ў СЭРВІС................ |
223 |
3
Thank you very much for buying this SHARP product. Before using your SHARP refrigerator, |
|
|
Household use only.. |
||
please read this operation manual to ensure that you gain the maximum benefit from it. |
||
|
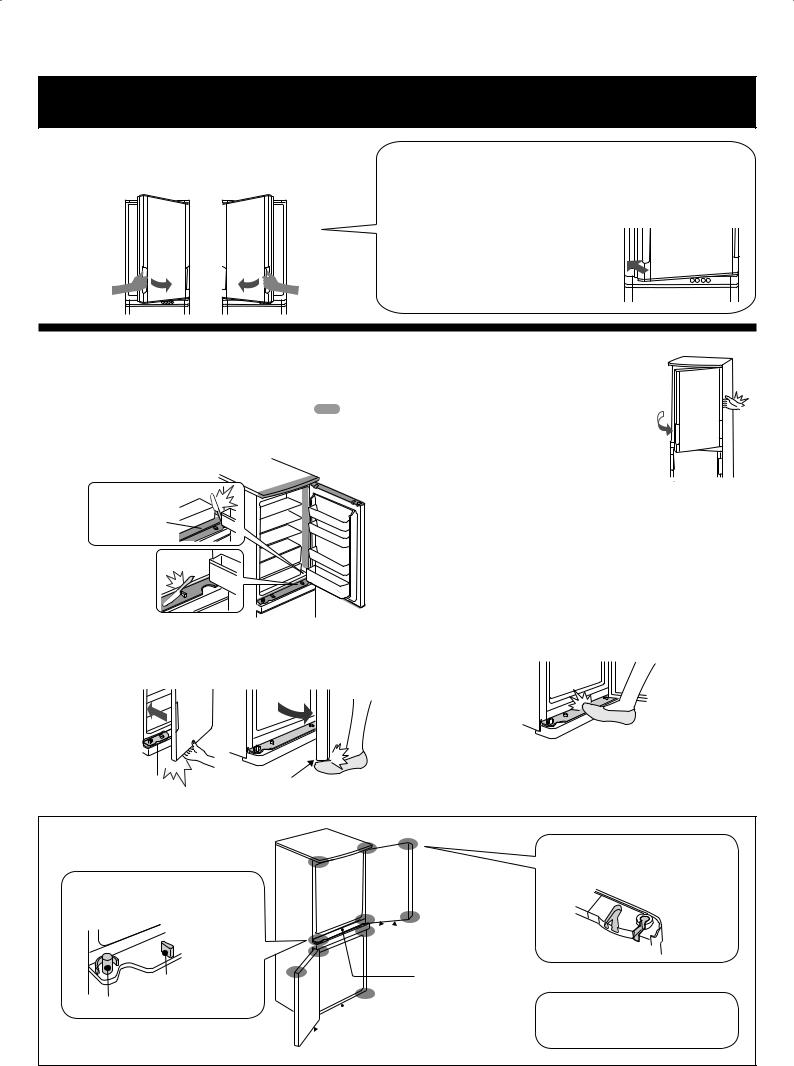
DUAL SWING DOOR
(Only for SJ-WS320T, SJ-WP320T, SJ-WS360T, SJ-WP360T)
The door can be opened from the right and the left. Freezer door is the same.
Hold the handle to open or close the door.
When closing the door
Push the door securely to ensure that it is completely closed because the door does not have self-closing function.
If you release your hand from the handle halfway, the door may remain half-opened. The half-open door may cause cool air leakage.
Unless the door has been closed completely, it cannot be opened from the opposite side.
WARNING
■■Under the following conditions, do not open or close the door forcibly.. Freezer door is the same..
The door may fall and it may cause injury..
• When some objects get stuck around the door. ( |
parts) |
•When the door is hard to open.
Open the door from opposite side and check whether any object
has got stuck or not.
Bottom of the refrigerator
■■Do not put your hands or feet under the open door.. Especially, be careful around the mechanical section..
(Danger of injury to your fingers or to your foot being caught in these sections.)
Mechanical section |
Mechanical section |
(The same applies when opened from the left hand side.)
NOTE
•• Do not put your hand on the opposite side to open the door. Your fingers may
be caught in the door.
•• Do not pull the both handles at the same time.
The handles may get broken.
•• Do not hurt or put the objects on the mechanical section installed on the
cabinet and doors. It will cause problem in opening or closing the door.
•• Do not put the objects on the roller holder. The door cannot be closed.
•• Do not fill the oil to the mechanical section of the cabinet and doors, rollers and roller holders.
Depending on the kind of oils, cracking of plastic parts can be caused.
•• Do not step on the roller holder of the freezer compartment. The refrigerator may fall to the front or transformation may happen on the roller holder.
The damaged roller holder leads to difficulty in opening or closing the door.
Structure
Body mechanisms
(Installed at four corners of each compartment)
Cam
Hinge pin
 Rollers (2 pcs..)
Roller holder

 Roller holder
 Rollers (2 pcs..)
Door mechanisms
(Installed at four corners of each door)
Roller & Roller holder
For smooth opening and closing of the door.
4
WARNING |
CAUTION |
■This refrigerator contains flammable refrigerant (R600a: isobutane) and insulation blowing gas (cyclopentane). Observe the following rules to prevent ignition and explosion.
•The refrigeration system behind and inside the refrigerator contains refrigerant. Do not allow any sharp objects to come into contact with the refrigeration system.
•Do not use mechanical devices or other means to accelerate the defrosting process. (This refrigerator has adopted automatic defrosting system.)
•Do not use electric appliances inside the refrigerator.
•Use only the specified parts for the refrigerator compartment light.
•Do not block the openings on the circumference of the refrigerator.
•Do not use flammable sprays, such as spray paint near the refrigerator. It may cause explosion or fire.
•If the refrigeration system should get punctured, do not touch the wall outlet and do not use open flames. Open the window and air out the room. Then ask a service agent approved by SHARP for servicing.
•This refrigerator should be disposed appropriately. Take the refrigerator to a recycling plant for flammable refrigerant and insulation blowing gases.
■Do not store highly volatile and flammable materials such as ether, petrol, propane gas, aerosol cans, adhesive agents and pure alcohol etc.
These materials are liable to explode.
■Dust deposited on the power plug may cause fire. Wipe it off carefully.
■Do not attempt to change or modify this refrigerator. This may result in fire, electric shock or injury.
■Ensure that the refrigerator presents no danger to children while being stored for disposal. (e.g. remove the magnetic door seals to prevent child entrapment.)
■Do not touch the compressor unit or its peripheral parts, as they become extremely hot during operation and the metal edges may cause injury.
■Do not touch foods or metal containers in the freezer compartment with your wet hands. This may cause frostbite.
■Do not use an extension cord or adapter plug.
■Do not place bottled and canned drinks in the freezer as they may crack when frozen.
■Make sure that the power cord has not been damaged during installation or moving. If the power plug or cord is loose, do not insert the power plug. There is a risk of electric shock or fire.
■Disconnect from the mains electricity supply by removing the mains plug from the electricity supply socket. Do not remove by pulling the mains lead. This may cause electric shock or fire.
■Should the flexible supply cord be damaged, it must be replaced by service agent approved by SHARP as a special cord is required.
■In case of gas leak, ventilate the area by opening a window, etc. Do not touch the refrigerator or the power outlet.
■Do not place objects containing liquid or unsteady objects on top of refrigerator.
■This refrigerator is not intended for use by persons
(including children) with reduced physical, sensory or mental capabilities, or lack of experience and knowledge, unless they have been given supervision or instruction concerning use of the refrigerator by a person responsible for their safety. Young children should be supervised to ensure that they do not play with the refrigerator.
Information on Disposal for Users (private households)
Attention:
Your product is marked with this symbol.
It means that used electrical and electronic products should not
be mixed with general household waste. There is a separate collection system for these products.
1.. In the European Union
Attention: If you want to dispose of this equipment, please do not use the ordinary dust bin!
Used electrical and electronic equipment must be treated separately and in accordance with legislation that requires proper treatment, recovery and recycling of used electrical and electronic equipment.
Following the implementation by member states private households within the EU states may return their used electrical and electronic equipment to designated collection facilities free of charge*. In some countries* your local retailer may also take back your old product free of charge if you purchase a similar new one.
*) Please contact your local authority for further details.
If your used electrical or electronic equipment has batteries or accumulators, please dispose of these separately beforehand according to local requirements.
By disposing of this product correctly you will help ensure that the waste undergoes the necessary treatment, recovery and recycling and thus prevent potential negative effects on the environment and human health which could otherwise arise due to inappropriate waste handling.
2.. In other Countries outside the EU
If you wish to discard this product, please contact your local authorities and ask for the correct method of disposal.
For Switzerland: Used electrical or electronic equipment can be returned free of charge to the dealer, even if you don't purchase a new product. Further collection facilities are listed on the homepage of www.swico.ch or www.sens.ch.
5
INSTALLATION
WARNING
■■Do not install the refrigerator in a damp or wet location as this may cause damage to the insulation and a leakage.. Condensation may also build on the outer cabinet and cause rust..
■■In order to prevent possible electric shock, connect the receptacle of earth to the earth terminal properly..
1 |
Keep adequate ventilation space around the refrigerator. |
||||||||||||||
• |
The figure shows the minimum required space for |
||||||||||||||
|
|
installing the refrigerator. The measurement condition |
|||||||||||||
|
|
of power consumption is conducted under a different |
|||||||||||||
|
|
space dimension. |
|
|
|
|
|
|
|
|
|
|
|||
|
• |
By keeping greater space, the refrigerator may be |
|||||||||||||
|
|
operated under a less amount of power consumption. |
|||||||||||||
|
• |
If using the refrigerator in the smaller space dimension |
|||||||||||||
|
|
than the below figure, it may cause the temperature |
|||||||||||||
|
|
rise in the unit, loud noise and failure. |
|||||||||||||
|
|
|
|
|
|
|
|
|
|
|
|
|
|
|
|
|
|
|
|
|
|
|
|
|
|
|
|
|
|
|
|
|
|
|
|
90mm or more |
1300mm |
|
60mm or more |
|
|||||||
|
|
|
|
|
|
||||||||||
|
|
|
|
|
|
|
|
|
|
|
|
|
|||
|
|
|
|
|
|
|
|
|
|
|
|||||
60mm |
60mm |
|
|
or more |
or more |
1040mm |
1350mm |
|
|
SJ-RP320T |
SJ-WS320T |
|
|
SJ-RM320T |
SJ-WP320T |
|
Free standing type |
SJ-RP360T |
SJ-WS360T |
|
SJ-RM360T |
SJ-WP360T |
|
|
|
2 Use the two front adjustable feet, to ensure that the refrigerator is positioned firmly and flat on the floor.
 Adjustable foot
3 Clip the foot cover (supplied inside the refrigerator compartment) in the position on the front of the two adjustable feet.
 Foot cover
NOTE
•• Position your refrigerator so that the plug is accessible.
•• Keep your refrigerator out of direct sunlight.
•• Do not place next to heat generating appliance.
•• Do not place directly on the ground. Provide suitable stand.
Before using your refrigerator
Clean the inside parts with a cloth soaked in warm water. If soapy water is used, wipe it off thoroughly with water.
Before transporting
•Wipe up water in the evaporating pan.
Before wiping up the water, wait more than 1 hour after pulling out the plug because the refrigeration cycle equipment is extremely hot.
(The evaporating pan is located on the rear of the product.)

 Evaporating Pan
NOTE
•• Do not bend or damage the ductwork located on the inside of the evaporating pan. It may cause failure.
When transporting
•The casters allow the refrigerator to move back and forth.
•Carry the refrigerator by holding the handles located on the rear and the bottom.
Casters (4pcs.)
When the door is heavy to open
(Only for SJ-WS320T, SJ-WP320T, SJ-WS360T, SJ-WP360T)
When one side door is heavy
•When the left side is heavy, lower the right side adjustable foot.
(Until the opposite side adjustable foot is slightly off-ground.)
Heavy
Adjustable foot
•When the right side is heavy, lower the left side adjustable foot.
When both sides are heavy
•When the refrigerator is tilted backwards, insert a wooden board (with relatively large width), etc. between the rear of the refrigerator and the floor to adjust the tilting.
Front |
Back |
|
A wooden board |
|
(with relatively |
|
large width) |
Reversible door
(Only for SJ-RP320T, SJ-RM320T, SJ-RP360T, SJ-RM360T)
It is possible to change the door to left side opening. To modify the door a REFRIGERATOR HINGE KIT (for left side opening) will be required, SJ-LR320TD. For details of the kit and the modification work, please contact the service agent approved by SHARP.
CAUTION SHARP recommends that all modification work will be carried out by the approved service agent.
6

DESCRIPTION
1 |
25 |
|
19 |
||
2 |
||
20 |
||
3 |
21 |
|
4 |
22 |
|
|
||
5 |
|
|
6 |
|
|
7 |
23 |
|
Chilled section 8 |
||
24 |
||
9 |
|
|
10 |
|
|
11 |
|
|
12 |
|
|
13 |
|
|
15 |
|
|
14 |
|
|
17 |
25 |
|
16 |
||
|
||
18 |
SJ-WS360T |
1.LED lights
2.Hybrid cooling panel (Aluminum panel)
The panel is cooled from the rear, thus indirectly cools the refrigerator compartment. In this way, food is refrigerated gently, without exposing it to cold air flow.
3. Refrigerator shelves
SJ-WS320T,SJ-RP320T : 2 pcs.. SJ-WP320T,SJ-RM320T SJ-WS360T,SJ-RP360T : 3 pcs.. SJ-WP360T,SJ-RM360T
4. Fruit & vegetable shelf
The airflow to the vegetable crisper can be controlled by moving the vent hole lever to the right or left.
5. Fruit & vegetable crisper
6. Divider
7.Shelf
8.Chilled case
9.Control panel
10.Ice cube maker
1)Do not over fill the ice cube trays; otherwise the ice cubes will be joined together when frozen.
2)When the ice cubes are made, turn the lever clockwise to empty the ice into the ice cube box.
NOTE
Lever
Ice cube box
To prevent damage to the ice cube box, do not make ice in the ice cube box or pour oil into it.
11.Ice cube box
12.Freezer case (top)
13.Freezer case (middle)
14.Freezer case (bottom)
15.Freezer shelf
16.Foot cover
17.Casters (4 pcs..)
18.Adjustable feet (2 pcs..)
19.Utility pocket cover
20.Utility pocket
21.Egg holder
22.Door pockets (2 pcs..)
23. Bottle stopper / Tube stand
Prevents bottles etc. from falling. Stick-type food products stored inside.
24.Bottle pocket
25.Magnetic door seals (2 pcs..)
Deodorizing unit
Deodorizing catalyst is installed on the routes of cold air. No operation and cleaning are required.
More foods can be stored by removing the following accessories as indicated in the figure below.
Chilled case, Ice cube maker, Ice cube box,
Freezer case (top & middle)
• If the refrigerator is operated with these accessories taken out, it will work under the most energy-efficient condition.
• Please do not remove
Freezer case (bottom).
7
OPERATION
Control panel |
1 |
2 |
3 |
|
|
|
|||
|
|
|
|
|
|
|
|
|
|
|
|
|
|
|
|
|
|
|
|
|
|
|
|
|
|
|
|
|
|
|
|
|
|
|
|
|
|
|
|
|
|
|
|
|
|
|
|
|
|
|
|
|
|
|
|
|
|
|
|
|
|
|
|
|
|
|
|
|
|
|
|
|
|
|
|
|
|
|
|
|
|
|
|
|
|
|
|
|
|
4 5 6
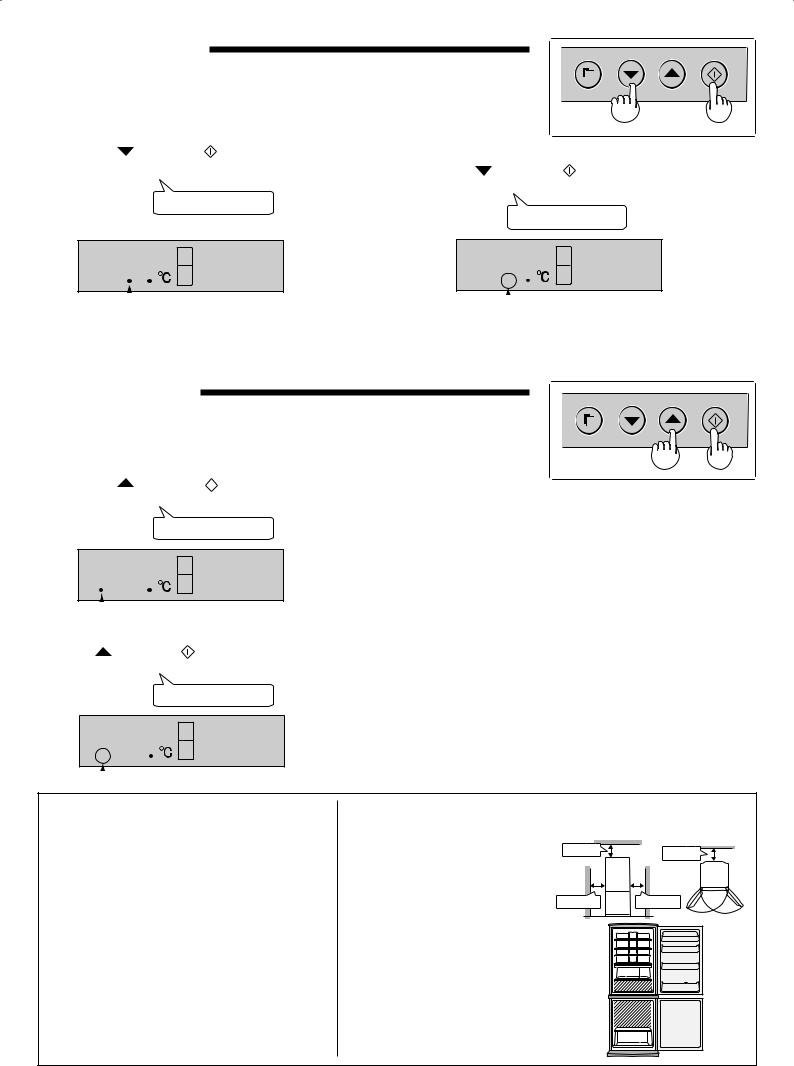
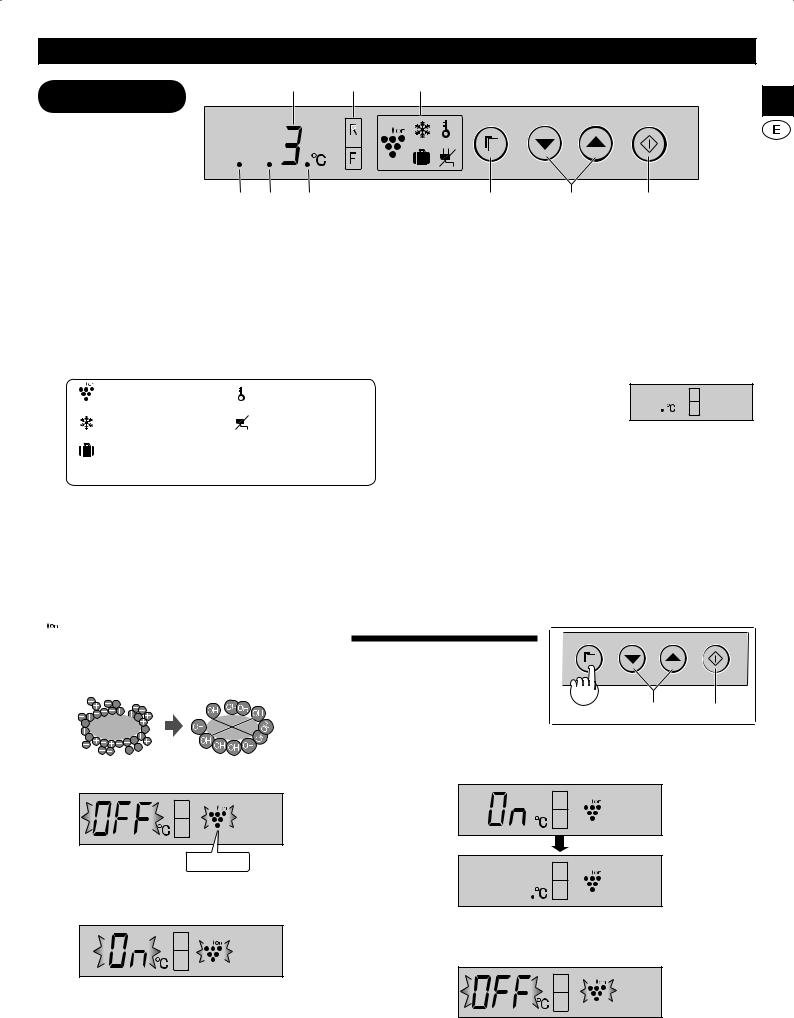
1. Display for temperature setting
The preset temperature of selected compartment is displayed. It is not the actual temperature in the compartment.
2. Display for controlling temperature
The temperature of refrigerator and freezer can be selected. The indicator of the temperature will light when the compartment is selected to change its temperature.
3. Display for feature icon
Icons of features in operation are displayed.
Plasmacluster |
Child lock* |
Express Freezing* |
Power failure |
Vacation mode*
(*: Except for SJ-RM320T, SJ-RM360T)
4. Energy saving indication
This indication shows energy saving "ON".
5. Sound ON/OFF indication
This indication shows sound "OFF".
6. Door alarm indication
This indication shows door alarm "ON".
(Door alarm is only for the refrigerator compartment.)
|
|
|
7 |
|
|
9 |
|
|
|
8 |
|||
7. Select button |
|
|
|
|||
|
Press to select feature icon and door alarm signal. |
|||||
8.. |
/ |
button |
|
|
|
|
|
Press to select feature ON/OFF or temperature setting. |
|||||
9.. |
|
(Enter) button |
|
|||
|
|
|||||
|
|
|||||
Finalize the setting.
NOTE
•• Features start automatically like right figure when inserting the power plug.
(The initial content is only Door alarm "ON".)
•• When there is no operation for 1 minute, the display will automatically return to the initial content.
Additionally, the display will be turned off when there is no operation for 1 minute.
•• When either of the button is pressed, the display will blink once and show the initial content. When the refrigerator stops with power failure, the display shows similarly as before having a power failure at the time of re-power distribution. However, when it has a power failure during operation of
Express Freezing, the operation is stopped at the time of repower distribution.
 Plasmacluster
The ionizer inside your refrigerator releases clusters of ions, which are collective masses of positive and negative ions, into the refrigerator compartment.
These ion clusters inactivate airborne mold fungus.
1
mold

2 3
fungus
1
2
Press the Select button and select Plasmacluster icon. |
3 Press the |
button. |
Flashing
Press the button. [ : ON, : OFF ]
To cancel operation
It is the same method as starting operation.
Press the button in step 2.
NOTE
•• There may be a slight odor in the refrigerator. This is the smell of ozone generated by the ionizer. The amount of ozone is minimal, and quickly decomposes in the refrigerator.
8
1
2 3
Express Freezing (Except for SJ-RM320T, SJ-RM360T)
High-quality frozen foods can be made using this feature and is convenient for home-freezing. 1 Press the select button and select express freezing icon.
Flashing
2 Press the  button. [
  : ON,
: ON, : OFF ]
3 Press the  button.
 Vacation Mode
(Except for SJ-RM320T, SJ-RM360T)
Use this feature when going on a trip or leaving the house for a long time.
1 Press the select button and select vacation mode icon.
Flashing
2 Press the button. [ : ON, : OFF ]
3 Press the  button.
To cancel operation
Press the button in step 2.
NOTE
•• The temperature inside the refrigerator compartment will be adjusted to about 10°C.
•• Food storage period in the refrigerator compartment becomes approx.1/2-1/3 of normal operation. Please utilize only when there is no perishable food.
•• Temperature of refrigerator compartment cannot be modified.
("10°C" is indicated on the display.)
Key operation of the control panel will be locked. Use this feature to prevent the panel from being used unintentionally by children or someone.
1 |
Press the select button and select the child lock icon. |
|||
|
|
|
Flashing |
|
2 Press the |
button. [ |
: ON, |
: OFF ] |
|
3 Press the  button.
To cancel operation
It is the same method as starting operation. Press the button in step 2.
9
Controlling Temperature
The refrigerator controls its temperature automatically.
However, if needed, adjust the temperature as follows.
1
2 3
Refrigerator compartment |
Freezer compartment |
Adjustable between 0°C and 6°C in steps of 1°C. 1 Press the select button and select  icon.
icon.
Flashing
2 |
|
|
|
|
|
|
|
|
|
|
|
|
|
|
|
Press the |
/ |
button and set the temperature. |
|||||
[ |
: increase, |
|
: decrease ] |
||||
|
|
|
|
|
|
|
|
|
|
|
|
|
|
|
|
NOTE
•• During vacation mode is operating, this compartment cannot be set. ( "10°C" is indicated on the display. )
3 Press the  button.
Adjustable between -13°C and -21°C in steps of 1°C. 1 Press the select button and select  icon.
icon.
|
|
|
|
|
|
|
|
|
|
|
|
|
|
|
|
|
|
|
|
Flashing |
|||
2 |
Press the |
/ |
button and set the temperature. |
||||
[ |
: increase, |
|
: decrease ] |
||||
|
|
|
|
|
|
|
|
|
|
|
|
|
|
|
|
3 Press the  button.
Advanced Setting of Refrigerator compartment
The temperature of refrigerator compartment can be adjusted in steps of 0.5°C by following steps 1 to 3 below.
1 Select |
icon. |
Beep beep beep |
|
2 Press  button continuously for 3 seconds or more.
3 Adjust the temperature in the same way as steps 2 to 3 above.
Follow steps 1 to 2 again if you want to adjust the temperature in steps of 1°C.
Indicator of Temperature
This refrigerator is provided with an indicator of temperature in the refrigerator compartment to allow you to control the
average temperature in the coldest zone. |
|
|
BLUE |
WHITE |
Coldest zone |
|
|
||
Symbol |
|
|
||
The symbol indicates the coldest zone in |
|
|
||
the refrigerator compartment. |
|
|
|
|
(The door pocket positioned at the same |
|
|
|
|
|
|
|
|
|
height isn't the coldest zone.) |
|
|
|
|
Checking the temperature in the |
|
|
Correct setting |
Temperature too high, |
coldest zone |
|
|
||
You can carry out regular checks to ensure the |
|
|
|
adjust the refrigerator temp. |
|
|
NOTE |
control. |
|
temperature in the coldest zone is correct and, |
|
|
|
|
if necessary, adjust the refrigerator temp. control. |
•• The internal temperature of the refrigerator depends on |
|||
To maintain a correct temperature inside the appliance, |
various factors such as the ambient temperature of the |
|||
check that the indicator of temperature is always BLUE. |
room, the amount of food stored and the frequency of door |
|||
If the indicator of temperature turns WHITE, the |
|
|
opening. |
|
temperature is too high; in this case, increase the |
•• When fresh food has been introduced or the door has been |
|||
refrigerator temp. control setting and wait for 6 hours |
left open for some time, it is normal for the indicator of |
|||
before checking the indicator of temperature again. |
temperature to turn WHITE. |
|
||
10
 Power Failure
While this feature is operating, it will indicate the rise of inside temperature caused by power failure or something.
1 Press the select button and select the power failure icon. (The icon is orange.)
Flashing
2 Press the button. [ : ON, : OFF ]
3 Press the  button.
To cancel operation
It is the same method as starting operation.
Press the button in step 2.
1
2 3
Door Alarm
•When the refrigerator door is left open, the door alarm will sound.
•The door alarm will sound in 1minute after opening the door and again after 1 minute (once in each case).
•If the door is left open for approx. 3 minutes, the alarm will sound continuously.
•At first, door alarm is set "ON".
To cancel operation
1 Press the select button and select the door alarm indication like the below figure.
Flashing
|
|
|
|
|
|
|
|
|
|
|
|
|
|
|
|
|
|
|
|
|
|
2 Press the |
|
|
|
|
|
Door alarm indication |
||||
|
|
|
|
|
||||||
button. [ |
|
: ON, |
: OFF ] |
|||||||
|
|
|
|
|
|
|
|
|
||
|
|
|
|
|
|
|
|
|
|
|
3 Press the  button.
 The indication will disappear.
Indication of power failure
•At the time of repower, if the inside temperature of the refrigerator and freezer compartment becomes as follows, R: more than 7°C, F: more than -10°C, power failure icon will blink slowly.
Blink slowly
• Check the quality of food before you eat.
How to cancel the indicator blink
Press the  button while the icons are blinking.
To start operation
It is the same method as canceling operation. Press the button in step 2.
 It shows Door alarm "ON".
11
Sound ON/OFF
Use this feature to turn off the sound of key operation.
1 Press the button and button simultaneously and continuously for 3 seconds or more.
Beep beep beep
 It shows the sound "OFF".
1 1
To set sound "ON"
Press the button and button simultaneously and continuously for 3 sceconds or more again.
Beep beep beep
 The indication will disappear.
Energy Saving
Use this feature when you want to switch the appliance to energy-saving operation.
1 1
Press the |
button and |
|
button simultaneously and |
|
|
|
|||
1 continuously for 3 seconds or more. |
NOTE |
|||
Beep beep beep
 It shows Energy Saving "ON".
To cancel operation
Press the button and button simultaneously and continuously for 3 sceconds or more again.
Beep beep beep
 The indication will disappear.
•• While this feature is operating, the inside temperature of the refrigerator and freezer compartment will be higher than the preset temperature as follows ; R: about 1°C, F: about 2°C. (If the preset temperature is set at R: 3°C, F: -18°C.)
The displayed temperature will not be changed.
•• The efficiency of power saving depends on the usage environment (controlling temperature, ambient temperature, frequency of opening or closing the door, amount of food).
If express freezing is operated at the same time, the efficiency of power saving will also change.
•• Cancel this feature when you feel the beverages are not cooled enough or ice making takes time.
Tips for saving energy
■Keep the ventilation space as much as possible around the refrigerator.
■Keep your refrigerator out of direct sunlight, and do not place next to heat generating appliance.
■Open your refrigerator door as briefly as possible.
■Hot foods should be cooled before storing.
■Place the food evenly on the shelves to allow the cooling air to circulate efficiently.
The amount of power consumption of this model is measured |
|||
according to the international standard of the refrigerator |
|||
performance.. |
90mm |
60mm |
|
• The amount of power |
|||
|
|
||
consumption of this model is |
|
|
|
measured under the space |
300mm |
300mm |
|
dimensions on the right figure. |
|||
• The amount of power consumption of this model is measured with some accessories taken out as indicated in the right figure.
12
STORING FOOD
Fruits, Vegetables
Meat, Fish, Poultry etc. 

Vegetables are improper in this case. They may be frozen.
Frozen foods
(Large size)
Refrigeration reduces the rate of food spoilage.
To maximize the shelf life of perishable food products, ensure that the food is the freshest possible quality. The following is a general guide to help promote longer food storage.
Fruit / Vegetables
To minimize moisture loss, fruit and vegetables should be loosely enclosed in a plastic material e.g. wrap, bags (do not seal) and place in the vegetable crisper.
Dairy Products & Eggs
•Most dairy products have a use by date on the outer packaging which informs the recommended temperature and shelf life of the product.
•Eggs should be stored in the Egg holder.
Meats / Fish / Poultry
•Place on a plate or dish and cover with paper or plastic wrap.
•For larger cuts of meat, fish, or poultry, place to the rear of the shelves.
•Ensure all cooked food is wrapped securely or placed in an airtight container.
Dairy products
 Eggs
Eggs
Small foods etc.
Bottles etc.
Frozen foods
(Small size)
NOTE
•• Evenly place the food on the shelves to allow the cooling air to circulate efficiently.
•• Hot foods should be cooled before storing. Storing hot foods increases the temperature in the unit and increases the risk of food spoilage.
•• Do not block the outlet and inlet of the cool air circulating circuit with foods or containers; otherwise the foods will not be evenly cooled throughout the refrigerator.
•• Keep the door securely closed.
 IN
IN
 OUT
OUT
Do not place food directly in front of cold air outlet. This may lead to the food
freezing.
For best freezing
•Quality of foods should be fresh.
•Freeze small quantities of food at a time to freeze them quickly.
•Food should be properly sealed, sealed tightly or covered.
•Evenly place the food in the freezer.
•Label bags or containers to keep an inventory of freezing food.
13

CARE AND CLEANING
WARNING
■■Unplug the refrigerator first to prevent electric shock.
■■Do not splash water directly on the outer cabinet or the interior.. This may lead to rusting and deterioration of the electrical insulation..
IMPORTANT
To prevent cracking on inside surfaces and plastic components, follow these tips..
•Wipe any food oils adhered to plastic components.
•Some household chemicals may cause damage,so use only diluted washing-up liquid (soapy water).
•If undiluted detergent is used or soapy water is not wiped off thoroughly, cracking of plastic parts can result.
1 Remove the accessories e.g. shelves from the cabinet and door. Wash them in warm soapy dishwashing water; rinse in clean water and dry.
2 Clean the inside with a cloth soaked in warm soapy dishwashing water. Then, use cold water to wipe off soapy water.
3
4 Clean the magnetic door seal with a toothbrush and warm soapy dishwashing water.
5 Wipe the control panel with the dry cloth.
NOTE
•• To prevent damage to your refrigerator, do not use heavy duty cleansers or solvents (lacquer, paint, polishing powder, benzine, boiled water, etc.)
•• If the power supply is disconnected, please wait for at least 5 minutes before re-connecting power.
•• The glass shelves weigh approximately 2kg each. Hold firmly when removing from the cabinet or carrying.
•• When dropped the juice and the like near the control panel, wipe off directly. It becomes cause of failure of the control panel.
•• Do not drop objects inside the refrigerator or strike the inner wall. This may cause the inner surface to crack.
Defrosting
Defrosting is fully automatic due to a unique energy saving system.
When the compartment light is blown
Contact the service agent approved by SHARP to request a replacement compartment light. The compartment light is not to be removed other than by qualified service personnel.
Switching off your refrigerator
If you switch your refrigerator off when you are going away for an extended period, remove all food, clean the interior thoroughly. Remove the power cord plug from the power socket and leave all doors open.
BEFORE YOU CALL FOR SERVICE
Before you call for service, check the following points.
Problem |
Solution |
The outside of the cabinet is hot |
It is normal. The hot pipe is in the cabinet in order to prevent dew generation. |
when touched. |
|
When there is refrigerator noise. |
It is normal for the refrigerator to produce the following sounds. |
|
••Loud noise produced by the compressor when operation starts |
|
--- Sound becomes quieter after a while. |
|
••Loud noise produced once a day by the compressor |
|
--- Operating sound produced immediately after automatic defrost operation. |
|
••Sound of flowing fluid (gurgling sound, fizzing sound) |
|
--- Sound of refrigerant flowing in pipes (sound may become louder from time to |
|
time). |
|
••Cracking or crunching sound, squeaking sound |
|
--- Sound produced by expansion and contraction of inner walls and internal parts |
|
during cooling. |
Frosting or dew generation occurs |
This may occur in one of the following cases. Use a wet cloth for wiping frost and |
inside or outside the refrigerator. |
a dry cloth for wiping dew. |
|
••When the ambient humidity is high. |
|
•• When the door is frequently opened and closed. |
|
••When foods containing plenty of moisture are stored. (Wrapping is required.) |
The foods in the refrigerator |
••Is the refrigerator operated for a long time with refrigerator temp. control set at |
compartment freeze. |
0°C? |
|
••Is the refrigerator operated for a long time with freezer temp. control set at -21°C? |
|
••Low ambient temperature may cause placed foods to freeze even if refrigerator |
|
temp. control is set to 6°C. |
It smells in the compartment. |
••Wrapping is required for the foods with strong smell. |
|
••Deodorizing unit cannot remove all of the smell. |
IF YOU STILL REQUIRE SERVICE
Refer to your nearest service agent approved by SHARP.
14

Le agradecemos la compra de este producto SHARP. Antes de utilizar su frigorífico SHARP, |
|
|
Sólo para uso doméstico.. |
||
es recomendable que lea este manual de funcionamiento para asegurarse de que obtiene |
||
|
||
las máximas ventajas de su nuevo frigorífico. |
|
|
|
PUERTA DE APERTURA DUAL
(Sólo para los modelos SJ-WS320T, SJ-WP320T, SJ-WS360T, SJ-WP360T)
La puerta se puede abrir del lado derecho o del lado izquierdo. La puerta del congelador se utiliza del mismo modo.
Utilice el tirador para abrir o cerrar la puerta.
Al cerrar la puerta
Empuje la puerta firmemente para asegurarse de que esté completamente cerrada, ya que la puerta no posee la función de cierre automático. Si suelta el tirador a mitad del proceso, la puerta podría quedar entreabierta.
Si la puerta queda entreabierta podrían producirse fugas de aire frío. A menos que la puerta haya sido cerrada firmemente, no podrá ser abierta desde el otro lado.
ADVERTENCIA
■■Bajo las siguientes condiciones, no abra ni cierre la puerta a la fuerza.. La puerta del congelador se utiliza del mismo modo..
La puerta podría caerse y ocasionar lesiones..
•• Cuando algunos objetos queden atascados alrededor de la puerta. (zonas )
•• Cuando sea difícil abrir la puerta. Abra la puerta del lado opuesto y verifique si no está atascado algún objeto.
Parte inferior del frigorífico
■■No coloque sus manos o pies debajo de la puerta cuando esté abierta.. Especialmente, tenga cuidado alrededor de la sección del mecanismo..
(Puede sufrir lesiones como por ejemplo si sus dedos o los pies quedan atrapados en esa sección.)
Sección del mecanismo |
Sección del mecanismo |
NOTAS
•• No coloque su mano en el lado opuesto para abrir la puerta. Sus dedos pueden
quedar atrapados en la misma.
•• No tire al mismo tiempo de ambos tiradores. Los tiradores podrían romperse.
•• No dañe ni coloque objetos en la sección del mecanismo instalada sobre
la carcasa y las puertas. Ocasionará problemas al abrir o cerrar la puerta.
•• No coloque objetos sobre el soporte de rodillo. De lo contrario no se podrá cerrar la puerta.
•• No agregue aceite en la sección del mecanismo del mueble y de la puerta, rodillos y soportes de rodillo. Dependiendo del tipo de aceite, las piezas de plástico se pueden agrietar.
•• No pise sobre el soporte de rodillo del compartimiento del congelador.
El frigorífico podría caer hacia el frente o se puede deformar el soporte de rodillo.
Si se llega a dañar el soporte de rodillo puede ser difícil abrir o cerrar la puerta.
(Se aplica lo mismo cuando se abre del lado izquierdo.)
Estructura
Mecanismos del mueble
(Instalados en las cuatro esquinas de cada compartimiento)
Leva
Pasador de bisagra
 Rodillos
(2 pzas..)
Soporte de rodillo

 Soporte de rodillo

 Rodillos (2 pzas..)
Mecanismos de la puerta
(Instalados en las cuatro esquinas de cada puerta)
Rodillo y Soporte de rodillo
Para abrir y cerrar suavemente la puerta.
15
ADVERTENCIA PRECAUCION
■■Este frigorífico contiene refrigerante inflamable (R600a: isobutano) y gas explosivo de aislamiento (ciclo pentano). Siga las siguientes reglas para evitar la ignición y explosión.
•• El sistema de refrigeración trasero e interior del frigorífico contiene refrigerante. No permita que ningún objeto puntiagudo toque el sistema de refrigeración.
•• No utilice dispositivos mecánicos u otros medios con el fin de acelerar el proceso de descongelacion. (Este frigorífico posee un sistema de descongelacion automático)
•• No utilice dispositivos eléctricos dentro del frigorífico.
•• Utilice sólo las piezas especificadas para la luz del compartimiento del frigorífico.
•• No bloquee las aperturas alrededor del frigorífico.
•• No use atomizadores inflamables, como por ejemplo la pintura en aerosol cerca del frigorífico. Podría ocasionar explosiones o incendios.
•• Si se perfora el sistema de refrigeración, no toque el enchufe de pared y no utilice llamas. Abra la ventana y ventile la habitación. Luego pida el servicio de un agente de servicio aprobado por SHARP.
•• Se debería deshechar de este frigorífico de forma apropiada. Lleve el frigorífico a una planta de reciclaje para refrigerantes inflamables y gases explosivos de aislamiento.
■■No guarde materiales altamente volátiles e inflamables como por ejemplo, éter, gasolina, gas propano, atomizadores en aerosol, sustancias adhesivas y alcohol puro, etc. Estos materiales pueden ocasionar explosiones.
■■La acumulación de polvo en el enchufe de la red puede provocar incendios. Límpielo con cuidado.
■■No modifique este frigorífico. Unicamente podrán desmontarlo o repararlo técnicos autorizados, ya que de lo contrario podrían producirse descargas eléctricas, incendio o daños personales.
■■Asegúrese de que el frigorífico no represente ningún peligro para los niños al ser almacenado para su desecho.
(por ejemplo, quite el cierre magnético de la puerta para prevenir que queden atrapados los niños)
■■No toque la unidad del compresor o sus piezas periféricas ya que pueden volverse muy calientes durante el funcionamiento y los bordes de metal pueden provocar heridas.
■■No toque los alimentos o recipientes de metal del compartimiento congelador con las manos mojadas. Esto puede causar congelamiento.
■■No utilice un cable de extensión o una clavija adaptadora.
■■No coloque las bebidas enbotelladas o enlatadas en el congelador ya que podrían explotar al congelarse.
■■Asegúrese de que el cable de alimentación no se haya dañado durante la instalación o el movimiento. Si la clavija o el cable se encuentran deteriorados, no inserte la clavija.
Existe el riesgo de descargas eléctricas o incendios.
■■Cuando sapue el enchufe, no coja, no el cable, sino el enchufe. Tirar del cable puede causar descargas eléctrica o incendios.
■■Si el cable de corriente flexible se daña, debe ser reemplazado por un agente de servicio aprobado por SHARP debido a que se necesita un cable especial.
■■En caso de que haya fugas de gas, ventile el área abriendo una ventana, por ejemplo. No toque el frigorífico ni el enchufe del mismo.
■■No coloque contenederos de líquidos u objetos inestables en la parte superior del frigorífico.
■■Este frigorífico no ha sido diseñado para ser usado por personas (incluyendo niños) con limitaciones físicas o mentales o sin experiencia o conocimiento, a menos que sean supervisadas o instruidas por una persona responsable de su seguridad. Los niños pequeños deben ser supervisados para asegurar que no jueguen con el frigorífico.
Información sobre eliminación para usuarios particulares
Atención:
Su producto está marcado con este símbolo. Significa que los productos eléctricos y electrónicos usados no deberían mezclarse con los residuos domésticos generales. Existe un sistema de recogida independiente para estos productos.
1.. En la Unión Europea
Atención: Si quiere desechar este equipo, ¡por favor no utilice el cubo de la basura habitual!
Los equipos eléctricos y electrónicos usados deberían tratarse por separado de acuerdo con la legislación que requiere un tratamiento, una recuperación y un reciclaje adecuados de los equipos eléctricos y electrónicos usados.
Tras la puesta en práctica por parte de los estados miembros, los hogares de particulares dentro de los estados de la Unión Europea pueden devolver sus equipos eléctricos y electrónicos a los centros de recogida designados sin coste alguno *. En algunos países* es posible que también su vendedor local se lleve su viejo producto sin coste alguno si tiene previsto comprar uno nuevo similar.
*) Por favor, póngase en contacto con su autoridad local para obtener más detalles. Si sus equipos eléctricos o electrónicos usados tienen pilas o acumuladores, por favor deséchelos por separado con antelación según los requisitos locales.
Al desechar este producto correctamente, ayudará a asegurar que los residuos reciban el tratamiento, la recuperación y el reciclaje necesarios, previniendo de esta forma posibles efectos negativos en el medio ambiente y la salud humana que de otra forma podrían producirse debido a una manipulación de residuos inapropiada.
2.. En otros países fuera de la Unión Europea
Si desea desechar este producto, por favor póngase en contacto con las autoridades locales y pregunte por el método de eliminación correcto.
Para Suiza: Los equipos eléctricos o electrónicos pueden devolverse al vendedor sin coste alguno, incluso si no compra ningún nuevo producto. Se puede encontrar una lista de otros centros de recogida en la página principal de www.swico.ch o www.sens.ch.
16

INSTALACION
ADVERTENCIA
■■No instale el frigorífico en un sitio húmedo o mojado ya que puede deteriorarse el aislante y se pueden producir fugas.. Además se puede formar condensación en el exterior del frigorífico y ocasionar corrosión.
■■Para evitar posibles descargas eléctricas, conecte correctamente el receptáculo de tierra en el terminal de tierra..
1 Mantenga un espacio de ventilación adecuado alrededor del frigorífico.
•• La figura muestra el espacio mínimo requerido para la instalación del frigorífico. Las condiciones de medición de consumo de energía se realizan bajo dimensiones diferentes de espacio.
•• Al conservar mayor espacio, el frigorífico podría operar con menos cantidad de consumo de energía.
•• Si utiliza el frigorífico en una superficie de tamaño inferior al mostrado por la siguiente figura, podría ocasionar
un aumento de la temperatura de la unidad, ruidos de operación altos y fallos.
90mmo más |
60mm o más |
|
1300mm |
60mm |
60mm |
1040mm |
1350mm |
o más |
o más |
||
|
|
SJ-RP320T |
SJ-WS320T |
|
|
SJ-RM320T |
SJ-WP320T |
|
Tipo no encastrablé. |
SJ-RP360T |
SJ-WS360T |
|
SJ-RM360T |
SJ-WP360T |
2 Use los dos pies ajustables frontales, para asegurarse de que el frigorífico quede posicionado firmemente y nivelado sobre el suelo.
 Pie ajustable
3 Fije la cubierta de protección inferior (suministrada en el interior del compartimiento del frigorífico) en la parte frontal de los dos pies ajustables.
Cubierta de protección inferior
NOTAS
•• Coloque el frigorífico de modo que el enchufe sea accesible.
•• Mantenga el frigorífico alejado de la luz solar directa.
•• No lo coloque junto a aparatos generadores de calor.
•• No coloque directamente en el suelo. Coloque un soporte adecuado.
Antes de utilizar el frigorífico
Limpie las partes del interior con un paño humedecido en agua tibia. Si emplea agua con jabón, frótelo bien con agua para que no queden residuos de jabón.
Antes del transporte
•• Seque cualquier residuo de agua que haya en la bandeja de evaporación. Antes de secar los residuos de agua, espere al menos 1 hora antes de desenchufar la clavija ya que el equipo del ciclo de refrigeración está extremadamente caliente. (La bandeja de evaporación está ubicada en la parte trasera del producto.)


 Bandeja de evaporación
NOTA
•• No doble ni dañe el conducto ubicado en el interior de la bandeja de evaporación. Podrían producirse averías.
Cuando se transporta
•• Las ruedecillas permiten mover el frigorífico hacia atrás y hacia delante.
•• Cargue el frigorífico sosteníendolo por las asas localizadas al frente y detrás.
detrás |
al frente |
Ruedecillas (4 pzas..)
Cuando la puerta es muy pesada para abrirla
(Sólo para los modelos SJ-WS320T, SJ-WS320T,SJ-WS320T, SJ-WP320T)
Cuando una parte de la puerta está pesada
•• Cuando la parte izquierda está pesada, baje el pie ajustable de la parte derecha. (Hasta que el pie ajustable del lado opuesto esté ligeramente sin tocar el suelo.)
Pesado
Pie ajustable
•• Cuando la parte derecha está pesada, baje el pie ajustable de la parte izquierda.
Cuando ambas partes estén pesadas
•• Cuando el frigorífico esté inclinado hacia atrás inserte una tabla de madera (con una anchura relativamente grande), etc. entre la parte trasera del frigorífico y el suelo para ajustar la inclinación.
Frente |
Atrás |
|
Una tabla de madera |
|
(con anchura |
|
relativamente grande) |
Puerta reversible
(Sólo para los modelos SJ-RP320T, SJ-RM320T, SJ-RP360T, SJ-RM360T)
Es posible cambiar la puerta al lado izquierdo para la apertura. Para modificar la puerta se requiere de un JUEGO DE BISAGRAS PARA EL FRIGORÍFICO (para el lado izquierdo), SJ-LR320TD. Para más información sobre el juego y el trabajo de modificación, póngase en contacto con el agente de servicio aprobado por SHARP.
PRECAUCION
SHARP recomienda que todo el trabajo de modificación sea llevado a cabo por un agente de servicio aprobado.
17
DESCRIPCION |
|
||
|
1 |
25 |
|
|
19 |
||
|
2 |
||
|
20 |
||
|
3 |
21 |
|
|
4 |
22 |
|
|
|
||
|
5 |
|
|
|
6 |
|
|
|
7 |
23 |
|
Sección de enfriamiento |
8 |
||
24 |
|||
|
9 |
|
|
|
10 |
|
|
|
11 |
|
|
|
12 |
|
|
|
13 |
|
|
|
15 |
|
|
|
14 |
|
|
|
17 |
25 |
|
|
16 |
||
|
|
||
|
18 |
SJ-WS360T |
|
11.1 Luces LED
22.2 Panel de enfriamiento híbrido (Panel de aluminio)
El panel se enfría por la parte de atrás, enfriando así de forma indirecta el compartimiento refrigerador. De esta forma, los alimentos se congelan suavemente, sin exponerlos a la corriente de aire frío.
33.3 Estanterías del frigorífico
SJ-WS320T,SJ-RP320T : 2 pzas. SJ-WP320T,SJ-RM320T
SJ-WS360T,SJ-RP360T : 3 pzas. SJ-WP360T,SJ-RM360T
44.4 Estante de frutas y vegetales
El flujo de aire al cajón para Vegetales
se puede controlar moviendo a derecha o izquierda la palanca de la ranura de ventilación.
55.5 Cajón para conservar frutas y verduras
66.6 Separador
77.7 Estante
88.8 Cajón de enfriamiento
99.9 Panel de control
111.1 Dispositivo para hacer cubitos de hielo
111No llene excesivamente las |
Palanca |
bandejas para cubitos de hielo; |
|
de lo contrario los cubitos de hielo |
|
quedarían pegados al congelarse. |
|
222Cuando estén hechos los cubitos, |
|
gire la palanca en el sentido horario |
|
para vaciarlos en la cubitera. |
|
NOTA No haga hielo con la cubitera |
Cubitera |
ni vierta aceite en ella pues ésta puede |
|
agrietarse.
111.1 Cubitera
111.1 Cajón del congelador (superior)
111.1 Cajón del congelador (central)
111.1 Cajón del congelador (inferior)
111.1 Estante congelador
111.1 Cubierta de protección inferior
111.1 Ruedecillas (4 pzas..)
111.1 Pies ajustables (2 pzas..)
111.1 Tapa del compartimiento multiuso
222.2 Compartimiento multiuso
222.2 Huevera
222.2 Compartimientos de la puerta (2 pzas..)
222.2 Tope de botellas / Base de tubo
Previene la caída de botellas, etc.
Los productos alimenticios tipo barra también se pueden almacenar aquí.
222.2 Botellero
222.2 Cierres magnéticos de la puerta (2 pzas..)
Unidad de desodorizacion
El catalizador de desodorización es instalado en las rutas del aire frío. No se requiere operación o limpieza.
Se pueden almacenar más alimentos quitando los siguientes accesorios como se indica en la figura de abajo..
Cajón de enfriamiento, dispositivo para hacer cubitos de hielo, cubitera, cajón del congelador (superior y central)
•• Si opera el frigorífico sin estos accesorios, trabajará bajo la condición más eficiente de energía.
•• No quite el cajón del congelador (inferior).
18
FUNCIONAMIENTO
1 2 3
Panel de control
4 5 6
11.1 Visualización para el ajuste de la temperatura
Se visualiza la temperatura preestablecida del compartimiento seleccionado. No es la temperatura real en el compartimiento.
22.2 Visualización de control de temperatura
Se puede seleccionar la temperatura del frigorífico y del congelador. El indicador de la temperatura se encenderá al seleccionar el compartimiento para cambiar su temperatura.
33.3 Visualización del icono de función
Se visualizan los iconos de las características en funcionamiento.
Ionizador |
|
Bloqueo para |
“Plasmacluster” |
|
niños* |
Congelado rápido* |
|
Fallo de energía |
|
||
|
Modo vacaciones*
(*: Excepto para SJ-RM320T, SJ-RM360T)
44.4 Indicador de ahorro de energía
Este indicador muestra el ahorro de energía “ACTIVADO”.
55.5Indicador de ACTIVACIÓN/ DESACTIVACIÓN de sonido
Este indicador muestra que se ha “DESACTIVADO” el sonido.
66.6 Indicador de alarma de la puerta
Este indicador muestra que está “ACTIVADA” la alarma de la puerta. (Laalarmadela puertasoloesparael compartimento del frigorífico.)
 Ionizador “Plasmacluster”
7 8 9
77.7 Botón de selección
Presiónelo para seleccionar el icono de función y la señal de la alarma de la puerta.
88.8 Botón  /
/ 
Presiónelo para seleccionar la función ACTIVACIÓN/
DESACTIVACIÓN o el ajuste de la temperatura.
99.9  (Intro) botón
Finaliza el ajuste.
NOTAS
•• Funciones que se inician automáticamente como la que se muestra en la figura de la derecha al
insertar la clavija de alimentación. (El contenido inicial sólo es la “ACTIVACIÓN” de la alarma de la puerta)
•• Cuando no se lleva a cabo ninguna operación durante 1 minuto, la pantalla regresará automáticamente al contenido inicial. Adicionalmente, la pantalla se apagará cuando no se realice ninguna operación durante 1 minuto.
•• Al pulsar alguno de los botones, la pantalla parpadeará una vez y mostrará el contenido inicial. Cuando el frigorífico deja de funcionar debido a un corte de corriente, al momento de redistribución de corriente se mostrará de forma similar a como estaba antes del corte de corriente.
Sin embargo, cuando ocurre un corte de corriente durante la operación de congelado rápido, la operación se detiene en el momento de redistribución de corriente.
El ionizador del interior de su frigorífico libera grupos de iones, que son masas colectivas |
|
|
de iones positivos y negativos, al compartimiento del frigorífico. Estos grupos de iones |
|
|
reducen los hongos de moho del aire. |
1 |
|
|
3 |
|
hongos de |
2 |
|
|
|
|
moho |
|
|
1
2
Pulse el botón de selección y seleccione el icono de Plasmacluster.
Parpadeando
Pulse el botón .
.
[ : ON (ACTIVACIÓN),
  : OFF (DESACTIVACIÓN)]
3 Pulse el botón “ ”.
”.
Para cancelar la operación
Es el mismo método cuando inicia el funcionamiento.
Pulse el botón en el paso 2.
NOTA
•• Es posible que se perciba cierto olor en el frigorífico. Este es el olor del ozono generado por el ionizador. La cantidad de ozono es mínima, y se descompone con rapidez en el frigorífico. 19
1
2 3
Congelado rápido (Excepto para SJ-RM320T, SJ-RM360T)
Se pueden congelar alimentos de alta calidad utilizando esta característica que es conveniente para congelar en casa.
1 Pulse el botón de selección y seleccione el icono de congelado rápido.
|
|
|
Parpadeando |
2 Pulse el botón |
. [ |
:ON(ACTIVACIÓN), |
:OFF(DESACTIVACIÓN)] |
3 Pulse el botón “ ”.
”.
Para cancelar la operación
Es el mismo método cuando inicia el funcionamiento. Pulse el botón en el paso 2.
NOTAS
•• El congelado rápido termina automáticamente en unas 2 horas.
(El icono desaparece).
•• Los alimentos grandes no se pueden congelar en una sola operación.
•• El congelado rápido puede que requiera más de 2 horas en el caso de que la operación se sobreponga con la
descongelación en cuanto comienza la operación después de que se haya completado el descongelado.
•• Trate al máximo de no abrir la puerta durante el funcionamiento de esta característica.
 Modo vacaciones
(Excepto para SJ-RM320T, SJ-RM360T)
Utilice esta característica cuando vaya de viaje o se vaya de casa durante un largo tiempo.
1 Pulse el botón de selección y seleccione el icono de modo de vacaciones.
|
|
|
Parpadeando |
2 Pulse el botón |
. [ |
:ON(ACTIVACIÓN), |
:OFF(DESACTIVACIÓN)] |
3 Pulse el botón “ ”.
”.
Para cancelar la operación
Pulse el botón en el paso 2.
NOTAS
•• La temperatura en el interior del compartimiento del frigorífico se ajustará a 10 °C.
•• El periodo de almacenamiento de los alimentos en el compartimiento del frigorífico es aproximadamente 1/2 - 1/3 del funcionamiento normal. Utilice sólo cuando no haya alimentos perecederos.
•• La temperatura del compartimiento del frigorífico no se puede modificar. (Se indican “10 °C” en la pantalla).
Bloqueo para niños
(Excepto para SJ-RM320T, SJ-RM360T)
Se pueden bloquear las teclas de funcionamiento del panel de control. Utilice esta función para evitar el uso no intencionado de niños o de cualquier persona.
1 Pulse el botón de selección y seleccione el icono de bloqueo para niños.
|
|
|
Parpadeando |
2 Pulse el botón |
. [ |
:ON(ACTIVACIÓN), |
:OFF(DESACTIVACIÓN)] |
3 Pulse el botón “ ”.
”.
Para cancelar la operación
Es el mismo método cuando inicia el funcionamiento. Pulse el botón en el paso 2.
20
Control de la temperatura |
|
|
|
|
|
|
|
|
|
|
|
|
|
|
|||
|
|
|
|
|
|
|
|
|
|
|
|
|
|
||||
|
|
|
|
|
|
|
|
|
|
|
|
|
|
||||
El frigorífico controla automáticamente la temperatura. No obstante, si es preciso, |
|
|
|
|
|
|
|||||||||||
|
|
|
|
||||||||||||||
|
|
|
|||||||||||||||
|
|
|
|
||||||||||||||
ajuste la temperatura de la manera siguiente. |
|
1 |
|
|
|
|
|
|
|||||||||
|
|
|
|
|
|
|
|||||||||||
|
|
|
|
|
|
|
|||||||||||
|
|
|
|
|
|
|
|
|
|
|
|
||||||
|
|
|
|
|
|
|
|
|
|
|
|
||||||
|
|
|
|
|
|
2 |
|
3 |
|
||||||||
Compartimiento frigorífico |
Compartimiento congelador |
|
|
|
|||||||||||||
Ajustable entre 0°C y 6°C en intervalos de 1°C. |
Ajustable entre -13°C y -21°C en intervalos de 1°C. |
|
|
|
|||||||||||||
1 |
Pulse el botón de selección y seleccione el icono . |
1 |
Pulse el botón de selección y seleccione el icono . |
|
|||||||||||||
Parpadeando |
|
|
|
|
|
|
|
|
|
|
|
|
|||||
|
|
|
|
|
|
|
|
|
|
|
|
||||||
|
|
|
|
|
|
|
|
|
|
|
|
|
|
|
|
|
|
|
|
|
|
|
|
|
|
|
|
|
|
|
|
|
|
|
|
|
|
|
|
|
|
|
|
|
|
|
|
|
|
|
|
|
|
|
|
|
|
|
|
|
|
|
|
|
Parpadeando |
||||
2 |
Pulse el botón |
/ |
|
|
y ajuste la temperatura. |
2 |
Pulse el botón |
/ |
|
|
y ajuste la temperatura. |
||||
[ |
: aumentar, |
|
: disminuir ] |
[ |
: aumentar, |
|
: disminuir ] |
||||||||
|
|
|
|
|
|
|
|
|
|
|
|
|
|
|
|
|
|
|
|
|
|
|
|
|
|
|
|
|
|
|
|
NOTA
•• Durante el modo de vacaciones, este compartimiento no se puede ajustar. (Se indican “10 ºC” en la pantalla).
3 Pulse el botón “ |
|
”. |
3 Pulse el botón “ |
|
”. |
||||||
|
|
||||||||||
|
|
||||||||||
|
|
|
|
|
|
|
|
||||
|
|
|
|
|
|
|
|
|
|
|
|
|
|
|
|
|
|
|
|
|
|
|
|
|
|
|
|
|
|
|
|
|
|
|
|
|
|
|
|
|
|
|
|
|
|
|
|
|
|
|
|
|
|
|
|
|
|
|
|
|
|
|
|
|
|
|
|
|
|
|
|
Ajustes avanzados del compartimiento del frigorífico
La temperatura del compartimiento del frigorífico se puede ajustar en incrementos de 0,5 °C siguiendo los pasos 1 a 3 presentados a continuación.
111Seleccione el icono |
. |
Pitido pitido pitido |
|
222Pulse el botón  durante 3 segundos o más.
333Ajuste la temperatura del mismo modo que en los pasos 2 a 3 antes descritos.
Siga los pasos 1 a 2 nuevamente si desea ajustar la temperatura en incrementos de 1 °C.
Indicador de temperatura
Este frigorífico está equipado con un indicador de temperatura en el compartimiento del frigorífico que permite controlar la
temperatura media en la zona más fría. |
|
AZUL |
BLANCO |
Zona más fría |
|
||
Símbolo |
|
||
El símbolo indica la zona más fría en el |
|
|
|
compartimiento del frigorífico. |
|
|
|
|
|
|
|
(El compartimiento de la puerta colocada a la |
|
|
|
misma altura no es la zona más fría). |
|
|
|
Comprobación de la temperatura en la zona más fría
Puede llevar a cabo comprobaciones regulares para asegurar que la temperatura en la zona más fría es la correcta, en caso necesario, ajuste el control de temperatura del frigorífico.
Para mantener la temperatura correcta dentro del electrodoméstico, compruebe que el indicador de temperatura esté siempre AZUL.
Si el indicador de temperatura se vuelve BLANCO, la temperatura es demasiado alta; en este caso, aumente el ajuste del control de la temperatura del frigorífico y espere 6 horas antes de controlar el indicador de temperatura de nuevo.
Ajuste correcto |
Temperatura demasiado |
|
alta, ajuste el control de |
NOTAS |
temperatura del frigorífico. |
•• La temperatura interna del frigorífico-congelador depende de varios factores tales como la temperatura ambiente de la habitación, la cantidad de alimentos almacenados y la frecuencia con la que se abre la puerta.
•• Cuando se introduzcan alimentos frescos o cuando se haya dejado la puerta abierta durante un tiempo, es normal que el indicador de temperatura se vuelva BLANCO.
21
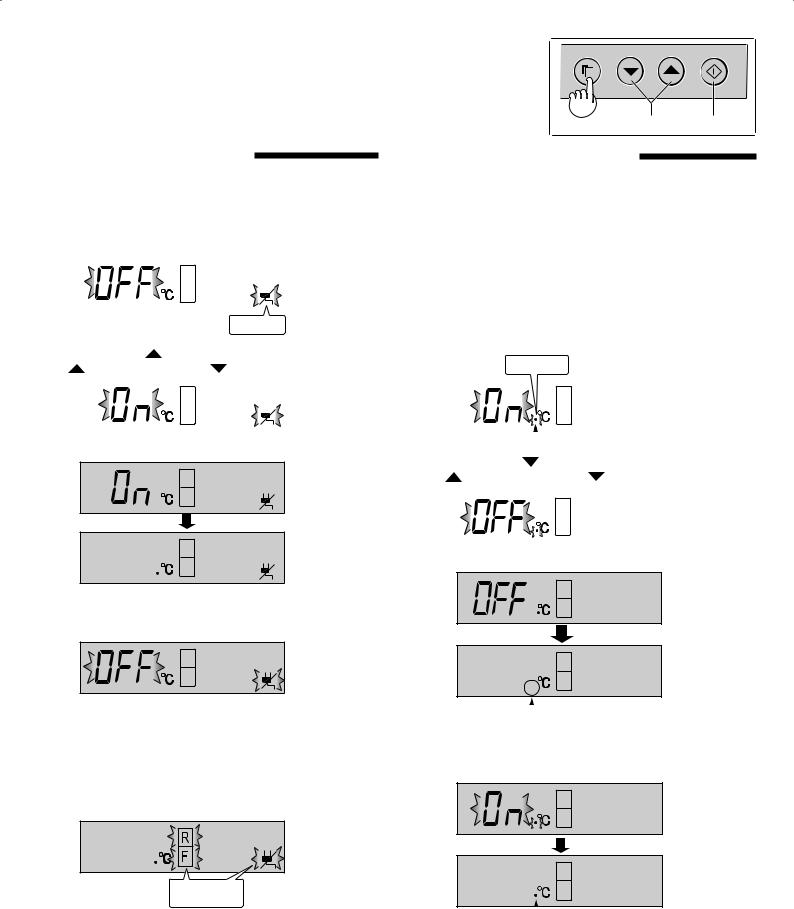
 Fallo de energía
Cuando esta función esté en operación, indicará el aumento de la temperatura interna ocasionado por un fallo de energía o problema similar.
1 Pulse el botón de selección y seleccione el icono de fallo de energía. (El icono es de color naranja.)
|
|
|
|
|
|
|
|
|
|
|
|
|
|
|
|
|
|
|
|
|
|
|
|
|
|
|
|
|
Parpadeando |
||
2 |
Pulse el botón . |
|
|
|
|||
[ |
: ON (ACTIVACIÓN), |
: OFF (DESACTIVACIÓN)] |
|||||
|
|
|
|
|
|
|
|
|
|
|
|
|
|
|
|
|
|
|
|
|
|
|
|
3 Pulse el botón “ ”.
”.
Para cancelar la operación
Es el mismo método cuando inicia el funcionamiento. Pulse el botón  en el paso 2.
Indicador de fallo de energía
•• En el momento de redistribuir la energía, si la temperatura interna del compartimiento del frigorífico y del congelador llega a ser como se muestra, R: más de 7 °C, F: más
de -10 °C, el icono de fallo de energía parpadeará lentamente.
Parpadea lentamente
•• Verifique la calidad de los alimentos antes de comerlos.
Cómo cancelar el parpadeo del indicador
Pulse el botón  cuando estén parpadeando los iconos.
1
2 3
Alarma de la puerta
•• Cuando se deje abierta la puerta del frigorífico, sonará la alarma de la puerta.
•• La alarma de la puerta sonará 1 minuto después de haber abierto la puerta y de nuevo después de 1 minuto
(una vez en cada caso).
•• Si se deja la puerta abierta durante aproximadamente
3 minutos, la alarma sonará continuamente.
•• Al inicio, la alarma de la puerta está ajustada en
“ACTIVADA”.
Para cancelar la operación
1 Pulse el botón de selección y seleccione el indicador de alarma de la puerta como se muestra en la figura de abajo. Parpadeando
|
|
|
|
|
|
|
|
|
|
|
|
|
|
|
|
|
|
|
|
2 |
|
|
|
|
|
Indicador de alarma de puerta |
|||
|
|
|
|
|
|||||
Pulse el botón . |
|
|
|||||||
[ |
: ON (ACTIVACIÓN), |
: OFF (DESACTIVACIÓN)] |
|||||||
|
|
|
|
|
|
|
|
|
|
|
|
|
|
|
|
|
|
|
|
3 Pulse el botón “ ”.
”.
 El indicador desaparecerá.
Para comenzar la operación
Es el mismo método cuando cancela el funcionamiento. Pulse el botón  en el paso 2.
 Muestra que la alarma de la puerta está “ACTIVADA”.
22
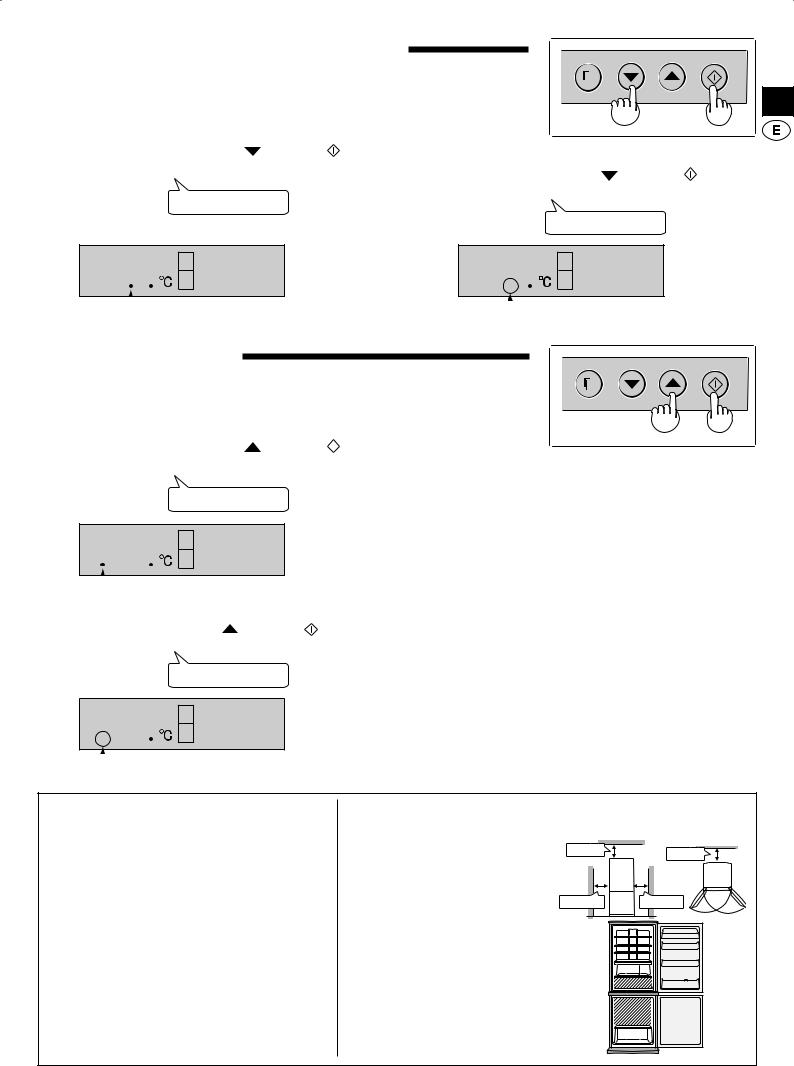
Sonido ACTIVADO/DESACTIVADO
Use esta función para apagar el sonido de operación de las teclas.
Pulse simultáneamente el botón |
y el botón |
1 durante 3 segundos o más. |
|
Pitido pitido pitido
 Muestra que el sonido está “DESACTIVADO”.
1 1
Para “ACTIVAR” el sonido
Pulse simultáneamente el botón y el botón nuevamente durante 3 segundos o más.
Pitido pitido pitido
 El indicador desaparecerá.
Ahorro de energía
Use esta función cuando desee cambiar el aparato al funcionamiento de ahorro de energía.
1 1
Pulse simultáneamente el botón |
y el botón |
|
|
|
|||
|
|||
1 durante 3 segundos o más. |
|
|
NOTAS |
Pitido pitido pitido
 Muestra la “ACTIVACIÓN” del ahorro de energía.
Para cancelar la operación
Pulse simultáneamente el botón y el botón nuevamente durante 3 segundos o más.
Pitido pitido pitido
•• Mientras esta función esté en funcionamiento, la temperatura interior del compartimento del frigorífico y del congelador será superior a la temperatura preestablecida de la siguiente manera; R: alrededor de 1ºC, F: alrededor de 2ºC.
(Si la temperatura preestablecida está ajustada en R: 3ºC, F: -18ºC.)
La temperatura visualizada no cambiará.
•• La eficacia del ahorro de energía dependerá del ambiente de uso (control de temperatura, temperatura ambiente, frecuencia de apertura o cierre de la puerta, la cantidad de alimentos).
Si se activa al mismo tiempo la función de congelación rápida, la eficacia del ahorro de energía también cambiará.
•• Cancele esta función cuando sienta que las bebidas no se enfrían lo suficiente o cuando tarda más tiempo en producir hielo.
 El indicador desaparecerá.
Sugerencias para ahorrar energía
■■Mantenga un espacio de ventilación adecuado alrededor del frigorífico.
■■Mantenga el frigorífico alejado de la luz solar directa y no lo coloque junto a aparatos generadores de calor.
■■Abra la puerta del frigorífico el menor tiempo posible.
■■Los alimentos calientes deben enfriarse antes de colocarlos en el frigorífico.
■■Coloque de manera uniforme la comida en los estantes para permitir que el aire frío circule eficientemente.
La cantidad de consumo de energía de este modelo ha sido |
|||
medida en conformidad con el estándar internacional de |
|||
funcionamiento del frigorífico. |
90mm |
60mm |
|
•• La cantidad de consumo de |
|||
|
|
||
energía de este modelo ha |
|
|
|
sido medida en relación con |
|
|
|
las dimensiones de espacio |
300mm |
300mm |
|
mostradas en la figura de la |
|
|
|
derecha. |
|
|
|
•• La cantidad de consumo de energía de este modelo ha sido medida sin algunos accesorios como se muestra en la figura de la derecha.
23
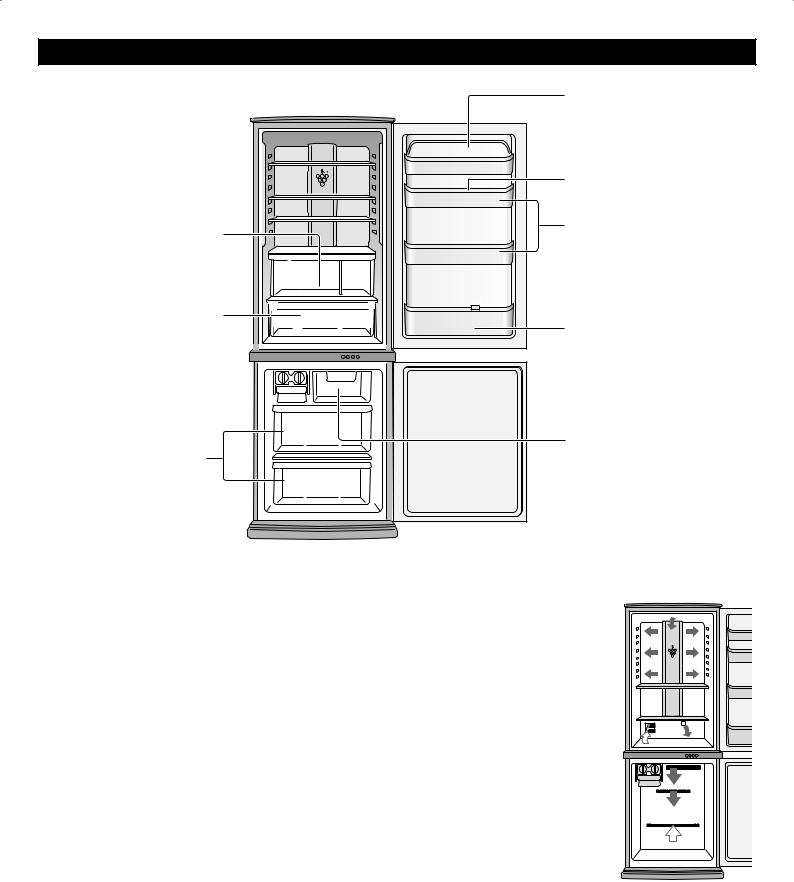
PARA ALMACENAR LOS ALIMENTOS
|
Productos lácteos |
|
Huevos |
Frutas, Vegetales |
Comida de dimensiones |
pequeñas, etc.. |
|
Carne, Pescado, Aves etc.. |
Botellas etc.. |
•• Los vegetales son inadecuados |
|
en este compartimiento. Podrían |
|
congelarse. |
|
Alimentos congelados |
Alimentos congelados |
|
(Tamaño pequeño) |
||
(Tamaño grande) |
||
|
La refrigeración enlentece el proceso por el cual se estropean los alimentos. Para maximizar la vida útil de los productos alimenticios perecederos, asegúrese de que la comida que compra sea lo más fresca posible.
A continuación se dan unas guías generales para poder guardar los alimentos el mayor tiempo posible.
Frutas / Vegetales
Para minimizar la pérdida de humedad, las frutas y vegetales deben ser envueltas seguramente en material plástico, p.e. bolsas, papel de envolver (sin sellar) y colocadas en el cajón para conservar frutas y verduras.
Productos lácteos y huevos
•• La mayoría de los productos lácteos tienen una fecha de caducidad impresa en el envoltorio que indica la vida útil y temperatura de conservación recomendada del producto.
•• Coloque los huevos en la huevera.
Carne / Pescado / Aves
•• Coloque el producto en un plato o una bandeja y cúbralo con papel o una lámina de plástico.
•• Coloque piezas grandes de carne, pescado o aves lo más atrás posible en las estanterías.
•• Asegúrese de que cuando guarde comida ya cocinada esté bien envuelta o guardada en contenedores herméticos.
NOTAS
•• Coloque de manera balanceada la comida en los estantes para permitir que el aire frío circule eficientemente.
•• Los alimentos calientes deben enfriarse antes de colocarlos en el frigorífico. Si coloca alimentos calientes se eleva la temperatura de la unidad y aumenta el riesgo de que se estropeen.
•• No bloquee la salida ni la entrada del circuito de circulación de aire frío con alimentos ni recipientes, de lo contrario los alimentos no se enfriarían de forma uniforme en el frigorífico.
•• Mantenga bien cerrada la puerta.
 ENTRADA
 SALIDA
No coloque los alimentos directamente delante de la salida de aire frío.
Esto puede hacer que se congelen.
Para una mejor congelación
•• La comida debe ser fresca.
•• Congele la comida en porciones pequeñas para congelarla más rápido.
•• La comida debe estar correctamente envuelta, sellada herméticamente o cubierta.
•• Distribuya los contenidos del congelador uniformemente.
•• Ponga etiquetas en las bolsas o contenedores para mantener un inventario de lo que tenga congelado.
24

CUIDADOS Y LIMPIEZA
ADVERTENCIA
■■Desenchufe primero el frigorífico para evitar descargas eléctricas..
■■No vierta agua directamente en el compartimiento exterior ni en el interior.. Esto puede producir la oxidación y deterioro del aislamiento eléctrico..
IMPORTANTE
Para evitar el agrietamiento de las superficies internas y en los componentes de plástico, siga estos consejos..
•• Limpie cualquier grasa o aceite procedente de los alimentos que se haya quedado adherida a los componentes de plástico.
•• Algunos químicos domésticos podrían ocasionar daños, así que utilice solamente líquido de limpieza diluido (agua jabonosa).
•• Si utiliza detergente no diluido o si no se quita completamente el agua enjabonada, esto puede producir la rotura de las partes de plástico.
1 Retire los accesorios, por ejemplo, la estantería del frigorífico desmontable y el botellero. Lávelos en agua tibia jabonosa mezclada con lavavajillas, enjuáguelos con agua limpia y séquelos.
2 Limpie el interior con un paño humedecido en agua caliente con jabón lavavajillas. Luego, utilice agua fría para quitar el agua enjabonada.
3 Limpie el exterior con un paño suave cada vez que se ensucie.
4 Limpiar el cierre magnético de la puerta con un cepillo de dientes y agua caliente con detergente para lavavajillas.
5 Limpie el panel de control con un paño seco.
NOTAS
•• Para evitar daños a su frigorífico, no utilice limpiadores o disolventes agresivos (laca, pintura, pulimento, bencina, agua hervida, etc.).
•• Si se desconecta la alimentación accidentalmente, espere
5 minutos por lo menos antes de conectarlo de nuevo.
•• Las estanterías de vidrio pesan aproximadamente 2kg cada una. Sosténgalas firmemente cuando las retire del interior o desee transportarlas.
•• Cuando se derrame zumo o algo parecido cerca del panel de control, límpielo inmediatamente. Si no, esto hace que el panel de control tenga fallos.
•• No deje caer objetos dentro del frigorífico ni golpeé la pared interior. Esto puede ocasionar el agrietamiento de la superficie interior.
Descongelacion
La descongelación se realiza de forma totalmente automática debido a un sistema exclusivo de ahorro de energía.
Cuando la luz del compartimiento se funde
Póngase en contacto con un agente de servicio aprobado por SHARP para solicitar la sustitución de la luz del compartimiento. La luz del compartimiento no debe ser sustituida por nadie más que por el personal de servicio.
Desconexión del frigorífico
Si tiene que desconectar el frigorífico porque va a estar fuera de casa durante un largo tiempo, vacíelo completamente de comida y limpie a fondo el interior.
Desenchufe el cable de alimentación de la toma de la pared y deje ambas puertas abiertas.
ANTES DE LLAMAR AL SERVICIO TECNICO
Antes de llamar al servicio técnico, compruebe los puntos siguientes.
Problema |
Solución |
El exterior de la carcasa del |
Es normal. La carcasa tiene una tubería caliente para evitar condensación. |
frigorífico está caliente al tacto. |
|
Cuando hay un ruido del frigorífico. |
Es normal que el frigorífico produzca los siguientes ruidos. |
|
••El compresor produce un ruido fuerte cuando se inicia la operación |
|
--- Este ruido se acalla luego de un rato. |
|
••El compresor produce un ruido fuerte una vez por día |
|
--- Ruido de operación producido inmediatamente después de la operación |
|
automática de descongelamiento. |
|
••Ruido del flujo del fluído (ruido de gorgoteo, ruido de burbujeo) |
|
--- Ruido del fluído refrigerante fluyendo en las tuberías (este ruido puede hacerse más fuerte |
|
de tiempo a tiempo). |
|
••Ruido de agrietamiento o crujido, rechinido |
|
--- Ruido producido por la expansión y la contracción de las paredes y partes |
|
internas del frigorífico durante el enfriamiento. |
Se produce escarcha o |
Esto podría ocurrir en alguno de los siguientes casos. Utilice un paño húmedo para |
condensación en el interior o |
limpiar la escarcha o paño seco para quitar la condensación. |
exterior del frigorífico. |
••Cuando la humedad del ambiente es alta. |
|
••Cuando la puerta se abre y se cierra frecuentemente. |
|
••Cuando se almacenan alimentos que contienen gran cantidad de agua (se requiere envolverlos). |
Los alimentos en el compartimiento |
••¿El refrigerador funciona durante mucho tiempo con el control de la temperatura del |
del frigorífico se congelan. |
frigorífico en 0°C? |
|
••¿El refrigerador funciona durante mucho tiempo con el control de la temperatura del |
|
congelador en -21°C? |
|
••Una temperatura ambiente baja puede hacer que la comida se congele aunque |
|
tenga el control de temperatura del frigorífico ajustado a 6°C. |
Existen olores en el compartimiento. |
••Se deben envolver los alimentos con olores fuertes. |
|
••La unidad de desodorización no puede eliminar todos los olores. |
SI NECESITA LLAMAR AL SERVICIO TECNICO
Diríjase al concesionario autorizado SHARP más próximo.
25

Vi ringraziamo per avere acquistato questo prodotto SHARP. Prima di utilizzare il vostro |
|
|
Solo per uso domestico.. |
||
frigorifero SHARP, leggete per favore con attenzione questo manuale di istruzioni, in modo |
||
|
||
da sfruttare al massimo le sue prestazioni. |
|
|
|
PORTA A DOPPIA ANTA
(Solo per i modelli SJ-WS320T, SJ-WP320T, SJ-WS360T, SJ-WP360T)
La porta può essere aperta da destra e sinistra.
La porta del freezer è la stessa.
Usare la maniglia per aprire o chiudere la porta.
Quando si chiude la porta
Premere la porta con decisione per assicurarsi che sia completamente chiusa perché la porta non ha una funzione automatica di chiusura. Se si lascia la maniglia quando la porta non è del tutto chiusa, questa
potrebbe rimanere parzialmente aperta. La porta parzialmente aperta potrebbe causare una perdita di aria fredda. Se la porta non è completamente chiusa, non è possibile aprirla dal lato opposto.
AVVERTENZE
■■Nelle seguenti condizioni, non aprire o chiudere la porta con forza.. La porta del freezer è la stessa..
La porta potrebbe cedere e provocare lesioni..
•• Quando alcuni oggetti si bloccano nella porta.
( parti)
•• Quando la porta è difficile da aprire, aprirla dal lato opposto e controllare se qualche oggetto sia rimasto bloccato o meno.
Fondo del frigorifero
■■Non mettere le mani o i piedi sotto la porta aperta.. In particolare, prestare attenzione alla parte meccanica..
(Pericolo di lesioni, le mani o i piedi potrebbero rimanere intrappolati nella parte meccanica.)
NOTA
•• Non mettere la mano sul lato opposto per aprire la porta. Le dita potrebbero
rimanere intrappolate nella porta.
•• Non tirare entrambe le maniglie contemporaneamente perché
potrebbero rompersi.
•• Non danneggiare o posizionare  oggetti sulla parte meccanica installata sull’armadio-frigorifero e sulle porte.
  Potrebbe causare problemi nell’apertura e nella chiusura della porta.
•• Non posare oggetti sul supporto del rullo. La porta non può essere chiuso.
•• Non riempire l'olio della parte meccanica del mobile e delle porte, rulli e portarulli. A seconda dei tipi di oli, le parti in plastica possono incrinarsi.
•• Non calpestare il portarullo del vano congelatore.
Il frigorifero può cadere in avanti o trasformazione può accadere sul porta a rulli. Il titolare del rullo danneggiato porta a difficoltà di aprire o chiudere la porta.
Parte meccanica |
Parte meccanica |
(Lo stesso vale quando si apre dal lato sinistro.)
Struttura
Meccanismi del corpo
(Installati ai quattro angoli di ciascun vano)
Camma
Perno cerniera
 Rulli (2 pezzi)
Portarullo

 Portarullo

 Rulli (2 pezzi)
Meccanismi della porta
(Installati ai quattro angoli di ogni porta)
Rullo & Portarullo
Per un’ottimale aperture e chiusura della porta.
26
AVVERTENZE ATTENZIONE
■■Il frigorifero contiene refrigerante infiammabile (R600a: isobutano) e gas di isolamento esplosivo (ciclopentano). Seguire le seguenti regole per evitare inneschi ed esplosioni.
•• Il sistema di refrigerazione situato dietro e all’interno del frigorifero contiene refrigerante. Evitate pertanto che qualsiasi oggetto tagliente venga a contatto con il sistema di refrigerazione.
•• Non utilizzare dispositivi meccanici o altri apparecchi per accelerare il processo di scongelamento. (Questo frigorifero è dotato di un sistema di scongelamento automatico.)
•• Non utilizzare apparecchi elettrici all'interno del frigorifero.
•• Utilizzare solo i componenti specifici per la luce del comparto frigorifero.
•• Non bloccare le aperture sulla circonferenza del frigorifero.
•• Non utilizzare spray infiammabili, come vernici spray vicino al frigorifero. Potrebbe causare esplosioni o incendi.
•• Se il sistema di refrigerazione viene forato, non toccare la presa a parete e non utilizzare fiamme aperte. Aprire la finestra e lasciare entrare l'aria nella stanza.
Rivolgersi quindi a un centro di assistenza approvato da SHARP per richiedere la riparazione.
•• Il frigorifero deve essere smaltito in modo appropriato. Portare il frigorifero in un impianto di riciclaggio per il refrigerante infiammabile e I gas di isolamento esplosivi.
■■Non riporre materiali infiammabili e altamente volatili come etere, benzina, gas propano, bombolette spray, collanti, alcool puro, ecc. Questi materiali potrebbero provocare esplosioni.
■■Residui eccessivi di polvere sulla spina possono essere causa di incendio. Tenete pulita la spina spolverandola regolarmente con cura.
■■Evitate di effettuare interventi su questo frigorifero. Tali interventi devono essere eseguiti solo da personale tecnico specializzato. In caso contrario si corre il rischio di shock elettrico, di incendio o di ulteriore danneggiamento.
■■Assicurarsi che il frigorifero non costituisca un pericolo per i bambini nell’immagazzinaggio per lo smaltimento
(p. es. rimuovere le guarnizioni magnetiche della porta per evitare che i bambini vi restino intrappolati).
■■Non toccare il compressore e le sue parti periferiche, poiché durante il funzionamento esse si scaldano molto ed inoltre le varie sporgenze metalliche possono causare lesioni.
■■Non toccare alimenti o contenitori in metallo nel comparto freezer con le mani bagnate. Ciò può dar luogo a congelamento cutaneo.
■■Non utilizzare una prolunga o un adattatore.
■■Evitare di collocare bevande in bottiglia o in lattina nel freezer, poiché potrebbero esplodere con il freddo.
■■Assicurarsi che il cavo di alimentazione non sia stato danneggiato durante l’installazione o lo spostamento.
Se la spina o il cavo di alimentazione sono allentati, non inserire la spina di alimentazione. Ciò comporta il rischio di scosse elettriche o incendi.
■■Quando staccate la spina per l’alimentazione elettrica, non tirate il filo ma la spina. Anche tirando il cavo si corre il rischio di shock elettrico o di incendio.
■■Nel caso che il filo flessibile di alimentazione venga danneggiato, deve essere sostituito da un centro di assistenza autorizzato dalla SHARP, in quanto viene richiesto un filo particolare.
■■Nel caso di perdita di gas, arieggiate la zona aprendo le finestre, ecc. Non toccate il frigorifero o la presa di corrente.
■■Non mettere oggetti riempiti di liquidi o oggetti instabili sulla sommità del frigorifero.
■■Si deve evitare che persone (compresi bambini) con funzioni fisiche, sensoriali o mentali ridotte o senza esperienza e conoscenza usino il frigorifero, a meno che non siano sotto la supervisione o non abbiano ricevuto istruzioni relative all’uso del frigorifero da parte di una persona responsabile della loro sicurezza. I bambini piccoli devono essere controllati in modo che non vi giochino.
Informazioni sullo smaltimento per gli utenti (privati)
Attenzione: Il dispositivo è
contrassegnato da questo simbolo, che segnala di non smaltire le apparecchiature elettriche ed elettroniche insieme ai normali rifiuti domestici. Per tali prodotti è previsto un sistema di raccolta a parte.
1.. Nell'Unione europea
Attenzione: Per smaltire il presente dispositivo, non utilizzare il normale bidone della spazzatura!
Le apparecchiature elettriche ed elettroniche usate devono essere gestite a parte e in conformità alla legislazione che richiede il trattamento, il recupero e il riciclaggio adeguato dei suddetti prodotti.
In seguito alle disposizioni attuate dagli Stati membri, i privati residenti nella UE possono conferire gratuitamente le apparecchiature elettriche ed elettroniche usate a centri di raccolta designati*. In alcuni paesi*, anche il rivenditore locale può ritirare gratuitamente il vecchio prodotto se l'utente acquista un altro nuovo di tipologia simile.
*) Per maggiori informazioni si prega di contattare l'autorità locale competente.
Se le apparecchiature elettriche o elettroniche usate hanno batterie o accumulatori, l'utente dovrà smaltirli a parte preventivamente in conformità alle disposizioni locali.
Lo smaltimento corretto del presente prodotto contribuirà a garantire che i rifiuti siano sottoposti al trattamento, al recupero e al riciclaggio necessari prevenendone il
potenziale impatto negativo sull'ambiente e sulla salute umana, che potrebbe derivare da un'inadeguata gestione dei rifiuti.
2.. In paesi che non fanno parte dell'UE
Se si desidera eliminare il presente prodotto, contattare le autorità locali e informarsi sul metodo di smaltimento corretto.
Per la Svizzera: Le apparecchiature elettriche o elettroniche usate possono essere restituite gratuitamente al rivenditore, anche se non si acquista un prodotto nuovo. Altri centri di raccolta sono elencati sulle homepage di www.swico.ch o di www.sens.ch.
27
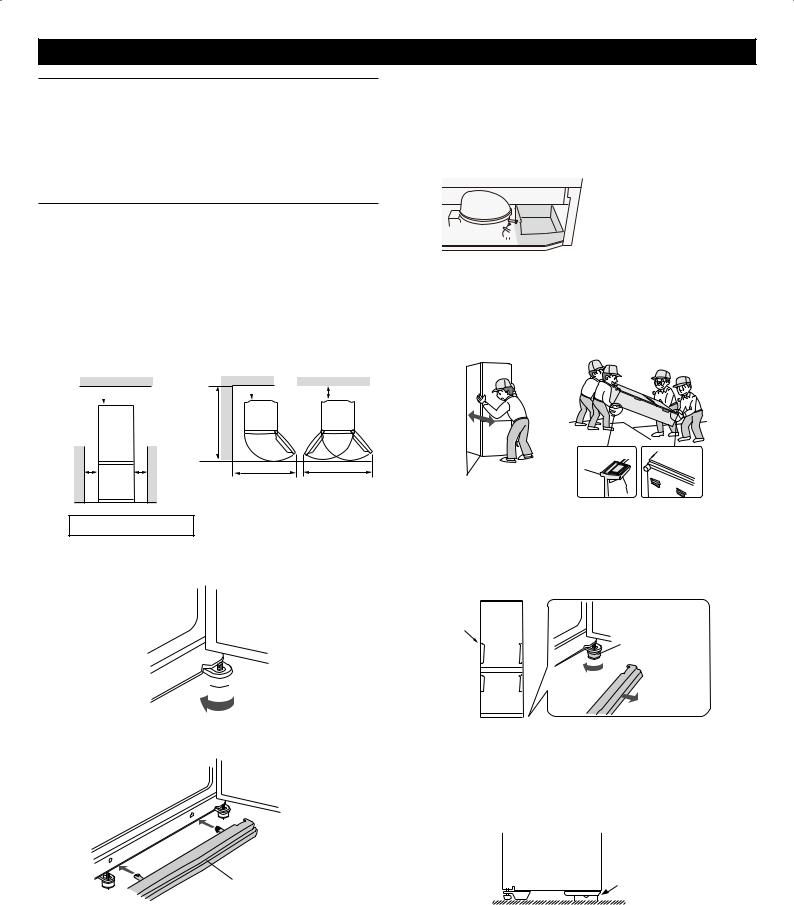
INSTALLAZIONE
AVVERTENZE
■■Non installate il frigorifero in luoghi umidi o bagnati, in quanto l’ isolamento potrebbe venir compromesso e dar luogo a perdite.. Inoltre, all’esterno dell’armadiofrigorifero potrebbe accumularsi della condensa..
■■Al fine di evitare scosse elettriche, collegare correttamente il contenitore sul fondo del frigorifero al terminale apposito..
1 Assicurarsi che lo spazio circostante al frigorifero sia sufficiente per la ventilazione.
•• L’illustrazione mostra lo spazio minimo necessario per l’installazione del frigorifero. La condizione di misurazione del consumo di energia è condotta in una diversa dimensione spaziale.
•• Mantenendo uno spazio maggiore dal muro, il frigorifero consuma un importo minore di energia elettrica.
•• L’utilizzo del frigorifero in uno spazio dalle dimensioni minori rispetto a quelle indicate nell’illustrazione in basso, potrebbe provocare un aumento di temperatura dell’unità, forti rumori e guasti.
 90mm o più
60mm |
60mm |
o più |
o più |
Libera installazione
 60mmo più
1300mm
1040mm |
1350mm |
SJ-RP320T |
SJ-WS320T |
SJ-RM320T |
SJ-WP320T |
SJ-RP360T |
SJ-WS360T |
SJ-RM360T |
SJ-WP360T |
2 L’utilizzo di due piedini sul bordo frontale regolabili, assicura che il frigorifero appoggi stabilmente e in linea con il pavimento.
 Piedino regolabile
3 Agganciate il coperchio della base (forniti all’interno del vano frigorifero) posizionandolo davanti ai due piedini aggiustabili.
Copripiedini
NOTA
•• Posizionare il frigorifero in modo che la spina sia accessibile.
•• Non installate il frigorifero in zone esposte alla luce del sole.
•• Non installate il frigorifero nelle dirette vicinanze di sorgenti di calore.
•• Non appoggiarlo direttamente al pavimento. Fornire al contrario un adeguato supporto.
Prima di usare il frigorifero
Pulire le parti interne con un panno imbevuto di acqua calda. Se si utilizza acqua saponata, pulire le parti completamente con acqua.
Prima del trasporto
•• Asciugare l’acqua nella vasca di evaporazione. Prima di asciugare l’acqua, aspettare più di 1 ora dal momento in cui si stacca la spina di alimentazione perché l’attrezzatura del ciclo di raffreddamento è estremamente calda. (La vasca di evaporazione è situata sul lato posteriore del prodotto.)


 Vasca di evaporazione
NOTA
•• Non piegare o danneggiare la tubatura situata all’interno della vasca di evaporazione. Ciò potrebbe causare guasti.
Durante il trasporto
•• Le rotelle permettono di spostare il frigorifero davanti e indietro.
•• Trasportare il frigorifero mantenendolo per le maniglie situate sul lato posteriore e sul fondo.
parte posteriore |
fondo |
Ruote orientabili (4 pezzi)
Quando la porta è dura da aprire
(Solo per i modelli SJ-WS320T, SJ-WP320T, SJ-WS360T, SJ-WP360T)
Quando una porta laterale è dura
•• Quando il lato sinistro è duro, abbassare i piedini aggiustabili del lato destro. (Finché il piedino aggiustabile del lato opposto non si trova leggermente lontano dal suolo.)
Duro
Piedino regolabile
•• Quando il lato destro è duro, abassare il piedino regolabile del lato sinistro.
Quando entrambi i lati sono pesanti
•• Quando il frigorifero è inclinato all'indietro, inserire una tavola di legno (di larghezza relativamente ampia), ecc. tra la parte posteriore del frigorifero e il pavimento per regolare l'inclinazione.
Anteriore |
|
|
|
|
|
Posteriore |
||
|
|
|
||||||
|
|
|
|
|
|
|
Una tavola di |
|
|
|
|
|
|
|
|
legno (di larghezza |
|
|
|
|
|
|
|
|
relativamente ampia) |
|
|
|
|
|
|
|
|
||
|
|
|
|
|
|
|
|
|
Porta reversibile
(Solo per i modelli SJ-RP320T, SJ-RM320T, SJ-RP360T, SJ-RM360T)
È possibile predisporre la porta per l’apertura a sinistra. Per modificare la porta è necessario un KIT PER CERNIERA FRIGORIFERO (per l’apertura a sinistra), SJ-LR320TD. Per ulteriori informazioni sul kit e sull‘operazione di modifica, rivolgersi ad un agente del servizio di assistenza approvato da SHARP.
ATTENZIONE
SHARP raccomanda di affidarsi per tutte le modifiche a personale autorizzato.
28
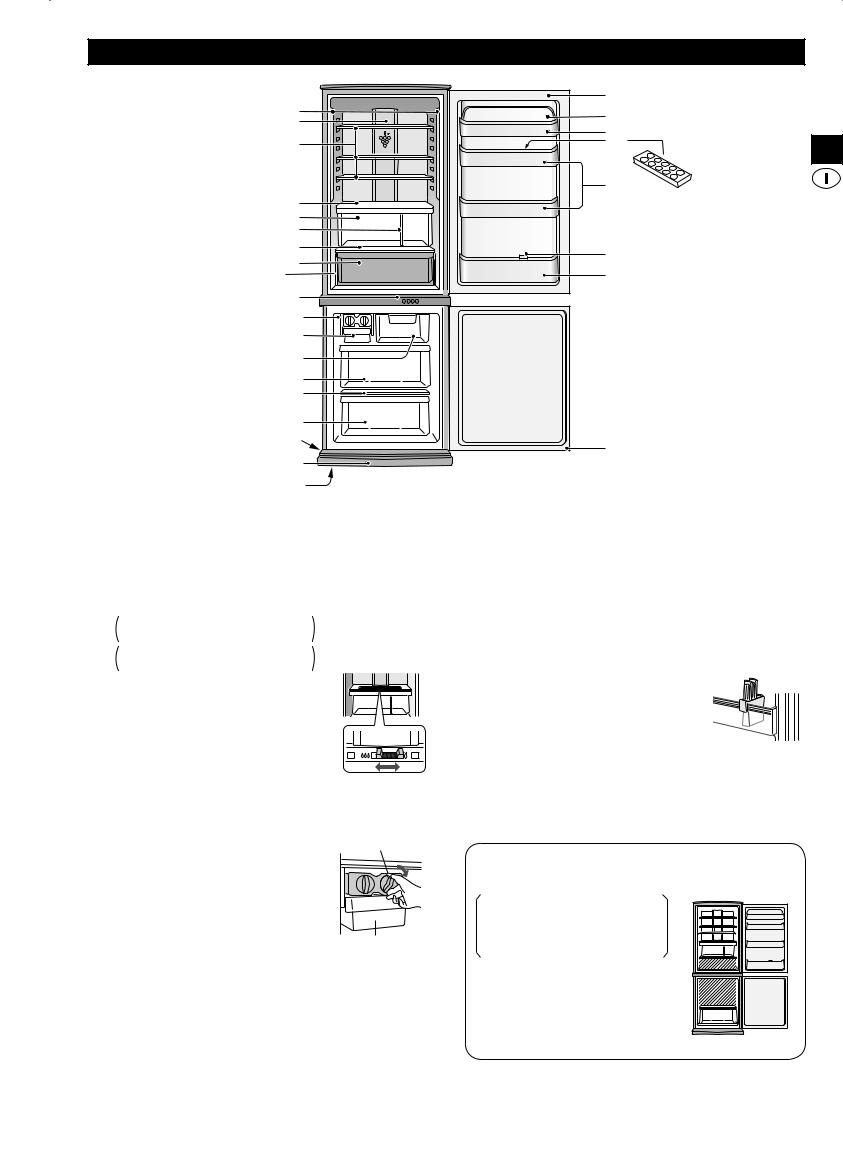
DESCRIZIONE |
|
|
1 |
25 |
|
19 |
||
2 |
||
20 |
||
3 |
21 |
|
4 |
22 |
|
|
||
5 |
|
|
6 |
|
|
7 |
23 |
|
Sezione refrigerata 8 |
||
24 |
||
9 |
|
|
10 |
|
|
11 |
|
|
12 |
|
|
13 |
|
|
15 |
|
|
14 |
|
|
17 |
25 |
|
16 |
||
|
||
18 |
SJ-WS360T |
11.1 Luci LED
22.2 Pannello di alluminio (Hybrid cooling)
Il pannello è raffreddato dal retro, quindi il comparto frigorifero viene raffreddato indirettamente. In questo modo, il cibo viene raffreddato delicatamente, senza essere esposto al flusso di aria fredda.
33.3 Ripiani del frigorifero
SJ-WS320T,SJ-RP320T : 2 pezzi SJ-WP320T,SJ-RM320T SJ-WS360T,SJ-RP360T : 3 pezzi SJ-WP360T,SJ-RM360T
44.4 Ripiano frutta & verdura
La circolazione dell’aria all’interno della vasca per verdura fresca puó essere controllata spostando verso destra o verso sinistra la leva per i fori di aerazione.
55.5 Cassetto frutta & verdura
66.6 Pannello di separazione
77.7 Ripiano
88.8 Vetrina refrigerata
99.9 Pannello di controllo LCD
111.1 Produzione ghiaccio
111Non riempite troppo le formelle per i cubetti di ghiaccio. Questi ultimi, altrimenti, una volta congelati, si attaccheranno l’uno all’altro.
222Quando sono pronti i cubetti di ghiaccio, girate la leva in senso orario per scaricare il ghiaccio nella vaschetta sottostante.
NOTA
Leva
Vaschetta per cubetti di ghiaccio
Non preparare il ghiaccio con la vaschetta per cubetti di ghiaccio né versare olio in essa. La vaschetta potrebbe spaccarsi.
111.1 Vaschetta per cubetti di ghiaccio
111.1 Cassetti freezer (superiore)
111.1 Cassetti freezer (medio)
111.1 Cassetti freezer (inferiore)
111.1 Ripiano del freezer
111.1 Copripiedini
111.1 Ruote orientabili (4 pezzi)
111.1 Piedini regolabili (2 pezzi)
111.1 Coperchio del balconcino di servizio
222.2 Balconcino di servizio
222.2 Portauova
222.2 Balconcini sportello (2 pezzi)
222.2 Fermabottiglie / Dispositivo anti caduta
Impedisce alle bottiglie e altro di
cadere. Può essere utilizzato anche per contenere prodotti alimentari di forma allungata.
222.2 Balconcino portabottiglie
222.2 Guarnizioni magnetiche della porta (2 pezzi)
Unità di deodorizzazione
Un catalizzatore di deodorizzazione è installato nel percorso del flusso d’aria fredda. Non sono necessarie manutenzione e pulizia.
Più alimenti possono essere conservati rimuovendo i seguenti accessori, come indicato nella figura sottostante..
Vetrina refrigerata, produzione ghiaccio, vaschetta per cubetti di ghiaccio, cassetti freezer
(superiore & medio)
•• Se il frigorifero è in funzione senza questi accessori, lavorerà nelle condizioni
energetiche più efficienti.
•• Si prega di non rimuovere la cassetti freezer (inferiore)
29
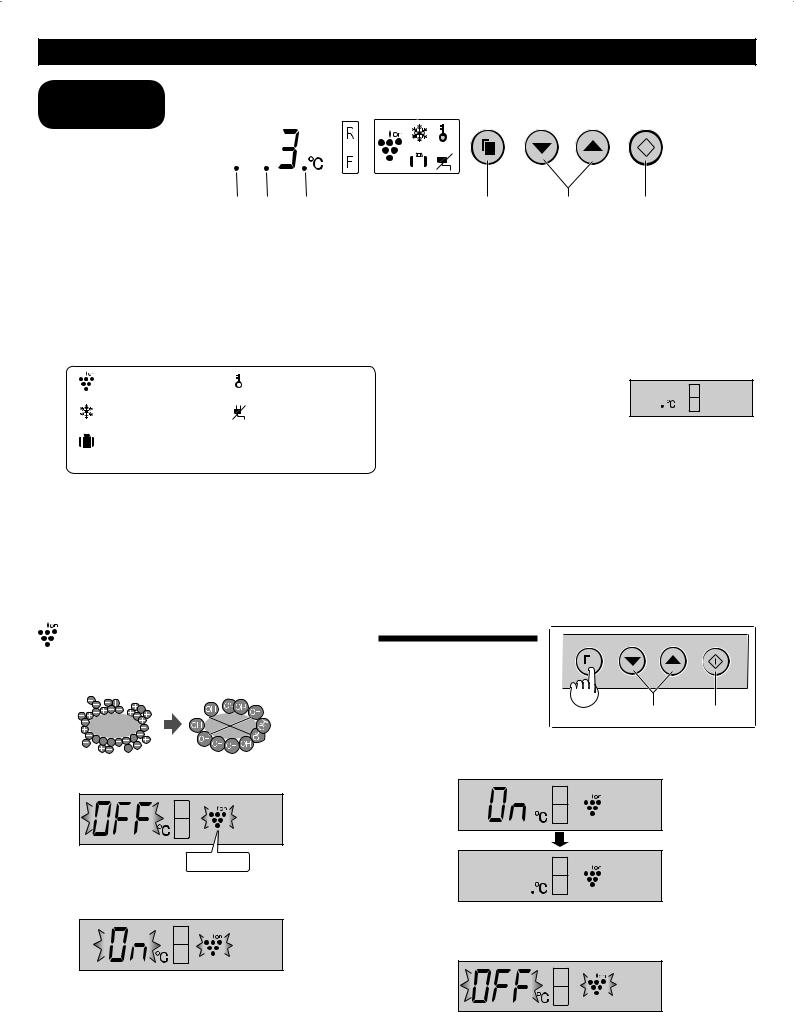
COMANDI
Pannello di |
1 |
2 |
3 |
|
|
|
||||
|
|
|
|
|
|
|
|
|
|
|
controllo LCD |
|
|
|
|
|
|
|
|
|
|
|
|
|
|
|
|
|
|
|
|
|
|
|
|
|
|
|
|
|
|
|
|
|
|
|
|
|
|
|
|
|
|
|
|
|
|
|
|
|
|
|
|
|
|
|
|
|
|
|
|
|
|
|
|
|
|
|
|
|
|
|
|
|
|
|
|
|
|
|
|
|
|
|
|
|
|
|
4 5 6
11.1 Display per l’impostazione della temperatura
Viene visualizzata la temperatura preimpostata del vano selezionato. Non si tratta della temperatura effettiva del vano.
22.2Display di controllo della temperatura
È possibile selezionare la temperatura del frigorifero e del congelatore. L’indicatore della temperatura si accende quando si sceglie di modificare la temperatura del vano.
33.3 Display delle funzioni dei simboli
Vengono visualizzati i simboli delle funzioni in uso.
Ionizzatore |
Blocco bambini * |
|
“Plasmacluster” |
||
|
||
Congelamento |
Interruzione di |
|
rapido * |
alimentazione |
|
Modalità vacanza * |
|
(*: Ad eccezione di SJ-RM320T, SJ-RM360T)
44.4 Indicazione del risparmio energetico
Questa indicazione mostra che il risparmio energetico è impostato su “ACCESO”.
55.5 Indicazione del suono ACCESO/SPENTO
Questa indicazione mostra che il suono è impostato su “SPENTO”.
66.6 Indicazione di allarme della porta
Questa indicazione mostra che l’allarme della porta è impostato su “ACCESO”.
(Il suono èvalido solo per la porta del comparto frigo.)
7 8 9
77.7 Tasto di selezione
Premere per selezionare il simbolo della funzione e il segnale di allarme della porta.
88.8 Tasto  /
/ 
Premere per selezionare la funzione ACCESO/
SPENTO o l’impostazione della temperatura.
99.9 Tasto  (Conferma)
Per finalizzare l'impostazione.
NOTA
•• Le funzioni vengono attivate automaticamente, come nell’illustrazione a destra, quando
si inserisce la spina di alimentazione. (Il contenuto iniziale è esclusivamente Allarme porta “ACCESO”)
•• Quando non viene eseguita nessuna operazione per 1 minuto, il display torna automaticamente al contenuto iniziale. Inoltre, il display si spegne quando non viene eseguita nessuna operazione nell’arco di 1 minuto.
•• Alla pressione di ciascun pulsante, il display lampeggia una volta visualizzando il contenuto iniziale. Quando il frigorifero si arresta per un problema di alimentazione, il display tornerà a funzionare come in precedenza alla redistribuzione dell’energia.
Tuttavia, quando si verifica un'interruzione di alimentazione durante il congelamento rapido, il funzionamento viene interrotto al momento della ridistribuzione dell'alimentazione.
Ionizzatore “Plasmacluster” |
|
|
Lo ionizzatore contenuto all'interno del frigorifero rilascia gruppi di ioni, cioè masse di |
|
|
ioni positivi e negativi, all’interno del vano frigorifero. Questi gruppi di ioni riducono la |
|
|
formazione della muffa, e dei batteri. |
1 |
|
|
|
|
fungo della |
2 |
3 |
muffa |
|
|
1
2
Premere il tasto “Select” e selezionare il simbolo “Plasmacluster”.
Luce flash
Premere il tasto .
.
[ : ON (ACCESO),
 : OFF (SPENTO)]
3 Premere il tasto “ ”.
”.
Per annullare il funzionamento
Lo stesso metodo si utilizza anche per l’avvio del funzionamento.
Premere il tasto nel passaggio 2.
NOTA
•• Nel frigorifero potrebbe esserci qualche leggero odore. Si tratta dell'ozono generato dallo ionizzatore. La quantità di ozono è minima, e si decompone rapidamente nel frigorifero.
30
 Loading...