


MODEL: MX-C311
MX-C381
DIGITAL FULL COLOUR MULTIFUNCTIONAL SYSTEM
Quick Start Guide
Before using the machine
Functions of the machine and procedures for placing originals and loading paper.
Copying
Using the copy function.
Printing
Using the printer function.
Faxing
Using the fax function.
Scanning
Using the scan function.
Document filing
Storing jobs as files on the hard drive.
System settings
Configuring settings to make the machine easier to use.
Troubleshooting
Keep this manual close at hand for reference whenever needed.
Frequently asked questions and how to clear paper misfeeds.
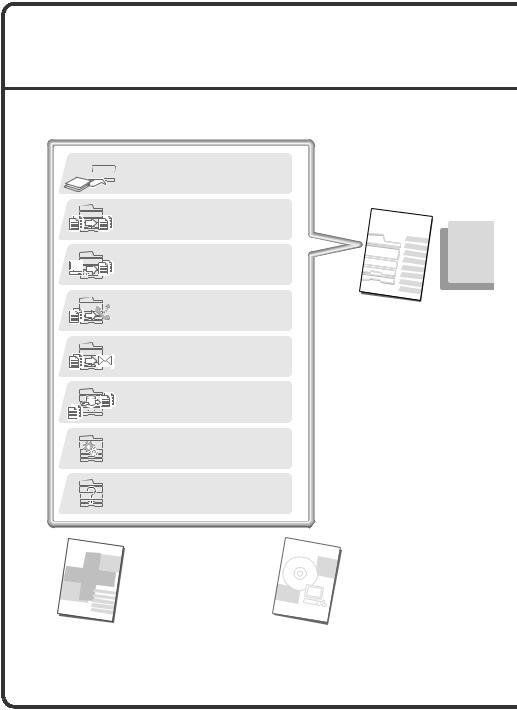
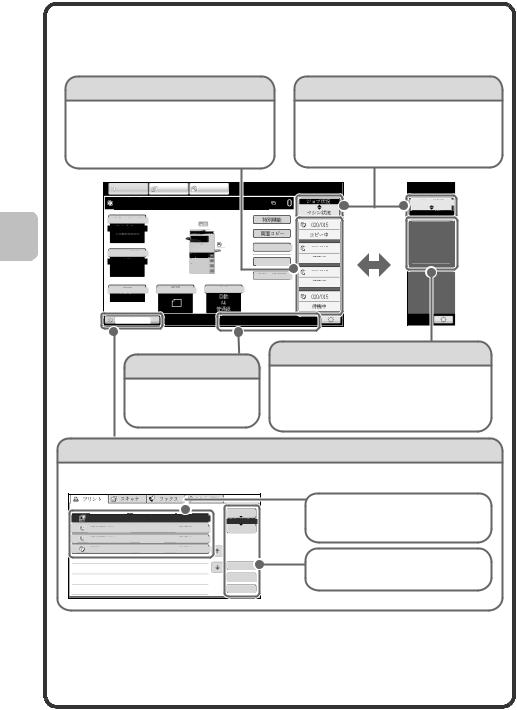
OPERATION MANUALS AND HOW TO USE THEM
Three printed manuals and a manual in PDF format are provided with the machine.
Printed manuals
 To learn the parts of the machine and how to use them
 To load paper

 Before using the machine (page 9)
To make a copy
Copying (page 29)
To print a file
Printing (page 61)
To send a fax
Faxing (page 75)
To send a scanned image
To use Internet fax
Scanning (page 99)
What is document filing?
What is it used for?
Document filing (page 121)
What are the system settings?
System settings (page 131)
Frequently asked questions and how to clear paper misfeeds
Troubleshooting (page 135)
Please read before using the machine.
Maintenance &
Safety Guide
Quick Start Guide
(this manual)
This manual provides easy-to- understand explanations of the functions of the machine in a single manual.
The explanations in this manual focus on frequently used functions. For special functions, troubleshooting, and detailed procedures for using the machine, see the manual in PDF format.
Software Setup
Guide
Contains important cautionary information, procedures for cleaning the machine and replacing supplies, and machine specifications.
Explains the procedures for installing the printer driver and scanner driver.
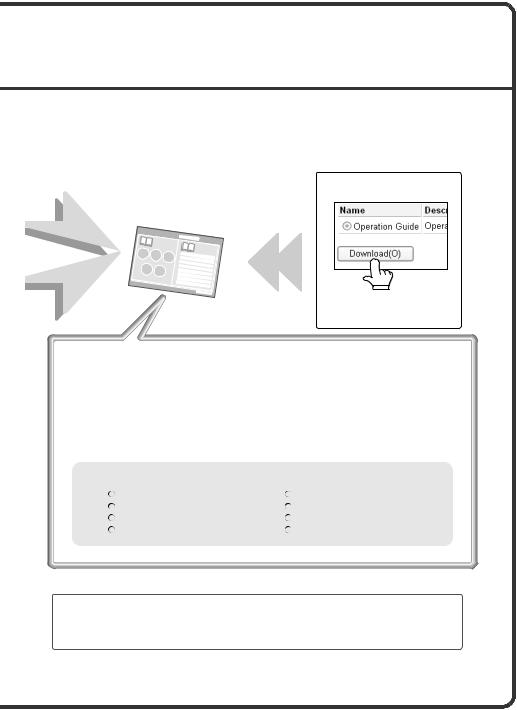
Manuals in PDF format
Detailed explanations of the functions that can be used on the machine are provided in the Operation Guide in PDF format. The Operation Guide can be downloaded from the Web pages in the machine.
Download the Operation Guide from
the Web pages in the machine.
Operation Guide
For detailed information
For the downloading procedure, see "Downloading the Operation Guide" (page 4).
Convenient methods for using the Operation Guide
The first page contains a regular table of contents as well as an "I want to..." table of contents.
"I want to..." lets you jump to an explanation based on what you want to do. For example, "I use the copier function often, so I'd like to save paper".
Use either table of contents as appropriate based on what you want to know.
The contents of the Operation Guide are as follows:
BEFORE USING THE MACHINE |
SCANNER / INTERNET FAX |
COPIER |
DOCUMENT FILING |
PRINTER |
SYSTEM SETTINGS |
FACSIMILE |
TROUBLESHOOTING |
*To view the Operation Guide in PDF format, Adobe® ReaderTM or Acrobat® Reader of Adobe Systems Incorporated is required. If neither program is installed on your computer, the programs can be downloaded from the following URL:
http://www.adobe.com/
1
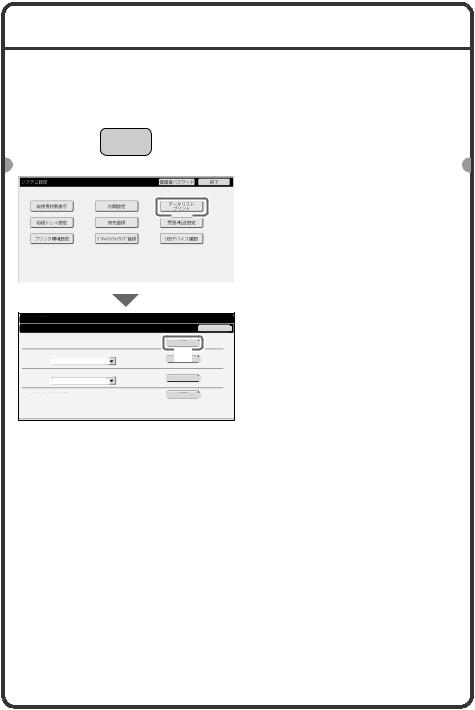
CHECKING THE IP ADDRESS
To check the IP address of the machine, print out the all custom setting list in the system settings.
|
|
|
|
|
SYSTEM |
|
|
|
|
|
|
1 Press the [SYSTEM |
|
|
|
|
|
|
SETTINGS |
|
|
|
|
|
|
SETTINGS] key. |
|
|
|
|
|
|
|
|
|
|
|
|
|
|
|
|
|
|
|
|
|
|
|
|
|
|
|
|
2 Select the all custom |
|
|
System Settings |
|
|
|
Admin Password |
|
Exit |
|
||||
|
|
|
|
|
|
|
|
|
|
|
|
setting list in the touch |
|
|
|
|
Total Count |
|
Default Settings |
|
|
(User) |
|
|
|||
|
|
|
|
|
|
|
List Print |
|
|
|
|||
|
|
|
|
|
|
|
|
|
|
|
|
|
panel. |
|
|
|
Settings |
|
|
|
(1) |
|
|
|
|
||
|
|
|
Paper Tray |
|
Address Control |
|
|
Fax Data |
|
|
|
|
|
|
|
|
|
|
|
|
Receive/Forward |
|
|
|
|
||
|
|
|
|
|
|
|
|
|
|
|
|
|
(1) Touch the [List Print |
|
|
|
Printer Condition |
|
Document Filing |
|
USB-Device Check |
|
|
||||
|
|
|
Settings |
|
Control |
|
|
|
|
||||
|
|
|
|
|
|
|
|
|
|
|
|
|
(User)] key. |
|
|
|
|
|
|
|
|
|
|
|
|
|
|
System Settings
List Print (User)
All Custom Setting List:
Printer Test Page:
PCL Symbol Set List
Sending Address List:
Individual List
Back
(2)Print |
(2)Touch the [Print] key to the right of "All Custom Setting List".
The IP address is shown in the list that is printed.
Document Filling Folder List: |
2
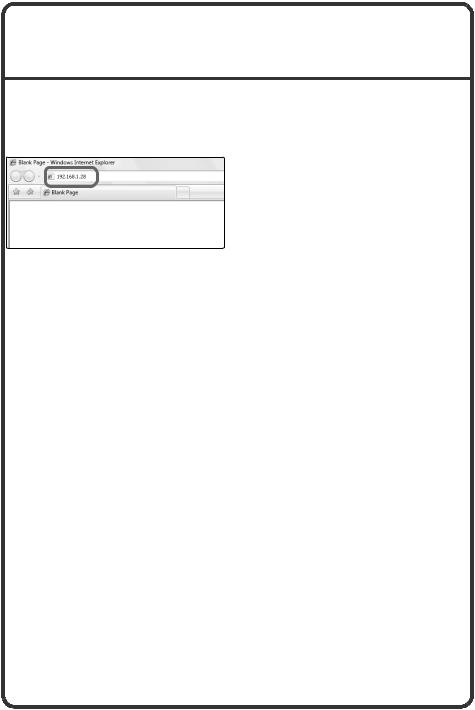
ACCESSING THE WEB SERVER IN THE MACHINE
When the machine is connected to a network, the machine's built-in Web server can be accessed from a Web browser on your computer.
Opening the Web pages
Access the Web server in the machine to open the Web pages.
Start a Web browser on a computer that is connected to the same network as the machine and enter the IP address of the machine.
Recommended Web browsers
•Internet Explorer: 6.0 or higher (Windows®)
•Netscape Navigator: 9 (Windows®)
•Firefox: 2.0 or higher (Windows®)
•Safari: 1.5 or higher (Macintosh)
The Web page will appear.
The machine settings may require that user authentication be performed in order to open the Web page. Please ask the administrator of the machine for the password that is required for user authentication.
3
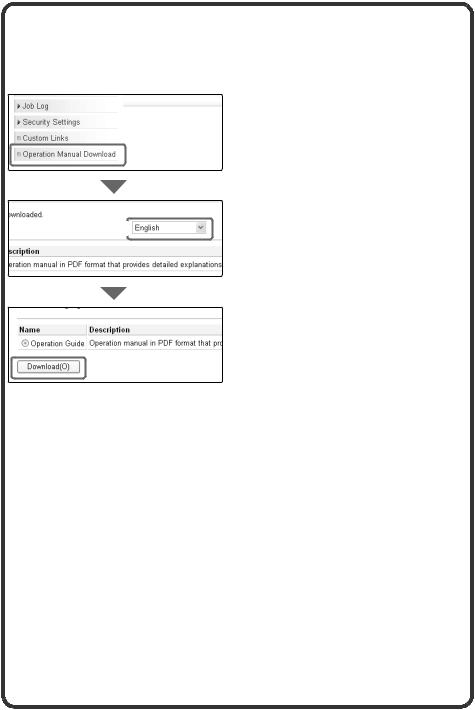
Downloading the Operation Guide
The Operation Guide, which is a more detailed manual, can be downloaded from the machine's Web pages.
|
Downloading the Operation |
|
Guide. |
|
(1) Click [Operation Manual |
(1) |
Download] in the menu of the |
|
Web page. |
(2) Select the desired language.
(2)
(3) Click the [Download] button.
The Operation Guide is downloaded.
(3)
4
TABLE OF CONTENTS
CHECKING THE IP ADDRESS. . . . . . . . . . . . . . . . . . . . . . . . . . . . . . . . . . 2 ACCESSING THE WEB SERVER IN THE MACHINE . . . . . . . . . . . . . . . . 3
Before using the machine
PART NAMES AND FUNCTIONS. . . . . . . . . . . . . . . . . . . . . . . . . . . . . . . 10 SUPPLIES . . . . . . . . . . . . . . . . . . . . . . . . . . . . . . . . . . . . . . . . . . . . . . . . . 11 OPERATION PANEL. . . . . . . . . . . . . . . . . . . . . . . . . . . . . . . . . . . . . . . . . 12 USING THE TOUCH PANEL. . . . . . . . . . . . . . . . . . . . . . . . . . . . . . . . . . . 14 USER AUTHENTICATION . . . . . . . . . . . . . . . . . . . . . . . . . . . . . . . . . . . . 17 HOME SCREEN . . . . . . . . . . . . . . . . . . . . . . . . . . . . . . . . . . . . . . . . . . . . 19 IMAGE CHECK FUNCTION (PREVIEW) . . . . . . . . . . . . . . . . . . . . . . . . . 20 PLACING ORIGINALS . . . . . . . . . . . . . . . . . . . . . . . . . . . . . . . . . . . . . . . 22 CHANGING PAPER IN A TRAY . . . . . . . . . . . . . . . . . . . . . . . . . . . . . . . . 24
Copying
BASE SCREEN OF COPY MODE . . . . . . . . . . . . . . . . . . . . . . . . . . . . . . 30
MAKING COPIES . . . . . . . . . . . . . . . . . . . . . . . . . . . . . . . . . . . . . . . . . . . 32
2-SIDED COPYING (Automatic Document Feeder) . . . . . . . . . . . . . . . . 34
COPYING ON SPECIAL PAPER (Bypass Copy) . . . . . . . . . . . . . . . . . . 36
MAKING COLOUR COPIES (Colour Mode) . . . . . . . . . . . . . . . . . . . . . . 39
SELECTING THE EXPOSURE AND IMAGE TYPE . . . . . . . . . . . . . . . . . 41
FITTING THE COPY IMAGE TO THE PAPER (Automatic Ratio
Selection) . . . . . . . . . . . . . . . . . . . . . . . . . . . . . . . . . . . . . . . . . . . . . . . . . 43
ENLARGEMENT/REDUCTION (Preset Ratios / Zoom) . . . . . . . . . . . . . 45
INTERRUPTING A COPY RUN (Interrupt Copy) . . . . . . . . . . . . . . . . . . 47
STORING COPY OPERATIONS (Job Programs) . . . . . . . . . . . . . . . . . . 48
SPECIAL MODES . . . . . . . . . . . . . . . . . . . . . . . . . . . . . . . . . . . . . . . . . . . 51
SELECTING A SPECIAL MODE. . . . . . . . . . . . . . . . . . . . . . . . . . . . . . . . 52
CONVENIENT COPY FUNCTIONS . . . . . . . . . . . . . . . . . . . . . . . . . . . . . 54
5

Printing
PRINTING . . . . . . . . . . . . . . . . . . . . . . . . . . . . . . . . . . . . . . . . . . . . . . . . . 62 CANCELLING PRINTING (AT THE MACHINE) . . . . . . . . . . . . . . . . . . . . 68 SELECTING PRINT SETTINGS . . . . . . . . . . . . . . . . . . . . . . . . . . . . . . . . 69 CONVENIENT PRINTER FUNCTIONS. . . . . . . . . . . . . . . . . . . . . . . . . . . 71
Faxing
BASE SCREEN OF FAX MODE . . . . . . . . . . . . . . . . . . . . . . . . . . . . . . . . 76 SENDING A FAX . . . . . . . . . . . . . . . . . . . . . . . . . . . . . . . . . . . . . . . . . . . . 78 CHANGING THE SIZE OF A FAX. . . . . . . . . . . . . . . . . . . . . . . . . . . . . . . 79 CHANGING THE EXPOSURE . . . . . . . . . . . . . . . . . . . . . . . . . . . . . . . . . 81 CHANGING THE RESOLUTION. . . . . . . . . . . . . . . . . . . . . . . . . . . . . . . . 82 STORING A FAX NUMBER . . . . . . . . . . . . . . . . . . . . . . . . . . . . . . . . . . . 83 FORWARDING RECEIVED FAXES (Fax Data Forward) . . . . . . . . . . . . 85 CONVENIENT DIALLING METHODS. . . . . . . . . . . . . . . . . . . . . . . . . . . . 87 SENDING THE SAME FAX TO MULTIPLE DESTINATIONS (Broadcast Transmission). . . . . . . . . . . . . . . . . . . . . . . . . . . . . . . . . . . . . . . . . . . . . . 91 SPECIAL FAX MODES . . . . . . . . . . . . . . . . . . . . . . . . . . . . . . . . . . . . . . . 93 SELECTING A SPECIAL MODE. . . . . . . . . . . . . . . . . . . . . . . . . . . . . . . . 94 CONVENIENT FAX FUNCTIONS . . . . . . . . . . . . . . . . . . . . . . . . . . . . . . . 96
6

Scanning
NETWORK SCANNER FUNCTION . . . . . . . . . . . . . . . . . . . . . . . . . . . . 100 BASE SCREEN OF SCAN MODE . . . . . . . . . . . . . . . . . . . . . . . . . . . . . 101 SCANNING AN ORIGINAL . . . . . . . . . . . . . . . . . . . . . . . . . . . . . . . . . . . 102 CHANGING THE EXPOSURE AND ORIGINAL IMAGE TYPE . . . . . . . 104 CHANGING THE RESOLUTION. . . . . . . . . . . . . . . . . . . . . . . . . . . . . . . 106 CHANGING THE FILE FORMAT . . . . . . . . . . . . . . . . . . . . . . . . . . . . . . 107 STORING A DESTINATION . . . . . . . . . . . . . . . . . . . . . . . . . . . . . . . . . . 109 CONVENIENT TRANSMISSION METHODS . . . . . . . . . . . . . . . . . . . . . 111 SENDING THE SAME IMAGE TO MULTIPLE DESTINATIONS (Broadcast Transmission). . . . . . . . . . . . . . . . . . . . . . . . . . . . . . . . . . . 114 SPECIAL SCAN MODES . . . . . . . . . . . . . . . . . . . . . . . . . . . . . . . . . . . . 116 SELECTING A SPECIAL MODE. . . . . . . . . . . . . . . . . . . . . . . . . . . . . . . 117 CONVENIENT SCANNER FUNCTIONS. . . . . . . . . . . . . . . . . . . . . . . . . 119
Document filing
DOCUMENT FILING . . . . . . . . . . . . . . . . . . . . . . . . . . . . . . . . . . . . . . . . 122 QUICKLY SAVING A JOB (Quick File) . . . . . . . . . . . . . . . . . . . . . . . . . 124 APPENDING INFORMATION WHEN STORING A FILE (File) . . . . . . . 125 SAVING A DOCUMENT ONLY (Scan to HDD) . . . . . . . . . . . . . . . . . . . 128 PRINTING A SAVED FILE . . . . . . . . . . . . . . . . . . . . . . . . . . . . . . . . . . . 130
System settings
SYSTEM SETTINGS . . . . . . . . . . . . . . . . . . . . . . . . . . . . . . . . . . . . . . . . 132
Troubleshooting
FREQUENTLY ASKED QUESTIONS . . . . . . . . . . . . . . . . . . . . . . . . . . . 136 REMOVING MISFEEDS . . . . . . . . . . . . . . . . . . . . . . . . . . . . . . . . . . . . . 142
7
Beforeusingi themachinei
This section provides general information about the machine, including the names and functions of the parts of the machine and its peripheral devices, and the procedures for placing originals and loading paper.
XPART NAMES AND FUNCTIONS . . . . . . . . . . . . . . . . . . . 10
XSUPPLIES . . . . . . . . . . . . . . . . . . . . . . . . . . . . . . . . . . . . . 11
XOPERATION PANEL . . . . . . . . . . . . . . . . . . . . . . . . . . . . . 12
XUSING THE TOUCH PANEL . . . . . . . . . . . . . . . . . . . . . . . 14
XUSER AUTHENTICATION . . . . . . . . . . . . . . . . . . . . . . . . . 17
XHOME SCREEN . . . . . . . . . . . . . . . . . . . . . . . . . . . . . . . . . 19
XIMAGE CHECK FUNCTION (PREVIEW). . . . . . . . . . . . . . 20
XPLACING ORIGINALS. . . . . . . . . . . . . . . . . . . . . . . . . . . . 22
XCHANGING PAPER IN A TRAY . . . . . . . . . . . . . . . . . . . . 24
9
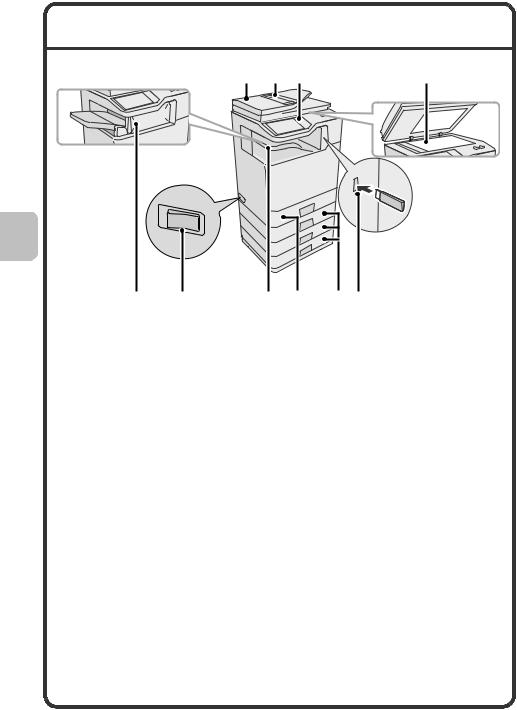
PART NAMES AND FUNCTIONS
(1) |
(2) |
(3) |
(4) |
(5) |
(6) |
(7) |
(8) |
(9) (10) |
(1)Automatic document feeder
This automatically feeds and scans multiple originals. Both sides of 2-sided originals can be scanned at once.
(2)Document feeder tray
Place the originals in this tray when using the automatic document feeder.
(3)Operation panel
(4)Document glass
This is used to scan books and other originals that cannot be scanned using the automatic document feeder.
(5)Finisher*
This can be used to staple output.
(6)Main power switch
This is used to power on the machine. When using the fax or Internet fax functions, keep this switch in the "on" position.
(7)Output tray (centre tray)
Copy jobs and print jobs are delivered to this tray.
(When a finisher is installed, the output tray (centre tray) cannot be used.)
(8)Tray 1
Up to 500 sheets of paper (80 g/m2 (21 lbs.)) can be loaded in each tray.
(9)Tray 2/Tray 3/Tray 4 (500-sheet paper feed unit is installed)*
This holds paper. Up to 500 sheets (80 g/m2 (21 lbs.)) of paper can be loaded.
(10)USB connector (type A)
Supports USB 2.0 (Hi-Speed). This is used to connect a USB memory or other USB device to the machine.
*Peripheral device. For more information, see "PERIPHERAL DEVICES" in "1. BEFORE USING THE MACHINE" in the Operation Guide.
10
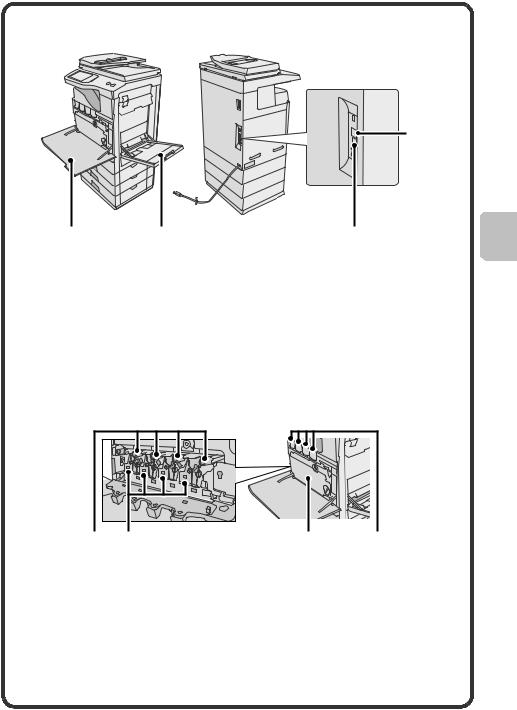
(11)(12)
(11)Front cover
Open to replace a toner cartridge.
(12)Bypass tray
Special types of paper and envelopes can be fed from the bypass tray.
SUPPLIES
(1) |
(2) |
(1)Drum cartridges
This contains the photosensitive drum that is used to create images for copying and printing.
(2)Developer cartridges
This contains the developer that is necessary to transfer the toner to the paper.
(14)
(13)
(13)USB connector (B type)
Supports USB 2.0 (Hi-Speed). A computer can be connected to
this connector to use the machine as a printer.
(14)LAN connector
Connect the LAN cable to this connector when the machine is used on a network.
(3) |
(4) |
(3)Toner collection container
This collects excess toner that remains after printing.
(4)Toner cartridges
These contain toner for printing. When the toner runs out in a cartridge, the cartridge of the colour that ran out must be replaced.
11
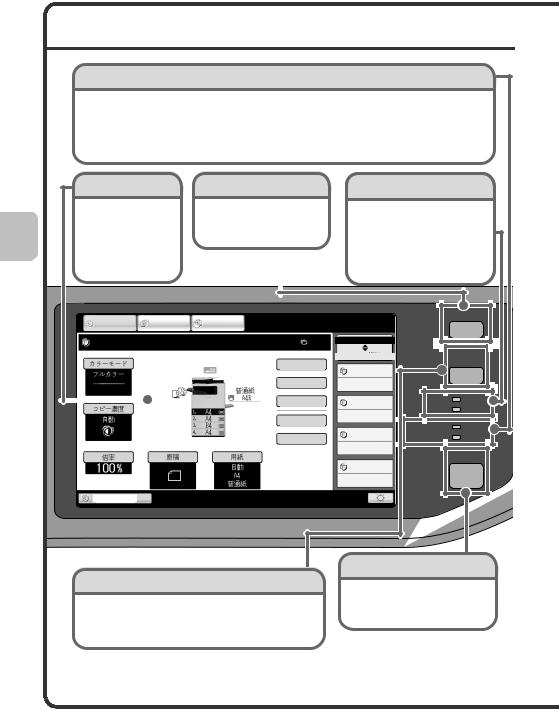
OPERATION PANEL
Image send indicators
LINE indicator
This lights up during transmission or reception in fax mode. The indicator also lights up during transmission in scan mode.
DATA indicator
When a received fax cannot be printed because of a problem such as out of paper, the indicator blinks. The indicator lights steadily when there is data that is waiting to be transmitted.
Touch panel |
[JOB STATUS] key |
Print mode indicators |
Messages and keys |
Press this key to view the job |
|
appear in the LCD |
status screen. You can check |
|
display. |
the status of jobs and cancel |
|
Operations are |
jobs in the job status screen. |
|
performed by |
|
|
|
|
|
touching the keys with |
|
|
your finger. |
|
|
|
|
|
READY indicator
Print data can be received when this indicator is lit.
DATA indicator
This blinks while print data is being received and lights steadily while printing is taking place.
|
COPY |
|
|
IMAGE SEND |
|
DOCUMENT |
||||||
|
|
|
|
FILING |
||||||||
|
|
|
|
|
|
|
|
|
||||
|
Ready to scan for copy. |
|
|
|
|
|
||||||
|
|
|
|
|
|
|
|
|
|
|
|
|
|
Colour Mode |
|
|
|
|
|
|
|
|
|
||
|
|
|
|
|
|
|
|
|
|
|
|
|
|
Full Colour |
|
|
|
|
|
|
|
|
|
||
|
|
|
|
|
|
|
|
|
|
|
|
|
|
|
|
|
|
|
|
|
|
|
|
|
Plain |
|
|
|
|
|
|
|
|
|
|
|
|
A4 |
|
|
|
|
|
|
|
|
|
|
|
|
|
|
|
|
|
|
|
|
|
|
|
|
|
|
|
Exposure |
|
|
|
|
|
|
|
|
|
||
|
|
|
|
|
|
|
1. |
|
A4 |
|
|
|
|
|
Auto |
|
|
|
2. |
|
A5 |
|
|
||
|
|
|
|
|
|
|
|
|
|
|
||
|
|
|
|
|
|
|
3. |
|
A4 |
|
|
|
|
|
|
|
|
|
|
|
|
|
|
||
|
|
|
|
|
|
|
4. |
|
A4 |
|||
|
|
|
|
|
|
|
|
|
|
|
|
|
|
Copy Ratio |
|
|
Original |
|
|
Paper Select |
|||||
|
|
|
|
|
|
|
|
|
|
|
|
|
|
100% |
|
|
|
|
|
|
Auto |
||||
|
|
|
|
|
|
|
|
|
|
|
A4 |
|
|
|
|
|
|
|
|
|
|
|
Plain |
||
0 |
Job Status |
|
|
|
MFP Status |
Special Modes |
|
|
020/015 |
2-Sided Copy |
Copying |
Output |
005/000 |
File |
Waiting |
|
|
Quick File |
010/000 |
|
|
|
Waiting |
|
010/000 |
|
Waiting |
JOB STATUS
SYSTEM |
SETTINGS |
READY |
||
DATA |
||
|
||
IMAGE SEND |
LINE |
|
DATA |
||
|
||
|
HOME |
Tray1
[SYSTEM SETTINGS] key
Press this key to display the system settings screen. The system settings can be adjusted to make the machine easier to use, such as configuring paper tray settings and storing addresses.
[HOME] key
Touch this key to display the home screen.
The base screen of each mode is opened from the home screen.
12
Numeric keys |
[CLEAR] key |
Main power indicator |
These are used to enter the number of copies, fax numbers, and other numbers.
[LOGOUT] key (  )
)
When user authentication is enabled, press this key to log out after using the machine. When using the fax function, this key can be pressed to send tone signals on a pulse dial line.
[#/P] key (  )
)
Press this key to use a job program when using the copier function. When using the fax function, this key can be used when dialling.
Press this key to return |
This indicator lights when the |
settings such as the |
main power is switched on. |
number of copies to "0". |
The main power switch is on |
|
the left side of the machine. |
[COLOUR START] key |
|
|
[POWER] key |
|||||
|
|
|
|
|
|
|||
Use this key to copy or scan |
|
|
Use this key to turn |
|||||
an original in colour. |
|
|
the machine power |
|||||
|
|
|
|
|
|
|
on and off. |
|
|
|
|
|
|
|
|
|
|
|
|
|
|
|
|
|
|
|
|
|
|
|
|
|
|
|
|
|
|
|
|
|
|
|
|
|
|
|
|
|
|
|
|
|
|
|
|
|
|
|
|
|
|
|
|
|
|
|
|
|
|
|
|
|
|
|
|
|
|
|
|
|
LOGOUT
[CLEAR ALL] key
Press this key to redo an operation from the beginning.
All settings will be cleared and operation will return to the initial state.
[STOP] key
[POWER SAVE] key
Use this key to activate power save mode. The [POWER SAVE] key blinks when the machine is in power save mode. This key is also used to deactivate power save mode.
[BLACK & WHITE START] key
Press this key to stop a copy job or scanning of an original.
Use this key to copy or scan an original in black and white. This key is also used to send a fax in fax mode.
13
USING THE TOUCH PANEL
The touch keys that appear in the touch panel are grouped for easy operation. The layout and functions of the touch keys are explained below.
Mode select keys
[COPY] key
To use the copy function, touch this key to switch to copy mode. Keep your finger on the [COPY] key to view the machine's total page use count and amount of toner remaining.
[IMAGE SEND] key
To use the scan or fax function, touch this key to switch to image send mode.
[DOCUMENT FILING] key
When you wish to print or send a file stored on the hard drive, touch this key to switch to document filing mode.
COPY |
IMAGE SEND |
DOCUMENT |
|
FILING |
|||
|
|
Ready to scan for copy. |
|
0 |
Job Status |
||
|
|
|
|
||
|
|
|
|
MFP Status |
|
Colour Mode |
|
|
Special Modes |
020/015 |
|
Full Colour |
|
|
|
||
|
|
|
|
||
|
|
|
2-Sided Copy |
Copying |
|
|
|
|
Plain |
|
|
|
|
|
A4 |
|
|
Exposure |
|
|
Output |
005/000 |
|
1. |
A4 |
|
|
||
|
|
Waiting |
|||
Auto |
2. |
A5 |
File |
||
|
|||||
|
3. |
A4 |
|
||
|
|
|
|||
|
4. |
A4 |
|
010/000 |
|
|
|
|
Quick File |
||
|
|
|
|
||
|
|
|
|
Waiting |
|
Copy Ratio |
Original |
|
Paper Select |
|
|
100% |
|
|
Auto |
010/000 |
|
|
|
|
|||
|
|
|
A4 |
Waiting |
|
|
|
|
Plain |
||
|
|
|
|
||
Tray1 |
|
|
|
|
|
Brightness adjustment key
When the mode of the machine is |
|
|
changed, the base screen of the newly |
Touch this key to adjust the brightness of |
|
selected mode appears. |
||
the touch panel. |
||
Functions can be selected and settings |
||
|
||
checked in the base screen. |
|
14
Using general keys
|
|
|
|
|
|
|
|
|
|
|
|
|
|
|
|
|
|
|
|
|
|
|
|
|
|
|
|
|
|
|
|
|
|
|
|
|
Special Modes |
|
|
|
|
|
|
|
|
|
|
|
|
|
|
|
|
|
|
|
OK |
|
|
||||||||||||
|
|
|
|
|
|
|
|
|
|
|
|
|
|
|
|
|
|
|
|
|
|
|
|
|
|
|
|
|
|
|
|
|
|
|
|
|
|
|
Margin Shift |
|
|
|
|
Erase |
|
|
|
Pamphlet Copy |
|
|
|
|
|
|
|
|
|
|
|||||||||||||
|
|
|
|
|
|
|
|
|
|
|
|
|
|
|
|
|
|
|
|
|
|
|
|
|
|
|
|
|
|
|
|
|
|
|
|
|
|
|
|
|
|
|
|
|
|
|
|
|
|
|
|
|
|
|
|
|
|
|
|
|
|
|
|
|
|
1 |
|
|
|
|
|
|
|
|
|
Job |
|
|
|
|
Transparency |
|
|
|
|
|
2in1 |
|
|
|
|
2 |
|
|
|
|
|
||||||||||
|
|
|
|
Build |
|
|
|
|
|
|
Inserts |
|
|
|
|
|
|
|
|
|
|
|
|
|
|
|
|||||||||
|
|
|
|
|
|
|
|
|
|
|
|
|
|
|
|
|
|
|
|
|
|
|
|
|
|
|
|||||||||
|
|
|
|
|
|
|
|
|
|
|
|
|
|
|
|||||||||||||||||||||
|
|
|
|
|
|
|
|
|
|
|
|
|
|
|
|
|
|
|
|
|
|
|
|
|
|
|
|
|
|
|
|
||||
|
|
|
Card Shot |
|
|
|
|
|
Stamp |
|
|
|
|
Image Edit |
|
|
|
|
|
|
|
|
|
|
|||||||||||
|
|
|
|
|
|
|
|
|
|
|
|
|
|
|
|
|
|
|
|
|
|
|
|
|
|
|
|
|
|
|
|
|
|
|
|
|
|
|
|
Colour |
|
|
|
|
File |
|
|
|
|
Quick File |
|
|
|
|
|
|
|
|
|
|
|||||||||||
|
|
|
Adjustments |
|
|
|
|
|
|
|
|
|
|
|
|
|
|
|
|
|
|
|
|||||||||||||
|
|
|
|
|
|
|
|
|
|
|
|
|
|
|
|
|
|
|
|
|
|
|
|
|
|
|
|
|
(1) |
|
|
|
|
||
|
|
|
|
|
|
|
|
|
|
|
|
|
|
|
|
|
|
|
|
|
|
|
|
|
|
|
|
|
|
|
|
|
|
|
|
|
|
|
|
|
|
|
|
|
|
|
|
|
|
|
|
|
|
|
|
|
|
|
|
|
|
|
|
|
|||||||
|
|
|
|
|
|
|
|
|
|
|
|
|
|
|
|
|
|
|
|
|
|
|
|
|
|
||||||||||
|
Job Settings / Print |
|
|
|
|
|
|
|
|
|
|
|
|
|
|
|
|
|
|
Cancel |
|
||||||||||||||
|
|
|
|
|
|
|
|
|
|
|
|
|
|
|
|
|
|
|
|
|
|
|
|
|
|
|
|
|
|
|
|
|
|
|
|
|
|
file-01 |
|
|
|
|
Name 1 |
|
|
A4 |
|
|
F. Colour |
|
|||||||||||||||||||||
|
|
|
|
|
|
|
|
|
|
|
|
|
|
|
|
|
|
|
|
|
|
|
|
|
|
|
|
|
|
|
|
|
|
|
|
|
|
Paper Select |
|
|
|
|
|
|
|
|
|
|
|
|
|
|
|
|
|
|
|
|
|
|
|
|
|
|
|
|
|||||
|
|
|
|
|
|
|
|
|
|
|
Number of Prints |
|
|
|
|
|
|
|
|
|
|
|
|
|
|
|
|||||||||
|
|
Auto |
|
|
|
|
|
|
|
|
|
|
|
|
|
|
|
|
|
|
|
|
|||||||||||||
|
|
|
|
|
|
|
|
|
|
|
|
|
|
|
|
|
|
||||||||||||||||||
|
|
|
|
|
|
|
|
|
|
|
|
1 |
|
|
|
|
|
|
|||||||||||||||||
|
|
|
|
|
|
|
|
|
|
|
|
|
|
|
(1~999) |
|
|
|
Print and Delete the Data |
|
|||||||||||||||
|
|
|
|
|
|
|
(3) |
|
|
|
|
|
|
|
|
|
|
||||||||||||||||||
|
|
|
|
|
|
|
|
|
|
|
|
|
|
|
|
|
|
|
|
|
|
|
|
|
|
|
|
|
|
|
|||||
|
|
Output |
|
|
|
|
|
|
|
|
|
|
|
|
|
|
|
|
|
|
Print and Save the Data |
|
|
|
|||||||||||
|
|
|
|
|
|
|
|
|
|
|
|
|
|
|
|
|
|
|
|
|
|
|
|
||||||||||||
|
|
|
|
|
|
|
|
|
|
|
|
|
|
|
|
|
|
|
|
|
|
|
|
|
|
|
|
|
|
|
|
||||
|
|
2-Sided |
|
|
|
|
|
|
|
|
|
|
|
|
|
|
|
|
|
|
|
|
|
|
|
|
|
|
|
|
|
|
|
||
|
|
|
|
|
|
|
|
|
|
|
|
|
|
|
|
|
|
|
|
|
|
|
|
|
|
|
|
||||||||
|
|
|
|
|
(2) |
|
|
|
|
|
|
|
|
|
|
|
|
|
|
|
|
|
|
|
|
|
|
|
|
|
|
||||
|
|
|
|
|
|
|
B/W Print |
|
|
|
|
|
|
|
|
|
|
|
|
|
|
|
|
||||||||||||
|
|
Special Modes |
|
|
|
|
|
|
|
|
|
|
|
|
|
|
|
|
|
|
|||||||||||||||
|
|
|
|
|
|
|
|
|
|
|
|
|
|
|
|
|
|
|
|
|
|
|
|
|
|
|
|
||||||||
|
|
|
|
|
|
|
|
|
|
|
|
|
|
|
|
|
|
|
|
|
|
|
|
|
|
|
|
|
|
|
|
|
|
|
|
|
|
|
|
|
|
|
|
|
|
|
|
|
|
|
|
|
|
|
|
|
|
|
|
|
|
|
|
|
|
|
|
|
|
|
|
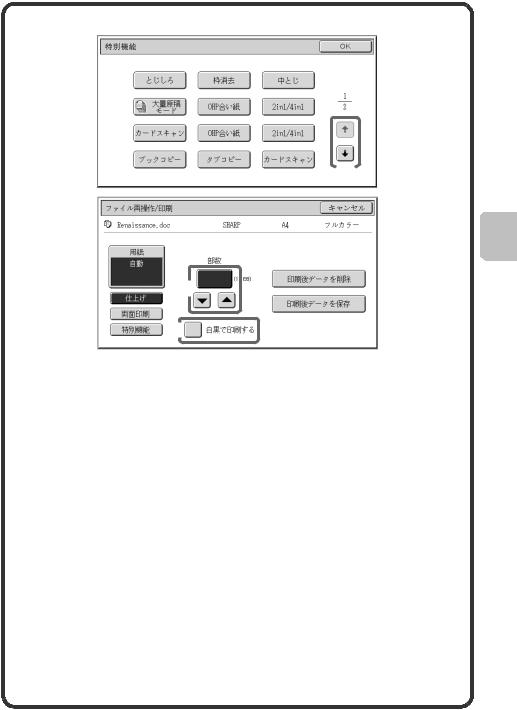
(1)When the displayed screen is one of two or more screens, use the

 keys to switch through the screens.
(2)When a checkbox  is touched, a checkmark
  will appear to indicate that the setting is enabled.
(3)The 
 keys can be used to increase or decrease a value. To make a value change quickly, keep your finger on the key. You can also directly touch a numeric value display key to change a number with the numeric keys.
15
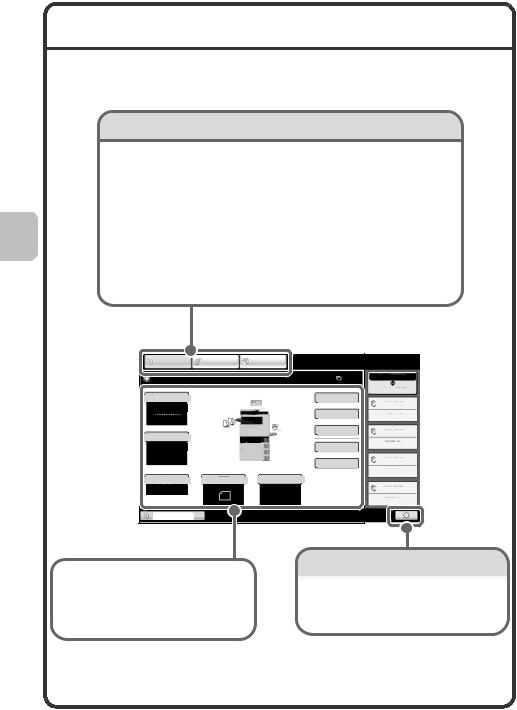
Checking the status of the machine
The touch panel has a key for checking the status of the machine.
"Job Status" display |
Display selection key |
This shows the first 4 print jobs in the print queue (the job in progress and jobs waiting to be printed). The type of job, the set number of copies, the number of copies completed, and the job status appear.
The status display can be switched between "Job Status" and "MFP Status". If the job status screen is displayed, the status display automatically changes to the "MFP Status".
COPY |
IMAGE SEND |
Ready to scan for copy.
Colour Mode
Full Colour
Exposure
Auto
Copy Ratio |
Original |
100%
Tray1
DOCUMENT
FILING
|
0 |
|
|
Job Status |
||
|
|
|
|
|
||
|
|
|
|
|
|
|
|
|
|
|
|
MFP Status |
|
Special Modes |
|
|
|
|
|
|
|
|
|
|
|
020/015 |
|
|
|
|
|
|
|
|
2-Sided Copy |
|
|
|
|
|
|
|
|
|
Copying |
|||
Plain
|
|
A4 |
|
|
|
|
Output |
005/000 |
|
1. |
A4 |
|
Waiting |
|
2. |
A5 |
File |
||
|
||||
3. |
A4 |
|
||
|
|
|||
4. |
A4 |
|
010/000 |
|
|
|
Quick File |
||
|
|
|
||
|
|
|
Waiting |
|
|
|
Paper Select |
|
Auto |
|
010/000 |
|
|
A4 |
|
|
|
|
Plain |
|
|
Waiting |
|
|
|
|
|
|
|
|
|
|
|
Job Status
MFP Status
Maintenance
Information
DC DC DC
DC DC DC
DC DC DC
System display
The USB device connection status and communication status are shown as icons.
"MFP Status" display
This shows machine system information.
"Maintenance Information"
This shows machine maintenance information by means of codes.
Job status display
The mode icon of the reserved job or job in progress, the tray being used to feed paper, and the job status appear. This can be touched to show the job status screen.
Print Job |
|
Scan to |
|
Fax Job |
|
Internet Fax |
|
|
|
|
|
|
|
|
|
|
|
|
|
|
Spool |
1 |
Computer01 |
002/001 |
Printing |
|
Job Queue |
|
|
|
|
|
|
2 |
0312345678 |
002/000 |
Waiting |
1 |
Complete |
3 |
0312345678 |
002/000 |
Waiting |
1 |
|
|
|
||||
4 |
Copy |
002/000 |
Waiting |
|
|
Detail
Priority
Stop/Delete
Jobs are displayed as a list of touch keys. The job keys appear in the order that they will be run. A job key can be touched to select it.
A selected job can be given priority and run ahead of other jobs, or a job waiting in the queue can be cancelled.
16
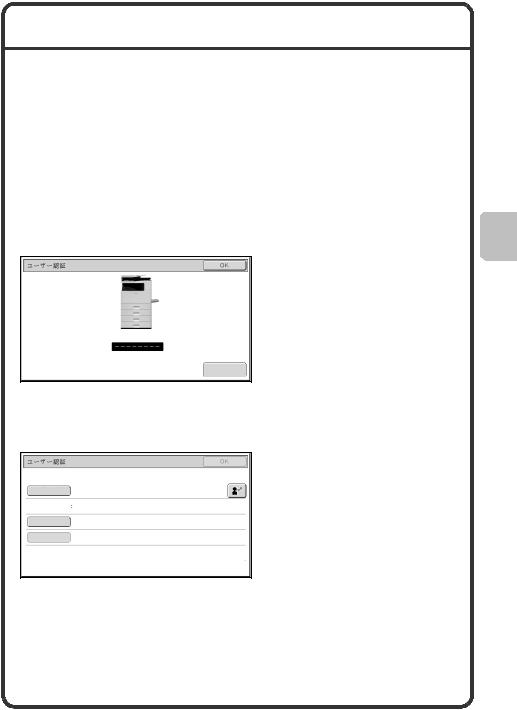
USER AUTHENTICATION
When user authentication is enabled in the system settings, you must log in before using the machine. User authentication is initially disabled.
When you have finished using the machine, log out.
User authentication methods
There are two methods for performing user authentication: login by user number and login by login name and password. Ask the administrator of the machine for the information that is required to log in.
For details on user authentication, see "USER AUTHENTICATION" in "1. BEFORE USING THE MACHINE" in the Operation Guide.
Login by user number
User Authentication |
|
OK |
|
|
|
This method requires that you log in by entering your user number (5 to 8 digits), which is stored in the system settings of the machine.
Admin Login
Login by login name and password
User Authentication |
|
OK |
|
|
|
Login Name
User Name
Password
Auth to: Login Locally
This method requires that you log in by entering your login name, password, and the login destination, which are stored in the system settings of the machine. Depending on how the machine administrator has configured the system settings, an e-mail address may also be used for authentication.
17
Logging out
When you have finished using the machine, log out. Logging out prevents unauthorised use of the machine.
How to log out
You can log out from any mode of the machine by pressing the [LOGOUT] key ( ). However, note that the [LOGOUT] key (
 ) cannot be used to log out when a fax number is being entered in fax mode, as the [LOGOUT] key (
 ) functions as a numeric key at this time.
If a preset duration of time elapses after the machine is last used, the auto clear function will activate. When auto clear activates, logout automatically takes place.
18
HOME SCREEN
When the [HOME] key is pressed on the operation panel, the home screen appears in the touch panel. Mode selection keys appear in the home screen. These keys can be touched to open the base screen of each mode. The [My Menu] key can be touched to display shortcuts to functions stored in "My Menu".
1st screen
(2) |
(1) |
COPY |
IMAGE SEND |
DOCUMENT |
|
FILING |
|||
|
|
My Menu |
2nd screen
(2)
COPY |
IMAGE SEND |
DOCUMENT |
|
FILING |
|||
|
|
Home Screen |
Total Count |
Address Control |
Document Filing |
Paper Tray Settings |
Control |
|
|
|
04/04/2010 11:40 |
|
(3) |
(4) |
(5) |
|
(1)[My Menu] key
Touch this to move to the second home screen.
(2)Mode select keys
Use these keys to switch between copy, image send, document filing, and Sharp OSA modes.
(3)Title
This shows the title of the home screen.
(4)Shortcut key
A registered function appears as a shortcut key.
The key can be touched to select the registered function.
(5)User name
This shows the name of the logged in user.
The user name appears when user authentication is
enabled on the machine.
Register frequently used functions in the home screen to quickly and conveniently access those functions.
Register keys that you wish to show in the home screen in the system settings.
For details on home screen settings, see "Favourite Operation Group Registration" and "Home Screen Settings" in "7. SYSTEM SETTINGS" in the Operation Guide.
19
IMAGE CHECK FUNCTION (PREVIEW)
The image check function is used to display the content of a received fax or other data in the touch panel.
Convenient uses of image check
"Printing only faxes that are needed"
You can check a received fax before printing it. If you don't need the fax, you can delete it without printing it, allowing you to save paper and toner.
"Checking the content of a file stored in the machine"
Before printing or sending a file stored using the document filing function, you can check the content of the file. A preview can be displayed directly from the Job Settings menu, making it easy to move from image preview to execution of the job.
Data that can be checked
The image check function can be used to check the following types of data:
•Faxes received in fax mode
•Faxes received in Internet fax mode
•Faxes stored in a memory box
•Files stored using the document filing function
*The key names in the image check screen and the procedures for using the screen vary depending on the image type.
When the image check function is used, a screen similar to the following screen appears.
20
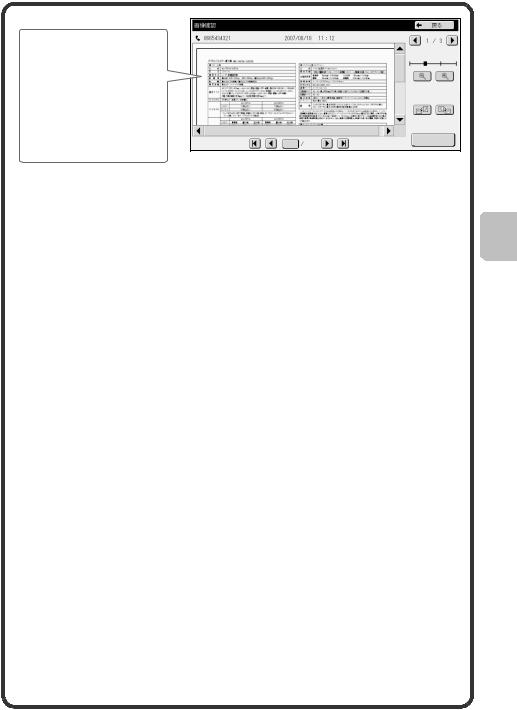
The content of the data appears here In the touch panel, you can
•Scroll the display
•Change pages
•Change the display magnification
Image Check |
|
|
|
|
|
Back |
|
|
|
|
|
|
|
|
|
|
|
|
0123456789 |
|
2010/04/04 |
11:12 |
|
|
|
|
|
|
|
1 / 3 |
|
||||
|
|
|
|
|
|
|
|
|
|
|
|
|
|
|
|
|
|
Display Rotation
0001 0010
Example: The image check screen for a received fax
For details on the image check function, see each of the modes in the Operation Guide.
*A preview image is an image for display on the touch panel. It will differ from the actual print result.
After you have checked the received fax data using this function, print or delete the data; do not leave the data.
21
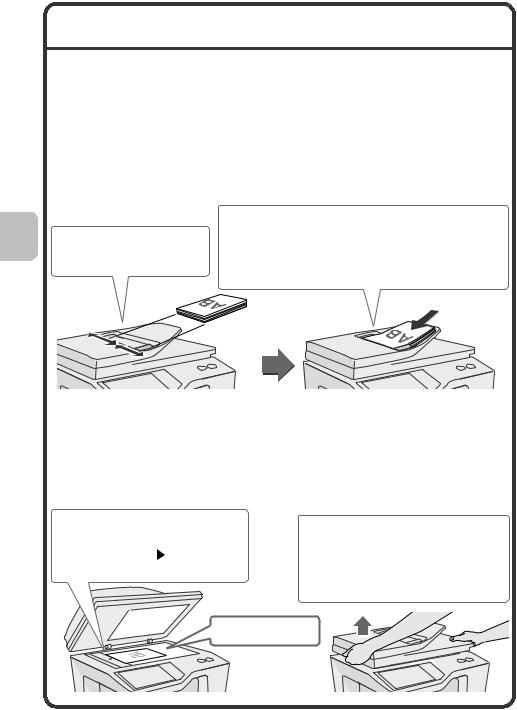
PLACING ORIGINALS
The automatic document feeder can be used to automatically scan many originals at once. This saves you the trouble of manually feeding each original. For originals that cannot be scanned using the automatic document feeder, such as a book or a document with notes attached, use the document glass.
Using the automatic document feeder
When using the automatic document feeder, place the originals in the document feeder tray.
Make sure an original has not been placed on the document glass.
Adjust the original guides to the width of the originals.
Place the originals face up with the edges aligned evenly.

 The indicator line indicates approximately how many originals can be placed.The placed originals must not be higher than this line.
Using the document glass
Take care that your fingers are not pinched when closing the automatic document feeder.
After placing the original, be sure to close the automatic document feeder. If left open, parts outside of the original will be copied black, causing excessive use of toner.
Place the original face down.
Align the middle of the original with the tip of the mark in the centre of the glass.
To place a thick original such as a book, push up the far edge of the automatic document feeder and then close the automatic document feeder slowly.
Do not press hard on the automatic document feeder.This may cause failure.
Place the original face down.
22
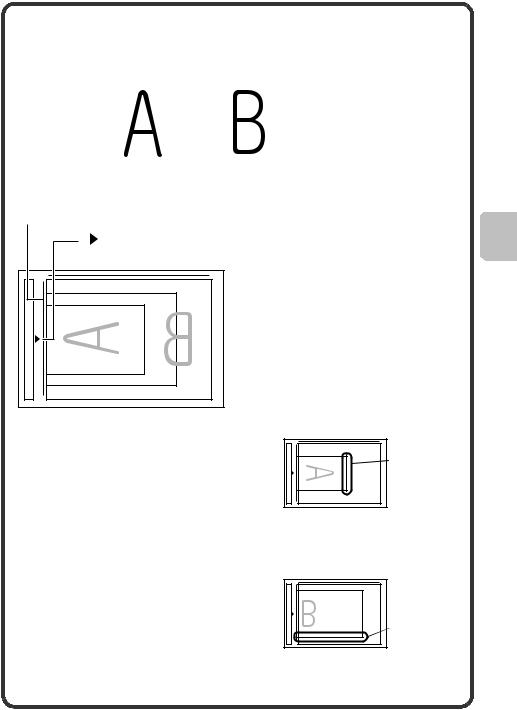
Place the original in the horizontal orientation, referring to the document glass scale.
Originals
|
|
|
|
Portrait original |
Landscape original |
||
Document glass scale
mark |
A5 (5-1/2" x 8-1/2") |
B5 |
A4 (8-1/2" x 11") |
Portrait originals
When using the below functions in copy mode, place the original so that the top of the image is to the right.
•Staple sort
•Pamphlet copy
•2in1
•Stamp
Top of image to the right
Landscape originals
When using the staple sort function, place the original so that the top of the image is toward you.
Top of image |
toward you |
For more information, see "ORIGINALS" in "1. BEFORE USING THE MACHINE" in the Operation Guide.
23
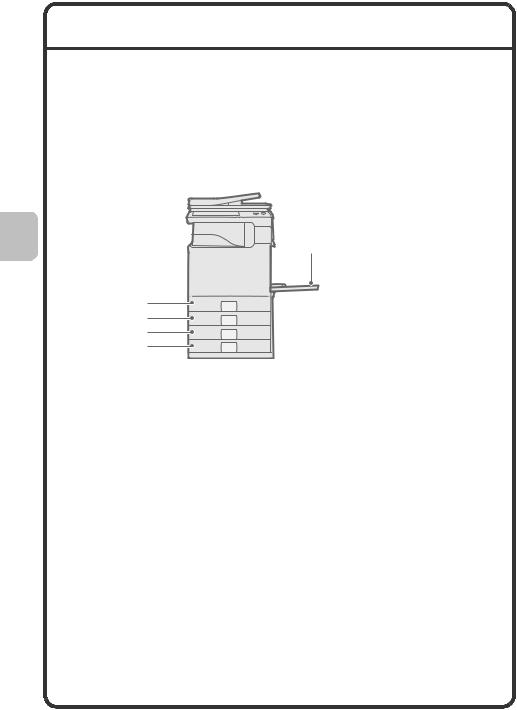
CHANGING PAPER IN A TRAY
Names of the trays
The names of the trays are shown below.
For the number of sheets of paper that can be loaded in each tray, see the following manuals:
•Operation Guide, "Paper Tray Settings" in "7. SYSTEM SETTINGS"
•Maintenance & Safety Guide, "SPECIFICATIONS"
|
(1) |
Tray 1 |
(5) |
(2) |
Tray 2 |
|
(3) |
Tray 3 |
|
(4) |
Tray 4 |
(1) |
(5) |
Bypass tray |
(2) |
|
|
(3)
(4)
Print side face up or face down
Paper is loaded with the print side face up or face down depending on the paper type and tray.
Tray |
Print side* |
|
|
Tray 1 to 4 |
Face up |
|
|
Bypass tray |
Face down |
|
|
*When loading "Pre-Punched", "Letter Head", or "Pre-Printed" paper in the paper tray, the direction the print side faces is different.
For more information, see "LOADING PAPER" in "1. BEFORE USING THE MACHINE" in the Operation Guide.
24
Loading paper in a tray
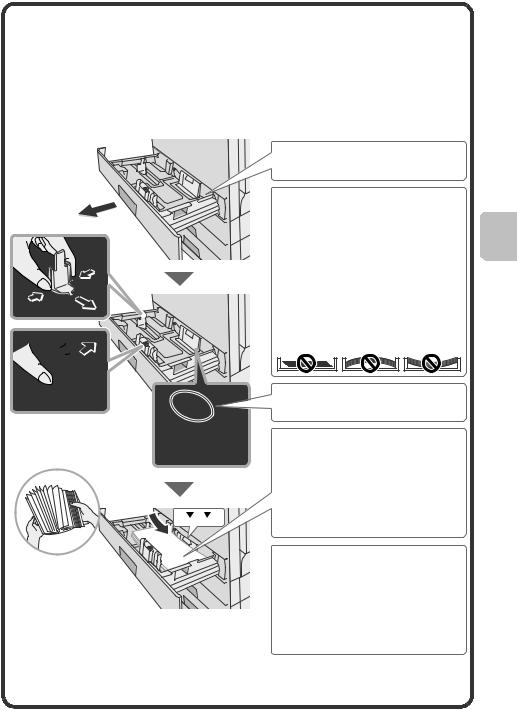
To change the paper in a tray, load the desired paper in the tray and then change the tray settings in the machine to specify the loaded paper. The procedure for changing the tray paper size is explained below. As an example, the paper in tray 1 is changed from A4 (8-1/2" x 11") size plain paper to A5 (5-1/2" x 8-1/2") size recycled paper.
Gently pull out the paper tray. If paper remains in the tray, remove it.
Move the two guides on the tray. For example, move the guides from
A4 (8-1/2" x 11") to A5 (5-1/2" x 8-1/2"). Adjust the guides to match the paper being loaded. If the guides are too loose, the paper will not be held in place. If the guides are too tight, the paper will bow.
Load the paper so that it is not as shown below when viewed from the front and side of the machine.
The loaded paper should not go higher than these protrusions.
Insert the paper with the print side face up.
Fan the paper well before inserting it. Otherwise, multiple sheets may feed at once and cause a misfeed. Insert the paper and then gently push the tray into the machine.

 Indicator line
The indicator line indicates the maximum height of the paper that can be loaded in the tray. When loading paper, make sure that the stack is not higher than the indicator line.
25
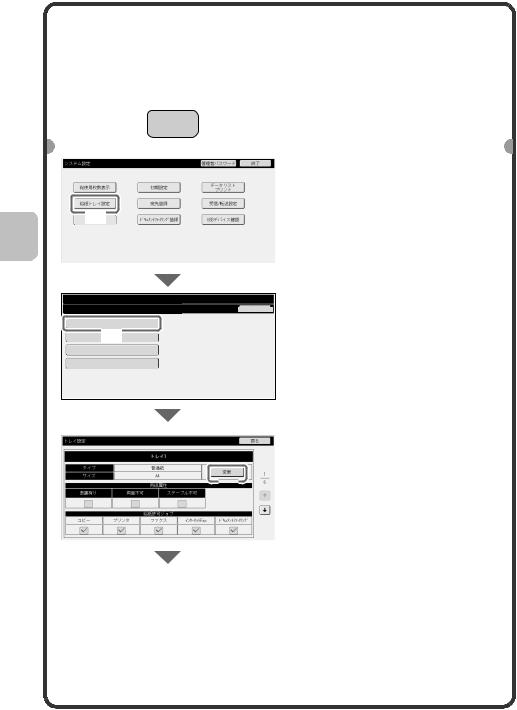
Changing the tray settings
When you change the paper in a tray, the tray settings in the system settings must also be changed.
|
|
|
|
|
|
SYSTEM |
|
|
|
|
1 Press the [SYSTEM |
|
|
|
|
|
|
|
SETTINGS |
|
|
|
|
SETTINGS] key. |
|
|
|
|
|
|
|
|
|
|
|
|
|
|
|
|
|
|
|
|
|
|
|
|
|
|
2 Configure the tray settings |
|
|
System Settings |
|
|
|
Admin Password |
|
Exit |
|
|||
|
|
|
|
|
|
|
|
|
|
|
|
in the touch panel. |
|
|
|
Total Count |
|
Default Settings |
|
(User) |
|
|
|||
|
|
|
|
|
|
|
|
List Print |
|
|
|
|
|
|
|
|
|
|
|
|
|
|
|
|
(1) Touch the [Paper Tray |
|
|
|
Paper Tray |
|
Address Control |
|
Fax Data |
|
|
|||
|
|
|
|
Settings |
|
|
Receive/Forward |
|
|
|
||
|
|
|
|
Settings(1) |
|
|
|
|
|
|
|
Settings] key. |
|
|
|
|
|
Control |
|
USB-Device Check |
|
|
|||
|
|
|
Printer Condition |
|
Document Filing |
|
|
|
|
|
|
|
|
|
|
|
|
|
|
|
|
|
|
|
|
System Settings |
|
Paper Tray Settings |
Back |
Tray Settings
Paper Type(2)Registration
Auto Tray Switching
Custom Size Registration (Bypass)
|
|
|
|
|
|
|
|
|
|
|
|
|
|
|
|
|
|
|
|
|
|
|
|
|
|
|
|
Tray Settings |
|
|
|
|
|
|
|
|
|
|
|
|
|
|
|
|
|
Back |
|
||||||
|
|
|
|
|
|
|
|
|
|
|
|
|
|
|
|
|
|
|
|
|
|
|
|
|
||
|
|
|
|
|
|
|
|
|
|
|
|
Tray 1 |
|
|
|
|
|
|
|
|
|
|
|
|
||
|
|
|
|
|
|
|
|
|
|
|
|
|
|
|
|
|
|
|
|
|
|
|
|
|
|
|
|
|
|
Type |
|
|
|
|
|
|
Plain |
|
|
|
|
|
|
Change |
|
|
|
||||||
|
|
|
|
|
|
|
|
|
|
|
|
|
|
|
|
|
|
|
|
|
|
|
|
|||
|
|
|
Size |
|
|
|
|
|
|
Auto-AB |
|
|
|
|
|
|
|
|
|
|
|
|
||||
|
|
|
|
|
|
|
|
|
|
|
|
|
|
|
|
|
|
|
|
|
(3) |
|
|
|
|
|
|
|
|
|
|
|
|
|
|
|
|
Paper Property |
|
|
|
|
|
||||||||||
|
|
|
|
|
|
|
|
|
|
|
|
|
|
|
|
|
|
|
|
|
|
|
|
|
|
|
|
|
Fixed Paper Side |
|
Disable Duplex |
|
|
Disable Staple |
|
|
|
|
|
|
|
|
|||||||||||
|
|
|
|
|
|
|
|
|
|
|
|
|
|
|
|
|
|
|
|
|
|
|
||||
|
|
|
|
|
|
|
|
|
|
Feeding Approved Job |
|
|
|
|
|
|
|
|
||||||||
|
|
|
Copy |
|
|
|
|
|
Fax |
|
|
I-Fax |
|
Doc. Filing |
|
|||||||||||
|
|
|
|
|
|
|
|
|
|
|
|
|
|
|
|
|
|
|
|
|
|
|
|
|
|
|
(2)Touch the [Tray Settings] key.
(3)Touch the [Change] key in "Tray 1".
26
System Settings |
|
|
|
|
|
|
|
|
|
|
|
|
|
|
|
|
|
|
|
|
|
|
|
Tray Settings |
|
|
|
|
Cancel |
|
|
OK |
|||
|
|
|
|
|
|
|
|
|
|
|
|
|
|
|
|
|
|
|
|
|
(6) |
|
|
Tray: |
|
Tray 1 |
|
|
|
|
|
|
|||
|
|
|
|
|
|
|
|
|
|
|
|
Type: |
|
Recycled |
|
(4) |
|
|
|
|
|
|
|
|
|
|
|
|
|
|
|
|
|||
|
|
|
|
|
|
|
|
|
|
|
|
Size: |
Auto-AB |
(5) |
||
|
|
|
||
|
|
|
|
|
Paper Property: |
|
|
|
|
|
|
|
|
|
|
|
|
|
|
|
|
Copy |
|
|
|
|
|
|
|
|
|
I-Fax |
|
|
|
|
|
|
|
|
|
Fax |
|
|
|
|
|
|
|
|
|
Doc. Filing |
|
|
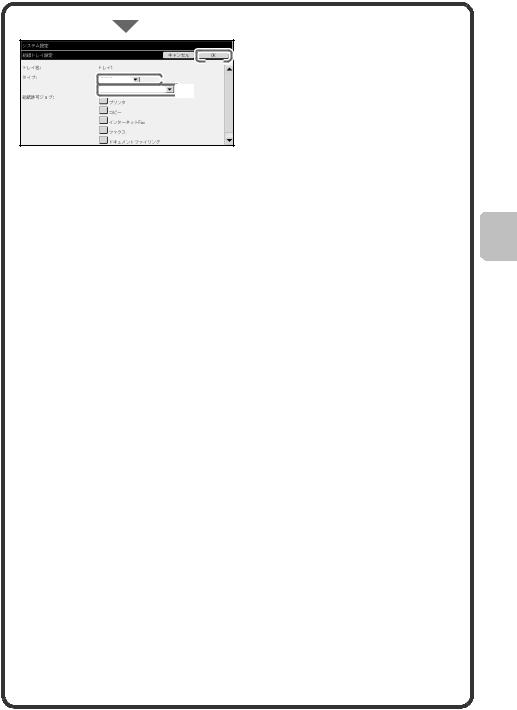
Select settings in the touch panel. (Continued)
(4)Select [Recycled] from the "Type" select box.
(5)Make Sure that [Auto-AB] is selected in the "Size" select box.
For more information, see "Paper Tray Settings" in "7. SYSTEM SETTINGS" in the Operation Guide.
(6)Touch the [OK] key.
The above steps change the paper settings for tray 1 to A5 recycled paper.
27

Loading paper in bypass tray
 The side to be copied on must be face down!
Load the paper in the horizontal orientation.
When loading A4 size paper, pull out the tray extension.
The maximum number of sheets that can be loaded in the bypass tray is approximately 100 for plain paper and approximately 20 for envelopes.
Example: Loading an envelope
Place paper that is A5
(7-1/4" x 10-1/2") or smaller in the horizontal orientation.
Only the address side of envelopes can be printed on. Place envelopes with the address side face down.
Do not place heavy objects on the bypass tray or press down on the tray. The bypass tray may be damaged, the machine may topple, and injury may result. Special types of paper that cannot be loaded in other trays can be loaded in the bypass tray.
For detailed information on the bypass tray, see "LOADING PAPER IN THE BYPASS TRAY" in "1. BEFORE USING THE MACHINE" in the Operation Guide.
28
 Loading...