


SHARP ELECTRONICS (Europe) GmbH
Sonninstraße 3, D-20097 Hamburg
SHARP CORPORATION
http://www.sharp-eu.com
|
|
|
|
Printed in Poland |
|
|
|
|
Wydrukowano w Polsce |
|
|
|
|
Készült Lengyelországban |
|
|
|
|
Vytištěno v Polsku |
|
|
|
|
Vytlačené v Poľsku |
|
|
|
|
Надруковано в Польщі |
|
|
|
|
Trükitud Poolas |
|
|
|
|
Iespiests Polijā |
|
|
|
|
Išspausdinta Lenkijoje |
|
|
|
|
Τυπώθηκε στην Πολωνία |
|
|
|
|
Polonya’da basılmıştır |
PIN |
TINS-E287WJZZ |
|||
|
|
|
|
09P07-PL-NG |
|
|
|
|
|
46LE600E-LC |
32LE600E/LC-LC |
|
40LE600E- |
E287WJZZ |
|
/ΛΕΙΤΟΥΡΓΙΑΣ ΕΓΧΕΙΡΙΔΙΟINSTRUKCIJA/ MATA/NAUDOJIMOĀROKASGR LIETOŠANAS KILAVUZU KULLANMA |
K ÚTMUTATÓ/NÁVOD UGI/KEZELÉSIŁOBS MANUAL/INSTRUKCJA OPERATION /KASUTUSJUHEND/ЕКСПЛУАТАЦІЇ З ІНСТРУКЦІЯOBSLUHU/ NA OBSLUZE/NÁVOD |
3
LC-32LE600E LC-40LE600E LC-46LE600E
LCD COLOUR TELEVISION
TELEWIZOR KOLOROWY LCD LCD SZÍNESTELEVÍZIÓ
TELEVIZOR S BAREVNOU LCD OBRAZOVKOU TELEVÍZOR S FAREBNOU LCD OBRAZOVKOU
КОЛЬОРОВИЙТЕЛЕВІЗОРЗ РІДКОКРИСТАЛІЧНИМДИСПЛЕЄМ
VÄRVILINE LCD-TELER
ŠĶIDRO KRISTĀLU EKRĀNA (LCD) KRĀSU TELEVIZORS
SPALVINIS LCD TELEVIZORIUS
ΤΗΛΕΟΡΑΣΗΜΕΕΓΧΡΩΜΗΟΘΟΝΗLCD (ΥΓΡΩΝΚΡΥΣΤΑΛΛΩΝ)
LCD RENKLİTELEVİZYON
OPERATION MANUAL
INSTRUKCJA OBSŁUGI
KEZELÉSI ÚTMUTATÓ
NÁVOD K OBSLUZE
NÁVOD NA OBSLUHU
ІНСТРУКЦІЯ З ЕКСПЛУАТАЦІЇ
KASUTUSJUHEND LIETOŠANAS
ROKASGRĀMATA NAUDOJIMO INSTRUKCIJA
ΕΓΧΕΙΡΙΔΙΟ ΛΕΙΤΟΥΡΓΙΑΣ
KULLANMA KILAVUZU
TÜRKÇE ΕΛΛΗΝΙΚΑ LIETUVIŠKAI LATVISKI EESTI УКРАЇНСЬКА SLOVENSKY ČESKY MAGYAR POLSKI ENGLISH
Cover_PL01_LE600E.indd 1 |
|
|
|
|
2009/07/14 14:26:50 |
|
|
|
|
||
|
|
|
|
|
|
SPECIAL NOTE FOR USERS IN THE U.K.
The mains lead of this product is fitted with a non-rewireable (moulded) plug incorporating a 13A fuse. Should the fuse need to be replaced, a BSI or ASTA approved BS 1362 fuse marked  or ASA and of the same rating as above, which is also indicated on the pin face of the plug, must be used. Always refit the fuse cover after replacing the fuse. Never use the plug without the fuse cover fitted. In the unlikely event of the socket outlet in your home not being compatible with the plug supplied, cut off the mains plug and fit an appropriate type.
DANGER:
The fuse from the cut-off plug should be removed and the cut-off plug destroyed immediately and disposed of in a safe manner.
Under no circumstances should the cut-off plug be inserted elsewhere into a 13A socket outlet, as a serious electric shock may occur.
To fit an appropriate plug to the mains lead, follow the instructions below:
IMPORTANT:
The wires in the mains lead are coloured in accordance with the following code:
Blue: Neutral
Brown: Live
As the colours of the wires in the mains lead of this product may not correspond with the coloured markings identifying the terminals in your plug, proceed as follows:
•The wire which is coloured blue must be connected to the plug terminal which is marked N or coloured black.
•The wire which is coloured brown must be connected to the plug terminal which is marked L or coloured red.
Ensure that neither the brown nor the blue wire is connected to the earth terminal in your three-pin plug.
Before replacing the plug cover make sure that:
•If the new fitted plug contains a fuse, its value is the same as that removed from the cut-off plug.
•The cord grip is clamped over the sheath of the mains lead, and not simply over the lead wires.
IF YOU HAVE ANY DOUBT, CONSULT A QUALIFIED ELECTRICIAN.
Cover_PL02_LE600E.indd 1
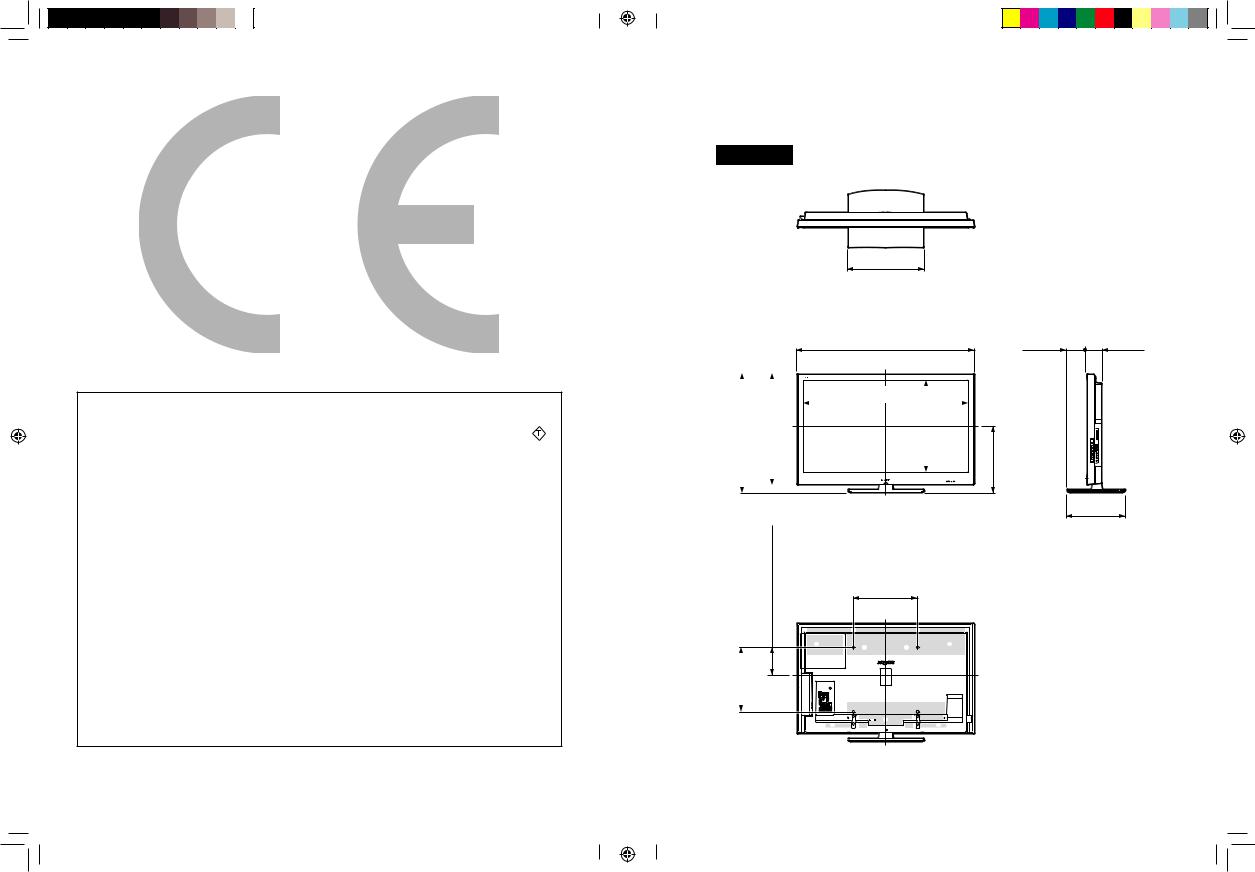
46o/40o/36o
( ) LC-46LE600E
[ ] LC-40LE600E
[[ ]] LC-32LE600E
( 470.0 ) / [ 420.0 ] / [[ 390.0 ]] ( 470,0 ) / [ 420,0 ] / [[ 390,0 ]]
]] ]] |
|
]] ]] |
|
|
||
554.0 |
554,0 |
|
502.0 |
502,0 |
|
|
[[ [[ |
|
[[ [[ |
|
|
||
/ / |
|
/ / |
|
|
||
|
] ] |
|
|
|||
] ] |
|
612.0 |
612,0 |
|
|
|
664.0 |
664,0 |
|
[ [ |
|
|
|
[ [ |
|
/ / |
|
|
||
/ / |
|
) ) |
|
|
||
) ) |
|
688.0 |
688,0 |
|
|
|
740.0 |
740,0 |
|
( ( |
|
|
|
|
|
|
|
|
||
( ( |
|
|
|
|
|
|
|
|
|
]] ]] |
|
|
|
|
|
|
135.0 |
135,0 |
|
|
|
|
|
[[ [[ |
|
|
|
|
|
|
/ / |
|
|
|
|
|
|
] ] |
|
|
|
|
|
|
170.0 |
170,0 |
|
|
|
|
|
[ [ |
|
|
|
|
|
|
/ / |
|
|
|
]] |
]] |
|
) ) |
|
|
|
|
175.0 |
175,0 |
|
|
||
200.0 200,0 |
|
( ( |
|
|
||
[[ [[ |
|
|
|
|
|
|
/ / |
|
|
|
|
|
|
] ] |
|
|
|
|
|
|
300.0 |
300,0 |
|
|
|
|
|
[ [ |
|
|
|
|
|
|
/ / |
|
|
|
|
|
|
) ) |
|
|
|
|
|
|
400.0 |
400,0 |
|
|
|
|
|
|
|
|
|
|||
( ( |
|
|
|
|
|
|
( 1099.0 ) / [ 964.0 ] / [[ 767.0 ]] ( 1099,0 ) / [ 964,0 ] / [[ 767,0 ]]
|
|
|
|
|
|
|
|
|
|
|
|
|
( 1023.4 ) / [ 887.8 ] |
/ [[ 700.0 ]] |
|
|
|
|
|
||||||
|
|
|
|
|
|
|
|
|
|
|
|
|
( 1023,4 ) / [ 887,8 ] |
/ [[ 700,0 ]] |
|
|
|
|
|
||||||
) ] ]] |
|
) ] ]] |
|
|||||||||
575.6 |
500.4 |
394.5 |
|
575,6 |
500,4 |
394,5 |
|
|||||
( [ |
[[ |
|
( [ |
[[ |
|
|||||||
|
|
|
|
|
|
|
|
|
|
|
|
|
|
|
|
|
|
|
|
|
|
|
|
|
|
|
|
|
|
|
|
|
|
|
|
|
|
|
|
|
|
|
|
|
|
|
|
|
|
|
|
( 400.0 ) / [ 300.0 ] / [[ 200.0 ]] ( 400,0 ) / [ 300,0 ] / [[ 200,0 ]]
]] ]] |
|
321.0 |
321,0 |
[[ [[ |
|
/ / |
|
] ] |
|
377.0 |
377,0 |
[ [ |
|
/ / |
|
) ) |
|
415.0 |
415,0 |
( ( |
|
( 123.2 ) |
( 93.2 ) |
||
[ 99.0 |
] |
[ 93.1 |
] |
[[ 83.0 |
]] |
[[ 91.9 |
]] |
( 123,2 ) |
( 93,2 ) |
||
[ 99,0 |
] |
[ 93,1 |
] |
[[ 83,0 |
]] |
[[ 91,9 |
]] |
( 357.0 ) / [ 309.0 ] / [[ 271.9 ]] ( 357,0 ) / [ 309,0 ] / [[ 271,9 ]]
2009/07/14 14:27:49
OPERATION MANUAL
ENGLISH
• The illustrations and the OSD in this operation manual are for explanation purposes and may vary slightly from the actual operations. |
ENGLISH |
• The examples used throughout this manual are based on the LC-46LE600E model. |
|
• LC-32LE600E, LC-40LE600E and LC-46LE600E models are compatible with H.264 (MPEG4 H.264, MPEG4 AVC, MPEG4 AVC/H.264) |
|
compressed broadcasts. |
|
|
|
Dear SHARP customer |
|
Thank you for your purchase of the SHARP LCD colour TV product. To ensure safety and many years of trouble-free operation of your product, please read the Important Safety Precautions carefully before using this product.
Contents
Contents ...................................................................... |
1 |
Introduction................................................................. |
2 |
Important Safety Precautions ................................ |
2 |
Remote control unit .............................................. |
3 |
TV (Front view) ...................................................... |
4 |
TV (Rear view)....................................................... |
4 |
Preparation.................................................................. |
5 |
Supplied accessories............................................ |
5 |
Attaching the stand unit ........................................ |
5 |
Inserting the batteries............................................ |
6 |
Using the remote control unit ................................ |
6 |
Cautions regarding the remote control unit...... |
6 |
Quick guide ................................................................. |
7 |
Initial installation overview...................................... |
7 |
Before turning on the power ................................. |
8 |
Initial auto installation ............................................ |
9 |
Checking signal strength................................. |
9 |
Watching TV .............................................................. |
10 |
Daily operation.................................................... |
10 |
Switching on/off ............................................ |
10 |
Switching between digital and analogue |
|
broadcasts................................................. |
10 |
Changing channels ....................................... |
10 |
Selecting an external video source ................ |
10 |
Selecting a sound mode ............................... |
10 |
EPG.................................................................... |
11 |
Teletext ............................................................... |
12 |
Using the MHEG-5 application (UK only) ............. |
12 |
Connecting external devices................................... |
13 |
Video connections .............................................. |
13 |
HDMI connection .......................................... |
13 |
Component connection ................................ |
14 |
VIDEO connection......................................... |
14 |
SCART connection ....................................... |
14 |
Audio connections .............................................. |
15 |
Speaker/amplifier connection........................ |
15 |
Inserting the CA Card into the CI Module ............ |
15 |
Menu operation......................................................... |
16 |
What is the MENU? ............................................ |
16 |
Basic Operation ............................................ |
16 |
Basic adjustment...................................................... |
17 |
Picture Settings .................................................. |
17 |
AV MODE...................................................... |
18 |
Audio Settings .................................................... |
18 |
Setting audio input........................................ |
19 |
Automatic volume adjustment....................... |
19 |
Outputting audio only.................................... |
19 |
AQUOS LINK Settings ........................................ |
19 |
What you can do with AQUOS LINK ............. |
19 |
Controlling AQUOS LINK devices using remote |
|
control unit................................................. |
19 |
Power Save Settings........................................... |
20 |
Channel Settings ................................................ |
20 |
Auto Installation ............................................ |
20 |
Channel detail settings .................................. |
20 |
Password/Parental lock settings ................... |
22 |
Language Settings.............................................. |
22 |
Useful viewing functions.......................................... |
23 |
Selecting the picture size .................................... |
23 |
Display Settings .................................................. |
23 |
Channel display............................................. |
23 |
Time and Title display ................................... |
23 |
Other useful features ............................................... |
24 |
Setting when using external devices ................... |
24 |
Input source settings..................................... |
24 |
Skipping specified inputs .............................. |
24 |
Reset.................................................................. |
24 |
Identification ....................................................... |
24 |
Software update ................................................. |
24 |
Connecting a PC....................................................... |
25 |
Connecting a PC ................................................ |
25 |
Adjusting the PC image automatically ........... |
25 |
Adjusting the PC image manually .................. |
25 |
RS-232C port specifications ............................... |
26 |
PC compatibility chart......................................... |
27 |
RS-232C command list ...................................... |
27 |
Appendix ................................................................... |
28 |
Troubleshooting .................................................. |
28 |
Specifications ..................................................... |
29 |
Optional accessory ............................................. |
30 |
Environmental specifications ............................... |
30 |
Trademarks......................................................... |
30 |
End of life disposal.............................................. |
31 |
Rating table for Child Lock.................................. |
32 |
Abbreviation list .................................................. |
32 |

 1
1
LC-LE600E_GB3.indd 1 |
|
|
2009/07/14 14:37:41 |
|
|
||
|
|
|
|
Introduction
Important Safety Precautions
•Cleaning—Unplug the AC cord from the AC outlet before cleaning the product. Use a damp cloth to clean the product. Do not use liquid cleaners or aerosol cleaners.
•Use a soft damp cloth to gently wipe the panel when it is dirty. To protect the panel, do not use a chemical cloth to clean it. Chemicals may cause damage or cracks in the cabinet of the TV.
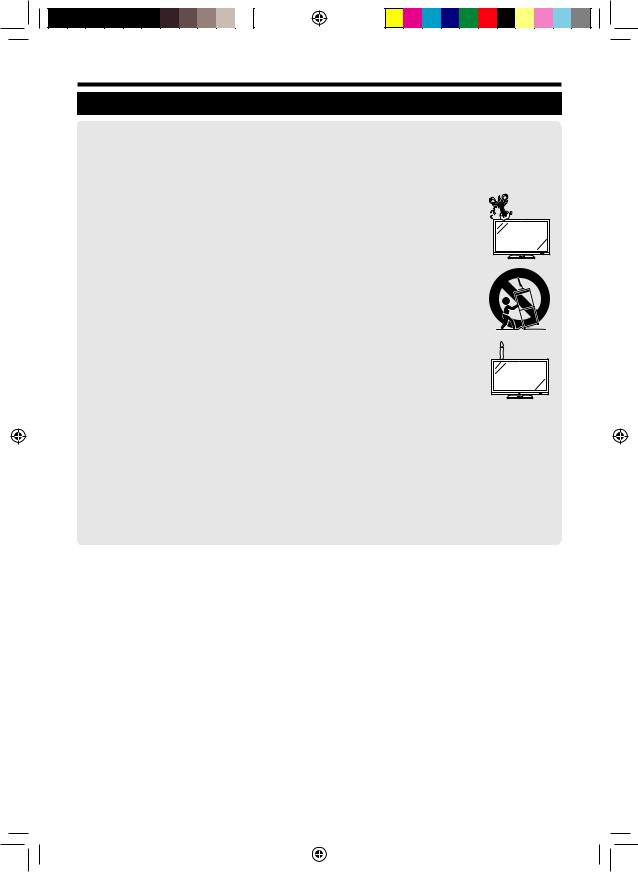
•Water and moisture—Do not use the product near water, such as bathtub, washbasin, kitchen sink, laundry tub, swimming pool and in a wet basement.
• Do not place vases or any other water-filled containers on this product. The water may spill onto the product causing fire or electric shock.
• Stand—Do not place the product on an unstable cart, stand, tripod or table. Doing so can cause the product to fall, resulting in serious personal injuries as well as damage to the product. Use only a cart, stand, tripod, bracket or table recommended by the manufacturer or sold with the product. When mounting the product on a wall, be sure to follow the manufacturer’s instructions. Use only the mounting hardware recommended by the manufacturer.
•When relocating the product placed on a cart, it must be moved with utmost care. Sudden stops, excessive force and uneven floor surface can cause the product to fall from the cart.
•Ventilation—The vents and other openings in the cabinet are designed for ventilation. Do not cover or block these vents and openings since insufficient ventilation can cause overheating and/or shorten the life of the
product. Do not place the product on a bed, sofa, rug or other similar surface, since they can block ventilation openings. This product is not designed for built-in installation; do not place the product in an enclosed place such as a bookcase or rack, unless proper ventilation is provided or the manufacturer’s instructions are followed.
• The LCD panel used in this product is made of glass. Therefore, it can break when the product is dropped or impact applied. If the LCD panel is broken, be careful not to be injured by broken glass.
• Heat sources—Keep the product away from heat sources such as radiators, heaters, stoves and other heatgenerating products (including amplifiers).
•To prevent fire, never place any type of candle or naked flames on the top or near the TV set.
•To prevent fire or shock hazard, do not place the AC cord under the TV set or other heavy items.
•Headphones—Do not set the volume at a high level. Hearing experts advise against extended listening at high volume levels.
•Do not display a still picture for a long time, as this could cause an afterimage to remain.
•There is power consumption always if main plug is connected.
•Servicing—Do not attempt to service the product yourself. Removing covers can expose you to high voltage and other dangerous conditions. Request a qualified person to perform servicing.
The LCD panel is a very high technology product, giving you fine picture details.
Due to the very large number of pixels, occasionally a few non-active pixels may appear on the screen as a fixed point of blue, green or red. This is within product specifications and does not constitute a fault.
Precautions when transporting the TV
When transporting the TV, never carry it by holding onto the speakers. Be sure to always carry the TV by two people holding it with two hands—one hand on each side of the TV.

 2
2
LC-LE600E_GB3.indd 2 |
|
|
2009/07/14 14:37:42 |
|
|
||
|
|
|
|

Introduction
Remote control unit
1B(Standby/On)
(Page 10)
2Buttons for useful operations
m(Teletext)
ATV: Display analogue teletext (Page 12).
DTV: Select MHEG-5 and teletext for DTV (Page 12).
k(Reveal hidden Teletext)
(Page 12)
[(Subtitle)
Switch subtitle languages on/off (Pages 12 and 22).
3(Freeze/Hold)
Press to freeze a moving image on the screen.
Teletext: Stop updating teletext pages automatically or release the hold mode.
1(Subpage)
(Page 12)
v(Top/Bottom/Full)
Set the area of magnification in teletext mode (Page 12).
3Numeric buttons 0_9
Set the channel.
Enter desired numbers.
Set the page in teletext mode.
•When the four Nordic countries (Sweden, Norway, Finland or Denmark) are selected in the country setting from the initial auto installation (Page 9), TV channels are four digits. When another country is selected, TV channels are three digits.
4A(Flashback)
Press to return to the previously selected channel or external input.
5DTV
Press to access to a digital TV channel.
6ATV
Press to access to an analogue TV channel.
72(Sound mode)
Select a sound multiplex mode (Page 10).
8i+/-(Volume)
Increase/decrease TV volume.
9e(Mute)
TV sound on/off.
E END
1 |
|
Exit the “MENU” screen. |
|
|
R R/G/Y/B (Colour) buttons |
||
2 |
|
||
|
The coloured buttons are |
||
|
|
||
|
|
correspondingly used to select the |
|
3 |
|
coloured items on the screen (e.g., |
|
|
|
EPG, MHEG-5, Teletext). |
|
4 |
15 |
T b(INPUT SOURCE) |
|
16 |
Select an input source (Page 10). |
||
5 |
|||
6 |
17 |
Y EPG |
|
7 |
18 |
||
DTV: Display the EPG screen (Page |
|||
8 |
19 |
11). |
|
9 |
20 |
U RADIO |
|
10 |
21 |
||
DTV: Switch to Radio mode. |
|||
11 |
22 |
||
I P. INFO |
|||
|
|
||
12 |
|
Press to display programme |
|
13 |
23 |
information which is transmitted |
|
through digital video broadcasting in |
|||
14 |
|
the upper left corner of the screen |
|
|
|
(DTV only). |
|
|
24 |
O :r/s |
|
|
Select the TV channel. |
||
|
25 |
P p(Display information) |
|
|
Press to display the station |
||
|
|
||
|
|
information (channel number, signal, |
|
|
|
etc.) in the upper right corner of the |
|
|
|
screen (Page 23). |
|
|
|
A ECO (Standard/Advanced/Off) |
|
|
|
Select “Energy Save” setting (Page |
|
|
|
20). |
|
|
|
S @ |
|
|
|
“MENU” screen on/off. |
|
|
|
D 6(Return) |
|
|
|
Return to the previous “MENU” |
|
|
|
screen. |
|
|
|
F SLEEP |
|
|
|
Press to schedule a time for the TV |
|
|
|
to automatically standby. |
|
|
|
G AQUOS LINK buttons |
|
|
|
If external equipment such as a |
|
0 f(WIDE MODE) |
|
AQUOS BD Player is connected via |
|
|
HDMI cables and is AQUOS LINK |
||
Select a wide mode (Page 23). |
|||
compatible, you can use these |
|||
Q # |
|
||
|
AQUOS LINK buttons. See page 19 |
||
Select a video setting (Page 18). |
for details. |
||
|
|
||
W a/b/c/d(Cursor) |
|
• On this model, <key |
|
Select a desired item on the setting |
does not work. |
||
screen. |
|
|
|
;
Execute a command within the “MENU” screen.
ATV/DTV: Display the programme list when no other “MENU” screen is running.

 3
3
LC-LE600E_GB3.indd 3 |
|
|
2009/07/14 14:37:42 |
|
|
||
|
|
|
|

Introduction
TV (Front view)
|
|
1 |
B(Standby/On indicator) |
|
5 |
2 |
OPC indicator |
|
3 |
Remote control sensor |
|
1 2 3 4 |
6 |
4 |
OPC sensor |
|
5 |
a(Power button) |
|
|
|
||
|
7 |
6 |
@(Menu button) |
|
|
7 |
b(Input source button) |
|
8 |
8 |
:r/s(Programme [channel] |
|
|
|
buttons) |
|
9 |
9 |
i+/-(Volume buttons) |
|
|
|
TV (Rear view)
6
1
*1
7
8 9 10
2 |
11 |
3
*2
12


 13 4
13 4 


14
5
15 |
16 |
17 |
18 |
1COMMON INTERFACE slot
2SERVICE terminal (USB terminal for service personnel only)
3 HDMI 3 (HDMI) terminal
4EXT 8 terminals
5Headphones
6AC INPUT terminal
7MAIN POWER switch
8EXT 4 (ANALOGUE RGB) terminal
9 HDMI 1 (HDMI) terminal
10HDMI 2 (HDMI) terminal
11Antenna terminal
12HDMI 2/PC AUDIO (R/L) jack
13DIGITAL AUDIO OUTPUT terminal
14RS-232C terminal
15EXT 3 (COMPONENT/AUDIO) terminals
16EXT 1 (RGB) terminal
17EXT 2 (AV) terminal
18OUTPUT (AUDIO) terminals
WARNING
•Excessive sound pressure from earphones and headphones can cause hearing loss.
•Do not set the volume at a high level. Hearing experts advise against extended listening at high volume levels.
•The SERVICE terminal is reserved only for qualified service personnel. Do not connect anything to the terminal.
IWhen the MAIN POWER switch is turned off (a), the amount of electric power consumed will be reduced to 0.01 W or less. However, unlike when unplugging the AC cord, the power is not completely disconnected.
JThe HDMI 2 and EXT 4 terminals can both use the same audio input terminal (HDMI 2/PC AUDIO (R/L)). However, the proper item must be selected in the “PC Audio Select” menu (Refer to page 19 for details).

 4
4
LC-LE600E_GB3.indd 4 |
|
|
2009/07/14 14:37:43 |
|
|
||
|
|
|
|
Preparation
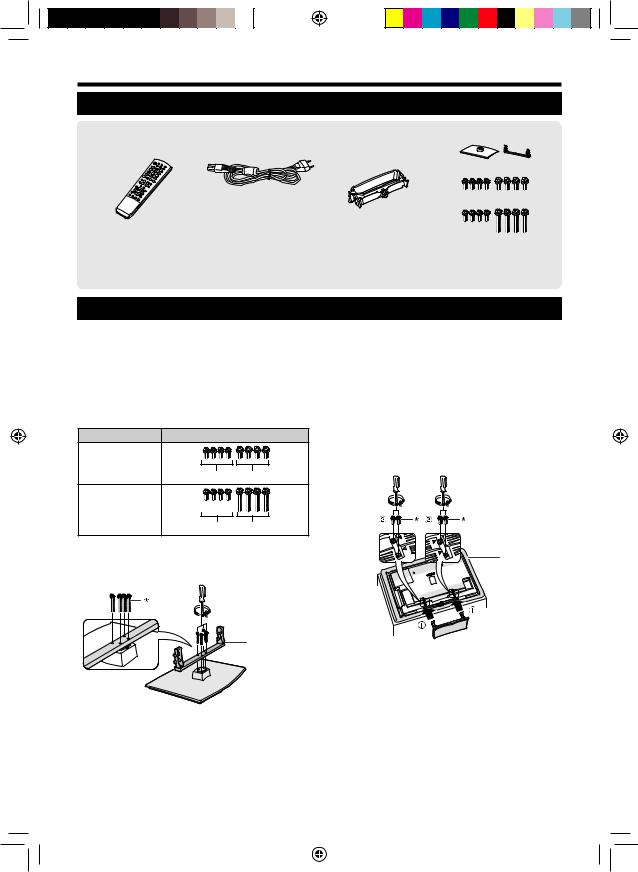
Supplied accessories
Remote control unit ( x 1) |
AC cord ( x 1) |
Cable clamp ( x 1) |
Stand unit ( x 1) |
Product shape varies in some countries.
For 32 inch models |
For 40/46 inch models |
Pages 3 and 6 |
Page 8 |
Page 8 |
Page 5 |
•Operation manual (This publication)
•“AAA” size zinc-carbon battery ( x 2) ... Page 6
Attaching the stand unit
•Before attaching (or detaching) the stand, unplug the AC cord from the AC INPUT terminal.
•Before performing work, spread cushioning over the surface on which you will be laying the TV. This will prevent it from being damaged.
CAUTION
•Attach the stand in the correct direction.
•Be sure to follow the instructions. Incorrect installation of the stand may result in the TV falling over.
1Confirm that there are eight screws with the stand unit.
Models |
Screws |
32 inch models
A B
40/46 inch models
C D
2Attach the supporting post for the stand unit onto the base using the four screws with the screw driver as shown.
Supporting post
*32 inch models: Use Screws B in the table in step 1.
*40/46 inch models: Use Screws D in the table in step 1.
3Inserting the stand.
1Insert the stand into the openings on the bottom of the TV (Hold the stand so it will not drop from the edge of the base area).
2Insert and tighten the four screws into the four holes on the rear of the TV.
Soft cushion
*32 inch models: Use Screws A in the table in step 1.
*40/46 inch models: Use Screws C in the table in step 1.
NOTE
•To detach the stand unit, perform the steps in reverse order.
•A screw driver is not supplied with this product.

 5
5
LC-LE600E_GB3.indd 5 |
|
|
2009/07/14 14:37:43 |
|
|
||
|
|
|
|
Preparation
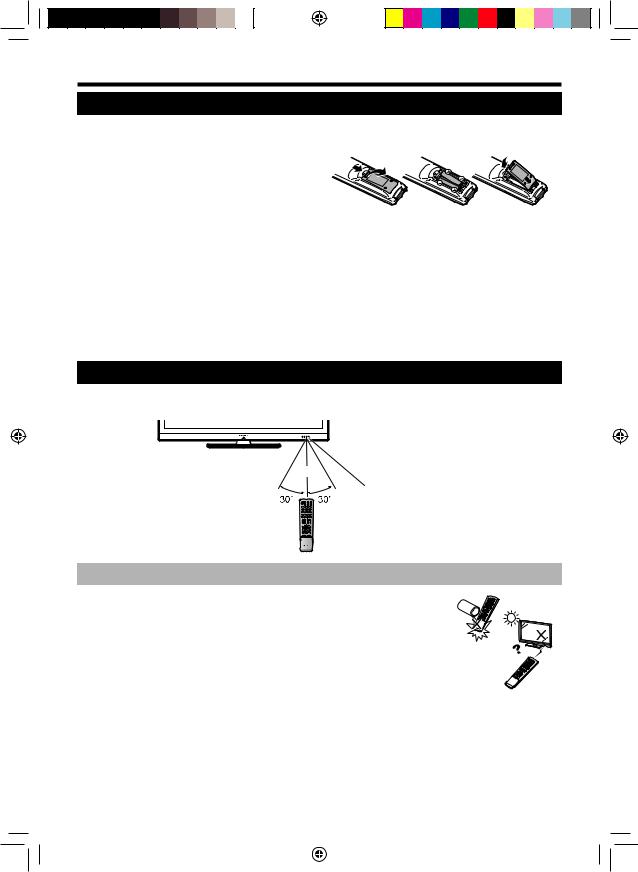
Inserting the batteries
Before using the TV for the first time, insert two supplied “AAA” size zinc-carbon batteries. When the batteries become depleted and the remote control unit fails to operate, replace the batteries with new “AAA” size batteries.
1Open the battery cover.
2 Insert two supplied “AAA” size batteries.
• Place batteries with their terminals corresponding to the (e) and (f) indications in the battery compartment.
3 Close the battery cover.
CAUTION
Improper use of batteries can result in chemical leakage or explosion. Be sure to follow the instructions below.
•Do not mix batteries of different types. Different types of batteries have different characteristics.
•Do not mix old and new batteries. Mixing old and new batteries can shorten the life of new batteries or cause chemical leakage in old batteries.
•Remove batteries as soon as they have worn out. Chemicals that leak from batteries can cause a rash. If you find any chemical leakage, wipe thoroughly with a cloth.
•The batteries supplied with this product may have a shorter life expectancy due to storage conditions.
•If you will not be using the remote control unit for an extended period of time, remove the batteries from it.
Note on disposing batteries:
The batteries provided contain no harmful materials such as cadmium, lead or mercury.
Regulations concerning used batteries stipulate that batteries may no longer be thrown out with the household rubbish. Deposit any used batteries free of charge into the designated collection containers set up at commercial businesses.
Using the remote control unit
Use the remote control unit by pointing it towards the remote control sensor. Objects between the remote control unit and sensor may prevent proper operation.
5 m
Remote control sensor
Cautions regarding the remote control unit
• Do not expose the remote control unit to shock. In addition, do not expose the remote control unit to liquids, and do not place in an area with high humidity.
• Do not install or place the remote control unit under direct sunlight. The heat may cause deformation of the unit.
• The remote control unit may not work properly if the remote control sensor of the TV is under direct sunlight or strong lighting. In such cases, change the angle of the lighting or the TV, or operate the remote control unit closer to the remote control sensor.

 6
6
LC-LE600E_GB3.indd 6 |
|
|
2009/07/14 14:37:44 |
|
|
||
|
|
|
|
Quick guide
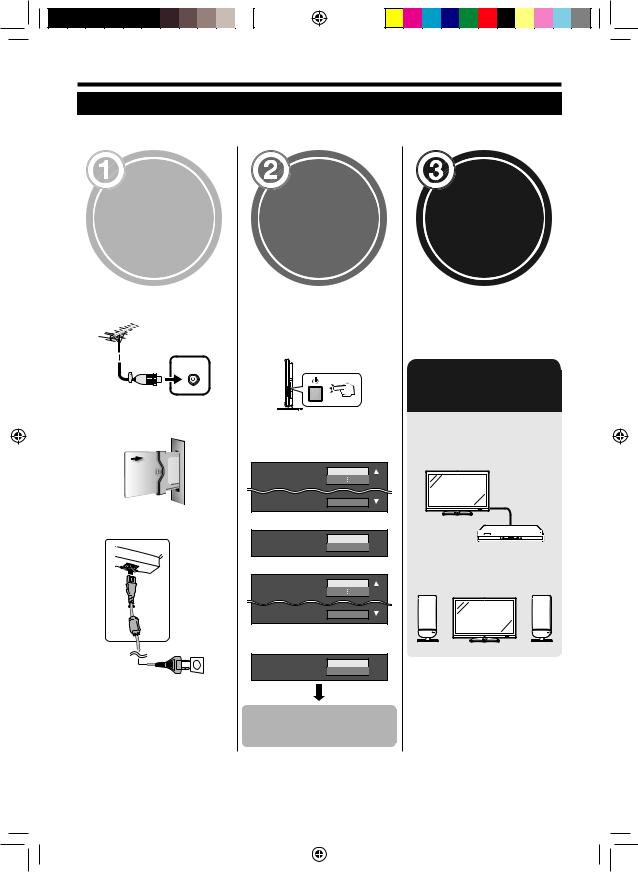
Initial installation overview
Follow the steps below one by one when using the TV for the first time. Some steps may not be necessary depending on your TV installation and connection.
Preparation
Connect an antenna cable to the antenna terminal (Page 8).
If necessary, insert a CA card into the CI slot to watch
scrambled broadcasts (Page 15).
Connect the AC cord to the TV (Page 8).
Product shape varies in some countries.
Run the initial settings
Turn on (;) the MAIN POWER switch on the left side of the TV (Page 4).
Turn on the power using aon the TV (Page 10).
Run the initial auto installation (Page 9).
Language setting
English
Português
Home/Store setting
HOME
STORE
Country setting
Austria
Finland
Installation start confirmation
Start
Skip
Start searching channels
Watch TV
Congratulations!
Now you can watch TV.
If necessary, adjust the antenna to attain maximum signal reception (Page 9).
Connect external devices
Connect external devices such as a DVD player/ recorder as instructed (Pages 13_14).
Connect external audio devices such as speakers/ amplifier as instructed (Page 15).

 7
7
LC-LE600E_GB3.indd 7 |
|
|
2009/07/14 14:37:45 |
|
|
||
|
|
|
|
Quick guide
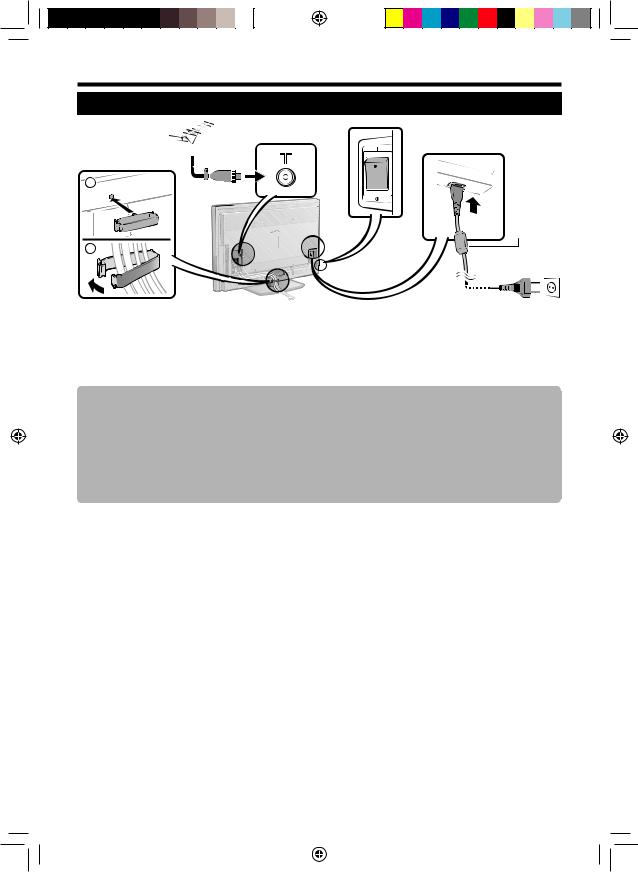
Before turning on the power
|
|
|
|
|
|
|
||
|
|
|
|
|
||||
|
|
|
|
|||||
1 |
|
|
|
|
|
|
|
|
2
Cable clamp (Bundle the cables with the clamp)
Standard DIN45325 plug (IEC 169-2) 75 qcoaxial cable
Turn on (;) the MAIN POWER switch on the left side of the TV.
AC cord (Product shape varies in some countries)
*The AC cord is supplied either with a ferrite core or without a ferrite core. Neither type causes unnecessary electrical wave emissions or interference.
*
Place the TV close to the AC outlet, and keep the power plug within reach.
Supplying power to the antenna
When an active antenna is used, power must be supplied to the antenna using the following procedures after connecting the antenna cable to the antenna terminal on the rear of the TV in order to receive terrestrial digital signals.
1 Press @and the “MENU” screen displays.
2Press c/dto select “Setup”.
3 Press a/bto select “Antenna Setup”, and then press ;. 4 Press a/bto select “Supply Voltage”, and then press ;.
5Press c/dto select “On”, and then press ;.
Mounting the TV on a wall
•This TV should be mounted on a wall only with the wall mount bracket and attachment* available from SHARP (Page 30). The use of other wall mount brackets may result in an unstable installation and may cause serious injuries.
•Mounting the LCD colour TV requires special skills and should only be performed by qualified service personnel. Customers should not attempt to do the work themselves. SHARP bears no responsibility for improper mounting or mounting that results in accident or injury.
•You can ask qualified service personnel about using an optional bracket and attachment* to mount the TV to a wall.
•To use this TV mounted on a wall, first remove the adhesive tape at the two locations on the rear of the TV, and then use the screws supplied with the wall mount bracket to secure the bracket to the rear of the TV.
•When you mount the TV on a wall, you should attach the supporting post.
*Only for 40 inch models.

 8
8
LC-LE600E_GB3.indd 8 |
|
|
2009/07/14 14:37:47 |
|
|
||
|
|
|
|
Quick guide
Initial auto installation
When the TV is powered on for the first time after purchase, the initial auto installation wizard appears. Follow the menus and make the necessary settings one after another.
Confirm the following before turning on the power
E Is the antenna cable connected? E Is the AC cord plugged in?
EIs the MAIN POWER switch turned on (;)?
1 Press aon the TV.
• The initial auto installation wizard appears.
2Setting the OSD language.
English
Português
Press a/bto select the desired language, and then press ;.
3Selecting the location of the TV.
HOME
STORE
Press a/bto select where you will use this TV, and then press ;.
•HOME: “STANDARD” will be the default value for the “AV MODE” setting.
•STORE: “DYNAMIC (Fixed)” will be the default value for the “AV MODE” setting. If the “AV MODE” is changed, the TV will automatically switch back to “DYNAMIC (Fixed)” when there is no signal input from the TV or remote control unit for 30 minutes.
4Setting the country.
Austria
5Starting channel search.
Start
Skip
Press a/bto select “Start” or “Skip”, and then press ;.
•If you want to search for more broadcasts, execute “Additional Search” from the “Programme Setup” menu (Page 21).
6The TV searches for, sorts and stores all the receivable TV stations according to their settings and the connected antenna.
• To abort the initial auto installation in progress, press 6.
NOTE
•If you turn off the power on the TV after performing step 5 or if you select “Skip” on step 5, the initial auto installation wizard will not appear. The auto installation function allows you to
execute the installation again from the “Setup” menu (Page 20).
•The initial auto installation wizard will abort if you leave the TV unattended for 10 minutes before searching for channels in step 6.
•After initial auto installation is completed, the default PIN is automatically set to “1234”. To change the PIN setting, refer to
Password/Parental lock settings (Page 22). To clear the PIN setting (PIN input will no longer be needed), refer to CLEARING THE PIN (Page 24).
•When “Italy” is selected in the country setting, the default PIN is automatically set to “1234” and the default age restriction value is set to 18.
Checking signal strength
If you install an antenna for the first time or relocate it, you should adjust the alignment of the antenna to receive a good reception while checking the antenna setup screen.
1Press @and the “MENU” screen displays.
2Press c/dto select “Setup”.
3Press a/bto select “Antenna Setup”, and then press ;.
4Press a/bto select “Signal Strength”.
NOTE
•The values of “Signal Strength” indicates when to check the appropriate alignment of the antenna.
Finland
Press a/bto select your country or area, and then press ;.
•This setting screen only appears during the first installation.

 9
9
LC-LE600E_GB3.indd 9 |
|
|
2009/07/14 14:37:48 |
|
|
||
|
|
|
|
 Loading...