


R
*Plasmacluster is a trademark of Sharp Corporation.
Free standing type Volně stojící Voľne stojaca Különálló típus
Вільностоячий тип
KC-930E
AIR PURIFIER |
|
|
ENGLISH |
||
with Humidifying Function |
||
|
||
OPERATION MANUAL |
|
|
ČISTIČKA VZDUCHU |
|
|
|
||
ESKYČ |
||
s funkcí zvlhčování |
||
|
||
NÁVOD K OBSLUZE |
|
|
ČISTIČKA VZDUCHU |
|
|
|
||
SLOVENSKY |
||
NÁVOD NA POUŽITIE |
||
s funkciou zvlhčovania |
|
|
LÉGTISZTÍTÓ |
|
|
|
||
MAGYAR |
||
párásító funkcióval |
||
|
||
HASZNÁLATI ÚTMUTATÓ |
|
|
ОЧИСНИК ПОВІТРЯ |
|
|
|
||
УКРАЇНСЬКА |
||
ПОСІБНИК З ЕКСПЛУАТАЦІЇ |
||
з Функцією Зволожування |
|
|
|
|

Please read before operating your new Air Purifier
Some odour ingredients absorbed by the filter may become separated and may be discharged through the air outlet and result in additional odour. Depending on the usage environment, especially when the product is used in a condition significantly more severe than household use, this odour may become strong in a shorter period than expected.
In this case we recommend purchasing the optional replacement filter.
NOTE
•The air purifier is designed to remove air-suspended dust and odour, but not harmful gases (for example, carbon monoxide contained in cigarette smoke.) If the odour sources still exist, it cannot completely remove the odour(for example, odours from construction materials and pet odours).
•It is suggested to open the window a bit when you are smoking in order to facilitate ventilation.
 Dust Collection / Deodorizing Filter
Elements removed by filter
Dust
pollen, dust, particles of cigarette smoke, pet dander
Odour
cigarette smoke odour, household odour (toilet / raw garbage / pet, etc.)

ENGLISH
FEATURES
"Plasmacluster" technology
Plasmacluster technology uses plasma discharge to produce and release the same positive and negative ions as those found in nature ("Plasmacluster ions").
This is a unique air cleaning technology of the SHARP CORPORATION for breaking down and inactivating such potential allergens as the feacal matter or corpses of aerial mites*1, viruses *2 and mold and bacteria *3 suspended in the air, and has been substantiated by third-party organizations both in Japan and overseas.
When there is a high density of Plasmacluster ions in the air, the smell of cigarette smoke trapped in curtains or sofas is removed in about 80 minutes*4, and when clothing is hung in a place exposed to the direct air expelled from the unit generating Plasmacluster ions, the smell of sweat is reduced to a virtually imperceptible level in one night (about 6 hours).
*1 Graduate School of Advanced Sciences of Matter, Hiroshima University, Japan
Measurement of action on the potential allergens of aerial mites in (13m²)
*2 Retroscreen Virology, Ltd., London, UK Measurement of ratio of viruses eliminated from the air in a 1m³ box
*3 Ishikawa Health Service Association, Japan
Measurement of aerial mold and bacteria with an air sampler (13m²)
*4 Japan Spinners Inspecting Foundation, Japan
Evaluation of deodorizing effect on odor-imbued fragments of cloth
CONTENTS
IMPORTANT SAFETY INSTRUCTIONS .....E-2
• WARNING .................................................... |
E-2 |
• CAUTIONS CONCERNING OPERATION ... |
E-3 |
• INSTALLATION GUIDELINES...................... |
E-3 |
• FILTER GUIDELINES .................................. |
E-3 |
PART NAMES...............................................E-4 |
|
• MAIN UNIT DISPLAY ................................... |
E-4 |
• ILLUSTRATIVE DIAGRAM.......................... |
E-4 |
• INCLUDED ................................................... |
E-5 |
• BACK............................................................ |
E-5 |
PREPARATION ............................................E-6 |
|
• FILTER INSTALLATION ............................... |
E-6 |
• REFILLING THE WATER TANK................... |
E-7 |
OPERATION .................................................E-8 |
|
• MAIN UNIT OPERATION ............................. |
E-8 |
CARE AND MAINTENANCE .....................E-9 |
|
• FILTER INDICATOR LIGHT ......................... |
E-9 |
• BACK PANEL AND SENSORS .................... |
E-9 |
• WATER TANK............................................. |
E-10 |
• UNIT ........................................................... |
E-10 |
• HUMIDIFYING TRAY ................................. |
E-11 |
• HUMIDIFYING FILTER............................... |
E-12 |
• FILTER REPLACEMENT GUIDELINES..... |
E-13 |
TROUBLESHOOTING ..............................E-14
SPECIFICATIONS......................................E-15
Thank you for purchasing the SHARP Air Purifier. Please read this manual carefully for the correct usage information. Before using this product, be sure to read the section: “Important Safety Instructions.”
After reading this manual, retain it in a convenient location for future reference.
ENGLISH
E-1

IMPORTANT SAFETY INSTRUCTIONS
When using electrical appliances, basic safety precautions should be followed, including the following:
WARNING - To reduce the risk of electrical shock, fire or injury to persons:
•Read all instructions before using the unit.
•Use only a 220-240 volt outlet.
•Do not use the unit if the power cord or plug is damaged or the connection to the wall outlet is loosened.
•Periodically remove dust from the power plug.
•Do not insert fingers or foreign objects into the intake or air outlet.
•When removing the power plug, always hold the plug and never pull the cord.
Electrical shock and/or fire from short circuit may occur as a result.
•Do not remove the plug when your hands are wet.
•Do not use this unit near gas appliances or fireplaces.
•Remove the power plug from the wall outlet before cleaning the unit and when not using the unit.
Electrical shock from bad insulation and/or fire from short circuit may occur as a result.
•When refilling the Water Tank, cleaning the unit, or when the unit is not in use, be sure to unplug the unit. Electrical shock and/or fire from a short circuit may result.
•If the power cord is damaged, it must be replaced by the manufacturer, its service agent, Sharp Authorised Service Centre or similarly qualified person in order to avoid a hazard.
•Do not operate when using aerosol insecticides or in rooms where there is oily residue, incense, sparks from lit cigarettes, chemical fumes in the air or in very high humidity conditions, such as a bathroom.
•Be cautious when cleaning the unit. Corrosive cleansers may damage the exterior.
•Only Sharp Authorised Service Centre should service this air purifier. Contact the nearest Service Centre for any problems, adjustments, or repairs.
•When carrying the unit, remove the Water Tank and Humidifying Tray first and hold the unit by handles on both sides.
•Do not drink the water in the Humidifying Tray or Water Tank.
•Change the water in the Water Tank daily with fresh tap water and regularly clean the Water Tank and Humidifying Tray. (See E-12 and E-13). When unit is not in use, dispose of the water in the Water Tank and Humidifying Tray. Leaving water in the Water Tank and/or Humidifying Tray may result in mold, bacteria, and bad odours.
In rare cases, this bacteria may cause harmful physical effects.
•This appliance is not intended for use by persons (including children) with reduced physical, sensory or mental capabilities, or lack of experience and knowledge, unless they have been given supervision or instruction concerning use of the appliance by a person responsible for their safety.
Children should be supervised to ensure they do not play with the appliance.
NOTE - Radio or TV Interference
If this air purifier should cause interference to radio or television reception, try to correct the interference by one or more of the following measures:
•Reorient or relocate the receiving antenna.
•Increase the separation between the unit and radio/TV receiver.
•Connect the equipment into an outlet on a circuit different from that to which the receiver is connected.
•Consult the dealer or an experienced radio/TV technician for help.
E-2

CAUTIONS CONCERNING OPERATION
•Do not block the intake and/or air outlet.
•Do not use the unit near or on hot objects, such as stoves or heaters or where it may come into contact with steam.
•Always operate the unit in an upright position.
•Always hold the handle on both sides of the unit when moving it.
Holding the back panel when carrying may cause it to detach, thus dropping the unit and resulting in bodily injury.
•Do not operate the unit without the filters, Water Tank, and Humidifying Tray properly installed.
•Do not wash and reuse the filter .
Not only does it not improve filter performance, it may cause electrical shock or malfunction.
•Clean the exterior with a soft cloth only.
Do not use volatile fluids and/or detergents. The unit surface may be damaged or cracked.
In addition, the sensors may malfunction as a result.
INSTALLATION GUIDELINES
•During the operation of the product, please place the unit at least 2 m away from equipment utilizing electrical waves such as televisions, radios or wave clocks.
•Avoid use in locations where furniture, fabrics or other items may come in contact with and restrict the air intake and/or air outlet.
•Avoid use in locations where the unit is exposed to condensation or rapid temperature changes. (Use under appropriate conditions between 0 and 35˚C in the room.)
(If it is unavoidable please allow unit to stand for 1 hour before switching on.)
•Place on a stable surface with sufficient air circulation.
When placing the unit on a heavily carpeted area, it may cause the unit to vibrate slightly.
•Avoid use in locations where grease or oily smoke is generated (such as in a kitchen, etc.).
The unit surface may crack or the sensor may malfunction as a result.
•Place the unit about 30 cm~60 cm(1~2 ft) away from the wall in order to ensure proper airflow.
The wall directly behind the air outlet may become dirty over time. When using the unit for an extended period of time in the same location, periodically clean the wall and protect the wall with a vinyl sheet, etc. to prevent the wall from becoming dirty.
ENGLISH
FILTER GUIDELINES
•Follow the instructions in this manual for correct care and maintenance of the filters. Use only filters designed for this product.
E-3
PART NAMES
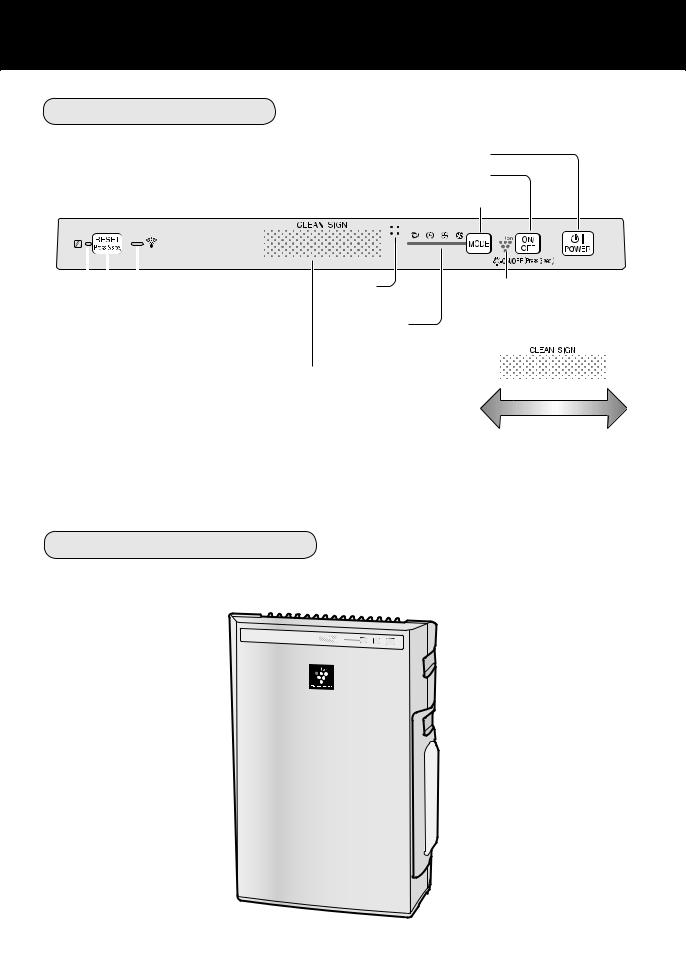
MAIN UNIT DISPLAY
POWER ON/OFF Button
Plasmacluster Ion ON/OFF Button
MODE Button
|
|
|
|
|
|
|
|
|
Odour |
|
|
|
|
|
|
|
|
|
|
|
|
|
|
|
|
|
|
||
|
|
|
Humidify Mode Indicator |
||||||
|
|
|
|
Light |
|
|
|
Sensor |
|
|
|
|
|
|
|
|
|
|
|
|
|
|
|
|
|
|
|
Fan Speed |
|
|
|
Filter |
Reset Button |
|
|
||||
|
|
|
|
|
|
|
|
|
Indicator Lights |
|
|
|
|
|
|
|
|
|
|
|
|
|
|
|
|
|
|
|
|
Filter Indicator Light |
CLEAN SIGN |
||||||||
|
|
|
|
|
|
The odour sensor continuosly |
|||
monitors the air and changes colour depending on air punity.
Plasmacluster Ion
ON/OFF Indicator
Light
Green |
Orange |
Red |
Clean |
|
Very impure |
ILLUSTRATIVE DIAGRAM
Main Unit Display
Handle
Main Unit
E-4
INCLUDED
• Operation manual
BACK
Handle
Tank Handle
Water Tank
(for humidifying)
Humidifying filter
Tank Cap


Humidifying Tray
Float
Power Cord
Plug
(Shape of plug depends on country.)
Air Inlet
Date label
Air Outlet
Filter 
(Dust Collection /
Deodorizing Filter)
Tab
Back Panel (Pre-Filter)
Air Outlet
ENGLISH
E-5
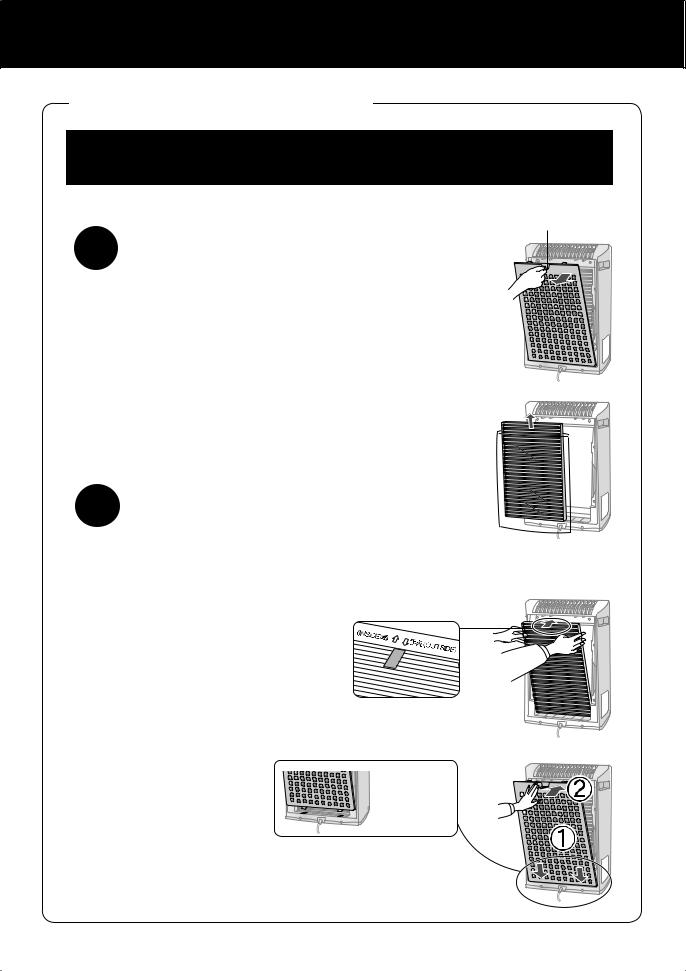
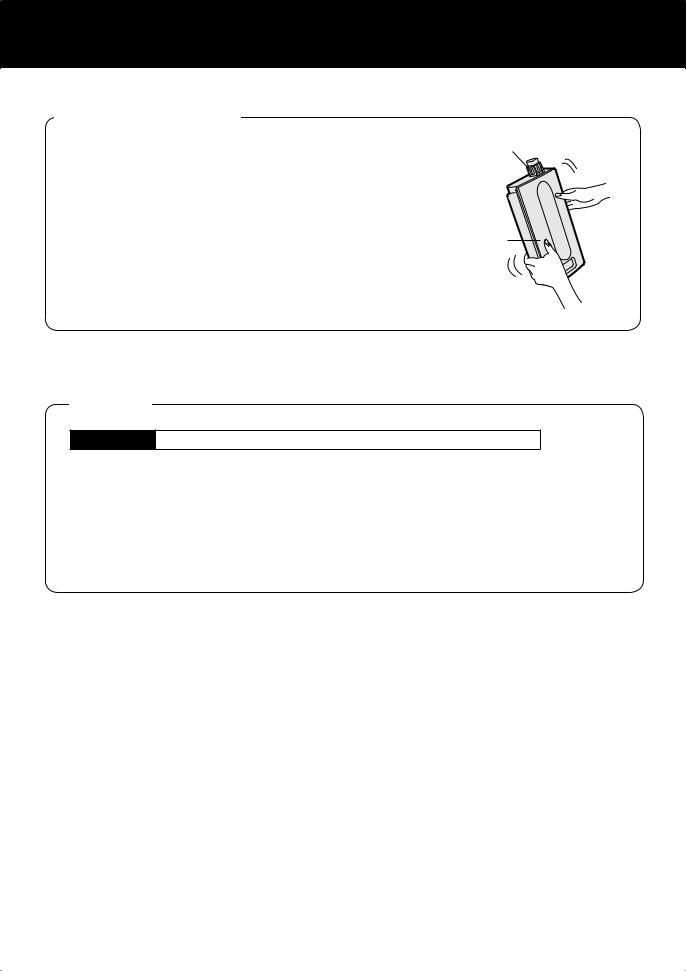
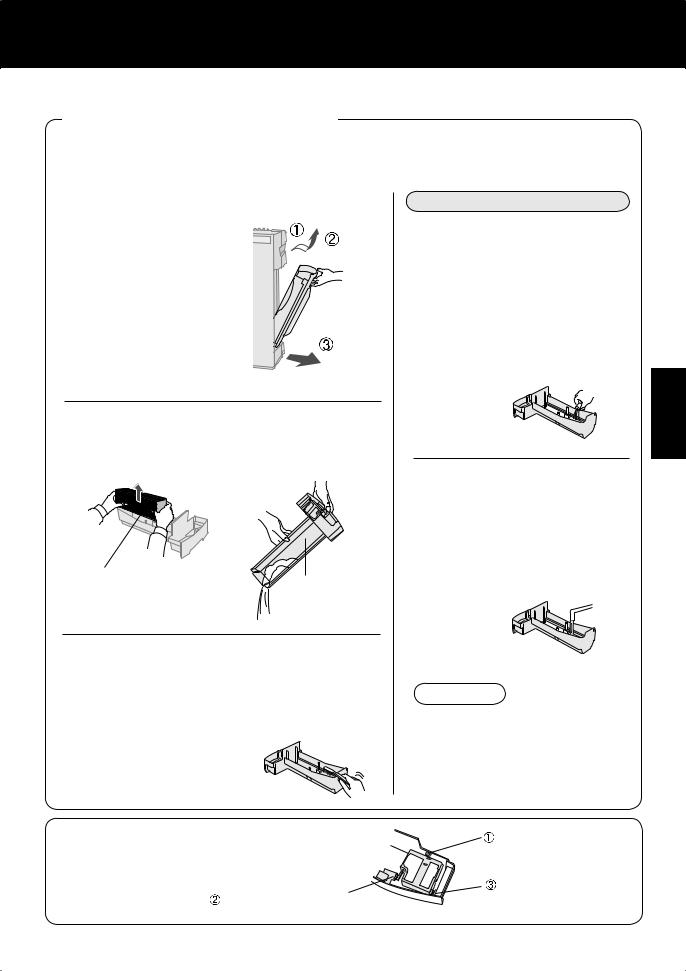
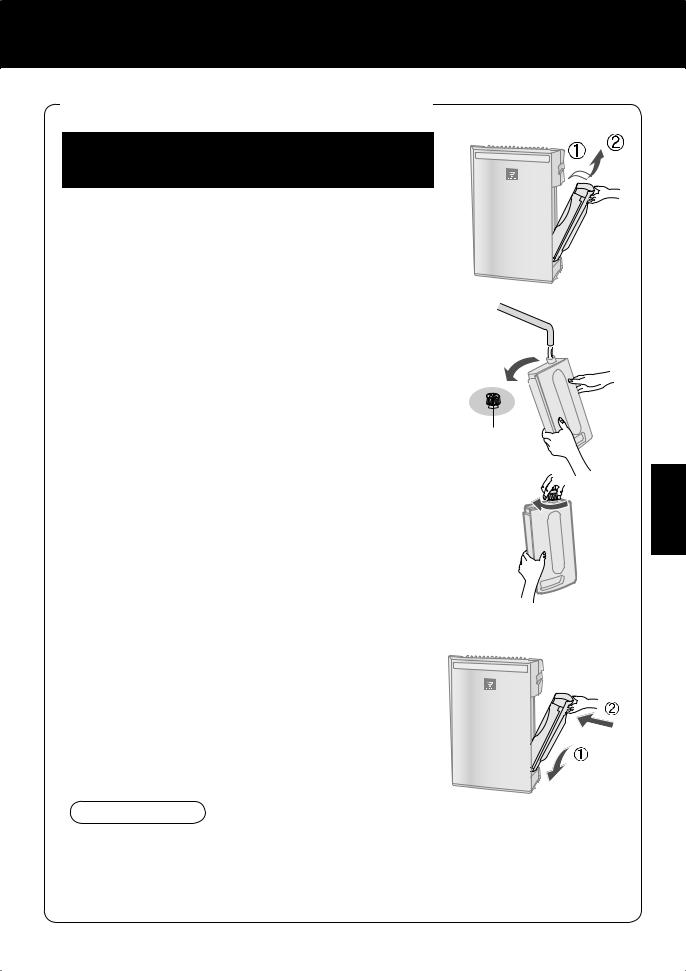
PREPARATION Be sure to remove the power plug from the wall outlet.
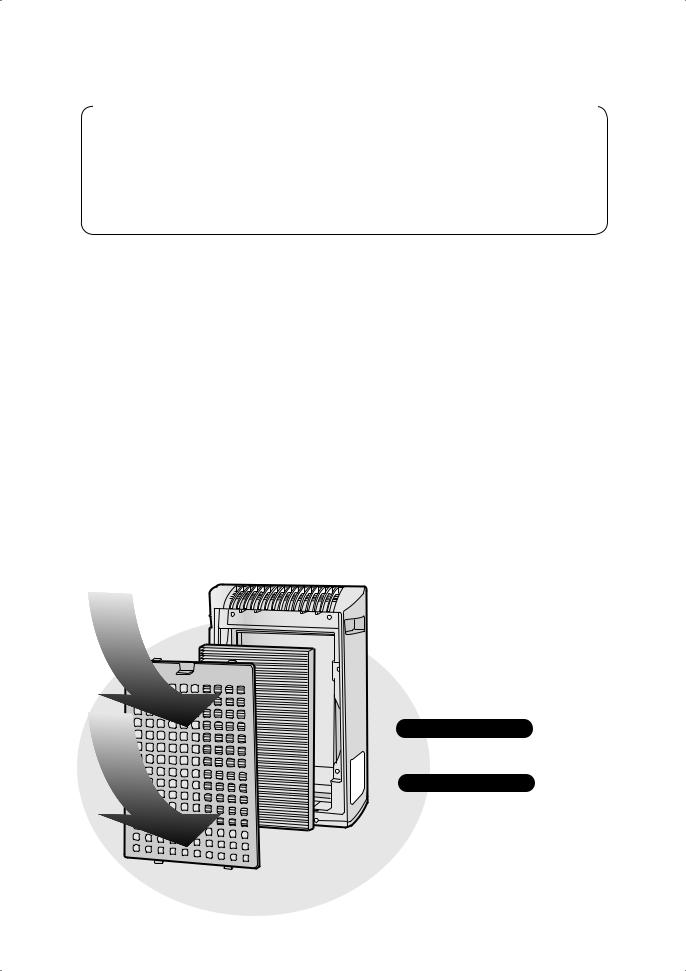
FILTER INSTALLATION
To maintain the quality of the filter, it is installed in the main unit and packed in plastic bag. Be sure to remove the filter from the plastic bag before using the unit.
1
2
Tab
Remove the filter
1 Remove the Back Panel.
Pull the tab at the top of the Back Panel.
2 Remove the Filter from the plastic bag.
Intall the filter
1 |
Place the Filter within the main unit. |
Do not install the filter backwards or the unit |
will not operate properly.
2 |
Replace the Back Panel to the main |
unit. |


 Date Label
3 Fill in the usage start date on the Date Label.
Use the date as a guide for the filter replacement schedule.
E-6

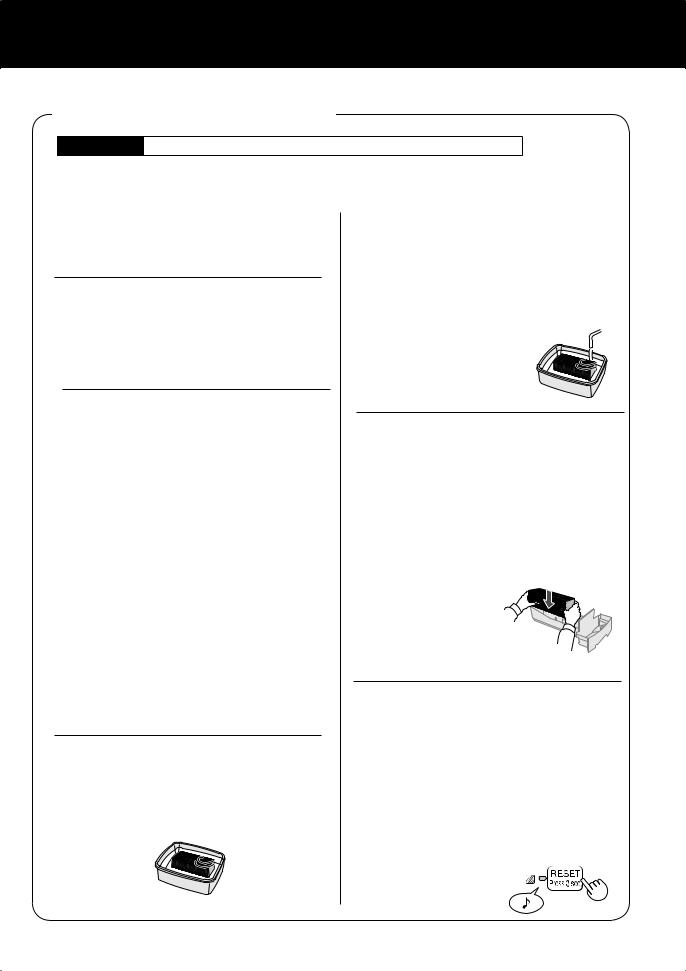
REFILLING THE WATER TANK
The unit can be used in the Clean Air Mode without putting water in the Water Tank. When using in the Humidify Mode, the Water Tank should be filled with water.
1 Remove the Water Tank by unlatching the top.
2 Remove the Water Tank Cap and carefully fill the Water Tank with tap water.
Change the water in the Water Tank every day with fresh tap water.
Tank Cap
3 |
After filling, securely tighten the Tank Cap. |
• Check to see that there is no water leaking. |
• Be sure to wipe off any excess water on the outside of the Water Tank.
• When carrying the Water Tank, hold it with both hands so that the Water Tank opening is facing up.
4 Replace the Water Tank in the unit.
The top latch will “click” in place when the Water Tank is properly installed.
ENGLISH
CAUTION
•Do not expose the unit to water. Short circuit and/or electrical shock may occur as a result.
•Do not use hot water (40 ºC), chemical agents, aromatic substances, dirty water, or other damaging substances, deformation and/or malfunction may occur.
•Use only fresh tap water. Use of other water sources may promote the growth of mold, fungus and/or bacteria.
E-7
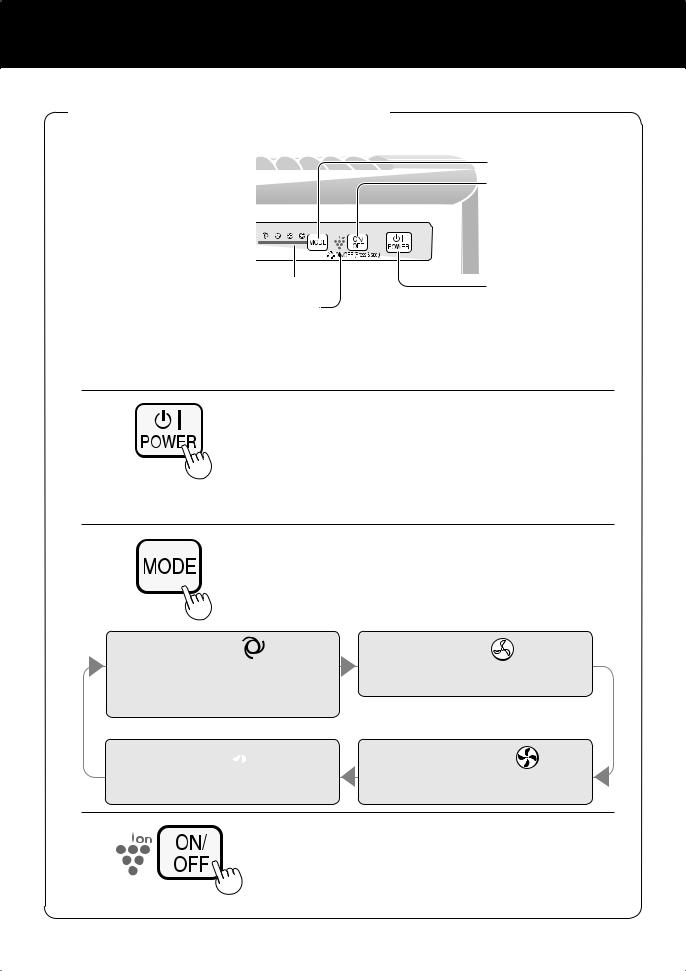
OPERATION
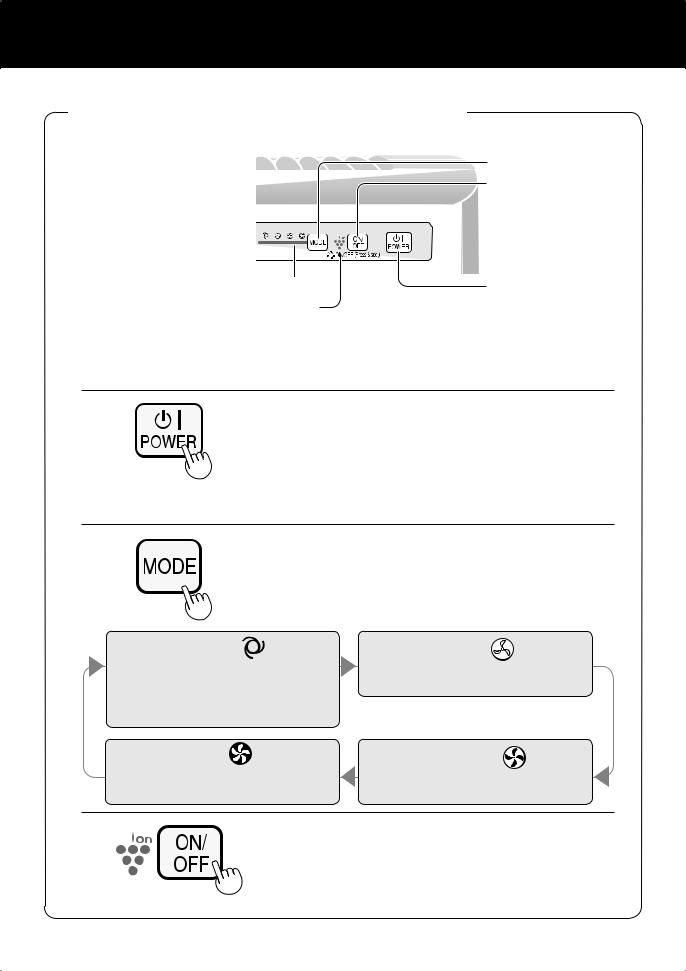
MAIN UNIT OPERATION
MODEButton
PlasmaclusterIonIon
ON/OFFButtonButton
Fan Speed Indicator Lights |
|
POWERON/OF F |
|
Fan Speed Indicator Lights |
|
Button |
F |
PlasmaclusterIonIoInIndicatorLight |
|
|
|
|
Button |
|
|
|
|
|
|
Please select either Humidify mode or Clean air mode operation when operation when using.
Humidify mode : Fill Water Tank.(See E-10)
Clean Air mode : Drain Water Tank and Humidifying Tray.
Power ON/OFF Button
•Press to start operation (short beep) and stop operation (long beep)
•Plasmacluster Indicator Light and Fan Speed Indicator Light turn on/off.
•Unless the power cord has been unplugged, the operations starts in the previous mode it was operated in.
MODE Button
•Press the MODE Button to select the desired fan speed. Indicator Lights will show the fan speed currently selected.
•The operation mode can be switched as below.
AUTO operation
The fan speed is automatically switched (between HIGH and LOW) depending on the amount of impurities in the air. The sensors detect impurities for efficient air purfication.
MAX operation 
The unit will operate at a fan speed of MAX.
LOW operation
The unit will operate quietly using minimal air intake.
MEDIUM operation
The unit will operate at a fan speed of MEDIUM.
Plasmacluster Ion ON/OFF Button
Press the Plasmacluster Ion ON/OFF Button to turn Plasmacluster Ion Mode ON and OFF.
When Plasmacluster Ion is ON, the Plasmacluster Ion Indicator Light will turn on.(blue)
E-8
CARE AND MAINTENANCE
To maintain optimum performance of this air purifier, please clean the unit including the sensor and filters periodically.
When cleaning the unit, be sure to first unplug the power cord, and never handle the plug with wet hands. Electrical shock and/or bodily injury may occur as a result.
FILTER INDICATOR LIGHT
Care Cycle |
After 720 hours of use |
|
(30days × 24hours = 720) |
|
|
|
|
|
The Filter Indicator Light will illuminate as a reminder to perform maintenance of the Back Panel, Sensors, and Humidifying Filter. The Indicator Light will turn on after approximately 720 hours of use.
After performing maintenance, reset the Filter Indicator.
1 Plug the unit in, turn power ON.
2 |
Press the RESET button for 3 seconds. |
• The Filter Indicator Light will go off. |
• Even if the Filter Indicator Light is already off, the RESET button should be pressed to reset the maintenance timer.
BACK PANEL and SENSORS
Care Cycle |
Whenever dust accumulates |
on the unit or every 2 months |
Gently remove dust from the sensor opening and the back panel, using a vacuum cleaner attachment or similar tool.
<When the back panel has stubborn dirt>
1 |
In case of heavy dirt, soak the back panel in water with a small amount of kitchen |
detergent. |
|
(Approx. 10min.) |
|
2 |
(Avoid scrubbing the back panel hard when washing.) |
Rinse the back panel repeatedly with clean water to remove |
|
|
the solution residue. |
3 |
Drip dry filter to remove excess water. |
|
Back Panel |
ENGLISH
E-9
CARE AND MAINTENANCE
WATER TANK
Care Cycle |
Every day when Humidifying |
|
Tank Cap |
Rinse the inside of the tank by leaving a small amount of luke- |
|
||
warm water inside, closing the tank cap firmly, and shaking |
|
||
the tank. Mild household detergents may be used to clean the |
|
||
inside of the tank, but detergent should be diluted and the tank |
|
||
should be thoroughly rinsed to remove all detergent residue. |
Water Tank |
|
(Note the Water Tank is not dishwasher safe.) |
||
|
UNIT
Care Cycle Whenever dust accumulates on the unit or every 2 months
To prevent dirt or stains on the unit, clean regularly. If stains are allowed to remain, they may become difficult to remove.
Wipe with a dry, soft cloth
For stubborn stains or dirt, use a soft cloth dampened with warm water.
Do not use volatile fluids
Benzene, paint thinner, polishing powder, may damage the surface.
Do not use detergents
Detergent ingredients may damage the unit.
E-10
HUMIDIFYING TRAY
|
|
Frequency of maintenance cycle will depend on the hardness |
|
Care Cycle |
1 month |
||
of the water. Avoid spilling water when removing or cleaning |
|||
|
|
the tray. |
1 Remove the Water Tank and Humidifying Tray.
Unlatch the Water Tank first, then remove the tray. Use both hands when pulling out the Humidifying Tray to avoid spilling water.
2 Remove the Humidifying Filter from the Humidifying Tray. Drain accumulated wa-
ter by tilting the Humidifying Tray slowly.
Humidifying Filter
Humidifying Tray
3 Rinse the inside of the Humidifying Tray with lukewarm water to remove
impurities.
•Do not remove the Styrofoam float.
•Clean difficult-to-reach parts with a cottontipped swab or tooth brush.
If the Styrofoam float comes off, replace by inserting the tabs of the Float into the holes in the Humidifying Tray as shown in the diagram.
When Water Deposits are Difficult to Remove
1 Fill Humidifying Tray halfway with lukewarm water,
add a small amount of mild kitchen detergent, and leave to soak for about 30 minutes.
Dilute detergent according to instructions on the container. Clean difficult-to-reach parts with a cotton swab or tooth brush.
2 Rinse the Humidifying Tray with lukewarm wa-
ter.
•Rinse until all detergent residue is removed.
•Inadequate rinsing may cause the detergent odour or changes in the shape/colour of the main unit.
CAUTION
•Use only mild kitchen detergents to clean the Humidifying Tray. Use of non-designated chemicals or detergents can cause deformation, tarnishing, cracking (water leakage).
Insert the float below this tab.
Insert the tab on the other side of the float into the hole.
ENGLISH
E-11
CARE AND MAINTENANCE
When cleaning the unit, be sure to first unplug the power cord, and never handle the plug with wet hands. Electrical shock and/or bodily injury may occur as a result.
HUMIDIFYING FILTER
Care Cycle Once a month or when the Filter Indicator Light is on.
Frequency of maintenance cycle will depend on the hardness or the impurities of the water that you use; the harder the water the more often descaling will be necessary.
Pay attention not to spill water when cleaning the filter.
1 Remove the Water Tank and
Humidifying Tray.(See E-11)
2 Remove the Humidifying Filter
from the Humidifying Tray.
Avoid spilling water from the Humidifying
Tray.
3 Preparing the descaling solution.
Citric acid, available at some drugstores, or 100 % bottled lemon juice are used for descaling. Choose either one to use, and prepare the descaling solution.
<For using citric acid>
Dissolve 3 teaspoons of citric acid and 2 1/2 cups of lukewarm water in a suitable container, and stir well.
<For using lemon juice>
100 % bottled lemon juice can be used for descaling. Use only 100 % bottled lemon juice with no pulp (strain juice if necessary). Combine 1/4 cup lemon juice and 3 cups of lukewarm water in a container large enough to hold the Humidifying Filter and stir well.
4 Pre-soak the Humidifying Filter in the solution for 30 minutes before cleaning.
When using lemon juice, it is recommended to pre-soak longer than citric acid.
5 Rinse the Humidifying Filter repeatedly with lukewarm water
to remove all the solution residue.
Inadequate rinsing may cause odour and affect the performance and/or appearance of the unit.
* Do not scrub the Humidifying Filter, rinse gently under lukewarm water only.
6 Attach the Humidifying Filter to the Humidifying Tray, and
replace the Humidifying Tray in the unit.
•The Humidifying Filter dose not need to be oriented in any particular positionn (forward/backward, up/down)
•When not using the unit for a long periods of time, dry the Humidifying Filter com- p l e t e l y b e f o r e replacing.
7 Plug in the unit, turn power ON, and press the Filter Reset Button on the display for more than 3 seconds to reset.
You may notice reddish-brown or white deposits forming on the surface of the Humidifying Filter. These impurities (calcium, etc.) are due to the impurities contained in tap water; this is not a defect. Replace the Humidifying Filter when it is covered completely in white deposits.
E-12
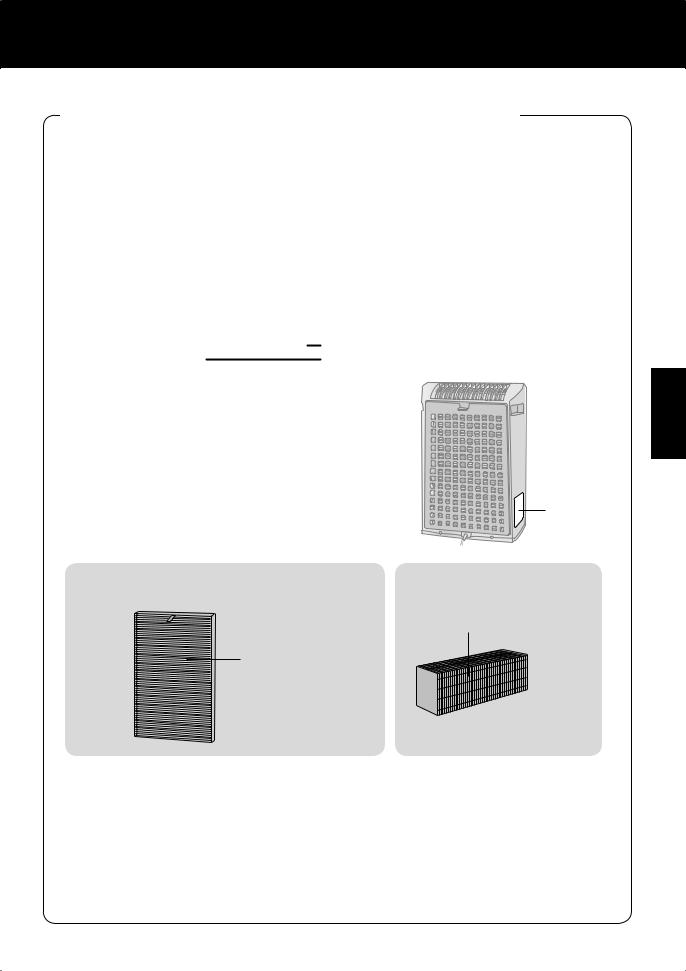
FILTER REPLACEMENT GUIDELINES
Filter life vary depending on the room environment, usage, and location of the unit.
If dust or odour persist, replace the filter.
(Refer to “Please read before operating your new Air Purifier”)
Guide for filter replacement timing
•The following filter life and replacement period is based on the condition of smoking 5 cigarettes per day and the dust collection/deodorization power is reduced by half compared with that of new filter.
We recommend to replace the filter more frequently if the product is used in a condition significantly severer than normal household use.
•Dust Collection / Deodorizing Filter |
About 2 years after opening |
•Humidifying Filter |
About 1 years after opening |
REPLACING THE FILTER
1 See page E-6,7 and E-11,12 for
directions on how to install the filter when replacing.
2 Fill in the usage start date of the filter on the Date Label.
Replacement Filters
Model : FZ-Y30SFE
•Dust Collection / Deodorizing Filter : 1 unit
Dust Collection /
Deodorizing Filter
Date Label
Model : FZ-Y30MFE
•Humidifying filter : 1 unit
Humidifying Filter
Please consult your dealer for purchase of replacement filter.
Disposal of Filter
Please dispose of the replaced filter according to the local disposal laws and regulations.
Dust Collection / Deodorizing Filter materials :
•Filter : Polypropylene •Frame : Polyester
•Deodorizer : Activated charcoal Humidifying Filter materials : •Rayon, Polyester
ENGLISH
E-13

TROUBLESHOOTING
Before calling for service, please review the Troubleshooting chart below, since the problem may not be a unit malfunction.
SYMPTOM |
REMEDY (not a malfunction) |
Odours and smoke are not removed.
•Clean or replace the filters if they appear to be heavily soiled. (See E-9,E-14)
The Clean Sign illuminates green even when the air is impure.
•The air could be impure at the time the unit was plugged in. Unplug the unit, wait one minute, and plug the unit in again.
The Clean Sign illuminates orange or red even when the air is clean.
•Sensor operation is affected if the odour sensor openings are dirty or clogged. Gently clean the dust sensors.
(See E-9)
A clicking or ticking sound is heard from the unit.
•Clicking or ticking sounds may be audible when the unit is generating Plasumacluster ions.
The discharged air has an odour.
•Check to see if the filter are heavily soiled.
•Clean or replace the filter.
•Plasmacluster Air Purifiers emit small traces of ozone which may produce an odour.
The unit does not operate when cigarette smoke is in the air.
•Is the unit installed in a location that is difficult for the sensor to detect cigarette smoke?
•Are the dust sensor openings blocked or clogged? (In this case, clean the openings.) (See E-9)
Filter Indicator Light is |
• After replacing filters, connect the power cord to an outlet and press |
illuminated. |
the Filter Reset Button. |
|
(See E-9) |
The Clean Sign are turned off.
•Check to see if the Lights OFF Mode selected. If so, then press the Lights Control Button to activate the indicator lights.
(See E-10)
The Humidify Mode Indicator Light does not illuminate when the tank is not empty.
•Check Styrofoam float for impurities. Clean the HumidifyingTray. Ensure unit is located on a level surface.
Water level in the tank does not decrease or decreases slowly.
•Check to see if the Humidifying Tray and Water Tank are correctly installed. Check the Humidifying Filter.
•Clean or replace the filter when it is heavily soiled. (See E-11, E-12, E-13)
The Clean Sign lights change colour frequently.
•The Clean Sign lights automatically change colours as impurities are detected by the dust sensor and odour sensor.
Flashing of the Fan Speed |
• Abnormal fan motor |
• Turn power OFF to cancel the error |
Indicator Light ' '. |
|
display, wait one minute, and then turn |
|
|
power ON. |
|
|
|
E-14

SPECIFICATIONS
|
|
Model |
|
KC-930E |
|
|
|
|
Power supply |
|
220-240V 50/60Hz |
|
|
Fan Speed |
|
Fan Speed Adjustment |
MAX |
MED |
|
LOW |
|
Rated Power |
27W |
13W |
|
4.5W |
|
operation |
|
Fan Speed |
180m3/hour |
126m3/hour |
|
60m3/hour |
|
|
Humidification |
350ml/hour |
250ml/hour |
|
140ml/hour |
Recommended Room Size |
|
~21m2 *1 |
|
|
||
High density Plasmacluster ion |
|
~17m2 *2 |
|
|||
recommended room size |
|
|
||||
|
|
|
|
|||
|
|
|
|
|
||
|
Water tank capacity |
|
2.1L |
|
||
|
|
Sensor |
|
odour sensor |
|
|
|
|
Filter type |
Dust Collection / Deodorizing Filter |
|||
|
|
Cord Length |
|
2.0m |
|
|
|
|
Dimensions |
375mm(W)x205mm(D)x535mm(H) |
|||
|
|
Weight |
|
6.1kg |
|
|
*1 Size of a room which is appropriate for operating the unit at maximum fan speed.
•It indicates the space where a certain amount of dust particles can be removed in 30 minutes(JEM1467).
*2 Size of a room in which approximately 7000 ions can be measured per cubic centimeter in the center of the room (at a height of approximately 1.2 meters from the floor) when the product is placed next to a wall and run at the MAX operation position.
Standby Power |
In order to operate the electrical circuits while the power plug is inserted in the |
|
wall outlet, this product consumes about 0.9W of standby power. |
|
For energy saving, unplug the power cord when the unit is not in use. |
ENGLISH
The class of the HEPA filter by EN 1822 is H10.
E-15

Attention: Your product is marked with this symbol. It means that used electrical and electronic products should not be mixed with general household waste. There is a separate collection system for these products.
A. Information on Disposal for Users (private households)
1. In the European Union
Attention: If you want to dispose of this equipment, please do not use the ordinary dust bin!
Used electrical and electronic equipment must be treated separately and in accordance with legislation that requires proper treatment, recovery and recycling of used electrical and electronic equipment.
Following the implementation by member states, private households within the EU states may return their used electrical and electronic equipment to designated collection facilities free of charge*. In some countries* your local retailer may also take back your old product free of charge if you purchase a similar new one.
*) Please contact your local authority for further details.
If your used electrical or electronic equipment has batteries or accumulators, please dispose of these separately beforehand according to local requirements.
By disposing of this product correctly you will help ensure that the waste undergoes the necessary treatment, recovery and recycling and thus prevent potential negative effects on the environment and human health which could otherwise arise due to inappropriate waste handling.
2. In other Countries outside the EU
If you wish to discard this product, please contact your local authorities and ask for the correct method of disposal.
For Switzerland: Used electrical or electronic equipment can be returned free of charge to the dealer, even if you don’t purchase a new product. Further collection facilities are listed on the homepage of www.swico.ch or www.sens.ch.
B. Information on Disposal for Business Users.
1. In the European Union
If the product is used for business purposes and you want to discard it:
Please contact your SHARP dealer who will inform you about the take-back of the product. You might be charged for the costs arising from take-back and recycling. Small products (and small amounts) might be taken back by your local collection facilities.
For Spain: Please contact the established collection system or your local authority for take-back of your used products.
2. In other Countries outside the EU
If you wish to discard of this product, please contact your local authorities and ask for the correct method of disposal.

Memo
ENGLISH
Pročtěte si tuto příručku před zahájením obsluhy své nové čističky vzduchu
Některé pachy absorbovány filtrem se mohou rozložit, vyloučit přes odvod vzduchu a způsobit další pachy. V závislosti na prostředí, ve kterém se přístroj používá, především když se výrobek používá v prostředích podstatně horších než je běžné používání v domácnosti, mohou být tyto pachy v krátkém čase intenzivnější než by se očekávalo.
V takovém případě doporučujeme nákup volitelného náhradního filtru.
POZNÁMKA
•Čistička vzduchu je navržena tak, aby odstraňovala prach a pachy rozptýlené ve vzduchu, ale ne škodlivé plyny (například oxid uhelnatý obsažený v cigaretovém kouři). Nachází-li se zdroj zápachu stále v místnosti, čistička vzduchu nemůže pach odstranit úplně (například pachy ze stavebných materiálů a pachy zvířat).
•Když kouříte, doporučujeme vám na chvíli trochu otevřít okno, abyste zabezpečili ventilaci.
 Sběr prachu / dezodorizační filtr
Prvky odstraněné filtrem
Prach
pyl, prach, částečky cigaretového kouře, pach zvířat
Pach
pach cigaretového kouře, pach v domácnosti (záchod / odpadky / zvíře, apod.)
ČESKY
FUNKCE
Technologie „Plasmacluster“
Technologie Plasmacluster používá plazmový výboj k produkci a uvolňování stejných pozitivních a negativních ionů jako jsou ty, které se nachází v přírodě („iony Plasmacluster“).
Toto je unikátní technologie čistění vzduchu od společnosti SHARP CORPORATION na rozložení a deaktivaci potenciálních alergenů, jako jsou fekální látky nebo těla vzduchových roztočů*1, virů*2, plísní a bakterií*3 rozptýlených ve vzduchu a byla otestována nezávislými organizacemi v Japonsku, ale i v zámoří.
Je-li ve vzduchu vysoká koncentrace ionů Plasmacluster, odstraní se pach cigaretového kouře zachyceného v záclonách nebo pohovkách asi za 80 minut*4, a když zavěsíte oblečení na místo vystavené přímému působení přístroje generujícího iony Plasmacluster, pach potu se za jednu noc (asi 6 hodin) sníží na téměř nepatrnou úroveň.
*1 Graduate School of Advanced Sciences of Matter, Hiroshima University, Japonsko
Měření účinku na potenciální alergeny vzduchových roztočů v (13 m²)
*2 Retroscreen Virology, Ltd., London, UK Měření množství vírů odstraněných ze vzduchu v krabici s objemem 1 m³
*3 Ishikawa Health Service Association, Japonsko
Měření plísní a bakterií ve vzduchu se vzorkem vzduchu (13 m²)
*4 Japan Spinners Inspecting Foundation, Japonsko
Odhad dezodorizačního efektu na pachové částečky v oblečení
OBSAH
DŮLEŽITÉ BEZPEČNOSTNÍ POKYNY.... CZ-2
• VÝSTRAHA ............................................... |
CZ-2 |
|
|
• UPOZORNĚNÍ VZTAHUJÍCÍ |
CZ-3 |
|
|
SE K PROVOZU ....................................... |
|
||
• POKYNY K INSTALACI ............................ |
CZ-3 |
|
|
• SMĚRNICE TÝKAJÍCÍ SE FILTRU .......... |
CZ-3 |
|
|
NÁZVY ČÁSTÍ ........................................... CZ-4 |
|
||
• DISPLEJ HLAVNÍ JEDNOTKY.................. |
CZ-4 |
|
|
• ILUSTRAČNÍ DIAGRAM ........................... |
CZ-4 |
|
|
• OBSAHUJE ............................................... |
CZ-5 |
|
|
• ZADNÍ ČÁST ............................................. |
CZ-5 |
|
|
PŘÍPRAVA ................................................. CZ-6 |
|
||
• INSTALACE FILTRU................................. |
CZ-6 |
|
|
• DOPLNĚNÍ VODNÍ NÁDRŽE.................... |
CZ-7 |
|
|
PROVOZ..................................................... CZ-8 |
|
||
• PROVOZ HLAVNÍ JEDNOTKY ................. |
CZ-8 |
|
|
ESKY |
|||
PÉČE A ÚDRŽBA..................................... CZ-9 |
|||
• KONTROLKA INDIKÁTORU FILTRU ....... |
CZ-9 |
||
• ZADNÍ PANEL A SENZORY |
CZ-9 |
Č |
|
|
|||
• VODNÍ NÁDRŽ........................................ |
CZ-10 |
|
|
.............................................• JEDNOTKA |
CZ-10 |
|
|
• ZVLHČOVACÍ MISKA ............................. |
CZ-11 |
|
|
• ZVLHČOVACÍ FILTR .............................. |
CZ-12 |
|
|
• POKYNY K VÝMĚNĚ FILTRU ................ |
CZ-13 |
|
|
ŘEŠENÍ PROBLÉMŮ............................. CZ-14
TECHNICKÉ ÚDAJE.............................. CZ-15
Děkujeme vám za zakoupení čističky vzduchu od společnosti SHARP. Přečtěte si, prosím, pozorně tento návod kvůli informacím o správném používání. Před použitím tohoto výrobku si prosím přečtěte část: „Důležité bezpečnostní pokyny“.
Po přečtení tento návod uschovejte na dostupném místě, abyste do něj mohli nahlédnout i v budoucnu.
CZ-1

DŮLEŽITÉ BEZPEČNOSTNÍ POKYNY
Při používaní elektrických zařízení byste měli dodržovat základní bezpečnostní opatření, mimo jiné:
VÝSTRAHA – pro snížení nebezpečí zkratu, požáru, nebo poranění:
•Před použitím přístroje si přečtěte všechny pokyny.
•Používejte jen zásuvku s napětím 220 – 240 voltů.
•Přístroj nepoužívejte, jsou-li napájecí kabel nebo zástrčka poškozené, nebo je-li připojení k elektrické zásuvce uvolněné.
•Ze zástrčky odstraňujte pravidelně prach.
•Do přívodu ani vývodu vzduchu ventilace nedávejte prsty ani jiné cizí předměty.
•Při vytahování zástrčky vždy uchopte zástrčku a nikdy netahejte za kabel.
Mohlo by to způsobit elektrický výboj a/nebo požár vlivem zkratu.
•Nevytahujte zástrčku mokrýma rukama.
•Nepoužívejte přístroj v blízkosti plynových zařízení ani ohnišť.
•Před čistěním přístroje a v případe, že jej déle nebudete používat, jej odpojte z elektrické zásuvky.
Jinak může vlivem zkratu dojít k elektrickému výboji (kvůli špatné izolaci) a/nebo požáru.
•Při doplňování vodní nádrže, čištění přístroje, nebo když přístroj nepoužíváte, nezapomeňte ho odpojit z elektrické zásuvky. Jinak může dojít k elektrickému výboji a/nebo požáru vlivem zkratu.
•Je-li napájecí kabel poškozen, může ho vyměnit pouze výrobce, jeho servisní technik, autorizované servisní středisko společnosti Sharp nebo kvalifikovaná osoba, aby se zabránilo nebezpečí.
•Přístroj nepoužívejte, když používáte aerosolové insekticidy, ani v místnostech, kde jsou ve vzduchu zbytky oleje, kadidla, jiskry od zapálených cigaret, chemické výpary, ani na místech, kde je vysoká vlhkost, jako například v koupelnách.
•Při čištění přístroje si dávejte pozor. Korosivní čistící prostředky můžou poškodit zevnějšek přístroje.
•Servis této čističky vzduchu může vykonávat jen autorizované servisní středisko společnosti Sharp. Při výskytu problémů, potřebě nastavení nebo opravy kontaktujte nejbližší servisní středisko.
•Při přenášení přístroje odstraňte nejdříve vodní nádrž a zvlhčovací misku a držte přístroj pomocí držadel nacházejících se na obou stranách.
•Nepijte vodu ze zvlhčovací misky nebo vodní nádrže.
•Vyměňte každý den vodu ve vodní nádrži čerstvou vodou z vodovodního kohoutku a pravidelně čistěte vodní nádrž a zvlhčovací misku. (Viz CZ-12 a CZ-13). Když přístroj nepoužíváte, vylijte vodu z vodní nádrže a zvlhčovací misky. Necháte-li ve vodní nádrži a/nebo zvlhčovací misce vodu, může to způsobit plesnivění, množení bakterií a zápachy.
V ojedinělých případech můžou tyto bakterie nepříznivě působit na zdraví.
•Tento přístroj není určen k používání osobami (včetně dětí) se sníženými fyzickými, smyslovými nebo mentálními schopnostmi, nebo nedostatkem zkušeností a znalostí, pokud na ně nedohlíží osoba zodpovědná za jejich bezpečnost, nebo pokud jim tato osoba nedala pokyny ohledně používání.
Na děti je potřeba dohlížet, aby se zaručilo, že si se zařízením nebudou hrát.
POZNÁMKA – rušení rádia nebo televizoru
Pokud tato čistička vzduchu způsobí rušení příjmu rádia nebo televize, pokuste se opravit rušení jedním nebo více následujícími opatřeními:
•Přeorientujte nebo přemístěte příjmovou anténu.
•Zvyšte vzdálenost mezi přístrojem a radiovým/televizním přijímačem.
•Připojte zařízení do zásuvky v jiném okruhu než je ten, do kterého je zapojený přijímač.
•Vyhledejte pomoc u prodejce nebo zkušeného radiového/televizního technika.
CZ-2

UPOZORNĚNÍ VZTAHUJÍCÍ SE K PROVOZU
•Neblokujte vstupní a/nebo výstupní otvory ventilace.
•Nepoužívejte přístroj u ani na horkých předmětech, jako jsou například sporáky nebo ohřívače, ani tam, kde můžou přijít do kontaktu s párou.
•Přístroj obsluhujte vždy ve svislé poloze.
•Při přenášení přístroje jej vždy držte pomocí držadel nacházejících se na obou stranách.
Držením zadního panelu během přenášení přístroje byste mohli způsobit jeho demontáž, spadnutí přístroje a mohli byste se tak poranit.
•Nespouštějte přístroj bez správné instalace filtrů, vodní nádrže a zvlhčovací misky.
•Neumývejte ani opětovně nepoužívejte filtr.
Nejenom, že tím nezlepšíte výkon filtru, ale můžete tak způsobit úraz elektrickým proudem nebo poruchu.
•Zevnějšek čistěte jen jemným hadříkem.
Nepoužívejte prchavé látky ani čistící prostředky.
Mohli byste jimi poškodit povrch přístroje nebo by mohl prasknout. Taky by vlivem toho nemusely senzory pracovat správně.
POKYNY K INSTALACI
• Během provozu přístroje jej položte nejméně 2 m od zařízení využívajících elektrické vlny,
jako jsou například televizory, rádia nebo vlnové hodiny. |
|
• Vyhněte se používání na místech, kde se může přístroj dostat do kontaktu s nábytkem, lát- |
ČESKY |
kami, nebo jinými předměty, které by mohly zabránit vstupu/výstupu vzduchu ventilace. |
|
• Vyhněte se používání na místech, kde bude přístroj vystaven kondenzaci nebo velkým změ- |
|
nám teploty. (Používejte ve vhodných podmínkách mezi 0 a 35 ˚C v místnosti.) |
|
(Nedá-li se tomu zabránit, nechte přístroj před jeho zapnutím asi jednu hodinu stát.) |
|
|
|
• Umístěte na stabilní povrch s dostatečnou cirkulací vzduchu. |
|
Když přístroj umístíte na oblast s hrubou kobercovou plochou, může mírně vibrovat. |
|
• Přístroj nepoužívejte na místech, kde se tvoří mastnota nebo olejový kouř (například v |
|
kuchyni apod.) |
|
Mohl by vlivem toho prasknout povrch, nebo by senzor nemusel pracovat správně. |
|
• Přístroj umístěte asi 30 cm – 60 cm od zdi, abyste zajistili správné proudění vzduchu. |
|
Časem se může zeď nacházející se přímo za výfukem ventilace zašpinit. Používáte-li tento přístroj |
|
delší dobu na stejném místě, pravidelně čistěte zeď a chraňte zeď vinylovou pokrývkou nebo ně- |
|
čím podobným, aby se nezašpinila. |
|
SMĚRNICE TÝKAJÍCÍ SE FILTRU
•Postupujte podle pokynů v tomto návodu, abyste se správně starali o filtry a abyste je dobře udržovali. Používejte pouze filtry určeny k použití s tímto přístrojem.
CZ-3

NÁZVY ČÁSTÍ
DISPLEJ HLAVNÍ JEDNOTKY
Vypínač
Tlačítko zap./vyp. iony Plasmacluster
Tlačítko MODE
Kontrolka indikátoru režimu |
Pachový |
vlhkosti |
senzor |
Tlačítko resetování filtru
Kontrolka indikátoru filtru
Kontrolky indikátoru rychlosti ventilátoru
CLEAN SIGN (MĚŘIČ ČISTOTY)
Pachový senzor neustále monitoruje vzduch a v závislosti na čistotě vzduchu mění barvu.
Kontrolka indikátoru zap./vyp. ionů Plasmacluster
Zelená Oranžová Červená
Čisté |
Velmi špinavé |
ILUSTRAČNÍ DIAGRAM
Displej hlavní jednotky
Držadlo
Hlavní jednotka
CZ-4

OBSAHUJE
• Návod k obsluze
ZADNÍ ČÁST
Držadlo
Držadlo nádrže
Vodní nádrž (na zvlhčení)
Zvlhčovací filtr
Víko nádrže 


Zvlhčovací miska
Plovák
Napájecí kabel
Zástrčka
(Tvar zástrčky závisí na zemi.)
Odvod vzduchu
Filtr 
(Sběr prachu / dezodorizační filtr)
Ouško
Zadní panel (předfiltr)
Odvod vzduchu
Přívod vzduchu 
Štítek s datem
ČESKY
CZ-5

PŘÍPRAVA Nezapomeňte vyjmout zástrčku z elektrické zásuvky.
INSTALACE FILTRU
K udržení kvality filtru je instalován v hlavní jednotce a zabalen v umělohmotném sáčku. Nezapomeňte před prvním použitím přístroje vyjmout filtr z umělohmotného sáčku.
1
2
Ouško
Vyjmutí filtru
1 Odstraňte zadní panel.
Zatáhněte za ouško v horní části zadního panelu.
2 Odstraňte filtr z umělohmotného sáčku.
Instalace filtru
1 |
Vložte filtr do hlavní jednotky. |
Neinstalujte filtr v opačném směru, jinak stroj |
nebude pracovat správně.
2 |
Dejte opět zadní panel na hlavní jednotku. |
|
Štítek s datem |
3 |
Vyplňte na štítku s datem počáteční |
datum používání. |
Datum použijte jako pomůcku k zjištění, kdy byste měli vyměnit filtr.
CZ-6
DOPLNĚNÍ VODNÍ NÁDRŽE
Přístroj se může používat v režimu čistého vzduchu bez toho, abyste dali do vodní nádrže vodu. Chcete-li použít režim zvlhčení, musíte dát do vodní nádrže vodu.
1 Odstraňte vodní nádrž odjištěním vrchu.
2 Odstraňte víko vodní nádrže a opatrně naplňte vodní nádrž vodou z vodovodního kohoutku.
Každý den vyměňte vodu ve vodní nádrži čistou vodou z vodovodního kohoutku.
Víko nádrže
3 |
Po naplnění bezpečně utáhněte víko nádrže. |
• Zkontrolujte, neuniká-li voda. |
• Nezapomeňte otřít všechny zbytky vody na zevnějšku vodní nádrže.
• Při přenášení vodní nádrže ji držte oběma rukama tak, aby otvor vodní nádrže směřoval nahoru.
4 Vložte zpět vodní nádrž do přístroje.
Je-li vodní nádrž správně nainstalována, horní západka zaklapne na své místo.
ČESKY
UPOZORNĚNÍ
•Přístroj nevystavujte vlivu vody. Mohlo by to způsobit zkrat a/nebo elektrický výboj.
•Nepoužívejte horkou vodu (40 °C), chemické látky, aromatické látky, špinavou vodu ani jiné poškozující látky, jinak by mohlo dojít k deformaci a/nebo závadě.
•Používejte jen čerstvou vodu z vodovodního kohoutku. Používáním jiných zdrojů vody byste mohli pomoci množení plísní, hub a/nebo bakterií.
CZ-7
PROVOZ
PROVOZ HLAVNÍ JEDNOTKY
TlaMODEčítkoButtonMODE
TlaPlasmaclusterčítko zap./vypIon. ionyON/OFFPlasmaclusterButton
Fan Speed Indi at r Ligh s |
POWER ON/OFF |
|
Kontrolky indikátoru rychlosti ventilátoru |
Vypínač |
|
|
|
Button |
KontrolkaPlasmaclusterindikátoruIonionůIndicatorPlasmaclusterLight |
||
Při obsluze vyberte buď režim vlhkosti, nebo režim čistého vzduchu.
Režim vlhkosti: naplňte vodní nádrž. (Viz CZ-10)
Režim čistého vzduchu: vypusťte vodní nádrž a zvlhčovací misku.
Vypínač
•Stiskněte k spuštění provozu (krátké pípnutí) a zastavení provozu (dlouhé pípnutí)
•Kontrolka indikátoru Plasmacluster a kontrolka indikátoru rychlosti ventilátoru se zapnou/vypnou.
•Nebyl-li odpojen napájecí kabel, provoz začne v posledním režimu, ve kterém byl přístroj spuštěn.
Tlačítko MODE
•Stiskněte tlačítko MODE k vybrání požadované rychlosti ventilátoru. Kontrolky indikátoru zobrazí aktuálně vybranou rychlost ventilátoru.
•Režim provozu se dá přepnout podle níže uvedeného popisu.
AUTOM. provoz
Rychlost ventilátoru se automaticky přepne (mezi nastavením VYSOKÁ a NÍZKÁ) v závislosti na množství nečistot ve vzduchu. Senzory detekují nečistoty kvůli efektivnímu čištění vzduchu.
MAX. provoz
Přístroj bude pracovat s maximální rychlostí ventilátoru.
NÍZKÝ provoz
Přístroj bude pracovat potichu pomocí minimálního přívodu vzduchu.
STŘED. provoz
Přístroj bude pracovat se středně velkou rychlostí ventilátoru.
Tlačítko zap./vyp. iony Plasmacluster
Stiskněte tlačítko zap./vyp. iony Plasmacluster pro zapnutí a vypnutí režimu ionů Plasmacluster.
Když je zapnut režim ionů Plasmacluster, zapne se kontrolka indikátoru ionů Plasmacluster (modrá).
CZ-8
 Loading...