


Sharp KB-3425, KB-4425LK, KB-4425LW, KB-3425LK, KB4425LS Manual
...Operation Manual
Models
KB-3425L / KB-4425L
Followed by indicating color: K = black, W = white, S = stainless steel
contents........................................................... |
2 |
Customer Assistance.......................................... |
3 |
Precautions to Avoid Possible Exposure |
|
to Excessive Microwave Energy.......................... |
3 |
CONSUMER LIMITED warranty................................ |
4 |
important safety instructions........................... |
5-7 |
Unpacking and Examining Your Range..................... |
7 |
PARTS name.................................................... |
8-11 |
INTRODUCTION TO TOUCHSCREEN.............................. |
12 |
KB-4425L
before operating........................................... |
13-14 |
Cooktop Use ................................................. |
14-15 |
MICROWAVE DRAWER cooking............................. |
16-28 |
OVEN cooking................................................ |
29-34 |
OVEN cooking-convection................................ |
35-38 |
Other Features............................................. |
39-41 |
cleaning and care......................................... |
42-44 |
before you call for service............................ |
45-46 |
auto-touch guide.............................. |
47-back cover |
ctriclEe
rawerD av eicroMwithW ang Re

Contents |
|
Contents........................................................... |
2 |
Customer Assistance.......................................... |
3 |
Precautions to Avoid Possible Exposure |
|
to Excessive Microwave Energy.......................... |
3 |
CONSUMER LIMITED warranty................................ |
4 |
Product Information Card................................... |
4 |
Important safety instructions........................... |
5-7 |
IMPORTANT SAFETY NOTICE AND WARNING........................ |
5 |
Safety precautions................................................................ |
5 |
Radiant Surface units....................................................... |
5-6 |
Microwave drawer............................................................... |
6-7 |
OVEN................................................................................................. |
7 |
SELF-CLEANING OVEN................................................................ |
7 |
Unpacking and Examining Your Range..................... |
7 |
PARTS NAME.................................................... |
8-11 |
ELECTRIC RANGE WITH MICROWAVE DRAWER................ |
8-9 |
EZ PULL OVEN RACK INSTRUCTIONS ................................... |
10 |
GLASS CERAMIC COOKTOP, CONTROL PANEL |
|
and KEYSHEET...................................................................... |
11 |
INTRODUCTION TO TOUCHSCREEN.............................. |
12 |
Before operating........................................... |
13-14 |
TO SET DATE AND TIME............................................................. |
13 |
Stop/Clear.................................................................................. |
14 |
OPEN OR CLOSE MICROWAVE DRAWER................................ |
14 |
COOKtop Use.................................................. |
14-15 |
Information YOU NEED TO KNOW..................................... |
14 |
Radiant SURFACE units........................................................ |
15 |
Suggested heat settings................................................... |
15 |
COOKTOP WARM ZONE.............................................................. |
15 |
MICROWAVE DRAWER cooking............................. |
16-28 |
Information YOU NEED TO KNOW................................ |
16-17 |
Manual operation............................................................ |
18-19 |
TIME COOKING............................................................... |
18-19 |
TO SET POWER LEVEL................................................... |
18-19 |
Sensor settings................................................................. |
20-25 |
REHEAT............................................................................. |
20-21 |
POPCORN............................................................................... |
21 |
automatic cooking.................................................. |
22-25 |
Defrost........................................................................................ |
26 |
MANUAL DEFROST...................................................................... |
26 |
other convenient features........................................ |
27-28 |
Keep warm.......................................................................... |
27 |
Minute plus™..................................................................... |
27 |
CUSTOM HELP® ................................................................... |
|
27 |
More / less time adjustment.................................... |
|
28 |
OVEN cooking................................................ |
|
29-34 |
Information YOU NEED TO KNOW..................................... |
|
29 |
Before using oven................................................................. |
|
29 |
oven BAKING AND BROILING................................................ |
|
29 |
How to set Oven Temperature for bake.................... |
30 |
|
How to Proof............................................................................ |
|
30 |
how to set timed cook........................................................ |
|
31 |
how to set delay start....................................................... |
|
32 |
How to set Broil................................................................ |
|
33-34 |
Broiling Chart........................................................................ |
|
34 |
OVEN cooking-Convection................................ |
|
35-38 |
CONVECTION cooking............................................................ |
|
35 |
HOW TO SET OVEN TEMPERATURE FOR |
|
|
CONVECTION BAKE.......................................................... |
|
35-36 |
CONVECTION ROAST.................................................................. |
|
36 |
HOW TO SET CONVECTION roast.................................... |
|
36-37 |
HOW TO SET delay start....................................................... |
|
37 |
CONVECTION BROIL................................................................... |
|
38 |
HOW TO SET CONVECTION BROIL.......................................... |
|
38 |
CONVECTION BROILING CHART............................................. |
|
38 |
Other Features............................................. |
|
39-41 |
how to start self-clean.................................................... |
|
39 |
HOW TO SET SELF-CLEAN DELAY START.............................. |
|
39 |
OVEN LIGHT.................................................................................. |
|
40 |
KITCHEN TIMER........................................................................... |
|
40 |
control lock........................................................................... |
|
40 |
SETUP......................................................................................... |
|
40-41 |
PAGE FORWARD AND BACKWARD.......................................... |
|
41 |
3 minute plus............................................................................. |
|
41 |
Cleaning and care......................................... |
|
42-44 |
Non-Cooktop Surfaces........................................................ |
|
42 |
COOKTOP.................................................................................. |
|
42-43 |
Microwave DRAWER................................................................ |
|
43 |
OVEN............................................................................................... |
|
43 |
Remove and replace oven door.................................... |
|
43 |
Oven racks................................................................................ |
|
44 |
Broiler Pan, Grid AND ROASt/broil RACK.................... |
44 |
|
Oven light replacement.................................................... |
|
44 |
Before you call for service............................ |
|
45-46 |
Auto-Touch Guide............................. |
47-back cover |
|

Customer Assistance
To aid in reporting this electric range, please record below the model number and serial number located on the unit. We also suggest you record all the information listed and retain for future reference.
MODEL NUMBER |
|
|
|
|
|
|
|
|
SERIAL NUMBER |
|
|||
DATE OF PURCHASE |
|
/ |
|
/ |
|
|
|
Telephone |
|
|
|||
Dealer |
|
|
|
|
|
|
|
|
|
|
|
|
|
|
|
|
|
|
|
|
|
|
|
|
|
||
Servicer |
|
|
|
|
|
|
|
|
|
Telephone |
|
|
|
TO PHONE: |
|
|
|
|
|
|
|
|
|
|
|
||
DIAL |
1-800-BE-SHARP (237-4277) for: |
||||||||||||
|
|
|
SERVICE (for your nearest Sharp Authorized Servicer) |
||||||||||
PARTS (for your authorized parts distributor)
ADDITIONAL CUSTOMER INFORMATION
ADDITIONAL OVEN RACKS
TO WRITE:
Sharp Electronics Corporation
Customer Assistance Center 1300 Naperville Drive Romeoville, IL 60446-1091
Please provide the following information when you write or call: model number, serial number, date of purchase, your complete mailing address (including zip code), your daytime telephone number (including area code) and description of the problem.
TO ACCESS INTERNET: www.sharpusa.com
PRECAUTIONS TO AVOID POSSIBLE EXPOSURE TO EXCESSIVE MICROWAVE ENERGY
(a)Do not attempt to operate this oven with the door open since open-door operation can result in harmful exposure to microwave energy. It is important not to defeat or tamper with the safety interlocks.
(b)Do not place any object between the oven front face and the door or allow soil or cleaner residue to accumulate on sealing surfaces.
(c)Do not operate the oven if it is damaged. It is particularly important that the oven door close properly and that there is no damage to the: (1) door (bent), (2) hinges and latches (broken or loosened), (3) door seals and sealing surfaces.
(d)The oven should not be adjusted or repaired by anyone except properly qualified service personnel.
These precautions apply to the Microwave Drawer only.

CONSUMER LIMITED warranty
SHARP ELECTRONICS CORPORATION warrants to the first consumer purchaser that this Sharp brand product (the “Product”), when shipped in its original container, will be free from defective workmanship and materials, and agrees that it will, at its option, either repair the defect or replace the defective Product or part thereof with a new or remanufactured equivalent at no charge to the purchaser for parts or labor for the period(s) set forth below.
This warranty does not apply to any appearance items of the Product nor to the additional excluded item(s) set forth below nor to any Product the exterior of which has been damaged or defaced, which has been subjected to misuse, abnormal service or handling, or which has been altered or modified in design or construction.
In order to enforce the rights under this limited warranty, the purchaser should follow the steps set forth below and provide proof of purchase to the servicer.
The limited warranty described herein is in addition to whatever implied warranties may be granted to purchasers by law. ALL IMPLIED WARRANTIES INCLUDING THE WARRANTIES OF MERCHANTABILITY AND FITNESS FOR USE ARE LIMITED TO THE PERIOD(S) FROM THE DATE OF PURCHASE SET FORTH BELOW. Some states do not allow limitations on how long an implied warranty lasts, so the above limitation may not apply to you.
Neither the sales personnel of the seller nor any other person is authorized to make any warranties other than those described herein, or to extend the duration of any warranties beyond the time period described above on behalf of Sharp.
The warranties described herein shall be the sole and exclusive warranties granted by Sharp and shall be the sole and exclusive remedy available to the purchaser. Correction of defects, in the manner and for the period of time described herein, shall complete fulfillment of all liabilities and responsibilities of Sharp to the purchaser with respect to the Product, and shall constitute full satisfaction of all claims, whether based on contract, negligence, strict liability or otherwise. In no event shall Sharp be liable, or in any way responsible, for any damages or defects in the Product which were caused by repairs or attempted repairs performed by anyone other than an authorized servicer. Nor shall Sharp be liable or in any way responsible for any incident or consequential economic or property damage. Some states do not allow the exclusion of incidental or consequential damages, so the above exclusion may not apply to you.
THIS WARRANTY GIVES YOU SPECIFIC LEGAL RIGHTS. YOU MAY ALSO HAVE OTHER RIGHTS WHICH VARY FROM STATE TO STATE.
Your product model number & description
Warranty period for this product:
Additional item(s) excluded from warranty coverage (if any):
Where to obtain service:
What to do to obtain service:
KB-3425L or KB-4425L Home Use Electric Range with Microwave Drawer. (Be sure to have this information available when you need service for your Product.)
One (1) year parts and labor including in-home service. The warranty period continues for an additional four (4) years, for a total of five (5) years, with respect to the glass ceramic cooktop, radiant surface units and magnetron tube in the Product for parts only; labor and service are not provided free of charge for this additional period.
Non-functional accessories and light bulbs.
From a Sharp Authorized Servicer located in the United States. To find the location of the nearest Sharp Authorized Servicer, call Sharp toll free at 1-800-BE-SHARP (1-800-237-4277).
In-home service is provided for one year from date of purchase. In-home service can be arranged by calling 1-800-BE-SHARP. Be sure to have Proof of Purchase available.
TO OBTAIN SUPPLY, ACCESSORY OR PRODUCT INFORMATION, CALL 1-800-BE-SHARP or visit www.sharpusa.com. SAVE THE PROOF OF PURCHASE AS IT IS NEEDED SHOULD YOUR OVEN EVER REQUIRE WARRANTY SERVICE.
PRODUCT INFORMATION CARD
The Product Information Card should be completed within ten days of purchase and returned. We will keep it on file and help you access the information if needed. This will also enable us to contact you in the unlikely event that any adjustments or modifications are ever required for your range.

Important safety instructions
READ ALL INSTRUCTIONS BEFORE USING
IMPORTANT SAFETY NOTICE AND
WARNING
The California Safe Drinking Water and Toxic Enforcement Act of 1986 (Proposition 65) requires the Governor of California to publish a list of substances known to the State of California to cause cancer or reproductive harm and requires businesses to warn customer of potential exposures to such substances.
Users of this appliance are hereby warned that when it is engaged in the self-clean cycle, there may be low level exposure to carbon monoxide, a chemical known to the State of California to cause reproductive harm. Exposure can be minimized by properly venting the oven to the outdoors during the self-clean cycle, by opening a window and/or door in the room where the appliance is located.
WARNING All ranges can tip and injury 
 could result. To reduce the risk of tipping of the
 appliance from abnormal usage by excessive loading of the oven door, the appliance must
  be secured to wall and floor by installing the Anti-Tip device supplied. If it is not, there is
 a possible risk of the range tipping over and
causing injury if you or a child stand, sit or lean on an open door. Please refer to the Anti-Tip
device information in the Installation Manual.
To check if the device is properly installed and engaged, look underneath the range with a flashlight to make sure one of the rear leveling legs is properly engaged in the bracket slot. The Anti-Tip device secures the rear leveling leg to the floor when properly engaged. You should check this anytime the range has been moved.
Safety precautions
When using electrical appliances, basic safety precautions should be followed, including the following:
1Use this appliance only for its intended purpose as described in this manual.
2Be sure your appliance is properly installed and grounded by a qualified technician in accordance with the provided installation instructions.
3Never use appliance for warming or heating the room.
4Children should not be left alone or unattended in area where appliance is in use. They should never be allowed to sit or stand on any part of the appliance.
5Never wear loose-fitting or hanging garments while using the appliance. Be careful when reaching for items stored over the range. Flammable material could be ignited if brought in contact with hot surface units or heating elements and may cause severe burns.
6Do not repair or replace any part of appliance unless specifically recommended in this manual. All other servicing should be referred to a qualified technician.
7Do not store flammable materials in an oven, Microwave Drawer or near surface units. Do not store or use
combustible materials, gasoline or other flammable vapors and liquids in the vicinity of this appliance.
8Do not use water on grease fires. Smother a flame or use a dry chemical or foam-type extinguisher. Flaming grease outside a pan can be put out by covering it with baking soda or, if available, by a multi-purpose dry chemical or foam-type fire extinguisher.
9Use only dry potholders - a moist or damp potholder on hot surfaces may result in burns from steam. Do not let potholders touch hot surfaces, radiant surface units or heating elements. Do not use a towel or other bulky cloth.
10 CAUTION Do not store items of interest to children in cabinets above a range or on the backsplash of a range. Children climbing on the range to reach items could be seriously injured.
11Do not touch the surface units, heating elements or the interior surface of the oven. These surfaces may be hot even though they are dark in color. These surfaces may become hot enough to cause burns. During and after use, do not touch or let clothing or other flammable materials contact surface units, heating elements or interior surfaces of oven until they have had sufficient time to cool. Other potentially hot surfaces include: cooktop, areas facing the cooktop, oven vent opening, surfaces near the vent opening, oven door and window and area around the door.
12Have the installer show you the location of the circuit breaker or fuse. Mark it for easy reference.
13Before performing any service, disconnect the range power supply at the household distribution panel by removing the fuse or switching off the circuit breaker.
14Do not allow anyone to climb, stand or hang on the door, Microwave Drawer or cooktop. They could damage the range and even tip it over, causing severe personal injury.
15Teach children not to play with the controls or any other part of the range.
16Always keep wooden and plastic utensils and canned food a safe distance from your range.
17Always keep combustible wall coverings, curtains or drapes a safe distance from your range.
Radiant Surface units
1Use proper pan size — this appliance has different size surface units. Select utensils having flat bottoms large enough to cover the surface unit heating element. The use of undersized utensils will expose a portion of surface unit heating element to direct contact and may result in ignition of clothing. Proper relationship of utensils to heating element will also improve efficiency.
2Never leave surface units unattended at high heat settings. Boilovers cause smoking and greasy spillovers that may catch on fire.
3Only certain types of glass, glass/ceramic, ceramic,

Important safety instructions
earthware or other glazed utensils are suitable for cooktop service without breaking due to the sudden change in temperature.
4To reduce the risk of burns, ignition of flammable materials and spillage due to unintentional contact with utensils, the handle of a utensil should be positioned so that it is turned inward and does not extend over adjacent surface units.
5Do not cook on broken cooktop. If cooktop should break, cleaning solutions and spillovers may penetrate the broken cooktop and create a risk of electric shock. Contact a qualified technician immediately.
6Clean cooktop with caution. If a wet sponge or cloth is used to wipe spills on a hot surface unit, be careful to avoid steam burn. Some cleaners can produce noxious fumes if applied to a hot surface. Please see cleaning the glass cooktop section.
7Clean ventilating hoods frequently. Grease should not be allowed to accumulate on hood or filter.
8When flaming foods under the hood, turn the fan on.
9Deep fat fryers - use extreme caution when moving the grease kettle or disposing of hot grease.
10Always turn the surface units off before removing cookware.
11Keep an eye on foods being fried at high or medium high heat settings.
12Food for frying should be as dry as possible. Frost on frozen foods or moisture on fresh foods can cause hot fat to bubble up and over the sides of the pan.
13Use little fat for effective shallow or deep fat frying. Filling the pan too full of fat can cause spillovers when food is added.
If a combination of oils or fats will be used in frying, stir together before heating or as fats melt slowly.
14Always heat fat slowly and watch as it heats.
15Use a deep fat thermometer whenever possible to prevent heating fat beyond the smoking point.
16Avoid scratching the glass cooktop. The cooktop can be scratched with items such as sharp instruments, rings or other jewelry and rivets on clothing.
17Large scratches or impacts to glass doors or cooktop can lead to broken or shattered glass.
18Never use the glass cooktop surface as cutting board.
19Do not place or store items that can melt or catch fire on the glass cooktop, even when it is not being used.
20Be careful when placing spoons or other stirring utensils on glass cooktop surface when it is in use. They may become hot and could cause burns.
Microwave drawer
When using the Microwave Drawer, basic safety precautions should be followed, including the following:
WARNING To reduce the risk of burns, electric shock, fire, injury to persons or exposure to excessive microwave energy:
1Read all instructions before using the appliance.
2Read and follow the specific “PRECAUTIONS TO AVOID POSSIBLE EXPOSURE TO EXCESSIVE MICROWAVE ENERGY” on page 3.
3This appliance must be properly grounded. See Installation Instructions for grounding instructions.
4Install or locate this appliance only in accordance with the provided Installation Manual.
5Some products such as whole eggs and sealed containers - for example, closed glass jars—are able to explode and should not be heated in the appliance.
6Use this appliance only for its intended use as described in this manual. Do not use corrosive chemicals or vapors in this appliance. This appliance is specifically designed to heat, cook or dry food. It is not designed for industrial or laboratory use.
7As with any appliance, close supervision is necessary when used by children.
8Do not operate this appliance if it has a damaged cord or plug, if it is not working properly or if it has been damaged or dropped.
9This appliance should be serviced only by qualified service personnel. Contact nearest Sharp Authorized Servicer for examination, repair or adjustment.
10Do not cover or block any openings on the appliance.
11Do not store or use this appliance outdoors. Do not use this product near water—for example, near a kitchen sink, in a wet basement, near a swimming pool or similar locations.
12Do not immerse cord or plug in water.
13Keep cord away from heated surfaces.
14Do not climb or sit on the appliance. The range could tip and cause injuries to persons.
15Be sure that fingers or other objects or materials are not around the appliance opening when the appliance is closed.
16Do not put fingers or clothes around the drawer guides when the appliance is opened or closed. They could be caught in the guides when the appliance is closed.
17Be sure that the food and container are shorter than the drawer before closing it. You can refer to the height of the side walls of the drawer.
18When cleaning appliance sealing surfaces that come together on closing the drawer, use only mild, nonabrasive soaps or detergents applied with a sponge or soft cloth. See cleaning instructions on page 43.
19To reduce the risk of fire in the appliance cavity:
a Do not overcook food. Carefully attend appliance when paper, plastic or other combustible materials are placed inside the appliance to facilitate cooking.
b Remove wire twist-ties from paper or plastic bags before placing bag in appliance.
c If materials inside the appliance ignite, keep appliance door closed, turn microwave off and shut off power at the fuse or circuit breaker panel.
Important safety instructions
d Do not use the appliance for storage purposes. Do not leave paper products, cooking utensils, or food in the appliance when not in use.
20Liquids, such as water, coffee or tea are able to be overheated beyond the boiling point without appearing to be boiling due to surface tension of the liquid. Visible bubbling or boiling when the container is removed from the appliance is not always present. THIS COULD RESULT IN VERY HOT LIQUIDS SUDDENLY BOILING OVER WHEN A SPOON OR OTHER UTENSIL IS INSERTED INTO THE LIQUID.
To reduce the risk of injury to persons: a Do not overheat the liquid.
b Stir the liquid both before and halfway through heating it.
c Do not use straight-sided containers with narrow necks. Use a wide-mouthed container.
d After heating, allow the container to stand in the appliance at least for 20 seconds before removing the container.
e Use extreme care when inserting a spoon or other utensil into the container.
21If the appliance light fails, consult a SHARP AUTHORIZED SERVICER.
OVEN
1Use care when opening door—let hot air or steam escape before removing or replacing food.
2Do not heat unopened food containers. Build-up of pressure may cause container to burst and result in injury.
3Keep oven vent unobstructed.
4Always place oven racks in desired locations while oven is cool. If rack must be moved while oven is hot, do not let potholder contact hot heating element.
5Do not use aluminum foil to line oven bottom, as use may result in a risk of electric shock or fire.
6Keep the oven free from grease buildup.
7When using cooking or roasting bags in the oven, follow the manufacturer’s directions.
8Pulling out the rack to the stop-lock is a convenience in lifting heavy foods. It is also a precaution against burns from touching hot surfaces of the door or oven walls.
9Do not use the oven to dry newspapers. If overheated, they can catch fire.
10Do not use the oven for a storage area. Items stored in oven can ignite.
11Do not leave paper products, cooking utensils or food in the oven when not in use.
SELF-CLEANING OVEN
1Do not clean door gasket. The door gasket is essential for a good seal. Care should be taken not to rub, damage or move the gasket.
2Do not use oven cleaners. No commercial oven cleaner or oven liner protective coating of any kind should be used in or around any part of the oven. Residue from oven cleaners will damage the inside of the oven when the self-clean cycle is used.
3Clean only parts listed in this manual.
4Before self-cleaning the oven, remove broiler pan, racks, and other utensils.
5If the self-cleaning mode malfunctions, turn the oven off and disconnect the power supply. Have it serviced by a qualified technician.
SAVE THESE INSTRUCTIONS
Unpacking and Examining Your Range
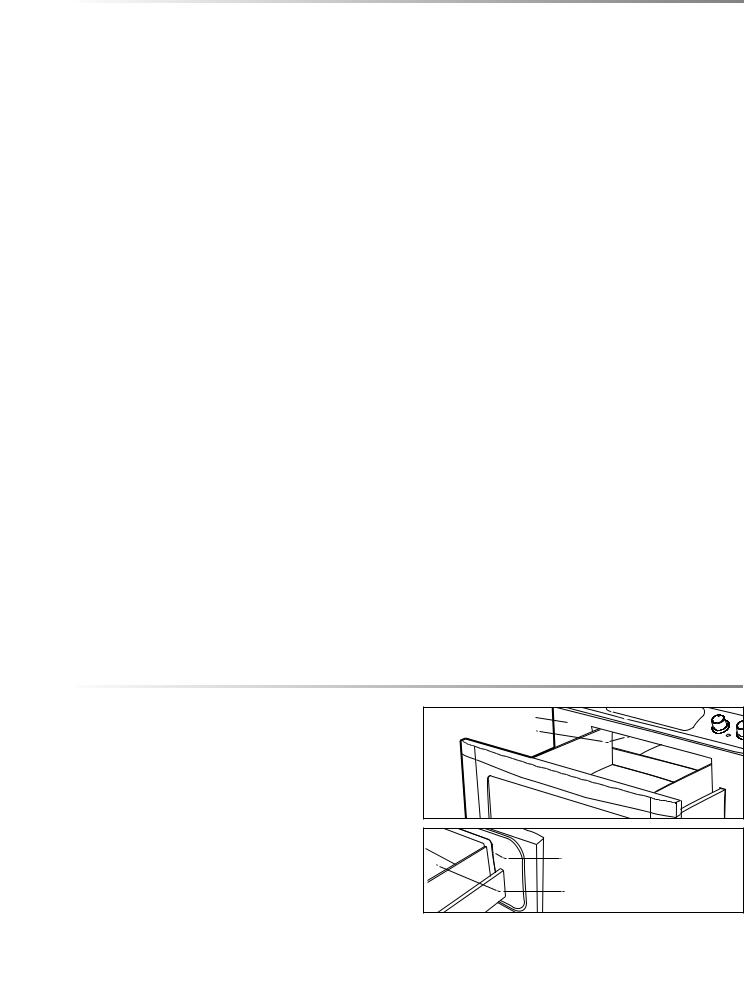
1 Remove all packing materials from inside the Microwave Drawer and the oven cavity. DO NOT REMOVE THE WAVEGUIDE COVER which is located on the top of the Microwave Drawer area.
2 Remove the feature sticker, if there is one, from the outside of the Microwave Drawer. Check the drawer for any damage, such as misaligned or bent drawer, damaged drawer seals and sealing surfaces, broken or loose Microwave Drawer guides and dents inside the cavity or on the front side of the drawer. If there is any damage, do not operate the Microwave Drawer and contact your dealer or a SHARP AUTHORIZED SERVICER.
Sealing Surface |
Waveguide Cover |
Sealing Surface |
Microwave Drawer Cavity |
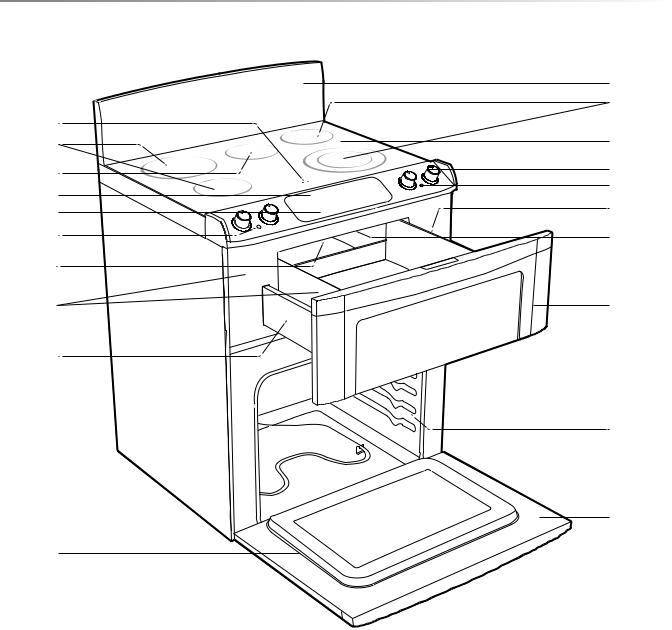
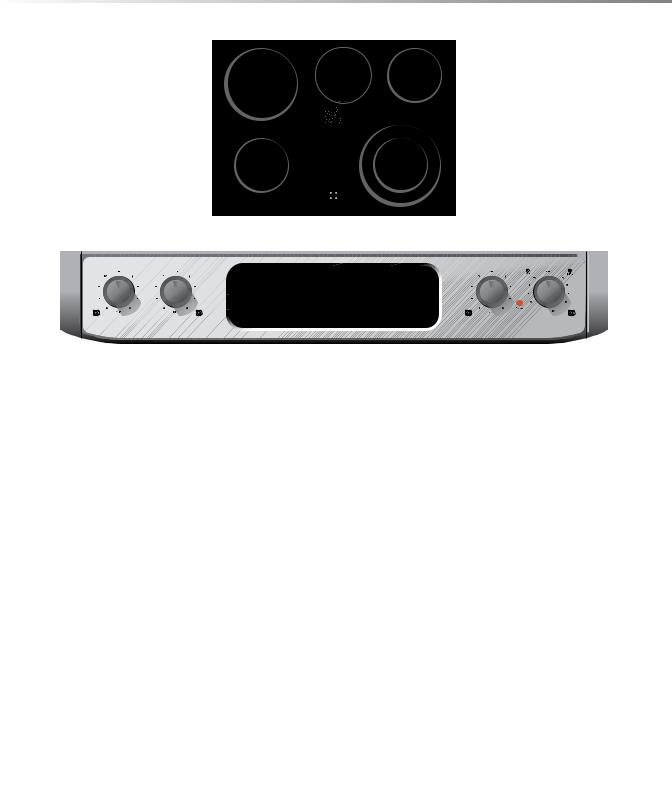
PARTS NAME
Electric RANGE with Microwave Drawer
1
2
3
4
5
6
7
8
9
10 
11
12
2
13
14
6
9
15
16
17
18
1 |
Hot surface indicator |
10 |
Oven |
2 |
Radiant surface units |
11 |
Gasket |
3 |
Cooktop Warm Zone |
12 |
Backsplash (model KB-3425L only) |
4 |
Control panel |
13 |
Glass ceramic cooktop |
5 |
Cooktop Warm indicator |
14 |
Control knobs |
6 |
Cooktop-on indicator |
15 |
Drawer light |
7 |
Waveguide cover |
16 |
Microwave Drawer |
|
DO NOT REMOVE |
17 |
Rack supports |
8 |
Drawer sealing surfaces |
18 |
Oven door |
9 |
Microwave Drawer guides |
|
|
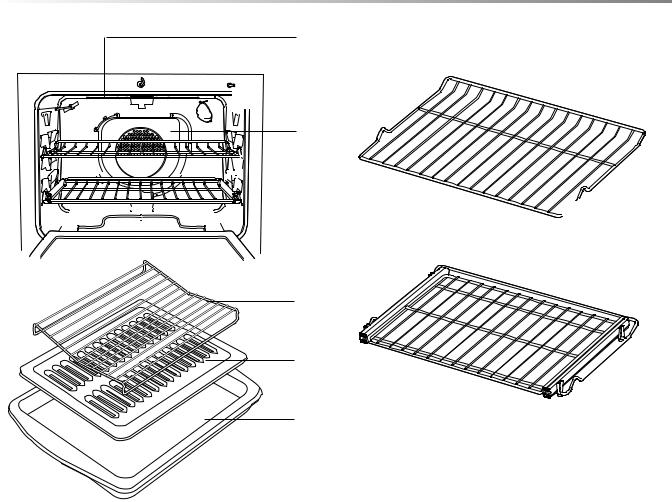
PARTS NAME
19

 20
20

 21
21
22 |


 23
23 


 10
10


 24
24
25
26
27
19Top heating element
20Oven door lock
21Oven light
22Convection fan cover
23Rear heater
24Bottom heating element
 28
28
 29
29
25Roast/Broil rack
26Broiler pan grid
27Broiler pan
28Standard rack (1)
29EZ Pull oven rack (2)

Parts Name
EZ Pull oven rack instructions
The EZ Pull Oven Racks make it easy and convenient to place food in and remove food from the lower oven. They are ideal for heavier foods or dishes. While the EZ Pull Oven Racks can be used in any position, you will find them most useful when placed in lower positions.
IMPORTANT Do not leave the EZ Pull Oven Racks in oven during self-cleaning cycle.
Figure 1
 Base support rack
Rack
Ball bearing steel slides
Figure 2 |
Figure 3 |
|
IMPORTANT |
|
Base support rack |
|
remains snapped |
|
in position inside |
|
the oven. |
Insert and snap |
Shelf shown in |
into position in |
|
the oven. |
extended position. |
|
Figure 4 |
DO NOT extend base support rack beyond oven opening during use as shown in Figure 4.
Note: It is important that the range be level. check installation instructions.
10
|
|
Parts Name |
|
Glass Ceramic COOKTOP |
|
WARM zone |
|
RADIANT |
|
|
|
|
|
SURFACE UNIT |
RADIANT |
|
|
SURFACE UNIT |
|
|
RADIANT |
|
RADIANT |
SURFACE UNIT |
|
SURFACE UNIT |
|
HOT SURFACE INDICATOR LIGHTS |
|
Control Knobs |
CONTROL PANEL |
Control Knobs |
|
|
|
15 |
|
15 |
COOKTOP-ON |
COOKTOP |
COOKTOP-ON |
INDICATOR LIGHT |
WARM ZONE-ON |
INDICATOR LIGHT |
|
INDICATOR LIGHT |
|
KEYSHEET
41 |
40 |
14 27 |
12-13, 16-28 |
|||
|
|
|
|
|
|
|
|
|
|
|
|
|
|
2:40 PM |
DEC 22 |
Convection |
|
Reheat |
|
|
|
|
|
|
|
|
|
|
|
|
|
|
|
|
|
|
|
|
|
|
|
|
Bake |
|
Defrost |
|
|
|
|
|
|
|
|
|
|
|
|
|
||
|
|
|
|
|
|
|
|
|
|
|
|
|
|
|
|
|
|
Broil |
|
Micro Cook |
|
|
|
|
|
|
|
|
|
|
|
|
|
|
|
|
|
|
|
|
|
|
|
|
|
Microwave |
|
|
|
|
|
|
12-13, 29-39 |
|
|
|
|
|
|
|
|
|
||
Oven |
40 |
15 |
40-41 40 |
14 |
14 |
||||
Numbers next to the keysheet illustration indicate pages on which there are feature descriptions and usage information.
When you wish to use both the Microwave Drawer and the Oven, complete one setting and touch START before programming the other setting.
11
introduction to TOUCHSCREEN
This Sharp Insight Range features an LCD Touchscreen that is designed to make operation easy by providing step-by-step instructions right on the active touchscreen display.
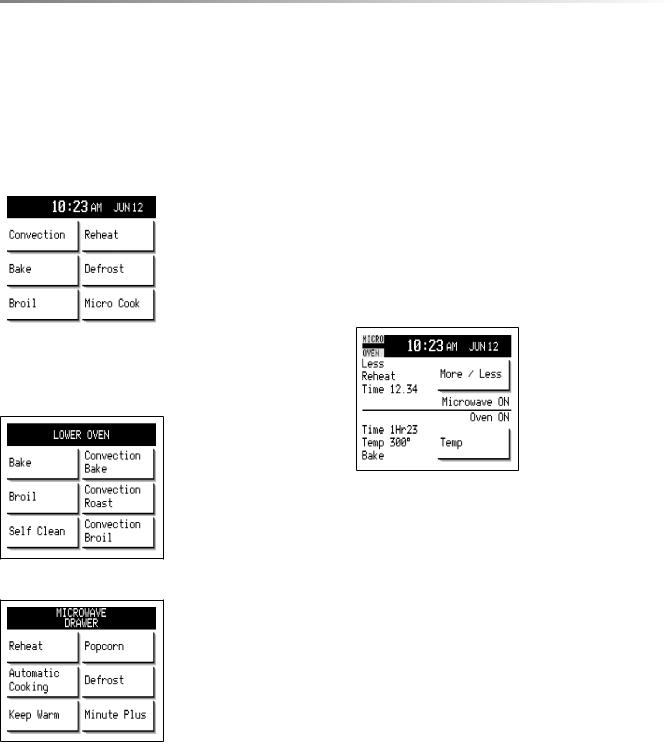
After the time of day and date are set (instructions on next page), the “Home Screen” will appear. Notice that the Lower Oven operation pads appear on the left side of the touchscreen and the Microwave options are on the right.
Touchscreen Display
HOME screen
|
To u s e t h e L o w e r |
|
|
||
|
Oven for |
Convection |
|
cooking, |
conventional |
|
baking or conventional |
|
|
broiling, simply touch |
|
|
the appropriate pad and |
|
|
follow the directions in the |
|
|
display. For more options, |
|
|
touch the Lower Oven pad |
|
|
toward the right-hand side |
|
|
||
of the control panel. When you touch this Lower Oven pad, |
||
the Lower Oven “Home Page” will appear. |
|
|
Lower Oven Home PAGE
You can see that there are more choices on this screen, including SelfClean. Keep in mind that you can access Convection Cooking, Bake and Broil from either the “Home Screen” or the “Lower Oven Home Page”.
Microwave Drawer Home PAGE
To use the Microwave Drawer, you can select one of the options on the right-hand side of the “Home Screen” to Reheat, Defrost or Micro Cook (automatic cooking). For more options, touch the
Microwave Drawer pad toward the right side of the control panel or simply open the Microwave Drawer
by touching the OPEN pad. The Microwave Drawer Home Page will appear.
The “Microwave Drawer Home Page” gives you six options: Reheat, Defrost and Automatic Cooking, plus Popcorn, Minute Plus and Keep Warm. By simply touching one of these pads, you will see more options and specific directions. All of these settings are automatic, but microwave cooking times and power levels can be set manually, as well (see page 18-19).
As you use the touchscreen, you will see that regardless of where you start—from the Home Screen, from the Lower Oven Home Page or from the Microwave Drawer Home Page—you will get to the same options and information.
Just read the information on the touchscreen and follow thedirections.You’llsoonfindthatselectingfromthevarious cooking options is easy and fun—and the guesswork has been eliminated. Please refer to detailed programming information on the following pages for specific features.
USING BOTH OVENS SIMULTANEOUSLY
You can use the Lower Oven and the Microwave Drawer at the same time. When both ovens are in operation, the touchscreen display will be split. The Microwave Drawer program and countdown will be displayed in the upper part of the touch-
screen and the Oven program will appear in the lower portion.
If the Lower Oven is ON and you want to use the Microwave Drawer, simply touch the Microwave Drawer pad. The Lower Oven program will disappear and the touchscreen will display microwave cooking options. If you want to cook by time and power level (you do not want to use the automatic settings), you can now program the microwave manually (see page 18). Once you have finished programming the microwave and touched START, the display will split so that you can keep track of both functions.
If you are using the Microwave Drawer and wish to use the Lower Oven, touch the Lower Oven pad. Proceed to set the Lower Oven, then touch START. The display will be split to show both functions.
12
before operating
|
2:40 PM |
DEC 22 |
Convection |
Reheat |
|
Bake |
Defrost |
|
Broil |
Micro Cook |
|
Touch Microwave Drawer pad to view Microwave Drawer Home Page.
 Touch Lower Oven pad
  to view Lower Oven Home Page.
Before operating your new range make sure you read and understand this operation manual completely.
• Before the range can be used, follow these steps:
1Plug in the range. The display will read, “Please wait 30 seconds”. After 30 seconds, you can select either Video Demo or Set Clock.
2Touch Set Clock and follow the instructions below.
Note:
• If no choice is made for 30 seconds, the Video Demo will begin automatically. To cancel the Video Demo, Touch the Stop/Clear pad and the display will return to the Home Screen. To set the clock, touch the Setup pad, touch Clock and follow the directions on the touchscreen.
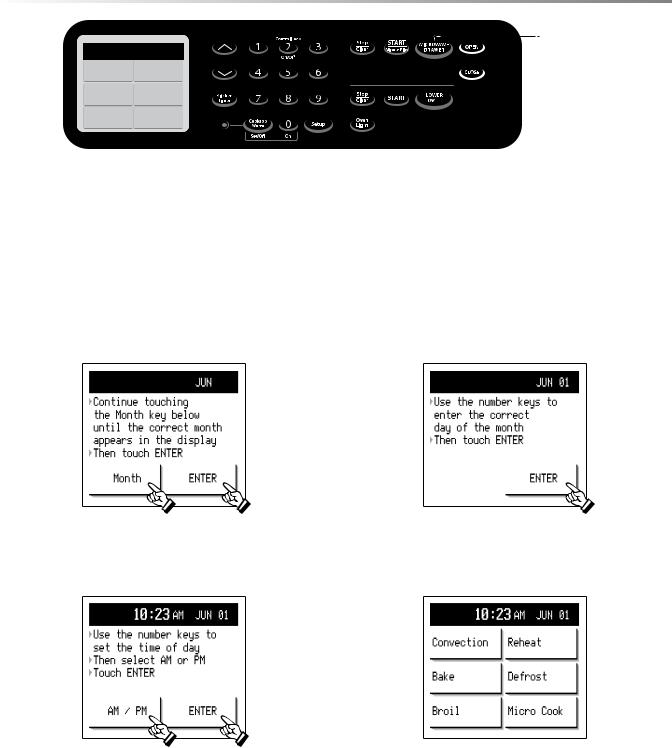
TO SET date and time
1 After touching Set Clock or Clock, enter the correct month by touching Month repeatedly. The month appears in the banner at the top of the display. When set for the correct month, touch ENTER.
3 Enter the time by touching the number pads. Select AM/PM and then touch ENTER.
Note:
2 Enter the date by touching the number pads on the control panel. Example: for June 1, touch 01. Check the date in the banner, then touch ENTER.
4 The month, date and time will appear in the banner. The display will return to the Home Screen.
•If you make a mistake while setting the clock, touch Stop/Clear pad. The Home Screen will appear. To set clock again, touch Setup pad on the control panel. Then touch Clock and follow the directions.
•If you want to change the setting of the time of day, Touch Setup pad and follow the directions.
•If the electrical power supply to your range should be interrupted, the screen will intermittently show Video Demo or Set Clock after the power is reinstated. If this occurs during cooking, the program will be erased. Simply touch Set Clock and follow the directions.
13

before operating
STOP/Clear
Touch the Stop/Clear pad to:
1Erase if you make a mistake during programming.
2Stop the Oven or Microwave Drawer temporarily during timed cooking.
3To cancel a program during cooking, touch twice for timed cooking.
COOKtop Use
Information YOU NEED TO KNOW
ABOUT the Cooktop
•Glass ceramic cooktop - Make sure the surface and the pan bottom are clean before turning on. Do not use the cooktop if the glass is broken or if metal melts on it.
•Radiant surface units - The radiant surface heating units are beneath the smooth glass ceramic cooktop. The design on the cooktop outlines the area of the surface unit underneath. When the cooktop is on, the cooktop-on indicator, next to the surface cooking control knob, comes on even if the cooktop unit doesn’t look red. The areas around the units may become hot enough to cause burns.
•Hot surface indicator - An indicator light, on the cooktop, comes on when the surface unit is turned on and the cooktop temperature increases. The indicator will remain on until the surface has cooled below 150˚F even after the unit is turned off.
•Temperature limiter - The radiant surface units have a temperature limiter that allows the unit to cycle on and off, even at the HI setting. It protects the glass ceramic cooktop from damage. Cycling at the HI setting can occur when improper cookware is used.
Note:
•Never leave any items on the cooktop. Hot units may ignite flammable items, melt or soften plastics or increase pressure in closed containers causing them to burst.
•Don’t store heavy items above the cooktop as they can cause damage if they drop on to the cooktop.
•Never cook directly on the cooktop. Always use cookware.
OPEN OR CLOSE MICROWAVE DRAWER
Always touch the OPEN or CLOSE pad on the control panel to open or close the Microwave Drawer.
Do not push or pull the Microwave Drawer by hand, except in case of emergency such as a power failure.
ABOUT COOKING UTENSILS
For best results and energy conservation, choose cooking utensils as below.
•Bottom of pan- Pans should have flat bottoms that make good contact with the entire surface unit. Check for flatness by using a straight edge. Pans with curved or warped bottoms are not recommended.
•Size of pan - Pan size should match the amount of food and the size of the surface unit. Do not use canners or frypans that exceed the width of the radiant surface units.
•Material of pan - Always use a utensil for its intended purpose. Follow manufacturer’s instructions. Some utensils were not made to be used on the cooktop.
•Position of pan - Always place the pan in the center of the surface unit you are using.
•Wok Cooking - Only a flat-bottomed wok is recommended. Do not use round-bottom wok or a wok with a support ring.
Note:
•Do not slide cookware across the cooktop surface because it can scratch the glass or may leave marks which need to be removed promptly.
•Never allow a pan to boil dry. This could damage the pan and the countertop.
•Do not use aluminum foil on the cooktop surface.
•Do not use cooktop as a cutting board.
14
Cooktop Use
COOKTOP
warm zone
RADIANT
SURFACE UNIT
Cooktop-ON indicator light
RADIANT
SURFACE UNIT 
CONTROL PANEL
RADIANT
SURFACE UNIT
Cooktop-ON indicator light
RADIANT
SURFACE UNIT
cooktop warm ZONE-ON indicator LIGHT
Radiant SURFACE Units
Surface units are turned on and adjusted using the control knobs.
How To set Single surface unit
1Place correctly sized cookware on the radiant surface unit.
2Push the knob in and turn in either direction to the desired heat setting.
3When cooking is completed, turn the knob to OFF. Remove pan.
How To set dual surface unit
The right front surface unit has 2 cooking sizes so that you can choose either to match the diameter of the cookware you are using.
1Place correct size cookware on the radiant surface unit.
2To use the small surface unit, push the knob in and turn it to the left, counter clockwise.
To use the large surface unit, push the knob in and turn it to the right, clockwise.
3 When cooking is completed, turn the knob to OFF. Remove pan.
Note for surface unit: A hot surface indicator light in the center of the cooktop will glow when a radiant unit is turned on. It will remain on until the surface is cooled to about
150˚F. Be sure the knob is turned to OFF when you have finished cooking.
The glass ceramic cooktop retains heat after the radiant surface units have been turned to OFF. If possible, turn the units off and allow foods to finish cooking with the retained heat. It may be necessary to remove the pan from the unit to prevent further cooking, also.
Suggested heat settings
Setting |
Type of cooking |
|
|
|
|
High |
Bring liquid to a boil. Always reduce |
|
|
setting to a lower heat when liquids |
|
|
begin to boil or foods begin to cook. |
|
Medium High |
Brown meat, heat oil for deep fat frying |
|
|
or to continue a rapid boil. |
|
Medium |
Maintain a slow boil, thicken sauces |
|
|
and gravies |
|
Medium Low |
Continue cooking covered foods or |
|
|
steam foods. |
|
Low |
Melt or simmer. |
|
Note: The size and type of cookware used will influence the setting needed.
COOKTOP WARM ZONE
The Cooktop Warm Zone will keep hot cooked food at an ideal serving temperature. To turn Cooktop Warm on, touch the Cooktop Warm pad, then touch number 0 within 3 seconds. The red indicator will light. To turn the Cooking Warm Zone off, touch the Cooktop Warm pad.
CAUTION The Cooktop Warm Zone will not glow red when it is hot, but it does become hot enough to cause burns. Always use oven mittens when removing food from the Warm Zone as cookware and plates will be hot. Use only cookware recommended for top-of-range cooking. Do not use plastic wrap to cover foods. Plastic may melt on to the surface and be very difficult to clean.
15
 Loading...