


MODEL
FO-4650
FO-4970
FACSIMILE
OPERATION MANUAL
1.Installation
2.Sending Documents
3.Receiving Documents
4.Making Copies
5.Special Functions
6.Option Settings
7.Printing Reports and Lists
8.Maintenance
9.Troubleshooting

WARNING - FCC Regulations state that any unauthorized changes or modifications to this equipment not expressly approved by the manufacturer could void the user’s authority to operate this equipment.
Note: This equipment has been tested and found to comply with the limits for a Class B digital device, pursuant to Part 15 of the FCC Rules.These limits are designed to provide reasonable protection against harmful interference in a residential installation.This equipment generates, uses and can radiate radio frequency energy and, if not installed and used in accordance with the instructions, may cause harmful interference to radio communications. However, there is no guarantee that interference will not occur in a particular installation. If this equipment does cause harmful interference to radio or television reception, which can be determined by turning the equipment off and on, the user is encouraged to try to correct the interference by one or more of the following measures:
-Reorient or relocate the receiving antenna.
-Increase the separation between the equipment and the receiver.
-Connect the equipment into an outlet on a circuit different from that to which the receiver is connected.
-Consult the dealer or an experienced radio/TV technician for help.
ABOUT THE TELEPHONE CONSUMER PROTECTION ACT OF 1991
"The Telephone Consumer Protection Act of 1991 makes it unlawful for any person to use a computer or other electronic device to send any message via a telephone facsimile machine unless such message clearly contains in a margin at the top or bottom of each transmitted page or on the first page of the transmission the following information:
(1)The date and time of transmission.
(2)Identification of either the business, business entity or individual sending the message.
(3)Telephone number of either the sending machine, business, business entity or individual.
In order to program this information into your facsimile machine, please refer to the appropriate instructions in the operation manual."
As an ENERGY STAR partner, SHARP has determined
that this product meets the ENERGY STAR guidelines for energy efficiency.

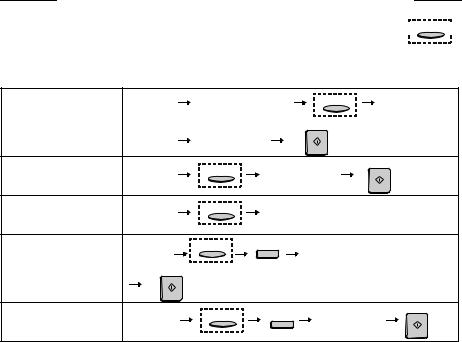
QUICK REFERENCE GUIDE
Note: Steps which are optional are enclosed in a dotted frame:  RESOLUTION
Transmitting documents
Normal Dialing |
Load |
press SPEAKER |
RESOLUTION |
Dial (press |
||
|
document |
|
|
|
numeric keys) |
|
|
|
Wait for |
|
START |
|
|
|
|
|
|
|
||
|
|
reception tone |
|
|
|
|
Direct Keypad |
Load |
|
Dial (press |
START |
||
RESOLUTION |
|
|||||
Dialing |
document |
|
numeric keys) |
|
||
|
|
|
|
|||
Rapid Key Dialing |
Load |
RESOLUTION |
Press Rapid |
|
||
|
|
|||||
|
document |
|
Key |
|
|
|
Speed Dialing |
Load |
RESOLUTION |
SPEED DIAL |
Enter Speed Dial number |
||
(press numeric keys, - if less |
||||||
|
document |
|
|
|||
|
|
|
than 3 digits, press START |
|||
|
|
|
|
|||
|
START |
|
|
to complete entry) |
||
Redialing |
Load |
RESOLUTION |
REDIAL |
Wait for |
START |
|
|
||||||
|
document |
|
|
reception tone |
||
1
GUIA DE CONSULTA RAPIDA
Nota: El marco punteado significa que el procedimiento puede ser opcional: RESOLUTION
Transmisión de documentos
Marcación normal |
Colocar el |
pulse SPEAKER |
RESOLUTION |
|
Marque (pulse |
|
|
documento |
|
|
|
|
teclas numéricas) |
|
|
Espere el tono |
START |
|
|
|
|
|
|
|
|
||
|
|
recepción |
|
|
|
|
Marcación directa |
Colocar el |
|
Marque (pulse |
START |
||
RESOLUTION |
|
|
||||
con el teclado |
documento |
|
teclas numéricas) |
|
|
|
Marcación con |
Colocar el |
RESOLUTION |
Pulse la Tecla |
|
|
|
Teclas Rápidas |
documento |
|
Rápida |
|
|
|
Marcación Veloz |
Colocar el |
RESOLUTION |
SPEED DIAL |
Introduzca el número de discado r |
||
|
documento |
|
|
pido (presione las teclas numéricas, |
||
|
|
|
si fueran menos de 3 digitos, para |
|||
|
|
|
|
|||
|
START |
|
|
completar el procedimiento presione |
||
|
|
|
|
START.) |
|
|
Remarcación |
Colocar el |
|
|
Espere el tono |
START |
|
RESOLUTION |
REDIAL |
|
||||
|
documento |
|
|
recepción |
|
|
2

Introduction
Welcome, and thank you for choosing a Sharp facsimile machine! The features and specifications of your new Sharp fax machine are shown below.
Automatic dialing |
Rapid Key Dialing: 48 numbers |
|
|
Speed Dialing: |
|
|
FO-4650: 75 numbers |
|
|
FO-4970: 100 numbers |
|
Memory size* |
FO-4650: 1 |
MB (approx. 56 pages ) |
|
FO-4970: 2 |
MB (approx. 116 pages) |
Modem speed |
FO-4650: 14,400 bps (max.) |
|
|
FO-4970: 33,600 bps (max.) |
|
|
Automatic fallback to lower speeds. |
|
Transmission time*
Toner cartridge yield (4% page coverage, letter paper)
Drum cartridge yield
Resolution
FO-4650: Approx. 6 seconds
FO-4970: Approx. 2 seconds
Initial starter cartridge (included with fax machine): Approx. 3000 pages
Replacement cartridge (FO-47ND):
Approx. 6000 pages
Initial starter cartridge (included with fax machine): 20,000 pages (ave.)
Replacement cartridge (FO-47DR): 20,000 pages (ave.)
Horizontal: 203 pels/inch (8 pels/mm)
Vertical:
Standard: 98 lines/inch (3.85 lines/mm) Fine /Halftone:
196 lines/inch (7.7 lines/mm)
Super fine: 391 lines/inch (15.4 lines mm)
*Based on ITU-T Test Chart #1 at standard resolution in Sharp special mode, excluding time for protocol signals (i.e., ITU-T phase C time only).
3
Automatic document feeder
Letter paper (20 lb): Max. 50 pages Legal paper: Max. 20 pages
(Note: 11” x 17” paper must be loaded one page at a time.)
Paper capacity |
250 sheets (500-sheet cassette available as |
|
option) |
Compression scheme |
MMR, MR, MH, Sharp (H2) |
|
(FO-4970: Also supports JBIG) |
Halftone (grayscale) |
64 levels |
Applicable telephone line |
Public switched telephone network |
Compatibility |
ITU-T (CCITT) G3 mode |
Printing resolution |
Horizontal: 406 lines/inch (16 lines/mm) |
|
Vertical: 391 lines/inch (15.4 lines/mm) |
Input document size |
Automatic feeding: |
|
Width: 5.8 to 10.1" (148 to 256 mm) |
|
Length: 5.0 to 14.3" (128 to 364 mm) |
|
Manual feeding: |
|
Width: 5.8 to 11.0" (148 to 279 mm) |
|
Length: 5.0 to 17.0" (128 to 432 mm) |
Effective Scanning width |
8.3" (210 mm) max. |
Effective Printing width |
8.0" (203 mm) max. |
Reception modes |
Auto/Manual |
Instascan speed |
30 ppm (letter paper) |
Full Dual Access |
Yes |
Copy function |
Single/Multi/Sort (99 copies/page) |
Power requirements |
120 V AC, 60 Hz |
Operating temperature |
50 - 86°F (10 - 30°C) |
Humidity |
20 to 85% RH |
4
Power consumption |
Standby: 10 W |
|
Maximum: 580 W |
Dimensions |
Width: 18.1" (460 mm) |
|
Depth: 15.2" (385 mm) |
|
Height: 10.6" (270 mm) |
Weight |
Approx. 27.8 lbs. (12.6 kg) |
As a part of our policy of continuous improvement, SHARP reserves the right to make design and specification changes for product improvement without prior notice. The performance specification figures indicated are nominal values of production units. There may be some deviations from these values in individual units.
Important safety information
Be sure to save these instructions!
When using your facsimile equipment, basic safety precautions should always be followed to reduce the risk of fire, electric shock and injury to persons, including the following:
•CAUTION: To reduce the risk of fire, use only No. 26 AWG or larger telecommunication line cord.
•Do not disassemble this machine or attempt any procedures not described in this manual. Refer all servicing to qualified service personnel.
•This machine must only be connected to a 120 V, 60 Hz, grounded (3- prong) outlet. Connecting it to any other kind of outlet will damage the machine and invalidate the warranty.
•Do not install or use the machine near water, or when you are wet. For example, do not use the machine near a bath tub, wash bowl, kitchen sink or laundry tub, in a wet basement, or near a swimming pool. Take care not to spill any liquids on the machine.
5
•Use only the power cord provided with the facsimile machine. Do not use an AC extension cord.
•Unplug the machine from the telephone jack and then the power outlet and consult a qualified service representative if any of the following situations occur:
-Liquid has been spilled into the machine or the machine has been exposed to rain or water.
-The machine produces odors, smoke, or unusual noises.
-The power cord is frayed or damaged.
-The machine has been dropped or the housing damaged.
•Do not allow anything to rest on the power cord, and do not install the machine where people may walk on the power cord.
•Never insert objects of any kind into slots or openings on the machine. This could create a risk of fire or electric shock. If an object falls into the machine that you cannot safely remove, unplug the machine and consult a qualified service representative.
•Do not place this machine on an unstable cart, stand or table. The machine could be seriously damaged if it falls.
•Avoid using a telephone (other than a cordless type) during an electrical storm. There may be a remote risk of electric shock from lightning.
•Do not use a telephone to report a gas leak in the vicinity of the leak.
•The power outlet must be installed near the equipment and must be easily accessible.
Important:
•This facsimile machine is not designed for use on a line which has call waiting, call forwarding, or certain other special services offered by your telephone company. If you attempt to use the fax machine in conjunction with any of these services, you may experience errors during transmission and reception of facsimile messages.
•This machine is not compatible with digital telephone systems.
6

Table of Contents
QUICK REFERENCE GUIDE . . . . . . . . . . . . . . . . . . . . . . . . . . 1 GUIA DE CONSULTA RAPIDA . . . . . . . . . . . . . . . . . . . . . . . . 2
Introduction . . . . . . . . . . . . . . . . . . . . . . . . . . . . . . . . . . . . . . . 3
Important safety information . . . . . . . . . . . . . . . . . . . . . . . . . . . . . 5
Table of Contents . . . . . . . . . . . . . . . . . . . . . . . . . . . . . . . . . . 7
1. Installation. . . . . . . . . . . . . . . . . . . . . . . . . . . . . . . . . . . . . . 9
Unpacking Checklist . . . . . . . . . . . . . . . . . . . . . . . . . . . . . . . . . . . 9
A Look at the Operation Panel . . . . . . . . . . . . . . . . . . . . . . . . . . 10
Connections . . . . . . . . . . . . . . . . . . . . . . . . . . . . . . . . . . . . . . . . 16
Installing the Print Cartridges . . . . . . . . . . . . . . . . . . . . . . . . . . . 20
Loading Printing Paper . . . . . . . . . . . . . . . . . . . . . . . . . . . . . . . . 25
Entering Your Name and Fax Number . . . . . . . . . . . . . . . . . . . . 28
Setting the Date and Time. . . . . . . . . . . . . . . . . . . . . . . . . . . . . . 31
Volume Adjustment . . . . . . . . . . . . . . . . . . . . . . . . . . . . . . . . . . . 33
2. Sending Documents. . . . . . . . . . . . . . . . . . . . . . . . . . . . . 35
Transmittable Documents . . . . . . . . . . . . . . . . . . . . . . . . . . . . . . 35 Loading the Document . . . . . . . . . . . . . . . . . . . . . . . . . . . . . . . . 37 Adjusting the Resolution and Contrast . . . . . . . . . . . . . . . . . . . . 38 Sending a Fax by Normal Dialing . . . . . . . . . . . . . . . . . . . . . . . . 40 Programming Auto-Dial Numbers . . . . . . . . . . . . . . . . . . . . . . . . 42 Sending a Fax by Automatic Dialing . . . . . . . . . . . . . . . . . . . . . . 48 Cover Sheet . . . . . . . . . . . . . . . . . . . . . . . . . . . . . . . . . . . . . . . . 59 Batch Page Numbering . . . . . . . . . . . . . . . . . . . . . . . . . . . . . . . . 61
3. Receiving Documents . . . . . . . . . . . . . . . . . . . . . . . . . . . 63
Using AUTO Reception Mode . . . . . . . . . . . . . . . . . . . . . . . . . . . 64 Using MANUAL Reception Mode . . . . . . . . . . . . . . . . . . . . . . . . 64 Substitute Reception to Memory . . . . . . . . . . . . . . . . . . . . . . . . . 65
7
Table of Contents
4. Making Copies. . . . . . . . . . . . . . . . . . . . . . . . . . . . . . . . . . 66
5. Special Functions . . . . . . . . . . . . . . . . . . . . . . . . . . . . . . . 69
Broadcasting . . . . . . . . . . . . . . . . . . . . . . . . . . . . . . . . . . . . . . . . 69 Confidential Operations . . . . . . . . . . . . . . . . . . . . . . . . . . . . . . . . 74 Relay Request . . . . . . . . . . . . . . . . . . . . . . . . . . . . . . . . . . . . . . . 80 Polling . . . . . . . . . . . . . . . . . . . . . . . . . . . . . . . . . . . . . . . . . . . . . 88 Power Save Mode . . . . . . . . . . . . . . . . . . . . . . . . . . . . . . . . . . . . 96 Timer Operations . . . . . . . . . . . . . . . . . . . . . . . . . . . . . . . . . . . . 102 Batch Transmission . . . . . . . . . . . . . . . . . . . . . . . . . . . . . . . . . . 113 Entering and Using Programs . . . . . . . . . . . . . . . . . . . . . . . . . . 116 Duplex Scanning for Two-sided Documents . . . . . . . . . . . . . . . 131 Print Hold . . . . . . . . . . . . . . . . . . . . . . . . . . . . . . . . . . . . . . . . . . 133 Department Control . . . . . . . . . . . . . . . . . . . . . . . . . . . . . . . . . . 135 Blocking Reception of Unwanted Faxes . . . . . . . . . . . . . . . . . . 138 Telephone Billing . . . . . . . . . . . . . . . . . . . . . . . . . . . . . . . . . . . . 140 Distinctive Ring . . . . . . . . . . . . . . . . . . . . . . . . . . . . . . . . . . . . . 142
6. Optional Settings . . . . . . . . . . . . . . . . . . . . . . . . . . . . . . 144
7. Printing Lists and Reports . . . . . . . . . . . . . . . . . . . . . . . 154
8. Maintenance . . . . . . . . . . . . . . . . . . . . . . . . . . . . . . . . . . 162
Cleaning the Scanning Glass and Rollers . . . . . . . . . . . . . . . . . 162
The Housing . . . . . . . . . . . . . . . . . . . . . . . . . . . . . . . . . . . . . . . 163
Replacing the Verification Stamp. . . . . . . . . . . . . . . . . . . . . . . . 163
9. Troubleshooting . . . . . . . . . . . . . . . . . . . . . . . . . . . . . . . 165
Problems and Solutions . . . . . . . . . . . . . . . . . . . . . . . . . . . . . . . 165
Messages and Signals. . . . . . . . . . . . . . . . . . . . . . . . . . . . . . . . 169
Clearing Paper Jams . . . . . . . . . . . . . . . . . . . . . . . . . . . . . . . . . 172
FCC Regulatory Information . . . . . . . . . . . . . . . . . . . . . . . . . . . 176
Index . . . . . . . . . . . . . . . . . . . . . . . . . . . . . . . . . . . . . . . . . . . 179
8
1. Installation
Unpacking Checklist
Before setting up, make sure you have all of the following items. If any are missing, contact your dealer.
1. Installation
Power cord |
Rapid Key |
|
labels |
||
|
||
|
Paper size |
|
|
labels |
|
Telephone |
Document |
|
line cord |
OUT tray |
|
Toner cartridge |
Operation |
|
|
||
|
manual |
|
Drum cartridge |
Received |
|
document tray |
||
|
9
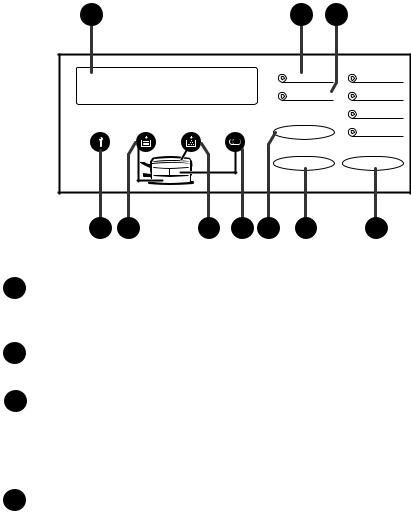
A Look at the Operation Panel
A Look at the Operation Panel
1 |
|
|
|
|
2 |
3 |
|
|
|
|
|
LINE IN USE |
STANDARD |
|
|
|
|
|
STATUS CHECK |
FINE |
|
|
|
|
|
CHANGEOVER |
SUPER FINE |
|
|
|
|
|
|
|
|
|
|
|
|
|
HALF TONE |
|
|
|
|
|
POWER SAVE |
RESOLUTION |
4 |
5 |
6 |
7 |
8 |
9 |
10 |
1Display
This displays messages and prompts during operation and programming.
2LINE IN USE light
This lights when the fax machine is using the telephone line.
3STATUS CHECK light
This lights when a paper size error or paper jam occurs, or when the print compartment cover is open. A message will appear in the display to indicate the problem. (The indicator also lights steadily when the received document tray is not properly installed.)
4Service indicator
This lights when a problem occurs which must be fixed by a service technician.
10

A Look at the Operation Panel
5Paper out indicator
This lights when the fax machine is out of paper. If the machine has a paper cassette, the indicator blinks when one of the paper sources (tray or cassette) is out of paper, and lights steadily when all sources are out of paper.
6Toner cartridge indicator
This blinks when the toner cartridge nears empty, and lights steadily when the toner cartridge needs replacement.
7Drum cartridge indicator
This blinks when the drum cartridge needs replacement.
8CHANGEOVER key
Two types of information appear in the display: prompts related to operations you are performing, and information about how the fax is using the telephone line (transmitting, receiving, etc.). Press this key to switch between the two types of information.
9POWER SAVE key
Press this key to turn on Power Save Mode, or set the Power Save Mode timer if TIMER has been selected with Option Setting 34 (Power Save Type).
10RESOLUTION key
Press this key to adjust the resolution before sending or copying a document.
1. Installation
11
A Look at the Operation Panel
11
01 |
02 |
03 |
04 |
05 |
06 |
07 |
08 |
A |
B |
C |
D |
E |
F |
G |
H |
09 |
10 |
11 |
12 |
13 |
14 |
15 |
16 |
I |
J |
K |
L |
M |
N |
O |
P |
17 |
18 |
19 |
20 |
21 |
22 |
23 |
24 |
Q |
R |
S |
T |
U |
V |
W |
X |
25 |
26 |
27 |
28 |
29 |
30 |
31 |
32 |
Y |
Z |
|
|
|
|
|
|
|
|
SPACE |
SHIFT |
SP |
CLEAR |
|
|
Rapid Key overlay down
11 |
12 |
13 |
14 |
15 |
16 |
17 |
18 |
19 |
33 |
34 |
35 |
36 |
37 |
38 |
39 |
40 |
A |
B |
C |
D |
E |
F |
G |
H |
41 |
42 |
43 |
44 |
45 |
46 |
47 |
48 |
I |
J |
K |
L |
M |
N |
O |
P |
CONTRAST PAGE COUNTERCONFIDENTIAL |
TIMER |
RELAY |
LIFE |
MEM.STATUS |
SEARCH DIAL |
||
Q |
R |
S |
T |
U |
V |
W |
X |
COVER SHEET |
|
|
|
|
|
DOWN |
UP |
Y |
Z |
|
|
|
|
|
|
|
|
SPACE |
SHIFT |
SP |
CLEAR |
|
|
Rapid Key overlay up
20 |
21 |
22 |
23 |
24 |
25 |
26 |
11Rapid Dial Keys
Press one of these keys to dial a fax number automatically. (Note that you must attach the Rapid Key labels.)
12CONTRAST key
Press this key to adjust the contrast before sending or copying a document.
13PAGE COUNTER key
Press this key to include a slash and the total number of pages after each page number on the pages of a transmitted document.
14CONFIDENTIAL key
Press this key to send or print out a confidential document.
15TIMER key
Press this key to set an operation to be performed automatically at a later time.
12

A Look at the Operation Panel
16RELAY key
Press this key to send a document to another Sharp fax machine and have that machine in turn relay the document to one or more end receiving machines.
17LIFE key
Press this key, followed by 1, to check the total number of pages printed by the fax machine.
18MEM. STATUS key
Press this key to check the status of documents waiting in memory for transmission.
19SEARCH DIAL key
Press this key to search through your auto dial fax numbers by name.
20COVER SHEET key
Press this key to include a cover sheet when sending a fax.
21SPACE key
Press this key to enter a space when programming a name.
22SHIFT key
Press this key to switch between upper and lower case letters when programming a name.
23SP key
Press this key to enter a symbol when programming a name.
24CLEAR key
Press this key to clear a mistake when programming a name or fax number.
25Arrow keys
Press these keys to move the cursor forward or backward when programming a name or fax number.
26UP and DOWN keys
Press these keys to adjust the volume of the speaker when the SPEAKER key has been pressed, or the volume of the ringer at all other times.
1. Installation
13
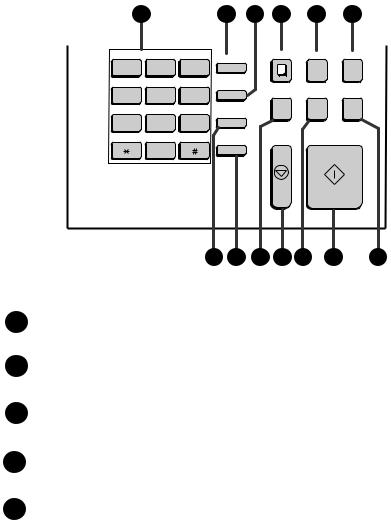
A Look at the Operation Panel
|
27 |
|
28 |
29 |
30 |
31 |
32 |
|
|
ABC |
DEF |
FUNCTION |
|
COPY |
DOCUMENT DUPLEX SCAN |
||
1 |
2 |
3 |
|
|
|
|
||
|
|
|
|
|
||||
GHI |
JKL |
MNO |
SPEED DIAL |
|
|
|
||
4 |
5 |
6 |
BROADCAST |
PRIORITY |
REPORT |
|||
|
|
|||||||
PRS |
TUV |
WXY |
REDIAL |
|
|
|
|
|
7 |
8 |
9 |
|
|
|
|
||
|
|
|
|
|
||||
|
OPER |
|
SPEAKER |
|
STOP |
START |
||
|
|
|
|
|||||
0
33 |
34 |
35 |
36 37 |
38 |
39 |
27Dial keypad (numeric keys)
Use these keys to dial and program fax numbers.
28FUNCTION key
Press this key to select various special functions.
29SPEED DIAL key
Press this key to dial a Speed Dial number.
30COPY key
Press this key to make a copy of a document.
31DOCUMENT key
Press this key to transmit a document without reading it first into memory.
14

A Look at the Operation Panel
32DUPLEX SCAN key
Press this key to transmit or copy a two-sided document.
33REDIAL key
Press this key to automatically redial the last number dialed.
34SPEAKER key
Press this key when transmitting a document by Normal Dialing to listen to the line and verify the response of the receiving fax machine.
35BROADCAST key
Press this key to send a document to a group of receiving fax machines.
36STOP key
Press this key to cancel an operation before it is completed.
37PRIORITY key
Press this key when you need to transmit a document ahead of other documents waiting in memory for transmission.
38START key
Press this key to begin transmission when using Speed Dialing, Direct Keypad Dialing, or Normal Dialing.
39REPORT key
Press this key to print out a report on the most recently completed transmission or reception.
1. Installation
15
Connections
Connections
Points to keep in mind when setting up
♦Do not place the machine in direct sunlight.
♦Do not place the machine near heaters or air conditioners.
♦Keep dust away from the machine.
♦Install the machine on a level surface.
Connecting the power cord
Connect the female end of the power cord to the fax machine as shown. Insert the male end into a 120 V, 60 Hz, grounded (3-prong) AC outlet.
Press the power switch to turn on the power.
Note: If your area experiences a high incidence of lightning or power surges, we recommend that you install surge protectors for the power and telephone lines. Surge protectors can be purchased at most telephone specialty stores.
16
Connections
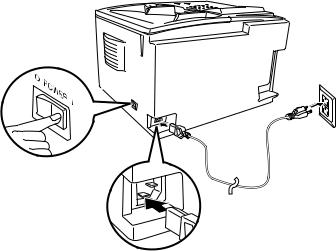
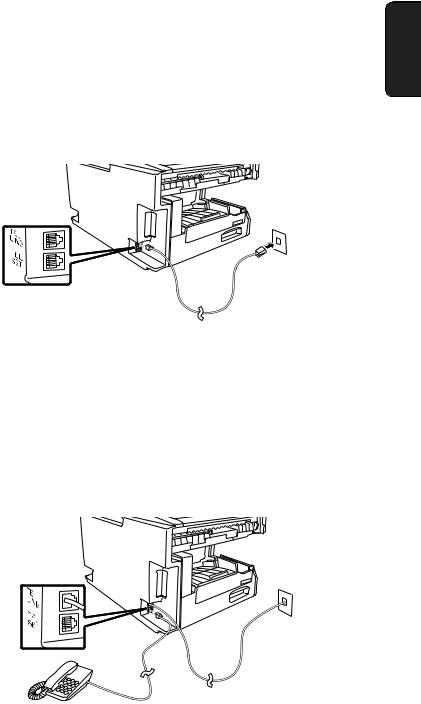
Connecting the telephone line cord
Insert one end of the line cord into the jack on the back of the machine marked TEL. LINE. Insert the other end into a standard (RJ11C) single-line wall telephone jack.
Note: The fax machine is set for touch-tone dialing. If you are on a pulse dial (rotary) line, you must set the fax machine for pulse dialing by changing Option Setting 22. This procedure is described in Chapter 6,
Optional Settings.
Connecting a telephone (optional)
If desired, you can connect a telephone to the TEL. SET jack on the back of the machine.
1. Installation
17

Connections
Attaching the document OUT tray
Insert the protrusion on the right side of the machine into the hole in the right side of the document OUT tray as shown, then bend the tray slightly and insert so that the protrusion on the left side of the machine goes into the hole on the left side of the document OUT tray.
Pull out the tray extension.
Automatic Document Feeder
LETTER : MAX 50 SHEETS
LEGAL : MAX 20SHEETS
Attach the Automatic Document Feeder label to the top of the machine.
Attaching the received document tray
Slide the received document tray into the machine as shown. When it stops, lift the end slightly and push in so that the tray locks into place.
Make sure the left edge of the tray fits into the slot.
Important!
The received document tray must be attached for the fax machine to operate properly.
18
Connections
Verification Stamp (option)
Note: This function is available as an option. Consult your dealer if you wish to use it.
When transmitting a document, you can have your fax stamp each document page as it is scanned. After scanning, you can check to see if all documents have been stamped to verify that no double feeds occurred. (A double feed is when two pages are fed through the scanner at once, which means that one of the pages is not scanned.)
To use this function, have your dealer install the Verification Stamp option, and then set Option Setting 29 to ON as explained in Chapter 6, Optional Settings.
1. Installation
19
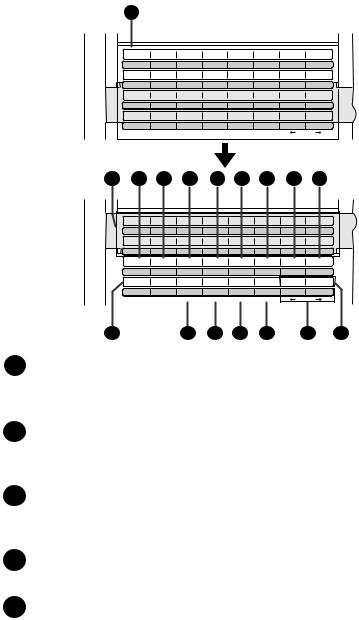
Installing the Print Cartridges
Installing the Print Cartridges
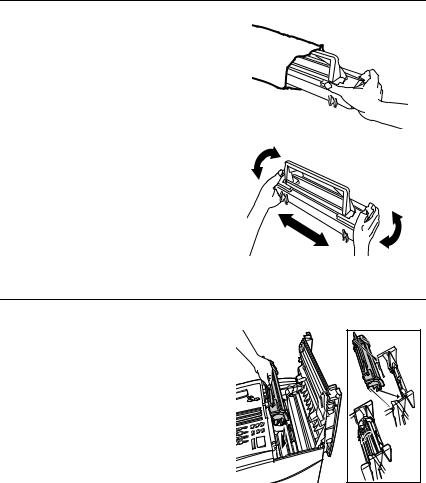
Follow the steps below to install or replace the toner and drum cartridges.
♦The initial starter toner cartridge included with the fax machine can print approximately 3000 letter-size pages (4% coverage of each page).
♦The replacement toner cartridge (FO-47ND) can print approximately 6000 letter-size pages.
♦The drum cartridge (FO-47DR) can print approximately 20,000 let- ter-size pages.
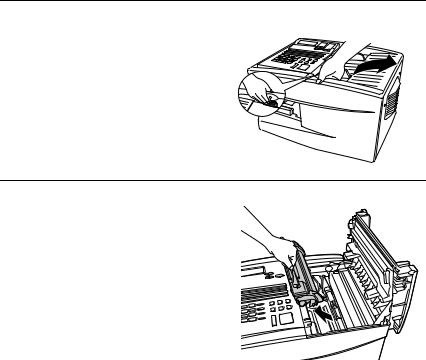
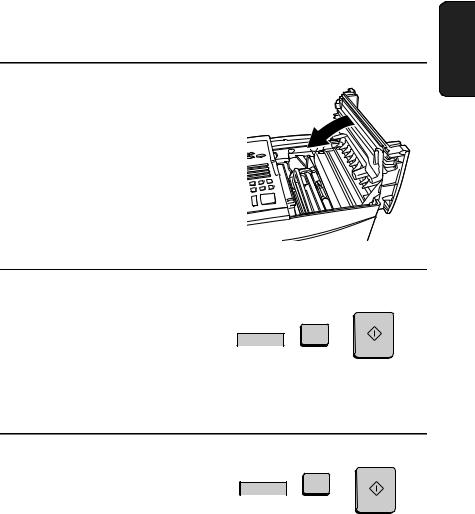
1Press the green release and open the print compartment cover.
• Caution!
The fusing unit inside the print compartment becomes very hot during operation. Be careful not to touch the inside of the compartment.
2 If you are replacing the toner cartridge, remove the old cartridge and dispose of it according to local regulations. Go directly to Step 6 if you are only replacing the toner cartridge and not the drum cartridge.
• If you are replacing the drum cartridge but not the toner cartridge, remove the toner cartridge and place it on a sheet of paper.
20
Installing the Print Cartridges
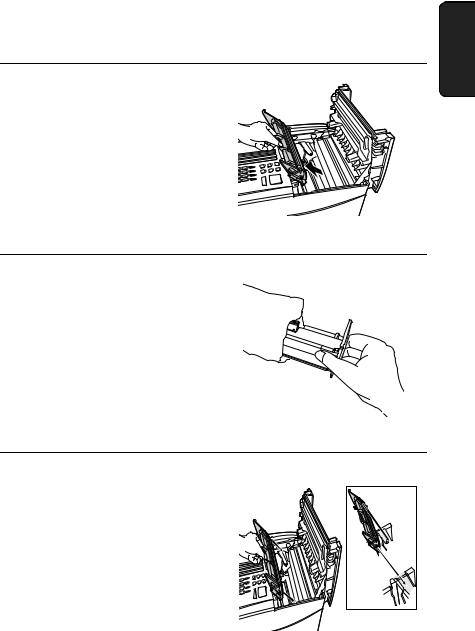
3 If you are replacing the drum cartridge, remove the old cartridge and dispose of it according to local regulations.
4 Remove the new drum cartridge from its packaging.
• Caution! Excessive exposure to light will damage the drum cartridge. Install the cartridge promptly after removing it from its packaging.
5 Insert the drum cartridge into the print compartment, aligning the guides on the cartridge with the grooves on the
sides of the compartment. |
Blue |
|
|
||
• Insert the cartridge by aligning the |
Green |
|
colored “1” labels on the cartridge |
||
|
||
and the sides of the compartment. |
|
•Make sure the drum cartridge is inserted in as far as it will go.
1. Installation
21
Installing the Print Cartridges
6 If you are installing a new toner cartridge, remove the new toner cartridge from its packaging. Shake as indicated by the arrows to distribute the toner evenly within the cartridge.
•If the toner is still lumpy after shaking, the gears in the cartridge may make a noticeable sound when the print compartment cover is closed after installing the cartridge. This is normal and does not indicate a problem in the machine.
7 Hold the toner cartridge by the handle and lower it into the print compartment. Make sure that the four pins (two on each side) fit into the grooves on the sides of the compartment.
• Insert the cartridge by aligning the colored “2” labels on the cartridge and the side of the compartment
•Make sure the toner cartridge clicks into place.
 Blue
Blue
 Green
Green
22
8 Close the print compartment cover.
•Press down on the dot markings at the left edge to make sure the cover is completely closed.
Installing the Print Cartridges
1. Installation
9 Reset the toner counter by pressing the LIFE key (flip up the Rapid Key overlay), 2, and the START key.
START
|
LIFE |
2 |
V |
|
10 Reset the drum counter by pressing the LIFE key (flip up the Rapid Key overlay), 3, and the START key.
START
|
LIFE |
3 |
V |
|
Note: The print compartment cover may become noticeably warm if a large number of pages are successively printed. This is normal and does not indicate a problem in the machine.
23
Installing the Print Cartridges
When to replace the toner cartridge
When the toner cartridge nears empty (about 100 pages can still be printed), the toner cartridge indicator on the operation panel will blink. When the toner cartridge is empty, the toner cartridge indicator will light steadily and REPLACE TONER will appear in the display. Printing will no longer be possible. Use the following replacement toner cartridge:
Sharp FO-47ND toner cartridge
When to replace the drum cartridge
When the drum cartridge life is over, the drum cartridge indicator on the operation panel will blink and DRUM LIFE OVER will appear in the display. Use the following replacement drum cartridge:
Sharp FO-47DR drum cartridge
♦Caution!
Be sure to use only genuine Sharp supplies.
24
Loading Printing Paper
Loading Printing Paper
You can load up to 250 sheets of letter or legal paper (max. 20 lbs.) in the paper tray. You can load up to 500 sheets of letter paper in the paper cassette.
Note: The paper cassette is available as an option. To have the cassette installed, consult your dealer.
Note: To use A4 paper in the paper cassette, you must have a service technician adjust the cassette.
Loading paper in the paper tray
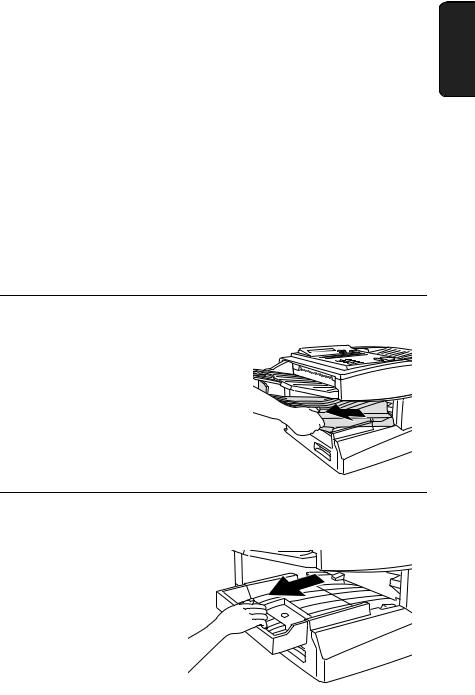
1 Remove the received document tray.
2 If you are loading legal paper, grasp the end of the paper tray and pull it out.
1. Installation
25
Loading Printing Paper
3 Insert a stack of paper into the tray, print side up.
•If you loaded letter paper, make sure the end of the tray is pushed in.
Otherwise a size error will result.
• Caution! |
|
This paper tray is designed to |
|
accomodate 250 sheets of paper. |
Attach a letter or legal label |
[See the Red line in the tray.] |
here to indicate the paper size. |
Loading more than 250 sheets may |
|
damage the machine. |
|
4 Replace the received document tray.
•The received document tray must be attached for the fax machine to operate properly.
Loading paper in the paper cassette (if installed)
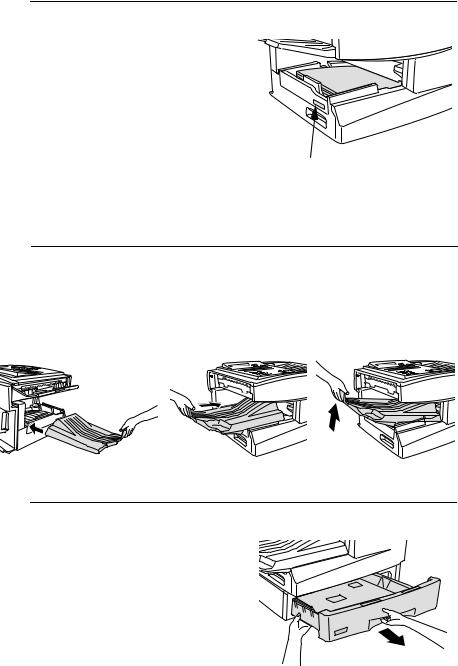
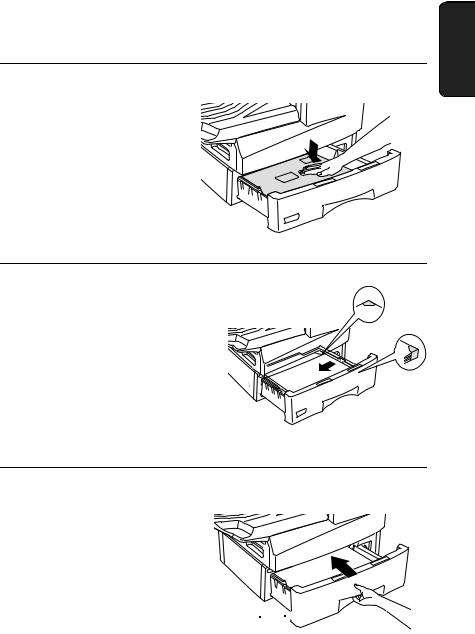
1 Grasp the hand-hold on the cassette and pull out the cassette until it stops.
26
Loading Printing Paper
2 Push the pressure plate down until it locks into position.
3 Place a stack of paper in the cassette, print side up.
• Make sure the stack of paper is not higher than the two tabs on the  paper guide and the two metal tabs. If it is, remove some of the paper.
4 Push the cassette back into the machine, making sure it clicks into place.
Attach a LETTER label here


 to indicate the paper size.
Note: We recommend that you do not add paper to the tray or cassette while paper still remains. This may result in double feeds.
1. Installation
27

Entering Your Name and Fax Number
Entering Your Name and Fax Number
Before you can begin using the fax machine, you must program your name and fax number. Once you program this information, it will appear automatically at the top of each fax page you send.
Important!
The law requires that your name, telephone/fax number, and the date and time appear on each fax message you send. Enter your name and fax number here and set the date and time as explained in the following section to have the fax machine include this information automatically at the top of your fax messages.
Note: Make sure the display shows the date and time before beginning a programming operation. If the display shows the telephone line status, press the CHANGEOVER key to switch to the date and time.
1 Press these keys:
The display will show:
3:ENTRY MODE ENTER #(1-9,*,#)
FUNCTION
3
2 Press the 3 key.
3
The display will show:
3:OWN PASSCODE SET ENTER FAX #
28
 Loading...