


EL-1197PIII
ELECTRONIC PRINTING CALCULATOR
CALCULADORA IMPRESORA ELECTRÓNICA
OPERATION MANUAL
EL-1197
P
MANUAL DE MANEJO
WARNING – FCC Regulations state that any unauthorized changes or modifications to this equipment not expressly approved by the
manufacturer could void the user’s authority to operate this equipment.
Note: This equipment has been tested and found to comply with the limits for a Class B digital device, pursuant to Part 15
These limits are designed to provide reasonable protection against harmful interference in a residential installation. This equipment
generates, uses, and can radiate radio frequency energy and, if not installed and used in accordance with the instructions, may cause
harmful interference to radio communications. However, there is no guarantee that interference will not occur in a particular installation. If
this equipment does cause harmful interference to radio or television reception, which can be determined by turning the equipment off and
on, the user is encouraged to try to correct the interference by one or more of the following measures:
– Reorient or relocate the receiving antenna.
– Increase the separation between the equipment and receiver.
– Connect the equipment into an outlet on a circuit different from that to which the receiver is connected.
– Consult the dealer or an experienced radio/TV technician for help.
SHARP CORPORATION
OPERATIONAL NOTES
To insure trouble-free operation of your SHARP calculator, we
recommend the following:
1. The calculator should be kept in areas free from extreme
temperature changes, moisture, and dust.
2. A soft, dry cloth should be used to clean the calculator. Do not
use solvents or a wet cloth.
3. Since this product is not waterproof, do not use it or store it
where fluids, for example water, can splash onto it. Raindrops,
water spray, juice, coffee, steam, perspiration, etc. will also
cause malfunction.
4. If service should be required, use only a SHARP servicing
dealer, a SHARP approved service facility or SHARP repair
service.
5. Do not operate the unit with the battery insulation sheet
attached. The battery insulation sheet prevents the memory
protection battery from wearing, and is found on the back of the
unit.
Operating with the battery insulation sheet attached may result
to loss of information such as date and time, conversion rate,
and tax/discount rate if the AC power plug is accidentally pulled
out from the wall socket.
6. Do not wind the AC cord around the body or otherwise forcibly
bend or twist it.
SHARP will not be liable nor responsible for any incidental or
consequential economic or property damage caused by
misuse and/or malfunctions of this product and its peripherals,
unless such liability is acknowledged by law.
USING THE CALCULATOR FOR THE FIRST TIME
First, pull out the insulation sheet for the memory protection
battery (installed for retaining the date/time, conversion rate, and
tax/discount rate information). Reset the calculator to initialize the
unit's state, then adjust the date and time.
Removing the insulation sheet, and resetting
1. Pull out the insulation sheet for the memory protection battery.
2. Press the RESET switch located on the back of the unit.
(See “RESETTING THE UNIT”.)
* The clock starts, indicating the current date and time as
January 1, 2005, 12:00:00 a.m.
Adjusting date and time
Example: When the date is September 15, 2004, and the time is
3:38 p.m.
Operation Display
RATE
SET
GT •
15 2004 9-15-2004
9
38 3-38 00 P
15
0.
(see “GRAND TOTAL / RATESETTING MODE SELECTOR”)
* When the adjustment is complete, the clock starts at 3:38:00
p.m.
NOTAS AL MANEJARLA
A fin de que su calculadora SHARP funcione sin averías, le
recomendamos lo siguiente:
1. Evite dejar la calculadora en ambientes en que haya cambios
de temperatura, humedad y polvo bastante notables.
2. Al limpiar la calculadora, utilice un paño suave y seco. No use
disolventes ni tampoco un paño húmedo.
3. Debido a que este producto no es a prueba de agua, no deberá
ser utilizado o guardado en lugares donde pudiera ser
salpicado por líquidos, por ejemplo agua. Gotas de lluvia,
salpicaduras de agua, jugos o zumos, café, vapor,
transpiración, etc. también perjudican el funcionamiento del
producto.
4. Si necesita reparar esta unidad, diríjase sólo a un distribuidor
SHARP, a un centro de servicio autorizado por SHARP o a un
centro de reparaciones SHARP.
5. No utilice la unidad con la lámina aislante de la pila fijada. La
lámina aislante de la pila evita que la pila de protección de la
memoria se desgaste, y se encuentra en la parte posterior de
la unidad.
Si la utilizase con la lámina aislante fijada, correría el riesgo de
pérdida de información tal como la fecha y la hora, la tasa de
conversión, y la tasa de impuestos/descuento cuando
desconectase accidentalmente el enchufe de alimentación de
CA del tomacorriente de la red.
6. No bobine el cable de CA alrededor de la calculadora, y no lo
doble o retuerza a la fuerza.
SHARP no será responsable de ningún daño imprevisto o
resultante, en lo económico o en propiedades, debido al mal
uso de este producto y sus periféricos, a menos que tal
responsabilidad sea reconocida por la ley.
UTILIZACIÓN DE LA CALCULADORA POR PRIMERA VEZ
En primer lugar, extraiga la lámina de protección de la pila
(instalada para conservar la información sobre la fecha/hora, la
tasa de conversión, y la tasa de impuestos/descuento). Reponga
la calculadora para inicializar el estado de la unidad, y después
ajuste la fecha y la hora.
Extracción de la lámina aislante, y reposición
1. Tire de la lámina aislante para la pila de protección de la
memoria.
2. Pulse el interruptor RESET situado en la parte posterior de la
unidad. (Consulte "REPOSICIÓN DE LA UNIDAD".)
* El reloj se pondrá en funcionamiento, indicando la fecha y la
hora actuales con 1 de enero, 2005, 12:00:00 a.m.
Ajuste de la fecha y la hora
Ejemplo: Cuando la fecha sea el 15 de septiemre de 2004, y la
hora las 3:38 p.m.
Operación Visualización
RATE
SET
GT •
9 15 2004 9-15-2004
15 38 3-38 00 P
(consulte“SELECTOR DEL MODO DE TOTAL GLOBAL /
FIJACIÓN DE TASA”)
* Cuando finalice el ajuste, el reloj comenzará a funcionar a las
3:38:00 p.m.
PRINTED IN CHINA / IMPRESO EN CHINA
of the FCC Rules.
04GT(TINSZ0774EHZZ)
0.
OPERATING CONTROLS CONTROLES DE FUNCIONAMIENTO
POWER SWITCH; PRINT / ITEM COUNT MODE
SELECTOR:
“OFF”: Power off.
“•”: Power ON. Set to the non-print mode.
“P”: Power ON. Set to the print mode.
“P•IC”: Power ON. Set to the print and item count mode.
1) The counter will count the number of times that the
has been pressed in addition.
Note:• Each time the
subtracted from the count.
• The count is printed when the calculated result is
obtained.
• Pressing of the
2) When the grand total/rate setting mode selector is in the ON
3) The memory item counter will count the number of times that
Note: The counter has a maximum capacity of 3 digits (up to
Presets the number of decimal places in the answer. In the ‘‘F’’
position, the answer is displayed in the floating decimal system.
‘‘K’’: The following constant functions will be performed:
Multiplication:
The calculator will automatically remember the first number
entered (the multiplicand) and
Division:
The calculator will automatically remember the second number
entered (the divisor) and
‘‘•’’: Neutral
‘‘A’’: Use of the Add mode permits addition and subtraction of
Use of
mode and decimally correct answers will be printed at the preset
decimal position.
the counter.
position (GT), the counter will count the number of times that
the calculation results have been stored in the grand total
memory. To print and clear the count, press the
key has been pressed in the addition.
the
Note:• Each time the
be subtracted from the count.
• The count is printed when the memory is recalled.
• Pressing of the
±999). If the count exceeds the maximum, the counter will
recount from zero.
DECIMAL SELECTOR:
CONSTANT/ADD MODE SELECTOR:
numbers without an entry of the decimal point. When the Add
mode is activated, the decimal point is automatically
positioned according to the decimal selector setting.
, and will automatically override the Add
key is used in subtraction, 1 will be
, , , or key clears
key is used in the subtraction, 1 will
key clears the counter.
instruction.
instruction.
key
key.
“OFF”: Apagado (OFF)
“•”: Encendido (ON). Fija el modo de no impresión.
“P”: Encendido (ON). Fija el modo de impresión.
“P•IC”: Encendido (ON). Fija el modo de impresión y de cuenta de
1) El contador contará las veces que se ha apretado la tecla
en la suma.
Nota: • Cada vez que se use la tecla
2) Cuando está activado el selector del modo de total global/
fijación de tipos (posición GT), el contador contará el número
de veces que se han almacenado los resultados de cálculo en
la memoria del total global. Para imprimir y borrar la cuenta,
apretar la tecla
3) El contador de artículos en memoria contará el número de
veces que la tecla
Notas: • Cada vez que se use la tecla
Nota: El contador tiene una capacidad de un máximo de 3 cifras
Prefija el número de lugares decimales de la respuesta. En ‘‘F’’, la
respuesta aparecerá en la exhibición en el sistema decimal
flotante.
‘‘K’’: Se podrán realizar las siguientes funciones de constantes:
Multiplicación:
La calculadora retendrá automáticamente el primer factor
registrado (el multiplicando) y la instrucción
División:
La calculadora retendrá automáticamente el segundo factor
registrado (el divisor) y la instrucción
‘‘•’’: Neutra.
‘‘A’’: Utilizando el modo de suma se pueden sumar y restar
El uso de
de suma y las respuestas decimalmente correctas se imprimirán
en la posición decimal prefijada.
INTERRUPTOR DE CORRIENTE; SELECTOR DEL
MODO DE IMPRESIÓN / MODO PARA CONTAR
ARTÍCULOS:
articulos.
restará 1 de la cuenta.
• La cuenta queda impresa cuando se obtiene el
resultado calculado.
• Al apretar la tecla
el contenido del contador.
restado de la cuenta.
• La cuenta queda impresa al llamarse la memoria.
• Apretando la tecla
(hasta ±999). Si la cuenta excede el máximo, el contador
vuelve a contar partiendo de cero.
SELECTOR DECIMAL:
SELECTOR DEL MODO DE CONSTANTE/SUMA:
números sin registrar el punto decimal. Cuando se activa el
modo de suma, el punto decimal se coloca automáticamente
de acuerdo con el ajuste del selector decimal.
, y desactivará automáticamente el modo
, , , o se borra
.
ha sido apretada en la suma.
en la resta, se
en la resta, 1 será
se borra el contador.
.
.
III
ROUNDING SELECTOR:
“
”: An answer is rounded up.
“5/4”: An answer is rounded off.
”: An answer is rounded down.
“
Note: The decimal point floats during successive calculation by
the use of
If the decimal selector is set to “F” then the answer is always
rounded down (
GRAND TOTAL/RATE SETTING MODE SELECTOR:
“GT”: Grand Total
“•”: Neutral
”: To set up date, time, conversion rate, and tax/discount
“
rate, place the switch at the "RATE SET" position.
Date:
• Enter in the order of month, day and year, then press
• Use
• When
and displayed as “date” if the value is within the
following range; “Error” is displayed otherwise, and the
previously set date is restored.
Month: 1 - 12; day: 1 - 31; Year: 2000 - 2099 (in 4
digits) or 00 - 99 (in 2 digits)
Time:
• Enter in the order of hour, minutes, then press
complete the entry.
(There is no entry available for the seconds value. The
clock starts at zero second.)
• If the hour/minute digit is less than 10, it is not
necessary to enter the first digit “0”.
• Use
• When
and displayed as “time” if the value is within the
following range; “Error” is displayed otherwise, and the
previously set time is restored.
Hour: 0 - 23 (24-hour system for the hour entry),
Minute: 0 - 59
Conversion rate:
• Press
• A maximum of 6 digits can be stored (decimal point is
not counted as a digit).
Tax / discount rate:
• Press
• Press
• A maximum of 4 digits can be stored (decimal point is
not counted as a digit).
Note: • Be sure to set this selector to the “•” position
TIME CALCULATION KEY:
• Utilise this key to enter hours and minutes in time
calculations.
• Press this key after entering an hour or minute value.
(There is no need to press this key when entering a second
value.)
• To bypass hour entry, press this key after entering 0.
• To bypass minute entry, you may press this key alone, or
press it after entering 0.
• When this key is pressed, if the preceding entry is in any of
the following ranges, it is set as an hour or minute value:
Hour: Within 6 digits
Minute: 0 to 99 (An entry above 60 is rounded up to one
• A second value is set when it is entered in the following
range:
Second: 0 to 99 (An entry above 60 is rounded up to one
CLOCK / CALENDAR KEY:
• Each time this key is pressed, the mode switches.
Calculation mode → Date display mode → Clock display
mode → Calculation mode
• Use this key also to adjust date and time (see “GRAND
TOTAL / RATE SETTING MODE SELECTOR”).
PAPER FEED KEY
LAST DIGIT CORRECTION KEY
GRAND TOTAL KEY
CLEAR ENTRY KEY
TOTAL KEY:
Press this key twice, followed by
rate.
The tax rate is printed with the symbol “TX”.
MULTIPLICATION KEY
DIVISION KEY
MINUS EQUAL KEY
PLUS EQUAL KEY
CHANGE SIGN KEY
MARKUP KEY
MEMORY TOTAL CLEAR KEY
MEMORY SUBTOTAL RECALL KEY
MEMORY PLUS KEY
MEMORY MINUS KEY
TAX-INCLUDING KEY
PRE-TAX KEY
PERCENT KEY
NON-ADD/SUBTOTAL KEY:
Non-add – When this key is pressed right after an entry of a
Subtotal – Used to get subtotal(s) of additions and/or
By pressing this key even in the Non-print mode, the
displayed number is printed with the symbol “P”.
• When the POWER SWITCH; PRINT / ITEM COUNT MODE
SELECTOR isset “•”, “P” or “P•IC” position, and Dateor
Clock is displayed, press this key toprint the displayed
contents, including“#” symbol, from the left side of thepaper
roll.
Example:
Date printing
#9 • 15 • 2004 • • • • • •
(when the date is September 15, 2004)
Clock printing
#10 • 30 • • • • • • • • • • A
(when the time is 10:30 a.m.)
#6 • 25 ------------ P
(when the time is 6:25 p.m.)
• When the Date / Clock printing iscomplete, the Calculation
mode isrestored.
AVERAGE KEY:
Used to calculate the average.
CONVERSION KEY:
This key is used:
• to store the conversion rate (by the use of the rate setting
mode selector).
• obtains a value by multiplying a given number with a
specified conversion rate.
• to recall the presently stored rate for check. Press
condition, then press
with the symbol “TC”.
CONVERSION KEY:
This key is used to obtain a value by dividing a given number
with a specified conversion rate.
or .
).
to complete the entry.
to separate month, day, and year.
is pressed, the number entered is evaluated
to separate hour and minute values.
is pressed, the number entered is evaluated
twice, enter the conversion rate, followed by
.
twice, enter the tax rate, followed by .
twice, enter the discount rate, followed by
then .
after storing an each rate.
• For the conversion rate and the tax / discount
rate, a single value can be stored for each. If you
enter a new rate, the previous rate will be
cleared.
hour. If a value of more than 3 digits is entered,
only the least significant two digits take effect.)
minute. If a value of more than 3 digits is
entered, only the least significant two digits take
effect.)
, to print the set tax
number in the Print mode, the entry is printed on
the left-hand side with the symbol “#”.
This key is used to print out numbers not
subjects to calculation such as code, date, etc.
subtractions. When pressed following the
key, the subtotal is printed with the symbol
“
◊
” and the calculation may be continued.
first to clear the calculation register and reset an error
. The conversion rate is printed
SELECTOR DE REDONDEO:
“
”: El resultado es redondeado hacia arriba.
“5/4”: El resultado no es redondeado.
”: El resultado es redondeado hacia abajo.
“
Nota: El punto (= coma) decimal flota mientras se hacen cálculos
sucesivos usando
Si el selector decimal se coloca en ‘‘F’’, la respuesta siempre se
redondea por defecto (
SELECTOR DEL MODO DE TOTAL GLOBAL/
FIJACIÓN DE TIPOS:
“GT”: Total Global
“•”: Neutra
”: Para establecer la fecha, la hora, la tasa de conversión, y
“
la tasa de impuestos/descuento, ponga el selector en la
posición "RATE SET".
Fecha:
• Introduzca, por este orden, el mes, el día, y el año, y
después pulse
• Utilice
• Cuando pulse
y visualizará como “fecha” si el valor introducido está
dentro del margen; de lo contrario se visualizará
“Error”, y se restablecerá la fecha preestablecida.
Mes: 1 - 12; día: 1 - 31; año: 2000 - 2099 (introduzca 4
dígitos) o 00 - 99 (introduzca 2 dígitos)
to
or
Hora:
• Introduzca, por este orden, la hora y los minutos, y
después pulse
(No es posible introducir los segundos. El reloj
comenzará a funcionar a partir de cero segundos.)
• Si los dígitos de la hora/minutos son inferiores a 10, no
será necesario introducir el primer dígito “0”.
• Utilice
minutos.
• Cuando pulse
y visualizará como “hora” si el valor está dentro de la
gama; en caso contrario se visualizará “Error”, y se
restablecerá la hora previamente ajustada.
Hora: 0 - 23 (sistema de 24 horas para la introducción
de la hora), Minutos: 0 - 59
Tasa de conversión:
• Pulse
seguido por
• Se puede almacenar un máximo de 6 dígitos (la coma
decimal no cuenta como un dígito).
Tasa de impuesto / descuento:
• Pulse
seguido por
• Pulse
seguido por
• Se puede almacenar un máximo de 4 dígitos (la coma
decimal no cuenta como un dígito).
Nota: • Asegúrese de poner este selector en la posición
“•” después de almacenar cada tipo.
• Se puede almacenar un tipo de cada para la
conversión y el impuesto / descuento. Si
introduce un tipo nuevo, el tipo anterior se
borrará.
TECLA DE CÁLCULO DE TIEMPO:
• Utilice esta tecla para introducir horas y minutos en
cálculos de tiempo.
• Pulse esta tecla tras introducir una valor de horas o
minutos (no es necesario pulsar esta tecla cuando se
introduzca un valor de segundos).
• Para pasar por alto la entrada de horas, pulse esta tecla
tras introducir 0.
• Para pasar por alto la entrada de minutos, podrá pulsar
esta tecla sola o tras introducir 0.
• Cuando se pulse esta tecla, si la entrada precedente se
encuentra dentro de cualquiera de los rangos siguientes,
ésta se establecerá como un valor de horas o minutos:
Hora: dentro de 6 dígitos
Minuto: 0 a 99 (una entrada superior a 60 se redondeará a
una hora. Si se introduce un valor de más de 3
dígitos, sólo tendrán efecto los dos dígitos menos
significativos).
• Se establecerá un segundo valor cuando éste se
introduzca dentro del rango siguiente:
Segundo: 0 a 99 (una entrada superior a 60 se redondeará
TECLA DEL RELOJ / CALENDARIO:
• Cada vez que pulse esta tecla, el modo cambiará.
Modo de cálculo → Modo de visualización de la fecha →
Modo de visualización del reloj → Modo de cálculo
• Utilice esta tecla para ajustar también la fecha y la hora
(consulte “SELECTOR DEL MODO DE TOTAL GLOBAL /
FIJACIÓN DE TASA”).
TECLA DE AVANCE DEL PAPEL
TECLA DE CORRECCIÓN DE LA ULTIMA CIFRA
TECLA DE TOTAL GLOBAL
TECLA DE BORRADO DE ENTRADA
TECLA DE TOTAL:
Presione esta tecla dos veces, seguida por
imprimir la tasa de impuestos establecida.
El tasa de impuesto se imprime con el smbolo “TX”.
TECLA DE MULTIPLICACIÓN
TECLA DE DIVISIÓN
TECLA MENOS IGUAL
TECLA MÁS IGUAL
TECLA DE CAMBIO DE SIGNO
TECLA DE USO MÚLTIPLE
TECLA DE TOTAL DE MEMORIA
TECLA DE ACCESO A MEMORIA SUBTOTAL
TECLA DE SUMA EN MEMORIA
TECLA DE RESTA EN MEMORIA
TECLA DE INCLUSIÓN DE IMPUESTOS
TECLA DE ANTES DE IMPUESTOS
TECLA DE PORCENTAJE
TECLA DE NO SUMA/TOTAL PARCIAL:
No-suma – Cuando se aprieta esta tecla inmediatamente
Total parcial – Se usa para obtener uno o varios totales
Al apretar esta tecla, incluso en el modo de no
impresión, se imprimirá el número que aparece en la
exhibición con el símbolo “P”.
• Cuando el INTERRUPTOR DE LAALIMENTACIÓN;
SELECTOR DELMODO DE IMPRESIÓN / MODO
PARACONTAR ARTÍCULOS esté en laposición “•” o “P” o
“P•IC”, y estévisualizándose la fecha o la hora, pulse esta
tecla para imprimir elcontenido visualizado, incluyendo
elsímbolo “#”, desde el lado derecho delrollo de papel.
Ejemplo:
Impresión de la fecha
#9 • 15 • 2004 • • • • • •
(cuando la fecha sea el 15 desetiembre de 2004)
Impresión del reloj
#10 • 30 • • • • • • • • • • A
(cuando la hora sea 10:30 a.m.)
#6 • 25 ------------ P
(cuando la hora sea 6:25 p.m.)
• Cuando finalice la impresión de lafecha / hora, volverá al
modo decálculo.
TECLA DE PROMEDIO:
Se usa para calcular el promedio.
TECLA DE CONVERSIÓN:
Esta tecla se utiliza para:
• Almacenar el tasa de conversión (utilizando el selector del
modo de fijación de tipos).
• Obtiene un valor multiplicando un número dado por una
tasa de cambio especificada.
• Comprobar el tipo actualmente almacenado. Pulse primero
condición de error, y luego pulse
sión se imprime con el símbolo “TC”.
TECLA DE CONVERSIÓN:
Esta tecla se utiliza para obtener un valor dividiendo un
número dado por una tasa de cambio especificada.
a un minuto. Si se introduce un valor de más de
3 dígitos, sólo tendrán efecto los dos dígitos
menos significativos).
para borrar el registro del cálculo y restaurar una
o .
).
para finalizar la introducción.
para separar el mes, el día, y el año.
, el número introducido se evaluará
para completar la introducción.
para separar los valores de la hora y los
, el número introducido se evaluará
dos veces, introduzca la tasa de conversión,
.
dos veces, introduzca la tasa de impuesto,
.
dos veces, introduzca la tasa de descuento,
y después .
después de haber ingresado un número en
el modo de impresión, el número registrado
se imprime a la izquierda, junto con el
símbolo “#”.
Esta tecla se usa para imprimir números que
no están sujetos a cálculos como, por
ejemplo, códigos, fechas, etc.
parciales de sumas y/o restas.
Cuando se aprieta a continuación de la tecla
o , se imprimirá el total parcial junto
con el símbolo “
cálculos.
◊
” pudiéndose seguir con los
. El tasa de conver-
, para
DISPLAY SYMBOLS:
M:A number has been stored in memory.
–:The display value is negative.
E:Error or overflow of capacity.
• : Appears when a number is in the grand total memory.
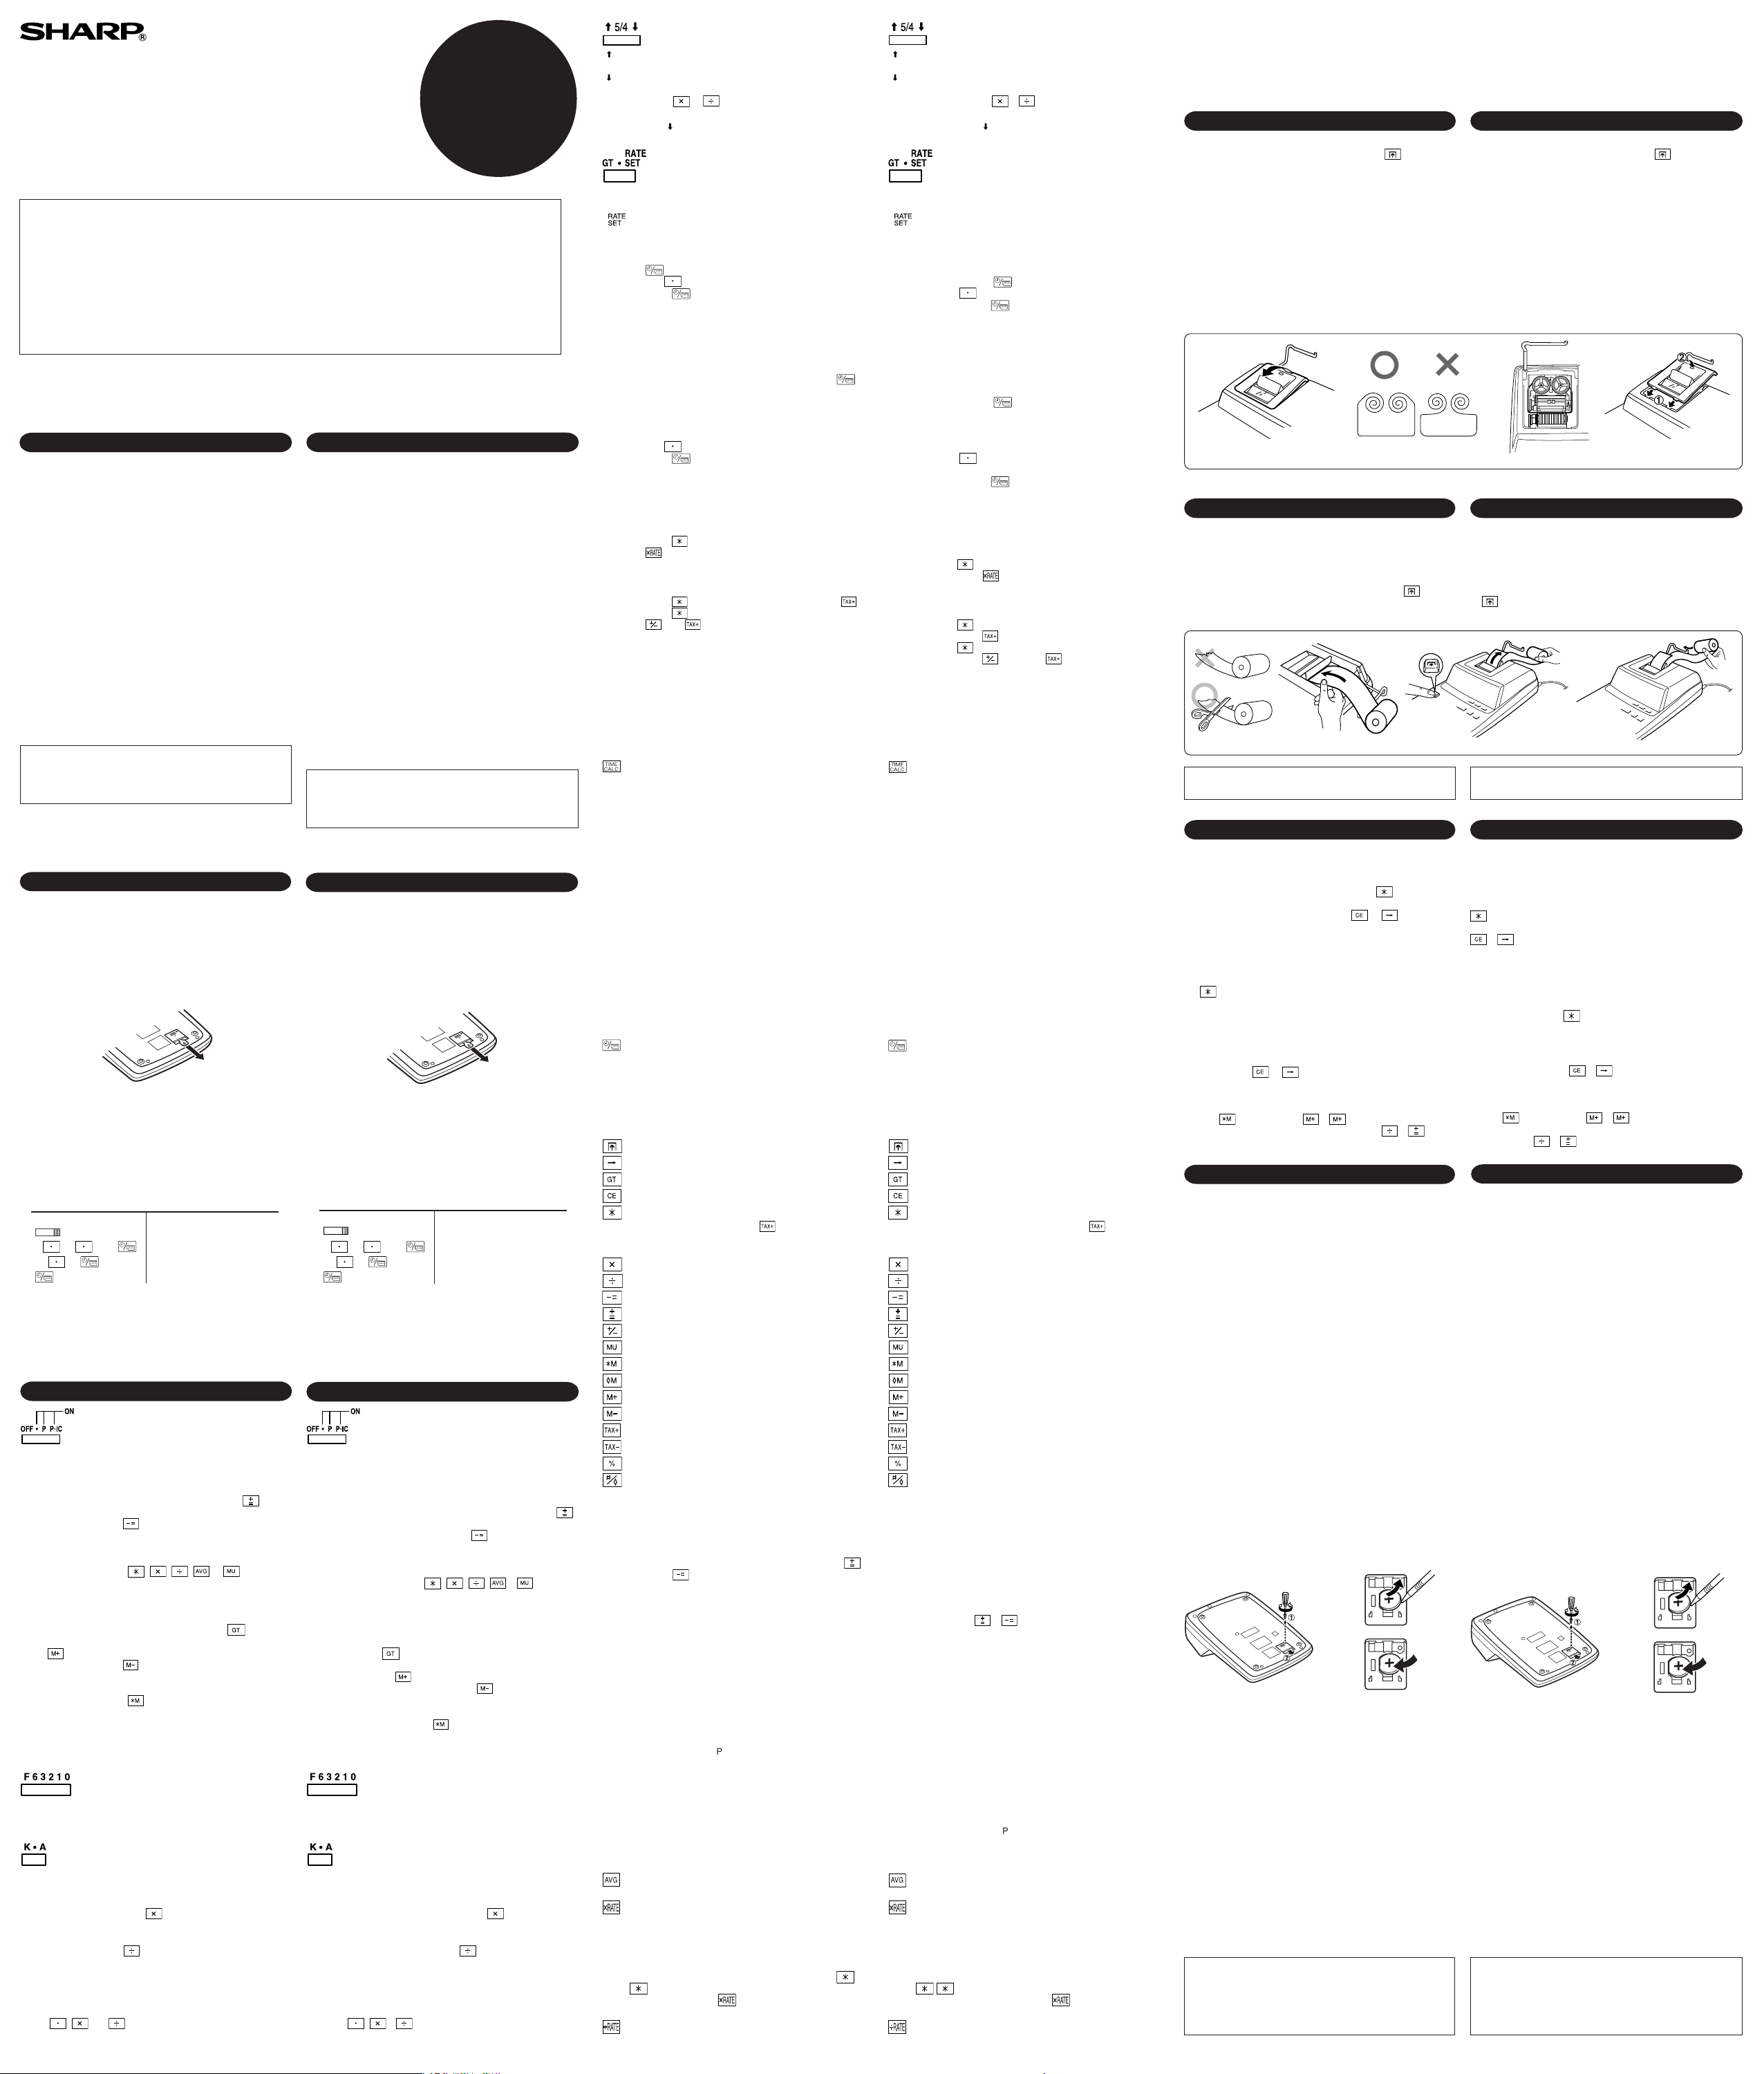
INK RIBBON REPLACEMENT
1. Remove the paper roll from the calculator. (Tear the paper and
remove it from the print mechanism by using
2. Turn the power off before replacing ribbon.
3. Remove the printer cover. (Fig. 1)
4. Remove the old ribbon by pulling it up.
5. Insert the new ribbon.
6. With the black side of the ribbon facing upwards, place one of
the reels on the reel shaft on the right. (Fig. 2) Make sure that
the reel is securely in place.
7. Thread the ribbon around the outside of the metal guides.
(Fig. 3)
8. Take up any slack by manually turning one of the reels.
9. Replace the printer cover. (Fig. 4)
10. Replace the paper roll.
Fig. 1
.)
Fig. 2
PAPER ROLL REPLACEMENT
Never insert paper roll if torn. Doing so will
cause paper to jam.
Always cut leading edge with scissors first.
1) Insert the leading edge of the paper roll into the opening. (Fig.
1)
2) Turn the power on and feed the paper by pressing
3) Insert the paper roll to the paper holder. (Fig. 3)
. (Fig. 2)
Fig. 1 Fig. 2 Fig. 3
DO NOT PULL PAPER BACKWARDS AS THIS MAY CAUSE
DAMAGE TO PRINTING MECHANISM.
ERRORS ERRORES
There are several situations which will cause an overflow or an
error condition. When this occurs, “E” will be displayed. The
contents of the memory at the time of the error are retained.
If an ‘‘0䡠E’’ is displayed at the time of the error, must be used
to clear the calculator. If an ‘‘E’’ with any numerals except zero is
displayed, the error may be cleared with
calculation can still be continued.
Also, in rare cases, printing may stop midway and the indication
“E” appear on the display. This is not a malfunction but is caused
when the calculator is exposed to strong electromagnetic noise or
static electricity from an external source. Should this occur, press
key and then repeat the calculation from the beginning.
the
Error conditions:
1. Entry of more than 12 digits or 11 decimals. This error can be
cleared with
2. When the integer portion of an answer exceeds 12 digits.
3. When the integer portion of the contents of the memory or
grand total memory exceeds12 digits.
(Ex.
4. When any number is divided by zero. (Ex. 5
or .
999999999999 1 )
or and the
0 )
REPLACEMENT OF BATTERY FOR MEMORY PROTECTION
Time for battery replacement
Life of the memory protection battery is approximately 2,500
hours at 25°C(77°F) with the power plug not connected to the
socket.
* When the memory protection battery is weak, the date/time
setting is initialised (1/1/2005, 12:00:00 a.m.).
Verify the date/time setting in the date/clock display mode when
connecting the power plug to the socket.
If the date/time setting is modified or incorrect, promptly replace
the memory protection battery with new one.
(The life of the pre-installed battery may be shorter than expected
because of the time the calculator spends during shipment.)
Method of battery replacement
Use one lithium battery (CR2032).
Caution: Replacing the battery will clear the date and time
1) Turn the power switch “OFF” and unplug the power supply plug
2) Remove the battery cover on the back of the unit. (Fig. 1)
3) Remove the exhausted battery and install one new lithium
4) Replace the battery cover by reversing the removal procedure.
5) Press the RESET switch on the back of the unit (See
After battery replacement
• Connect the power supply plug to an outlet and turn the power
• Reconfigure date, time, conversion rate, and tax/discount rate.
• On the battery replacement date label found on the back of the
Precautions on battery use
• Do not leave an exhausted battery in the equipment.
• Do not expose the battery to water or flame, and do not take it
• Store batteries out of the reach of small children.
Notes for handling Lithium batteries:
settings, as well as the conversion rate, and the tax/
discount rate.
from the outlet.
battery. Wipe the battery well with a dry cloth and place the
plus “+” side upward. (Fig. 2)
“RESETTING THE UNIT”).
Fig. 1
switch “ON”.
Check that “0.” is displayed. If “0.” is not displayed, remove the
battery, reinstall it, and check the display again.
unit, write down the month and year when the battery is
replaced, as a reference for the next battery replacement.
apart.
CAUTION
Danger of explosion if battery is incorrectly replaced.
Replace only with the same or equivalent type recommended by
the manufacturer.
Dispose of used batteries according to the manufacturer’s
instructions.
Fig. 2
SÍMBOLOS DEL VISUALIZADOR:
M:Un número ha sido guardado en la memoria.
–:El valor del display es negativo.
E:Error ó desbordamiento de la capacidad.
• : Aparece cuando un número está en la memoria de total
global.
CAMBIO DE LA CINTA ENTINTADA
1. Quitar el rollo de papel de la calculadora. (Cortar el papel y
sacarlo del mecanismo impresor usando
2. Desconecte el aparato antes de cambiar la cinta.
3. Sacar la tapa de la impresora. (Fig. 1)
4. Retire el rollo viejo empujando hacia arriba.
5. Introduzca la cinta nueva.
6. Con el lado negro de la cinta mirando para arriba, colocar uno
de los carretes en el eje del carrete de la izquierda. (Fig. 2)
Asegurarse de que el carrete esté firmemente colocado en su
lugar.
7. Pasar la cinta por la parte exterior de las quías metálicas.
(Fig. 3)
8. Estirar cualquier parte de cinta floja girando con la mano uno
de los carretes.
9. Volver a poner la tapa de la impresora. (Fig. 4)
10. Volver a poner el rollo de papel.
Fig. 3
.)
Fig. 4
CAMBIO DEL ROLLO DEL PAPEL
Nunca introduzca un rollo de papel roto. Esto causará
atascos del papel.
Corte siempre en primer lugar el borde anterior.
1) Introduzca el borde del papel del rollo de papel en la abertura.
(Fig. 1)
2) Conecte la alimentación y haga avanzar el papel apretando
. (Fig. 2)
3) Introduzca el rollo de papel en el soporte. (Fig. 3)
NO TIRAR DEL PAPEL HACIA ATRÁS PUES PUEDE
OCASIONAR DAÑOS AL MECANISMO DE IMPRESIÓN.
Existen diversos casos en los que ocurre un exceso de capacidad
o una condición de error. Al producirse esto, aparecerá “E”. Los
contenidos de la memoria, en el momento del error, quedan
retenidos.
Si, al ocurrir el error, se visualiza el símbolo ‘‘0䡠E’’, se deberá usar
para borrar la calculadora. Si se visualiza el símbolo ‘‘E’’ con
cualquier número (excepto el cero), se puede borrar el error con
o pudiéndose continuar el cálculo.
Además, en casos muy raros, la impresión puede pararse en la
mitad, y en el visualizador puede aparecer la indicación “E”. Esto
no significa mal funcionamiento, sino que se debe a que la
calculadora ha estado expuesta a ruido electromagnético intenso
o electricidad estática de una fuente externa. Cuando ocurra
esto, presione la tecla
principio.
Condiciones de error:
1. Entrada de más de 12 cifras o de 11 decimales. Este error
puede borrarse con
2. Cuando la parte entera de un resultado excede las 12 cifras.
3. Cuando la parte entera del contenido de la memoria o la
memoria del total global supere12 dígitos.
999999999999 1 )
(Ej.
4. Cuando se divide un número cualquiera por un divisor de
cero. (Ej. 5
y después repita el cálculo desde el
o .
0 )
CAMBIO DE LA PILA PARA PROTECCIÓN DE LA MEMORIA
Plazo para cambiar la pila
La duración de la pila de protección de la memoria será de
aproximadamente 2.500 horas a 25°C sin el enchufe de
alimentación conectado a un tomacorriente.
* Cuando la pila de protección de la memoria se debilite, se
inicializará la fecha/hora (1/1/2005, 12:00:00 a.m.).
Verifique el ajuste de la fecha/hora en el modo de visualización de
la fecha/reloj cuando conecte el enchufe de alimentación a un
tomacorriente.
Si el ajuste de la fecha/hora se ha modificado o es incorrecto,
reemplace inmediatamente la pila de protección de la memoria
por otra nueva.
(La duración de la pila instalada en fábrica puede ser más corta
de la esperada debido al tiempo transcurrido desde el envío de la
calculadora.)
Método de cambio de la pila
Utilice una pila de litio (CR2032).
Precaución: Al reemplazar la pila se borrarán los ajustes de la
1) Ponga el interruptor de la alimentación en “OFF” y desenchufe
la clavija de alimentación de la toma de corriente.
2) Retire la cubierta de la pila de la parte posterior de la unidad.
(Fig. 1)
3) Retire la pila agotada e instale una pila de litio nueva. Limpie
bien la pila con un paño seco y coloque el lado positivo “+”
hacia arriba. (Fig. 2)
4) Vuelva a colocar la cubierta de la pila siguiendo a la inversa el
procedimiento de retirada.
5) Pulse el interruptor RESET de la parte posterior de la unidad
(Consulte “REPOSICIÓN DE LA UNIDAD”).
Después de cambiar la pila
• Conecte la clavija de alimentación a una toma de corriente y
ponga el interruptor de la alimentación en “ON”.
Compruebe que se visualice “0.”. Si no se visualiza “0.”, retire la
pila, vuelva a instalarla y compruebe de nuevo la visualización.
• Reconfigure la fecha, la hora, la tasa de conversión, y la tasa de
impuestos/descuento.
• En la etiqueta de fecha de cambio de la pila colocada en la
parte posterior de la unidad, escriba el mes y el año del cambio
de la pila. Esto le servirá de referencia para el próximo cambio
de la pila.
Precauciones al utilizar la pila
• No deje una pila descargada en el equipo.
• No exponga la pila al agua ni a las llamas, y no la desarme.
• Guarde las pilas donde no puedan alcanzarlas los niños.
Notas para el manejo de las baterías de litio:
PRECAUCIÓN
Peligro de explosión si reemplaza incorrectamente la batería.
Reemplácela por otra igual o de tipo equivalente recomendada
por el fabricante.
Deshágase de las baterías de acuerdo con las instrucciones del
fabricante.
fecha y la hora, así como la tasa de conversión y la
tasa de impuestos/descuento.
Fig. 1
Fig. 2
EL-1197P
III
(U1U)-1
➀
 Loading...