


DVD Video Player MODEL
DV-SL10W 


 DV-SL10 DV-SL10(P)
OPERATION MANUAL
DVD / CD / VIDEO CD PLAYER
OPERATE
OPEN/CLOSE |
PLAY |
STOP |
SKIP |
|
|
REW |
FWD |
The region number for this DVD player is 3.
3 NTSC/PAL
Please read this Operation Manual carefully before using your DVD Video player.
SAFETY INFORMATION
Note:
This Player can be used only where the power supply is AC 110V-240V, 50/60Hz. It cannot be used elsewhere.
CAUTION:
USE OF CONTROLS OR ADJUSTMENTS OR PERFORMANCE OF PROCEDURES OTHER THAN THOSE SPECIFIED HEREIN MAY RESULT IN HAZARDOUS RADIATION EXPOSURE.
AS THE LASER BEAM USED IN THIS PLAYER IS HARMFUL TO THE EYES, DO NOT ATTEMPT TO DISASSEMBLE THE CABINET. REFER SERVICING TO QUALIFIED PERSONNEL ONLY.
WARNING:
TO REDUCE THE RISK OF FIRE OR ELECTRIC SHOCK, DO NOT EXPOSE THIS EQUIPMENT TO RAIN OR MOISTURE.
TO REDUCE THE RISK OF FIRE OR ELECTRIC SHOCK, AND ANNOYING INTERFERENCE, USE THE RECOMMENDED ACCESSORIES ONLY.
TO PREVENT FIRE OR SHOCK HAZARD, DO NOT EXPOSE THIS APPARATUS TO DRIPPING OR SPLASHING, NO OBJECTS FILLED WITH LIQUIDS, SUCH AS VASES, SHOULD BE PLACED ON THE APPARATUS.
Laser Diode Properties
Material: GaAs
Wave length: DVD: 655 nm
CD: 790 nm
Emission Duration: Continuous
Laser output: Max. 0.8 mW
Power Cord Protection
To avoid any malfunctions of the Player, and to protect against electric shock, fire or personal injury, please observe the following.
•Hold the plug firmly when connecting or disconnecting the AC power cord.
•Keep the AC power cord away from heating appliances.
•Never put any heavy object on the AC power cord.
•Do not attempt to repair or reconstruct the AC power cord in any way.
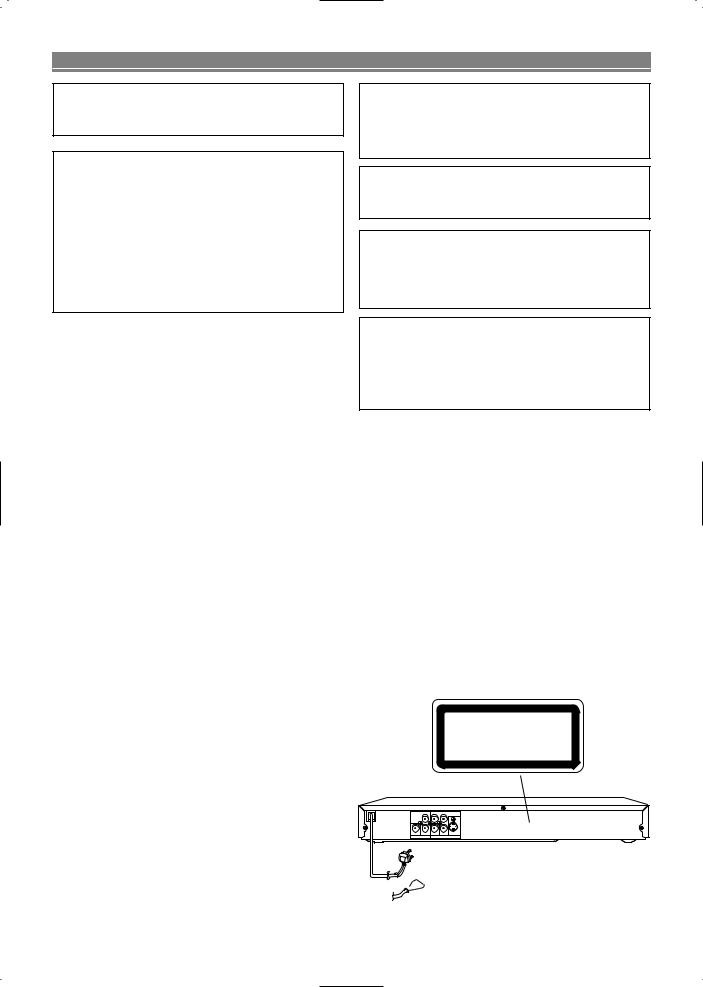
•This Player is classified as a CLASS 1 LASER product.
•The CLASS 1 LASER PRODUCT label is located on the rear cover.
•This product contains a low power laser device. To ensure continued safety do not remove any cover or attempt to gain access to the inside of the product. Refer all servicing to qualified personnel.
CLASS 1
LASER PRODUCT
L |
Y |
CR |
COMPONENT |
DIGITAL R |
VIDEO |
CB |
S-VIDEO |
AUDIO OUT |
VIDEO OUT |
||
DV-SL10W
OR DV-SL10
DV-SL10(P)
– 2 – |
EN |

SAFETY INFORMATION
Location and Handling
•Do not cover or place the Player in enclosed spaces to prevent excessive temperature build up.
•Do not place the Player in direct sunlight, or near heat sources.
•Keep the Player away from strong magnetic objects.
•Do not place any object containing water or other liquids on the Player. In the event that liquid should enter the cabinet, unplug the Player immediately and contact the retailer or service centre approved by SHARP immediately.
•Do not remove the Player cabinet. Touching parts inside the cabinet could result in electric shock and/ or damage to the Player. For service and adjustment inside the cabinet, call a qualified dealer or service centre approved by SHARP.
Nonuse Periods
When the Player is not being used, switch the Player to the Standby mode.
When left unused for a long period of time, the Player should be unplugged from the household AC outlet.
No Fingers or Other Objects Inside
Do not put any foreign object on the disc tray.
Stacking
Place the Player in a horizontal position, and do not place anything heavy on it.
Condensation
Moisture may form on the pickup lens in the following conditions:
•immediately after a heater has been turned on.
•in a steamy or very humid room.
•when the Player is suddenly moved from a cold environment to a warm one.
If moisture forms inside this Player, it may not operate properly.
In this case, turn on the power and wait about one hour for the moisture to evaporate.
Cleaning
Unplug your Player before cleaning. Use a damp cloth for cleaning. Do not use cleaning fluids or aerosols which could enter the Player and cause damage, fire, or electrical shock. These substances may also deteriorate the finish of your
Player.
If there is Noise Interference on the TV While a Broadcast is being Received
Depending on the reception condition of the TV, interference may appear on the TV monitor while you watch a TV broadcast and the Player is left on. This is not a malfunction of the
Player or the TV. To watch a TV broadcast, turn off the Player.
Service
Do not attempt to service this Player yourself. Please refer any service to the nearest service centre approved by SHARP.
Copyright
Audio-visual material may consist of copyrighted works which must not be recorded without the authority of the owner of the copyright. Please refer to relevant laws in your country.
Copy Protection
This Player supports Macrovision copy protection. On DVDs that include a copy protection code, if the contents of the DVD are copied using a VCR, the copy protection code prevents the videotape copy from playing normally.
Apparatus Claims of U.S.Patent Nos. 4,631,603, 4,577,216, 4,819,098 and 4,907,093 licensed for limited viewing uses only.
This product incorporates copyright protection technology that is protected by method claims of certain U.S. patents and other intellectual property rights owned by Macrovision Corporation and other rights owners. Use of this copyright protection technology must be authorized by Macrovision Corporation, and is intended for home and other limited viewing uses only unless otherwise authorized by Macrovision Corporation. Reverse engineering or disassembly is prohibited.
Recommended Measures for Optimum Picture Excellence
The Player is a precision device that is constructed using extremely accurate technology.
Soiling or friction affecting the pickup lens or disc drive can impair the image quality. At the worst, neither video nor audio will be played back. To maintain optimum picture quality, the Player should be serviced (cleaned and replacement of some parts) every 1,000 hours. Note that this period varies depending on the environment (temperature, humidity, dust, etc.) in which the Player is used. Contact your authorized Sharp supplier for details.
Do not attempt to clean the pickup lens yourself.
– 3 – |
EN |

FEATURES
¡Dolby Digital sound
This player can handle Dolby Digital surround sound having 5.1 channels when connected to a Dolby Digital decoder.
¡Still/fast/slow/step playback
¡Random playback for audio CD and MP3 ¡Programme playback for audio CD and MP3 ¡DVD menus in a desired language ¡Screen saver/Auto power-off functions
The screen saver programme starts when there is no input from the player for five minutes in the stop mode. When the screen saver programme is activated for 30 minutes, the power is automatically turned off.
¡Subtitles in a desired language ¡Selecting a camera angle
¡Choices for audio language and sound mode ¡Parental lock
¡Automatic detection of discs
This player automatically detects if a loaded disc is DVD, audio CD, videoCD or MP3 on disc.
¡Playing an MP3 disc ¡Direct Search
¡DTS (Digital theater System)
Sound system different from Dolby Digital sound system. External DTS decoder required.
¡MPEG audio
This player can handle a disc that supports MPEG audio when it is connected to a MPEG decoder.
¡On-screen display
Information about the current operation can be displayed on a TV screen, allowing you to confirm the currently active functions (such as programme playback), on the TV screen using the remote control.
¡Search
Chapter search / Title search / Track search / Time search
¡Repeat
Chapter / Title / Track / Group / All / A-B
¡Zoom ¡Marker
The part designated by user can be called back.
¡Resume Play ¡Virtual Surround
¡Component Video Out Jacks
Jacks located on the back of the DVD Player which are used to send high-quality video to a TV via Component Video In Jacks.
¡Dimmer
¡Bit rate indication
¡DRC (Dynamic range control)
You can control the range of sound volume.
¡Digital Gamma Setting ¡Video Out
When playing an NTSC disc, images are converted into PAL 60 signals (when PAL mode is selected), or output in NTSC signals (when AUTO mode is selected). PAL/AUTO mode can be selected in VIDEO OUT setting.
– 4 – |
EN |
TABLE OF CONTENTS
■ SAFETY INFORMATION. . . . . . . . . . . . . . . . . . . . . . . . 2
■ FEATURES . . . . . . . . . . . . . . . . . . . . . . . . . . . . . . . . . . 4
■ INTRODUCTION . . . . . . . . . . . . . . . . . . . . . . . . . . . . . . 5
Symbols Used in this Manual. . . . . . . . . . . . . . . . . . . . . 5 Supplied Accessories . . . . . . . . . . . . . . . . . . . . . . . . . . 5
■ ABOUT THE DISCS . . . . . . . . . . . . . . . . . . . . . . . . . . . 6
Playable Discs . . . . . . . . . . . . . . . . . . . . . . . . . . . . . . . . 6 Disc Types. . . . . . . . . . . . . . . . . . . . . . . . . . . . . . . . . . . 6
■ FUNCTIONAL OVERVIEW . . . . . . . . . . . . . . . . . . . . . . 7
FRONT PANEL . . . . . . . . . . . . . . . . . . . . . . . . . . . . . 7 REAR VIEW . . . . . . . . . . . . . . . . . . . . . . . . . . . . . . . 7 REMOTE CONTROL . . . . . . . . . . . . . . . . . . . . . . . . . 7 Display . . . . . . . . . . . . . . . . . . . . . . . . . . . . . . . . . . . . . 8 Displays During Operation . . . . . . . . . . . . . . . . . . . . . . . 8 Loading the Batteries. . . . . . . . . . . . . . . . . . . . . . . . . . . 8
■ SETTING UP YOUR DVD PLAYER . . . . . . . . . . . . . . . . 9
Connecting a TV or a stereo TV that has component video in jacks. . . . . . . . . . . . . . . . . . . . . . . . . . . . . . . . . 9 Connecting a TV Equipped with S-VIDEO Input or VIDEO/AUDIO Input Jacks. . . . . . . . . . . . . . . . . . . . . . 10 Connecting to Audio Equipment . . . . . . . . . . . . . . . . . . 10
Playing 2 channel audio . . . . . . . . . . . . . . . . . . . . . . 10 Playing Dolby Digital (5.1 channel), DTS
or MPEG audio . . . . . . . . . . . . . . . . . . . . . . . . . . . . 11
■ PLAYING A DISC . . . . . . . . . . . . . . . . . . . . . . . . . . . . 12
Basic Playback . . . . . . . . . . . . . . . . . . . . . . . . . . . . . . 12 General Features. . . . . . . . . . . . . . . . . . . . . . . . . . . . . 12 Pause . . . . . . . . . . . . . . . . . . . . . . . . . . . . . . . . . . . . . 12 Disc Menus . . . . . . . . . . . . . . . . . . . . . . . . . . . . . . . . . 12 Title Menu . . . . . . . . . . . . . . . . . . . . . . . . . . . . . . . . . . 13
CALLING UP A MENU SCREEN DURING
PLAYBACK . . . . . . . . . . . . . . . . . . . . . . . . . . . . . . . 13 Step by Step Playback. . . . . . . . . . . . . . . . . . . . . . . . . 13 Resume / Stop . . . . . . . . . . . . . . . . . . . . . . . . . . . . . . 13 Playing the disc recorded in VR mode
(Video Recording format) . . . . . . . . . . . . . . . . . . . . . . . 13
Fast Forward / Reverse Search . . . . . . . . . . . . . . . . . . 14
Slow Forward / Slow Reverse . . . . . . . . . . . . . . . . . . . 14
Zoom. . . . . . . . . . . . . . . . . . . . . . . . . . . . . . . . . . . . . . 14
Track . . . . . . . . . . . . . . . . . . . . . . . . . . . . . . . . . . . . . . 14
Title / Chapter Search . . . . . . . . . . . . . . . . . . . . . . . . . 15
Time Search . . . . . . . . . . . . . . . . . . . . . . . . . . . . . . . . 15
Repeat . . . . . . . . . . . . . . . . . . . . . . . . . . . . . . . . . . . . 15
REPEAT TITLE / CHAPTER. . . . . . . . . . . . . . . . . . . 15
REPEAT TRACK . . . . . . . . . . . . . . . . . . . . . . . . . . . 15
A-B REPEAT . . . . . . . . . . . . . . . . . . . . . . . . . . . . . . 15
Programme . . . . . . . . . . . . . . . . . . . . . . . . . . . . . . . . . 16
Random Playback . . . . . . . . . . . . . . . . . . . . . . . . . . . . 16
MP3 Playback . . . . . . . . . . . . . . . . . . . . . . . . . . . . . . . 16
On-Screen Information. . . . . . . . . . . . . . . . . . . . . . . . . 16
Track Selection . . . . . . . . . . . . . . . . . . . . . . . . . . . . . . 17
Random Playback . . . . . . . . . . . . . . . . . . . . . . . . . . . . 17
Programme . . . . . . . . . . . . . . . . . . . . . . . . . . . . . . . . . 17
Audio Language . . . . . . . . . . . . . . . . . . . . . . . . . . . . . 17
Stereo Sound Mode. . . . . . . . . . . . . . . . . . . . . . . . . . . 17
Subtitle Language . . . . . . . . . . . . . . . . . . . . . . . . . . . . 17
Camera Angle . . . . . . . . . . . . . . . . . . . . . . . . . . . . . . . 17
Changing the On-Screen Display . . . . . . . . . . . . . . . . . 18
Marker Setup Screen. . . . . . . . . . . . . . . . . . . . . . . . . . 18
Digital Gamma Setting . . . . . . . . . . . . . . . . . . . . . . . . . 18
Virtual Surround . . . . . . . . . . . . . . . . . . . . . . . . . . . . . 18
■ DVD SETUP . . . . . . . . . . . . . . . . . . . . . . . . . . . . . . . . 19
Audio Setting . . . . . . . . . . . . . . . . . . . . . . . . . . . . . . . . 19
Parental Control. . . . . . . . . . . . . . . . . . . . . . . . . . . . . . 19
PARENTAL LEVEL. . . . . . . . . . . . . . . . . . . . . . . . . . 19
IF YOU FORGET THE PASSWORD . . . . . . . . . . . . . 19
PARENTAL CONTROL LEVELS. . . . . . . . . . . . . . . . 19
Display Setting. . . . . . . . . . . . . . . . . . . . . . . . . . . . . . . 20
Language Setting . . . . . . . . . . . . . . . . . . . . . . . . . . . . 20
■ TROUBLESHOOTING GUIDE. . . . . . . . . . . . . . . . . . . 22
■ SPECIFICATIONS . . . . . . . . . . . . . . . . . . . . . . . . . . . . 23
■ MAINTENANCE . . . . . . . . . . . . . . . . . . . . . . . . . . . . . 23
INTRODUCTION
Symbols Used in this Manual
The following symbols appear below in some headings and |
DVD-RW |
|
||||
notes in this manual, with the following meanings! |
|
|||||
|
VR mode |
|||||
|
|
|
|
|||
|
DVD |
|
: Description refers to playback of the VR mode (Video |
|||
|
|
|
Recording format). |
|||
|
: Description refers to playback of DVD video discs. (includ- |
|
||||
|
|
*The VR mode (Video Recording format) is a recording |
||||
|
ing DVD-RW/R discs) |
|
||||
|
|
|
mode to enjoy editing the programme or “manual mode” |
|||
|
|
|
|
|
||
|
CD |
|
|
|
for recording in desired resolution and time. |
|
|
|
|
|
|
|
|
: Description refers to playback of audio CDs. |
|
|
|
(QUICK) |
|||
|
|
|
|||||
|
|
|
|||||
|
|
|
|
: Basic setup can be performed more quickly by selecting |
|||
VCD |
/ |
VCD |
|
||||
|
|
|
|
(QUICK setup menu). |
|||
|
|
|
|||||
|
without PBC function |
|
|
|
|||
|
|
|
|||||
: Description refers to playback of video CDs. |
|
|
|
|
|||
MP3
: Description refers to playback of MP3 discs.
Manufactured under license from Dolby Laboratories. “Dolby” and the double-D symbol are trademarks of Dolby Laboratories.
“DTS” and “DTS Digital Out” are trademarks of Digital Theater Systems, Inc.
Supplied Accessories
• Remote control |
|
|
|
• Two AA batteries |
|
|
|
• Operation Manual |
|
|
|
• Video / Audio cable |
– 5 |
– |
EN |
|
ABOUT THE DISCS
Playable Discs
The following discs can be played back on this DVD player.
¡DVD video ¡DVD-R/RW* ¡Audio CD ¡CD-R/RW* ¡MP3* ¡Video CD
*Depending on the types or the writing method of the medium some discs can not be played.
•Some DVD-R/RW, or CD-R/RW discs made on personal computers, or on DVD recorders may not be played back properly due to the factors such as scratches, dirt or special properties of the disc.
•Discs made on personal computers may not playback properly due to compatibility or settings in the recording software. We recommend always to use the standard settings and correctly formatted discs. (Please contact the sofware supplier for more details.)
DV-SL10W and DV-SL10: This unit can output the NTSC signal when playing back NTSC discs. Also you can play discs recorded with the NTSC system via a PAL system TV set.
DV-SL10P conforms to the NTSC colour system. PAL discs cannot be played if they are played via an NTSC system TV set.
• Some discs include region codes as shown below.
3
•The number inside the symbol refers to a region of the world, and a disc encoded in a specific region format can only be played back on DVD player with the same region code.


 :This label indicates playback compatibility with DVD-RW discs recorded in VR mode (Video Recording Format).
NOTE
• This player cannot play the DVD-RW that supports CPRM (Contents Protection for Recordable Media).
ABOUT THE PBC FUNCTION OF VIDEO CD
This unit conforms to ver.1.1 and ver.2.0 of VIDEO CD standard, with PBC function. Ver.1.1 (without PBC function): You can enjoy playback picture as well as music CD.
Ver.2.0 (with PBC function): When using a VIDEO CD with PBC function, “PBC” appears on the display.
What is PBC? “PBC” stands for the PlayBack Control. You can play interactive software using a menu screens. Refer to instructions of VIDEO CD.
For Customer Use:
Read carefully the information located at the bottom of your DVD player and enter below the Serial No.Retain this information for future reference.
Model No. DVD player : DV-SL10W / DV-SL10 / DV-SL10(P)
Serial No. __________________________
The following discs cannot be played back on this DVD player. ¡DVD with region codes other than 3 or ALL. ¡DVD-ROM ¡DVD-RAM (Never play back, otherwise malfunction may result.) ¡CD-ROM ¡VSD ¡CDV (Only plays back the audio part.)
¡CD-G (Only plays back the sound.) ¡CD-I (Never play back, otherwise malfunction may result.) ¡Super Audio CD ¡Photo CD (Never play back, otherwise malfunction may result.)
Any other discs without compatibility indications.
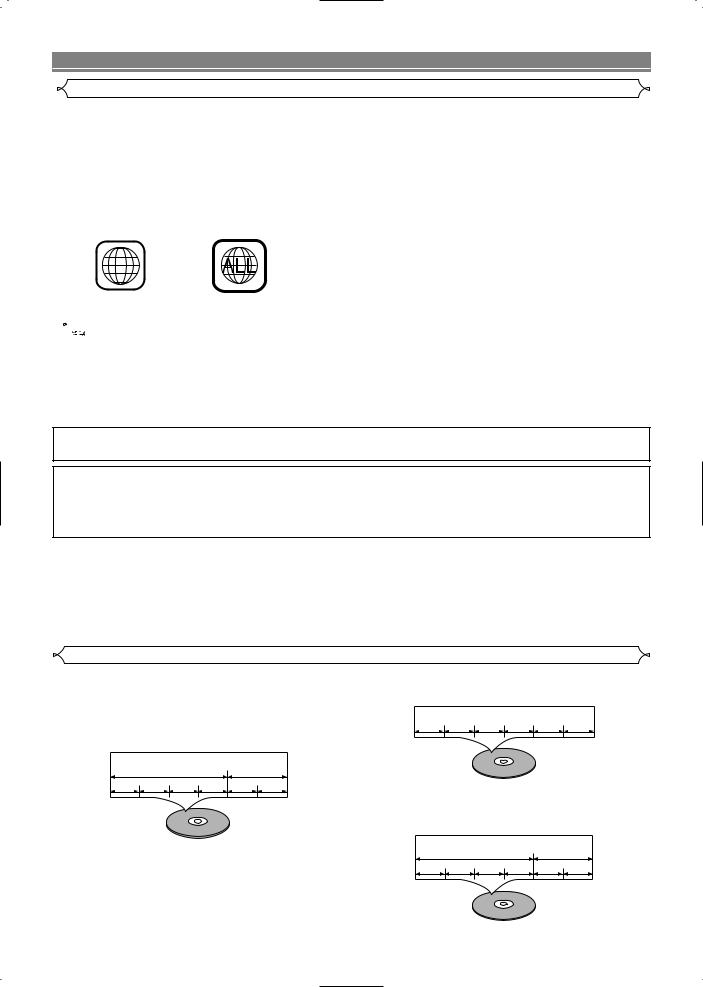
Disc Types
[DVD]
Data on a DVD is divided into sections called "titles", and then into subsections called "chapters", each of which is given a title or chapter number. Playback conditions are preset on some DVD video discs, and these playback conditions take priority over user operations on this player. If a function you selected do not run as desired, refer to the manual accompanying the disc.
Example
Title 1 |
Title 2 |
Chapter 1 Chapter 2 Chapter 3 Chapter 4 Chapter 1 Chapter 2
[Audio CD / Video CD]
Data on an audio CD or a video CD is divided into sections called “tracks”, each of which is given a track number.
Example
Track 1 Track 2 Track 3 Track 4 Track 5 Track 6
[MP3]
Data on a MP3 is divided into sections called "groups", and then into subsections called "tracks", each of which is given a group or track number.
Example
Group 1 |
Group 2 |
Track 1 Track 2 Track 3 Track 4 |
Track 1 Track 2 |
– 6 – |
EN |
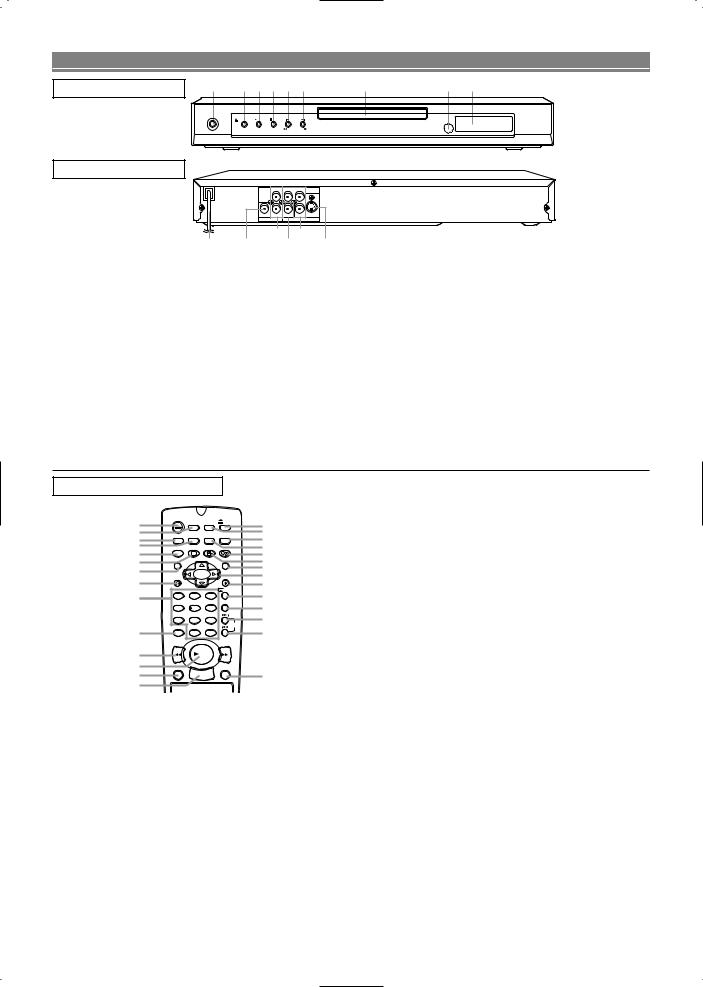
FUNCTIONAL OVERVIEW
FRONT PANEL |
1 |
2 |
3 |
4 5 |
6 |
7 |
8 9 |
|
OPERATE |
|
|
|
|
|
|
|
|
OPEN/CLOSE |
PLAY |
STOP |
SKIP |
|
|
|
|
|
|
REV |
FWD |
|
|
REAR VIEW
|
L |
Y |
CR |
COMPONENT |
|
DIGITAL R |
VIDEO CB |
S-VIDEO |
|
|
AUDIO OUT |
VIDEO OUT |
||
|
12 |
|
14 |
|
10 |
11 |
13 |
|
15 |
1.OPERATE
to switch the player to ON or OFF
2.OPEN/CLOSE
to open/close the disc tray
3.PLAY
to start or resume disc playback
4.STOP
to stop playback
5.SKIP H / REVh
goes to previous chapter or track during playback; press and hold for 1.5 seconds for a reverse search
6.SKIP G / FWD g
goes to next chapter or track during playback; press and hold for 1.5 seconds for a forward search
7.Disc tray
8.Remote sensor window
9.Display
10.MAIN (AC Power Cord) connect to a standard AC outlet
11.DIGITAL AUDIO OUT (coaxial)
connect to AUDIO inputs of a digital (coaxial) audio equipment
12.AUDIO OUT (Left/Right)
connect to AUDIO inputs of an amplifier, receiver or stereo system
13.VIDEO OUT
connect to the Video Input of a TV
14.COMPONENT VIDEO OUT
connect to a TV with Component video in jacks
15.S-VIDEO OUT
connect to a TV with S-Video inputs
Caution: Do not touch the inner pins of the jacks on the rear panel. Electrostatic discharge may cause permanent damage to the player.
REMOTE CONTROL
1 |
OPERATE |
ON |
|
OPEN/ |
15 |
|
|
SCREEN SETUP |
CLOSE |
||||
|
|
|
|
|||
2 |
DIMMER |
GAMMA |
MODE |
MARKER |
16 |
|
3 |
|
|
|
|
17 |
|
4 |
ZOOM |
SUBTITLE |
ANGLE |
AUDIO |
18 |
|
5 |
|
|
|
|
19 |
|
6 |
TITLE |
|
|
MENU |
20 |
|
7 |
|
|
|
|
21 |
|
RETURN |
|
|
ENTER |
22 |
||
8 |
|
|
||||
|
|
|
REPEAT |
23 |
||
9 |
1 |
2 |
3 |
24 |
||
A-B REPEAT |
||||||
|
|
|
||||
|
4 |
5 |
6 |
|
25 |
|
|
7 |
8 |
9 |
SKIP |
26 |
|
10 |
CLEAR |
|
|
|
27 |
|
C |
0 |
+10 |
|
|||
|
REV |
|
|
FWD |
|
|
11.REV Button [page 14]
Fast reverse playback to a desired point.
12.PLAY Button [page 12]
Starts playback of the disc contents.
13.DIRECT SKIP Button [page 14]
Press to locate a desired point.
14.STOP Button [page 12]
Stops operation of the disc.
15.OPEN/CLOSE Button [page 12]
Press to insert discs into or remove them from the tray.
16.SETUP Button [page 19]
Press to enter the setup mode or to change setup items.
17.MARKER Button [page 18]
Press to call back the Marker display.
18.MODE Button [page 16]
|
11 |
|
|
PLAY |
|
|
|
|
|
|
28 |
|
Activates programme playback or random playback |
|
|
|
|
|
|
|
|
mode.(CD/MP3) Activates the 3D sound.(DVD) |
|||||||
|
12 |
|
|
|
|
|
|
|
|
|
|
|
||
|
DIRECT SKIP |
STILL/PAUSE |
19. |
AUDIO Button [page 17] |
||||||||||
|
13 |
|
|
STOP |
|
|
|
|
29 |
|||||
|
|
|
|
|
||||||||||
|
14 |
|
|
|
|
|
|
|
|
|
|
|
Press to select a desired audio language or sound mode. |
|
1. |
OPERATE Button [page 12] |
|
|
|
|
|
|
|
20. |
ANGLE Button [page 17] |
||||
|
|
|
|
|
|
|
|
Press to change the camera angle to see the sequence |
||||||
|
Press to turn the power on and off. |
|
||||||||||||
|
|
being played back from a different angle. |
||||||||||||
2. |
ON SCREEN Button [page 16] |
|
||||||||||||
21. |
MENU Button [page 12] |
|||||||||||||
|
Displays the current status on the TV screen for checking purposes. |
Displays the DVD menus. |
||||||||||||
3. |
DIMMER Button [page 20] |
|
|
|
|
|
|
|
|
|||||
|
|
|
|
|
|
|
22. |
Arrow Buttons (L K B s) [page 12] |
||||||
|
Press to change the Panel Display settings. |
|||||||||||||
|
|
(left/right/up/down) select an item in the menu |
||||||||||||
4. |
GAMMA Button [page 18] |
|
|
|
|
|
|
|
|
|||||
|
|
|
|
|
|
|
23. |
ENTER Button [page 12] |
||||||
|
Press to adjust the black parts of the picture brighter. |
|||||||||||||
|
|
Press to accept a setting. |
||||||||||||
5. |
ZOOM Button [page 14] |
|
|
|
|
|
|
|
|
|||||
|
|
|
|
|
|
|
24. |
REPEAT Button [page 15] |
||||||
|
Enlarges part of a DVD-reproduced image. |
|||||||||||||
|
|
Repeats playback of the current disc, title, chapter or track. |
||||||||||||
6. |
SUBTITLE Button [page 17] |
|
|
|
|
|
|
|
|
|||||
|
|
|
|
|
|
|
25. |
A-B REPEAT Button [page 15] |
||||||
|
Press to select a desired subtitle language. |
|||||||||||||
|
|
Repeats playback of a selected section. |
||||||||||||
7. |
TITLE Button [page 13] |
|
|
|
|
|
|
|
|
|||||
|
|
|
|
|
|
|
26. |
SKIP UP Button [page 14] |
||||||
|
Displays the title menu. |
|
|
|
|
|
|
|
||||||
|
|
|
|
|
|
|
|
|
Plays back from the beginning of the next chapter or track. |
|||||
8. |
RETURN Button [page 18] |
|
|
|
|
|
|
|
|
|||||
|
|
|
|
|
|
|
27. |
SKIP DOWN Button [page 14] |
||||||
|
Returns to the previous operation. |
|||||||||||||
|
|
Plays back from the beginning of the current chapter or track. |
||||||||||||
9. |
0-9 numerical key pad [page 14] |
|
||||||||||||
28. |
FWD Button [page 14] |
|||||||||||||
|
select numbered items in a menu |
|||||||||||||
|
|
Fast forwards playback to a desired point. |
||||||||||||
|
+10 |
|
|
|
|
|
|
|
|
|
|
|
||
|
|
|
|
|
|
|
|
|
|
|
29. |
STILL/PAUSE Button [page 12] |
||
|
use this button to enter number 10 and above |
|||||||||||||
|
|
Pause playback temporarily/frame-by-frame playback. |
||||||||||||
10. |
CLEAR Button [page 15] |
|
|
|
|
|
|
|
|
|||||
|
|
|
|
|
|
|
|
EN |
||||||
|
Resets a setting. |
|
|
|
|
|
|
|
|
|
|
– 7 – |
||
FUNCTIONAL OVERVIEW
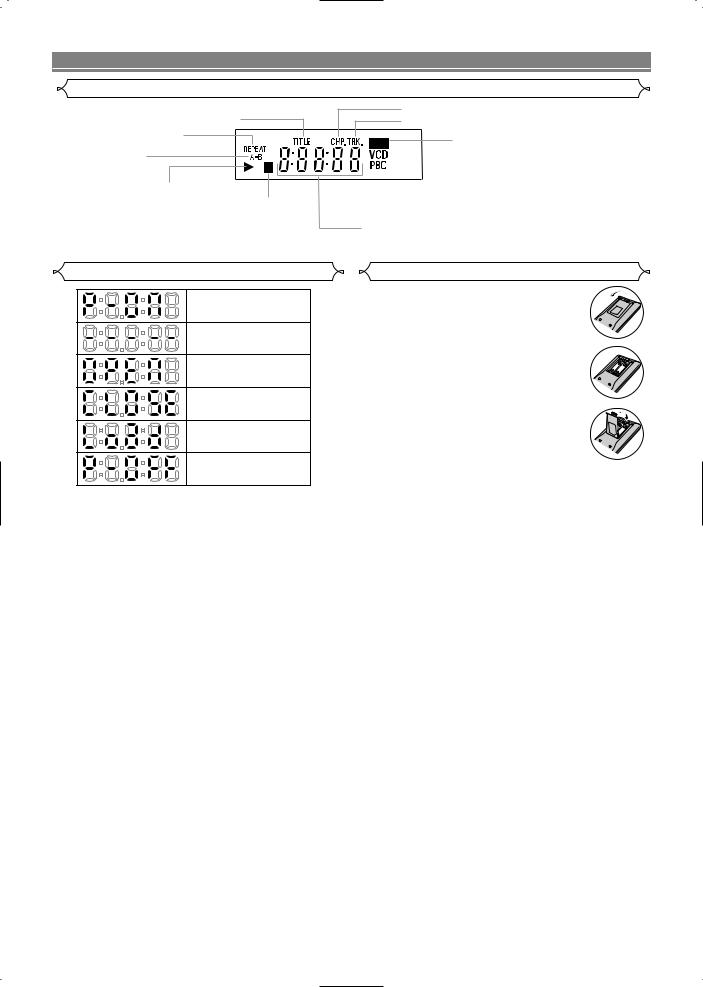
Display
Stays on when repeat
title function is on.
Stays on when
the repeat function is on.
Stays on when the A-B repeat function is on.
Stays on when the inserted
disc is being played back.
Lights up when the inserted disc comes to a pause.
Stays on when repeat chapter function is on.
Stays on when repeat track function is on.
|
|
|
|
Lights up when a DVD |
|
|
|
|
|
is inserted on the tray. |
|
|
|
|
|
|
CD: |
|
|
|
|
|
|
|
|
|
|
|
Lights up when a |
|
|
|
|
|
CD is inserted on |
|
|
|
|
|
the tray. |
Lights up when a |
|
||||
|
VCD: |
||||
playback control is |
|
||||
|
Lights up when a |
||||
activated. |
|
||||
|
Video CD is |
||||
|
|
|
|
|
|
|
|
|
|
|
inserted on the tray. |
Displays how long a current title or track has been played back. When a chapter or track has switched, the number of a new title, chapter or track is displayed.
Displays During Operation
Power on
No disc inserted or playing DVD Menu
Tray open
Tray closed
Loading the Disc
Power off
Loading the Batteries
1. Open the battery compartment cover.
2. Insert two AA batteries, with each one oriented correctly.
3. Close the cover.
NOTES
•Do not mix alkaline and manganese batteries.
•Do not mix old and new batteries.
– 8 – |
EN |
 Loading...