


 Loading...
R
AY -AP18DR
AY -AP24DR
AH -AP18DR
AH -AP24DR
•Uses ozone layer friendly refridgerant R410A.
•Verwendet das die Ozonschicht schonende Kühlmittel R410A.
•Utilise un réfrigérant qui n’attaque pas la couche d’ozone, le R410A.
•Utiliza refrigerante R410A que no daña la capa de ozono.
•Utilizza il refrigerante R410A che non danneggia il buco nell’ozono.
•Usa refrigerante R410A amigo da camada de ozono.
•ρησιµ π ιεί ψυκτικ R410A α λα ές για τ στρώµα τ υ % ντ ς.
•Gebruikt de ozon-vriendelijke koelvloeistof R410A.
INDOOR UNIT |
OUTDOOR UNIT |
ZIMMERGERÄT |
AUSSENGERÄT |
UNIT INTERIEURE |
UNIT EXTERIEURE |
UNIDAD INTERIOR |
UNIDAD EXTERIOR |
UNITA' INTERNA |
UNITA' ESTERNA |
UNIDADE INTERIOR |
UNIDADE EXTERIOR |
ΕΣΩΤΕΡΙΚΗ ΣΥΣΚΕΥΗ |
Ε ΩΤΕΡΙΚΗ ΣΥΣΚΕΥΗ |
BINNEN-UNIT |
BUITEN-UNIT |
AY-AP18DR AE -A18DR AY-AP24DR AE -A24DR AH-AP18DR AU-A18DR AH-AP24DR AU-A24DR
SPLIT TYPE
ROOM AIR CONDITIONER
ZWEITEILIGES KLIMAGERÄT
CLIMATISEUR INDIVIDUEL EN DEUX PARTIES
ACONDICIONADOR DE AIRE DE DOBLE SERVICIO
CONDIZIONATORE D'ARIA DA CAMERA TIPO SPLIT
AR CONDICIONADO
DE DUAS UNIDADES
ΑΙΡΚ ΝΤΙΣΙ Ν ∆ΩΜΑΤΙ Υ ΤΥΠ Υ SPLIT
SPLIT-AIRCONDITIONER
OPERATION MANUAL BEDIENUNGSANLEITUNG NOTICE D'UTILISATION MANUAL DE INSTRUCCIONES MANUALE DI ISTRUZIONE MANUAL DE INSTRUÇÕES
ΕΓ ΕΙΡΙ∆Ι ΛΕΙΤ ΥΡΓΙΑΣ
GEBRUIKSAANWIJZING
ENGLISH DEUTSCH
FRANÇAIS ESPAÑOL
ITALIANO PORTUGUÊS ΕΛΛΗΝΙΚΑ NEDERLANDS

ENGLISH
Thank you for purchasing a SHARP air conditioner. Please read this manual carefully before operating the product.
CONTENTS
...........................................• PRECAUTIONS |
E-1 |
......• PLASMACLUSTER OPERATION |
E-11 |
• ADDITIONAL NOTES ON OPERATION ..... |
E-3 |
• ONE-HOUR OFF TIMER .................... |
E-11 |
• TIPS ON SAVING ENERGY ........................ |
E-3 |
• TIMER OPERATION ........................... |
E-12 |
• PART NAMES .............................................. |
E-4 |
• AUXILIARY MODE ............................. |
E-14 |
• USING THE REMOTE CONTROL .............. |
E-6 |
• MAINTENANCE .................................. |
E-14 |
• TIPS ABOUT PLASMACLUSTER OPERATION . E-7 |
• OPTION KIT ........................................ |
E-15 |
|
• BASIC OPERATION .................................... |
E-8 |
• BEFORE CALLING FOR SERVICE ... |
E-16 |
• ADJUSTING THE AIR FLOW DIRECTION . E-10 |
|
|
|
PRECAUTIONS
WARNINGS FOR USE
1 |
Do not pull or deform the power supply cord. Pulling and misuse of the power supply cord |
can result in damage to the unit and cause electrical shock. |
|
2 |
Be careful not to expose your body directly to the outlet air for a long time. It may affect |
your physical conditions. |
|
3 |
When using the air conditioner for infants, children, elderly, bedridden, or disabled people |
make sure the room temperature is suitable for those in the room. |
|
4 |
Never insert objects into the unit. Inserting objects can result in injury due to the high |
speed rotation of internal fans. |
|
5 |
Ground the air conditioner without fail. Do not connect the grounding wire to gas pipe, |
water pipe, lightning rod or telephone grounding wire. Incomplete grounding may cause |
|
|
electric shock. |
6 |
If anything is abnormal with the air conditioner (ex. a burning smell), stop the operation |
immediately and turn the circuit breaker OFF. |
|
7 |
Follow local rules and regulations for power supply cord cabling. Improper cable |
connection can cause the power supply cord, plug and the electrical outlet to overheat |
|
|
and cause fire. |
8 |
Use only the manufacture-specified power cord for replacement. Replacement should be |
performed by a qualified technician or a service person. |
WARNINGS FOR INSTALLATION / REMOVAL / REPAIR
•Do not attempt to install/remove/repair the unit by yourself. Incorrect work will cause electric shock, water leak, fire etc. Consult your dealer or other qualified service personnel for the installation/removal/repair of the unit.
This equipment complies with the requirements of Directives 89/336/EEC and 73/23/ EEC as amended by 93/68/EEC.
ENGLISH
E-1

PRECAUTIONS
CAUTIONS FOR USE
1
2 |
Do not operate the buttons with wet hand. It may cause electric shock. |
3 |
For safety, turn the circuit breaker off when not using the unit for an extended period of |
time. |
|
4 |
Check the outdoor unit mounting rack periodically for wear and to make sure it is firmly |
in place. |
|
5 |
Do not put anything on the outdoor unit nor step on it. The object or the person may fall |
down or drop, causing injury. |
|
6 |
This unit is designed for residential use. Do not use for other applications such as in a |
kennel or greenhouse to raise animals or grow plants. |
|
7 |
Do not place a vessel with water on the unit. If water penetrates into the unit, electrical |
insulations may deteriorate and cause electric shock. |
|
8 |
Do not block the air inlets nor outlets of the unit. It may cause insufficient performance |
or troubles. |
|
9 |
Be sure to stop the operation and turn the circuit breaker off before performing any |
maintenance or cleaning. A fan is rotating inside the unit and you may get injured. |
10 Do not splash or pour water directly on the unit. Water can cause electrical shock or equipment damage.
11 This appliance is not intended for use by young children or infirm persons without supervision.
Young children should be supervised to ensure that they do not play with the appliance.
CAUTIONS FOR LOCATION / INSTALLATION
•Make sure to connect the air conditioner to power supply of the rated voltage and frequency.
Use of a power supply with improper voltage and frequency can result in equipment damage and possible fire.
•Do not install the unit in a place where inflammable gas may leak. It may cause fire. Install the unit in a place with minimal dust, fumes and moisture in the air.
•Arrange the drain hose to ensure smooth drainage. Insufficient drainage may cause wetting of the room, furniture etc.
•Make sure a leak breaker or a circuit breaker is installed, depending on the installation location, to avoid electrical shock.
E-2

ADDITIONAL NOTES ON OPERATION
OPERATING TEMPERATURE RANGE
|
|
INDOOR TEMP. |
OUTDOOR TEMP. |
|
|||
|
upper limit |
32˚C |
D.B. |
43˚C |
D.B. |
||
COOLING |
23˚C W.B. |
|
- |
|
|||
|
|
|
|||||
lower limit |
21˚C |
D.B. |
21˚C |
D.B. |
|||
|
|||||||
|
15˚C W.B. |
|
- |
|
|||
|
|
|
|
||||
|
upper limit |
27˚C |
D.B. |
24˚C |
D.B. |
|
|
HEATING |
|
- |
18˚C |
W.B. |
|||
|
|
||||||
(AY-AP18DR/AY- |
lower limit |
20˚C |
D.B. |
-8.5˚C |
D.B. |
|
|
AP24DR only) |
|
- |
-9.5˚C |
W.B. |
|||
|
|
|
|||||
D.B. = Dry-bulb |
W.B. = Wet-bulb |
|
|
|
|
||
•The built-in protective device may prevent the unit from operating when used out of this range.
•Condensation may form on the air outlet if the unit operates continuously in the COOL or DRY mode when humidity is over 80 percent.
WHEN POWER FAILURE OCCURS
This air conditioner has a memory function to store settings when a power failure occurs.
After power recovery, the unit will automatically re-start in the same settings which were active before the power failure, except for timer settings.
If the timers were set before a power failure, they will need to be re-set after power recovery.
NOTES FOR MODELS AY-AP18DR/AY-AP24DR
PREHEATING FUNCTION
In the HEAT operation, the indoor fan may not start for two to five minutes after the unit is turned on to prevent cold air from blowing out of the unit.
DE-ICING FUNCTION
•When ice forms on the heat exchanger in the outdoor unit during the HEAT operation, an automatic de-icer provides heat for about 5 to 10 minutes to remove the ice. During de-icing, the inside and outside fans stop operating.
•After de-icing is completed, the unit automatically resumes operation in the HEAT mode.
HEATING EFFICIENCY
•The unit employs a heat pump that draws heat from the outside air and releases it into the room. The outside air temperature therefore greatly affects the heating efficiency.
•If the heating efficiency is reduced due to low outside temperatures, use an additional heater.
•It takes time to warm up and heat the entire room because of the forced air circulation system.
TIPS ON SAVING ENERGY
Below are some simple ways to save energy when you use your air conditioner.
SET THE CORRECT TEMPERATURE
•Setting the thermostat 1°C higher than the desired temperature in the COOL mode (and 2°C lower in the HEAT mode with models AY-AP18DR/AY-AP24DR) will save approximately 10 percent in power consumption.
•Setting the temperature lower than necessary during cooling operation will result in increased power consumption.
BLOCK DIRECT SUNLIGHT AND PREVENT DRAFTS
•Blocking direct sunlight during cooling operation will reduce power consumption.
•Close the windows and doors during cooling operation (and heating operation with models AY-AP18DR/AY- AP24DR).
SET PROPER AIR FLOW DIRECTION TO OBTAIN THE BEST AIR CIRCULATION
KEEP FILTER CLEAN TO ENSURE THE MOST EFFICIENT OPERATION MAKE MOST OF THE TIMER OFF FUNCTION
DISCONNECT THE POWER CORD WHEN THE UNIT IS NOT USED FOR AN EXTENDED PERIOD OF TIME
• The indoor unit still consumes a small amount of power when it is not operating.
ENGLISH
E-3
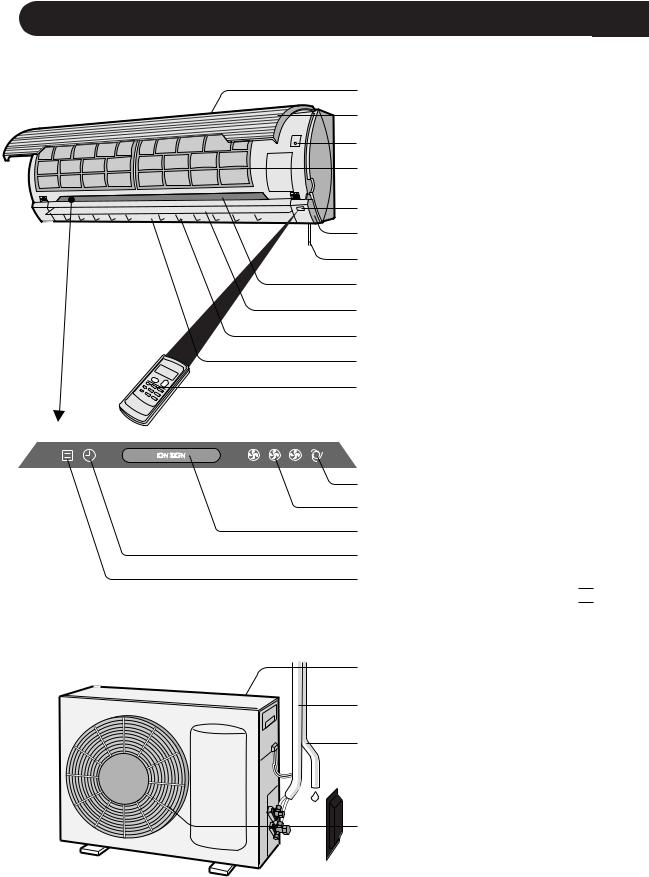
PART NAMES
INDOOR UNIT
1
2
3
4
5
6
7
8
9
0 q w
e r t y u
1 Inlet (Air)
2 Open Panel
3 AUX. Button
4 Air Filters
5 Receiver Window
6Louvre Unit
Open to clean the inside of the air conditioner.
7Power Supply Cord
(AY-AP18DR/AH-AP18DR only)
8 Indicator Panel
9 Vertical Adjustment Louvres
0 Horizontal Adjustment Louvres
q Outlet (Air)
w Remote Control
e AUTO FAN SPEED Lamp (green  )
)
r FAN SPEED Lamp (green  )
)
t PLASMACLUSTER Lamp
(blue, green)
y TIMER Lamp (orange  )
)
u OPERATION Lamp (red 

 )
)
OUTDOOR UNIT
i |
i Inlet (Air) |
o |
o Refrigerant Tube and |
Interconnecting Cord |
|
p |
p Drainage Hose |
|
|
|
a Outlet (Air) |
a |
|
NOTE: Actual units might vary slightly from those shown above.
E-4

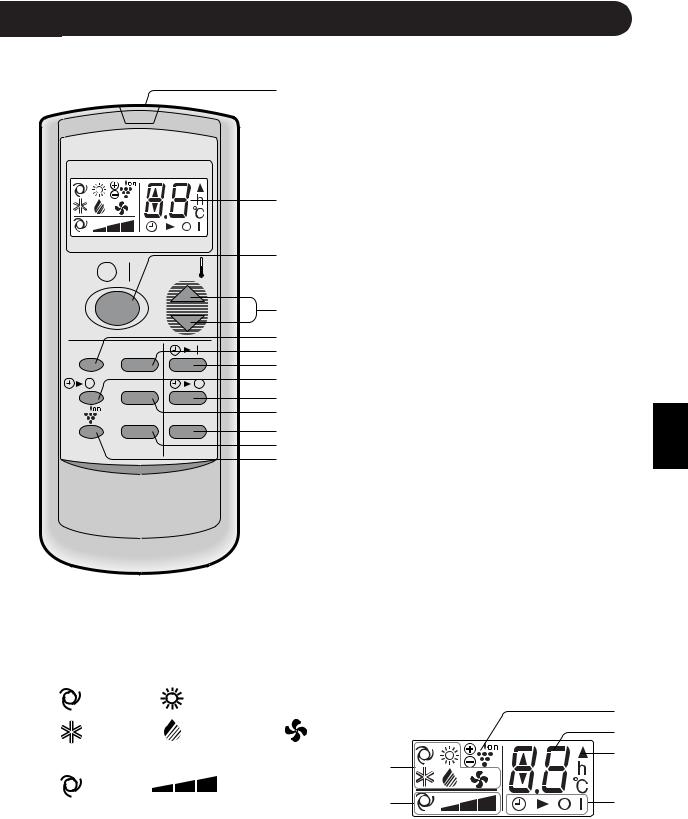
REMOTE CONTROL
11 TRANSMITTER
|
|
|
2 DISPLAY (Liquid Crystal Display) |
MODE |
TEMP. |
|
3 ON/OFF Button |
|
|
||
|
|
2 |
4 THERMO. (Thermostat) Button |
|
|
|
|
|
|
|
5 DISPLAY Button |
FAN |
TIMER |
3 |
6 MODE Button |
|
|
||
|
TEMP. |
|
7 TIMER ON Button (for setting the timer) |
|
|
|
|
|
|
4 |
8 ONE-HOUR OFF TIMER Button |
|
|
|
|
DISPLAY MODE |
5 |
9 TIMER OFF Button (for setting the timer) |
|
6 |
|||
|
|
7 |
0 FAN Button |
1h |
FAN |
8 |
|
|
|
9 |
q TIMER CANCEL Button |
SWING CANCEL |
0 |
||
|
|
q |
w SWING Button |
|
|
w |
|
|
|
e |
|
|
|
|
e PLASMACLUSTER Button |
ENGLISH
(The heat mode symbol  is provided only on models AY-AP18DR/AY-AP24DR)
L.C.D. REMOTE CONTROL DISPLAY
rMODE SYMBOLS
:AUTO  : HEAT
|
(only for AY-AP18DR/AY-AP24DR) |
|
: COOL |
: DRY |
: FAN ONLY |
t FAN SPEED SYMBOLS |
r |
|
|
|
|
: AUTO |
|
: Manual setting |
t
y PLASMACLUSTER SYMBOL
y u i
o
uTEMPERATURE AND TIMER COUNT DOWN INDICATOR
i TRANSMITTING SYMBOL
oTIMER ON/TIMER OFF INDICATOR
Indicates when timer on or timer off is set.
(The heat mode symbol  is provided only on models AY-AP18DR/AY-AP24DR)
E-5
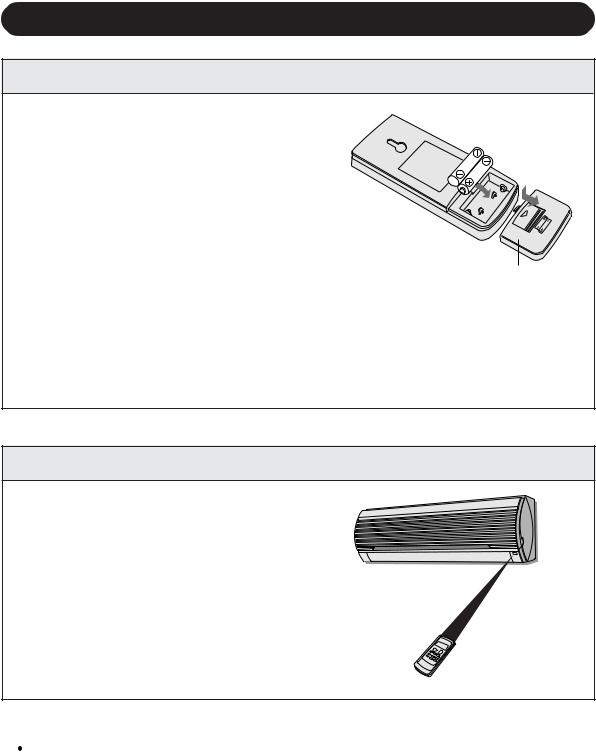
USING THE REMOTE CONTROL
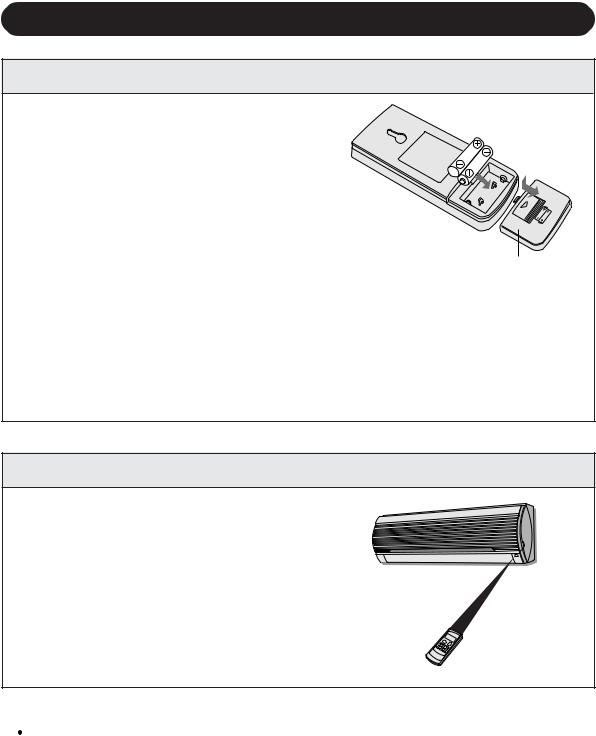
LOADING BATTERIES Use two size-AAA (R03) batteries.
1 Remove the battery cover at the back of the remote control.
2 Insert batteries in the compartment, making sure the ± and — polarities are correctly aligned.
•Lines will be indicated on the display when batteries are properly installed.
3 Reinstall the battery cover.
NOTES:
Battery cover
•The battery life is approximately one year in normal use.
•When you replace the batteries, always change both batteries, and make sure they are the same type.
•If the remote control does not operate properly after replacing the batteries, take out the batteries and reinstall them again after 30 seconds.
•If you will not be using the unit for a long time, remove the batteries from the remote control.
HOW TO USE THE REMOTE CONTROL
Point the remote control towards the unit’s signal receiver window and press the desired button. The unit generates a beep when it receives the signal.
•Make sure there is no curtain or other object between the remote control and
the unit.
• The remote control can send signals from up to 7 metres away.
 CAUTION
•Do not allow the signal receiver window to receive strong direct sunlight, since it can adversely affect its operation. If the signal receiver window is exposed to direct sunlight, close a curtain to block the light.
•Using a fluorescent lamp with a quick starter in the same room may interfere with transmission of the signal.
•The unit can be affected by signals transmitted from the remote control of a television, VCR or other equipment used in the same room.
•Do not leave the remote control in direct sunlight or near a heater. Also, protect the unit and remote control from moisture and shock which can discolour or damage them.
E-6
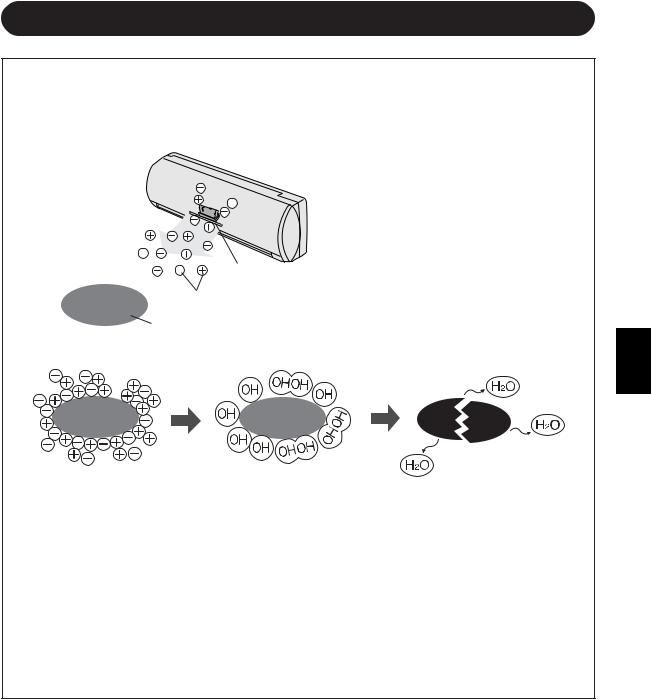
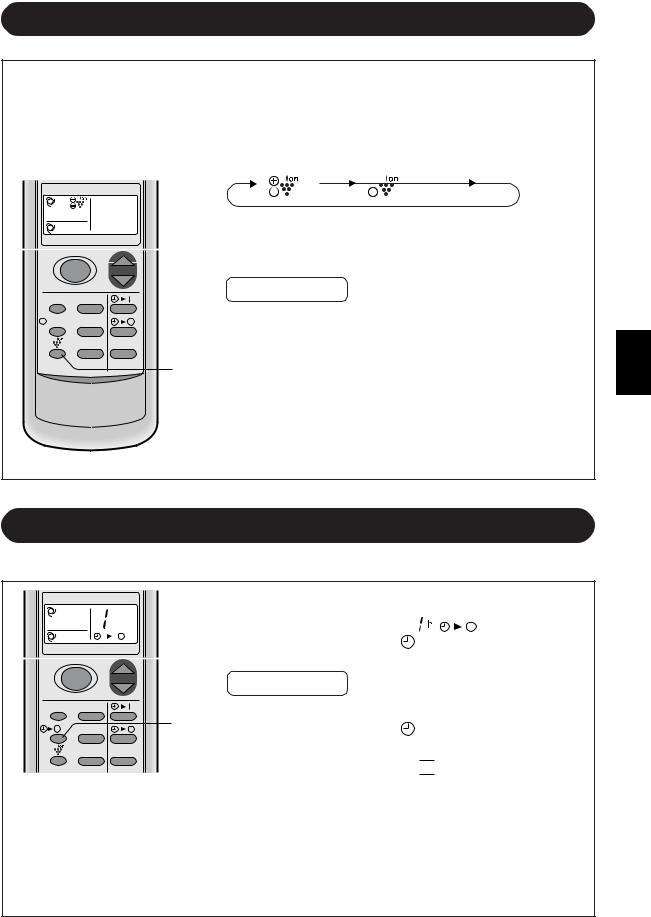
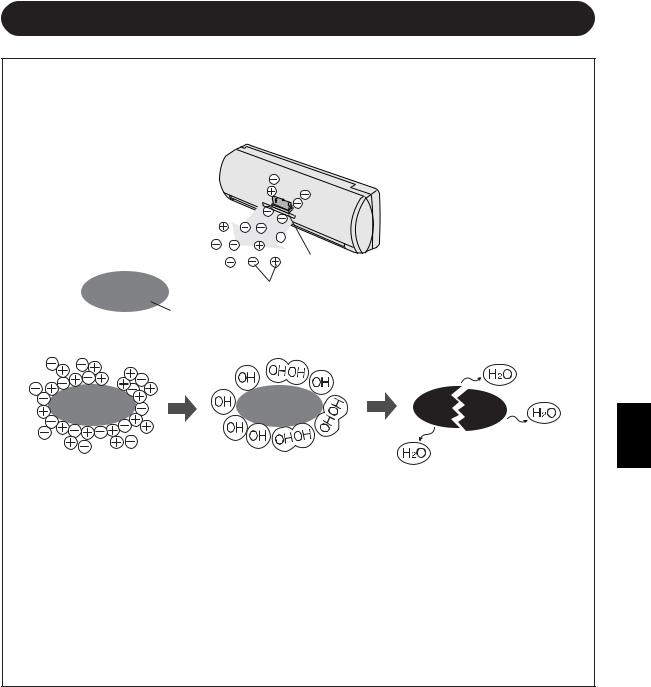
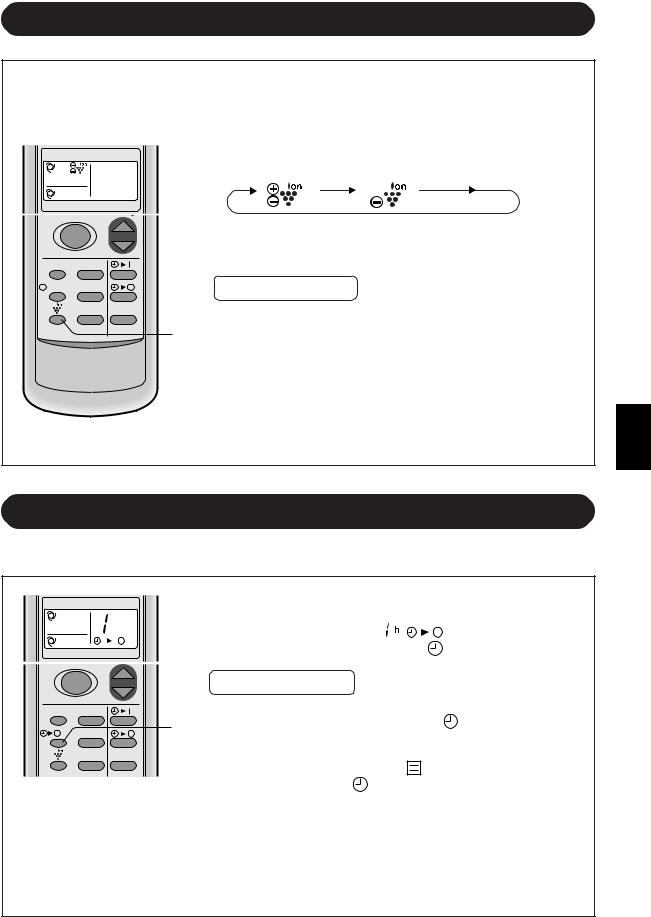
TIPS ABOUT PLASMACLUSTER OPERATION
The ionizer inside the air conditioner will release cluster ions, which are collective mass of positive and negative ions, into the room.
The cluster ions reduce airborne mold fungus.
Ionizer
Cluster ions
Mold fungus
ENGLISH
AIR CLEAN OPERATION
Cluster ions released into the air will reduce airborne mold fungus.
ION BALANCE OPERATION
It is said that plenty of negative ions exist in places such as waterfalls or waterside in natural environment. In this operation mode, negative ions will be released in an increased rate, in order to bring the room air close to this condition.
Please refer to page 11 for operation.
E-7

BASIC OPERATION
MODE TEMP.
FAN TIMER
TEMP. 
DISPLAY MODE

 1h FAN
SWING CANCEL
2
5
3
1
4
1 |
Press the MODE button to select the |
|
operation mode. |
||
|
|
AUTO HEAT COOL DRY FAN ONLY |
|
|
HEAT |
|
( |
is only for AY-AP18DR/AY-AP24DR) |
2 |
Press the ON/OFF button to start op- |
|
eration. |
||
•The red OPERATION lamp ( 

 ) on the unit will light.
3 |
Press the THERMO. button to set the |
|
desired temperature. |
||
|
||
|
AUTO/DRY MODE |
|
|
The temperature can |
|
|
be changed in 1°C in- |
|
|
crements within the |
|
|
range of 2°C higher to |
|
|
2°C lower from the tem- |
|
|
perature automatically |
|
|
determined by the air |
|
|
conditioner. |
|
|
COOL(HEAT for AY-AP18DR/AY-AP24DR)MODE |
|
|
The temperature can |
|
|
be set within the range |
|
|
of 18 to 32°C. |
|
|
FAN ONLY MODE |
|
|
The temperature set- |
|
|
ting cannot be made. |
4 |
Please the FAN button to set the de- |
|||||||||||
|
sired fan speed. |
|
|
|
|
|||||||
|
AUTO SOFT |
LOW |
|
HIGH |
||||||||
|
|
|
|
|
|
|
|
|
|
|
|
|
|
|
|
|
|
|
|
|
|
|
|
|
|
|
|
|
|
|
|
|
|
|
|
|
|
|
|
|
|
|
|
|
|
|
|
|
|
|
|
|
|
|
|
|
|
|
|
|
|
|
|
|
•In the DRY mode, the fan speed is preset to AUTO and cannot be changed.
•In the FAN ONLY mode, the fan speed cannot be set to AUTO.
5 |
To turn off the unit, press the ON/OFF |
|
button again. |
•The red OPERATION lamp ( 

 ) on the unit will turn off.
E-8
TIPS ABOUT AUTO MODE
In the AUTO mode, the temperature setting and mode are automatically selected according to the room temperature when the unit is turned on.
Modes and Temperature Settings for Models AH-AP18DR/AH-AP24DR
Room temp. at opera- |
|
Automatic Operation |
|
tion start-up |
Mode |
|
Thermostat Setting |
|
|
|
|
Below 24°C |
DRY |
|
Room Temp. at start-up |
|
|
|
|
24°C-26°C |
COOL |
|
24°C |
|
|
|
|
26°C-28°C |
COOL |
|
25°C |
|
|
|
|
Above 28°C |
COOL |
|
26°C |
|
|
|
|
Modes and Temperature Settings for Models AY-AP18DR/AY-AP24DR
Room temp. at opera- |
|
Automatic Operation |
|
tion start-up |
Mode |
|
Thermostat Setting |
|
|
||
|
|
|
|
Below 21°C |
HEAT |
|
23°C |
21°C-24°C |
DRY |
|
Room Temp. at start-up |
24°C-26°C |
COOL |
|
24°C |
|
|
|
|
26°C-28°C |
COOL |
|
25°C |
|
|
|
|
Above 28°C |
COOL |
|
26°C |
TIPS ABOUT FAN SPEED LAMP
During operation, the FAN SPEED Lamp will light up in 3 levels (2 levels for DRY mode) on the indicator panel of the unit to indicate the fan speed.
When fan speed is set to AUTO |
When fan speed is set to manual |
Soft speed
Low speed
High speed
The AUTO FAN SPEED Lamp |
|
will light up. |
DISPLAY MODE |
|
|
To turn off the FAN SPEED Lamp, press |
|
the DISPLAY button. |
|
The PLASMACLUSTER Lamp will also go off. |
SWING CANCEL |
ENGLISH
E-9
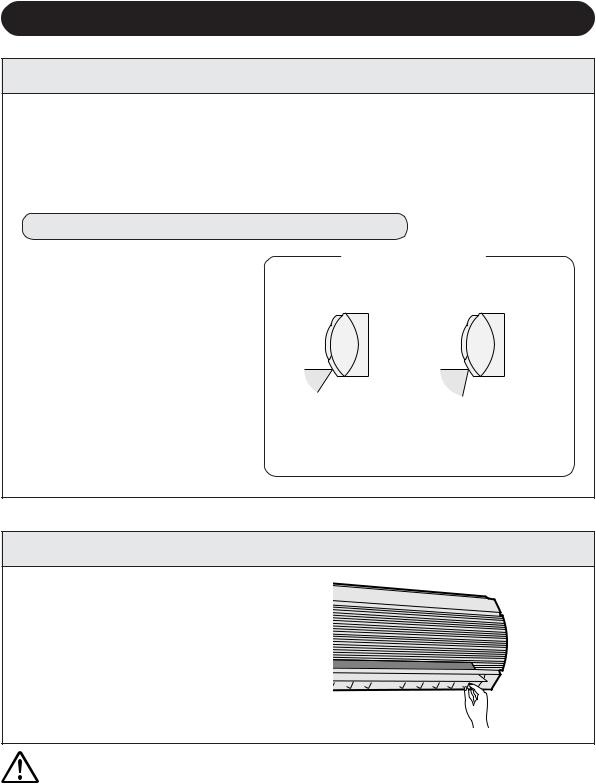
ADJUSTING THE AIR FLOW DIRECTION
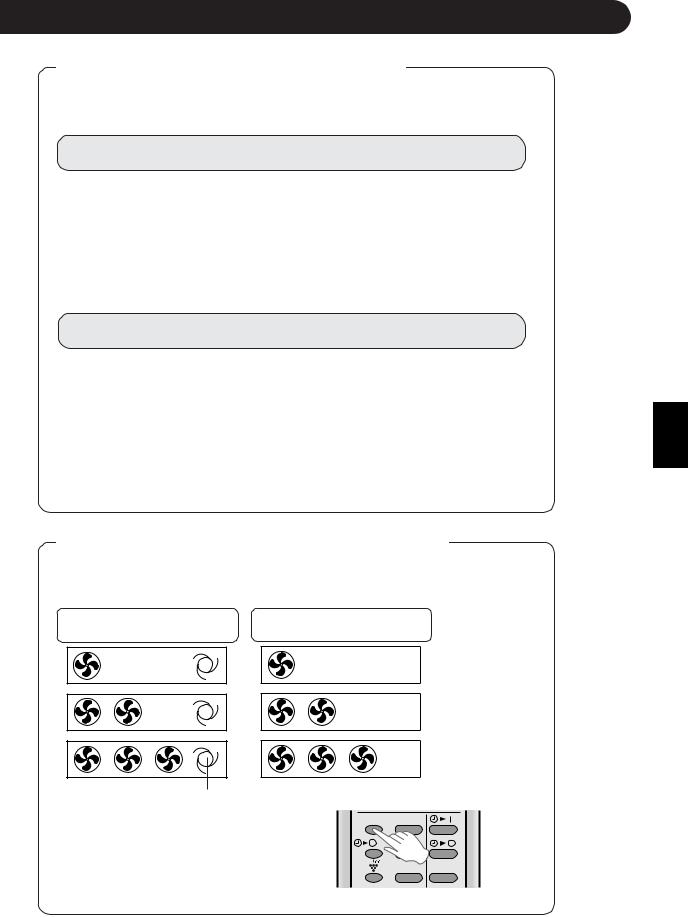
VERTICAL AIR FLOW DIRECTION
The air flow direction is automatically preset in each mode as follows for optimum comfort:
COOL and DRY mode |
Horizontal air flow |
FAN ONLY mode (and HEAT for AY-AP18DR/AY-AP24DR) |
Diagonal air flow |
HOW TO ADJUST THE AIR FLOW DIRECTION |
|
Press the SWING button on the remote control once.
•The vertical adjustment louvre will change its angle continuously.
Press the SWING button again when the vertical adjustment louvre is at the desired position.
•The louvre will stop moving within the range shown in the diagram.
•The adjusted position will be memorized and will be automatically set to the same position when operated the next time.
Adjustment range
COOL and DRY mode FAN ONLY (and HEAT for AY-AP18DR/AY-AP24DR) mode
The adjustment range |
The range is wide so the |
is narrower the SWING |
air flow can be directed |
range in order to pre- |
toward the floor. |
vent condensation from |
|
dripping. |
|
HORIZONTAL AIR FLOW DIRECTION
Hold the horizontal adjustment louvre as shown in the diagram and adjust the air flow direction.
CAUTION
Never attempt to adjust the vertical adjustment louvres manually.
•Manual adjustment of the vertical adjustment louvre can cause the unit to malfunction when the remote control is used for the adjustment.
•When the vertical adjustment louvre is positioned at the lowest position in the COOL or DRY mode for an extended period of time, condensation may result.
Do not adjust the horizontal adjustment louvre extremely to the right or left when operating the air conditioner with fan speed "SOFT" for an extended period of time.
Condensation may form on the louvres.
E-10
PLASMACLUSTER OPERATION
AIR CLEAN OPERATION : Cluster ions released into air will reduce airborne mold fungus.
ION BALANCE OPERATION : Negative ions will be released in an increased rate.
MODE TEMP.
FAN TIMER
DISPLAY MODE

 1h FAN
SWING CANCEL
1 During operation, press the PLASMACLUSTER button to select the mode.
AIR CLEAN |
ION BALANCE |
CANCEL |
|||||||
|
|
|
|
|
|
|
|
|
|
•In the AIR CLEAN operation, the blue PLASMACLUSTER lamp on the unit will light up.
•In the ION BALANCE operation, the green PLASMACLUSTER lamp on the unit will light up.
TO CANCEL
Press the PLASMACLUSTER button until PLASMACLUSTER symbol on the remote control display goes off.
1 |
• The PLASMACLUSTER lamp on the unit will turn off. |
|
NOTE: |
||
|
•Setting of the PLASMACLUSTER operation will be memorized and will operate in the same mode, the next time you turn on the air conditioner.
•To turn off the PLASMACLUSTER Lamp, press the DISPLAY button.
ONE-HOUR OFF TIMER
When the ONE-HOUR OFF TIMER is set, the unit will stop operating after one hour.
MODE |
TEMP. |
1 Press the ONE-HOUR OFF TIMER button. |
|||
|
h |
||||
|
• |
The remote control displays “ |
”. |
||
|
|
||||
FAN |
TIMER |
• |
The orange TIMER lamp ( |
) on the unit will light up. |
|
• |
The unit will stop operating after one hour. |
||||
|
|
||||
|
|
|
TO CANCEL |
|
|
DISPLAY MODE |
Press the CANCEL button. |
|
|||
|
1 |
|
|||
1h FAN |
• |
The orange TIMER lamp ( |
) on the unit will turn off. |
||
SWING CANCEL |
Or, turn the unit off by pressing the ON/OFF button. |
||||
•The red OPERATION lamp ( 

 ) and the orange TIMER lamp (
  ) on the unit will turn off.
NOTES:
•The ONE-HOUR OFF TIMER operation has priority over TIMER ON and TIMER OFF operations.
•When the ONE-HOUR OFF TIMER is set while the unit is not operating, the unit will operate for an hour with the formerly set condition.
•If you wish to operate the unit for another hour before the ONE-HOUR OFF TIMER activiates, press the ONE-HOUR OFF TIMER button again during operation.
ENGLISH
E-11
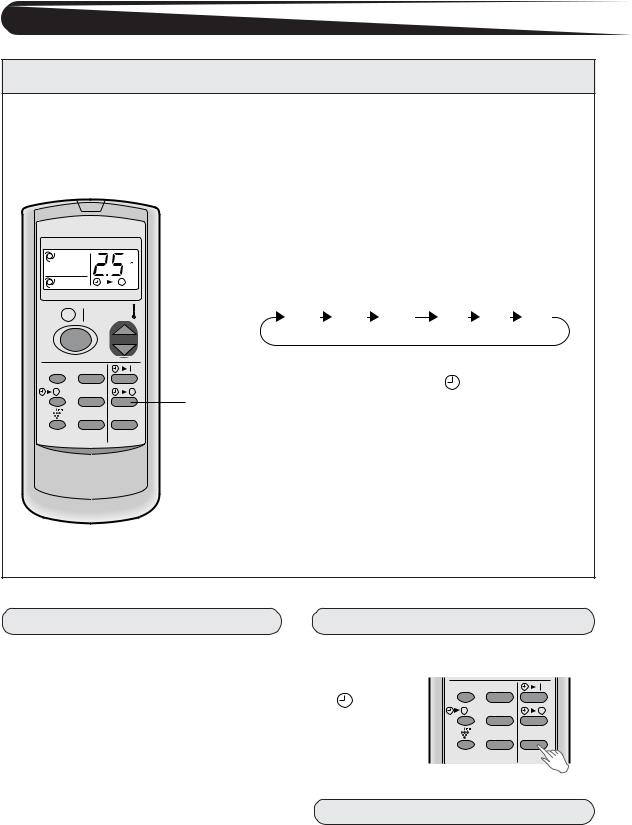
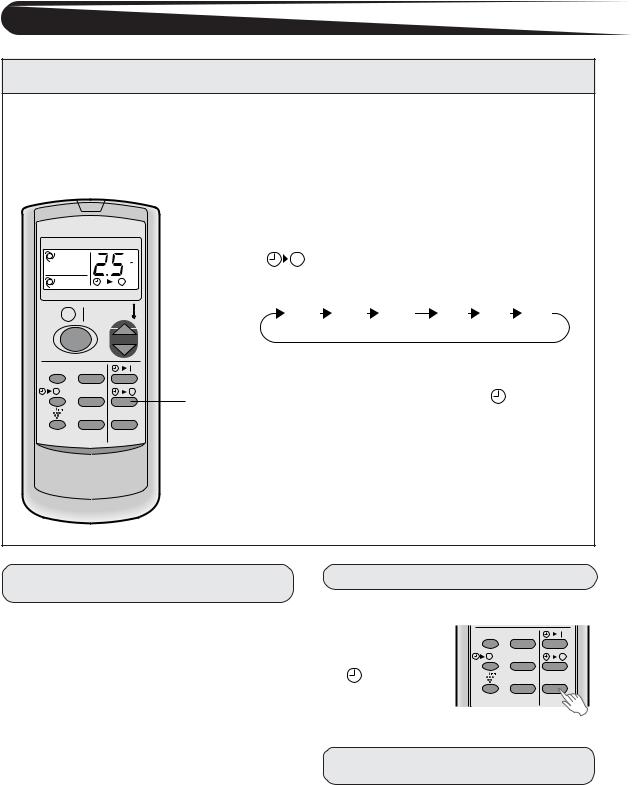
TIMER OPERATION
TIMER OFF
The unit will turn off automatically according to your setting.
Timer duration can be set from minimum 0.5 hours (30 minutes) to maximum 12 hours.
Up to 9.5 hours, you can set by 0.5 hours (30 minutes) increments and from 10 to 12 hours, by 1 hour increment.
MODE TEMP.
Point the remote control at the signal receiver window on the unit.
1 Press the TIMER OFF (  ) button and set time as desired.
|
|
|
• |
The time setting will change as you to press the |
|||||
FAN |
TIMER |
|
|
button as follows. |
|
|
|
|
|
|
|
|
|
|
|
|
|
||
|
TEMP. |
|
|
0.5h |
1.0h |
1.5h |
10h |
11h |
12h |
|
|
|
|
||||||
DISPLAY MODE |
|
Hold the button pressed down for fast setting. |
|||||||
1h |
FAN |
1 |
• |
The orange TIMER lamp ( |
|
) on the unit will |
|||
|
light. |
|
|
|
|
|
|||
SWING CANCEL |
• |
The unit will generate a beep when it receives the |
|||||||
|
|
|
|
signal. |
|
|
|
|
|
|
|
|
• |
The time setting will count down to show remain- |
|||||
|
|
|
|
ing time. |
|
|
|
|
|
Example : When you wish to stop the operation 2.5 hours later.
TIPS ABOUT TIMER OFF OPERATION
When the TIMER OFF is set, the temperature setting is automatically adjusted to prevent the room from becoming excessively hot or too cold while you sleep. (Auto Sleep function)
COOL/DRY MODE:
•One hour after the timer operation begins, the temperature setting rises 1°C higher than the original thermostat setting.
TO CANCEL TIMER
Press the CANCEL button.
• The |
orange |
|
TIMER lamp |
DISPLAY MODE |
|
( |
) on the |
1h FAN |
unit |
will turn |
|
off. |
|
SWING CANCEL |
|
|
|
HEAT MODE:
(only for models AY-AP18DR/AY-AP24DR)
•One hour after the timer operation begins, the temperature setting drops 3°C lower than the original thermostat setting.
NOTE:
•The Auto Sleep function will not activate during the FAN ONLY mode.
TO CHANGE TIMER SETTING
Press the TIMER button which you wish to change, (TIMER OFF or TIMER ON) and change the time setting.
E-12
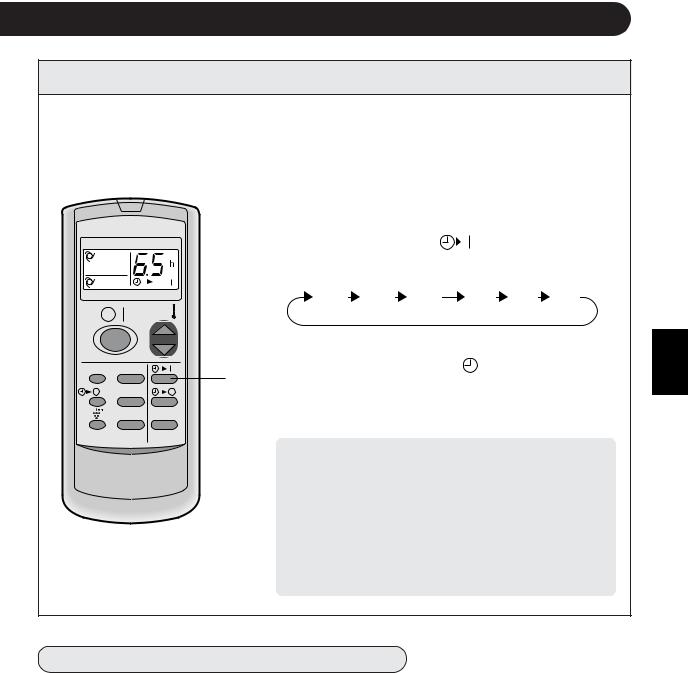
TIMER ON
The unit will turn on automatically according to your setting.
Timer duration can be set from minimum 0.5 hours (30 minutes) to maximum 12 hours.
Up to 9.5 hours, you can set by 0.5 hours (30 minutes) increments and from 10 to 12 hours, by 1 hour increment.
Point the remote control at the signal receiver window on the unit.
MODE |
TEMP. |
|
1 Press the TIMER ON ( |
) button. |
|
|
|
|
• |
The time setting will change as you press the button |
|
|
|
|
|
as follows. |
|
FAN |
TIMER |
|
|
0.5h 1.0h 1.5h |
10h 11h 12h |
|
TEMP. |
|
|
|
|
|
|
|
Hold the button pressed down for fast setting. |
||
DISPLAY MODE |
1 |
• |
The orange TIMER lamp ( |
) on the unit will light. |
|
|
|
• |
The unit will generate a beep when it receives the |
||
1h |
FAN |
|
|
signal. |
|
SWING CANCEL |
|
• |
The time setting will count down to show remaining |
||
|
|
time. |
|
||
|
|
|
|
|
|
Select the mode, temperature, fan speed setting and PLASMACLUSTER operation as desired.
Example : When you wish the room temperature to be as desired 6.5 hours later.
•When the temperature is set with the TIMER ON, the temperature will show in the display for 5 seconds and then return to the time display.
•If you do not change the setting, the unit will operate with the latest setting.
•The unit will turn on prior to the set time to allow the room to reach the desired temperature by the programmed time. (Awaking function)
NOTES FOR TIMER SETTING AND OPERATION
•The latest time setting will be memorized and will appear on the remote control display the next time you set the TIMER OFF or TIMER ON.
•TIMER OFF and TIMER ON can not be set together. The latest set TIMER will be active.
•When ONE-HOUR OFF TIMER is set, TIMER OFF and TIMER ON will not be available.
•When ONE-HOUR OFF TIMER is set during TIMER OFF or TIMER ON duration, the TIMER ON or TIMER OFF will be cancelled.
ENGLISH
E-13
AUXILIARY MODE
Use this mode when the remote control is not available.
TO TURN ON
Lift the front panel of the indoor unit and press the AUX. button on the operation panel.
• The red OPERATION lamp ( 

 ) on the unit will light and the unit will start operating in the AUTO mode.
• The fan speed and temperature setting are set to AUTO.
TO TURN OFF
Press the AUX. button on the |
operation panel again. |
• The red OPERATION lamp ( |
) on the unit will turn off. |
NOTE:
If the AUX. button is pressed during normal operation, the unit will turn off.
MAINTENANCE
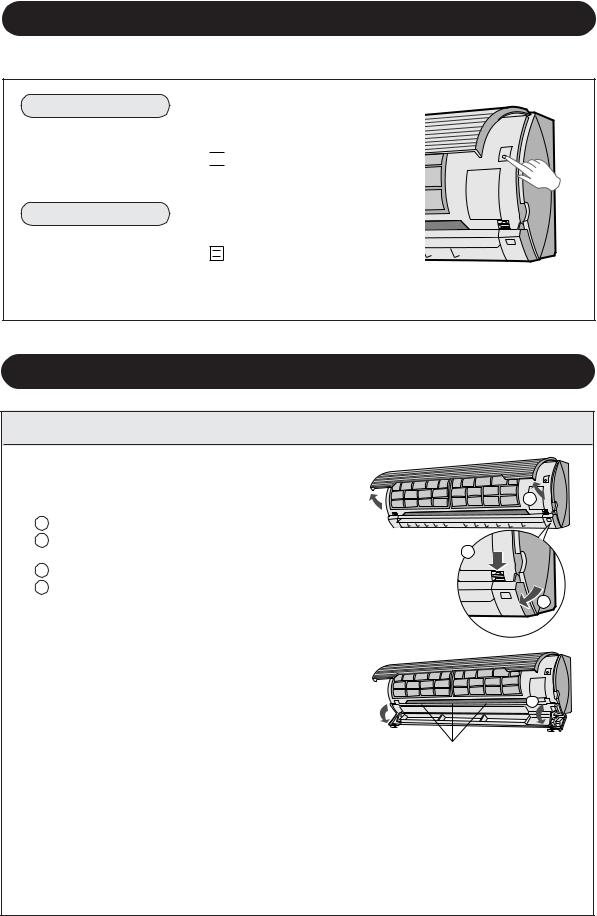
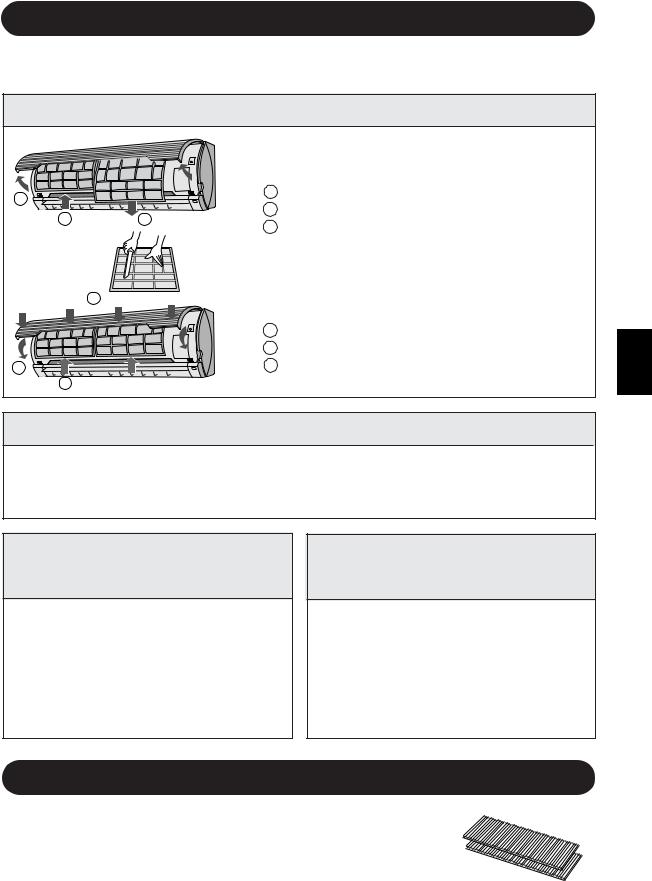
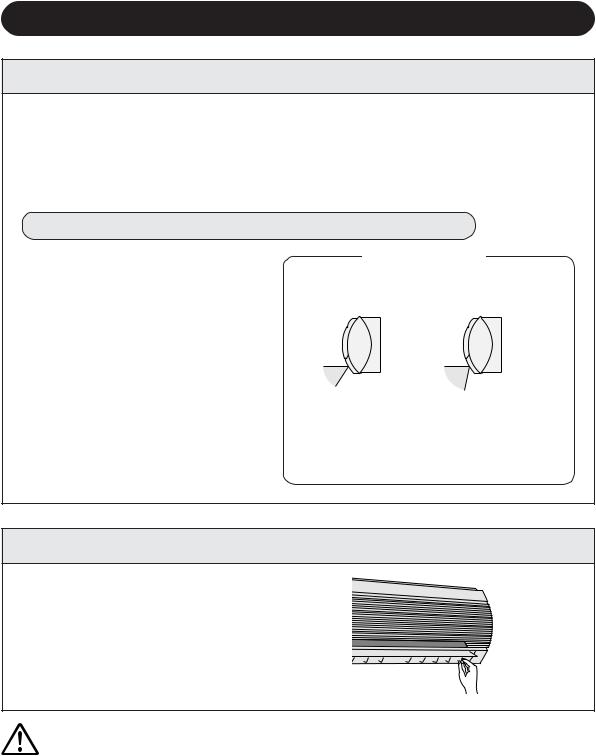
CLEANING THE INTERIOR OF AIR CONDITIONER UNIT
1 Be sure to disconnect the power cord from the wall outlet or turn off the circuit breaker.
2 OPEN THE LOUVRE UNIT
1Lift the open panel.
2Push down both hooks at the left and right, and release the lock.
3Pull out the louvre unit forward.
4Let it open downward gently.
3 CLEAN THE INTERIOR OF THE AIR CONDITIONER UNIT
Make sure the fan inside is not rotating. Remove the dust using a vacuum cleaner or wipe with dry cloth.
4 CLOSE THE LOUVRE UNIT
1 Lift up the louvre unit and slide it back into its position.
2 Make sure both hooks at the left and right are locked in place and the three supports are firmly fit.
3 Close the open panel.
1
2
4
Supports
5 Connect the power cord to the wall outlet or turn on the circuit breaker.
6 Make sure the all lamps on the indicator panel are not blinking.
If the louvre unit is not reinstalled properly, the safety equipment will work and the lamps will blink, preventing the unit from operating. In such case, reinstall the louvre unit properly. Push the ON/OFF button of the remote control and check if the unit operates properly.
E-14
MAINTENANCE
Be sure to disconnect the power cord from the wall outlet or turn off the circuit breaker before performing any maintenance.
CLEANING THE FILTERS The air filters should be cleaned every two weeks.
1 TURN OFF THE UNIT
2 REMOVE THE FILTERS
1 Lift the open panel.
1
2 Push the air filters up slightly to unlock them.
2 |
3 |
3 Pull the air filters down to remove them. |
|
|
3 CLEAN THE FILTERS
Use a vacuum cleaner to remove dust. If the filters are dirty, wash them with warm water and a mild
detergent. Dry filters in the shade before reinstalling.
3
4 REINSTALL THE FILTERS
|
1 |
Reinstall the filters in the original positions. |
|
2 |
Close the open panel. |
2 |
3 |
Push the arrow-marked of the panel firmly to lock |
|
1 |
it in place. |
|
|
CLEANING THE UNIT AND THE REMOTE CONTROL
•Wipe them with a soft cloth.
•Do not directly splash or pour water on them. We can cause electrical shock or equipment damage.
•Do not use hot water, thinner, abrasive powders or strong solvents.
MAINTENANCE AFTER AIR CONDITIONER SEASON
1 Operate the unit in the FAN ONLY mode for about half a day to allow the mechanism to thoroughly dry.
2 Stop the operation and unplug the unit. Turn off the circuit breaker, if you have one exclusively for the air conditioner.
3 Clean the filters, then reinstall them.
OPTION KIT
MAINTENANCE BEFORE AIR CONDITIONER SEASON
1 Make sure that the air filters are not dirty.
2 Make sure that nothing obstructs the air inlet or outlet.
3 Check the outdoor mounting rack periodically for wear and to make sure it is firmly in place.
Air Purifying Filter
During operation of the air conditioner, the air purifying filter removes dust and tobacco smoke from the air and discharges clean air.
The apatite antibacterial material used in the air purifying filter suppresses activities of adsorbed viruses and other germs.
The replacement period for the disposable type is approximately 3~6 months. |
Type AZ-F1800C |
Contact your dealer for the purchase of this option. |
|
ENGLISH
E-15

BEFORE CALLING FOR SERVICE
The following conditions do not denote equipment malfunctions
UNIT DOES NOT OPERATE |
SWISHING NOISE |
|
The unit will not operate if it is turned on |
The soft, swishing noise is the sound of |
|
immediately after it is turned off. The unit will not |
the refrigerant flowing inside the unit. |
|
operate immediately after the mode is changed. |
|
|
This is to protect the internal mechanisms. Wait 3 |
WATER VAPOUR |
|
minutes before operating the unit. |
||
• In the COOL and DRY operation, wa- |
||
|
||
UNIT DOES NOT SEND OUT WARM AIR |
ter vapour can sometimes be seen at |
|
the air outlet due to the difference |
||
(Models AY-AP18DR/AY-AP24DR) |
||
between the room air temperature and |
||
The unit is preheating or de-icing. |
the air discharged by the unit. |
|
|
• In the HEAT operation, water vapour |
|
ODORS |
||
may flow out of the outdoor unit dur- |
||
Carpet and furniture odors that entered into the |
ing de-icing. (Only in models AY- |
|
AP18DR/AY-AP24DR) |
||
unit and the air conditioner's inner component |
||
odors at the early stage of installation may be |
|
|
sent out from the unit. |
ODOR EMITTED FROM THE |
|
|
||
CRACKING NOISE |
PLASMACLASTER AIR OUTLET |
|
This is the smell of ozone generated |
||
The unit may produce a cracking noise. This sound |
||
from the ionizer. Density of the ozone is |
||
is generated by the friction of the front panel and |
||
very little, having no adverse effect over |
||
other components expanding or connecting due to |
||
your health. The ozone released into |
||
a temperature change. |
||
the air will decompose soon, and its den- |
||
|
sity in the room will not increase. |
|
A LOW BUZZ NOISE EMITTED |
||
|
||
This is a sound emitted when the unit is generating |
|
|
ion clusters. |
|
|
|
|
If the unit appears to be malfunctioning, check the following points before calling for service.
IF THE UNIT FAILS TO OPERATE
•Check to see if the circuit breaker has tripped or the fuse has blown.
•Check if the louvre unit is properly installed. All lamps on the indicator panel will blink when the louvre unit is not properly installed.
IF THE UNIT FAILS TO COOL (OR HEAT) THE ROOM EFFECTIVELY
Check the filters. If dirty, |
Check the outdoor unit to |
Check the thermostat is |
clean them. |
make sure nothing is blocking |
proper setting. |
|
the air inlet or outlet. |
|
|
|
|
Make sure windows and |
A large number of people in |
Check whether any heat- |
doors are closed tightly. |
the room can prevent the unit |
generating appliances are |
|
from achieving the desired |
operating in the room. |
|
temperature. |
|
|
|
|
IF THE UNIT FAILS TO RECEIVE THE REMOTE CONTROL SIGNAL
Check whether the remote control batteries have become old and weak.
Try to send the signal again with the remote control pointed properly towards the unit’s signal receiver window.
Check whether the remote control batteries are installed with the polarities properly aligned.
Please call for service when OPERATION Lamp and TIMER Lamp on the indicator panel blink.
E-16
DEUTSCH
Vielen Dank für den Kauf dieses SHARP-Erzeugnisses. Bitte lesen Sie sich diese Bedienungsanleitung sorgfältig durch, bevor Sie das Klimagerät betreiben.
INHALT
• VORSICHTSMASSNAHMEN ...................... |
D-1 |
• ZUSÄTZLICHE ANMERKUNGEN |
|
ZUM BETRIEB ............................................. |
D-3 |
• ENERGIESPARTIPPS ................................. |
D-3 |
• TEILEBEZEICHNUNG ................................. |
D-4 |
• VERWENDUNG DER FERNBEDIENUNG .. |
D-6 |
• TIPPS ZUM PLASMACLUSTER- |
|
BETRIEB ...................................................... |
D-7 |
• GRUNDLAGEN DES BETRIEBS ................ |
D-8 |
• EINSTELLUNG DER RICHTUNG DES |
|
LUFTSTROMS ............................................. |
D-10 |
• PLASMACLUSTER-BETRIEB ............ |
D-11 |
• EIN-STUNDEN-AUSSCHALT- |
|
ZEITSCHALTER ................................. |
D-11 |
• BETRIEB MIT DEM ZEITSCHALTER ... |
D-12 |
• HILFSBETRIEB .................................. |
D-14 |
• WARTUNG ......................................... |
D-14 |
• WAHLAUSSTATTUNG ....................... |
D-15 |
• BEVOR SIE DEN |
|
KUNDENDIENST RUFEN .................. |
D-16 |
VORSICHTSMASSNAHMEN
WARNHINWEISE
1 |
Ziehen Sie nicht am Netzkabel und deformieren Sie es nicht. Das Ziehen am Netzkabel |
sowie dessen Missbrauch kann zu einer Beschädigung des Gerätes führen und einen |
|
2 |
elektrischen Schlag verursachen. |
Zur Vermeidung von Gesundheitsschäden sollten Sie Ihren Körper nicht über einen |
|
längeren Zeitraum hinweg dem kalten Luftstrom aussetzen. |
|
3 |
Bei der Benutzung des Klimageräts für Säuglinge, Kinder, ältere, bettlägerige oder |
behinderte Personen ist unbedingt sicherzustellen, dass die Raumtemperatur für die |
|
4 |
sich im Raum befindlichen Personen angemessen ist. |
Stecken Sie keinerlei Gegenstände in das Gerät hinein. Dies könnte aufgrund der |
|
Hochgeschwindigkeitslüfter Verletzungen verursachen. |
|
5 |
Das Klimagerät muss auf jeden Fall geerdet werden. Schließen Sie den Erdungsdraht |
nicht an Gasoder Wasserleitungen, an Blitzableitern oder Telefonerdkabeln an, da dies |
|
6 |
einen elektrischen Schlag verursachen könnte. |
Wenn mit dem Klimagerät irgendwelche Unregelmäßigkeiten auftreten (z.B. Brandgeruch), |
|
muss der Betrieb sofort beendet und der Leistungsschalter auf AUS gestellt werden. |
|
7 |
Halten Sie sich bei der Verlegung des Netzkabels an die örtlichen Vorschriften und |
Bestimmungen. Ein falscher Kabelanschluss kann eine Überhitzung des Netzkabels, |
|
8 |
des Netzsteckers oder der Steckdose und damit einen Brand verursachen. |
Tauschen Sie das Netzkabel ausschließlich gegen den vom Hersteller angegebenen |
|
Netzkabeltyp aus. Der Austausch sollte ausschließlich einem qualifizierten Techniker |
oder dem Kundendienst vorbehalten bleiben.
DEUTSCH
SICHERHEITSHINWEISE ZUR INSTALLATION / ZUM AUSBAU / ZUR REPARATUR
•Versuchen Sie nicht, das Gerät selbst zu installieren/auszubauen/zu reparieren. Fehlerhaft durchgeführte Arbeiten können einen elektrischen Schlag, eine Wasserleckage, einen Brand usw. verursachen. Konsultieren Sie für die Installation/den Ausbau/die Reparatur dieses Gerätes Ihren Fachhändler oder einen anderen qualifizierten Kundendienst.
Dieses Gerät erfüllt die Vorschriften der EG-Richtlinien 89/336/EEC und 73/23/EEC in der geänderten Fassung 93/68/EEC.
D-1

VORSICHTSMASSNAHMEN
SICHERHEITSHINWEISE ZUM BETRIEB
1 |
Öffnen Sie regelmäßig ein Fenster oder eine Tür, um den Raum zu lüften, besonders |
dann, wenn Sie mit Gas betriebene Geräte benutzen. Eine unzureichende Belüftung |
kann einen Sauerstoffmangel verursachen.
2
3
4
5
Die Tasten nicht mit nassen Händen bedienen. Dies könnte einen elektrischen Schlag verursachen.
Aus Sicherheitsgründen sollte der Leistungsschalter ausgeschaltet sein, wenn das Gerät für einen längeren Zeitraum nicht benutzt wird.
Überprüfen Sie den Montagerahmen regelmäßig auf Verschleiß und richtigen, festen Sitz.
Legen Sie keinerlei Gegenstände auf das Außengerät, und betreten Sie es nicht. Der Gegenstand oder die Person könnten in das Gerät hineinbzw. hinunterfallen; dadurch könnten Beschädigungen bzw. Verletzungen verursacht werden.
6 |
Dieses Gerät wurde ausschließlich für den Hausgebrauch hergestellt und darf nicht für |
Einrichtungen wie zum Beispiel eine Hundehütte oder ein Gewächshaus, um Tiere oder |
|
|
Pflanzen aufzuziehen, verwendet werden. |
7 |
Stellen Sie keinen mit Wasser gefüllten Behälter auf das Gerät. Beim Eintreten von |
Wasser in das Gerät könnten die elektrischen Isolierungen Schaden nehmen und einen |
|
|
elektrischen Schlag verursachen. |
8 |
Blockieren Sie weder die Lufteinlassnoch Luftauslassöffnungen des Gerätes. Dies |
könnte einen erheblichen Leistungsabfall des Gerätes sowie Störungen zur Folge |
|
|
haben. |
9 |
Vor der Durchführung von Wartungsoder Reinigungsarbeiten muss in jedem Fall der |
Betrieb gestoppt und der Leistungsschalter ausgeschaltet werden. Da im Inneren des |
Gerätes ein Lüfter läuft, könnten Sie sich ansonsten Verletzungen zuziehen.
10
11
Verspritzen bzw. verschütten Sie kein Wasser direkt über dem Gerät. Wasser kann sowohl einen elektrischen Schlag als auch eine Beschädigung des Gerätes verursachen.
Dieses Gerät ist nicht für die unbeaufsichtigte Benutzung durch Kleinkinder oder hilflose Personen ausgelegt.
Kleinkinder sollten beaufsichtigt werden, um auszuschließen, dass sie dieses Gerät als Spielzeug benutzen.
VORSICHTSMASSNAHMEN ZUR AUFSTELLUNG / INSTALLATION
•Schließen Sie die Klimaanlage unbedingt an ein Netz mit der angegebenen Spannung und Frequenz an.
Der Anschluss an ein Netz mit der falschen Voltzahl und Frequenz kann zu einer Beschädigung des Gerätes führen und möglicherweise sogar einen Brand verursachen.
•Installieren Sie das Gerät nicht an einem Ort, an dem möglicherweise Gas ausströmt. Dies könnte einen Brand verursachen.
Installieren Sie das Gerät an einem Ort, an dem in der Luft nur geringe Mengen an Staub, Rauch und Feuchtigkeit vorhanden sind.
•Verlegen Sie den Ablaufschlauch gerade, um einen sanften Ablauf sicherzustellen. Ein unzureichender Ablauf kann den Raum, die Möbel etc. feucht werden lassen.
•Stellen Sie abhängig vom Aufstellungsort sicher, dass ein Kriechstromschutz oder Leistungsschalter installiert ist, um einen elektrischen Schlag zu vermeiden.
D-2
ZUSÄTZLICHE ANMERKUNGEN ZUM BETRIEB
BETRIEBSTEMPERATUREN
|
|
INNENTEMP. |
AUSSENTEMP. |
|||
|
obere Grenze |
32˚C |
D.B. |
43˚C |
D.B. |
|
KÜHLUNG |
23˚C W.B. |
|
- |
|||
|
|
|||||
untere Grenze |
21˚C |
D.B. |
21˚C |
D.B. |
||
|
||||||
|
15˚C W.B. |
|
- |
|||
|
|
|
||||
HEIZUNG |
obere Grenze |
27˚C |
D.B. |
24˚C |
D.B. |
|
|
- |
18˚C W.B. |
||||
|
|
|||||
(nur AY-AP18DR/ |
untere Grenze |
20˚C |
D.B. |
-8,5˚C |
D.B. |
|
AY-AP24DR) |
||||||
|
- |
-9,5˚C |
W.B. |
|||
|
|
|
||||
D.B. = Trockenthermometer W.B. = Feuchtthermometer
BEI STROMAUSFALL
•Eine eingebaute Schutzvorrichtung sperrt den Gerätebetrieb, wenn der entsprechende Temperaturbereich überschritten wird.
•Am Luftauslass kann sich Kondenswasser bilden, wenn das Gerät bei einer Luftfeuchtigkeit von mehr als 80 Prozent kontinuierlich in der Betriebsart KÜHLEN oder TROCKNEN läuft.
Dieses Klimagerät verfügt über eine Reservefunktion, um Einstellungen im Falle eines Stromausfalls zu speichern.
Nach Ende des Stromausfalls startet das Gerät wieder mit den Einstellungen, die vor dem Stromausfall aktiv waren. Einzige Ausnahme sind die Zeitschalter-Einstellungen.
Falls vor dem Stromausfall Zeitschalter-Einstellungen gemacht worden sind, müssen diese erneut eingestellt werden.
HINWEISE FÜR MODELLE AY-AP18DR/AY-AP24DR
VORHEIZFUNKTION
Bei der Betriebsart HEIZEN startet der Innenlüfter nach dem Einschalten des Gerätes möglicherweise erst nach zwei bis fünf Minuten, um zu verhindern, dass kalte Luft aus dem Gerät geblasen wird.
ENTEISUNGSFUNKTION
• |
Wenn sich während der Betriebsart HEIZEN auf dem Wärmeaustauscher im Außengerät Eis bildet, liefert ein |
DEUTSCH |
|
automatischer Enteiser ca. 5 bis 10 Minuten Wärme, um das Eis zu beseitigen. Während der Enteisung laufen |
|
|
die Innenund Außenlüfter nicht. |
|
• |
Nach Beendigung der Enteisung setzt das Gerät automatisch den Betrieb im HEIZEN-Modus fort. |
|
HEIZLEISTUNG
•Das Gerät ist mit einer Wärmepumpe ausgestattet, die Wärme aus der Außenluft herauszieht und diese Wärme an den Raum abgibt. Daher hängt die Heizleistung in hohem Maß von der Außentemperatur ab.
•Wenn die Heizleistung aufgrund geringer Außentemperaturen reduziert ist, sollten Sie ein zusätzliches Heizgerät einsetzen.
•Es dauert eine Zeit lang, um den ganzen Raum aufzuwärmen und zu heizen, denn dieses Gerät arbeitet nach dem Prinzip der erzwungenen Luftumwälzung.
ENERGIESPARTIPPS
Bei Berücksichtigung der nachfolgend aufgeführten Tipps, können Sie bei der Benutzung der Klimaanlage auf einfache Weise Energie sparen.
STELLEN SIE DIE RICHTIGE TEMPERATUR EIN
•Wenn Sie das Thermostat im KÜHLEN-Modus 1°C höher als die gewünschte Temperatur einstellen (und bei den Modellen AY-AP18DR/AY-AP24DR im HEIZEN-Modus 2°C niedriger), sparen Sie ungefähr 10 Prozent Strom.
•Wenn Sie die Temperatur beim Kühlen niedriger als erforderlich einstellen, erhöht sich der Stromverbrauch.
VERMEIDEN SIE DIREKTES SONNENLICHT UND ZUGLUFT
•Der Ausschluss von direktem Sonnenlicht während des Kühlbetriebes reduziert den Stromverbrauch.
•Schließen Sie während des Kühlbetriebes die Fenster und Türen (bei den Modellen AY-AP18DR/ AY-AP24DR auch während des Heizbetriebes).
STELLEN SIE DIE RICHTUNG DES LUFTSTROMS RICHTIG EIN, UM DIE BESTMÖGLICHE LUFTZIRKULATION ZU ERREICHEN
HALTEN SIE DEN FILTER SAUBER, UM EINEN MÖGLICHST LEISTUNGSFÄHIGEN BETRIEB SICHERZUSTELLEN
NUTZEN SIE DIE AUSSCHALTFUNKTION DES ZEITSCHALTERS VOLL AUS
TRENNEN SIE DAS NETZKABEL AB, WENN DAS GERÄT ÜBER EINEN LÄNGEREN ZEITRAUM HINWEG NICHT BENUTZT WIRD
• Das Gerät verbraucht auch bei Nichtbenutzung eine geringe Menge Strom.
D-3

TEILEBEZEICHNUNG
ZIMMERGERÄT
1
2
3
4
5
6
7
8
9
0 q w
e r t y u
1 Einlass (Luft)
2 Öffnungsklappe
3 AUX.-Taste
4 Luftfilter
5 Empfänger-Fenster
6Lamellen-Einheit
Öffnen, um das Klimagerät innen zu reinigen.
7Netzkabel
(nur AY-AP18DR/AH-AP18DR)
8 Anzeigefeld
9Lamelle zur vertikalen Einstellung
0Lamelle zur horizontalen Einstellung
q Auslass (Luft)
w Fernbedienung
eAUTOM. LÜFTERDREHZAHLLampe (Grün  )
)
rLÜFTERDREHZAHL-Lampe (Grün  )
)
t PLASMACLUSTER-Lampe
(Blau, Grün)
yZEITSCHALTER-Lampe (Orange  )
)
uBETRIEBS-Lampe (Rot 

 )
)
AUSSENGERÄT
i |
i Einlass (Luft) |
|
o |
o Kühlmittelrohr und |
|
Verbindungskabel |
||
|
||
p |
p Entwässerungsschlauch |
|
|
||
|
a Auslass (Luft) |
|
a |
|
HINWEIS: Die neuesten Geräte können sich leicht von der obigen Darstellung unterscheiden.
D-4
FERNBEDIENUNG
11 SENDER
|
|
|
2 ANZEIGE (Flüssigkristallanzeige) |
|
|
|
|
3 EIN-/AUS-Taste |
|
MODE |
TEMP. |
|
4 THERMO. (Thermostat)-Taste |
|
|
|
|
||
|
|
2 |
5 ANZEIGE-Taste |
|
FAN |
TIMER |
|
6 MODUS-Taste (für die Wahl der Betriebsart) |
|
3 |
|
|||
|
|
7 ZEITSCHALTER AN-Taste |
||
|
TEMP. |
|
||
|
|
(zur Einstellung der Einschaltzeit) |
||
|
|
4 |
8 EIN-STUNDEN-AUSSCHALT- |
|
|
|
ZEITSCHALTER-Taste |
||
|
|
|
||
DISPLAY MODE |
5 |
9 ZEITSCHALTER AUS-Taste |
||
6 |
||||
(zur Einstellung der Ausschaltzeit) |
||||
|
|
7 |
||
|
|
|
||
1h |
FAN |
8 |
0 LÜFTER-Taste |
|
|
|
9 |
|
|
SWING CANCEL |
0 |
q ZEITSCHALTER-ABBRUCH-Taste |
||
|
|
q |
w SCHWUNG-Taste |
|
|
|
w |
||
|
|
(für die Einstellung des Luftstroms) |
||
|
|
e |
||
|
|
|
||
|
|
|
e PLASMACLUSTER-Taste |
|
DEUTSCH
(Das Symbol für die Betriebsart HEIZEN  ist nur bei den Modellen AY-AP18DR/AY-AP24DR vorhanden)
DIE FLÜSSIGKRISTALLANZEIGE DER FERNBEDIENUNG
rBETRIEBSSYMBOLE
:AUTOM. : HEIZEN
|
(nur für AY-AP18DR/AY-AP24DR) |
|
|
: KÜHLEN |
: TROCKNEN |
: NUR LÜFTEN |
|
t LÜFTERGESCHWINDIGKEITSSYMBOLE |
r |
||
|
|
|
|
: AUTOM. |
: Manuelle Einstellung |
|
|
y PLASMACLUSTER-SYMBOL |
t |
|
uANZEIGE FÜR TEMPERATUR UND HERABZÄHLEN DES ZEITSCHALTERS
i SENDERSYMBOL
oANZEIGE FÜR ZEITSCHALTER EIN/AUS
Zeigt die Einstellung Zeitschalter Ein oder Aus an.
y u i
o
(Das Symbol für die Betriebsart HEIZEN  ist nur bei den Modellen AY-AP18DR/ AY-AP24DR vorhanden)
D-5
VERWENDUNG DER FERNBEDIENUNG
EINLEGEN DER BATTERIEN Verwenden Sie zwei AAA (R03)-Batterien.
1 Batterieabdeckung auf der Rückseite der Fernbedienung abnehmen.
2 Legen Sie Batterien in das Batteriefach ein; achten Sie dabei auf die richtige Ausrichtung der ± und — Polarität.
• Auf dem Display werden Linien angezeigt, wenn die Batterien richtig eingelegt wurden.
3 Batterieabdeckung wieder anbringen.
Batterieabdeckung
HINWEISE:
•Bei normaler Benutzung beträgt die Lebensdauer der Batterie ungefähr ein Jahr.
•Verwenden Sie immer zwei neue Batterien desselben Typs, wenn Sie Batterien austauschen.
•Wenn die Fernbedienung nach dem Austausch der Batterien nicht ordnungsgemäß funktioniert, nehmen Sie bitte die Batterien heraus und legen Sie sie nach ca. 30 Sekunden wieder ein.
•Nehmen Sie die Batterien aus der Fernbedienung heraus, wenn Sie das Gerät über einen längeren Zeitraum hinweg nicht benutzen.
DIE VERWENDUNG DER FERNBEDIENUNG
Richten Sie die Fernbedienung auf das Empfängerfenster des Hauptgerätes und drücken Sie die gewünschte Taste. Beim Empfang des Signals erzeugt das Gerät einen Piepton.
•Stellen Sie sicher, dass sich zwischen der Fernbedienung und dem Gerät keine Vorhänge oder anderere Gegenstände
befinden.
• Die Fernbedienung funktioniert aus einer Entfernung von bis zu 7 Metern.
 VORSICHT
•Setzen Sie das Empfängerfenster keinem direkten Sonnenlicht aus, da sich dies negativ auf den Betrieb auswirken könnte. Falls direktes Sonnenlicht auf das Empfängerfenster fällt, schließen Sie bitte die Gardinen.
•Die Benutzung einer leichtentzündlichen Leuchtstoffröhre im selben Raum kann die Übertragung des Signals möglicherweise stören.
•Das Gerät kann durch die von der Fernbedienung eines Fernsehgerätes, Videorecorders oder eines anderen im selben Raum benutzten Gerätes gesendeten Signale beeinflusst werden.
•Lassen Sie die Fernbedienung weder in der Sonne noch in der Nähe einer Heizung liegen. Schützen Sie die Fernbedienung darüber hinaus vor Feuchtigkeit und Stößen, um sowohl Verfärbungen als auch eine Beschädigung der Fernbedienung zu verhindern.
D-6
TIPPS ZUM PLASMACLUSTER-BETRIEB
Der Ionisator im Klimagerät gibt Cluster-Ionen in den Raum frei, die eine kollektive Masse von positiven und negativen Ionen darstellen.
Die Cluster-Ionen reduzieren die in der Luft befindlichen Schimmelpilze.
Ionisator
Cluster-Ionen
Schimmelpilze
DEUTSCH
LUFTREINIGUNGSBETRIEB
In die Luft abgegebene Cluster-Ionen reduzieren die in der Luft befindlichen Schimmelpilze.
IONENAUSGLEICH-BETRIEBSART
Es wird gesagt, dass an Orten wie Wasserfällen oder Wäldern in einer natürlichen Umgebung jede Menge negative Ionen vorhanden sind.
In diesem Betrieb werden negative Ionen in erhöhtem Maß freigesetzt, um die Raumluft diesem Zustand anzugleichen.
Lesen Sie bitte Seite 11 für die Bedienung.
D-7
GRUNDLAGEN DES BETRIEBS
MODE TEMP.
FAN TIMER
TEMP. 
DISPLAY MODE

 1h FAN
SWING CANCEL
2
5
3
1
4
1 |
Drücken Sie zum Auswählen des |
|
Betriebsmodus die MODUS-Taste. |
||
|
AUTOM. |
HEIZEN KÜHLEN TROCKNEN NUR LÜFTER |
|
( HEIZEN |
ist nur für AY-AP18DR/AY-AP24DR) |
2 |
Drücken Sie die EIN-/AUS-Taste, um |
|
den Betrieb zu starten. |
||
•Die rote BETRIEBS-Lampe ( 

 ) am Gerät leuchtet.
3 |
Drücken Sie zur Einstellung der gewün- |
|
schten Temperatur die THERMO.- |
||
|
Taste. |
|
|
AUTOM./TROCKENBETRIEB |
|
|
Die Temperatur kann in |
|
|
1°C-Stufen innerhalb eines |
|
|
Bereiches von 2°C höher |
|
|
oder 2°C niedriger als die |
|
|
von der Klimaanlage auto- |
|
|
matisch bestimmten Tem- |
|
|
peratur geändert werden. |
|
|
KÜHLEN (HEIZEN für AY-AP18DR/AY-AP24DR ) |
|
|
BETRIEB |
|
|
Die |
Temperatur kann |
|
innerhalb eines Bereiches |
|
|
von 18 bis 32°C eingestellt |
|
|
werden. |
|
|
NUR LÜFTER-BETRIEB |
|
|
Die |
Temperatureinstel- |
|
lung kann nicht durch- |
|
|
geführt werden. |
|
4 Drücken Sie zur Einstellung der gewünschten Lüftergeschwindigkeit die LÜFTER-Taste.
AUTOM. SCHWACH NIEDRIG |
HOCH |
•Im TROCKNEN-Modus ist die Lüftergeschwindigkeit auf AUTO voreingestellt und kann nicht verändert werden.
•Im NUR LÜFTER-Modus kann die Lüftergeschwindigkeit nicht auf AUTO eingestellt werden.
5 Drücken Sie zum Ausschalten des Gerätes noch einmal die EIN-/AUS-Taste.
• Die rote BETRIEBS-Lampe ( 

 ) am Gerät erlischt.
D-8
TIPPS ZUR BETRIEBSART AUTOM.
Im AUTOM.-Modus werden automatisch sowohl die TemperaturEinstellung als auch der Modus entsprechend der beim Einschalten des Gerätes herrschenden Raumund Außentemperatur gewählt.
Betriebsarten und Temperatur-Einstellungen für die Modelle AH-AP18DR/ AH-AP24DR
Raumtemp. zu Beginn |
Automatischer Betrieb |
|
des Betriebes |
Betrieb |
Thermostateinstellung |
|
|
|
Unter 24°C |
TROCKNEN |
Raumtemperatur zu Beginn |
|
|
|
24°C-26°C |
KÜHLEN |
24°C |
|
|
|
26°C-28°C |
KÜHLEN |
25°C |
|
|
|
Über 28°C |
KÜHLEN |
26°C |
|
|
|
Betriebsarten und Temperatur-Einstellungen für die Modelle AY-AP18DR/ AY-AP24DR
Raumtemp. zu Beginn |
Automatischer Betrieb |
|
des Betriebes |
Betrieb |
Thermostateinstellung |
|
|
|
Unter 21°C |
HEIZEN |
23°C |
|
|
|
21°C-24°C |
TROCKNEN |
Raumtemperatur zu Beginn |
|
|
|
24°C-26°C |
KÜHLEN |
24°C |
|
|
|
26°C-28°C |
KÜHLEN |
25°C |
|
|
|
Über 28°C |
KÜHLEN |
26°C |
TIPPS ZUR LÜFTERDREHZAHL-LAMPE
Während des Betriebes leuchtet die LÜFTERDREHZAHL-Lampe in 3 Stufen (2 Stufen für TROCKNEN-Betrieb) auf dem Anzeigenfeld der Einheit zur Anzeige der Lüfterdrehzahl auf.
Wenn die Lüfterdrehzahl auf |
Wenn die Lüfterdrehzahl auf |
AUTOM. gestellt wurde |
manuell gestellt wurde |
Sanfte
Drehzahl
Niedrige
Drehzahl
Hohe
Drehzahl
Die AUTOM. LÜFTERDREHZAHL-Lampe
leuchtet auf.
DISPLAY MODE
Zum Abschalten der Lüfterdrehzahllampe |
|
die ANZEIGE-Taste drücken. |
|
Die PLASMACLUSTER-Lampe erlischt |
SWING CANCEL |
auch. |
|
DEUTSCH
D-9
EINSTELLUNG DER RICHTUNG DES LUFTSTROMS
VERTIKALER LUFTSTROM
Für optimalen Komfort ist die Luftstromrichtung in jeder Betriebsart automatisch wie folgt voreingestellt:
Betriebsarten KÜHLEN und TROCKNEN |
Horizontaler Luftstrom |
|
|
|
|
NUR LÜFTER-BETRIEB |
Diagonaler Luftstrom |
|
(und HEIZEN für AY-AP18DR/AY-AP24DR) |
||
|
||
|
|
RICHTIGE EINSTELLUNG DER LUFTSTROMRICHTUNG
Drücken Sie einmal die SCHWUNGTaste auf der Fernbedienung.
•Die Lamellen für den vertikalen Luftstrom ändern kontinuierlich ihren Winkel.
Drücken Sie die SCHWUNG-Taste noch einmal, sobald sich die senkrechten Einstellungslamellen in der gewünschten Position befinden.
•Die Lamellen beenden ihre Bewegung innerhalb des in der rechten Abbildung aufgeführten Bereiches.
•Die eingestellte Position wird gespeichert und bei der nächsten Inbetriebnahme des Gerätes automatisch wieder eingestellt.
Einstellbereich
Betriebsarten KÜHLEN |
NUR LÜFTER-BETRIEB |
und TROCKNEN |
(und HEIZEN für AY- |
|
AP18DR/AY-AP24DR) |
Der Einstellbereich ist |
Der Bereich ist groß, |
||||
kleiner |
als |
der |
damit |
der |
Luftstrom |
SCHWUNG-Bereich, |
direkt |
auf |
den Boden |
||
um ein |
Tropfen |
des |
gerichtet werden kann. |
||
Kondenswassers zu |
|
|
|
||
vermeiden. |
|
|
|
|
|
HORIZONTALER LUFTSTROM
Halten Sie die waagerechten Einstellungslamellen wie neben-stehend gezeigt fest und stellen Sie die Luftstromrichtung ein.
VORSICHT
Versuchen Sie niemals, die Lamellen für den vertikalen Luftstrom manuell einzustellen.
•Die manuelle Einstellung der senkrechten Einstellungslamellen kann eine Fehlfunktion verursachen, wenn die Einstellung mit der Fernbedienung ausgeführt wird.
•Wenn die Lamellen für die Einstellung des vertikalen Luftstroms in den Betriebsarten KÜHLEN oder TROCKNEN für einen längeren Zeitraum auf die niedrigste Position eingestellt sind, kann dies zu Kondensation führen.
Stellen Sie die horizontalen Lamellen nicht extrem nach rechts oder links, wenn Sie das Klimagerät mit der sanften Ventilatordrehzahl “SOFT” (sanfte Drehzahl) über einen längeren Zeitraum hinweg betreiben.
An den Lamellen könnte sich Kondensat bilden.
D-10
PLASMACLUSTER-BETRIEB
LUFTREINIGUNGSBETRIEB : In die Luft abgegebene Cluster-Ionen reduzieren die in der Luft befindlichen Schimmelpilze.
IONENAUSGLEICH-BETRIEBSART : Negative Ionen werden in erhöhtem Maß freigesetzt.
MODE |
TEMP. |
1 |
Drücken Sie während des Betriebes die PLASMA- |
|
|
|
CLUSTER-Taste, um die Betriebsart auszuwählen. |
|
|
|
LUFTREINIGUNG IONENAUSGLEICH ABBRECHEN |
FAN |
TIMER |
|
|
DISPLAY MODE

 1h FAN
SWING CANCEL
•Im LUFTREINIGUNGSBETRIEB leuchtet die blaue PLASMACLUSTER-Lampe an der Einheit auf.
•In der IONENAUSGLEICH-Betriebsart leuchtet die grüne PLASMACLUSTERLampe am Gerät auf.
DEAKTIVIEREN
Drücken Sie die PLASMACLUSTER-Taste, bis das 1 PLASMACLUSTER-Symbol auf dem Fernbedienungs-
display erlischt.
• Die PLASMACLUSTER-Lampe an der Einheit erlischt.
HINWEIS:
•Die Einstellung des PLASMACLUSTER-Betriebs wird gespeichert und nach dem nächsten Einschalten arbeitet das Klimagerätes in derselben Betriebsart.
•Um die PLASMACLUSTER-Lampe auszuschalten, drücken Sie die ANZEIGE-Taste.
EIN-STUNDEN-AUSSCHALT- ZEITSCHALTER
Wenn der EIN-STUNDEN-AUSSCHALT-ZEITSCHALTER-Betrieb eingestellt ist, beendet das Gerät seinen Betrieb nach einer Stunde.
MODE |
TEMP. |
1 Drücken Sie die EIN-STUNDEN-AUSSCHALT-ZEIT- |
|||||
|
h |
|
SCHALTER-Taste. |
|
|
||
|
|
• |
Die Fernbedienung zeigt |
“ |
” an. |
||
|
|
|
|||||
FAN |
TIMER |
|
• |
Die orange ZEITSCHALTER-Lampe ( |
) am Gerät leuchtet auf. |
||
|
• |
Das Gerät beendet seinen Betrieb nach einer Stunde. |
|||||
|
|
|
|||||
|
|
|
|
DEAKTIVIEREN |
|
|
|
DISPLAY MODE |
1 |
Drücken Sie die ABBRUCH-Taste. |
|
||||
• Die orange ZEITSCHALTER-Lampe ( |
) am Gerät erlischt. |
||||||
1h |
FAN |
||||||
Oder schalten Sie das Gerät durch Betätigung der EIN-/ |
|||||||
|
|
||||||
SWING CANCEL |
|
AUS-Taste aus. |
|
|
|||
|
|
|
• |
Die rote BETRIEBS-Lampe ( ) und die orange ZEIT- |
|||
HINWEISE: |
|
|
SCHALTER-Lampe ( |
) am Gerät erlöschen. |
|||
|
|
|
|
|
|||
•Der EIN-STUNDEN-AUSSCHALT-ZEITSCHALTER-Betrieb hat gegenüber dem ZEITSCHALTER EINund ZEITSCHALTER AUS-Betrieb Priorität.
•Wenn der EIN-STUNDEN-AUSSCHALT-ZEITSCHALTER-Betrieb eingestellt wird, während das Gerät außer Betrieb ist, arbeitet das Gerät eine Stunde lang unter den zuvor eingestellten Bedingungen.
•Wenn Sie das Gerät vor dem Aktivieren des EIN-STUNDEN-AUSSCHALT-ZEITSCHALTER- Betriebes eine weitere Stunde in Betrieb nehmen möchten, müssen Sie während des Betriebes noch einmal die EIN-STUNDEN-AUSSCHALT-ZEITSCHALTER-Taste drücken.
DEUTSCH
D-11
BETRIEB MIT DEM ZEITSCHALTER
ZEITSCHALTER AUS
Die Einheit schaltet sich entsprechend Ihren Einstellungen automatisch ab.
Die Zeitschalter-Dauer kann von minimal 0,5 Std. (30 Minuten) bis zu 12 Std. eingestellt werden.
Bis zu 9,5 Std. kann in Stufen von 0,5 Std. (30 Minuten), und von 10 bis 12 Std. in Stufen von 1 Std. eingestellt werden.
Richten Sie die Fernbedienung auf das Signalempfangsfenster an der Einheit.
MODE |
TEMP. |
|
1 Drücken Sie die ZEITSCHALTER AUS-Taste |
|||||||
|
|
|
|
|
|
|
|
|||
|
|
|
( |
) und stellen Sie die gewünschte Zeit ein. |
||||||
|
|
|
• |
Die Zeiteinstellung ändert sich beim Drücken der |
||||||
FAN |
TIMER |
|
|
Taste wie folgt: |
|
|
|
|
||
|
|
|
|
|
|
|
|
|||
|
TEMP. |
|
|
0.5h |
1.0h |
1.5h |
10h |
11h |
12h |
|
DISPLAY MODE |
|
Halten Sie für eine schnelle Einstellung die Taste |
||||||||
1h |
FAN |
|
gedrückt. |
|
|
|
|
|
||
1 |
• Die orange ZEITSCHALTER-Lampe ( |
) am Gerät |
||||||||
|
|
|||||||||
SWING CANCEL |
• |
leuchtet auf. |
|
|
|
|
||||
|
|
|
Beim Empfangen des Signals erzeugt das Gerät |
|||||||
|
|
|
|
einen Piepton. |
|
|
|
|
||
|
|
|
• Die Zeiteinstellung wird heruntergezählt, um die |
|||||||
|
|
|
|
verbleibende Zeit anzuzeigen. |
|
|
||||
Beispiel: Wenn Sie den Ablauf 2,5 Std. später stoppen wollen.
TIPPS ZUM BETRIEB MIT VORGEGEBENER AUSSCHALTZEIT
Wenn der ZEITSCHALTER AUS-Modus eingestellt ist, wird die Temperatur automatisch eingestellt, um zu verhindern, dass es im Raum extrem warm oder zu kalt wird, während Sie schlafen. (Automatische Schlaffunktion)
BETRIEBSART KÜHLEN/TROCKNEN:
•Wenn das Klimagerät eine Stunde gelaufen ist, erhöht sich die Temperatur-Einstellung im Vergleich zur ursprünglichen ThermostatEinstellung um 1°C.
BETRIEBSART HEIZEN:
ZEITSCHALTER-ABBRUCH
Drücken Sie die ABBRUCH-Taste.
• Die orange ZEIT- |
DISPLAY MODE |
|
SCHALTER- |
1h FAN |
|
Lampe |
||
|
||
( ) am Gerät |
SWING CANCEL |
|
erlischt. |
|
ÄNDERUNG DER ZEITSCHALTEREINSTELLUNG
(nur für die Modelle AY-AP18DR/AY-AP24DR)
•Wenn das Klimagerät eine Stunde gelaufen ist, verringert sich die Temperatur-Einstellung im Vergleich zur ursprünglichen ThermostatEinstellung um 3°C.
HINWEIS:
•Die automatische Schlaffunktion wird im NUR LÜFTER-Modus nicht aktiviert.
Drücken Sie die ZEITSCHALTERTaste, die Sie ändern wollen (ZEITSCHALTER AUS oder ZEITSCHALTER AN) und ändern Sie die Zeiteinstellung.
D-12
Loading...