


®
SUPERHEATED STEAM OVEN
OPERATION MANUAL
MODEL
A X - 7 0 0
followed by letter indicating color S= silver R= red
C O N T E N T S
• |
For Customer Assistance ... |
Inside Front Cover |
|
• |
Consumer Limited Warranty |
................... |
1 |
• |
Product Information Card ........................ |
|
1 |
• |
Important Safeguards.............................. |
|
2-3 |
• |
Unpacking and Installation Instructions... |
3 |
|
• |
Grounding Instructions ............................ |
|
4 |
• |
Information You Need to Know ............... |
5-9 |
|
• |
Part Names ............................................. |
|
10 |
• |
Control Panel .......................................... |
|
11 |
• |
How to Use the Reservoir / Drain Water ... |
12-13 |
|
• |
Before Operating ..................................... |
|
14-15 |
• |
Automatic Cooking .................................. |
|
16-20 |
• |
Manual Cooking ...................................... |
|
21-29 |
• |
Other Convenient Features ..................... |
|
30-32 |
• |
Cleaning and Care .................................. |
|
33 |
• Service Call Check / |
|
|
|
|
Troubleshooting Chart............................. |
|
34-36 |
• |
Specifications .......................................... |
|
37 |
• |
Quick Programming Guide ............. |
Back Cover |
|
R E A D A L L I N S T R U C T I O N S C A R E F U L L Y B E F O R E U S I N G T H E O V E N .

F O R C U S T O M E R A S S I S T A N C E
To aid in reporting this Superheated Steam Oven in case of loss or theft, please record below the model number and serial number located on the unit. We also suggest you record all the information listed and retain for future reference.
Please provide the following information when you write or call: model number, serial number, date of purchase, your complete mailing address (including zip code), your daytime telephone number (including area code) and description of the problem.
MODEL NUMBER ________________________ SERIAL NUMBER ______________
DATE OF PURCHASE ______________________
DEALER ____________________________ TELEPHONE ________________
SERVICER ___________________________ TELEPHONE ________________
TO PHONE:
DIAL 1-800- BE-SHARP ( 237-4277 ) for :
SERVICE (for your nearest Sharp Authorized Servicer)
PARTS (for your authorized parts distributor)
ADDITIONAL CUSTOMER INFORMATION
DIAL 1-800-642-2122 for :
REPLACEMENT ACCESSORIES
TO WRITE:
Sharp Electronics Corporation
Customer Assistance Center
1300 Naperville Drive
Romeoville, IL 60446-1091
TO ACCESS INTERNET: www.sharpusa.com

C O N S U M E R L I M I T E D W A R R A N T Y
SHARP ELECTRONICS CORPORATION warrants to the first consumer purchaser that this Sharp brand product (the “Product”), when shipped in its original container, will be free from defective workmanship and materials, and agrees that it will, at its option, either repair the defect or replace the defective Product or part thereof with a new or remanufactured equivalent at no charge to the purchaser for parts or labor for the period(s) set forth below.
This warranty does not apply to any appearance items of the Product nor to the additional excluded item(s) set forth below nor to any Product the exterior of which has been damaged or defaced, which has been subjected to improper voltage or other misuse, abnormal service or handling, or which has been altered or modified in design or construction.
In order to enforce the rights under this limited warranty, the purchaser should follow the steps set forth below and provide proof of purchase to the servicer.
The limited warranty described herein is in addition to whatever implied warranties may be granted to purchasers by law. ALL IMPLIED WARRANTIES INCLUDING THE WARRANTIES OF MERCHANTABILITY AND FITNESS FOR USE ARE LIMITED TO THE PERIOD(S) FROM THE DATE OF PURCHASE SET FORTH BELOW. Some states do not allow limitations on how long an implied warranty lasts, so the above limitation may not apply to you.
Neither the sales personnel of the seller nor any other person is authorized to make any warranties other than those described herein, or to extend the duration of any warranties beyond the time period described herein on behalf of Sharp.
The warranties described herein shall be the sole and exclusive warranties granted by Sharp and shall be the sole and exclusive remedy available to the purchaser. Correction of defects, in the manner and for the period of time described herein, shall constitute complete fulfillment of all liabilities and responsibilities of Sharp to the purchaser with respect to the Product, and shall constitute full satisfaction of all claims, whether based on contract, negligence, strict liability or otherwise. In no event shall Sharp be liable, or in any way responsible, for any damages or defects in the Product which were caused by repairs or attempted repairs performed by anyone other than an authorized servicer. Nor shall Sharp be liable or in any way responsible for any incidental or consequential economic or property damage. Some states do not allow the exclusion of incidental or consequential damages, so the above exclusion may not apply to you.
THIS WARRANTY GIVES YOU SPECIFIC LEGAL RIGHTS. YOU MAY ALSO HAVE OTHER RIGHTS WHICH VARY FROM STATE TO STATE.
Your Product Model Number
& Description:
Warranty Period for this Product:
Additional Item(s) Excluded from Warranty Coverage (if any):
Where to Obtain Service:
AX-700 Home Use Superheated Steam Oven. (Be sure to have this information available when you need service for your Product.)
One (1) year parts and labor carry-in service.
Non-functional accessories, reservoir, drip tray, base tray, rack, baking tray, perforated tray and light bulb.
From a Sharp Authorized Servicer located In the United States. To find the location of the nearest Sharp Authorized Servicer, call Sharp toll free at 1-800-BE-SHARP (1-800-237-4277).
What to do to Obtain Service:
Ship prepaid or carry in your Product to a Sharp Authorized Servicer. Be sure to have Proof of Purchase available. If you ship the Product, be sure it is insured and packaged securely.
TO OBTAIN SUPPLY, ACCESSORY OR PRODUCT INFORMATION, CALL
1-800-BE-SHARP OR VISIT www.sharpusa.com.
Save the proof of purchase as it is needed should your oven ever require warranty service.
P R O D U C T I N F O R M A T I O N C A R D
The product information card, which is inside of the superheated steam oven carton, should be completed within ten days of purchase and returned. We will keep it on file and help you access the information in case of loss, damage or theft. This will also enable us to contact you in the unlikely event that any adjustments or modifications are ever required for your oven.
1

I M P O R T A N T S A F E G U A R D S
When using electrical appliances, basic safety precautions should always be followed, including the following:
1.Read all instructions before using the appliance.
2.CAUTION: To ensure continued protection against risk of electric shock, connect to a properly grounded outlet only. See “GROUNDING INSTRUCTIONS” on page 4.
3.Install or locate this appliance only in accordance with the provided installation instructions.
4.Use tap water in the reservoir, except when descaling.
5.Do not touch hot surfaces.
6.To protect against electrical shock do not immerse this appliance, cord or plug in water or other liquid.
7.Close supervision is necessary when any appliance is used by or near children.
8.Unplug from outlet when not in use and before cleaning. Allow to cool before putting on or taking off parts.
9.Do not operate any appliance with a damaged cord or plug, after the appliance malfunctions or has been damaged in any manner. Contact nearest Sharp Authorized Servicer for examination, repair or adjustment.
10.Do not operate this appliance if it has a damaged door or door gasket. Contact nearest Sharp Authorized Servicer.
11.The use of accessory attachments not recommended by the appliance manufacturer may cause injuries.
12.Do not use outdoors.
13.Do not let cord hang over edge of table or counter.
14.Do not place on or near hot gas burner or electric element or in a heated oven.
15.Do not move the oven during operation. Drain water using the DRAIN WATER function before moving.
16.Do not use appliance for other than intended use as described in this manual. Do not use corrosive chemicals or vapors in this appliance. This oven is specifically designed to heat or cook food. It is not designed for industrial or laboratory use.
17.Keep cord away from heated surfaces.
18.Liquids and other foods must not be heated in sealed containers since they are liable to explode.
19.This appliance should be serviced only by qualified service personnel. Contact nearest Sharp Authorized Servicer for examination, repair or adjustment. Disconnect power plug before servicing.
20.Do not cover or block any openings on the appliance.
21.A fire may occur if this appliance is covered or touching flammable material, including curtains, draperies, walls, etc. when in operation. Do not store any item on top of the appliance when in operation.
22.To reduce the risk of fire in the oven cavity: a. Do not overcook food.
b. If materials inside the oven ignite, keep oven door closed, turn oven off and disconnect the power cord or shut off power at the fuse or circuit breaker panel.
c.Do not use the cavity for storage purposes. Do not leave paper products, cooking utensils or food in the cavity when not in use.
d.The oven should not be left unattended during operation. Oven temperatures that are too high or cooking times that are too long may overheat foods resulting in a fire.
e.There is a risk that vapors released by alcohol, used in roasting or baking, may ignite if they come in contact with the electrical heating element. Watch the cooking carefully if using any kind of alcohol.
f.Plastic containers must not be used with SUPER GRILL, SUPER ROAST, SUPER BAKE or THERMAL modes unless the container manufacturer claims they are for high temperatures.
23.If the oven light fails, consult a SHARP AUTHORIZED SERVICER.
24.Do not operate the oven with the door open. It is important not to force or tamper with the door projection or door projection opening. Never operate the oven while any object is caught or jammed between the door and the oven.
2
I M P O R T A N T S A F E G U A R D S
25.Do not insert fingers or objects in the the steam inlets, the drain hole or air vent openings, as this may damage the oven and cause an electric shock or a hazard. If any objects drop inside the air vent openings or ventilation cover, turn off the oven immediately, unplug and consult a Sharp Authorized Servicer.
26.Do not touch the plug with wet hands when inserting into or removing from the outlet. Plug securely into the electric wall receptacle and remove by gripping on the plug end. Never pull using just the cord.
THIS PRODUCT IS FOR HOUSEHOLD USE ONLY
SAVE THESE INSTRUCTIONS
Note:
•Any unauthorized changes or modifications to this equipment not expressly approved by the manufacturer could void the user’s authority to operate this equipment.
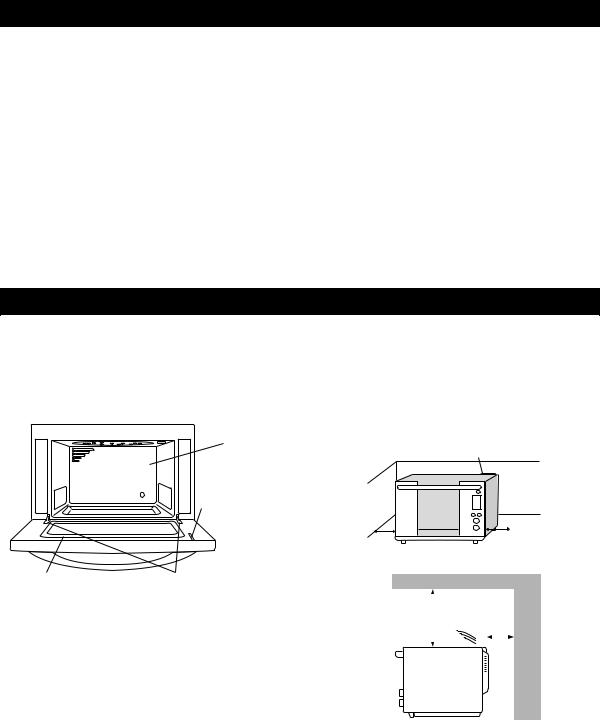
U N P A C K I N G A N D I N S T A L L A T I O N I N S T R U C T I O N S
Unpacking and Examining Your Oven
Remove:
All packing materials from inside the oven cavity. Read enclosures and SAVE the Operation Manual and Cookbook.
Oven cavity
Door projection
CAUTION: Steam can escape from the rear of the oven during cooking. Pay careful attention to nearby areas. Protect, if necessary, as the steam condenses into water droplets.
This oven is not designed to be built into a wall or cabinet.
Door gasket Door hinges
Check the oven for any damage, such as mis- |
|
|
|
|||||||||||
aligned or bent door, damaged door gasket, bro- |
|
|
|
|
|
|
|
|
|
|
|
|
|
|
ken or loose door hinges, loose or damaged door |
|
|
|
|
|
|
|
|
|
|
|
|
|
|
|
|
|
|
|
|
|
|
|
|
|
|
|
|
|
projection or dents inside the oven cavity. If there |
|
|
|
|
|
|
|
|
|
|
|
|
|
|
is any damage, do not operate the oven and con- |
|
|
|
|
|
|
|
|
|
|
|
|
|
|
tact your dealer or SHARP AUTHORIZED |
|
|
|
|
|
|
|
|
|
|
|
|
|
|
SERVICER. |
|
|
|
|
|
|
|
|
|
|
|
|
|
|
|
|
|
|
|
|
|
|
|
|
|
|
|
|
|
Choosing a Location for Your Oven
You will use your oven frequently so plan its location for ease of use. Place the oven on a flat, level surface strong enough to support the oven’s weight (44 lb) plus the heaviest item likely to be cooked. The oven must be placed on a countertop that is a minimum of 36 inches from the floor. Allow 4 inches on the sides and at the rear of the oven for air circulation. Allow 12 inches on the top. Allow 8 inches from the back of the oven to any window. Be sure to position oven so that the rear cannot be touched inadvertently.
3
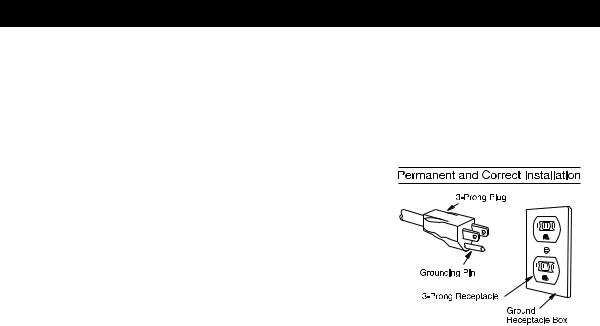
G R O U N D I N G I N S T R U C T I O N S
This appliance must be grounded. This oven is equipped with a cord having a grounding wire with a grounding plug. It must be plugged into a wall receptacle that is properly installed and grounded in accordance with the National Electrical Code and local codes and ordinances. In the event of an electrical short circuit, grounding reduces risk of electric shock by providing an escape wire for the electric current.
WARNING – Improper use of the grounding plug can result in a risk of electric shock.
Electrical Requirements
The electrical requirements are a 120 volt 60 Hz, AC only, 15 amp. or more protected electrical supply. It is recommended that a separate circuit serving only this appliance be provided.
The oven is equipped with a 3-prong grounding plug. It must be plugged into a wall receptacle that is properly installed and grounded. Should you only have a 2-prong outlet, have a qualified electrician install a correct wall receptacle.
Extension Cord
If it is necessary to use an extension cord, use only a 3-wire extension cord that has a 3-blade grounding plug and a 3-slot receptacle that will accept the plug on the oven. The marked rating of the extension cord should be AC 115-120 volt, 15 amp. or more.
Be careful not to drape the cord over the countertop or table where it can be pulled on by children or tripped over accidentally.
Notes:1. If you have any questions about the grounding or electrical instructions, consult a qualified electrician or service person.
2.Neither Sharp nor the dealer can accept any liability for damage to the oven or personal injury resulting from failure to observe the correct electrical connection procedures.
3.Steam is ventilated from the top rear of the oven. Make sure the escaping steam from the oven does not dampen electric outlets and other electrical appliances. Do not place the electric outlet under the oven. Always wipe the dust off the plug. The electrical outlet must be readily accessible so that the unit can be unplugged easily in an emergency.
4.Do not allow the power supply cord to run over any hot or sharp surfaces, such as the hot air vent area at the top rear of the oven.
4

I N F O R M A T I O N Y O U N E E D T O K N O W
Your oven can be used in a variety of ways. It not only steam cooks food, but by using superheated steam it can roast, bake and grill food.
STEAM COOKING
Steam cooking is suitable for foods that need gentle cooking, while retaining their shape, color and typical aroma, ie : foods such as fish and vegetables. Steam cooking is easy with this oven. Steam is also used for proofing and defrosting.
SUPERHEATED STEAM COOKING
Steam is heated to above 550°F to create superheated steam. SUPER GRILL, SUPER ROAST and SUPER BAKE cooking modes use this technology to give traditional brown and crispy results.
When using these modes, you will not be able to see the superheated steam. Ordinary steam generates mist so it will be visible inside the oven. However, superheated steam is not visible due to the high temperatures; this is normal and does not mean the oven is faulty.
When using any of the superheated steam settings, the time in traditional recipes will not apply to the oven. Please follow the instructions given in the separate cookbook.
THERMAL COOKING
The oven can be used as a conventional oven by using the THERMAL option. Use package directions for oven use and standard cookbooks and favorite recipes. No adjustments will be necessary.
5

I N F O R M A T I O N Y O U N E E D T O K N O W
ABOUT STEAM USE
There are certain techniques for cooking with steam. It is essential that these techniques are followed for good results. Many of them are similar to those used in conventional cooking so may require little change. Note information in all of the charts in the cookbook for all cooking modes that use STEAM, SUPER GRILL, SUPER ROAST, SUPER BAKE, DEFROST, REHEAT and PROOF.
•Always attend the oven when in use.
•Use utensils/cookware suitable for the cooking mode as described on page 8.
•Ventilate the room to allow the steam to dissipate.
•Refer to the charts in the Superheated Steam Oven Cookbook for recommended cooking times and modes.
•After cooking, clean the base tray and dry any liquid residue in the oven with a soft cloth. Follow directions to drain water from the system.
For STEAM and REHEAT modes
Cooking Techniques
Rack/Container |
Place food on the rack to allow steam to reach all sides so cooking is even. |
|
Foods crowded together will take longer to cook, so position with enough space |
|
between items to allow the steam to circulate. Use shallow, less dense contain- |
|
ers, if desired. Dense containers increase cooking time. To reduce the most salt |
|
and fat, cook using only the rack. |
Covering |
Covering is not necessary in most cases. If a cover is required, aluminum foil is |
|
recommended to keep food from becoming wet. |
Door |
For accurate cooking times, keep the door closed. |
Stir |
Sometimes soups or casseroles reheated without covering look watery after cook- |
|
ing. Appearance will be better by stirring well. |
Stand |
Standing time is recommended after cooking to allow heat to disperse equally |
|
throughout the food. Do not allow to stand for a long time; food may be over- |
|
cooked or wet from the residual steam. |
|
|
|
|
Cooking Hints |
|
|
|
Blanching |
STEAM mode can be used to blanch vegetables to prepare them for freezing. |
|
Place the prepared vegetables in the perforated tray and cook with STEAM mode |
|
for 4 - 5 minutes. After that, put in cold water to cool quickly. Drain and then |
|
freeze. |
Removing Salt |
To reduce salt in foods, such as smoked sausage or bacon, steam before com- |
|
pleting the cooking. Place food on rack. STEAM for 4 to 5 minutes and then |
|
complete cooking with desired method. |
|
|
6

I N F O R M A T I O N Y O U N E E D T O K N O W
For STEAM, SUPER GRILL, SUPER ROAST, SUPER BAKE and REHEAT modes
Food Characteristics
Density |
Food density will affect the amount of cooking time. Cut the food into thinner |
|
|
parts, if possible, and arrange in single layer. |
|
Quantity |
The cooking time must be increased as the amount increases. |
|
Size |
Small foods and small pieces cook faster than large ones, as heat can penetrate |
|
|
from all sides to the center. For even cooking make all the pieces the same size. |
|
Shape |
Foods which are irregular in shape, such as chicken breasts or drumsticks, may |
|
|
take longer to cook in the thicker parts. Check that these parts are cooked thor- |
|
|
oughly before serving. |
|
Temperature of Food |
The initial temperature of food affects the cooking time. Chilled foods will take |
|
|
longer to cook than foods at room temperature. The temperature of the container |
|
|
is not the actual temperature of the food or drink. |
|
Seasoning and |
Seasoning or flavoring are best added after cooking. If added as marinades or |
|
Flavoring |
rubs, the taste may become less pronounced when cooking with steam. Add |
|
|
seasoning or flavoring again after cooking if necessary. |
|
|
|
|
•Check that food is thoroughly cooked/reheated before serving.
•Cooking time will be affected by the shape, depth, quantity and temperature of food together with the size, shape and material of the container.
•Never heat oil or fat for deep frying as this may lead to overheating and fire.
CAUTION:
Always use dry pot holders or oven mitts to remove food or utensils from the oven. Be careful when opening the oven door to allow steam to dissipate.
For DEFROST mode
Arrange |
Remove all packing and wrapping before defrosting. Arrange food in a single |
|
even layer either directly on the rack or on a flat dish on the rack. |
Separate |
Separate any foods that are frozen together as quickly as possible to ensure |
|
even defrosting. |
Stand |
Standing time is necessary to ensure food is thoroughly defrosted. Food must |
|
stand, covered, for a length of time to ensure the center has completely de- |
|
frosted. |
|
|
7

I N F O R M A T I O N Y O U N E E D T O K N O W
ABOUT UTENSILS AND COVERINGS
To cook / defrost food in this oven, it is important to choose suitable utensils/cookware. The chart below will help you decide what utensils and coverings should be used in each mode.
CAUTION: Extreme caution should be exercised when using containers constructed of other than metal or glass.
Utenils/Coverings |
STEAM, REHEAT, |
SUPER ROAST, |
THERMAL |
Comments |
|
DEFROST, |
SUPER GRILL, |
|
|
|
PROOF |
SUPER BAKE |
|
|
Aluminium foil |
YES |
YES |
YES |
|
Foil containers |
|
|
|
|
Metal |
YES |
YES |
YES |
|
China and ceramics |
YES |
YES |
YES |
Oven-proof porcelain, pottery, glazed earthenware |
|
|
|
|
and bone china are usually suitable. Do not use |
|
|
|
|
the container if it has a flaw. |
Heat-resistant |
YES |
YES |
YES |
Care should be taken if using fine glassware as |
glassware |
|
|
|
it can break or crack if heated suddenly. Do not |
e.g. Pyrex ® |
|
|
|
use non-heat-resistant glassware. |
Plastic/Polystyrene |
YES |
NO |
NO |
Care must be taken as some containers warp, |
heat-resistant temp. |
|
|
|
melt or discolor at high temperatures. Do not use |
up to 285°F |
|
|
|
the container if the heat-resistant temperature is |
|
|
|
|
less than 285°F. |
Plastic wrap |
YES |
NO |
NO |
No need to cover for steaming most foods. |
heat-resistant temp. |
|
|
|
Plastic wrap should not touch the food and must |
up to 285°F |
|
|
|
be pierced to let the steam escape. Keep away |
|
|
|
|
from the oven wall. Check that the heat-resistant |
|
|
|
|
temperature is up to 285°F. |
Baking parchment |
YES |
YES |
YES |
Do not touch the oven wall as the parchment may |
|
|
|
|
be burned. |
Paper towel |
NO |
NO |
NO |
|
Rack |
YES |
YES |
YES |
Rack and trays supplied have been specially |
Baking tray |
|
|
|
designed for all cooking modes and will not |
Perforated tray |
|
|
|
damage the oven. Avoid cutting on baking tray or |
|
|
|
|
perforated tray to avoid damage. |
|
|
|
|
|
•Do not use roasting bags.
•Do not use silver dishes.
•Do not use cooking utensils or containers that might rust inside the oven.
•A thermometer will assist you in determining correct doneness and assure you that foods have been cooked to safe temperatures.
•Sharp is not responsible for any damage to the oven when accessories other than those supplied with the oven are used.
•For AUTO cooking, use the recommended container in the cooking chart in this operation manual or the cookbook.
ABOUT CHILDREN
Children below the age of 7 should use the oven with a supervising person very near to them. Between the ages of 7 and 12, the supervising person should be in the same room.
The child must be able to reach the oven comfortably; if not, he/she should stand on a sturdy stool.
At no time should anyone be allowed to lean or swing |
|
on the oven door. |
8 |
|
Children should be taught all safety precautions.
Don’t assume that because a child has mastered one cooking skill he/she can cook everything.
Children need to learn that the oven is not a toy. Young children should be supervised to ensure that they do not play with the oven.
I N F O R M A T I O N Y O U N E E D T O K N O W
ABOUT SAFETY
•Do not operate the oven if it is damaged. It is particularly important that the oven door close properly.
•Check foods to see that they are cooked to the United States Department of Agriculture's recommended temperatures.
T E M P |
F O O D |
160°F ... for fresh pork, ground meat, boneless white poultry, fish, seafood, egg dishes and frozen prepared food.
165°F ... for leftover, ready-to-reheat refrigerated, and deli and carryout “fresh” food.
170°F ... white meat of poultry.
180°F ... dark meat of poultry.
To test for doneness, insert a meat thermometer in a thick or dense area away from fat or bone.
•Accessible parts (e.g. oven door, oven cavity, dishes and accessories) may become hot during use. Use dry pot holders or oven mitts when removing container, food and oven accessories from the oven and be careful not to touch the oven cavity to prevent burns.
•Use care when opening door. Avoid steam burns by directing steam away from the face and hands. Always stand back from the oven when opening it.
•Stay near the oven while it's in use and check cooking progress frequently so that there is no chance of overcooking food.
•NEVER use the cavity for storing cookbooks or other items.
•Select, store and handle food carefully to preserve its high quality and minimize the spread of foodborne bacteria.
•Use care when removing items from the oven so that the utensil, your clothes or accessories do not touch the door projection.
9
•Do not touch around the oven light directly. This part will become hot when the oven light is on.
•To avoid burns, always be careful of splashing grease from the tray when removing roasted or grilled meats from the oven.
•To avoid burns, always test food and container temperature and stir before serving. Pay special attention to the temperature of containers, foods and drinks. Do not drink beverage or soup without checking the container’s temperature.
•Do not touch the oven door, outer cabinet, rear cabinet, oven cavity, ventilation openings, accessories, dishes and the escaping steam from the ventilation cover during operation because they will become hot.
•Do not operate the oven if reservoir cracks and water leaks. Call 1-800-BE-SHARP to purchase a replacement part.
•After use, condensed water may be inside oven cavity, especially under the base tray. Dry any liquid residue with a soft cloth and wipe out to keep the oven clean.
•Do not place anything on the outer cabinet during operation.
•Do not put anything weighing more than 8 pounds on the door to prevent damage to the door or door hinges and to prevent tilting/falling of the oven. Do not hang anything heavy from the handle nor lean on it.
•If the oven needs to be moved, always drain all water inside the oven using the DRAIN WATER function (See page 13). After draining, empty the base tray.
•To prevent condensation, which could corrode the appliance, do not leave cooked food in the oven for an extended period.
•Clean the oven at regular intervals and remove any food deposits in the oven or on the door.
•Do not heat oil or fat for deep frying.

P A R T N A M E S
|
|
|
|
|
|
|
|
|
|
|
|
|
|
|
|
|
|
|
|
|
|
|
|
|
|
|
|
|
|
|
|
|
|
|
|
|
|
|
|
|
|
|
|
|
|
|
|
|
|
|
|
|
|
|
|
|
|
|
|
|
|
|
|
|
|
|
|
|
|
|
|
|
|
|
|
|
|
|
|
|
|
|
|
|
|
|
|
|
|
|
|
|
|
|
|
|
|
||
|
|
|
|
|
|
|
|
|
1 |
Control panel |
17 |
Ventilation cover DO NOT REMOVE |
|
2 |
LCD display |
18 |
Outer cabinet |
|
3 |
Water level / cooking indicator |
19 |
Power cord |
|
4 |
Handle |
20 |
Air vent openings |
|
5 |
Drip tray location |
ACCESSORIES included with your oven: |
||
6 |
Steam inlets |
Check to make sure the following accessories are |
||
7 |
Air circulation vent |
supplied: |
||
8 |
Oven light |
21 |
Reservoir and removable top |
|
9 |
Oven cavity |
22 |
Drip tray |
|
10 |
Oven floor |
23 |
Base tray |
|
11 |
Drain hole |
24 |
Rack |
|
12 |
Door gasket |
25 |
Baking tray |
|
13 |
Reservoir location |
26 |
Perforated tray |
|
14 |
Door projection |
27 |
Drain tube |
|
15 |
Door projection opening |
PRINTED MATERIALS included: |
||
16 |
Cooling air vent |
|||
Menu Label |
||||
|
|
|||
Remove the backing and place on the outside of the oven or on a cardboard to be placed near the oven for easy reference.
Operation Manual
Superheated Steam Oven Cookbook
10
 Loading...