


 Loading...
OPERATION
MANUAL
(for printer and scanner)
DIGITAL MULTIFUNCTIONAL SYSTEM
|
Page |
• INTRODUCTION .................... |
1 |
• CONTENTS............................ |
2 |
• PRINT..................................... |
3 |
• PRINTER SHARING ............ |
11 |
• SCAN ................................... |
15 |
• KEY OPERATOR PROGRAMS ... |
26 |
• TROUBLESHOOTING ......... |
28 |
• SPECIFICATIONS ............... |
32 |
INTRODUCTION
This manual describes the printer and scanner functions of the digital multifunctional system.
Note
•For information on loading paper, replacing toner cartridges, clearing paper misfeeds, handling peripheral devices, and other copier-related information, please refer to "Operation manual (for general information and copier)" that accompanies the machine.
•For information on installing the drivers and software cited in this manual, please refer to the separate "Software setup guide".
•For information on the operating system, please refer to your operating system manual or the online Help function.
•The screen images and procedures that appear in this manual are mainly for Windows XP. With other versions of Windows, some screen images may be different from those in this manual.
•The explanations in this manual are based on American English and the North American version of the software. Software for other countries and regions may vary slightly from the North American version.
•This manual refers to the Reversing single pass feeder as the "RSPF" and the Single pass feeder as the "SPF". Unless specific mention is made, both the RSPF and the SPF are referred to simply as "SPF".
•Where "AR-XXXX" appears in this manual, please substitute the name of your model for "XXXX".
•In some regions the "Key operator's guide" cited in this manual is a separate manual, and in other regions the "Key operator's guide" is included in the "Operation manual (for general information and copier)".
•The "Dual function board" cited in this manual can be installed as an option in some models and is pre-installed standard in other models. For detailed information, please refer to "3. PERIPHERAL DEVICES AND SUPPLIES" in the "Operation manual (for general information and copier)".
Trademark Acknowledgments
•Sharpdesk is a trademark of Sharp Corporation.
•Microsoft®, Windows®, Windows® 95, Windows® 98, Windows® Me, Windows NT® 4.0, Windows® 2000, Windows® XP and Internet Explorer® are registered trademarks or trademarks of Microsoft Corporation in the U.S.A. and other countries.
•IBM, PC/AT, and PowerPC are trademarks of International Business Machines Corporation.
•Acrobat® Reader Copyright © 1987-2002 Adobe Systems Incorporated. All rights reserved.
Adobe, the Adobe logo, Acrobat, and the Acrobat logo are trademarks of Adobe Systems Incorporated.
•All other trademarks and copyrights are the property of their respective owners.
The display screens, messages, and key names shown in the manual may differ from those on the actual machine due to product improvements and modifications.
1

CONTENTS
INTRODUCTION ........................................................................................................................................ |
1 |
1 |
|
|
BASIC PRINTING .............................................. |
3 |
|
● IF THE TRAY RUNS OUT OF PAPER DURING |
||
|
PRINTING......................................................... |
4 |
● PAUSING A PRINT JOB................................... |
4 |
|
● WHEN "PAPER SOURCE" IS SET TO [AUTO |
|
|
|
SELECT] ........................................................... |
4 |
●HOW [BYPASS TRAY] AND [BYPASS MANUAL] DIFFER IN THE "PAPER SOURCE"
SETTINGS ........................................................ |
4 |
4 |
KEY OPERATOR PROGRAMS |
|
KEY OPERATOR PROGRAM LIST ................ |
26 |
|
USING THE KEY OPERATOR PROGRAMS...... |
27 |
|
5 |
TROUBLESHOOTING |
|
TROUBLESHOOTING..................................... |
28 |
|
● PRINTING PROBLEMS ................................. |
28 |
|
● SCANNING PROBLEMS ............................... |
30 |
|
OPENING THE PRINTER DRIVER FROM THE |
|
|
||||
[START] BUTTON |
5 |
|
|
|
||
|
6 |
SPECIFICATIONS |
||||
PRINTER DRIVER SETTINGS .......................... |
6 |
|
||||
● TWO-SIDED PRINTING (ONLY FOR MODELS |
|
|
||||
|
THAT SUPPORT TWO-SIDED PRINTING) ..... |
7 |
|
|
||
● PRINTING MULTIPLE PAGES ON ONE PAGE ...... |
7 |
|
|
|||
● FITTING THE PRINT IMAGE TO THE PAPER.... |
8 |
|
|
|||
● ROTATING THE PRINT IMAGE 180 DEGREES ..... |
9 |
|
|
|||
● PRINTING A WATERMARK ............................. |
9 |
|
|
|||
OUTLINE OF THE PRINT STATUS WINDOW ... |
10 |
|
|
|||
|
|
|
|
|
|
|
2 |
|
PRINTER SHARING |
|
|
|
|
SHARING THE PRINTER USING WINDOWS |
|
|
|
|
||
NETWORKING................................................. |
11 |
|
|
|
||
● SHARED PRINTER SETTINGS ..................... |
12 |
|
|
|||
● CLIENT SETTINGS ........................................ |
13 |
|
|
|||
|
|
|
|
|
|
|
3 |
|
SCAN |
|
|
|
|
SCANNING OVERVIEW .................................. |
15 |
|
|
|
||
SCANNING FROM A TWAIN-COMPLIANT |
|
|
|
|
||
APPLICATION .................................................. |
16 |
|
|
|||
● SCANNER DRIVER SETTINGS ..................... |
18 |
|
|
|||
SCANNING FROM A WIA-COMPLIANT |
|
|
|
|
||
APPLICATION (WINDOWS XP)...................... |
20 |
|
|
|
||
SCANNING FROM THE "SCANNER AND |
|
|
|
|
||
CAMERA WIZARD" (WINDOWS XP) ............. |
21 |
|
|
|
||
SCANNING USING THE KEYS ON THE |
|
|
|
|
||
MACHINE......................................................... |
23 |
|
|
|
||
BUTTON MANAGER ....................................... |
24 |
|
|
|
||
● BUTTON MANAGER SETTINGS ................... |
25 |
|
|
|||
2
1 PRINT
This chapter explains the basic procedure for printing and how to select printer driver settings for various purposes.
• |
Paper that can be used and the procedures for loading paper are the same as for copying. See the "Operation |
Note |
manual (for general information and copier)". |
When the dual function board is installed
•Before using the machine in USB 2.0 High-speed mode, be sure to read "USB2.0 MODE" and "System requirements for USB 2.0 (Hi-Speed mode)" in the "Key operator's guide".
BASIC PRINTING
The following example explains how to print a document from WordPad.
Before printing, make sure that the correct size of paper for your document has been loaded in the machine.
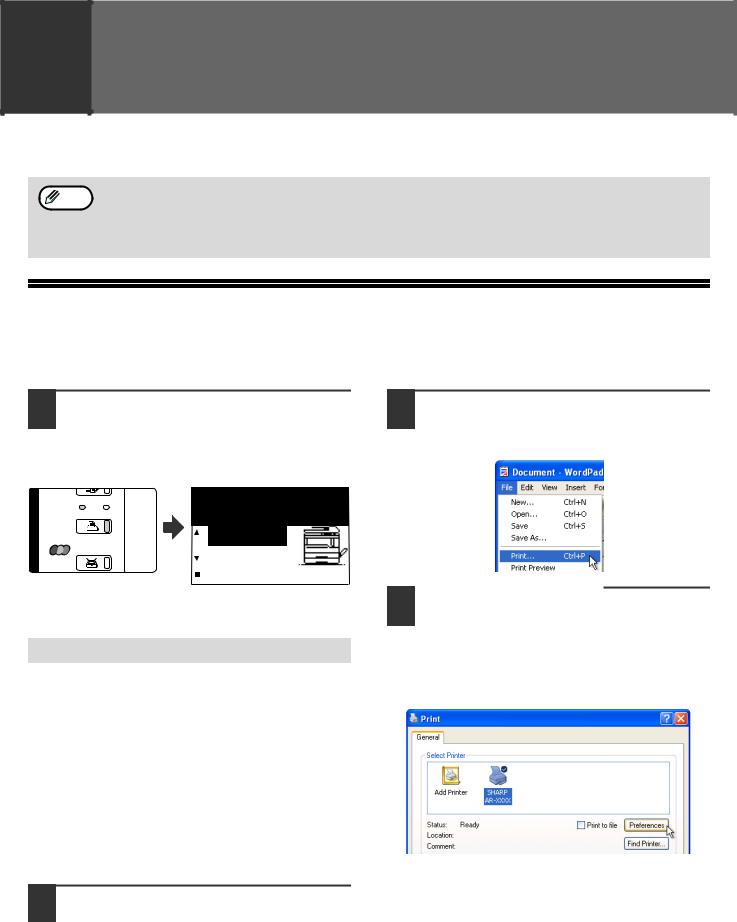
1 Make sure that the ONLINE indicator on the operation panel is lit.
If the ONLINE indicator is not on, press the [PRINT] key to switch to printer mode and then use the [ ] key to select "ONLINE".
COPY
Ready to print.
ON LINE DATA
ONLINE
OFFLINE
SCAN
The status of the printer function is indicated by the ONLINE and DATA indicators above the [PRINT] key.
|
ONLINE indicator |
|
DATA indicator |
|
|
|
|
||
|
|
|
|
|
|
The machine is |
|
There is print data in |
|
Lit |
online. |
|
memory that has not |
|
|
Printing is possible. |
|
been printed yet. |
|
|
|
|
|
|
|
A print job is being |
|
Printing is in |
|
Blinking |
|
progress or data is |
|
|
canceled. |
|
|
||
|
|
being received. |
|
|
|
|
|
|
|
|
|
|
|
|
|
The machine is |
|
There is no print |
|
Off |
offline. |
|
data in memory |
|
Printing is not |
|
and print data is |
|
|
|
|
|
||
|
possible. |
|
not being received. |
|
|
|
|
|
|
2 Start WordPad and open the document that you wish to print.
3 Select [Print] from the application's [File] menu.
The "Print" dialog box will appear.
4 Make sure that "SHARP AR-XXXX" is selected as the printer. If you need to change any print settings, click the [Preferences] button ([Properties] button in Windows 95/98/Me/NT 4.0).
The printer driver setup screen will appear.
Windows 2000 does not have the [Preferences] button in this dialog box. Select settings as needed on each of the tabs in the setup screen.
PRINTER DRIVER SETTINGS (page 6), TWO-SIDED PRINTING (ONLY FOR MODELS THAT SUPPORT TWO-SIDED PRINTING) (page 7), PRINTING MULTIPLE PAGES ON ONE PAGE (page 7),
FITTING THE PRINT IMAGE TO THE PAPER (page 8), ROTATING THE PRINT IMAGE 180 DEGREES (page 9),
PRINTING A WATERMARK (page 9)
3

|
|
|
|
|
5 |
Click the [Print] button ([OK] button in |
Note |
When the job separator tray is |
|
installed |
||||
|
Windows 95/98/Me/NT 4.0). |
|
||
|
|
The output tray can be selected when |
||
|
Printing begins. When printing begins, the Print |
|
||
|
|
selecting print settings at the time of |
||
|
Status Window automatically opens. |
|
||
|
|
printing. To change the tray selection, select |
||
|
OUTLINE OF THE PRINT STATUS WINDOW (page |
|
the desired tray in "Output" in the [Paper] |
|
10) |
|
tab of the printer driver setup screen. |
||
The print job is delivered to the output tray, with the position of the paper offset slightly from the previous job (offset function).
IF THE TRAY RUNS OUT OF PAPER DURING PRINTING
Add paper to the tray that ran out or to the bypass tray. If you add paper to the bypass tray, press the [PRINT] key on the machine to switch to printer mode and select "BYPASS-TRAY". Printing will resume. Note that if the "AUTO TRAY SWITCHING" setting is selected in the "PAPER SIZE SET" (accessed by pressing the [SPECIAL FUNCTION] key) and there is the same size of paper in another tray, the machine will automatically switch to the other tray and continue printing.
PAUSING A PRINT JOB
To pause a print job, press the [PRINT] key on the machine to switch to printer mode and then select "OFFLINE" with the [ ] key. The machine pauses the print job and then goes offline.
•To cancel a print job, press the [C] key ( ).
).
•To resume printing, select "ONLINE" with the [ ] key.
WHEN "PAPER SOURCE" IS SET TO [AUTO SELECT]
If "Paper Source" is set to [Auto Select] in the [Paper] tab of the printer driver setup screen and the correct size of paper for a print job is not loaded in the machine, the printing procedure will vary depending on the "FORCED OUTPUT OF PRINT" setting (page 26) in the key operator programs.
When "FORCED OUTPUT OF PRINT" is disabled
Add paper to the bypass tray, press the [PRINT] key on the machine to switch to printer mode, and select "BYPASS-TRAY". Printing will resume.
When "FORCED OUTPUT OF PRINT" is enabled
The closest size of paper in a tray other than the bypass tray will be used for printing.
When the dual function board is installed
Note • If the print image is in a different orientation than the paper, the print image will be automatically rotated 90 degrees to enable correct printing on the paper. (Other than the bypass tray)
When the dual function board is not installed
•Be sure to set each tray's paper size in "Set Tray Status" in the "Configuration" tab of the printer driver setup screen. See "CONFIGURING THE PRINTER DRIVER" in "3. TROUBLESHOOTING AND USEFUL INFORMATION" in the "Software setup guide".
When printing, be sure to specify a tray other than "Auto Select" in "Paper Source" in the "Paper" tab of the printer driver setup screen.
HOW [BYPASS TRAY] AND [BYPASS MANUAL] DIFFER IN THE "PAPER SOURCE" SETTINGS
There are two bypass tray settings in "Paper Source" in the [Paper] tab of the printer driver setup screen:
•When [Bypass Tray] is selected, the print job is automatically printed on the paper in the bypass tray.
•When [Bypass Manual] is selected, the print job is not printed until paper is inserted into the bypass tray. If paper is already in the bypass tray, remove the paper and then re-insert it to begin printing.
4

OPENING THE PRINTER DRIVER FROM THE [START] BUTTON
To change the printer driver settings, follow the steps below. Settings adjusted in this way will be the initial settings when you print from an application. (If you change the settings in the printer driver setup screen at the time of printing, the settings will revert to the initial settings when you quit the application.)
Windows 2000/XP
1 Click the [start] button, and then click [Control Panel].
In Windows 2000, click the [Start] button and select [Settings].
2 Click [Printers and Other Hardware], and click [Printers and Faxes].
In Windows 2000, click [Printers].
3 Click the [SHARP AR-XXXX] printer driver icon and select [Properties] from the [File] menu.
4 Click the [Printing Preferences] button in the [General] tab.
The printer driver setup screen will appear.
PRINTER DRIVER SETTINGS (page 6)
Windows 95/98/Me/NT 4.0
1 |
Click the [Start] button, select |
|
|
|
1 |
||||
|
[Settings] and then click [Printers]. |
|
||
|
||||
2 |
Click the [SHARP AR-XXXX] printer |
|||
|
||||
driver icon and select [Properties] from the [File] menu.
Note |
In Windows NT 4.0, select [Document |
Defaults] to open the printer driver setup |
|
|
screen. |
3 In Windows 95/98/Me, click the [Setup] tab.
The printer driver setup screen will appear.
PRINTER DRIVER SETTINGS (page 6)
5
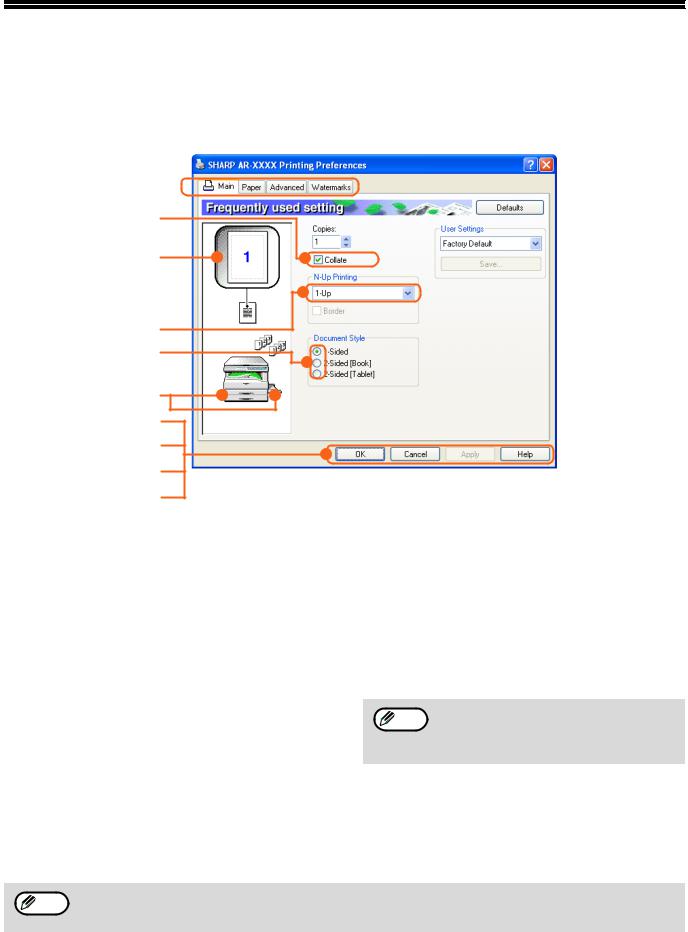
PRINTER DRIVER SETTINGS
To view Help for a setting, click the  button in the upper right-hand corner of the window and then click the setting.
Some restrictions exist on the combinations of settings that can be selected in the printer driver setup screen. When a restriction is in effect, an information icon (  ) will appear next to the setting. Click the icon to view an explanation of the restriction.
(1) 
(2)
(3)
(4)
(5)
(6)
(7)
(8)
(9)
(10)
(1)Tab
The settings are grouped on tabs. Click on a tab to bring it to the front.
(2)Checkbox
Click on a checkbox to activate or deactivate a function.
(3)Print image
This shows the effect of the selected print settings.
(4)Drop-down list
Allows you to make a selection from a list of choices.
(5)Check button
Allows you to select one item from a list of options.
(6)Image of paper trays
The tray selected in "Paper Source" in the [Paper] tab appears in blue. You can also click on a tray to select it.
(7)[OK] button
Click this button to save your settings and exit the dialog box.
(8)[Cancel] button
Click this button to exit the dialog box without making any changes to the settings.
(9)[Apply] button
Click to save your settings without closing the dialog box.
• |
Windows NT 4.0 does not have the |
Note |
[Apply] button. |
•The [Apply] button does not appear when you open this window from an application.
(10)[Help] button
Click this button to display the help file for the printer driver.
The settings and the image of the machine will vary depending on the model. If a tray or job separator tray option Note is installed, see "CONFIGURING THE PRINTER DRIVER" in "3. TROUBLESHOOTING AND USEFUL
INFORMATION" in the "Software setup guide" to configure the settings for the option.
6

TWO-SIDED PRINTING (ONLY FOR MODELS THAT SUPPORT TWO-SIDED PRINTING)
On models that have the two-sided printing function, both sides of the paper can be printed on.
To use this function, open the printer driver setup screen and select [2-Sided (Book)] or [2-Sided (Tablet)] from "Document Style" in the [Main] tab.
To open the printer driver, see "BASIC PRINTING" (page 3).
Note |
• |
Paper sizes that can be used for two-sided printing are Ledger, Letter, Legal, Foolscap, A3, A4, A5, B4 and B5. |
1 |
|
• |
The bypass tray cannot be used for two-sided printing. |
|||
|
||||
|
|
|
|
The following example shows the result when portrait data is printed on both sides of the paper.
Printing result
Print data
|
|
|
|
|
|
|
2-Sided (Book) |
2-Sided (Tablet) |
||
|
|
|
|
|
|
|
|
|
|
|
|
|
|
|
|
|
|
|
|
|
|
|
|
|
|
|
|
|
|
|
|
|
|
|
|
|
|
|
|
|
|
|
|
|
|
|
|
|
|
|
|
|
|
|
|
|
|
|
|
|
|
|
|
|
|
|
|
|
|
|
|
|
|
|
|
|
|
|
|
|
|
|
|
|
|
|
|
|
|
|
|
|
|
|
|
|
|
|
|
|
|
|
|
|
|
|
|
|
|
The pages are printed so that they can be bound at the side.
The pages are printed so that they can be bound at the top.
PRINTING MULTIPLE PAGES ON ONE PAGE
This feature allows you to reduce and print two or four document pages on a single sheet of paper.
To use this function, open the printer driver setup screen and select [2-Up] or [4-Up] for "N-Up Printing" on the [Main] tab.
To open the printer driver, see "BASIC PRINTING" (page 3).
The "N-Up Printing" setting is not available when [Fit to Page] is selected.
Note |
FITTING THE PRINT IMAGE TO THE PAPER (page 8) |
|
N-Up |
|
|
Border |
|
|
|
Border |
|||||||||||||
|
|
|
|
|
|
|
|
|
|
|
|
|
|
|
|
|
|
|
|
|
[2-Up] |
|
|
|
|
|
|
|
|
|
|
|
|
|
|
|
|
|
|
|
|
|
|
|
|
|
|
|
|
|
|
|
|
|
|
|
|
|
|
|
|
|
|
|
|
|
|
|
|
|
|
|
|
|
|
|
|
|
|
|
|
|
|
|
|
|
|
|
|
|
|
|
|
|
|
|
|
|
|
|
|
|
|
|
|
|
|
|
|
|
|
|
|
|
|
|
|
|
|
|
|
|
|
|
|
|
|
|
|
|
|
|
|
|
|
|
|
|
|
|
|
|
|
|
|
|
|
|
|
|
|
|
|
|
|
|
|
|
|
|
|
|
|
|
|
|
|
[4-Up]
If you select the [Border] checkbox, borderlines will be printed around each page.
7
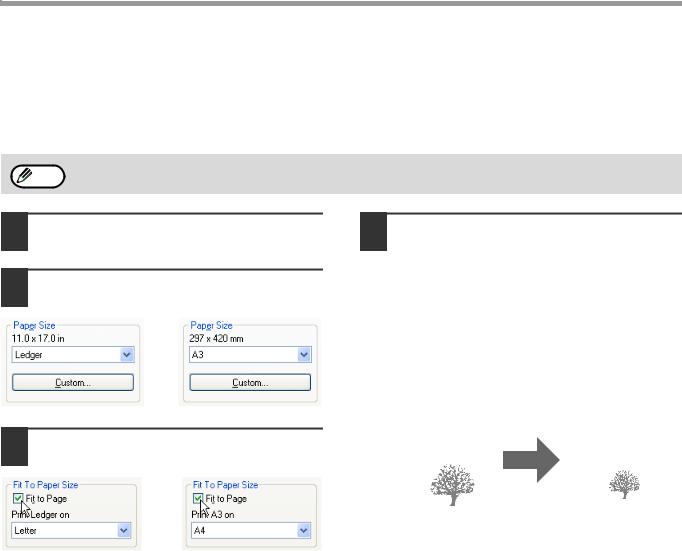
FITTING THE PRINT IMAGE TO THE PAPER
The printer driver can adjust the size of the print image to match the size of the paper loaded in the machine. Follow the steps shown below to use this function. The explanation below assumes that you intend to print a ledger or A3 size document on letter or A4 size paper.
To open the printer driver, see "BASIC PRINTING" (page 3).
The "Fit To Paper Size" setting is not available when "N-Up Printing" is selected.
Note PRINTING MULTIPLE PAGES ON ONE PAGE (page 7)
1 Click the [Paper] tab in the printer driver setup screen.
2 Select the original size (Ledger or A3) of the print image in "Paper Size".
or
3 Click on the [Fit to Page] checkbox.
or
4 Select the size of the paper (Letter or
A4) that is loaded in the machine from "Fit to Paper Size".
The size of the print image will be automatically adjusted to match the paper loaded in the machine.
Paper Size: Ledger or A3
Fit To Paper Size: Letter or A4
|
|
|
|
|
|
|
|
|
|
|
|
|
|
|
|
|
|
|
|
|
|
|
|
|
|
|
|
|
|
|
|
|
|
|
|
|
|
|
|
|
|
|
|
|
|
|
|
|
|
|
|
|
|
|
|
|
|
|
|
|
|
|
|
|
|
|
|
|
|
|
|
|
|
|
|
|
|
|
|
|
|
|
|
|
|
|
|
|
|
|
|
|
|
|
|
|
|
|
|
|
|
|
|
|
|
|
|
|
|
|
|
|
|
|
|
|
|
|
|
|
|
|
|
|
|
|
|
|
|
|
|
|
|
|
|
|
|
|
|
|
|
|
|
|
|
|
|
|
|
|
|
|
|
Ledger or A3 size |
Letter or A4 size |
|||||||||
|
document |
|
|
paper |
||||||
|
(Paper Size) |
(Fit To Paper Size) |
||||||||
8
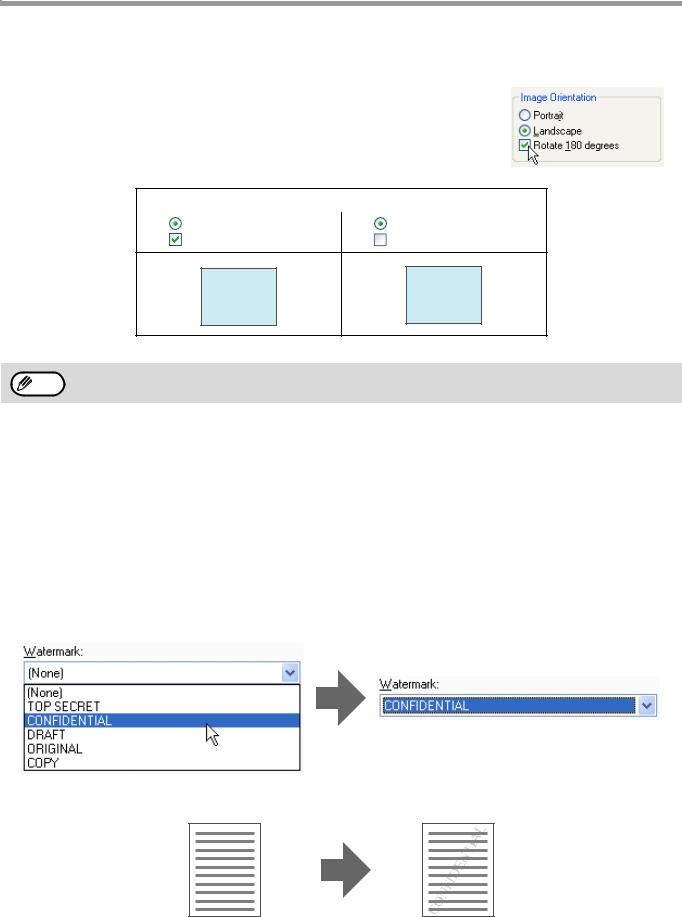
ROTATING THE PRINT IMAGE 180 DEGREES
The print image can be rotated 180 degrees.
This feature rotates the print image 180 degrees to enable correct printing on paper that can only be loaded in one orientation.
To use this function, select the image orientation in "Image Orientation" on the [Paper] tab, and then click on the [Rotate 180 degrees] checkbox.
To open the printer driver, see "BASIC PRINTING" (page 3).
Printing result |
|
|
|
|
|
|
|
|
|
Landscape |
Landscape |
|
|
|
1 |
||||
Rotate 180 degrees |
Rotate 180 degrees |
|
||
|
|
|||
|
|
|
|
|
|
|
|
|
ABCD
ABCD
Note |
The procedure for loading paper is explained in the "Operation manual (for general information and copier)". |
PRINTING A WATERMARK
You can print a watermark such as "CONFIDENTIAL" on your document. To print a watermark, open the printer driver setup screen, click the [Watermarks] tab, and follow the steps below.
To open the printer driver, see "BASIC PRINTING" (page 3).
How to Print a Watermark
From the "Watermark" drop-down list, select the watermark that you wish to print (for example "CONFIDENTIAL"), and start printing.
Print sample
You can enter text to create your own custom watermark. For details on watermark settings, view printer driver Help.PRINTER DRIVER SETTINGS (page 6)
9
OUTLINE OF THE PRINT STATUS WINDOW
When printing begins, the Print Status Window automatically opens.
The Print Status Window is a utility that monitors the machine and informs you of the name of the document being printed and any errors that occur.
(1)
(2)
(3)
(4)
(5)
(6)
(7)
(1)Status window
Provides information on the current status of the printer.
(2)Status icons
The status icons appear to alert you to printer errors. Nothing appears when printing is taking place normally.
The icons are explained below. Follow the instructions in the status window to solve the problem.
(5)[Cancel Job] button
Printing can be canceled by clicking this button before the machine receives the job.
(6)[Help] button
Click this button to display the help file for the Print Status Window.
(7)[Close] button
Click this button to close the Print Status Window.
Icon |
Print Status |
|
|
An error has occurred that requires immediate attention.
An error has occurred that requires attention soon.
(3)Tab
Click a tab to bring it to the front. The [Options] tab allows you to select display options for the Print Status Window.
(4)Document Name
Shows the name of the document currently being printed.
10
Loading...