


SKM 5200-II
Instruction manual

Contents
Contents |
|
Important safety instructions ......................................................................... |
2 |
The SKM 5200-II radio microphone ................................................................ |
4 |
Delivery includes ................................................................................................. |
6 |
Product overview ................................................................................................ |
7 |
Overview of the SKM 5200-II radio microphone ................................... |
7 |
Putting the radio microphone into operation .............................................. |
9 |
Inserting, removing and changing the power pack .............................. |
9 |
Changing the microphone head .............................................................. |
11 |
Using the radio microphone ........................................................................... |
13 |
Switching the radio microphone on/off ................................................ |
13 |
Doing a frequency check .......................................................................... |
14 |
The automatic lock mode (autolock function) .................................... |
14 |
Identifying the radio microphone .......................................................... |
15 |
The operating menu ......................................................................................... |
16 |
The buttons ................................................................................................ |
16 |
Overview of the operating menu ........................................................... |
17 |
Working with the operating menu ........................................................ |
17 |
Overview of the operating menu ........................................................... |
21 |
Adjustment tips for the operating menu ................................................... |
23 |
Selecting a channel – “CHAN” ................................................................. |
23 |
Selecting the frequencies to be stored |
|
in the channel bank “VAR” – “TUNE” .................................................... |
23 |
Entering a name – “NAME” ..................................................................... |
25 |
Adjusting the microphone sensitivity – “ATTEN” ............................... |
26 |
Adjusting the low-cut frequency – “LOWCUT” .................................... |
26 |
Selecting the standard display – “VIEW” ............................................. |
26 |
Loading the factory-preset default settings – “RESET” .................... |
27 |
Activating/deactivating the automatic lock mode – “LOCK” ........... |
27 |
Adjusting the output power – “POWER” .............................................. |
28 |
Displaying the software revision – “SW--REV” ................................... |
28 |
Exiting the operating menu – “EXIT” .................................................... |
28 |
Maintenance and care ..................................................................................... |
28 |
If a problem occurs ... ....................................................................................... |
29 |
Accessories ......................................................................................................... |
30 |
Specifications .................................................................................................... |
31 |
Manufacturer Declarations ............................................................................. |
34 |
1

Important safety instructions
Important safety instructions
•Read this instruction manual.
•Keep this instruction manual. Always include this instruction manual when passing the product on to third parties.
•Heed all warnings and follow all instructions in this instruction manual.
•Use only a cloth for cleaning the product.
•Do not place the product near any heat sources such as radiators, stoves, or other devices (including amplifiers) that produce heat.
•Only use attachments/accessories specified by Sennheiser.
•Refer all servicing to qualified service personnel.
Servicing is required if the product has been damaged in any way, liquid has been spilled, objects have fallen inside, the product has been exposed to rain or moisture, does not operate properly or has been dropped.
•WARNING: To reduce the risk of short circuits, do not use the product near water and do not expose it to rain or moisture.
Safety instructions for handling rechargeable batteries
When used properly, rechargeable batteries are a safe and reliable energy source. However, if abused or misused, rechargeable batteries may leak and, in extreme cases, may even present an explosion and fire hazard.
Please understand that Sennheiser does not accept liability for damage arising from abuse or misuse. Especially observe the following safety instructions.
2
|
|
|
|
|
|
|
Important safety instructions |
||
|
|
|
|
|
|
|
|
|
|
|
|
|
|
|
|
|
|
|
|
|
|
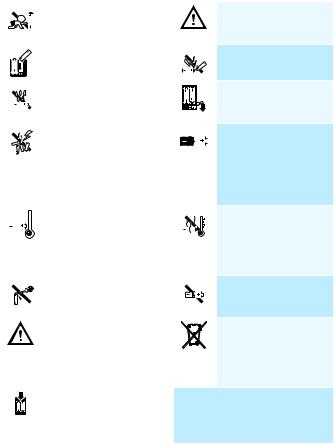
Keep away from children. |
|
|
|
|
|
|
Only use rechargeable |
|
|
|
|
|
|
|
|
|
batteries recommended |
|
|
|
|
|
|
|
|
|
by Sennheiser. |
|
|
Observe correct polarity. |
|
|
|
|
|
|
Do not short-circuit. |
|
|
|
|
|
|
|
|
|
|
|
|
|
|
|
|
|
|
|
|
|
|
Do not expose to moisture. |
|
|
|
|
|
|
Switch rechargeable |
|
|
|
|
|
|
|
|
||
|
|
|
|
|
|
|
|
|
battery-powered |
|
|
|
|
|
|
|
|
|
products off after use. |
|
|
Do not get fully charged |
|
|
|
|
|
|
When not using |
|
|
but unpacked |
|
|
|
|
|
|
rechargeable batteries |
|
|
|
|
|
|
|
|
||
|
|
rechargeable batteries |
|
|
|
|
|
|
for extended periods of |
|
|
mixed up. |
|
|
|
|
|
|
time, charge them |
|
|
|
|
|
|
|
|
|
regularly (about every |
|
|
|
|
|
|
|
|
|
three months). |
|
|
Only charge rechargeable |
|
|
|
|
|
|
Do not heat above |
|
|
batteries at ambient |
|
|
|
|
|
|
70°C/158°F, e.g. do not |
|
|
|
|
|
|
|
|
||
|
|
temperatures between |
|
|
|
|
|
|
expose to sunlight or |
|
|
10°C/50°F and 40°C/ |
|
|
|
|
|
|
throw into a fire. |
|
|
104°F. |
|
|
|
|
|
|
|
|
|
Do not mutilate or |
|
|
|
|
|
|
Do not continue to use |
|
|
dismantle. |
|
|
|
|
|
|
defective rechargeable |
|
|
|
|
|
|
|
|
|
batteries. |
|
|
Immediately remove |
|
|
|
|
|
|
Dispose of rechargeable |
|
|
|
|
|
|
|
|
||
|
|
rechargeable batteries |
|
|
|
|
|
|
batteries at special |
|
|
from obviously defective |
|
|
|
|
|
|
collection points or |
|
|
units. |
|
|
|
|
|
|
return them to your |
|
|
|
|
|
|
|
|
|
specialist dealer. |
|
|
Only charge rechargeable |
|
|
|
|
|
|
|
|
|
batteries with the |
|
|
|
|
|
|
|
|
|
appropriate Sennheiser |
|
|
|
|
|
|
|
|
|
chargers. |
|
|
|
|
|
|
|
|
|
|
|
|
|
|
|
|
|
Intended use of the radio microphone
Intended use of the product includes:
•having read this instruction manual especially the chapter “Important safety instructions”,
•using the product within the operating conditions and limitations described in this instruction manual.
“Improper use” means using the product other than as described in this instruction manual, or under operating conditions which differ from those described herein.
3

The SKM 5200-II radio microphone
The SKM 5200-II radio microphone
The SKM 5200-II is a professional hand-held radio microphone transmitter that is easy to use and is easily adaptable to a wide variety of applications:
•Suitable for all-purpose use, e.g. for reporting, stage and studio applications.
•Rugged housing and intuitive, menu-assisted operation.
•Screw-on microphone heads with different pick-up patterns (omnidirectional, cardioid and super-cardioid) for a wide variety of applications. A super-cardioid dynamic micro-phone head capable of accommodating extremely high sound pressure levels is also available.
•Microphone sensitivity can be adjusted in steps of 1 dB.
•Tunable transmission frequencies ensure high flexibility in varying transmission situations.
•Can be operated either on rechargeable or standard alkaline batteries
– with LC display (in percent) of charging status on suitable receivers.
•Color-coded identification markers for quick and unambiguous identification.
•Switchable low-cut filter
•Up to 184 MHz switching bandwidth
•Signal-to-noise ratio typ. 110 dB(A)
•Adjustable output power:
10 mW, 10 mW Low Intermodulation mode (LoI), 50 mW.
In Low Intermodulation mode (LoI), the intermodulation performance is significantly improved.
Information on the compander system
This product is equipped with HiDynplus™, the Sennheiser noise reduction system that reduces RF interference. HiDynplus™ offers extreme operational reliability and ensures highest transmission quality.
4

The SKM 5200-II radio microphone
The channel bank system
The transmitter is available in five UHF frequency ranges with up to 184 MHz switching bandwidth:
Range N-GB
606 – 790 MHz
Range N-US 614.075 –
697.925MHz
Range N
614 – 798 MHz
|
Range L |
|
|
Range P |
|
|
|
|
470 – 638 MHz |
|
|
776 – 866 MHz |
|
|
|
|
|
|
|
|
|
|
|
400 |
500 |
600 |
700 |
800 |
900 |
MHz |
|
The transmitter has two frequency banks:
Channel |
Frequency bank |
|
|||
|
|
|
|
|
|
|
“FIX” |
“VAR” |
|||
1 |
The transmission frequencies are |
The transmission |
|||
2 |
factory-preset (see enclosed frequency |
frequencies |
|||
table) and cannot be changed. |
can be freely |
||||
... |
|||||
|
|
|
selected within |
||
max. 59 |
|
|
|
the switching |
|
|
|
|
|
bandwidth. |
|
|
|
|
|
|
|
|
|
|
Optimized |
|
|
|
|
|
for maximum |
|
|
|
|
|
|
||
|
|
|
|
||
|
|
|
transmission |
|
|
|
|
|
|
||
|
|
|
reliability |
|
|
|
|
|
|
||
|
|
|
Additionally available |
|
|
|
|
|
|
||
|
|
|
|
||
|
|
|
|
||
|
|
|
|
||
|
|
|
channels in Low Inter- |
|
|
|
|
|
|
||
|
|
|
modulation mode |
|
|
|
|
|
|
||
|
|
|
|
|
|
|
|
|
|
|
|
|
|
|
|
|
|
|
|
|
|
|
|
The factory-preset frequencies within the frequency bank “FIX” are interference and intermodulation-free.
Set all transmitters of your multi-channel system to different channels within the frequency bank “FIX”.
5

Delivery includes
Variants
•SKM 5200-II (hematite-colored housing)
•SKM 5200 BK-II (black housing)
•SKM 5200 NI-II (nickel-colored housing)
Suitable receivers
•EM 1046 system
•EM 3532, EM 3031, EM 3032
•EK 3041, EK 3241
•EM 3731, EM 3732, EM 3732 COM
•EM 3731-II, EM 3732-II, EM 3732 COM-II
Delivery includes
1radio microphone transmitter body SKM 5200-II (microphone head and power pack to be ordered separately)
1 MZQ 3072 quick release clamp
9 color-coded identification markers
1 instruction manual
1 frequency table
1 supplement “Legal requirements for the use of radiomicrophones”
6
Product overview
Product overview
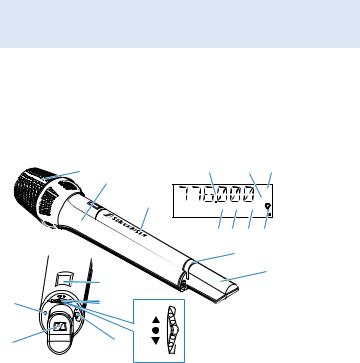
Overview of the SKM 5200-II radio microphone
|
|
|
|
|
|
|
RF |
|
|
|
|
|
|
|
AF |
|
CH dB MHz |
||
|
|
||
|
|
|
|
|
|
|
|
|
|
|
|
|
|
|
|
|
|
|
|
|
UP |
|
|
|
SET |
|
|
|
DOWN |
|
|
|
|
|
|
Operating controls |
LC display panel |
|
|
Screw-on microphone head |
Alphanumeric display |
||
|
(not included in the delivery) |
Level display for audio |
|
Body of radio microphone |
signal “AF” |
|
|
Power pack |
“RF” – appears when an |
||
|
(not included in the delivery) |
RF signal is transmitted |
|
Battery compartment |
Lock mode icon |
||
|
locking mechanism |
“MHz” – appears when the |
|
Antenna |
frequency is displayed |
||
LC display |
“dB” – appears when the |
||
Multi-function switch with three |
microphone sensitivity is |
||
|
switch positions: |
displayed |
|
|
(DOWN), (UP) and (SET) |
“CH” – appears when the |
|
|
ON/OFF button (red) with ESC |
channel number is displayed |
|
|
function (cancel) |
|
|
Color-coded identification |
|
|
|
|
marker |
|
|
LED ON/LOW BATT: operation and battery status indication, green LED
7
Product overview
Display backlighting
When the lock mode is deactivated, the display remains backlit for approx. 20 seconds after pressing a button.
Operation and battery status indication
The LED ON/LOW BATT provides information on the current operating state of the radio microphone:
LED |
Meaning |
ON/LOW BATT ... |
|
... lights up normally |
The radio microphone is switched on and the |
|
capacity of the power pack is sufficient (ON). |
... is flashing |
The power pack is going flat (LOW BATT)! |
|
|
8
Putting the radio microphone into operation
Putting the radio microphone into operation
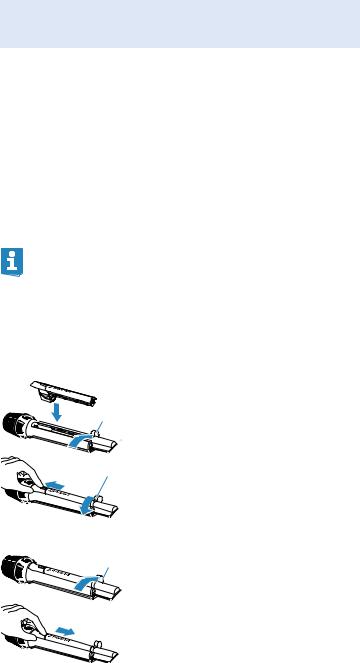
Inserting, removing and changing the power pack
For powering the radio microphone, you can either use the Sennheiser B 5000-2 battery box (1.5 V AA size batteries) or the rechargeable Sennheiser BA 5000-2 battery pack. For regular use, we recommend using the environmentally friendly rechargeable BA 5000-2 battery pack.
For battery pack operation of the radio microphone, only use the BA 5000-2 battery pack in order to ensure optimum operational reliability. Batteries and rechargeable battery cells have different discharging curves. The radio microphone is able to identify the BA 5000-2 battery pack and to use its capacity to the full. Individual rechargeable battery cells in the B 5000-2 battery box will not be identified as battery packs.
Inserting the power pack |
|
|
|
|
|
Open |
the |
locking |
mechanism by |
|
moving it in the direction of the arrow. |
|||
|
Insert the power pack into the radio |
|||
|
microphone. |
|
|
|
|
Push the power pack towards the |
|||
|
microphone head. |
|
||
|
Close |
the |
locking |
mechanism by |
|
moving it in the direction of the arrow. |
|||
Removing the power pack |
|
|
|
|
|
Open |
the |
locking |
mechanism by |
|
moving it in the direction of the arrow. |
|||
Push |
the |
power |
pack towards the |
|
|
antenna. |
|
|
|
|
You can now remove the power pack. |
|||
9
Putting the radio microphone into operation
After you have changed the power pack, the radio microphone continues operating on exactly the same settings as before the change. Stored settings are retained in memory on switch-off.
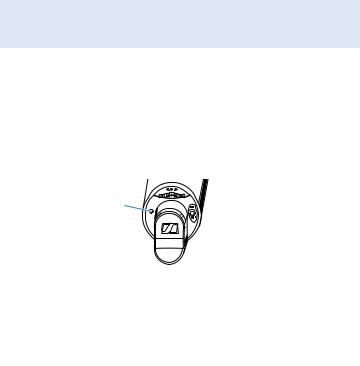
Inserting batteries into the B 5000-2 battery box
To open the battery box, push down the
|
|
display section of the battery box . |
|
|
|
|
|
Insert the batteries. Observe correct |
|
|
polarity when inserting the batteries. |
|
|
Close the battery box. |


LC display shown on the example of the B 5000-2 battery box
• 3-step LC display for remaining battery capacity.
• If the battery capacity is too low (LOW BATT), the last segment starts flashing and the batteries must be changed.
 LOW BATT
Recharging the BA 5000-2 battery pack
Before using the BA 5000-2 battery pack (see “ Accessories” on page 30) for the first time or if you have not used it for several weeks, you must charge the battery pack completely.
The L 50 charger (see “ Accessories” on page 30) can charge two BA 5000-2 battery packs simultaneously.
10
Putting the radio microphone into operation
|
|
Place the appropriate charging adapter |
|
|
in the charging compartment of the |
|
|
charger. |
|
|
Insert the BA 5000-2 battery pack into the |
|
charging adapter . |
|
|
|
|
|
|
Charging time: approx. 2.5 hrs with the |
|
|
L 50 charger (dependent on the residual |
|
|
charge of the battery pack). |
The battery pack is carefully charged using the − U-method. For further details, please refer to the user manual of the L 50 charger.
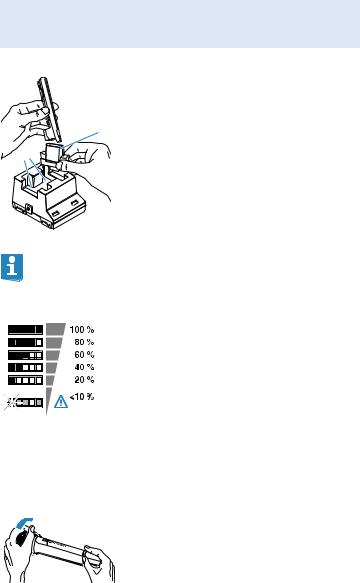
LC display shown on the example of the BA 5000-2 battery pack
• 6-step LC display for (remaining) battery pack capacity.
• Microprocessor-controlled electronics takes self-discharge of rechargeable cells into account.
• The maximum capacity of is reduced due
|
|
|
|
|
LOW BATT |
to natural ageing of the cells. The |
|
|
|
|
|||
|
|
|||||
|
|
|
|
|
|
|
|
|
|
|
|
|
BA 5000-2 battery pack measures the |
|
|
|
|
|
|
maximum capacity and therefore displays |
|
|
|
|
|
|
less than 100% capacity for older cells – |
|
|
|
|
|
|
even when they have been fully charged. |
Changing the microphone head
Unscrew the microphone head by turning it in the direction of the arrow.
11
 Loading...