


QUICK GUIDE
Digital Movie Camera
Important note
This manual explains how to safely operate the VPC-HD1010EX, VPC-HD1010 and VPC-HD1010GX.
Any information regarding only one of these products will be labeled as such.
Please read these instructions carefully before using the camera.
Make sure to read and understand the separate booklet “SAFETY MANUAL”. Keep this manual in a safe place for later reference.
English

CONTENTS |
|
ABOUT THIS MANUAL ......................................................................... |
2 |
PARTS NAMES ..................................................................................... |
3 |
INSTALLING THE CARD ....................................................................... |
5 |
CHARGING THE BATTERY PACK ....................................................... |
6 |
TURNING THE CAMERA ON AND OFF ............................................... |
8 |
DATE AND TIME SETTING ................................................................... |
9 |
SWITCHING BETWEEN THE SHOOTING MODE AND PLAYBACK |
|
MODE .............................................................................................. |
11 |
SIMPLE MODE/NORMAL MODE ........................................................ |
12 |
VIDEO CLIP RECORDING .................................................................. |
18 |
SHOOTING SINGLE SHOTS .............................................................. |
19 |
PLAYING BACK VIDEO CLIPS AND STILL IMAGES ......................... |
21 |
USING THE Xacti Library .................................................................... |
23 |
1

ABOUT THIS MANUAL
This instruction manual explains the basic operation of your camera.
For complete information on the operation and use of your camera, please read the PDF files in the CD-ROM (Sanyo Software Pack) included with the camera.
About the PDF-format Instruction Manuals
Instruction manuals for the Camera and the Sanyo Software Pack are stored as PDF files in the CD-ROM (Sanyo Software Pack).
To read the PDF files, you will need Adobe® Acrobat® Reader 4.0 or later. If one is not installed in your computer, install it from the CD-ROM (Sanyo Software Pack).
An English version of Adobe® Acrobat® Reader is provided on the CD-ROM (Sanyo Software Pack). If you need a version for a different language, you can download it from the web site given below (Adobe® Reader).
http://www.adobe.com/products/acrobat/readstep2.html k To install Acrobat Reader
For information on how to use Acrobat Reader, read the Help files of Acrobat Reader.
Installing to a Windows computer
1Set the CD-ROM (Sanyo Software Pack) in the DVD drive. h The installation window soon appears.
h If the installation window does not appear, double-click on the
[Sanyo DSC (D:)] icon in the My Computer window, and double-click on [Autorun.exe] in the [Sanyo DSC (D:)] window.
*The drive name (D:) may be different on your computer.
2In the installation window, click on [Adobe Reader 8].
h Installation begins. Follow the messages that appear on your screen to complete the installation.
h When installation is completed, restart your computer.
Installing to a Macintosh computer
Double-click the installer icon located inside the Adobe Reader folder that is in the CD-ROM.
h When the installer window opens, follow the instructions given on the screen and complete the installation of Acrobat Reader.
k How to view the PDF-file Instruction Manuals
1Insert the CD-ROM (Sanyo Software Pack) in your computer’s CD-ROM drive. h The installation window appears.
2In the installation window, click on [Instruction Manuals (PDF)].
h The list of languages in which the instruction manual is available appears.
3Click on the language of your choice.
h The folder containing the instruction manual opens.
h Double-click on the icon to view the instruction manual.
English
2
PARTS NAMES
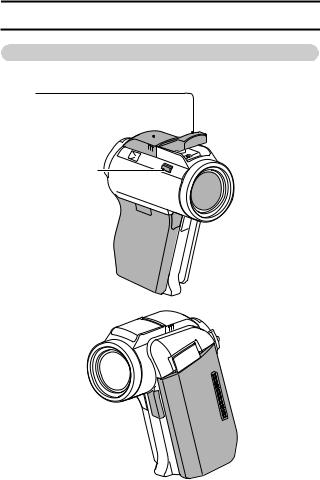
Camera
Front
Flash
i Extends when the flash button [?] is pressed.
Shoe cover
Strap holder 
Flash button [?]
Battery cover lock 

Battery cover

 Flash unit

 Lens
Lens
 Remote control sensor

 Monitor unit
 Stereo
microphone
Mic/headphones teminal 
 cover [MIC/
 ]
]
3
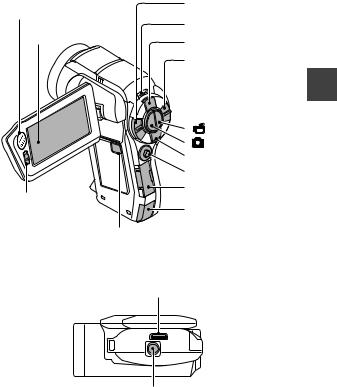
Rear
Zoom switch
Speaker
|
Multi-indicator |
Monitor |
PHOTO VIEW button |
|
|
|
REC/PLAY switch |
|
[ |
] button |
|
[ |
] button |
|
MENU button |
|
|
SET button |
|
|
Card slot cover |
|
SIMPLE/NORMAL |
|
|
switch |
DC IN terminal cover |
|
ON/OFF button
Bottom
Docking station terminal
Tripod stand hole
English
4
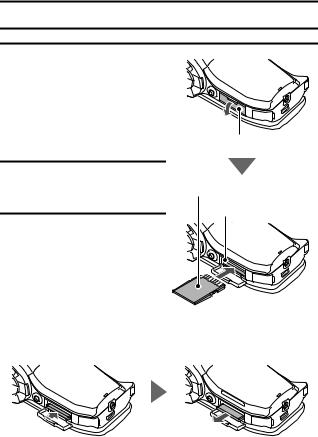
INSTALLING THE CARD
1 Open the card slot cover, and insert the card in the card slot.
2 Insert the card all the way in.
hFirmly insert the card until it clicks into place.
3 Close the card slot cover.
Card slot cover
SD Memory Card
Card slot
<To remove the card...>
hTo remove the card, press it in, and then release. The card will protrude slightly, and you can then pull it out.
5

CHARGING THE BATTERY PACK
1 While pressing the battery cover lock, slide it (1), and pull out the battery cover toward the bottom of the camera (2).
h The battery cover comes off.
1
Battery cover lock
2
Battery cover
2 Insert the battery pack.
h Take care that it is positioned correctly.
Battery pack
English
6
CHARGING THE BATTERY PACK
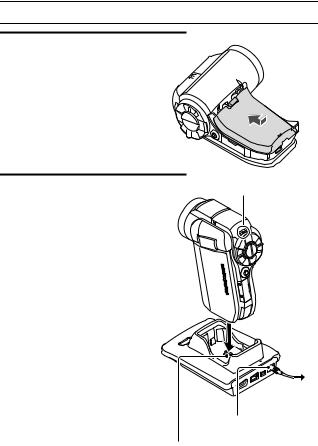
3 Replace the battery cover.
<To remove the battery pack...>
h Raise the edge of the battery pack to remove it.
4 Close the camera’s monitor |
Multi-indicator |
|
unit, and set the camera in the |
|
|
docking station. |
|
|
h Set the camera securely, |
|
|
making sure that the camera |
|
|
is correctly oriented in relation |
|
|
to the terminal contacts in the |
|
|
docking station. |
|
|
h Charging begins when the |
|
|
camera is set in the docking |
|
|
station. |
|
|
h During charging, the multi- |
|
|
indicator is lit red. When |
|
|
charging is completed, the |
|
|
indicator turns off. |
|
|
h If the multi-indicator flashes |
|
|
red, it indicates that the |
|
|
battery pack is defective or |
|
|
the camera is not correctly set |
To power |
|
in the docking station. Reset |
||
outlet |
||
the camera correctly in the |
||
|
||
docking station. |
DC IN terminal |
|
h The charging time is approx. |
||
200 minutes. |
|
|
|
Docking station terminal |
7
 Loading...