


INSTRUCTION MANUAL
Dual Camera
VPC-CG10EX VPC-CG10 VPC-CG10GX
Important note
This manual explains how to safely operate the VPC-CG10EX, VPC-CG10 and VPC-CG10GX.
Any information regarding only one of these products will be labeled as such.
Please read these instructions carefully before using the camera.
Make sure to read and understand the separate booklet “SAFETY MANUAL”. Keep this manual in a safe place for later reference.

HOW TO READ THIS MANUAL
For first-time users
Please read the sections on “SETUP” and “SIMPLE” in this manual, as well as the included “QUICK GUIDE” to familiarize yourself with
your camera’s operation.
↓
To use the various camera features
Please read the sections on “NORMAL” and “OPTION SETTINGS” in this manual. To connect the camera to a computer or view images on a TV, please read the section on “OTHER DEVICES AND
CONNECTIONS” in this manual.
↓
To use additional features
Visit the Sanyo website to learn how to adjust the camera settings for various shooting scenes. There you’ll also find information about the software for playing back data recorded with your camera and for burning (recording) DVDs (page 151).
You may find the answers to questions or problems concerning camera operation in the sections “COMMONLY ASKED QUESTIONS” (page 164) and “TROUBLESHOOTING” (page 172).
Symbols used in this manual
HINT |
Points giving some extended instructions or special points to pay |
CAUTION |
attention to. |
Points that require special attention. |
|
(page xx) |
Refer to the page indicated for detailed information. |
i English

SHOOT, PLAY BACK AND SAVE
Preparing the camera
1 Insert the battery pack.
|
3Insert by matching the |
|
1 While pressing, push |
connector markings |
|
Connector |
||
towards the bottom. |
||
|
markings |
|
2 Open |
|
Battery cover |
4 Close |
2 Insert the SD Memory Card.
h An SD Memory Card is not included with your camera. Please purchase a commercially sold card.
h In this manual, the SD Memory Card is referred to as the “card”.
Card Monitor unit 3Insert 1 Open
Card slot cover |
4 Close |
2Open |
|
English ii
SHOOT, PLAY BACK AND SAVE
Shooting
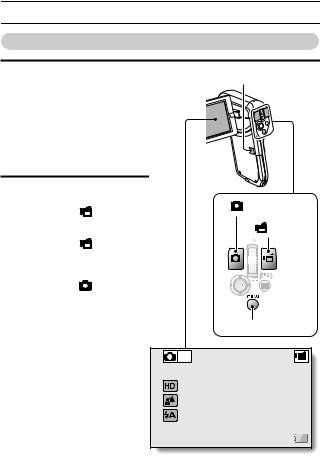
1 Press the ON/OFF button |
ON/OFF button |
||||
for at least 1 second to turn |
|
|
|
||
the camera on. |
|
|
|
|
|
h If the screen to set the |
|
|
|
||
date and time appears, |
|
|
|
||
press the MENU button 2 |
|
|
|
||
times to cancel it. |
|
|
|
||
For how to set the date |
|
|
|
||
and time, see page 33. |
|
|
|
||
2 Record. |
|
|
|
|
|
To record a video clip: |
[ |
] button |
|||
h Press the [ |
] button to |
||||
|
|
|
|||
begin recording a video |
|
[ |
] button |
||
clip. |
|
|
|||
|
|
|
|
||
h Press the [ |
] button |
|
|
|
|
again to end the |
|
|
|
||
recording. |
|
|
|
|
|
To take a photo: |
|
|
|
|
|
h Press the [ |
] button. |
|
|
|
|
h A still image is captured. |
|
|
|
||
|
|
MENU button |
|||
|
|
10M-S |
|
|
|
|
357 |
|
|
00:13:51 |
|
iii English
Before capturing those important shots, be sure to first take a test shot to confirm that your camera is set up and ready to go
i Sanyo declines any claim for compensation for recorded contents etc. in case of photographing or recording failure due to a chance camera or card flaw.
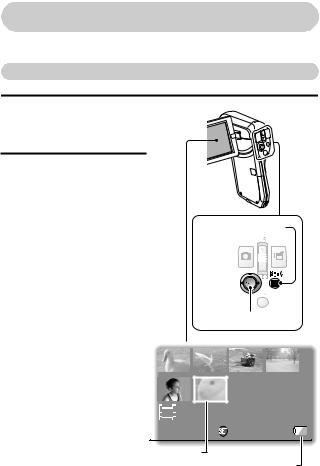
Playback
1 Press the REC/PLAY
button.
hThe display changes to the Playback Screen.
2 Select the image to play back.
hToggle the SET button left, right, up or down to
move the orange frame to the image you wish to play back.
hThe image information for the framed image is shown at the bottom of the screen.
REC/PLAY button
SET button
2009.12.24 |
18:41 |
100-0006 |
HD-SHQ |
6.5MB |
00:00:05 |
|
OK |
|
|
|
|
Orange frame
Remaining battery power idication
English iv

SHOOT, PLAY BACK AND SAVE
3 Press the SET button. h Playback begins.
<To return to the recording mode> h Press the REC/PLAY button.
When you are finished using the camera...
Press the ON/OFF button for at least 1 second to turn the camera off.
v English
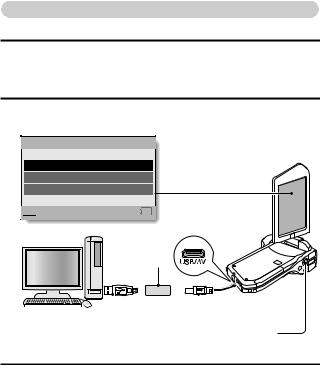
Copy files to the computer (Windows XP)
Connect your camera to a computer, and copy files to the computer.
1 Turn on the computer, and use the supplied dedicated USB interface cable to connect your camera to the computer.
hConnect the cable between the camera’s USB/AV terminal and the computer’s USB connector.
2 Turn on the camera (page 30).
hThe USB Connection Screen appears on the camera’s monitor.
USB CONNECTION
COMPUTER PRINTER CANCEL


 CANCEL
  OK
OK
Supplied dedicated USB interface cable
|
|
|
|
|
|
|
|
|
|
|
|
|
|
|
|
|
|
|
|
|
|
|
|
|
|
|
|
|
|
|
|
|
|
|
|
|
|
|
|
|
|
|
|
|
|
|
|
|
|
|
|
|
To USB connector on |
To USB/AV terminal |
||||||||||||||||||||
|
|
|
the computer |
|
|
|
|
|
|
|
|
SET button |
||||||||||||
|
|
|
|
|
|
|
|
|
|
|
|
|
|
|
|
|
|
|
|
|
|
|
|
|
3 Select “COMPUTER”, and press the SET button.
h The screen to select the computer connection mode appears.
English vi

SHOOT, PLAY BACK AND SAVE
4 Select “CARD READER”, and press the SET button.
hThe message [Found New Hardware] appears in the task tray, showing that the camera is recognized as a drive.
hThe card is recognized (mounted) as a disk, and the [XACTI (E:)] icon appears in the [My Computer] window.
h The drive name (E:) may be different on your computer.
<If the access menu (page 153) appears> h Click on [Exit] to cancel the access menu.
5 Select an action.
hIf the [XACTI (E:)] window appears automatically, select the desired procedure from the window.
6 Copy files from the camera to a computer.
vii English

Dismounting the camera
CAUTION
i To disconnect your camera, be sure to follow the procedure below. Failure to follow this procedure may cause faulty operation of your computer or corrupt the files in your camera.
1 Left-click on the icon for safely removing hardware in the task tray.
hA list appears showing the devices connected to the computer’s USB connector.
2 Left-click on the camera drive (E:).
hThe camera can now be disconnected.
h The drive name (E:) may be different on your computer.
No software is included with this camera. Instructions for obtaining the software can be found on page 152.
English viii

CONTENTS |
|
HOW TO READ THIS MANUAL ............................................................. |
i |
QUICK SEARCH BY OPERATION ........................................................ |
6 |
CHECKING THE INCLUDED ACCESSORIES .................................... |
11 |
How to use the accessories .......................................................... |
13 |
ABOUT THE CARD ............................................................................. |
14 |
Media cards that can be used with this camera ............................ |
14 |
What “card” means in this manual ................................................ |
14 |
GETTING THE MOST OUT OF YOUR CAMERA ............................... |
15 |
High-quality images with “High Definition” .................................... |
15 |
Includes SIMPLE mode for quick-and-easy operation .................. |
16 |
Image stabilizer for sharp pictures ................................................ |
16 |
Sharp face shots ........................................................................... |
17 |
SYSTEM MAP ..................................................................................... |
18 |
SETUP |
|
PARTS NAMES ................................................................................... |
19 |
CHARGING THE BATTERY PACK ..................................................... |
21 |
Charging the battery pack ............................................................. |
22 |
INSTALLING THE CARD ..................................................................... |
24 |
INSTALLING THE BATTERY PACK .................................................... |
26 |
Installing the DC adaptor (sold separately: VAR-A3U/A3EX) ....... |
27 |
About the temperature alert icon \ .......................................... |
29 |
TURNING THE CAMERA ON AND OFF ............................................. |
30 |
Turning on the camera .................................................................. |
30 |
Turning on the camera when the power save (sleep) mode is |
|
active ........................................................................................ |
31 |
Turning off the camera .................................................................. |
32 |
DATE AND TIME SETTING ................................................................. |
33 |
SWITCHING BETWEEN THE RECORDING MODE AND |
|
PLAYBACK MODE .......................................................................... |
36 |
SWITCHING THE OPERATING MODE .............................................. |
37 |
Switching between the SIMPLE and NORMAL modes ................ |
37 |
Accessing/exiting the SIMPLE/NORMAL Mode Menu Screen ..... |
38 |
Overview of the SIMPLE Mode Setting Screen ............................ |
43 |
Overview of the NORMAL Mode Setting Screen .......................... |
47 |
1 English
SIMPLE |
|
SHOOTING |
|
BEFORE TAKING PICTURES ............................................................. |
55 |
For best results .............................................................................. |
55 |
Using the autofocus ....................................................................... |
56 |
Select the recording size ............................................................... |
59 |
Select the focus setting ................................................................. |
60 |
Hints for taking pictures ................................................................. |
61 |
VIDEO CLIP RECORDING ................................................................... |
62 |
SHOOTING SINGLE SHOTS ............................................................... |
63 |
Using the flash ............................................................................... |
65 |
SHOOT A STILL IMAGE WHILE RECORDING A VIDEO CLIP .......... |
67 |
MACRO-PHOTOGRAPHY (ZOOM) ..................................................... |
69 |
PLAYBACK |
|
PLAYING BACK VIDEO CLIPS AND STILL IMAGES .......................... |
70 |
How to save one frame from a video clip as a still image ............. |
73 |
SLIDESHOW PLAYBACK .................................................................... |
74 |
PLAYBACK VOLUME ........................................................................... |
75 |
DELETING FILES ................................................................................. |
76 |
Delete single/delete all .................................................................. |
76 |
Delete selected .............................................................................. |
77 |
PLAYBACK MODES ............................................................................. |
79 |
21-image display playback ............................................................ |
79 |
Selecting the playback folder ........................................................ |
80 |
Magnifying (zooming in) the image ............................................... |
81 |
English 2

CONTENTS |
|
NORMAL |
|
SHOOTING |
|
RECORDING MENU 1 ......................................................................... |
82 |
Video setting ................................................................................. |
82 |
Still image setting .......................................................................... |
85 |
Scene select setting ...................................................................... |
86 |
Filter setting .................................................................................. |
86 |
Self-timer setting ........................................................................... |
87 |
RECORDING MENU 2 ......................................................................... |
88 |
Video stabilizer setting .................................................................. |
88 |
Focus range setting ...................................................................... |
89 |
Focus mode setting ...................................................................... |
90 |
Light-measuring mode setting ...................................................... |
90 |
ISO sensitivity setting ................................................................... |
91 |
RECORDING MENU 3 ......................................................................... |
92 |
White balance setting ................................................................... |
92 |
Exposure setting ........................................................................... |
93 |
Face chaser setting ...................................................................... |
94 |
High sensitivity mode setting ........................................................ |
95 |
Exposure compensation ............................................................... |
96 |
PLAYBACK |
|
PLAYBACK MENU 1 ........................................................................... |
98 |
Slideshow settings ........................................................................ |
98 |
File protect setting ........................................................................ |
99 |
Resize ......................................................................................... |
102 |
Rotate ......................................................................................... |
102 |
PLAYBACK MENU 2 ......................................................................... |
103 |
Correcting the image .................................................................. |
103 |
Editing video clips ....................................................................... |
104 |
Printing instructions .................................................................... |
115 |
FILE INFO DISPLAY .......................................................................... |
119 |
3 English

OPTION SETTINGS |
|
DISPLAY THE OPTION SETTING MENU ......................................... |
120 |
INTRODUCTION TO THE OPTION SETTING MENU ....................... |
121 |
Storage folder setting .................................................................. |
127 |
Shortcut setting ........................................................................... |
128 |
Screen language ......................................................................... |
130 |
TV output setting ......................................................................... |
131 |
File No. continued setting ............................................................ |
135 |
Formatting (initializing) ................................................................ |
137 |
CHECKING THE REMAINING CARD MEMORY ............................... |
138 |
Checking the remaining number of images and |
|
video recording time ................................................................ |
138 |
For audio recordings ................................................................... |
139 |
CHECKING THE REMAINING BATTERY PACK CHARGE .............. |
140 |
OTHER DEVICES AND CONNECTIONS |
|
CONNECTING TO A COMPUTER |
|
OPERATING ENVIRONMENT ........................................................... |
142 |
When using as a card reader ...................................................... |
142 |
To access the files in the internal memory .................................. |
142 |
SETTING THE CONNECTION MODE ............................................... |
143 |
USING AS A CARD READER ............................................................ |
145 |
For Windows Vista/XP users ....................................................... |
145 |
For Windows 2000 users ............................................................. |
146 |
For Mac OS X users .................................................................... |
147 |
ABOUT THE CONTENTS OF THE CARD ......................................... |
148 |
Configuration of directories in the card ........................................ |
148 |
File formats .................................................................................. |
148 |
Cautions when using as a card reader ........................................ |
149 |
USING AS A PC CAMERA ................................................................. |
150 |
For Windows XP .......................................................................... |
150 |
Using as a PC camera ................................................................ |
150 |
USING THE SOFTWARE ................................................................... |
151 |
Operating environment ................................................................ |
151 |
Obtaining the software ................................................................ |
152 |
SAVE AN IMAGE OF YOUR COMPUTER SCREEN ......................... |
155 |
Install Screen Capture ................................................................. |
155 |
How to use Screen Capture ........................................................ |
156 |
English 4

CONTENTS |
|
CONNECTING TO A TV |
|
CONNECTING TO A TV .................................................................... |
157 |
Connecting to a standard video input terminal ........................... |
158 |
Connect to the 480p/720p terminal ............................................. |
159 |
PLAYING BACK ON A TV ................................................................. |
160 |
CONNECTING TO A PRINTER |
|
PRINTING .......................................................................................... |
161 |
APPENDICES |
|
COMMONLY ASKED QUESTIONS ................................................... |
164 |
TROUBLESHOOTING ....................................................................... |
172 |
Camera ....................................................................................... |
172 |
Notes regarding the Scene Select feature and filters ................. |
180 |
SPECIFICATIONS ............................................................................. |
182 |
Camera ....................................................................................... |
182 |
Camera connectors .................................................................... |
186 |
Battery life ................................................................................... |
186 |
Possible No. of Images/Possible Shooting Time/ |
|
Possible Recording Time ....................................................... |
187 |
Concerning the multi-indicator .................................................... |
188 |
Supplied battery pack charger .................................................... |
189 |
Supplied Li-ion battery pack ....................................................... |
189 |
Others ......................................................................................... |
190 |
Before capturing those important shots, be sure to first |
|
take a test shot to comfirm that your camera is set up and |
|
ready to go ............................................................................. |
191 |
HINTS FOR TAKING PICTURES ...................................................... |
192 |
5 English

QUICK SEARCH BY OPERATION
Your camera has an abundance of convenient features and functions. From creating precisely the photo you want, to viewing images using various techniques, you can locate the exact operation for your purposes in the following table.
Shooting/recording
|
Basic operation |
Convenient functions |
Additional functions |
Getting started |
Log the date and time |
For more accurate |
|
shooting/recording |
of your photos |
focus |
|
• “VIDEO CLIP |
• “DATE AND TIME |
• “How to use the manual |
|
|
RECORDING” on |
SETTING” on page 33 |
focus” (manual focus) on |
|
page 62 |
Zoom in on the |
page 89 |
• “SHOOTING SINGLE |
subject |
Set the focus to a |
|
|
SHOTS” on page 63 |
• “MACRO- |
narrow range |
• |
“Sequential shots” on |
PHOTOGRAPHY |
• “Focus mode setting” on |
|
page 85 |
(ZOOM)” on page 69 |
page 90 |
• |
“Audio recording” on |
Close-up |
Reduce noise when |
|
page 82 |
photography |
recording |
|
|
• “Focus range” (super |
• “NOISE REDUCTION |
|
|
macro mode) on |
setting” on page 124 |
|
|
pages 44 and 50 |
|
|
|
• “Select the focus setting” |
|
|
|
(super macro mode) on |
|
|
|
page 60 |
|
|
|
|
|
Optimize the photo |
Set the camera’s color/contrast |
||
quality |
characteristics |
|
|
• |
“Select the recording |
• “Image quality setting” on page 124 |
|
|
size” on pages 44 and |
|
|
|
59. |
|
|
• |
“Video setting” on |
|
|
|
pages 48 and 82 |
|
|
• “Still image setting” on |
|
|
|
|
pages 48 and 85 |
|
|
|
|
|
|
Capture fast-moving subjects |
|
||
• |
“Scene select” (sports mode) on page 48 |
|
|
Suppress camera shake effect |
|
||
• |
“Video stabilizer setting” on pages 50 and 88 |
|
|
English 6

QUICK SEARCH BY OPERATION
Shooting/recording
Basic operation |
Convenient functions |
Additional functions |
Shoot in dark conditions
• “Exposure compensation” on page 96
• “Using the flash” on pages 44, 48 and 65
• “Scene select setting” (night view portrait mode/fireworks mode/lamp mode) on pages 48 and 86
Increase the camera’s sensitivity
• “ISO sensitivity setting” on pages 50 and 91
• “High sensitivity mode setting” on pages 52 and 95
Photographing people
• “Scene select setting” (portrait mode/night view portrait mode) on pages 48 and 86
• “Filter setting” (cosmetic filter) on pages 48 and 86
Sharp face shots
• “Face chaser setting” on pages 52 and 94
Simplified operation for shooting/playback
• “SWITCHING BETWEEN THE RECORDING MODE AND PLAYBACK MODE” on page 36
Photographing landscapes
• “Scene select” (landscape mode) on page 48
Take a self-photo
• “Self-timer setting” on pages 48 and 87
|
Make images lighter |
Measure the |
|
|
or darker |
brightness of a |
|
|
• |
“Exposure compensation” |
specific area |
|
|
on page 96 |
• “Light-measuring mode |
|
• |
“High sensitivity mode |
setting” on pages 50 and |
|
|
setting” pages 52 and 95 |
90 |
|
|
|
Adjust the camera’s |
|
|
|
sensitivity |
|
|
|
• “ISO sensitivity setting” |
|
|
|
pages 50 and 91 |
|
|
|
For a more precise |
|
|
|
exposure setting |
|
|
|
• “Exposure setting” |
|
|
|
(manual exposure control) |
|
|
|
on pages 52 and 93 |
|
|
|
|
|
Change the color of |
Make white appear |
|
|
the images |
natural |
|
|
• |
“Filter setting” |
• “White balance setting” on |
|
|
(monochrome filter/sepia |
pages 52 and 92 |
|
|
filter) on pages 48 and 86 |
|
|
|
|
|
7 English

Playback
|
Basic operation |
Convenient functions |
Additional functions |
|
Getting started |
Adjust the speaker |
Change the angle of |
||
viewing images |
volume |
view |
||
• “PLAYING BACK VIDEO |
• |
“PLAYBACK VOLUME” |
• “Rotate” on pages 53 and |
|
|
CLIPS AND STILL |
|
pages 53 and 75 |
102 |
|
IMAGES” on page 70 |
Search for image/ |
Reduce the photo |
|
|
|
audio files |
size |
|
|
|
• |
“21-image display |
• “Resize” on pages 53 |
|
|
|
playback” on page 79 |
and 102 |
|
|
• |
“Selecting the playback |
|
|
|
|
folder” on pages 54 and |
|
|
|
|
80 |
|
|
|
Magnify an image |
|
|
|
|
• |
“Magnifying (zooming in) |
|
|
|
|
the image” on page 81 |
|
|
|
|
|
|
• |
“Audio playback” on |
Adjust the speaker volume |
||
|
page 84 |
• |
“PLAYBACK VOLUME” on pages 53 and 75 |
|
|
|
|
|
|
Continuous playback |
|
|
|
|
• “SLIDESHOW PLAYBACK” on pages 46, 74 and 98 |
|
|||
|
|
|||
Adjust the monitor brightness |
|
|||
• |
“Adjusting the monitor brightness” on page 64 |
|
||
• |
“BRIGHTNESS setting” on page 124 |
|
||
|
|
|
|
|
Playback on a TV |
|
|
|
|
• “PLAYING BACK ON A TV” on page 160 |
|
|||
Set the TV system |
|
|
|
|
• |
“TV output setting” on pages 124 and 131 |
|
||
English 8

QUICK SEARCH BY OPERATION
File managing/processing
Basic operation |
Convenient functions |
Additional functions |
Search for image/audio files
•“21-image display playback” on page 79
•“Selecting the playback folder” on pages 54 and 80
Delete files |
Protect files from accidental erasure |
|
• “DELETING FILES” on |
• |
“File protect setting” on pages 53 and 99 |
pages 46, 53 and 76 |
Format a card |
|
|
• |
“Formatting (initializing)” on pages 126 and 137 |
|
|
|
Delete a part of a video clip and join video clips
• “Editing video clips” on pages 54 and 104
Specify the number of prints, index print, and date imprint
• “Printing instructions” on pages 54 and 115
View the settings that were in effect when the image/audio files were recorded
• “FILE INFO DISPLAY” on page 119
9 English

Using with a computer
Basic operation |
Convenient functions |
Additional functions |
Use the camera as a card reader
•“SETTING THE CONNECTION MODE” on page 143
•“USING AS A CARD READER” on page 145
Use your computer to organize/edit files that were recorded with your camera
• “USING THE SOFTWARE” on page 151
Copy data from your |
Using with Windows Vista |
camera to a computer |
• “SETTING THE CONNECTION MODE” on page 143 |
• “Copy files to the |
|
computer (Windows XP)” |
|
on page vi |
|
• “OPERATING |
|
ENVIRONMENT” on |
|
page 142 |
|
• “SETTING THE |
|
CONNECTION MODE” |
|
on page 143 |
|
|
|
Playback
• “About video clip files recorded with this camera” on page 149
Using as a webcam
• “USING AS A PC CAMERA” on page 150
Record an image of the computer screen
• “Install Screen Capture” on page 155
English 10
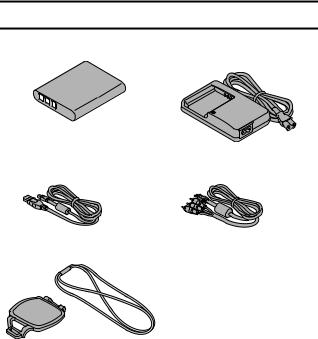
CHECKING THE INCLUDED ACCESSORIES
i Li-ion battery pack: 1 |
i Lithum-ion battery pack |
|
charger and power card: 1 |
i Dedicated USB interface |
i Dedicated AV interface cable |
cable (page 143): 1 |
(page 158): 1 |
i Lens cap (page 13): 1
11 English
i “SAFETY MANUAL”
(safety precautions booklet) Please read this booklet carefully before using the camera.
i Obtaining the PDF instruction manual and cautions
i Quick Guide
Included with model VPC-CG10GX. Not included with other models.
English 12
CHECKING THE INCLUDED ACCESSORIES
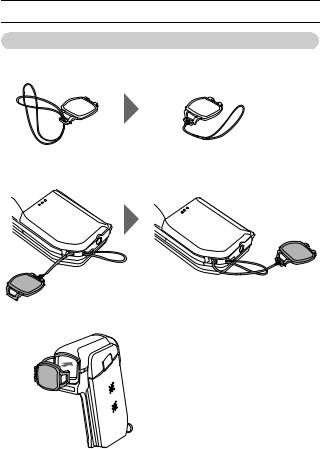
How to use the accessories
k How to attach the lens cap
12
34
5
13 English

ABOUT THE CARD
Media cards that can be used with this camera
The type of card that can be inserted into and used with this camera is: i SD Memory Card
i SDHC Memory Card
What “card” means in this manual
i In this manual, SD Memory Cards and SDHC Memory Cards that can be used in this digital camera are referred to as “card”.
English 14
GETTING THE MOST OUT OF YOUR CAMERA
Your dual camera can record video clips in High Definition.
High-quality images with “High Definition” (pages 48, 59 and 82)
Your camera can capture high definition (HD) 1280 × 720-pixel video clips. Also, the H.264/MPEG-4 AVC standard is used for formatting video files. You get both compact file size and high picture quality in one high-performance camera.
15 English
Includes SIMPLE mode for quick-and-easy operation (page 37)
Select from two recording/playback modes: the “SIMPLE mode” for users new to the camera, and the “NORMAL mode” for full use of all the camera’s many features and functions.
Example:
Select video |
|
and photo size |
|
S N |
|
EXIT |
OK |
<SIMPLE Mode Recording
Menu>
1 |
RECORDING MENU1 |
|
VIDEO |
HD-SHQ |
|
32 |
PHOTO |
|
|
SCENE SELECT |
|
1 |
FILTER |
|
2 |
FLASH |
|
3 |
SELF-TIMER |
|
|
EXIT |
OK |
<NORMAL Mode Recording
Menu>
Image stabilizer for sharp pictures (pages 50 and 88)
Your camera can compensate for the camera shake that results in blurry images when you try to capture a fast-moving subject, or when you zoom in while recording a video clip.
English 16

GETTING THE MOST OUT OF YOUR CAMERA
Sharp face shots (pages 52 and 94)
Your camera is equipped with a face recognition feature which detects the subject’s face even when slightly lit from behind or in dim surroundings and automatically adjusts the focus and brightness to compensate. Now those otherwise perfect photos that are marred by shadowed faces can be minimized.
17 English
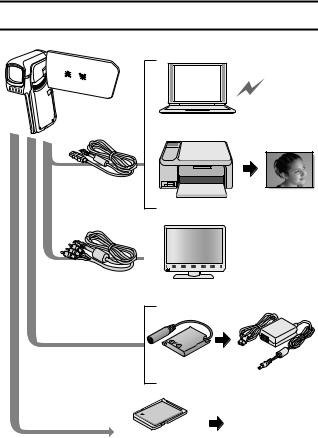
SYSTEM MAP
You can connect the camera to various devices to expand its capabilities.
Internet
Computer
Dedicated USB interface cable
Printer
Dedicated AV |
|
TV |
interface cable |
|
|
DC adaptor |
|
(Optional) |
AC adaptor |
|
(Optional) |
i Card reader
i DPOF-compatible printer
i Photo shop
Commercially available
SD Memory Card
English 18
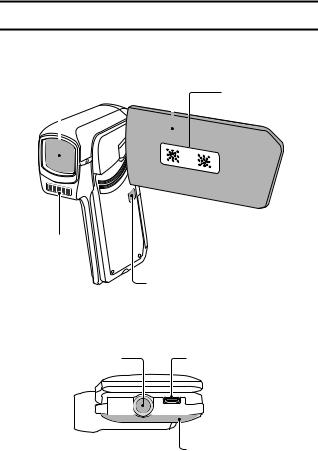
PARTS NAMES
Front
Monitor unit
Lens |
Stereo microphone |
|
|
|
|
|
|
|
|
|
|
Flash
ON/OFF button
Bottom
Tripod stand hole |
USB/AV terminal |
|||
|
|
|
|
|
Battery cover
19 English
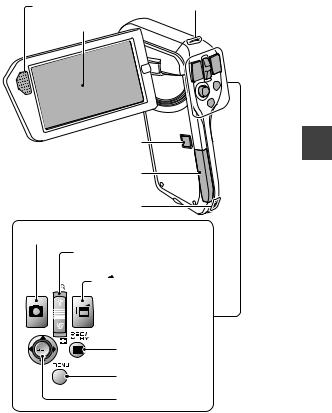
Rear
Speaker |
Multi-indicator |
|
|
Monitor |
|
SETUP
ON/OFF button
Card slot cover
Strap holder
[  ] button
Zoom switch [T/]]/[W/P]
[ 
 ] button
REC/PLAY button |
MENU button |
SET button |
English 20
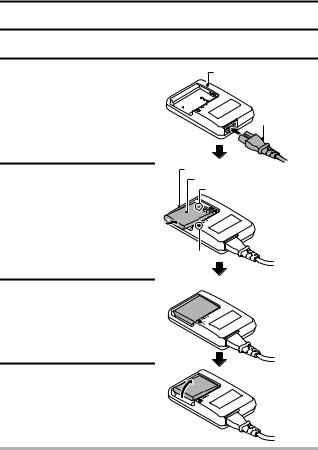
CHARGING THE BATTERY PACK
Please charge the supplied battery pack before using it.
1 Connect the supplied power cord to the socket on the battery pack charger.
hInsert the connector straight and securely.
2 Insert the battery pack in the battery charger.
hInsert it in the direction indicated by the [o] mark on the battery pack.
3 Plug the power plug into a power outlet (AC 100 V to 240 V).
h Charging begins.
hThe CHARGE indicator is lit during charging.
4 When the CHARGE indicator turns off, unplug the power cord from the power outlet, and remove the battery pack from the charger.
Battery pack charger
Power cord
Battery pack charger Battery pack
[o] mark
CHARGE |
|
indicator |
To power outlet |
|
HINT
i Charging takes approximately 120 min.
21 English
 Loading...