


GUIDE FOR
BASIC OPERATION
Dual Camera
VPC-CG100EX VPC-CG100GX VPC-CG100PX VPC-CG100TA VPC-CG102
Important note
This manual explains how to safely operate the VPC-CG100EX, VPC-CG100GX, VPC-CG100PX, VPC-CG100TA and VPC-CG102.
Any information regarding only one of these products will be labeled as such.
Please read these instructions carefully before using the camera.
Make sure to read and understand the separate booklet “SAFETY MANUAL”. Keep this manual in a safe place for later reference.

HOW TO READ THIS MANUAL
For first-time users
Please read this manual to familiarize yourself with your camera’s
operation.
↓
To use the various camera features
The Instruction Manual that explains the features in detail can be
obtained from our website (page 42).
↓
To use additional features
Visit the Sanyo website to learn how to adjust the camera settings for various shooting scenes. There you’ll also find information about the software for playing back data recorded with your camera and for burning (recording) DVDs (page 42).
You may find the answers to questions or problems concerning camera operation in the sections “COMMONLY ASKED QUESTIONS” (page 49).
Symbols used in this manual
HINT |
Points giving some extended instructions or special points to pay |
CAUTION |
attention to. |
Points that require special attention. |
|
(page xx) |
Refer to the page indicated for detailed information. |
i English
SHOOT, PLAY BACK AND SAVE
Preparing the camera
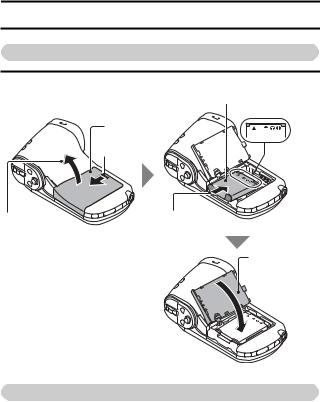
1 Insert the battery pack.
Battery pack Connector markings
Battery cover
1 Push out
2 Open |
3 Insert by matching |
|
the connector markings |
4 Close
About saving your recorded data
hIf you wish to use an SD Memory Card, refer to page 12 to install the card in the camera.
hAn SD Memory Card is not included with your camera. Please purchase a commercially sold card.
hThis camera has an internal memory, so you can shoot and record without an SD Memory Card installed.
English ii
Shooting
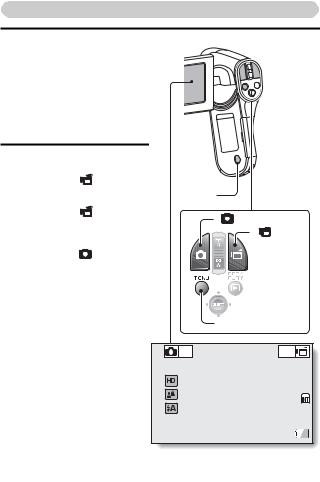
1 Press the ON/OFF button for at least 1 second to turn the camera on.
h If the screen to set the date and time appears, press the MENU button 2 times to cancel it.
For how to set the date and time, see page 20.
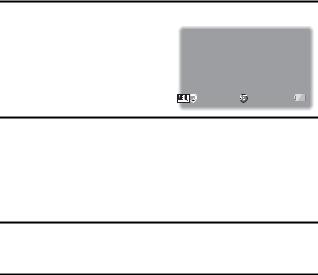
2 Record. |
|
|
|
|
To record a video clip: |
|
|
|
|
h Press the [ |
] button to |
|
|
|
begin recording a video |
ON/OFF |
|
|
|
clip. |
|
button |
|
|
h Press the [ |
] button |
[ |
] button |
|
again to end the |
|
|||
|
[ |
] button |
||
recording. |
|
|
||
To take a photo: |
|
|
|
|
h Press the [ |
] button. |
|
|
|
h A still image is captured. |
|
|
|
|
|
|
MENU button |
|
|
|
|
14M-S |
|
Full-HD |
|
|
10 |
|
000:00:14 |
iii English
Before capturing those important shots, be sure to first take a test shot to confirm that your camera is set up and ready to go
i Sanyo declines any claim for compensation for recorded contents etc. in case of photographing or recording failure due to a chance camera or card flaw.
Playback
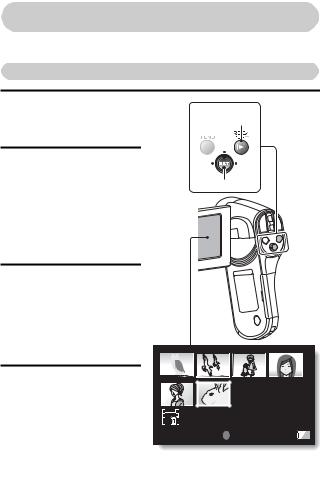
1 Press the REC/PLAY |
REC/PLAY |
|
button. |
button |
|
h The display changes to |
||
|
||
the Playback Screen. |
|
|
2 Select the image to play |
|
|
back. |
|
|
h Toggle the SET button to |
SET button |
|
move the orange frame |
||
|
||
to the image you wish to |
|
|
play back. |
|
|
h The image information |
|
|
for the framed image is |
|
|
shown in the bottom part |
|
|
of the monitor. |
|
3 Press the SET button. h Playback begins.
<To return to the recording mode>
h Press the REC/PLAY button.
Deleting files |
|
|
|
|
1 On the screen in step 2, |
|
|
|
|
move the orange frame to |
|
|
|
|
the file you wish to delete, |
|
|
|
|
and press the MENU |
|
|
100-0006 |
|
button. |
Full-HD |
|
||
6.5MB |
00:00:05 |
|||
|
|
|
|
|
|
|
SET OK |
||
2 Select “DELETE”, and |
|
|
|
|
|
|
|
|
|
|
|
|
|
Remaining battery |
|
|
|
press the SET button. |
|
|
|
|
|
|
||
|
Orange frame |
|
|
|
||||
|
|
|
||||||
|
|
|
|
|
|
power indication |
||
|
|
|
|
|
|
|||
English iv

3 Select “DELETE SINGLE”, and press the SET button.
4 Select “DELETE”, and press the SET button.
hIf you toggle the SET button to the left or right, the screen to delete a different file will appear.
5 When you are finished deleting files, press the MENU button.
hPressing the MENU button 3 times will return you to the screen in step
2.
When you are finished using the camera...
Press the ON/OFF button for at least 1 second to turn the camera off.
v English
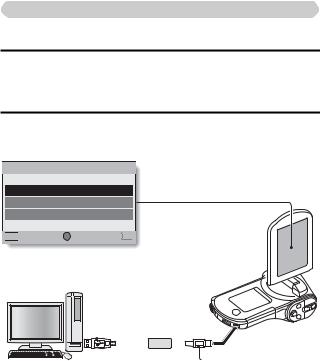
Copy data from your camera to the computer
Connect your camera to a computer, and copy the desired data to the computer.
1 Turn on the computer, and use the supplied dedicated USB interface cable to connect your camera to the computer.
hConnect the cable between the camera’s USB/AV terminal and the computer’s USB connector.
2 Turn on the camera (page 17).
h The USB Connection Screen appears on the camera’s monitor.
USB CONNECTION
COMPUTER
PRINTER
CANCEL


 CANCEL SET OK
 To USB connector
|
|
|
|
|
|
|
|
|
|
To USB/AV terminal |
Supplied dedicated |
|
|||||||||
USB interface cable |
|
|
|
|||||||
|
|
|
|
|
|
|
|
|
|
|
English vi
3 Select “COMPUTER”, and press the SET button.
h The screen to select the |
|
|
USB CONNECTION |
||
computer connection mode |
||
|
||
appears. |
CARD READER |
|
|
MTP |
|
|
SCREEN CAPTURE |
|
|
PC CAMERA |
|
|
CANCEL |
|
|
|
|
|
OK |
|
|
|
4 Select “CARD READER”, and press the SET button.
h The message [Found New Hardware] appears in the task tray, showing that the camera is recognized as a drive.
hThe card is recognized (mounted) as a disk, and the [XACTI (E:)] icon appears in the [My Computer] window.
h The drive name (E:) may be different on your computer.
<If the access menu (page 47) appears> h Click on [Exit] to cancel the access menu.
5 Select an action.
hIf the [XACTI (E:)] window appears automatically, select the desired procedure from the window.
6 Copy files from the camera to a computer.
vii English

Dismounting the camera
CAUTION
i To disconnect your camera, be sure to follow the procedure below. Failure to follow this procedure may cause faulty operation of your computer or corrupt the files in your camera.
1 Left-click on the icon for safely removing hardware in the task tray.
hA list appears showing the devices connected to the computer’s USB connector.
2 Left-click on the camera drive (E:).
hThe camera can now be disconnected.
h The drive name (E:) may be different on your computer.
No software is included with this camera. Please visit our website to obtain the available software.
English viii

CONTENTS |
|
HOW TO READ THIS MANUAL ............................................................. |
i |
CHECKING THE INCLUDED ACCESSORIES ...................................... |
3 |
How to use the accessories ............................................................ |
5 |
ABOUT THE CARD ............................................................................... |
6 |
Media cards that can be used with this camera .............................. |
6 |
What “card” means in this manual .................................................. |
6 |
SETUP |
|
PARTS NAMES ..................................................................................... |
7 |
CHARGING THE BATTERY PACK ....................................................... |
9 |
Charging the battery pack ............................................................. |
10 |
INSTALLING THE CARD ..................................................................... |
12 |
INSTALLING THE BATTERY PACK .................................................... |
14 |
About the temperature alert icon \ .......................................... |
16 |
TURNING THE CAMERA ON AND OFF ............................................. |
17 |
Turning on the camera .................................................................. |
17 |
Turning off the camera .................................................................. |
17 |
Turning on the camera when the power save (sleep) mode is |
|
active ........................................................................................ |
18 |
DATE AND TIME SETTING ................................................................. |
20 |
SWITCHING BETWEEN THE RECORDING MODE AND |
|
PLAYBACK MODE .......................................................................... |
23 |
SWITCHING THE OPERATING MODE .............................................. |
24 |
Switching between the SIMPLE and NORMAL modes ................ |
24 |
Accessing/exiting the SIMPLE/NORMAL Mode Menu Screen ..... |
25 |
SHOOTING |
|
VIDEO CLIP RECORDING .................................................................. |
29 |
SHOOTING SINGLE SHOTS .............................................................. |
30 |
SHOOT A STILL IMAGE WHILE RECORDING A VIDEO CLIP .......... |
32 |
MACRO-PHOTOGRAPHY (ZOOM) .................................................... |
34 |
PLAYBACK |
|
PLAYING BACK VIDEO CLIPS AND STILL IMAGES ......................... |
36 |
How to save one frame from a video clip as a still image ............. |
38 |
1 English
CONNECTING TO A TV |
|
CONNECTING TO A TV ....................................................................... |
39 |
Connecting to a video input terminal ............................................. |
40 |
Connecting to the HDMI terminal .................................................. |
40 |
PLAYING BACK ON A TV .................................................................... |
41 |
OBTAINING THE INSTRUCTION MANUAL |
|
OBTAINING THE INSTRUCTION MANUAL ........................................ |
42 |
Contents of the Instruction Manual ................................................ |
42 |
How to obtain the Instruction Manual ............................................ |
46 |
ABOUT THE EYE-FI TRANSFER FEATURE |
|
About the Eye-Fi transfer feature .......................................................... |
48 |
APPENDICES |
|
COMMONLY ASKED QUESTIONS ..................................................... |
49 |
SPECIFICATIONS ................................................................................ |
57 |
Camera .......................................................................................... |
57 |
Camera connectors ....................................................................... |
61 |
Battery life ..................................................................................... |
61 |
Possible No. of Images/Possible Shooting Time/ |
|
Possible Recording Time .......................................................... |
62 |
Concerning the multi-indicator ....................................................... |
63 |
Supplied battery pack charger ....................................................... |
64 |
Supplied Li-ion battery pack .......................................................... |
64 |
Others ............................................................................................ |
65 |
Before capturing those important shots, be sure to first take |
|
a test shot to confirm that your camera is set up and |
|
ready to go ................................................................................ |
66 |
English 2
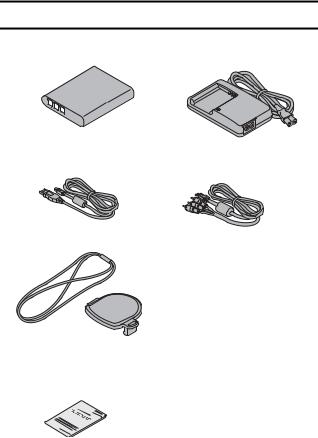
CHECKING THE INCLUDED ACCESSORIES
i Li-ion battery pack: 1 |
i Lithium-ion battery pack |
|
charger and power cord: 1 |
i Dedicated USB interface |
i Dedicated AV interface cable |
cable (page 46): 1 |
(page 40): 1 |
i Lens cap (page 5): 1 |
i GUIDE FOR BASIC |
|
OPERATION |
|
(VPC-CG100EX, |
|
VPC-CG100GX, |
|
VPC-CG100PX, |
|
VPC-CG100TA only) |
i SAFETY MANUAL
(safety precautions booklet) Please read this booklet carefully before using the camera.
3 English
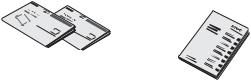
i QUICK GUIDE |
i Obtaining the PDF instruction |
|
manual and cautions |
English 4

How to use the accessories
k Lens cap |
|
1 |
2 |
|
▲ |
3 |
4 |
|
▲ |
k Handstrap (Please purchase a commercially available handstrap.) i To avoid dropping the camera, it is recommended that you attach a
handstrap.
▲ |
▲ |
5 English
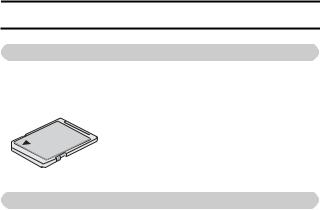
ABOUT THE CARD
Media cards that can be used with this camera
The type of card that can be inserted into and used with this camera is: i SD Memory Card
i SDHC Memory Card
i SDXC Memory Card
What “card” means in this manual
i In this manual, SD Memory Cards, SDHC Memory Cards and SDXC Memory Cards that can be used in this dual camera are referred to as “card”.
English 6
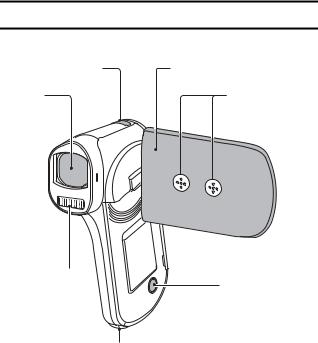
PARTS NAMES
Front
ZOOM RANGE button |
Monitor unit |
Lens |
Stereo microphone |
Flash
ON/OFF button
*The tripod mounting hole is on the bottom.
7 English
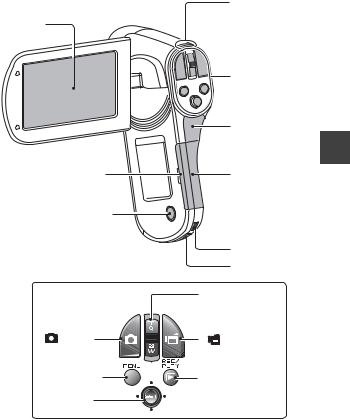
Rear
|
|
|
Multi-indicator |
Monitor |
|
|
|
|
|
|
Operation pad |
|
|
|
DC IN |
|
|
|
terminal cover |
Card slot cover |
|
Battery cover |
|
|
ON/OFF button |
|
|
|
|
|
USB/AV terminal |
Operation pad |
|
HDMI terminal |
|
|
|
||
|
|
Zoom switch |
|
[ |
] button |
[ |
] button |
Photo shooting |
Video recording |
||
button |
button |
||
|
MENU button |
REC/PLAY button |
|
|
SET button |
|
|
SETUP
English 8
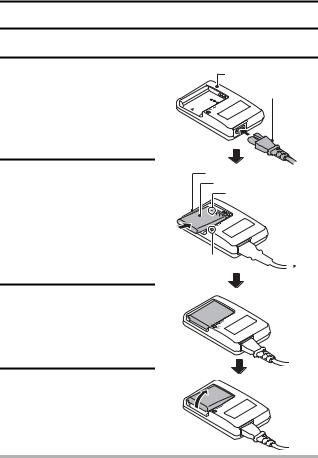
CHARGING THE BATTERY PACK
Please charge the supplied battery pack before using it.
1 Connect the supplied power cord to the socket on the battery pack charger.
hInsert the connector straight and securely.
2 Insert the battery pack in the battery charger.
hInsert it in the direction indicated by the [o] mark on the battery pack.
3 Plug the power plug into a power outlet (AC 100 V to 240 V).
h Charging begins.
hThe CHARGE indicator is lit during charging.
4 When the CHARGE indicator turns off, unplug the power cord from the power outlet, and remove the battery pack from the charger.
Battery pack charger
Power cord
Battery pack charger Battery pack
[o] mark
CHARGE  indicator To power outlet
HINT
i Charging takes approximately 120 min.
9 English

Charging the battery pack
Be sure to fully charge the supplied or separately sold battery pack before using it in your camera. For charging the battery pack, use the supplied charger.
Charge the battery pack if it is being used for the first time, and recharge it whenever the remaining charge is low.
Does the battery pack feel hot?
i During charging, the charger and battery pack will be warm. This is normal and does not indicate a malfunction.
If there is interference to your TV or radio during charging...
i Move the battery pack and charger further away from the TV or radio.
Ambient temperature during charging
i It is recommended that the ambient temperature during charging be between about 10 °C and 35 °C (50 °F and 95 °F). Due to the characteristics of the battery pack, at temperatures below 0 °C (32 °F), it may not be possible to sufficiently charge it.
i When the battery pack temperature is high, the safety function may be activated and halt charging.
Charge a battery pack in the following cases
i A battery pack which has not been used for a long time i Newly purchased battery pack
FOR AMERICAN USERS:
i Use a UL Listed, 1.8 to 3 m (6 to 10 ft.), Type SPT-2 or NiSPT-2, AWG No.18 power supply cord, rated for 125 V 7 A, with a non-polarized NEMA 1-15P plug rated for 125 V 15 A.
SETUP
English 10

About the CHARGE indicator
The CHARGE indicator shows the status of the battery pack and the charger. Please refer to the following table if the indicator flashes abnormally.
CHARGE indicator
Not lit |
Not connected properly |
|
i To recharge the battery pack, the power cord of the |
|
charger must be connected to a power outlet, and the |
|
plug at the other end inserted in the charger’s power |
|
socket (page 9). |
|
i The battery pack is not installed, or it is not installed |
|
correctly (page 9). |
|
Charging finished |
Lit |
Charging |
|
|
Flashing |
Problem with the battery pack or battery pack charger |
|
i Immediately remove the battery pack from the charger. |
|
i Do not use an abnormal battery pack. (The usable life of |
|
the battery pack has probably expired.) |
|
|
CAUTION
Do not charge the battery pack immediately after the camera has been in continuous use for a long time
i The battery pack becomes hot when the camera is used continuously for a long time. If you attempt to charge the battery pack in this state, the safety function may be activated and it may not be possible to charge the battery pack. Wait until the battery pack has cooled down before attempting to charge it.
11 English
INSTALLING THE CARD
Be sure to format a newly purchased card or one that was used in another device before using it in your camera (page 13). If an unformatted card is used, the card itself may become unusable.
Card slot cover |
4 Close |
|
1 Raise up |
||
|
||
▲ |
SETUP |
|
2 Swivel |
|
|
|
3 Insert the card |
<When removing the card...>
hTo remove the card, press it in, and then release. The card will protrude slightly, and you can then pull it out.
2 Pull it out
1 Push the card in
English 12

CAUTION
Do not attempt to forcibly remove the card
i Doing so may damage the card or the stored files.
If the multi-indicator is flashing red...
i Never remove the card when the multi-indicator is flashing red, as doing so may result in loss of files stored in the card.
HINT
To format a card
1 Insert the card in the camera, and press the ON/OFF button (pages 12 and 17).
2 Set the camera to the NORMAL mode (page 24). 3 Press the MENU button.
4 Select the [E] tab, and press the SET button.
5Select “FORMAT” and press the SET button.
i The Format Screen appears. Follow the instructions on the screen to
format the card.
Shooting without a card installed
i When a card is installed, images are recorded to and played back from the card. When no card is installed, images are recorded to and played back from the camera’s internal memory. When the camera is turned on with no card installed, the internal memory icon 


 is shown on the monitor to let you know that the images you capture will be saved to the camera’s internal memory.
13 English
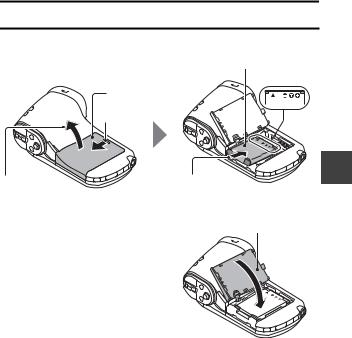
INSTALLING THE BATTERY PACK
Please charge the supplied battery pack before using it.
Battery pack Connector markings
Battery cover
1 Push out
2 Open |
3 Insert by matching |
|
the connector markings |
 4Close
SETUP
English 14
 Loading...