


SETUP MANUAL
Megapixel Camera
Caméra à mégapixels
Cámara de megapíxeles
Megapixel-Kamera
THIS INSTALLATION SHOULD BE MADE BY A QUALIFIED SERVICE PERSON AND SHOULD CONFORM TO ALL LOCAL CODES.
Before installing and using the camera, please read this manual carefully. Be sure to keep it handy for later reference.
In addition, be sure to read carefully the electronic manual (INSTRUCTION MANUAL) contained in the supplied CD-ROM to ensure correct operation of the camera.
 Important
•Be careful when opening holes for installing the unit. Work with the power and video cables pulled out for easy installation.
•Make sure to properly perform waterproofing for the ceiling or wall where you are installing the unit.
•Make sure that the surface in the installation location has no unevenness and is strong enough to bear the total weight of the unit.
•Install this unit in an environment where the temperature range stays between -10°C and +50°C/14°F and 122°F (no condensation allowed).
•As a precaution against static electricity damage, touch a nearby metal object (door knob, etc.) to dissipate static electricity in your body before touching this unit.
This manual covers six models. Any difference among the six models is indicated when necessary.
F
CETTE INSTALLATION DOIT ETRE EFFECTUEE PAR UNE PERSONNE QUALIFIEE DU SERVICE TECHNIQUE ET DOIT ETRE CONFORME A TOUS LES CODES LOCAUX.
Avant d’installer et d’utiliser la caméra, lisez attentivement ce manuel. Gardez-le accessible pour pouvoir le consulter ultérieurement.
Veuillez également lire très attentivement le manuel électronique (INSTRUCTION MANUAL) contenu dans le CD-ROM afin de faire fonctionner la caméra correctement.
 Important
•Attention lorsque vous percez des trous pour installer l’appareil. Travaillez avec les câbles d’alimentation et vidéo sortis pour faciliter l’installation.
•Lors de l’installation de l’appareil, veillez à bien imperméabiliser le plafond ou le mur d’installation.
•Assurez-vous que la surface du lieu d’installation ne présente aucune irrégularité et est assez solide pour supporter le poids total de l’appareil.
•Installez cet appareil dans un environnement où la plage de températures reste entre -10°C et +50°C/14°F et 122°F (aucune condensation autorisée).
•Pour éviter tout dommage électrostatique, touchez un objet métallique (poignée de porte, etc.) pour diffuser l’électricité statique dans votre corps avant de toucher l’appareil.
Le présent manuel d’installation couvre deux modèles. Les éventuelles diffrénces entre les deux modèles sont indiquées quand cela est nécessaire.
E
LA INSTALACIÓN TIENE QUE SER REALIZADA POR UNA PERSONA DE SERVICIO Y TIENE QUE ESTAR DE ACUERDO CON LOS CÓDIGOS LOCALES.
Lea cuidadosamente este manual antes de instalar y usar la cámara. Asegúrese de guardarlo a su alcance para futuras consultas.
Además, es preciso leer atentamente el manual electrónico (INSTRUCTION MANUAL) contenido en el CD-ROM para garantiza que se utiliza correctamente la cámara.
 Importante
•Tener cuidado a la hora de abrir los orificios para instalar la unidad. Trabajar sin los cables de vídeo y de energía para una instalación más fácil.
•Asegurarse de realizar una impermeabilización apropiada del techo o de la pared donde se instala la unidad.
•Comprobar que la superficie del lugar de instalación no tiene desniveles y que es lo suficientemente resistente como para soportar el peso total de la unidad.
•Instalar esta unidad en un ambiente cuya temperatura está entre -10°C y +50°C/14°F y 122°F (no se permite condensación).
•Como medida precautoria contra los daños causados por la electricidad estática, antes de tocar esta unidad tocar un objeto metálico que se encuentre cerca (el pomo de la puerta, etc.) para disipar la electricidad estática presente en el cuerpo.
Este manual se refiere a dos modelos. Las especificaciones de la lente son diferentes en los dos modelos.
VDC-HD3500P/HD3500
VDC-HD3300P/HD3300
VDC-HD3100P/HD3100
Ceiling Mounting |
|
Wall Mounting |
|
|
|
94 (3.7) |
86 (3.4) |
F146 (5.7) |
F114 (4.5) |
|
86 (3.4) |
Unit: mm (inch)
D
DIESE INSTALLATION IST QUALIFIZIERTEM SERVICE-PERSONAL VORBEHALTEN UND MUSS MIT ALLEN LOKALEN GESETZESVORSCHRIFTEN KONFORM SEIN.
Bevor Sie diese Kamera einrichten und verwenden, lesen Sie bitte dieses Handbuch sorgfältig durch. Bewahren Sie es so auf, dass Sie es bei Bedarf immer zur Hand haben.
Lesen Sie außerdem auch die auf der CD-ROM enthaltene elektronische Anleitung (INSTRUCTION MANUAL), um die korrekte Bedienung der Kamera zu gewährleisten.
 Wichtiger Hinweis
•Vorsicht bei der Anbringung von Löchern für die Installierung der Einheit. Ziehen Sie Netzund Videokabel während der Arbeit, um die Installierung zu vereinfachen.
•Stellen Sie sicher, dass die Deckenoder Wandinstallation der Einheit wasserdicht ausgeführt.
•Stellen Sie sicher, dass der Installationsort für das Gewicht der Kamera ausreichend tragfähig ist und eine ebene Oberfläche aufweist.
•Installieren Sie die Einheit an einem Ort mit Temperaturen zwischen -10°C und +50°C (nicht kondensierend).
•Berühren Sie zur Vermeidung von Schäden durch elektrostatische Entladungen einen Metallgegenstand in der Nähe (Türknauf o.Ä.), damit die statische Ladung aus Ihrem Körper abgeleitet wird, bevor Sie die Einheit berühren.
Diese Installationsanleitung gilt für zwei Modelle. Die Unterschiede swischen den zwei Modellen sind ggf. Angegebe.
CD-ROM |
(INSTRUCTION |
MANUAL) |
|
|
|
|
|
• |
|
• |
|
• |
|
• |
-10°C +50°C |
• |
|
|
|
1 PREPARATION
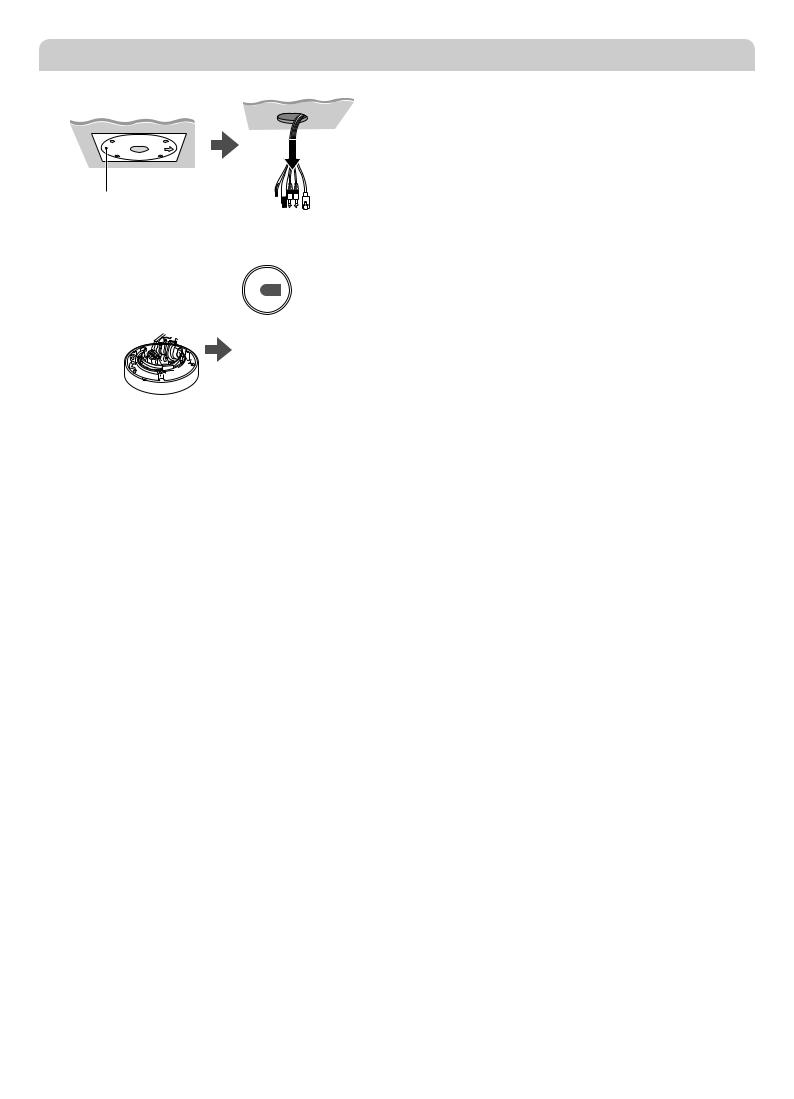
1 Drilling a cable hole/screw holes
Ceiling (Wall)
Pattern Sheet (supplied)
•Ceiling Mounting: Direct the arrow ( CEILING) to the subject.
•Wall Mounting: Direct the arrow ( WALL TOP) upward.
2 Open
Hexagonal Wrench
(supplied)
To insert an SD card (VDC-HD3500P/HD3500)
|
(A) |
Loosen the screws. |
|
|
Lift up the board and insert an SD |
|
|
card. |
|
|
• After you have inserted the SD |
|
|
card, make sure to fasten the |
|
|
screws firmly. |
(A)LED lamp
An LED lamp lights or flashes when the camera is powered on.
<When it flashes, it indicates either:>
•Recording to SD memory card stopped
•Firmware update is in progress
•An SD memory card error occurred (Fast brink)
If you want to take out the SD card from the slot, make sure that power is turned off.
Base Bracket (VA-85BX: sold separately)
We recommend you use the base bracket especially when you may not make a hole in the ceiling (wall), or there is no enough space available inside the ceiling (wall) for housing the connection cable. For the proper installation of this bracket, refer to the “Base Bracket” section on the separate sheet.
F
1Perçage d’un trou pour câble/de trous pour vis
•Montage au plafond: diriger la flèche ( CEILING) vers le sujet.
•Montage mural: diriger la flèche ( WALL TOP) vers le haut.
2 Ouverture
Pour l’insertion d’une carte SD (VDC-HD3500P/HD3500)
Desserrez les vis.
Soulevez la plaque et insérez une carte SD.
•Après avoir inséré la carte SD, veillez à serrer fermement les vis.
(A)Voyant LED
Quand la caméra est mise sous tension, un voyant LED s’allume ou clignote.
<S’il clignote, il indique:>
•Arrêt d’enregistrement sur carte mémoire SD
•Actualisation du micrologiciel en cours
•Défaillance carte mémoire SD (clignotement rapide)
Si vous souhaitez retirer la carte SD de la fente, assurez-vous que l’alimentation est coupée.
Support de base (VA-85BX : vendu séparément)
Nous vous recommandons d’utiliser le support de base surtout si vous ne pouvez pas percer le plafond (mur), ou s’il n’y a pas assez d’espace dans le plafond (mur) pour y loger le câble de connexion.
Pour installer correctement ce support, reportez-vous à la section « Base Bracket » sur la feuille séparée.
E
1Perforar el orificio para los cables/los orificios para los tornillos
•Montaje en el techo: Dirigir la flecha ( CEILING) hacia el sujeto.
•Montaje en la pared: Dirigir la flecha ( WALL TOP) hacia arriba.
2 Abrir
Para insertar una tarjeta SD (VDC-HD3500P/HD3500)
Aflojar los tornillos.
Levantar la placa e introducir una tarjeta SD.
•Después de insertar la tarjeta SD, asegurarse de apretar firmemente los tornillos.
(A)Piloto LED
Un piloto LED se enciende o parpadea cuando la cámara está conectada.
<Cuando parpadea, indica uno de los siguientes hechos:>
•Grabación en la tarjeta de memoria SD interrumpida
•Actualización del firmware en progreso
•Se ha producido un error en la tarjeta de memoria SD (parpadeo rápido)
Si se quiere sacar la tarjeta SD de la ranura, asegurarse de que la alimentación está desconectada.
Soporte de base (VA-85BX: vendido por separado)
Recomendamos el uso del soporte de base especialmente cuando no se puede hacer un orificio en el techo (pared), o no hay bastante espacio disponible dentro del techo (pared) para alojar el cable de conexión. Para la instalación correcta de este soporte, consultar “Base Bracket” en la hoja separada.
D
1Bohren eines Kabellochs/von Schraubenlöchern
• Deckenmontage: Richten Sie den Pfeil ( CEILING) auf das
Objekt.
• Wandmontage: Richten Sie den Pfeil ( WALL TOP) nach oben.
2 Öffnen
Installieren einer SD-Karte (VDC-HD3500P/HD3500)
Lösen Sie die Schrauben.
Heben Sie das Modul an und stecken Sie eine SD-Karte ein.
•Achten Sie darauf, die Schrauben nach der Installation der SD-Karte gut festzuziehen.
(A)LED-Lampe
Beim Einschalten der Kamera leuchtet oder blinkt eine LED-Lampe.
<Wenn sie blinkt, wird auf Folgendes hingewiesen:>
•Die Aufnahme mit der SD-Speicherkarte wurde gestoppt
•Die Firmware wird gerade aktualisiert
•Es ist ein Fehler in der SD-Speicherkarte aufgetreten (schnelles Blinken)
Vergewissern Sie sich vor dem Herausnehmen der SD-Karte aus ihrem Steckplatz, dass die Stromversorgung unterbrochen wurde.
Grundplattenhalterung (VA-85BX: separat erhältlich)
Wir empfehlen die Verwendung der Grundplattenhalterung insbesondere dann, wenn Sie kein Loch in die Decke (Wand) bohren können oder wenn in der Decke (Wand) nicht genug Platz für das Anschlusskabel vorhanden ist.
Weitere Angaben über die korrekte Montage dieser Halterung finden Sie im Abschnitt „Base Bracket“ auf dem separaten Blatt.
1 |
/ |
( CEILING) |
|
• |
|
2 |
• |
( WALL TOP) |
|
|
SD (VDC-HD3500P/HD3500)
SD
•SD
(A) LED
LED |
|
|
< > |
|
|
• SD |
|
|
• |
|
|
• SD |
( |
) |
SD
(VA-85BX: )
Base Bracket
 Loading...