


 Loading...
- i -

Manual |
|
TABLE OF CONTENT |
|
Overview................................................................................................................. |
6 |
Chapter 1................................................................................................................................. |
7 |
Network (IP) Cameras ............................................................................................ |
7 |
Digital Video Recorder........................................................................................... |
7 |
PTZ Cameras .......................................................................................................... |
8 |
USB and Web Cameras .......................................................................................... |
8 |
Frame Grabbers....................................................................................................... |
9 |
Video Pilot Terminology ...................................................................................... |
10 |
Toolbar.................................................................................................................. |
10 |
Structure Pane ....................................................................................................... |
11 |
Server .................................................................................................................... |
12 |
Client..................................................................................................................... |
13 |
Web Based Remote............................................................................................... |
14 |
ENTEPRISE SCALABILITY AND MONITORING.......................................... |
15 |
Chapter 2............................................................................................................................... |
16 |
Server Installation ................................................................................................. |
16 |
Software Activation .............................................................................................. |
17 |
Install Server Configuration.................................................................................. |
17 |
Server Network Settings and Port settings............................................................ |
17 |
Application Mode. ................................................................................................ |
18 |
Service Mode. ....................................................................................................... |
19 |
How to stop and start DVR services..................................................................... |
20 |
Client Server Connections .................................................................................... |
20 |
Control Server or Servers from your client application........................................ |
21 |
Chapter 3............................................................................................................................... |
22 |
Server Recording Properties-................................................................................ |
22 |
Server Communication Properties-....................................................................... |
23 |
Server Watchdog Properties ................................................................................. |
24 |
Start Watchdog with Server-................................................................................. |
24 |
Enable Watchdog-................................................................................................. |
24 |
Watchdog Operation ............................................................................................. |
24 |
Maintenance-......................................................................................................... |
24 |
Enable Periodic Restart- ....................................................................................... |
24 |
Server User Management- .................................................................................... |
25 |
Create Users or modify existing user rights.......................................................... |
25 |
System/User Permissions- .................................................................................... |
26 |
Submitting A Problem Report- ............................................................................. |
27 |
Chapter 4............................................................................................................................... |
28 |
Setting up an IP camera… .................................................................................... |
28 |
IP Servers.............................................................................................................. |
28 |
Configure your IP cameras automatically............................................................. |
28 |
- ii - |
|

Configure your IP cameras manually. .................................................................. |
28 |
Access Tab............................................................................................................ |
29 |
Frame Tab ............................................................................................................. |
29 |
Setup Arecont Network IP Cameras..................................................................... |
30 |
Setup SANYO standalone DVR ........................................................................... |
31 |
Setup SANYO Pan Focus IP camera.................................................................... |
32 |
CCTV Camera Configuration............................................................................... |
32 |
Device Title........................................................................................................... |
32 |
Format Tab- .......................................................................................................... |
33 |
Frame Tab – .......................................................................................................... |
33 |
HiCap & XECAP Tab........................................................................................... |
34 |
PTZ Camera Properties......................................................................................... |
34 |
PTZ Protocols-Communication Settings .............................................................. |
35 |
PTZ Control Pane ................................................................................................. |
36 |
Save Presets, and Tours for PTZ Cameras............................................................ |
36 |
Digital PAN-Tilt-Zoom on live view.................................................................... |
37 |
Digital PAN-Tilt-Zoom on Playback.................................................................... |
37 |
Video Compression............................................................................................... |
37 |
Enable Video Transfer Properties:........................................................................ |
38 |
Image Quality........................................................................................................ |
38 |
Motion Analysis- .................................................................................................. |
39 |
Sensitivity Tab-..................................................................................................... |
39 |
Exclusion Tab-...................................................................................................... |
39 |
Data Recording ..................................................................................................... |
40 |
Time Lapse Recording:......................................................................................... |
41 |
Motion Control Recording:................................................................................... |
41 |
Video Adjustments: .............................................................................................. |
42 |
Toggle Video Amplification Pane ........................................................................ |
42 |
Exclusivity Mode (Windows lock out feature):.................................................... |
43 |
Chapter 5 – Sanyo DSR Settings .......................................................................................... |
44 |
Recording Status ................................................................................................... |
44 |
Clock Set............................................................................................................... |
44 |
Daylight Saving/Ext Clock set.............................................................................. |
44 |
Holiday Set............................................................................................................ |
45 |
Recording Area Set............................................................................................... |
45 |
Recording Conditions Set ..................................................................................... |
45 |
Normal REC Mode Set ......................................................................................... |
46 |
Program REC Set.................................................................................................. |
46 |
Timer Set............................................................................................................... |
47 |
Alarm REC Mode Set ........................................................................................... |
47 |
Display Set............................................................................................................ |
48 |
Buzzer Set ............................................................................................................. |
48 |
HDD Set................................................................................................................ |
48 |
Network Set .......................................................................................................... |
49 |
RS-485 Set ............................................................................................................ |
49 |
Mask Set................................................................................................................ |
49 |
Power Loss/Used Time ......................................................................................... |
50 |
Initialization Log................................................................................................... |
50 |
Chapter 6 - Sanyo Network Camera Settings ....................................................................... |
51 |
- iii -

Camera Settings .................................................................................................... |
51 |
Recording Settings................................................................................................ |
51 |
Clock Settings ....................................................................................................... |
52 |
E-Mail Settings ..................................................................................................... |
53 |
Network Settings................................................................................................... |
53 |
Chapter 7............................................................................................................................... |
54 |
How to Playback Video-....................................................................................... |
54 |
Playback Window Structure- ................................................................................ |
54 |
To Navigate through the Video -........................................................................... |
54 |
Fast forward & Rewind......................................................................................... |
54 |
Smart Search-........................................................................................................ |
55 |
Define motion of interest – ................................................................................... |
55 |
Export Video-........................................................................................................ |
56 |
Export Snapshots. ................................................................................................. |
57 |
Layouts.................................................................................................................. |
58 |
Layout Sequences ................................................................................................. |
59 |
Chapter 8............................................................................................................................... |
60 |
Upgrading Video Pilot software to a newer Version............................................ |
60 |
Specifications........................................................................................................................ |
61 |
Table of Recording rate and size .......................................................................... |
61 |
Minimum System Requirements........................................................................... |
62 |
- iv -
Overview
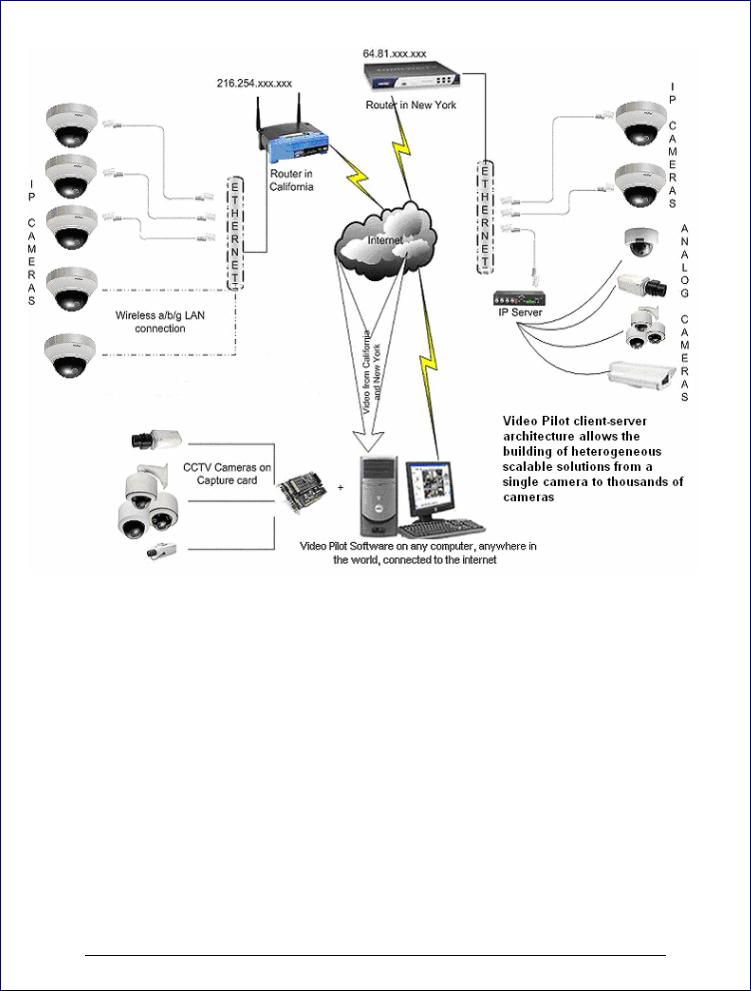
Video Pilot is a digital video recording and remote surveillance software package for Windows. Video Pilot accepts video streams from all major Network (IP) cameras and servers, Frame Grabbers and any Direct Show compatible devices including Webcams and USB cameras. This along with the Video Pilot client-server architecture allows you to build fully scalable solution sizing from a single camera up to thousands of cameras.
Video Pilot was designed to primarily be used to:
1.View live video streams from multiple sources locally and remotely, over the Internet. 2.Record video from multiple sources and play them back later locally or remotely 3.Export previously recorded video to preserve it and to present it as evidence.
Video Pilot offers a principally new concept for DVR solutions – “One Software/Choice of Hardware”. Video Pilot DVR software can be either integrated with supported hardware or acquired from a Video Pilot reseller as a part of a complete digital video recording and remote surveillance solution.
Video Pilot consists of two major components: DVRServer and DVRClient. The DVR Server is a behind-the-scene application that captures, processes and records video and then serves it to a local or remote DVR Client software. The DVR Client is the application that shows live and recorded video streams from a single DVR Server or multiple DVR Servers; it also allows users to configure and control DVR Server(s).
In order to better suit our customers' needs and budget, Video Pilot has 2 editions. These editions vary in the number of allowed cameras, the number of simultaneous remote DVR Client connections as well as other limitations, or lack thereof. However, all of the Video Pilot editions have the same user-friendly interface and functionality.
|
Advanced |
Enterprise |
Maximum Number of Video Streams |
16 |
Unlimited |
|
|
|
Maximum number of concurrent remote |
5 |
Unlimited |
DVR Client connections |
|
|
- 6 -
Chapter 1
Network (IP) Cameras
What is Network (IP) Camera? Network camera, IP addressable camera, IP Camera, all referring to the same type of cameras, is a digital camera that can be directly connected to the Internet through a CAT5 or WiFi connection. Network cameras send already digitized and compressed video streams. Network Cameras are the fastest growing trend in the Surveillance industry. Here are some of the benefits of IP cameras:
Existing local network infrastructure could be used for the installation. Comparably less cabling required compared with an analog CCTV
installation.
Network cameras have built-in motion detectors and compression engines, which enable the DVR Server to use a minimum of its computer resources; therefore, the same computer can also be used for other tasks.
There are no requirements on CPU or chipset manufacturers, since Network Cameras do not require any additional hardware to be installed in to the computer.
There are Network (IP) cameras with very high resolution (1.3 Mega pixels and more). Analog cameras are incapable of achieving such resolution.
Network (IP) camera installations are highly scaleable and upgradeable. There is no need to buy and install additional video capture boards for the DVR system in the event you want to add a camera or increase performance of the system.
Any analog camera can be converted to a network camera by using a Network (IP) server. There is no geographical limitation for the installation.
Effective offsite recording (either by itself or in addition to onsite recording) eliminates the possibility of destruction of the video medium due to deliberate actions or an accident (fire, flooding, etc.).
Some of the network cameras also can be used as a webcam to serve as an advertising engine for a business.
Video Pilot supports Network Cameras from all major manufacturers. Please visit the www.sanyocctv.com for the perpetually growing list of supported Network cameras.
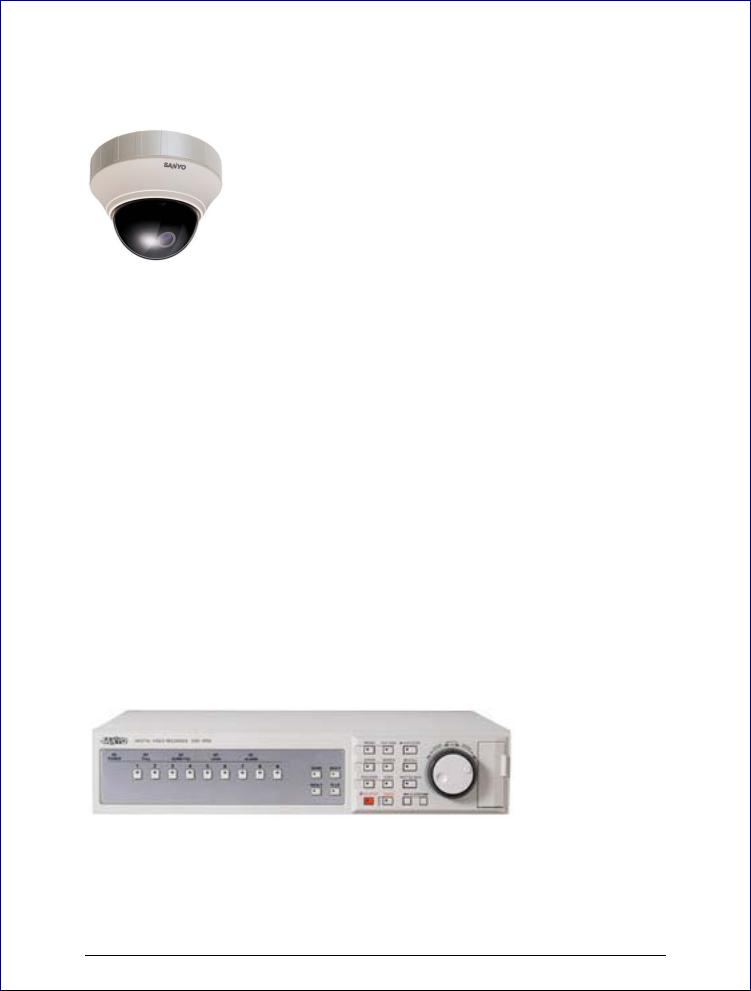
Digital Video Recorder
What is Digital Video Recorder? A DVR (digital video recorder) is a device that allows you to record video from analog cameras in digital format.
Digital recorders store the digitally encoded video on Hard Drives. The usually include additional features such as multiplexed analog display outputs, alarm recording, redundant recording onsite, video search functions for playback, and telemetry control of PTZ cameras.
The Sanyo Digital Recorders that Video Pilot connects to provide the same function as a video encoder; in that they bridge the gap between Analog cameras and the digital world allowing video
- 7 -

images to be transmitted over a network. Additional benefits include remote access to the telemetry controls, and redundant on-site recording
PTZ Cameras
What are PTZ Cameras? PTZ camera is the camera with the mechanical assembly for Panning, Tilting and Zooming the camera. There are many types of PTZ cameras available and their cost varies based on Speed, Zoom capacity, Manufacturer, etc. Analog CCTV PTZ cameras require additional set of wires compliant with RS422/485 protocol standard to control
PTZ movements. Therefore, usually it is necessary to put a RS232 to RS422/485 converter to a DVR system. RS232 to
RS422/485 converter is a small unit that plugs to the serial port on
the back of your computer.
Video Pilot currently supports the most popular Analog CCTV PTZ command protocols, including Sanyo, Pelco-D, Bosch, Philips and Merit-Lilin. Network PTZ cameras do not require any additional wiring or devices, since PTZ commands are being sent over a TCP/IP network; therefore, making the installation process much simpler and eliminating a lot of compatibility and configuration issues.
In the case of Sanyo PTZ cameras, they can be connected directly to the Sanyo DVR without the requirement of a converter.
USB and Web Cameras
Can I use my USB or Web Cameras? Yes, Video Pilot is the world’s leader in the best most economic, versatile and powerful DVR. We want everyone to be able to use our software and if you have a USB cam or a Web Cam, feel free to try our software for free and purchase as many licenses as you wish. Of course don’t forget that you are limited to USB ports with this option but for small users, Video Pilot is for you.
- 8 -
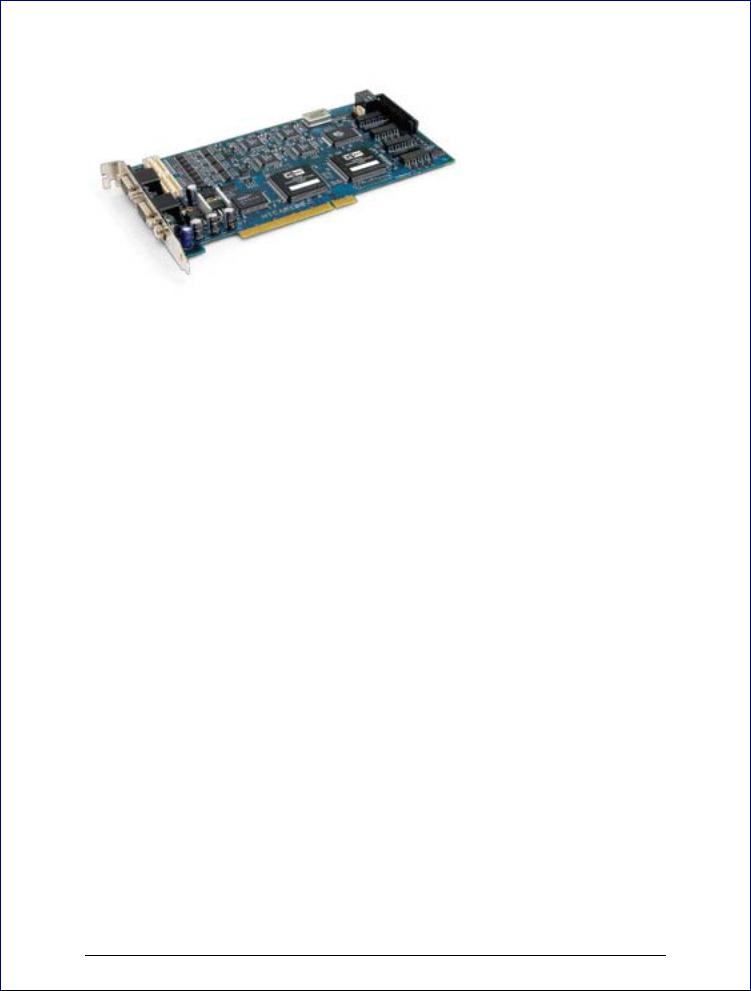
Frame Grabbers
What is Frame Grabber? Frame Grabber is a PCI board that is installed into the PC and CCTV cameras (Cameras with BNC or RCA connectors) are attached thereto. These boards come in various configurations 4 camera inputs, 8 inputs, 16 inputs, etc. and boards are made by various manufacturers. Also, depending on the Frame Grabber certain criteria is expected from the PC. Some frame grabbers require a minimum amount of PC power as where others require more. Frame Grabbers have the following terminology:
Inputs |
= The amount of cameras the board can handle (4, 8, 16, 24, 32) |
Frame Rate |
= Frame Grabbers supported by Video Pilot come in 60Frames, 120Frames and |
240Frames per second. These frames however, are the entire frame rate numbers divided by the amount of inputs; therefore if you have a 60FPS (Frame Per Second) board with 4 inputs, that means 4 divided by 60FPS = 15FPS per camera.
The other important factor in Frame rates is FPS viewing and FPS recording. What this means, is that you may view at 15FPS but choose to record any of your cameras at a lower FPS to save storage space. Remember, the higher the FPS the more storage space it needs since the data is larger. The same principle applies to image quality. The higher the image quality you choose, the more space is required. More on image quality on page 38
You can purchase these boards from any Video Pilot authorized reseller, or if you currently purchase or own any of the above cards, you only need to purchase the appropriate Video Pilot Edition.
Video Pilot works with any and all CCTV cameras. CCTV cameras are analog cameras, even though some of them might have written the word Digital written on them, which only means that a DSP chip is used, but the Frame Grabber is what makes the signal truly digital. Therefore, if you decided to retrofit existing installation or make a new one based on analog CCTV cameras, make sure that you choose a Video Pilot supported frame grabber card or acquire a complete system from a Video Pilot reseller. You can check the perpetually growing list of supported Frame Grabber cards on the Video Pilot website.
- 9 -
Video Pilot Terminology
Pane - Panel, window.
Toggle- To alternate between two or more electronic, mechanical, or computer-related options, usually by the operation of a single switch or keystroke.
Video Pilot Icons-
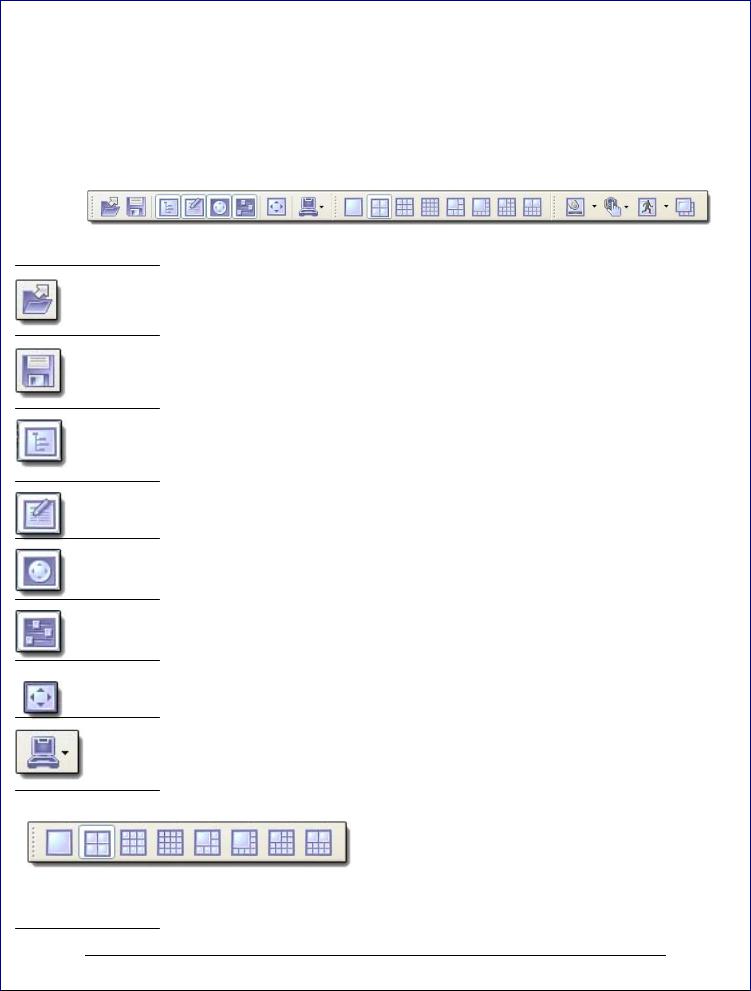
Toolbar
Toolbar- The toolbar that you see at the top of your screen gives you various options such as open, save and various screen manipulations, at the click of a button.
Open Configuration- This button on the toolbar allows you to open previous Video Pilot configurations. It is most useful if you are exporting configurations from one machine to another.
Save Configuration- This button on the toolbar allows you to save any changes that you have just made to your DVR, it will continue to save to the same file unless you click on File and Save As then you can save to a different file or even to a floppy.
Structure Pane- This button toggles whether you see or don’t see the structure pane on the left side of your Video Pilot window. The structure pane is most useful when you are looking at cameras from multiple locations and multiple Video Pilot servers. We will discuss the structure pane later on in this chapter.
Events - This button toggles the events window. The events window gives you important notifications such as, when you are connecting to a server successfully. It lets you know if you have input improper user names and passwords and gives you error codes when needed.
PTZ Control- This button toggles the PTZ control pane. If you do not have a pan-tilt-zoom camera connected to your system then this button does no need to be pressed.
Video amplification- This button toggles the video amplification pane. When this button is pressed a pane will come up from which you will be able to adjust the brightness, contrast, saturation, sharpness, and hue for any camera.
Full Screen- This button toggles full screen mode. In full screen, none of the panes will be seen and the cameras will be expanded to their maximum size to fill the full screen of your monitor.
Wizards- The wizard’s icon on the toolbar gives you a shortcut to various server, and camera options and configurations. You can also access these features through the right click menus in the software.
Views- These buttons on the toolbar allow you to manipulate your views and camera layouts to your own preference.
- 10 -
Screen Footer- The screen footer button on the toolbar allows you to display various information underneath each camera window. It can display frame rate, time, picture quality, recording, motion detection, and image size. The screen footer is the text below each camera
Stream Selection- The stream selection button allows you to pick which camera you would like to view in the selected camera window. This can also be done through the right click menus and by dragging the desired camera from the structure pane to the desired display window, or right click on any camera window and select stream.
Show Motion- The show motion toolbar button toggles whether or not you want the motion outlined on the selected camera screen. Note: Motion detection must be setup before this feature can be activated.
Maximize- When pressed the maximize button puts the selected camera into a single view, if pressed again it will return to the previous view. This can also be accomplished by double clicking on the camera of choice.
Structure Pane
The structure pane is the control center of your DVR. In the structure pane is where you will setup all of your cameras, and DVR’s. The structure pane makes it possible for you to manage many DVR servers from one window by right click on the DVR of your choice.
- 11 -

Server
What is Video Pilot Server? Video Pilot server is the Windows application, which can run as Windows service or Windows tray-application. Video Pilot Server grabs video streams from the configured sources, analyzes it for motion, broadcasts it to local (running on the same computer) and remote clients and records it to a local hard drives. Video Pilot server is the only application in the Video Pilot suite, which requires licensing, which can be activated via software key.
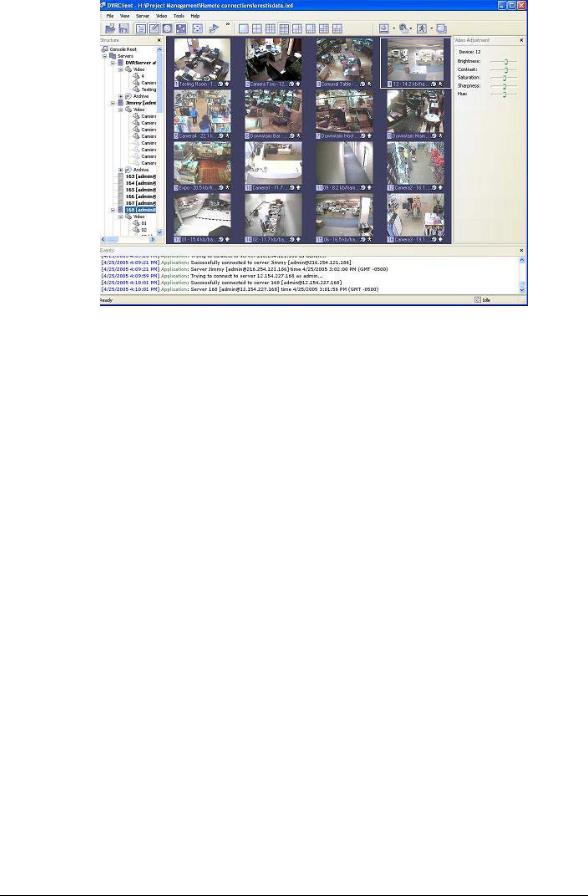
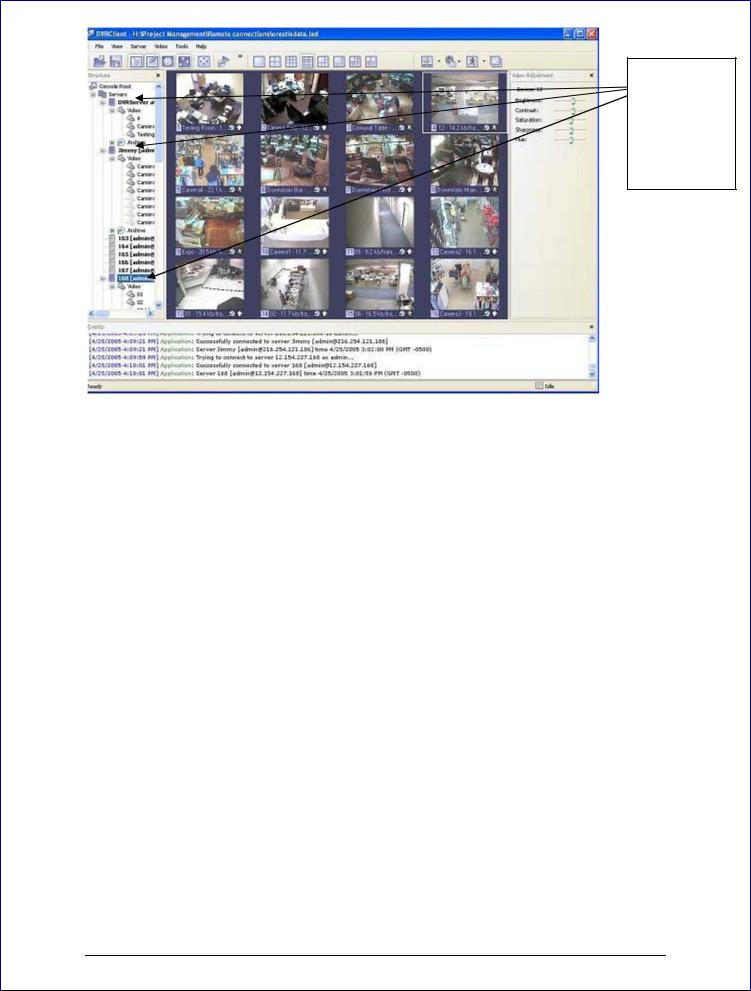
Through Console Root an unlimited number of cameras and servers can be manage, configured, and adjusted, without the need to be at the server site.
Right mouse click on any camera or server to drop down a list of various options like camera setup, recording settings, user management, …etc
Right Mouse Click on any camera screen to bring up the archive (playback recorded feed)
Wizards for easy navigation and step- by-step setup to perform configurations and other setup tasks.
- 12 -
Client
What is Video Pilot Client? Video Pilot Client Application is the component to monitor live and recorded video from several Video Pilot servers. Also Video Pilot Client is the main tool to manage and configure local and remote Video Pilot servers.
The Client component is the control interface of your Video Pilot Software is the Interface to control your Video Pilot surveillance system. The client is the piece of software that controls every aspect of your server. This software can be installed on the main machine running the server or on any machine that can access the server via TCP/IP. The client application can be used to control and fully administer your server or an unlimited number of servers from any computer connected on the Internet. You never need to go on-site again to make changes to your DVR.
- 13 -
Connect to Multiple servers, manage servers and cameras through the client software
Benefits – By not having to ever be on-site to administer your DVR is a tremendous advantage and one that VIDEO PILOT offers. We have revolutionized the DVR world with this application feature enabling full flexibility to the DVR operator. Another advantage to not installing the Client on the Server Site is your DVR is now Tamper Proof. Since Video Pilot server can run as a Windows service. The server/Computer running the software can be logged out of Windows and have login password protected.
Web Based Remote
The Client Application is of course your main remote viewing option giving you full control of your DVR, all of its recorded video, etc., however; we wanted to give you a web based option as well incase you are ever in need to check on your location and the client software is not an option. For these instances, you can log onto your site using our web application located at http://www.sanyocctv.com
- 14 -
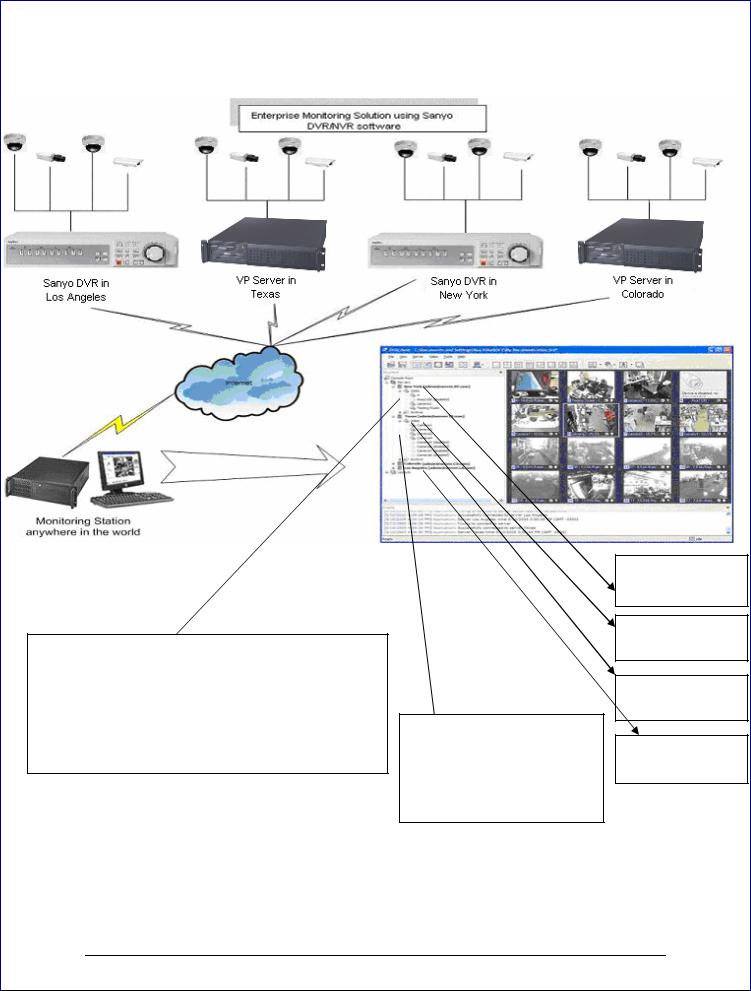
ENTEPRISE SCALABILITY AND MONITORING.
Enterprise Scalability:
Control and fully administer your server or an unlimited number of servers from any computer connected on the Internet with Video Pilot client. Engineer not to use any network resources for the open server connections and only use network resources for the cameras you monitor at the given time . Can be connected to unlimited server and control unlimited cameras within those servers.
Layouts: Create custom layouts by grouping cameras from different DVR Servers/Location into groups for more efficient monitoring, and better management.
Sanyo DVR in Los
Angeles
VP Server in
Texas
Sanyo DVR in
New York
VP Server in
Colorado
- 15 -
Chapter 2
Server Installation
Lets Begin Installing- Insert your Video Pilot CD into your CD drive, or if you have downloaded Video Pilot begin the installation process by double clicking the Video Pilot file.
1st Screen- “Welcome to the Video Pilot Digital Video Recorder Setup Wizard”
Click next
2nd Screen- “Software License Agreement” Please read and choose accept
Click next
3rd Screen- “Release Notes”
Click next
4th Screen- “Select installation Destination” changing the location is optional but not recommended.
Click next
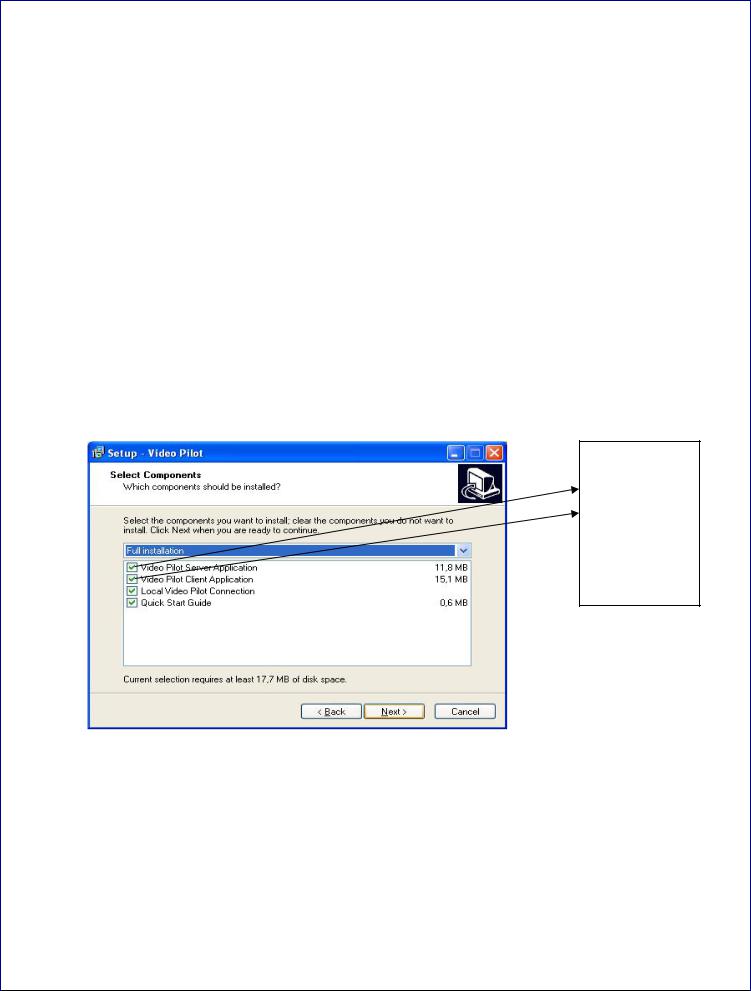
5th Screen- “Select Components” Here you will need to check the top
Unchecked option “VIDEO PILOT SERVER APPLICATION” This option needs to be checked now, since we are now
Installing The Server portion of the Video Pilot package. If you would also like to install the GUI (Graphic User Interface) or the CLIENT put a checkmark next to Video Pilot client application.
Then leave the rest of the boxes unchecked. If you would like to Have the server run without the client, please uncheck the remaining Boxes.
If you want to be able to view and manage the server from the same machine check both Video Pilot Client & Server Application.
Click next
6th Screen- “Select Start Menu Folder” changing the location is optional |
|
|
But not recommended. |
|
|
7th Screen- “Additional Icons” These are shortcuts and are recommended |
|
|
but optional. |
Click next |
|
8th Screen- “Ready to Install” Video Pilot Server and options will now be |
||
|
||
Installed. |
Click Install |
|
9th Screen- “Completing the Video Pilot Recorded Setup Wizard” Here there |
||
|
||
Is an option for “run server setup wizard” Leave it checked |
|
|
And lets continue. |
Click Finish |
|
|
|
|
- 16 - |
|
Software Activation
1st Screen- “Wizard explanation”
Click Next
2nd ScreenIF YOU HAVE DOWNLOADED VIDEO PILOT THE SHAREWARE VERSION, click cancel and skip down to page eight of your manual “Install Server Configuration. For those who have purchased Video Pilot or wish to purchase Video Pilot at this time
Click Next
3rd Screen- “Product Activation Options” If you have purchased a License or would like to make a purchase now, choose option one
Click Next
4th Screen- “Enter your Activation Key” carefully enter your product License key here. (If you are now making the purchase
Choose “buy online” now. Once you have made your purchase you can come back to this screen at any time)
5th Screen- “Product has been successfully activated” you will also see |
Click Next |
|
|
||
the description of your edition and your access limitations. |
Click Finish |
|
Install Server Configuration |
||
|
||
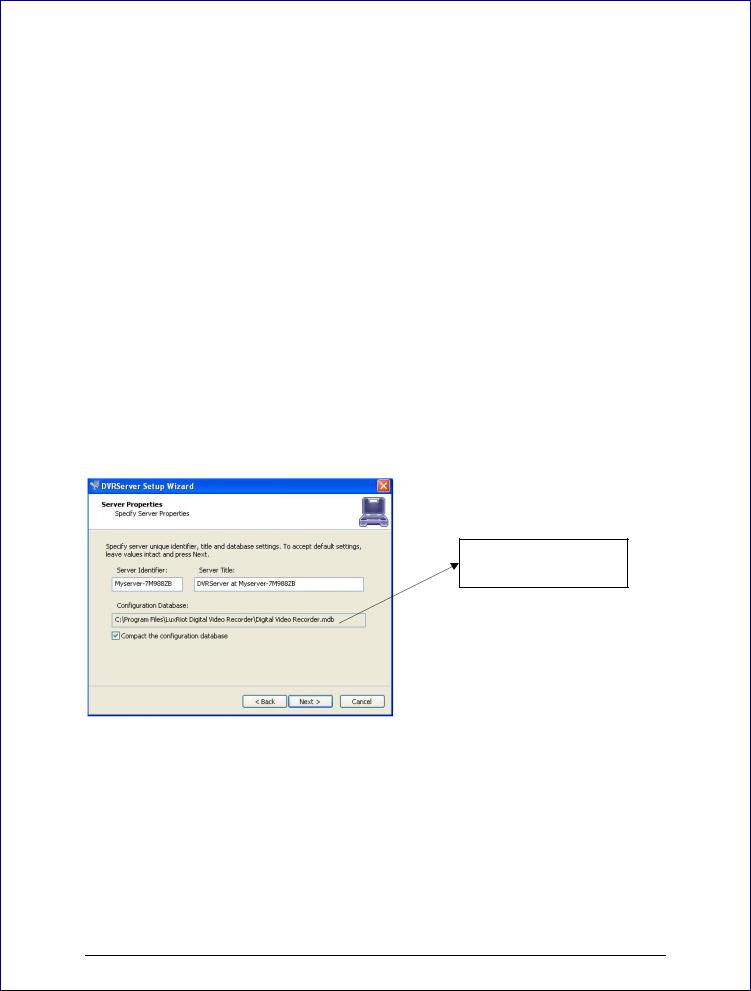
1st Screen- “Server Properties” Here is where you will enter your |
Click Next |
Machines unique Identifying name and server title. Underneath You will see an option that is by default UNCHECKED
“Compact the configuration database” it is a good choice to check This option for it will help optimize your configuration database in The future.
Default Install Directory
of Database
2nd Screen- “Server Administrator Settings” Here you are setting up |
|
The settings for the Administrator. Leave the default |
|
User name to “admin” and enter a unique password in |
|
Both lines. You will have the chance to add additional users |
|
At a later time. |
Click Next |
3rd Screen-
Server Network Settings and Port settings
The default firewall port that Video Pilot uses is 60554 but you can
- 17 -
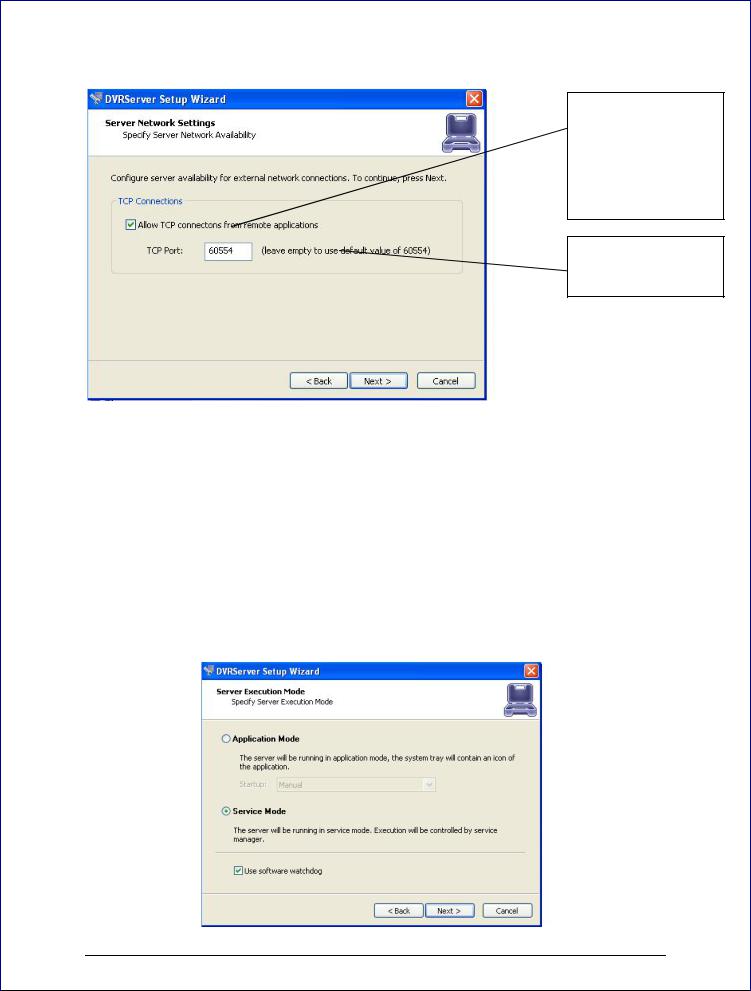
change that to any port that you would like as long as it is open on your firewall. Please check with your network administrator or internet service provider about your firewall settings
Click Next
To enable TCP to accept remote connections can be disabled or enable at any time from the Video Pilot server settings.
This is the default Port and it can be changed to your preferences.
4th Screen- “Server Execution Mode” Here you have two options
Application Mode.
This means that the program
(Video Pilot) will need to somehow be manually started. It then gives you a drop down list with options on how that can happen. “Manually” is one option. That means you will physically have to double click the program to get it started. “Automatically with any user logon” is another option. This option will turn the software on when any user logs into Windows on that machine.
“Automatically with current user logon” is the last option. This means that the user currently logged into Windows, will be the user that activates Video Pilot upon Windows login.
- 18 -
Service Mode.
This option is RECOMMENDED. This
Option is an amazing feature offered exclusively through
Video Pilot. With Service Mode checked, the software will always be running in the background even though nobody has yet logged into Widows. This means you can lock everyone out
of windows and never have to worry about any of your data. Also, if your power ever goes out, upon power recovery your system will turn on and nobody needs to physically log into windows or turn your Video Pilot program on, in order to keep your data flowing both locally and remotely.
DVR SERVICE
Watchdog Service
Click Next
5th Screen - “Server Execution Control” Here depending on which option you Chose in the previous screen, will show you your options. Again your options will be limited to your previous selection.
Choose to either “Start Server Application” or “Start Server Service”
Click Next
6th Screen- “Stop Server Application” or “Stop Server Service” Just showing you how you can now stop the Server if desired.
Click Next
7th Screen- “Wizard Complete”
Click Finish
Your Server Application is now complete.
End of Server Installation
- 19 -
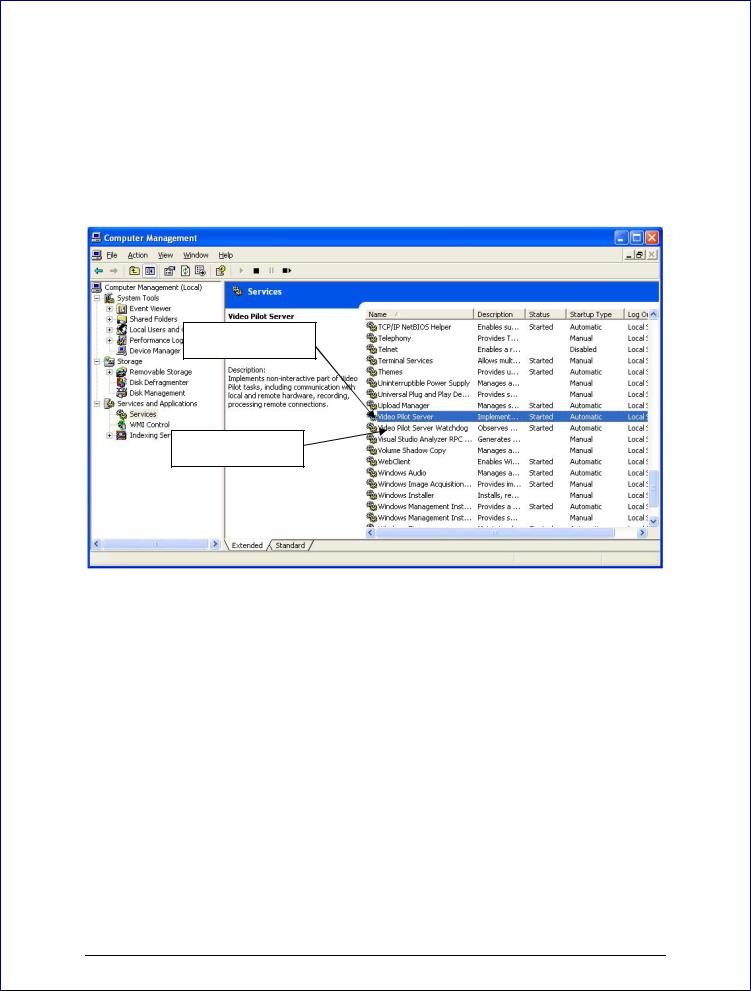
How to stop and start DVR services
The Video Pilot Software if it is setup on service Mode can be stopped by browsing the windows services (see Page 17). Or by using the DVR SERVER WIZARD
Client Server Connections
Lets Begin Installing- Insert your Video Pilot CD into your CD drive, or if you have downloaded Video Pilot begin the installation process by double clicking the Video Pilot file.
1st Screen- “Welcome to the Video Pilot Digital Video Recorder Setup Wizard”
Click next
2nd Screen- “Software License Agreement” Please read and choose accept
Click next
3rd Screen- “Release Notes”
Click next
4th Screen- “Select installation Destination” changing the location is optional but not recommended.
Click next
5th Screen- “Select Components” Leave the
“VIDEO PILOT SERVER APPLICATION” unchecked, since we
are now installing only the Client or the GUI (Graphic User Interface) portion of the Video Pilot package. The remaining options are for
the Video Pilot “Quick Guide” a quick guide to getting started (optional) and the Video Pilot Demo connection, which will install a connection to our live Demo (optional). You can always remove our connection at
a later time if you so choose. |
Click next |
6th Screen- “Select Start Menu Folder” changing the location is optional |
|
But not recommended. |
Click next |
7th Screen- “Additional Icons” These are shortcuts and are recommended |
|
but optional. |
Click next |
8th Screen- “Ready to Install” Video Pilot Video Recorder and options will now be |
|
installed. |
Click Install |
- 20 -
Loading...