


I N T E R N E T R E A D Y
HDTV Guide
INTERNET  APPLICATIONS ON YOUR HDTV!
Use your Sanyo HDTV to enjoy internet based content directly on your television through the use of an internet connection.
Access on-screen links to get the latest weather information, sports, news, stock updates and content services such as the VUDU, Netflix, and Pandora apps.
NOTE: The use of a PC is needed to create and setup your content service accounts.
WHAT YOU NEED
•Internet-ready Sanyo HDTV
•WiFi USB dongle or Ethernet cable
•Modem and/or Router (with wireless capabilities in order to use WiFi USB dongle)
•ISP (Internet Service Provider) w/broadband internet service of 1.5Mbps or higher.
IMPORTANT NOTE
If the HDTV is to be returned or given away, please DEACTIVATE the content services through the Deactivation menu. Failure in doing so will keep your HDTV as an active device for downloadable content from the different services.
Although your personal information will be safe, the HDTV will still be able to download and stream content registered to your account or accounts.
Please read the Owner’s Manual and Internet Ready HDTV Guide carefully for more useful information.
DP47460
INTERNET READY HDTV GUIDE CONTENTS
DISCLAIMER . . . . . . . . . . . . . . . . . . . . . . . . . . . . . . . . . . . . . .2 SETTING UP TO YOUR HOME NETWORK
Wireless LAN Connection . . . . . . . . . . . . . . . . . . . . . . . .3 Wired LAN Connection . . . . . . . . . . . . . . . . . . . . . . . . . . .5 Checking your HDTV’s Network Connection . . . . . . . .6 Glossary . . . . . . . . . . . . . . . . . . . . . . . . . . . . . . . . . . . . . . .8 Remote Control . . . . . . . . . . . . . . . . . . . . . . . . . . . . . . . .10 Sanyo Net Apps . . . . . . . . . . . . . . . . . . . . . . . . . . . . . . . .11
VUDU SERVICE—
Account setup . . . . . . . . . . . . . . . . . . . . . . . . . . . . . . . . .12 VUDU FAQ . . . . . . . . . . . . . . . . . . . . . . . . . . . . . . . . . . . . .13
NETFLIX SERVICE—
Account setup . . . . . . . . . . . . . . . . . . . . . . . . . . . . . . . . .15 Netflix FAQ . . . . . . . . . . . . . . . . . . . . . . . . . . . . . . . . . . . .16
PANDORA SERVICE—
Account setup . . . . . . . . . . . . . . . . . . . . . . . . . . . . . . . . .17 Pandora FAQ . . . . . . . . . . . . . . . . . . . . . . . . . . . . . . . . . .18
Need assistance?
Visit our Web site at
www.sanyoctv.com
or call toll free
1-877-864-9604
We can Help!
IP Software Upgrade
To get the most from your TV Internet functions you need to get the latest software upgrade by completing your network connection setup from your TV to the Internet.
For proper procedure follow the instructions in the green IP Software Upgrade Procedures sheet.
Part No. 1JC6P1P0382-–

IMPORTANT NOTICE RELATING TO NETWORK AND OTHER SERVICES
All content and services accessible through this device belong to third parties and are protected by copyright, patent, trademark and/or other intellectual property laws. Such content and services are provided solely for your personal noncommercial use. You may not use any content or services in a manner that has not been authorized by the content owner or service provider. Without limiting the foregoing, unless expressly authorized by the applicable content owner or service provider, you may not copy, upload, post, transmit, translate, sell, modify, create derivative works, or distribute in any manner or medium any content or services displayed through this device.
YOU EXPRESSLY ACKNOWLEDGE AND AGREE THAT THE DEVICE AND ALL THIRD PARTY CONTENT AND SERVICES ARE PROVIDED “AS IS” WITHOUT WARRANTY OF ANY KIND, EITHER EXPRESS OR IMPLIED. SANYO EXPRESSLY DISCLAIMS ALL WARRANTIES AND CONDITIONS WITH RESPECT TO ANY CONTENT AND SERVICES, EITHER EXPRESS OR IMPLIED, INCLUDING BUT NOT LIMITED TO, WARRANTIES OF MERCHANTABILITY, OF SATISFACTORY QUALITY, FITNESS FOR A PARTICULAR PURPOSE, AND NON-INFRINGEMENT OF THIRD PARTY RIGHTS. SANYO DOES NOT GUARANTEE THE ACCURACY, VALIDITY, TIMELINESS, LEGALITY, OR COMPLETENESS OF ANY CONTENT OR SERVICE MADE AVAILABLE THROUGH THIS DEVICE AND DOES NOT WARRANT THAT THE DEVICE OR SERVICES WILL MEET YOUR REQUIREMENTS, OR THAT OPERATION OF THE DEVICE OR SERVICES WILL BE UNINTERRUPTED OR ERRORFREE. FURTHER, SANYO DOES NOT GUARANTEE OR WARRANT ANY PROMISES, WARRANTYS, OBLIGATIONS, OR OTHER STATEMENTS MADE BY ANY THIRD PARTY. UNDER NO CIRCUMSTANCES, INCLUDING NEGLIGENCE, SHALL SANYO BE LIABLE, WHETHER IN CONTRACT OR TORT, FOR ANY DIRECT, INDIRECT, INCIDENTAL, SPECIAL OR CONSEQUENTIAL DAMAGES, OR ANY OTHER DAMAGES ARISING OUT OF, ANY INFORMATION CONTAINED IN, OR ANY CONTENT OR SERVICE ACCESSED BY YOU OR ANY THIRD PARTY, EVEN IF ADVISED OF THE POSSIBILITY OF SUCH DAMAGES.
Third party services may be changed, suspended, removed, terminated or interrupted, or access may be disabled at any time, without notice, and SANYO makes no representation or warranty that any content or service will remain available for any period of time. Any and all charges assessed by any third party, regardless of the reason and/or validity of said charge, shall be your sole responsibility. Content and services are transmitted by third parties by means of networks and transmission facilities over which SANYO has no control. SANYO may impose limits on the use of or access to certain services or content, in any case and without notice or liability. SANYO EXPRESSLY DISCLAIMS ANY RESPONSIBILITY OR LIABILITY FOR ANY CHANGE, INTERRUPTION, DISABLING, REMOVAL OF OR SUSPENSION OF ANY CONTENT OR SERVICE MADE AVAILABLE THROUGH THIS DEVICE.
SANYO is neither responsible nor liable for customer service related to the content and services. Any question or request for service relating to the content or services should be made directly to the respective content and service providers.
2 |
Need help? |
www.sanyoctv.com |
1-877-864-9604 |

SETTING UP TO YOUR HOME NETWORK _______________
WIRELESS LAN (LOCAL AREA NETWORK) CONNECTION
Enable your HDTV’s network connection by hooking up the supplied WiFi USB dongle to any of the two USB ports on your HDTV. (For a Wired connection with an Ethernet cable please see page 5.)
AUDIO (DVI)
HDTV SIDE
PANEL
WiFi
dongle
SCANNING FOR ACCESS POINTS
1.Turn on your HDTV and press the
MENU key.
2.Use the CURSOR▲▼ keys to select the Setup option from the main menu and press ENTER.
3.Select the Network option and press ENTER.
4.Select the Wireless option and press ENTER.
5.Select Scan Access Points and press ENTER to look for a wireless LAN.
NOTE: The Access Point with stronger signal appears higher in the list.
6.Press the CURSOR ▼ key to highlight Select Network and press ENTER.
7.Select the Access Point for the wireless network you wish to connect to and press ENTER.
8.Choose the network’s type of security protocol and press ENTER. Follow the on-screen instructions to complete your HDTV’s setup to the wireless network.
After completing the wireless network setup check your TV’s network connection by performing a Connect Test (see page 6.)
NETWORK SELECTION SCREEN
ACCESS POINT SCREEN (SCAN ACCESS POINTS)
ACCESS POINT SCREEN (SELECT NETWORK)
SECURITY PROTOCOL SCREEN
Need help? |
www.sanyoctv.com |
1-877-864-9604 |
3 |
SETTING UP TO YOUR HOME NETWORK _______________
WIRELESS LAN CONNECTION (CONTINUED)
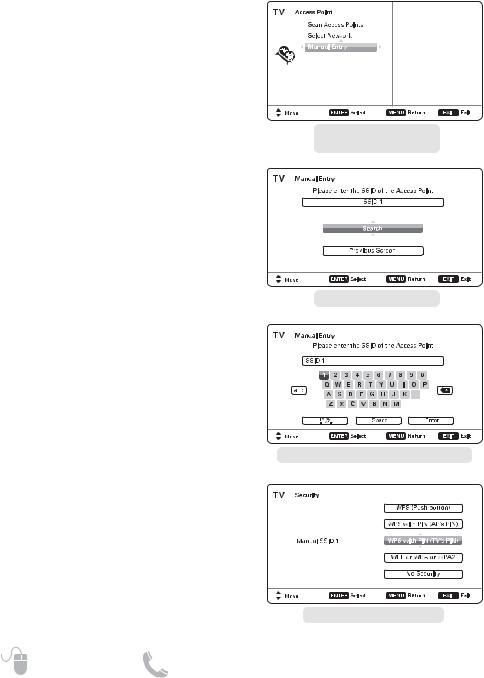
SCANNING FOR A SPECIFIC ACCESS POINT
1. Turn on your HDTV and press the MENU key.
2. Use the CURSOR▲▼ keys to select the Setup option from the main menu and press ENTER.
3. Select the Network option and press ENTER.
4. Select the Wireless option and press ENTER.
5.Select Manual Entry and press ENTER.
NOTE: The Access Point with stronger signal appears higher in the list.
6. Press the CURSOR ▲ key to highlight Access Point name entry box and press ENTER.
7.Use the on-screen keyboard layout to enter the name of the wireless network (or Access Point) that you wish to connect to.
When name has been input, select the Enter option and press ENTER.
8.Choose the network’s type of security protocol and press ENTER. Follow the on-screen instructions to
complete your HDTV’s setup to the wireless network.
After completing the wireless network setup check your TV’s network connection by performing a Connect Test (see page 6.)
ACCESS POINT SCREEN (MANUAL ENTRY)
MANUAL ENTRY SCREEN
KEYBOARD FOR MANUAL ENTRY SCREEN
SECURITY PROTOCOL SCREEN
4 |
Need help? |
www.sanyoctv.com |
1-877-864-9604 |
SETTING UP TO YOUR HOME NETWORK _______________
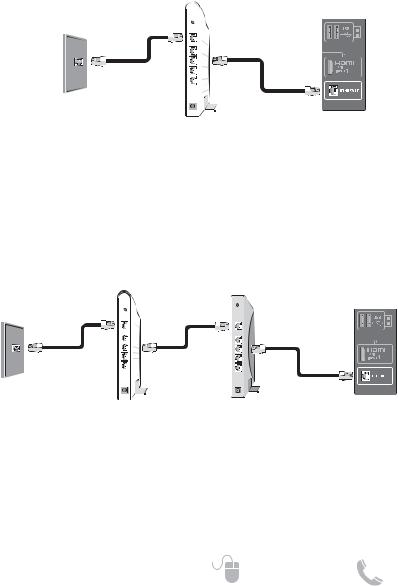
WIRED LAN CONNECTION
Enable your HDTV’s network connection by hooking up the TV to the Modem or Router with the use of an Ethernet cable.
• DIRECT CONNECTION TO MODEM
Connect the HDTV’s Ethernet port to your Internet Service Provider’s modem.
NOTE: Make sure your modem is correctly hooked up to its modem port on the wall.
AUDIO (DVI)
WALL PORT*
ISP MODEM |
HDTV SIDE |
|
PANEL |
||
|
*Actual type of connection from your wall port to the Internet Service Provider’s modem may vary. Please check your modem’s owner’s manual for proper setup.
• CONNECTION THROUGH A ROUTER
If your internet connection is being shared to multiple devices with the use of a router, you may hook up your HDTV to an available slot on your router or IP sharer.
NOTE: Make sure your router and modem are correctly hooked up and turned on.
AUDIO (DVI)
WALL PORT*
|
|
HDTV SIDE |
ISP MODEM |
ROUTER |
PANEL |
*Actual type of connection from your wall port to the Internet Service Provider’s modem may vary. Please check your modem’s owner’s manual for proper setup.
After hooking up your HDTV to the Modem and/or Router check your TV’s network connection by performing a Connect Test (see page 6.)
Need help? |
www.sanyoctv.com |
1-877-864-9604 |
5 |

SETTING UP TO YOUR HOME NETWORK _______________
CHECKING YOUR HDTV’S
NETWORK CONNECTION
Please follow these simple steps to verify your HDTV’s communication with your LAN (Local Area Network.)
1.Turn on your HDTV and press the MENU key.
2.Use the CURSOR keys to select the Setup option from the main menu and press ENTER.
3.Select the Network option and press ENTER.
4.Select your type of connection (Wired or Wireless) and press ENTER.
5.Select Connect Test and press ENTER.
This connect test will verify if in fact your HDTV is correctly setup to your Network.
NOTE: If connect test fails when using a Router, please connect HDTV directly to Modem and repeat the process, if successful, try once more through router.
MANUAL CONFIGURATION
A manual configuration might be needed to setup your IP Address, Subnet Mask, Default Gateway and DNS Server.
If such is the case, please follow these steps:
1.From the main menu select Setup and press ENTER.
2.Select Network and press ENTER.
3.Select your type of connection (Wired or Wireless) and press ENTER.
4.Select Setting Mode and press ENTER.
5.Select Manual and press ENTER.
4.Select the desired parameter and press ENTER.
5.Use the CURSOR keys or the NUMERICAL keys on your remote to input the correct sets of numbers and press ENTER.
6. When finished, press the MENU key to return to the previous screen.
7. Select Connect Test and press ENTER so your HDTV may verify connectivity to the LAN.
WIRED SCREEN
WIRELESS SCREEN
CONNECT TEST SCREEN
MANUAL SETTING SCREEN*
* Sample values used as reference only
6 |
Need help? |
www.sanyoctv.com |
1-877-864-9604 |
 Loading...