


DS27930
AS
Model Nos.:
No. de Modelo:
N
o
de modele:
Color TV Owner’s Manual
Color TV Manual Del Propietario
Manuel d’instructions du télécouleur
“Read this manual before assembling
(or using) this product.”
Important Safety Instructions . . . . . . . . . . . . . . . . . . . . . . 2
Welcome to the World of Sanyo . . . . . . . . . . . . . . . . . . . . 3
Features . . . . . . . . . . . . . . . . . . . . . . . . . . . . . . . . . . . . . . . 3
Specifications . . . . . . . . . . . . . . . . . . . . . . . . . . . . . . . . . . 3
Basic Set-up and Connections . . . . . . . . . . . . . . . . . . . . . . 4
Using the Audio / Video Input Jacks . . . . . . . . . . . . . . . . . 5
Connecting a VCR or DVD Player . . . . . . . . . . . . . . . . . 5
Using the Component Audio / Video Input Jacks . . . . . . . 6
Connecting a DVD . . . . . . . . . . . . . . . . . . . . . . . . . . . . . . 6
Using the Audio Output Jacks . . . . . . . . . . . . . . . . . . . . . . 6
Connecting Stereo Amplifier . . . . . . . . . . . . . . . . . . . . . . 6
Using the Multimedia Remote Control . . . . . . . . . . . . 7 ~ 11
Programming the Remote . . . . . . . . . . . . . . . . . . . . . . . 9
DVD / Satellite Receiver Codes . . . . . . . . . . . . . . . . . . . . 9
VCR / Cable Box Codes . . . . . . . . . . . . . . . . . . . . . . . . 10
Keys Functions Chart . . . . . . . . . . . . . . . . . . . . . . . . . . 11
TV Adjustment and Setup . . . . . . . . . . . . . . . . . . . . 12 ~ 14
How to operate the On-Screen Menu . . . . . . . . . . . . . . 12
Setting the Clock, Audio Mode . . . . . . . . . . . . . . . . . . . 12
Adjusting Picture/Sound . . . . . . . . . . . . . . . . . . . . . . . . 13
Setting the Initial Channel . . . . . . . . . . . . . . . . . . . . . . 13
Adding or Deleting a Channel . . . . . . . . . . . . . . . . . . . . 14
Adjusting Aspect Ratio and Scan Velocity . . . . . . . . . . 14
TV Speakers and Audio Output Settings . . . . . . . . . . . 14
V-Guide Operation (Parental Control) . . . . . . . . . . . 15 ~ 16
Closed-Captioning . . . . . . . . . . . . . . . . . . . . . . . . . . . . . . 17
Care and Cleaning . . . . . . . . . . . . . . . . . . . . . . . . . . . . . . 17
Helpful Hints (problems/solutions) . . . . . . . . . . . . . . . . . 18
Warranty (Mexico) . . . . . . . . . . . . . . . . . . . . . . . . . . . . . . 19
Warranty (U.S.A. and Canada) . . . . . . . . . . . . . . . . . . . . . 20
Child Safety Matters . . . . . . . . . . . . . . . . . . . . . . Back cover
ESPAÑOL . . . . . . . . . . . . . . . . . . . . . . . . . . . . . . . . 21 ~ 41
Contenido . . . . . . . . . . . . . . . . . . . . . . . . . . . . . . . . . . . 21
FRANÇAIS . . . . . . . . . . . . . . . . . . . . . . . . . . . . . . . 42 ~ 59
Table des matières . . . . . . . . . . . . . . . . . . . . . . . . . . .
42
Contents
DS27930
DS32424
Printed in U.S.A. SMC, March 2004
Impreso en U.S.A. SMC, Marzo 2004
Imprimé aux É.-U. SMC, mars 2004
Part No. / No. de Parte/
N
o
de pièce : 1JC6P1P0163––
Service Code/Código de Servicio/
Code de service : 610 304 6839
Importado Por :
Comercializadora México
Americana, S. DE R.L. DE C.V.
Nextengo N
º
78
Col. Santa Cruz Acayucan
Del. Azcapotzalco, México D.F. C.P.
02770, RFC CMA 9109119L0
Telefono: 55-5328-3500
A
S
A
S
DS27930
DS32424
ENERGY STAR
“As an ENERGY STAR
®
Partner, Sanyo Manufacturing
Corporation has determined that this product meets
the E
NERGY STAR
®
guidelines for energy efficiency.”
Positioning the appliance
1. Do not place your appliance on an unstable cart, stand, shelf or table.
Serious injury to an individual, and damage to the appliance, may result
if it should fall. Your salesperson can recommend approved carts and
stands or shelf and wall mounting instructions. An appli-
ance and cart combination should be moved with care.
Quick stops, excessive force, and uneven surfaces may
cause the appliance and cart combination to overturn.
2. Slots and openings in the cabinet and in the back or bottom are
provided for ventilation. To ensure reliable operation of the appliance
and to protect it from overheating, these openings must not be blocked
or covered. The openings should never be covered with a cloth or other
material, and the bottom openings should not be blocked by placing the
unit on a bed, sofa, rug, or other similar surface. This appliance should
never be placed near or over a radiator or heat register. This appliance
should not be placed in a built-in installation such as a bookcase unless
proper ventilation is provided.
3. Do not expose the appliance to rain or use near water . . . for example,
near a bathtub, swimming pool, kitchen sink, in a wet basement, etc.
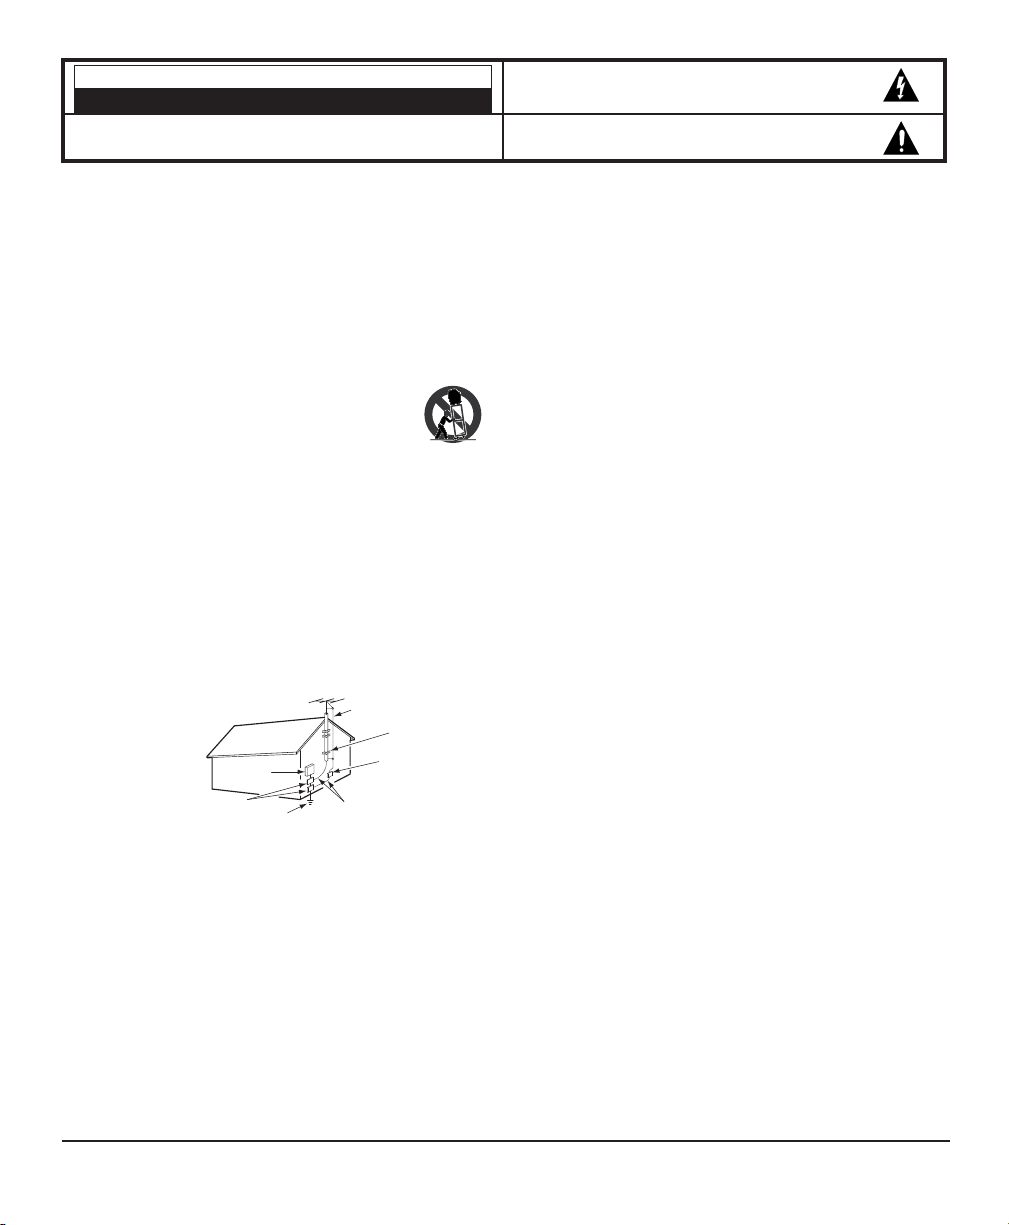
Hooking Up Outdoor Antenna
LIGHTNING PROTECTION FOR YOUR ANTENNA AND SET AS PER NATIONAL
ELECTRICAL CODE INSTRUCTIONS.
4. If an outside antenna is connected to the receiver, be sure the antenna
system is grounded so as to provide some protection against voltage
surges and built up static charges. Article 810 of the National Electri-
cal Code, ANSI/NFPA 70, provides information with respect to proper
grounding of the mast and supporting structure, grounding of the lead
in wire to an antenna discharge unit, size of grounding conductors,
location of antenna discharge unit, connection to grounding electrodes,
and requirements for the grounding electrode.
An outside antenna system should not be located in the vicinity of over-
head power lines or other electric light or power circuits, or where it can
fall into such power lines or circuits. When installing an outside antenna
system extreme care should be taken to keep from touching such power
lines or circuits as contact with them might be fatal.
Plug in the power cord
5. This product should be operated only from the type of power source
indicated on the marking label. If you are not sure of the type of power
supply to your home, consult your product dealer or local power
company. This product is equipped with a polarized alternating current
line plug (a plug having one blade wider than the other). This plug will
fit into the power outlet only one way. This is a safety feature. If you
are unable to insert the plug fully into the outlet, try reversing the plug.
If the plug should still fail to fit, contact your electrician to replace your
obsolete outlet. Do not defeat the safety purpose of this polarized plug.
Do not overload wall outlets, extension cords, or integral convenience
receptacles as this can result in a risk of fire or electric shock.
6. Power-supply cords should be routed so that they are not likely to be
walked on or pinched by items placed upon or against them, paying
particular attention to cords at plugs, convenience receptacles, and the
point where they exit from the product.
Cleaning
7. Before cleaning, unplug the unit from the wall outlet. Do not apply liquid
cleaners or aerosol cleaners directly to the unit. Use a dry cloth for cleaning.
Service & Repair
8. Unplug the appliance from the wall outlet and refer servicing to
qualified service personnel under the following conditions:
A. If the power cord or plug is damaged or frayed.
B. If liquid has been spilled into the appliance.
C. If the appliance has been exposed to rain or water.
D. If the appliance has been dropped or the cabinet has been
damaged.
E. If the appliance exhibits a distinct change in performance.
F. If the appliance does not operate normally by following the operat-
ing instructions, adjust only those controls that are covered in the
operating instructions. Improper adjustment of other controls may
result in damage and will often require extensive work by a qualified
technician to restore the appliance to normal operation.
9. Upon completion of any service or repair, request the service techni-
cian’s assurance that only Factory Authorized Replacement Parts that
have the same characteristics as the original parts were used, and
that routine safety checks have been performed to determine that the
appliance is in safe operating condition. Unauthorized substitutions may
result in fire, electrical shock, or other hazards.
10. Never add accessories that have not been specifically designed for use
with this appliance as they may cause hazards.
11. For added protection during a lightning storm, or when the set is left
unattended and unused for long periods of time, unplug it from the wall
outlet and disconnect the antenna. This will prevent damage to the set
due to lightning or power line surges.
12. Never push objects of any kind into this product through openings as
they may touch dangerous voltage points or short-out parts that could
result in a fire or electric shock. Never spill liquid of any kind on the
product.
CAUTION
RISK OF ELECTRIC SHOCK DO NOT OPEN
CAUTION: TO REDUCE THE RISK OF ELECTRIC SHOCK, DO NOT REMOVE COVER (OR
BACK). NO USER-SERVICEABLE PARTS INSIDE. REFER SERVICING TO QUALIFIED
SERVICE PERSONNE
L.
THIS SYMBOL INDICATES THAT DANGEROUS VOLTAGE CONSTITUTING
A RISK OF ELECTRIC SHOCK IS PRESENT WITHIN THIS UNIT.
THIS SYMBOL INDICATES THAT THERE ARE IMPORTANT OPERATING
AND MAINTENANCE INSTRUCTIONS IN THE LITERATURE ACCOMPANY-
ING THIS UNIT.
WARNING: TO REDUCE THE RISK OF FIRE OR ELECTRIC SHOCK, DO NOT EXPOSE THIS APPLIANCE TO RAIN OR
MOISTURE.
IMPORTANT SAFETY INSTRUCTIONS
CAUTION: PLEASE ADHERE TO ALL WARNINGS ON THE PRODUCT AND IN THE OPERATING INSTRUCTIONS. BEFORE
OPERATING THE PRODUCT, PLEASE READ ALL OF THE SAFETY AND OPERATING INSTRUCTIONS. RETAIN THIS
LITERATURE FOR REFERENCE. Follow all instructions...
EXAMPLE OF ANTENNA GROUNDING ACCORDING TO NATIONAL
“Note to CATV system installer:
This reminder is provided to call the CATV system installer’s attention to Article 820-40 of the NEC
that provides guidelines for proper grounding and, in particular, specifies that the cable ground
shall be connected to the grounding system of the building, as close to the point of cable entry
as practical.”
NEC
- NATIONAL ELECTRICAL COD
E
ANTENNA
LEAD IN
WIRE
GROUNDING CONDUCTORS
(NEC SECTION 810-21)
GROUND CLAMPS
ANTENNA
DISCHARGE UNIT
(NEC SECTION 810-2
0)
GROUND
CLAMP
ELECTRIC
SERVICE
EQUIPMENT
P
OWER SERVICE GROUNDING
E
LECTRODE SYSTEM
(
NEC ART 250, PART H)
ELECTRICAL CODE, ANSI/NFPA 70
2
Important Safety Instructions

◆ Trilingual On-Screen Menu
◆ Automatic Channel Search
◆ Auto Shut Off
◆ Closed-Captioning/Quikcap
◆ 3-Line Digital Comb Filter
◆ Scan Velocity Modulator
◆ Scan Velocity settings
◆ Aspect Ratio settings
◆ Digital picture controls with
on-screen display
◆ MTS stereo
/ SAP Decoder
◆ Auto Flesh Tone
◆ Color Enhancer
◆ Factory preset adjustments for
picture / sound
◆ Front Surround Sound
◆ Bass / Treble
◆ Initial Channel
◆ V- Guide (Parental Control)
◆ XDS Extended data service) station
call letters, title of show, ratings
◆ 480i Component AV Input Jacks
◆ Audio / Video Input Jacks
(2 sets, R/L)
◆ Audio Out Jacks Switchable
(Fixed / Variable)
◆ S-Video In Jack (2)
◆ Auto Clock
◆ Sleep Timer (3 hours)
◆ TV Reset
◆ 181 Channel Tuning System
VHF Channels 2-13
UHF Channels 14-69
Cable TV (CATV) 1, 14-125
◆ Automatic Fine Tuning
VHF and Cable Channels
◆ Multimedia Remote Control
VCR/TV/CABLE/DVD/SAT/AUX
Large Glow-in-the-Dark
basic operating keys
0~9 Numbered Channel Selection
Channel Scanning
Volume Mute
Power Recall
Display Sleep
Caption Reset
Menu V-Guide
Input VCR/DVD keys
Enter
CAUTION: FCC Regulations state that improper modifications or unauthorized changes to this unit may void the user’s
authority to operate the unit.
PICTURE TUBE SIZE (True Flat Screen)
(Measured Diagonally)
DS27930 . . . . . . . . . . . . . . . . . 27-inches
DS32424 . . . . . . . . . . . . . . . . . 32-inches
PICTURE RESOLUTION . . . . . 330 Lines
Video Input . . . . . . . . . . . . . . . . 800 Lines
ANTENNA INPUT . . UHF/VHF/CATV 75Ω
POWER REQUIREMENT . . 120VAC 60Hz
POWER
DS27930 . . . . . . . . . . . . . . . . . . 95 watts
DS32424 . . . . . . . . . . . . . . . . . 100 watts
HORIZONTAL DIM. (Width)
DS27930 . . . . . . . . . . . . 26.1 in. (664mm)
DS32424 . . . . . . . . . . . . 30.2 in. (768mm)
VERTICAL DIM. (Height)
DS27930 . . . . . . . . . . . . 24.7 in. (629mm)
DS32424 . . . . . . . . . . . . 28.8 in. (732mm)
DEPTH DIM. (Thickness)
DS27930 . . . . . . . . . . . . 19.3 in. (489mm)
DS32424 . . . . . . . . . . . . 22.7 in. (577mm)
WEIGHT (Approx.)
DS27930 . . . . . . . . . . . 91.3 lbs. (41.4 Kg.)
DS32424 . . . . . . . . . . 136.6 lbs. (62.0 Kg.)
SOUND (2 Speakers)
DS27930 . . . . . . . . . . . . . . . . . . Size: 8 cm
DS32424 . . . . . . . . . . . . . . . . Size: 10 cm
AMPLIFIER . . . . . . . . . Built-in with 3W/ch
AUDIO/VIDEO INPUT JACKS . . Video Input
. . . . . . . . . . . . . Audio Input (2 sets, R/L)
. . . . . . . . . . . . . . . . . . . . S-Video Input (2)
480i COMPONENT AV INPUT
JACKS . . . . . . . . . . . Input (Y, Pb, Pr-R/L)
AUDIO OUTPUT
JACKS . . . . . . . . . . . . . Fixed and Variable
. . . . . . . . . . . . . . . . . . . . . Audio Out (R/L)
. . . . . . . . . . . . . . . . . . . (RCA Connectors)
Welcome to the World of Sanyo
Thank you for purchasing a Sanyo Color Television. You made an excellent choice for Performance, Styling,
Reliability, and Value. The TV is designed with easy to use on-screen set-up instructions and operating features.
Need assistance? Visit our Web site at www.sanyoctv.com or call toll free 1-800-877-5032.
Features
Specifications
Features / Specifications
3
Basic Set-up and Connections
CATV FRANCHISE NOTE:
Cable companies, like public
utilities, are franchised by
local government authorities.
To receive cable programs,
even with equipment which
is capable of receiving cable
channels, the consumer
must subscribe to the cable
company’s service.
IN FROM
SAT.
CATV IN
OUT TO TV
S-VIDEO
CH3
CH4
L- -RAUDIOVIDEO
L- -RAUDIOVIDEO
S-VIDEO
VIDEO AUDIO INPUT
Y
P
b
Pr
AV2 AV1
COMPONENT
RRR R
L L L L
(MONO)
(MONO)
UHF/VHF/CATV
75Ω
AUDIO
OUTPUT
VIDEO
AUDIO
AUDIO
FROM ANT.
OUT TO TV
IN
OUT
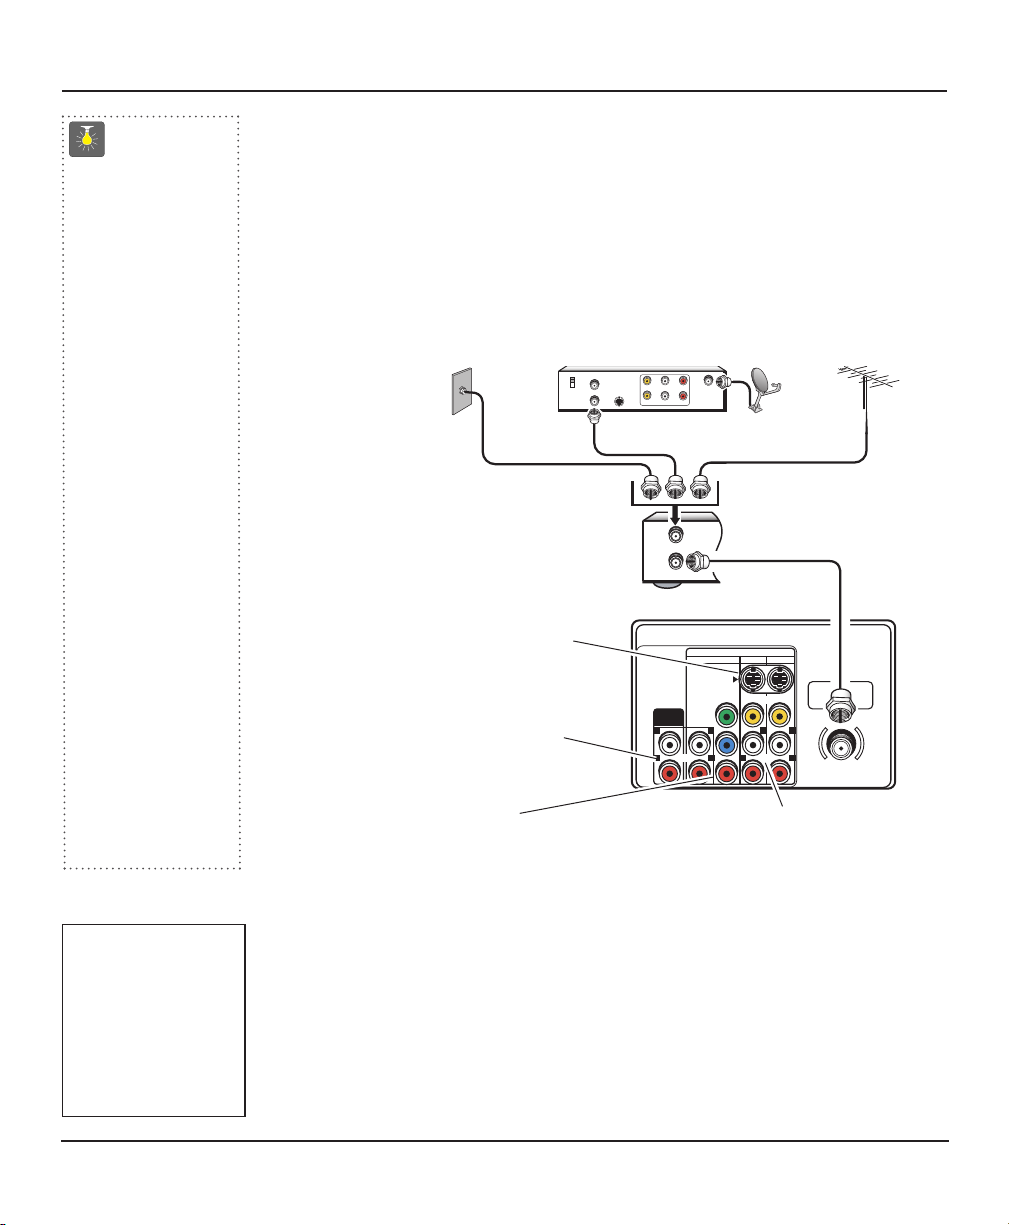
Connecting Cable Service, RF Antenna, or Satellite Dish Receiver to
TV
Cable Service
RF Antenna
Satellite Receiver
TV Back
Audio/Video Input Jacks (AV1 / AV2)
Connect video equipment here (see pages 5 ~ 6).
Note: S-Video connections override the AV1 and
AV2 video connections.
S-Video Input Terminal
To enhance video detail use the S-Video AV1 and
AV2 jacks instead of the Video jacks, if available
on your external equipment.
(S-Video connections will override con-
nections to the AV input jacks.) (See page 5.)
Audio Output Jacks
Connect external audio equipment here.
(See page 6.)
Initial Set-up
1.
Install batteries in remote control, see page 7.
2.
Connect signal, see below.
3.
Plug in AC power cord.
4.
Press POWER key to turn on TV.
5. Follow on-screen instructions.
480i Component Video In Jacks
(Component 3, Y, Pb, Pr)
Connect video equipment here.
(See page 6.)
VCR Back
Note: If you do not have a VCR
connect signal directly
to TV 75 ohm jack.
QuickTips
■
The TV will auto-
matically select the
correct Antenna
mode for the type
of RF signal you
connect.
■
TV will switch off
automatically after
15 minutes if there is
no signal reception
(cable out or station
not broadcasting).
Exception—When
the Video mode is
selected, the TV will
not automatically
switch off when
signal reception
has stopped for 15
minutes.
■
If you move the TV
to a new location,
press the RESET key
twice after connect-
ing the signal and
turning on the TV.
Need help?
Visit our Web site at
www.sanyoctv.com
or Call 1-800-877-5032
Operational Tip for No Signal Connection:
If the TV is used as a monitor only, with a DVD player or some other type of external equip-
ment, and no cable or antenna signal is available, the following setup is necessary:
Your TV is designed to automatically search for available channels. Therefore, the initial
start up requires that you press the MENU key, enabling the TV to automatically go through
the channel search process before you can operate the TV. After the initial channel search is
completed, you must press the MENU key again to complete the channel search process (may
take several minutes).
After the channel search process is complete (2 searches), you can press the INPUT key on
the remote control to use the TV as a monitor.
4
Basic Set-up & Connections
➀
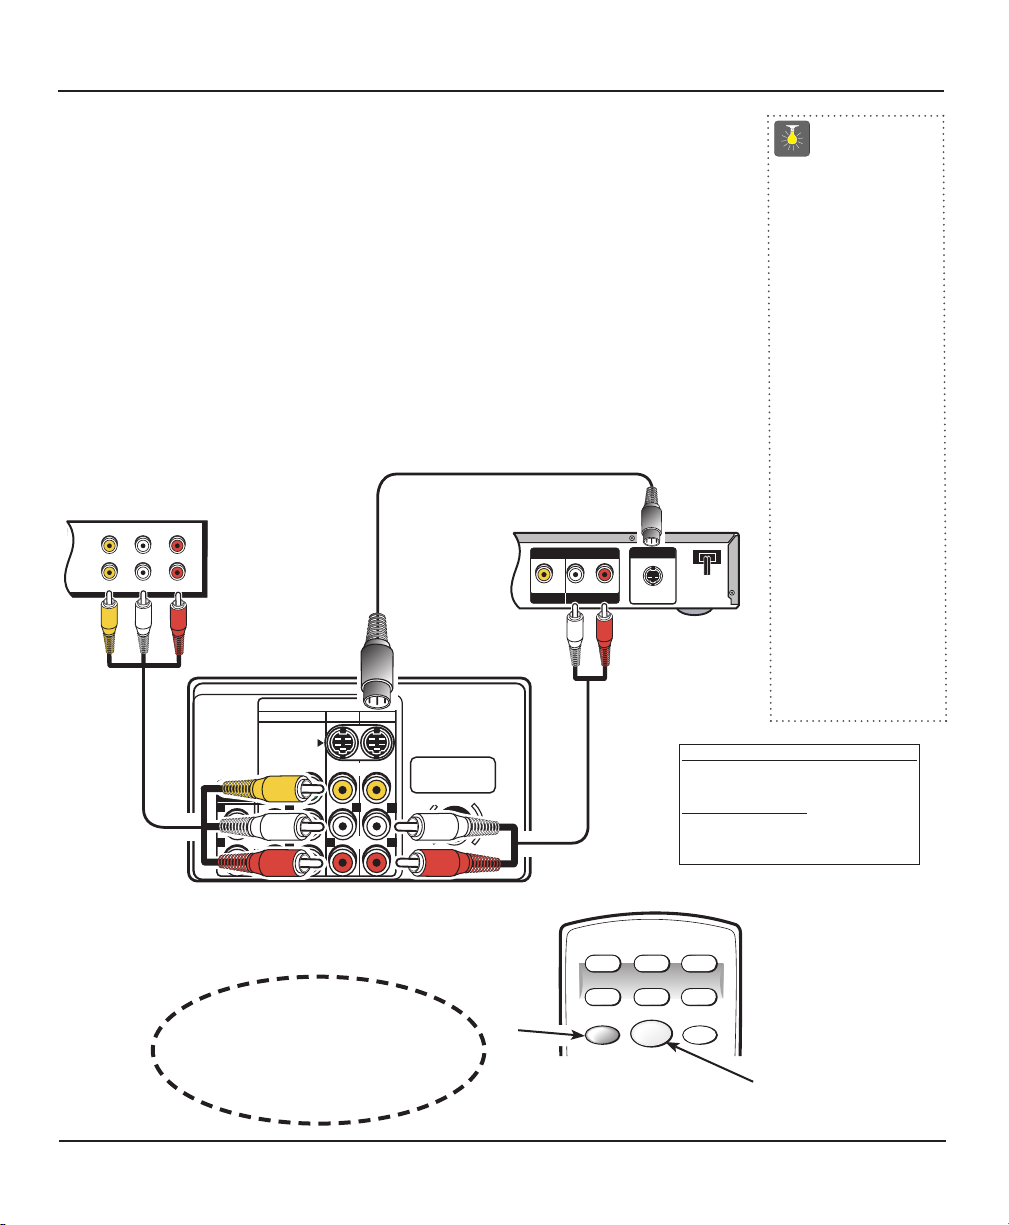
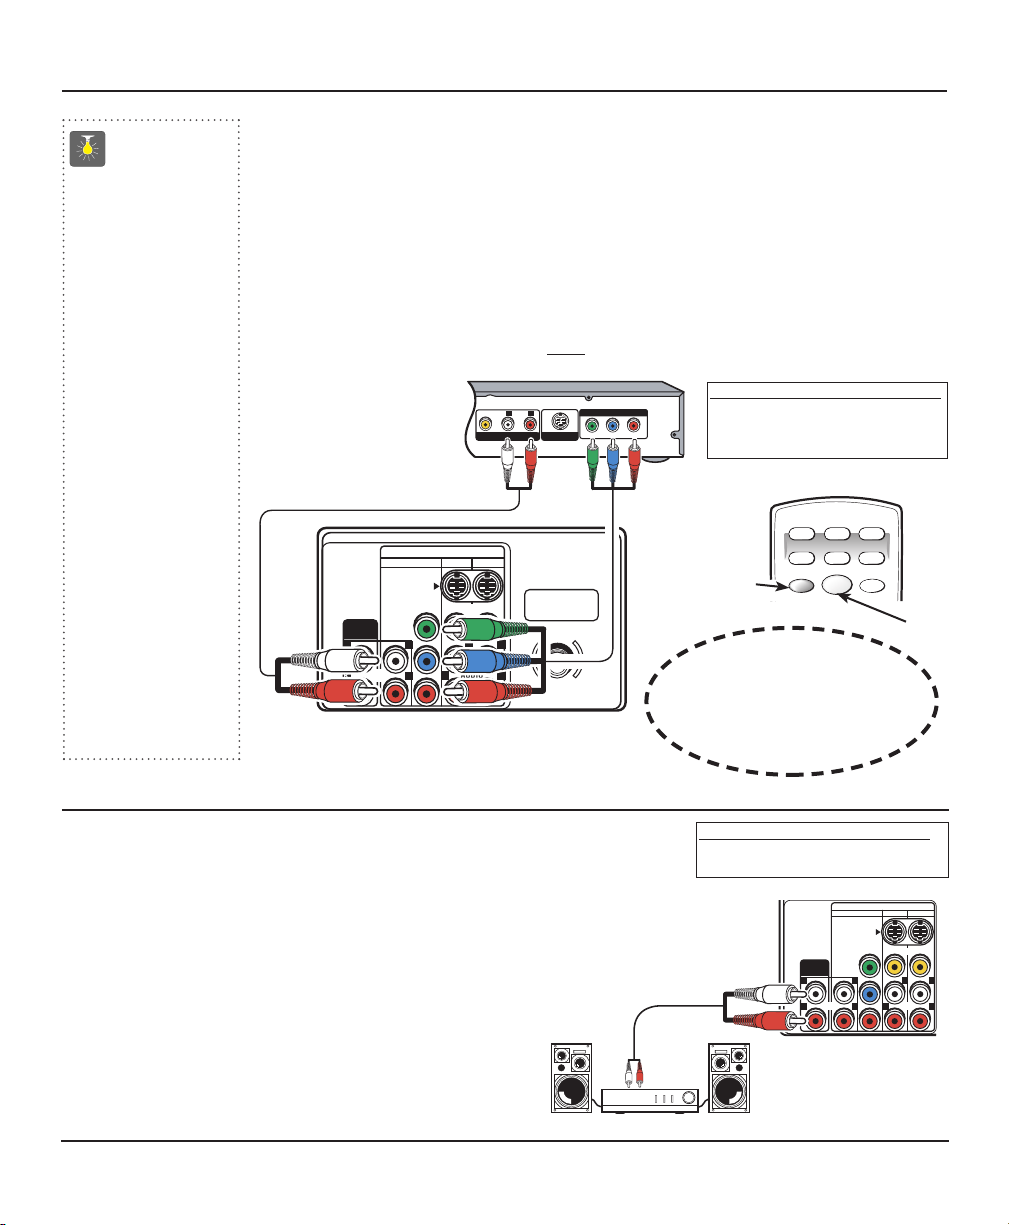
Connecting a VCR or DVD PLAYER
Switch off TV and external equipment before connecting cables. (Cables are not supplied.)
❶
Connect VCR, DVD Player, or other equipment’s Audio Video Output to the TV Audio Video
Input.
For Mono VCR (Single Audio Jack) connect VCR Audio Output to TV Audio (L) Input.
➀ Optional
Connect DVD Player or other equipment’s S-Video Output to the TV S-Video Input Jack.
Using the S-Video jack overrides the Video jack.
❷
Press POWER to turn on the TV. Turn on external equipment also.
❸
Press the INPUT key to select VIDEO1 or VIDEO2.
IN
OUT
A/V JACKS
L- -RAUDIOVIDEO
L- -RAUDIO
VIDEO
S-VIDEO OUT
RL
OUTPUT
AUDIO OUT
VIDEO OUT
S-VIDEO
VIDEO AUDIO INPUT
Y
P
b
P
r
AV2 AV1
COMPONENT
RR
R R
L L L
L
(MONO)
(MONO)
AUDIO
OUTPUT
VIDEO
AUDIOAUDIO
UHF/VHF/CATV
75Ω
INPUT
POWER
RESET
DVD SAT AUX
VCR TV
CABLE
Back View of VCR
Remote Control
TV AV Input
Jacks
DVD Player
Using the Audio/Video Input Jacks
What you will need for connections:
❶
AV Cable – 1
OPTIONAL CONNECTION
①
S-Video Cable – 1
①
Audio Cable – 1
❶
Press INPUT key after
connecting cables to access the A/V
inputs.
T
here is NO need to tune to a blank
channel.
❷
❶
①
①
❸
①
①
QuickTips
■
Make sure all cable
connectors are fully
seated on jacks.
■
Always match A/V
cables according to
the colors;
RED for
right audio,
WHITE for
left audio and
YELLOW
for video.
■
A solid Blue screen
with VIDEO1 or
VIDEO2, displayed
means that a Video
mode is selected,
but no signal is
being detected at
the Video jacks.
Check connections,
and turn on external
equipment.
Need help?
Visit our Web site at
www.sanyoctv.com
or Call 1-800-877-5032
Audio & Video Input Jacks
5
Connecting a DVD Player or other equipment
Switch off TV and external equipment before connecting cables. (Cables are not supplied.)
❶
Connect a DVD Player or other equipment’s interlaced Component Video Output to the
TV Component Video Input (Y-Pb-Pr) Jacks.
❷ Connect the DVD Player’s Audio Output to the TV Component L/R Jacks.
❸
Press POWER to turn on the TV. Turn on external equipment also.
❹ Press the INPUT key to select COMPONENT3.
Note: DVD Player component output must
be set to Interlaced (480i).
Y
P
B PR
RL
AUDIOVIDEO
COMPONENT VIDEO OUT
S-VIDEO OUT
A/V OUT
S-VIDEO
VIDEO AUDIO INPUT
Y
P
b
Pr
AV2 AV1
COMPONENT
RR
R R
L L L
L
(MONO)
(MONO)
UHF/VHF/CATV
75Ω
AUDIO
OUTPUT
VIDEO
AUDIOAUDIO
DVD Player
❶
TV Back
INPUT
POWER
RESET
DVD SAT AUX
VCR TV
CABLE
❸
Remote Control
What you will need for connections
:
❶
Component video cable – 1
❷ Audio Cable – 1
What you will need for connections:
❶
Audio Cable – 1
Using the Component Audio/Video Input Jacks
QuickTips
■
You may be able
to use the TV remote
control to operate
your DVD Player.
(See pages 9 ~11).
■
A solid Blue screen
with COMPONENT3
displayed means
that the Compo-
nent Video mode
is selected, but
no signal is being
detected at the Com-
ponent jacks. Check
connection, and
turn on external
equipment.
■
Position your TV
at least 2 feet from
stereo speakers.
The magnets in the
speakers may affect
the picture quality.
Need help?
Visit our Web site at
www.sanyoctv.com
or Call 1-800-877-5032
❶
❹
Press INPUT key after
connecting cables to access the
A/V inputs.
There is NO need to tune to a
blank
channel.
❷
❷
S-VIDEO
VIDEO AUDIO INPUT
Y
P
b
P
r
AV2 AV1
COMPONENT
RRR R
L L L L
(MONO)
(MONO)
AUDIO
OUTPUT
VIDEO
AUDIO
AUDIO
Back of TV
Stereo Amplifier
Using the Audio Output Jacks
Connecting Audio Output Jacks to a Stereo Amplifier
Switch off TV and external equipment before connecting cables.
(Cables are not supplied.)
❶
Connect the TV Audio Output (R/L) to the Stereo Amplifier In (R/L).
❷ Press POWER to turn on the TV. Turn on external equipment also.
❸
Use the AUDIO OUTPUT on-screen menu options to select Fixed or Variable output signal.
Notes: DO NOT connect external speakers directly to the TV.
When TV Speakers is in the ON mode, sound will
be produced through your TV and stereo amplifier.
When TV Speakers is in the OFF mode, sound will be
produced only through the stereo amplifier.
(See page 14 to set TV speakers.)
❶
6
Component A/V Input / Audio Output Jacks
Using the Multimedia Remote Control
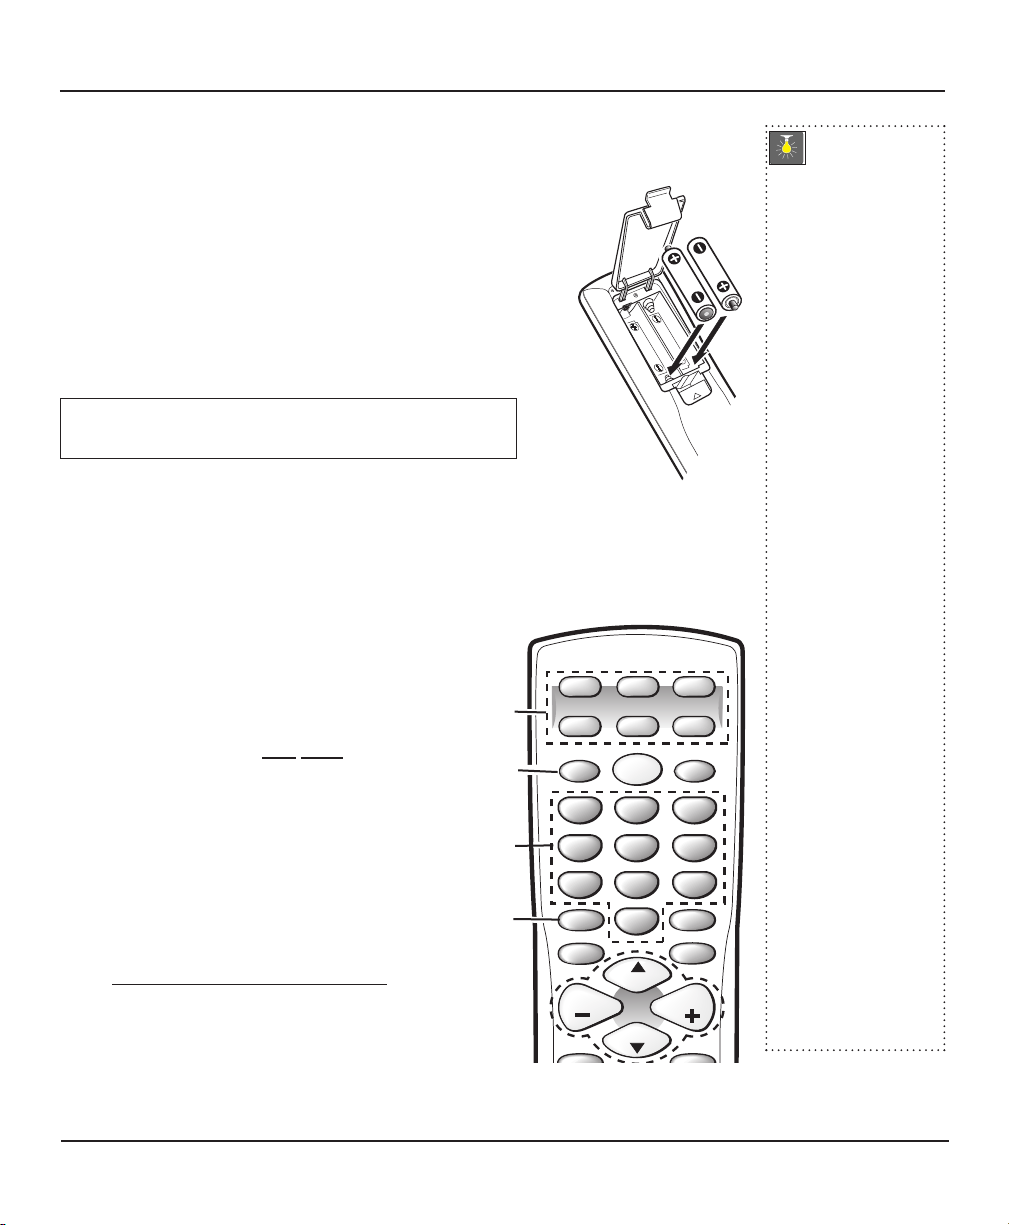
Remote Control Keys
➀
Mode Keys—Use these keys to program the remote
control and to select the operating mode (VCR, TV,
CABLE, DVD, SAT, or AUX). To Operate Your...
VCR—Press the VCR key;
Television—Press the TV key; Cable Box—Press
the CABLE key; DVD Player—Press the DVD key;
and Satellite Receiver—Press the
SAT
key.
Note: Make sure you hold
down the mode key
while entering a code number, see page 9.
➁
Input Key—In the TV and Satellite modes, this
key selects the program source to display on the
screen (TV signal or signal from equipment con-
nected to the AV jacks). In the VCR mode, this key
functions as a VCR’s TV/VCR key.
➂
Number Keys—Two keys must be pressed to select
a channel. Example: Press 0 then 6 to select channel
6. For cable channels 100 through 125
, press and
hold the 1 key until C1– – appears. Then press the
other two numbers.
➃
Caption Key—See page 17.
Operates your TV, VCR, DVD, Cable converter box, and Satellite Receiver. To program
the remote control, see pages 9 ~ 11.
Install Batteries as shown (2 AA, not included)
Notes:
– Do not mix old batteries with new ones or mix different types of
batteries together.
– Remove the batteries if the remote control will not be used for
a month or more. Weak batteries may leak and cause damage.
(Normal battery life is roughly six months.)
IMPORTANT NOTE: Spent or discharged batteries must be recycled or disposed
of properly in compliance with all applicable laws. For detailed information,
contact your local County Solid Waste Authority.
QuickTips
■
Be sure batteries are
installed correctly.
■
Point the remote
control toward the
equipment you want
to operate. Objects
between the remote
control and the equip-
ment may cause
misoperation of the
remote control
function.
■
If the remote control
does not work: Press
TV key (see item 1).
■
The remote control
must be programmed
before it will operate
your VCR, DVD
Player, Satellite
Receiver, or Cable
Box. See pages 9~11.
■
Cannot select channel
with number keys.
Press “0” in front
of numbers 1~9.
Example: Channel 05.
■
Adjusting the volume
level: Flashing Right
arrow indicates
volume is increasing
and flashing Left
arrow indicates
volume is decreasing.
Need help?
Visit our Web site at
www.sanyoctv.com
or Call 1-800-877-5032
23
1
4
78
0
9
56
INPUT
CAPTION
SLEEP
MENU
RECALL
POWER
RESET
DVD SAT AUX
VCR TV
CABLE
VOL VOL
CH
CH
➀
➁
➂
➃
(Continued on page 8.)
▲
▲
Remote Control
7
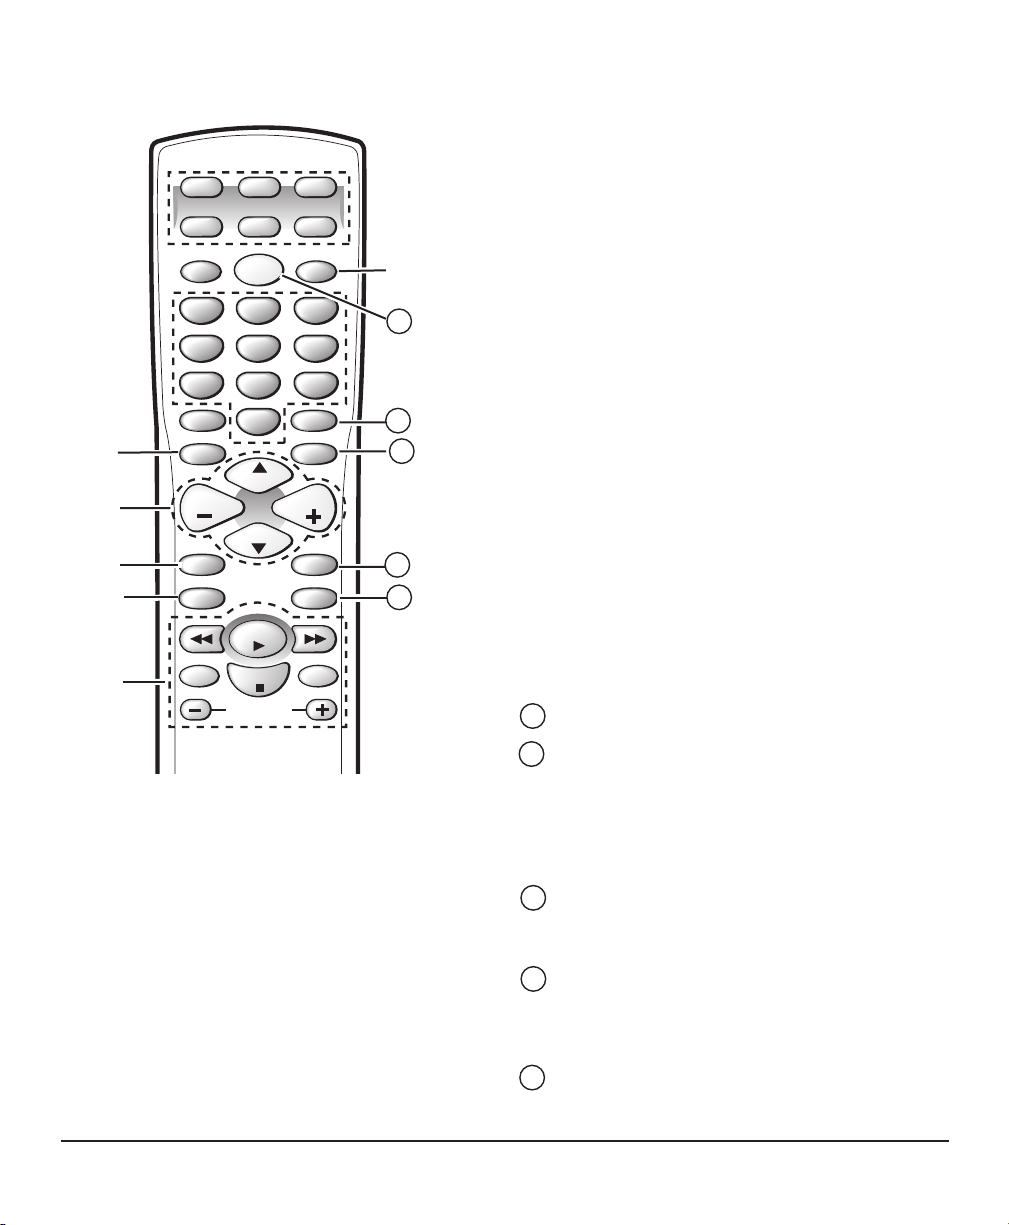
➄
Menu Key—Use this key with the ▲/▼ and – /+ keys
to navigate and adjust features of the on-screen menu
system (see pages 12 ~ 14).
➅
Channel Scanning (CH ▲ /▼ ) and Volume
(VOL – /+) Keys—Press to scan through the
channels in memory and to adjust the volume.
➆
Mute Key—Press once to minimize the volume.
Press again to restore.
Note: When using the audio out jacks this key will
not mute the sound in the fixed mode, but will mute
the sound in the variable mode.
➇
V-Guide Key—See pages 15 ~ 16.
➈
VCR / DVD Keys—These keys control VCR or DVD
functions for Fast Forward (
44), Rewind (33), Play (4 ),
Record (REC), Stop (
■), Tracking (–/ +), and Pause.
➉
Reset Key—Press this key twice to restore factory set-
tings. The TV will automatically start Channel Search
and clear all customized settings. These features will
automatically reset:
•
Picture/Sound Adjustments: Color, Tint, Contrast,
Brightness, Sharpness, Color Enhancer, Bass,
Treble, and Surround Sound
•
Channel Memory
•
Initial Channel to OFF
•
Audio to Stereo
•
Caption to OFF
•
V-Guide to OFF
•
TV Speakers to ON
•
Audio Output to FIXED
•
Aspect Ratio to 4:3 (normal)
•
Scan Velocity to HIGH
•
Menu Language to English
•
Clock and Sleep Timer (if previously set)
•
Video to TV (if previously set)
If desired, personal settings can be made again using
the menu options.
Power Key—Press to turn TV on or off.
Sleep Key—Press this key, then press the “0” key to
set the Sleep Timer. The desired time can be set from
30 minutes up to 3 hours in 30 minutes increments.
Sleep Timer will switch off the TV automatically.
Note: The Sleep Timer cancels when the TV is turned
off or if a power failure occurs.
Recall Key—Select a channel then select another
channel using the number keys. Press Recall to switch
between the channels.
Display Key—Press once to display the channel
number and time. Press twice to display the channel
number continuously. Press again to remove the
display.
Enter Key—Use this key to activate menu selections
on your DVD Player, Cable Box, Satellite Receiver, or
VCR.
23
1
4
78
0
9
5
6
INPUT
CAPTION
SLEEP
MENU
MUTE
RECALL
POWER
RESET
DVD SAT AUX
VCR TV
CABLE
TRACKING
STOP
REC PAUSE
DISPLAY
V-GUIDE
ENTER
PLAY
VOL VOL
CH
CH
➇
➈
➉
➠
Point towards TV
Remote Control Keys (Continued)
➆
➅
➄
12
14
11
13
15
15
14
11
13
12
8
Remote Control Keys
❶
Find your VCR, Cable Box, DVD Player, and Satellite
Receiver brand codes in the charts at the right and on
page 10.
❷
Press and hold the VCR, CABLE, DVD, SAT
(Satellite Receiver), or AUX (Auxiliary) mode key
while entering a three-digit code number. Then release
the mode key.
If the code was accepted, the mode key will flash 5 times after
it is released. If you entered an invalid code, the mode key
will not flash. Check the code number and repeat Step 2.
After entering each code number check the unit’s operation
by pressing the
POWER and/or CHANNEL keys. If these
keys operate your equipment, you have probably entered the
correct code number for that device. If not, follow Step 2 and
enter another code, if available.
Perform Steps 1 and 2 for each piece of equipment you
have.
The VCR mode will accept only VCR codes.
The AUX mode will accept code types for DVD Players,
Cable Boxes, or a second VCR, but only one code at a time.
For programmed key functions, see chart on page 11.
After you have programmed the remote control and
confirmed its operation, enter your codes in the spaces
provided below for easy reference.
Programming the Remote Control
VCR Code:
Cable Box
Code:
DVD Player
Code:
Satellite Code:
AUX ______________
LIST DEVICE HERE
BRAND NAME CODES
Akai . . . . . . . . . . . 529
Apex . . . . . . . . . . 525, 527,
. . . . . . . . . . . . . . 528, 523
Daewoo . . . . . . . . 529
Denon . . . . . . . . . 501, 520
Emerson . . . . . . . . 521, 524, 527
Fisher . . . . . . . . . . 500
GE . . . . . . . . . . . . 504
Harman/Kardon . . 513
Hitachi . . . . . . . . . 530
JVC . . . . . . . . . . . . 515, 510
Kenwood . . . . . . . 507
Koss . . . . . . . . . . . 522
Magnavox . . . . . . 508, 502
Marantz . . . . . . . . 508
Mitsubishi . . . . . . . 503
Onkyo . . . . . . . . . 516, 502
Optimus . . . . . . . . 511
Orion . . . . . . . . . . 526
BRAND NAME . CODES
Oritron . . . . . . . . . 522
Panasonic . . . . . . . 501, 518
Philips . . . . . . . . . . 508, 502
Pioneer . . . . . . . . . 511, 505, 518
Proscan . . . . . . . . . 504
RCA . . . . . . . . . . . . 504
Samsung . . . . . . . . 512
Sanyo . . . . . . . . . . 500, 526
Sharp . . . . . . . . . . 531, 517
Sherwood . . . . . . . 519
Sony . . . . . . . . . . . 506
Sylvania . . . . . . . . 524
Symphonic . . . . . . 524
Technics . . . . . . . . . 501
Theta Digital . . . . . 511
Toshiba . . . . . . . . . 502, 526
Yamaha . . . . . . . . . 501, 509
Zenith . . . . . . . . . . 521, 514, 502
DVD CODES
BRAND NAME . CODES
AlphaStar . . . . . . . 431
Echostar . . . . . . . . 432, 410, 416
ExpressVU . . . . . . . 432
Fujitsu . . . . . . . . . . 404
GE . . . . . . . . . . . . . 426, 436,
. . . . . . . . . . . . . . . 437, 423
General
Instruments . . . . . . 425, 427, 415,
. . . . . . . . . . . . . . . 435, 405
Hitachi . . . . . . . . . 407, 421
HTS . . . . . . . . . . . . 432
Hughes . . . . . . . . . 407
Janeil . . . . . . . . . . 404
Jerrold . . . . . . . . . 425, 427
JVC . . . . . . . . . . . . 432
Magnavox . . . . . . . 429, 430
Memorex . . . . . . . 430
BRAND NAME . CODES
Next Level . . . . . . . 415
Optimus . . . . . . . . 430
Panasonic . . . . . . . 428, 400
Philips . . . . . . . . . . 429, 430
Primestar . . . . . . . 425, 427
Proscan . . . . . . . . . 426, 436, 437, 423
Radio Shack . . . . . 415
RCA . . . . . . . . . . . . 426, 436, 437, 423
Sony . . . . . . . . . . . 420
Star Choice . . . . . . 415, 435
Toshiba . . . . . . . . . 422, 405
Uniden . . . . . . . . . 429, 430, 406,
. . . . . . . . . . . . . . . 409, 412
Video Pall . . . . . . . 404
Viewstar . . . . . . . . 418
Zenith . . . . . . . . . . 434, 404
SATELLITE RECEIVER CODES
Programming the Remote Control
9

BRAND NAME . CODES
Admiral . . . . . . . . . 234, 239, 243, 247,
. . . . . . . . . . . . . . . 224, 229, 222, 215
Adventura . . . . . . . 228
Aiko . . . . . . . . . . . 240, 205
Aiwa . . . . . . . . . . . 228, 217
Akai . . . . . . . . . . . 209, 215
America Action . . . 205, 240
America High . . . . 232
Bell & Howell . . . . 203, 201
Broksonic . . . . . . . 234, 243, 247, 227, 204
Candle . . . . . . . . . 233, 240, 248, 222,
. . . . . . . . . . . . . . 223, 204, 205, 208,
. . . . . . . . . . . . . . 211, 216, 217
Canon . . . . . . . . . . 232, 216
CCE . . . . . . . . . . . . 240, 205
Cineral . . . . . . . . . 240, 205
Citizen . . . . . . . . . . 233, 240, 222, 205,
. . . . . . . . . . . . . . 211, 216, 217
Craig . . . . . . . . . . . 223, 235, 202, 219
Craver . . . . . . . . . . 204
Curtis Mathes . . . . 232, 236, 238, 248,
. . . . . . . . . . . . . . 222, 228, 208, 209,
. . . . . . . . . . . . . . 211, 216, 217
Daewoo . . . . . . . . . 205, 240, 211
Daytron . . . . . . . . 240, 205
Denon . . . . . . . . . . 221, 230
Dynatech . . . . . . . . 228
Emerex . . . . . . . . . 214
Emerson . . . . . . . . 228, 243, 234, 236,
. . . . . . . . . . . . . . 240, 247, 223, 227,
. . . . . . . . . . . . . . 201, 203, 204, 205,
. . . . . . . . . . . . . . 206, 210, 211, 217
Fisher . . . . . . . . . . 200, 201, 202, 203, 211
Fuji . . . . . . . . . . . . 232
Funai . . . . . . . . . . 228, 233, 217
GE . . . . . . . . . . . . . 222, 246, 248, 232,236,
. . . . . . . . . . . . . . . 239, 226, 229, 224,
. . . . . . . . . . . . . . . 208, 212, 213, 216
BRAND NAME . CODES
Goldstar . . . . . . . . 223, 238, 248, 226,
. . . . . . . . . . . . . . . 206, 208, 215, 217
Go Video . . . . . . . . 248, 249, 208, 212,
. . . . . . . . . . . . . . . 213, 219
Gradiente . . . . . . . 228
Garrard . . . . . . . . . 228
Harley Davidson . . 228
Headquarter . . . . . 200
Hitachi . . . . . . . . . 228, 230, 246, 226,
. . . . . . . . . . . . . . . 221, 222, 209, 217
Hughes . . . . . . . . . 221, 230
JBL . . . . . . . . . . . . 237
Jensen . . . . . . . . . 209
JVC . . . . . . . . . . . . 220, 225, 238, 226,
. . . . . . . . . . . . . . . 201, 203, 209, 221, 230
KEC . . . . . . . . . . . . 240, 205
Kenwood . . . . . . . . 220, 225, 226, 238,
. . . . . . . . . . . . . . . 201, 203, 209
Kodak . . . . . . . . . . 232
Lloyd’s . . . . . . . . . 228
Logik . . . . . . . . . . 235, 219
LXI . . . . . . . . . . . . 232, 221, 228, 230,201,
. . . . . . . . . . . . . . . 202, 203, 206, 211, 217
Magnasonic . . . . . . 223, 235, 240, 205, 219
Magnavox . . . . . . . 204, 232, 235, 228,211,
. . . . . . . . . . . . . . . 216, 217, 219, 220, 225
Marta . . . . . . . . . . 206
Matsushita . . . . . . . 232, 216
MEI . . . . . . . . . . . . 232
Memorex . . . . . . . 227, 232, 239, 243, 245,
. . . . . . . . . . . . . . . 223, 224, 228, 229,
. . . . . . . . . . . . . . . 230, 221, 200, 201,
. . . . . . . . . . . . . . . 202, 203, 206, 215
Minolta . . . . . . . . . 221, 230
Mitsubishi . . . . . . . 231, 239, 244, 224,
. . . . . . . . . . . . . . . 226, 229, 210, 223
Motorola . . . . . . . . 232, 239, 229, 224
MTC . . . . . . . . . . . 228, 235, 217, 219
BRAND NAME . CODES
Multitech . . . . . . . . 228, 217
NEC . . . . . . . . . . . . 238, 208, 223, 226,
. . . . . . . . . . . . . . . 201, 203, 206, 209,
. . . . . . . . . . . . . . . 215, 217, 248
Olympus . . . . . . . . 232
Optimus . . . . . . . . 239, 245, 248, 223,224,
. . . . . . . . . . . . . . . 229, 201, 203, 208
Orion . . . . . . . . . . 243, 227, 234, 240,
. . . . . . . . . . . . . . . 205, 206, 210, 211
Panasonic . . . . . . . 245, 232, 235, 236,223,
. . . . . . . . . . . . . . . 202, 211, 216, 219
Penny . . . . . . . . . . 230, 232, 235, 248,221,
. . . . . . . . . . . . . . . 223, 208, 211, 216, 219
Pentax . . . . . . . . . 238, 221, 230
Philco . . . . . . . . . . 204, 232, 243, 228,
. . . . . . . . . . . . . . . 216, 217
Philips . . . . . . . . . . 204, 232, 228, 211,
. . . . . . . . . . . . . . . 216, 217
Pioneer . . . . . . . . . 242, 204, 207, 220, 225
Proscan . . . . . . . . . 222, 241, 246, 230,
. . . . . . . . . . . . . . . 236, 221, 226
Proton . . . . . . . . . . 219, 235,
Pulsar . . . . . . . . . . 233, 240, 248, 205,
. . . . . . . . . . . . . . . 208, 216, 217
Quarter . . . . . . . . . 200
Quartz . . . . . . . . . 200
Quasar . . . . . . . . . 245, 232, 236, 223, 216
Radio Shack . . . . . 228, 245, 223
RCA . . . . . . . . . . . . 222, 241, 246, 248,230,
. . . . . . . . . . . . . . . 232, 236, 239, 224,226,
. . . . . . . . . . . . . . . 229, 221, 201, 203,
. . . . . . . . . . . . . . . 207, 208, 210, 216
Realistic . . . . . . . . 232, 239, 240, 248,
. . . . . . . . . . . . . . . 223, 224, 228, 229
. . . . . . . . . . . . . . . 200, 201, 202, 203,
. . . . . . . . . . . . . . . 206, 208, 216, 217
Samsung . . . . . . . . 248, 208, 233, 211,
. . . . . . . . . . . . . . . 217, 222
BRAND NAME . CODES
Samtron . . . . . . . . 208, 248
Sansui . . . . . . . . . . 243, 226, 228, 235,
. . . . . . . . . . . . . . . 209, 219, 220, 225
Sanky . . . . . . . . . . 239, 229, 224
Sanyo . . . . . . . . . . 200, 201, 202, 203
Scott . . . . . . . . . . . 234, 247, 223, 227, 211
Sears . . . . . . . . . . 232, 223, 228, 230, 221,
. . . . . . . . . . . . . . . 200, 201, 202, 203, 206,
. . . . . . . . . . . . . . . 211, 216, 217
Semp . . . . . . . . . . 211
Shintom . . . . . . . . 219, 227, 235
Sharp . . . . . . . . . . 239, 229, 224
Signature . . . . . . . 228, 217, 239, 229,
. . . . . . . . . . . . . . . 224, 200
Sony . . . . . . . . . . . 214, 218, 232, 237,
. . . . . . . . . . . . . . . 226, 228
STS . . . . . . . . . . . . 221, 230
Sylvania . . . . . . . . 228, 232, 244, 204,
. . . . . . . . . . . . . . . 216, 217
Symphonic . . . . . . 228, 217, 233, 226, 202
Yamaha . . . . . . . . . 238, 226
Tatung . . . . . . . . . . 226, 209
Teac . . . . . . . . . . . 228, 209, 214, 217
Technics . . . . . . . . . 232
Teknika . . . . . . . . . 232, 223, 228, 216, 217
Toshiba . . . . . . . . . 211, 240, 244, 202,
. . . . . . . . . . . . . . . 205, 210
Tomas . . . . . . . . . . 228, 217
Vector . . . . . . . . . . 211
Video Concept . . . . 211
Wards . . . . . . . . . . 230, 232, 239, 248,
. . . . . . . . . . . . . . 223, 224, 228, 229,
. . . . . . . . . . . . . . . 221, 202, 204, 208,
. . . . . . . . . . . . . . 211, 217
White
Westinghouse . . . . 240, 243, 205
XR-1000 . . . . . . . . 228, 232
Zenith . . . . . . . . . . 206, 215, 237, 243, 220,
. . . . . . . . . . . . . . . 223, 225, 228, 222
VCR CODES
BRAND NAME . CODES
ABC . . . . . . . . . . . . 312, 304, 306, 308,309,
. . . . . . . . . . . . . . . 311, 313, 314, 318, 319,
. . . . . . . . . . . . . . . 321, 322, 323, 324,
. . . . . . . . . . . . . . . 327, 329
AIM . . . . . . . . . . . . 321
Archer . . . . . . . . . . 334
Bell & Howell . . . . 313, 314, 329
Contec . . . . . . . . . . 305, 302, 307, 308,309,
. . . . . . . . . . . . . . . 311, 318, 319, 320,
. . . . . . . . . . . . . . . 322, 323, 324, 327
CPI . . . . . . . . . . . . 319, 308, 309, 311,
. . . . . . . . . . . . . . . 322, 323
Diamond . . . . . . . . 320
Eagle . . . . . . . . . . 313, 314, 329
Emerson . . . . . . . . 334
Gemini . . . . . . . . . 334
General
Instruments . . . . . . 303, 300, 308, 309, 311,
. . . . . . . . . . . . . . . 319, 320,321, 322, 323
Goldstar . . . . . . . . 312
Goodmind . . . . . . . 334
BRAND NAME . CODES
Hamlin . . . . . . . . . 330, 320
Hitachi . . . . . . . . . 309, 308, 311, 319,
. . . . . . . . . . . . . . . 322, 323
Hytex . . . . . . . . . . 318
Jerrold . . . . . . . . . 300, 303, 308, 309,
. . . . . . . . . . . . . . . 311, 313, 314, 319,
. . . . . . . . . . . . . . . 320, 321, 322, 323, 329
Magnavox . . . . . . . 325, 329, 301, 308,
. . . . . . . . . . . . . . . 309, 311, 313, 314,
. . . . . . . . . . . . . . . 319, 322, 323
Memorex . . . . . . . 331, 332, 313, 314, 329
Motorola . . . . . . . . 338, 303, 300, 308,
. . . . . . . . . . . . . . . 309, 311, 319, 320,
. . . . . . . . . . . . . . . 321, 322, 323
Movie Time . . . . . . 306, 310, 314, 313, 329
Northcoast . . . . . . . 316
NSC . . . . . . . . . . . . 305, 306, 314, 313, 329
Oak . . . . . . . . . . . 305, 318, 320
Paragon . . . . . . . . 331, 313, 314, 329
Panasonic . . . . . . . 331, 324, 302, 307,
. . . . . . . . . . . . . . . 317, 327
BRAND NAME . CODES
Philips . . . . . . . . . . 325, 329, 301, 308,
. . . . . . . . . . . . . . . 309, 311, 313, 314,
. . . . . . . . . . . . . . . 319, 322, 323
Pioneer . . . . . . . . . 312, 327, 335, 333,
. . . . . . . . . . . . . . . 317, 324
Proscan . . . . . . . . . 327
Quasar . . . . . . . . . 331, 302, 307, 317
RCA . . . . . . . . . . . . 328, 302, 307
Regal . . . . . . . . . . 330, 307, 320
Rembrandt . . . . . . 305, 309, 308, 311,
. . . . . . . . . . . . . . . 319, 322, 323
Radio Shack . . . . . 334
Samsung . . . . . . . . 312, 310
Scientific Atlanta . . 335, 327, 307, 324
Signal . . . . . . . . . . 310
Signature . . . . . . . 300, 309, 308, 311,
. . . . . . . . . . . . . . . 319, 321, 322, 323
Sprucer . . . . . . . . . 302, 307, 316
Starcom . . . . . . . . 332, 309, 308, 311,
. . . . . . . . . . . . . . . 319, 321, 322, 323
BRAND NAME . CODES
Stargate . . . . . . . . 309, 310, 311, 321,
. . . . . . . . . . . . . . . 322, 334
Teleview . . . . . . . . 310
Tocom . . . . . . . . . . 300, 303, 305, 304,
. . . . . . . . . . . . . . . 306, 307
Toshiba . . . . . . . . . 331, 309, 308, 311,
. . . . . . . . . . . . . . . 316, 319, 322, 323
Unika . . . . . . . . . . 314, 313, 329
United Artists . . . . . 318
United Cable . . . . . 309, 308, 311, 319,
. . . . . . . . . . . . . . . 322, 323
U.S. Electronics . . . 309, 308, 311, 319,
. . . . . . . . . . . . . . . 322, 323, 324, 327
Viewstar . . . . . . . . 326, 313, 315, 314, 329
Wards . . . . . . . . . . 321, 322, 308, 309,
. . . . . . . . . . . . . . . 311, 319, 323
Warner . . . . . . . . . 312
Zenith . . . . . . . . . . 331, 336, 337, 308, 309,
. . . . . . . . . . . . . . . 311, 316, 319, 322, 323,
. . . . . . . . . . . . . . . 324, 327
CABLE BOX CODES
10
VCR Codes / Cable Box Codes

Notes:
Many of the keys on this remote control are multi-
functional. Please refer to the chart for a generic
description of the keys and their functions. Refer to your
original operating manuals for specific feature operation.
This remote control cannot add keys or features to your
equipment. Your equipment’s manufacturer must have
originally provided them.
The CHANNEL (▲/▼) and VOLUME (
–/+) keys
become CURSOR keys when the MENU key is
pressed. This operating state remains active for 10
seconds after pressing the MENU key or either of the
CHANNEL or VOLUME keys. After 10 seconds, these
keys will revert to normal channel and volume operation.
Some equipment brands use the CHANNEL and
VOLUME keys instead of CURSOR keys to navigate
through their menu system. If, after pressing the MENU
key, the CHANNEL and VOLUME keys do not move
the cursor, wait 10 seconds then try them again. If the
menu leaves the screen, press the MENU key again
then wait 10 seconds before pressing the CHANNEL
and VOLUME keys.
Operations in the chart that are marked with an asterisk
(*) work when the menu is displayed (after pressing the
MENU key).
The AUX mode can be programmed to operate a, DVD
Player, Cable Box, Satellite Receiver, or second VCR,
but only one device at a time.
Multimedia Remote Control Keys’ Functions Chart
REMOTE KEYS TV MODE VCR MODE CABLE MODE DVD MODE SATELLITE MODE
POWER Turns Unit On/Off Turns Unit On/Off Turns Unit On/Off Turns Unit On/Off Turns Unit On/Off
NUMBER KEYS (0 ~ 9) Used to Select Channels Used to Select Channels Used to Select Channels No Function Used to Select Channels
INPUT Selects TV/Video mode Selects TV/VCR mode No Function No Function Selects TV/DSS mode
RECALL Selects Previous Channel Selects Previous Channel Selects Previous Channel Select Repeat Function Selects Previous Channel
MENU Displays Setup Menu Displays Setup Menu Displays Setup Menu Displays Setup Menu Displays Setup Menu
CHANNEL ▲ (UP) Channe l/Cursor* Up Channel /Cursor* Up Channel /Cursor* Up Next/ Cursor* Up Channe l/Cursor* Up
CHANNEL ▼ (DOWN) Channel/Cursor* Down Channel /Cursor* Down Channel /Cursor* Down Previous/Cursor* Down Channel /Cursor* Down
VOLUME – (DOWN) Audio Down/Cursor* Left Audio Down/Cursor* Left Audio Down/Cursor* Left Audio Down/Cursor* Left Audio Down/Cursor* Left
VOLUME + (UP) Audio Up/Cursor* Right Audio Up/Cursor* Right Audio Up/Cursor* Right Audio Up/Cursor* Right Audio Up/Cursor* Right
MUTE Switches TV sound Off/On Switches TV sound Off/On Switches TV sound Off/On Switches TV sound Off/On Switches TV sound Off/On
DISPLAY Shows/Clears display No Function No Function Zoom Function No Function
RESET Operates TV ONLY No Function No Function No Function No Function
CAPTION Operates TV ONLY No Function No Function Accesses Audio Options No Function
SLEEP Operates TV ONLY No Function No Function No Function No Function
V-GUIDE Operates TV ONLY No Function No Function No Function No Function
ENTER Makes Selection Makes Selection Makes Selection Makes Selection Makes Selection
PLAY (
) Selects VCR/DVD Play Mode Selects VCR Play Selects VCR/DVD Play Selects DVD Play Selects VCR/DVD Play
FAST FORWARD ( ) Operates VCR/DVD Operates VCR Operates VCR/DVD Operates DVD Operates VCR/DVD
REWIND (
) Operates VCR/DVD Operates VCR Operates VCR/DVD Operates DVD Operates VCR/DVD
STOP (
■ ) Selects VCR/DVD Stop Selects VCR Stop Selects VCR/DVD Stop Selects DVD Stop Selects VCR/DVD Stop
PAUSE Selects VCR/DVD Pause Selects VCR Pause Selects VCR/DVD Pause Selects DVD Pause Selects VCR/DVD Pause
RECORD (REC) No Function Selects VCR Record No Function No Function No Function
TRACKING – / + Adjusts VCR Head Tacking Adjusts VCR Head Tacking Adjusts VCR Head Tacking Still Frame Step Fwd/Rev Adjusts VCR Head Tacking
MODE KEYS Press these keys (VCR/TV/CABLE/DVD/SAT/AUX) when programming the remote control and to choose an operating mode.
▼
▼
▼
▼
▼
Remote Control Keys’ Functions
11
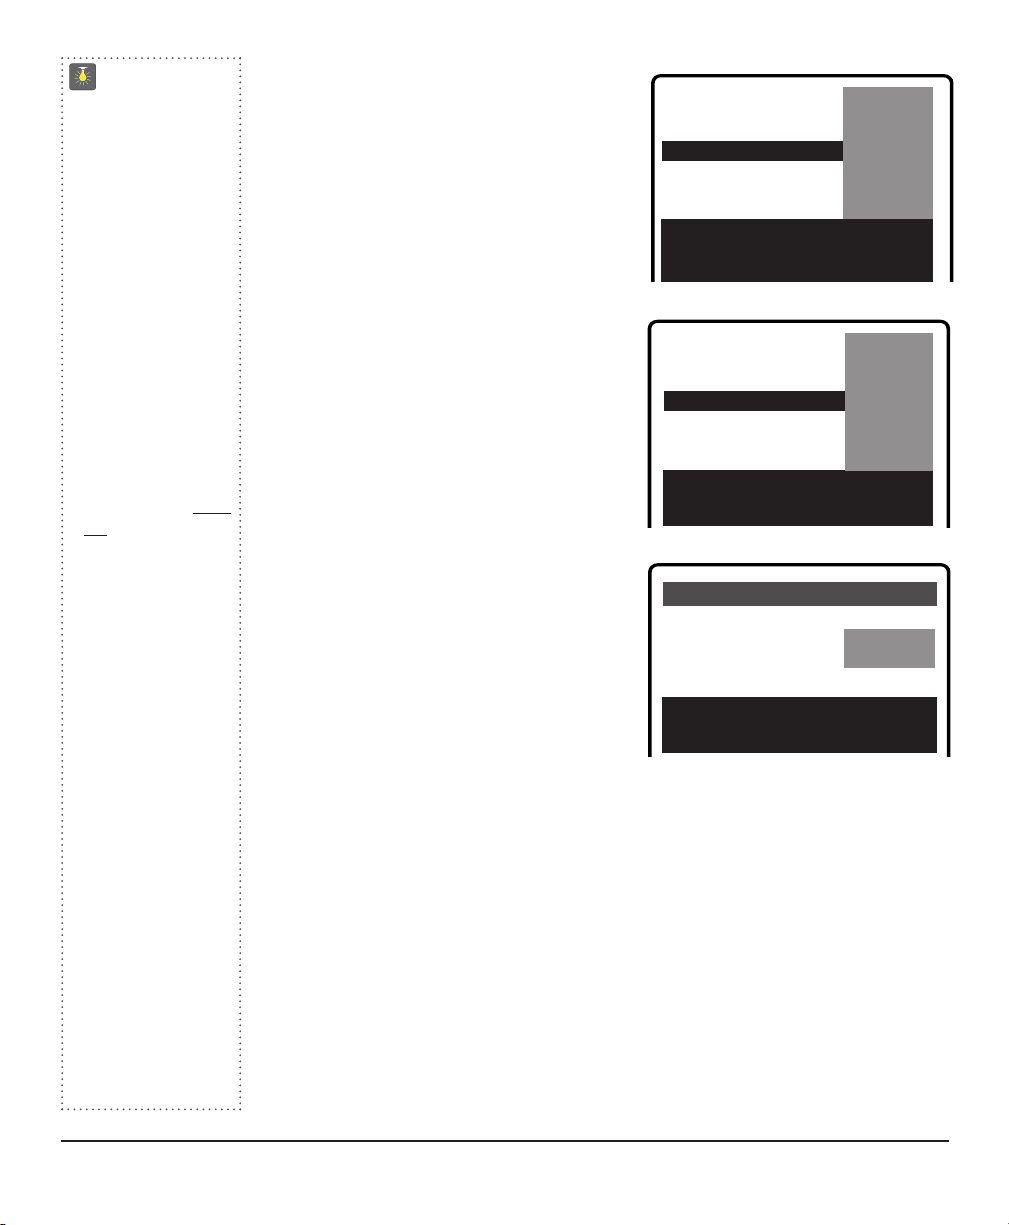
The on-screen menu provides the viewer with easy access to adjustments and settings. Just use
the keys on the remote control and follow the on-screen instructions.
How to operate the On-screen Menu
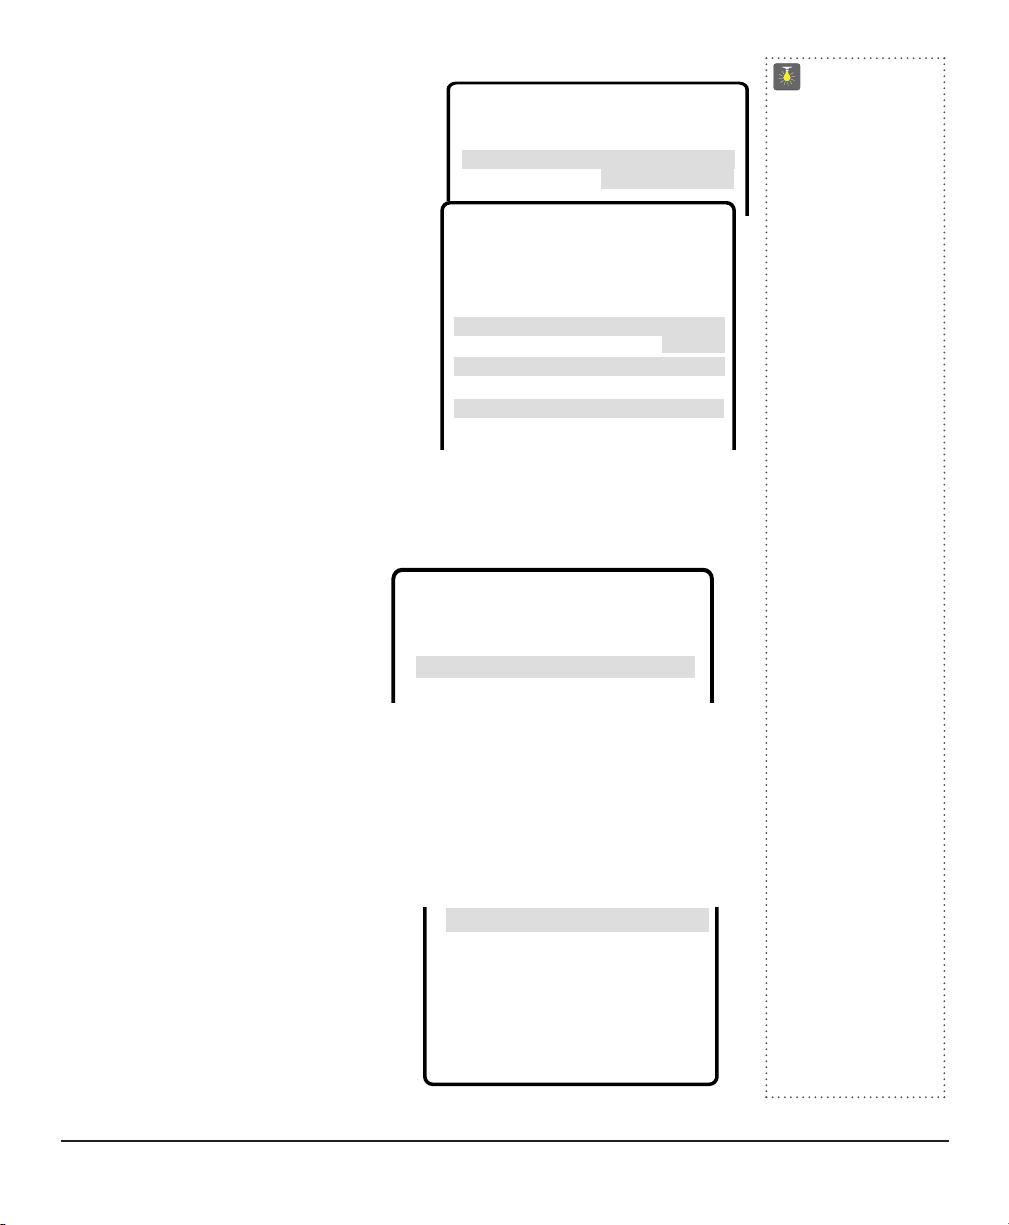
1. Press MENU key.
2. Use the ▲/▼ keys to highlight the desired
feature.
3. Use the – /+ keys to choose desired
option. (
➧
indicates selected item.)
4. Press the MENU key to exit.
Items with submenus requires additional
steps.
Setting the Clock
To use the Auto Clock feature, a local PBS
station that is broadcasting an XDS signal
must be received. The Auto Clock searches
for the transmitted signal and automatically
sets the clock. (This may take several seconds.)
To set the clock automatically
1. Press MENU key.
2. Use the + key to activate Auto setting.
Notes:
The clock will be cleared after a power interruption.
When power is restored, the TV will display the Auto
Clock setup menu on the screen automatically.
Cable Box and Satellite users must set the clock manually.
To set the clock manually
1. Press the MENU key.
2. Press the ▲ or ▼ key to select Clock.
3. Press the MENU key to choose
Manual.
4. Use the – key to set the hour and the + key to set the minutes.
Setting Audio Mode
Select desired sound setting, Stereo, Mono, or SAP (secondary audio program).
Note: Stereo and SAP must be part of the broadcast signal.
1. Choose Stereo, Mono, or SAP from the Audio
options.
Note: The TV will automatically reset to stereo
if unplugged or a power failure occurs.
▲▼ keys – + keys
▲▼ keys – + keys
Clock
➧
Manual Auto
Audio
➧
Stereo Mono SAP
Picture/Sound
➧
Sports Movie
News Manual
Initial Channel
➧
OFF ON C---
Antenna
➧
Cable VHF/UHF
CH. Search
➧
NO Start
CH. Scan Memory C 34 Added
Aspect Ratio
➧
4:3 16:9
Scan Velocity OFF Low
➧
High
TV Speakers
➧
ON OFF
Audio Output
➧
Fixed Variable
Espanol
Menu Language
➧
English Francais
Press MENU key to exit
Auto Clock Setting
Press MENU key to cancel
TV Adjustment and Setup
12
On-Sreen Menu / Setting the Clock / Audio Mode
Clock
Clock
Manual
➧
Auto
Auto
▲▼ keys – + keys
Clock
Clock
➧
Manual
Manual Auto
10:30
10:30
▲▼ keys – + keys
Clock
Audio
Audio
➧
Stereo
Stereo Mono SAP
QuickTips
■
The menu will
display on the
screen for approxi-
mately 20 seconds.
Press MENU again
to redisplay.
■
Use the CHANNEL
▲ / ▼ keys and the
VOLUME – /+ keys
to navigate through
the menus and to
make selections
from the menus.
■
To see the time
of day after setting
the clock, press the
DISPLAY key.
■
Extended Data
Service (XDS)
signal may not be
transmitted by all
broadcasters.
■
Under weak stereo
signal conditions,
you may receive
better quality sound
in the “Mono”
position.
Need help?
Visit our Web site at
www.sanyoctv.com
or Call 1-800-877-5032
Adjusting Picture/Sound
For automatic picture/sound adjustment
Choose Sports, Movie,
or
News from
the Picture/Sound options.
Adjust the picture/sound manually
1. Choose Manual from the Picture/Sound
options.
2. Press the MENU key to open the
picture/sound settings submenu.
3. Use the ▲/ ▼ keys to highlight the
picture or sound setting you want to change.
4. Use the – /+ keys to adjust settings.
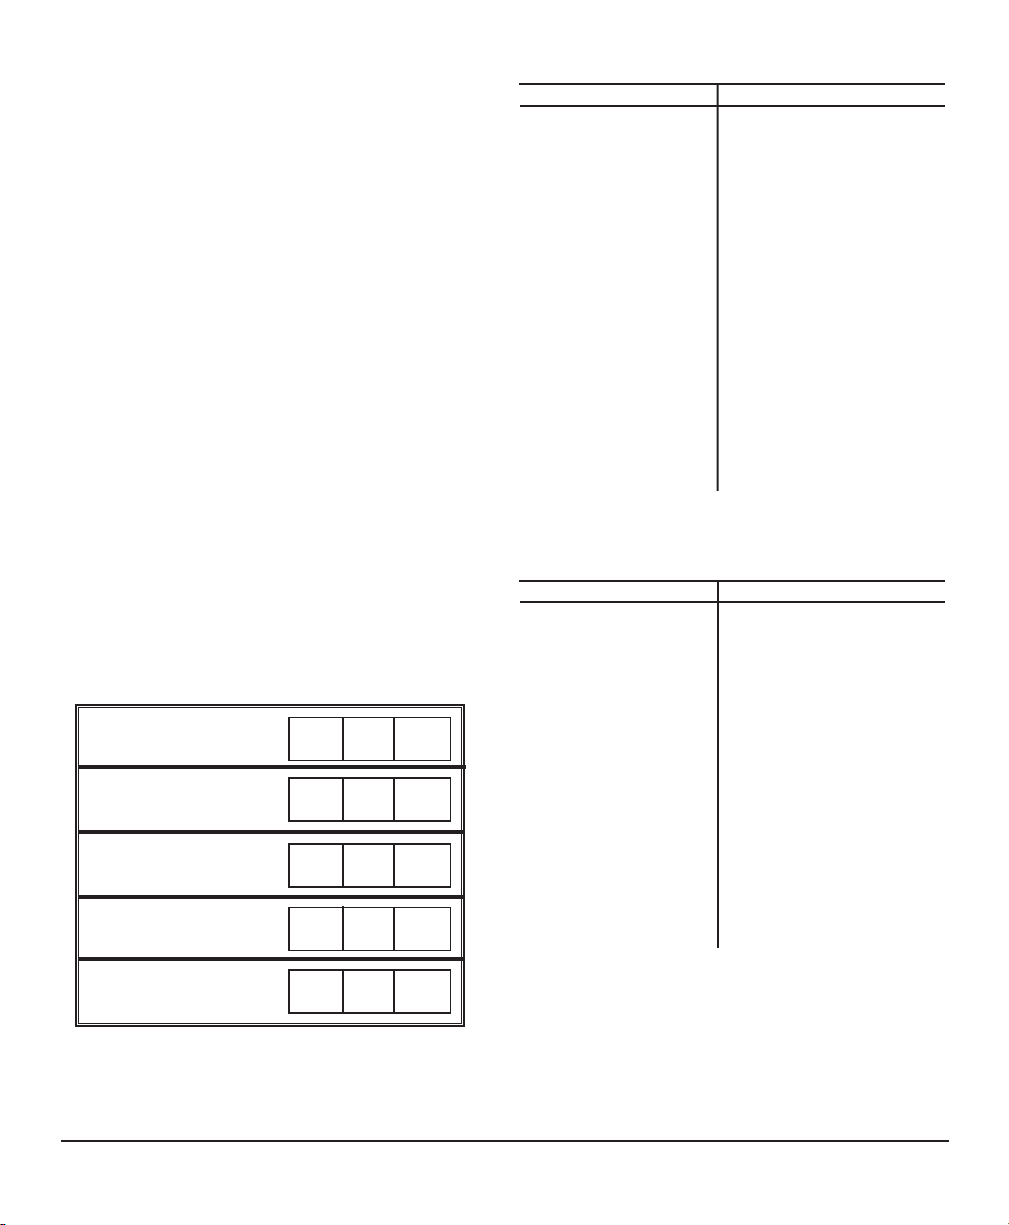
Initial Channel Setup
The TV can be programmed to tune to your
favorite channel each time it is turned on, such
as, a news or sports network, or the output
of your VCR.
1. Press MENU key.
2. Use the ▲/ ▼ keys to highlight Initial
Channel.
3. Press the + key to choose ON. Select
favorite channel using remote number
keys 0~9 (example): C03.
To select
cable channels above 99
, press and hold
the 1 key until C1– – appears.
Resetting the Antenna/Cable Mode and Channel Search
Resetting the Antenna/Cable Mode or CH. (Channel) Search is required only if additional
channels become available, such as moving to another city or having a cable service
installed.
1. Choose Start from the Ch. Search
menu options.
(Continued on page 14.)
▲▼ keys – + keys
Clock
Audio
Initial Channel
Picture/Sound
Picture/Sound
Sports Movie
News
➧
Manual
Manual
QuickTips
■
To expand your
viewing experi-
ence select Sports,
Movie, or News to
match the program
you are watching.
■
Use the Color
Enhancer feature
to highlight the
picture flesh tones
and color highlights.
Selecting warm will
deepen the picture
red tints and cool
will highlight the
picture blue tints.
■
Surround sound
will be automatically
on when Sports or
Movie is selected.
Surround expands
the sound effect
while receiving MTS
stereo signals.
■
When Initial Channel
is set to OFF the TV
will tune to the last
channel selected
when powered on.
■
When setting the
Antenna mode,
choose Cable if your
TV is connected
to a cable system,
otherwise choose
VHF/UHF.
Need help?
Visit our Web site at
www.sanyoctv.com
or Call 1-800-877-5032
Color Enhancer
Color Enhancer Normal
➧
Warm
Warm
▲▼ keys – + keys
Color
Tint
Contrast
Brightness
Sharpness
Tr eble
Press MENU key to exit
Bass
Bass
I I I I I I I -- - -
IIIIIII ----
Color Enhancer
Color Enhancer Normal
➧
Wa r m
Warm
Cool
Surround
Surround OFF
➧
ON
ON
▲▼ keys – + keys
Clock
Audio
Picture/Sound
Antenna
Initial Channel
Initial Channel OFF
➧
ON C 03
ON C 03
CH. Scan Memory
Aspect Ratio
Scan Velocity
TV Speakers
Audio Output
Menu Language
Press MENU key to exit
CH. Search
CH. Search NO
➧
Start
Start
Adjusting Picture/Sound / Initial Channel Setup
13
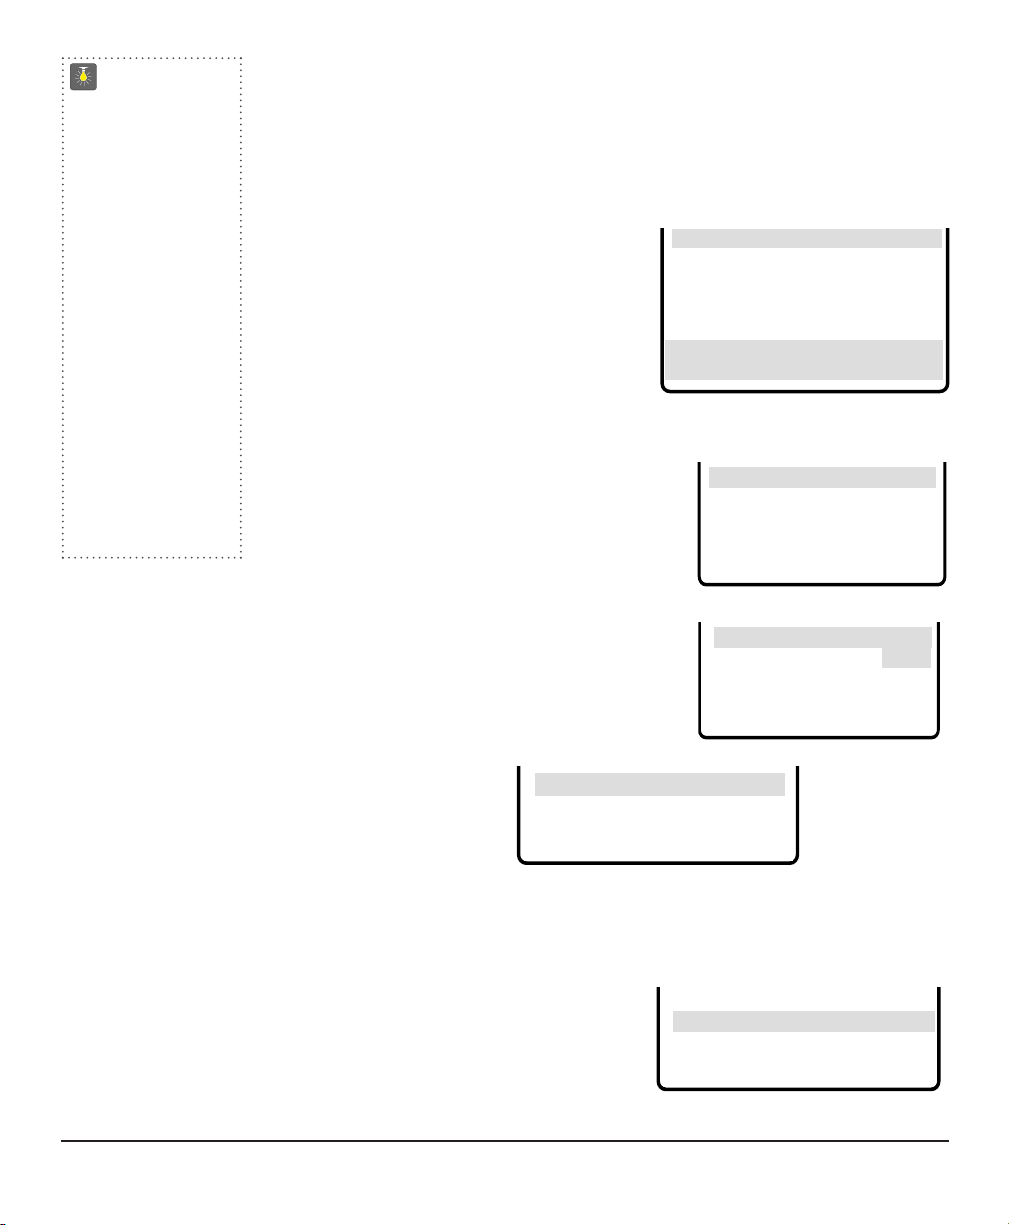
Adding or Deleting Channels
1. Press MENU key.
2. Use the ▲/▼ keys to highlight CH. Scan Memory.
3. Press the
+ key to highlight channel number entry area.
4. Enter the channel number you want to add or delete (example): C34. For cable channels
above 99, press and hold the 1 key until C1– – appears. Then enter the other two numbers.
5. Press the
+ key to change the present setting.
Example: Added will change to Deleted. This
takes about three seconds. During that time, the
word “Added” or “Deleted” will become yellow.
6. Use the 0~9 or ▲▼ keys to choose other channels
to delete or add, or press the MENU key to exit.
QuickTips
■
Channels deleted
from scan memory
can be selected with
the number keys.
■
Restoring deleted
channels, use the
on-screen menu to
manually add chan-
nels or start CH.
(Channel) Search
from the menu.
It may take a few
minutes to search
thru the available
channels, or press
RESET key twice.
Need help?
Visit our Web site at
www.sanyoctv.com
or Call 1-800-877-5032
Aspect Ratio
Use this feature when digital equipment is connected to the component input jacks. The 4:
3 setting is for normal viewing. The 16:9 setting changes the picture image to wide-screen
viewing with minimal portion of top and bottom
compressed.
1. Press MENU key.
2. Use the ▲/▼ keys to highlight Aspect Ratio.
3. Press the – /+ keys to select 4:3 or 16:9.
Scan Velocity
TV Speakers
Audio Output
Menu Language
Press MENU key to exit
Aspect Ratio
Aspect Ratio
➧
4:3
4:3
16:9
TV Speakers
1. Press MENU key.
2. Use the ▲/▼ keys to highlight TV Speakers.
3. Press the – /+ keys to turn the speakers ON or OFF.
Note: Sound will not be produced through your TV speakers if the OFF mode is selected.
Audio Output
Menu Language
Press MENU key to exit
TV Speakers
TV Speakers
➧
ON
ON
OFF
TV Speakers
Audio Output
Menu Language
Press MENU key to exit
Scan Velocity
Scan Velocity OFF
➧
Low
High
High
Aspect Ratio
Scan Velocity
TV Speakers
Audio Output
Menu Language
Select channel using
Select channel using
▲▼
▲▼
,
,
0~9 keys
0~9 keys
Press MENU key to exit
Press MENU key to exit
CH. Scan Memory
C 34
C 34
Deleted
Scan Velocity
This unit features an electronic circuit that regulates the scan speed of the electron
beam creating sharp transitions between the light and dark portions of the picture.
The result is crisp edges and sharply-defined clarity.
1. Press MENU key.
2. Use the ▲/▼ keys to highlight Scan Velocity.
3. Press the – /+ keys to select Off, Low, or High.
Audio Output
This convenient menu option enables you to select a fixed or variable audio signal.
1. Press MENU key.
2. Use the ▲/▼ keys to highlight Audio Output.
3. Press the – /+ keys to select Fixed or Variable.
Fixed Mode (Constant audio output level from TV)
Use external equipment’s volume control to adjust sound level.
Variable Mode (Output from TV varies with volume)
Use the TV and external equipment’s volume controls to adjust the sound level.
TV Speakers
Menu Language
Press MENU key to exit
Audio Output
Audio Output Fixed
➧
Variable
Variable
14
Add or Delete Channels / Aspect Ratio / Scan Velocity / TV Speakers / Audio Output
The V-Guide system contain both age-based and content-based settings. This gives parents
discretionary ways of choosing appropriate material for their children to view.
Content ratings are represented by the initials D (Suggestive Dialog), L (Adult Language),
S (Sexual Situations), V (Violence), and FV (Fantasy Violence). When programming contains
any or all of these conditions, these letters become part of the icon that is displayed on the TV
screen.
A rating icon will generally appear in the upper left hand corner of the TV screen for
about fifteen seconds.
V-Guide (Parental Control) Information
NOTE: THIS FEATURE IS DESIGNED TO COMPLY WITH THE UNITED STATES OF
AMERICA’S FCC V-CHIP REGULATIONS. THEREFORE, IT MAY NOT
FUNCTION WITH BROADCASTS THAT ORIGINATE IN OTHER COUNTRIES.
This Sanyo television is equipped with an electronic V-Chip to interpret MPAA and TV Parental
Guidelines rating codes. When these codes are detected, the TV will automatically display or block
the program, depending upon choices you make when setting up the V-Guide system.
QuickTips
■
Use the CHANNEL
▲ / ▼ keys
and the VOLUME
– /+ keys to
navigate through
the menus and to
make selections
from the menus.
■
V-Guide feature is
accessible only from
the remote control.
■
The TV guidelines
rating icon will
appear generally in
the upper left hand
corner of your TV
screen.
■
The V-Guide display
remains on screen
for approximately
20 seconds. If it
disappears, press
the
V-GUIDE key.
Need help?
Visit our Web site at
www.sanyoctv.com
or Call 1-800-877-5032
V-Guide Operation
Use this feature to supervise television viewing for young children. This television can be set to
automatically block programs with content you deem as inappropriate for your children to view,
including: suggestive dialog, adult language, sexual situations, violence, and fantasy violence.
The ability of the television to block the reception of specific programming content depends
upon several conditions: 1) The program must be rated, 2) Networks must broadcast the rating
code data, 3) Cable companies must transmit the rating code signal, and 4) The TV must be
properly setup to decode the signal.
Setting MPAA Movie Rating
1. Press the V-GUIDE key on the remote control to display menu.
2. Press the + key to switch V-Guide ON.
3. Press the + key again. Then use the ▲ / ▼ keys to highlight
rating.
4. Press the MENU key to Block (B) or Unblock (U) selected
rating. (➡ Arrow indicates selection.)
5. Press the – key to return to the V-Guide Options menu.
(Continued on page 16.)
V-GUIDE
MPAA Movie Ratings
TV Parental Guidelines
Press MENU key to BLOCK
Use ▲▼, – + keys to select
Press V-GUIDE key to exit
X B
NC17 B
➡
R
B
PG13 U
PG U
G U
V-Gu ide
15
QuickTips
■
When in the
V-Guide menu
system, the – /+
keys allow you to
navigate between
the ratings and the
options menu.
■
The TV will auto-
matically block (B)
ratings above or
unblock (U) ratings
below selection.
For example, if
you block rating R,
NC17 and X will be
blocked as well.
■
Blocking TVY7 does
not block higher
ratings.
■
You can block a
content rating such
as TVPG-V and still
be able to watch
TVPG programs with
ratings of S-L-D
provided TVPG is
unblocked (U).
■
To temporarily
unblock or view
Blocked (B)
programs, set
V-GUIDE to OFF, or
press the RESET
key twice to clear all
Blocked (B) ratings
and other custom-
ized settings
.
Need help?
Visit our Web site at
www.sanyoctv.com
or Call 1-800-877-5032
Setting TV Parental guidelines
6. Use the ▲ / ▼ keys to highlight TV
Parental Guidelines.
7. Press the + key. Then use the ▲ / ▼
keys to highlight rating.
8. Press the MENU key to Block (B) or
Unblock (U) selected rating.
(➡ Arrow indicates selection.)
Setting Content-Based
Guidelines
9. Follow steps 6 and 7. Use the ▲ / ▼
keys to highlight Content.
10. Press the MENU key to display the
Content Option menu.
11. Use the ▲ / ▼ keys to highlight a category
(D-Suggestive Dialog, L-Adult Language,
S-Sexual Situations, V-Violence, FV-Fantasy
Violence).
12. Press the + key. Then use the ▲ / ▼ keys
to highlight a rating.
13. Press the MENU key to Block (B) or Un-
block (U) selected rating. (➡ Arrow
indicates selection.)
14. Press the V-GUIDE key to exit; or press the
– key to return to the Content Options menu.
15. Repeat steps 11 through 13 to Block (B) or
Unblock (U) additional content ratings,
if desired.
Tu r ning Off the V-Guide
1. Press the V-GUIDE key.
2. Use the – /+ keys to select OFF.
Note: Networks and local stations may or
may not include the content ratings
portion of the TV Parental
Guidelines.
V-GUIDE
MPAA Movie Ratings
TV Parental Guidelines
TVMA B
TV14 B
TVPG B
➡
TV-G
TV-G
B
TVY7 U
TV-Y U
Content
Press MENU key to BLOCK
Use ▲▼, – + keys to select
Press V-GUIDE key to exit
V-GUIDE
MPAA Movie Ratings
TV Parental Guidelines
Press MENU key to set
Use ▲▼, – + keys to select
Press V-GUIDE key to exit
TVMA B
TV14 B
TVPG B
TV-G B
TVY7 U
TV-Y U
➡
Content
Content
D-Suggestive Dialog
L-Adult Language
S-Sexual Situations
V-Violence
FV-Fantasy Violence
➡
TV14
TV14
B
TVPG B
Press MENU key to BLOCK
Use ▲▼, – + keys to select
Press V-GUIDE key to exit
16
V-Guide
CAPTION1: This is the main mode used for program captioning (words
match the program you are watching). These captions are generally one or
two lines.
CAPTION2: This is an alternative mode for program captioning. Caption2
may be used by the broadcaster to provide captions in another language,
such as, Spanish or French.
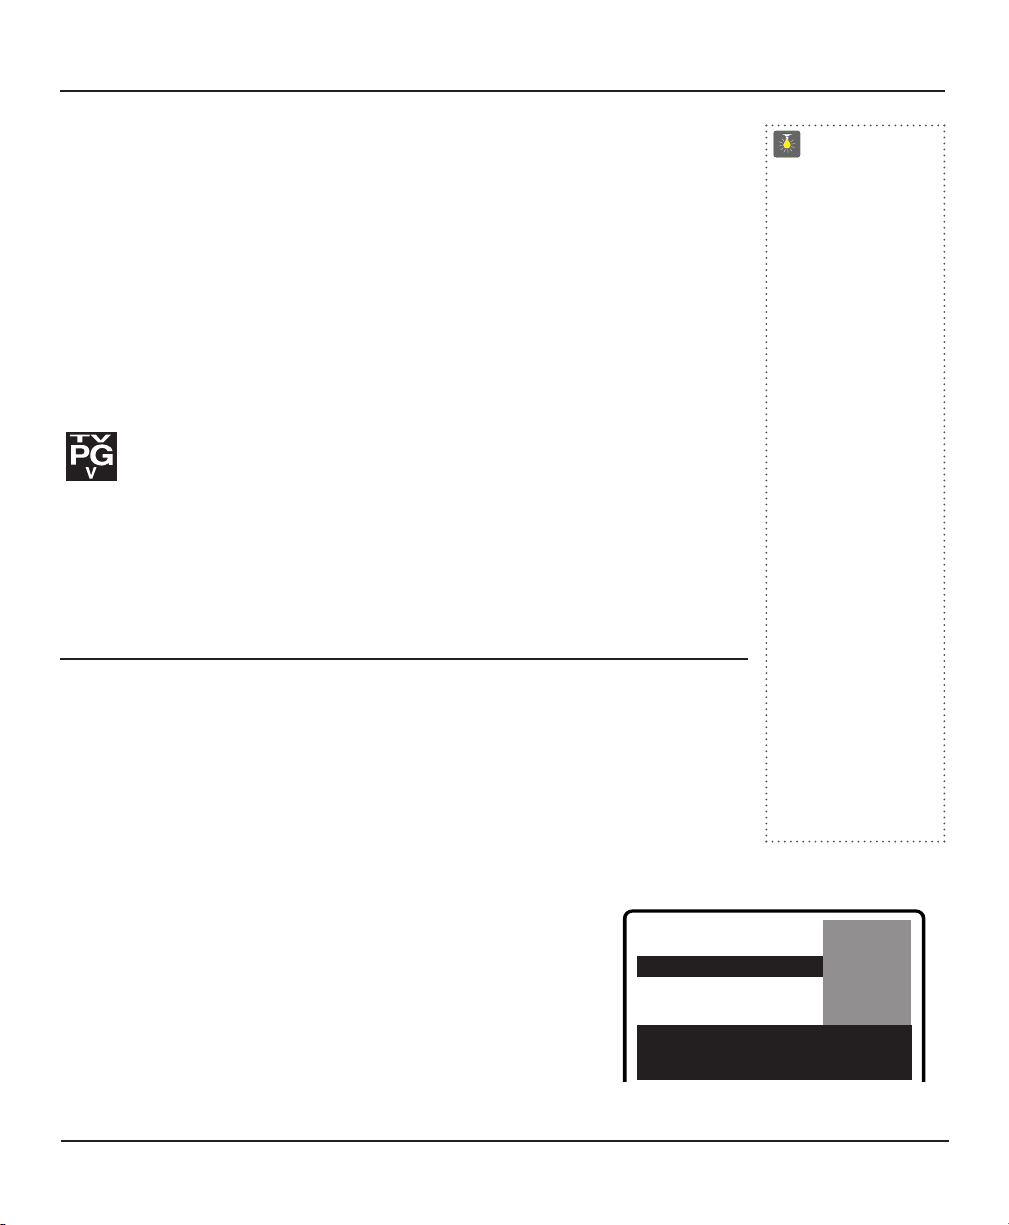
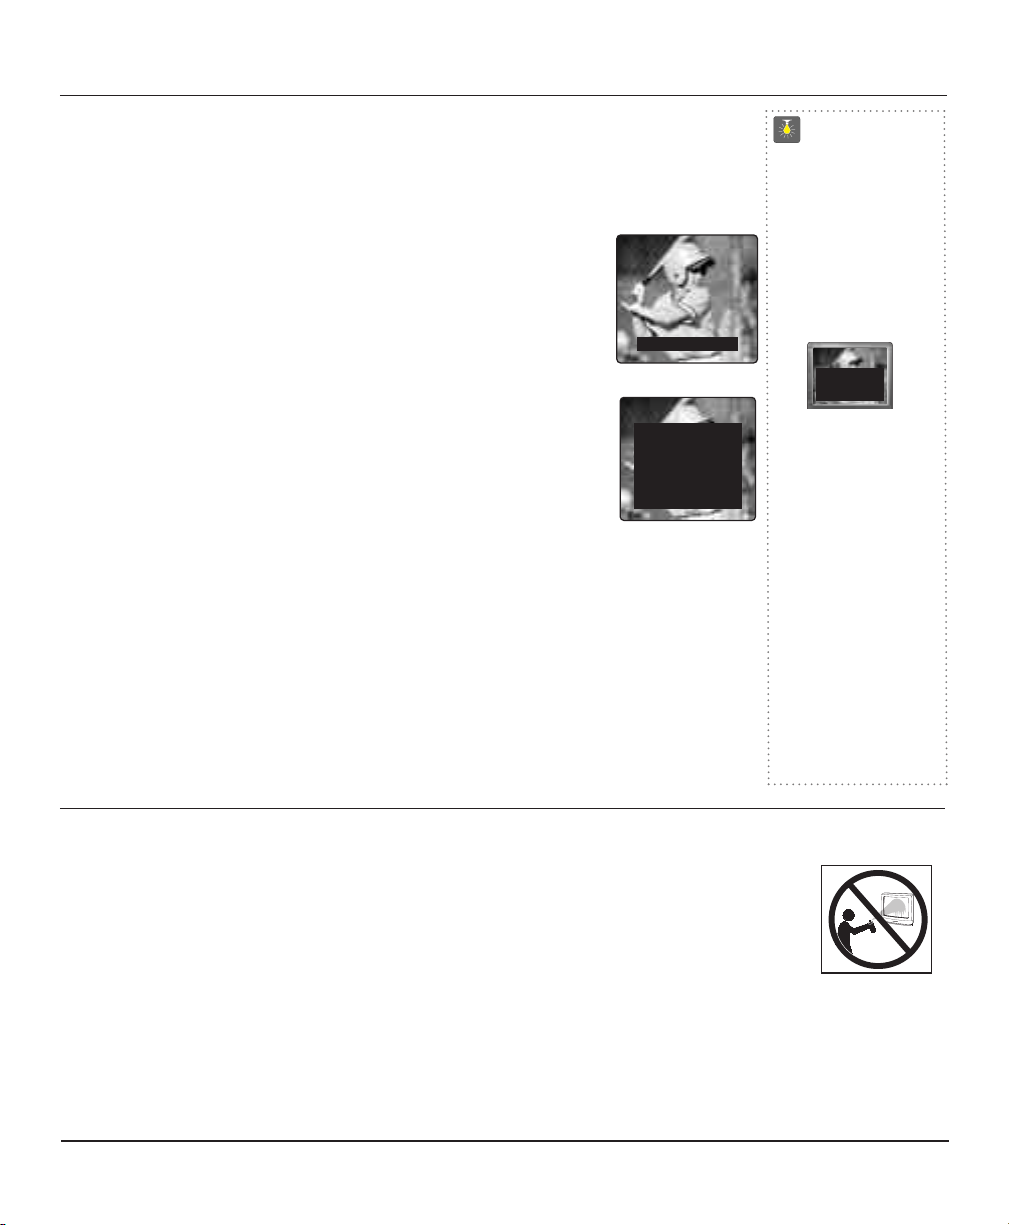
TEXT1: This mode is used to display large amounts of text. This text will
appear within a black box that may be nearly as large as the TV screen.
Text displayed in this manner does not generally relate to the program.
These captions may be used by broadcasters to provide weather reports,
community bulletins, etc.
TEXT2: This is an alternative mode used to display large amounts of text
(same as Text1).
QUIKCAP: Allows captions to toggle on and off with the Mute func-
tion. Press the MUTE key on the remote control to block the TV sound; the captions display
automatically. Press the MUTE key again to restore the sound, the captions will disappear.
Quikcap displays program captions in the Caption1 mode.
Setting Captions
1. Press the CAPTION key on the remote control.
2. Press the 0 key to select options: OFF, CAPTION1, CAPTION2, TEXT1, TEXT2, or
QUIKCAP.
TWO OUTS AND TWO STRIKES
Caption1/ 2
TONIGHT: BECOMING MOSTLY
CLOUDY WITH A 40 PERCENT
CHANCE OF RAIN. COLD WITH
A LOW IN THE UPPER 30's WEST
WIND AROUND 20 MPH, SHIFT-
ING TO NORTHWEST AROUND
MIDNIGHT. FRIDAY: MOSTLY
CLOUDY AND COLDER WITH
A 50 PERCENT CHANCE OF
RAIN. HIGH IN THE MID 50's.
Text1/2
Closed-Captioning
Captioning is text information transmitted along with the picture and sound so it can be dis-
played on the TV screen. Because different types of captions can be transmitted with the TV
signal, separate captioning modes are provided. The captioning modes recognized by this model
are: Caption1, Caption2, Text1, and Text2. Local broadcasters decide which caption signals to
transmit.
QuickTips
■
If Caption Text mode
is selected and NO
captioned text is
broadcasted, a black
box may appear and
remain on the TV
screen as shown
below.
To remove this black
box, set captioning
to any mode other
than Text1 or Text2 or
press the RESET key
to cancel captioning
and other customized
settings.
■
Channel number
will not display
continuously when
captioning is on.
Need help?
Visit our Web site at
www.sanyoctv.com
or Call 1-800-877-5032
Care and Cleaning
Cleaning the Cabinet
The surface of the cabinet can be damaged if not properly maintained. Many common household
aerosol sprays, cleaning agents, solvents and polishes will cause permanent damage to the fine surface.
1. Unplug the power cord before cleaning the television.
2. Clean the cabinet with a soft dry cloth.
Cleaning the Television Screen
1. Use a soft cloth moistened with a non-alkaline diluted soap solution. Gently rub surface until it is fully dry.
Notes: Never spray liquids on the screen because they can run down and drip onto the chassis. This may cause
component failure not covered under Warranty.
Never try to polish away any stain or other blemish, or use an abrasive material on the screen surface as this
action may permanently damage the surface of the picture tube.
Closed-Captioning / Care & Cleaning
17

18
Helpful Hints (Problems/Solutions)
Problem Check these Conditions Try these Solutions Page
No.
TV turns off automatically. • Check signal (Cable/Ant.) connection.
• Power surge protection feature.
• Press POWER key.
• The sleep timer may have been set.
• Unplug TV momentarily.
4
No picture, poor picture
or wavy lines in picture.
• Check antenna/external equipment connections.
• May be station trouble, No signal broadcast.
• Brightness or Contrast misadjusted.
• Possible interference from household appliance.
• Adjust antenna.
• Try a different channel.
• Press RESET key or restart channel search.
• Turn off Mixer, Drill, Blender, etc.
4, 13
No sound, poor. No sound
on some channels.
• May be station trouble.
• Maybe MUTE function is on.
• Check Audio/Video connections.
• Try a different channel.
• Adjust volume.
8, 13~14
Black Box on screen. • Caption Text mode without display information. • Press RESET key twice, or switch OFF
Captioning.
17
No Captioning. • Check if station is broadcasting a Closed-
Caption signal. Select another channel.
• Select Caption1 or Caption2. 17
Poor Color or no color. • Check if program is in color.
• Check antenna/external equipment connections.
• Color or Tint misadjusted.
• May be station trouble.
• Try a different channel.
• Adjust antenna.
• Press RESET key to restart channel
search.
4, 13
Blue Screen with Video1,
Video2, or Component3
displayed.
• Check Audio/Video connections.
• Check external equipment connections.
• Check external equipment setting.
• Check DVD setting.
• Press INPUT key.
• Switch on external equipment.
• Set DVD component output to interlaced.
5~7
No TV Stereo or SAP
Sound.
• Check if station is broadcasting a true MTS
stereo signal or a SAP signal.
• Select Stereo or SAP from Audio on-
screen menu.
12
Cannot select or scan
some channels.
• Channel may be removed from memory.
• Check antenna connections.
• V-Guide is set to block programming.
• Select CH. Scan Memory and manually
add channels or start CH. (channel) search.
• Turn V-Guide to OFF or press RESET key
to clear all settings.
14
15~16
Remote Control will not
work TV or other equip-
ment (VCR, Cable Box,
and DVD).
• Press TV key to operate the TV. Press
VCR to
operate VCR;
CABLE to operate cable; DVD
to operate DVD Player; SAT to operate Satellite
Receiver.
• Check batteries; see if TV is plugged in.
• Check external equipment.
• Replace batteries.
•
Aim remote control at front of TV and
external equipment.
8~11
Menu words seem
misspelled.
• Maybe a different language is selected. • Reselect menu language choice using the
on-screen menu.
12
Cabinet makes popping
sound.
• This is a normal condition during warm-up and
cool down of the plastic cabinet parts.
Helpful Hints (Problems / Solutions)
Before calling for assistance, please check the condition that most closely resembles your problem in the following
chart, then try the solutions for that condition. Visit our Web site at
www.sanyoctv.com or call toll free
1-800-877-5032.
 Loading...