


INSTRUCTION MANUAL
2.4 GHz
Cordless Telephone with Caller ID & Visual Call Waiting
CLT-U20
CLT-U30
Dual Handset Models
CLT-U12
CLT-U22
CLT-U32
The picture depicts dual handset model
Important
Charge the handset battery for 12 continuous hours prior to first use.
SANYO Canada Inc.
1 www.sanyocanada.com

TABLE OF CONTENTS |
|
INTRODUCTION -------------------------------------------------------------------- |
4 |
GETTING STARTED ---------------------------------------------------------------- |
5 |
Checking package contents ------------------------------------------------ |
5 |
Modular jack ------------------------------------------------------------------ |
5 |
Installation tips ---------------------------------------------------------------- |
5 |
Battery setup ----------------------------------------------------------------- |
6 |
Connecting the base unit and charging the handset -------------------- |
6 |
Connecting the charger and charging the handset |
|
(For CLT-U12, CLT-U22 and CLT-U32) ------------------------------------- |
6 |
Telephone line connection --------------------------------------------------- |
7 |
Tone/pulse setting ------------------------------------------------------------ |
7 |
Mounting on a wall ----------------------------------------------------------- |
7 |
Register handsets to the main base before use ------------------------- |
8 |
To register the second handset |
|
(For CLT-U12, CLT-U22 and CLT-U32) ------------------------------------- |
8 |
NAMES AND CONTROLS -------------------------------------------------------- |
9 |
Handset --------------------------------------------------------------------------- |
9 |
Base unit and Charger ------------------------------------------------------- |
10 |
INITIAL PROGRAMMING --------------------------------------------------------- |
11 |
Language setting ------------------------------------------------------------- |
11 |
Area code setting ------------------------------------------------------------ |
11 |
Ringer tone -------------------------------------------------------------------- |
11 |
Tone/pulse setting ------------------------------------------------------------ |
11 |
Resetting to default ---------------------------------------------------------- |
12 |
BASICS ----------------------------------------------------------------------------- |
12 |
Receiving a call -------------------------------------------------------------- |
12 |
Making a call ------------------------------------------------------------------ |
13 |
Volume adjustment ----------------------------------------------------------- |
13 |
Transferring a call (For CLT-U12, CLT-U22 and CLT-U32) -------------- |
13 |
Ringer switch ----------------------------------------------------------------- |
13 |
Pre-dialing --------------------------------------------------------------------- |
14 |
Changing the pre-dial number ---------------------------------------------- |
14 |
Redialing ----------------------------------------------------------------------- |
14 |
Fast redialing ----------------------------------------------------------------- |
14 |
FLASH key -------------------------------------------------------------------- |
14 |
CH (Channel)/DEL key ------------------------------------------------------- |
14 |
* TONE key -------------------------------------------------------------------- |
15 |
2

TABLE OF CONTENTS |
|
Handset locator (paging function) ---------------------------------------- |
15 |
MUTE key --------------------------------------------------------------------- |
15 |
Low battery warning ------------------------------------------------------- |
15 |
Voice mail indicator ---------------------------------------------------------- |
16 |
CALLER ID FEATURES ---------------------------------------------------------- |
16 |
Caller ID with Call Waiting -------------------------------------------------- |
16 |
Caller ID list ------------------------------------------------------------------- |
17 |
Reviewing Caller ID list ----------------------------------------------------- |
17 |
Formatting Caller ID numbers ---------------------------------------------- |
17 |
Storing Caller ID entries in the directory ---------------------------------- |
18 |
Dialing a Caller ID number -------------------------------------------------- |
18 |
Deleting entries from the Caller list --------------------------------------- |
18 |
Deleting the displayed entry ----------------------------------------------- |
18 |
Deleting all entries ----------------------------------------------------------- |
19 |
DIRECTORY ----------------------------------------------------------------------- |
19 |
Storing a number in the directory ------------------------------------------ |
19 |
Replacing a directory entry with a Caller ID entry ---------------------- |
20 |
Changing a stored number ------------------------------------------------ |
20 |
Making calls from the directory ------------------------------------------- |
20 |
Reviewing and deleting directory contents ----------------------------- |
20 |
Chain dialing from the directory ------------------------------------------- |
21 |
CHANGING THE BATTERY ----------------------------------------------------- |
21 |
RECYCLING NICKEL-CADMIUM BATTERIES ------------------------------- |
22 |
POWER FAILURE ----------------------------------------------------------------- |
22 |
HEADSET JACK AND BELT CLIP ---------------------------------------------- |
23 |
LIGHT SIGNALS ----------------------------------------------------------------- |
23 |
LCD SCREEN MESSAGES ------------------------------------------------------ |
24 |
SOUND SIGNALS ---------------------------------------------------------------- |
25 |
TROUBLESHOOTING ------------------------------------------------------------ |
25 |
MAINTENANCE ------------------------------------------------------------------- |
27 |
MAXIMIZE BATTERY PERFORMANCE --------------------------------------- |
28 |
TECHNICAL INFORMATION ---------------------------------------------------- |
29 |
SANYO COMFORT WARRANTY ----------------------------------------------- |
31 |
SOS HELP LINE ------------------------------------------------------------------ |
33 |
The exclamation point within the triangle is a warning sign alerting you of important instructions accompanying the product.
3

INTRODUCTION
Congratulations on your purchase of this Sanyo cordless telephone.
Your Sanyo 2.4 GHz cordless telephone is a fine-quality home communications product. It is carefully designed and produced by a world leader of consumer and industrial electronic equipment. With proper maintenance and care, it will provide you with years of enjoyment and convenience.
Main Features
2.4 GHz Technology
Superior Range – The use of 2.4 GHz frequency band for signal transmission between base and handset means greater communication range compared to conventional 43 - 49 MHz cordless telephones.
Ultra-Low Noise – The high frequency communication also has significantly reduced noise level.
40-Channel Auto Scan – Your new telephone uses one of 40 channels in the 2.4-GHz frequency band. It automatically selects a clear channel every time you receive or place a call on the handset.
COMPANDER PLUS Noise Reduction
This fourth generation of Sanyo’s original noise reduction technology now filters out more background noise.
Other features
• Caller ID on handset |
• Dial back from Caller ID list |
• Compatible with Caller ID and |
• 3 ringer tones |
Visual Call Waiting |
• 10 memory call log |
• 40 name/number Caller ID list: |
• Tone & pulse dialing compatible |
name/number, time and date |
• Caller transfer |
• 3-line trilingual display with backlight |
(CLT-U12, CLT-U22 & CLT-U32 only) |
LCD screen |
|
• Lighted handset keypad |
|
(CLT-U30 & CLT-U32 only) |
|
IMPORTANT: To use all of the features of this telephone, you must subscribe to either the standard Name/Number Caller ID Service or Caller ID with Call Waiting Service from your telephone company. To know who is calling while you are on the phone, you must subscribe to Caller ID with Call Waiting Service.
4
GETTING STARTED
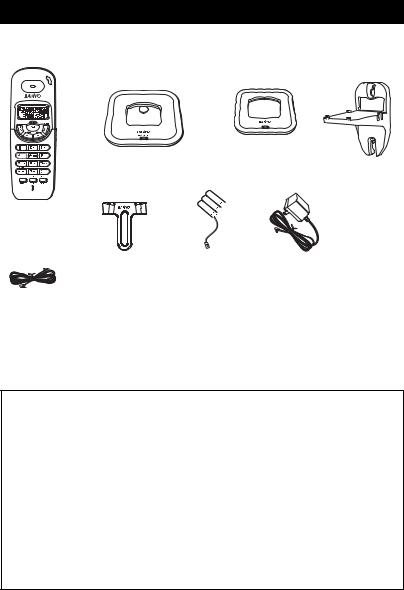
Checking package contents
Make sure your package includes the items shown here.
2 X Handsets (CLT-U20 & CLT-U30 with one handset)
Telephone
line cord
Base unit |
Charger |
|
(For CLT-U12, |
|
|
|
CLT-U22 & |
Wall mount |
|
CLT-U32) |
|
|
bracket |
|
|
|
2 X Belt clips |
2 X Batteries |
2 X AC Adaptors |
|
|
|
|
(CLT-U20 & |
(CLT-U20 & |
(CLT-U20 & CLT- |
|
Battery |
||
CLT-U30 with |
U30 with one |
U30 with one |
|
|||
order sheet |
||||||
one belt clip) |
battery) |
adaptor) |
||||
|
|
|
||||
|
|
KU28-9-250D |
|
|
|
|
Modular jack
You need an RJ11 type modular phone jack. If you do not have a modular jack, call your local phone company to find out how to get one installed.
Installation tips
Some cordless telephones operate at frequencies that may cause interference to nearby TVs, microwave ovens, and VCRs. To minimize or prevent such
interference, the base of the cordless telephone should not be placed near or on top of a TV, microwave oven, or VCR. If such interference continues, move the cordless telephone farther away from these appliances.
Certain other communications devices may also use the 2.4 GHz frequency for communication and if not set properly these devices may interfere with each other and/or your new telephone. If you are concerned with interference, please refer to the owner’s manual for these devices on how to properly set channels to avoid interference. Typical devices that may use the 2.4 GHz frequency for communication include wireless audio/video senders, wireless computer networks, multi-handset cordless telephone systems, and some long-range cordless telephone systems.
5
GETTING STARTED
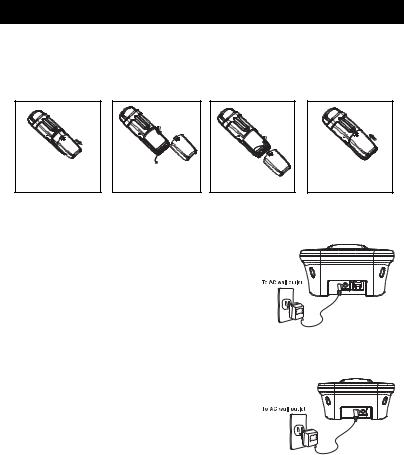
Battery setup
1.Remove the battery compartment cover on the handset, insert the battery, plug the cord into the jack (inside the compartment) and replace the cover.
2.Set the handset RINGER switch to ON, and place handset in the base.
Slide down the battery cover
Place the battery |
in the slot |
Plug the wire |
into the jack |
Slide up the battery cover
Connecting the base unit and charging the handset
1.Plug the AC adaptor into the power DC 9V jack
on the back of the base. Plug the other end into a wall outlet.
2. Set the base on a desk on tabletop and place one handset in the base unit.
3. Make sure that the CHARGE/IN USE LED illuminates.
Connecting the charger and charging the handset (For CLT-U12, CLT-U22 , CLT-U32)
1. Plug the AC adaptor into the power DC 9V jack on the back of the charger. Plug the other end into a wall outlet.
2. Place another handset in the charger and make sure that the CHARGE LED illuminates. Note: • Charge your handset at least 12
hours before plugging into the phone line.
•Charge the handset for 12 continuous hours prior to first use. The initial battery charge is important for best performance.
•It is normal for the handset and base to get warm when the
handset is charging in the base.
Caution: Use only the Sanyo AC adaptor that is supplied with this phone. Using another AC adaptor may damage the phone.
6
GETTING STARTED
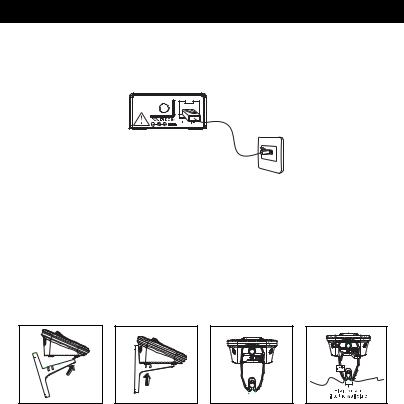
Telephone line connection
Once the handset battery is fully charged, connect the telephone line cord to the TEL LINE jack on the back of the base. Plug the other end into a telephone outlet.
Tone/pulse setting
1.If you have Pulse (rotary) service, you will need to set the dial mode to pulse. If you have Touch-Tone service, do nothing as your phone has been set to Tone prior to shipment. If you do not know which type of service you have, contact your local telephone company.
2.To change to Pulse or Tone service, See Tone/pulse setting, page 11.
Mounting on a wall
Do not attempt to wall mount the phone before initial 12-hour charging is complete.
1.Remove the handset from the base and set aside.
2.Align the four slots on the bottom of the base with the four hook-tabs on the bracket.
3.Insert the hook-tabs into the slots and push up until the bracket snaps securely into place.
4.Turn the base over and unplug the AC adaptor and telephone cords. Run the cords through the square hole on the wall mount. Plug them back in to the base.
Note: If you use Pulse (rotary) dial service, See Tone/pulse setting, page 11.
7

GETTING STARTED
5.Slip the mounting holes over the wall plate posts and slide the unit down firmly into place. (Wall plate not included.)
6.Place the handset in the base.
Note: If desired, gather the extra AC adaptor cord and telephone cord together, fasten with a wire tie, and store inside the wall mounting bracket.
Register handsets to the main base before use
Your cordless phone uses a digital security system to provide protection against false ringing, unauthorized access and charges to your phone line. When you place the handset in the main base, the handset will automatically register to the base.
To register the second handset (For CLT-U12, CLT-U22 & CLT-U32)
The second handset (charge in the extra charging cradle) must also be registered to the main base before use.
1.Be sure both handsets are fully charged.
2.Remove the handset from the charging cradle, and place it in the main base.
3.Wait for at least 5 seconds before removing the handset from the main base.
4.After both handsets are registered, it doesn’t matter which handset is placed in the main base or the charger.
5.The charge/in use LED lights on the main base.
Note:
•After a power failure occurs or battery replacement, both handsets will need to be re-registered. To re-register, follow the same registration process as above.
•If the handset’s battery becomes very low, the handset must be recharged for 12 hours and re-registered to the main base unit.
8

NAMES AND CONTROLS
Handset
For CLT-U20 & CLT-U30
1.Belt clip
2.REDIAL key
3.Headset jack
4.MEM (memory) key
5.CH (channel)/DEL key
6.FLASH/PROG (program) key
7.Charging contacts
8.Incoming call/in use LED
9.Earpiece
10.LCD screen
For CLT-U12, CLT-U22 & CLT-U32
11.TALK key (also used to end a call)
12.MUTE/FORMATkey (MUTE/FORMAT/TRANSFERkey)
13.Ringer switch
14.CID/VOL (volume) up/down key
15.Keypad (0-9)
16.*TONE/EXITkey
17.# PAUSE key
18.Microphone
9
NAMES AND CONTROLS
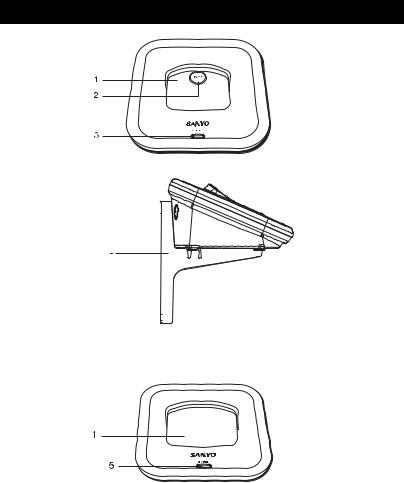
Base Unit
Charger (For U12, U22 & U32)
1.Handset cradle
2.PAGE key
3.CHARGE/INUSELED
4.Wall mount
5.CHARGELED
10
 Loading...