


INSTRUCTION MANUAL |
CLT -D6220 |
|
|
|
Dual Handset Model |
|
CLT -D6222 |
|
Triple Handset Model |
Digital Enhanced Cordless CLT -D6223 |
|
Telephone 6.0 |
|
VOL |
|
|
CID |
|
|
|
|
|
|
|
|
VOL |
|
|
CID |
FLASH |
MENU |
MUTE |
|
|
|
|
|
BACK |
OK |
|
CLEAR |
|
|
|
|
1 |
ABC |
2 |
DEF 3 |
|
|
|
|
GHI 4 |
JKL |
5 |
MNO 6 |
FLASH |
MENU |
MUTE |
|
BACK |
OK |
|
CLEAR |
||||
PQRS 7 |
TUV |
8 |
WXYZ 9 |
1 |
ABC |
2 |
DEF 3 |
TONE |
|
0 |
|
GHI 4 |
JKL |
5 |
MNO 6 |
PQRS 7 TUV 8 WXYZ 9 |
PAGE |
INT |
R |
FORMAT |
PAUSE |
TONE |
0 |
|
|
INT |
R |
|
|
|
|
|
|
FORMAT |
PAUSE |
(This picture depicts dual handset model CLT-D6222)
IMPORTANT!
Charge the handset battery for a full 15 hours before using your telephone for the first time.
SANYO Canada Inc. |
SANYO Canada Inc. |
66DD121BHBAG |
www.sanyo.ca |
|
|
www.sanyo.ca |
|
|
|
|
|
|
|
|
|
|
TABLE OF CONTENTS
INTRODUCTION |
3 |
SAFETY INSTRUCTIONS |
3 |
UNPACKING |
5 |
TIPS FOR BEST PERFORMANCE |
6 |
NAMES OF CONTROLS |
7 |
Handset |
7 |
LCD display |
7 |
Base station |
8 |
External charger |
8 |
INITIAL SETUP |
9 |
AC connection |
9 |
Wall mount |
9 |
Installing the handset battery and |
10 |
initial charging |
|
Replace the handset battery |
11 |
BASIC OPERATION |
12 |
Register |
12 |
Dial mode |
12 |
Set time |
13 |
Placing a call |
13 |
Answering a call |
14 |
Out of range |
14 |
MENU CHART |
14 |
FEATURES |
16 |
Phonebook |
16 |
Character chart |
17 |
Chain dialing |
17 |
Ringer mute |
17 |
Redial |
18 |
Temporary touch tone access |
18 |
Quick access for missed call |
18 |
Flash |
18 |
Handsfree speaker |
19 |
Headset |
19 |
Mute |
19 |
Keylock |
19 |
To adjust the volume |
19 |
Page/Handset locator |
19 |
Intercom/Call transfer |
20 |
3-Way conference |
21 |
Caller ID features |
21 |
Voice mail indicator |
21 |
|
22 |
SETTINGS MENU |
22 |
New entry |
22 |
PHONEBOOKEdit record |
22 |
Delete record |
23 |
Delete All |
23 |
Music Group |
23 |
Speed dial |
24 |
Memory Status |
24 |
SETUP |
25 |
Unit name |
25 |
Backlight time |
25 |
Area code |
25 |
Dial mode |
25 |
Auto talk |
26 |
Flash time |
26 |
Language |
26 |
Contrast |
27 |
Register |
27 |
New register |
27 |
De-register |
27 |
Select base |
28 |
Time format |
28 |
Set time |
29 |
Set default |
29 |
PROFILE |
29 |
HS ringer music |
29 |
HS ringer volume |
30 |
Page tone |
30 |
Key tone |
30 |
FUNCTION |
31 |
No disturb |
31 |
Alarm 1, Alarm 2 |
31 |
Call log |
32 |
Call log options |
32 |
Store record |
32 |
Delete record |
33 |
Delete all |
33 |
|
34 |
|
34 |
MAXIMIZE BATTERY PERFORMANCE
35
REPLACE THE BATTERY
35
RECYCLING NICKEL-METAL
35
HYDRIDE BATTERIES
36
POWER FAILURE
37
HEADSET JACK
38
DEFAULT SETTING
39
TROUBLE SHOOTING
41
MAINTENANCE
42
TECHNICAL INFORMATION SANYO COMFORT WARRANTY SOS HELP LINE
2
INTRODUCTION
Thank you for choosing SANYO. Your SANYO DECT 6.0 telephone features include:
Handset speakerphone
Multilingual menu: English, French, Spanish Caller ID
Voicemail indicator 100-name/number phone book 50-caller log
Polyphonic ringers
Listening and ringer volume control Lighted keypad
Speed dialing Page/handset locator Headset jack on handset
3 parties conference call (CLT-D6222, CLT-D6223 multi handsets) Clock & 2 wake-up alarms
Intercom and call transfer between handsets (CLT-D6222, CLT-D6223 multi handsets)
IMPORTANT SAFETY INSTRUCTIONS
Some of the following information may not apply to your particular product; however, when using telephone equipment, basic safety precautions should always be followed to reduce the risk of fire, electric shock and injury to persons, including the following:
1.Read and understand all instructions.
2.Follow all warnings and instructions marked on the product.
3.Unplug this product from the wall outlet before cleaning. Do not use liquid cleaners or aerosol cleaners. Use a damp cloth for cleaning.
4.Telephones should not be used while you are in a bathtub, shower or pool. Immersion of the telephone or handset in water could cause an electrical shock.
5.Slots and openings in the cabinet back or bottom are provided for ventilation, to protect it from overheating. These openings must not be blocked or covered. The openings should never be blocked by placing the product on the bed, sofa, rug, or other similar surface. This product should not be placed in a built-in installation unless proper ventilation is provided.
6.This product should be operated only from the type of power source indicated on the marking label. If you are not sure of the type of power supplied to your home, consult your dealer or local power company.
7.Do not allow anything to rest on the power cord. Do not locate this product where the cord will be abused by people walking on it.
8.Do not overload wall outlets and extension cords as this can result in the risk of fire or electric shock.
9.Never push objects of any kind into this product through cabinet slots as they may touch dangerous voltage points or short out parts that could result in a risk of fire or electric shock. Never spill liquid of any kind on the product.
10.To reduce the risk of electric shock, do not disassemble this product, but take it to a qualified serviceman when service or repair work is required. Opening or removing covers may expose you to dangerous voltages or other risks. Incorrect reassembly can cause electric shock when the telephone equipment is subsequently used.
11.Do not expose the product to extreme temperatures such as areas near a hot radiator or stove or in a hot car.
12.Do not place light candles, cigarettes, cigars, etc., on the telephone.
SAVE THESE INSTRUCTIONS
IMPORTANT SAFETY INSTRUCTIONS
13.Never touch uninsulated telephone wires or terminals unless the telephone line has been disconnected at the network interface.
14.Never install or modify telephone wiring during a lightning storm.
15.Never install telephone jacks in wet locations unless the jack is specifically designed for wet locations.
16.Use caution when installing or modifying telephone lines to prevent electrical shock and/or fire.
17.Unplug this product from the wall outlet and refer servicing to qualified service personnel under the following conditions:
A.When the power supply cord or plug is damaged or frayed.
B.If the product has been exposed to water.
C.If the product does not operate normally by following the operating instructions.
D.If the product’s cabinet has been damaged.
E.If the product exhibits a distinct change in performance.
18.Avoid using a telephone (other than a cordless type) during an electrical storm. There may be a remote risk of electric shock from lightning.
19.Do not use the telephone to report a gas leak in the vicinity of the leak.
20.Do not place this product on an unstable cart, stand or table. The product may fall, causing serious damage to the product.
 CAUTION
You must use a Class 2 power source that supplies 7.5V DC and delivers at least 250mA. Its plug must fit the phone’s DC IN jack. The supplied adaptor meets these specifications. Using an adaptor that does not meet these specifications could damage the phone or the adaptor.
Always connect the AC adaptor to the phone before you connect it to AC power. When you finish, disconnect the adaptor from AC power before you disconnect from the phone.
SAFETY INSTRUCTIONS FOR BATTERIES
1.CAUTION: Risk of explosion if battery is replaced by an incorrect type. Use only the provided battery pack in the handset of your cordless phone: 2.4V 600mAH NiMH rechargeable battery pack
2.Do not dispose of the battery(ies) in a fire. They may explode. Check with local codes for possible special disposal instructions.
3.Do not open or mutilate the battery(ies). Released electrolyte is corrosive and may cause damage to the eyes or skin and it may be toxic if swallowed.
4.Exercise care in handling battery(ies) in order not to short out the battery(ies) with conducting materials such as rings, bracelets, and keys. The battery(ies) or conductor may overheat and cause burns.
5.Do not attempt to rejuvenate the battery(ies) provided with or identified for use with this product by heating them. Sudden release of the battery(ies) electrolyte may occur causing burns or irritation to eyes or skin.
6.When inserting battery pack into this product,the proper polarity or direction must be observed. Remove battery(ies) from this product if storing over 30 days because the battery(ies) could leak and damage the product.
7.If your product uses rechargeable battery(ies), charge the battery(ies) only in accordance with the instructions and limitation specified in the User Manual.
SAVE THESE INSTRUCTIONS
3 |
4 |
||
|
|
|
|
|
|
|
|
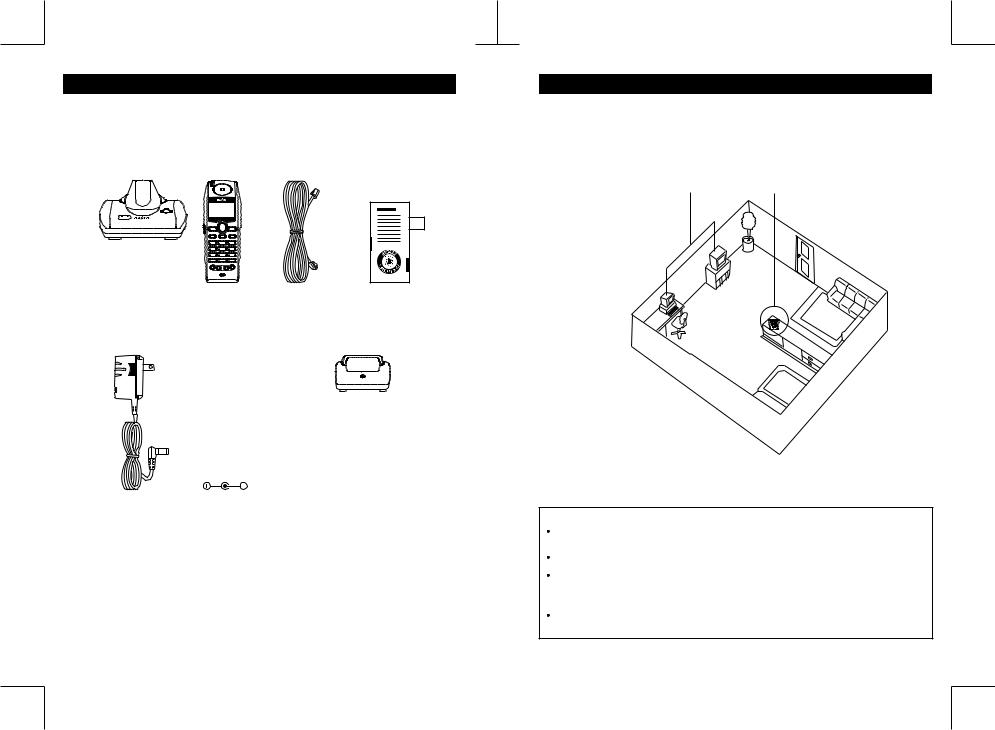
UNPACKING
Check to make sure you have all the items that come with the system.
Base Station |
Handset |
Telephone Cord |
(1 pc for CLT-D6220 2 pcs for CLT-D6222 3 pcs for CLT-D6223)
Rechargeable
Battery Pack 2SN-AAA60H-S-T (Pre-installed)
(1 pc for CLT-D6220 2 pcs for CLT-D6222 3 pcs for CLT-D6223)
VOL CID
AC Adaptor |
External Charger |
1 pc for base 250mA |
(1 pc for CLT-D6222 |
1 pc for charger 150mA (CLT-D6222) |
2 pcs for CLT-D6223) |
2 pcs for charger 150mA (CLT-D6223) |
|
INPUT: AC120V, 60Hz OUTPUT: DC 7.5V, 250mA Polarity: Center Negative (for base station)
INPUT: AC120V, 60Hz OUTPUT: DC 7.5V, 150mA Polarity: Center Negative (for external charger)
TIPS FOR BEST PERFORMANCE
Base station location
For the maximum operating range, the best location for the base station is at the highest point in the house. Avoid places near electrical appliances and metal structures such as refrigerator and filing cabinets that can reduce operating range and performance.
Away from electrical appliances such |
In a HIGH and CENTRAL location |
as TV, radio, or personal computer. |
with no obstructions. |
Do not place the base station on top of or near TV or VCR as this may interfere with the performance of these appliances.
CAUTIONS:
If you operate this product near water (bathtub, swimming pool, kitchen), take care to avoid contact between the water and the handset.
Never spill liquid on the handset. This may cause a malfunction.
Do not operate this product with dirty hands or allow the handset to be exposed to direct sunlight for extended periods. This can cause blurring, discoloration and fading of the lettering on the handset keypad. Discoloration or fading will have no effect on the telephone performance.
Connect the AC adaptor to a wall outlet that receives power continuously. Do not connect it to a switched outlet.
5 |
6 |
||
|
|
|
|
|
|
|
|

NAMES OF CONTROLS
Handset
Incoming Ring/
In use LED
TALK Button
Press to answer an incoming call or to place an outgoing call.
MENU/OK Button Press to enter the menu
in standby mode. Also use
to confirm the selection in the menu.
Headset Jack
FLASH/BACK Button
Works like a temporary hook switch. Use to access
special telephone company services (call waiting, for example) Press in menu mode will go
back one step.
TONE/ / Button
Press for temporary access to Touch-Tone dialing. Press and hold will turn ON and OFF No disturb mode.
INTERCOM/FORMAT Button Press to page or intercom another handset registered to the same base unit.
Press to format area code/ Long distance numbers when reviewing Caller ID numbers.
PHONEBOOK Button Press to access
phonebook. Microphone
VOL |
|
|
CID |
|
FLASH |
MENU |
MUTE |
||
BACK |
OK |
|
CLEAR |
|
1 |
ABC |
2 |
DEF |
3 |
GHI 4 |
JKL |
5 |
MNO |
6 |
PQRS 7 |
TUV |
8 |
WXYZ 9 |
|
TONE |
|
0 |
|
|
INT |
|
|
R |
|
|
|
|
|
|
FORMAT |
|
PAUSE |
|
|
Earpiece
Display
UP/DOWN Button
Use to scroll up ( ) or down ( ) in the menu. Or adjust the volume level of the earpiece during a call. Press Up (
 ) or Down ( ) in standby mode to check for missed calls.
END Button
Press to disconnect a call or exit from menu.
MUTE/CLEAR Button
Use to mute the microphone during a call. Also use for clear an input.
Dial Buttons
#/KEYLOCK Button
Press and hold will activate or deactivate keylock
HANDSFREE SPEAKER Button Press to activate the speakerphone.
REDIAL (PAUSE) Button Press to display the dialed number. Also use to insert
a pause between dialing digits.
Contact Points
For handset battery charging.
LCD display |
Speaker, In Use, |
|
Date |
Ringer Off, Alarm Time |
|
In Range Signal |
|
Battery |
|
||
NAMES OF CONTROLS (Continued)
Base station
Contact Points
For handset battery charging.
CHARGE /IN USE
PAGE

 7.5
7.5
CHARGE/IN USE
Indicator
Lights when the handset battery is being recharged or when the telephone
is in use.
Flashes when there is an incoming call.
PAGE Button Press to page the handset.
AC Adaptor Jack |
Modular Telephone Jack |
(DC 7.5V AC Adaptor) |
(TEL LINE) |
External charger
(For CLT-D6222, CLT-D6223)
CHARGE Indicator

 7.5
7.5
AC Adaptor Jack
(DC 7.5V AC Adaptor)
7 |
8 |
||
|
|
|
|
|
|
|
|
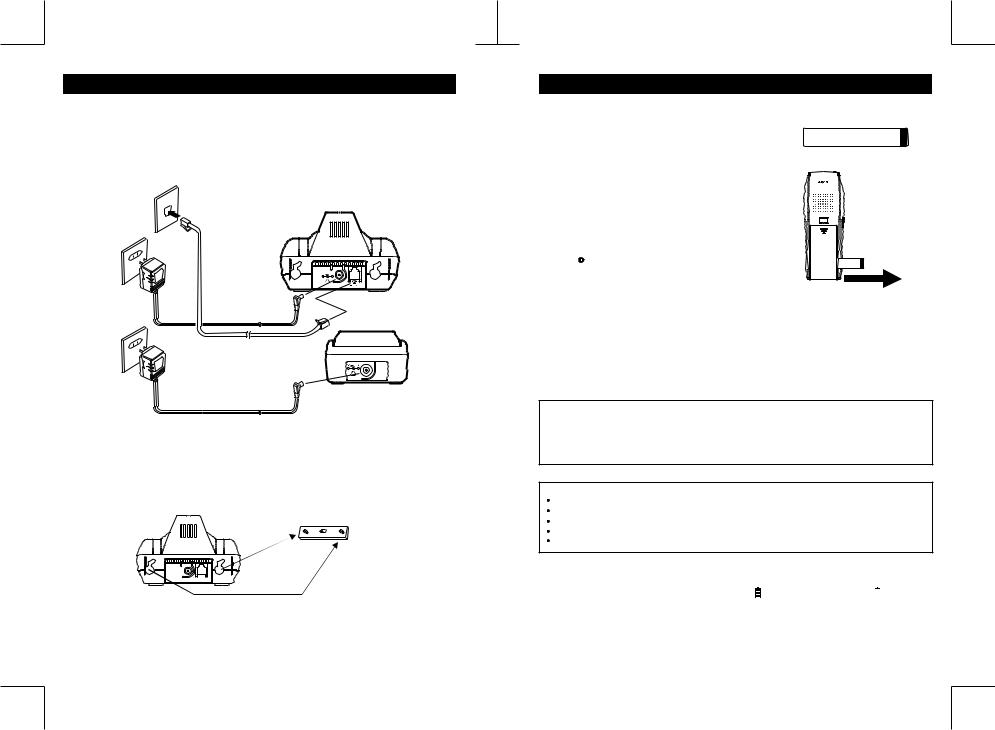
INITIAL SETUP
AC connection
1.Insert the small plug on the end of the AC adaptor cord into the DC 7.5V AC ADAPTOR jack on the back of the base station.
2.Plug the AC adaptor into a standard AC120V wall outlet.
3.Plug one end of the telephone cord into a telephone wall jack and the other into the TEL LINE jack on the back of the base station.
Wall Telephone Jack
AC Wall Outlet

 7.5
7.5
AC Adaptor
To Telephone Line
7.5 |
(For CLT-D6222, CLT-D6223)
NOTE:
Use only AC adaptor provided with the telephone.
Wall mount
To mount the base station on a wall
1.Connect the cord to a wall phone plate (not supplied).
2.Mount the base station on the wall phone plate securely.
WARNING:
Be certain there are no electrical cables, pipes or other items behind the mounting location that could cause a hazard when inserting the screws into the wall.
INITIAL SETUP (Continued)
Installing the handset battery and initial charging
1.The battery pack is already pre-installed in the handset. Find the battery contact tab on the back of the handset.
2. Pull the battery contact tab out slowly from the battery compartment.
3. Place the handset on the base station for 15 hours.
CHARGE
The /IN USE indicator in base will light.
The base station must be connected to AC power.
NOTE:
Battery and handset may become warm during charging. This is normal.
Pull to remove before use
Retirer avant usage
Pull to remove before use
Retirer avant usage
IMPORTANT: Charge the handset battery for a full 15 hours before using the telephone for the first time.
If the handset battery is not installed and the handset is placed on the base station cradle, the incoming ring will not sound.
Replacement battery:
Nickel Metal Hydride 2.4V 600mAh battery pack.
Using other types of batteries may cause serious damage or equipment malfunctions. Only replace with an approved battery pack available through SANYO.
Use enclosed form to order.
CAUTION:
Use only the specified battery.
Do not remove the battery from the handset to charge.
Never throw the battery into a fire, disassemble it, or heat it.
Do not remove or damage the battery casing.
Remove the battery if would not use the phone for over 30 days.
Low battery
If the handset battery power is low the BATTERY ICON in the display will be empty and you will hear a warning beep every 15 seconds. If you are on a call, finish your conversation as soon as possible as your call will be cut in approximately 5 minutes. Recharge the handset for 15 hours before continuing to use the telephone.
9 |
10 |
||
|
|
|
|
|
|
|
|
INITIAL SETUP (Continued)
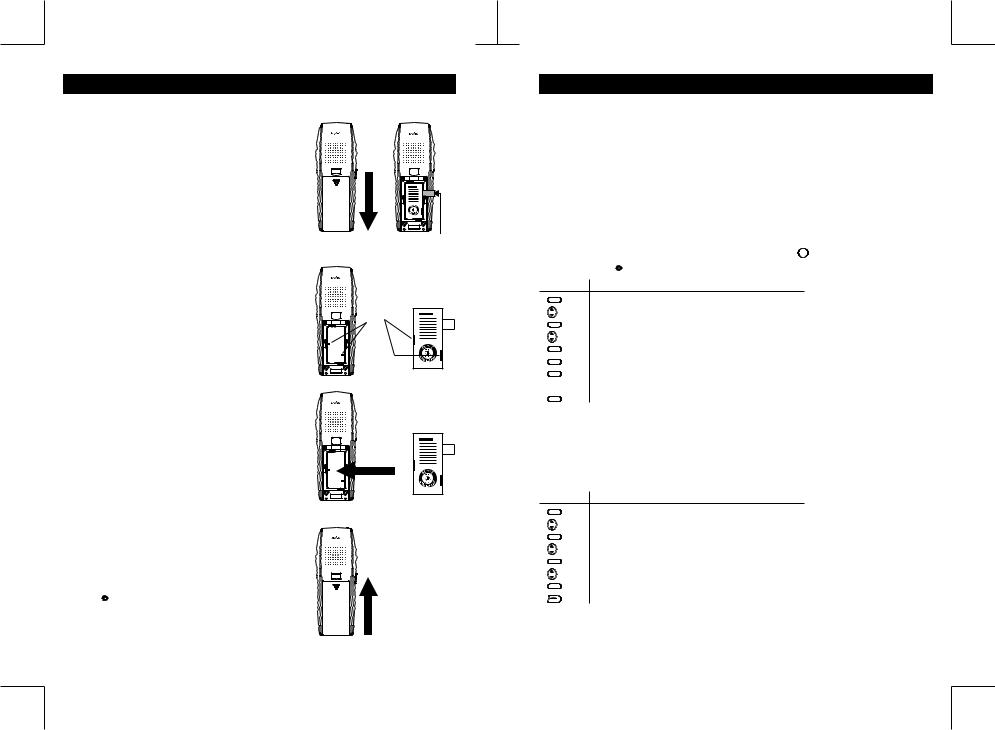
Replace the handset battery
1. Remove the battery compartment lid.
2. Detach the old battery from the battery compartment by using the ribbon linked to the battery.
Battery ribbon
3. Place the new battery into the compartment. |
|
Follow the direction and make sure the contacts |
|
of the battery touch the contacts of the |
|
compartment. |
Battery |
|
contacts |
4. |
Replace the lid. |
5. |
Place the handset on the base station for 15 hours. |
|
CHARGE |
|
The /IN USE indicator in base will light. |
BASIC OPERATION
Before using the phone
Register
Your handset has been registered to the base at the factory. Please verify the link is still valid before use.
1.Place the handset close to the base station. The antenna icon in the display should appear.
2.Press  . Verify that you get a dial tone and the IN USE indicator lights. The display will show "IN USE" and a call timer.
Your handset is ready to use.
3.Place a call or press  to hang up.
If your handset does not register to the base, please see page 36 TROUBLE SHOOTING for help and/ or try the following procedures to register the handset:
Lift the handset from the base charging cradle. Press and hold the PAGE button in the base for 10
CHARGE
seconds until the /IN USE LED flashes. Please complete the registration within 1 minute.
Press |
To |
|
MENU |
enter MENU |
|
|
||
|
scroll to SETUP |
|
MENU |
enter SETUP |
|
|
scroll to REGISTER |
|
MENU |
enter REGISTER |
|
MENU |
enter NEW REGISTER |
|
MENU |
select BASE 1 for the first base unit |
|
input PIN code, default is 1234 |
||
key 0-9 |
||
confirm |
||
MENU |
||
|
Your handset is now searching for the base. If successful you will hear a long beep confirmation tone. If not successful, you will hear a 3 beep error tone. Please try again.
Dial mode
Depending on the telephone system, you may need to set the dial mode TONE or PULSE to match. Default is TONE. If you are not sure the dialing system, contact your local telephone company.
Press To
MENU |
enter MENU |
scroll to SETUP
MENU |
enter SETUP |
scroll to DIAL MODE
MENU |
enter DIAL MODE |
select TONE or PULSE
confirm
MENU
exit
NOTE: For CLT-D6222 and CLT-D6223 multi-handsets, you must set the dial mode for each handset.
11 |
12 |
||
|
|
|
|
|
|
|
|
 Loading...