

Samsung UE40F8080, UE65F8080, UE75F8080, UE46F8080, UE55F8080 User Manual
Contact SAMSUNG WORLD WIDE
If you have any questions or comments relating to Samsung products, please contact the SAMSUNG customer care centre.
Country
AUSTRIA 0810 - SAMSUNG (7267864, € 0.07/min) www.samsung.com
BELGIUM 02-201-24-18 www.samsung.com/be (Dutch)
BOSNIA 051 331 999 www.samsung.com
BULGARIA 07001 33 11 , share cost tariff www.samsung.com/bg
CROATIA 062 SAMSUNG (062 726 786) www.samsung.com/hr
CZECH 800 - SAMSUNG (800-726786) www.samsung.com
DENMARK 70 70 19 70 www.samsung.com
FINLAND 030-6227 515 www.samsung.com
FRANCE 01 48 63 00 00 www.samsung.com/fr
GERMANY 0180 6 SAMSUNG bzw.
CYPRUS 8009 4000 only from landline www.samsung.com/gr
GREECE 80111-SAMSUNG (80111 726 7864) only from land line
HUNGARY 06-80-SAMSUNG (726-7864) http://www.samsung.com/hu
ITALIA 800-SAMSUNG (726-7864) www.samsung.com
LUXEMBURG 261 03 710 www.samsung.com
MONTENEGRO 020 405 888 www.samsung.com
NETHERLANDS 0900-SAMSUNG (0900-7267864) (€ 0,10/Min) www.samsung.com
NORWAY 815 56480 www.samsung.com
POLAND
PORTUGAL 808 20-SAMSUNG (808 20 7267) www.samsung.com
ROMANIA 08008 SAMSUNG (08008 726 7864)
SERBIA 011 321 6899 www.samsung.com/rs
SLOVAKIA 0800 - SAMSUNG (0800-726 786) www.samsung.com
SPAIN 902172678 www.samsung.com
SWEDEN 0771 726 7864 (SAMSUNG) www.samsung.com
SWITZERLAND 0848 - SAMSUNG(7267864, CHF 0.08/min) www.samsung.com/ch (German)
U.K 0330 SAMSUNG (7267864) www.samsung.com
EIRE 0818 717100 www.samsung.com
LITHUANIA 8-800-77777 www.samsung.com/lt
LATVIA 8000-7267 www.samsung.com/lv
ESTONIA 800-7267 www.samsung.com/ee
TURKEY 444 77 11 www.samsung.com
Customer Care Centre
Samsung Electronics Czech and Slovak, s.r.o. V Parku 2343/24, 148 00 - Praha 4
0180 6 7267864*
(*0,20 €/Anruf aus dem dt. Festnetz, aus dem Mobilfunk
max. 0,60 €/Anruf)
(+30) 210 6897691 from mobile and land line
0 801-172-678* lub +48 22 607-93-33 **
*(całkowity koszt połączenia jak za 1 impuls według taryfy operatora)
** (koszt połączenia według taryfy operatora)
TOLL FREE No.
Web Site
www.samsung.com/be_fr (French)
www.samsung.com
www.samsung.com/gr
www.samsung.com/pl
www.samsung.com/ro
www.samsung.com/ch_fr (French)
LED TV
user manual
MORE
e-Manual
Thank you for purchasing this Samsung product.
To receive more complete service, please register
your product at
www.samsung.com/register
Model _____________Serial No. _____________
© 2013 Samsung Electronics Co., Ltd. All rights reserved.
0_BN68-04794S-Cover.indd 1 2013-11-04 9:59:59
BN68-04794S-02
Important Safety Instructions
Warning! Important Safety Instructions
(Please read the appropriate section that corresponds to the marking on your Samsung product before attempting to install the product.)
RISK OF ELECTRIC SHOCK DO NOT OPEN
CAUTION
CAUTION: TO REDUCE THE RISK OF ELECTRIC SHOCK, DO
NOT REMOVE COVER (OR BACK). THERE ARE NO USER SERVICEABLE PARTS INSIDE. REFER ALL SERVICING TO QUALIFIED
PERSONNEL.
• The slots and openings in the cabinet and in the back or bottom are provided for necessary ventilation. To ensure reliable operation of this apparatus,
and to protect it from overheating, these slots and openings must never be blocked or covered.
− Do not cover this apparatus in a confined space, such as a bookcase, or built-in cabinet, unless proper ventilation is provided.
− Do not place this apparatus near or over a radiator or heat resistor, or where it is exposed to direct sunlight.
− Do not place a water containing vessel(vases etc.) on this apparatus, as this can result in a risk of fire or electric shock.
• Do not expose this apparatus to rain or place it near water(near a bathtub, washbowl, kitchen sink, or laundry tub, in a wet basement, or near a
swimming pool etc.). If this apparatus accidentally gets wet, unplug it and contact an authorized dealer immediately. Make sure to pull out the power
cord from the outlet before cleaning.
• This apparatus use batteries. In your community there might be regulations that require you to dispose of these batteries properly under
environmental considerations. Please contact your local authorities for disposal or recycling information.
• Do not overload wall outlets, extension cords or adaptors beyond their capacity, since this can result in fire or electric shock.
• Power-supply cords should be routed so that they are not likely to be walked on or pinched by items placed upon or against them, paying particular
attention to cords at plug end, adaptors and the point where they exit from the appliance.
• To protect this apparatus from a lightning storm, or when it is left unattended and unused for long periods of time, unplug it from the wall outlet and
disconnect the antenna or cable system. This will prevent damage to the set due to lightning and power line surges.
• Before connecting the AC power cord to the DC adaptor outlet, make sure the voltage designation of the DC adaptor corresponds to the local
electrical supply.
• Never insert anything metallic into the open parts of this apparatus. Doing so many create a danger of electric shock.
• To avoid electric shock, never touch the inside of this apparatus. Only a qualified technician should open this apparatus.
• Make sure to plug the power cord in until it is firmly inserted. When removing the power cord, make sure to hold the power plug when pulling the
plug from the outlet. Do not touch the power cord with wet hands.
• If this apparatus does not operate normally - in particular, if there are any unusual sounds or smells coming from it - unplug it immediately and
contact an authorized dealer or service centre.
• Be sure to pull the power plug out of the outlet if the TV is to remain unused or if you are to leave the house for an extended period of time (especially
when children, elderly or disabled people will be left alone in the house).
− Accumulated dust can cause an electric shock, an electric leakage or a fire by causing the power cord to generate sparks and heat or the
insulation to deteriorate.
• Be sure to contact an authorized service centre, when installing your set in a location with heavy dust, high or low temperatures, high humidity,
chemical substances and where it operates for 24 hours such as the aerial port, the train station etc.
• Failure to do so may cause serious damage to your set.
• Use only a properly grounded plug and receptacle.
− An improper ground may cause electric shock or equipment damage. (Class l Equipment only.)
• To disconnect the apparatus from the mains, the plug must be pulled out from the mains socket, therefore the mains plug shall be readily operable.
• Do not allow children to hang onto the product.
• Store the accessories (battery, etc.) in a location safely out of the reach of children.
• Do not install the product in an unstable location such as a shaky self, a slanted floor or a location exposed to vibration.
• Do not drop or impart any shock to the product. If the product is damaged, disconnect the power cord and contact a service centre.
• Unplug the power cord from the power outlet and wipe the product using a soft, dry cloth. Do not use any chemicals such as wax, benzene, alcohol,
thinners, insecticide, aerial freshener, lubricant or detergent. This may damage the appearance or erase the printing on the product.
• Apparatus shall not be exposed to dripping or splashing.
• Do not dispose of batteries in a fire.
• Do not short circuit, disassemble or overheat the batteries.
• Danger of explosion if battery is incorrectly replaced. Replace only with the same or equivalent type.
• WARNING - TO PREVENT THE SPREAD OF FIRE, KEEP CANDLES OR OTHER OPEN FLAMES AWAY FROM THIS PRODUCT AT ALL TIMES.
This symbol indicates that high voltage is
present inside. It is dangerous to make any kind
of contact with any internal part of this product.
This symbol alerts you that important literature
concerning operation and maintenance has
been included with this product.
English - 2
[UF8000-ZG]BN68-04794B-05L04.indb 2 2013-10-29 10:28:28
Figures and illustrations in this User Manual are provided for reference only and may differ from the actual product
appearance. Product design and specifications may change without notice.
CIS languages (Russian, Ukrainian, Kazakhs) are not available for this product, since this is manufactured for
customers in EU region.
Features for your new TV
• 3D: This new feature enables you to view 3D content.
• SMART HUB:
This TV features Smart Hub, a multi-purpose entertainment and family centre. With Smart Hub, users can surf
the web, download applications, and stay in touch with family and friends through social networking services. In
addition, you can enjoy photo, video, and music files stored on external storage devices.
Press the
Social: Watch the latest YouTube videos and you and your friends' video posts on Facebook and Twitter. You can
also make video calls to friends by the TV camera.
Apps: Download and install applications such as Web Browser.
On TV: Check a listing of programmes that are currently aerialing and are scheduled to aerial. (Depending on the
country)
Films and TV Shows: Purchase and watch movies and series without a separate external device. (Depending on
the country)
Photos, Videos & Music: Play back photo, video, and music files from an external storage device.
™
button to launch Smart Hub. Choose a service using the icons displayed in the top part of the screen.
English
• Anynet+ (HDMI-CEC): This allows you to control all connected Samsung devices that support Anynet+ with your
Samsung TV’s remote.
• e-Manual: Provides a detailed, on-screen user's manual built into your TV. (page 13)
• SMART Interaction: Using this function, you can access and control menu options and functions using motions.
Voice Interaction in the German language is available in Switzerland.
✎
• Device Manager: Use the TV features with a USB or Bluetooth keyboard and mouse.
• MHL & Screen Mirroring: Displays mobile device screens on your TV using a wired or wireless connection.
Correct Disposal of This Product (Waste Electrical & Electronic Equipment)
(Applicable in countries with separate collection systems)
This marking on the product, accessories or literature indicates that the product and its electronic accessories (e.g. charger, headset,
USB cable) should not be disposed of with other household waste at the end of their working life. To prevent possible harm to the
environment or human health from uncontrolled waste disposal, please separate these items from other types of waste and recycle
them responsibly to promote the sustainable reuse of material resources.
Household users should contact either the retailer where they purchased this product, or their local government office, for details of
where and how they can take these items for environmentally safe recycling.
Business users should contact their supplier and check the terms and conditions of the purchase contract. This product and its
electronic accessories should not be mixed with other commercial wastes for disposal.
Correct disposal of batteries in this product
(Applicable in countries with separate collection systems)
This marking on the battery, manual or packaging indicates that the batteries in this product should not be disposed of with other
household waste at the end of their working life. Where marked, the chemical symbols Hg, Cd or Pb indicate that the battery
contains mercury, cadmium or lead above the reference levels in EC Directive 2006/66. If batteries are not properly disposed of,
these substances can cause harm to human health or the environment.
To protect natural resources and to promote material reuse, please separate batteries from other types of waste and recycle them
through your local, free battery return system.
English - 3
[UF8000-ZG]BN68-04794B-05L04.indb 3 2013-10-29 10:28:28
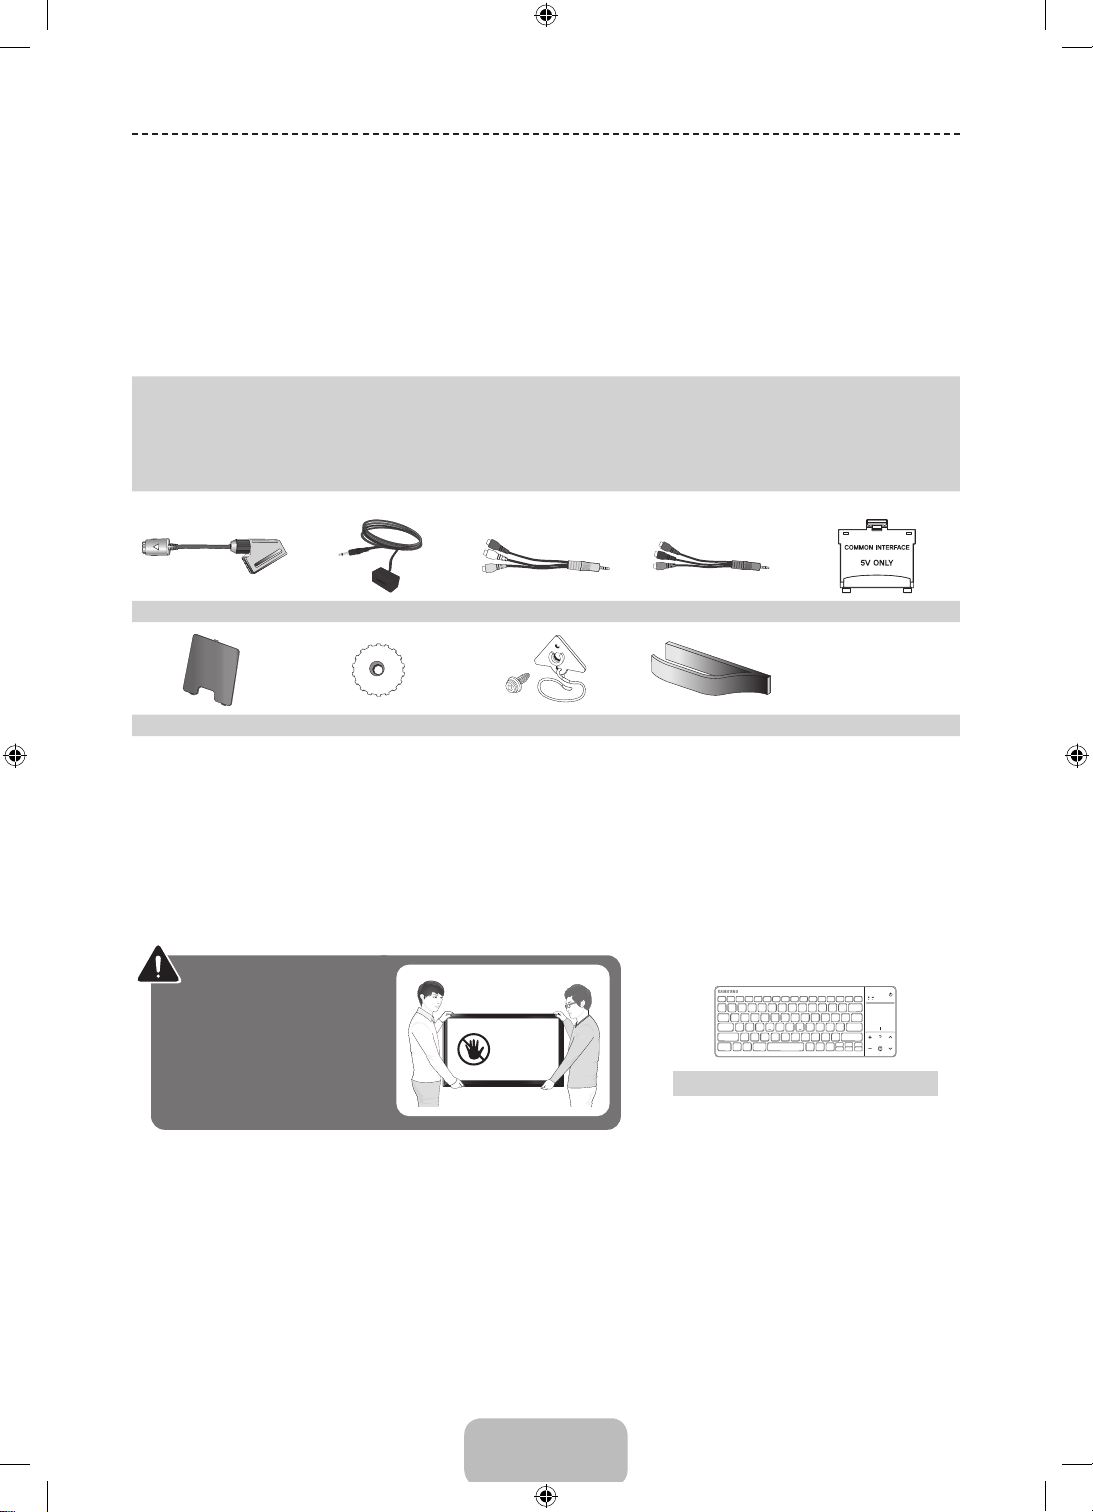
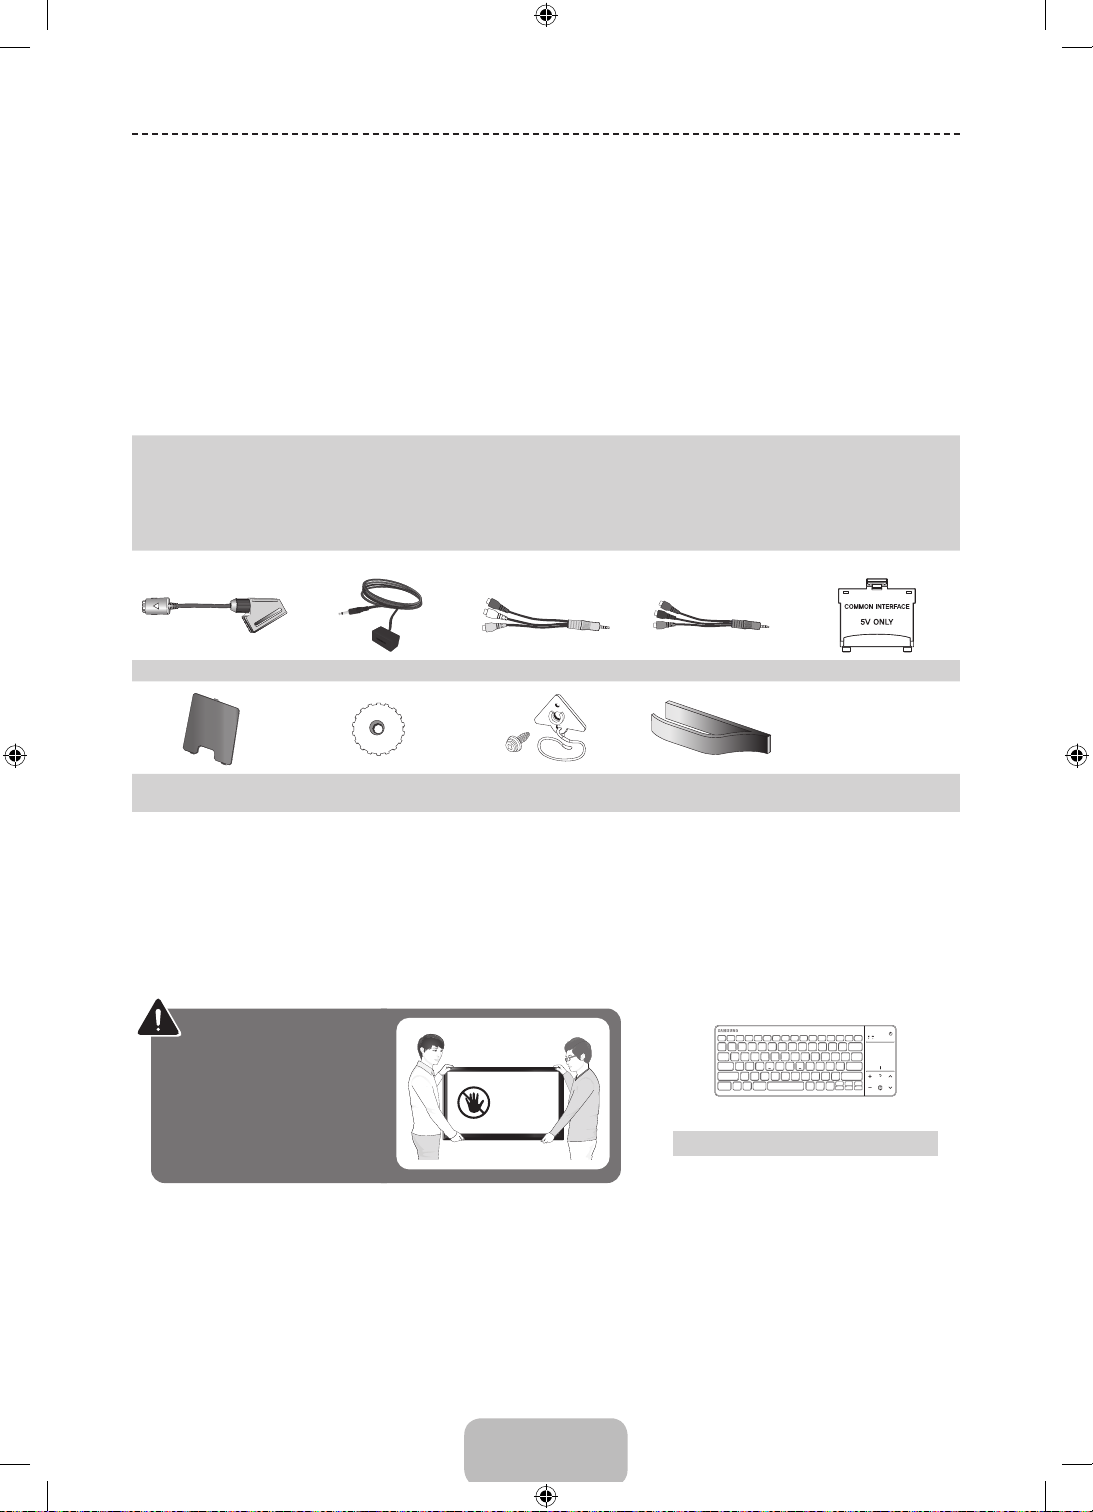
Accessories
Please make sure the following items are included with your TV. If any items are missing, contact your dealer.
✎
The items’ colours and shapes may vary depending on the models.
✎
Cables not included in the package contents can be purchased separately.
✎
Check that there is no accessory hidden behind packing materials when you open the box.
✎
CAUTION: INSERT SECURELY LEST SHOULD BE DETACHED IN SET
[
• Smart Touch Control & Batteries (AAA x 2) • Power Cord
• Remote Control & Batteries (AAA x 2) • Samsung 3D Active Glasses
• User Manual • Warranty Card (Not available in some locations)
• Regulatory Guide
Scart Adapter IR Extender Cable AV Adapter Component adapter CI Card Adapter
Power cover Wall mount adapter x 2 TV-Holder Kit Cable manager
• An administration fee may be charged if either
− (a) an engineer is called out at your request and there is no defect in the product
(i.e. where you have failed to read this user manual)
− (b) you bring the unit to a repair centre and there is no defect in the product
(i.e. where you have failed to read this user manual).
• The amount of such administration charge will be advised to you before any work or home visit is carried out.
Warning: Screens can
be damaged from direct
pressure when handled
incorrectly. We recommend
lifting the TV by the edges,
Don't Touch
This Screen!
Wireless Keyboard (Sold Separately)
as shown.
English - 4
[UF8000-ZG]BN68-04794B-05L04.indb 4 2013-10-29 10:28:29
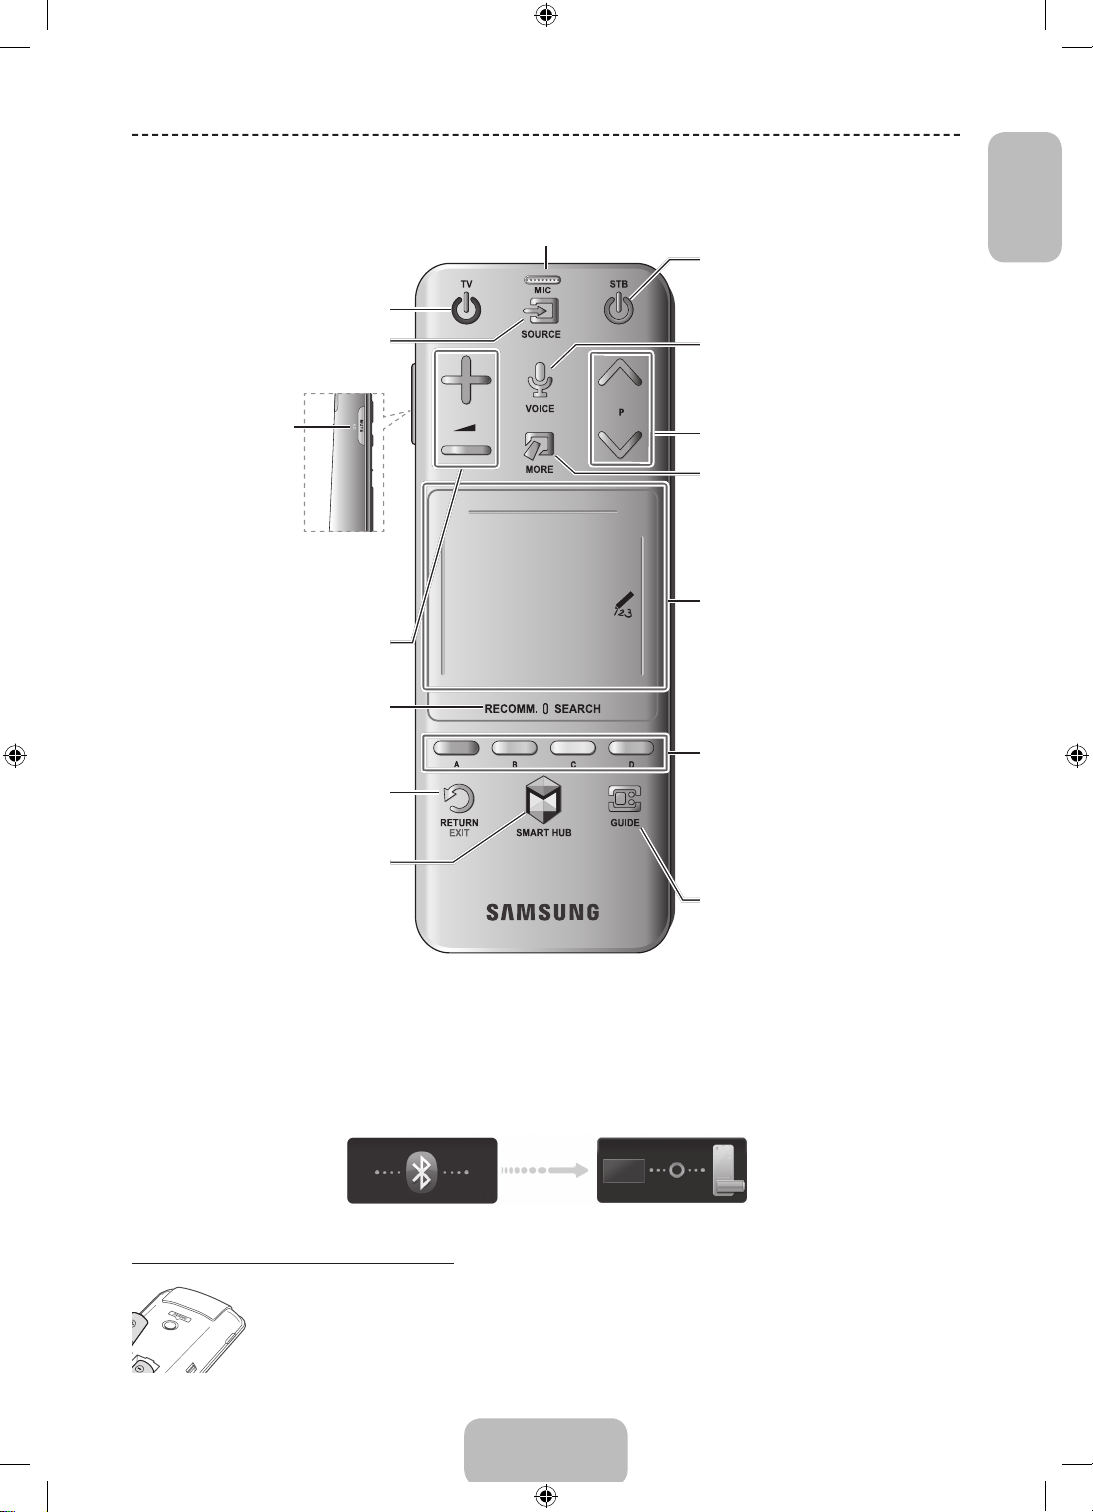
Basic Features
Using the Smart Touch Control
˜
You can use the MIC to give Voice Recognition commands. Simply press the VOICE
Voice Recognition function can be affected by unclear pronunciation, voice level, or surrounding noise.
✎
Turns the TV on and off.
Displays and selects the available video
Cuts off the sound
Press and hold this button
to select Audio Description
and Subtitle. (Depending on
Toggles this button between Recommended
Returns to the previous menu. Press and
hold this button to exit all currently running
Brings up Smart Hub applications. See the
e-Manual chapter, Smart TV Features >
temporarily.
the country or region.)
Adjusts the volume.
To exit an application that is running,
✎
press the
sources.
and Search.
applications.
Smart Hub.
™
button.
Connecting to the TV
In order to operate the TV using a Smart Touch Control, you must fi rst pair it to the TV via Bluetooth. However, the Smart Touch Control is only available
for the paired Samsung TV.
We recommend to use the Smart Touch Control in less than 6m. A usable distance may differ depending on the wireless environmental conditions.
✎
1. When the TV is off, point the Smart Touch Control at the remote control receiver of the TV and press the TV button for the fi rst pairing. Only this
buttons sends an IR signal. The remote control receiver's location may vary depending on the model.
2. A Bluetooth icon will appear at the bottom left of the screen as shown below. The TV will then attempt to connect to the Smart Touch Control
automatically.
button.
Turn on and off the satellite or cable set-top
box connected to the TV. For this, the Smart
Touch Control must be confi gured as a
universal remote control.
VOICE
˜
Take your voice command and enter a text
using your voice.
Changes channels.
Displays a virtual remote panel on the screen.
See the e-Manual chapter, Controlling TV >
Using the Virtual Remote Control.
Press and hold the MORE button to select a
desired function (e.g. MENU (
T
TOOLS (
TouchPad
• Drag on the touchpad to move the focus
• Press the touchpad to run, activate, or
• Press and hold the touchpad to display
The colour buttons work differently, depending
on the function that the TV is currently
performing.
Press and hold the
TV to view information about the current
programme.
View each digital channel's programming
schedule, including showtimes. In addition,
sets a Schedule Viewing or Schedule
Recording to press the touchpad on the
programme entry scheduled to air later.
), INFO (`), etc.) easily.
on the screen.
select the highlighted item.
the Channel List.
m
),
{
button while watching
English
<Attempting to connect and completion icons>
Reconnecting the Smart Touch Control
[UF8000-ZG]BN68-04794B-05L04.indb 5 2013-10-29 10:28:30
<The Smart Touch Control's pairing button>
If the Smart Touch Control stops operating or works abnormally, replace the battery as this may be caused by insuffi cient
battery power. If the problem persists, press the PAIRING button on the Smart Touch Control to restore pairing with the TV. The
PAIRING button cannot be accessed without removing the Smart Touch Control's battery cover. Within a distance between
30cm to 4m, point the Smart Touch Control to the TV receiver and press the PAIRING button. When pairing is complete, the
pairing image displays at the bottom left of the TV screen.
English - 5
Battery Low Alarm
3
If the battery becomes and blanks low while using the Smart Touch Control, the following alarm window blinks and appears at the
bottom left of the screen. If the alarm window pops up, replace the batteries of the Smart Touch Control. Use alkaline batteries for
longer usage.
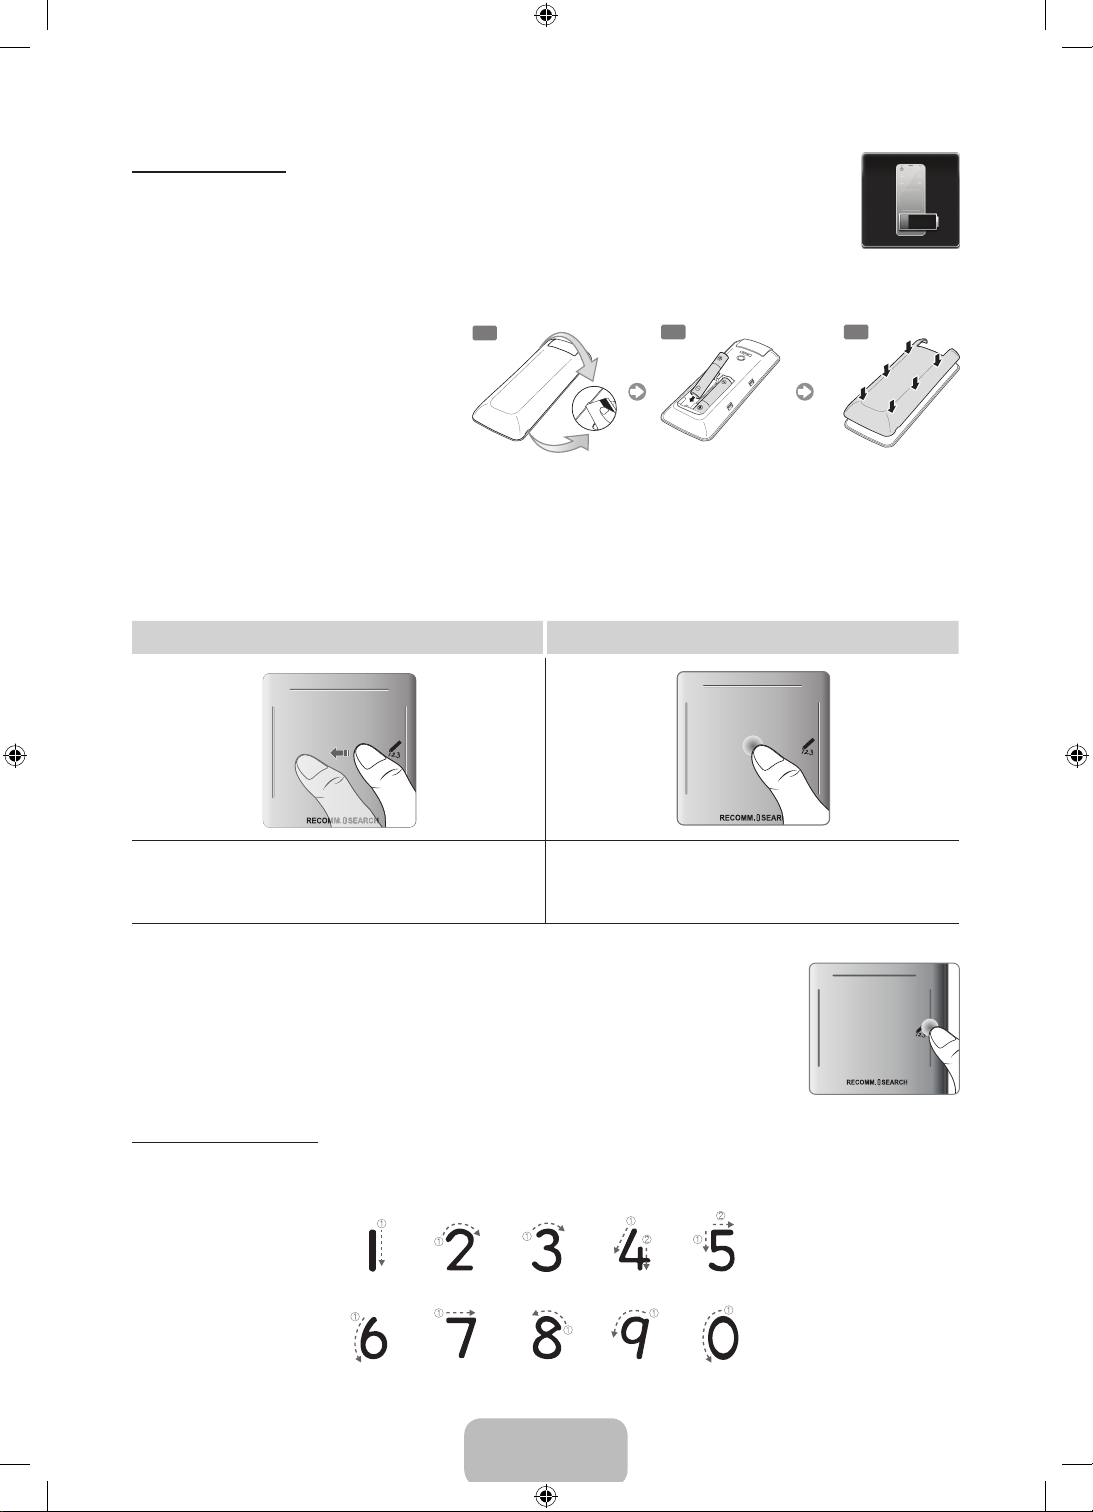
Inserting the Batteries (AAA X 2)
1. Slightly lift the battery cover using a plastic card. Next,
pull on the cover’s notch with a fingernail to remove
the cover completely.
Check the location of the battery cover groove.
✎
The groove's location may vary depending on
the type of Smart Touch Control is provided
with the product.
2. Insert 2 AAA batteries, making sure to align the positive and negative ends correctly.
3. Align the battery cover with the back of the remote control and press down along the edges until it is cleanly attached to the remote control.
1
2
Using the Touchpad
Use the touchpad to perform various commands. Navigate to Tutorial (Screen Menu > System > Device Manager >
Smart Touch Control Settings > Tutorial) to view an on-screen guide to using the Smart Touch Control.
Dragging Press
Drag on the touchpad in the desired direction.
Move the focus or the pointer in the direction the finger is dragging.
Press on the touchpad. This selects the focused item. When watching TV,
pressing and holding the touchpad displays the channel list. On some apps,
pressing and holding the touchpad for over 2 seconds displays a list of functions
available for the app.
Changing Channels by Entering Numbers
While watching TV, tap on the protruding line on the left or right edge of the touchpad
to bring up the numerical input window on the screen. Use your finger to enter the
number for the channel you want to watch. The recognised number is displayed on the
screen and the TV switches to the corresponding channel. See the e-Manual chapter,
Controlling TV > Touchpad.
Numerical Input Guide
Refer to the diagrams below when entering numerical values. The TV may not recognise your entries if you do not
follow the sequences shown below.
English - 6
[UF8000-ZG]BN68-04794B-05L04.indb 6 2013-10-29 10:28:31

Show Status and Notification Banner
Press the MORE button on the Smart Touch Control and then select STATUS on the virtual remote panel to display the
status and notification banner at the top of the screen.
Recommendations
Press the RECOMM. / SEARCH button and then select Recommended from the list displayed at the bottom of
the screen. Select a programme that is currently airing to jump to the corresponding channel or a programme that
is scheduled to air to set up a Schedule Viewing or Schedule Recording setting. Select an application to launch.
Samsung Apps will launch if the selected application is not installed on the TV.
History
Press the RECOMM. / SEARCH button and then select History from the list displayed at the bottom of the screen.
This displays an interactive list of recently accessed channels, media content and applications.
The RECOMM. / SEARCH button may function as a History recall feature, depending on your country or region.
✎
Deleting History Data
You can delete the history information about recently viewed channels, content and applications.
Searching
Press the RECOMM. / SEARCH button on the Smart Touch Control. The list appears at the bottom of the screen. Press the
RECOMM. / SEARCH button again. The keypad will appear on the screen. Enter search criteria to search not only many apps and
their contents on the TV but also the Web. This button toggles between Recommended and Search.
English
Adjusting the Touchpad
Users can adjust the sensitivity of the Smart Touch Control’s touchpad. Set Touch Sensitivity to adjust sensitivity and
make it more convenient to use.
Using the Virtual Remote Control
Press MORE button to display the virtual remote panel on the screen. The virtual remote panel consists of a number
panel, a playback control panel, and a quick access panel. Use the touchpad to select numbers and buttons.
The displayed virtual remote panel on the TV screen may differ depending on the country.
✎
Changing the Virtual Remote Panel
Choose the number panel, playback control panel, or quick access panel as the panel to be shown on the screen.
Use the touchpad to keep moving the focus left or right. The panel changes when the focus is moved beyond the
leftmost or rightmost edge.
Use left / right scroll function on the touchpad to change the panel easily.
✎
Using the Number Panel
Use the number panel to enter numbers on a keypad screen or webpage or to change the channel while watching TV.
Changing the channel using the number pad leaves a record, allowing you to easily return to previous channels.
Using the Playback Control Panel
Use the playback control panel to pause, rewind, fast forward, skip to the next file, and much more while enjoying
media content.
Using the Quick Access Panel
Quickly access the INFO, MENU and e-Manual buttons. However, the availability of buttons vary depending on the
operating mode of the Smart Touch Control unit (with the TV only, as a universal remote, etc.).
English - 7
[UF8000-ZG]BN68-04794B-05L04.indb 7 2013-10-29 10:28:31

Using the Remote Control
Learn where the function buttons are on your remote. Especially note these: SOURCE, MUTE,
MENU, TOOLS,
This remote control has Braille points on the Power, Channel, and Volume buttons and can be used by visually
✎
E
, INFO, CH LIST, RETURN, GUIDE and EXIT.
Y, < P >
impaired persons.
Your TV also comes with a Smart Touch Control. For information about the Smart Touch Control, refer to the
✎
e-Manual.
SOURCE
Turns the TV on and off.
Displays and selects the available
video sources.
Gives direct access to channels.
Alternately select Teletext ON Double,
Mix or OFF.
TTX/MIX
PRE-CH
MUTE
Returns to the previous channel.
Cuts off the sound temporarily.
Adjusts the volume.
Changes channels.
Brings up Smart Hub applications.
See the e-Manual chapter, Smart TV
Features > Smart Hub.
Displays the EPG (Electronic
Programme Guide).
Displays channel lists on the screen.
Opens the OSD (Menu).
Quickly selects frequently used
functions.
MENU
TOOLS
CH LIST
SMART
HUB
GUIDE
INFO
,
Moves the cursor, selects the on-
Displays information on the TV screen.
screen menu items, and changes the
values seen on the TV's menu.
RETURN
EXIT
Exits the menu.
Returns to the previous menu.
Use these buttons according to the
directions on the TV's screen.
BCD
AD/SUBT.
REC: Records whatever you are
currently watching.
W
Use these buttons in a specific feature.
Use these buttons according to the
directions on the TV's screen.
: Turns the 3D function on or off.
See e-Manual chapter TV Viewing >
3D TV
AD/SUBT.: Turns the audio description
on and off (not available in some
locations)./ Displays digital subtitles.
See e-Manual chapter TV Viewing >
Subtitles
'
: Stop.
English - 8
[UF8000-ZG]BN68-04794B-05L04.indb 8 2013-10-29 10:28:31
Installing batteries (Battery size: AAA)
Match the polarity of the batteries to the symbols in the battery compartment.
NOTE
✎
− Use the remote control within 23 feet of the TV.
− Bright light may affect the performance of the remote control. Avoid using when near special fluorescent lights
or neon signs.
− The colour and shape may vary depending on the model.
Turning on the TV
English
Turn on the TV using the P button on the remote control or TV panel.
The product colour and shape may vary depending on the model.
✎
The TV’s Controller, a small joy stick like button on the rear right side of the TV, lets you control the TV without the
✎
remote control.
Camera
Function menu
Remote control sensor
When you use the Smart Touch Control, a standby
LED does not work (except
mR
P
TV Controller
The image is drawn by facing the front
P
button).
side of the TV.
[UF8000-ZG]BN68-04794B-05L04.indb 9 2013-10-29 10:28:32
English - 9
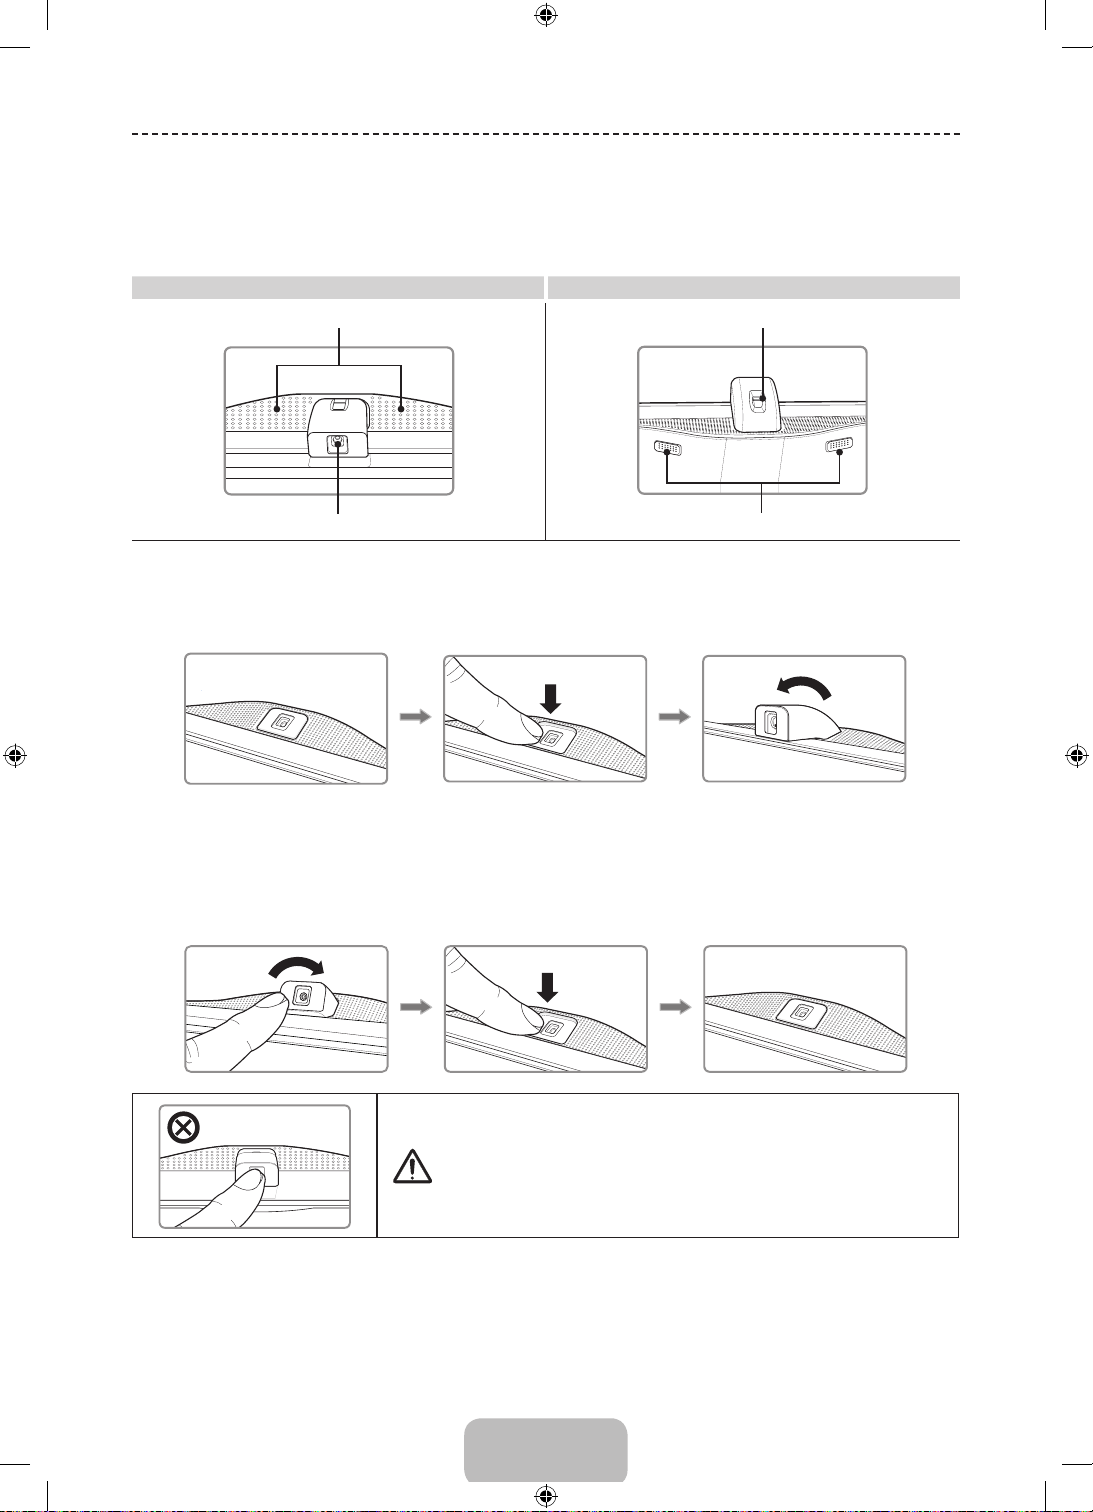
Built-in TV Camera and Microphone
주의
This TV features a built-in TV camera that can be used for the Motion Control, Voice Recognition (built-in microphone),
and Face Recognition features. You can also use the knob for camera's angle adjustment to change the camera's
viewing angle.
From the Top From Behind
Microphone
Knob for camera's angle adjustment
Lens
Microphone
Extending the TV Camera
In order to use the TV camera, you must first extend it.
Gently push the camera in without touching the lens until you hear a click.
Retracting the Camera
If you are not using the TV camera, keep it retracted inside the TV. The Motion Control and Face
Recognition features cannot be used while the TV camera is in the retracted state, but Voice Recognition
will still be available.
Gently push the camera in without touching the lens until you hear a click.
Do not touch the lens while operating the TV camera. Leave
fingerprints that may affect the image quality. If the lens gets dirty,
clean it using a soft piece of cloth.
English - 10
[UF8000-ZG]BN68-04794B-05L04.indb 10 2013-10-29 10:28:33
Universal Remote Setup
This TV has a universal remote control feature that lets you control cable boxes, Blu-ray players, home theatres, and
other third-party external devices connected to the TV using the TV's remote control.
5 cm
Plug the cable into the TV IR connector and then point the transmitter at the other end of the cable towards the
external device's remote panel receiver. However, there can' be any obstacles between the IR extension cable and the
external device. The presence of an obstacle will interfere with the transmission of the remote control signal.
Add the External Device
1. Turn on the external device you wish to set up universal remote function for and then press SOURCE to bring up
the Source screen.
2. Select Universal remote setup from the top of the screen. This initiates the universal remote setup process.
3. Follow the on-screen instruction and set up the universal remote control. If it does not work, set up the remote
control by entering the model number manually.
English
SETUP
The initial setup dialog appears when the TV is first activated. Follow the on-screen instructions to finish the initial setup
process, including menu language choice, channel scan, network connection, and more. At each step, either make a
choice or skip the step. Users can manually perform this process at a later time under the Screen Menu > System >
Setup menu.
If you connect any device to HDMI1 before starting the installation, the Channel Source will be changed to
✎
Set-top box automatically.
If you do not want to select Set-top box, please select Aerial.
✎
Password Change
Screen Menu > System > Change PIN
Change the TV's password.
1. Run Change PIN and then enter the current password in the password field. The default password is “0-0-0-0”.
2. Enter a new password and then enter it again to confirm it. The password change is complete.
If you forget the PIN code, press the buttons in the following sequence which resets the PIN to “0-0-0-0”:
✎
For Standard Remote Control: In Standby mode: MUTE → 8 → 2 → 4 → POWER (On)
For Smart Touch Control: When the TV turns on: MUTE → Volume up → RETURN → Volume down →
RETURN → Volume up → RETURN
English - 11
[UF8000-ZG]BN68-04794B-05L04.indb 11 2013-10-29 10:28:34
Switching Between Video
Connecting to a COMMON
Sources
Press SOURCE button to switch between devices
connected to the TV.
For example, to switch to a game console connected
to the second HDMI connector, press SOURCE button.
From the Source list, select HDMI2. The connector
names may vary depending on the product. Select Tools
button at the upper-right corner of the screen to access
the following functions.
• Anynet+ (HDMI-CEC)
A list appears showing Anynet+ compatible ones of
external devices connected to the TV.
This function is only available Anynet+ (HDMI-
✎
CEC) function set to On.
• Edit Name
You can rename devices connected to the TV to
more easily identify external sources.
With a computer connected to the TV's HDMI (DVI)
port via an HDMI cable, for example, you can change
Edit Name to PC.
With a computer connected to the TV's HDMI (DVI)
port via an HDMI-to-DVI cable, for example, you can
change Edit Name to DVI PC.
With an AV device connected to the TV's HDMI (DVI)
port via an HDMI-to-DVI cable, for example, you can
change Edit Name to DVI Devices.
• Information
View detailed information about the connected
devices.
• Disconnect USB Device
Remove the USB device from the list safely. This
function is only available when the USB device
selected.
• Universal remote setup
To add a new external device to control it with the
Smart Touch Control, press the SOURCE button and
select Universal remote setup on the top right of
the screen.
Using the universal remote control, users can control
external devices connected to the TV, such as a
settop box, Blu-ray player, and AV receiver.
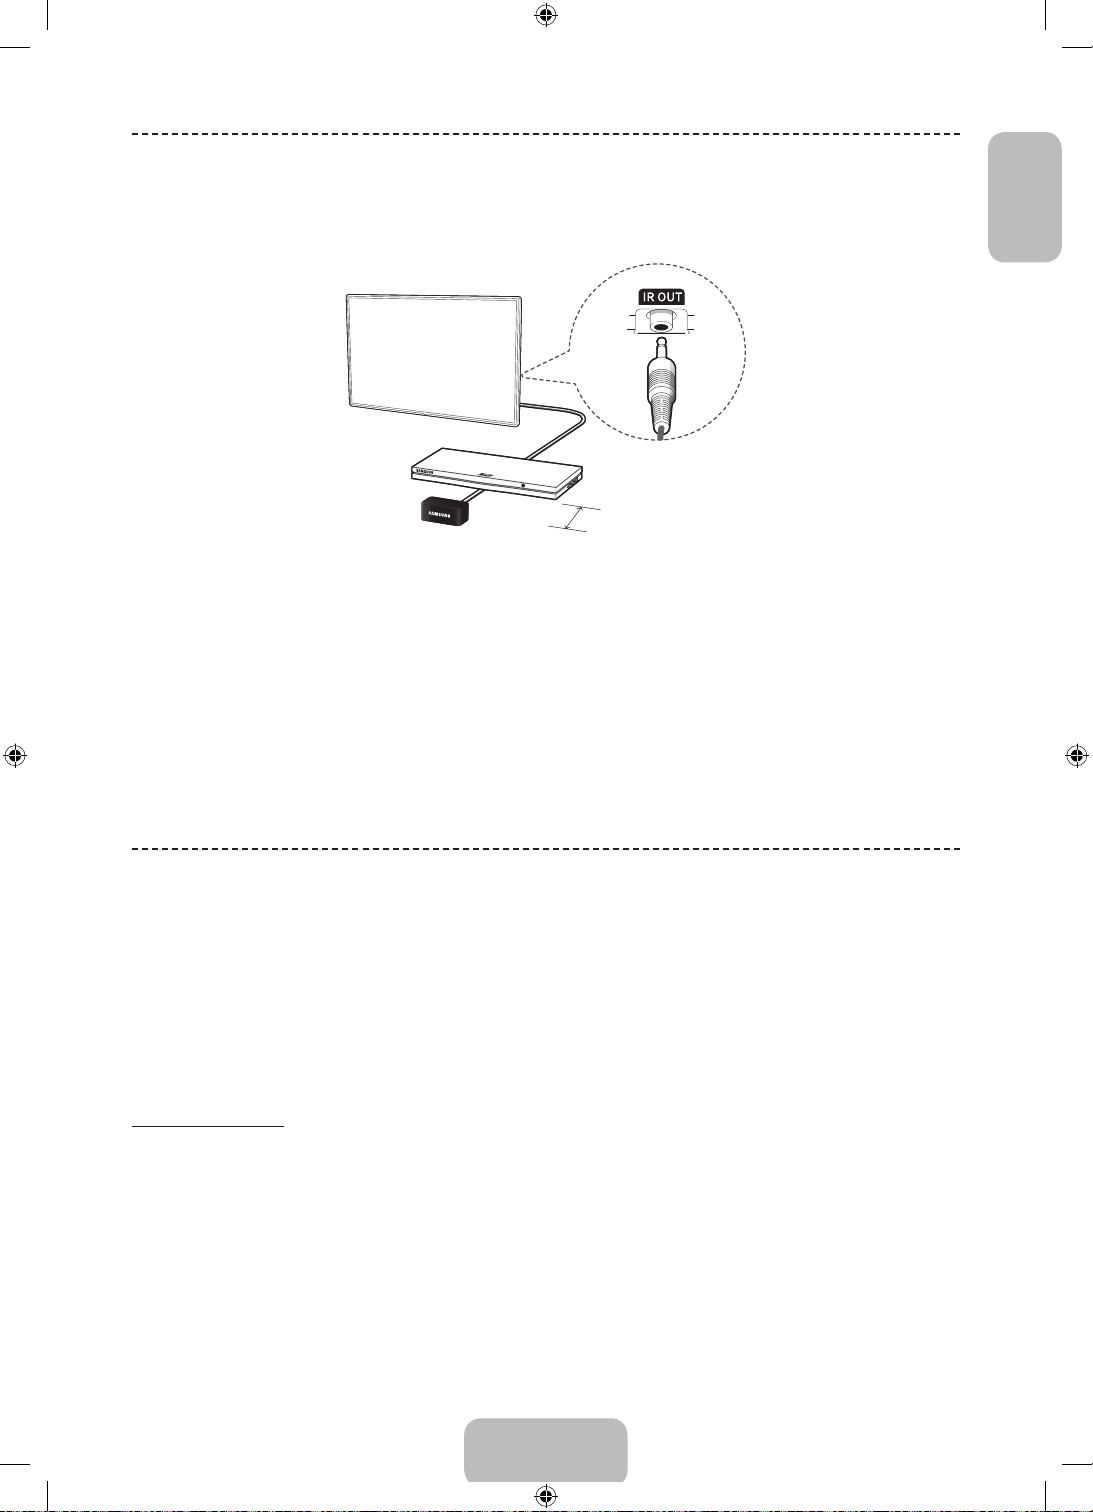
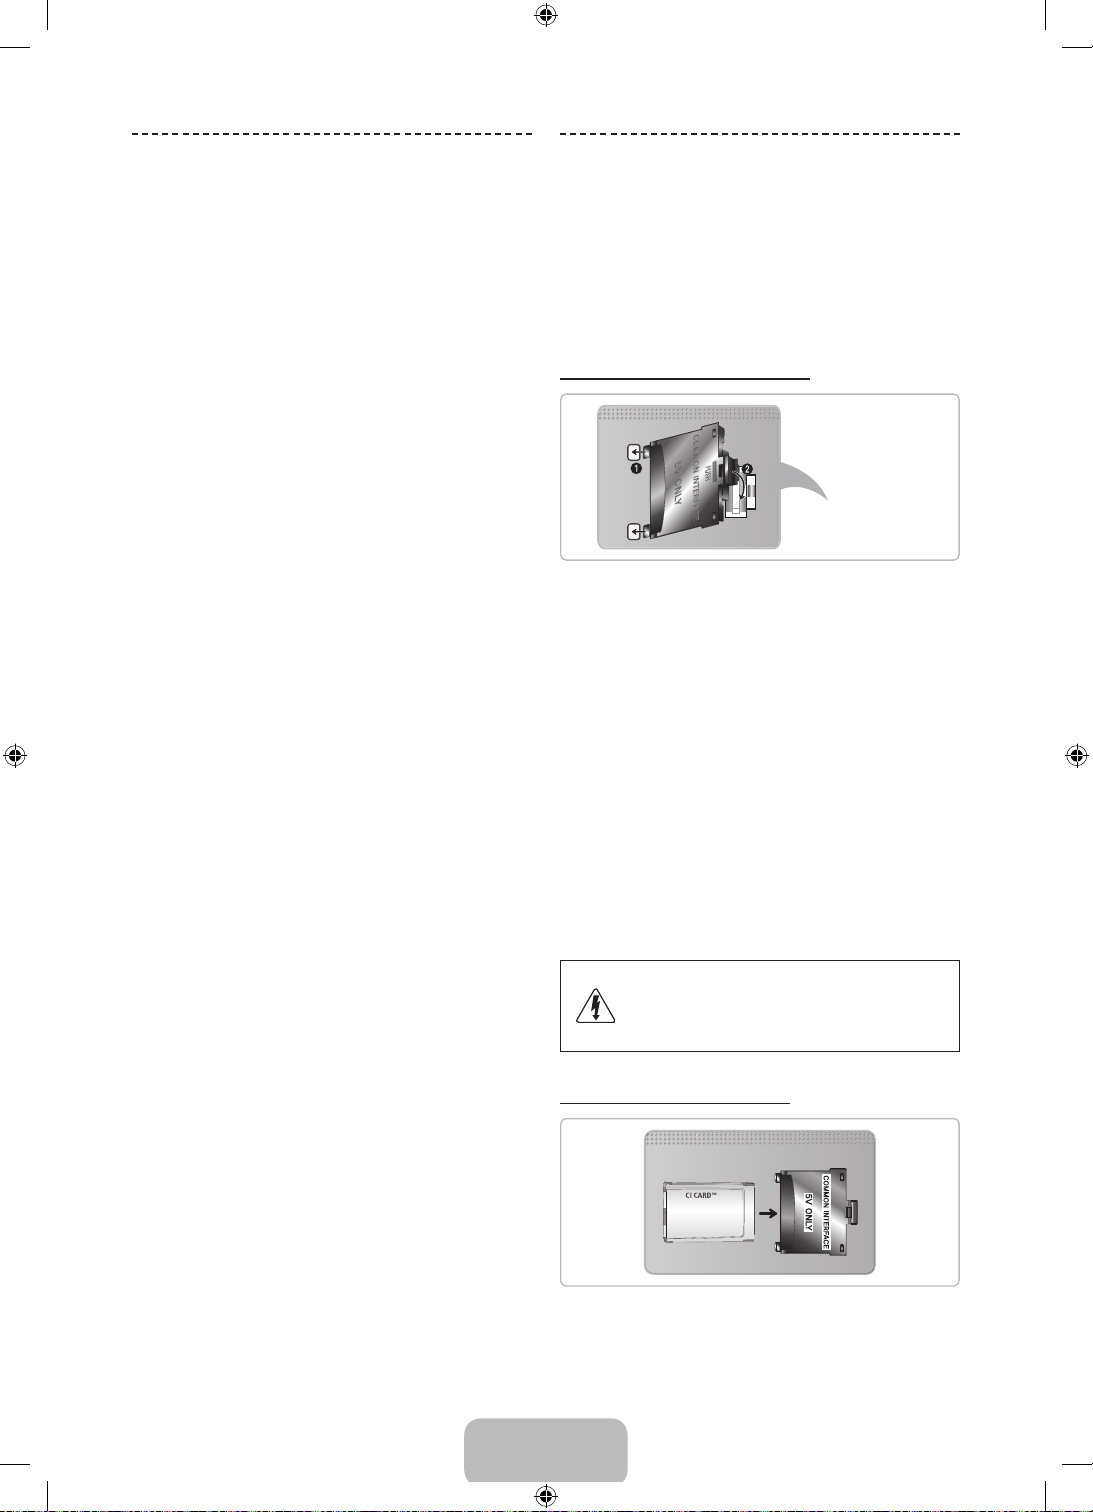
INTERFACE slot
(Your TV viewing Card Slot)
Turn the TV off to connect or disconnect a CI card
✎
or CI card adapter.
Attaching the CI Card Adapter
TV Rear
Attach the adapter as shown above.
To install the CI CARD Adapter, please remove the
✎
sticker attached to the TV.
To connect the CI CARD Adapter, follow these steps.
We recommend attaching the adapter before
✎
installing the wall mount, or inserting the “CI or CI+
CA RD”.
1. Insert the CI CARD Adapter into the two holes on the
product 1.
Please find two holes on the rear of the TV,
✎
beside the COMMON INTERFACE port.
2. Connect the CI CARD Adapter into the COMMON
INTERFACE port on the product 2.
3. Insert the “CI or CI+ CARD”.
We recommend that you insert the CI card before you
mount the TV on a wall. It may be difficult to insert after
mounting. Insert the card after attaching the CI Card
Adapter on TV. It is difficult to attach the module if you
insert the card before attaching.
Using the “CI or CI+ CARD”
• If you don’t insert the “CI or CI+ CARD”, some
channels will display the message “Scrambled
Signal”.
English - 12
[UF8000-ZG]BN68-04794B-05L04.indb 12 2013-10-29 10:28:35
• The pairing information containing a telephone
number, the “CI or CI+ CARD” ID the Host ID and
other information will be displayed in about 2~3
minutes. If an error message is displayed, please
contact your service provider.
• When the configuration of channel information has
finished, the message “Updating Completed” is
displayed, indicating the channel list is updated.
NOTE
✎
• You must obtain a “CI or CI+ CARD” from a local
cable service provider.
• When removing the “CI or CI+ CARD”, carefully
pull it out with your hands since dropping the “CI
or CI+ CARD” may cause damage to it.
• Insert the “CI or CI+ CARD” in the direction
marked on the card.
• The location of the COMMON INTERFACE slot
may be different depending on the model.
• “CI or CI+ CARD” is not supported in some
countries and regions; check with your
authorized dealer.
• If you have any problems, please contact a
service provider.
• Insert the “CI or CI+ CARD” that supports
the current aerial settings. The screen will be
distorted or will not be seen.
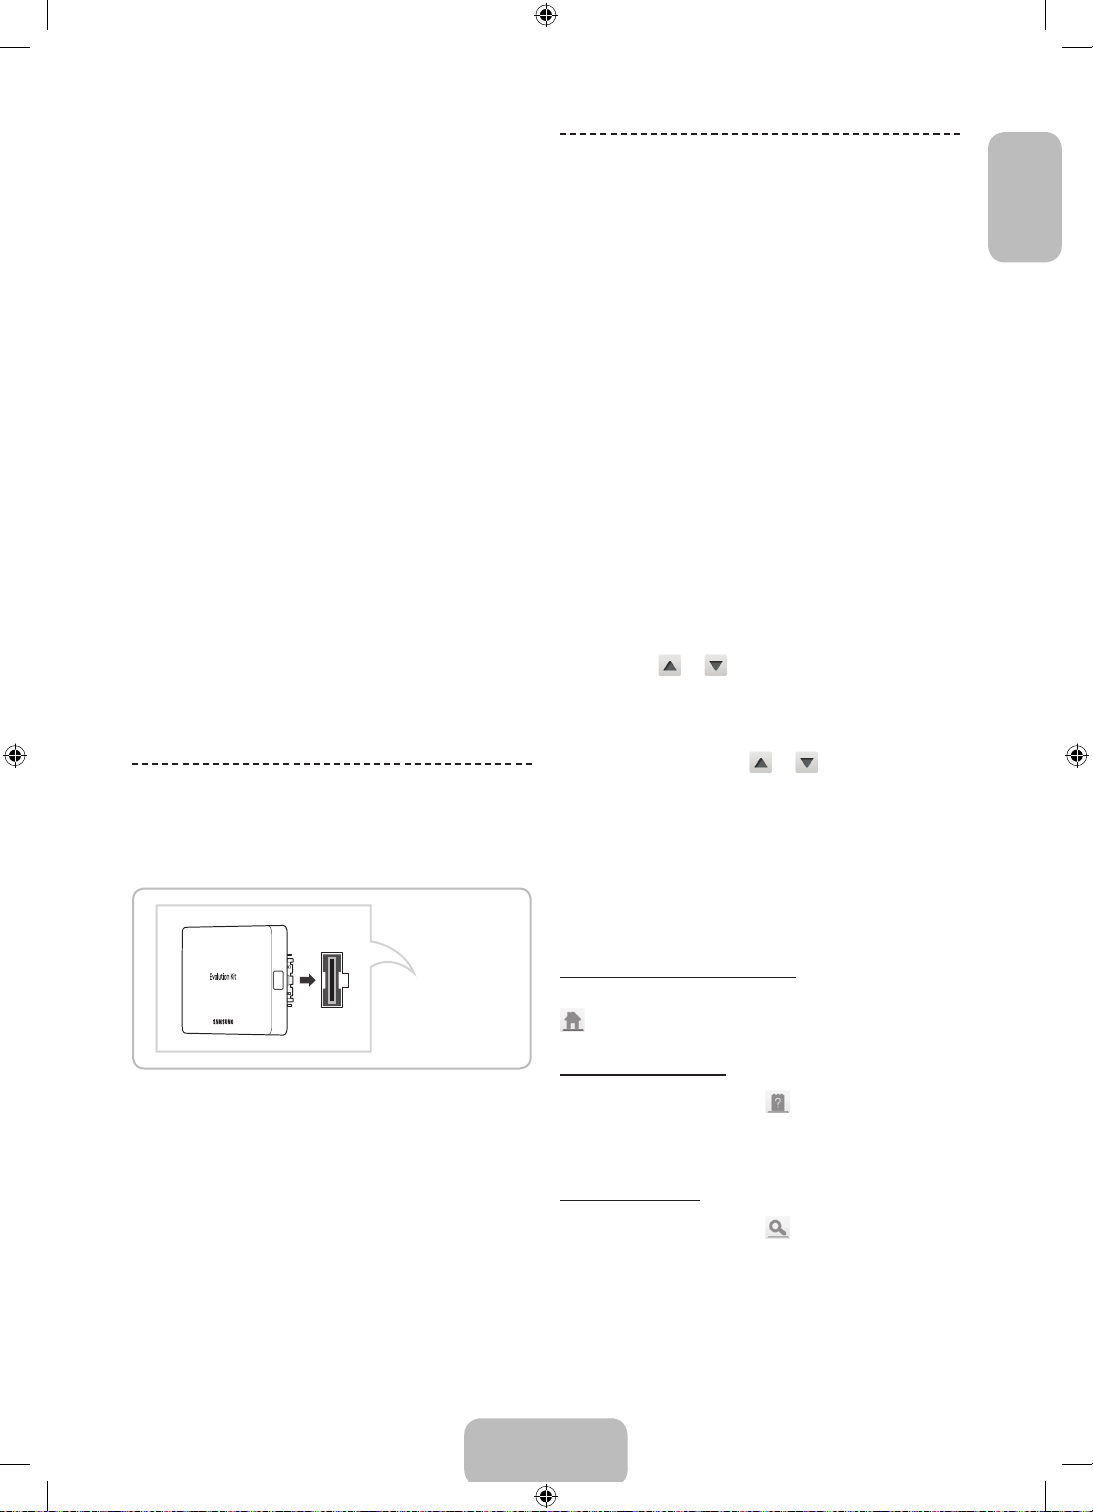
The Evolution Kit Slot
Viewing the e-Manual
The embedded e-Manual contains information about
your TV's key features.
This TV has a built-in user guide. To read it, use one of
the following methods:
• Open the Support menu and choose e-Manual
(Troubleshooting).
• Press the E-MANUAL button on the standard
remote control.
• Press the MORE button on the Smart Touch Control
to display control buttons on the screen. Flick the
touchpad until e-Manual appears and select it.
Words in blue refer to screen menu options and
✎
words in light blue refer to remote control buttons.
A printable version of this guide is also available at
✎
www.samsung.com/support.
Scrolling a Page
To scroll a page, use of one of the following methods:
• Press the
right edge of the screen.
• Drag or flick up or down the line on either the left or
right edge of the touchpad.
• Place the focus on the
edge of the screen, drag or flick up or down on the
touchpad.
or button on the scroll bar at the
or button at the right
English
(Kit Sold Separately)
TV Rear
Attaching the Evolution Kit to your Samsung TV
upgrades the TV’s hardware and software without your
needing to purchase a new TV. With the Evolution Kit,
you can keep your TV updated with the latest features
and services provided by Samsung Electronics.
The Evolution Kit is sold separately. When users
✎
purchase an Evolution Kit released in 2014 or
later, the user's TV can be upgraded to match the
software version of the Evolution Kit. However, an
Evolution Kit may not be available, depending on the
product.
The colour and design of the Evolution Kit may vary
✎
depending on the model.
Using the Top Icons
Use the Back, Forward, and Opened page icons on the
top left of the screen to navigate through pages. These
icons are available when two or more pages are passed.
Returning to the Home Page
To return to the home page, press the a button or select
on the top right of the screen.
Searching the Index
Press the b button or select on the top right of the
screen to display the index. Select a term to display the
page containing the term.
Searching Pages
Press the { button or select on the top of the
screen to access the search screen. Enter a search
phrase and select Done. Select an item from the search
results list to navigate to the relevant page.
English - 13
[UF8000-ZG]BN68-04794B-05L04.indb 13 2013-10-29 10:28:36
Network Configuration
Closing the e-Manual
To close the e-Manual, press and hold the RETURN button or select at the upper-right corner of the screen or
press EXIT button.
Jumping to a Menu Item
To directly jump to the menu item that is described in the current section, select
a menu item directly to the related section in the e-Manual. If you want to read an e-Manual entry on a specific screen
menu feature, press the virtual remote panel's or the regular remote's E-MANUAL button to load the corresponding
e-Manual page.
This feature may not be available, depending on the menu.
✎
Try Now
. It is possible to jump from
Updating the e-Manual
Open the Smart Hub and select Apps, and then select More Apps. The e-Manual can be updated in the same way
with an application update.
On the More Apps screen, select Apps to update, and then select e-Manual from the list. The e-Manual starts
updating to the latest version. However, Apps to update appears on the screen only when the update is required.
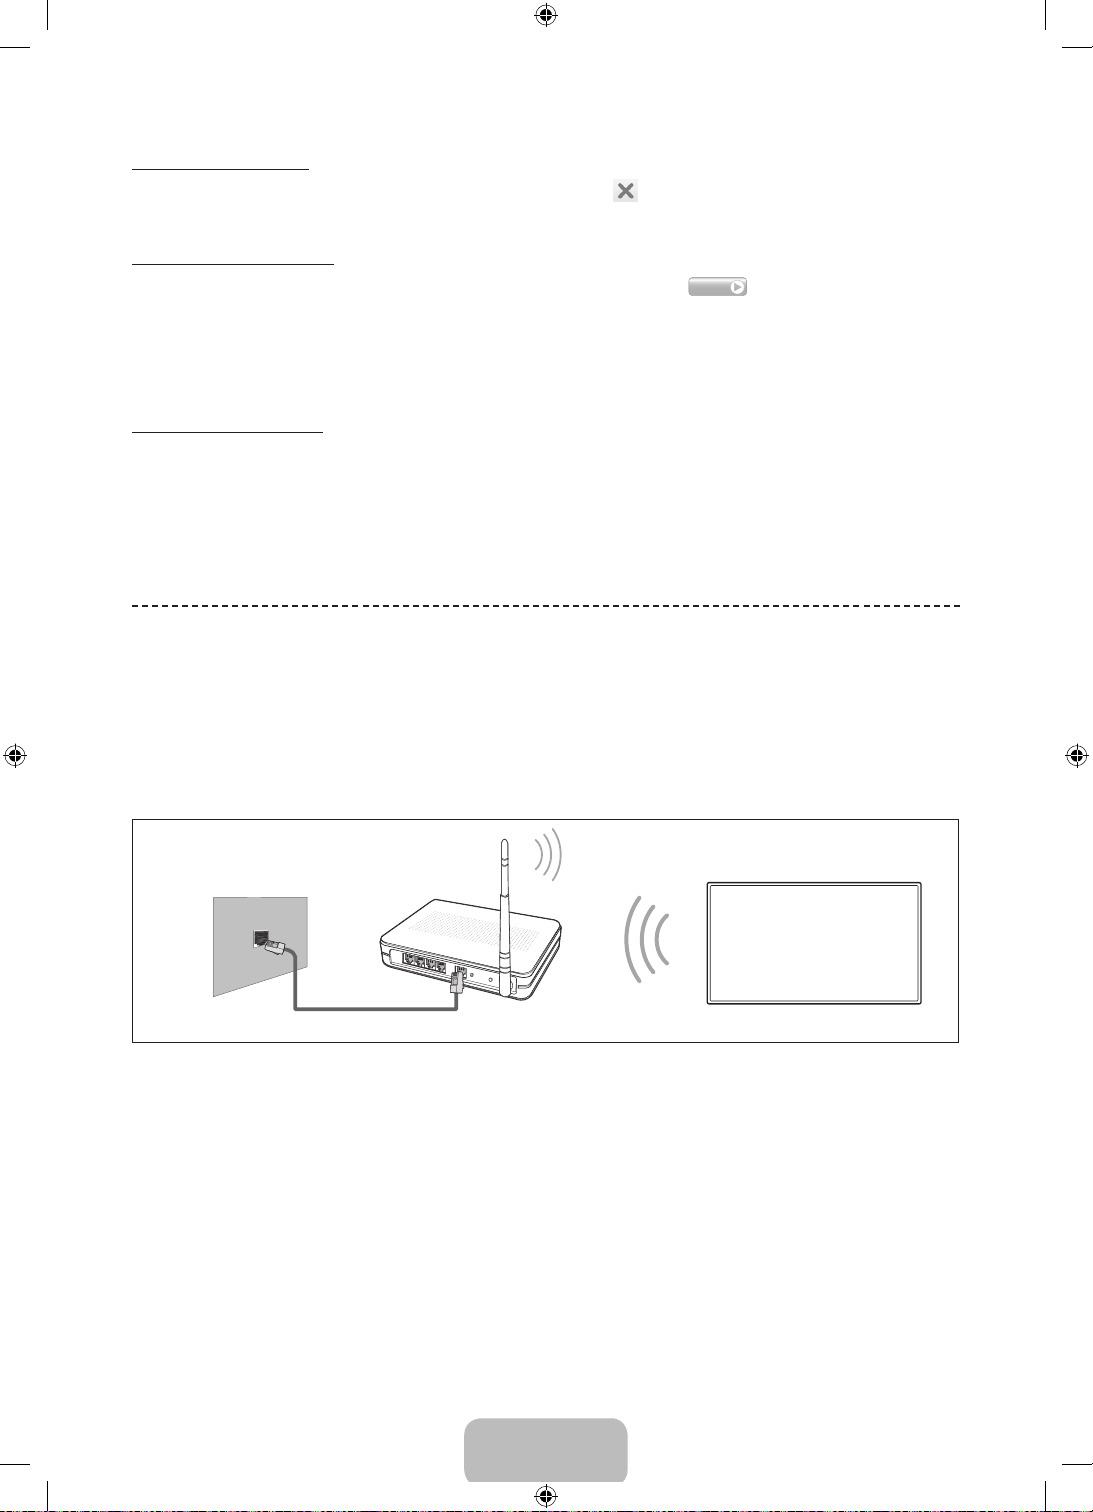
Connecting to a Network
Connecting the Smart TV to a network gives you access to online services such as the Smart Hub, as well as software
updates.
Network Connection - Wireless
Connect the TV to the Internet using a standard router or modem.
Wireless IP Router or Modem
that has a DHCP Server
The LAN Port on the Wall
LAN Cable (Not Supplied)
Wireless Network Precautions
• This Smart TV supports the IEEE 802.11a/b/g /n communication protocols. Samsung recommends using IEEE
802.11n. Otherwise when you play video over a network connection, the video may not play smoothly.
• To use a wireless network, the TV must be connected to a wireless router or modem. If the wireless router
supports DHCP, the TV can use a DHCP or static IP address to connect to the wireless network.
• Select a channel that is not currently in use for the wireless router. If the channel set for the wireless router is
currently being used by another device, the result is usually interference and/or a communications failure.
• Most wireless networks have an optional security system. To enable a wireless network's security system, you
need to create a security key using characters and numbers. This security key is then needed to connect to the
wireless network.
English - 14
[UF8000-ZG]BN68-04794B-05L04.indb 14 2013-10-29 10:28:36
Network Security Protocols
The TV only supports the following wireless network security protocols and is unable to connect to non-certified
wireless routers:
• Authentication Modes: WEP, WPAPSK, WPA2PSK
• Encryption Types: WEP, TKIP, AES
If the wireless router has been set to Pure High-throughput (Greenfield) 802.11n mode and the Encryption Type to
WEP or TKIP, Samsung Smart TVs will not support the connection in compliance with the new Wi-Fi certification
specifications.
If the wireless router supports WPS (Wi-Fi Protected Setup), it is possible to connect to the network using PBC (Push
Button Configuration) or a PIN (Personal Identification Number). WPS automatically configures the SSID and WPA key
settings.
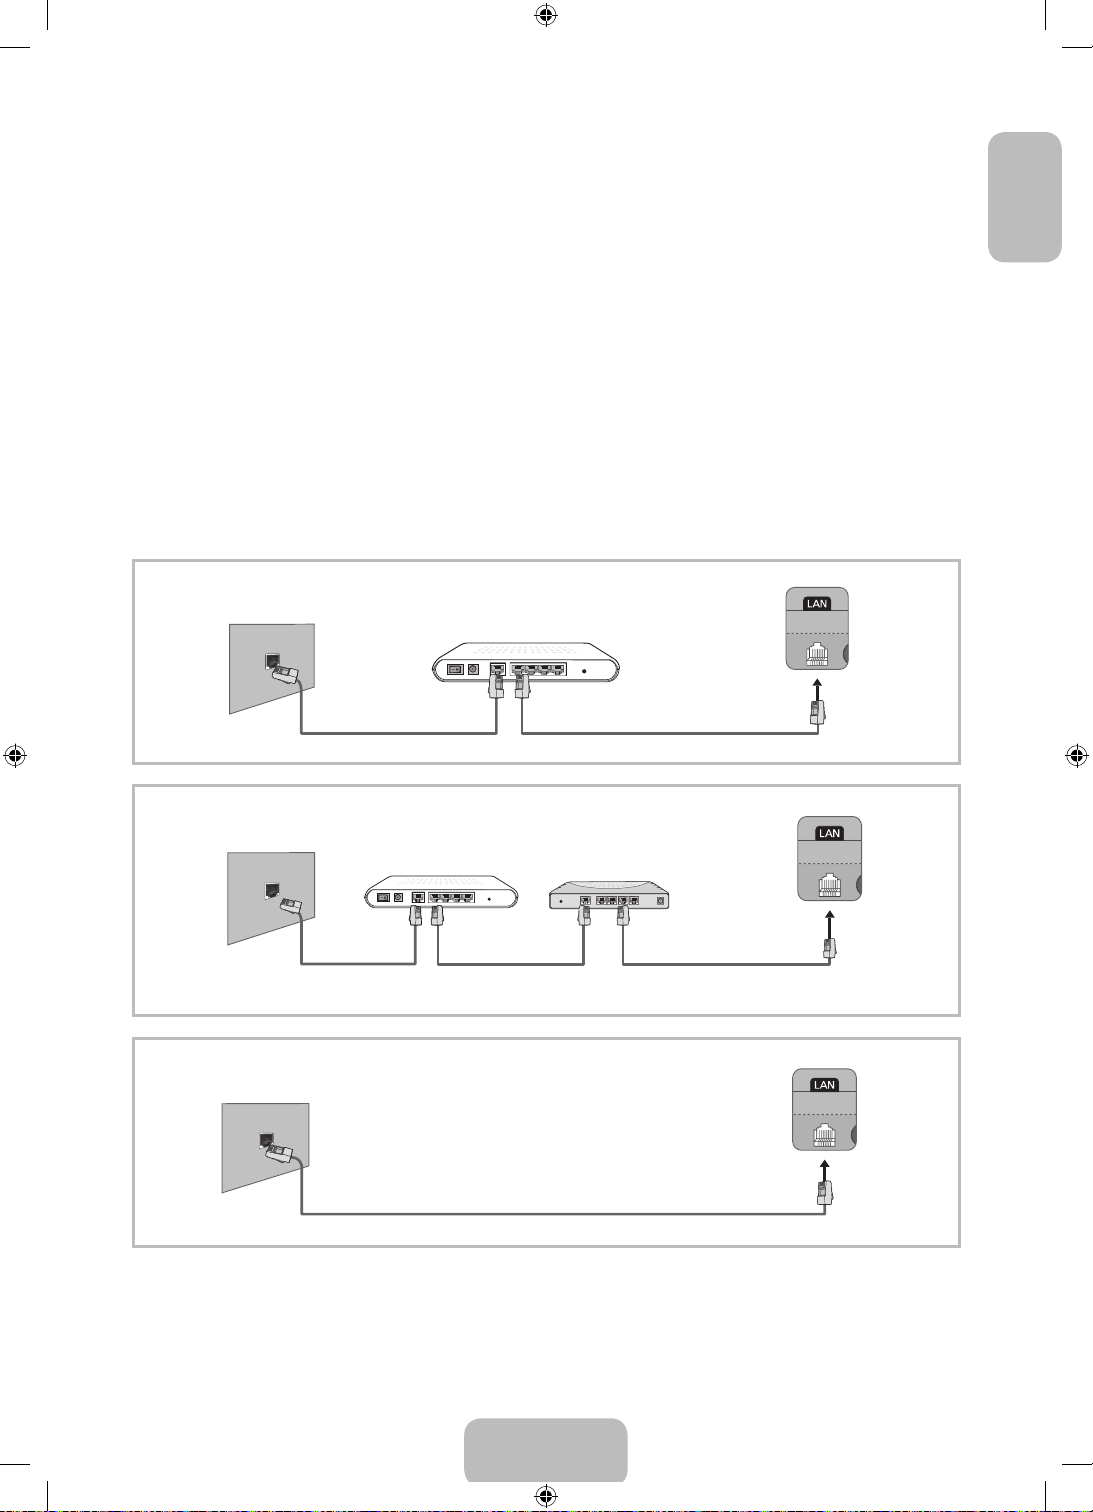
Network Connection - Wired
There are three main ways to connect your TV to your network using cable, depending on your network setup. They
are illustrated starting below:
English
The Modem
Port on the Wall
The Modem
Port on the Wall
The LAN Port
on the Wall
External Modem
(ADSL / VDSL / Cable TV)
Modem Cable (Not Supplied) LAN Cable (Not Supplied)
External Modem
(ADSL / VDSL / Cable TV)
Modem Cable
(Not Supplied)
LAN Cable
(Not Supplied)
IP Router that has a
DHCP Server
LAN Cable
(Not Supplied)
TV Rear Panel
TV Rear Panel
TV Rear Panel
LAN Cable (Not Supplied)
The TV does not support network speeds less than or equal to 10Mbps.
✎
Use Cat 7 cable for the connection.
✎
English - 15
[UF8000-ZG]BN68-04794B-05L04.indb 15 2013-10-29 10:28:37
3D Basics
3D Active Glasses
Features
Pairing 3D Active Glasses
Samsung's SSG-5100GB 3D glasses enable you to view
3D images on your 3D TV. The Samsung 3D glasses
communicate with Samsung 3D TVs via the 2.4GHz RF
band.
The Samsung 3D glasses are only compatible with
✎
Samsung D, E, and F series 3D TV's that were
released in 2011, 2012, and 2013. These 3D glasses
cannot be connected to other Bluetooth devices.
Parts
LED Indicator & Power Button
Battery Cover
Liquid crystal shutter
For details on how to attach the glasses' temples and
how to pair the glasses with the TV, refer to the separate
3D glasses manual.
Replacing the Battery
If the red LED blinks every two seconds continually,
replace the battery with a new one.
Insert the "+" side of the battery into the side marked
✎
with "+" in the battery compartment.
To check the remaining battery capacity, refer to the
✎
pairing section in this manual.
What is Pairing? Pairing is the process of connecting
✎
3D glasses and a 3D TV so that the two devices can
exchange data.
Ensure your Samsung TV and 3D glasses are no
✎
farther than 19.5 in (50 cm) apart from each other
while pairing is in progress.
• Turning the glasses on
Press the power button
briefly. The green LED is
turned on for 3 seconds.
(Make sure that 3D is
activated on the TV before
using the 3D glasses.)
• Turning the glasses off
Press the power button briefly. The red LED is turned
on for 3 seconds.
• Performing the pairing process
Turn the TV on and let it power up completely. Press
and hold the Power button on the glasses. The green
and the red LEDs blink alternately for 2 seconds.
• Operating range
Recommended pairing distance
2~6m
50 cm
Pull the battery
cover downward
Replace the battery
Open the battery
cover
Push the battery
cover downward
Remove the
battery
Close the battery
cover
Recommended viewing distance
Recommended viewing distance 2~6m (6.5 to 19.5 ft)
Recommended pairing distance 50 cm or less (19.5 in)
Once the 3D glasses are paired, the remaining
✎
battery capacity is displayed on the TV screen. (This
feature only applies to Samsung F series 3D TVs
and 3D glasses that have been available since 2013.)
If you keep trying to pair the glasses and the TV, the
✎
battery level will decrease significantly. However, the
battery level will recover to a certain degree in about
a minute.
English - 16
[UF8000-ZG]BN68-04794B-05L04.indb 16 2013-10-29 10:28:38

The working distance depends on the existence
✎
of obstacles (a person, metal, walls, etc.) between
the glasses and the TV and the strength of the
Bluetooth signal.
Turn off the 3D glasses while they are not in use.
✎
If you leave the 3D glasses on, the battery lifespan
decreases.
Pairing steps
1. Turn on the TV, and then move the glasses within
19.5 inches of the TV.
2. Press the power button on the 3D glasses briefly.
The 3D glasses will power on and pairing will start.
3. The message “3D glasses are connected to TV.” will
be displayed on the TV screen when the pairing is
successfully completed.
• If pairing fails, the 3D glasses will power off.
• If the first attempt to pair fails, power the TV off
and on again and perform step 2.
• How to pair again: Press the power button on
the 3D glasses for more than 1 second.
Troubleshooting
Pairing is needed again in the following
situations:
• If the 3D glasses do not function, even when the
power button is pressed, especially with a 3D TV
after a repair.
• If you want to play 3D content on another
Samsung 3D TV model that belongs to the D, E,
or F series released in 2011 through 2013. You
must pair the glasses with the other TV.
Watching 3D Video
Some 3D modes may not be available depending on the
format of the image source.
To watch in 3D, you must wear 3D Active Glasses and
turn the glasses on by pressing the power button.
1. Go to the 3D screen. (Picture > 3D)
2. Select the 3D Mode. The 3D Mode screen appears.
3. Set the 3D Mode of the image you want to view.
English
If you encounter... Try this...
Replace the battery.
My 3D glasses do not work.
The LED keeps blinking The battery is dead. Replace the battery.
The 3D glasses should be close to the TV. Make sure that the distance between the TV and your 3D
glasses is less than 19.5 feet (6m) in a straight line.
Check the 3D function settings of your TV.
Specifications (Model Number: SSG-5100GB )
Optics
Weight Glasses 21.5g/.76 oz. (including the battery: 24.0±0.5g/.85.±.018oz. )
Power Glasses One 3V lithium/manganese dioxide battery 3V(CR2025)
Power consumption
Operating conditions
Product specifications may be changed without notice in order to enhance product performance.
The continuous operating time may differ depending on the wireless communication environment and usage
✎
conditions.
Shutters Liquid crystal Transmittance 36±2%
Recommended
operating distance
Glasses 0.85mA (Average)
Battery
Operating temperature 50 °F ~ 104 °F (10°C ~ 40°C)
Custody temperature -4 °F ~ 113 °F (-20°C ~ 45°C)
2 ~ 6m (6.5 to 19.5 ft) Field Rate 120 fields/second
Type 165mAh, 3.0V (CR2025)
Operating time 150 hours
[ Recommendation ]- EU ONLY
Hereby, Samsung Electronics, declares that this 3D Active Glasses is in compliance with the
essential requirements and other relevant provisions of Directive 1999/5/EC.
This equipment may be operated in all EU countries.
English - 17
[UF8000-ZG]BN68-04794B-05L04.indb 17 2013-10-29 10:28:38
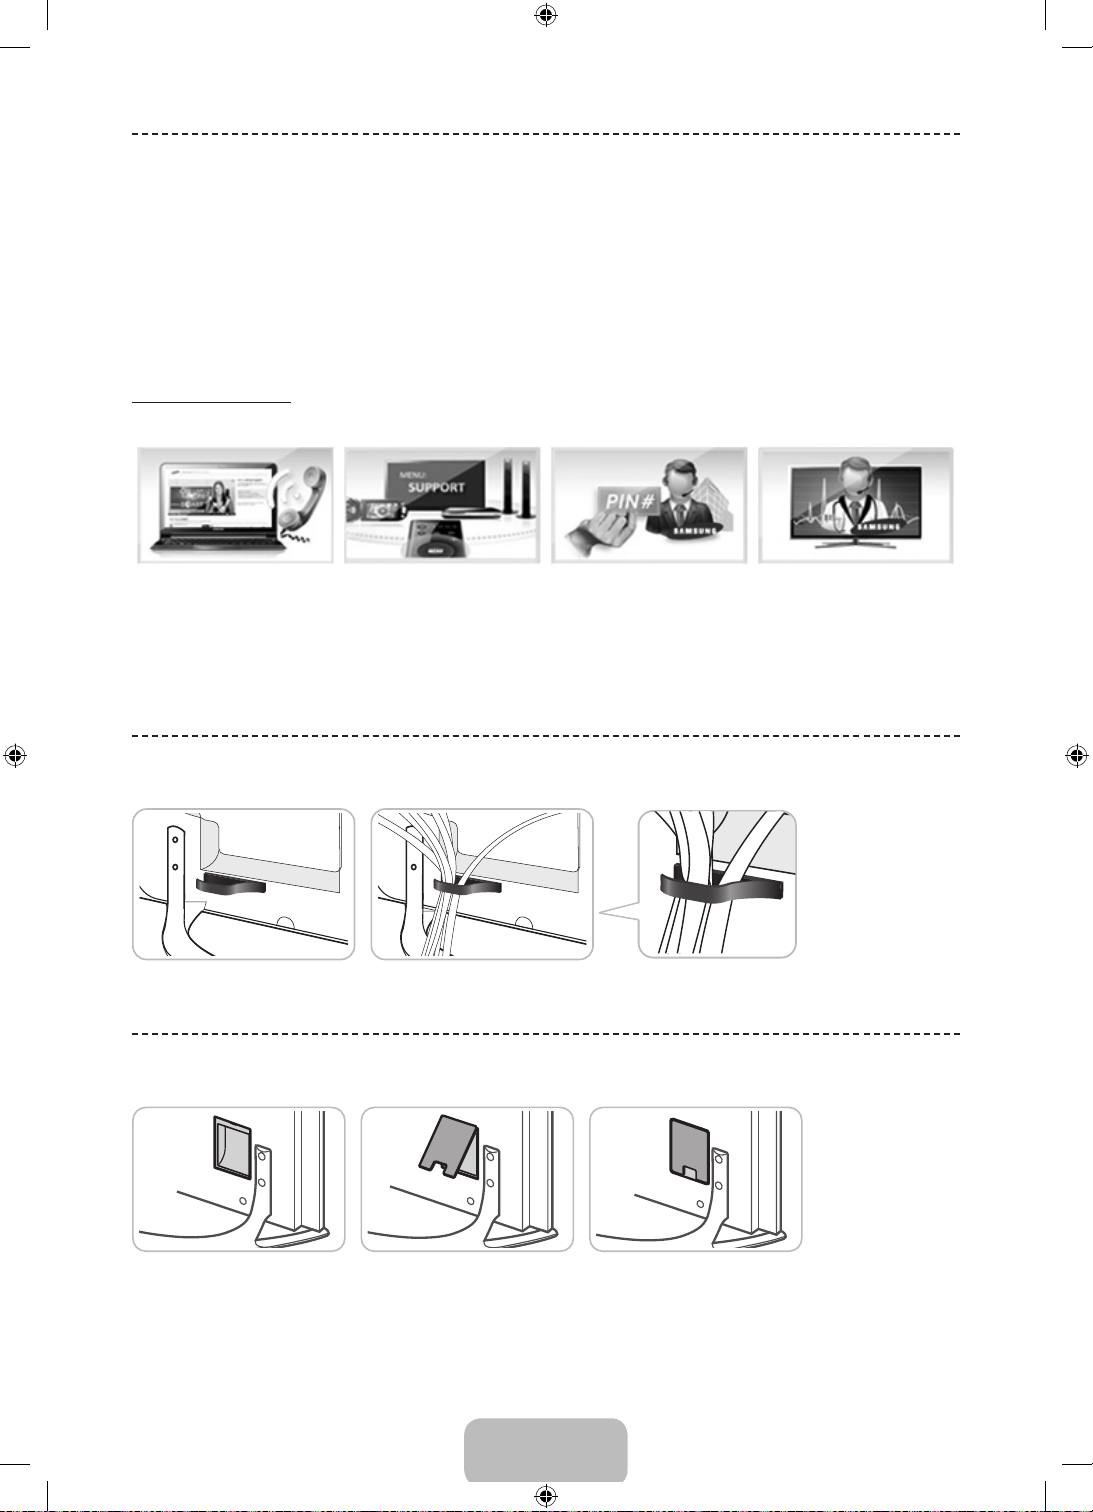
What is Remote Support?
Samsung Remote Support service offers you one-on-one support with a Samsung Technician who can remotely.
• Diagnose your TV
• Adjust the TV settings for you
• Perform a factory reset your TV
• Install recommended firmware updates
How Does it Work?
Having a Samsung Tech remotely service your TV is really pretty simple
1. Call Samsung
Contact Centre
and ask for remote
support.
2. Open the menu on
your TV and go to the
Support section.
3. Select Remote
Management and
Provide the Pin# to
the agent.
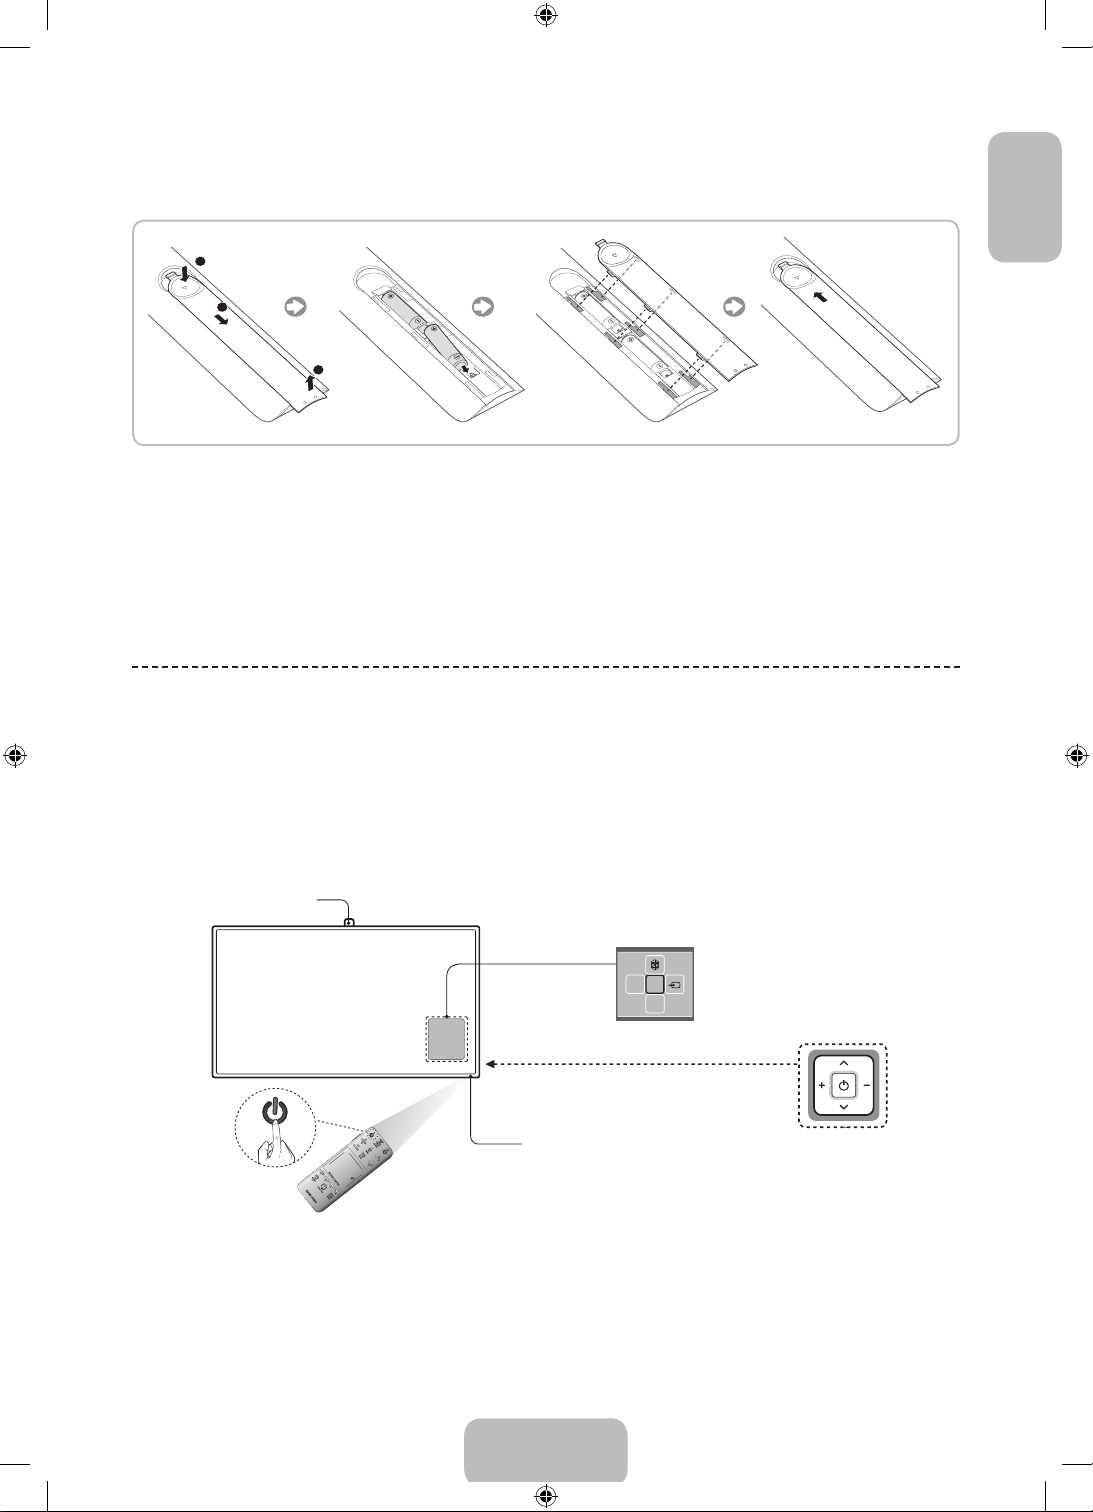
Assembling the Cable manager
Assembling the Power Cover
4. The agent will then
access your TV.
That's it!
English - 18
[UF8000-ZG]BN68-04794B-05L04.indb 18 2013-10-29 10:28:38
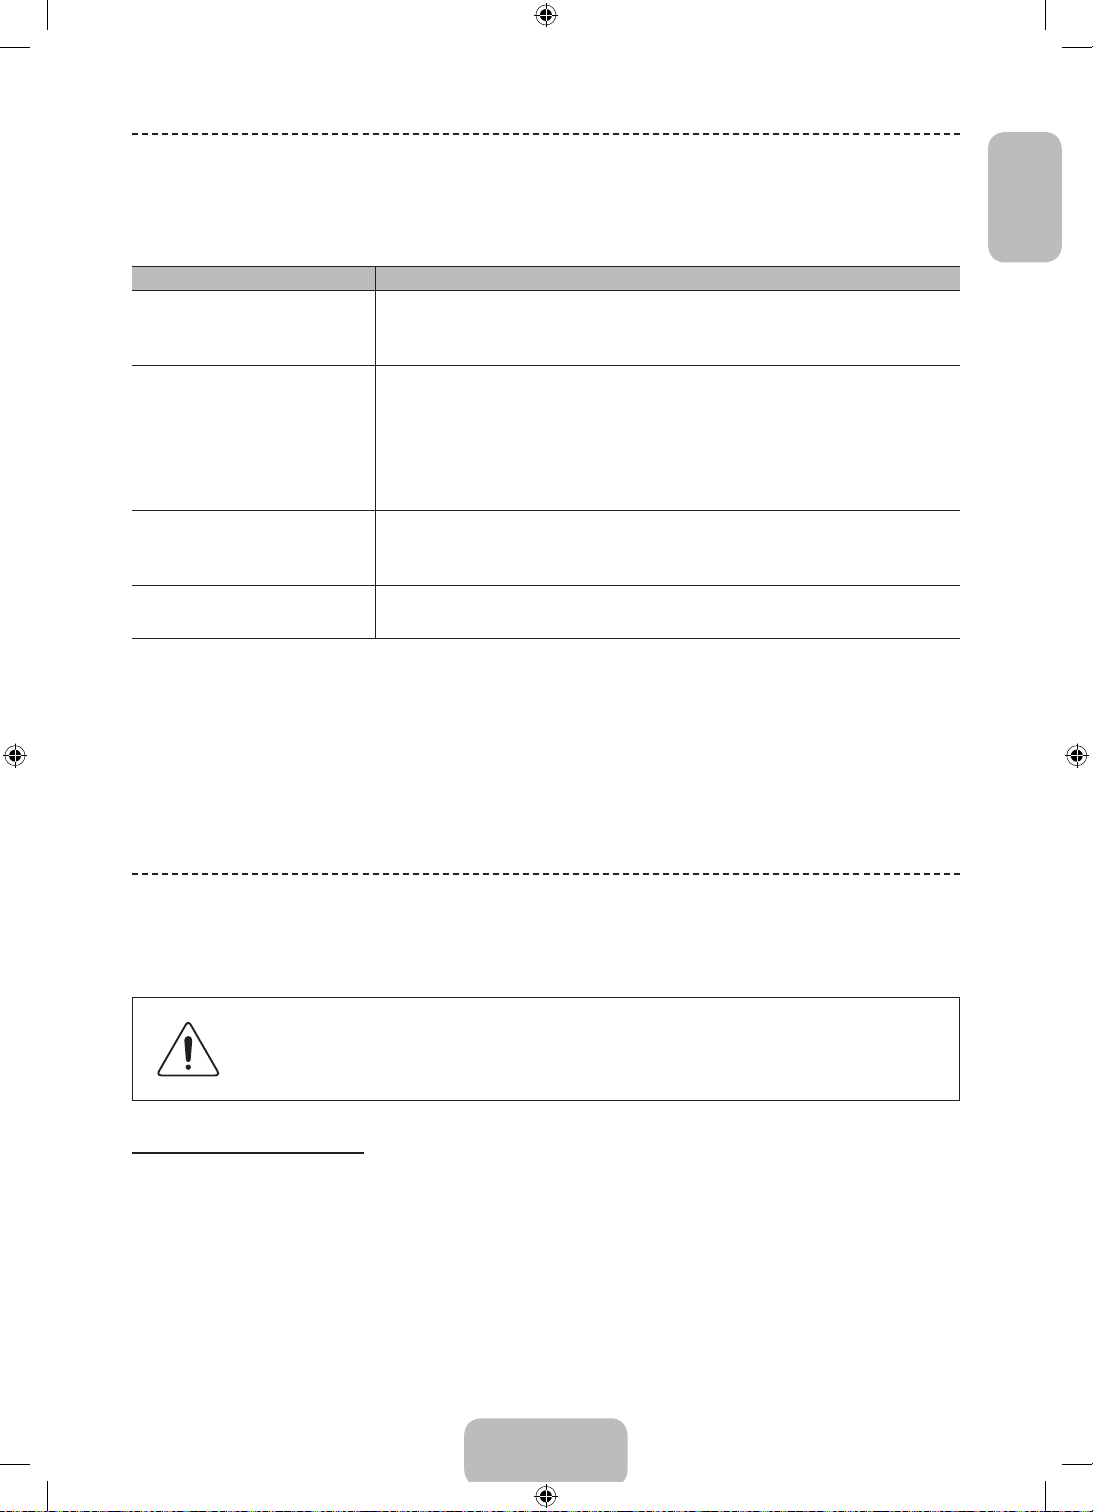
Troubleshooting
If you have any questions about the TV, first refer to this list. If none of these troubleshooting tips apply, please visit
“www.samsung.com,” then click on Support, or contact the call centre listed on the back-cover of this manual.
Issues Solutions and Explanations
The TV won’t turn on. • Make sure the AC power cord is securely plugged in to the wall outlet and the TV.
There is no picture/video. • Check the cable connections. Remove and reconnect all cables connected to the TV and external
The remote control does not work. • Replace the remote control batteries. Make sure the batteries are installed with their poles (+/–) in the
The cable/set top box remote control
doesn’t turn the TV on or off or adjust the
volume.
This TFT LED panel uses a panel consisting of sub pixels which require sophisticated technology to produce.
✎
There may be, however, be a few bright or dark pixels on the screen. These pixels will have no impact on the
performance of the product.
To keep your TV in optimum condition, upgrade to the latest firmware on the Samsung web site by USB
✎
(Samsung.com > Support > Downloads).
Some of above pictures and functions are available at specific models only.
✎
• Make sure the wall outlet is working.
• Try pressing the
refer to “Remote control does not work” below.
devices.
• Set the video outputs of your external devices (Cable/Sat Box, DVD, Blu-ray etc) to match the TV's
input connections. For example, if an external device’s output is HDMI, it should be connected to an
HDMI input on the TV.
• Make sure your connected devices are powered on.
• Be sure to select the correct input source.
• Reboot the connected device by unplugging it, and then reconnecting the device’s power cable.
correct direction.
• Clean the sensor’s transmission window on the remote.
• Try pointing the remote directly at the TV from 5~6 feet away.
• Programme the Cable/Set remote control to operate the TV. Refer to the Cable/Set-Top-Box user
manual for the SAMSUNG TV code.
P
button on the TV to make sure the problem is not the remote. If the TV turns on,
English
Mounting the TV on the Wall Using the Wall Mount Kit
(Optional)
Wall or Ceiling Mounting
If you mount this product on a wall, it should be mounted only as recommended by the
manufacturer. Unless it is correctly mounted, the product may slide or fall, causing serious injury to a
child or adult, and serious damage to the product.
Installing the Wall Mount Kit
The wall mount kit (sold separately) lets you mount the TV on the wall.
For detailed information about installing the wall mount, see the instructions provided with the wall mount. We
recommend you contact a technician for assistance when installing the wall mount bracket. We do not advise you to
do it yourself. Samsung Electronics is not responsible for any damage to the product or injury to yourself or others if
you select to install the wall mount on your own.
English - 19
[UF8000-ZG]BN68-04794B-05L04.indb 19 2013-10-29 10:28:38
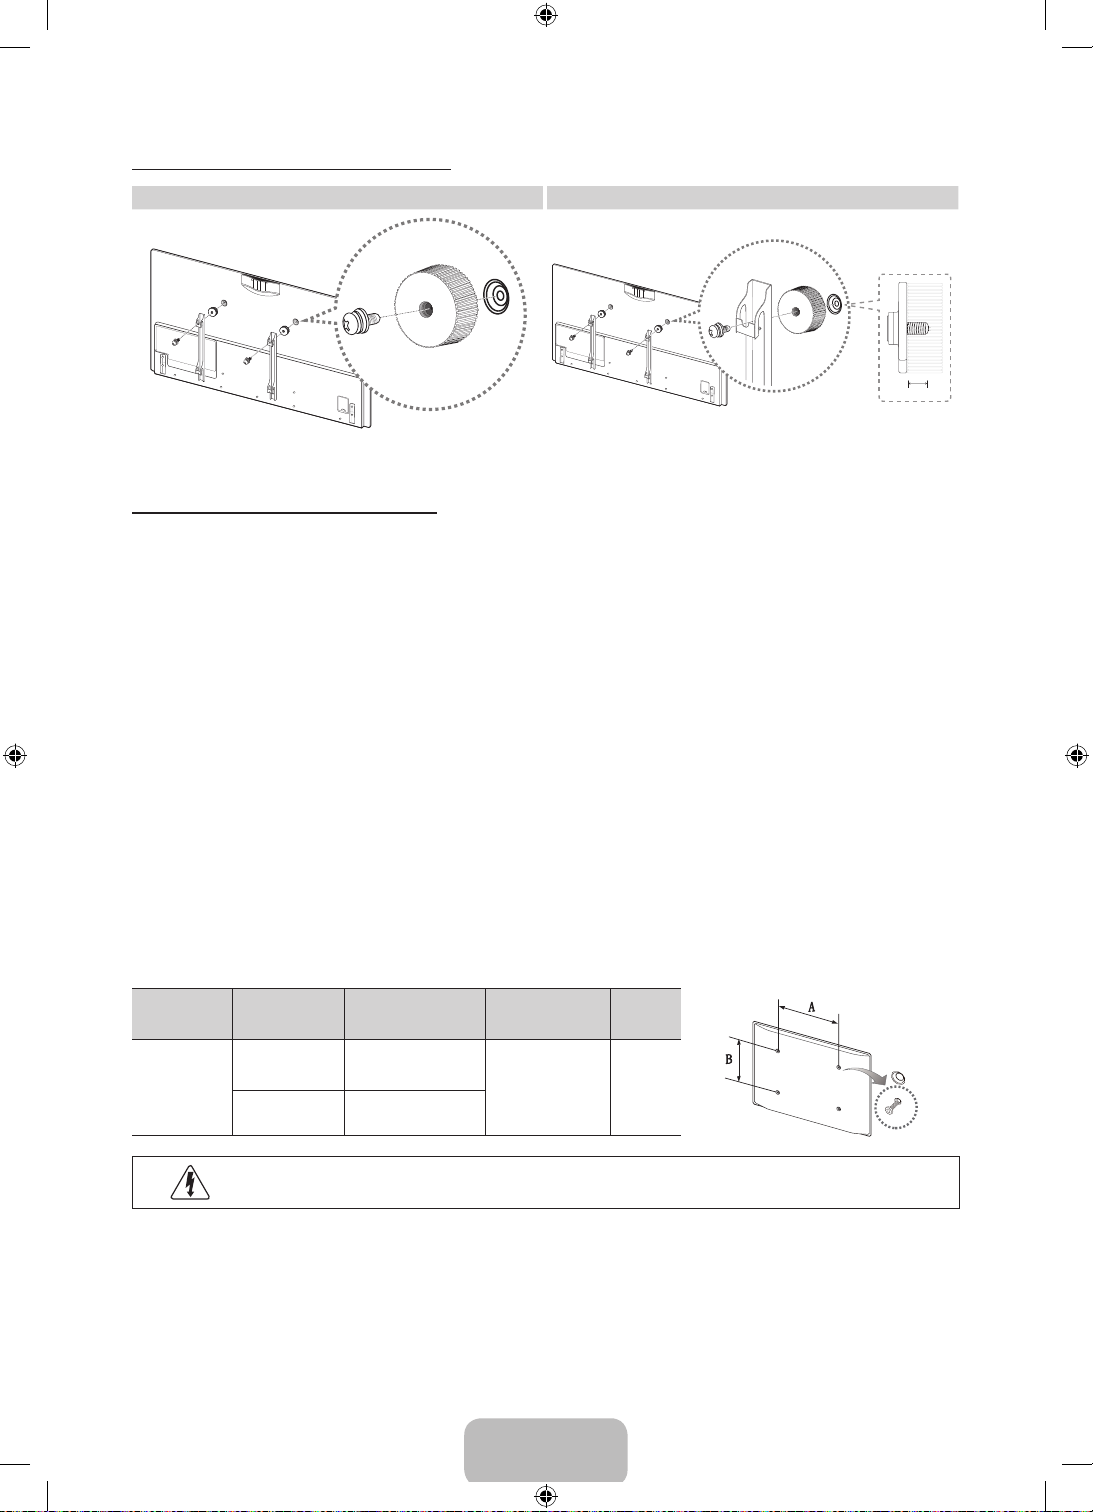
Preparing before installing Wall-Mount
Case A. Installing the SAMSUNG Wall-Mount Case B. Installing another company’s Wall-Mount
1
1
15.6 mm
To install a wall-mount, use the Wall mount adapter 1.
Wall Mount Kit Specifications (VESA)
The wall mount kit is not supplied, but sold separately. Install your wall mount on a solid wall perpendicular to the
✎
floor. When attaching to other building materials, please contact your nearest dealer. If installed on a ceiling or
slanted wall, it may fall and result in severe personal injury.
NOTE
✎
− Standard dimensions for wall mount kits are shown in the table below.
− When purchasing our wall mount kit, a detailed installation manual and all parts necessary for assembly are
provided.
− Do not use screws that do not comply with the VESA standard screw specifications.
− Do not use screws that are longer than the standard dimension or do not comply with the VESA standard
screw specifications. Screws that are too long may cause damage to the inside of the TV set.
− For wall mounts that do not comply with the VESA standard screw specifications, the length of the screws may
differ depending on the wall mount specifications.
− Do not fasten the screws that are too strongly; this may damage the product or cause the product to fall,
leading to personal injury. Samsung is not liable for these kinds of accidents.
− Samsung is not liable for product damage or personal injury when a non-VESA or non-specified wall mount is
used or the consumer fails to follow the product installation instructions.
− Do not mount the TV at more than a 15 degree tilt.
Product
Family
LED-TV
Inch VESA Spec.(A * B) Standard Screw Quantity
40 - 46 200 X 200
M8 4
55 - 75 400 X 400
Do not install your Wall Mount Kit while your TV is turned on. It may result in personal injury due to
electric shock.
English - 20
[UF8000-ZG]BN68-04794B-05L04.indb 20 2013-10-29 10:28:39
Storage and Maintenance
If a sticker was attached to the TV screen, some debris can remain after you remove the sticker. Please clean the
✎
debris off before watching TV.
The exterior and screen of the product can get scratched during cleaning. Be sure to wipe the exterior and
✎
screen carefully using a soft cloth to prevent scratches.
English
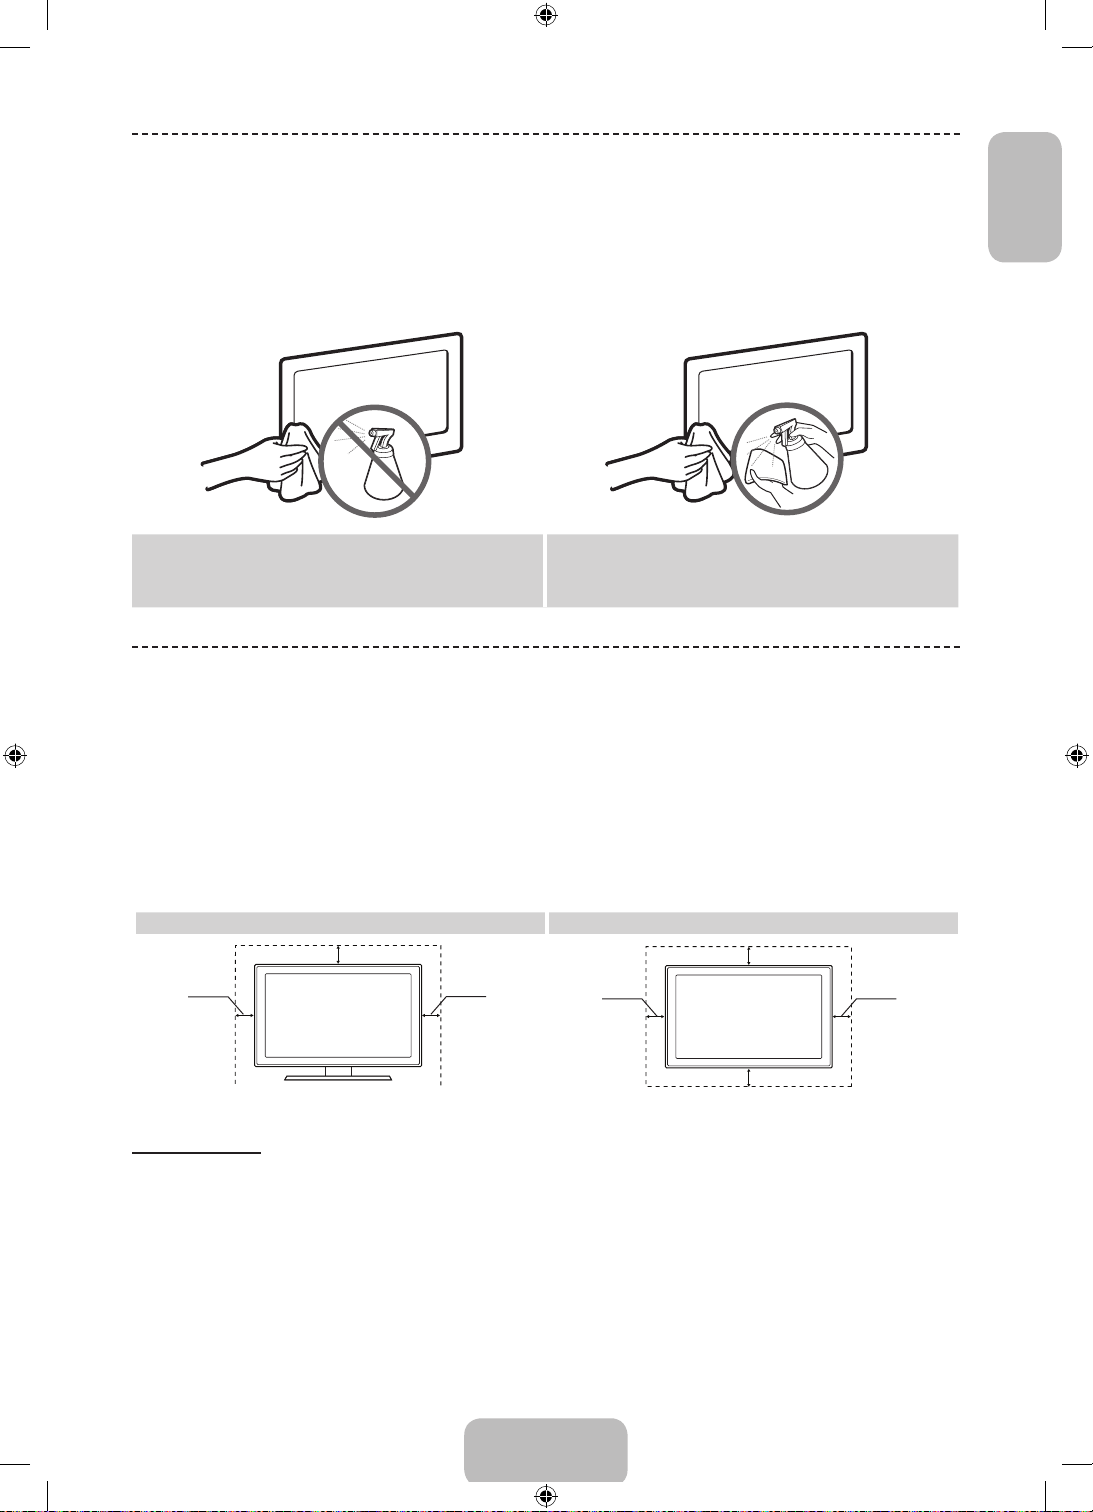
Do not spray water directly onto the product. Any liquid
that goes into the product may cause a failure, fire, or
electric shock.
Clean the product with a soft cloth dampened with a
small amount of water. Do not use a flammable liquid
(e.g. benzene, thinners) or a cleaning agent.
Providing Proper Ventilation for Your TV
When you install your TV, maintain a distance of at least 10 cm between the TV and other objects (walls, cabinet sides,
etc.) to ensure proper ventilation. Failing to maintain proper ventilation may result in a fire or a problem with the product
caused by an increase in its internal temperature.
Whether you install your TV using a stand or a wall-mount, we strongly recommend you use parts provided by
✎
Samsung Electronics only.
• If you use parts provided by another manufacturer, it may cause difficulties with the product or result in injury
caused by the product falling.
Installation with a stand. Installation with a wall-mount.
10 cm
10 cm
10 cm
10 cm
10 cm
10 cm
10 cm
Other Warnings
The actual appearance of the TV may differ from the images in this manual, depending on the model.
✎
Be careful when you touch the TV. Some parts can be somewhat hot.
✎
English - 21
[UF8000-ZG]BN68-04794B-05L04.indb 21 2013-10-29 10:28:39

Eco Sensor and Screen Brightness
Eco Sensor measures the light in your room and optimizes the brightness of the TV automatically to reduce power
consumption. This causes the TV to brighten and dim automatically. If you want to turn this function off, go to Screen
Menu > System > Eco Solution > Eco Sensor
Do not block the sensor with any material. It can decrease picture brightness.
1. Eco Sensor: This power-saving feature automatically adjusts the screen brightness of the TV according to the ambient
light intensity detected by the Light Sensor.
2. To enable or disable Eco Sensor, go to Screen Menu > System > Eco Solution > Eco Sensor and select On or Off.
3. Precaution: If you find the screen too dark while watching the TV in a dark area, this may be caused by the Eco Sensor.
Tip Prevention – Securing the TV to the Wall
Caution: Pulling, pushing, or climbing on the TV may cause the TV to fall. In
particular, ensure your children do not hang on or destabilize the TV. Doing so
may cause the TV to tip over, causing serious injuries or death. Follow all safety
precautions provided in the Safety Flyer included with your TV. For added stability
and safety, you can purchase and install the anti-fall device as described below.
Installing the TV-Holder Kit:
TV-Holder Holder Screw (M8 X L28) 2ea
English - 22
[UF8000-ZG]BN68-04794B-05L04.indb 22 2013-10-29 10:28:40
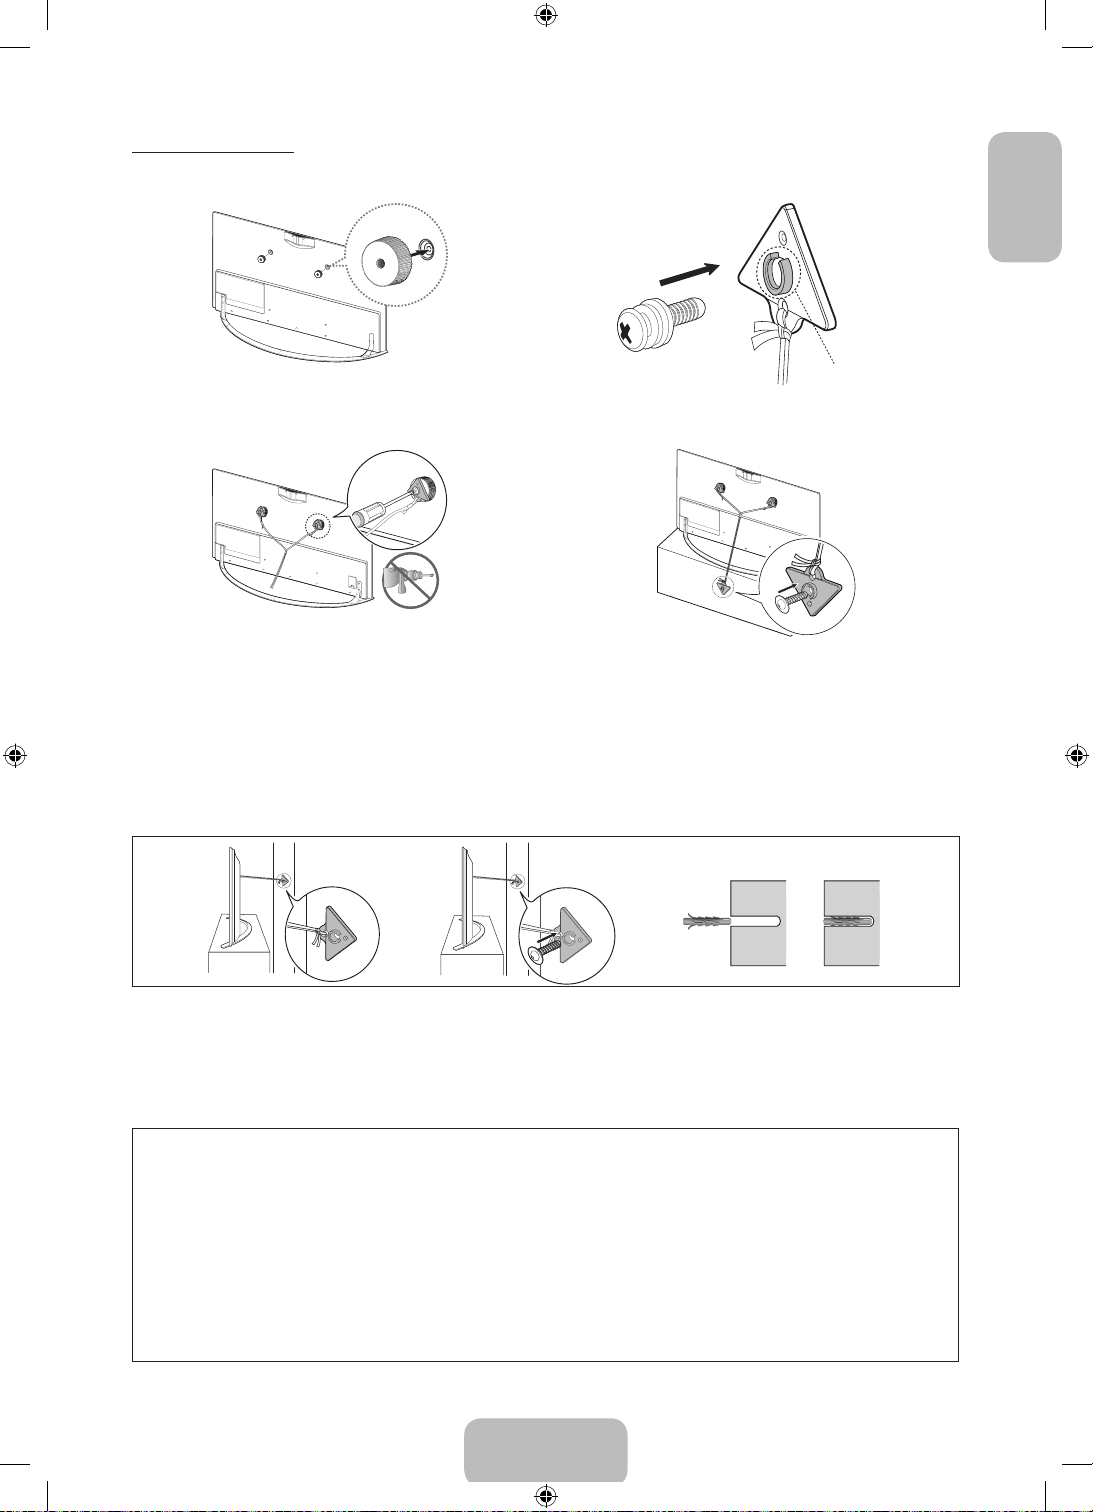
Installing the TV-Holder
1. Screw the provided wall mount adapters on the
back of the TV.
2. Insert the screw into the centre of the TV-holder, as
shown by the illustration.
Fastening direction
Holder
Protrusion
English
3. Tighten the TV-holders on the wall mount adapters,
as shown by the illustration.
5. If you fasten the Holder to a wall, attach it as described in Step 4. Make sure to centre the Holder cord and stretch it tight. Also, attach the
Holder so that the cord is level with the ground or slanted downwards from the wall.
When attaching the holder to a wall, use an anchor compatible with the wall's material. If you can, drive the screw into a stud
✎
(Recommended).
4. Fasten the Holder to the cabinet using a wood
screw.
Use an M5 x L35 or a larger screw.
✎
Ensure that the Holder cord is in the middle
✎
of the TV Holder and that the Holder cord is
stretched tight.
Anchor
Install the TV close to the wall so that it does not fall.
✎
When attaching the TV-Holder cord to the wall, tie the cord level with the ground or slanted downwards for safety purposes.
✎
Check the cord occasionally to make sure it is secure.
✎
Before moving the TV, separate the connected cord first.
✎
6. Verify all connections are properly secured. Periodically check the connections for any sign of fatigue or failure. If you have any doubt
about the security of your connections, contact a professional installer.
IMPORTANT INFORMATION
If a television is not installed in a stable location, it can fall and cause serious injuries. To prevent injuries, particularly to children, take
these simple precautions:
• Use cabinets or stands recommended by the manufacturer of the television.
• Only use furniture that can safely support the television.
• Ensure the television is not overhanging the edge of the supporting furniture.
• Do not place the television on tall pieces of furniture (for example, cupboards or bookcases) without anchoring both the furniture
and the television to a suitable support.
• Do not rest the television on a piece of cloth or or similar material placed between the television and the supporting furniture.
• Educate children about the dangers of climbing on furniture to reach the television or its controls.
English - 23
[UF8000-ZG]BN68-04794B-05L04.indb 23 2013-10-29 10:28:41
Specifications
Specifications - TV
Display Resolution 1920 x 1080
Environmental Considerations
Operating Temperature
Operating Humidity
Storage Temperature
Storage Humidity
Stand Swivel (Left / Right) 0˚
Model Name UE40F8080 UE46F8080
Screen Size
(Diagonal)
Sound
(Output) 40W (10x2, woofer 10x2)
Dimensions (W x H x D)
Body
With stand
Weight
Without Stand
With Stand
Model Name UE55F8080 UE65F8080 UE75F8080
Screen Size
(Diagonal)
Sound
(Output) 40W (10x2, woofer 10x2) 60W (15x2, woofer 15x2)
Dimensions (W x H x D)
Body
With stand
Weight
Without Stand
With Stand
1224.2 x 707.2 x 34.9 mm
1224.2 x 741.9 x 310.3 mm
40 inches 46 inches
900.2 x 525.0 x 34.9 mm
900.2 x 559.0 x 235.0 mm
10.3 kg
11.2 kg
55 inches 65 inches 75 inches
16.8 kg
18.3 kg
50°F to 104°F (10°C to 40°C)
10% to 80%, non-condensing
-4°F to 113°F (-20°C to 45°C)
5% to 95%, non-condensing
1032.7 x 599.5 x 34.9 mm
1032.7 x 634.3 x 257.7 mm
1447.3 x 837.6 x 38.4 mm
1447.3 x 876.0 x 330.3 mm
24.6 kg
26.9 kg
12.8 kg
14.0 kg
1670.2 x 962.7 x 39.9 mm
1670.2 x 1000.5 x 342.1 mm
35.9 kg
42.7 kg
Design and specifications are subject to change without prior notice.
✎
For information about the power supply, and more about power consumption, refer to the label attached to the
✎
product.
Typical power consumption is measured according to IEC 62087 Ed.2
✎
Standby mode
To decrease power consumptionunplug the power cord when you don't use the TV for a long time.
Recommendation - EU Only
• Hereby, Samsung Electronics, declares that this LED TV is in compliance with the essential requirements and other
relevant provisions of Directive 1999/5/EC.
• The official Declaration of Conformity may be found at http://www.samsung.com, go to Support > Search Product
Support and enter the model name.
• This equipment may only be used indoors.
• This equipment may be operated in all EU countries.
English - 24
[UF8000-ZG]BN68-04794B-05L04.indb 24 2013-10-29 10:28:41

Guides
Licences
Still image warning
Avoid displaying still images (such as jpeg picture files), still image elements (such as TV channel logos, stock or news
bars at the screen bottom etc.), or programmes in panorama or 4:3 image format on the screen. Constantly displaying
still pictures can cause image burn-in on the LED screen, which will affect image quality. To reduce risk of this effect,
please follow the recommendations below:
• Avoid displaying the same TV channel for long periods.
• Always try to display any image in full screen. Use the TV set’s picture format menu for the best possible match.
• Reduce brightness and contrast to avoid the appearance of after-images.
• Use all TV features designed to reduce image retention and screen burn. Refer to the e-Manual for details.
English
English - 25
[UF8000-ZG]BN68-04794B-05L04.indb 25 2013-10-29 10:28:42
Wichtige Sicherheitshinweise
Achtung! Wichtige Sicherheitshinweise
(Bitte lesen Sie den Ihrem Samsung Gerät entsprechenden Abschnitt, bevor Sie dieses installieren.)
STROMSCHLAGGEFAHR NICHT ÖFFNEN
ACHTUNG
ACHTUNG: UM DIE GEFAHR EINES ELEKTRISCHEN SCHLAGES ZU VERRINGERN, ENTFERNEN SIE NICHT DIE ABDECKUNG (ODER RÜCKSEITE).
ES BEFINDEN SICH IM INNEREN KEINE TEILE, DIE VON BENUTZERN
GEWARTET WERDEN KÖNNEN. LASSEN SIE REPARATUREN NUR VON
QUALIFIZIERTEM KUNDENDIENSTPERSONAL DURCHFÜHREN.
• Die Schlitze und Öffnungen im Gehäuse und in der Rückwand oder im Boden sind für die Belüftung erforderlich. Um den zuverlässigen Betrieb des Geräts zu
gewährleisten und es vor Überhitzung zu schützen, dürfen diese Öffnungen keinesfalls blockiert oder bedeckt werden.
− Stellen Sie das Gerät nicht in abgeschlossene Räume wie z.B. in ein Bücherregal oder einen Einbauschrank. Dieser Einbau ist nur dann zulässig, wenn
für ausreichende Belüftung gesorgt wird.
− Außerdem darf das Gerät keinesfalls in der Nähe oder über einem Radiator oder Heizkörper aufgestellt werden, oder an Orten, an denen es direkter
Sonneneinstrahlung ausgesetzt ist.
− Stellen Sie keine mit Flüssigkeit gefüllte Behälter (Vasen usw.) auf das Gerät, da dies zu einem Brand oder Stromschlag führen kann.
• Setzen Sie das Gerät keinesfalls Regen aus und stellen Sie es nicht in der Nähe von Wasser auf (Badewanne, Küchenspüle, feuchter Keller, Schwimmbecken
usw.). Falls das Gerät dennoch Nässe ausgesetzt wurde, trennen Sie es von der Stromversorgung und wenden Sie sich umgehend an Ihren örtlichen
Vertreter. Ziehen Sie vor dem Reinigen des Geräts den Netzstecker aus der Steckdose.
• Für dieses Gerät benötigen Sie Akkus. Entsorgen Sie die Akkus gemäß den regionalen Umweltschutzbestimmungen. Bitte wenden Sie sich bei Fragen zur
ordnungsgemäßen Entsorgung an Ihre örtlichen Behörden.
• Überlasten Sie Steckdosen, Verlängerungskabel und Netzteile keinesfalls, da dies zu einem Brand oder Stromschlag führen kann.
• Netzkabel müssen so verlegt werden, dass niemand auf das Kabel treten kann oder es durch Gegenstände gequetscht wird, die auf dem Kabel stehen oder
gegen das Kabel drücken. Besondere Aufmerksamkeit muss den Bereichen um Stecker, Steckdosen und dem Punkt zukommen, an dem das Netzkabel aus
dem Gerät herausgeführt wird.
• Zum Schutz des Geräts bei einem Gewitter oder längerem Nichtbetrieb trennen Sie das Gerät vom Netz. Trennen Sie darüber hinaus das Antennenkabel vom
Gerät. Auf diese Weise werden Schäden durch Blitzschlag oder Spannungsstöße vermieden.
• Stellen Sie sicher, dass die Nennspannung des Gleichstromnetzteils für die örtliche Stromversorgung geeignet ist, bevor Sie das Netzkabel an die
Stromversorgung anschließen.
• Führen Sie niemals Metallgegenstände in die Öffnungen dieses Geräts ein. Dies kann zu Stromschlägen führen.
• Berühren Sie keinesfalls Bauteile im Geräteinneren, um Stromschläge zu vermeiden. Das Gerät darf nur von einem qualifizierten Techniker geöffnet werden.
• Stellen Sie sicher, dass das Netzkabel fest in die Steckdose eingestöpselt wird. Fassen Sie das Netzkabel am Stecker an, wenn Sie es aus der
Wandsteckdose ziehen. Berühren Sie das Netzkabel niemals mit feuchten Händen.
• Wenn das Gerät nicht einwandfrei funktioniert, insbesondere beim Auftreten ungewöhnlicher Geräusche oder Gerüche aus dem Inneren, trennen Sie es
unverzüglich von der Stromversorgung und wenden Sie sich umgehend an Ihren örtlichen Vertreter oder das nächste Kundendienstzentrum.
• Ziehen Sie auf jeden Fall den Netzstecker aus der Steckdose, wenn das Fernsehgerät längere Zeit nicht verwendet werden soll, weil Sie beispielsweise
längere Zeit abwesend sind (besonders wenn Kinder und ältere Personen allein im Haus bleiben).
− Staubansammlungen können Stromschläge, Kurzschlüsse oder Brände verursachen, da am Netzkabel Funken auftreten oder die Hitze zu einer
Beschädigung der Isolierung führt.
• Wenden Sie sich an den autorisierten Kundendienst, wenn das Gerät an einem Ort mit hoher Konzentration an Staubpartikeln, außergewöhnlich hoher oder
geringer Raumtemperatur, extrem hoher Luftfeuchtigkeit, in unmittelbarer Nähe zu chemischen Lösungsmitteln oder für den Dauerbetrieb, z.B. auf Bahn- oder
Flughäfen, aufgestellt werden soll.
• Eine nicht fachgerechte Aufstellung kann zu schweren Schäden am Gerät führen.
• Verwenden Sie nur ordnungsgemäß geerdete Stecker und Steckdosen.
− Eine fehlerhafte Erdung kann zu einem elektrischen Schlag oder Schäden an den Geräten führen. (Nur Geräte der Klasse I.)
• Wenn Sie das Gerät vom Stromnetz trennen möchten, müssen Sie den Netzstecker aus der Dose ziehen. Deshalb muss der Netzstecker jederzeit leicht
erreichbar sein.
• Achten Sie darauf, dass sich Kinder nicht an das Gerät hängen.
• Lagern Sie die Zubehörteile (Akku usw.) an einem sicheren Ort außerhalb der Reichweite von Kindern.
• Bringen Sie das Gerät nicht an einem instabilen Ort wie z.B. einem wackligen Regal, einem abschüssigen Boden oder einem Ort, der Vibrationen ausgesetzt
ist, an.
• Lassen Sie das Gerät nicht fallen, und vermeiden Sie Erschütterungen. Wenn das Gerät beschädigt ist, trennen Sie es vom Stromnetz, und wenden Sie sich
an ein Kundendienstcenter.
• Ziehen Sie den Netzstecker aus der Steckdose, und wischen Sie das Gerät mit einem weichen, trockenen Tuch ab. Verwenden Sie keine Chemikalien wie
Wachs, Benzol, Alkohol, Verdünner, Insektizide, Luftverbesserer, Schmiermittel oder Reinigungsmittel. Hierdurch kann das Aussehen des Geräts beschädigt
oder der Aufdruck gelöscht werden.
• Es dürfen keinesfalls Flüssigkeitstropfen oder-spritzer in das Gerät eindringen.
• Entsorgen Sie Batterien niemals in einem Feuer.
• Schließen Sie die Batterie nicht kurz, zerlegen und überhitzen Sie sie nicht.
• Explosionsgefahr bei unsachgemäßem Ersetzen von Batterien. Setzen Sie nur Batterien des gleichen oder eines gleichwertigen Typs ein.
• ACHTUNG: UM DIE AUSBREITUNG VON FEUER ZU VERHINDERN, SORGEN SIE JEDERZEIT DAFÜR, DASS DAS GERÄT NICHT MIT
KERZEN ODER OFFENEM FEUER IN BERÜHRUNG KOMMT.
Dieses Symbol weist auf eine hohe Spannung
im Inneren des Geräts hin. Es ist gefährlich, Teile
im Inneren dieses Geräts zu berühren.
Dieses Symbol weist darauf hin, dass diesem
Gerät wichtige Anweisungen zu Betrieb und
Wartung beigefügt sind.
Deutsch - 2
[UF8000-ZG]BN68-04794B-05L04.indb 2 2013-10-29 10:28:42
Die Abbildungen und Illustrationen in diesem Handbuch dienen nur zur Information und können vom tatsächlichen
Aussehen des Geräts abweichen. Änderungen an Ausführung und technischen Daten vorbehalten.
Einige GUS-Sprachen (Russisch, Ukrainisch, Kasachisch) stehen für dieses Produkt nicht zur Verfügung, da das Gerät für
Kunden in der EU hergestellt wurde.
Funktionen Ihres neuen Fernsehgeräts
Deutsch
• 3D: Mit dieser neuen Funktion können Sie Inhalte räumlich anzeigen.
• SMART HUB:
Dieser Fernseher verfügt über Smart Hub, ein Unterhaltungs- und Familienzentrum für viele verschiedene
Anwendungsgebiete. Mit Smart Hub können die Benutzer im Internet surfen, Anwendungen herunterladen und
über soziale Netzwerke mit Familie und Freunden in Kontakt bleiben. Darüber hinaus können Sie Fotos, Videos,
Musik und Dateien von einem externen Speichermedium genießen.
™
Drücken Sie , um Smart Hub zu starten. Wählen Sie mit den Symbolen im oberen Bereich des Bildschirms
einen Dienst aus.
Meine sozialen Netzwerke: Schauen Sie sich die neuesten YouTube-Videos und die auf Facebook und Twitter
geposteten Videos Ihrer Freunde an. Auch können Sie Videotelefonate mit Ihren Freunden führen, sofern Sie eine
Kamera an das Fernsehgerät angeschlossen haben.
Meine TV - Apps: Hiermit laden Sie Anwendungen, wie z.B. einen Web Browser, herunter und installieren sie auf
Ihrem Gerät.
Meine TV-Programme: Hier sehen Sie eine Liste der Sendungen, die zurzeit oder später ausgestrahlt werden. (je
nach Land)
Meine Filme & Serien: Sie können Filme und Serien ohne separates externes Gerät erwerben und ansehen. (je
nach Land)
Meine Fotos, Videos & Musik: Wiedergabe und Anzeige von Fotos, Videos und Musikdateien von einem
externen Speichergerät.
• Anynet+ (HDMI-CEC): Mit dieser Funktion können Sie alle angeschlossenen Samsung-Geräte, die Anynet+ unterstützen,
mit der Fernbedienung für Ihr Samsung-Fernsehgerät bedienen.
• e-Manual: Ihr Fernsehgerät verfügt über eine eingebaute, detaillierte elektronische Bedienungsanleitung. (Seite 13)
• SMART-Interaktion: Mit Hilfe dieser Funktion können Sie durch Sprache oder Gesten auf Menüoptionen und Funktionen
zugreifen und diese ausführen oder bearbeiten.
Voice Interaction ist in der Schweiz in deutscher Sprache verfügbar.
✎
• Gerätemanager: Bedienen Sie die TV-Funktionen mit einer Tastatur und einer Maus, die Sie über USB oder Bluetooth
anschließen.
• MHL & Bildschirmspiegelung: Mit Hilfe einer drahtlosen oder kabelgebundenen Verbindung können Sie die Bildschirme
Ihrer Mobilgeräte auf dem großen Fernsehbildschirm anzeigen.
Ordnungsgemäße Entsorgung dieses Geräts (Elektro- & Elektronik-Altgeräte)
(Anwendbar in Ländern mit Systemen zur getrennten Sammlung von Wertstoffen).
Diese Kennzeichnung auf dem Gerät, dem Zubehör oder der Dokumentation bedeutet, dass das Gerät sowie das elektronische
Zubehör (z.B. Ladegerät, Headset, USB-Kabel) am Ende ihrer Lebensdauer nicht im normalen Hausmüll entsorgt werden
dürfen. Entsorgen Sie diese Geräte bitte getrennt von anderen Abfällen, um der Umwelt bzw. der menschlichen Gesundheit nicht
durch unkontrollierte Müllbeseitigung zu schaden. Recyceln Sie das Gerät, um die nachhaltige Wiederverwertung von stofflichen
Ressourcen zu fördern.
Private Nutzer sollten den Händler, bei dem das Produkt gekauft wurde, oder die zuständigen Behörden kontaktieren, um in
Erfahrung zu bringen, wie sie das Gerät auf umweltfreundliche Weise recyceln können.
Gewerbliche Nutzer wenden sich an ihren Lieferanten und überprüfen die Konditionen Ihres Kaufvertrags. Dieses Gerät und seine
elektronischen Zubehörteile dürfen nicht zusammen mit anderem Gewerbemüll entsorgt werden.
Ordnungsgemäße Entsorgung der Batterien dieses Produkts
(Anwendbar in Ländern mit Systemen zur getrennten Sammlung von Wertstoffen).
Diese Kennzeichnung auf der Batterie, dem Handbuch oder der Verpackung bedeutet, dass die Batterie am Ende ihrer Lebensdauer
nicht im normalen Hausmüll entsorgt werden darf. Wenn die Batterie mit den chemischen Symbolen Hg, Cd oder Pb gekennzeichnet
ist, liegt der Quecksilber-, Cadmium- oder Blei-Gehalt der Batterie uber den in der EG-Richtlinie 2006/66 festgelegten
Referenzwerten. Wenn Batterien nicht ordnungsgemaß entsorgt werden, konnen sie der menschlichen Gesundheit bzw. der Umwelt
schaden.
Zum Schutz der natürlichen Ressourcen und zur Förderung der Wiederverwertung von Materialien trennen Sie die Batterien von
anderem Müll und führen Sie sie Ihrem örtlichen Recyclingsystem zu.
Deutsch - 3
[UF8000-ZG]BN68-04794B-05L04.indb 3 2013-10-29 10:28:42
Zubehör
Vergewissern Sie sich, dass im Lieferumfang des Fernsehgeräts folgende Komponenten enthalten sind. Falls
✎
irgendwelche Teile fehlen sollten, setzen Sie sich bitte mit Ihrem Händler in Verbindung.
Farbe und Form der Teile können sich je nach Modell unterscheiden.
✎
Kabel, die nicht zum Paketinhalt gehören, können gesondert erworben werden.
✎
Achten Sie darauf, dass Sie beim Auspacken keine Zubehörteile übersehen, die durch Verpackungsmaterialien verdeckt
✎
werden.
ACHTUNG: STELLEN SIE DEN VERBINDUNG DAUERHAFT HER, DAMIT SIE NICHT
[
VERSEHENTLICH GETRENNT WERDEN KANN
• Smart Touch Control & 2 Batterien (Typ AAA) • Netzkabel
• Fernbedienung & 2 Batterien (Typ AAA) • Samsung 3D-Aktivbrille
• Benutzerhandbuch • Garantiekarte (nicht überall verfügbar)
• Vorschriftenhandbuch
Scart-Adapter IR-Verlängerungskabel AV-Adapter Komponentenadapter CI-Kartenadapter
Abdeckung für den
Netzanschluss
2 Adapter für die
Wandhalterung
TV-Halterungsbausatz Kabelhalterung
• Verwaltungskosten werden abgerechnet, wenn:
− (a) auf Ihren Wunsch ein Ingenieur zu Ihnen geschickt wird, und es liegt kein Defekt des Geräts vor
(d.h. wenn Sie dieses Benutzerhandbuch nicht gelesen haben)
− (b) Sie das Gerät in eine Reparaturwerkstatt bringen, und es liegt kein Defekt des Geräts vor
(d.h. wenn Sie dieses Benutzerhandbuch nicht gelesen haben).
• Der abgerechnete Betrag wird Ihnen mitgeteilt, ehe irgendwelche Arbeiten oder Kundenbesuche ausgeführt werden.
ACHTUNG: Bei unsachgemäßer
Behandlung können Bildschirme
durch direkten Druck beschädigt
werden. Wir empfehlen, das
Fernsehgerät beim Hochheben
am Rahmen anzufassen (siehe
Abbildung).
Berühren Sie
diesen Bildschirm nicht!
Drahtlose Tastatur (separat erhältlich)
Deutsch - 4
[UF8000-ZG]BN68-04794B-05L04.indb 4 2013-10-29 10:28:44
Grundfunktionen
Verwenden der Smart Touch Control
Sie können das Mikrofon verwenden, um die Befehle der Spracherkennung einzugeben. Drücken Sie einfach die Taste VOICE˜.
Spracherkennung Funktion kann durch undeutliche Aussprache, Lautstärke oder Umgebungsgeräusche beeinträchtigt werden.
✎
Ein- und Ausschalten des Fernsehgeräts.
Anzeigen und auswählen verfügbarer
Bildsignalquellen.
Hiermit schalten Sie den an das Fernsehgerät
angeschlossenen Kabel- oder Satellitenreceiver
ein bzw. aus. Dazu muss die Smart Touch Control
jedoch als Universalfernbedienung konfi guriert
werden.
VOICE˜
Wählen Sie die Spracheingabe, und sprechen Sie
einen Text.
Deutsch
Vorübergehendes Ausschalten
Halten Sie diese Taste gedrückt,
um Audio f. Sehgesch. und
Untertitel auszuwählen. (je nach
Hiermit wechseln Sie zwischen „Empfohlen“ und
Die Farbtasten arbeiten unterschiedlich, je nachdem
welche Funktion das Fernsehgerät gerade ausführt.
Drücken Sie beim Fernsehen die Taste {,
um Informationen über die laufende Sendung
Hiermit kehren Sie zum vorherigen Menü zurück.
Halten Sie diese Taste gedrückt, um alle laufenden
des Tons.
Land oder Region)
Einstellen der Lautstärke.
„Suchen“.
anzuzeigen.
Anwendungen zu beenden.
Verbinden mit dem Fernsehgerät
Damit Sie das Fernsehgerät mit einer Smart Touch Control bedienen können, müssen Sie zunächst ein Pairing der beiden Geräte via Bluetooth durchführen. Allerdings
steht die Smart Touch Control nur nach dem Pairing mit einem Samsung-Fernsehgerät zur Verfügung.
Wir empfehlen, die Smart Touch Control innerhalb eines Bereichs von maximal 6 m zu verwenden. Der Betriebsbereich ist abhängig von den
✎
Umgebungsbedingungen für die Drahtloskommunikation.
1. Richten Sie die Smart Touch Control auf den Fernbedienungsempfänger des ausgeschalteten Fernsehgeräts, und drücken Sie dann die Taste „TV“, um das Pairing-
Verfahren erstmals zu starten. Nur durch Drücken dieser Taste wird ein IR-Signal gesendet. Der Fernbedienungsempfänger des Fernsehgeräts befi ndet sich je nach
Modell an unterschiedlichen Stellen.
2. In der unteren linken Ecke des Bildschirms wird ein Bluetooth-Symbol angezeigt (siehe nachfolgende Abbildung). Das Fernsehgerät versucht dann, automatisch eine
Verbindung zur Smart Touch Control herzustellen.
Wechseln des Senders.
Hiermit zeigen Sie auf dem Bildschirm eine virtuelle
Fernbedienung an. Siehe Kapitel, Steuer des
Fernsehgeräts > Verwenden der virtuellen
Fernbedienung
Halten Sie die Taste MORE gedrückt, um schnell
eine gewünschte Funktion auszuwählen (z.B.
MENU (m), TOOLS (T), INFO (`) usw.).
Touchpad
• Sie können die Markierung auf dem Bildschirm
verschieben, indem Sie den Finger über das
Touchpad ziehen.
• Tippen Sie auf das Touchpad, um das
markierte Element auszuführen, zu aktivieren
oder auszuwählen.
• Halten Sie den Finger auf dem Touchpad
gedrückt, um das Fenster Senderliste. zu
öffnen.
Hiermit können Sie für jeden Digitalsender den
Programmplan mit den Sendezeiten anzeigen.
Zudem können Sie mit dem Touchpad zwischen
den Optionen Wiedergabe planen und Aufnahme
programmieren wählen, um eine Sendung zu
programmieren, die zu einem späteren Zeitpunkt
ausgestrahlt wird.
Hiermit öffnen Sie die Smart Hub-Anwendungen.
Siehe Kapitel Smart TV-Funktionen > Smart Hub
im e-Manual.
Zum Beenden einer laufenden Anwendung
✎
drücken Sie die Taste ™.
<Symbole bei Verbindungsaufbau und erfolgreich hergestellter Verbindung>
Erneutes Verbinden der Smart Touch Control
[UF8000-ZG]BN68-04794B-05L04.indb 5 2013-10-29 10:28:44
<Pairing-Taste der Smart Touch Control>
Wenn die Smart Touch Control nicht mehr funktioniert oder ungewöhnlich reagiert, tauschen Sie die Batterie aus, da das Problem
möglicherweise durch eine zu geringe Batterieladung hervorgerufen wird. If Wenn das Problem weiterhin besteht, drücken Sie die Taste
PAIRING auf der Smart Touch Control, um das Pairing-Verfahren mit dem Fernsehgerät zu wiederholen. Die Taste PAIRING sehen Sie, wenn
Sie die Batterieabdeckung der Smart Touch Control entfernen. Richten Sie die Smart Touch Control aus einer Entfernung von 30cm bis 4m
auf den Empfänger am Fernsehgerät, und drücken Sie die Taste PAIRING. Nach Abschluss des Pairing-Verfahrens wird unten links auf dem
Fernsehbildschirm das Pairing-Symbol angezeigt.
Deutsch - 5
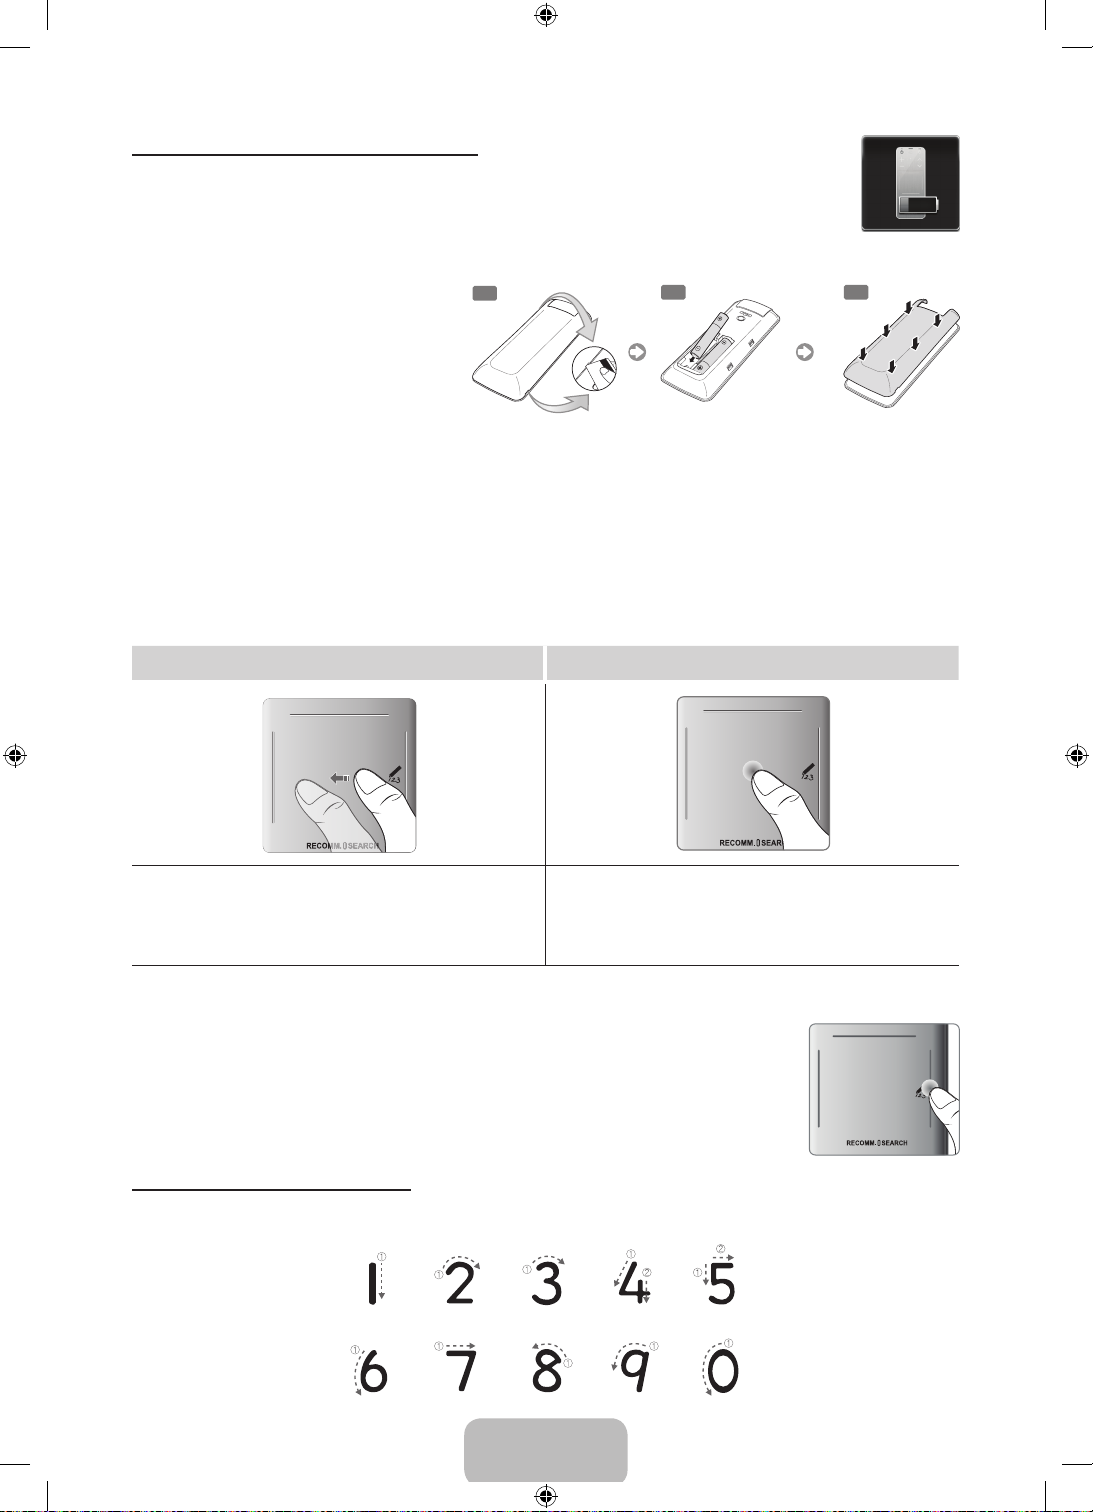
Warnung bei zu schwach geladener Batterie
Wenn die Batterieladung bei Verwendung der Smart Touch Control nachlässt und die Batterieanzeige blinkt, erscheint unten links
auf dem Bildschirm das folgende Alarm-Fenster. Sobald das Alarm-Fenster angezeigt wird, müssen Sie die Batterien der Smart
Touch Control austauschen. Verwenden Sie Alkaline-Batterien, da diese eine längere Lebensdauer besitzen.
Einlegen der Batterien (2x Typ AAA)
1. Heben Sie die Abdeckung des Batteriefachs mit
Hilfe einer Kunststoffkarte ein wenig an. Ziehen
Sie dann mit einem Fingernagel an der Kerbe der
Batteriefachabdeckung, und entfernen Sie die
Abdeckung vollständig.
Suchen Sie nach der Aussparung an der
✎
Batteriefachabdeckung. Die Position der Aussparung
kann je nach Typ der im Lieferumfang des
Fernsehgeräts enthaltenen Smart Touch Control
unterschiedlich sein.
2. Legen Sie 2 AAA-Batterien ein, und achten Sie dabei auf die richtige Polung (positive und negative Seite der Batterien).
3. Legen Sie die Batterieabdeckung parallel zur Öffnung auf die Rückseite der Fernbedienung, und drücken Sie an den Kanten entlang, bis der Deckel
ordentlich in das Gehäuse der Fernbedienung eingerastet ist.
1
2
3
Verwenden des Touchpads
Verwenden Sie das Touchpad, um verschiedene Befehle einzugeben. Navigieren Sie zu Anleitung (Bildschirmmenü >
System > Gerätemanager > Smart Touch Control-Einstellungen > Anleitung), um auf dem Bildschirm eine Anleitung zur
Verwendung der Smart Touch Control anzuzeigen.
Ziehen Drücken
Ziehen Sie den Finger auf dem Touchpad in die gewünschte Richtung.
Bewegen Sie den Fokus oder den Zeiger in die Richtung, in die Sie den
Finger ziehen.
Drücken Sie auf das Touchpad. Hiermit wählen Sie das markierte Element aus.
Die Senderliste wird angezeigt, wenn Sie beim Fernsehen einen Finger auf dem
Touchpad gedrückt halten. Bei einigen Anwendungen wird eine Liste der für die
jeweilige Anwendung verfügbaren Funktionen angezeigt, wenn Sie Ihren Finger
mehr als 2 Sekunden lang auf dem Touchpad gedrückt halten.
Wechseln des Senders durch direkte Eingabe der
Sendernummer
Tippen Sie beim Fernsehen rechts oder links auf dem Touchpad auf die vorstehende Linie,
um auf dem Bildschirm das Fenster zum Eingeben von Ziffern zu öffnen. Geben Sie mit Ihren
Fingern die Sendernummer des gewünschten Senders ein. Wenn die auf dem Bildschirm
eingegebene Nummer erkannt wird, wechselt das Fernsehgerät zum ausgewählten Sender.
Siehe Kapitel Steuer des Fernsehgeräts > Touchpad im e-Manual.
Anleitung zum Eingeben von Ziffern
Geben Sie Ziffern so ein, wie in den folgenden Abbildungen dargestellt. Wenn Sie die unten beschriebene Vorgehensweise
nicht einhalten, wird Ihre Eingabe vom Fernsehgerät möglicherweise nicht erkannt.
Deutsch - 6
[UF8000-ZG]BN68-04794B-05L04.indb 6 2013-10-29 10:28:45
 Loading...