

Samsung UA40ES7 E-manual
E-MANUAL
SUPPORT
Thank you for purchasing this Samsung
product.
To receive more complete service, please
register your product at
www.samsung.com/register
Model______________ Serial No.______________

Contents
Connection and Channel Menu
• ConnectingtheTV 1
• UsingtheINFObutton(Now&Nextguide)19
• ManagingChannelsandChannelFunctions
21
• MemorizingChannels 64
• OtherFeatures 73
Basic Feature
• ChangingthePresetPictureMode 77
• AdjustingPictureSettings 80
• ChangingthePictureSize 86
• ChangingthePictureOptions 96
• UsingtheTVwithYourPC 114
• ChangingthePresetSoundMode 118
• AdjustingSoundSettings 120
Preference Features
• ConnectingtotheNetwork 136
• SettingupaWiredNetwork 147
• SettinguptheWirelessNetwork 160
• ManagingtheNetworkDevices 189
• SettingtheTime 200
• BlockingProgrammes 212
• EconomicalSolutions 215
• PictureInPicture(PIP) 219
• UsingtheTVwithaKeyboardandaMouse
224
• OtherFeatures 232
• SupportMenu 243
Advanced Features
• Usingthe3Dfunction 268
ℓ
∫
•
Smart Hub 287

•∫CustomizingtheHomeScreen 310
• UsingtheDLNAFunction 630
•∫UsingtheSamsung Apps 340
ℓ
∫
•
Search 350
ℓ
∫
•
Your Video 356
ℓ
∫
•
Family Story 373
ℓ
∫
•
Fitness 428
ℓ
∫
•
Kids 440
ℓ
∫
•
Web Browser 454
ℓ
∫
•
Skype 479
•∫SMARTInteraction 482
•ℓAllShare Play 524
ℓ
∫
•
My list(InAllShare Play) 542
ℓ
∫
•
Videos(InAllShare Play) 550
ℓ
∫
•
Photos(InAllShare Play) 567
ℓ
∫
•
Music(InAllShare Play) 583
ℓ
∫
•
Recorded TV(InAllShare Play) 597
• Calendar 611
•ℓTimeshift 620
•ℓUsingtheMHLfunction 641
ℓ
∫
•
Anynet+ (HDMI-CEC) 647
Other Information
ℓ
∫
•
Troubleshooting 664
ℓ
∫
•
UsingtheSmartTouchControl 722
•ℓSupportedSubtitleandAllSharePlayfile
formats 750
•ℓDataService 759
•ℓAnti-theftKensingtonLock 766
•ℓLicence 771
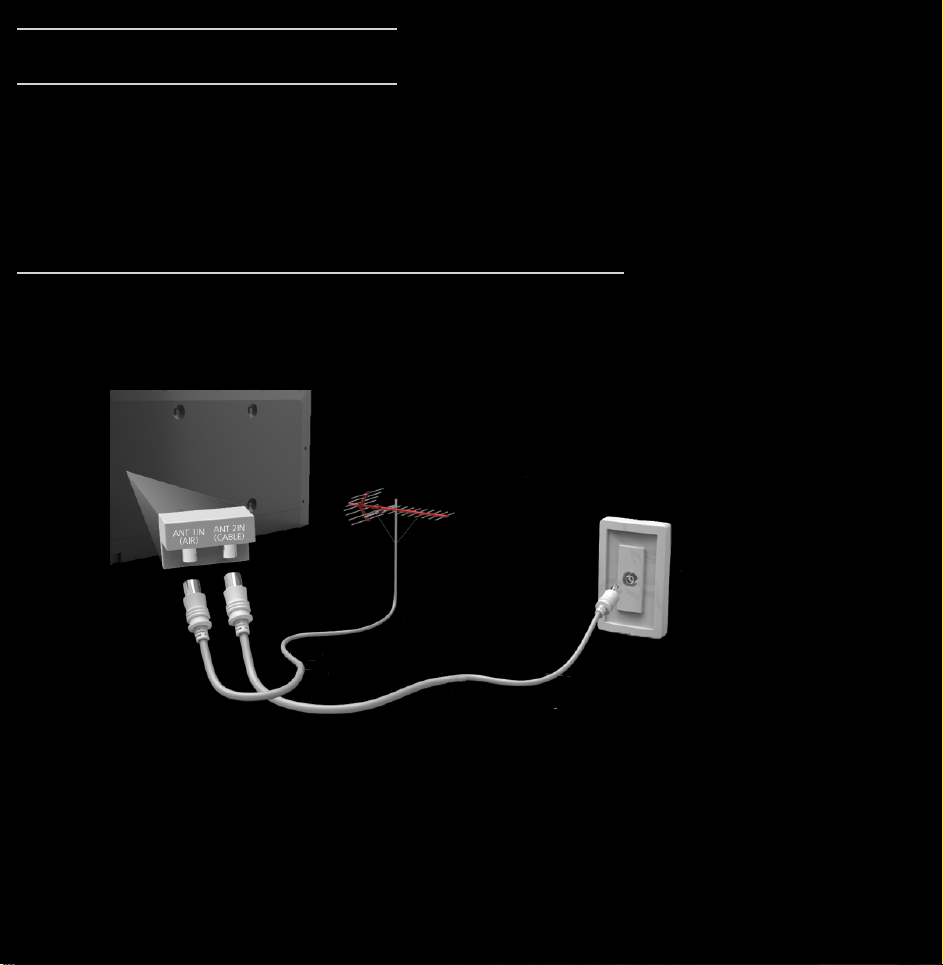
Connecting the TV
Connecting to an Air or Cable
The displayed image may differ depending on the model.
Connecting to an AV Device
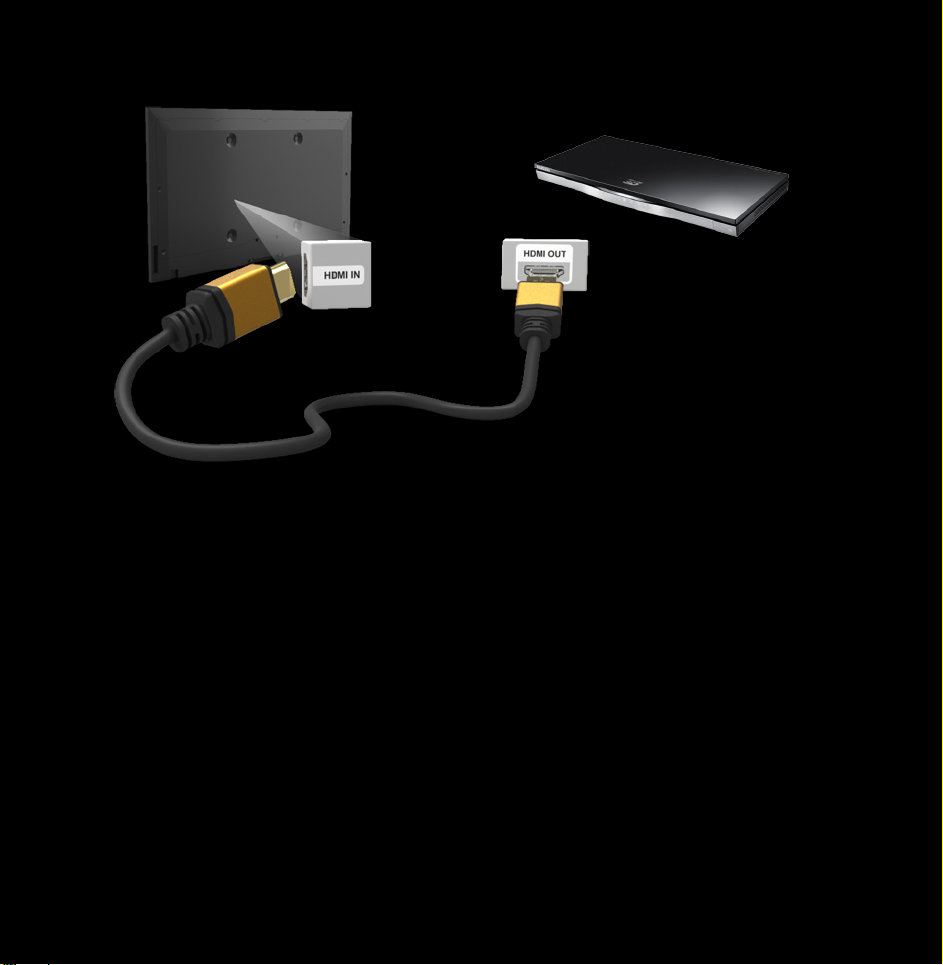
Using a HDMI (up to 1080p)
The displayed image may differ depending on the model.
Using an HDMI cable (up to 1080p)
N
HDMI IN 1(DVI), HDMI IN 2(ARC),
HDMI IN 3(MHL)
●
For better picture and audio quality,

connect to a digital device using an
HDMI cable.
●
An HDMI cable supports digital video
and audio signals, and does not require
an audio cable.
–To connect the TV to a digital device
that does not support HDMI output,
use an HDMI/DVI and audio cables.
●
The picture may not display normally
(if at all) or the audio may not work if
an external device that uses an older

version of HDMI mode is connected to
the TV. If such a problem occurs, ask
the manufacturer of the external device
about the HDMI version and, if out of
date, request an upgrade.
●
Be sure to use an HDMI cable with a
thickness of 14 mm or less.
●
Be sure to purchase a certified HDMI
cable. Otherwise, the picture may not
display or a connection error may
occur.

●
A basic high-speed HDMI cable or one
with Ethernet is recommended. This
product does not support the Ethernet
function via HDMI.
●
This product supports the 3D and ARC
(Audio Return Channel) functions via an
HDMI cable. Note that the ARC function
is supported by the HDMI IN 2(ARC)
port only.
–If 3D Auto View is set to On, some
functions such as SMART HUB may

be disabled. In this case, set 3D Auto
View or 3D Mode to Off.
●
The ARC function allows digital audio
to output via the HDMI IN 2(ARC) port.
It can be enabled only when the TV is
connected with an audio receiver that
supports the ARC function.
●
This product supports the Mobile High-
Definition Link (MHL) function via an
HDMI-MHL cable. Note that the MHL
function is supported by the HDMI IN 3

(MHL) port only.
●
The MHL function allows to display
mobile device's screen via the HDMI
IN 3 (MHL) port. It can be enabled
only when the TV is connected with a
mobile device that supports the MHL
function. For more detailed information,
see "Using the MHL function" in
e-Manual.

Using a Component (up to 1080p)
The displayed image may differ depending on the model.
Using a Component (up to 1080p) or an
Audio/Video (480i only)
N
When connecting to AV IN, connect

the AV connector (yellow) to the TV
jack (Green).
N
To obtain the better picture quality,
the Component connection or Scart
connection are recommended over
the A/V connection.

Connecting to an Audio device
Using an Optical (Digital) Connection
The displayed image may differ depending on the model.

DIGITAL AUDIO OUT (OPTICAL)
●
When a digital audio system is
connected to the DIGITAL AUDIO OUT
(OPTICAL) jack, decrease the volume
of both the TV and the system.
●
5.1 CH (channel) audio is available when
the TV is connected to an external
device supporting 5.1 CH.
●
When the receiver (home theatre) is set
to on, you can hear sound output from
the TV’s optical jack. When the TV

is receiving a DTV signal, the TV will
send 5.1 CH sound to the home theatre
receiver. When the source is a digital
component such as a DVD / Blu-ray
player / cable box / STB (Set-Top-Box)
satellite receiver and is connected to the
TV via HDMI, only 2 CH audio will be
heard from the home theatre receiver. If
you want to hear 5.1 CH audio, connect
the digital audio out jack from your
DVD / Blu-ray player / cable box / STB
satellite receiver directly to an amplifier
or home theatre.
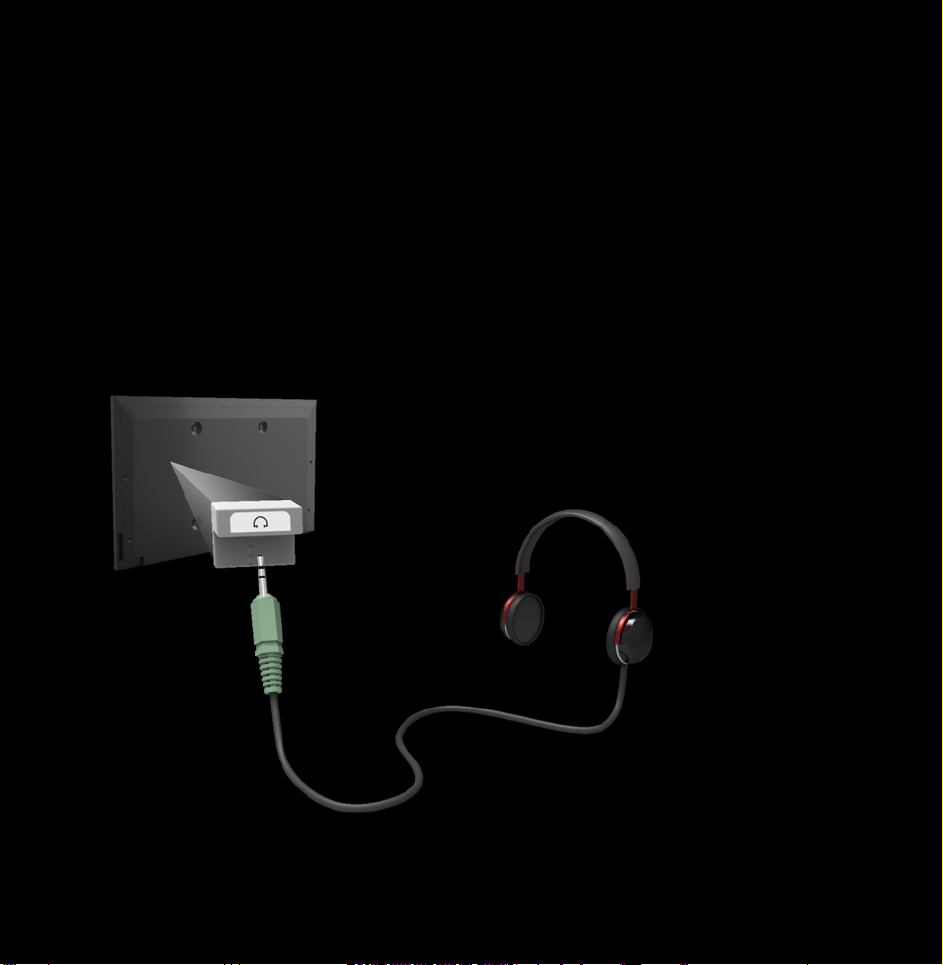
Headphones
The displayed image may differ depending on the model.
H
You can connect your headphones to

the headphones output on your set.
While the headphones are connected,
the sound from the built-in speakers
will be disabled.
●
Sound function may be restricted
when connecting headphones to the
TV.
●
Headphone volume and TV volume
are adjusted separately.
●
The headphones jack supports only
the 3 conductor tip-ring-sleeve (TRS)

type.
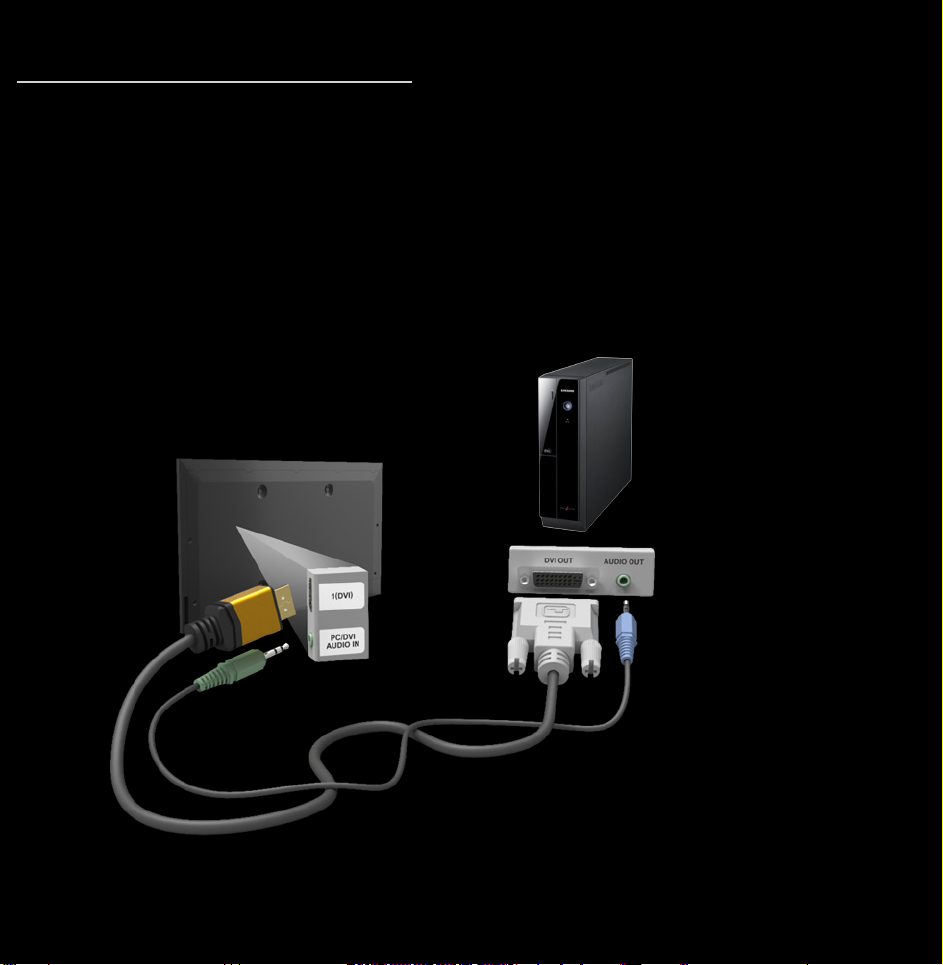
Connecting to a PC
Using an HDMI cable or an HDMI to DVI
cable
The displayed image may differ depending on the model.
N
Connecting through the HDMI cable

may not be supported depending on
the PC.
Optimal resolution is 1920 X 1080 @ 60
Hz.
N
For HDMI/DVI cable connection, you
must use the HDMI IN 1(DVI) jack.
●
The interlace mode is not supported.
●
The set might operate abnormally
if a non-standard video format is
selected.

●
Separate and Composite modes are
supported. SOG (Sync On Green) is
not supported.
●
PC (D-Sub) input is not supported.

Using the INFO button (Now & Next guide)
The display identifies the current
channel and the status of certain audio-
video settings.
The Now & Next guide shows daily
TV programme information for each
channel according to the broadcasting
time.
●
Scroll l, r to view information for a
desired programme while watching the
current channel.

●
Scroll
u, d
to view information for
other channels. If you want to move to
the currently selected channel, select
using your remote.
E

Managing Channels and Channel Functions
Press the ™ button to select the menu
you want to use. Each screen will be
displayed.
ℓ∫
Guide
Guide
→
™
The EPG (Electronic Programme Guide)
information is provided by broadcasters.
Using programme schedules provided
by broadcasters, you can specify

programmes you want to watch
in advance so that the channel
automatically changes to the selected
programme channel at the specified
time. Programme entries may appear
blank or out of date depending on a
channel status.
Using Channel View
●
(Sche. Mgr): Displays the Schedule
a
Manager.

●
(-24 Hours): Viewing the list of
b
programmes to be broadcasted before
24 hours.
●
(+24 Hours): Viewing the list of
{
programmes to be broadcasted after 24
hours.
●
(Ch. Mode): Select the type of
}
channels you want to display on the
Channel View window.
●
Information: Displays details of the
`
selected programme.

●
●
Page: Move to next or previous page.
k
Watch / Schedule: When selecting
E
the current programme, you can watch
the selected programme. / When
selecting the future programme, you
can reserve to watch the selected
programme.
∫ℓ
Channel
Channel
→
™
Using this function, you can delete

channels from the different Category
channel lists on the Channel screen,
set favourite channels, view and access
recently viewed and most viewed
channels, and edit the channel names
of analogue channels.
N
The available items may differ
depending on the selected aerial
source.
Category Options (on the left side of the

Channel screen)
●
All
Shows all channels.
●
TV
Shows TV channels.
●
Radio
Shows radio channels.
●
Data/Other
Shows data channels and other
channels.
●
Analogue

Shows analogue channels.
ℓ
●
Favourites 1 – Favourites 5
Lets you arrange and display favourite
channels in up to five groups. Each
group is independent of the other
groups and can contain the same
channels as other groups, different
channels, or a combination of both.
N
The TV displays favourites only if
you have added favourites using Edit
Favourites in the Tools menu.
 Loading...