

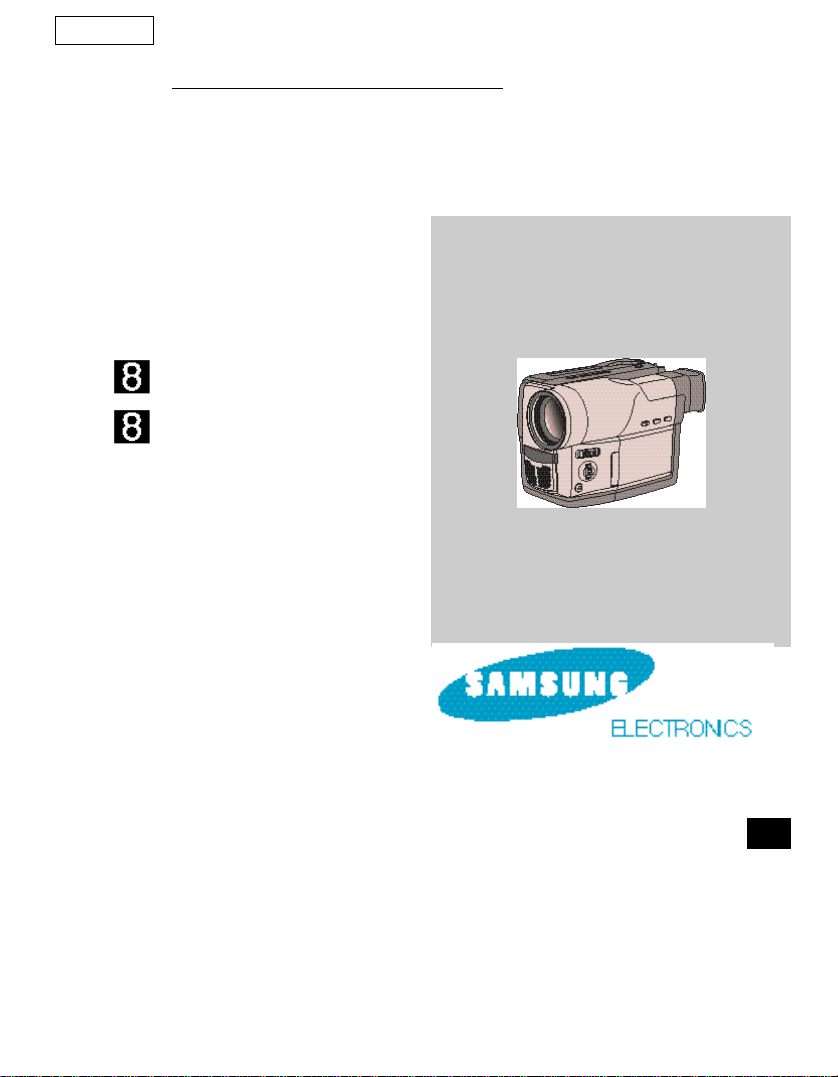
Samsung SCL540, SCL520, SCL530, SCL550 Owner's Instruction Manual
ENGLISH
Video Camcorder
8mm
COLOR LCD
S C L 5 2 0 / L 5 3 0 / L 5 4 0 / L 5 5 0 ( N T S C )
S C L 5 2 0 / L 5 3 0 / L 5 4 0
H i
Owner’s Instruction Book
Before operating the unit, please read
this instruction book thoroughly, and retain it for
future reference.
S C L 5 5 0
U S

ENGLISH
Notices and Safety Instructions
Getting to Know Your Camcorder
Features...................................................................................................................................................................12
Descriptions
■ Front View/Side View/Rear View........................................................................................................13, 14, 15
■ OSD (On Screen Display) .............................................................................................................................16
Accessories Supplied with the Camcorder..............................................................................................................18
Remote Control........................................................................................................................................................19
■
Self Timer Recording......................................................................................................................................19
Preparing
Adjusting the Hand Strap and Shoulder Strap........................................................................................................20
Lithium Battery Installation......................................................................................................................................21
Connecting the Power Source.................................................................................................................................22
■
To use the AC Power Adapter........................................................................................................................22
■
To use the Battery Pack .................................................................................................................................23
Using the Battery Pack............................................................................................................................................24
■
Continuous Recording time table...................................................................................................................24
■
Battery Level Display......................................................................................................................................25
Inserting and Ejecting a Cassette ...........................................................................................................................26
Basic Recording
Making Your First Recording...................................................................................................................................27
Hints for Stable Image Recording ..........................................................................................................................29
■
Recording with LCD Monitor...........................................................................................................................29
■
Recording with Viewfinder..............................................................................................................................29
Adjusting the LCD....................................................................................................................................................30
Adjusting Focus of the VIEWFINDER.....................................................................................................................31
Playing back a tape on the LCD..............................................................................................................................32
■
Adjusting the LCD during PLAY......................................................................................................................33
■
Controlling the Sound from the Speaker........................................................................................................33
■
Viewing a Still Picture.....................................................................................................................................33
■
Picture Search................................................................................................................................................33
Advanced Recording
Zooming In and Out.............................................................................................................................................................34
Digital Zoom.........................................................................................................................................................................35
2

ENGLISH
DIS (Digital Image Stabilizer, SCL530/L540/L550 only)......................................................................................................37
MF/AF (Manual Focus/Auto Focus).....................................................................................................................................38
I-BLC/BLC............................................................................................................................................................................39
Program AE (Automatic Exposure)......................................................................................................................................40
DSE (Digital Special Effect) in CAMERAmode...................................................................................................................42
Setting and Recording DATE/TIME.....................................................................................................................................44
Selecting and Recording a Title...........................................................................................................................................46
Fade In and Out...................................................................................................................................................................48
PIP.......................................................................................................................................................................................49
Snap Shot............................................................................................................................................................................50
White Balance......................................................................................................................................................................51
Setting the Viewfindwr( EVF or CVF)..................................................................................................................................52
Setting the Remote Control.................................................................................................................................................52
Demonstration......................................................................................................................................................................53
Lighting Techniques.............................................................................................................................................................54
Playing back a Tape
To watch with LCD ..............................................................................................................................................................55
To watch with TV monitor....................................................................................................................................................55
Various Functions in PLAYER mode...................................................................................................................................57
Adjusting the LCD................................................................................................................................................................58
Setting the EVF(or CVF) ON/OFF.......................................................................................................................................58
Setting the Speaker ON/OFF..............................................................................................................................................58
Setting the Remote Control.................................................................................................................................................59
DSE in PLAYER mode.........................................................................................................................................................59
Maintenance
Cleaning and Taking care of the Camcorder...........................................................................................................59
■ Cleaning the Viewfinder .................................................................................................................................59
■ Cleaning the LCD Panel.................................................................................................................................59
■ Cleaning the Video Heads .............................................................................................................................60
■ Storing the Camcorder....................................................................................................................................60
Using Your Camcorder Abroad............................................................................................61
Troubleshooting
Self Diagnosis Display ............................................................................................................................................62
Checking..................................................................................................................................................................63
Moisture Condensation............................................................................................................................................65
Specifications.................................................................................................................................66
Index...................................................................................................................................................67
Warranty..........................................................................................................................................69
3
ENGLISH
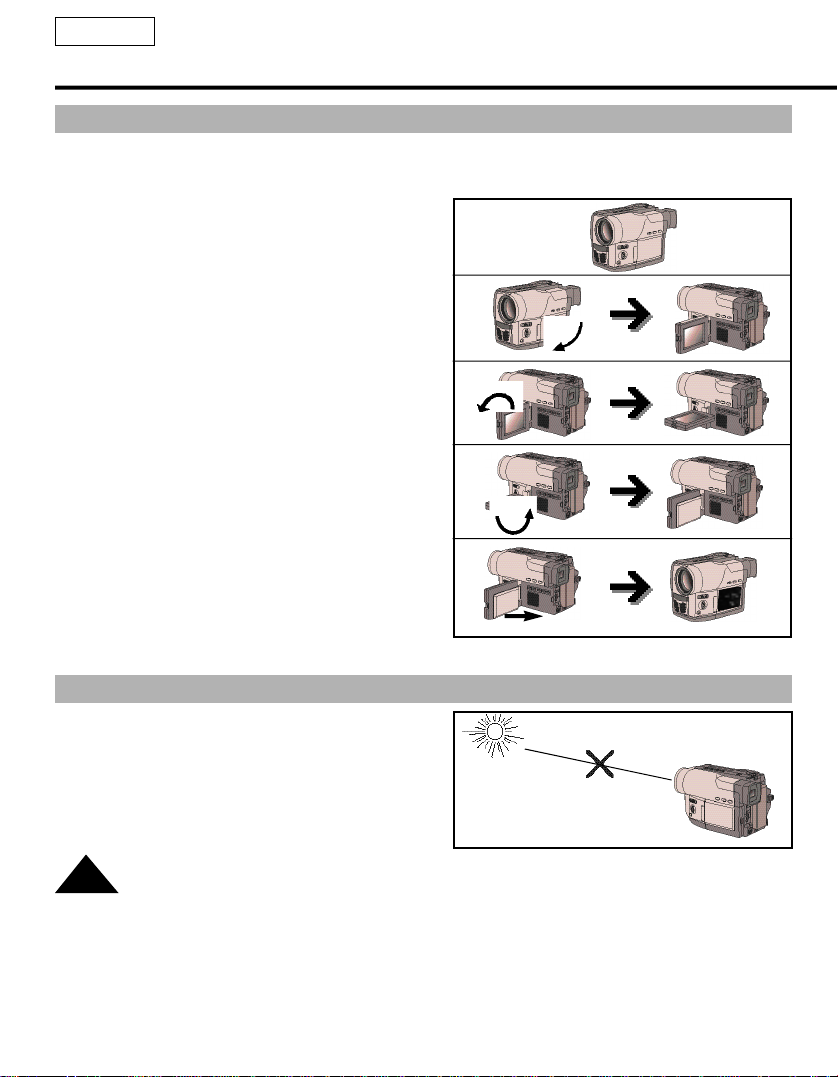
Notices regarding rotation of LCD screen
Please rotate the LCD screen carefully as illustrated. Unintended rotation may cause damage to the inside
of the hinge that connects the LCD screen to the Camcorder.
1) LCD screen closed.
2) Standard recording by using the LCD screen.
3) Making a recording by looking at the LCD screen
from the top.
4) Making a recording by looking at the LCD screen
from the front.
5) Making a recording with the LCD screen closed.
Notices regarding the LENS
✤ Do not let LENS point toward the sun.
Direct sunlight can damage the CCD
(Charge Coupled Device).
1)
2)
90°
3)
90°
4)
90°
5)
90°
4
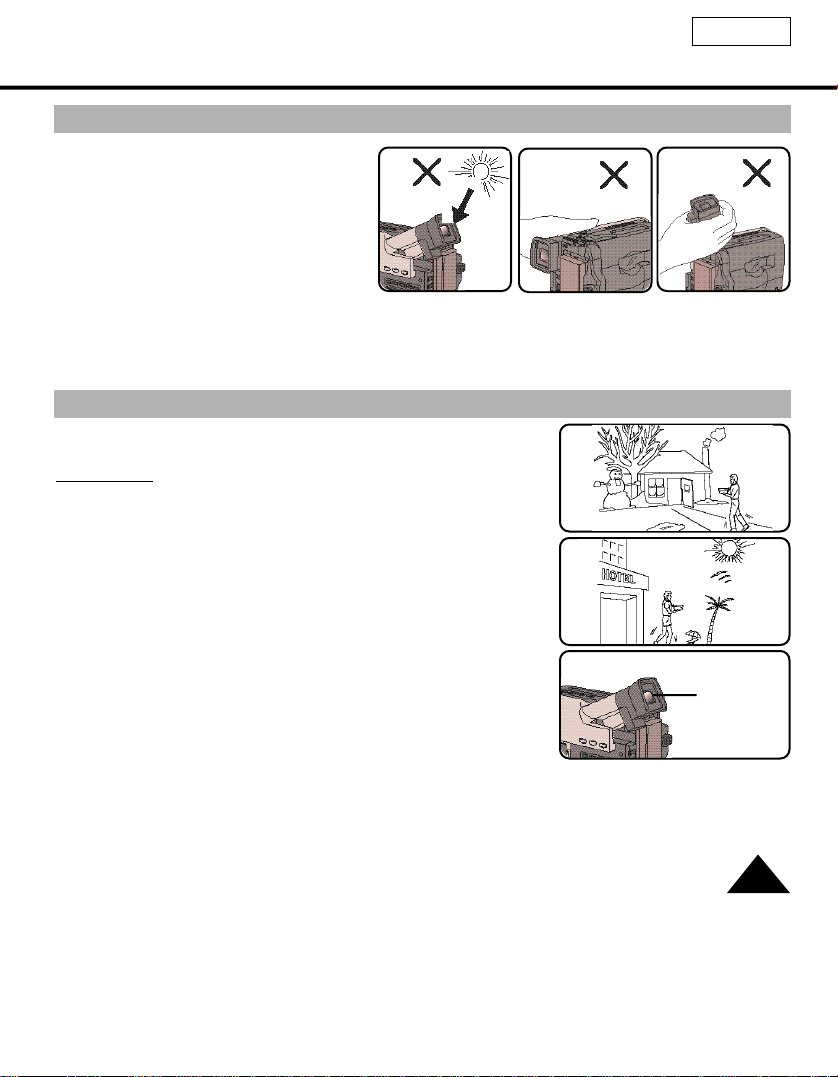
Notices regarding electronic viewfinder
1) Do not place the camcorder so that the
viewfinder is pointing towards the sun.
Direct sunlight can damage the inside of
the viewfinder. Be careful when placing
the camcorder under sunlight or by a
window.
2) Do not pick up the camcorder by the
viewfinder.
3) Unintended rotation may cause damage
to the viewfinder.
1
2 3
Notices regarding moisture condensation
1) A sudden rise in atmospheric temperature may cause condensa-
tion to form inside the camcorder.
for example:
■ When you take the camcorder from cold temperature outside to
warm temperature inside during the winter.
■ When you take the camcorder from cool temperature inside to hot
temperature outside during the summer.
2) If the “DEW” protection feature is activated, leave the camcorder
in a dry, warm room with the cassette compartment opened and
the battery removed.
ENGLISH
3) If the “DEW” protection feature is activated unexpectedly, and you
want to override it, detach, then reinstall the battery pack and lithium battery.
Please make sure that the condensation has disappeared completely. (see page 65)
DEW
5

ENGLISH
Notices regarding the battery pack
✤ Make sure that the battery pack is charged before recording outdoors.
✤ To preserve battery power, keep your camcorder turned off when you are not operating it.
✤ When your camcorder is in CAMERA mode, if it is left in STANDBY for more than 5~6 minutes without
operation, it will automatically turn off to protect against unexpected battery discharge.
✤ It is a good idea to use the viewfinder instead of the LCD when recording for a long time because the
LCD uses more battery power.
✤ Make sure that the battery pack is fitted firmly into place.
Dropping the battery pack might damage it.
✤ When the battery reaches the end of its life, please contact your local dealer. The batteries have to be
dealt with as chemical waste.
Notices regarding the Lithium battery
Warning: Keep the LITHIUM BATTERY out of the reach of children. Should the battery be swal-
lowed, consult a doctor immediately.
✤ The lithium battery maintains the clock function, title and preset contents memory; even if the battery
pack or AC power adapter is removed.
✤ The lithium battery for the camcorder lasts about 8~10 months under normal operation from time of
installation.
✤ When the lithium battery becomes weak or dead, the date/time indicator flashes about 5 seconds when
you set the power switch to CAMERA. In this case, replace the lithium battery with type CR2025. (see
page 21)
WARNING:
LITHIUM BATTERY MUSTBE
RECYCLED OR DISPOSED
OF PROPERLY.
6
* When the lithium battery
becomes weak or dead please
contact your local dealer. The
batteries have to be dealt with
as chemical waste.

Notices with Recording or Playback by using LCD
1) The LCD monitor is manufactured by using high precision
technology. However, there may be some tiny specks (red,
blue or green in color) that appear on the LCD monitor.
These points are normal and do not affect the recorded pic-
ture in any way.
2) When using the LCD monitor outdoors in direct sunlight, it
may be difficult to view. If this occurs, use the viewfinder.
3) The LCD monitor's OSD is turned off when the LCD is
placed in the forward direction.
Notices regarding the hand strap
✤ It is very important to adjust the hand strap for better
recording. (see page 20)
✤ Do not insert your hand in the hand strap forcibly, the buck-
le may be damaged.
ENGLISH
Notices regarding video head cleaning
✤ To ensure normal recording and clear picture, clean the video heads. When playing back the pictures,
if they are noisy or hardly visible, the video heads may be dirty. If this happens, clean the video heads
with a dry type cassette cleaner.
✤ Do not use a wet type cassette cleaner. It may damage the video heads. (see page 60)
5 minutes off timer in STANDBY mode
✤ To protect against tape and head-drum wear, your camcorder will automatically turn off if it is left in
STANDBY mode without operation for more than 5~6 minutes.
7

ENGLISH
Safety Instructions
CAUTION
RISK OF ELECTRIC SHOCK
DO NOTOPEN
CAUTION:
TO REDUCE THE RISK OF ELECTRIC
SHOCK, DO NOTREMOVE COVER(OR
BACK). NO USER SERVICEABLE PARTS
INSIDE, REFER SERVICING TO
QUALIFIED SERVICE PERSONNEL.
To prevent electric shock, match wide
blade of plug to wide slot and fully
insert.
1. READ INSTRUCTIONS:
All the safety and operating instructions should be
read before the CAMCORDER is operated.
2.RETAIN INSTRUCTIONS:
The safety and operating instructions should be
retained for future reference.
3. HEED WARNINGS:
All warnings on the CAMCORDER and in the
operating instructions should be adhered to.
4. FOLLOW INSTRUCTIONS:
All operating and maintenance instructions should
be followed.
5.CLEANING:
Unplug this CAMCORDER from the wall outlet before
cleaning. Do not use liquid or aerosol cleaners.
Use a dry cloth used for dusting cabinets.
6. ATTACHMENTS:
Do not use attachments not recommended by the
CAMCORDER product manufacturer as they may be
hazardous.
7. WATER AND MOISTURE:
Do not use this CAMCORDER near water;
for example, near a bathtub, wash bowl, kitchen
sink, laundry tub, in a wet basement, near a swimming
pool or lake.
This symbol is intended to alert the user to the presence
of uninsulated dangerous voltage within the product’s
enclosure that may be of sufficient magnitude to
constitute a risk of fire or electric shock.
This symbol is intended to alert the user to the presence
of important operating and maintenance instructions in
the literature accompanying this product.
8. ACCESSORIES:
Do not place this CAMCORDER on an unstable cart,
stand, tripod, bracket or table.
The CAMCORDER may fall, causing serious injury to
a child or adult, and serious damage to the unit.
Use only with a cart, stand, tripod, bracket, or table
recommended by the manufacturer or sold with
the CAMCORDER. Any mounting of the unit should
follow the manufacturer’s instructions and
should use a mounting accessory recommended
by the manufacturer.
A. An appliance and cart combination
should be moved with care.
Quick stops, excessive force and uneven surfaces
may cause the appliance and cart combination to
overturn.
PORTABLE CARTWARNING
(Symbol provided by RETAC)
8
ENGLISH
9.VENTILATION:
Slots and openings in the cabinet are provided for
ventilation to ensure reliable operation of
the CAMCORDER and to protect it from overheating.
These openings must not be blocked or covered.
Never place your CAMCORDER on a bed, sofa, rug,
or other similar surface: on or near a radiator or heat
register.
This CAMCORDER should not be placed in a built-in
installation such as a bookcase or rack unless
proper ventilation is provided or the manufacturer’s
instructions have been adhered to.
10. POWER SOURCES:
The CAMCORDER should be operated only from
the type of power source indicated on the label.
If you are not sure of the type of power supply at
your home, consult your appliance dealer or local
power company.
A CAMCORDER is intended to be operated from
battery power, or other sources, refer to the
operating instructions.
11.GROUNDING OR POLARIZATION:
This CAMCORDER may be equipped with either a
polarized 2-wire AC line plug (a plug having
one blade wider than the other) or a 3-wire grounding
type plug, a plug having a third (grounding) pin.
If you are unable to insert the plug fully into the outlet,
try reversing the plug. If the plug still fails to fit,
contact your electrician to replace your outlet.
Do not defeat the safety purpose of the polarized
plug.
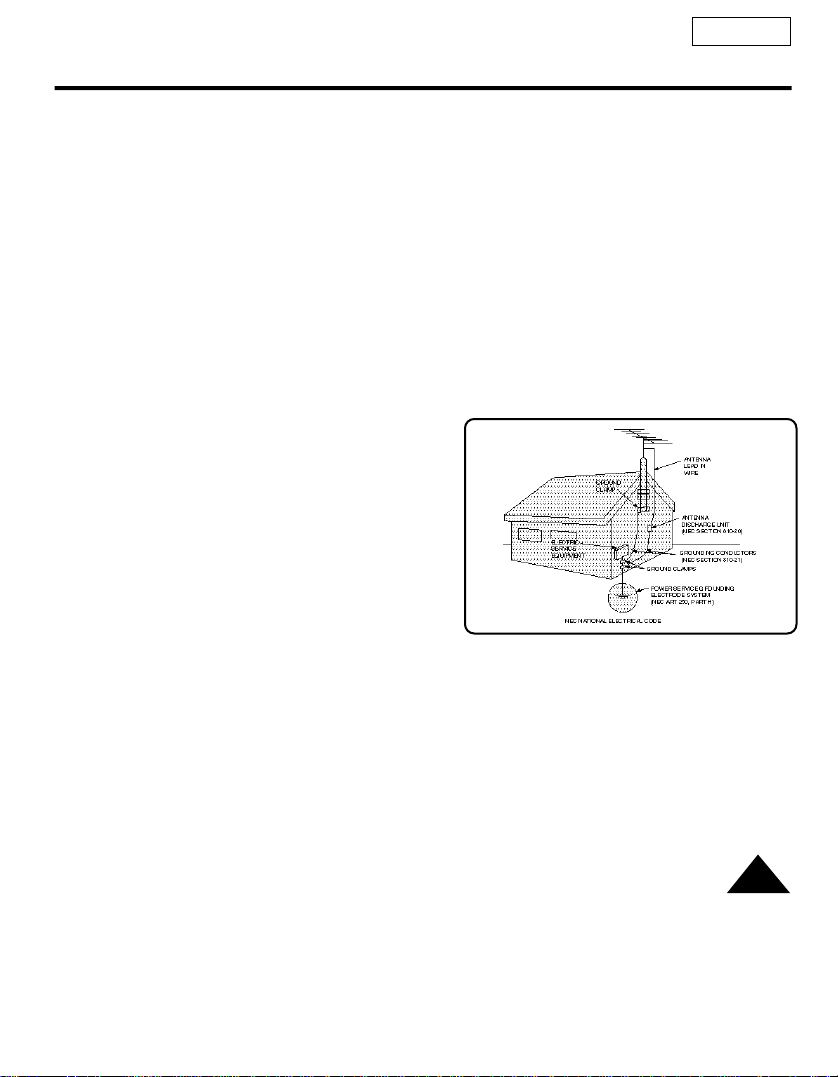
13. OUTDOOR ANTENNAGROUNDING:
If an outside antenna or cable system is connected
to the CAMCORDER, be sure the antenna or cable
system is grounded to provide some protection
against voltage surges and built-up static charges,
Section 810 of the National Electrical Code,
ANSI/NFPANo. 70-1984, provides information
with respect to proper grounding of the mast and
supporting structure, grounding of the lead-in wire
and supporting structure, grounding of the mast
and supporting structure, grounding of the lead-in
wire to an antenna discharge unit, size of
grounding to conductors, location of antennadischarge unit, connection to grounding
electrodes and requirements for the grounding
electrode.
See figure below.
12. POWER-CORD PROTECTION:
Power-supply cords should be routed so that they are
not likely to be walked on or pinched by items
placed upon or against them, paying particular
attention to cordsor plugs, convenient receptacles,
and the point where they exit from the unit.
9

ENGLISH
14. LIGHTNING:
For added protection of this CAMCORDER during
a lightning storm or when it is left unattended and
unused for long periods of time, unplug it from
the wall outlet and disconnect the antenna or cable
system.
This will prevent damage to the CAMCORDER due
to lightning and power-line surges.
15. POWER LINES:
An outside antenna system should not be located
in the vicinity of overhead power lines or other
electric light or power circuits where it can fall into
such power lines or circuits.
When installing an outside antenna system,
extreme care should be taken to keep from touching
such power lines or circuits as contact with them
might be fatal.
16. OVERLOADING:
Do not overload wall outlets and extension cords
as this can result in a risk of fire or electric shock.
17. OBJECTS AND LIQUIDS:
Never push objects of any kind into this
CAMCORDER through openings as they may touch
dangerous voltage points or short out a part
that could result in a fire or electric shock.
Never spill liquids of any kind onto the
CAMCORDER. Should spillage occur, unplug unit
and have it checked by a technician before use.
18. SERVICING:
Do not attempt to service this CAMCORDER
yourself. Opening or removing covers may expose
you to dangerous voltage or other hazards.
Refer all servicing to qualified service personnel.
19. DAMAGE REQUIRING SERVICE:
Unplug this CAMCORDER from the wall outlet and
refer servicing to qualified service personnel
under the following conditions:
a. When the power-supply cord or plug is damaged.
b. If any liquid has been spilled onto, or objects have
fallen into the CAMCORDER.
c. If the CAMCORDER has been exposed to rain or
water.
d. If the CAMCORDER does not operate normally
by following the operating instructions, adjust only
those controls that are covered by the operating
instructions. Improper adjustment of other
controls may result in damage and will often
require extensive work by a qualified technician to
restore the CAMCORDER to its normal
operation.
e.If the CAMCORDER has been dropped or
the cabinet has been damaged.
f. When the CAMCORDER exhibits a distinct
change in performance, this indicates a
need for service.
20. REPLACEMENT PARTS:
When replacement parts are required, be sure
the service technician has used replacement parts
specified by the manufacturer and having the
same characteristics as the original part.
Unauthorized substitutions may result in fire,
electric shock or other hazards.
21. SAFETY CHECK:
Upon completion of any service or repairs to this
CAMCORDER, ask the service technician to
perform safety checks to determine that
the CAMCORDER is in safe operating order.
10

NOTE TO CATV SYSTEM INSTALLER:
This reminder is provided to call the CATV system
installer’s attention to Article 820-40 of the NEC that
provides guidelines for proper grounding and,
in particular, specifies that the cable ground shall be
connected to the grounding system of the building as
close to the point of cable entry as practical.
USER INSTALLER CAUTION:
Your authority to operate this FCC certified equipment
could be voided if you make changes or modifications
not expressly approved by this party responsible for
compliance to part 15 FCC rules.
ENGLISH
11

ENGLISH
Features
Your camcorder has many features for recording and playing back.
Snap Shot (SCL530/L540/L550 only)
The Snap Shot function lets you record an object at a standstill for a limited time in Camera mode. (see
page 50)
PIP (SCL530/L540/L550 only)
The PIP function shows where the center of the image is while recording in Digital Zoom of the Camera
mode. (see page 49)
I-BLC/BLC
■
BLC for SCL520.
When you record a subject with the light source behind the subject or a subject with a light background,
use the I-BLC/BLC function. (see page 39)
DSE (Digital Special Effects)
The DSE enables you to give a creative look to your films by adding various special effects.(see page 42)
Program AE (Auto Exposure)
The Program AE enables you to adapt the shutter speed and aperture to the type of scene to be filmed.
(see page 40)
DIS (SCL530/L540/L550 only)
The DIS compensates for unstable images caused by hand shake, particularly at high magnification.
(see page 37)
22x High ratio zoom lens
Zooming is a recording technique that lets you change the size of the subject in the picture.
For more professional recordings, use the zoom function. (see page 34)
Digital Zoom
Zoom more than 22x are performed digitally. (see page 35)
Macro
The macro function allows you to record your subject at close range.
You have to adjust the zoom fully wide for macro recording. (see page 34)
12
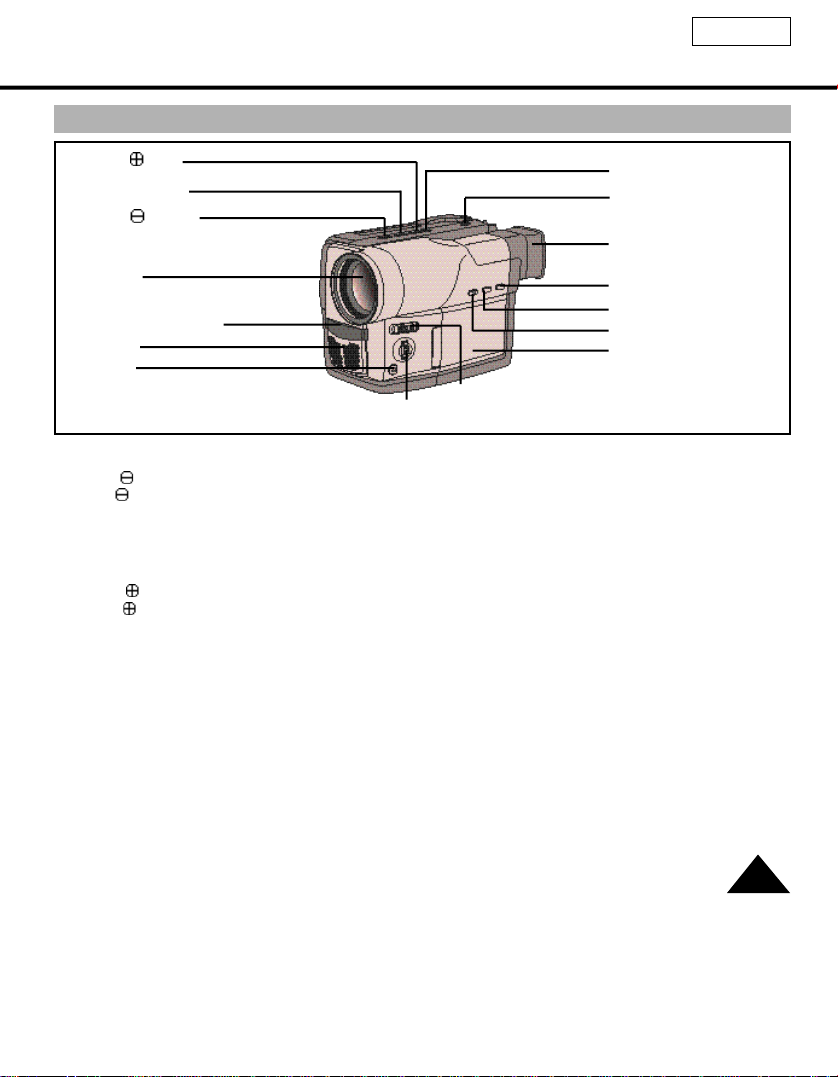
Front View
ENGLISH
4. Edit (FF)
3. PLAY/STILL
2. Edit (REW)
1. Lens
16. Remote Sensor
15. MIC
14. MF
13. MF dial
1. Lens (see page 66)
2. Edit (REW)
Edit works in STANDBYmode (see page 28)
REW works in PLAYER mode (see page 57)
3. PLAY/STILL
PLAY/STILLworks in PLAYER mode
(see page 56)
4. EDIT (FF)
EDIT works in STANDBY mode (see page 28)
FF works in PLAYER mode (see page 57)
5. DATE/TIME(STOP)
DATE/TIME works in CAMERAmode
(see page 44)
STOP works in PLAYER mode (see page 56)
6. TAPE EJECT
Use when ejecting the tape (see page 26)
7 . EVF(Electronic Vi e w f i n d e r, see pages 52,58)
(CVF for SCL540)
8. PIP(Z.RETURN)
PIP works in CAMERAmode (SCL530/L540/L550
only, see page 49)
5. DATE/TIME(STOP)
6. TAPE EJECT
7. EVF(CVF for SCL540)
8. PIP(Z.RETURN)
9. FADE
10. I-BLC/BLC
11. LCD
12. POWER
9. FADE
FADE works in CAMERA mode (see page 48)
10. I-BLC/BLC
I-BLC/BLC works in CAMERAmode
(BLC for SCL520, see page 39)
11. LCD (see page 30)
12. POWER switch (see page 22)
- CAMERA : Select to record.
- OFF : Select to turn off the camcorder.
- PLAYER : Select to play back.
13. MF dial (see page 38)
MF dial works in CAMERAmode.
14. MF (see page 38)
MF works in CAMERAmode.
15. MIC
MIC works in CAMERAmode.
16. Remote Sensor (see page 19)
(SCL530/L540/L550 only)
13

ENGLISH
Side View
26. Speaker
28. LCD open
25. DISPLAY
24. C. RESET
23. TITLE
27. Lithium Battery
17. MENU ON/OFF (see page 30)
MENU ON/OFF works in CAMERAand
PLAYER mode.
18. ENTER (see page 30)
ENTER works in MENU mode.
19. MENU dial/VOLUME
Menu dial works in MENU mode. (see page 30)
VOLUME works in PLAYER mode.
(see page 58)
20. S.VIDEO out (SCL550 only, see page 56)
21. PROGRAM AE (see page 40)
PROGRAM AE (Auto Exposure) works in
CAMERA mode.
17. MENU ON/OFF
18. ENTER
19. MENU dial/VOLUME
20. S.VIDEO out
21. PROGRAM AE
22. DSE
22. DSE (see page 42, 59)
DSE works in CAMERAand PLAYER mode.
23. TITLE (see page 46)
TITLE works in CAMERA mode.
24. C. RESET (Counter Reset)
Use to reset the tape counter.
25. DISPLAY
Use to turn the OSD on or off.
26. Speaker (see page 58)
Speaker works in PLAYER mode.
27. Lithium Battery (see page 21)
28. LCD open
14
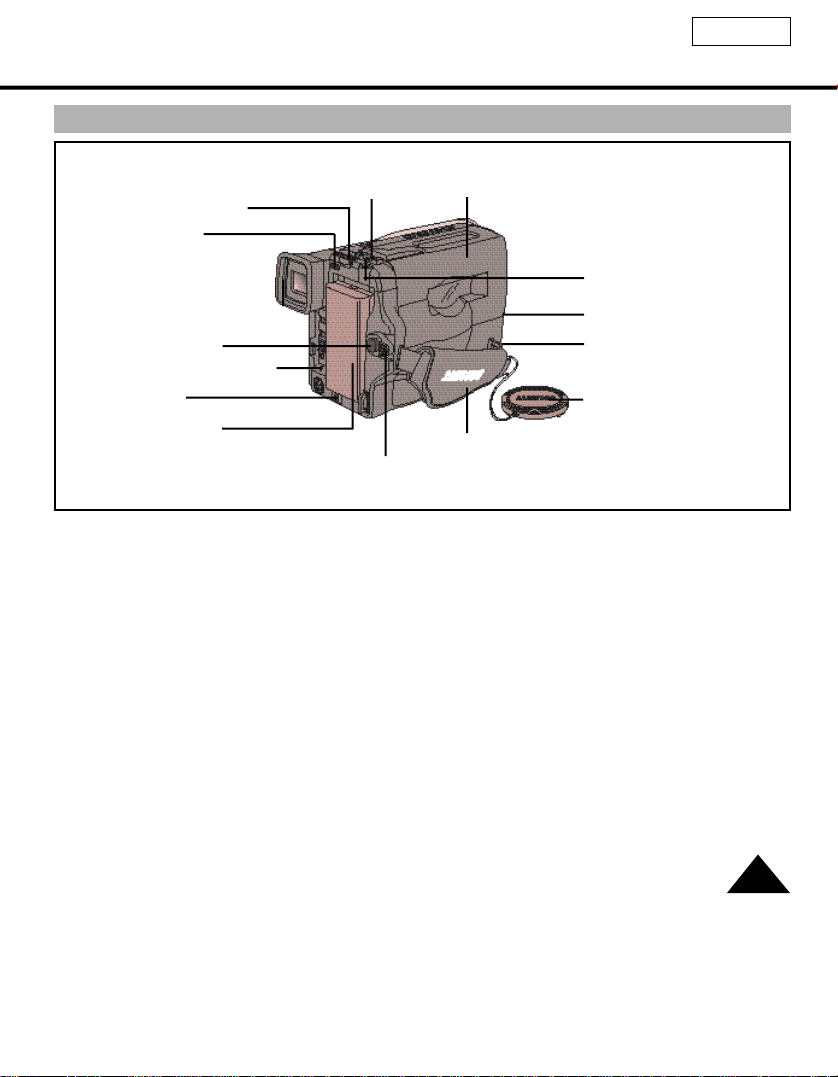
Rear View
ENGLISH
29. ZOOM
40. BATTERY EJECT
31. Hooks for
shoulder strap
36. START/STOP
42. Recharging Indicator
38. DC jack
39. Battery pack
compartment
35. LOCK/STANDBY
29. ZOOM (see page 34)
30. Cassette holder
31. Hooks for shoulder strap (see page 21)
32. AUDIO/VIDEO out (see page 55)
33. LENS cap
34. Hand strap (see page 20)
35. LOCK/STANDBY(see page 22)
- LOCK : off
- STANDBY : CAMERA
30. Cassette holder
41. SNAPSHOT/D.ZOOM
37. External MIC
32. AUDIO/VIDEO out
33. LENS cap
34. Hand strap
36. START/STOP (see page 27)
START/STOP works in CAMERA mode.
37. External MIC (see page 66)
38. DC jack (see page 22)
39. Battery pack compartment (see page 23)
40. BATTERY EJECT
41. SNAP SHOT/D.ZOOM
SNAP SHOT works in CAMERA mode
(SCL530/L540/L550 only, see page 50)
D.ZOOM works in CAMERAmode
(SCL520 only, see page 36)
42. Recharging Indicator (see page 23)
15
ENGLISH
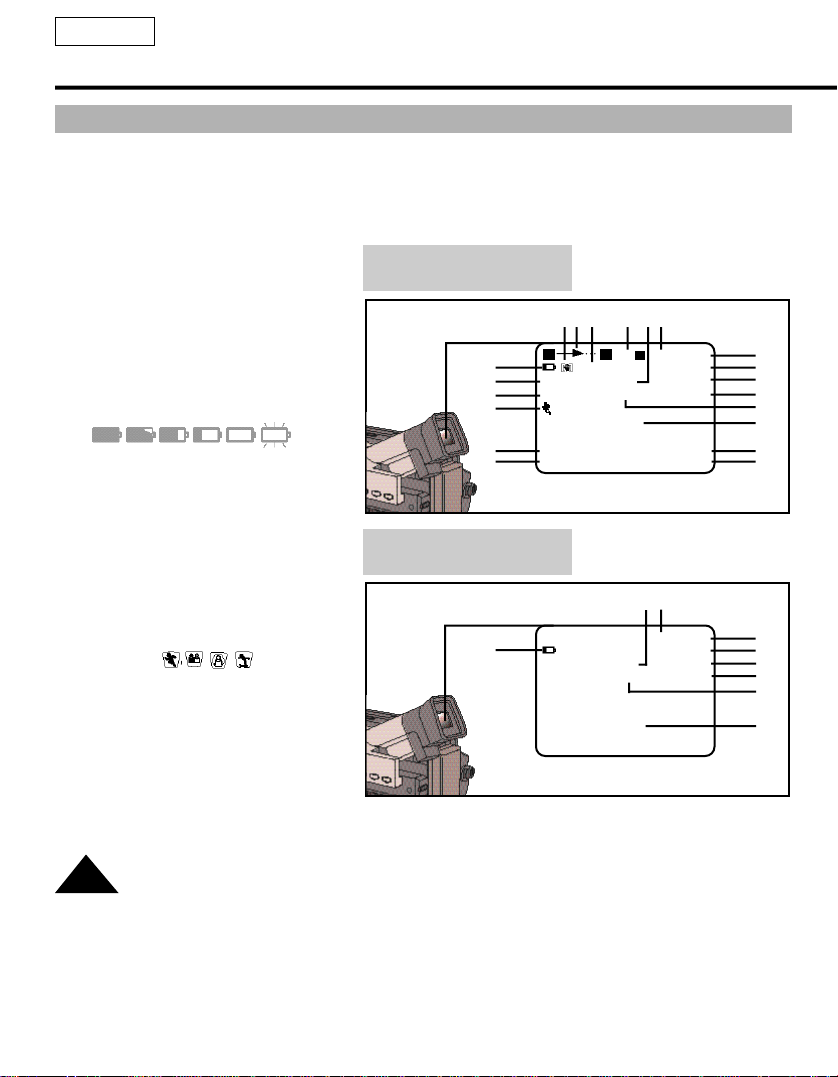
OSD (On Screen Display)
✤ The OSD on/off switch is operated by using the DISPLAY button.
✤ The title and date/time functions can be operated even after the OSD is turned off.
✤ The OSD is displayed in the viewfinder and the LCD monitor.
a. Zoom position (see page 34)
Indicates zoom position.
b. DIS (SCL530/L540/L550 only)
(see page 37)
Indicates DIS is activated.
c. Battery level (see page 25)
Indicates the power left in the battery.
( )
d. Manual Focus (see page 38)
Indicates manual focus is on.
Auto Focus is not displayed.
e. I-BLC/BLC (see page 39)
(BLC for SCL520)
Indicates I-BLC or BLC is activated.
f. Program AE (see page 40)
Indicates Program AE mode is
activated. ( , , , ,HSS)
g.
Self record waiting timer. (see page 19)
Indicates 10 second timer.
h. Self record recording timer.
(see page 19)
(30 seconds or END).
i. Date (see page 44)
Indicates the date of the recording.
OSD in CAMERA mode
c
d
e
f
g
h
OSD in PLAYER mode
c
a s r qb t
W T
W T 440 Hi8 REC
M.FOCUS DEW
I-BLC/BLC TAPE
WAIT-10S 13:10
SELF-30S 29. AUG. 2002
x
XX
PICNIC
DEW LP
TAPE Z.RTN
VOLUME
INDOOR
CINEMA
r q
Hi8 PLAY
0:00:00
0:00:25
p
o
n
m
l
k
j
i
p
o
u
v
l
w
16

ENGLISH
OSD (On Screen Display)
j. Time (see page 44)
Indicates the time you are recording.
k. Title (see page 46)
Indicates the recorded title you have set.
It is superimposed on the scene.
l. Self diagnosis (see page 62)
(TAPE, TAPE END) Checks the operation of the Camcorder.
m. DSE (Digital Special Effect) (see page 42)
Indicates the DSE mode is activated.
The operation modes are MAKE-UP, EMBOSS, WIDE(16:9), CINEMA, NEG., MIRROR, MOSAIC,
B&W, SEPIA, GHOST, STROBE and LSS.
n. White Balance mode (see page 51)
Indicates the White Balance mode is activated.
The White Balance modes are AUTO, INDOOR and OUTDOOR.
o. Tape counter
Indicates amount of the tape used.
We recommend that you reset the tape counter with the COUNTER RESET button before you start
recording.
p. Operation mode
Indicates the operation mode is activated.
The operation modes are STBY, REC, STOP, PLAY, FF, REW.
q. Hi8 (SCL550 only) (see page 56)
Indicates you are using Hi8 tape when recording or playing back.
r. DEW condensation (see page 65)
Monitors the moisture condensation.
s. Digital zoom (see page 35)
Indicates digital zoom is activated.
t. Snap Shot (see page 50)
Indicates the time left during Snap Shot Recording.
u. Playback speed
Indicates the playback speed in PLAYER mode. (see page 56)
SP is not displayed.
v. Zero return(see page 57)
Indicates that the zero return is activated.
w. VOLUME (see page 58)
17
ENGLISH
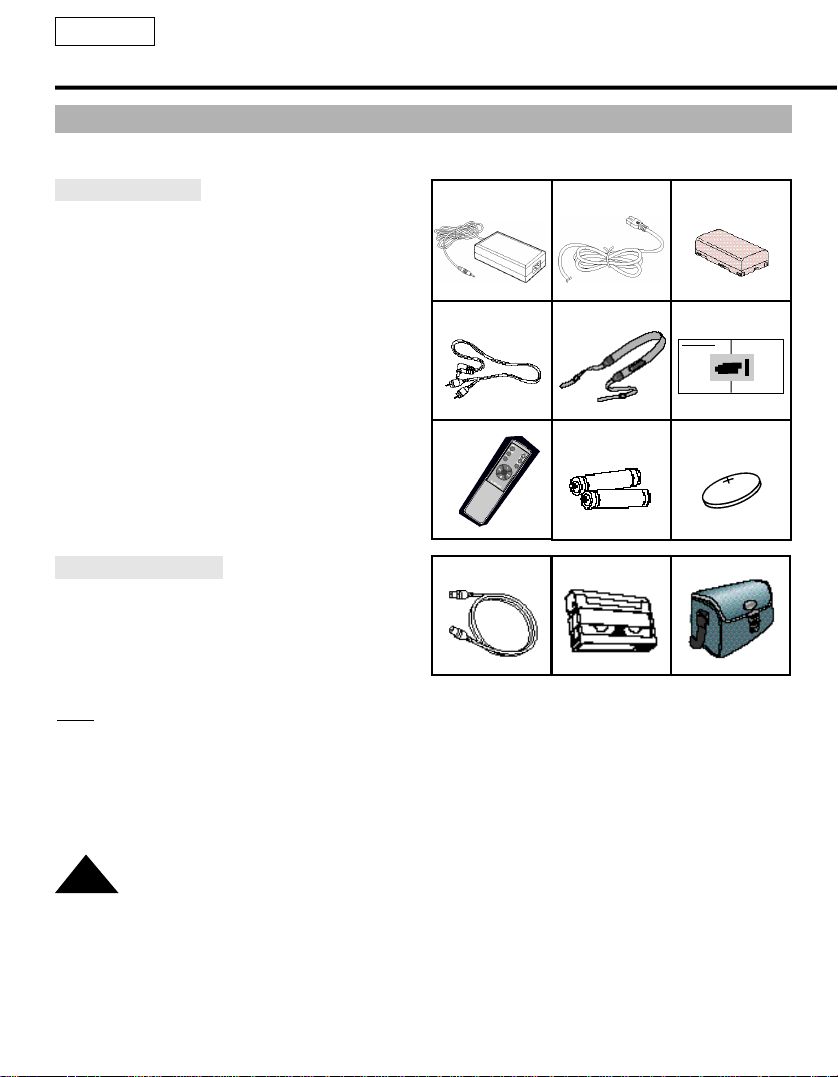
Accessories Supplied with Camcorder
Make sure that the following basic accessories are supplied with your camcorder.
Basic Accessories
1. AC Power Adapter. (see page 22)
2. AC cord. (see page 22)
3. Battery Pack. (see page 23)
4. Audio/Video Cable. (see page 55)
5. Shoulder strap. (see page 21)
6. Instruction Book.
7. Remote Control. (see page 19)
(SCL530/L540/L550)
8. Batteries for Remote Control. (see page 19)
9. Lithium Battery for Clock.
(TYPE: CR2025, see page 21)
Optional Accessories
10. S-VIDEO cable. (see page 56)
(SCL550 only)
11. Cassette. (see page 26)
12. Carrying Case.
Note: Optional accessories may be included
with the camcorder, depending on the
country in which it is purchased.
1. AC Power Adapter
AD44-00035A
AD39-40200A
7. Remote Control
AD59-10536B
AC39-42001Z AD69-00001A
2. AC cord 3. Battery Pack
AD39-00028A AD43-00022A
5. Shoulder Strap4. AUDIO/VIDEOCable 6. Instruction Book
Video Camcorder
8mm
COLOR
AD63-00044B
8. Two R6 AAbatteries
9. Lithium Battery
12. Carrying Case10. S-VIDEO cable 11. Cassette
AD43-10130A
18
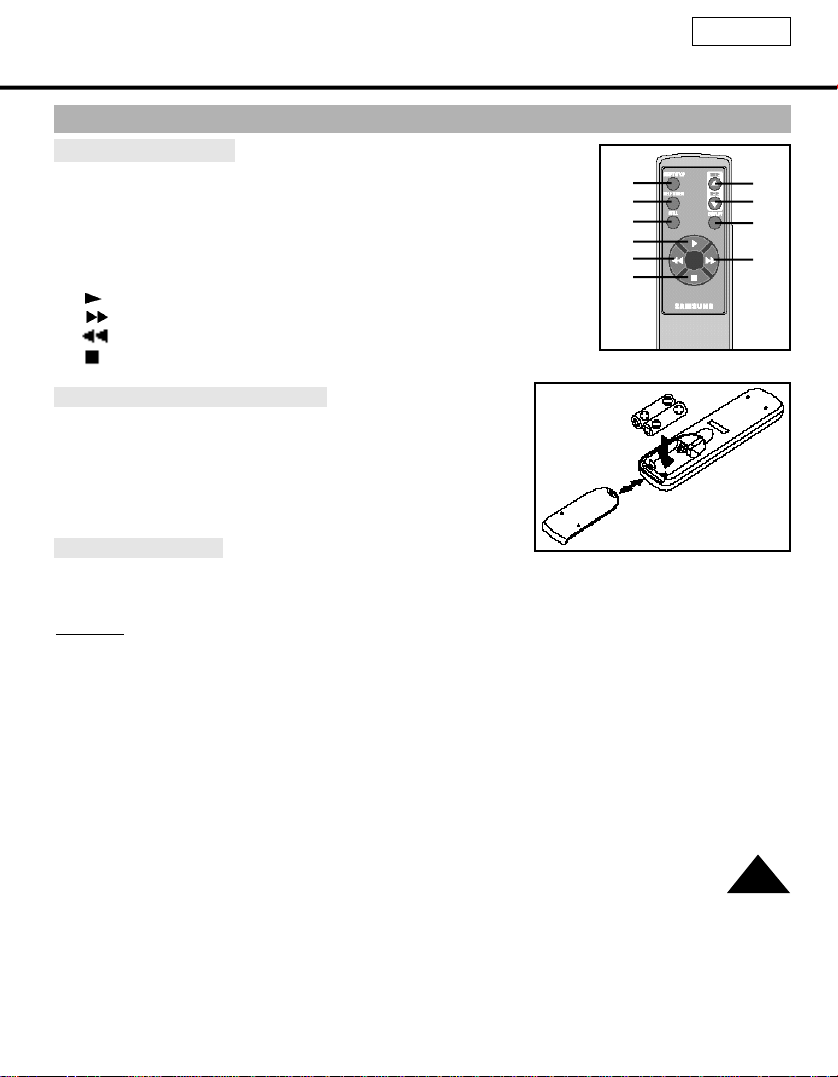
Remote Control (SCL530/L540/L550)
Description of Buttons
1. Start/Stop (see page 27)
2. Self Timer
3. Still (see page 57)
4. WIDE (see page 34)
5. TELE (see page 34)
6. Display (see page 16)
7. (Play) (see page 56)
8. (FF) (see page 57)
9. (REW) (see page 57)
10. (Stop) (see page 56)
Remote Control Battery Installation
✤ You must insert or replace these batteries when:
- You purchase the camcorder.
- The remote control doesn’t work.
✤ Insert two AAbatteries, following the + and - markings.
✤ Be careful not to reverse the polarity of the batteries.
Self Timer Recording
✤ The Self Timer function on the remote control allows you to
start and stop recording automatically.
10
ENGLISH
1
2
3
7
9
4
5
6
8
Example: scene with all members of your family
✤ Two options are available
- WAIT-10S/SELF-30S: wait 10 seconds, followed by 30
seconds of recording.
- WAIT-10S/SELF-END: wait 10 seconds, followed by
recording until you press the START/STOP button
again.
19
ENGLISH
1. Set power switch to CAMERAmode and
LOCK/STANDBYswitch to STANDBY mode.
1
2. Press Self Timer button until the appropriate indicator is displayed on the LCD:
2
■ WAIT-10S/SELF-30S
■ WAIT-10S/SELF-END
3. Press START/STOP button to start the timer.
: After waiting for 10 seconds, recording starts.
3
WAIT-10S
SELF-30S
: If you have selected SELF-30S, recording stops
automatically after 30 seconds.
: If you have selected SELF-END, press
START/STOPagain when you wish to stop
recording.
Note: When recording with the timer, you can press START/STOP button again to cancel the function.
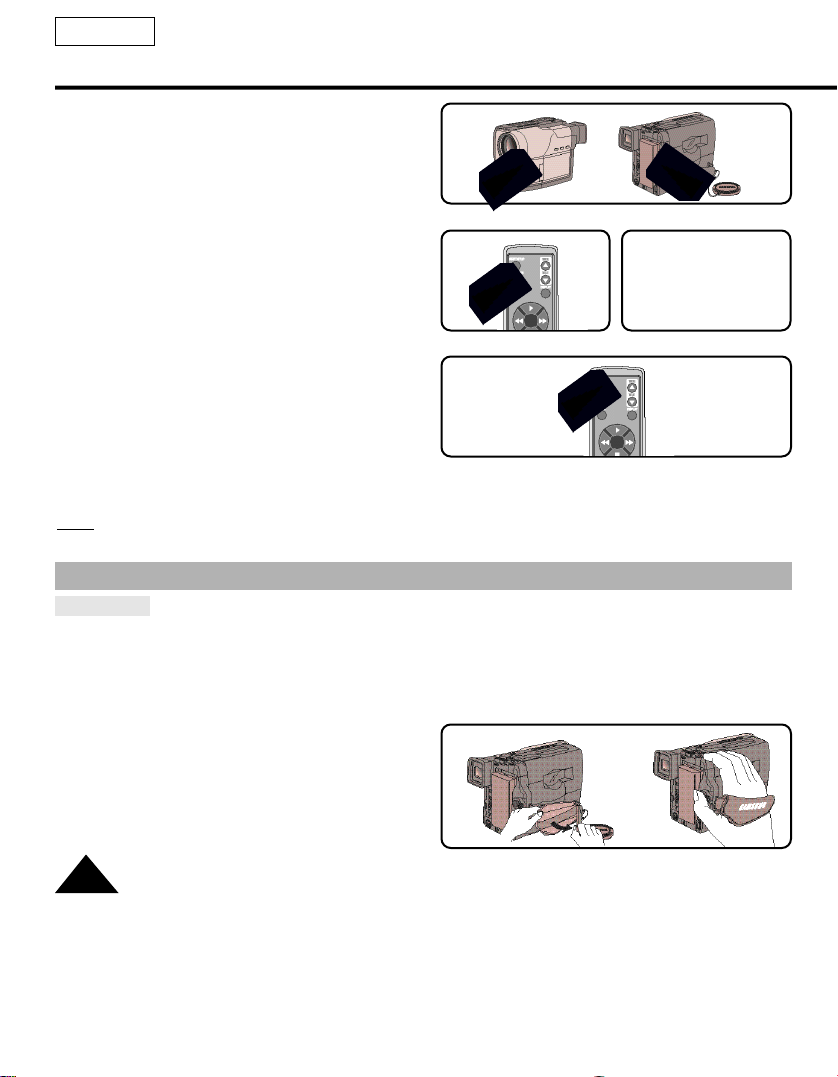
Adjusting the Hand Strap and Shoulder Strap
Hand Strap
✤ It is very important to adjust the hand strap for better recording.
✤ The hand strap enables you to:
- Hold the camcorder in a stable, comfortable position.
- Press the Zoom and the red Record button without having to change the position of your hand.
1. Pull open the Hand Strap cover and release the
Hand Strap, adjust its length and stick it back onto
the Hand Strap cover.
2. Close the Hand Strap cover back up again.
20

ENGLISH
Shoulder Strap
✤ The Shoulder Strap allows you to carry your camcorder with complete safety.
1. Insert each end of the strap into the hooks on the
camcorder.
2. Put the end of each strap through the buckle, adjust
the length of the strap, then pull it tight in the
buckle .
Lithium Battery Installation
✤ The lithium battery maintains the clock function, title and preset contents of the memory; even if the
battery pack or AC power adapter is removed.
✤ The lithium battery for the camcorder lasts about 8~10 months under normal operation from the time of
installation.
✤ When the lithium battery becomes weak or dead, the date/time indicator flashes for about 5 seconds
when you set the power switch to CAMERA.
When this occurs, replace the lithium battery with type CR2025.
1. Take out the holder from the lithium battery com-
partment.
2. Insert the side of the lithium battery toward the
bottom of the holder.
3. Reinsert the holder into the lithium battery compart-
ment.
Note: If the holder is inserted in the wrong direction, it
will not fit correctly.
Warning: Keep the LITHIUM BATTERY out of the reach of the children. Should the battery be
swallowed, consult a doctor immediately.
21
 Loading...