

Samsung ProXpress M4530ND, ProXpress M4530NX User Manual

76
3. Maintenance
Cleaning the machine
If printing quality problems occur or if you use your machine in a dusty enviroment, you need to clean your machine regularly to keep it in the best printing condition
and use your machine longer.
• Cleaning the cabinet of the machine with cleaning materials containing large amounts of alcohol, solvents, or other strong substances can discolor or distort the
cabinet.
• If your machine or the surrounding area is contaminated with toner, we recommend you use a cloth or tissue dampened with water to clean it. If you use a vacuum
cleaner, toner blows in the air and might be harmful to you.
9
Cleaning the outside
Clean the machine cabinet with a soft, lint-free cloth. Dampen the cloth slightly with water, but be careful not to let any water drip onto or into the machine.
10
Cleaning the inside
During the printing process, paper, toner, and dust particles can accumulate inside the machine. This buildup can cause print quality problems, such as toner specks
or smearing. Cleaning the inside of the machine clears and reduces these problems.
Use a dry lint free cloth when cleaning the inside of the machine, be careful not to damage the transfer roller or any other inside parts. Do not use solvents such as
benzene or thinner. Printing quality problems can occur and cause damage to the machine.

Cleaning the machine
77
3. Maintenance

Cleaning the machine
78
3. Maintenance

Cleaning the machine
79
3. Maintenance
11
Cleaning the pickup roller

80
3. Maintenance
Tips for moving & storing the machine
The warranty does not cover damage from falls or impacts due to the intentional or unintentional actions of the user.
• When moving the machine, do not tilt or turn it upside down. Otherwise, the inside of the machine may be contaminated by toner, which can cause damage to
the machine or reduce print quality.
• When moving the machine, make sure at least two people are holding the machine securely.
4. Troubleshooting
This chapter gives helpful information for what to do if you encounter an error.
• Tips for avoiding paper jams 82
• Clearing paper jams 83
• Understanding the status LED 94
• Understanding display messages 96
• This chapter gives helpful information about what to do when you encounter an error. If
your machine has a display screen, check the message on the display screen first to solve.
• If you cannot find a solution to your problem in this chapter, refer to the Troubleshooting
chapter in the Advanced Guide (see "Troubleshooting" on page 255).
• If you cannot find a solution in the User's Guide or the problem persists, call for service.

82
4. Troubleshooting
Tips for avoiding paper jams
By selecting the correct medias, most paper jams can be avoided. To avoid paper jams, refer to the following guidelines:
• Ensure that the adjustable guides are positioned correctly (see "Tray overview" on page 37).
• Do not remove paper from the tray while your machine is printing.
• Flex, fan, and straighten paper before loading.
• Do not use creased, damp, or highly curled paper.
• Do not mix papers in a tray.
• Use only recommended print media (see "Print media specifications" on page 107).

83
4. Troubleshooting
Clearing paper jams
To avoid tearing the paper, pull the jammed paper out slowly and gently.
1
In tray1
Illustrations in this user’s guide may differ from your machine depending on the model and options installed. Check your machine type (see "Front view" on page 17).

Clearing paper jams
84
4. Troubleshooting
2
In optional tray
• Illustrations in this user’s guide may differ from your machine depending on the model and options installed. Check your machine type (see "Front view" on page
17).
• This troubleshooting may not be available depending on model or optional goods (see "Variety feature" on page 8).

Clearing paper jams
85
4. Troubleshooting
If you do not see the paper in this area, stop and go to next step:
If you do not see the paper in this area, stop and go to next step:

Clearing paper jams
86
4. Troubleshooting
3
In the multi-purpose tray
Clearing paper jams
87
4. Troubleshooting
4
Inside the machine
The Fuser area is HOT, please wait until device cools down before accessing this area. Turn power off to cool the machine down. Take care when removing paper
from the machine.
Illustrations in this user’s guide may differ from your machine depending on the model and options installed. Check your machine type (see "Front view" on page 17).

Clearing paper jams
88
4. Troubleshooting

Clearing paper jams
89
4. Troubleshooting
If you do not see the paper in this area, stop and go to next step:
If you do not see the paper in this area, stop and go to next step:

Clearing paper jams
90
4. Troubleshooting
5
In the exit area
The Fuser area is HOT, please wait until device cools down before accessing this area. Turn power off to cool the machine down. Take care when removing paper
from the machine.

Clearing paper jams
91
4. Troubleshooting
If you do not see the paper in this area, stop and go to next step:

Clearing paper jams
92
4. Troubleshooting
6
In the duplex unit area

Clearing paper jams
93
4. Troubleshooting
If you do not see the paper in this area, stop and go to next step:
94
4. Troubleshooting
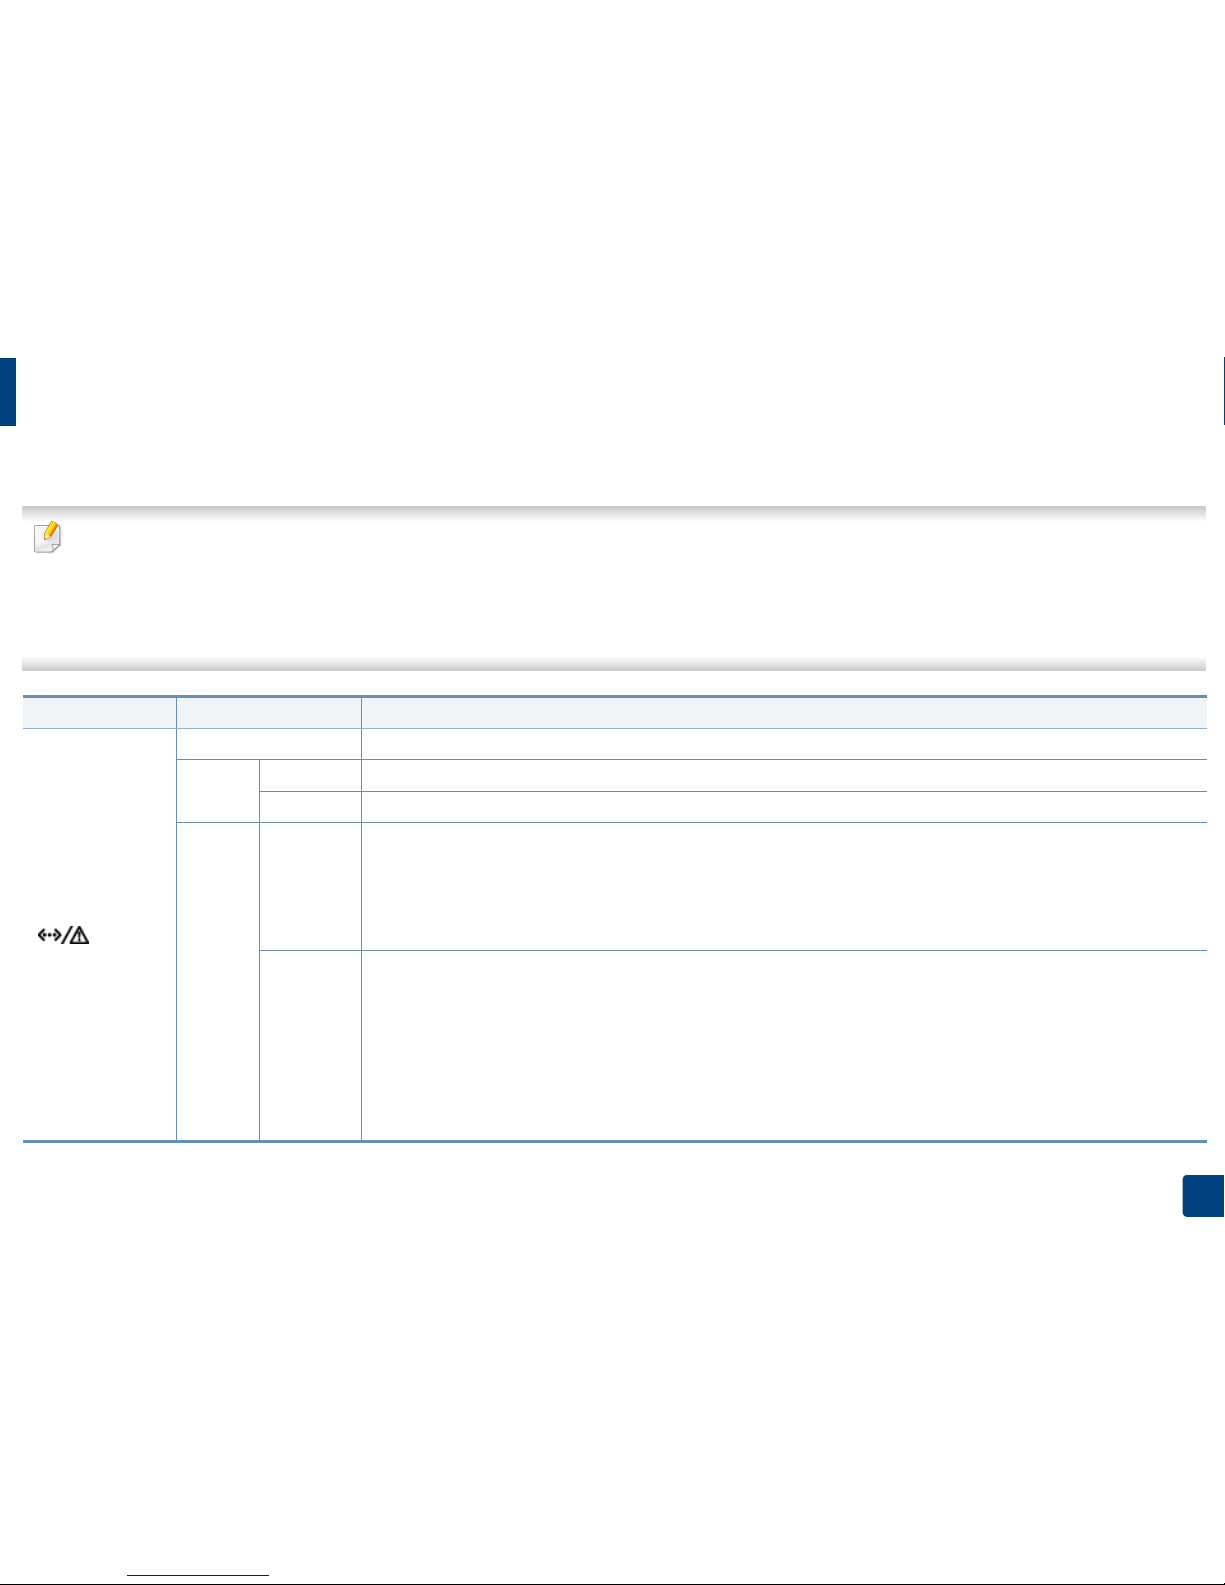
Understanding the status LED
The color of the LED indicates the machine's current status.
• Some LEDs may not be available depending on model or country (see "Control panel overview" on page 19).
• To resolve the error, look at the error message and its instructions from the troubleshooting part (see "Understanding display messages" on page 96).
• You also can resolve the error with the guideline from the computer’s Samsung Printing Status program window (see "Using Samsung Printer Status" on page
247).
• If the problem persists, call a service representative.
LED Status Description
() Status
Off The machine is off-line.
Blue
Blinking When the backlight blinks, the machine is receiving or printing data.
On • The machine is on-line and can be used.
Red
Blinking
• A minor error has occurred and the machine is waiting for the error to be cleared. Check the display message. When
the problem is cleared, the machine resumes.
• Small amount of toner is left in the cartridge. The estimated cartridge life
a
. of toner is close. Prepare a new cartridge
for replacement. You may temporarily increase the printing quality by redistributing the toner (see "Redistributing
toner" on page 65).
On
• A toner cartridge has almost reached its estimated cartridge life
a
. It is recommended to replace the toner cartridge (see
"Replacing the toner cartridge" on page 67).
• The cover is opened. Close the cover.
• There is no paper in the tray when receiving or printing data. Load paper in the tray.
• The machine has stopped due to a major error. Check the display message (see "Understanding display messages" on
page 96).
• A paper jam has occurred (see "Clearing paper jams" on page 83).

Understanding the status LED
95
4. Troubleshooting
( ) Power
Blue
On The machine is in power save mode.
Off The machine is in ready mode or machine’s power is off.
a. Estimated cartridge life means the expected or estimated toner cartridge life, which indicates the average capacity of print-outs and is designed pursuant to ISO/IEC 19752. The number of pages
may be affected by operating environment, percentage of image area, printing interval, graphics, media and media size.
LED Status Description

96
4. Troubleshooting
Understanding display messages
Messages appear on the control panel display to indicate the machine’s status
or errors. Refer to the tables below to understand the messages’ and their
meaning, and correct the problem, if necessary.
• You can resolve the error with the guideline from the computer’s
Printing Status program window (see "Using Samsung Printer Status" on
page 247).
• If a message is not in the table, reboot the power and try the printing job
again. If the problem persists, call a service representative.
• When you call for service, provide the service representative with the
contents of display message.
• Some messages may not appear on the display depending on the
options or models.
• [error number] indicates the error number.
• [tray type] indicates the tray number.
• [color] indicates the color of toner.
7
Paper Jam-related messages
Message Meaning Suggested solutions
• Jam inside of duplex Paper has jammed during
duplex printing. This is
applicable only to
machines with this feature.
Clear the jam (see "In the
duplex unit area" on page
92).
• Jam bottom of
duplex
• Jam in exit area Paper has jammed in the
exit area.
Clear the jam (see "In the
exit area" on page 90).
• Jam inside of
machine
Paper has jammed in the
inside machine.
Clear the jam (see "Inside
the machine" on page
87).
Paper jam in tray Paper has jammed in the
tray.
Clear the jam (see "In
tray1" on page 83).
• Paper jam in tray 2
• Paper jam in tray 3
• Paper jam in tray 4
• Paper jam in tray 5
Paper has jammed in the
optional tray.
Clear the jam (see "In
optional tray" on page
84).
Paper jam in MP tray Paper has jammed in the
multi-purpose tray.
Clear the jam (see "In the
multi-purpose tray" on
page 86).
Message Meaning Suggested solutions

Understanding display messages
97
4. Troubleshooting
8
Toner-related messages
Message Meaning Suggested solutions
• Replace new toner
• End of life, Replace
with new toner
cartridge
The indicated toner
cartridge has reached
its estimated
cartridge life
b
.
Replace the toner cartridge
with a Samsung- genuine toner
cartridge
a
(see "Replacing the
toner cartridge" on page 67).
• Replace IMG. unit
• End of life, Replace
with new imaging
unit
The indicated
imaging unit has
reached its estimated
imaging unit life
b
.
Replace the imaging unit with a
Samsung-genuine imaging
unit (see "Replacing the
imaging unit" on page 69).
• Error: [error
number]
• Imaging Unit
Failure: [error
number]. Install
imaging unit again
The imaging unit is
not installed.
Install the imaging unit. If it is
already installed, try to reinstall
the imaging unit. If the problem
persists, call for service.
• Error: [error
number]
• Imaging unit
Failure: [error
number]. Call for
service
There is a problem in
the imaging unit.
Turn the machine off and back
on again. If the problem
persists, call for service.
• Prepare new toner
• Prepare new toner
cartridge
The estimated
cartridge life
b
of
toner is close.
Prepare a new cartridge for a
replacement. You may
temporarily increase the
printing quality by
redistributing the toner (see
"Redistributing toner" on page
65).
• Prepare IMG. unit
• Prepare new
imaging unit
The estimated
imaging unit life of
toner is close.
Prepare a new imaging unit for
a replacement (see "Replacing
the imaging unit" on page 69).
• Shake toner cart.
• Shake toner
cartridge and then
install. Replace
toner cartridge if
the problem
persists
Small amount of
toner is left in the
indicated cartridge.
You may temporarily increase
the printing quality by
redistributing the toner (see
"Redistributing toner" on page
65).
• Error: [error
number]
• Toner Cartridge
Failure: [error
number]. Install
toner cartridge
again
The toner cartridge is
not installed.
Install the toner cartridge. If it is
already installed, try to reinstall
the toner cartridge. If the
problem persists, call for
service.
Message Meaning Suggested solutions

Understanding display messages
98
4. Troubleshooting
• Toner Not Installed
• Toner cartridge is
not installed.
Install the
cartridge
The toner cartridge is
not installed.
Reinstall the toner cartridge.
• IMG. Not Installed
• Imaging unit is not
installed. Install
the unit
The imaging unit is
not installed.
Reinstall the imaging unit two
or three times. If the problem
persists, call for service.
• Error: [error
number]
• Toner Cartridge
Failure: [error
number]. Call for
service
There is a problem in
the toner cartridge.
Turn the machine off and back
on again. If the problem
persists, call for service.
• Toner Not
Compatible
• Toner cartridge is
not compatible.
Check users guide
The toner cartridge
you have installed is
not for your machine.
Install a Samsung-genuine
toner cartridge, designed for
your machine (see "Available
consumables" on page 60).
• IMG. Not
Compatible
• Imaging unit is not
compatible. Check
guide
The imaging unit you
have installed is not
for your machine.
Install a Samsung-genuine
imaging unit, designed for your
machine (see "Available
consumables" on page 60).
Message Meaning Suggested solutions
• Replace new toner
• Replace with new
toner cartridge
The indicated toner
cartridge has almost
reached its estimated
cartridge life
b
.
Replace the toner cartridge for
the best print quality when this
message appears. Using a
cartridge beyond this stage can
result in printing quality issues
(see "Replacing the toner
cartridge" on page 67).
If the machine stops printing,
replace the toner cartridge (see
"Replacing the toner cartridge"
on page 67).
• Replace IMG. unit
• Replace with new
imaging unit
The indicated
imaging unit has
almost reached its
estimated imaging
unit life
b
.
Replace the imaging unit for
the best print quality when this
message appears. Using a
imaging unit beyond this stage
can resultin printing quality
issues (see "Replacing the
imaging unit" on page 69).
• Remove seal tape
• Did not supply
enough toner.
Remove seal tape
of toner cartridge
or shake it. Call for
service if the
problem persists
The seal tape of the
toner cartridge is not
removed
Remove the seal tape of the
toner cartridge (see "Replacing
the toner cartridge" on page
67).
Message Meaning Suggested solutions
 Loading...