

Samsung Projection Television, HC-P5252W Quick Manual
Thank you for choosing Samsung! Your new Samsung Projection TV represents the latest in
television technology. We designed it with easy-to-use on-screen menus and closed captioning
capabilities, making it one of the best products in its class. We are proud to offer you a product
that will provide convenient, dependable service and enjoyment for years to come. If you have
any problem in an initial installation, please feel free to contact SAMSUNG Customer Care
Center at 1-800-SAMSUNG (1-800-726-7864).
Quick Guide
You can use the remote control up to about 23 feet from the TV. When using the remote,
always point it directly at the TV. You can also use your remote control to operate your Set-Top
box, VCR, Cable box or DVD player.
Thank You for Choosing Samsung
Important Warranty Information Regarding Television Format Viewing
Standard screen format televisions (4:3, the aspect ratio of the screen width to height) are
primarily designed to view standard format full-motion video. The images displayed on them
should primarily be in the standard 4:3 ratio format and constantly moving. Displaying
stationary graphics and images on screen, such as the dark top and bottom letterbox bars (wide
screen pictures), should be limited to no more than 15% of the total television viewing per
week.
Wide screen format televisions (16:9, the aspect ratio of the screen width to height) are
primarily designed to view wide screen format full-motion video. The images displayed on
them should primarily be in the wide screen 16:9 ratio format, or expanded to fill the screen if
your model offers this feature, and constantly moving. Displaying stationary graphics and
images on screen, such as the dark side-bars on non-expanded standard format television video
and programming, should be limited to no more than 15% of the total television viewing per
week.
Additionally, viewing other stationary images and text such as stock market reports, video game
displays, station logos, web sites or computer graphics and patterns, should be limited as
described above for all televisions. Displaying any stationary images that exceed the above
guidelines can cause uneven aging of picture tubes (CRTs) that leave subtle, but permanent
burned-in ghost images in the television picture. To avoid this, vary the programming and
images, and primarily display full screen moving images, not stationary patterns or dark
bars. On television models that offer picture sizing features, use these controls to view the
different formats as a full screen picture.
Be careful in the selection and duration of television formats used for viewing. Uneven CRT
aging as a result of format selection and use, as well as other burned-in images, is not covered
by your Samsung limited warranty.
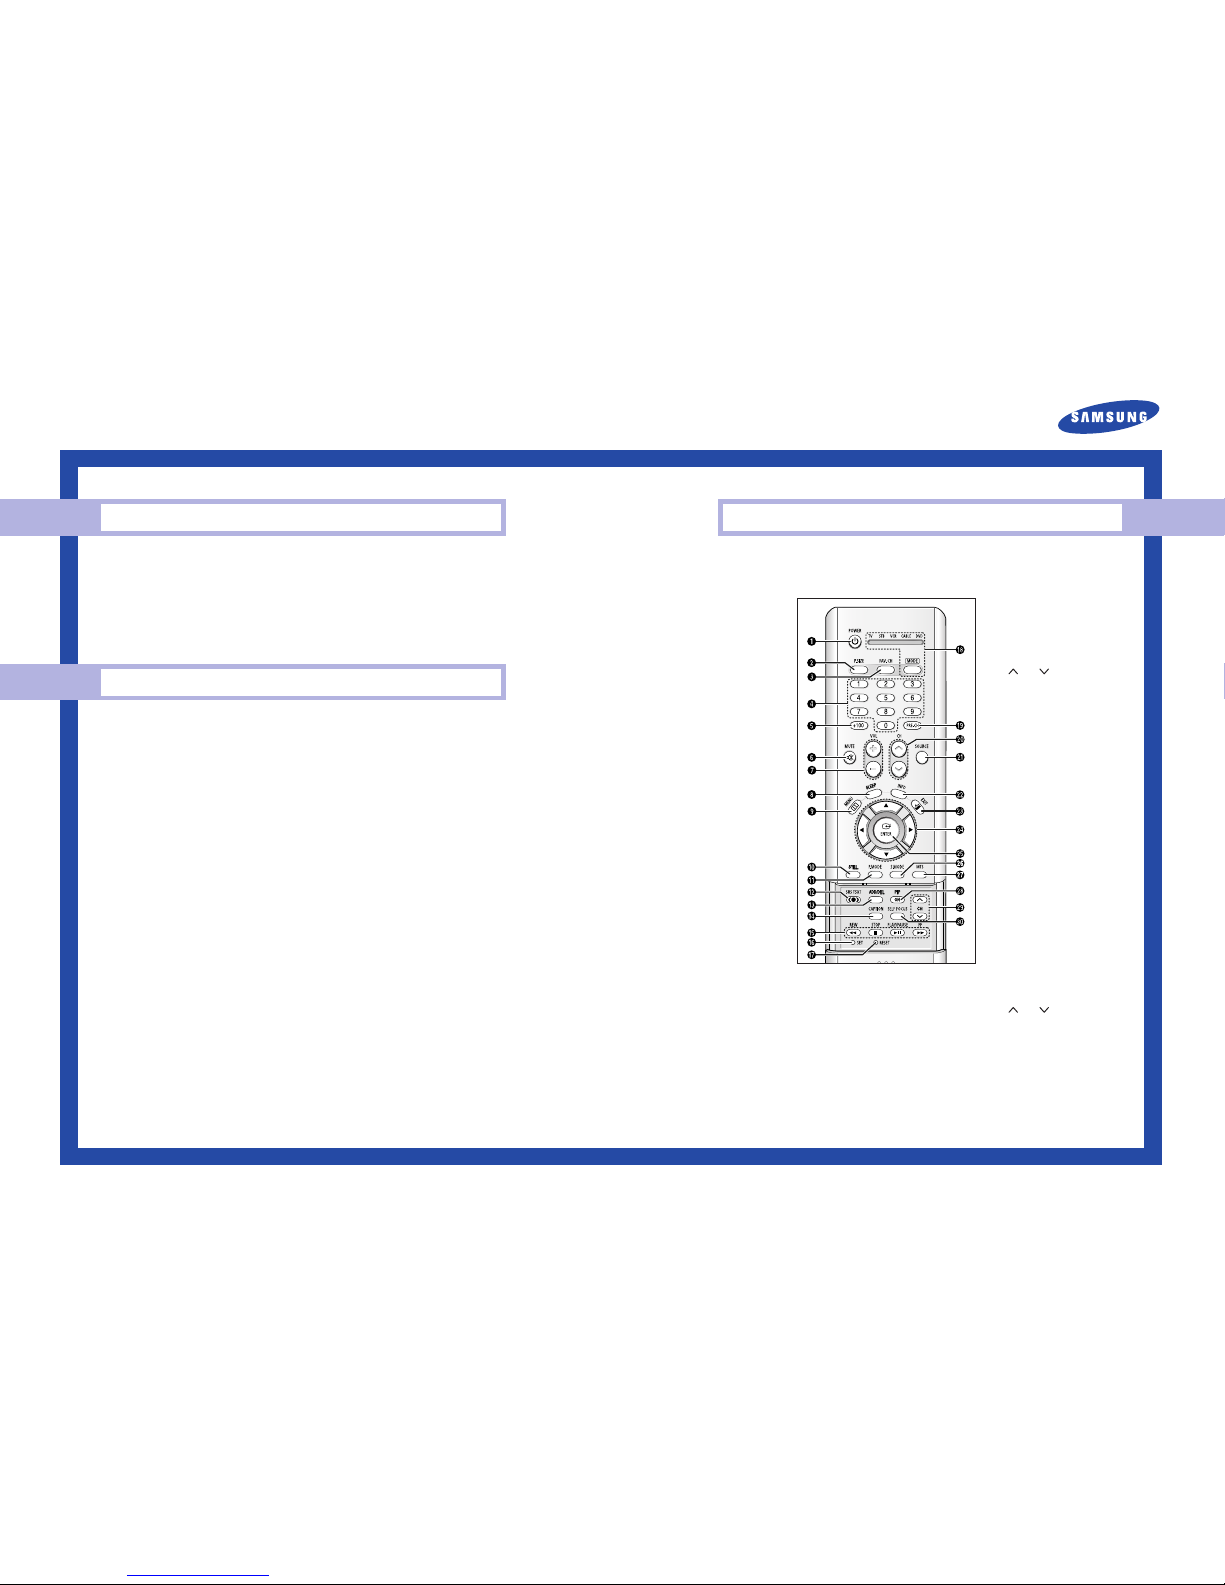
Remote Control
Œ
POWER
Turns the TV on and off.
´
P.SIZE
Press to change the picture size.
ˇ
FAV. CH
(Favorite Channel)
Press to switch between your
favorite channels.
¨
Number buttons
Press to select channels directly on
the TV.
ˆ
+100
Press to select channels over 100.
For example, to select channel 121,
press the “+100,” then press the “2”
and “1.”
Ø
MUTE
Press to temporarily cut off the
sound.
∏
VOL +, VOL -
Press to increase or decrease the
volume.
”
SLEEP
Press to select a preset time
interval for automatic shut off.
’
MENU
Displays the main on-screen menu.
˝
STILL
(Main picture)
Press to stop the action during a
particular scene. Press again to
resume normal video.
The still function doesn’t operate in
“Component1” or “Component2”
mode.
Ô
P.MODE
Adjust the TV picture by selecting
one of the preset factory settings
(or select your personal,
customized picture settings.)
SRS TSXT
Activates TruSurround.
Ò
ADD/DEL
Press to add or erase channels in
the TV’s memory. Use to memorize
or erase the fine tuning after fine
tuning channels.
Ú
CAPTION
Press to view closed caption
information.
¯
MODE
Selects a target device to be
controlled by this remote control
(i.e., TV, STB, VCR, CABLE or DVD).
˘
PRE-CH
Tunes to the previous channel.
¿
CH , CH
Press to change channels.
¸
SOURCE
Each time the button is pressed, all
the inputs connected to the external
component jacks will be shown in
regular sequence.
˛
INFO
Press to display information on the
TV screen.
◊
EXIT
Press to exit the menu.
±
œ/√/†/…
Control the cursor in the menu.
≠
ENTER
While using the on-screen menus,
press ENTER to activate (or change)
a particular item.
–
S.MODE
Adjust the TV sound by selecting
one of the preset factory settings
(or select your personal,
customized sound settings.)
—
MTS
(Multichannel Television
Sound)
Press to choose “Stereo”, “Mono”
or “SAP (Secondary Audio
Program)”.
÷
PIP ON
Activates PIP (Picture-In-Picture).
®
CH , CH
Displays the available channels in
sequence. (These buttons change
channels in the PIP window only.)
∑
SELF FOCUS
Press to adjust for the optimum
picture set in the factory.
Æ
VCR/DVD Controls
Controls VCR/DVD functions: Rewind, Stop,
Play/Pause, Fast Forward.
ı
SET
Used during set up of this remote control, so
that it will work compatibly with other devices
(VCR, Set-Top box, Cable box, DVD, etc.)
˜
RESET
If your remote control is not functioning
properly, take out the batteries and press the
reset button for about 2~3 seconds. Re-insert
the batteries and try using the remote control
again.
Quick Guide
Deactivating the Automatic Execution of the Self Focus
The “Self Focus” feature starts on default. It will automatically begin 10 minutes after switching
on the power and the appearance of the screen image. To set the optimum picture quality, the
“Self Focus” will automatically begin again after another 30 minutes, as the screen image is then
fully stabilized.
BP68-00339A-00
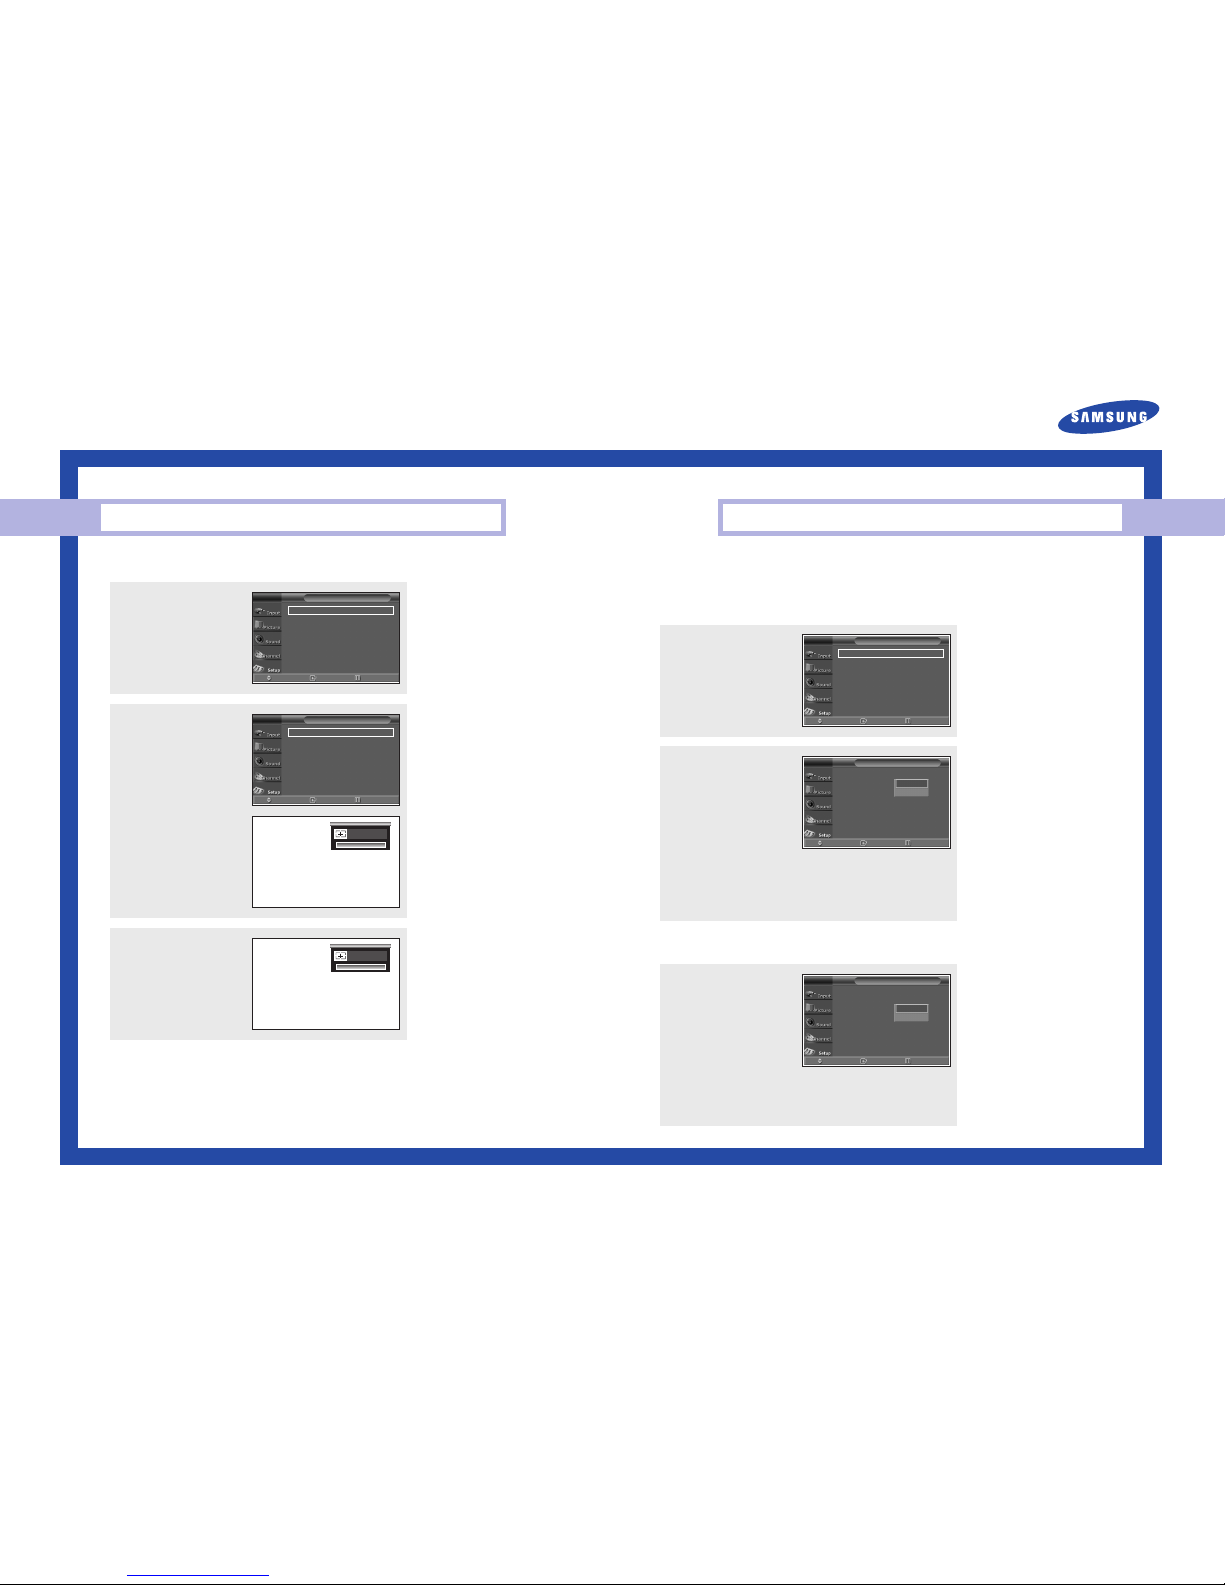
Adjusting the Screen Automatically (Self Focus) Adjusting the Screen Automatically (Self Focus)
The “Self Focus” feature automatically finds the optimum picture quality when blurring,
overlapping colors or incorrect focus occurs. These conditions may be caused by moving your TV.
Removing the “Self Focus” Message from the Display
1
Press the MENU button.
Press the … or † button to
select “Setup”, then press the
ENTER button.
2
Press the … or † button to
select “Self Focus”, then press
the ENTER button.
The “Self Focus” is selected.
Press the ENTER button again.
The self focus process begins
with the message “Self Focus”
and horizontal bar is displayed.
When it is finished, all of things
will disappear and the optimum
picture quality can be enjoyed.
Press the EXIT button to exit.
œ During the process, minor
distortions of the picture may
occur. At this time, the colors
may diffuse and a searching
pattern will appear on the edges
of the screen. This is a normal
part of the adjustment.
• Changing channels and any other signal changes will pause the self focus until a stable signal has
returned. It resumes after the signal has been stabilised. This feature will not work without a signal
• Ambient light that is too bright may affect the self focus. If this occurs, darken the environment and
try again.
Alternate method:
Simply press the SELF FOCUS
button on the remote control to
enjoy the optimum picture
quality.
Time
√√
Plug & Play
√√
Language : English
√√
Self Focus
√√
Blue Screen : On
√√
Caption
√√
†
More
Move Enter Return
Setup
T V
Self Focus
√√
Auto : On
√√
Message Display : On
√√
Move Enter Return
Self Focus
T V
Self Focus
Self Focus
1
Press the MENU button.
Press the … or † button to
select “Setup”, then press the
ENTER button.
2
Press the … or † button to
select “Self Focus”, then press
the ENTER button.
Press the … or † button to
select “Auto”, then press the
ENTER button.
To turn off the automatic
execution of the self focus
feature, select “Off” by pressing
the … or † button, then press
the ENTER button.
Self Focus
√√
Auto : On
√√
Message Display : On
√√
Move Enter Return
Self Focus
T V
Off
On
Time
√√
Plug & Play
√√
Language : English
√√
Self Focus
√√
Blue Screen : On
√√
Caption
√√
† More
Move Enter Return
Setup
T V
3
Press the … or † button to
select “Message Display”, then
press the ENTER button.
To remove the message “Self
Focus” and horizontal bar on the
screen during the self focus
process, select “Off” by pressing
the … or † button, then press
the ENTER button.
Press the EXIT button to exit.
Self Focus
√√
Auto : On
√√
Message Display : On
√√
Move Enter Return
Self Focus
T V
Off
On
 Loading...