

Samsung Potomac-PJT WF393, Potomac-PJT WF395, Potomac-PJT WF405 Repair Manual
- 1/39 -
HA Repair Guide
Front-Load Washer
Potomac-PJT
WF393/WF395/WF405
- 2/39 -
• Vibration
• Noise
Vibration
& Noise
• Water Leakage
Leakage
• Water Supply
• No Power
Improper
Operation
• Error-Mode
Error-
mode
• Test mode / Diagnosis
• Circuit Diagram / PBA
Appendix
Potomac-PJT Repair Guide
[ WF393/WF395/WF405]
- 3/39 -
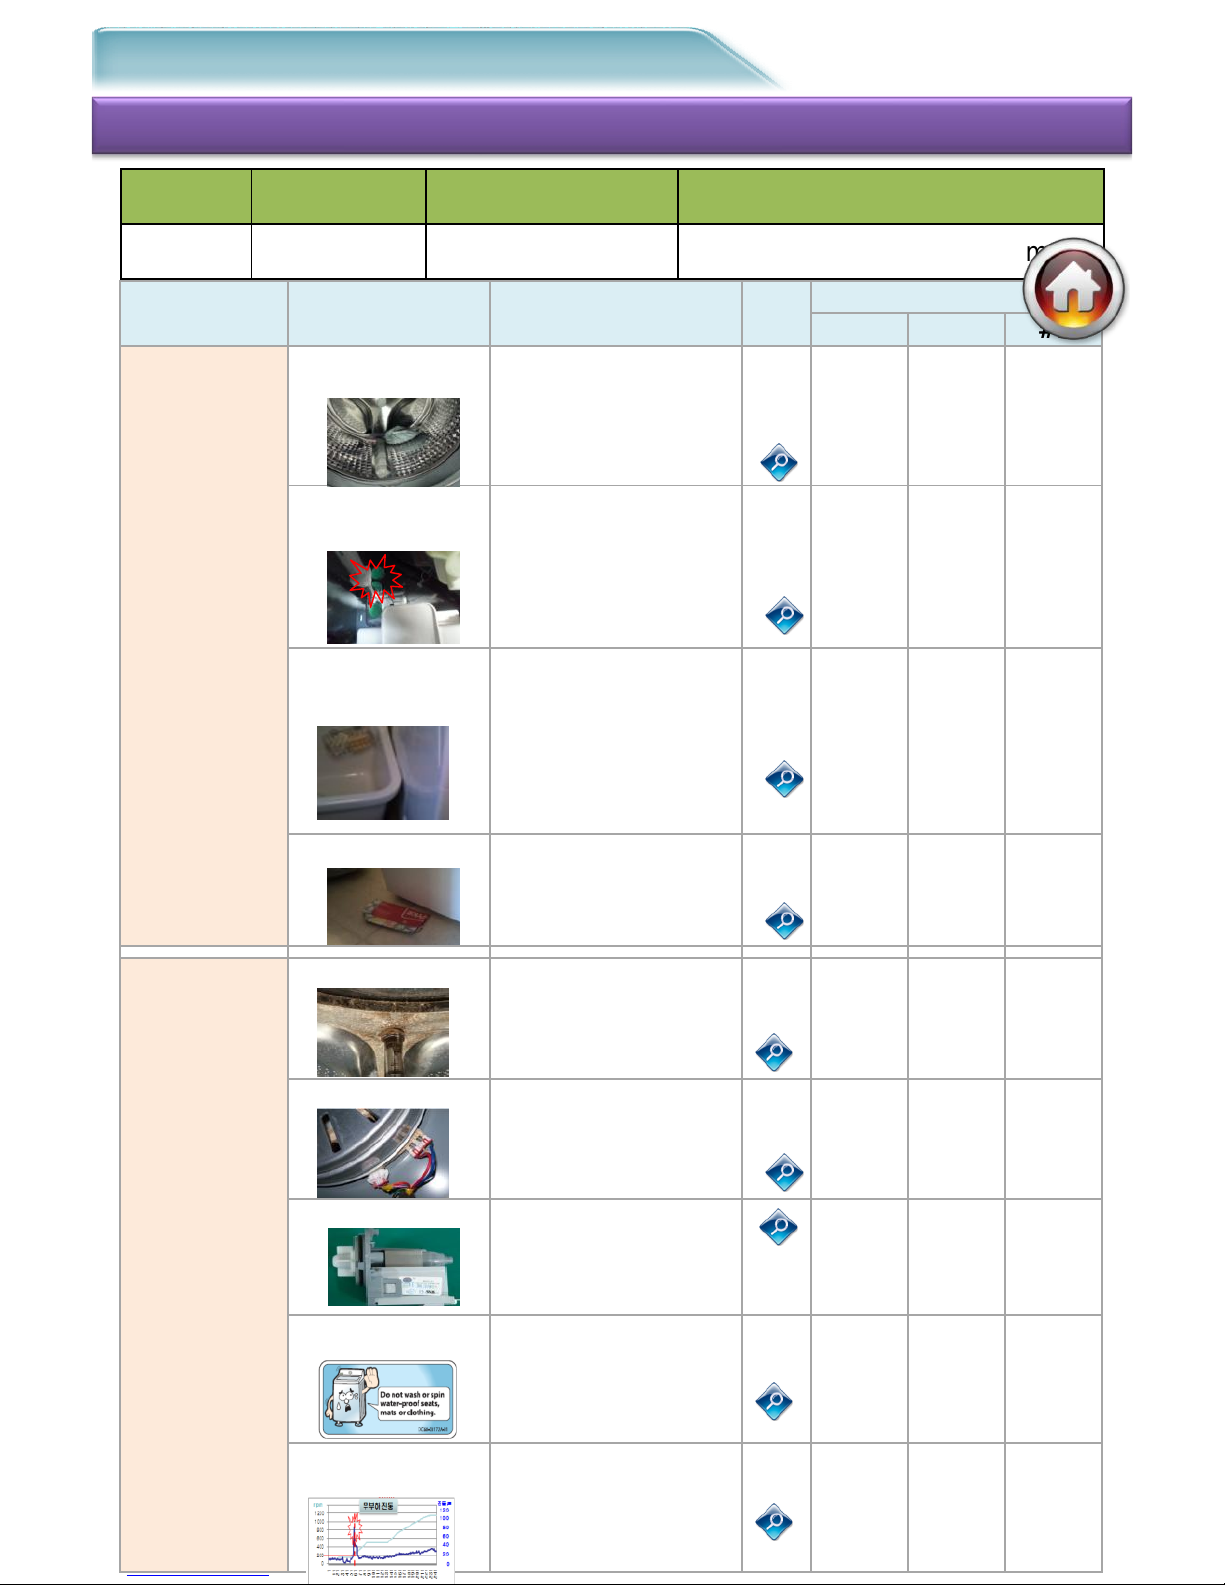
#1. Symptom : Vibration & Noise
1-1. Schematic diagram of Repair
Check-1
Step of Cause
Check-2
Tip
Code
Block
# 1
# 2
# 3
Set-Vibration
1.Spin-basket defect
Leg condition check
Ball-balancer oil-leakage
Weight-Balance
coupling
Spin-Basket
concentration
1-1
Balancer
Weight
Spin
concentra
tion
2.Damper defect
Diagnosis of Tub
movement noise
Hanger-Spring
separation
Damper separation
Loosening of Damper
coupling
1-2
Damper
Hanger
3.Unstable place
for installation
Floor moisture
environment
Installation in low-temp
environment
Dryer Pair installation
narrow
Rear hose interference
Floor shaking
1-3
Place of
installatio
n
Installatio
n environ
ment
4. Installation defect
Leg level installation
check
Non-Slip Pad Unattached
Moving Pad/Pan-Drain
1-3
Level
installatio
n
Non-Slip
Sheet
Installatio
n
Spin-Noise
1.Shaft & Frame
Rotor friction during
spinning mode
Tub Bearing rust
Frame friction
1-4
Motor
-Rotor
Tub-
Bearing
Frame
2.Motor defect
Spin-mode Stator check
Diagnosis of motor Coil
Hall sensor check
1-5
Motor
-Stator
Hall-S/S
3.Pump-Drain defect
Pump-Case Damage
Fixing bolt loosened
Foreign substance in
pump
Impeller Damage
1-6
Pump-
Case
Impeller
Foreign
Substanc
e
4.
Wrong usage of
product
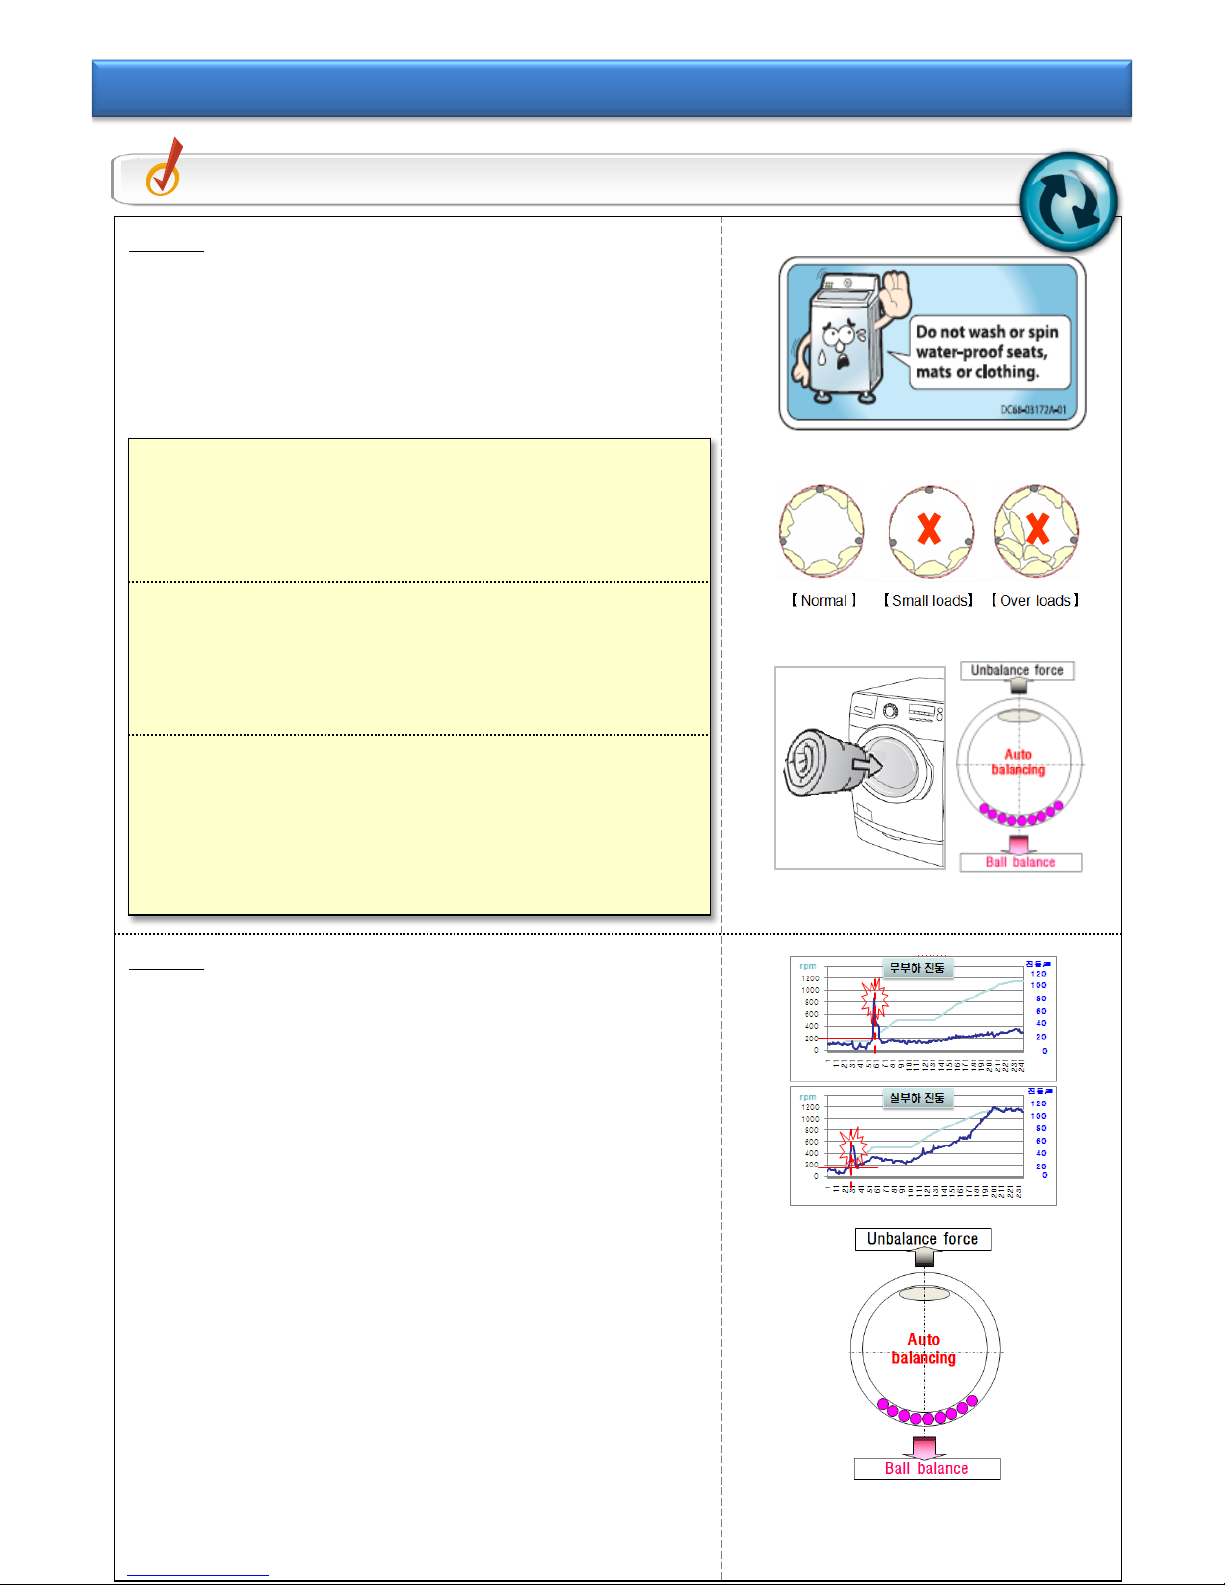
User uses moistureproof cloth
Wash little amount
Spin course only
1-7
Moisture-
proof
cloth
5.Product inherent
characteristics
Resonance RPM band
shaking
Shaking at the beginning
Tub Ball
Noise
1-7
Resonanc
e
phenome
non
Balancer
Chassis
Project
Basic Model
Type
Drum
Potomac
WF393/395/405
Front-Load
/ Power Foam
- 4/39 -
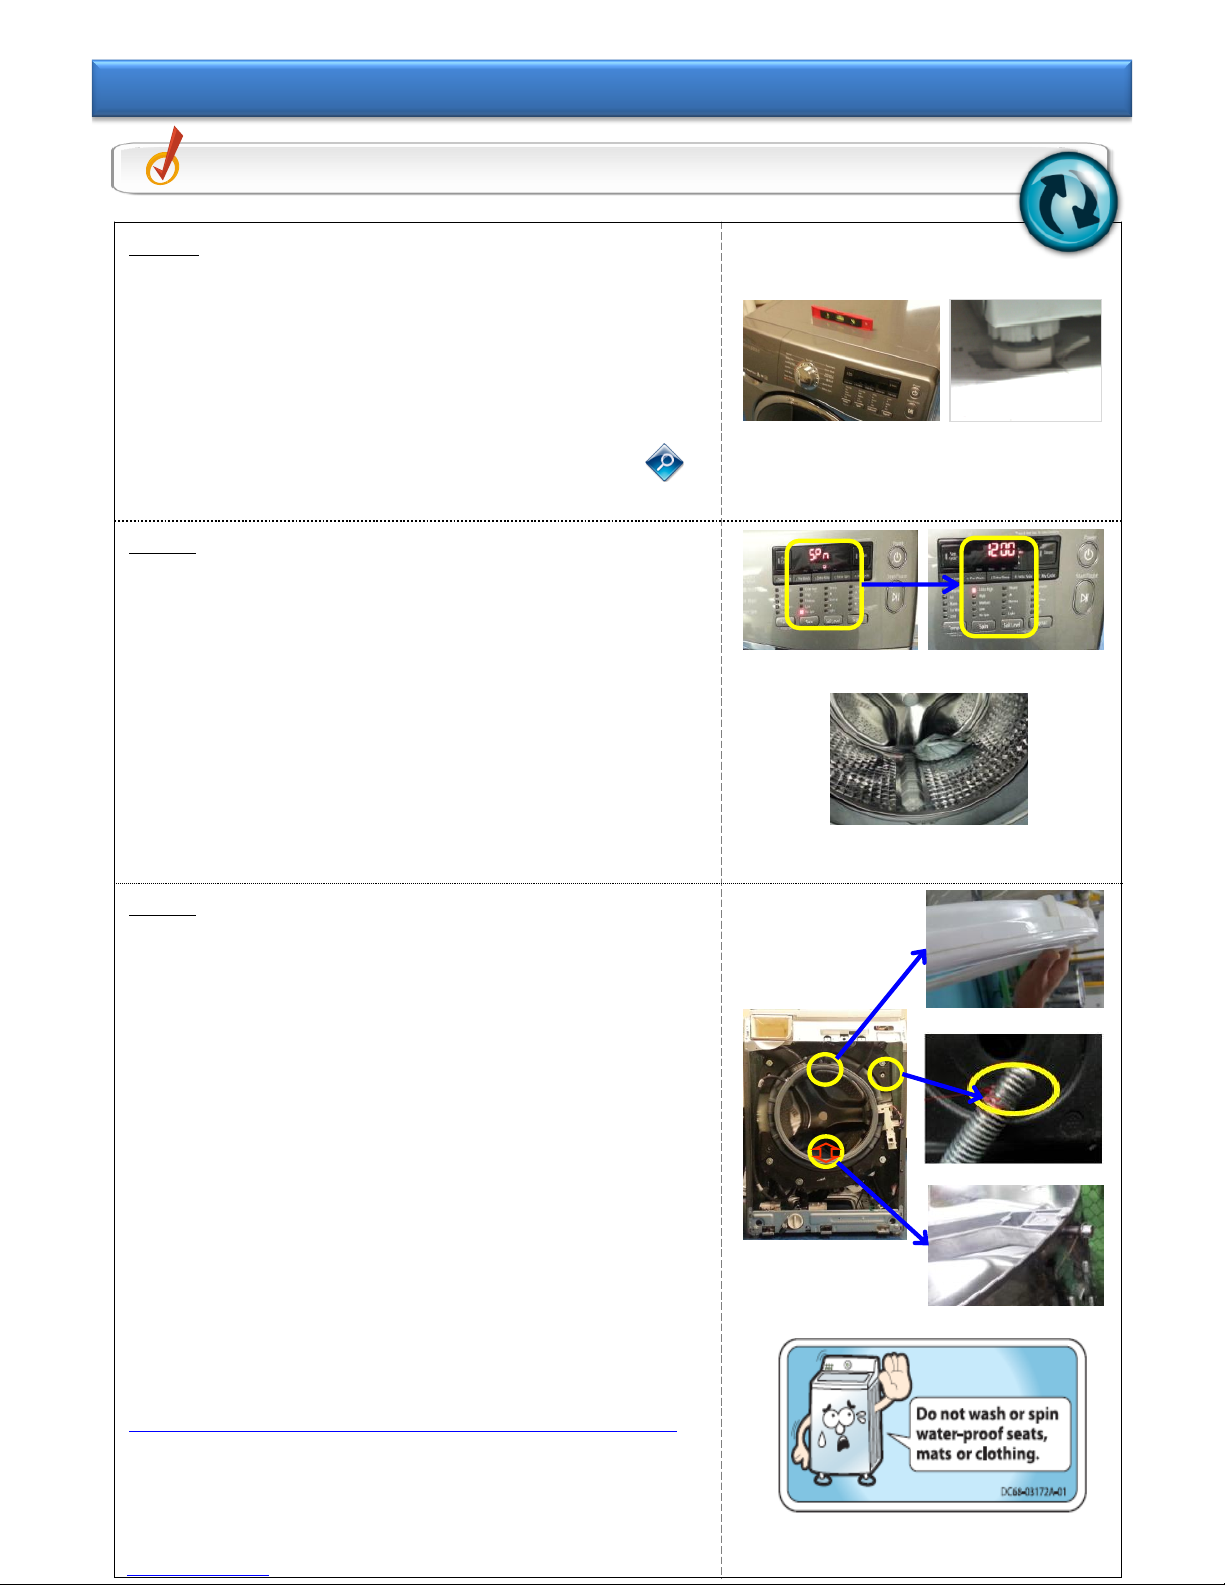
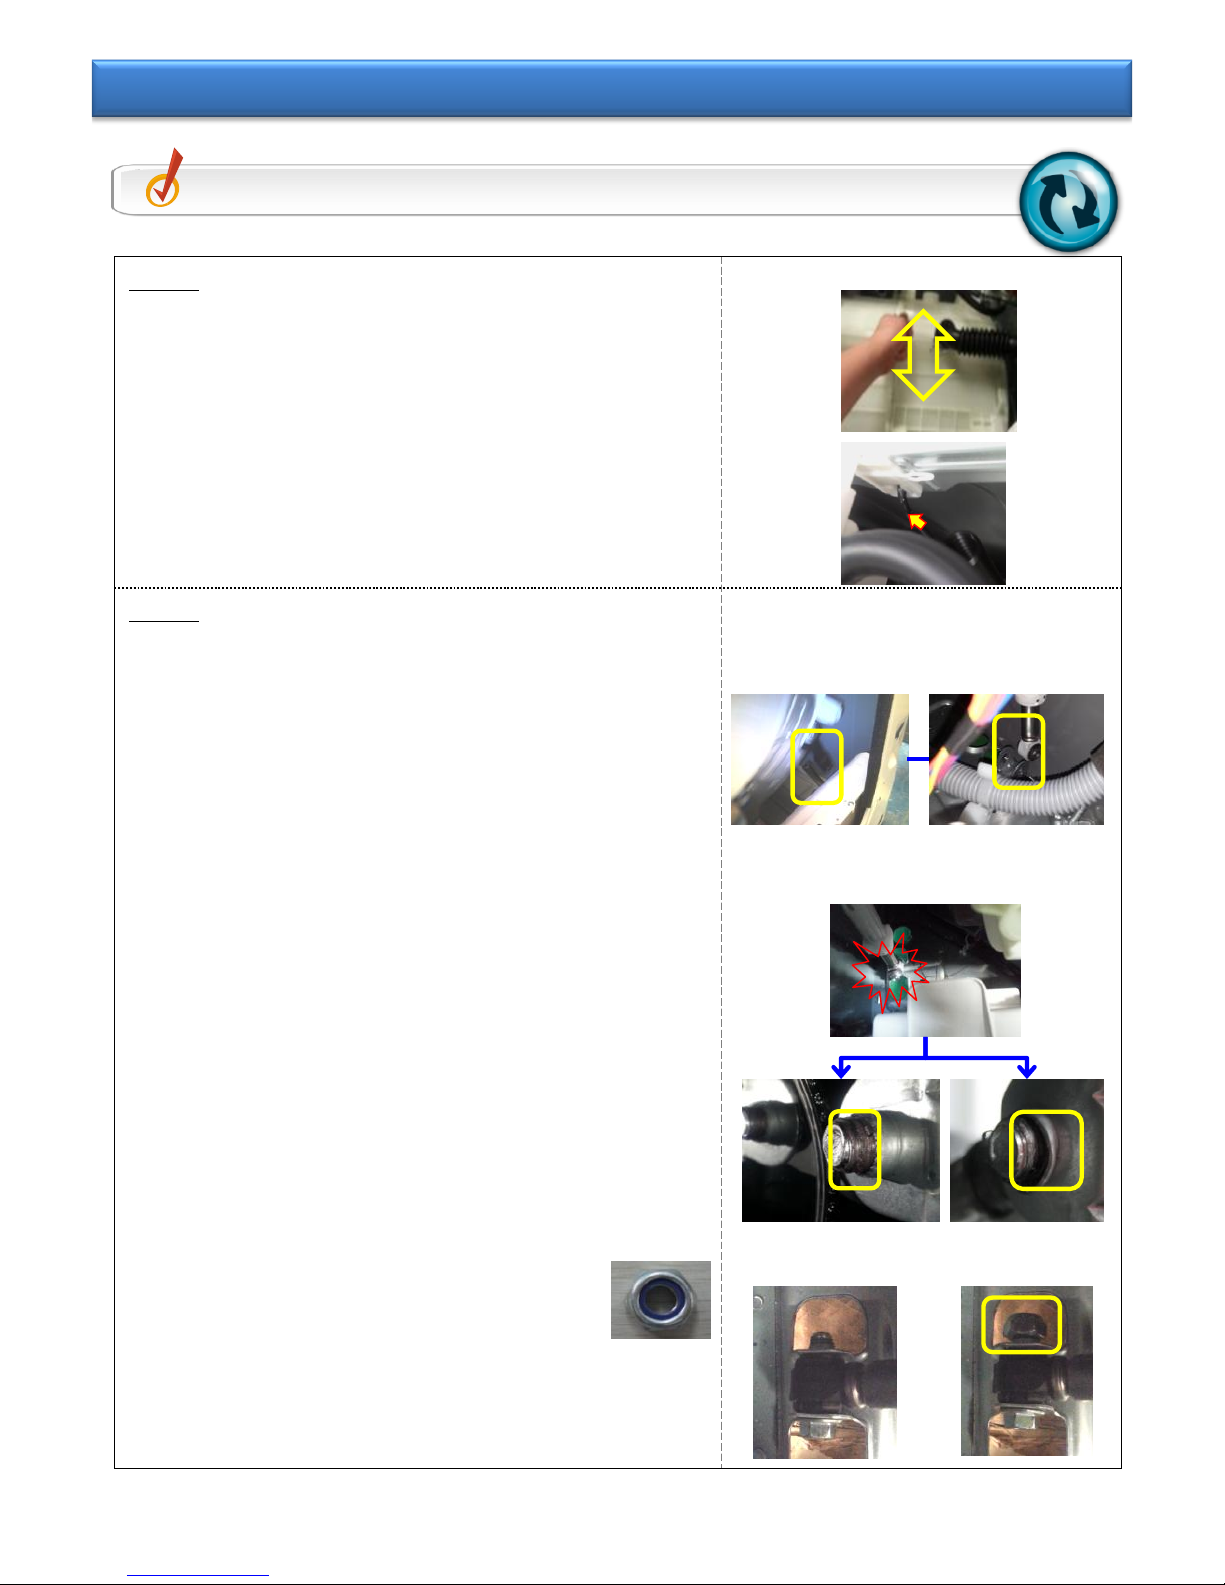
Step 1
① Check deformation of Leg of Frame bottom.
- Leg-bottom Rubber is damaged.
- Right angle is not maintained due to Leg Bolt
deformation.
② Adjust level installation of leg & inspect place
of installation.
- Refer to Level Product Installation Guide Tip 1-3.
Step 2
① Check Spin mode.
- Press Soil+Signal+Power to enter the
Test mode.
- Turn knob and select “SPn” to start.
- Check if Spin reaches Extra-High LED.
② Check Unbalance Test.
- Run Spin Test with 300g placed on one side
unbalanced.
※ 300g – 2 Towels OR Jig for this purpose only
- Check for abnormal noise & Set moving.
Step 3
① Oil leakage of Balancer
- Rotate Spin-Basket to check frictional noise
between balls.
※ If the frictional noise is dull, it is regarded as OK.
② Abrasion of Weight-Balancer
- Check if Weight-Balancer shakes.
- Gap is created if the screw head of fixing bolt wears
out.
- Couple more OR replace it.
③ Check the concentration of Spin-Basket.
- Check if Spin-Basket moves up and down.
- Check if Spin-Basket vibrates due to broken fixing
bolt.
※ After SVC, explain to the customer how to use it.
① Check the use condition of Customer.
- Check if moisture-proof cloth is used.
: Water–Proof Sheet, Mats, clothing
Check Point
Spin-Basket / Check the user environment condition.
Tip 1-1. Frame & Spin-Basket Abnormality
- 5/39 -
Step 1
① Check Tub for abnormal noise.
- Shake the Tub back and forth to check where the
noise is coming from.
② Hanger Spring connection & Grease application
condition
- Check if grease is properly applied between
Hanger Spring and Hanger Guide friction part.
Step 2
① Check if Damper is separated or unassembled.
- If the bolts connecting damper
- If the dampers are rusted or not fastening,
☞ replace.
② Check the condition of loosening of Damper
connection.
- The shape of connected part of Bottom-Plate is
defective, and thus it does not rotate properly.
- It does not rotate properly because it was
connected too much in the assembling process.
☞ When it does not rotate properly, “Dda-dda-dda”
noise is generated due to friction between Damper &
Bottom-Plate. Thus, do as in ③.
③ What to do when Damper connection is
loosened.
- Add Nut M10.
- Product Name: Nut-Hexagon (6021-001588)
※ Damper connecting force : 250 ~ 350kgf.㎠
Check Point
Check the operating condition of Damper.
Tip 1-2. Damper & Hanger Abnormality
- 6/39 -
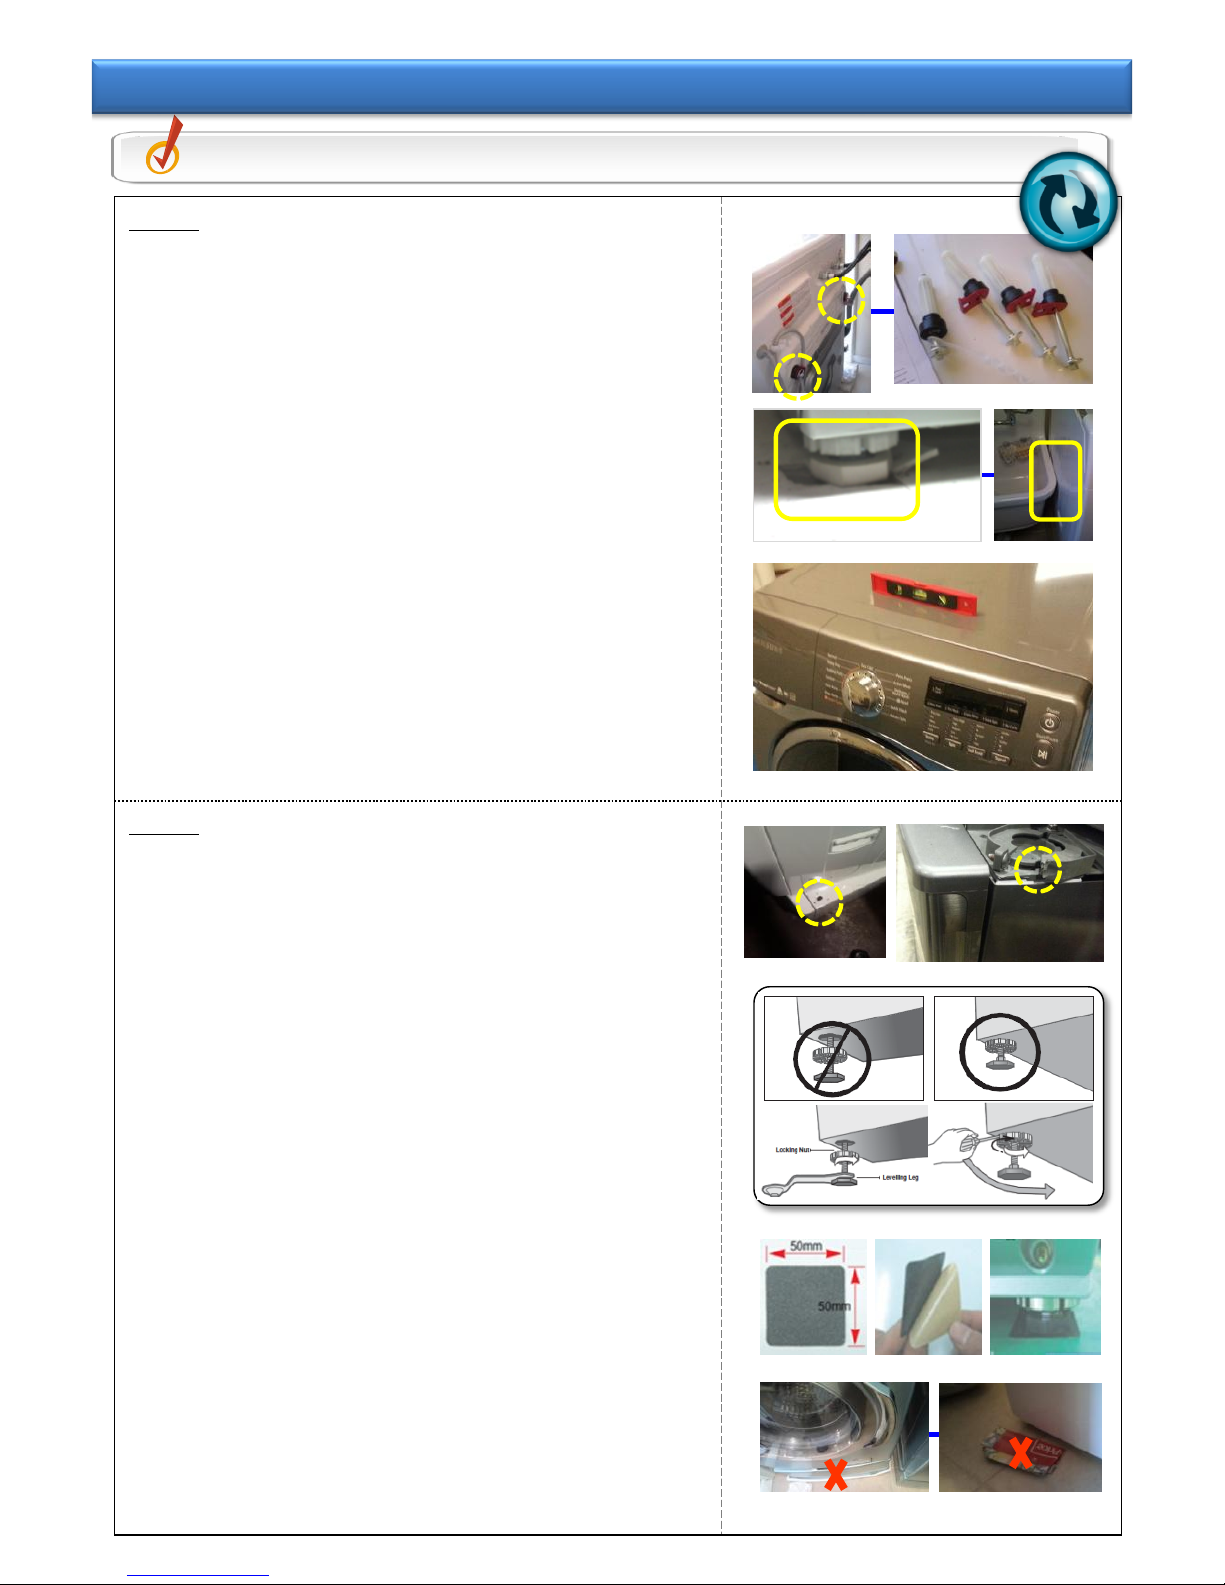
Step 1
① Check if there are any shipping bolts
on the back of washer.
Shipping bolts should be removed & kept.
② When installing, check the frictional relationship
with the surroundings.
- Install a pair of dryers together, causing
interferential noise when the Frame shakes
during spinning mode.
③ Check the installation levelness & Floor-moving
phenomenon.
Case #1 - The levelness, which is measured with
levelness-measuring apparatus, is poor.
Case #2 – It shakes due to old floor (lumber) of
laundry room.
☞ Re-installation is recommended so that it does not
influence on vibration.
Step 2
① Check if pedestal is installed properly.
- In case of old pedestal, check if all bolts
connecting washer and pedestal are
tightened properly.
② Condition of levelness of Leg installation
- If the rubber of legs is damaged, replace it.
- Lower leg is better for vibration.
Shorten the leg height and lock up the legs
after adjustment.
- Check if washer inclines to one side and
level washer again with adjustment of legs.
③ Environment with slippery floor (Tile, Moisture)
- Attach on-Slip Pad.
④ Material which is inappropriate for Leg floor
according to rules.
Case#1 Frictional noise of Pan Drain
Case#2 Use floor protection as sub-material for the
Leg bottom.
☞ Re-installation is recommended so that it does
not influence on vibration.
Check Point
Check the installation place and stability condition.
Tip 1-3. Installation Place & Installation Stability Abnormality
※ Pedestal Damage
Case
※ Installation
Error Case
- 7/39 -
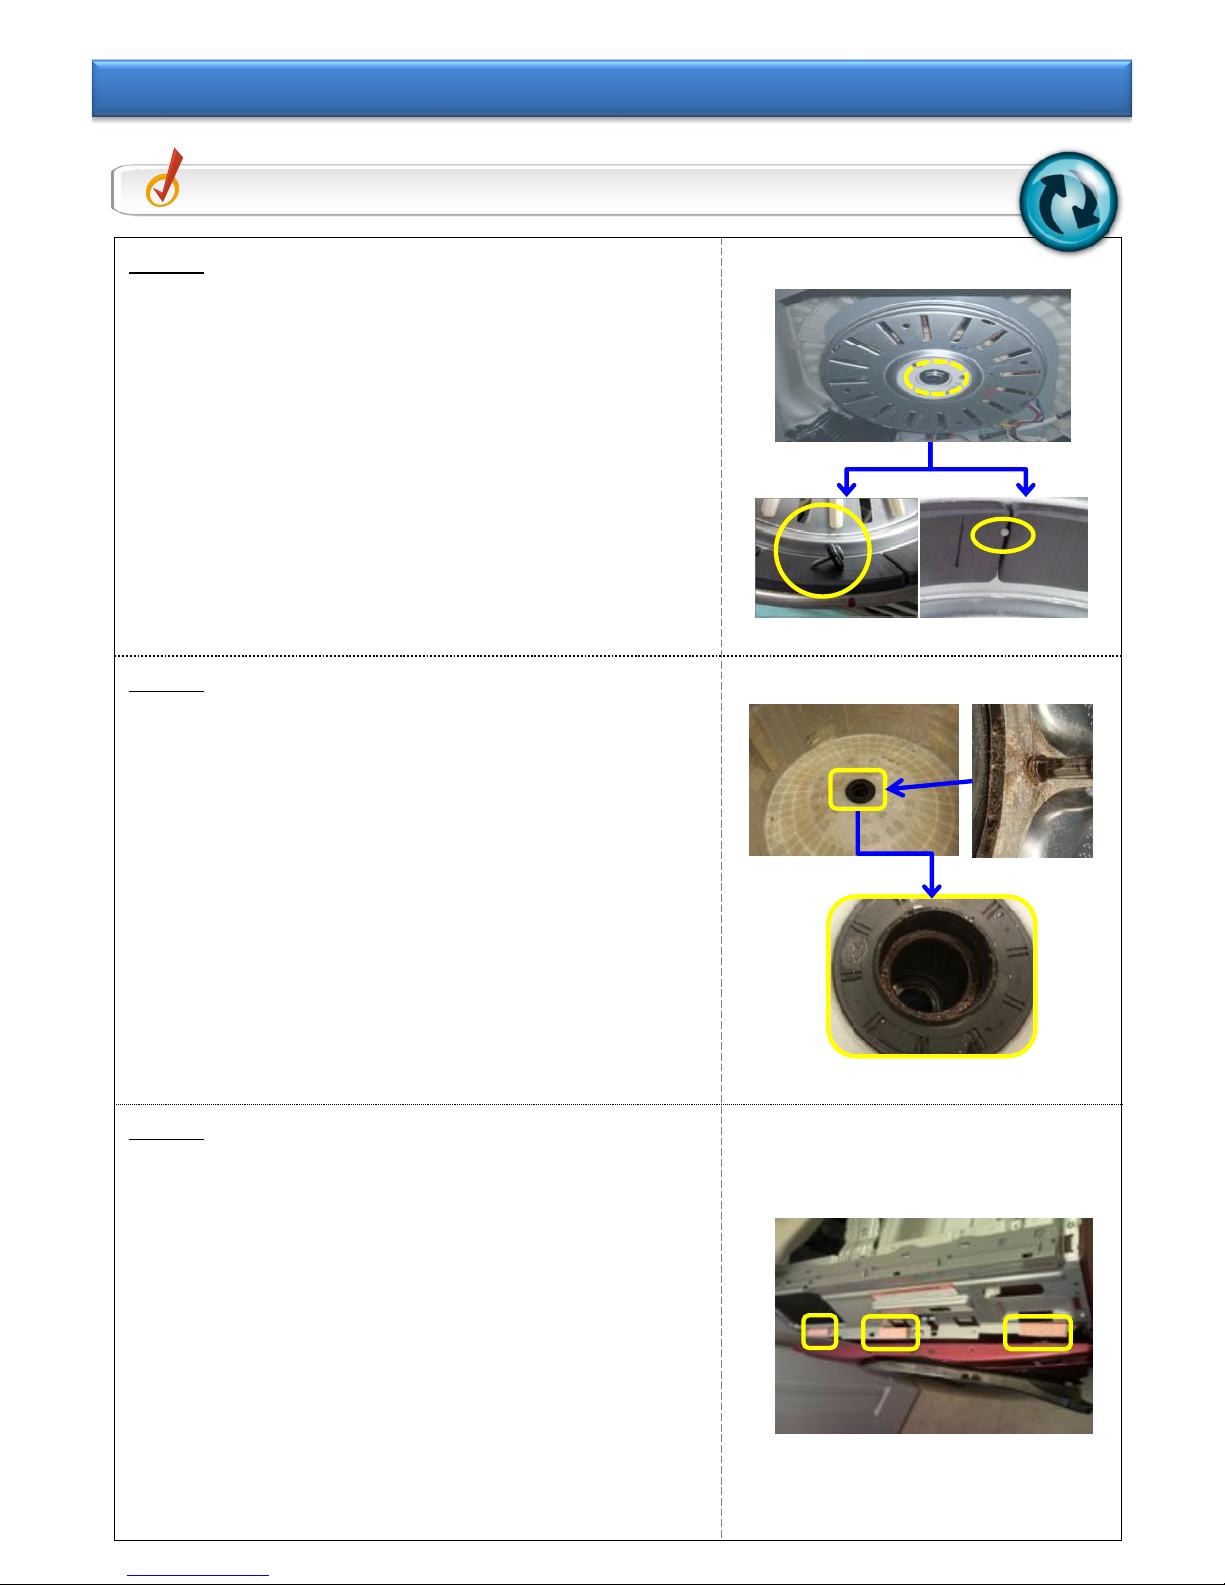
Step 1
① Assembly Bolt of Washing Motor
- Check the assembly status of the bolt.
If the bolt is loose, tighten it.
② When there is abnormal noise, have the
Rotor disassembled for checking.
- When the weight sensor is operating, check
for frictional noise of washing motor while
Motor-L / Motor-R is rotating.
- Remove iron foreign substance, if any,
absorbed by Rotor Magnetic.
Step 2
① Jet Engine noise during spinning mode
- Push Soil+Signal+Power to enter the Test
mode.
- Turn knob and select “SPn” to start.
- Check if Extra-High LED of Spin is reached.
☞ If the tub is rotating empty without load,
check the roaring sound during high-speed
rotation.
② In the case of abnormal noise or Bearing
abnormality, replace Tub-back.
Step 3
① Check frictional noise between parts of
Frame.
- Shake the Tub back and forth to check where
the noise is coming from.
② Inspect the main parts from which noise is
generated.
- Add sponge to frictional part of Frame-Front.
☞ Add more sponge to noise-generating part.
Check Point
Check the operating condition of shafting.
Tip 1-4. Shafting Abnormality
- 8/39 -
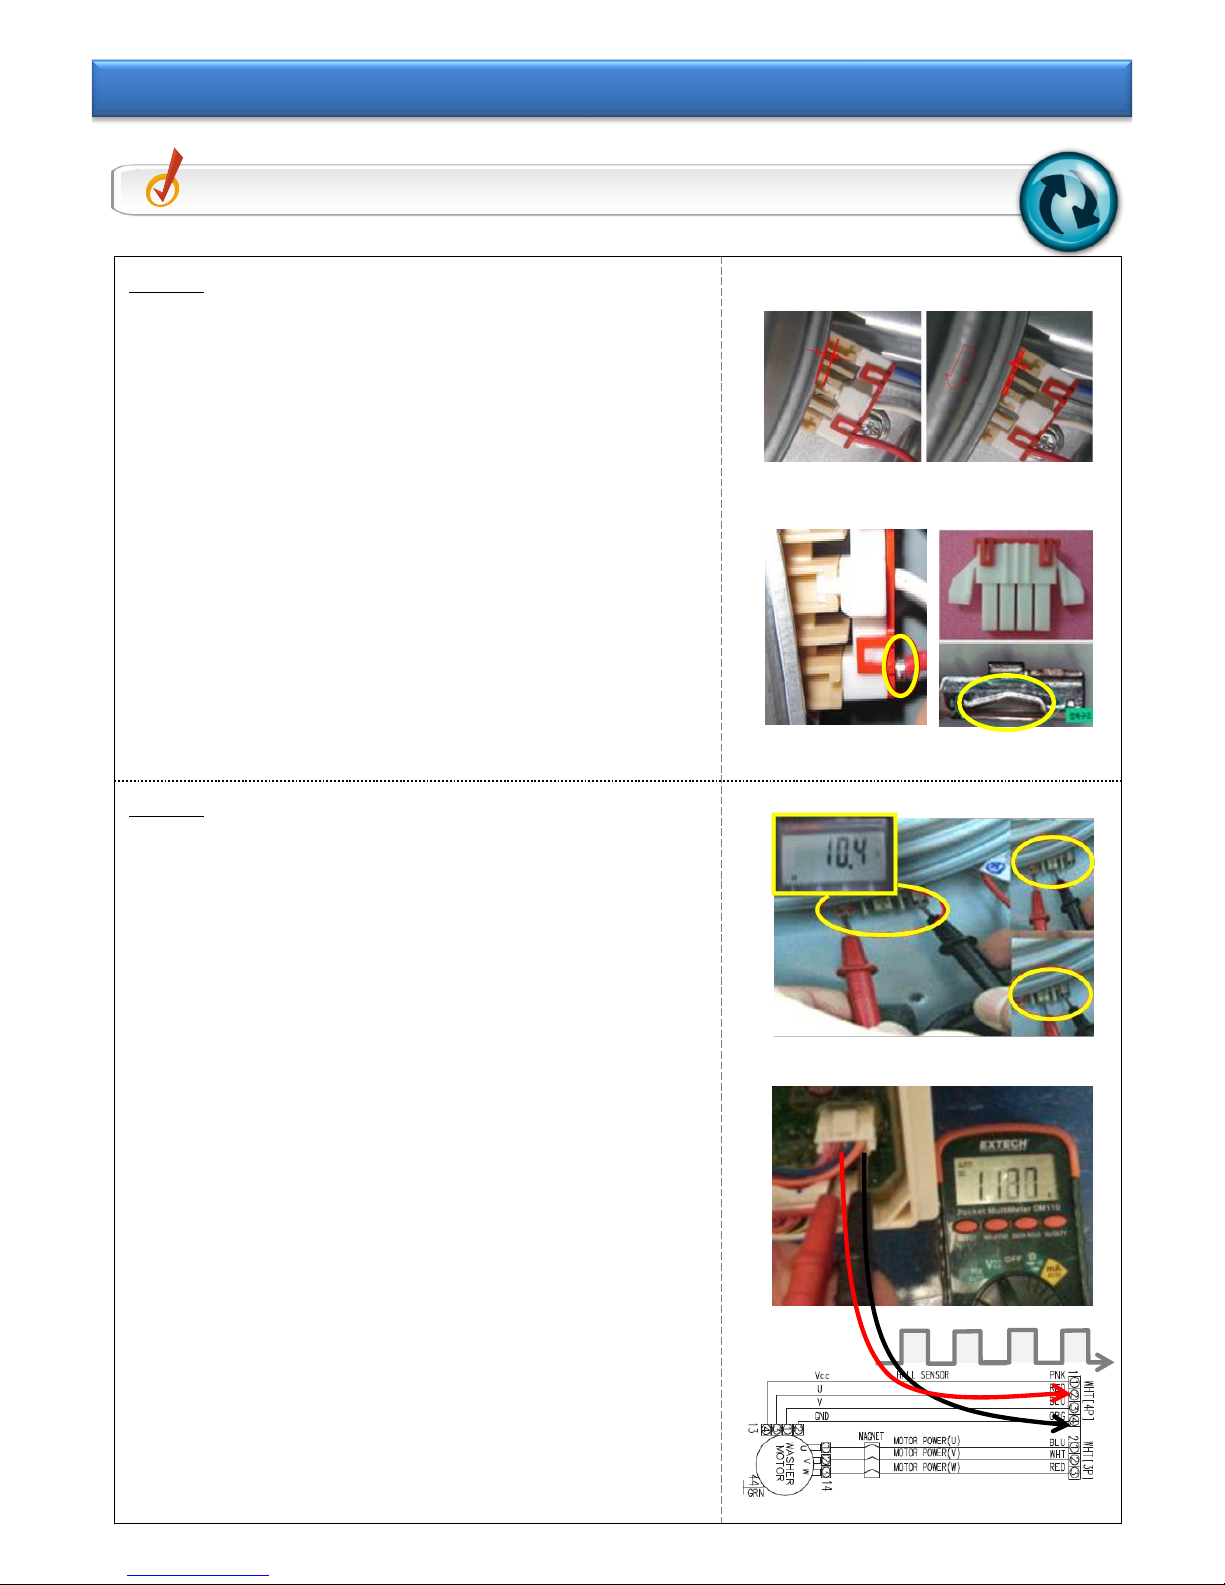
Step 1
① Rotor with your hand and check the gap
- If the gap is not the same as in the photo
right,
- it could cause noise during the spin cycle
② Check if Motor Wire Pin fell out
- photo of pin which had fallen out added
- Must check regarding contact fail caused by
the opening of Pin inside the terminal.
Step 2
① Check of Resistance motor (U-V-W).
☞ The Resistance : approximately 11Ω
② Check the Hall Sensor.
- Check of ⓐ-VCC(PNK) and ⓓ-GND(ORG)
☞ The Voltage : approximately 5.0V
- Check of ⓑ-U(RED)/ⓒ-V(BLU) and ⓓGND(ORG)
☞ The Voltage : approximately 0~1.2v Pulse
※ Rotor the slow turning by manually
☞ Replace the Motor
Check Point
Check the operating condition of Motor.
Tip 1-5. Motor Abnormality
ⓓ
ⓐ
※ⓑ/ⓒ:0↔1.2v
.

- 9/39 -
Step 1
① Mechanical Friction Noise
- When pump drain is operating,
it vibrates a little. If drain parts such as
drain hose are near other parts, it may
cause mechanical friction noise.
Step 2
① Foreign materials in Pump Drain
- Open debris filter and check there are
foreign materials such as coins, pins etc.
② Check pump drain impeller is broken.
Step 3
① Check if the fixing part of Pump-Case is loosened.
- Check if the two bolts fixing Frame-Plate bottom
are loosened.
- Check if the fixing part of Pump-Case front is
loosened.
☞ Assemble the Pump-Case again.
② One assembly part of Pump-Case front is loosened.
- Frictional noise is generated due to vibrating up
and down.
☞ Assemble Pump-Case again.
Check Point
Check the condition of Pump-Drain.
Tip 1-6. Pump Noise Abnormality
- 10/39 -
Step 1
※ Explain to NDF customer.
- Check the wrong usage condition of laundry
and explain recommended usage.
- Do not use Water–Proof Sheet, Mats and
clothing.
Step 2
① Resonance phenomenon occurs in the rising
section during spinning mode.
- Resonance Frequency: 200~450rpm section
- In the resonance frequency, Tub moves.
※ It is a resonance phenomenon occurring in
the rpm rising section for water extraction at
the beginning, which is normal.
② Ball friction occurs when Spin-Basket
rotates in low speed.
- Explain that the frictional noise from the Ball,
which is the center of gravity in the Balancer,
is normal.
※ If the Ball in the Balancer makes strong
frictional noise while checking Tub, then it
means that the oil is leaking. Thus, replace
Spin-Basket.
Check Point
Explain the NDF and product characteristics.
Tip 1-7. Explanation of NDF and product characteristics
Step 1 : Small Loads Case
: If loading the laundry whose weight is 1kg ±
0.5kg, it is easily inclined to one side.
☞ Add more laundry to make it normal.
Step 2 : Unbalance of laundry
: Stop using Water–Proof Sheet, Mats and clothing.
☞ Do not input the laundry listed above, since
water does not drain during high-speed spinning
mode, causing unbalance problems.
Step 3 : Unbalance of bedding, carpet, and etc.
: Bedding should be washed alone less than 3.5kg.
☞ Solution: Roll up the bedding before putting
into washer.
※ Do not wash Cotton bedding, wool bedding
and mink blanket.
- 11/39 -
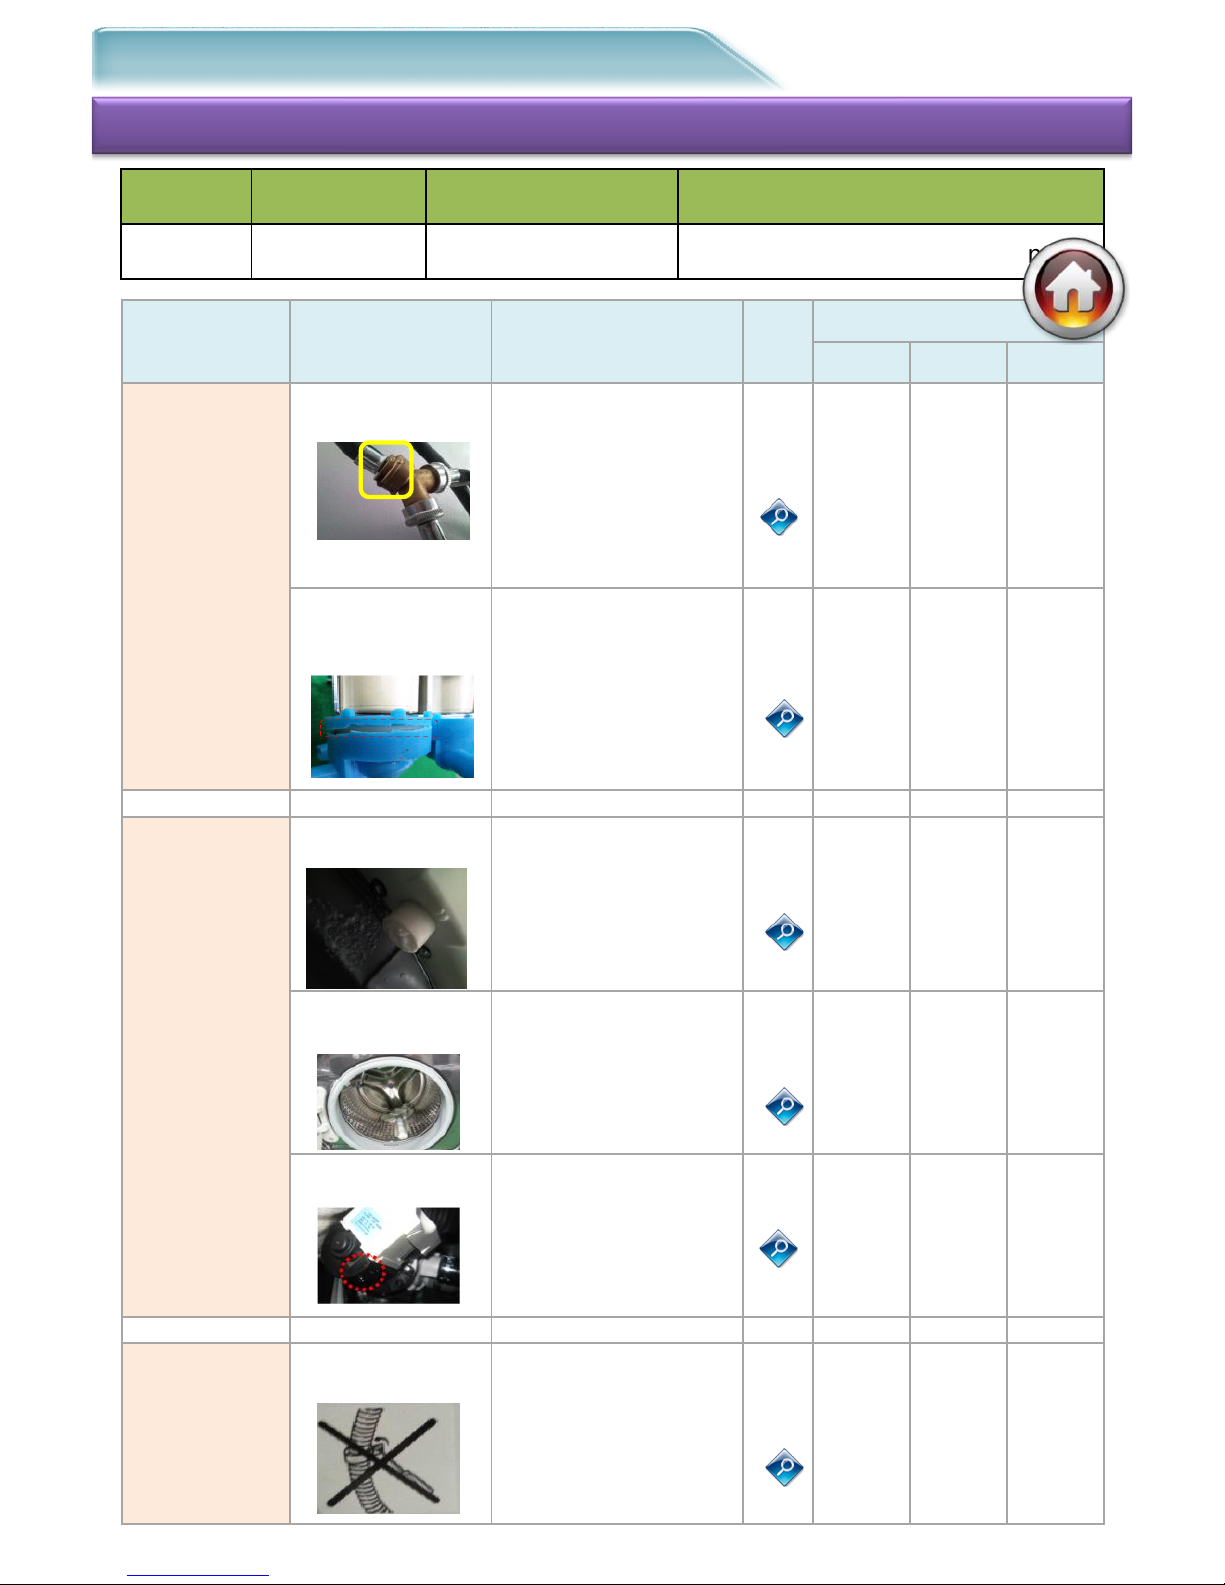
#2. Symptom : Water Leakage
2-1. Schematic Diagram of Repair
Check-1
Cause
Check-2
Tip
Code
Block
# 1
# 2
# 3
Water Supply
1. Water supply
hose connection
Tool is loose due to
over-connection.
Packing omission
Y-Joint Seal leakage
Cold water alone
installation
Wall-attached
installation
2-1
Water
supply
hose
Water
supply
valve
Y-Joint
2.Water-V/V
leakage
Foreign substance
enters pipe.
Nozzle-Connector
Body damage
Packing assembly bad
Freezing in the winter
2-2
Water
supply
valve
Water
supply
hose
Pipe
Water Leakage
1. Detergent
drawer leakage
Wrong powder used
Hose
separation/friction
Detergent drawer does
not open/close
smoothly.
2-3
Nozzle
Detergent
2.Tub-related
leakage
Heater assembled
wrong
Tub damage
Diaphragm leakage
User wrong usage
2-4
Tub
Heater
Diaphrag
m
3.Pump leakage
Pump-Drain hose
Pump-Case
Drain hose
Handle-Filter
2-5
Pump-
Case
Drain-
Hose
Installation/
NDF
1. Install & NDF
Dirty water flows
backward
Continuous drainage
2-6
Water
supply
hose
Clamp
Chassis
Project
Basic Model
Type
Drum
Potomac
WF393/395/405
Front-Load / Power Foam
- 12/39 -
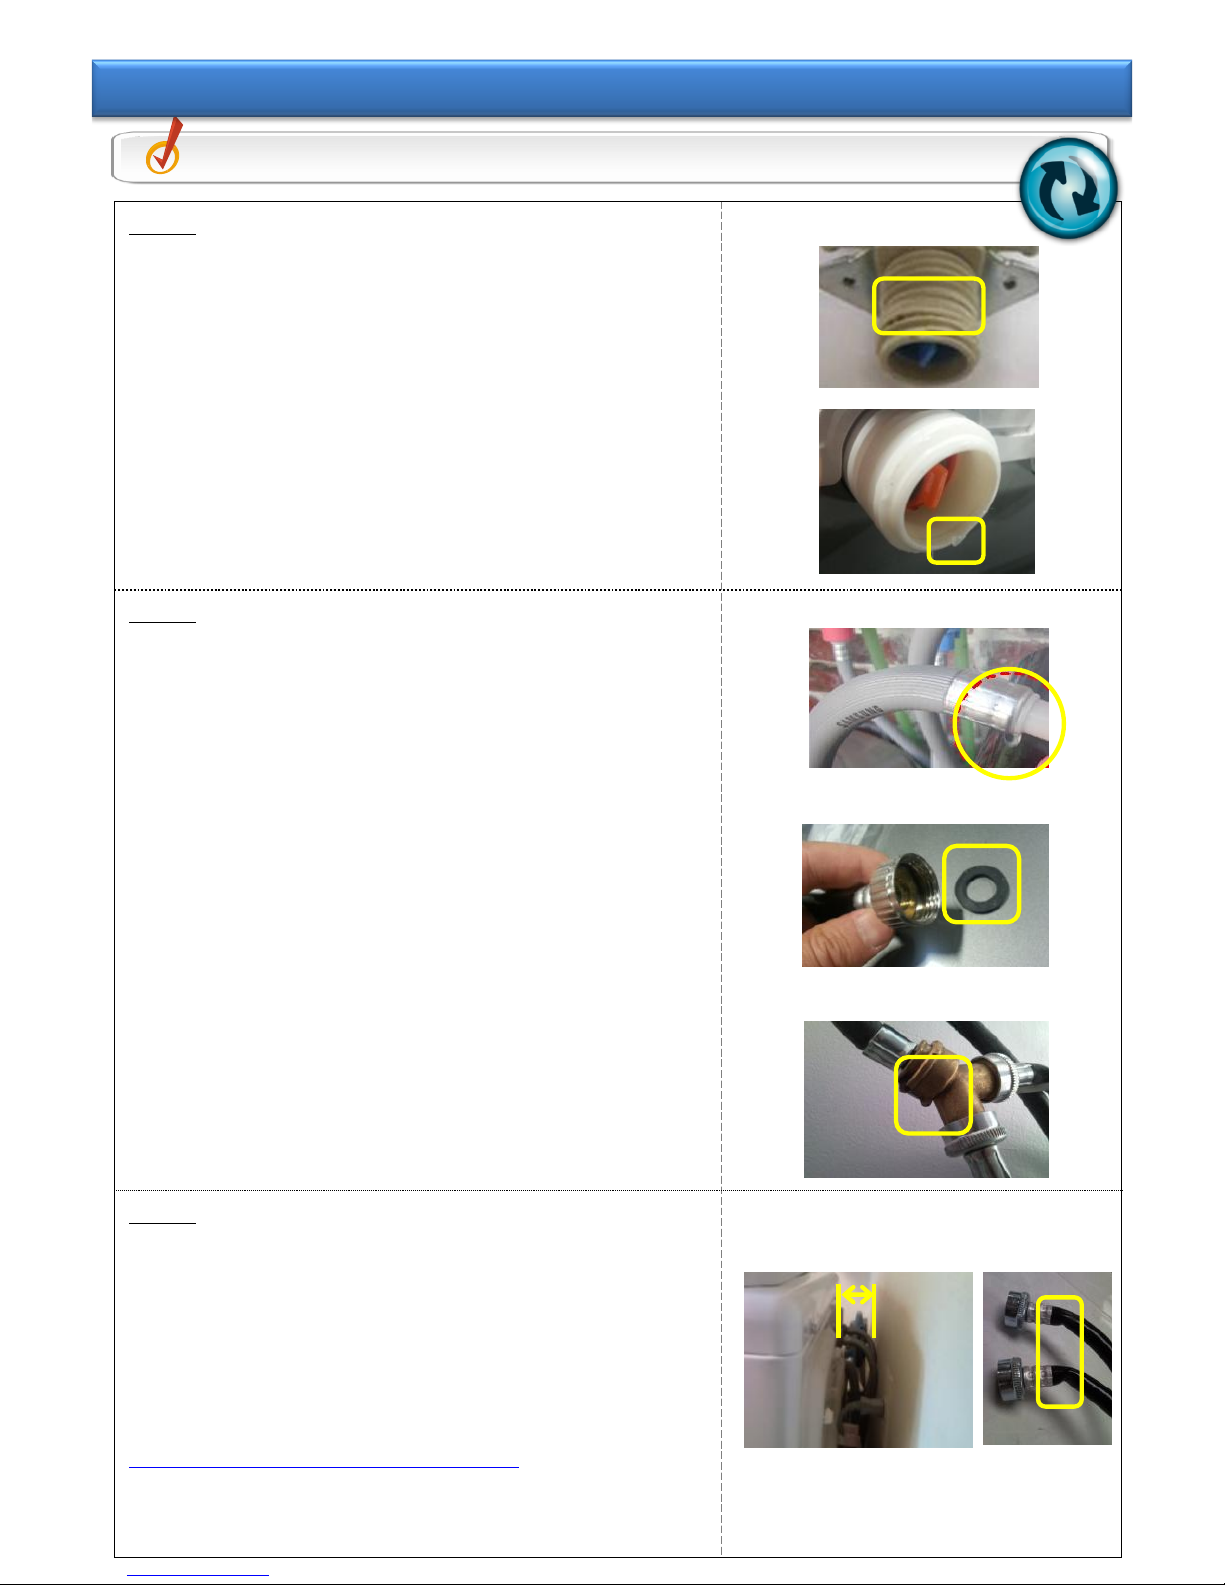
Step 1
① Check the exterior of water supply valve unit.
- Check if screw head is worn out due to overconnection using water supply hose tool.
- Check if the end of water supply valve is scratched
in the installation process.
Step 2
① Check the water supply hose unit.
- Water leaks due to loose Caulking.
- Water pressure check: Shall not exceed 8kgf.㎠ max.
② Check if sub-material unit installed is defective.
- Check if internal Packing-Seal is omitted or worn
out.
- Check if water leaks from Y-Joint unit.
: Apply more Seal Taping to water-supply parts.
③ If water leaks due to installation environment outside
the product, check out Step 3.
Step 3
① Hose is bent during installation.
- Since the product rear is too close to the wall, hose
is bent and friction occurs. Thus, water leaks.
- 6 in(152mm) is recommended for the distance
between the product rear and the wall is
recommended.
※ Explain to the customer after SVC.
=> Install it again such that it does not influence water
leakage and explain how to use it.
Check Point
Check the condition of Water-Hose.
Tip 2-1. Water-Hose & Connection Abnormality
 Loading...