

Samsung 650, PNSOB6SOS1F, PN58B6SOS1F User Manual

imagine
Thank you for purchasing this Samsung product.
To receive more complete service, please
register your product at
the
possibilities
www.samsung.com/register
Model Serial
No.
--
_
I
Important
Wide
screen
format
screen
format
or
expandedtofill
graphics
programming,
and
imagesonscreen,
Warranty
PDP
Displays
full-motion
shouldbelimitedtono
video.
the
screenifyour
The
suchasthe
Information
(16:9,
the
aspect
ratioofthe
images
displayedonthem
model
offers
this
feature
dark
more
side-barsonnonexpanded
than5%of
the
Regarding
screen
should
and
the
total
television
Television
widthtoheight)
primarilybein
images
are
standard
viewing
are
the
constantly
format
per
week.
Format
primarily
wide
screen
moving.
television
Viewing
designedtoview
16:9
ratio
format,
Displaying
video
stationary
and
wide
Additionally,
web
images that exceed the above guidelines can cause uneven aging
burned-in ghost images in the
full screen moving images. not stationary patterns or dark bars.
On
PDP
Be
carefulinthe
selection
U.S.A
The
In
5,539,829,5,606,618,5,530,655,5,777,992,
underUSPublished
This
commercial
unlicensed
unit.
or
11172-3orISO/lEG
Other countries
viewing
other
sitesorcomputer
models
and
use,aswellasburned-in
Only
product
particular,
licenseislimitedtoprivate
The
license
ISOIIEG
graphics
that
offer
selection
unit
accompanying
this
productislicensed
use.
The
product
unitorprocess
only
13818-3.Norights
13818-3.
stationary
and
patterns,
PDP
picture
sizing
and
durationoftelevision
this
Patent
Application
license
covers
non-commercial
does
the
are
images
and
text
suchasstock
shouldbelimitedasdescribed
picture.Toavoid this, vary the programming
features,
images,
user
under
not
conformingtoISOIIEG
useofthis
granted
use
these
formats
are
not
manualislicensed
the
followingUSpatents:
6,289,308,
No.
2001-44713-A
cover
usebyend-user
any
product
product
under
this
coveredbyyour
unittoencode
license
market
controlstoview
used
for
under
5,610,985,
1.
unit
other
11172-3orISO/lEG
for
reports,
video
game
displays,
above
for
all
televisions.
of
PDP
Displays that leave subtle, but permanent
and
images,
different
viewing.
Samsung
certain
5,991,715,5,740,317,4,972,484,5,214,678,5,323,396,
5,481,643,5,544,247,5,960,037,6,023,490,5,878,080,
consumers
than
this
and/or
product
formatsasa
Uneven
PDP
agingasa
limited
warranty.
intellectual
for
product
decode
featuresorfunctions
licensed
unit
13818-3
audio
property
contents.Norights
and
usedorsoldincombination
files
the
conformingtothe
station
logos,
Displaying stationary
and
primarily display
full
screen
picture.
resultofformat
rightsofcertain
license
thatdonot
are
does
not
conformtothe
third
granted
extendtoany
ISOIIEG
parties.
with
this
11172-3
ISOIIEG
and
for
product
The
product
unit
accompanying
licenseislimitedtoprivate
use.
The
license
does
not
product
unitorprocess
license
only
covers
the
useofthis
13818-3.Norights
ISOIIEG
13818-3.
are
granted
this
user
manualislicensed
non-commercial
cover
any
conformingtoISOIIEG
product
under
usebyend-user
product
unittoencode
this
license
unit
other
than
this
11172-3orISOIIEG
and/or
for
product
under
certain
intellectual
consumers
featuresorfunctions
product
13818-3
decode
for
licensed
unit
and
usedorsoldincombination
audio
property
contents.Norights
the
license
files
conformingtothe
thatdonot
rightsofcertain
does
not
extendtoany
ISO/lEG
conformtothe
third
are
granted
with
this
product
11172-3orISO/lEG
ISOIIEG
parties.
for
commercial
unlicensed
unit.
11172-3
This
The
or
©
2009
Samsung
Electronics
Go.,
Ltd.
All
rights
reserved.
I
User
Instructions
o Screen Image retention
Do
not
screen
manualtoreduce
o Altitude
The
PDP
displayastill
image
can
image
retention.
the
degreeofbrightness
only
operate
(suchasonavideo
This
image
retentionisalso
normallyatheights
game)onthe
and
contrastofthe
under
plasma
knownas"screen
screen
6500ft.
display
panel
burn".Toavoid
when
displayingastill
for
more
such
than
image
image.
several
retention,
minutesasit
refertopage26of
can
cause
this
o Heat on the top
The
top
sideofthe
partofthe
Thisisnormal
However,
product.
and
children
of
the Plasma TV
product
does
shouldbeprevented
maybehot
not
indicate
after
long
any
defectoroperation
from
touching
periodsofuseasheat
failureofthe
the
upper
partofthe
o The product is making a 'cracking' noise.
A
'cracking'
temperatureorhumidity.
noise
may
occur
when
Thisisnormal
the
product
contractsorexpands
and
notadefectofthe
unit.
o Cell Defects
The
PDP
usesapanel
produce.
product.
However,
o Avoid operating the
consistingof2,360,OOO(HD-level)to6,221
there
maybea
TVattemperatures below
few
brightordark
pixelsonthe
41°F
WC)
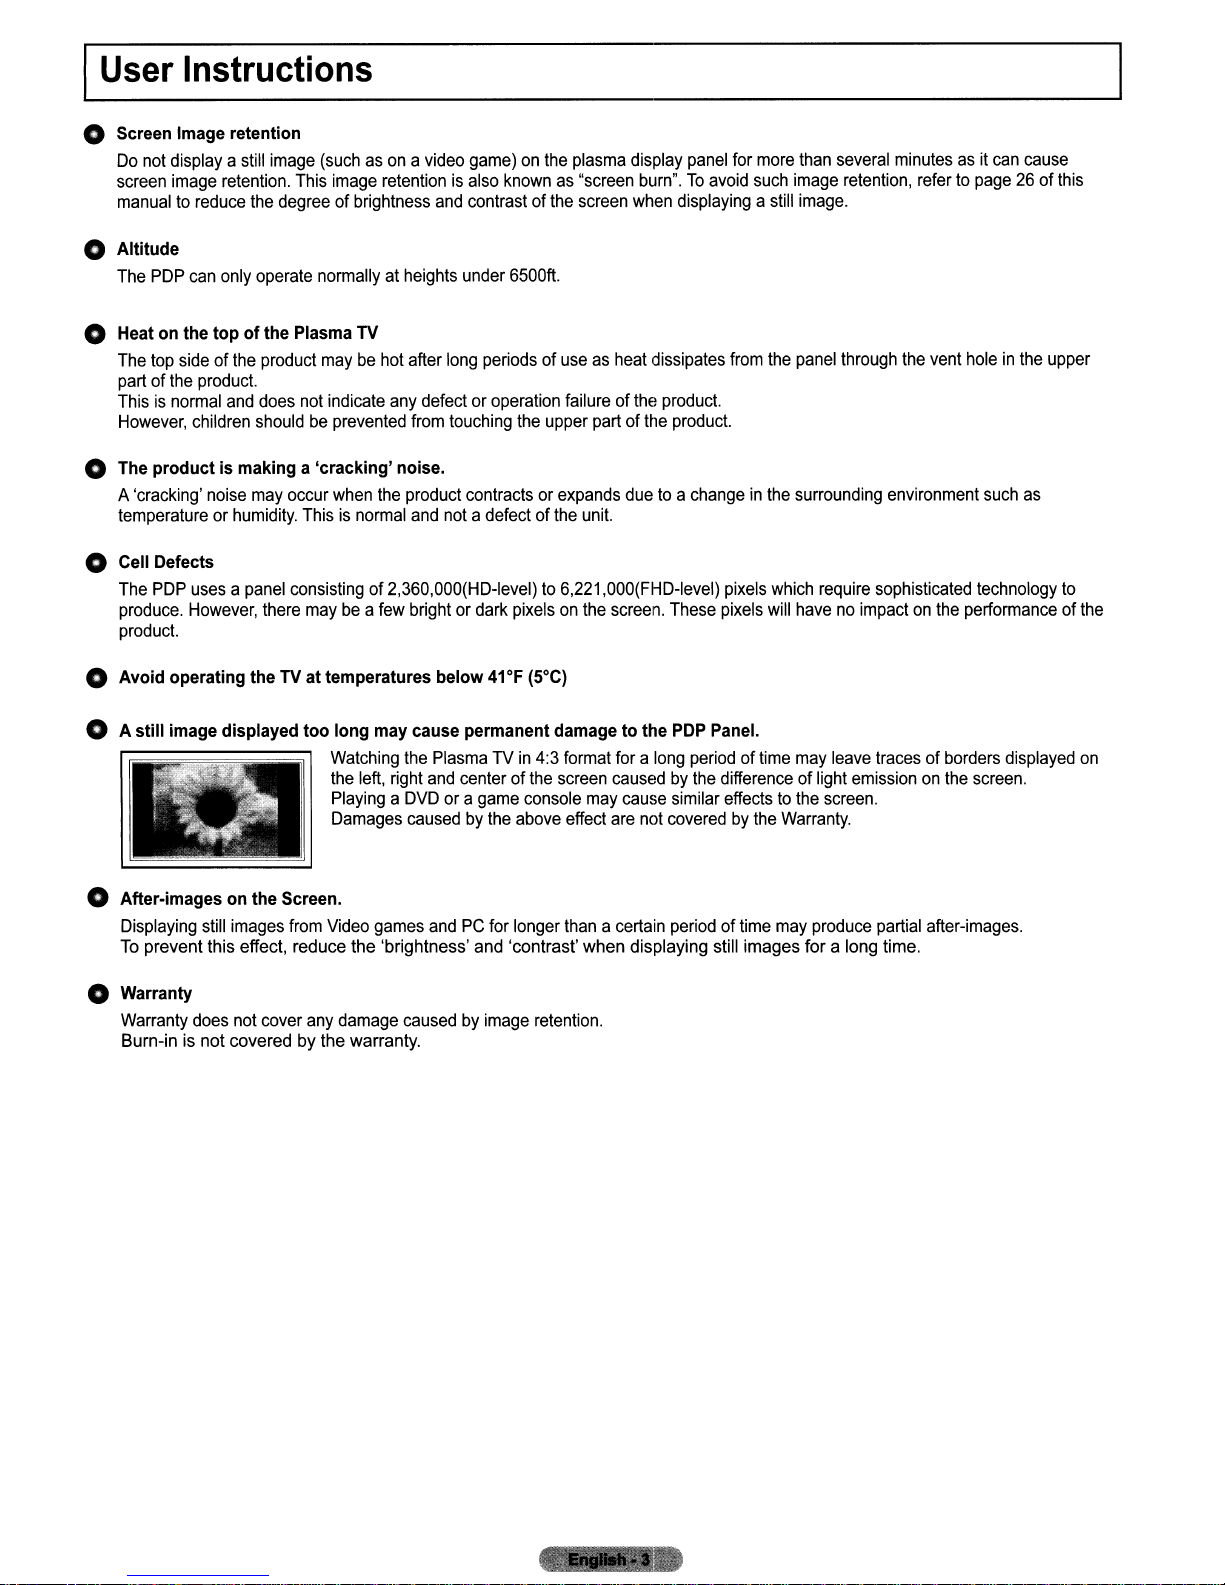
o A still image displayed too long may cause permanent damage
Watching
the
PlayingaDVDora
Damages
o After-images on the Screen.
Displaying
To
still
images
from
Video
prevent this effect, reduce the 'brightness'
left,
games
right
the
PlasmaTVin
and
centerofthe
game
causedbythe
andPCfor
and
4:3
screen
console
above
longer
'contrast'
format
may
effect
thanacertain
when
dissipates
product.
duetoa
,OOO(FHD-level)
screen.
to
the
foralong
causedbythe
cause
are
not
coveredbythe
displaying still images for a
from
product.
changeinthe
pixels
These
pixels
PDP
Panel.
periodoftime
differenceoflight
similar
effectstothe
periodoftime
the
will
panel
through
surrounding
which
require
havenoimpactonthe
may
screen.
Warranty.
may
produce
environment
sophisticated
leave
tracesofborders
emissiononthe
partial
long
time.
the
vent
after-images.
holeinthe
such
technology
performanceofthe
screen.
upper
as
displayed
to
on
o Warranty
Warranty
Burn-inisnot coveredbythe
does
not
cover
any
damage
warranty.
causedbyimage
retention.
I
Contents
Connecting
•
ListofFeatures
•
Checking
Assembling
•
•
Viewing
Viewing
•
•
Remote
and
Parts
the
the
Control
the
Connection
Control
Preparing
Cables
Connections
•
Connecting
Connecting
•
ConnectingaDVDIBlu-ray
•
receiver
•
ConnectingaDVD
receiver
•
ConnectingaDVDIBlu-ray
receiver
•
ConnectingaCamcorder
•
ConnectingaVCR
•
ConnectingaDigital
•
ConnectinganAmplifierIDVD
•
ConnectingaPC
VHF
Cable
(Set-Top
(Set-Top
(Set-Top
and
Box)
Box)
Box)
Operation
•
Turning
theTVOn
•
Changing
•
Adjusting
•
Using
•
Using
•
Viewing
•
Viewing
•
Plug&Play
Channel
•
Storing
•
Managing
Picture
•
Changing
PC
Display
•
Using
•
Display
•
SettinguptheTVwith
Sound
•
Changing
Function
•
Configuring
•
Viewing
•
Setting
•
Source
•
Support
Media
•
ConnectingaUSB
•
Using
Channels
the
Volume
the
TOOLS
the
Remote
the
Display
the
Menus
Feature
Control
Channels
Channels
Control
the
Picture
YourTVasaComputer
Modes
Control
the
Sound
Description
the
Setup
the
PictureinPicture
the
Time
ListIEdit
Name
Play
the
Media
Play
Panel
UHF
TV
via
IBlu-ray
via
via
Audio
and
Button
Control
Settings
your
Settings
Menu
Device
Function
Your
Panel
Antennas
PlayerorCable
HDM!.
PlayerorCable
DVI
PlayerorCable
Component
System
Home
Off
Backlight
(PC)
PC
(PiP)
TV
cables
Theater
Buttons
Display
BoxISatellite
BoxISatellite
BoxISatellite
5
5
5
6
7
8
9
9
11
11
12
12
13
14
14
15
16
16
16
17
17
17
18
19
20
21
23
27
27
28
29
30
33
34
35
36
38
39
•
Using
and
Sorting
ViewingaPhotoorSlide
•
•
Using
and
Sorting
PlayingaMusic
•
•
Using
and
Sorting
PlayingaMovie
•
PictureIMusic
•
Using
Play-DLNA
Setting
Installing
Using
Using
the
the
the
the
•
Media
•
•
•
•
File
Settings
Setup
Menu
DLNA
the
DLNAApplication
DLNAApplication
DLNA
Function
Anynet+
•
Connecting
•
SettingUpAnynet+
•
Switching
•
Recording
•
Listening
•
Troubleshooting
Content
•
Activating
•
Using
Anynet+
between
throughaReceiver
for
Library
the
Content
the
Content
Network
•
Network
•
Network
Connection
Setup
Internet@TV
•
Getting
Started
with
•
Editing
Snippetsinthe
•
Using
the
Profile
Widget...
•
Using
the
Yahoo!®
•
Using
the
Yahoo!®
•
Using
the
Yahoo!®
•
Using
the
Yahoo!®
•
Using
the
Yahoo!®
•
Troubleshooting
•
Help
Website
Home
Network
•
Home
Network
•
SettingUpthe
•
Using
the
•
Using
the
for
Center
Center
Home
Message
Media
Function
Appendix
•
Troubleshooting
•
Preparation
•
Howtoattach
•
Securing
•
Wall
•
Specifications
•
Dimensions
•
Dimensions
Mount
theTVto
Kit
before
the
Specifications
(PN50B650S1F)
(PN58B650S1
Photo
List... .40
Show
the
Music
List..
the
Movie
List...
Using
Media
Play
Network
Devices
Anynet+
Library
Stand-Base
Devices
Anynet+
Library
Internet@TV
Dock
Widget
Gallery
Weather
News
Flickr
Finance
internet@TV
Function
installing
the
Widget..
Widget
Widget..
Widget..
Network
the
Wall
F)
Center
Wall-Mount...
(VESA)
41
.43
44
.45
.46
.48
49
50
50
52
55
56
57
57
58
59
59
60
61
62
65
69
71
71
73
74
74
75
76
76
77
78
79
80
81
82
83
83
84
85
86
87
88
Symbol
Press
-
Note
One-Touch
Button
TOOLS
I
Connecting
List
of
Features
and
Preparing
Your
TV
• Adjustable picture settings that
• Automatic timertoturn
I
• Aspecial
•
V-Chip
• Excellent Digital Interface
With
needed.
•
HDMIIDVI
• Excellent Picture Quality
SRS
•
• Media Play:
• Internet@TV:
• Home Network Center: Allows
Checking
Please make sure the following items are included with
I
lEI
The
Remote
(BN59-00854A)
AAA
(4301-000103)
sleep
timer.
function.
a built-inHDdigital
connection of yourPCto
TruSurroundHDprovides a virtual surround
Allows
youtoplay music files, pictures,
You
can
Parts
items' color
Control
Batteries
and
shape
Power
/
canbestoredinthe TV's
theTVon
tuner,
use
and
off.
& Networking:
non-subscriptionHDbroadcasts
this
TV.
various internet services
youtoconfigure a mobile
may
vary dependingonthe
[[]
Cord
Owner's
Quick
(BN68-02270A)
system.
....•......d...S'
•.•..•..•..
1
..
Instructions
Setup
Guide
memory.
canbeviewed
and
movies
savedona
and
view useful information
message
your
model.
/
Safety
server or a
TV.Ifany items are missing, contact
warranty
Guide
(Not
availableinall
locations)
Card
Manual
/
withnoCable
USBorDLNA
and
entertaining
DLNA
media
o
Cleaning
(BN63-01798B)
Box/Satellite receiver
device.
content.
render.
your
Cloth
Holder-Wire
Cable
dealer.
(Set-Top
Box)
(~
TV-Holder/Screw
(BN96-10788A)
(Refertopage
84)
~.'!
,.
<~
171.'.;·11./
U
Program
lEI
Assembling
Enclose the cables in the Holder-Wire Cable so that the cables are not visible through the
transparent stand.
I
CD
Ferrite Core
The
ferrite
When
connecting a
plug.
Ferrite
Core
Power
(3301-001305)
cores
are
cable,
the
for
Ferrite
Cord
(PN58B650S1F
usedtoshield the cables
open
Cables
2
i
J.
···.·.·'····.··l
.
1J
Core
for
Side-AV
(3301-001201)
only)
the
ferrite
core
Cover-Bottom
(Refertopage
(PN50B650S1F
from
interference.
and
clipitaround
Cover-Bottom/Screw
83)
only)
the
(Refertopage
(PN58B650S1Fonly)
cable
near
the
(
(2ea)
83)
Holder-Ring
(Refertopage
.--------~-
..
.
(4ea)
Screw
83)
(PN50B650S1Fonly)
(4ea)
----l~---'····---····--------·------I-----·
:
~._l~.
, ,
, • 0 ,
, ,
.j
I"
.
._
...
:
_.1
Viewing
The
buttons on the lower-right panel control your TV's basic features, including the on-screen menu.
To
use the more advanced features, you must use the remote control.
I
®
The
®
The
product
front
panel
the
color
Control
and
shape
buttons
Panel
may
vary
canbeactivatedbytouching
dependingonthe
them
model.
with
your
finger.
I
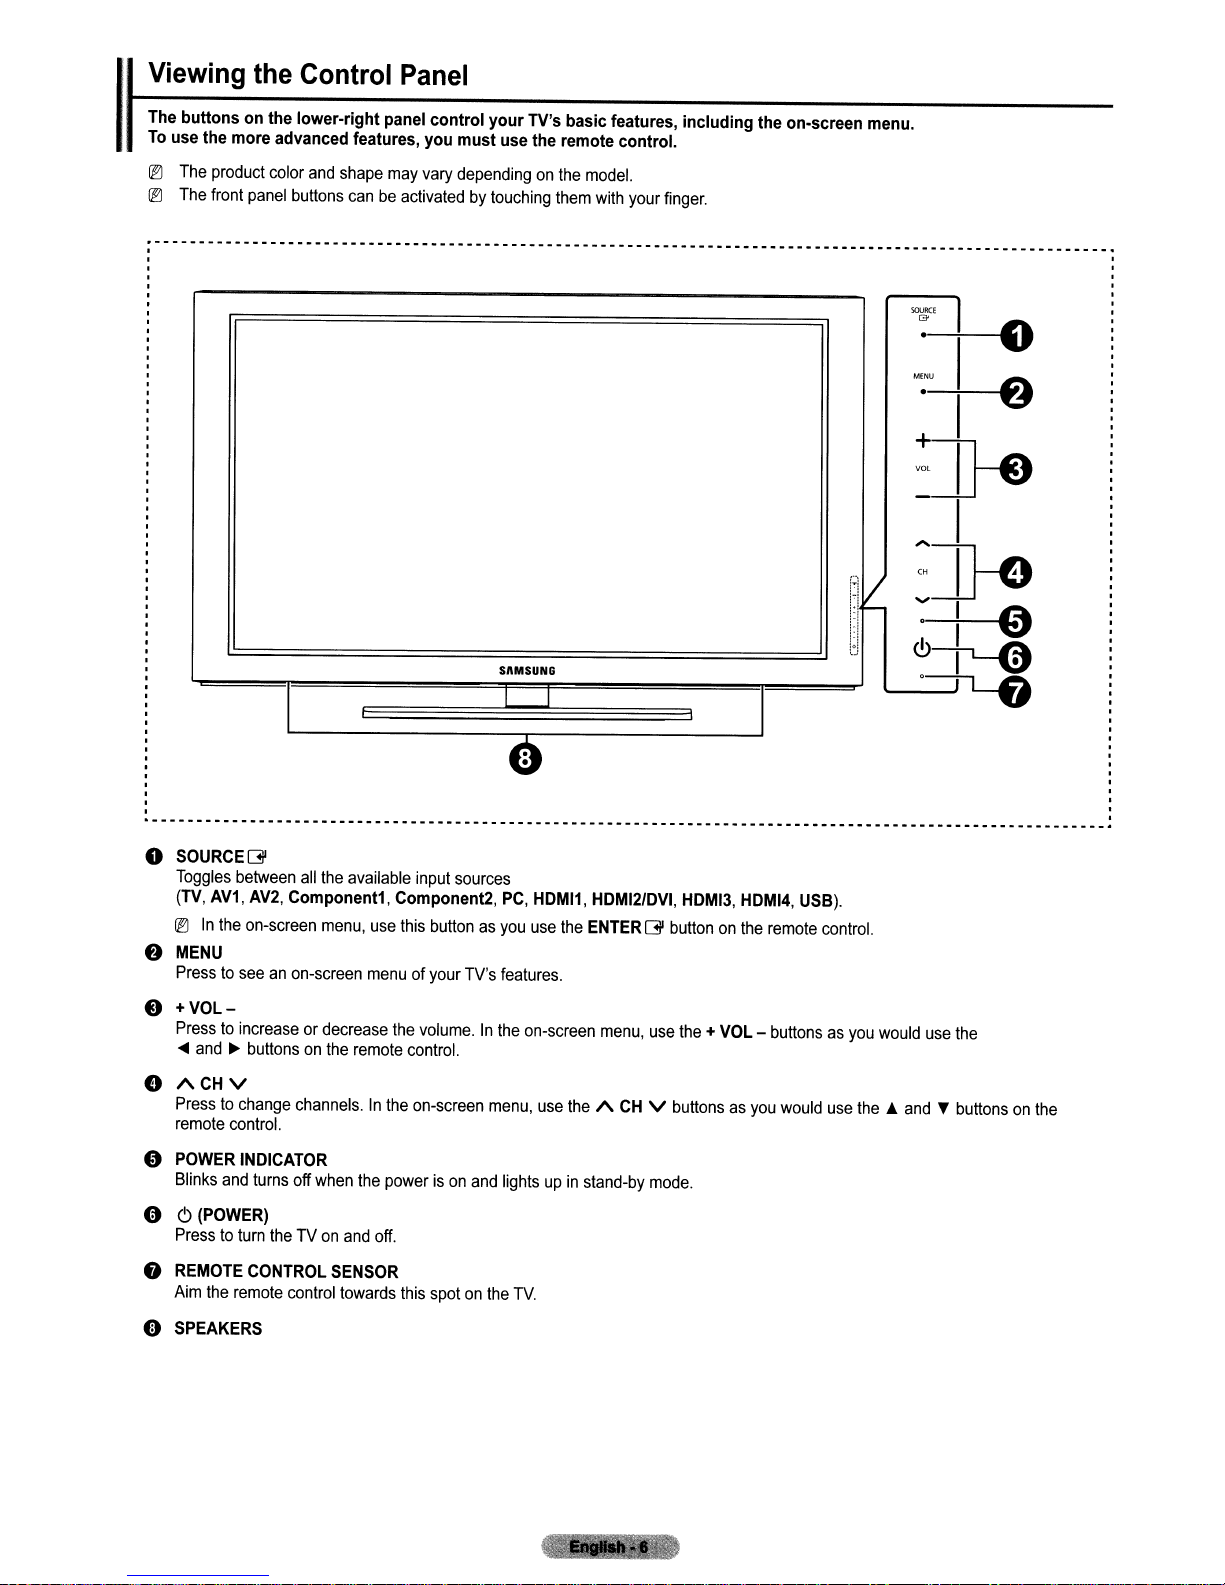
o SOURCEGI
Toggles
(TV,
®
e
e
e
o
Cit
between
AV1, AV2,
In
the
MENU
Presstoseeanon-screen
+VOLPresstoincreaseordecrease
....
and~buttonsonthe
/\
CH
V
Presstochange
remote
control.
POWER
Blinks
and
C)
(POWER)
Presstoturn
all
Component1, Component2,
on-screen
channels.Inthe
INDICATOR
turns
off
theTVon
the
menu,
when
available
use
this
menuofyour
the
remote
the
powerison
and
off.
input
sources
buttonasyou
TV's
volume.Inthe
control.
on-screen
and
SAMSUN6
I I
PC,
HDMI1,
use
features.
on-screen
menu,
lightsupin
HDMI2/DVI,
the
ENTERGI
menu,
use
the/\CHVbuttonsasyou
stand-by
HDMI3, HDMI4,
buttononthe
use
the+VOL-buttonsasyou
mode.
I
remote
USB).
would
control.
would
use
the
use
theAand~buttonsonthe
8
REMOTE
Aim
(\)
SPEAKERS
the
CONTROL
remote
control
SENSOR
towards
this
spotonthe
TV.
Viewing
the
Connection
Panel
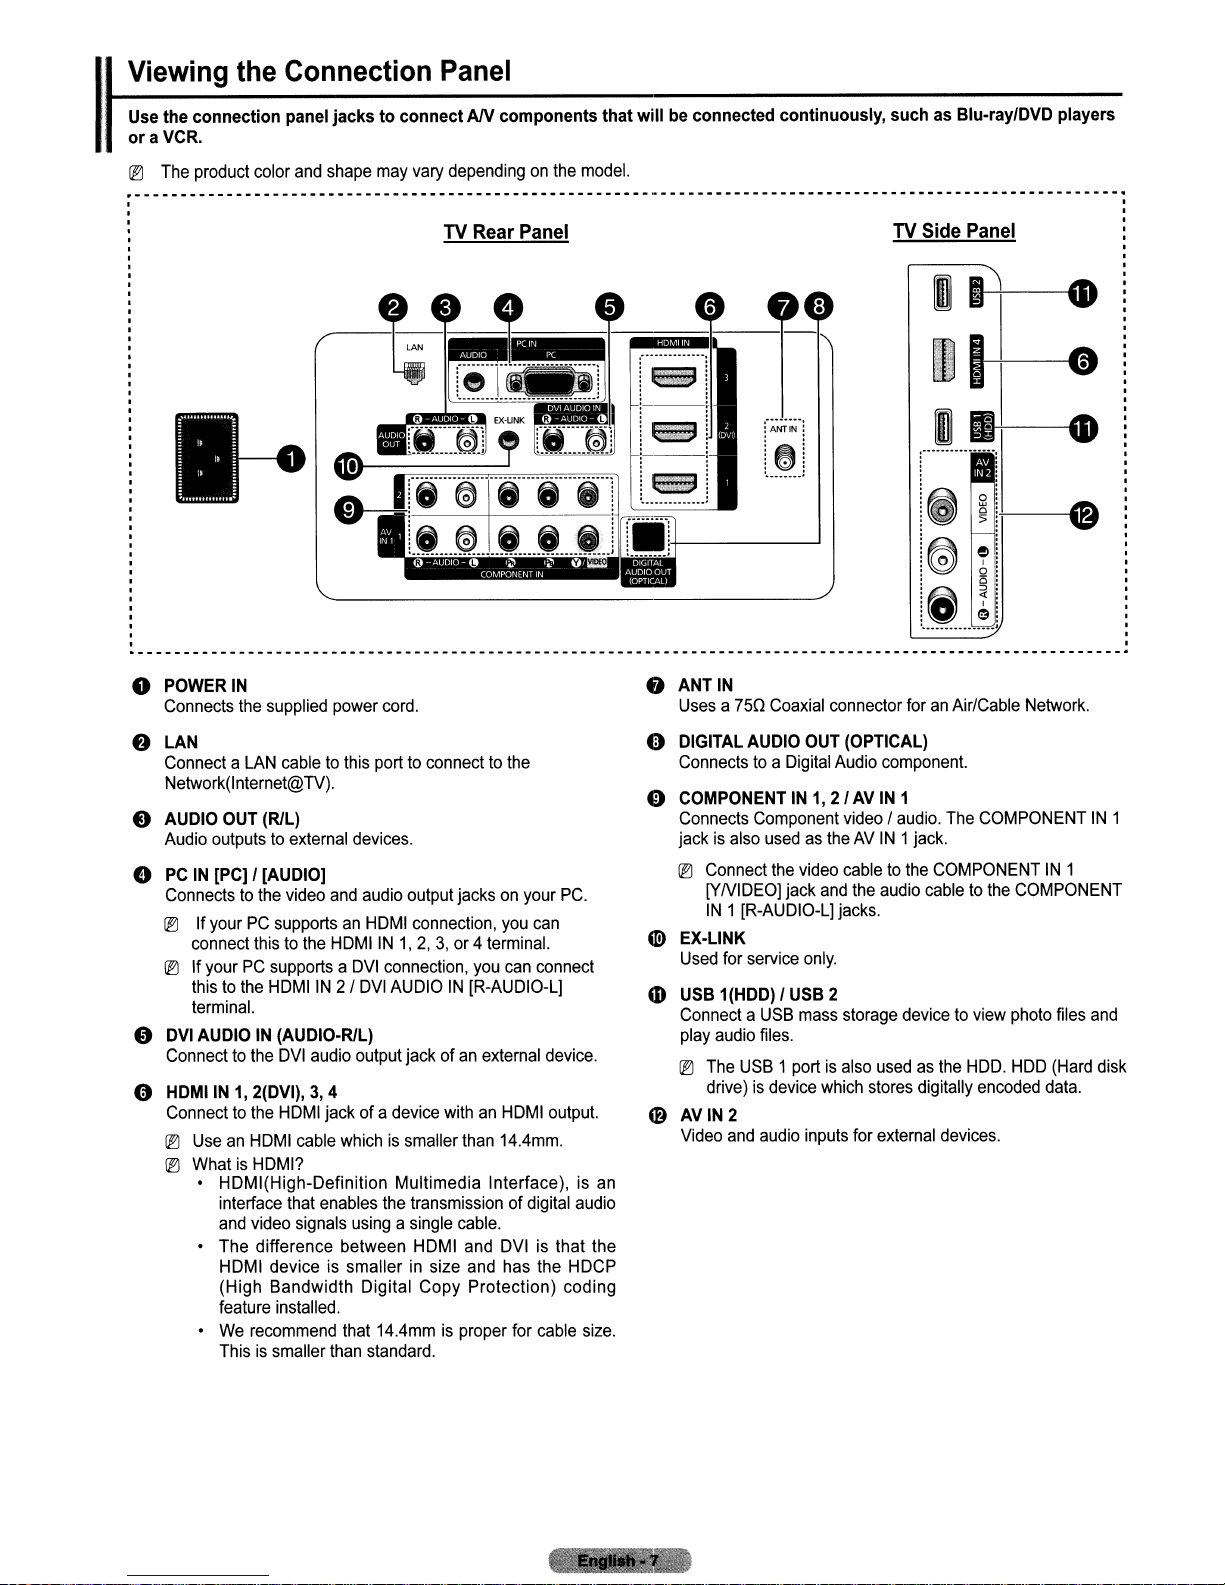
I
Use the
ora
@\)
connection
VCR.
The
product
color
panel
jackstoconnectANcomponents
and
shape
may
vary
dependingonthe
TV Rear Panel
that
model.
will
be connected continuously,
such
as Blu-ray/DVD players
TV Side Panel
II
rnl 0
m~
:-
: :
: :
,
------------------------------------------------------------------------------------------------------------
o POWERIN
Connects
the
supplied
power
cord.
8
ANTIN
Uses
a750
Coaxial
connector
foranAir/Cable
:
Network.
•
f)
LAN
ConnectaLAN
Network(lnternet@TV).
cabletothis
e AUDIO OUT (RlL)
Audio
outputstoexternal
e
PCIN[PC] / [AUDIO]
Connectstothe
@\)
If
yourPCsupportsanHDMI
connect
® If
thistothe
terminal.
«1)
DVI
Connecttothe
e HDMIIN
Connecttothe
@\)
UseanHDMI
@\)
WhatisHDMI?
thistothe
yourPCsupportsaDVI
HDMIIN2I
AUDIOIN(AUDIO-RlL)
DVI
1,
2(DVI),
HDMI
HDMI(High-Definition Multimedia Interface),isan
interface that
and
video
The
difference between
HDMI
deviceissmallerinsize
(High Bandwidth Digital Copy Protection) coding
feature
installed.
We
recommend
Thisissmaller
porttoconnecttothe
devices.
video
and
audio
HDMIIN1,2,3,or4
DVI
audio
output
3,4
jack of a
cable
whichissmaller
enables
signals
usingasingle
that
14.4mmisproper
than
standard.
output
jacksonyour
connection,
connection,
AUDIOIN[R-AUDIO-L]
jackofan
device
the
transmission
HDMI
you
terminal.
you
can
external
withanHDMI
than
14.4mm.
of digital
cable.
and
DVIisthat the
and
has
for
PC.
can
connect
device.
output.
the
HDCP
cable
audio
size.
Cl)
DIGITAL AUDIO OUT (OPTICAL)
Connectstoa
o COMPONENT
Connects
jack
is
®
Connect
[YNIDEO] jack
IN1[R-AUDIO-L]
Q)
EX-LINK
Used
for
Digital
IN1,2/AVIN
Component
also
usedastheAVIN
the
video
service
only.
Audio
video/audio.
cabletothe
and
jacks.
mUSB 1(HDD) / USB 2
ConnectaUSB
play
@\)
The
drive)isdevice
o
AVIN2
Video
audio
and
mass
files.
USB1portisalso
audio
storage
which
inputs
component.
the
audio
usedasthe
stores
for
external
1
The
COMPONENTIN1
1jack.
COMPONENTIN1
cabletothe
devicetoview
HOD.
digitally
encoded
devices.
COMPONENT
photo
files
and
HOD
(Hard
disk
data.

Remote
You
I
lEI
lEI
can use the remote control up to a distanceofabout23feet from the
The
The
Control
product color
performance of
and
shape
the
................................................................
remote
may
vary
dependingonthe
control
maybeaffectedbybright
o
POWER
Turns
eTV
Selects
NUMERIC
Presstochange
00
Presstoselect
being
example,toselect
"54-3",
4MUTE
Presstotemporarily
model.
theTVon
broadcastbythe
press
and
theTVmode
BUTTONS
the
additional
channel
"54",
then
light.
off.
directly.
channel.
channels
same
press
cut
off
station.
"0"
the
TV.
(digital)
sound.
For
and
"3".
~
INFO
Presstodisplay
screen.
@
Use
these
and
(~:
recordingonSamsung
Anynet+
~
\JON/OFF
Presstobacklight
This
or
control
toOnwill
'9
PRE-CH
Tunestothe
«1)
GCHB
Presstochange
buttonsinthe
Anynet+
This
remote
feature)
functionisconvenient
when
the
with
reduce
informationonthe
modes.
canbeusedtocontrol
recorders
the
buttonsonthe
roomisdark.
the
ON/OFF(V)
the
battery
previous
channel.
channels.
DMA,
for
(Using
light
usage
TV
Media
Play
with
the
remote.
usingatnight
the
remote
button
set
time.)
UPA/DOWNT /
RIGHT~
Usetoselect
change
menu
INTERNET@
This
function
Internet@TV.
@
COLOR
Use
SI\MSUNG
Q)
these
Media
Play,
MEDIA.P
This
function
photo
and
device.
(Refertopages40(Photo),
(Music)
and45(Movie))
o Installing Batteries in the Remote Control
1.
Lift
the
2.
Install
two
lEI
Make
compartment.
3.
Close
the
lEI
Remove
remote
for about
lEI
Using
lEI
If
the
remote
1.IstheTVpower
2.
Are
3.
Are
4.
Is
thereapower
5.Isthere
coveratthe
AM
suretomatch
coverasshowninthe
control for a
the
the
the
backofthe
size
batteries.
the
batteries
one
year.)
remote
control
control
doesn't
on?
plus
and
minus
batteries drained?
outageoris
a special fluorescent lightorneon
the
"+"
and
long
endsofthe
remote
control
and
"-"
endsofthe
figure.
store
themina
time.
(Assuming typicalTVusage,
with
the
ON/OFF(V) light button
work,
check
the
batteries reversed?
the
power
upwardasshowninthe
cool,
following
cord
unplugged?
sign
/ ENTERG'
on-screen
values.
enables
BUTTONS
buttonsinthe
and
Internet@TV,
(Media
play)
enables
music
files
batteries
dry
placeifyou
nearby?
LEFT
....
/
menu
youtoview
Channel
youtoview
fromanexternal
with
the
diagram inside
won'tbeusing
the
batteries
settoOn
items
list,
etc.
and
figure.
will
and
play
43
should
reduce
~
~
€J)
@)
€!)
the
the
last
the
EXIT
Presstoexit
P.SIZE
Picture
size
CONTENT
This
function
Library.
CC
Controls
MTS
Presstochoose
Audio
battery
the
Program
usage
the
menu.
selection.
enables
caption
stereo,
(SAP
time.
youtoview
decoder.
monoorSeparate
broadcast).
Content
IConnections
Connecting
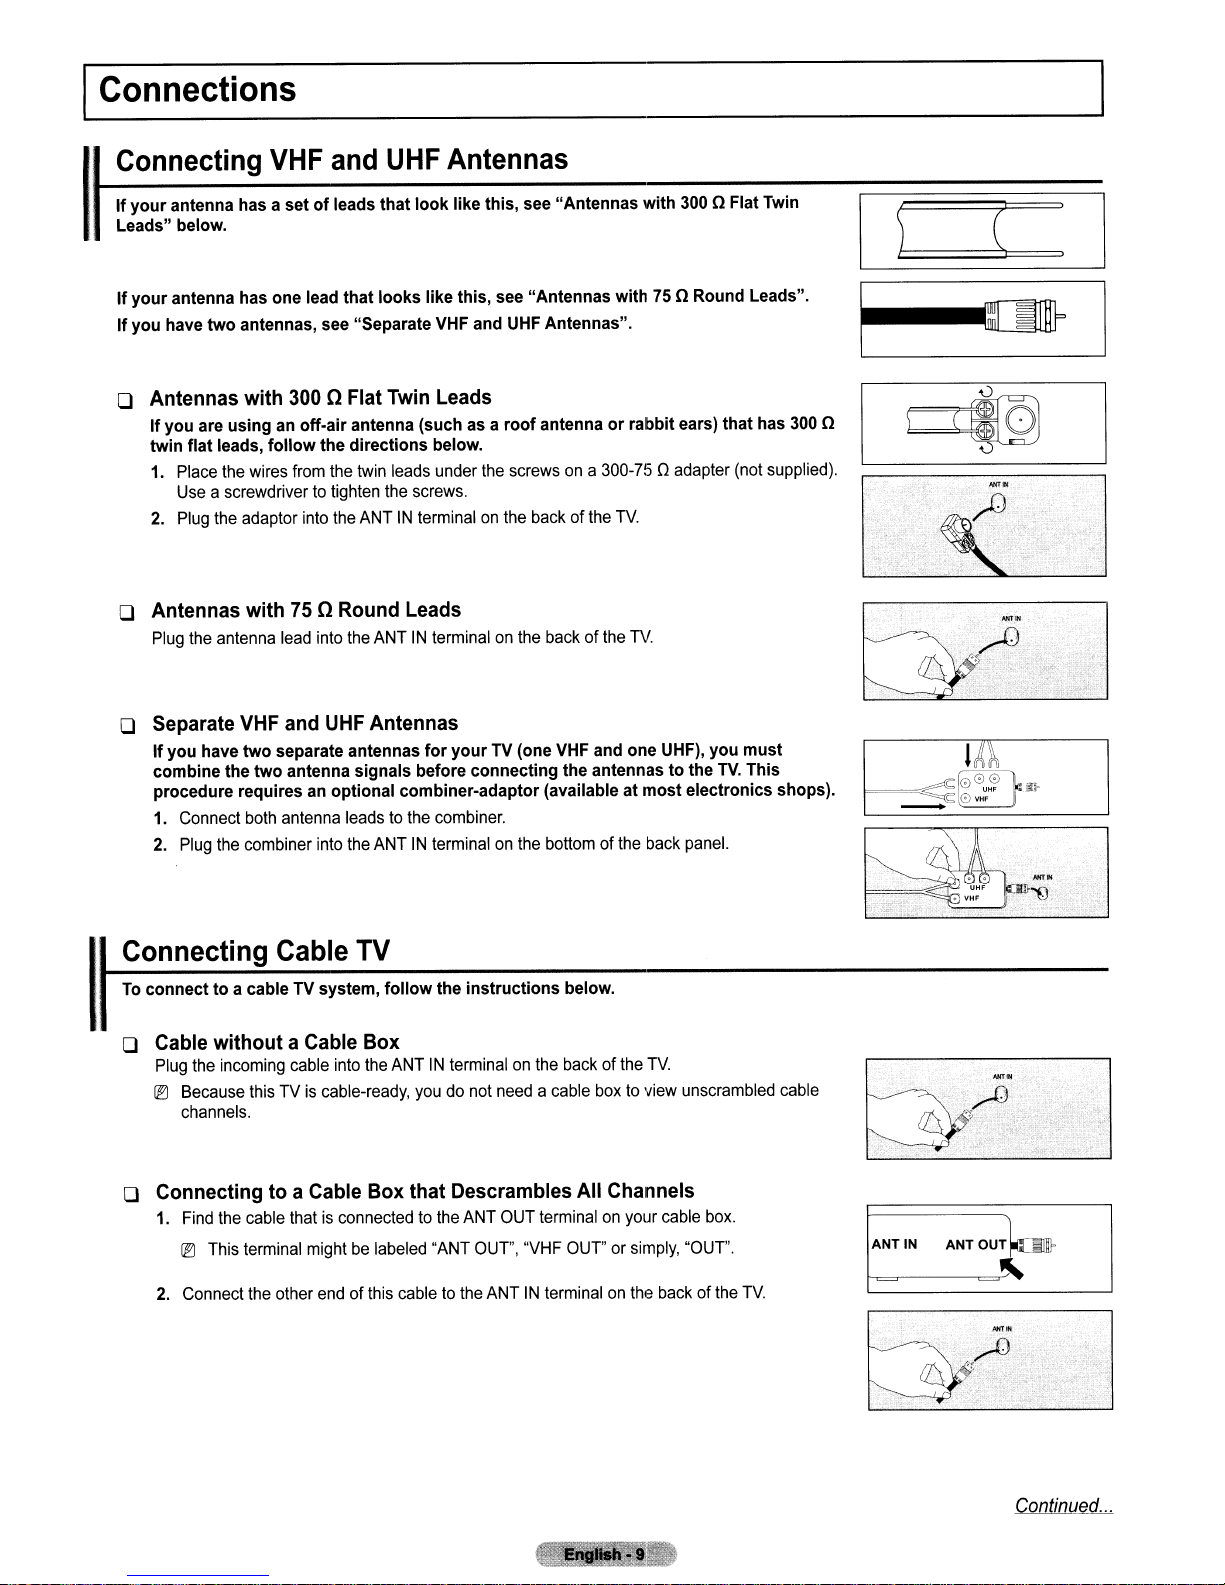
i;lf~y;OU~r~a~n~te;'n~n~a~h~a~s~a~s~e;t~of~l~e;ad;s~t;h~at~l~o~O;k~li;ke~t~h~is~,~s~ee~"A~n;t;e~nn~a~s~w:i~th~3;0~0~O;-;F~la;t~Tw~in:--rr=~)~~~~~(~:
I
Leads" below.
If
your antenna has one lead that looks like this,
If
you have two antennas,
o Antennas with
If
you are usinganoff-air antenna (suchasa roof antenna or rabbit ears) that has
twin flat leads, follow the directions below.
1.
Place the wires from the twin leads under the screws on a
Use a screwdriver to tighten the screws.
2.
Plug the adaptor into the ANTINterminal on the back of the
VHF
and
see
"Separate
300
nFlat Twin Leads
UHF
Antennas
see
"Antennas with750 Round Leads".
VHF
and
UHF
Antennas".
300-75
TV.
3000
0 adapter (not supplied),
;;;;~~
_~_
===~,
~~~
j--rra
0
F==FIQ
_0_
I
o Antennas with75nRound Leads
Plug the antenna lead into the ANTINterminal on the back of the
o Separate
If
you have two separate antennas for yourTV(one
combine the two antenna signals before connecting the antennas to the
procedure requires
1. Connect both antenna leads to the combiner.
2.
VHF
and
UHF
Antennas
VHF
an
optional combiner-adaptor (availableatmost electronics shops).
Plug the combiner into the ANTINterminal on the bottomofthe back panel.
and
TV.
one
UHF),
you must
TV.
This
Connecting Cable
To
connect to a cableTVsystem, follow the instructions below.
TV
I
o Cable
o Connecting
without
Plug the incoming cable into the ANT IN terminal on the back of the
rl0
Because this TV is cable-ready, you do not need a cable box to view unscrambled cable
channels.
1. Find the cable thatisconnected to the ANT OUT terminal on your cable box.
rl0
This terminal might be labeled "ANT OUT", "VHF OUT" or simply, "OUT".
2.
Connect the other endofthis cable to the ANTINterminal on the backofthe
a Cable Box
to
a Cable Box that Descrambles All Channels
TV.
TV.
[3(" I
ANT
IN
ANT
OUT
[3;(.
Continued
...
I
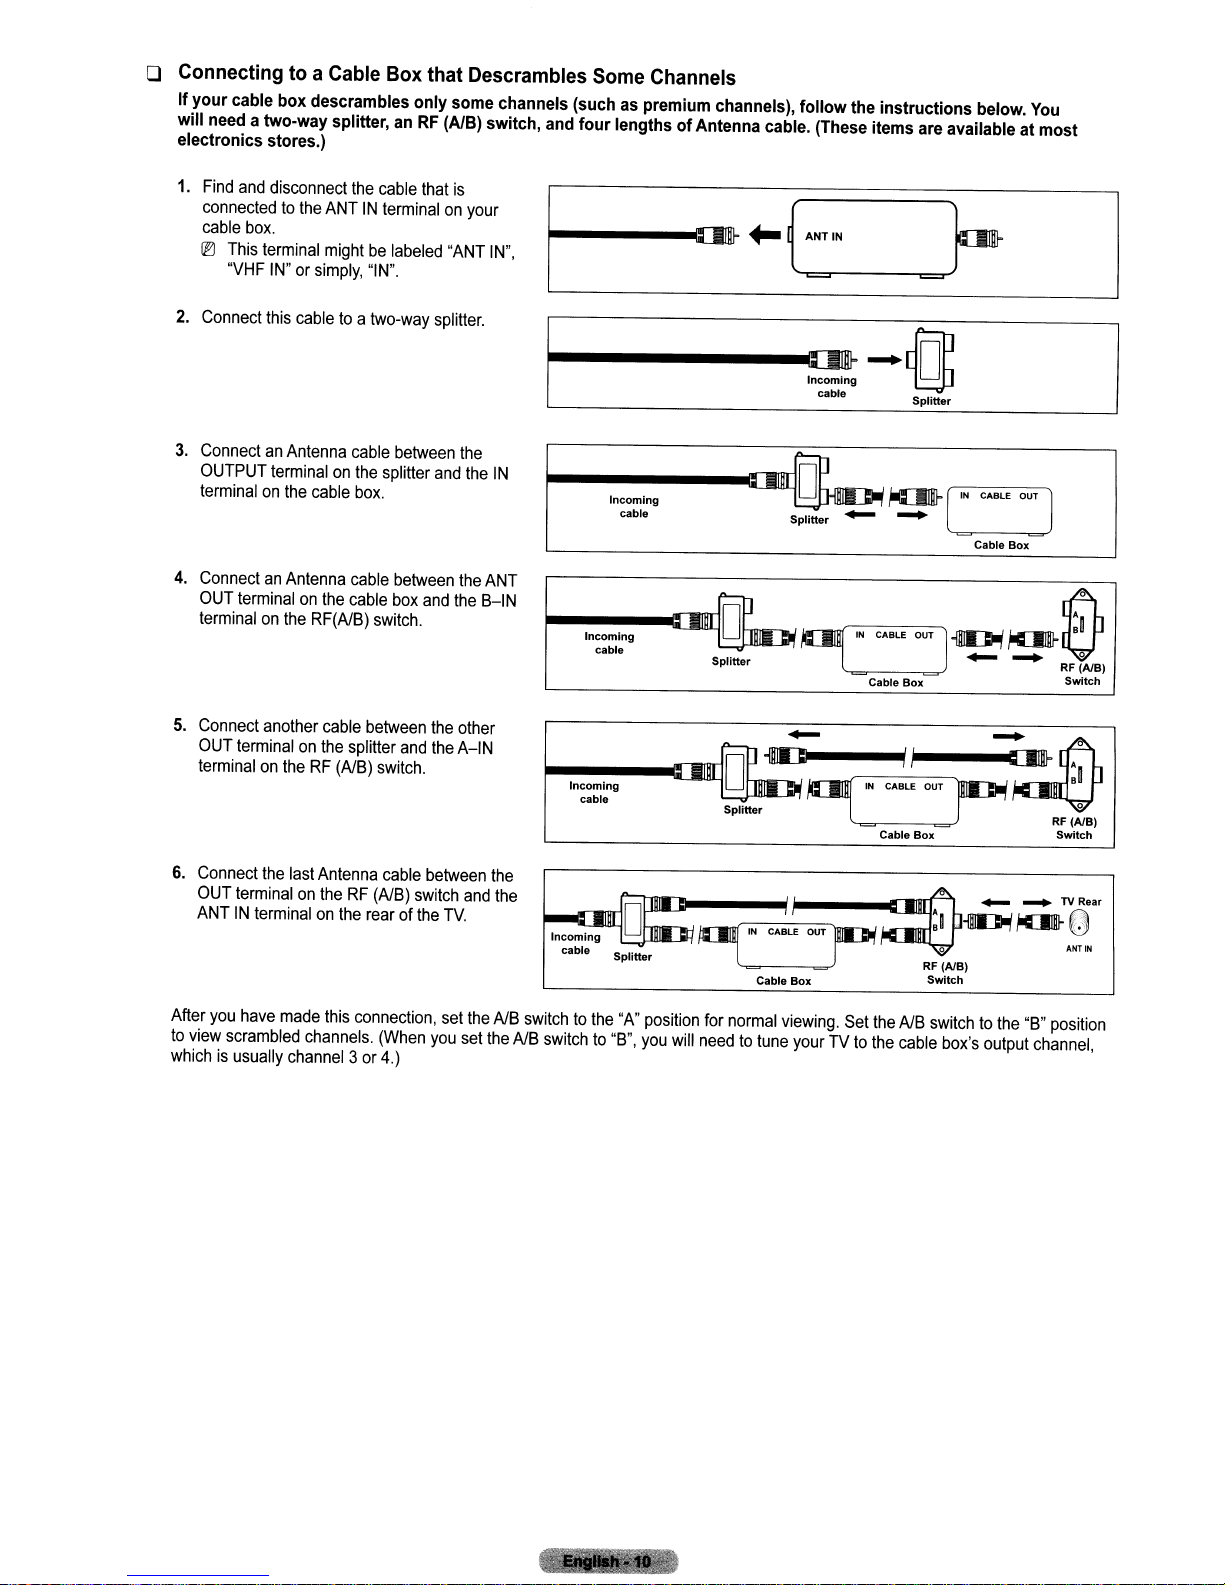
o Connecting
If
your
will need a two-way splitter,anRF
electronics stores.)
1.
Find
connectedtothe
cable
®
2.
Connect
to
a Cable Box that Descrambles Some Channels
cable box descrambles only some channels (such as premium channels), follow the instructions below.
and
box.
This
"VHF
disconnect
terminal
IN"orsimply,
this
the
ANTINterminalonyour
mightbelabeled
cabletoa
cable
"IN".
two-way
(AlB) switch, and
that
is
"ANT
IN",
splitter.
four
lengthsofAntenna cable. (These items are available at
You
most
6.
Connect
OUT
ANTINterminalonthe
the
last
terminalontheRF(AlB)
Antenna
cable
switch
rearofthe
between
and
TV.
-----~-a
cable
Splitter
~
-
the
the
Incoming
cable
L......J---,O(~
'--_~_,
Splitter
m
l= J
IN
CABLE OUT
Cable
~
Box
"."M
Cable
Cable
1IDD'
l~~~
Box
Box
AI
a:::JIj
B0
RF
(AlB)
Switch
Switch
__
KD
TVRear
D\
A~N
After
you
have
made
this
connection,
to
view
scrambled
whichisusually
channels.
channel3or
(When
4.)
you
set
set
the
AlB
the
AlB
switchtothe
switchto"B",
11~~"t~~~~~
l!Il1>£
'"
1!i,
,.,."
"A"
,~~~
position
you
will
w:,'I""
for
normal
needtotune
viewing.
yourTVto
Set
the
the
AlB
switchtothe
cable
box's
output
"B"
position
channel,
Connecting a
·
.•
1-
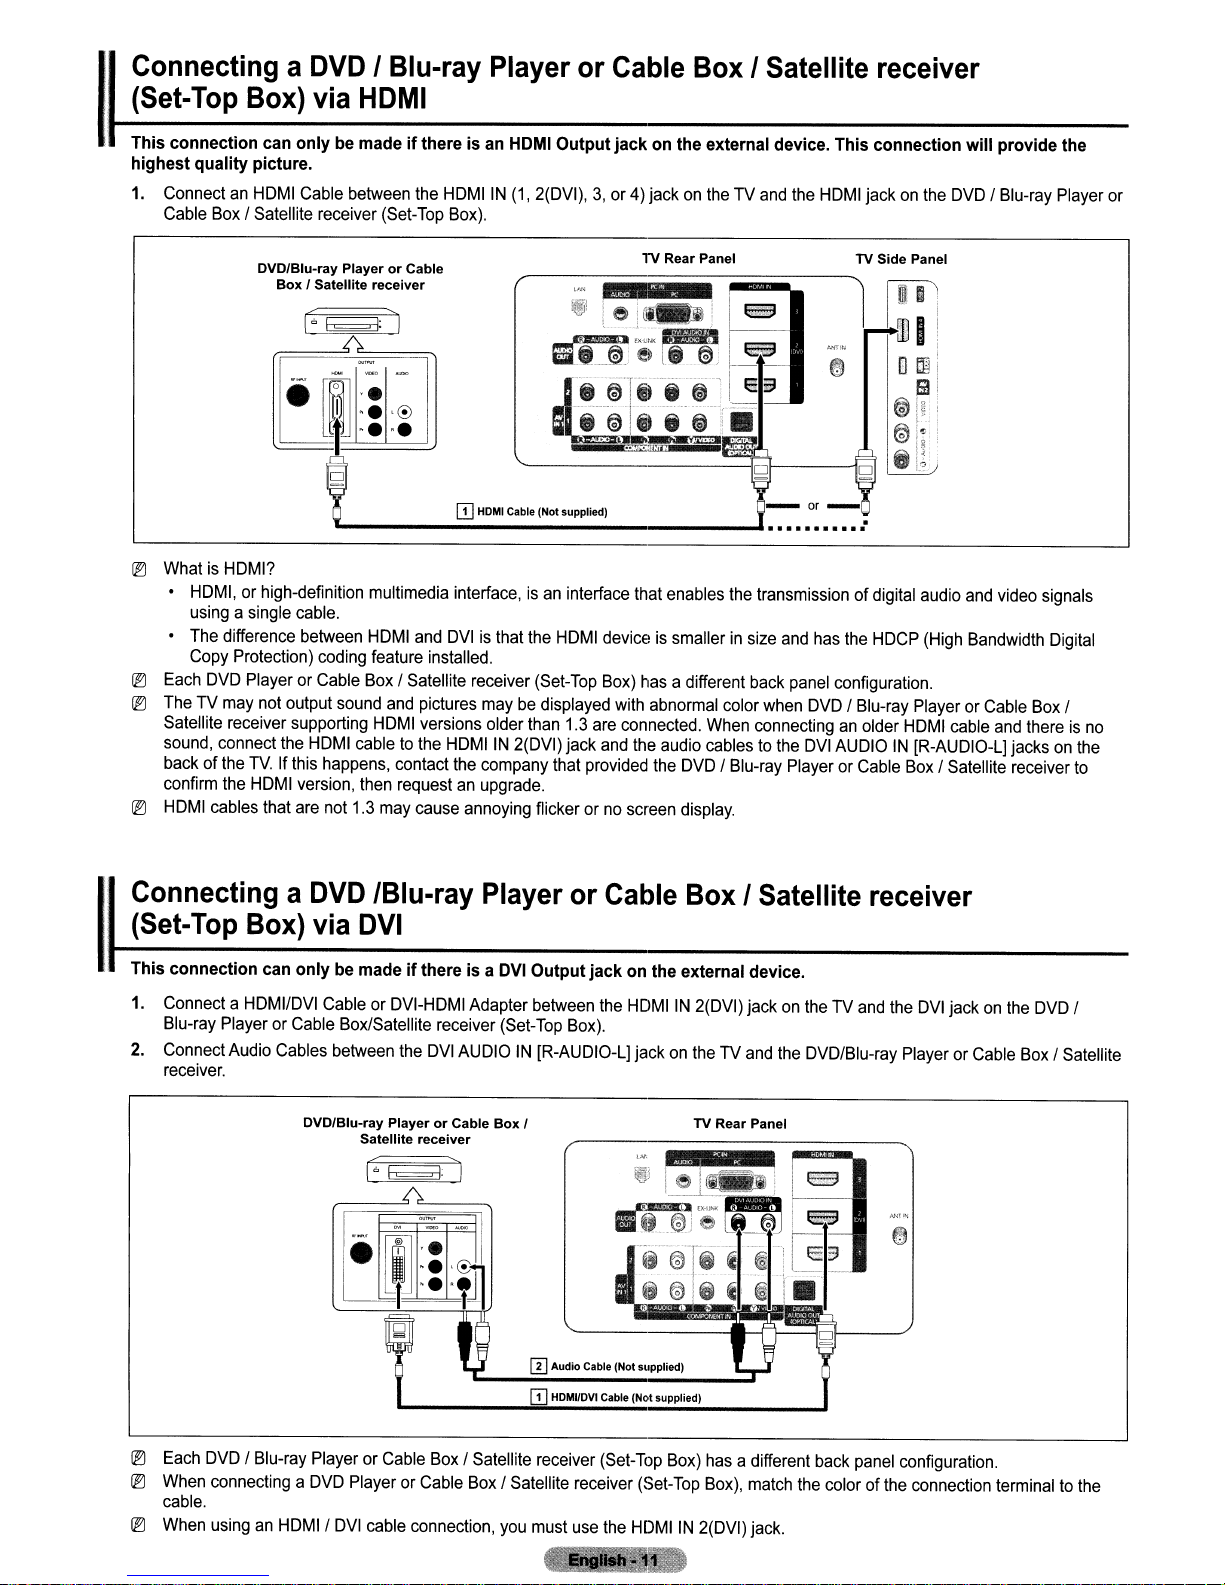
..:,.(S_e_t-_l_op_B_ox_)_v_ia_H_D_M_I
I
This connection can onlybemadeifthere isanHOMI
highest quality picture.
1.
ConnectanHDMI
Cable
Box
I Satellite receiver
DVD
Cable
, Blu-ray Player or Cable
between
the
(Set-Top
HDMIIN(1,
Box).
Box'
Outputjack on the external device. This connection will provide the
2(DVI),3,or4)jackontheTVand
Satellite receiver
the
HDMI
jackonthe
DVDIBlu-ray
Player
_
or
lEI
WhatisHDMI?
•
HDMI,orhigh-definition
usingasingle
•
The
difference
Copy
lEI
Each
DVD
lEI
TheTVmay
Satellite receiver
sound,
connect
backofthe
confirm
the
lEI
HDMI
cables
DVD/Blu-ray PlayerorCable
Box
I Satellite receiver
I
_1°
.•
•
...
multimedia
cable.
between
Protection)
PlayerorCable
not
output
supporting
the
TV.Ifthis
HDMI
version,
that
are
coding
sound
HDMI
happens,
not
HDMI
feature
Box
HDMI
cabletothe
then
1.3
may
'®
".
CD
HOMI
Cable (Not supplied)
interface,isan
and
DVIisthat
installed.
I Satellite receiver
and
pictures
versions
contact
requestanupgrade.
cause
maybedisplayed
older
HDMIIN2(DVI)
the
company
annoying
interface that
the
HDMI
(Set-Top
than
1.3
jack
that
provided
flickerorno
TV Rear Panel
enables
deviceissmallerinsize
Box)
has
with
abnormal
are
connected.
and
the
audio
the
screen
the
adifferent
color
When
cablestothe
DVDIBlu-ray
display.
TV Side Panel
transmission
and
back
panel
when
connectinganolder
PlayerorCable
of digital
has
the
HDCP
configuration.
DVDIBlu-ray
DVI
AUDIOIN[R-AUDIO-L]
audio
and
(High
Bandwidth
PlayerorCable
HDMI
cable
Box
I Satellite
video
signals
Digital
Box
and
thereisno
jacksonthe
receiver
I
to
..
·
...
_c_o_n_n_e_ct_in_g_a_D_V_D_'B_I_U-_r_ay_p_la_y_e_r
• (Set-lop Box) via
I
This connection can onlybemadeifthere is a
1.
ConnectaHDMI/DVI
Blu-ray
PlayerorCable
2.
®
®
lEI
Connect
receiver.
Each
When
cable.
When
Audio
Cables
DVDIBlu-ray
connectingaDVD
usinganHDMII
DVI
CableorDVI-HDMI
Box/Satellite receiver
between
DVD/Blu-ray PlayerorCable
PlayerorCable
DVI
the
Satellite receiver
PlayerorCable
cable
Adapter
DVI
AUDIOIN[R-AUDIO-L]
Box
I Satellite
Box
connection,
OVI
(Set-Top
Box
I Satellite receiver
you
_o_r
_C_a_bl_e_B_o_x_,_s_a_t_el_li_te_r_e_c_e_iv_e_r
Outputjack on the external device.
between
I
[I]
CD
receiver
must
the
Box).
Audio
Cable (Not supplied)
HOMUOVI
use
HDMIIN
jackontheTVand
Cable (Not supplied)
(Set-Top
the
Box)
(Set-Top
HDMIIN
2(DVI)
jackontheTVand
TV Rear Panel
has
adifferent
Box),
2(DVI)
match
jack.
the
DVD/Blu-ray
back
the
color of
the
PlayerorCable
panel
configuration.
the
DVI
jackonthe
connection
_
DVD
I
Box
I Satellite
terminaltothe
'..
ConnectingaDVDIBlu-ray
(Set-Top
I
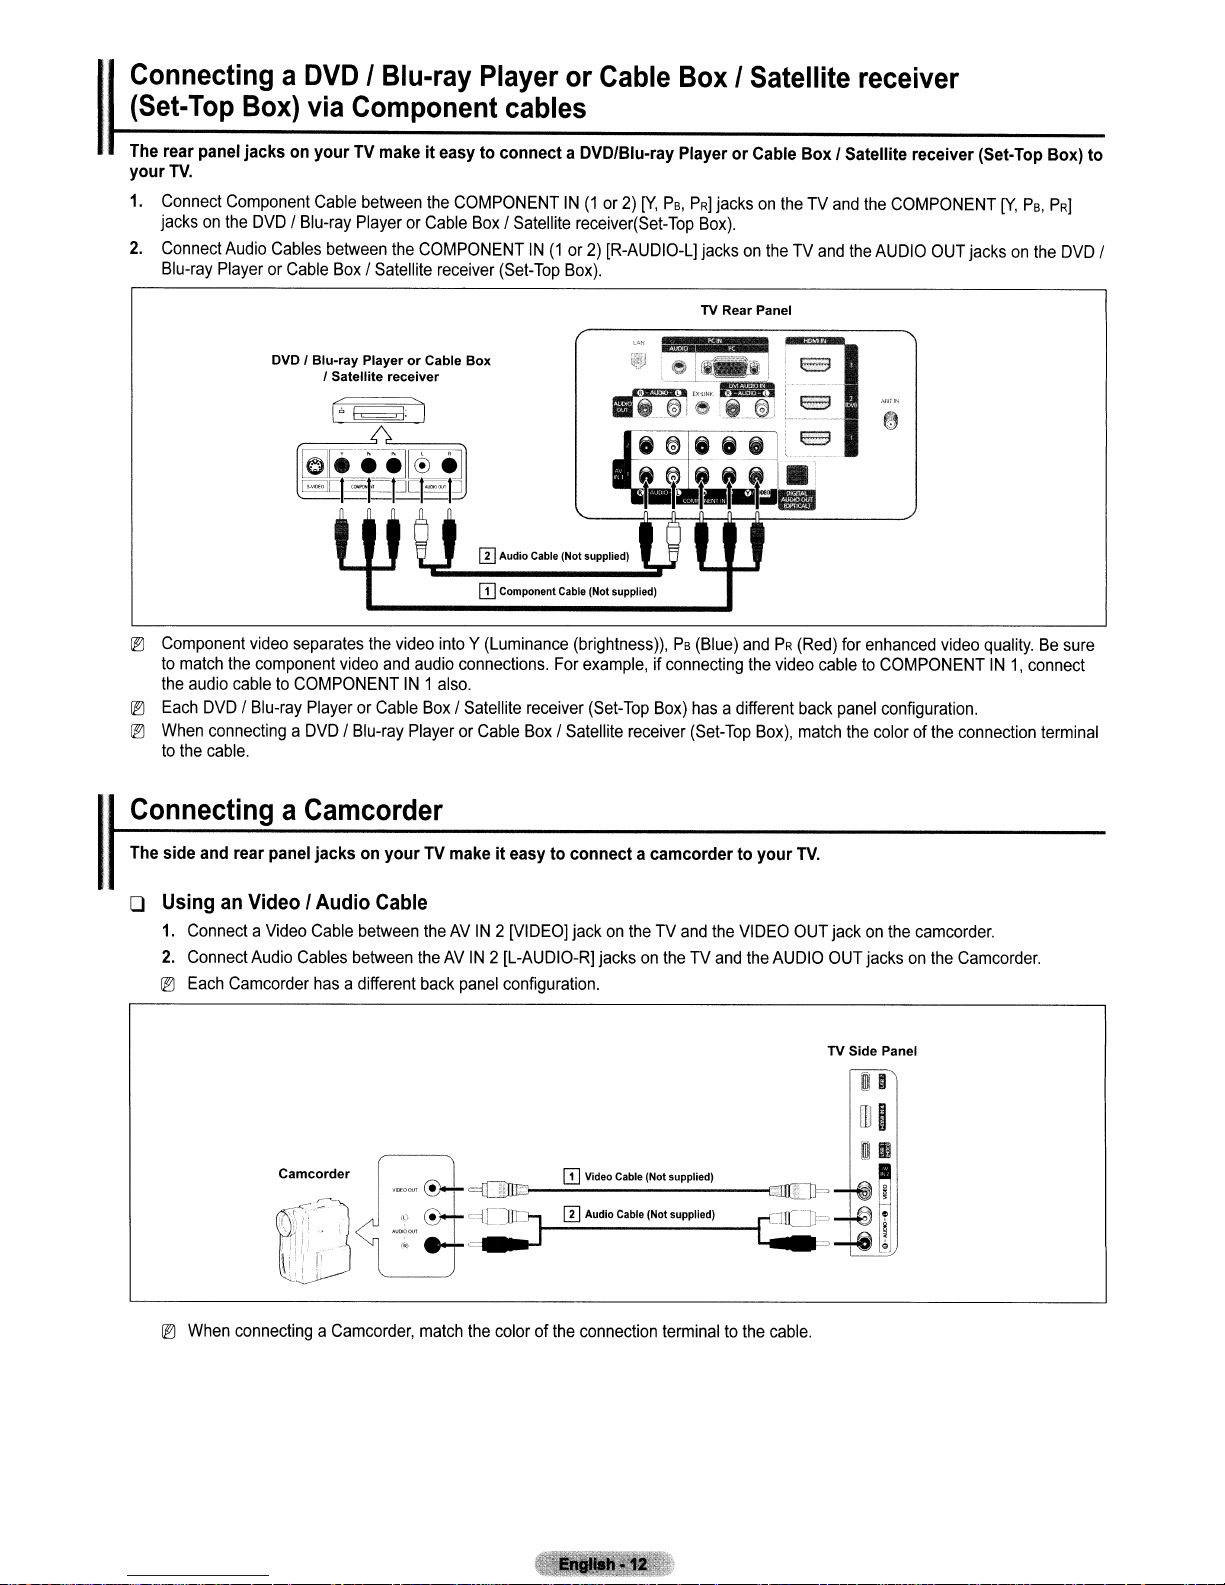
The rear panel jacks on
TV.
your
1.
Connect
jacksonthe
2.
Connect
Blu-ray
[lqJ
Component
to
match
the
[lqJ
Each
[lqJ
When
to
the
Box)
Component
Audio
PlayerorCable
the
audio
cabletoCOMPONENTIN1
DVD/Blu-ray
connectingaDVDIBlu-ray
cable.
via
yourTVmakeiteasy to connect a DVD/Blu-ray PlayerorCable Box I Satellite receiver (Set-Top Box) to
Cable
DVDIBlu-ray
Cables
between
Blu-ray
DVD I
I Satellite
video
separates
component
PlayerorCable
Box/Satellite
video
Component
between
PlayerorCable
PlayerorCable
the
and
Player
cables
the
COMPONENTIN(1or2)
BoxISatellite
the
COMPONENTIN(1or2)
receiver
receiver
video
audio
BoxISatellite
PlayerorCable
(Set-Top
Box
W Audio Cable (Not supplied)
IT]
Component Cable (Not supplied)
intoY(Luminance
connections.
also.
or
Cable
receiver(Set-Top
[R-AUDIO-L]
Box).
(brightness)),PB(Blue)
For
example,ifconnecting
receiver
Box
(Set-Top
I Satellite
BoxISatellite
[Y,
PB,
PRJ
jacksontheTVand
Box).
jacksontheTVand
TV Rear Panel
Box)
hasadifferent
receiver
(Set-Top
andPR(Red)
the
video
cabletoCOMPONENTIN1,
back
Box),
match
receiver
the
COMPONENT
the
AUDIO
for
enhanced
panel
configuration.
the
colorofthe
OUT
video
connection
jacksonthe
[Y,
PB,
PRJ
DVD
quality.Besure
connect
terminal
/
ConnectingaCamcorder
The side and rear panel jacks on your TV makeiteasy to connect a camcorder to
I
o Using
an
1.
ConnectaVideo
2.
Connect
IEJ
Each
Camcorder
[lqJ
When
connectingaCamcorder,
Video I Audio Cable
Cable
between
Audio
Cables
between
hasadifferent
Camcorder
•
0>
1 .
,.
''\J''~
\ I [
f
theAVIN2[VIDEO]
theAVIN2[L-AUDIO-R]
back
panel
configuration.
={[BIEJ
=j~
match
the
colorofthe
jackontheTVand
IT]
.....
--:;;;;~-----01EIJ=
WAUdiO
jacksontheTVand
Video Cable (Not supplied)
Cable (Not supplied)
connection
the
VIDEO
the
terminaltothe
your
AUDIO
~
cable.
TV.
OUT
OUT
TV Side Panel
jackonthe
jacksonthe
camcorder.
Camcorder.
o
UsinganHOMI
1.
ConnectanHDMI
Cable
Cable
between
the
HDMIIN
(1,
2(DVI),3,or4)jackontheTVand
the
HDMI
jackonthe
camcorder.
~
Each
:onnecting a
II.
Video
These
instructions
instructionsonpages
1.
Unplug
2.
Connect
3.
ConnectanAntenna
4.
Connect a
VCR.
5.
Connect
Camcorder
VCR
Connection
assume
the
cableorantenna
the
cableorantennatothe
Video
Audio
Cables
has
9-10).
Cable
a different
that
you
Skip
Cable
between
between
between
back
panel
have
already
step
1 if
you
from
the
backofthe
ANTINterminalonthe
the
ANT
theAVIN
theAVIN
1(orAVIN2)[R-AUDIO-L]
TV Rear Panel
III
HOMI
Cable (Not supplied)
configuration.
connected
have
not
OUT
1[YNiDEO]orAVIN2
yourTVtoanantennaora
yet
connectedtoan
TV.
backofthe
terminalonthe
antennaora
VCR.
VCR
and
the
ANTINterminalonthe
[VIDEO]
jackontheTVand
jacksontheTVand
TV Side Panel
cableTVsystem
cable
system.
the
VIDEO
the
AUDIO
(accordingtothe
TV.
OUT
jackonthe
OUT
jacksonthe
VCR
~
If
you
havea"mono"
TV.
Alternatively, connect
If
your
VCRisstereo,
~
Each
VCR
~
When
connecting a
~
When
connectingtoAVIN1,
VCR Rear Panel
...
has
a different
VCR,
TV Rear Panel
[!] Video Cable(Not supplied)
_------------_..........
IT]
Antenna cable(Not supplied)
(non-stereo)
the
you
back
match
VCR,
cabletothe
must
connect
panel
the
the
coloroftheAVIN
use
aY-connector
"R"
jack.
two
cables.
configuration.
color of
the
(not
supplied)toconnecttothe
connection terminaltothe
1[YNiDEO] jack
(Green)
cable.
does
TV Side Panel
o •
..............
. . .
right
and
not
match
the
colorofthe
I :
left
·
·
·
·
·
·
·
audio
input jacks of
video
cable
the
(Yellow).

t-c_o_n_n_ec_t_in_g_a_D_i9_it_a_1
A_ud_i_o_S_y_s_te_m
_
The rear panel jacks on
I
1.
ConnectanOptical
jacksonthe
WhenaDigital
adjust
the
®
5.1CHaudioispossible
®
Each
Digital
®
When
the
DTV(air)
asaDVD
If
you
wanttohear
Satellite
your
TV makeiteasytoconnect a Digital Audio System(Home theater/Receiver)toyour
Cable
Digital
Audio
volume
between
Audio
System.
Systemisconnectedtothe
level
with
Digital
Audio
the
System
the
system's
fOl~fOl
lQJ~lQJ
when
theTVis
Audio
System
has
a different
receiver
signal,
andisconnectedtotheTVvia
Box
(home
theTVwill
5.1
channel
directlytoan
theater)issettoOn,
send
out
audio,
AmplifierorHome
DIGITAL
[!]
connectedtoan
5.1
connect
AUDIO
DIGITAL
volume
control.
Optical Cable (Not supplied)
back
panel
you
channel
HDMI,
Theater,
soundtothe
only2channel
the
OUT
AUDIO
external
configuration.
can
hear
DIGITAL
not
the
(OPTICAL)
OUT
device
sound
Home
sound
AUDIO
TV.
jacksontheTVand
(OPTICAL)
TV Rear Panel
supporting
output
from
theater
willbeheard
OUT
the
receiver.
(OPTICAL)
jack:
Decrease
5.1
CH.
TV's
Optical
When
from
the
jackonthe
the
Digital
the
volumeofthe
jack.
the
Home
When
sourceisadigital
Theater
DVD/Blu-ray
Audio
Input
theTVis
receiver.
playerorCable/
TV.
(OPTICAL)
TV.
and
displaying
component
a
such
Connecting
1.
Connect
I
DVD
Whenanaudio
the
volume
®
Each
®
When
an
AmplifierIDVD
Audio
Cables
between
Home
Theater.
amplifierisconnectedtothe
level
with
the
Amplifier's
Amplifier
Amplifier /
connectinganAmplifier /
DVD
I DVD
Home
the
Home
Theater
DVD
AUDIO
OUT
AUDIO
volume
control.
Theater
[!]
Audio Cable (Not supplied)
has
a different
Home
Theater,
Home
[R-AUDIO-L)
OUT
[R-AUDIO-L)
back
panel
match
Theater
jacksontheTVand
jacks
TV Rear Panel
K,"
AIJOJO
configuration.
the
colorofthe
AUDIOIN[L-AUDIO-R)
terminals:
I'(
connection
Decrease
terminaltothe
the
volumeofthe
cable.
jacksonthe
TV,
Amplifier/
and
adjust
ConnectingaPC
o
UsingaD-Sub
I
1.
ConnectaD-Sub
2.
ConnectaPC
computer.
o
UsinganHDMIJDVI
1.
ConnectanHDMIIDVI
2.
Connecta3.5mmStereo
the
sound
Cable
Cable
Audio
cardonyour
betweenPCIN
Cable
between
[I]
PC
CD
O-Sub Cable (Not supplied)
Cable
cable
between
plugto2RCA
computer.
thePCIN
pc
Audio
Cable (Not supplied)
[PC]
jackontheTVand
[AUDIO]
the
HDMIIN
cable
between
jackontheTVand
2(DVI)
jackontheTVand
the
DVI
AUDIOIN[R-AUDIO-L]
thePCoutput
the
TV Rear Panel
jackonyour
Audio
thePCoutput jackonyour
computer.
Out
jack of
the
sound
jackontheTVand
cardonyour
computer.
the
Audio
Out
jack
of
~
EachPChas
~
When
~
When
a different
connectingaPC,
usinganHDMIIDVI
PC
[I]
3.5
mm Stereo
plugto2 RCA Cable (Not supplied)
CD
HOMI/OVI Cable (Notsupplied)
back
panel
configuration.
match
the
color of
cable
connection,
the
connection
you
must
terminaltothe
use
the
HDMIIN2(DVI)
TV
Rear Panel
cable.
terminal.
IOperation
ITurning the
Press the
on
®
Changing
the
It
POWER
TV.
may
takeawhile
TV
button on the remote control.
for
Channels
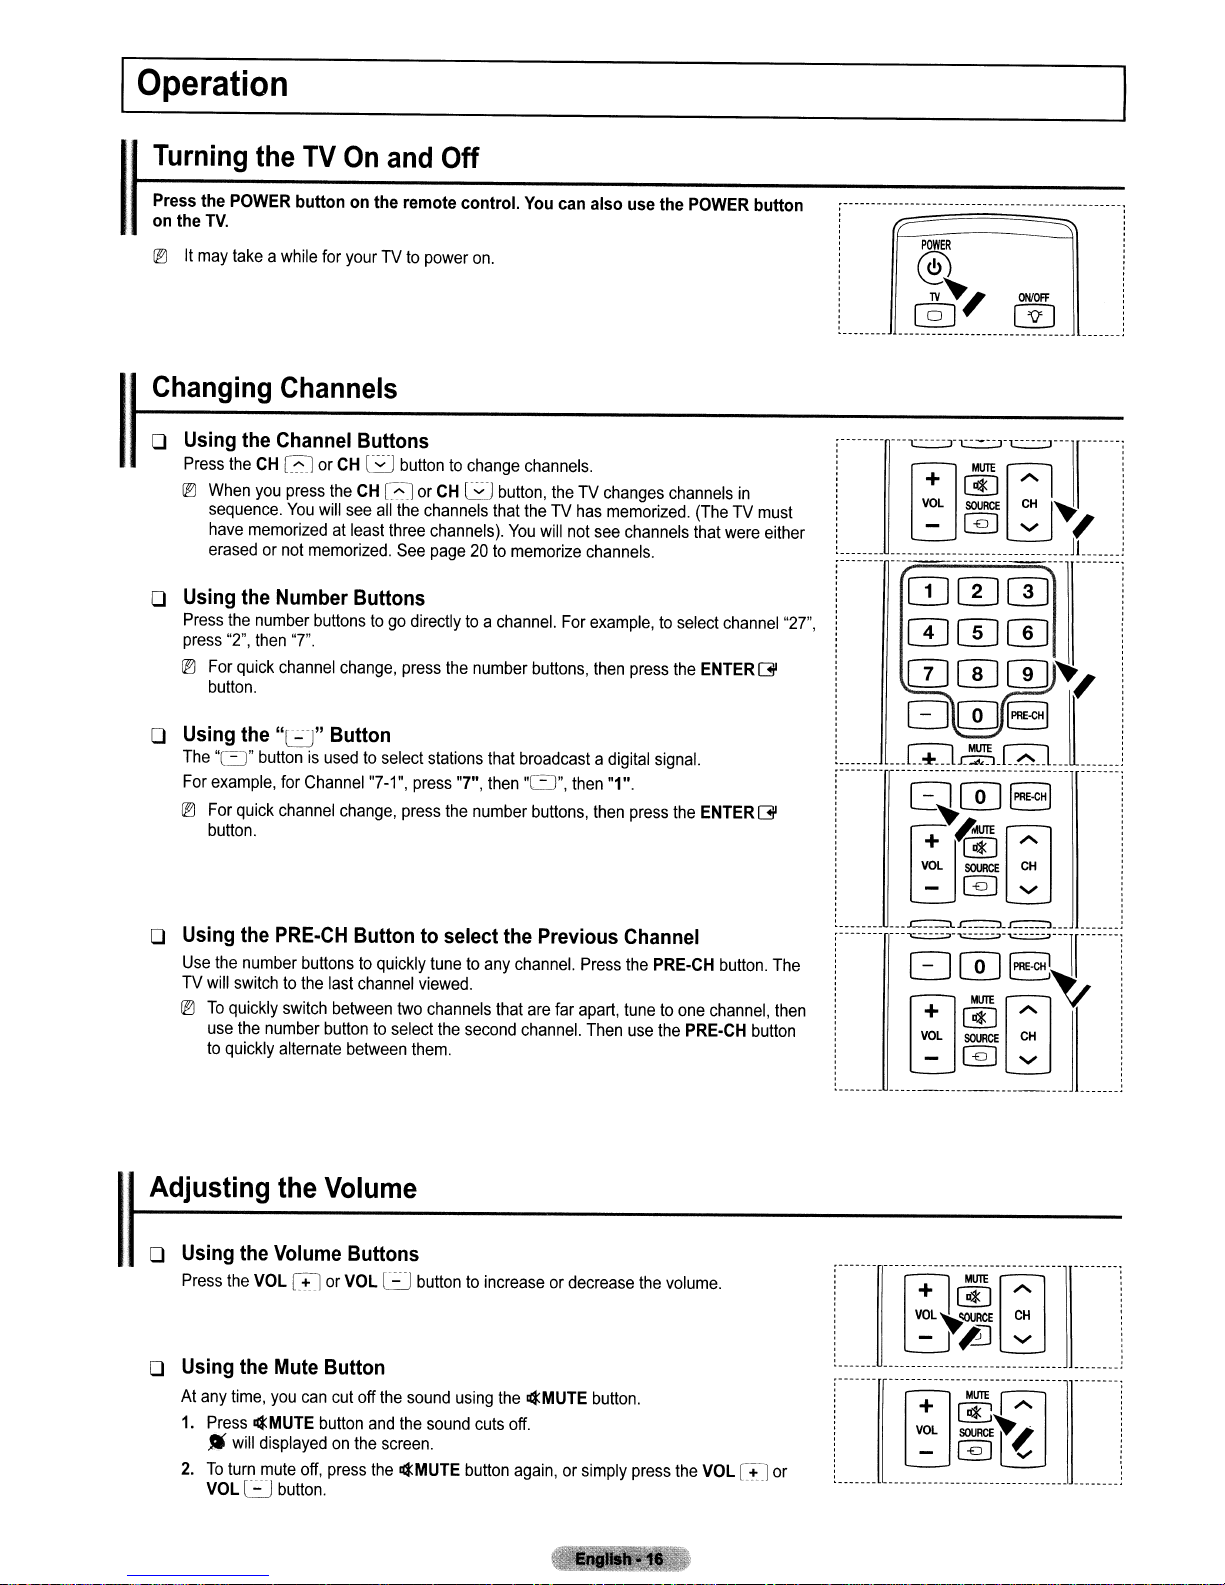
o Using the Channel Buttons
I
Press
the
®
When
sequence.
have
erasedornot
CHGor
you
memorizedatleast
press
the
You
will
memorized.
CH
o Using the Number Buttons
Press
the
number
buttonstogo
press
"2",
then
"7".
®
For
quick
channel
button.
o Using the
The
"0"
For
example,
®
For
button.
o Using the
Use
TV
will
®
To
use
to
"l:J"
buttonisusedtoselect
for
Channel
quick
channel
PRE-CH
the
number
buttonstoquickly
switchtothe
quickly
switch
the
number
quickly alternate
Button
last
between
buttontoselect
On
and
Off
You
can also use the
yourTVto
CHGor
see
change,
change,
Button to select the Previous Channel
channel
between
power
G
buttontochange
all
the
channels
three
channels).
See
page20to
directlytoa
press
stations
"7-1",
press
press
viewed.
two
channels
them.
on.
channels.
CHGbutton,
that
theTVhas
You
memorize
channel.
the
number
that
broadcastadigital
"7",
then
"0",
the
number
tunetoany
the
that
second
channel.
channel.
theTVchanges
memorized.
will
not
see
channels.
For
example,toselect
buttons,
buttons,
are
far
then
then
then
Press
apart,
Then
channels
press
"1".
press
the
tunetoone
use
POWER
channels
(TheTVmust
that
the
signal.
the
PRE·CH
the
PRE-CH
in
were
channel
ENTER
ENTER
button.
channel,
button
either
[31
[31
The
then
button
POWER
@
SOURCE
ONIOFF
@]
CH
'"
~
,
Jl
1V~'
@]
:-------~---~-"l.:.:.::::J-~---
i + @ A
:
i
i - @
~_______
.----------------------------
~MlIll:G
VOL
_
ITJ00
"27",
CDmw
0W0~,
DITJEJ[
uL+_JL~uT~U
------.------------------------
__
~_L_
Uh
___
EJITJEJ
~.#olUTE
VOL
SOURCE
'@G
[;j
- @ '"
__
unn
h_=L
CH
JJ
Ju_
_0000
!----------=-=-=---jl------
i
1
i
: - @
._--------------.------------
D~8~
VOL
SOURCE
~@G
CH
'"
_
__
Adjusting
o Using the Volume Buttons
I
Press
the
VOL
the
GJor
Volume
VOL
l:J
o Using the Mute Button
At
any
time,
you
can
cut
off
the
1.
Press
4MUTE
•
will
2.Toturn
VOL
l:J
button
displayedonthe
mute
off,
press
button.
and
screen.
the
the
4MUTE
buttontoincreaseordecrease
sound
using
the
sound
cuts
button
off.
!ltMUTE
again,orsimply
button.
the
press
volume.
the
VOLGJor
._------~------------------------------
: + @ A
:
i
:
~
-- ----- ------- -------
[jWTEG
VOL
~c:olJRCE
-,7J
_.
--- -----------
CH
'"
--
Using
You
dependingonwhich external input mode you
I
1.
2.
3.
the
can
use the
Press
the
Press
the
Press
the
Foramore
•
Anynet+
•
Picture
•
Sound
Sleep
•
SRSTSHD,
•
AddtoFavorite
•
SwitchtoCable
•
PIP,
•
Auto
TOOLS
TOOLS
TOOLS
A/~
A/~
detailed
Mode,
Mode,
Timer,
see
Adjustment,
button to select your frequently used functions quickly
button.
The
buttontoselectamenu,
1
....
/~/ENTER[3l'
descriptionofeach
(HDMI-CEC),
see
page
see
page
see
page
see
page
(or
Delete
(or
Air),
page
33
see
Button
Tools
see
23
29
34
29
see
page
are
menu
will
then
press
buttonstodisplay,
function,
page
57
from
Favorite),
page
20
28
viewing.
appear.
the
change,oruse
refertothe
see
page
ENTER
corresponding
21
[3l'
button.
the
selected
page.
and
items.
easily.
The
Tools
menu
.------
••n•••\••
~
i
~
lf~?~
_
..
[L~(\
Tools
~
Picture Mode Standard
Sound Mode Custom
Sleep Timer Off
SRSTS
HD Off
Add10Favonle
SWitchtoCable
changes
cwnr'-
..,;
Entu
_.
Ci31
~.
.
_
Exit
Using
Use
1.
I
Viewing
The
1.
I
the
Remote
this feature in dark surroundings
Press
the
ON/OFF(O)
®
When
ON,
the
button
®
Pressingaremote
If
you
touchormove
be
turnedonforamoment.
®
The
button
backlight
the
Display
display identifies the current channel
Press
the
INFO
buttononthe
sound,
and
the
statusofcertain
Control
and
light
button
backlightisturnedonforamoment.
control
button
the
remote
control
will
notbeturnedonwhen
remote
picture
Backlight
when
when
the
and
and
the status ofcertain audio-video settings.
control.
TheTVwill
and
sound
Buttons
you
are
unable to
remote
controlison
the
motionisdetectedbythe
the
remote
controlisturned
display
settings.
see
the remote control buttons clearly.
turns
the
button
backlightonforamoment.
the
channel,
sensorofthe
off.
the
type
remote
of
control,
the
button
backlight
will
[E
Press
the
INFO
button
once
automatically.
moreorwait
approximately10seconds
anditdisappears
......]==r=.=.=
B~0
..........
~
EJ.m.G
[ .
..
_ .
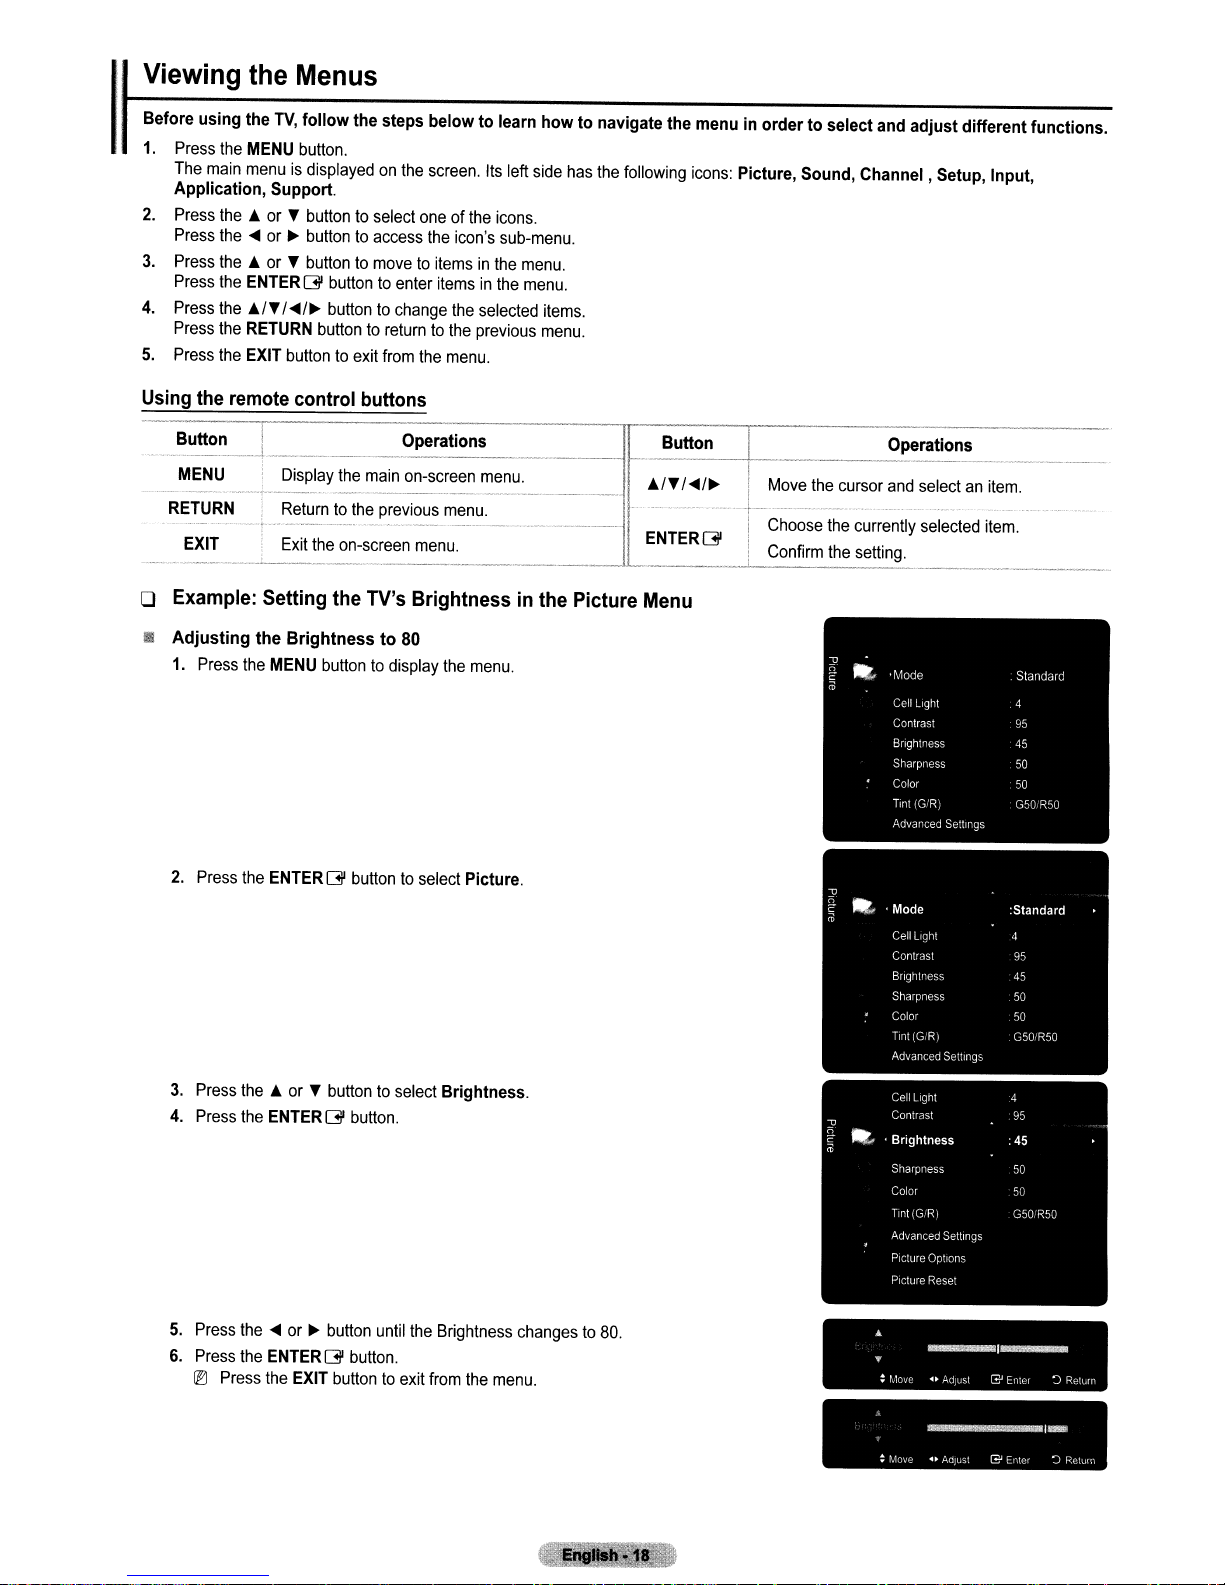
IViewing the Menus
Before
using
the
TV,
follow
the steps
1.
Press the MENU button.
The main menuisdisplayedonthe screen. Its left side has the following icons: Picture, Sound,
Application, Support.
2.
Press the10or~button to select one of the icons.
Press the
3.
Press the10or~button to movetoitemsinthe menu.
Press the
4.
Press the
Press the RETURN button to return to the previous menu.
5.
Press the EXIT button to exit from the menu.
Using the remote control buttons
....
or~buttontoaccess the icon's sub-menu.
ENTERG
I./~
buttontoenter itemsinthe menu.
/
....
/~
button to change the selected items.
belowtolearn
howtonavigate the menu in
ordertoselect and
Channel,
adjust
different
Setup, Input,
functions.
Button
. . -1
MENU Display the main on-screen menu.
RETURN
EXIT i Exit the on-screen menu.
I Operations
Returntothe previous menu.
----------
Button
11-------+--
I./~
-
---,
ENTERG I Confirm the setting.
o Example: Setting the TV's Brightness in the Picture Menu
•
Adjusting
1.
2.
the
Brightnessto80
Press the MENU buttontodisplay the menu.
Press the
ENTERG
buttontoselect Picture.
/
....
/~
I Move the cursor and select
- _.+--_.._-------..__.--
I Choose the currently selected item.
Operations
.-
---_.-
an
item.
------_
..
3.
Press the10or~button to select Brightness.
4.
Press the ENTERG button.
5.
Press the
6.
Press the
IB
....
or~button until the Brightness changesto80.
ENTERG
Press the EXIT button to exit from the menu.
button.
..
..
:
: fl..love
~JnvL
-1"""-
...
~
AUJuslI?Enter:)ReturP
-1-
.....
.....
oJUS!
(3J
Enter")Ret\;{
'I
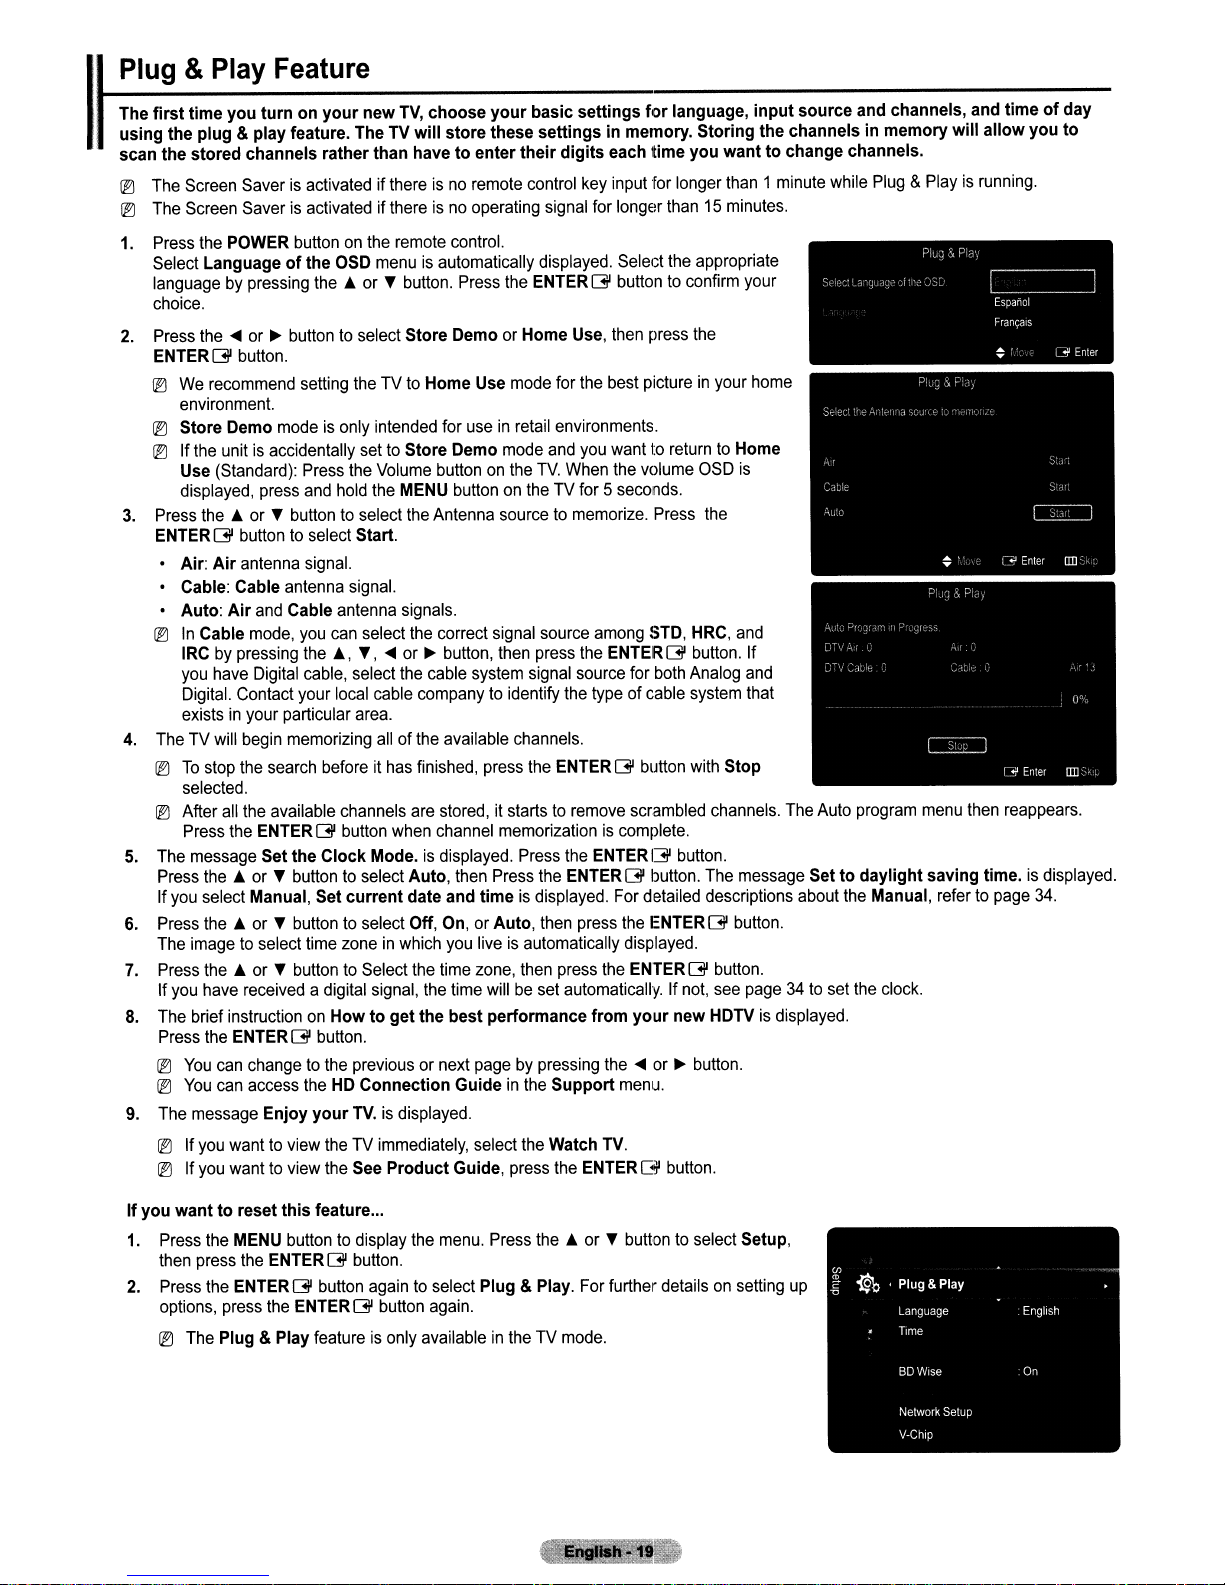
Plug&Play
The
first
time
using
the
I
scan
® The Screen Saver
the
plug
stored
Feature
you
turnonyour
&play feature. The TV
channels
is
new
rather
than
activated if there is no remote control key input for longer than 1 minute while Plug & Playisrunning.
TV,
choose
will
store
havetoenter
your
these
basic
settings
their
settings
digits
for
language,
in memory.
each
time
Storing
you
® The Screen Saver is activated if there is no operating signal for longer than 15 minutes.
1. Press the POWER button on the remote control.
Select Languageofthe OSD menu is automatically displayed. Select the appropriate
language by pressing
choice.
2. Press the
ENTER(]I
....
or~buttontoselect Store Demo or Home Use, then press the
button.
® We recommend setting the
environment.
® Store Demo mode
® If the unit is accidentally set to Store
Use (Standard): Press the Volume buttononthe
displayed, press and hold the MENU button on the TV for 5 seconds.
3.
Press
the.
ENTER
• Air:
• Cable: Cable antenna signal.
•
Auto:
or'Ybutton to select the Antenna source to memorize. Press the
(]I
button to select Start.
Air
antenna signal.
Air
the.
or'Ybutton. Press the ENTER
TV
to Home Use mode for the best pictureinyour home
is
only intended for use in retail environments.
and Cable antenna signals.
(]I
button to confirm your
Demo
mode and you want to return to Home
TV.
When the volume OSD
® In Cable mode, you can select the correct signal source among STD, HRC, and
IRC by pressing the
you have Digital cable, select the cable system signal source for both Analog and
Digital. Contact your local cable company to identify the typeofcable system that
existsinyour particular area.
4. The TV will begin memorizing allofthe available channels.
®
To
stop the search before it has finished, press the ENTER
selected.
® After all the available channels are stored, it starts
Press the ENTER
5. The message Set
Press the A or'Ybutton to select
If you select Manual, Set
6. Press the A or'Ybutton to select Off, On, or Auto, then press the ENTER
The image to select time zoneinwhich you live is automatically displayed.
7. Press
8.
9. The message
the.
or'Ybutton to Select the time zone, then press the ENTER
If you have received a digital signal, the time willbeset automatically. If not, see page34to set the clock.
The brief instructiononHowtoget
Press the ENTER
®
You
®
can change to the previous or next page by pressing the
You
can access the HD
Enjoy
.,
'Y,
....
or~button, then press the ENTER
(]I
button when channel memorizationiscomplete.
the
Clock
Mode.isdisplayed. Press the ENTER
Auto,
then Press the ENTER G button. The message Settodaylight
(]I
current
button.
your
date and
Connection
TV.
is displayed.
the
best
Guideinthe
time
performance
to
is displayed. For detailed descriptions about the Manual, refer to page
Support
(]I
button. If
(]I
button with
remove scrambled channels. The Auto program menu then reappears.
(]I
button.
(]I
from
your
new
....
or~button.
menu.
® If you want to view the TV immediately, select the Watch TV.
® If you want to view the See
Product
Guide, press the ENTER
(]I
button.
input
source
and channels, and
the
channelsinmemory
wanttochange channels.
is
Stop
(]I
button.
button.
HDTV is displayed.
will
saving
time.isdisplayed.
timeofday
allow
you
34.
to
If
you
wanttoreset
1. Press the MENU button to display the menu. Press
then press the ENTER
2.
Press the ENTER
options, press the ENTER
® The Plug &
this
feature
...
(]I
button.
(]I
button again to select Plug & Play. For further details on setting up
(]I
button again.
Play
feature is only availableintheTVmode.
the.
or'Ybutton to select Setup,
(j)
~
Plug&Play
~.
Language English
Time
BDWlSe On
Network Setup
V-Chip
I
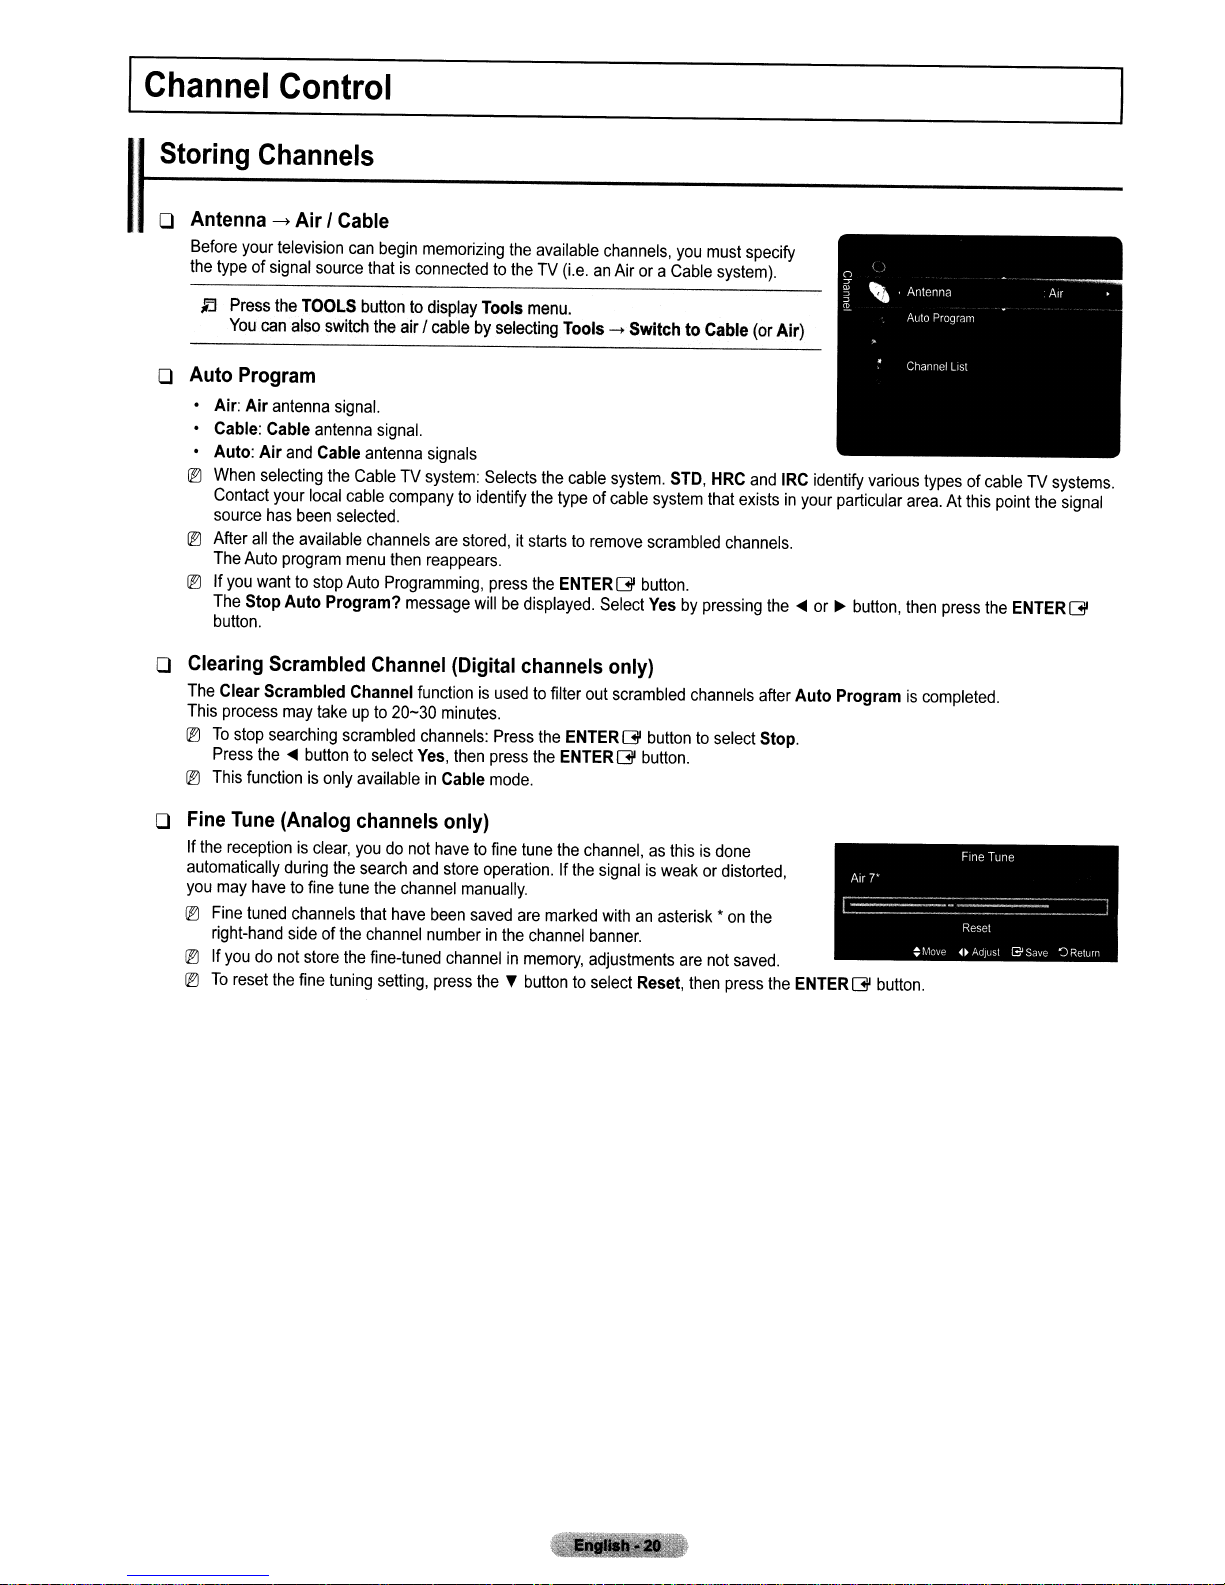
Channel
Before
the
typeofsignal
Jj
your
Press
You
the
can
Control
television
source
TOOLS
also
can
thatisconnectedtotheTV(i.e.anAirora
buttontodisplay
switch
the
begin
memorizing
airI
cablebyselecting
Tools
the
available
menu.
Tools-+Switch to Cable
o Auto Program
• Air: Air
•
• Auto: Air
l0
l0
l0 If
antenna
Cable:
Cable
antenna
and
Cable
When
selecting
Contact
your
local
source
has
been
After
all
the
The
you
The
button.
available
Auto
program
wanttostop
Stop Auto Program?
signal.
signal.
antenna
the
CableTVsystem:
cable
companytoidentify
selected.
channels
menu
then
Auto
Programming,
message
signals
Selects
the
the
are
stored,itstartstoremove
reappears.
press
the
willbedisplayed.
cable
typeofcable
ENTER
o Clearing Scrambled Channel (Digital channels only)
The
Clear Scrambled Channel
This
process
may
takeupto
l0Tostop
l0
Press
the'"
This
functionisonly
searching
buttontoselect
scrambled
availableinCable
functionisusedtofilter
20-30
minutes.
channels:
Yes,
then
Press
press
mode.
the
ENTER
the
ENTER[]I
channels,
system.
[]I
Select
out
scrambled
[]I
you
must
Cable
system).
STD,
HRC
system
that
scrambled
button.
Yesbypressing
buttontoselect
button.
channels.
channels
specify
(or
Air)
and
IRC
identify
various
existsinyour
the'"
after
Stop.
particular
or~button,
Auto Programiscompleted.
typesofcableTVsystems.
area.Atthis
then
press
point
the
the
ENTER
signal
[]I
o Fine Tune (Analog channels only)
If
the
receptionisclear,
automatically
you
may
havetofine
l0
Fine
tuned
right-hand
l0Ifyoudonot
l0Toreset
the
during
channels
sideofthe
store
fine
youdonot
the
search
tune
that
the
tuning
and
the
channel
have
channel
fine-tuned
setting,
havetofine
store
manually.
been
saved
numberinthe
channelinmemory,
press
tune
the
operation.Ifthe
are
the~buttontoselect
channel,asthisisdone
signalisweakordistorted,
marked
withanasterisk'onthe
channel
banner.
adjustments
Reset,
are
then
not
saved.
press
the
ENTER
Air?'
c:--
[]I
-
-:-~~~.-
:1'0.'
button.
Fine Tune
=-~
Rf:<:;et
n;'C:l\-.1
-
__
-:..:-~
.
.:-
-=-~.
GJSav(; '"JRe1L,fl
_...J
'1
~anaging
Channels
o Channel
1
Using
~
®
• All Channels:
• Added Channels:
• Favorite:
• Programmed:
• Using the Color buttons with the Channel
®
" A
---"---
o Channel
®
®
List
this
menu,
you
can
AddIDeleteorset
Press
theCHLIST
Selectachannelinthe
screenbypressing
you
can
watch
Shows
Red
(Antenna):
Green
(Zoom):
Yellow
(Select):
,LlTOOLS
Edit, Select All, Deselect All,
Channel
channel
A
reserved
(Tools):
Status
List
Press
the
TOOLS
Tools
menu
buttononthe
All Channels, Added Channels, Favorite,orProgrammed
the'"orT
the
selected
Shows
all
currently available
Shows
all
all
favorite
Shows
all
current
Toggle
between
Enlargesorshrinksachannel
Selects
multiple
Displays
Display
Icons
setasa
program
----------
Favorite.
Tools Menu (in All Channels I Added Channels I Favorite)
buttontouse
items
may
differ
channel.
added
channels.
the
and
dependingonthe
remote
buttons,
channels.
reserved
your
TV,
channel
Add
(or
Auto Program
the
tools
Favorite
controltodisplay
and
Radio,
lists.
Delete), Add to Favorite
channels
pressing
channels.
programs.
List
DataIOther
number.
the
menus
and
the
Channel list
ENTERQlI
and
(The
-/
3ij
menu.
channel
6 A
status.
use
the
program
button.
All.
(or
Delete from Favorite), Timer Viewing, Channel
Options
A
channel
program
menus
guide
for
digital
menu.
Then
may
differ
dependingonthe
selectedbypressing
currently
being
broadcast.
broadcasts.
the
yellow
Name
situation.)
button.
• Add I Delete
You
can
deleteoraddachanneltodisplay
®
All
deleted
channels
® A
gray-colored
®
The
Add
menu
®
You
can
also
manner.
• Add to Favorite I Delete from Favorite
You
can
set
channels
f-j
Press
the
TOOLS
You
can
also
->
Add to Favorite
®
The
".,"
symbol
®
All
favorite
channels
IEJ
To
select
remote
• Timer Viewing
If
you
reserved
To
reserve
®
Only
®
You
number
®
Reservingaprogram
the
control.
reserveaprogram
channelinthe
a program,
memorized
can
set
buttonsonthe
willbeshownonAll Channels
channel
deleteachanneltothe
favorite channels
the
indicates
only
appears
you
buttontodisplay Tools
set
the
willbedisplayed
willbeshownonFavorite
Channel
set
channels
channel,
for
watch
frequentlyasfavorites.
favorite
channelbyselecting
(or
Delete from Favorite)
you
wanttowatch,
List;
the
current
canbereserved.
day,
month,
remote
control.
willbeshownonProgrammed
the
the
channel
deleted
channels.
Added ChannelsorFavorite
and
the
channel
you
have
the
even
when
time
first.
year,
® Digital Program Guide and Viewing Reservation:
selected,
You
and
you
can
reserveaprogram
press
the~button,
accordingtothe
the
channels
menu.
set
hour
Program
procedures
you
want.
menu.
has
been
deleted.
Tools
willbesetasa
menu.
up,
press
the
channelisautomatically
you
are
watching
and
minute
directlybypressing
menu.
When
a digital
Guide
for
the
described
menuinthe
favorite.
FAV.CH
switchedtothe
another
channel
channel
above.
same
buttononthe
channel.
the
is
appears.
r-,,----------,...---,
Continued
...
III
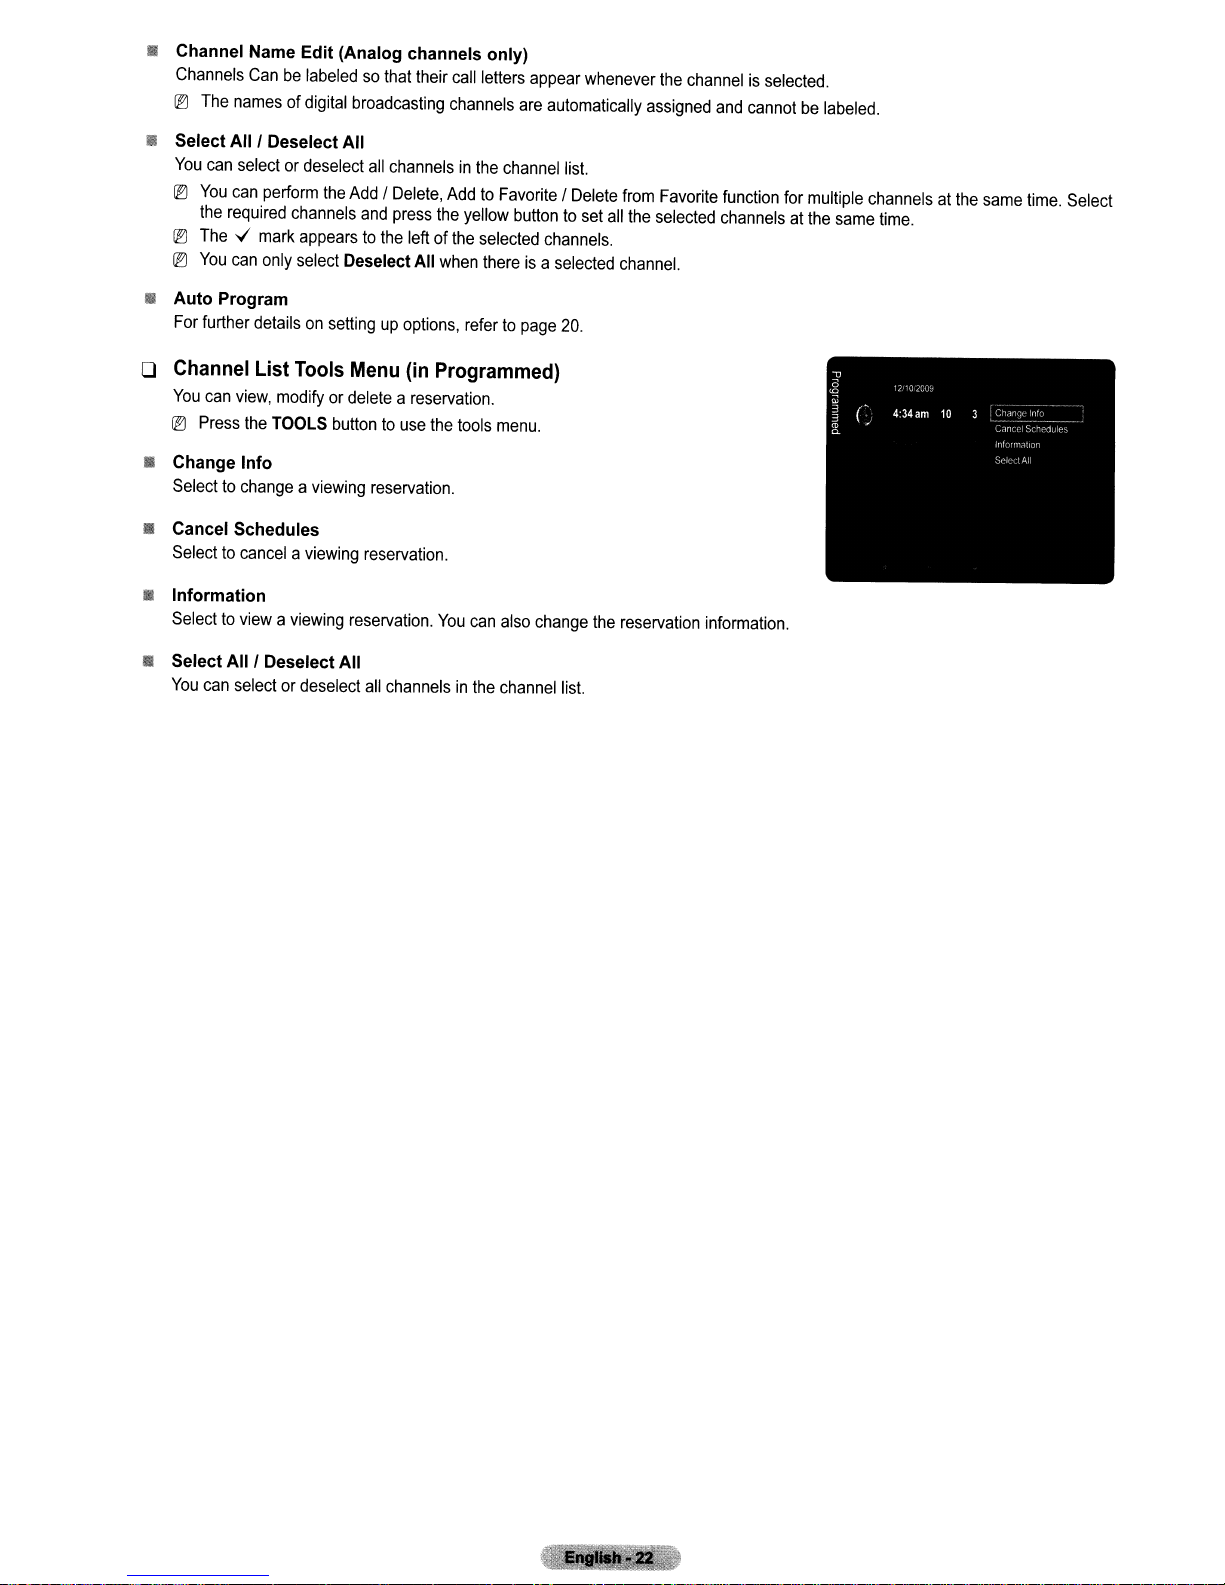
Channel Name Edit (Analog channels only)
Channels
®
Canbelabeledsothat
The
namesofdigital
their
broadcasting
channels
call
letters
appear
are
automatically
whenever
the
channelisselected.
assigned
and
cannotbelabeled.
• Select
iIII
o
• Change Info
• Cancel Schedules
III Information
• Select
AliI
Deselect All
You
can
selectordeselect
®
You
can
perform
the
required
®
The";
®
You
Auto Program
For
further
Channel
You
can
®
Press
Selecttochangeaviewing
Selecttocancelaviewing
Selecttoviewaviewing
AliI
You
can
channels
mark
appearstothe
can
only
select
detailsonsettingupoptions,
List
Tools
view,
modifyordeleteareservation.
the
TOOLS
Deselect All
selectordeselect
all
the
AddIDelete,
and
Deselect
Menu
buttontouse
reservation.
reservation.
reservation.
all
channelsinthe
AddtoFavoriteIDelete
press
the
yellow
leftofthe
All
(in
channelsinthe
selected
when
thereisa
refertopage
Programmed)
the
tools
You
can
channel
button
menu.
also
channel
list.
to set
channels.
selected
20.
change
list.
from
all
the
channel.
the
reservation
Favorite
selected
function
channelsatthe
information.
for
multiple
same
channelsatthe
time.
same
time.
Select

I
Picture
Control
Changing
o Mode
I
You
can
select
the
the
typeofpicture
Picture
Settings
which
best
correspondstoyour
• Dynamic: Select a high-definition picture for bright environments.
the
• Standard: Selects
This setting
• Eco: Selects
®
This
® Eco
is
convenient for most situations.
the
mode
has
is
not
availableinPC
optimal picture display for normal environments.
picture foranoptimum
the
advantageofreducing
and
eye-comfortable display.
power
consumption.
mode.
• Movie: Selects a comfortable picture display for dark environments.
Jj
Press
the
modebyselecting
TOOLS
buttontodisplay Tools
Tools
.....
Picture
Mode.
menu.
You
can
o Cell Light I Contrast I Brightness I Sharpness I Color I Tint
Your
television
Cell Light:
Contrast:
Brightness:
Sharpness:
Color:
Tint
®
When
accordingly.
®
The
®
InPCmode,
®
Each
®
ThisTVincludes
®
The
running
Adjusts
Adjusts
(G/R):
you
adjusted
adjusted
energy
cost.
has
several
setting
options
that
allow
youtocontrol
Adjusts
the
pixel
brightness.
the
contrast
Adjusts
the
Adjusts
the
the
color
Adjusts
the
make
changestoCell Light, Contrast, Brightness, Sharpness, Color,orTint
values
are
you
can
only
setting
willbestored
the
Cell
consumed
level.
brightness
level.
sharpness.
saturationofthe
color
tintofthe
saved
for
each
make
changestoCell Light, Contrast,
separately
Light
functiontoadjust
during
use
canbesignificantly
picture
using
the
picturebycompensating
picture
mode.
accordingtoits
the
panel
reducedifthe
vil~wing
also
configure
the
baronthe
the
input
brightness.
requirements.
(G/R)
picture
screen.
red
and
and
Brightness.
mode.
brightness
the
picture
quality.
green
color.
levelislowered,
"
~
ro
"
~
ro
. Mode
It.
Cell
Light
Contrast
Bnght'1€ss
Sharpness
Color
Tint
(G!R)
Advanced Settings
Mode Standard
. Cell Light
lit.
Contrast
Brightness
Sharpness
Color
Tlnt(GiRl
Advanced Settings
PIcture Options
(G/R),
the
OSD
which
will
:Standard
4
95
45
50
50
G50,R50
:4
95
45
50
50
G50·R50
willbeadjusted
reduce
the
overall
o Advanced Settings
You
can
adjust
the
detailed
® Advanced Settings
®
InPCmode,
White Balance
• Black Tone
You
can
• Off:
Turns
• Dark:
• Darker:
• Darkest:
• Dynamic Contrast
You
can
• Off:
Turns
•
low:
• Medium:
• High:
• Gamma
You
can
enhance
the
Sets
the
Sets
Sets
adjust
the
Sets
Dynamic
Sets
Sets
Dynamic
adjust
you
the
Black
black
the
the
the
Dynamic
Dynamic
the
can
from
black
screen
middle
settings
is
availableinStandardorMovie
only
among
picture
Adjust
color
color
black
contrastsothat
Contrast
for
your
screen
make
changestoDynamic Contrast,
the
Advanced Settings
depthbyadjusting
function
off.
depthtodark.
depthtodarker.
color
depthtodarkest.
the
function
off.
Contrasttolow.
Contrasttomedium.
Contrasttohigh.
levelofluminance.
including
the
black
optimal
contrastisprovided.
mode.
items.
color
the
density.
color
and
Gamma
contrast.
and
Advanced Settings
Black
Tone
DynamiC
Contrast
Gamma
Color Space
White Balance
Flash
Tone
Edge Enhancement
~ r..
Off
Medium
Native
On
')
....
-
::~,t,
~
<
Retur'1
-::
Continued
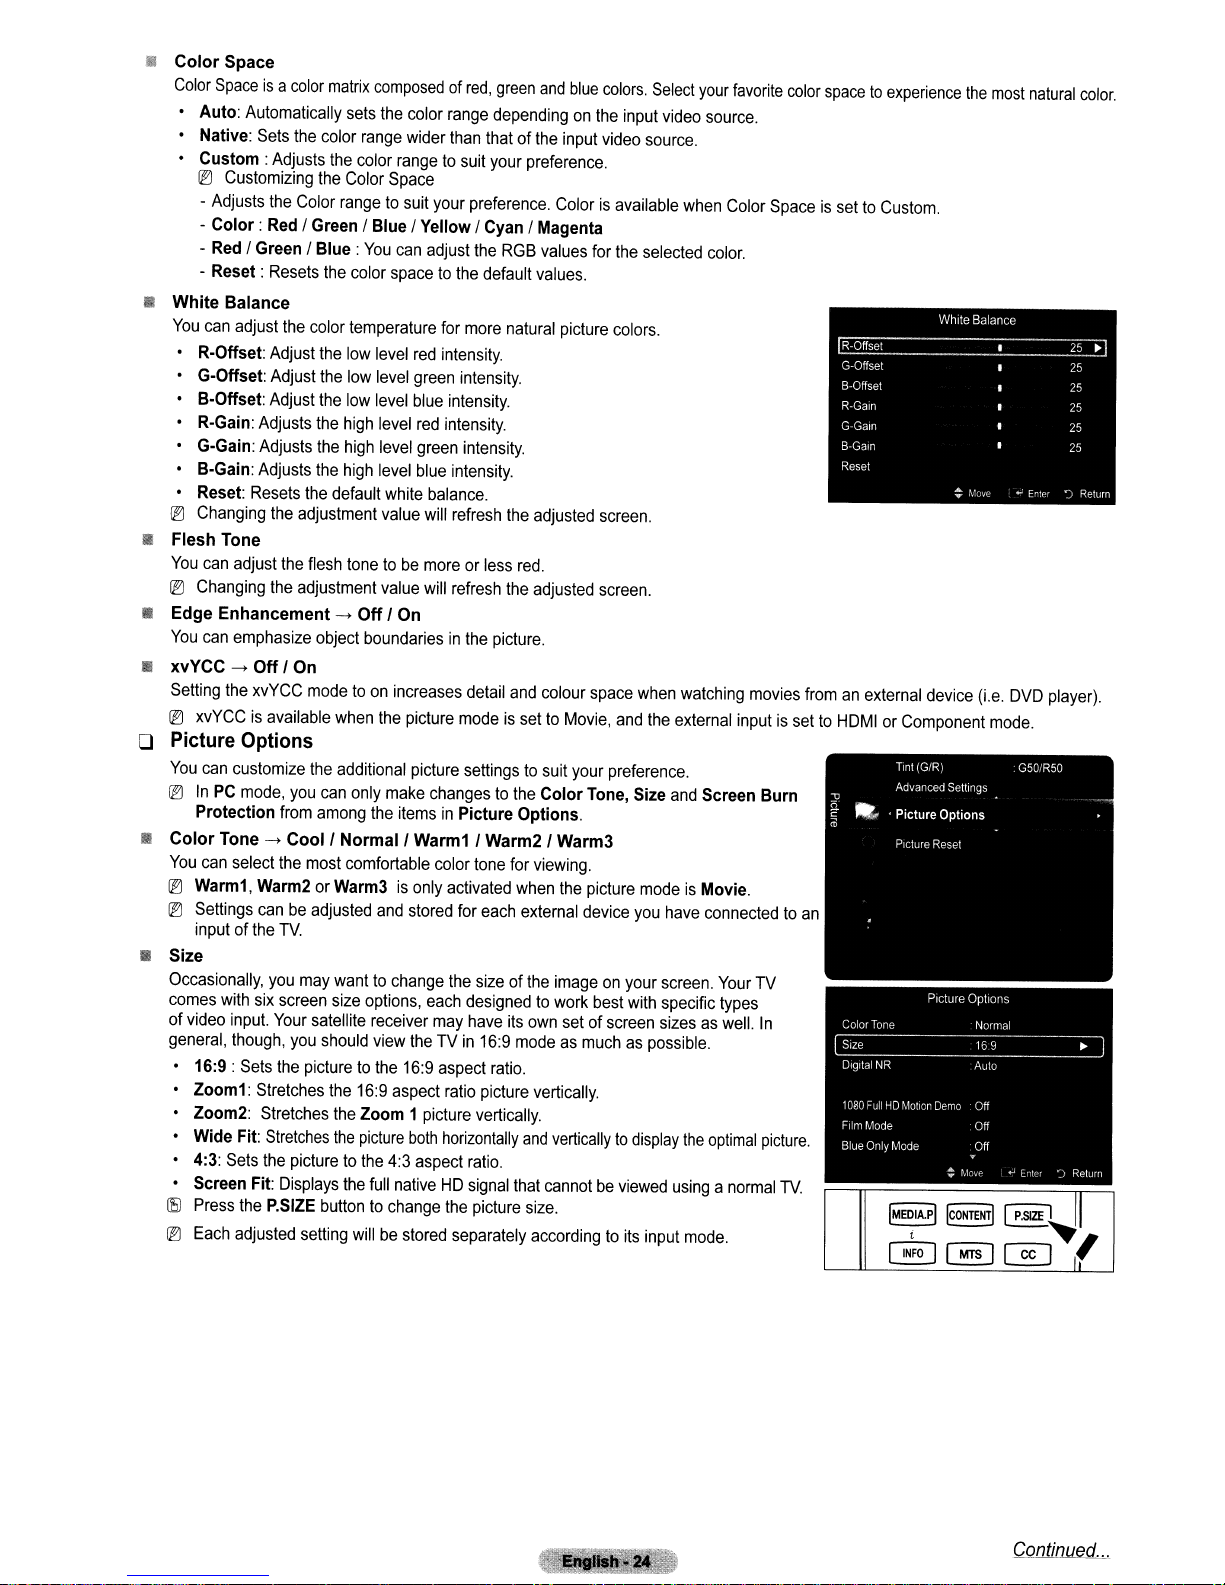
II
Color Space
Color
Spaceisa
o Auto:
o Native:
o Custom:
®
-
Adjusts
- Color:
RedIGreen
-
- Reset:
II
White Balance
You
can
oR-Offset:
o G-Offset:
o B-Offset:
o R.Gain:
o
G-Gain:
o B-Gain:
o
Reset:
®
Changing
II
Flesh Tone
You
can
®
Changing
Customizing
color
Automatically
Sets
the
Adjusts
the
Color
RedIGreen
I Blue:
Resets
adjust
the
Adjust
Adjust
Adjust
Adjusts
Adjusts
Adjusts
Resets
the
the
adjustment
adjust
the
the
adjustment
color
flesh
• Edge Enhancement
You
can
emphasize
• xvYCC
Setting
®
.......
Off!On
the
xvYCC
modetoon
xvYCCisavailable
o Picture Options
You
can
customize
®
InPCmode,
Protection
• Color Tone
You
can
®
Warm1,
®
Settings
inputofthe
• Size
Occasionally,
comes
with
of
video
general,
o 16:9:
o Zoom1:
o Zoom2:
o Wide Fit:
o
4:3:
Sets
o Screen
(g
Press
®
Each
you
from
.......
Cool!
select
the
most
Warm2orWarm3isonly
canbeadjusted
TV.
you
may
six
screen
input.
Your
though,
you
Sets
the
picturetothe
Stretches
Stretches
Stretches
the
picturetothe
Fit:
Displays
the
P.SIZE
adjusted
setting
matrix
composedofred,
sets
the
color
range
the
color
Color
rangetosuit
Space
the
rangetosuit
I Blue I Yellow I
You
can
the
color
spacetothe
temperature
the
low
level
the
low
level
the
low
level
the
high
level
the
high
level
the
high
level
default
white
value
tonetobe
value
.......
OffIOn
object
boundariesinthe
increases
when
the
the
additional
can
only
make
among
the
itemsinPicture Options.
Normal!
comfortable
and
wanttochange
size
options,
satellite
receiver
should
view
the
16:9
aspect
the
Zoom 1
the
picture
4:3
the
full
nativeHDsignal
buttontochange
willbestored
color
range
wider
than
your
preference.
Cyan
adjust
the
default
for
more
red
intensity.
green
intensity.
blue
intensity.
red
intensity.
green
intensity.
blue
intensity.
balance.
will
refresh
moreorless
will
refresh
detail
picture
modeissettoMovie,
picture
settingstosuit
changestothe
Warm1
! Warm2 ! Warm3
color
tone
activated
stored
for
the
sizeofthe
each
designedtowork
may
have
theTVin
16:9
aspect
ratio
picture
vertically.
both
horizontally
aspect
ratio.
the
picture
separately
green
and
blue
colors.
dependingonthe
thatofthe
your
input
preference.
input
video
Colorisavailable
I Magenta
RGB
values
for
the
values.
natural
picture
colors.
the
adjusted
screen.
red.
the
adjusted
screen.
picture.
and
colour
space
and
your
preference.
Color
Tone,
for
viewing.
when
the
picture
each
external
device
imageonyour
best
its
own
setofscreen
16:9
modeasmuchaspossible.
ratio.
picture
vertically.
and
verticallytodisplay
that
cannotbeviewed
size.
accordingtoits
Select
your
video
source.
source.
when
selected
when
Size
the
and
color.
watching
external
Screen Burn
modeisMovie.
you
have
connectedtoan
screen.
with
specific
sizesaswell.
the
optimal
usinganormal
input
mode.
favorite
color
spacetoexperience
Color
SpaceissettoCustom.
While
R-Offset 25
G-Offset
B·Offset 25
R-Galn
G·Galn 25
B-Gaui
Reset
movies
fromanexternal
device
inputissettoHDMIorComponent
Your
TV
types
In
picture.
TV.
the
~
most
Balance
r,1ove
(i.e.
mode.
natural
.-;
En:cr
DVD
color.
25
25
25
")
Return
player).
~
Continued
...
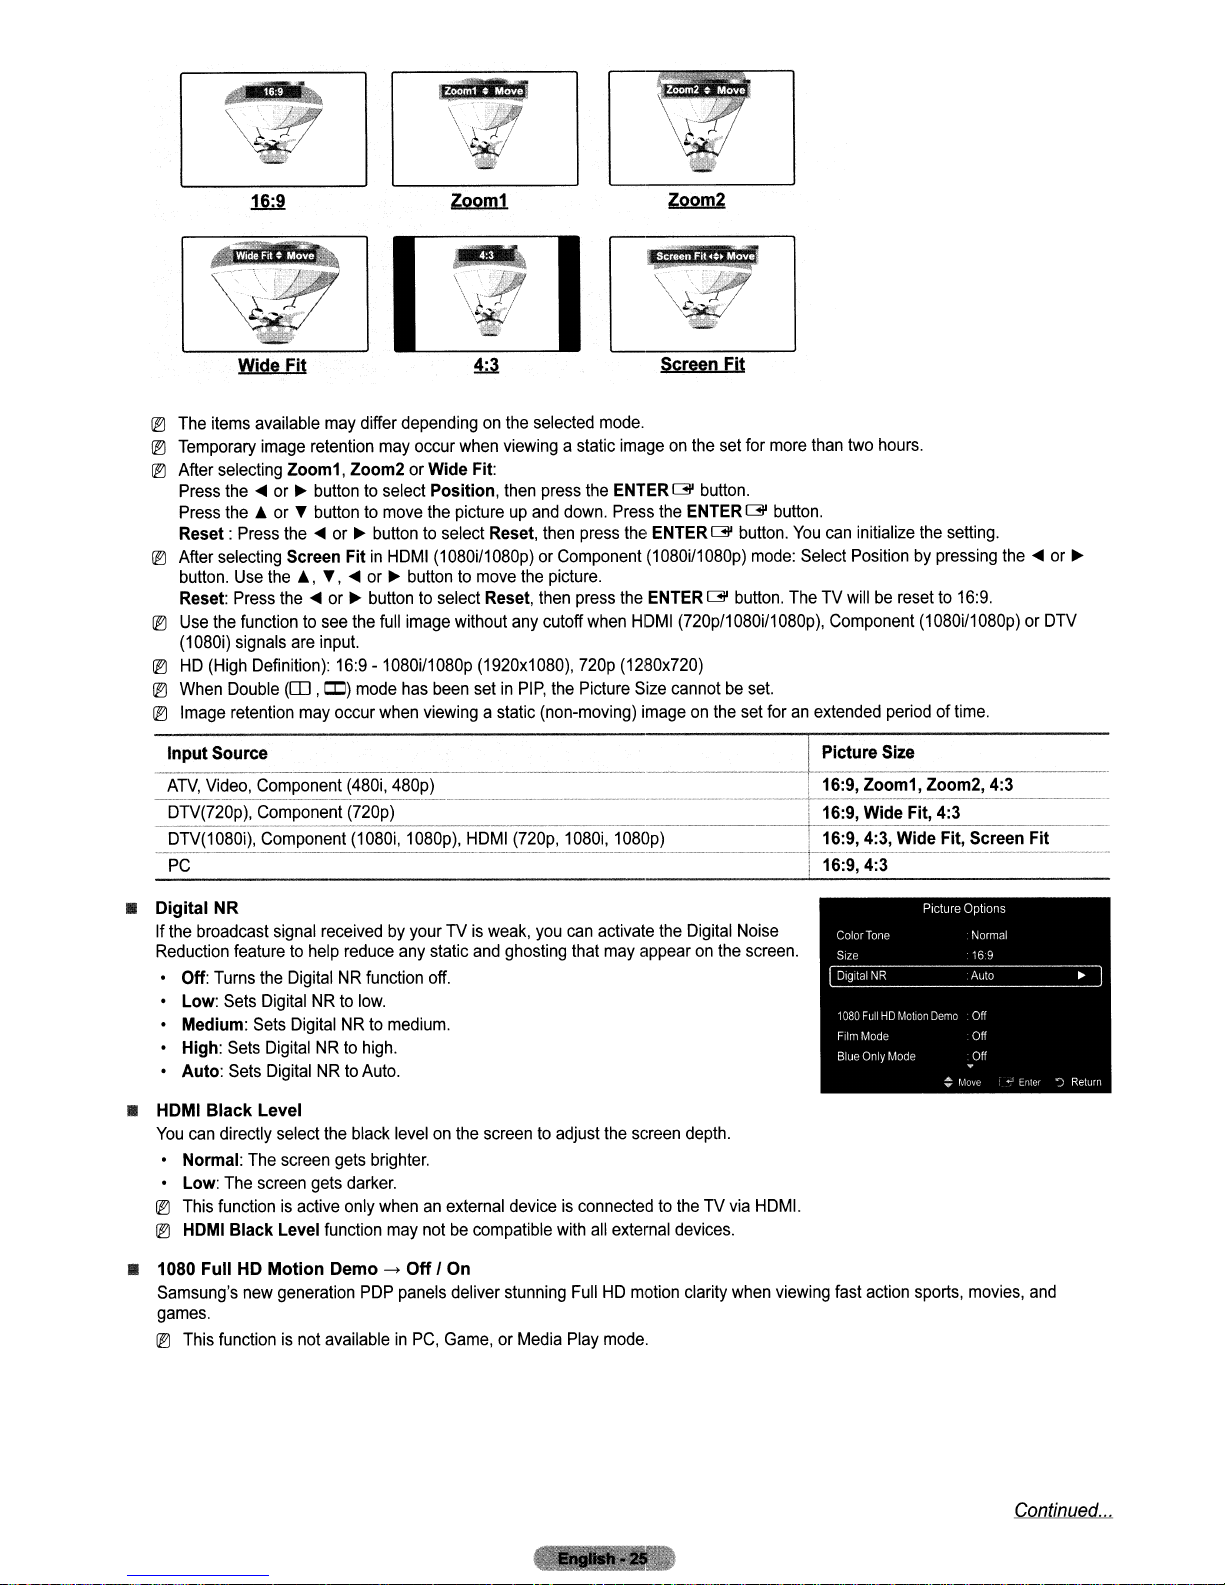
®
The
®
Temporary
® After
Press
Press
Reset:
®
After
button.
Reset:
®
Use
(1080i)
®
HD
®
When
®
Image
WjdeFjt
items
available
image
selecting
the'"
may
differ
retention
Zoom1, Zoom2orWide Fit:
or~buttontoselect Position,
the&orTbuttontomove
Press
the'"
or~buttontoselect Reset,
selecting
the
(High
Screen FitinHDMI
Use
the&,T,
Press
the'"
functiontosee
signals
are
Definition):
Double
(ITJ,CD)
retention
may
...
or~buttontomove
or~buttontoselect Reset,
the
input.
16:9
-1080i/1080p
mode
occur
dependingonthe
may
occur
when
the
pictureupand
(1
080i/1
full
image
without
has
been
when
viewing
selected
viewing
then
a static
press
mode.
the
down.
then
press
080p)orComponent
the
picture.
then
press
any
cutoff
when
(1920x1080),
setinPIP,
the
720p
Picture
a static (non-moving)
SCreen
imageonthe
ENTER
C3'
Press
the
the
ENTER
(1080i/1080p)
the
ENTER
HDMI
(720p/1080i/1080p),
(1280x720)
Size
cannotbeset.
imageonthe
Fjt
set
button.
ENTER
C3'
C3'
for
more
than
two
C3'
button.
button.
You
can
initialize
mode:
Select
Positionbypressing
button.
TheTVwillberesetto16:9.
Component(1080il1080p)orDTV
set
foranextended
hours.
the
setting.
periodoftime.
the'"
or
~
_~~~~~_~~~~~~
ATV,
Video,
__
._--_.--------~------_
NR
broadcast
featuretohelp
Turns
Sets
Sets
Sets
Sets
Component
Component
Component
the
DigitalNRto
----_.
y_~(!~..()p),
DTV(1080i),
--PC--·-----------------------------
• Digital
If
the
Reduction
• Off:
• Low:
• Medium:
• High:
• Auto:
~
(480i,
..__._._-----_.._--_._._-------,,_
(720p)
(1080i,
signal
receivedbyyourTVis
reduce
DigitalNRfunction
low.
DigitalNRto
DigitalNRto
DigitalNRto
high.
Auto.
.
..
480p) i 16:9, Zoom1, Zoom2, 4:3
1080p),
HDMI
(720p,
weak,
any
static
and
ghosting
off.
medium.
• HDMI Black Level
You
can
directly select
• Normal:
• Low:
®
This
®
HDMI
The
The
screen
functionisactive
Black Level
• 1080 FullHDMotion Demo->Off
Samsung's
new
the
screen
gets
gets
function
generation
black
levelonthe
brighter.
darker.
only
whenanexternal
may
PDP
panels
screentoadjust
deviceisconnectedtotheTVvia
notbecompatible
I On
deliver
stunning
games.
®
This
functionisnot
availableinPC,
Game,orMedia
. . ..
..
_~-_.,-,-,_
1080i,
----.--
you
can
that
with
FullHDmotion
Play
.._..
1080p)
-..
activate
may
the
all
external
mode.
__.
----,-_.._._..__..__
._--_._---,_.
the
Digital
appearonthe
screen
depth.
devices.
clarity
Lp'ct~~
__
._------_.-+---------_._-----------------------~_.-------_
·----····--r-1-6:9~4-j---------------------------
! 16:9, Wide Fit, 4:3
I 16:9,4:3, Wide Fit, Screen Fit
Size .
...
..
-
Noise
screen.
HDM!.
when
viewing
fast
action
sports,
movies,
and
Continued...
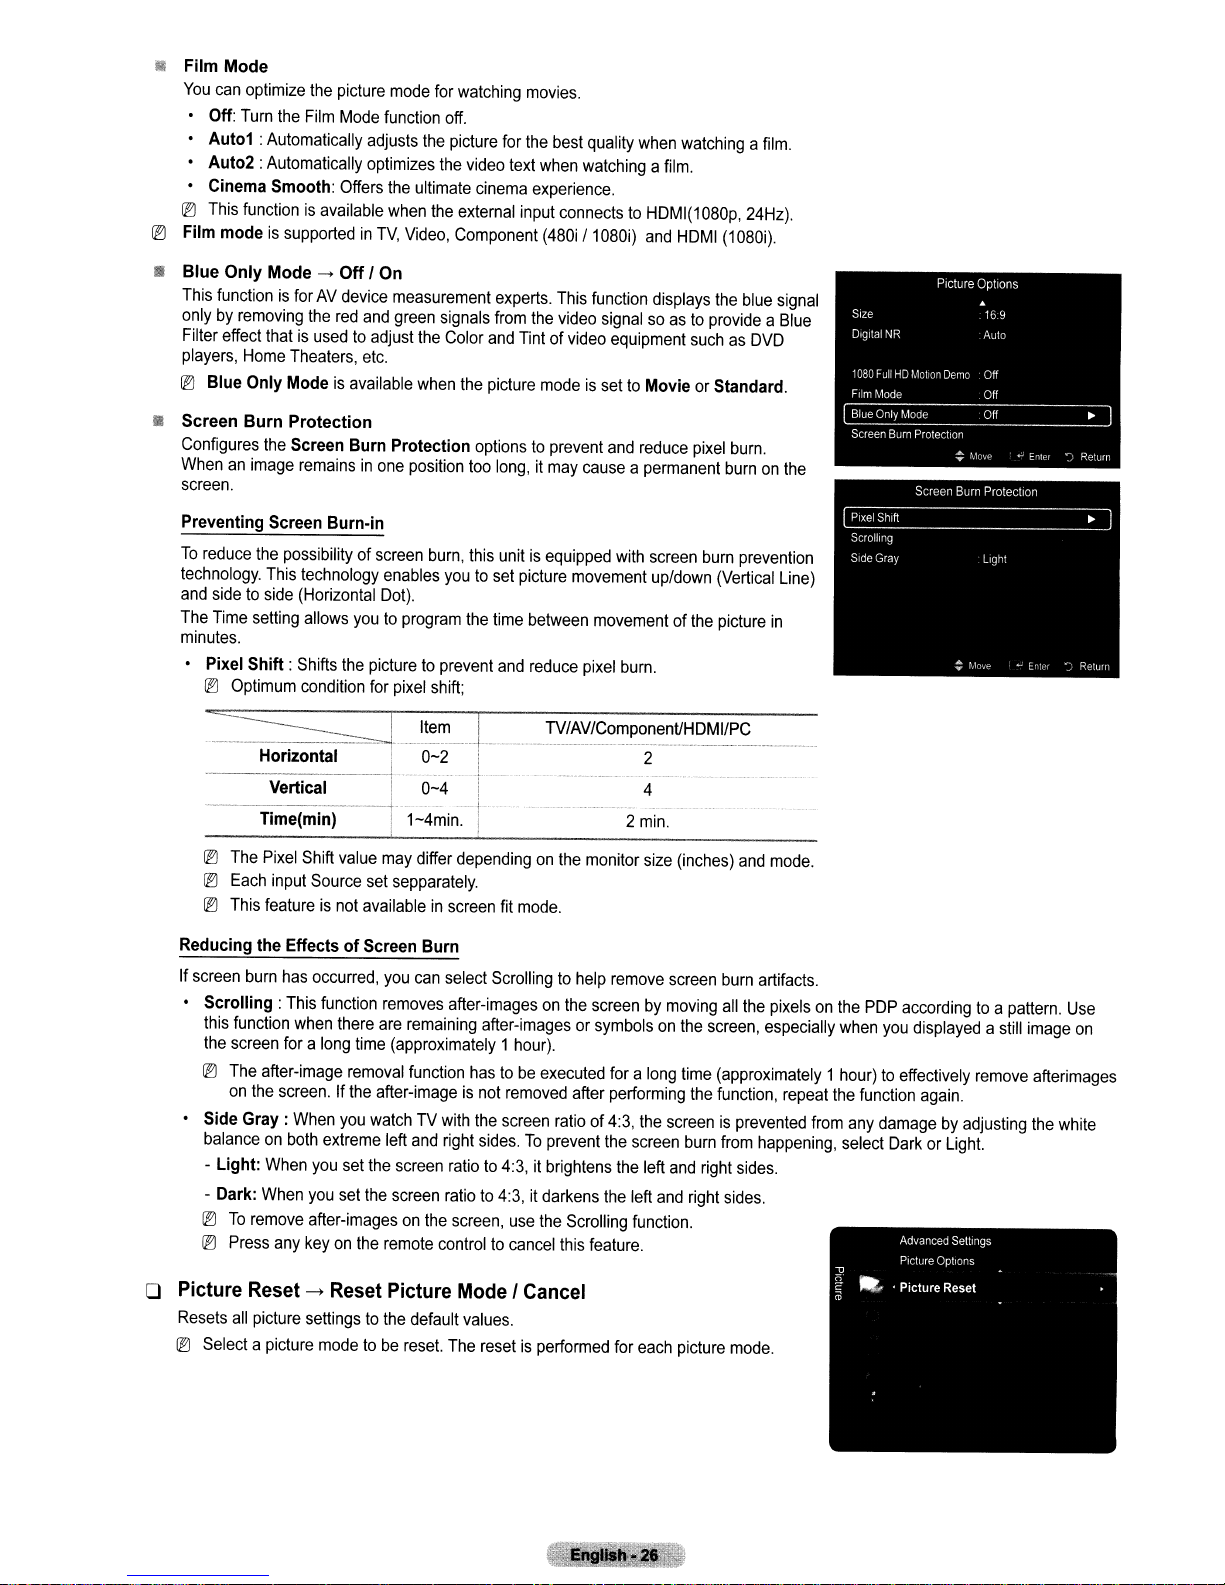
• Film Mode
You
can
• Off:
optimize
Turn
the
the
Film
• Auto1: Automatically
• Auto2: Automatically
• Cinema Smooth:
IEJ
This
functionisavailable
IEJ
Film modeissupportedinTV,
picture
Mode
Offers
mode
function
adjusts
optimizes
the
ultimate
when
Video,
for
watching
off.
the
picture
the
the
Component
video
cinema
external
movies.
for
the
best
quality
text
when
watchingafilm.
experience.
input
connectstoHDMI(1080p,
(48Qi
/ 1
Q80i)
when
watchingafilm.
and
HDMI(1Q80i).
24Hz).
• Blue Only Mode
This
functionisforAVdevice
onlybyremoving
Filter
effect
players,
Home
IEJ
Blue Only Modeisavailable
.......
Off
I On
measurement
the
red
and
green
thatisusedtoadjust
Theaters,
etc.
• Screen Burn Protection
Configures
Whenanimage
the
Screen Burn Protection
remainsinone
screen.
Preventing Screen Burn-in
To
reduce
the
technology.
and
sidetoside
The
Time
possibility of
This
setting
technology
(Horizontal
allows
screen
enables
Dot).
youtoprogram
minutes.
• Pixel Shift:
IEJ
Optimum
Shifts
the
condition
picturetoprevent
for
pixel
=~_.I.tel1l
--H~riion-~I
Vertical
Time(min) i 1-4min. ;
II'
signals
the
Color
when
position
burn,
youtoset
shift;
0-2 .
Q-4
experts.
from
the
and
Tintofvideo
the
picture
optionstoprevent
too
long,itmay
this
unitisequipped
picture
the
time
between
and
reduce
.....
J
--
~-
This
function
video
displays
the
blue
signalsoastoprovideaBlue
equipment
suchasDVD
modeissettoMovieorStandard.
and
reduce
pixel
burn.
causeapermanent
with
screen
movement
up/down
movementofthe
pixel
burn.
TV/AV/Component/H
- - _
..
-----,-----".
--_
..
_._-_
.....
__
DMI/PC
._.,-_.,,---_
burnonthe
burn
prevention
(Vertical
picture
...
"._._
..
_-------_.
2
4
2
min.
signal
Line)
in
__
.
__
..
_.,-
IEJ
The
Pixel
Shift
value
IEJ
Each
input
Source
set
IEJ
This
featureisnot
availableinscreen
Reducing the EffectsofScreen Burn
If
screen
burn
has
occurred,
Scrolling:
this
the
IEJ
Side Gray:
balanceonboth
- Light:
- Dark:
IEJ
IEJ
o Picture Reset
Resets
rE1
Selectapicture
function
screen
The
after-image
on
the
When
When
To
remove
Press
all
picture
This
function
when
there
foralong
time
removal
screen.Ifthe
When
after-imageisnot
you
watchTVwith
extreme
you
set
the
you
set
the
after-imagesonthe
any
keyonthe
---+
Reset Picture Mode I Cancel
settingstothe
modetobe
may
differ
dependingonthe
sepparately.
fit
you
can
select
Scrollingtohelp
removes
are
after-imagesonthe
remaining
after-imagesorsymbolsonthe
(approximately1hour).
function
hastobe
removed
the
screen
left
and
right
sides.Toprevent
screen
ratioto4:3,itbrightens
screen
ratioto4:3,itdarkens
screen,
use
remote
controltocancel
default
values.
reset.
The
resetisperformed
mode.
executed
the
monitor
remove
screenbymoving
foralong
after
performing
ratioof4:3,
the
the
the
Scrolling
this
feature.
for
size
(inches)
screen
screen,
time
(approximately1hour)toeffectively
the
function,
the
screenisprevented
screen
burn
left
and
right
left
and
right
function.
each
picture
and
burn
all
from
sides.
sides.
mode.
the
mode.
artifacts.
pixelsonthe
especially
repeat
from
happening,
PDP
accordingtoa
when
you
displayedastill
the
function
any
damagebyadjusting
select
DarkorLight.
again.
pattern.
remove
Use
image
on
afterimages
the
white
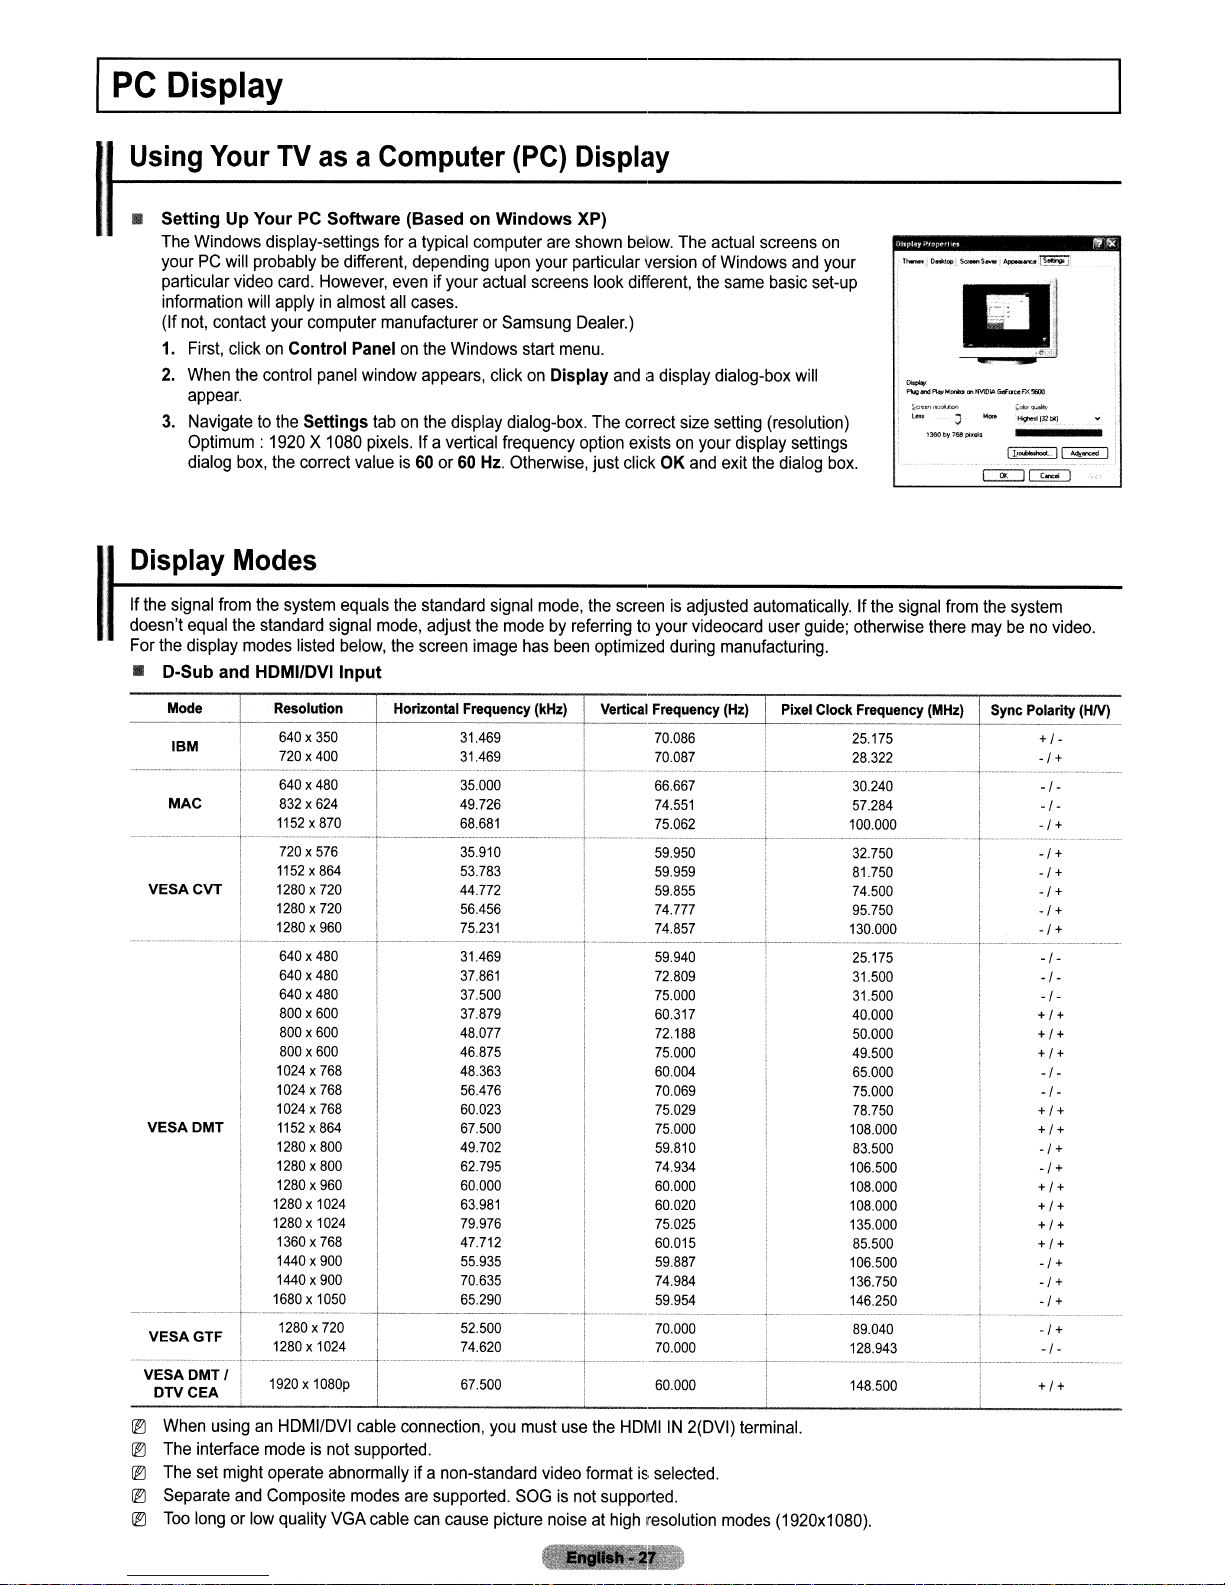
I
PC
Display
Using
• Setting Up YourPCSoftware (Based on Windows XP)
I
Display
If
the
doesn't
I
For
• D-Sub and HDMI/DVI
-----I720X
VESA
.---.---.--..-.---..-
Your
The
Windows
yourPCwill
particular
information
(If
1.
2.
3.
video
not,
contact
First,
clickonControl Panelonthe
When
the
appear.
Navigatetothe
Optimum:
dialog
Modes
signal
from
equal
the
the
display
Mode
IBM
~
MAC
CVT I 1280 x
..
TV
asaComputer
display-settings
probablybedifferent,
card.
However,
will
applyinalmost
your
computer manufacturerorSamsung
control
panel
Settings
1920X1080
box,
the
correct
the
system
standard
modes
listed
I Resolution
I 640 x 350
720 x 400
I~-
640
;4'80-1
i
832x62W
!
1152
x870
576
I 1152x864 53.783 59.959 81.750
I 1280 x
I 1280 x
~.---------.-------.--
720
720
960
for
a typical computer
depending
evenifyour
all
cases.
Windows
window
valueis60or60
equals
signal
below,
Input
appears,
tabonthe
pixels.
mode,
!
---·-3-5.910
display
Ifa vertical frequency
the
standard
adjust
the
screen
Horizontal Frequency (kHz)
I 44.772 59.855 74.500
(PC)
upon
actual
clickonDisplay
dialog-box.
Hz.
Otherwise,
signal
the
modebyreferringtoyour videocard
image
31.469
31.469
35.000 66.667 30240 -1-
49.726
68.681
56.456 I 74.777 95.750 I
75.231
_._
..~_.. ..
I 640 x 480 31.469 I 59.940 : 25.175 1
II
640 x 480
640 x 480 37.500 I 75.000 31.500
37.861
I 800 x 600 37.879 i 60.317 40.000 + I +
!
800
x 600 48.077 72.188 50.000 +I +
800
x 600 46.875 75.000 49.500 +I+
768
1024 x
768
1024 x
768
1152x864
800
48363 60.004 65.000
56.476 70.069 75.000
60.023 75.029 78.750 + I +
67.500 75.000 108.000 + I +
49.702 59.810 83.500
VESA
DMT
I
I 1024 x
II
I
I 1280 x
I 1280 x 800 62.795 74.934 106.500
I 1280 x 960 60.000 60.000 108.000 + I +
! 1280 x
II
I
, 1440 x 900 55.935 59.887 106.500
I 1440x900 70.635 I 74.984 136.750 I
I 1680x 1050 65.290
-----=-r-
VESA
GTF I 1280 x
-v~~f~~
Ir~~20
1024
1280 x 1024 79.976 75.025 135.000 + I +
1360 x 768 47.712 60.015 85.500 +I +
1280 x 720 52.500 70.000 89.040
1024
x
1~80P-
63.981
74.620 70.000 I 128.943
67.500
Display
are
shown
below.
The
actual
your particular version of
screens
look different,
Windows
the
same
screens
basic
and
on
your
set-up
'..:.:··
Oealer.)
start
menu.
and
mode,
has
The
option
just clickOKand
the
screenisadjusted
been
optimized
Vertical Frequency
._.__J.
.....__.
a display dialog-box
correct
size
setting
existsonyour
70.086
70.087
74.551
75.062
59.950 32.750 T---_
74.857 i 130.000 i
._.
during
. . .
exit
manufacturing.
(Hz)
will
(resolution)
display settings
the
dialog
box.
automatically.Ifthe
user
guide;
Pixel Clock Frequency
I
1.
signal
otherwise
25.175 ! +
28.322 :
57.284 i -1-
100.000!
I 72.809 31.500 -1-
60.020 108.000 + I +
t-_5.9.954
·l---·-60-.-00~-----·--t--·--14-8~500
146.250!
-.-.-
11IIIII
G
.....
P\,gr4~"onbQ'lHVIDlA(iefut.FX~
~<;"""IJ:~.hotl
leta
:;
from
there
maybeno
(MHz)
._
..
._;
~
.----+---:~-:-----
.0
the
system
video.
ISync Polarity (HN)
1-
-I
+
-I
+
-+
----.--
I
-1+
-I
+
-I
+
-I
+
.
....-----.
-I-
-I-
-I
-
-1-
-I
+
-I
+
-I
+
-1+
-1+
-I
+
-1-
..
-
IrJ
When
usinganHOMIIDVI
IrJ
The
interface
IrJ
The
set
IrJ
Separate
IrJ
Too
longorlow
might
and
modeisnot
operate
Composite
quality
cable
connection,
supported.
abnormally if a
modes
are
VGA
cable
non-standard
supported.
can
cause
you
must
SOGisnot
picture
use
the
video
formatisselected.
supported.
noiseathigh
HOMIIN2(OVI)
resolution
terminal.
modes
(1920x1
080).
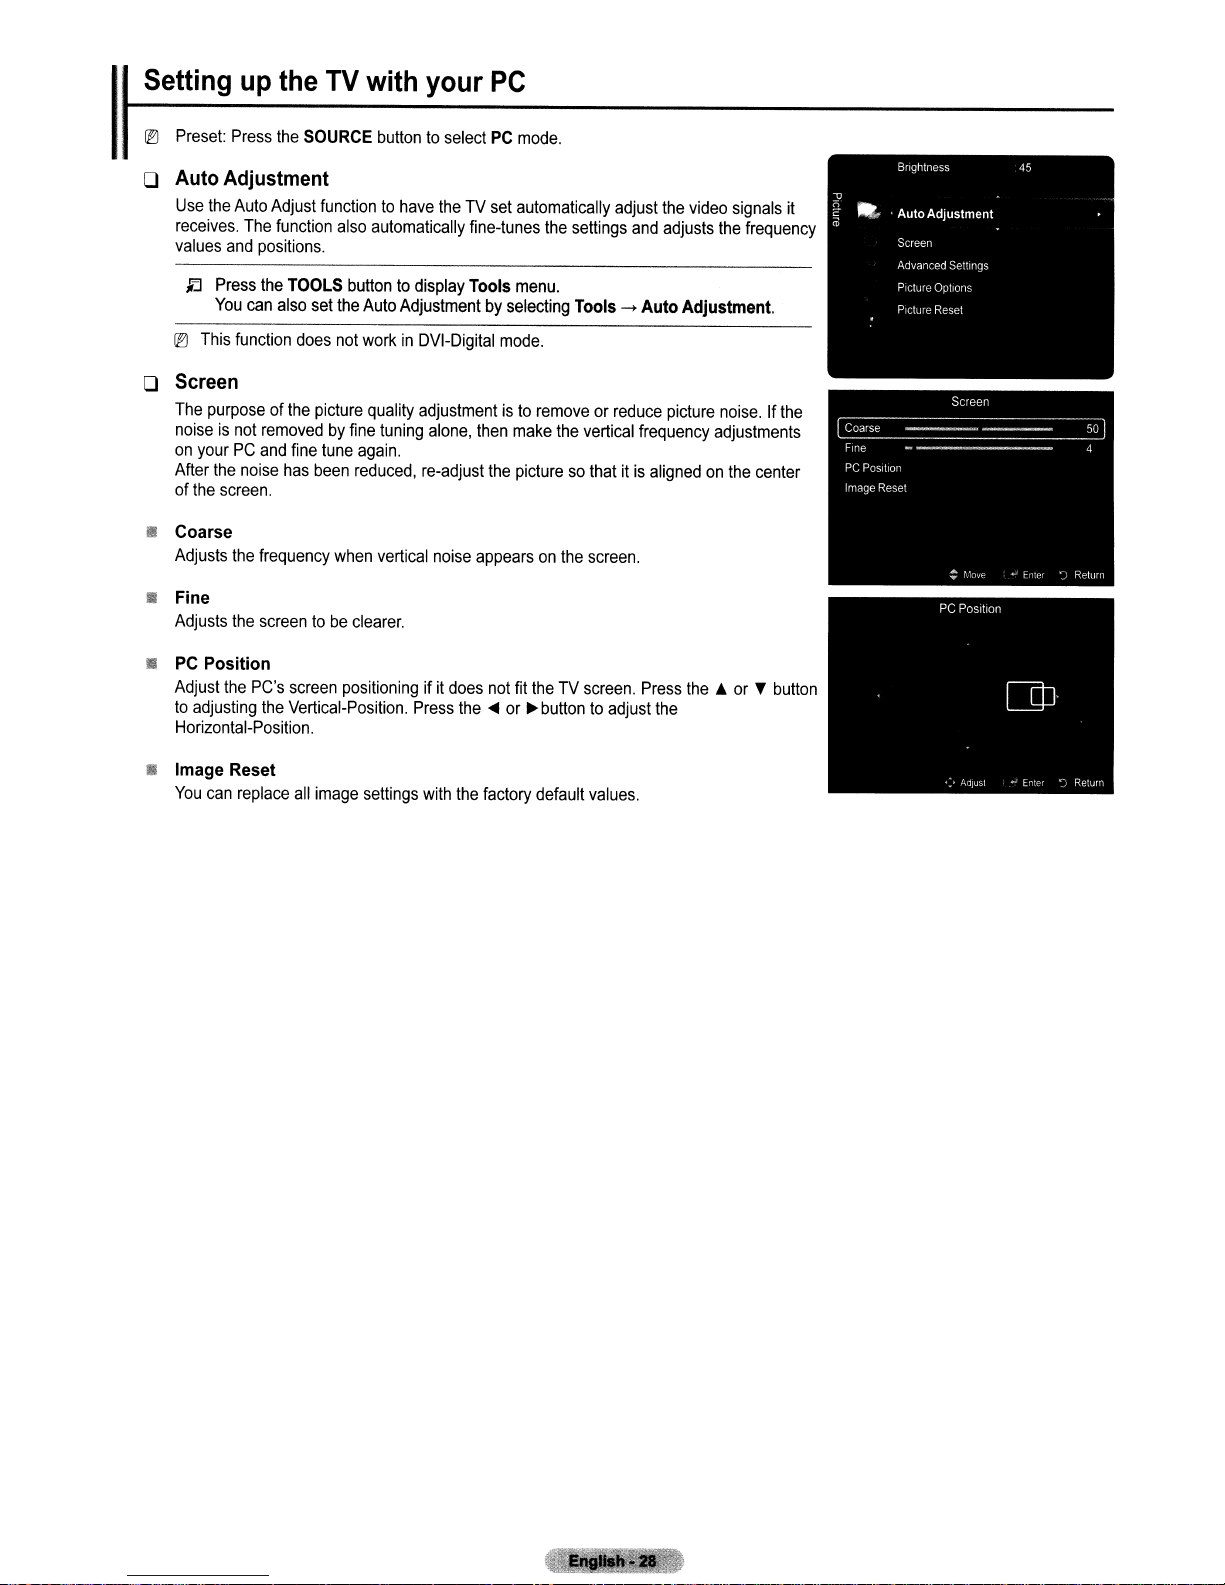
ISetting up the
@:1
Preset:
Press
the
o Auto Adjustment
Use
the
Auto
Adjust
receives.
values
@:1
o Screen
The
noiseisnot
on
After
of
• Coarse
Adjusts
• Fine
Adjusts
•
PC
Adjust
to
Horizontal-Position.
The
and
JEJ
Press
You
can
This
function
purposeofthe
yourPCand
the
noise
the
screen.
the
the
Position
the
adjusting
function
positions.
the
TOOLS
also
does
removedbyfine
fine
has
frequency
screentobe
PC's
screen
the
Vertical-Position.
TV
with
SOURCE
set
picture
been
buttontoselectPCmode.
functiontohave
also
automatically
buttontodisplay
the
Auto
not
workinDVI-Digital
quality
tuning
tune
again.
reduced,
when
vertical
clearer.
positioningifit
your
Adjustmentbyselecting
adjustmentisto
alone,
re-adjust
Press
theTVset
fine-tunes
Tools
then
noise
appearsonthe
does
the~or
PC
automatically
the
menu.
mode.
removeorreduce
make
the
picturesothatitis
not
fit
theTVscreen.
~button
adjust
the
video
settings
the
and
adjusts
the
Tools-+AutoAdjustment.
picture
noise.Ifthe
vertical
screen.
to
adjust
frequency
alignedonthe
Press
adjustments
the.or...
the
signals
frequency
center
it
button
• Image Reset
You
can
replace
all
image
settings
with
the
factory
default
values.
I
Sound
Control
~hanging
Mode
II
You
can
broadcast.
Standard:
Music:
hall.
Movie:
sittingina
Clear Voice:
watching
Custom:
~
Press
You
select
Music
Movie
the
can
o Equalizer
The
sound
settings
o
o Mode:
o Balance:
o
o Reset:
SRS
SRS
to
improves
Selects
100Hz,
300Hz,1kHz,
different
bandwidth
Resets
TruSurroundHD-
TruSurroundHDis
enjoy
a virtual
high
the Sound Settings
the
typeofspecial
This
sound
mode
enables
mode
enables
movie
theater.
Emphasizes
news,
soap
operas,ordocumentaries.
You
can
customize
TOOLS
also
Adjusts
frequency
buttontodisplay Tools
set
the
canbeadjustedtosuit
the
sound
the
balance
frequencies.
the
equalizer
5.1
Surround
resolution.
sound
effecttobe
modeisfor
sound
mode
3kHz,
the
general
youtolistentomusicasif
youtoexperience
voice
over
other
the
sound
modsbyselecting
among
between
10kHz
(Bandwidth
settingstothe
Off
IOn
combined
Sound
technologyofTruSurround
effect
settingstosuit
your
the
the
over
used
when
purposes.
you
live
and
full
sounds.
predefined
right
default
Select
your
menu.
Tools --> Sound Mode
personal
and
left
Adjustment):
values.
the
TV's
preferences.
settings.
speaker.
two
watchingagiven
are
sittingina
movie
soundasif
this
sound
mode
personal
speakers.
Adjusts
and
preferences.
the
FOCUS,
This
concert
when
level
TruBass.
function
you
of
are
SRS
provides
(f)
~.
§
"-
Mode
Equalizer
SRS TruSurro"od
Preferred Language English
AuloVolume Off
Speaker Select
TruSurroundHDenables
not
only
rich
deep
HD
bass,
: Custom
or
TV
Speaker
but
~
you
also
~
TOOLS
You
buttontodisplay Tools
can
also
set
SRse.)
TruSurround
DIGITAL
HD
the
menu.
SRS
TruSurroundHDby
TruSurround
TruSurroundHDtechnologyisincorporated
selecting Tools -->
HD,
SRS
and
o Preferred Language (Digital channels only)
Digital-TV
program
I!'J
[SJ
You
You
broadcasts
into
foreign
can
only
can
listenina
are
languages).
select
language
capableofsimultaneous
the
language
other
from
than
among
the
transmissionofmany
the
actual
Preferred Languagebypressing
o Multi-Track Sound (MTS) (Analog channels only)
Dependingonthe
o Mono:
o Stereo:
o
SAP:
[SJ
Press
or
SAP.
o
Auto
Each
broadcasting
changed.
modulation
Sets
the
Volume -
This
particular
Sets
the
soundtomono.
Sets
the
soundtostereo.
the
soundtothe
MTS
buttononthe
OffIOn
station
feature
lets
signalishighorby
program
second
remote
has
its
you
automatically
raising
own
being
audio
control
signal
the
broadcast,
program.
repeatedlytoselect
conditions,
adjust
the
sound
output
you
can
andsoitisnot
volumeofthe
when
the
ce)
symbol
languages
listentoMono,
Mono, Stereo,
desired
the
modulation
SRSTSHD.
are
trademarksofSRS
under
audio
tracks
being
broadcast.
the
Stereo,orSAP.
easytoadjust
channelbylowering
signalislow.
license
(for
MTS
the
from
example,
buttononthe
Labs,
SRS
simultaneous
~~~
~GQl1J
volume
every
the
Labs,
remote
i
time
sound
Inc.
Inc.
the
output
control.
channel
translationsofthe
~
is
when
the
Continued
...
o Speaker Select
You
can
settohave
speakers
• External Speaker:
•
lEI
lEI
-
----
connectedtoyour
TV
Speaker:
If
you
select
be
limited.
The
settoExternal Speaker.
External Speakerinthe
volume
buttons
TV
Speaker
External
VideoNoSignal
o Sound Select
When
the
PIP
featureisactivated,
• Main
Listentothe
• Sub
Listentothe
soundofthe
soundofthe
sound
output
from
sound
Uses
the
external
Uses
theTVspeakerstooutput
and
!ltMUTE
Please
Speaker
I
.-
__
± .
main
picture.
sub
picture.
the
TV's
system.
speakers(Home
Speaker Select
buttonsdonot
set
the
volumeonyour
TV
you
can
listentothe
internal
speakersorfrom
Theater)tooutput
sound.
menu,
operate
TVs
Internal
Speakers
IAVI
ComponentIPCIHDMI
Speaker
Output
Mute
__
M_u_te
soundofthe
when
Home
the
sound
the
Speaker Select
theater.
sub
(PIP)
external
sound.
settings
-'-_
picture.
will
Audio
.
is
Out
(Optical,
TV
IAVI
LIR
Out)toSound
ComponentIPCIHDMI
Sound
Output
Sound
Output
Mute
System
~
Press
the
TOOLS
picturebyselecting Tools
select
this
option
lEI
You
sub
can
o Sound Reset
Reset Alii Reset Sound Mode I Cancel
You
can
restore
the
Sound
I
Function
:onfigUring the Setup
II
Language
You
can
o Game Mode
When
more
Description
set
the
menu
-+
OffIOn
connectingtoa
realistic
gaming
experiencebyselecting
buttontodisplay Tools
when
settingstothe
......
PiP
PIPissettoOn.
Menu
language.
game
console
suchasPlayStation™orXbox™,
menu.
......
Sound Select.
factory
defaults.
the
game
You
can
menu.
also
set
you
the
soundofthe
can
enjoy
~
Plug & Play
Language
T,rT'€"
SD
',Iv,se
: English
On
[J)
ro
c
"
a
• When the Game Mode is
Picture
modeisautomatically
Sound
modeisautomatically
the
sound
using
the
The
Resetinthe
to
the
factory
defaults.
lEI
Game
Modeisnot
lEI
If
the
pictureispoor
lEI
If
you
display
theTVmenuinGame
lEI
The
mark
(~)
appearsonthe
lEI
Game
modeisnot
On
equalizer.
Sound
menuisactivated.
availableinregularTVmodeorGame
whenanexternal
availableinPC
changedtoStandard
changedtoCustom
Selecting
deviceisconnectedtothe
mode,
the
screen
screen
which
means
mode.
and
cannotbechanged.
and
cannotbechanged.
the
Reset
Mode
shakes
slightly.
that
Game
function
after
settoOff.
TV,
checkifGame
Modeison
Adjust
setting
with
the
ModeisOn.
the
selected
equalizer
source.
!\'elwork Setup
V-Chip
Caption
resets
the
equalizer settings
Continued
'c
 Loading...