


SAMSUNG
Enterprise IP Solutions
OfficeServ
User Guide for 5000D Series Phones
ITP-5021D
ITP-5014D
DS-5021D
DS-5014D

Publication Information
Samsung Telecoms reserves the right without prior notice to revise information in this publication for any reason.
Samsung Telecoms also reserves the right without prior notice to make changes in design or components of equipment as engineering and manufacturing may warrant.
Disclaimer
Samsung Telecoms is not responsible for errors or problems arising from customers not installing, programming or operating their Samsung systems as described in this manual.
Copyright 2004
Samsung Telecoms (UK) Limited
All rights reserved. No part of this manual may be reproduced in any form or by any means – graphic, electronic or mechanical, including recording, taping, photocopy or information retrieval system – without express written permission of the publisher of this material.
Part No.: 18933 |
Version 1.0 |

EU Declaration of Conformity (RTTE)
Samsung Electronics Co., Ltd.
259 Gongdan-Dong, Gumi-City Kyungbuk, Korea, 730-030
(factory name, address)
declare under our sole responsibility that the product
Digital Keyphone System "iDCS500 / OfficeServ500"
to which this declaration relates is in conformity with
RTTE Directive 1999/5/EC ( Annex II )
Low Voltage Directive 73/23/EEC
EMC Directive 89/336/EEC:92/31/EEC
By application of the following standards
.........................................................................................
RTTE: TBR4: November 1995 incorporating TBR4/A1: December 1997
.........................................................................................
LVD: EN60950: 2000 (IEC 60950, Third Edition, 1999)
.........................................................................................
EMC: EN55022 : 1998, EN61000-3-2:1995 Inc A1/A2:1998 + A14:2000*,
.........................................................................................
EN61000-3-3:1995, EN61000-4-2:1995 98, EN61000-4-3:1996,
.........................................................................................
EN61000-4-4:1995, EN61000-4-5:1995, EN61000-4-6:1996,
.........................................................................................
EN61000-4-11:1994, AS/NZS3548:1995
.........................................................................................
(Manufacturer)
Samsung Electronics Co., Ltd
259, Gongdan-Dong, Gumi-City
Kyungbuk, Korea, 730-030
2003-05-19 |
TE Jang |
Tae-eok Jang / General Manager |
................................................. |
|
................................................................................. |
(place and date of issue) |
(name and signature of authorized person) |
|
(Representative in the EU) |
|
|
Samsung Electronics Euro QA Lab. |
|
|
Blackbushe Business Park |
|
|
Saxony Way, Yateley, Hampshire |
|
|
GU46 6GG, UK |
|
|
2003-05-18 |
IS Lee |
In-Seop Lee / Manager |
................................................. |
|
............................................................................... |
(place and date of issue) |
(name and signature of authorized person) |

i
ABOUT THIS GUIDE
This User Guide provides instructions for installing and operating the following Samsung telephones with the Samsung Enterprise IP Solutions OfficeServ system.
•ITP-5000D Series IP phones (ITP-5021D and ITP-5014D 2-line LCD IP phones)
•DS-5000D Series phones (DS-5021D and DS-5014D 2-line LCD digital phones)
Please take the time to read this guide to familiarise yourself with the features of your phone. Keep the guide handy: you may need to look up instructions for infrequently used features.
SAFETY PRECAUTIONS
For your safety and to ensure correct operation of your phone, note carefully the following important precautions before you begin the installation.
Avoid placing objects containing water near the phone.
Do not put objects that contain water such as vases, cups, cosmetics, and medicines near the phone. Moisture in the phone may cause fire and electric shocks.
Do not install the phone in the following locations:
-Direct sunlight or near a heater
-Humid areas or where water flows
-Areas of extreme or volatile changes in temperature.
-Dusty or dirty areas
Use a soft dry cloth to clean the phone.
Do not use chemical solvents such as wax, benzene, alcohol, thinner, aerosol, lubricant, or detergent to clean your phone.

ii Introduction
Do not disassemble or attempt to repair the phone yourself.
If a repair is needed, please contact your authorised Samsung dealer.
Also, if installing an ITP-5000D Series phone:
Take care not to connect the network LAN cable to the PC connection jack.
If the LAN cable connected to the network is connected to the PC connection jack, both telephone and PC communications will be disabled.
Use the AC power adapter supplied with the phone.
If an alternative power adapter is used, this may result in serious damage and voids the warranty.
Do not turn off power to the phone while upgrading the Bootrom.
If you turn off power to the phone during the upgrade process, the phone will not function correctly.
If any items are missing or damaged when you open the phone packaging, contact your authorised Samsung dealer for advice.
.
|
iii |
|
|
|
|
Contents |
|
|
Chapter 1 Installing Your ITPor DS-5000D Series Phone ................................. |
1-1 |
|
ITP-5000D Series IP Phone ................................................................................................. |
1-1 |
|
Checking the Supplied Components.............................................................................. |
1-1 |
|
Connectors on the IP Phone.......................................................................................... |
1-2 |
|
Installing the IP Phone ................................................................................................... |
1-2 |
|
DS-5000D Series Digital Phone .......................................................................................... |
1-6 |
|
Checking the Supplied Components.............................................................................. |
1-6 |
|
Installing the Phone........................................................................................................ |
1-7 |
|
Chapter 2 Setting the Working Environment for ITP-5000D |
|
|
Series IP Phones .................................................................................. |
2-1 |
|
Overview of Environment Settings Mode ......................................................................... |
2-1 |
|
Starting the Phone............................................................................................................... |
2-2 |
|
Setting Parameters.............................................................................................................. |
2-3 |
|
Verifying Settings and Rebooting...................................................................................... |
2-7 |
|
Chapter 3 Things You Should Know..................................................................... |
3-1 |
|
Front Panel of Phone........................................................................................................... |
3-1 |
|
Dial (Keypad) Buttons ..................................................................................................... |
3-3 |
|
Programmable Buttons ................................................................................................... |
3-3 |
|
Volume Buttons ............................................................................................................ |
3-4 |
|
Redial Button .................................................................................................................. |
3-4 |
|
Conference Button .......................................................................................................... |
3-4 |
|
Transfer Button ............................................................................................................... |
3-4 |
|
Hold Button ..................................................................................................................... |
3-4 |
|
Speaker Button ............................................................................................................... |
3-4 |
|
Navigation Buttons.......................................................................................................... |
3-5 |
|
LCD Panel....................................................................................................................... |
3-6 |
|
Scroll Button.................................................................................................................... |
3-6 |
|
Soft Buttons..................................................................................................................... |
3-6 |
|
Microphone ..................................................................................................................... |
3-7 |
|
Phone Status Indicator ................................................................................................... |
3-7 |
|
iv |
Contents |
|
|
Chapter 4 Basic Features ....................................................................................... |
4-1 |
Button LEDs .......................................................................................................................... |
4-1 |
Phone Status Indicator......................................................................................................... |
4-1 |
Using Feature Codes............................................................................................................ |
4-2 |
Selecting Programmed Functions ...................................................................................... |
4-2 |
Assigning Button Values (Extenders) ................................................................................ |
4-3 |
Controlling Volume Levels................................................................................................... |
4-4 |
Handset Volume.............................................................................................................. |
4-5 |
Speakerphone Volume.................................................................................................... |
4-5 |
Ringer Volume ................................................................................................................ |
4-6 |
Selecting the Ring Tone....................................................................................................... |
4-6 |
Changing the Phone Passcode........................................................................................... |
4-7 |
Setting the Answering Mode for Intercom Calls................................................................ |
4-8 |
Switching Headset/Handset Mode.................................................................................... |
4-10 |
Enabling/Disabling Key Confirmation Tone..................................................................... |
4-11 |
Hot Keypad.......................................................................................................................... |
4-12 |
Dialling by Directory Name................................................................................................ |
4-13 |
Assigning/Changing Your Extension Name..................................................................... |
4-14 |
Making Intercom Calls ....................................................................................................... |
4-15 |
Calling an Extension Number ....................................................................................... |
4-15 |
Busy Extension Callback .............................................................................................. |
4-16 |
Busy Extension Camp-On............................................................................................. |
4-17 |
Calling Your System Operator....................................................................................... |
4-17 |
Answering Intercom Calls ................................................................................................. |
4-18 |
Answering Intercom Calls in Ring Mode....................................................................... |
4-18 |
Answering Intercom Calls in Voice Announce Mode .................................................... |
4-18 |
Answering Intercom Calls in Automatic Answer Mode ................................................. |
4-19 |
Making Outside Calls ......................................................................................................... |
4-20 |
Calling Outside Lines (Overview).................................................................................. |
4-20 |
Authorisation Codes and Account Codes ..................................................................... |
4-20 |
Calling Outside Lines Using the Handset ..................................................................... |
4-21 |
Calling Outside Lines Using the Speakerphone ........................................................... |
4-22 |
Making a New Call Without Releasing the Line (Recall Dial Tone) .............................. |
4-22 |
Busy Line Queuing With Callback ................................................................................ |
4-23 |
Cancelling a Callback ................................................................................................... |
4-24 |
Answering Outside Calls ................................................................................................... |
4-25 |
Universal Answer .......................................................................................................... |
4-25 |
|
v |
|
|
|
|
Holding a Call...................................................................................................................... |
4-25 |
|
System Hold.................................................................................................................. |
4-26 |
|
Automatic Hold.............................................................................................................. |
4-26 |
|
Exclusive Hold .............................................................................................................. |
4-28 |
|
Consultation Hold.......................................................................................................... |
4-29 |
|
Hold Recall.................................................................................................................... |
4-30 |
|
Retrieving Calls Held at Another Extension.................................................................. |
4-30 |
|
Parking Calls ....................................................................................................................... |
4-31 |
|
Transferring Calls ............................................................................................................... |
4-32 |
|
Transfer With Camp-On................................................................................................ |
4-33 |
|
Transfer To Voice Mail................................................................................................... |
4-33 |
|
Call Waiting ................................................................................................................... |
4-34 |
|
Chapter 5 Program Menus...................................................................................... |
5-1 |
|
Navigation Buttons............................................................................................................... |
5-1 |
|
Menu Button.................................................................................................................... |
5-1 |
|
Send Button .................................................................................................................... |
5-1 |
|
End Button ...................................................................................................................... |
5-2 |
|
Cancel Button ................................................................................................................. |
5-2 |
|
Enter Button .................................................................................................................... |
5-2 |
|
Direction (Arrow) Buttons................................................................................................ |
5-2 |
|
Main Menu ............................................................................................................................. |
5-3 |
|
How to Select Menu Items .............................................................................................. |
5-3 |
|
Viewing and Redialling Recently Called Numbers............................................................ |
5-4 |
|
Viewing and Calling Recently Received Numbers ............................................................ |
5-5 |
|
Viewing and Calling Personal Speed Dial Numbers ......................................................... |
5-5 |
|
Viewing and Calling System Speed Dial Numbers............................................................ |
5-6 |
|
Viewing and Calling Personal Speed Dial Numbers By Name......................................... |
5-7 |
|
Viewing and Calling System Speed Dial Numbers By Name ........................................... |
5-8 |
|
Viewing and Calling Extension Numbers by Name........................................................... |
5-9 |
|
Setting Call Forward Type and Destination ..................................................................... |
5-10 |
|
Setting Reminder Alarms................................................................................................... |
5-12 |
|
vi |
Contents |
|
|
Chapter 6 Dialling Features .................................................................................... |
6-1 |
Speed Dialling ....................................................................................................................... |
6-1 |
Redial an Outside Number................................................................................................... |
6-7 |
Automatic Redial/Retry ........................................................................................................ |
6-8 |
Pulse to Tone Changeover .................................................................................................. |
6-8 |
Conference Calls .................................................................................................................. |
6-9 |
Chapter 7 Call Pickup.............................................................................................. |
7-1 |
Station Call Pickup ............................................................................................................... |
7-1 |
Group Call Pickup................................................................................................................. |
7-2 |
Chapter 8 Call Forwarding...................................................................................... |
8-1 |
Forwarding All Calls ............................................................................................................. |
8-2 |
Forward Busy........................................................................................................................ |
8-3 |
Forward No Answer.............................................................................................................. |
8-3 |
Forward Busy/No Answer.................................................................................................... |
8-4 |
Forward DND......................................................................................................................... |
8-4 |
Forward Follow Me ............................................................................................................... |
8-5 |
Viewing and Changing Forward Options ........................................................................... |
8-6 |
Chapter 9 Paging and Messaging .......................................................................... |
9-1 |
Internal Page ......................................................................................................................... |
9-1 |
External Page ........................................................................................................................ |
9-2 |
All Page.................................................................................................................................. |
9-3 |
Meet Me Page: MMPG........................................................................................................... |
9-4 |
Call Park and Page ............................................................................................................... |
9-5 |
Rejoining a Page................................................................................................................... |
9-6 |
Setting a Message Waiting Indication ................................................................................ |
9-7 |
Replying to Message Waiting Indications.......................................................................... |
9-8 |
Cancelling Messages ......................................................................................................... |
9-10 |
Programmed Messages ..................................................................................................... |
9-10 |
|
vii |
|
|
|
|
Chapter 10 Special Features............................................................................... |
10-1 |
|
Do Not Disturb .................................................................................................................... |
10-1 |
|
Muting Your Phone ............................................................................................................. |
10-3 |
|
Background Music.............................................................................................................. |
10-3 |
|
Alarm Features.................................................................................................................... |
10-4 |
|
Using the Door Phone........................................................................................................ |
10-8 |
|
Executive/Secretary Hot Line ............................................................................................ |
10-9 |
|
Group Listening................................................................................................................ |
10-10 |
|
Locking and Unlocking Your Phone ............................................................................... |
10-11 |
|
Off-Hook Voice Announcements (OHVA) ....................................................................... |
10-12 |
|
In Group / Out of Group ................................................................................................... |
10-14 |
|
Call Duration Timer........................................................................................................... |
10-15 |
|
Ring Preference ................................................................................................................ |
10-17 |
|
Chapter 11 Caller Identification (CLIP) .............................................................. |
11-1 |
|
Viewing Number or Name of Caller................................................................................... |
11-1 |
|
Viewing Next Caller CLIP ................................................................................................... |
11-2 |
|
Storing a Caller Number..................................................................................................... |
11-2 |
|
Calling a Stored Number.................................................................................................... |
11-3 |
|
Storing a Caller Number as a Speed Dial Number. ......................................................... |
11-3 |
|
Viewing CLIP for Calls on Hold or Parked ....................................................................... |
11-3 |
|
Viewing CLIP for Previous Calls ....................................................................................... |
11-4 |
|
Appendix: Additional Information............................................................................ |
A-1 |
|
System Feature Codes........................................................................................................ |
A-1 |
|
Programmed Messages ...................................................................................................... |
A-2 |
|
Entering Characters on the LCD Panel ............................................................................. |
A-3 |
|
viii Contents
List of Figures
Figure 1.1 Contents of ITP-5000D Series IP Phone Package ................................... |
1-1 |
|
Figure 1.2 Base of ITP-5000D Series IP Phone......................................................... |
1-2 |
|
Figure 1.3 Contents of DS-5000D Series Phone Package ........................................ |
1-6 |
|
Figure 1.4 Base of DS-5000D Series Phone.............................................................. |
1-7 |
|
Figure 3.1 |
Front Panel of the ITPand DS-5014D Phone ......................................... |
3-1 |
Figure 3.2 |
Front Panel of the ITPand DS-5021D Phone ......................................... |
3-2 |
Figure 5.1 |
Navigation Buttons .................................................................................... |
5-1 |
Figure 6.1 |
Buttons A–F............................................................................................... |
6-1 |

1-1
Chapter 1 Installing Your ITPor DS-5000D Series Phone
This chapter explains how to install your phone. Refer to the appropriate section for ITP-5000D Series IP Phone or DS-5000D Series Digital Phone in this chapter for the phone you are installing.
ITP-5000D Series IP Phone
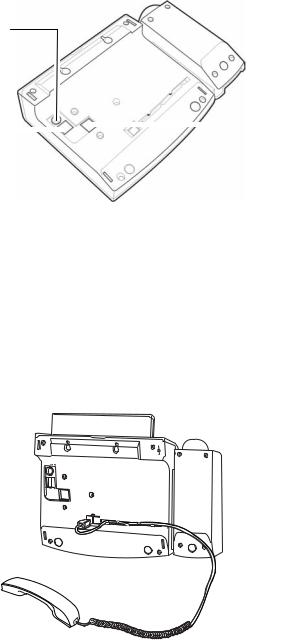
Checking the Supplied Components
First, open and check the package you have received. If any of the parts is missing or damaged, contact your dealer immediately.
The package supplied with the IP phone includes the following items:
IP phone
IP phone stand
Handset
LAN cable (for PC connection)
Power adapter (Input: AC 240V 50Hz, Output : DC 24V 0.4A)
|
IP Phone |
Handset |
|
|
IP Phone Stand |
LAN Cable |
User Guide |
|
Power Adapter |
Figure 1.1 Contents of ITP-5000D Series IP Phone Package
1-2 |
Chapter 1 Installing Your ITPor DS-5000D Series Phone |
|
|
Connectors on the IP Phone
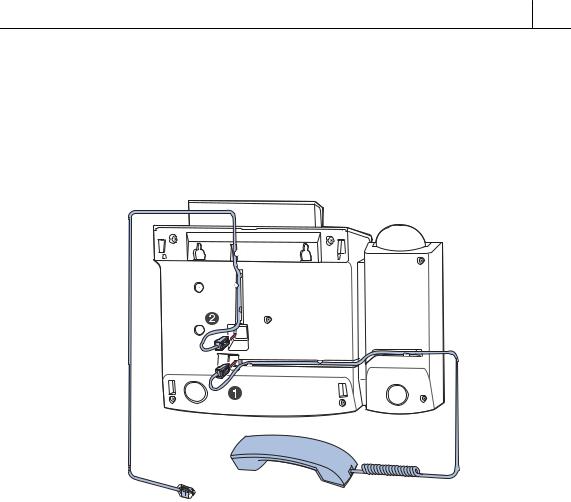
The base of the phone contains a handset connection jack, power connection jack, LAN connection jack, and a PC connection jack.
Power Connection Jack
PC Connection Jack |
|
|
|
|
LAN Connection Jack |
|
|
|
|
||
|
|
|
|
|
|
|
|
|
|
|
|
Handset Connection Jack
Figure 1.2 Base of ITP-5000D Series IP Phone
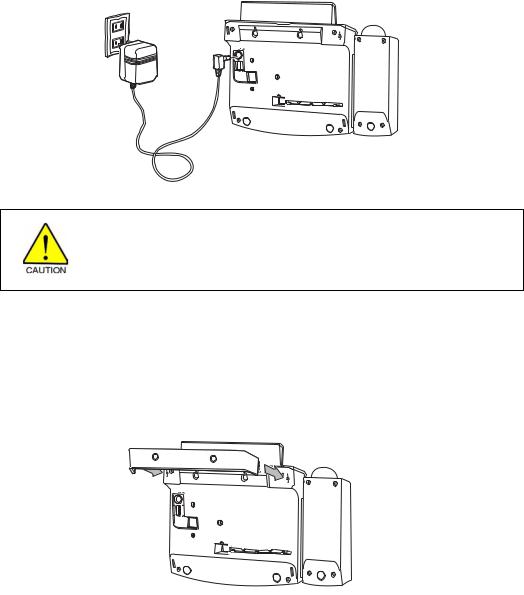
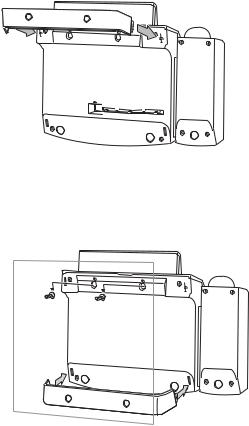
Installing the IP Phone
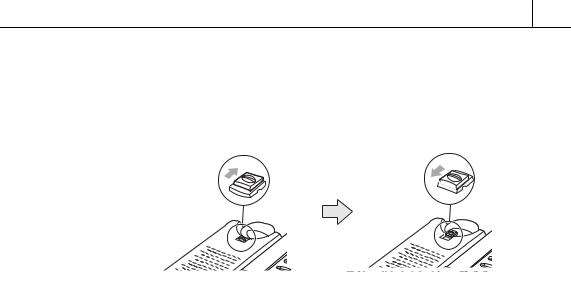
1.Plug the handset cord into the jack marked with the  symbol and push the cord inside the recess to secure it.
POWER
PC24V
PC
LAN

1-3
2. Connect the LAN cable from the network to the LAN connection jack.
POWER
PC24V
PC
LAN
3. Connect the LAN cable from the PC’s network card to the PC connection jack.
PC
LAN
Take care not to connect the LAN cable from the network to the PC connection jack on the phone.
Otherwise, neither the phone nor the PC connection will function.
1-4 |
Chapter 1 Installing Your ITPor DS-5000D Series Phone |
|
|
4.Connect the power adapter cable to the power connection jack. Do not connect the cable to the power outlet yet.
The power specification is as follows.
Input : AC 240V 50Hz
Output : DC 24V 0.4A
POWER
PC24V
PC
LAN
Use only the supplied adapter cable. Using any other cable may cause serious damage and will void the warranty.
5.Insert the phone stand.
•If using as a desk-phone, insert the phone stand into the slots located
in the upper section of the base.
POWER
PC24V
PC
LAN
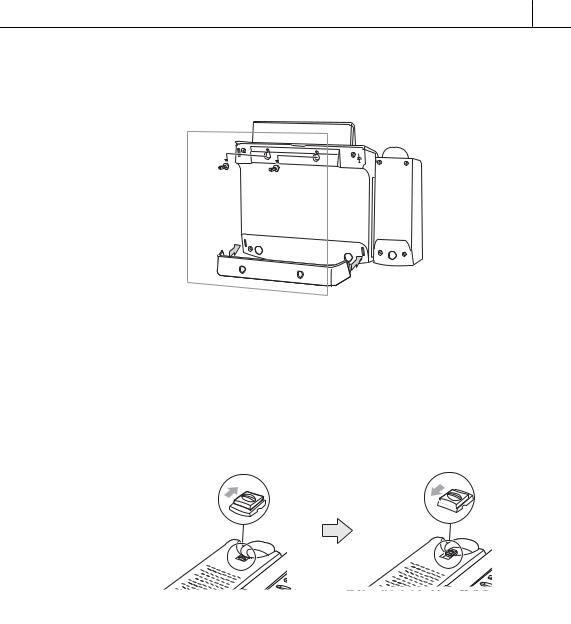
1-5
•If using as a wall-mounted phone, insert the support into the slots located in the lower section of the base.
–Use the two mounting holes in the upper section of the phone body for wall mounting the phone on screws inserted into the wall.
–The handset hook should also be changed so that the handset is secure
when mounted on the wall. Push out the handset hook from the holder, turn it through 180o and push it back into the holder.
Installation is complete. Now set up the ‘working environment’ for the phone as described in Chapter 2.

1-6 |
Chapter 1 Installing Your ITPor DS-5000D Series Phone |
|
|
DS-5000D Series Digital Phone
Checking the Supplied Components
First, open and check the package you have received. If any of the parts is missing or damaged, contact your dealer immediately.
The package supplied with the phone includes the following items:
Digital phone
Phone stand
Handset
Line cord
DS-5000D Series Phone


 Handset
|
Phone Stand |
Line Cord |
User Guide |
|
Figure 1.3 Contents of DS-5000D Series Digital Phone Package
1-7
Installing the Phone
The base of the phone contains a handset connection jack and a line cord connection jack.
Figure 1.4 Base of DS-5000D Series Digital Phone
1.Plug the handset cord into the handset jack (marked with the  symbol) and push the cord inside the recess to secure it.
2.Plug the line cord into the line cord jack and push the cord inside the recess to secure it. Plug the other end of the line cord into the phone socket.
1-8 |
Chapter 1 Installing Your ITPor DS-5000D Series Phone |
|
|
•If using as a desk-phone, insert the phone stand into the slots located in the upper section of the base.
POWER
PC24V
PC
LAN
•If using as a wall-mounted phone, insert the support into the slots located in the lower section of the base.
–Use the two mounting holes in the upper section of the phone body for wall mounting the phone on screws inserted into the wall.
1-9
–The handset hook should also be changed so that the handset is secure
when mounted on the wall. Push out the handset hook from the holder, turn it through 180o and push it back into the holder.
Installation is complete. Now find out what features your phone supports by going to Chapter 3.
2-1
Chapter 2 Setting the Working Environment for ITP5000D Series IP Phones
This chapter describes the procedure for starting (“booting”) an IP phone and setting the phone’s operating parameters.
Overview of Environment Settings Mode
Menu Items
The menu structure for setting the phone’s environment is as shown below.
TOP LEVEL |
SUB-LEVEL |
1.Information |
1.Version |
|
2.Network |
|
3.Load Option |
|
4.MAC address |
2.Network |
1.Mode |
|
2.IP* |
|
3.Netmask |
|
4.Gateway* |
(* Items 2 to 4 are only displayed when setting Manual IP) |
|
3.Load & Upgrade |
1.Load Option |
|
2.Upgrade Program |
|
3.Upgrade Bootrom |
|
4.Format |
4.System |
1.Password |
|
(Not used) |
5.Server |
1.Server IP |
|
2.ID |
|
3.Password |
6.Exit

2-2 |
Chapter 2 Setting the Working Environment for ITP-5000D Series IP Phones |
|
Using the Buttons in Edit Mode
When entering the edit mode for any menu option, the cursor flashes and you can enter digits using the dial buttons [0] – [9] and [*].
Button functions are listed in the table.
Table 3.1 Using the Buttons in Edit Mode
Button |
Function |
|
|
Left/Right arrow buttons on Navigation buttons |
Erase contents or move cursor |
Up/Down arrow buttons on Navigation buttons |
Move between menu options |
[Enter] button on Navigation buttons |
Select menu or save current settings and exit |
[End] button on Navigation buttons |
Cancel entered settings and exit |
|
|
Dial button [*] |
Enter full-stop (.) |
Dial button [0] – [9] |
Select menu or enter numbers |
Starting the Phone
Connect the power adapter plug from the phone to the power outlet. The phone starts automatically.
The power connection jack must be connected to a power outlet using the power adapter supplied with the phone.
Using a different adapter may result in serious damage and voids the warranty.
Press the [Menu] button on the Navigation buttons. The phone enters the environment settings menu and displays the first two top level menus:
>1.Information
2.Network

2-3
Setting Parameters
The procedure for setting parameters takes you through the top level menus for Network, Load & Upgrade, System and Server.
Network Menu
• Select ‘2.Network’. You see:
>1.Mode
2.IP
• Select ‘1.Mode’. You see:
>1.Manual IP 2.DHCP
•Select ‘1.Manual IP’ to manually enter the IP, Subnet Mask, and Gateway IP addresses and continue with this section.
OR
Select ‘2.DHCP’ to have the IP, Subnet Mask, and Gateway IP addresses automatically entered for you (and then go to the section Load & Upgrade Menu to continue).
If you selected ‘1.Manual IP’ you see:
Manual IP
Selected
followed by:
>1.Mode
2.IP

2-4 |
Chapter 2 Setting the Working Environment for ITP-5000D Series IP Phones |
|
• Select ‘2.IP’. You see:
Input IP Address xxx.xxx.xxx.xxx
If the IP address is set, you can confirm the address displayed by pressing the [Enter] button. (If it is incorrect, use the left arrow button to delete the set address and use the dial buttons [0] to [9], and [*] to enter the correct address, and press the [Enter] button to save and exit.)
OR
If the IP address is blank, use the dial buttons [0] to [9], and [*] to set the address and press the [Enter] button to save and exit.
• Select ‘3.Netmask’. You see:
Input Netmask xxx.xxx.xxx.xxx
If the subnet mask address is set, you can confirm the address displayed by pressing the [Enter] button. (If it is incorrect, use the left arrow button to delete the set address and use the dial buttons [0] to [9], and [*] to enter the correct address, and press the [Enter] button to save and exit.)
OR
If the subnet mask address blank, use the dial buttons [0] to [9], and [*] to set the address and press the [Enter] button to save and exit.
• Select ‘4.Gateway’. You see:
Input Def. Gateway xxx.xxx.xxx.xxx
If the gateway address is set, you can confirm the address displayed by pressing the [Enter] button. (If it is incorrect, use the left arrow button to delete the set address and use the dial buttons [0] to [9], and [*] to enter the correct address, and press the [Enter] button to save and exit.)

2-5
OR
If the gateway address is blank, use the dial buttons [0] to [9], and [*] to set the address and press the [Enter] button to save and exit.
You have now completed the network parameter setup. Press the [End] button to return to the top level menu.
Load & Upgrade Menu
The menu ‘3.Load & Upgrade’ sets or modifies the phone’s upgrade environment.
• Select ‘3.Load & Upgrade’. You see:
1.Load Option 2.Upgrade Program
•To designate where the phone’s program is to be downloaded from, select
‘1.Load Option’, then:
select ‘1.File System’ to operate programs saved in the phone’s flash memory, or
select ‘2.TFTP down run’ to download programs saved in the designated TFTP server to the RAM memory of the phone.
• To upgrade the program, select ‘2.Upgrade Program’ then ‘1.TFTP server’.
Input TFTP Server
xxx.xxx.xxx.xxx
Enter the IP address of the TFTP server from which the program should be downloaded. Press the [Enter] button to start the download.

2-6 |
Chapter 2 Setting the Working Environment for ITP-5000D Series IP Phones |
|
•To upgrade the phone’s bootrom select ‘3.Upgrade Bootrom’ then ‘1.TFTP server’.
Input TFTP Server
xxx.xxx.xxx.xxx
Enter the IP address of the TFTP server from which the program should be downloaded. Press the [Enter] button to start the download.
The phone is rebooted after downloading the Bootrom program and the environment setup main menu appears.
•The ‘[4. Format]’ option is used to delete previously saved programs. Check if the program needs to be deleted before using this function.
Server Menu (Setting System Authentication Information)
Select the ‘5.Server’ option on the main menu to set the IP address of the OfficeServ system connected to the IP phone and the authentication ID and password of the phone. (The ID and password are required if the OfficeServ system is set to request this information.) The following screen is displayed.
1.Server IP 2.ID
•To set/modify the IP address of the OfficeServ system, select ‘1.Server IP’. The following screen is displayed.
Input Server IP xxx.xxx.xxx.xxx
The address is left blank if it is not set. Use the dial buttons [0] to [9], and [*] to set the address and press the [Enter] button to save and exit.

2-7
•To set/modify the ID of the phone, select ‘2.ID’. The following screen is displayed.
*Input ID
Enter the ID as a maximum of 16 digits/characters.
•To set/modify the password of the phone, select ‘3.Password’. The following screen is displayed.
Enter the password as a maximum of 8 digits (displays as ‘*’).
Verifying Settings and Rebooting
The top level menu ‘1.Information’ allows you to view and verify all your parameter settings.
•When you are satisfied that the settings are valid, select the menu ‘6.Exit’ to save all settings and reboot your phone.
3-1
Chapter 3 Things You Should Know
The ITPand DS-5000D Series of phones comprise the ITP/DS-5021D and ITP/DS-5014D phones. These are 2-line LCD phones that can be used with the Samsung Enterprise IP Solutions OfficeServ System. They are described in detail in this chapter.
ITP and DS phones are operated in the same way. However, IP phones enjoy the added benefits of Internet technology to make and receive calls.
Front Panel of Phone
Programmable Buttons (14) |
LCD Panel |
|
Soft Buttons (3) |
||
|
||
|
Scroll Button |
|
|
Status Indicator |
|
Speaker |
|
|
Volume Button |
|
|
Redial Button |
Phone Support |
|
|
||
|
Navigation Buttons |
|
Dial Buttons |
Microphone |
|
|
||
Speaker Button |
Conference Button |
|
|
||
Hold button |
Transfer Button |
Figure 3.1 Front Panel of the ITPand DS-5014D Phone
3-2 |
Chapter 3 Things You Should Know |
|
Programmable Buttons (21) |
LCD Panel |
|
Soft Buttons (3) |
||
|
||
|
Scroll Button |
|
|
Status Indicator |
|
Speaker |
|
|
Volume Button |
|
|
Redial Button |
Phone Support |
|
|
||
|
Navigation Buttons |
|
Dial Buttons |
Microphone |
|
Speaker Button |
Conference Button |
|
|
||
Hold button |
Transfer Button |
Figure 3.2 Front Panel of the ITPand DS-5021D Phone
•The 14 or 21 programmable buttons can be programmed with desired functions.
•Dial keypad buttons for dialling numbers.
•Volume buttons to control volume levels for handset, speaker, ring etc.
•Redial button redials the last number dialled from the dial keypad.
•Conference button used for conference calls (a number of phones connected simultaneously).
•Transfer button transfers current call to another phone.
•Hold button puts your calls on hold.
•Speaker button turns the speakerphone on/off.
•Navigation buttons guide you easily through phone functions.
•The LCD panel shows call status, functions and other useful information.

3-3
•The status indicator displays the status of the phone using red, green, and amber colours.
Dial (Keypad) Buttons
The dial buttons are used to dial digits [0]-[9], [*] and [#].
Programmable Buttons
ITPand DS-5021D have 21 programmable buttons; ITPand DS-5014D have 14 programmable buttons. You can program these buttons with frequently used functions, such as dialling a specific telephone number when pressed. Your system administrator will normally do this for you using system programming (MMCs). Programmable functions are described in Chapter 4. Ask the system administrator how your phone is set up if you’re not sure.
Buttons are assigned a number from 1 to 21 (or 1 to 14) beginning with the top row left-hand button and ending with the bottom row right-hand button. Each button also has an LED which can display one of three colours, red, amber or green, if the button is being used. (See Chapter 4 for a description of possible LED displays.)
Three buttons are pre-set to perform the following functions. They may be changed in programming but it is not recommended.
Message Button:
If a message waiting indication is left for you, this button’s LED flashes.
Call 1 and Call 2 Buttons:
These are essential in order to allow your phone to make and receive calls. Up to six Call buttons can be set on your phone. Your phone should have at least one Call key, but two are recommended. While the hold or conference functions are in use, the corresponding button’s LED flashes.
 Loading...