

Samsung NA36N9755T Series, NA30N9755T Series, NK36K7000W Series, NK30K7000W Series Quick Manual

Quick guide
LOCATION OF THE COOKTOP BURNERS AND WIFI, BLUETOOTH BUTTONS
The control knobs operate the cooktop burners on the cooktop.
03
02
LR RR
04
01
02
01
01/02 . Semi Rapid burner
(Left Front/Left Rear)
Center
LF RF
01 02 03 04 05
0607
30" Model NA30N9755T*
03
RRLR
Center
RFLF
01 02 03 04 05
36" Model NA36N9755T*
05
04
05
0607
General purpose simmering
03. Dual power burner (Center)
04. Simmer burner (Right Rear)
05. Rapid burner (Right Front)
Large pots/Pans Quick boiling simmering
Simmering
General purpose
06. Wi-Fi button (below knob)
07. Bluetooth button (below knob)
1 English
Quick-Guide_NA9300K_AA_DG68-01094A-01_EN+MES+CFR.indb 1 2018-07-31 4:18:32

Quick guide
DIMENSIONS AND INSTALLLATION INFORMATION
Overall cooktop dimensions
27/16” (62 mm)
countertop to grate surface
31/8” (79.3 mm)
chassis eight
Model A B C
30”
NA30N9755T*
NA36N9755T*
(762 mm)
(914.4 mm)
36”
B
(715 mm)
33
(855 mm)
21” (533 mm)
281/8”
11
/16”
A
223/8” (568 mm)
C
193/8”
(492.1 mm)
187/8”
(479 mm)
Cutout dimensions of countertop
Rear
Vertical
combustible
surface
D
wall
E
Model (D) Min. (E) Min. (F) Min. (G) Min.
7
2
NA30N9755T*
NA36N9755T*
/8”
(73 mm)
3
3
/8”
(85.7 mm)
G
195/8”
(498.5 mm)
191/8”
(485.8 mm)
G
F
Minimum distance to combustible side
wall above countertop (both sides)
281/2”
(723.9 mm)
337/8”
(860.4mm)
12”
(304.8 mm)
12”
(304.8 mm)
2 English
Quick-Guide_NA9300K_AA_DG68-01094A-01_EN+MES+CFR.indb 2 2018-07-31 4:18:33
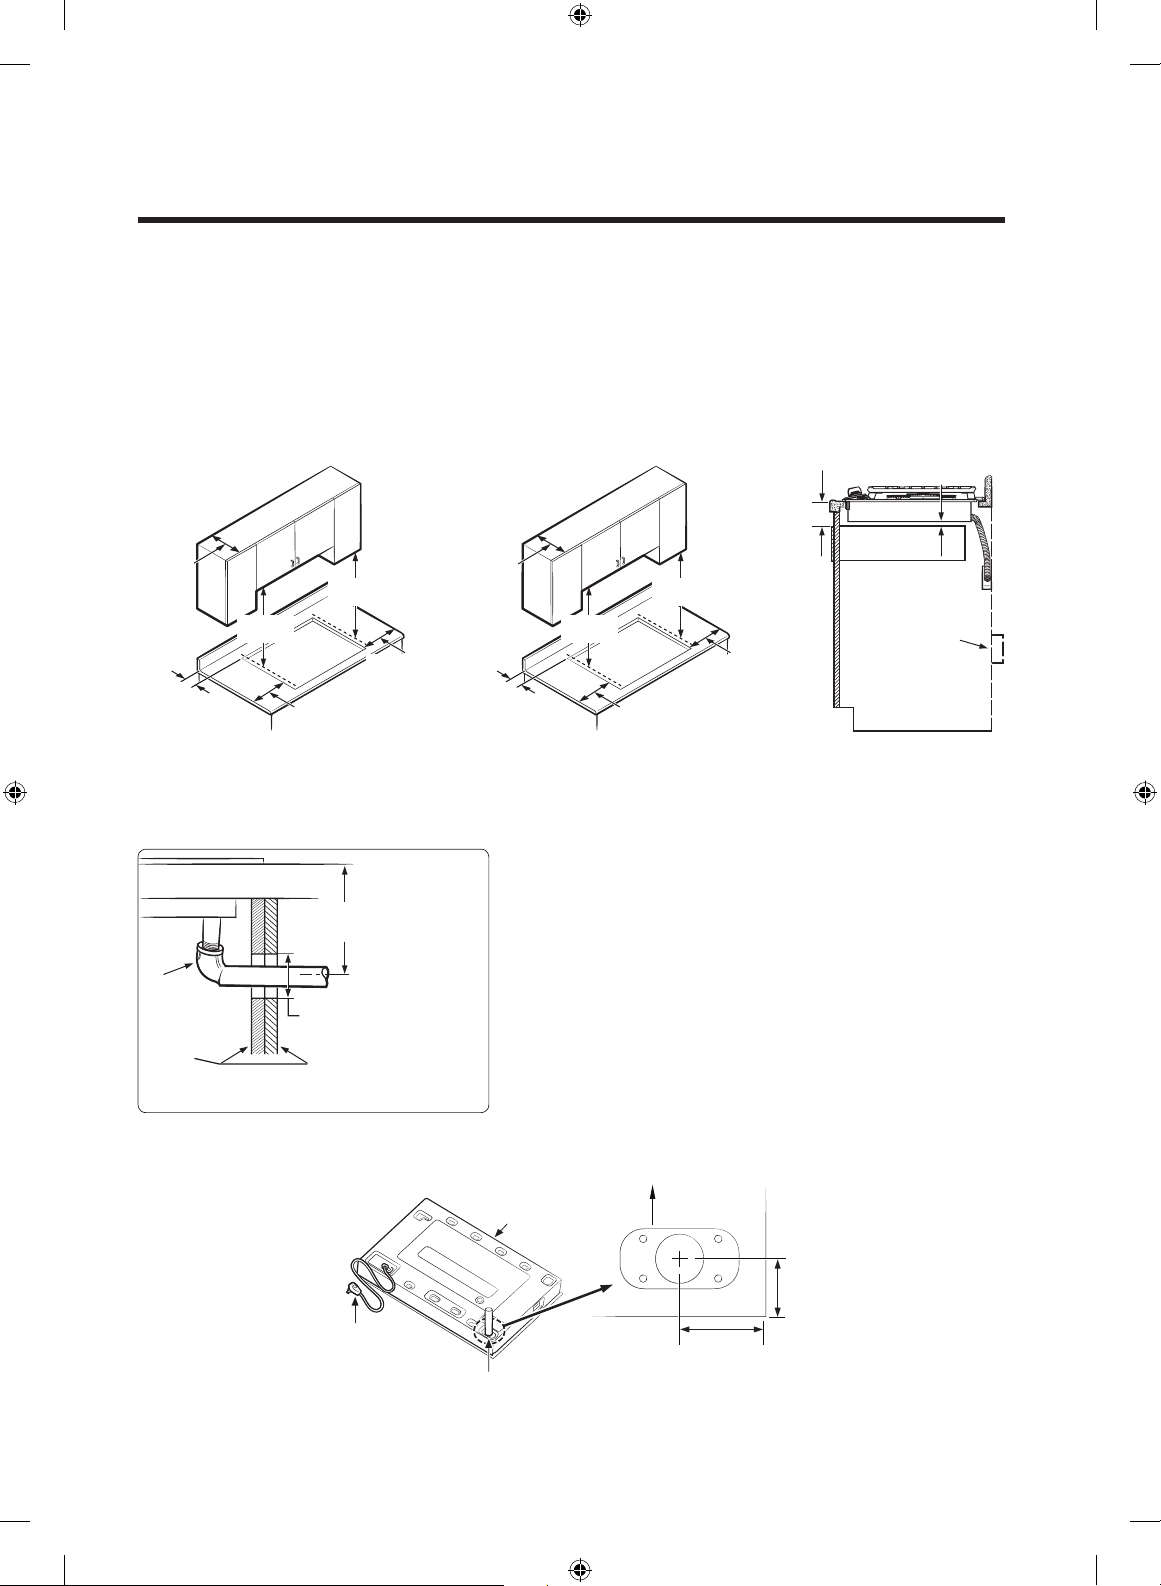
Location requirements and electrical requirements
• To ensure cooktop base clearance, cabinet side walls need to be wider than cutout.
• If cabinet has a drawer, allow 39/16” minimum clearance between countertop and top of drawer.
• A 120-Volt, 60-Hz, AC, approved electrical service with 20-amp circuit breaker or time-
delay fuse is required.
7
/16”
(11.1 mm)
39/16”
(90.5 mm)
DRAWER
13” MAX.
(330 mm)
27/8” MIN.
(73 mm)
30” MIN.
(762 mm)
12” MIN.
(304.8 mm)
30” -
NA30N9755T*
18” MIN.
(457 mm)
(304.8 mm)
12” MIN.
13” MAX.
(330 mm)
33/8” MIN.
(85.7mm)
30” MIN.
(762 mm)
12”
(304.8 mm)
36” -
NA36N9755T*
18” MIN.
(457 mm)
12”
(304.8 mm)
Electrical outlet 12”
(30.5cm) minimum
below countertop
Installation over built-in oven
See built-in oven installation for complete
installation instructions.
5” To Center of 2” Dia.
Hole From Countertop
90° Elbow
Cabinet
Sides
2” Dia. Hole (207/8” from
front of countertop to
hole Center
View from Front of Cooktop
Utility locations and dimensions
Front of unit
Power cord 39
3
/8”
(100 cm) long
3
/8”-18NPT male
gas inlet
3 English
Quick-Guide_NA9300K_AA_DG68-01094A-01_EN+MES+CFR.indb 3 2018-07-31 4:18:33
Front of cooktop
Chassis
15
1
/16”
(5 cm)
* Gas inlet protrudes 1
from bottom.
1
/4”
1
(3.2 cm)
9
/16” (4 cm)
Quick guide
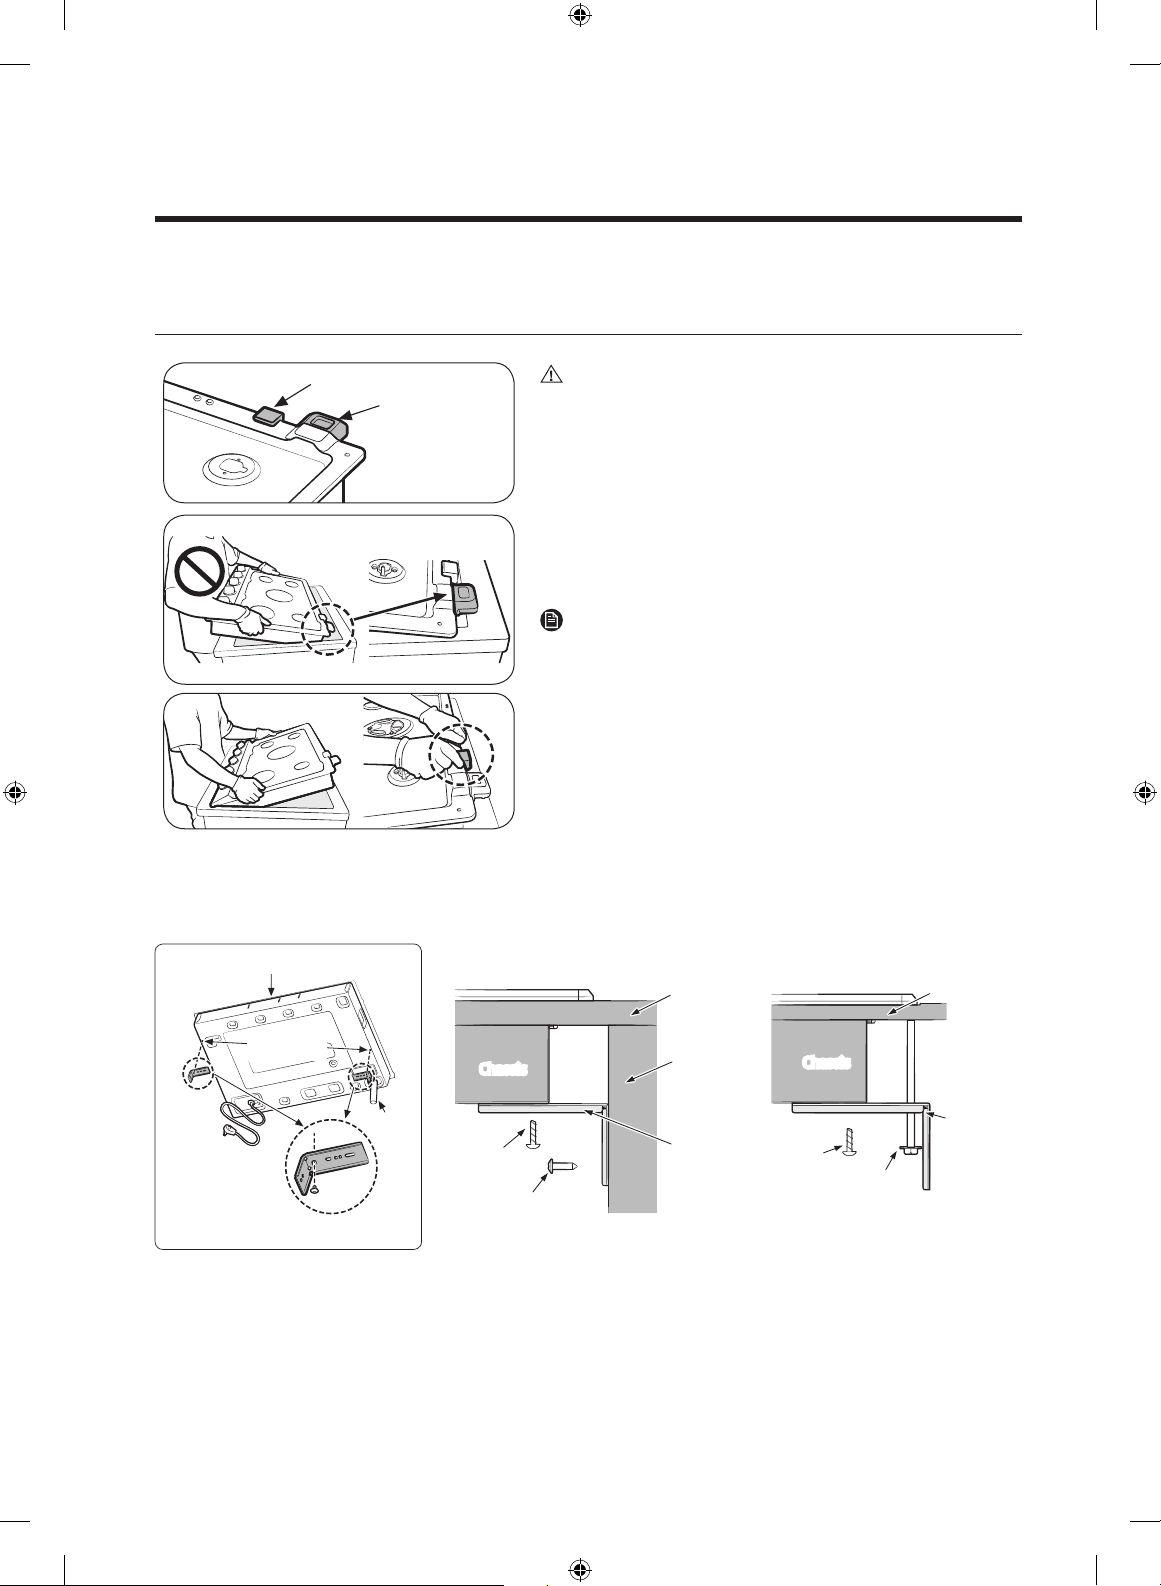
PACKING RUBBER AND HOLD DOWN BRACKETS
Rubber
Wi-Fi module
Smart Connect
module
Correct installation
Hold down bracket install guide
CAUTION
• When you insert the cooktop into the cutout
opening, do not remove the rubber to protect
WiFi-module. Please remove it after inserting the
cooktop carefully.
• When mounting the cooktop, make sure to insert
the cooktop with the front side rst. Inserting
from the rear may damage the Wi-Fi module.
NOTE
You can detach Smart Connect module before
installing the cooktop. See cooktop installation p.15
for detailed information.
Front of unit
Hold down
bracket holes
Gas inlet
Power cord
Hold Down Bracket Installation
Case 1.
Chassis
M4 L10
screw
M4 L16
screw
4 English
Countertop
Side wall of
undercounter
cabinet
Hold down
bracket
Case 2.
Chassis
M4 L10
screw
W
3
/16 L75
screw
Countertop
Hold down
bracket
Quick-Guide_NA9300K_AA_DG68-01094A-01_EN+MES+CFR.indb 4 2018-07-31 4:18:34
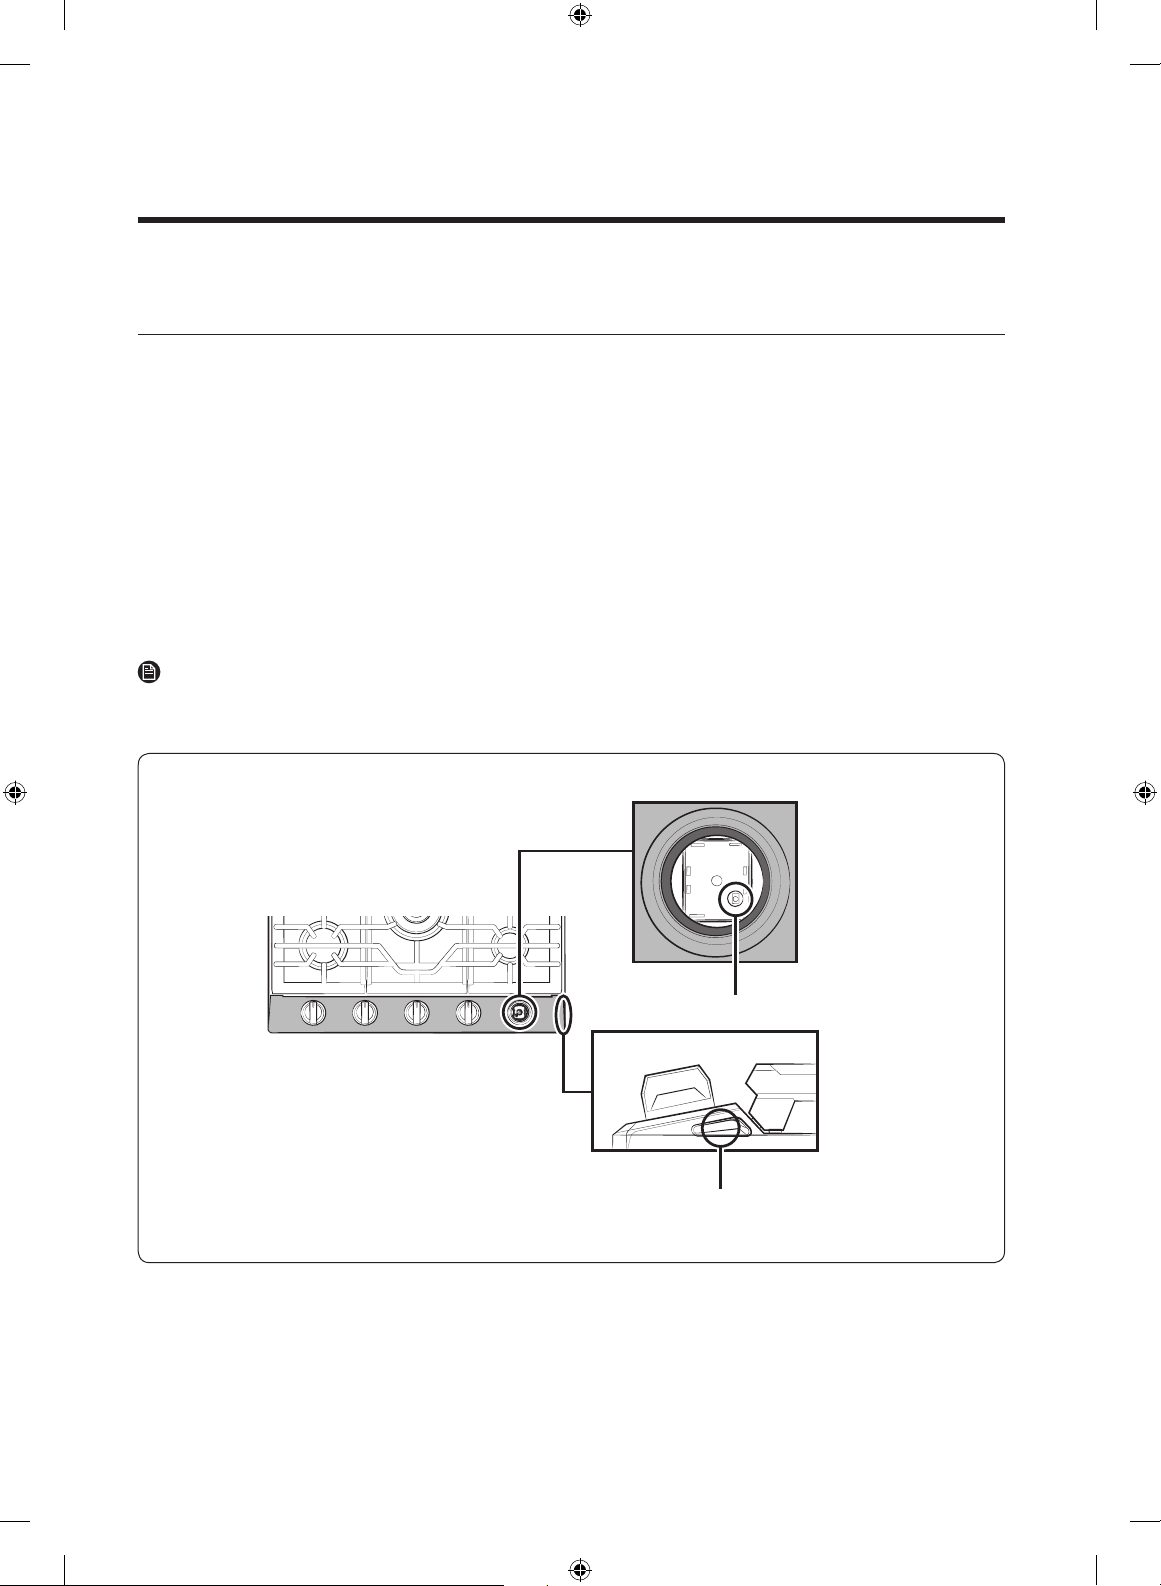
USING THE SMART CONNECT FEATURE
How to connect the cooktop
Before you can use the remote features of your Samsung oven or cooktop, you must pair it to
the SmartThings app.
1. Download and open the SmartThings app on your smart device.
2. Follow the app's on-screen instructions, and then press the Smart Connect button for 3
seconds to connect your cooktop.
3. Once the process is complete, the Smart Connect LED indicator stops blinking and turns
solid. The cooktop is connected successfully.
4. If the Smart Connect LED indicator does not turn in, follow the instruction on the app to
reconnect.
NOTE
The Smart Connect button is below the RF control knob. If you need to press the Smart
Connect button, remove the RF control knob by grasping it and then pulling it straight up.
Smart Connect button
Smart Connect LED indicator
5 English
Quick-Guide_NA9300K_AA_DG68-01094A-01_EN+MES+CFR.indb 5 2018-07-31 4:18:34

Quick guide
USING THE HOOD CONTROL FEATURE
NOTE
This product features a Bluetooth device that you can use to connect the cooktop to Samsung
hood control models. Through the Bluetooth connection, you can use the hood control
function on the SmartThings app.
For matching hood control-enabled cooktops and hoods, refer to the below table.
Gas cooktop Hood
Model
To connect to a hood control model and a hood:
1. Download and run the SmartThings app on your smartphone. Then, complete the Smart
Connect procedure to connect to the cooktop.
2. Follow the Bluetooth instructions of the hood control model and activate the Bluetooth
connection.
3. Press the Bluetooth icon
4. Press the Bluetooth button on the cooktop. Paring begins.
5. When Bluetooth pairing is nished, the Bluetooth icon LED stops blinking and glows
steadily.
6. Follow the instructions in the user manual of the hood control model and the App guide to
use the hood control.
NOTE
The Bluetooth button is below the LF control knob. If you need to press the Bluetooth button,
remove the LF control knob by grasping it and then pulling it straight up.
NA30N9755T*
NA36N9755T*
on the hood control panel. The Bluetooth icon LED blinks.
NK30K7000W*
NK36K7000W*
Bluetooth button
DG68-01094A-01
6 English
Quick-Guide_NA9300K_AA_DG68-01094A-01_EN+MES+CFR.indb 6 2018-07-31 4:18:35
 Loading...