

Samsung MX-FS9000 User Manual
MX-FS9000
PREMIUM HI-FI Component System
MP3/WMA/CD-DA Playback with CD/USB
user's manual
Imagine the possibilities
Thank you for purchasing this Samsung product.
To receive more complete service,
please register your product at
www.samsung.com/register
Safety Warnings
TO REDUCE THE RISK OF ELECTRIC SHOCK, DO NOT REMOVE THE COVER(OR BACK).
NO USER-SERVICEABLE PARTS ARE INSIDE. REFER SERVICING TO QUALIFIED SERVICE PERSONNEL.
CAUTION
RISK OF ELECTRIC SHOCK
DO NOT OPEN
This symbol indicates “dangerous voltage” inside
the product that presents a risk of electric shock or
personal injury.
WARNING
• T
o reduce the risk of fire or electric shock, do not
expose this appliance to rain or moisture.
CAUTION
• Apparatus shall not be exposed to dripping or splashing
and no objects filled with liquids, such as vases, shall be
placed on the apparatus.
• The Mains plug is used as a disconnect device and shall
stay readily operable at any time.
• Use only a properly grounded plug and receptacle.
- An improper ground may cause electric shock or
equipment damage. (Class l Equipment only.)
• CLASS 3B VISIBLE AND INVISIBLE LASER RADIATION
WHEN OPEN. AVOID EXPOSURE TO THE BEAM (IEC
60825-1)
• THIS PRODUCT UTILIZES A LASER. USE OF
CONTROLS OR ADJUSTMENTS OR PERFORMANCE
OF PROCEDURES OTHER THAN THOSE SPECIFIED
HEREIN MAY RESULT IN HAZARDOUS RADIATION
EXPOSURE. DO NOT OPEN COVER AND DO NOT
REPAIR YOURSELF. REFER SERVICING TO QUALIFIED
PERSONNEL.
CAUTION :
MATCH WIDE BLADE OF PLUG TO WIDE SLOT, FULLY
INSERT.
TO PREVENT ELECTRIC SHOCK,
CLASS 1 LASER PRODUCT
KLASSE 1 LASER PRODUKT
LUOKAN 1 LASER LAITE
KLASS 1 LASER APPARAT
PRODUCTO LÁSER CLASE 1
CLASS 1 LASER PRODUCT
This Compact Disc player is classified as a CLASS 1
LASER product.
Use of controls, adjustments or performance of
procedures other than those specified herein may result in
hazardous radiation exposure.
DANGER :
• Complies with 21CFR 1040.10 except for deviations
pursuant to Laser Notice No. 50, dated June 24, 2007
• VISIBLE AND INVISIBLE LASER RADIATION WHEN
OPEN. AVOID DIRECT EXPOSURE TO BEAM. (FDA 21
CFR)
This symbol indicates important instructions
accompanying the product.
• An administration fee may be charged if either
a. an engineer is called out at your request and there is no defect in the product
(i.e. where you have failed to read this user's manual)
b. you bring the unit to a repair centre and there is no defect in the product
(i.e. where you have failed to read this user's manual).
• The amount of such administration charge will be advised to you before any work or home visit is carried out.
2 English
Important Information on Use
Precautions
• Ensure that the AC power supply in your house complies
with the identification sticker located on the back of your
product.
• Install your product horizontally, on a suitable base (furniture),
with enough space around it for ventilation (7.5~10cm).
• Do not place the product on amplifiers or other equipment
which may become hot. Make sure the ventilation slots are
not covered.
• Do not stack anything on top of the product.
• Before moving the product, ensure the Disc Insert Hole is
empty.
• In order to disconnect the product completely from the
power supply, remove the AC plug from the wall outlet,
especially when left unused for a long period of time.
• During thunderstorms, disconnect the AC plug from the wall
outlet. Voltage peaks due to lightning could damage the
product.
• Do not expose the product to direct sunlight or other heat
sources. This could lead to overheating and malfunction of
the product.
• Protect the product from moisture, and excess heat or
equipment creating strong magnetic or electric fields (i.e.
speakers.).
• Disconnect the power cable from the AC supply if the
product malfunctions. Your product is not intended for
industrial use.
• Use of this product is for personal use only.
• Condensation may occur if your product or disc has been
stored in cold temperatures. If transporting the product
during the winter, wait approximately 2 hours until the
product has reached room temperature before using.
• The batteries used with this product contain chemicals
that are harmful to the environment. Do not dispose of
batteries in the general household trash.
• Maintain an open space of approximately 6 inches (15 cm)
on the sides and rear of the system, for ventilation purposes.
• Place the loudspeakers at a reasonable distance on either
side of the system to ensure good stereo sound.
• Direct the loudspeakers towards the listening area.
Cautions On Handling And Storing Discs
Small scratches on the disc may reduce sound and picture
quality or cause skipping.
Be especially careful not to scratch discs when handling
them.
Holding Discs
• Do not touch the playback side of the disc.
• Hold the disc by the edges so that fingerprints will not get
on the surface.
• Do not stick paper or tape on the disc.
Disc Storage
• Do not keep in direct sunlight.
• Keep in a cool ventilated area.
• Keep in a clean Protection jacket.
Store vertically.
• Do not allow the discs to become contaminated with dirt.
• Do not load cracked or scratched discs.
Handling and Storing Discs
If you get fingerprints or dirt on the disc, clean it with a
mild detergent diluted in water and wipe with a soft cloth.
• When cleaning, wipe gently from the inside to the outside of
the disc
• Condensation may form if warm air comes into contact
with cold parts inside the product. When condensation
forms inside the product, it may not operate correctly. If this
occurs, remove the disc and let the product stand for 1 or
2 hours with the power on.
Disc Types And Disc Format
This product does not support Secure (DRM) Media files.
CD-R Discs
• Some CD-R discs may not be playable depending on
the disc recording device (CD-Recorder or PC) and the
condition of the disc.
• Use a 650MB/74 minute CD-R disc.
Do not use CD-R discs over 700MB/80 minutes as they
may not be played back.
• Some CD-RW (Rewritable) media, may not be playable.
• Only CD-Rs that are properly "closed" can be fully played. If
the session is closed but the disc is left open, you may not
be able to fully play the disc.
CD-R MP3/WMA Discs
• Only CD-R discs with MP3 files in ISO 9660 or Joliet format
can be played.
• MP3 file names should contain no blank spaces or special
characters (. / = +).
• Use discs recorded with a compression/decompression
data rate greater than 128Kbps.
• Only files with the ".mp3" and ".wma" extensions can be
played.
• Only a consecutively written multisession disc can be
played. If there is a blank segment in the Multisession disc,
the disc can be played only up to the blank segment.
• If the disc is not closed, it will take longer to begin playback
and not all of the recorded files may be played.
• For files encoded in Variable Bit Rate (VBR) format, i.e. files
encoded in both low bit rate and high bit rate (e.g., 32Kbps
~ 320Kbps), the sound may skip during playback.
• A maximum of 999 files can be played per CD.
• Supported Audio Formats(Bit Rate):WMA 56~128kbps,
MP3 80~320kbps
English 3
Contents
Contents
Thank you for buying this SAMSUNG Hi-Fi Component system.
Please take time to read these instructions.
They will allow you to operate your system with ease and take full advantage of its features.
Safety Warnings ................................................. 2
Important Information On Use .......................... 3
Precautions .................................................... 3
Cautions On Handling And Storing Discs
...................................................................... 3
Disc Types And Disc Format .......................... 3
Accessories ........................................................ 4
Description ......................................................... 5
Front Panel .................................................... 5
Rear Panel ..................................................... 6
Remote Control ............................................. 7
Installing Batteries In The Remote
Control .................................................... 7
Connecting the Speakers .............................. 8
Attacking the speaker foot ............................. 8
Basic Functions ................................................. 9
Display Function ............................................ 9
Playing CD ..................................................... 9
Loading Compact Disc ............................ 9
CD/MP3/WMA-CD Playback .................. 9
Selecting a Track ................................... 10
Searching a Track/Folder Quickly .......... 10
Searching For Specific Music Passage
on a CD ................................................. 10
Repeat one or All Tracks on the CD....... 10
A-B Repeat Playback ............................ 10
CD Programming ..................................10
Checking or Editing the Programmed
Track ..................................................... 11
Playing USB ................................................. 11
Before You Begin! .................................. 11
To Select a File from USB Device .......... 11
To Use High Speed Search ................... 11
To Delete a File ...................................... 11
To Skip Next 10 Files ............................. 12
Move FOLDER ...................................... 12
How to safely remove the USB device ......
Before Using the USB Storage .............. 12
Bluetooth ..................................................... 12
What is Bluetooth? ................................ 12
To connect the Hi-Fi Component to a
Bluetooth device.................................... 12
To disconnect the Bluetooth device from
Hi-Fi Component ................................... 13
To disconnect Hi-Fi Component from
the Bluetooth device .............................. 13
Using My Karaoke ....................................... 13
10 Skip Function .......................................... 14
Auto Change Function ................................. 14
Listening a Radio ......................................... 14
To Store the Stations You Want ............. 14
Selecting a Stored Station ..................... 14
Advanced Functions ........................................ 15
Timer Function ............................................. 15
Setting the Clock ................................... 15
Setting the Timer ................................... 15
Cancelling the Timer .............................. 16
Recording Function......................................16
Basic Recording .................................... 16
Recording Speed ..................................17
Special Sound Effect....................................17
Selecting EQ Mode ............................... 17
Using the FOOTBALL Mode .................. 17
GIGA SOUND Function ......................... 17
BEAT WAVING Function ........................ 18
DJ BEAT Function .................................18
Booting Sound Function ........................ 18
Troubleshooting ............................................... 19
Specifications ..................................................20
12
Symbols
Accessories
Check for the supplied accessories below.
USB CD/
AH59-02553A
User's Manual
• Figures and illustrations in this User's Manual are provided for reference only and may differ from actual product
appearance.
Remote Control FM Antenna AM Antenna Power Cable FOOT Rubber
4 English
Important Note
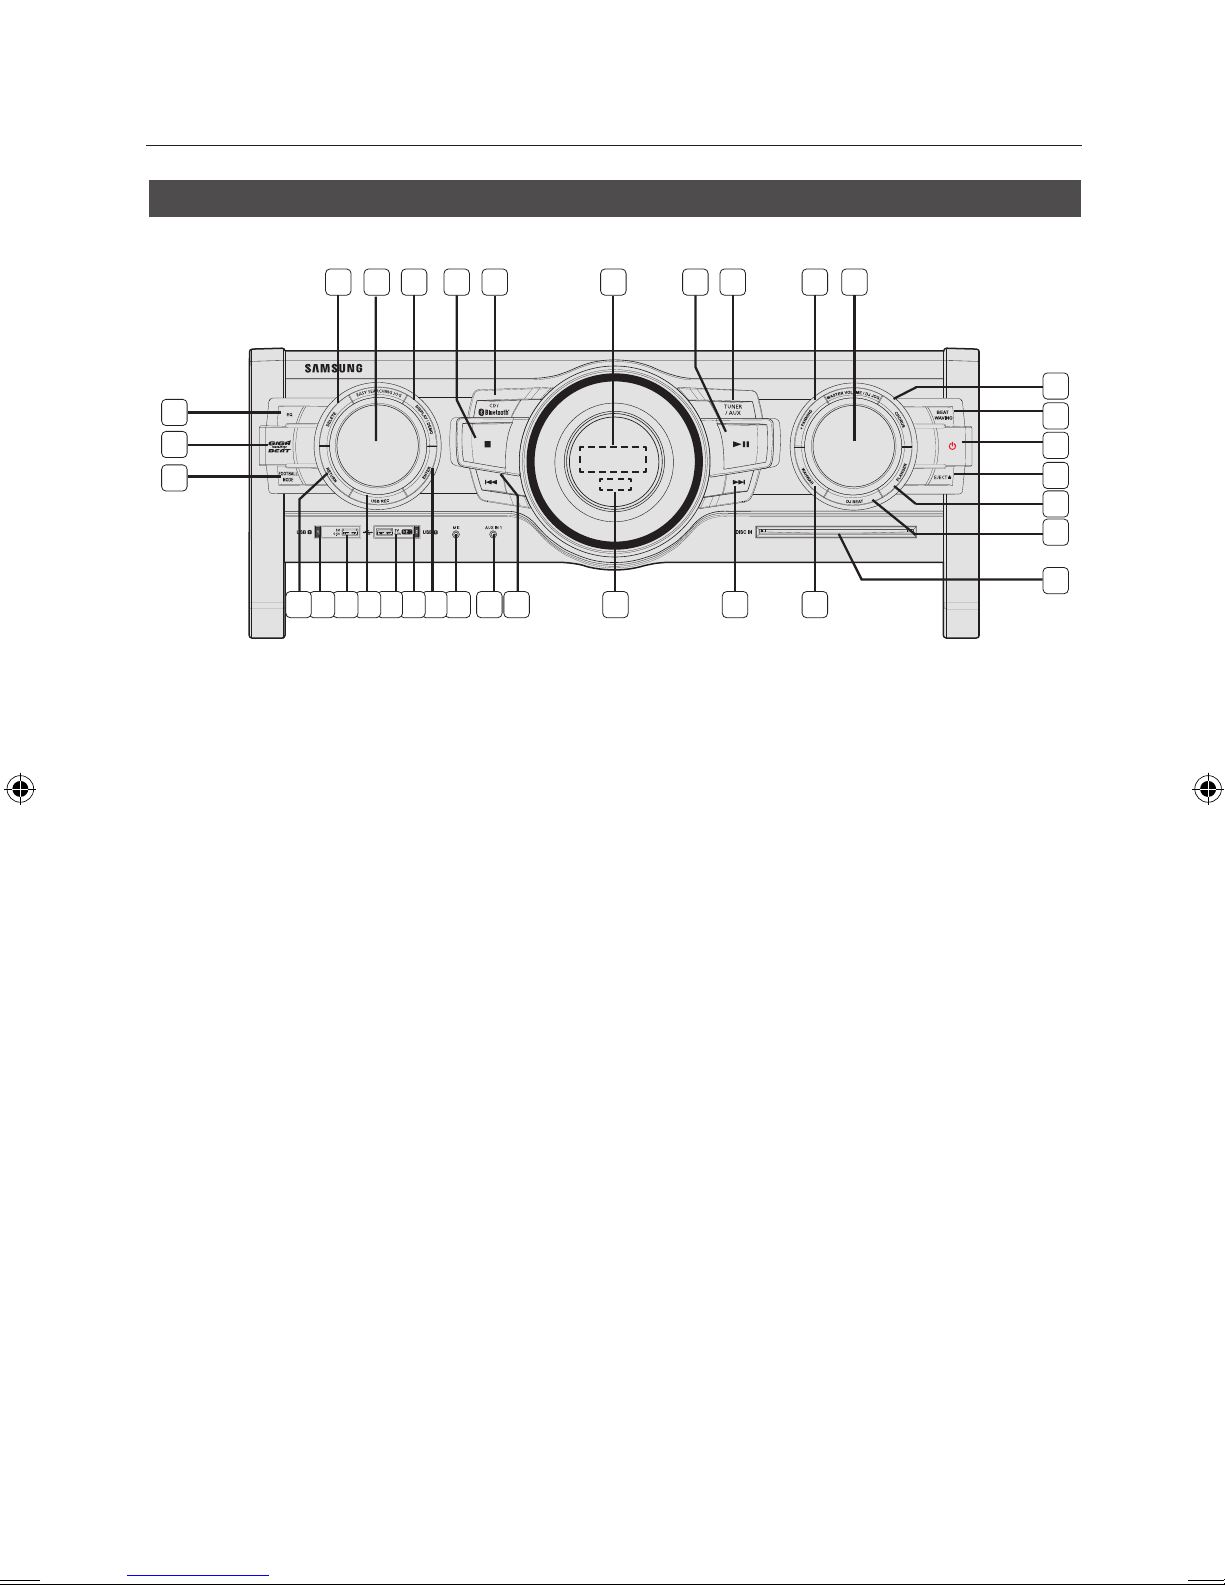
Description
Front Panel
1 2 3 4 5 6 7 8 9
33
32
31
1. DELETE button
2. EASY SEARCHING JOG
3. DISPLAY/ DEMO button
4. STOP button
5. CD/ Bluetooth button
6. Display Panel
7. PLAY/PAUSE button
8. TUNER/AUX button
9. +PANNING button for DJ BEAT sound effect
10. MASTER VOLUME/DJ JOG control
11. CHORUS button for DJ BEAT sound effect
12. BEAT WAVING button
13. POWER button
•Press this button to switch your product on or
off.
14. EJECT button
15. FLANGER button for DJ BEAT sound effect
16. DJ BEAT button
17. DISC slot
18. WAHWAH button for DJ BEAT sound effect
19. FORWARD SEARCH/SKIP button
10
11
12
13
14
15
16
17
18192021222324252627282930
20. REMOTE CONTROL SENSOR
21. BACKWARD SEARCH/SKIP button
22. AUX IN 1 jack
Connecting an external device such as an MP3
player.
• Connect AUX IN 1 on the front panel of the
product to the Audio Out of the external
device/MP3 player.
• Press the TUNER/AUX button to select the
AUX1.
23. MIC jack
24. ENTER button
25. USB 2 SELECT button
26. USB 2 jack for Playing and USB Recording
27. USB REC button
28. USB 1 jack for only Playback
29. USB 1 SELECT button
30. RETURN button
31. FOOTBALL MODE button
32. GIGA SOUND BEAT button
33. EQ button
English 5
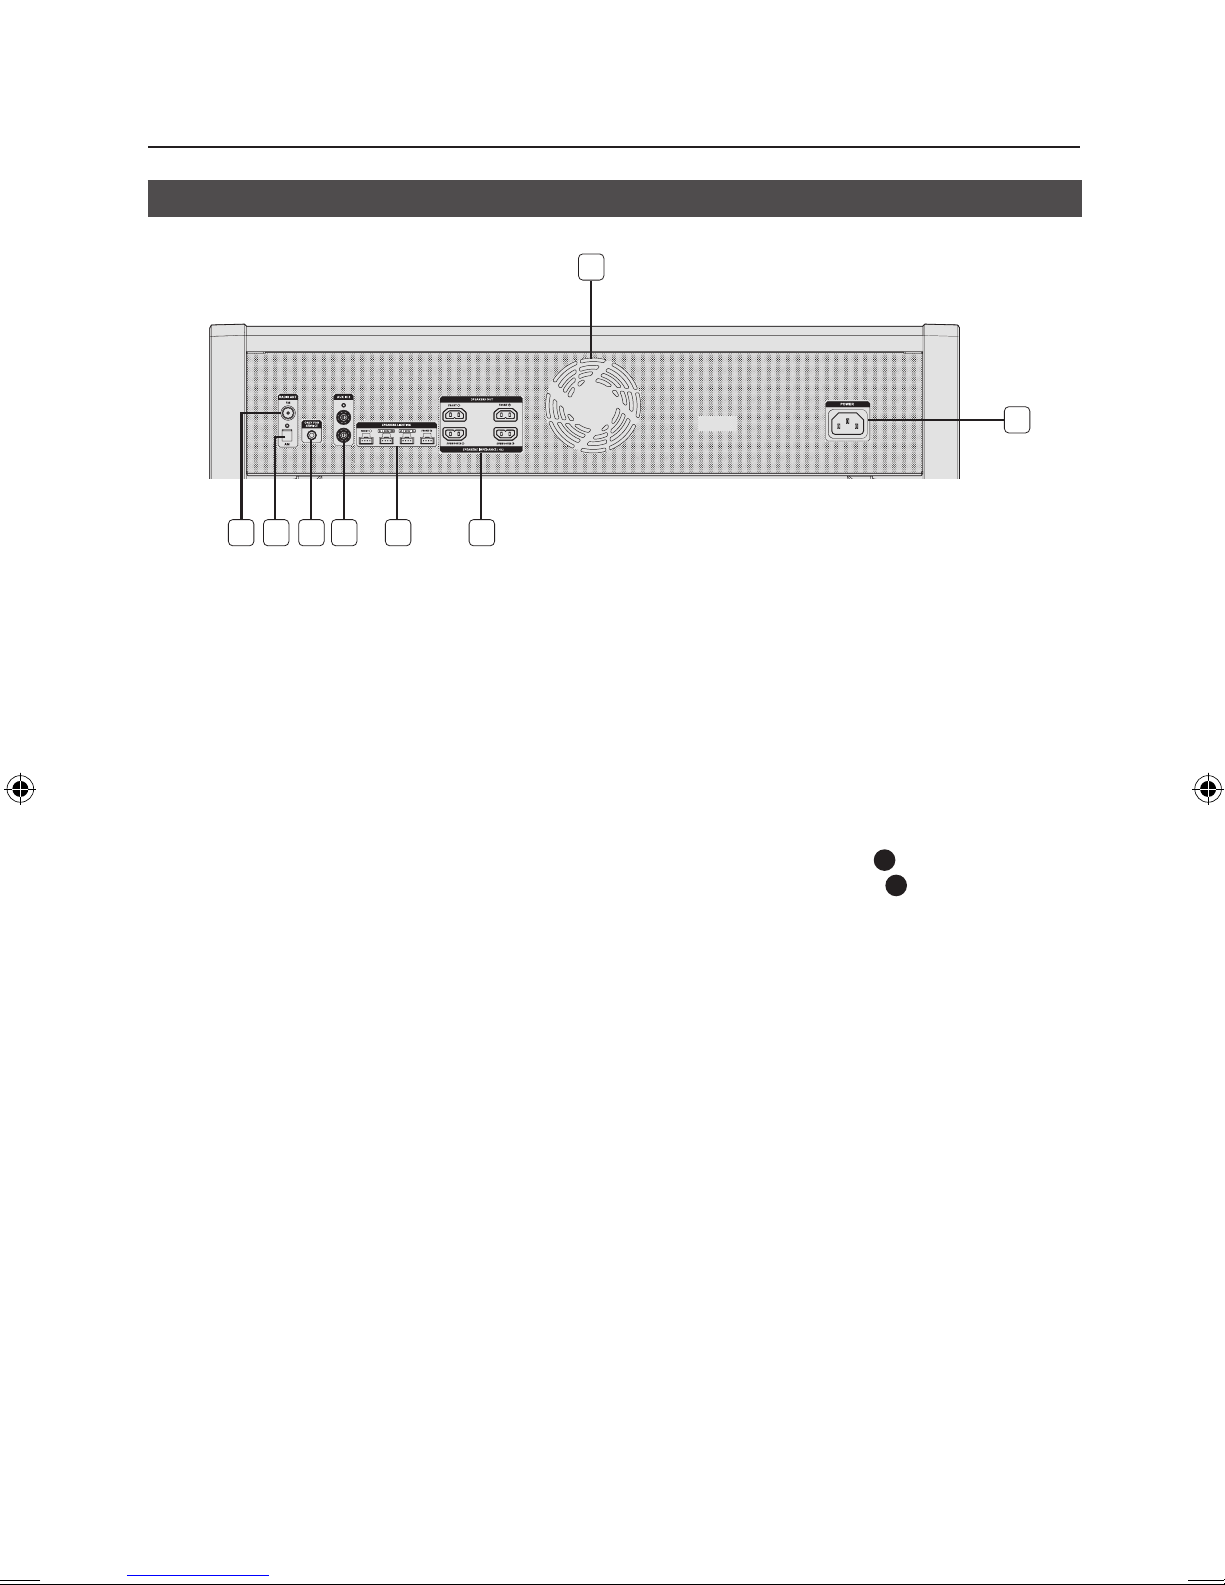
Description
Rear Panel
8
7
65321 4
1. FM Antenna Connector Terminal
Connect the FM antenna to the FM antenna con-
1.
nector terminal.
Slowly move the antenna wire around until you
2.
find a location where reception is good, then fas
ten it to a wall or other rigid surface.
If reception is poor, you may need to install an
3.
outdoor antenna. To do so, connect an outdoor
FM antenna to the FM antenna connector terminal
of the product using a 75Ω coaxial cable (not
supplied).
2. AM Antenna Connector Terminal
1. Plug the connector of the AM antenna into the
AM antenna connector terminal on the rear of the
product.
3. ONLY FOR SERVICE
• This jack is just for testing, please don't use it.
4. AUX IN 2 Terminals
Use the Audio Cable (not supplied) to connect AUX
1.
IN 2 on the product to Audio Out on the external
analog output device.
• Be sure to match connector colors.
• If the external analog output device has only one
Audio Out jack, connect either left or right.
• Press the TUNER/AUX button to select the AUX 2.
• If no button actions for more than 8 hours in AUX
mode, the power will automatically turn off.
5. LED Terminals for Speaker Beat Waving.
6. 2.2 CH Speaker Terminals
The speakers connector terminals are located on the
-
rear of the product.
To achieve the correct sound quality, insert those
1.
speaker connectors to the same color of the speaker
terminals system.
L
• LEFT channel (marked
• RIGHT channel (marked
• Don't plug in the Purple SUBWOOFER connector
to White or Red terminal by force.
, White/Purple).
R
, Red/Purple).
7. POWER
• Please use only provided Power Cable as an
accessory.
8. Cooling fan
• The fan operates while the unit is powered on.
If set to the minimum volume, the fan won't
operate.
Secure a minimum 10 cm of clear space from all
sides of the fan when installing the product.
6 English
Description
Remote Control
1
2
3
4
5
6
7
8
9
10
11
12
13
14
15
16
17
AH59-02553A
USB CD/
30
29
28
27
26
25
24
23
22
21
20
19
18
1. POWER
2. TUNER/AUX
3. USB
4. Number(0~9)
button
During playback, press the
desired track number. The
selected track is played.
5. SKIP(-10, +10)
6. SKIP
7. STOP
8. PLAY
9. REPEAT
10. GIGA
11. ENTER
12. VOLUME(-,+)
13. TUNING MODE
14. TIMER ON/OFF
15. TIMER SET
16. SLEEP
Set a sleep time to shut
off the product.
17. MY KARAOKE
18.
MIC VOLUME -, +
19. USB REC
20. DELETE
21. Mono/Stereo for FM, CD
REC SPEED for CD
Ripping
22. TUNING/ALBUM ,,.
23. EQ
24. AUTO CHANGE
25. REPEAT A-B
26. PAUSE
27. SEARCH
CD/Bluetooth
28.
29. BEAT WAVING
30. MUTE
Turn off the sound
temporarily.
Installing Batteries In The Remote Control
` Place batteries in the remote control so they match the polarity : (+) to (+) and
(–) to (–).
` Always replace both batteries at the same time.
` Do not expose the batteries to heat or a flame.
` The remote control can be used up to
approximately 23 feet (7 meters) in a straight line.
* Battery size: AAA
English 7
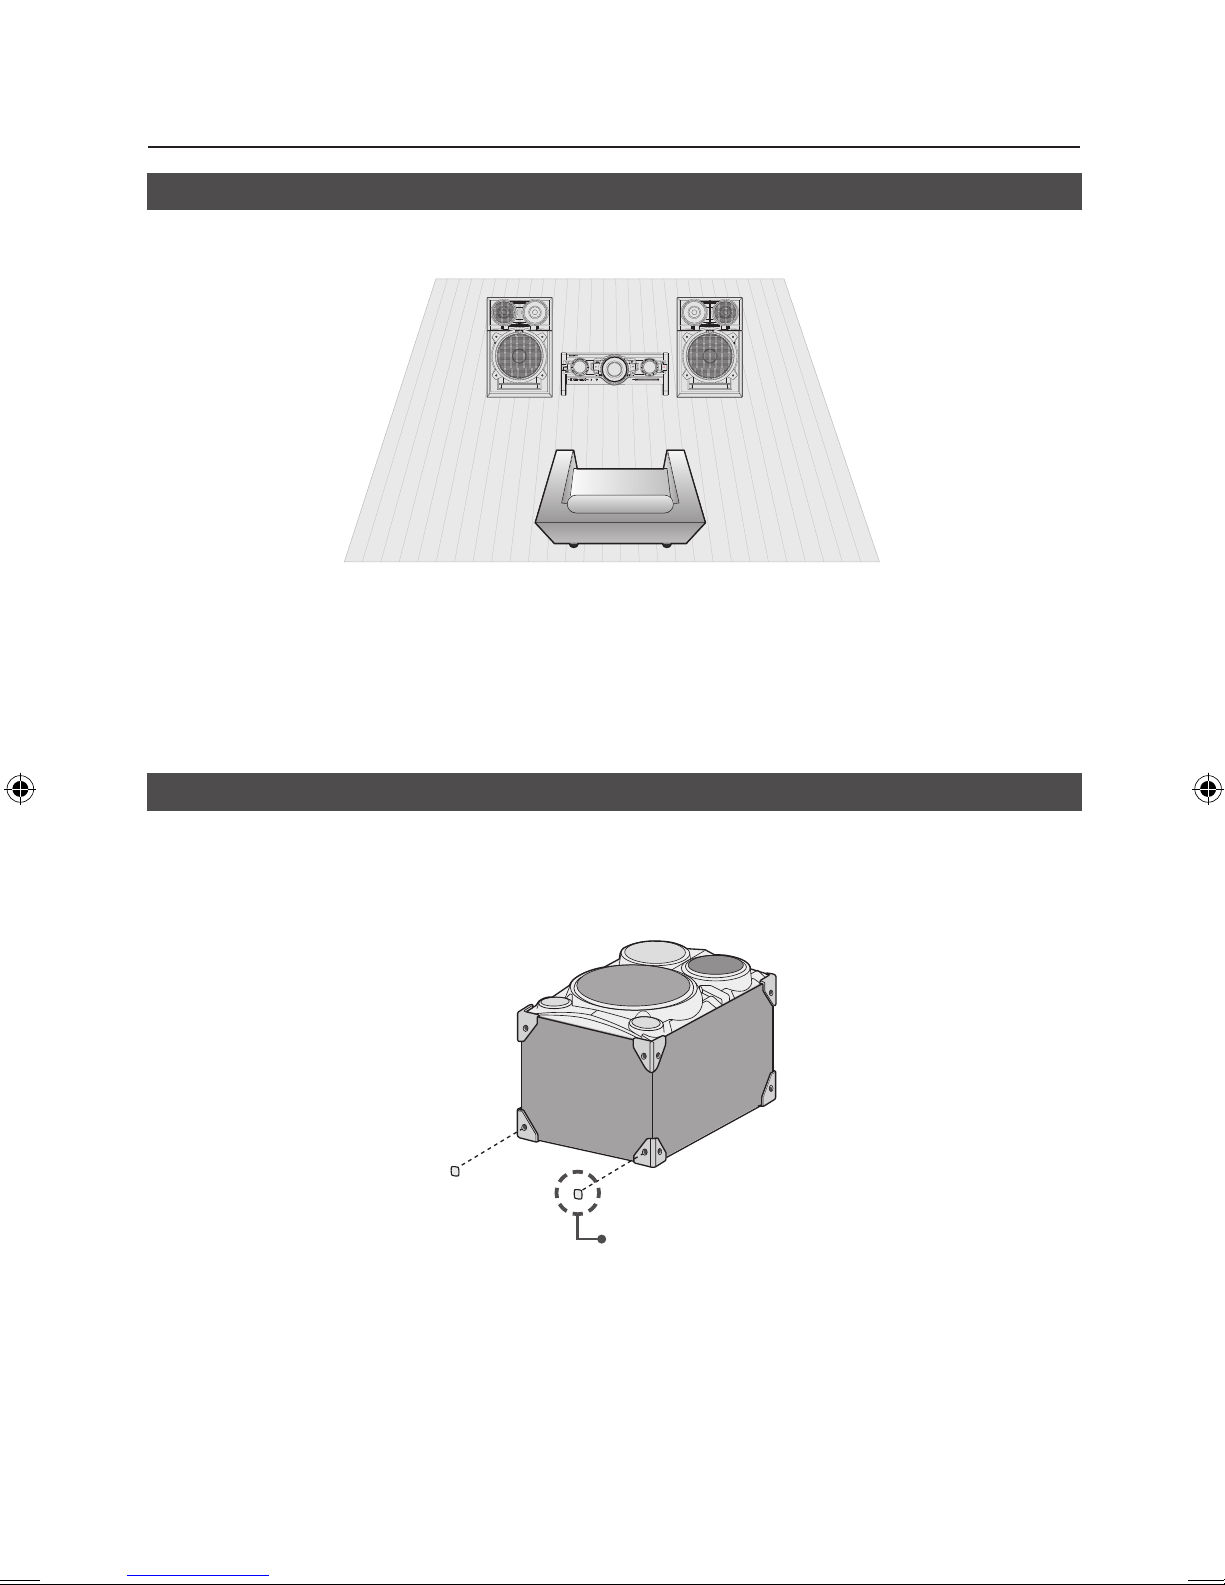
Description
Connecting the Speakers
Recommended speaker setup.
The product may not operate properly if not installed in accordance with recommended speaker
☛
setup, or exposed to shaking or external shocks.
Do not extend wires of the speakers, and do not pressed or peeled off them with a heavy object.
☛
Attaching the speaker foot
Attach the supplied speaker foot at rear corner on the bottom of the speaker to stabilize the speakers
and to prevent them from slipping.
FOOT Rubber
8 English
Basic Functions
Display function
You can view all functions available on the display, adjust the brightness of the display and
select the Display/LED either on or off.
Each time you press the DISPLAY/DEMO button
on the display mode will change as following:
The Dimmer function
◆
The Dimmer function is selected and the display dark-
ens.
LED OFF
◆
The LED is turned off while the dimmer function is work-
ing.
Clock ON
◆
The Clock you set is displayed.
Display/LED ON
◆
All display and LED turned on.
➣
Press DISPLAY/DEMO button for 5 seconds to play
The
DEMO Music function
demo music.
When you press the DISPLAY/DEMO button, the
function operates as follows:
DIMMER
play]
- To cancel the Demo Music mode
• Press the DISPLAY/DEMO button for 5 seconds.
•Press TUNER/AUX, CD/Bluetooth or USB button.
- While playing DEMO Music, all buttons will not work
➝
LED On (unit/speaker)
➝
The current mode is canceled and the product is
turned off.
The current mode is canceled and the mode is
changed to the mode you selected.
except
mentioned above
[Power], VOL, [MUTE] and buttons
LED Off (unit/speaker)
.
➝
--:--
[time dis-
CD/MP3/WMA-CD Playback
This product is designed to play an audio CD, CD-R,
☛
CD-RW, MP3/WMA-CD.
1. Insert a disc gently into the disc slot with the disc's
label facing up.
2. The disc will be played automatically.
• For MP3/WMA-CD audio, it may take several minutes
to complete scanning the disc tracks.
• If you play a file with an English name or a MP3/
WMA-CD medium in an English title, the song title will
be shown in the display. (Other languages besides
English may not be indicated.)
• An English-titled track containing a special character
will not show the title in the display.
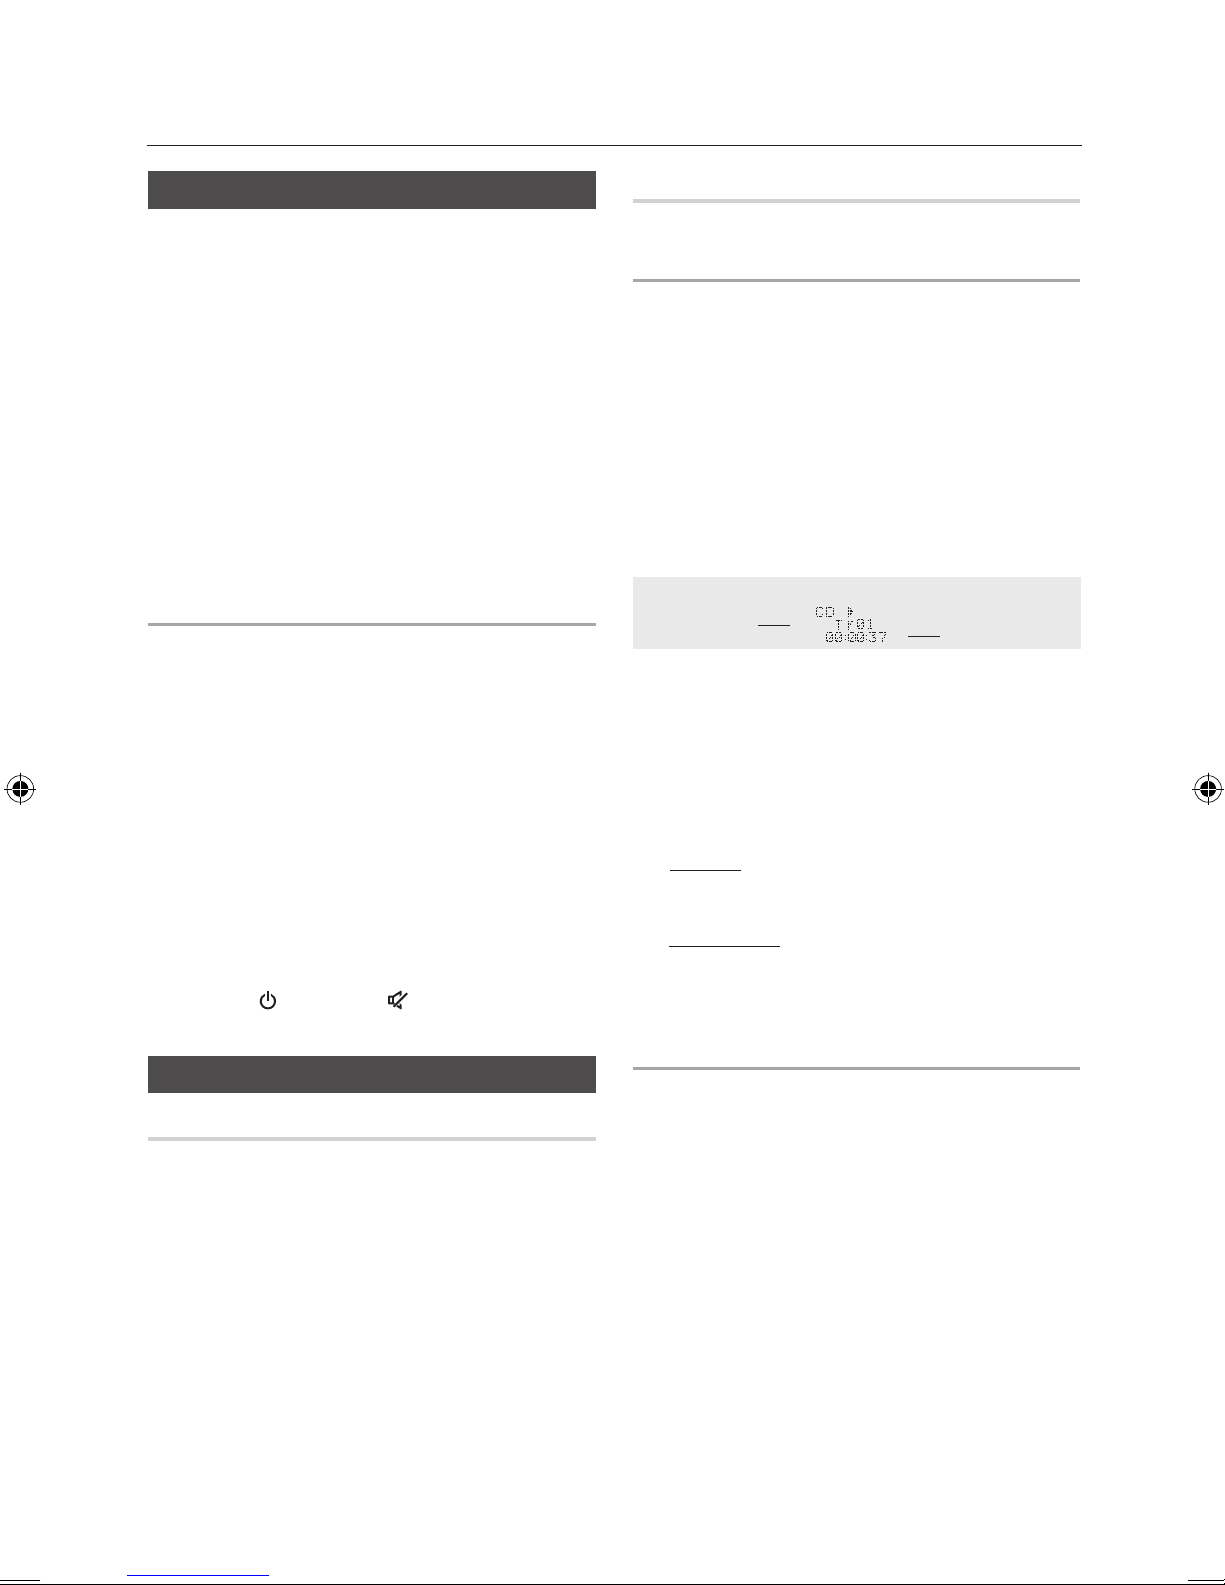
<CD Playback Display>
Track Indicator
3. Adjust the volume according to needs with the
following procedures.
• Turn the VOLUME control on the product.
• Press the VOL + or VOL - button of the remote
control.
The volume level can be adjust in 31 steps(VOLUME
MIN, VOLUME01~ VOLUME 29, and VOLUME MAX).
4. Main Unit
To pause playback temporarily, press the p button.
Press p again to continue playing the disc.
Remote control
To pause playback temporarily, press the PAUSE(#) but
ton.
Press PLAY(+) button to continue playing the disc.
5. To end playing, press the STOP (@) button.
Playtime Indicator
-
Playing CD
Loading Compact Disc
You can play 12 cm compact compact disc that
requires no adapter.
1. Insert a disc gently into the disc slot with the disc's
label facing up and then disc will be played
automatically.
• You can load or unload compact discs when the
radio, USB or auxiliary source function is selected,
and when you press the EJECT button, all of the
other functions will be changed to the CD mode.
• If no buttons are pressed on the product or remote
control for more than 3 minutes when the product is
in Pause mode, it will be changed to Stop mode.
• If no buttons are pressed on the product or remote
control for more than 25 minutes when the product
is in Stop mode, the power will automatically turn off.
• If there is not a CD inserted it is indicated as “NO DISC”.
• The quality of MP3/WMA-CD playback may vary
depending on the condition of the disc containing the
music files or the condition of the recorder with which the
disc was created.
• If different types of files or unnecessary folders are on the
same disc, you will have problems with playback.
Gently insert a CD into the disc slot and do not apply
➣
excessive force.
• Do not put force or place a heavy object on the
product.
• Do not insert an out-of-spec. shape of CD such as a
heart or octangle shaped CD. Otherwise, the product
may be damaged.
• Care must be taken about maintenance of the compact
discs.
English 9
Basic Functions
Selecting a Track
You can select a desired track while the disc is
being played
To play the previous track
Press the [ button within 3 seconds after the current
track started playing.
Press the [ button twice at least 3 seconds after the
current track started playing.
To play the next track
Press the ] button.
To play the current track
Press the [ button 3 seconds later after the current
track started playing.
To play the track of your choice
Press the [ or ] button to move to a desired track.
• You can also
remote control to select a track.
.
use the
number(0~9)
button on the
Searching a Track/Folder Quickly
You can select a track/folder directly without
[
the
CDDA/MP3-CD/WMA-CD
, ] button.
1. Turn the EASY SEARCHING JOG control on the
product to the left or right to select a desired track.
• You can move to the selected track directly.
2. When the searching is done, the track will
automatically start playing.
Searching for a Specific Music Passage on
a CD
When listening to a compact disc, you can quickly
search for a specific music passage on a track.
Forward Search ............................
Backward Search
You can also press and hold the
the product to automatically scan for a track.
.........................
)
(
[, ]
button on
Repeat One or All Tracks on the CD
You can repeat playing CD unlimitedly:
• CD containing a specific track.
• Whole tracks of a CD.
1. Press the REPEAT button on the remote
control.
Each time you press the REPEAT button, the
repeat mode will change as following:
OFF ➝ TRACK ➝ DIR ➝ ALL ➝ RANDOM
MP3:
CD:
OFF ➝ TRACK ➝ ALL ➝ RANDOM
2. When you wish to stop the repeat function,
press the REPEAT button until "OFF" is
displayed.
• OFF: Cancels repeat playback.
• TRACK: Repeatedly plays the selected track.
• DIR(DIRECTORY): Repeatedly plays all tracks in
the selected folder.
• ALL: Repeatedly plays the entire disc.
• RANDOM: Plays tracks in random order.
A-B Repeat Playback
You can repeatedly play back a designated
section of a CD.
1. Press the REPEAT A-B button at the beginning
of desired part.
• 'RPT A' will be displayed.
2. Press the REPEAT A-B button at the ending of
desired part.
• 'RPT AB' will be displayed.
3. To cancel REPEAT A-B function, press the
REPEAT A-B button again.
• 'OFF' will be displayed.
REPEAT A-B function is available within a track.
➣
CD Programming
This function is not available during playback of an
MP3/WMA-CD.
• You can program the playback order of up to 24
tracks of your choice.
• However, you must stop playing the CD before
selecting tracks.
1. While in CD playback mode, press the
STOP(@) button to stop playing the CD.
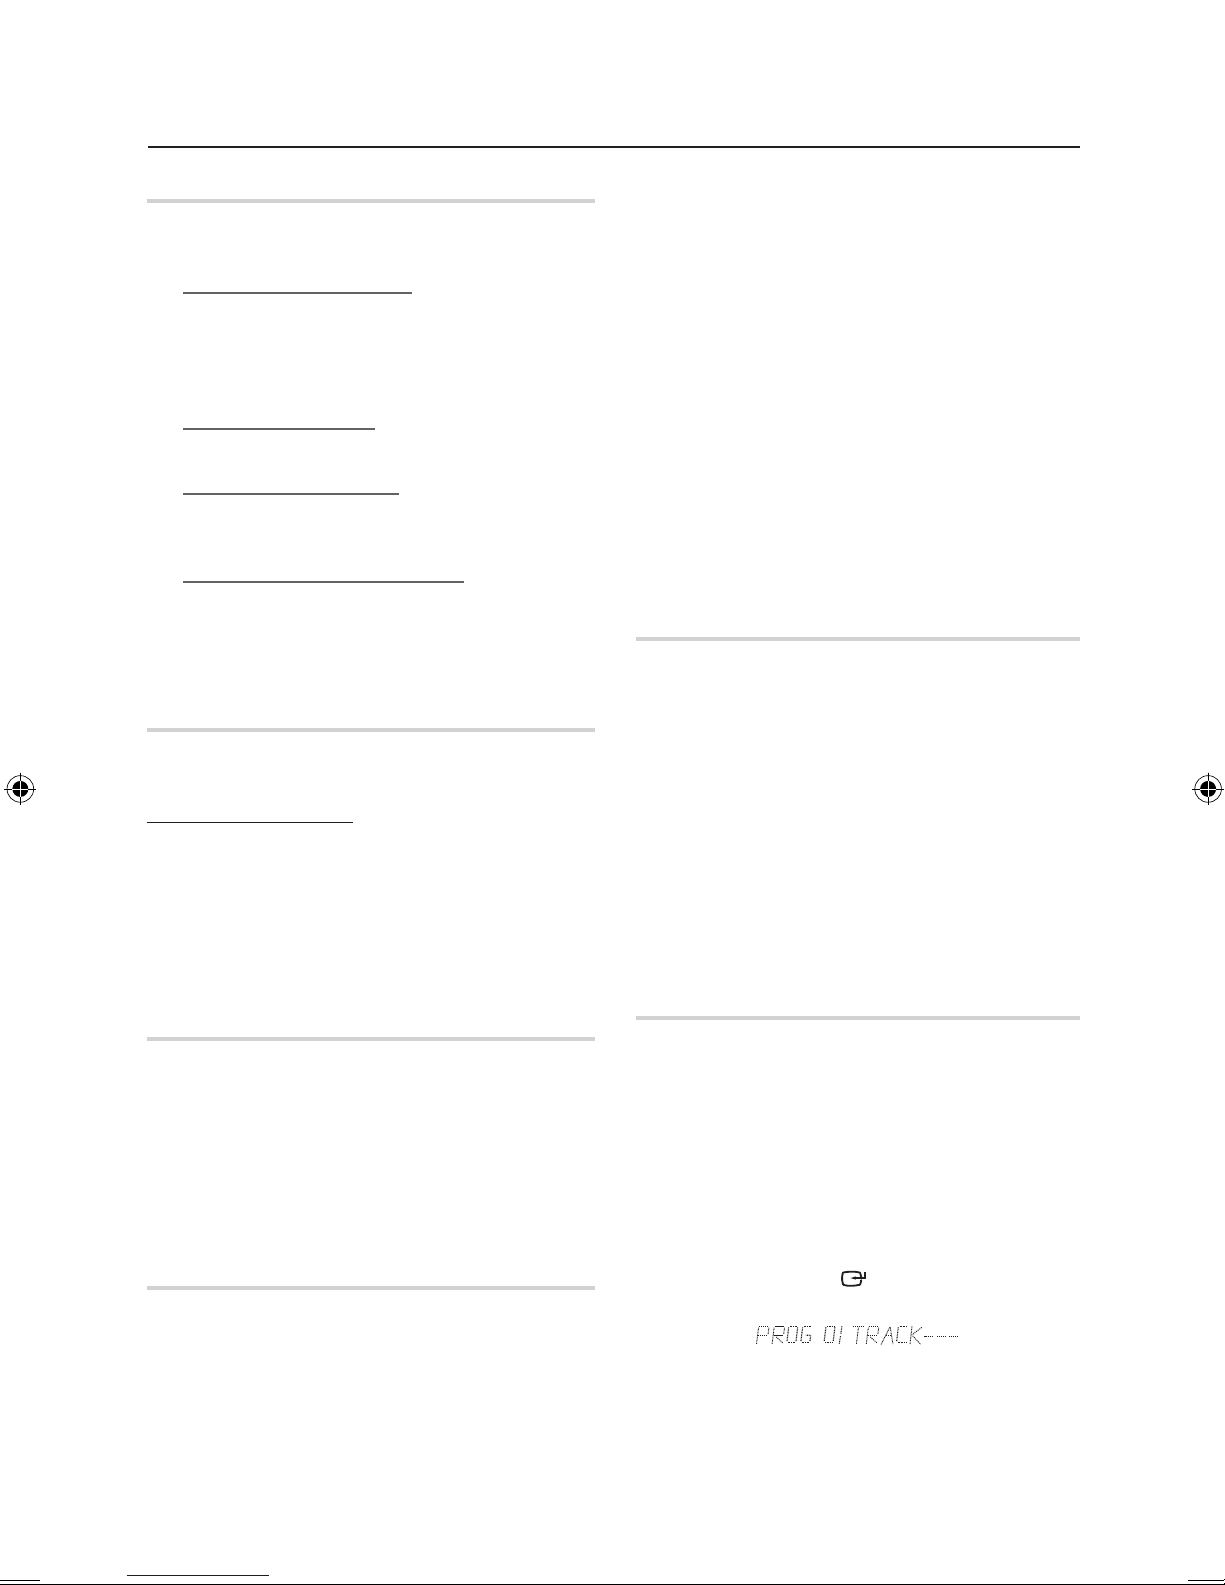
2. Press the ENTER
message below:
(01= program number, ---= track number)
( )
button to display the
10 English

Basic functions
3. Use the [ or ] button to move to a desired
track.
• Press
• Press
4. Press the ENTER
[
to move to the previous track.
]
to move to the next track.
( )
button to confirm your
selection, the selection is stored and
is displayed.
5. To select a different track, following the steps 3
to 4 above.
6. Press the
PLAY (+) button
to play the
programmed tracks.
7. Press the STOP(
@
) button to stop playing the
programmed tracks, Press the STOP (@) button
again to cancel playing the programmed tracks.
• If you eject the disc or turn off the product
or change other function mode,
your
programming will be canceled.
Checking or Editing the Programmed
Track
You can check a list of programmed tracks and
edit them as you want.
1. If a programmed track is being played, press
the STOP(@) button once.
2. Press the ENTER
the message below:
(01= program number, 002= track number)
3. Repeat pressing the ENTER
the desired track is displayed.
4. Press the
[
track.
( )
button twice to display
( )
button until
or ] button to select a different
2. Select the USB mode by pressing the USB 1 or USB 2
button on the product or the USB button on the remote
control.
3. The first file of the first directory plays automatically
4. To stop playing
Press the STOP ( @
To remove the USB device
➣
) button to stop playing.
.
If you press the STOP ( @ ) button once
again, you can remove the USB device safely.
☛ Do not connect a USB recharger to the USB
port of this product. Otherwise, the product may
be damaged.
To Select a File from USB Device
You can select an MP3 file during the play.
If you want to move the next/previous(file), press the
➣
[,] buttons shortly.
• It moves the next/previous file within the directory.
• If you press the
number of the files in the directory, it will move over to
the next directory.
To repeat
1. Press the REPEAT button.
Each time you press the REPEAT button, the repeat
mode will change as following:
OFF ➝ TRACK ➝ DIR ➝ ALL ➝ RANDOM
2. When you wish to stop the repeat function, press the
REPEAT button until "OFF" is displayed.
• OFF: Cancels repeat playback.
• TRACK: Repeatedly plays the selected file.
• DIR(DIRECTORY): Repeatedly plays all files in the
selected folder.
• ALL: Repeatedly plays all files.
• RANDOM: Plays files in random order.
To Use High Speed Search
[,] buttons more times than the
5. Press the ENTER
( )
button to confirm your
selection.
6. To play the programmed tracks, press the Play
(
+
) button.
Playing USB
Connect an external storage device such as USB
flash memory or external HDD (Hard Disk Drive) to
the product. You can play files in MP3/WMA format.
Before you begin!
1. Connect the external USB storage device to your
product.
You can search the desired section quickly during
the play.
1. Press the (,) button.
• Each time you press the button, you will move
forward/backward fast.
The sound will not output in high speed search.
☛
To Delete a File
You can delete a file in your USB device.
Select a file you want to delete.
1.
Press the DELETE button.
2.
Press [,] buttons on the product and remote control
3.
to select YES.
• To canc
el the selection, press the RETURN button on
the product.
English 11

Basic Functions
Press the ENTER button on the remote control.
4.
The selected file will be deleted.
The NTFS file system is not supported.
☛
To Skip Next 10 Files
1. Press the +10 or -10 button while in playback mode.
This will skip the files as many as 10 or -10 from the
current file.
Move FOLDER
Press the remote control's TUNING/ALBUM ,,. button
to move from the back folder to the front folder.
How to safely remove the USB device
1. Press the (
press the
2. If a REMOVE message appears on screen, remove the
USB device.
Before Using the USB Storage
• Some USB devices may not work properly with this
product.
• This product supports only an external HDD that is
formatted in FAT file system.
• USB 2.0 HDD should be connected to a separate power
source. Otherwise, the USB 2.0 HDD will not work at all.
• If an USB external storage is connected to multiple devices,
only the MP3 files in the first HDD will be played.
• DRM-applied files are not supported. Digital Right
Management: This will restrict unauthorized access to a
DRM file so that the copyright of the file is protected from
piracy.
• Even if the extension of the file is .mp3, the file cannot be
played if it is formatted in MPEG layer 1 or 2.
• Do not use an unrecognized USB hub.
• Only the first 15 characters of a MP3/WMA file are
displayed.
• Only removable HDDs with less than 160GB are supported.
Depending on the device, a 160GB- or more removable
HDD may not be supported.
• It will take several minutes to recognize the files in the
selected USB device.
• The USB device (USB HDD, in particular) may cause a
delay to move to the next file.
• The USB storage supporting only USB VER1.1 may perform
a slow access or may not recognize the file properties.
• The maximum current supported by an external USB
device via each USB port is 0.5A (based on DC 5V).
• If there is no USB connection or STOP mode lasts for
more than 25 minutes, the product will automatically
turn off.
@
) button twice while the USB is playing and
(@) button once when it is at a block state.
Bluetooth
You can use a Bluetooth device to enjoy music with
high quality stereo sound, all without wires!
What is Bluetooth?
Bluetooth is a technology that enables Bluetooth
compliant devices to interconnect easily with each
other using a short wireless connection.
• A Bluetooth device may cause noise or malfunction,
depending on usage, when:
- A part of your body is in contact with the receiving/
transmitting system of the Bluetooth device or the Hi-Fi
Component.
- It is subject to electrical variation from obstructions caused
by a wall, corner, or office partitioning.
- It is exposed to electrical interference from same frequencyband devices including medical equipment, microwave
ovens, and wireless LANs.
• Pair the Hi-Fi Component with the Bluetooth device while
they are close together.
• The further the distance is between Hi-Fi Component and
Bluetooth device, the worse the quality is. If the distance
exceeds the Bluetooth operational range, the connection is
lost.
• In poor reception-sensitivity areas, the Bluetooth connection
may not work properly.
• The Bluetooth connection only works when it is close to
the set. The connection will be automatically cut off if the
distance is out of this range. Even within this range, the
sound quality may be degraded by obstacles such as walls
or doors.
• This wireless device may cause electric interference during
its operation.
To connect the Hi-Fi Component to a
Bluetooth device
Check if the Bluetooth device supports the Bluetooth compliant stereo headset function.
Press the CD/Bluetooth button of the Hi-Fi Component
1.
to display the BLUETOOTH message.
• You will see WAIT for a while and then READY on the
front display of the Hi-Fi Component.
Select the Bluetooth menu on the Bluetooth device you
2.
want to connect. (Refer to the Bluetooth device's user
manual.)
Select the Stereo headset menu on the Bluetooth device.
3.
• You will see a list of scanned devices.
Select "[Samsung] HI-FI XXXXXX" from the list.
4.
• When the Component is connected to the Bluetooth
device,it will display CONNECTED ➞ BLUETOOTH
on the front display.
12 English

Basic functions
• If the Bluetooth device has failed pair with the
Component, delete the previous “[Samsung] HI-FI
XXXXXX” found by the Bluetooth device and make it
search for the component again.
Play music on the connected device.
5.
• You can listen to the music playing on the connected
Bluetooth device over the Hi-Fi Component system.
• In
Bluetooth
Next/Back functions are not available.
The product only supports Middle Quality SBC data (up
➣
to 237kbps@48kHz), and does not support High Quality
SBC data (328kbps@44.1kHz).
• The AVRCP feature is not supported.
• Connect only to a Bluetooth device that supports the
A2DP (AV) function.
• You cannot connect to a Bluetooth device that
supports only the HF (Hands Free) function.
• Only one Bluetooth device can be paired at a time.
• Once you have turned off Hi-Fi Component and the
pairing is disconnected, the pairing will not be restored
automatically. To reconnect, you must pair the device
again.
• Search or connection may not be performed properly
by Hi-Fi Component in the following cases.
- If there is a strong electrical field around Hi-Fi
Component.
- If several Bluetooth devices are simultaneously paired
with Hi-Fi Component.
- If the Bluetooth device is turned off, not in place, or
malfunctions.
- Note that such devices as microwave ovens, wireless
LAN adaptors, fluorescent lights, and gas stoves use
the same frequency range as the Bluetooth device,
which can cause electric interference.
mode, some model's Play/Repeat/Stop/
To disconnect the Bluetooth device from
Hi-Fi Component
You can disconnect the Bluetooth device from HiFi Component. For instructions, see the Bluetooth
device's user manual.
• Hi-Fi Component will be disconnected.
• When Hi-Fi Component is disconnected from the Bluetooth
device, Hi-Fi Component will display DISCONNECTED ➞
READY on the front display.
To disconnect Hi-Fi Component from
the Bluetooth device
Press the CD/Bluetooth button on the front panel
of Hi-Fi Component to switch from Bluetooth mode
to another mode or turn off Hi-Fi Component.
• The connected Bluetooth device will wait a certain time for
a response from Hi-Fi Component before terminating the
connection.(Disconnection time may differ, depending on
the Bluetooth device)
• The currently connected device will be disconnected.
In Bluetooth connection mode, the Bluetooth connection
➣
will be lost if the distance between the Hi-Fi Component
and the Bluetooth device exceeds (5 meters).
• If the Bluetooth device comes back into the effective
range and then again connect after disconnecting, you
can restart to restore the pairing with the Bluetooth
device.
• Hi-Fi Component automatically turns off after 25
minutes in the Ready state.
Using My Karaoke
You can use MY Karaoke function to sing along
with your favorite CDs and USB.
1. Connect the microphone to the MIC jack on the front
of the product.
` If your microphone jack is larger than 3.5 (ø) MIC
jack, you need a Connector-Adaptor(optional) to
complete the connection.
` First, connect the Connector-Adaptor to the MIC jack on
the front of the product,
` Second, connect the microphone (with larger jack) to
the Connector-Adaptor.
2. Press the MIC VOL-, + button on the remote
control to adjust the volume of the microphone.
3. Press the
control
the button is pressed, the selection is changed as
follows:
MY KARAOKE ON ➞ MY KARAOKE OFF
` If you hear strange noises (squealing or howling)
while using the Karaoke feature, move the
microphone away from the speakers. Turning down
the microphone's volume or the speaker volume is
also effective. Do not set the MICROPHONE towards
the SPEAKER.
` The microphone does not operate in the AUX and
TUNER mode.
` If you connect with the Microphone, GIGA SOUND
will automatically turn off. Even if you remove the
microphone, it will not turn on.
MY KARAOKE
to suppress the vocal if you need. Each time
button on the remote
English 13
 Loading...