

Samsung MIM-H02 User & Installation Manual
CAC WiFi Kit APP_03384A(1).indd 36 2012-10-12 오후 3:37:16
Smart A/C application
MIM-H02
Air Conditioner
user & installation manual
imagine the possibilities
E
DB68-03384A(1)
CAC WiFi Kit APP_03384A(1).indd 37 2012-10-12 오후 3:37:16

2
Contents
Safety precautions . . .. .. . .. .. . . . .. . . . .. .. . .. .. . . . .. .. . .. .. . .. .. . . . .. .. . .. .. . .. .. . . . .. .. . .. .. . .. .. . . . .. .. . .. .. . .. .. 3
Check before installing Wi-Fi kit .. . .. .. . . . .. .. . .. .. . . . .. .. . .. .. . .. .. . . . .. .. . .. .. . .. .. . . . .. .. . .. .. . .. .. . . . .. .. . .. .. . 4
Parts. .. . .. .. . .. . . . .. . . . .. . . . .. . . . .. . . . .. . . . .. . .. .. . .. .. . .. .. . .. .. . .. . . . .. . . . .. . . . .. . . . .. . . . .. . .. .. . .. .. . .. .. . .. .. . .. . . . . 4
Exterior dimension. .. . .. .. . .. .. . .. . . . .. . . . .. . . . .. . . . .. . . . .. . .. .. . .. .. . .. .. . .. .. . .. . . . .. . . . .. . . . .. . . . .. . . . .. . .. .. . .. .. . .. 4
How to install Wi-Fi kit . .. .. . .. .. . . . .. .. . .. .. . . . .. .. . .. .. . .. .. . . . .. .. . .. .. . .. .. . . . .. .. . .. .. . .. .. . . . .. .. . .. .. . .. .. . . . 5
Wi-Fi kit installation. . . .. . . . .. . . . .. . . . .. . . . .. . . . .. . .. .. . .. .. . .. .. . .. .. . .. . . . .. . . . .. . . . .. . . . .. . . . .. . . . .. . .. .. . .. .. . .. .. . .. 5
The procedure of setting option. . . . .. . . . .. . . . .. . . . .. . . . .. . .. .. . .. .. . .. .. . .. .. . .. . . . .. . . . .. . . . .. . . . .. . . . .. . .. .. . .. .. . .. . 10
Installing network . .. . .. .. . . . .. .. . .. .. . .. .. . . . .. .. . .. .. . . . .. . . . .. .. . .. .. . . . .. .. . .. .. . .. .. . . . .. .. . .. .. . .. .. . . . .. .. 12
Checking before using a wireless router . .. . .. .. . . . .. .. . .. .. . .. .. . . . .. .. . .. .. . . . .. . . . .. .. . .. .. . . . .. .. . .. .. . .. .. . . . 12
Connecting network . .. . . . .. .. . .. .. . .. .. . . . .. .. . .. .. . . . .. . . . .. .. . .. .. . . . .. .. . .. .. . .. .. . . . .. .. . .. .. . .. .. . . . .. .. . . 12
Connecting the wireless IP router with an air conditioner. . . . .. . . . .. . . . .. . . . .. . .. .. . .. .. . .. .. . .. .. . .. . . . .. . . . .. . . . .. . . . . 12
Checking the Wi-Fi kit. . .. .. . .. .. . .. .. . .. . . . .. . . . .. . . . .. . . . .. . . . .. . . . .. . .. .. . .. .. . .. .. . .. .. . .. . . . .. . . . .. . . . .. . . . .. . . . .. . 13
Checking network . .. . .. .. . .. .. . .. . . . .. . . . .. . . . .. . . . .. . . . .. . .. .. . .. .. . .. .. . .. .. . .. . . . .. . . . .. . . . .. . . . .. . . . .. . . . .. . .. .. . . 14
Connecting the wireless router with an air conditioner by the network (Select one of the 2 methods) .. . . . .. . . . .. . . . .. . . 15
Registering service . .. . .. .. . . . .. . . . .. .. . .. .. . . . .. .. . .. .. . .. .. . . . .. .. . .. .. . .. .. . . . .. .. . .. .. . .. .. . . . .. .. . .. .. . .. .. . 19
Registering an air conditioner. . . .. . . . .. . . . .. . .. .. . .. .. . .. .. . .. .. . .. . . . .. . . . .. . . . .. . . . .. . . . .. . .. .. . .. .. . .. .. . .. .. . .. .. . . 19
Operating Smart A/C application .. .. . .. .. . .. .. . . . .. .. . .. .. . . . .. . . . .. .. . .. .. . . . .. .. . .. .. . .. .. . . . .. .. . .. .. . .. .. . . . 22
Home screen . . . .. . . . .. . . . .. . .. .. . .. .. . .. .. . .. .. . .. . . . .. . . . .. . . . .. . . . .. . . . .. . .. .. . .. .. . .. .. . .. .. . .. . . . .. . . . .. . . . .. . . . .. 22
Accessing In-home . . . . . .. . .. .. . .. .. . .. .. . .. .. . .. . . . .. . . . .. . . . .. . . . .. . . . .. . .. .. . .. .. . .. .. . .. .. . .. . . . .. . . . .. . . . .. . . . .. . . 22
Controlling an air conditioner . . . . . . . . . . . . . . . . . . . . . . . . . . . . . . . . . . . . . . . . . . . . . . . . . . . . . . . . . . . . . . . . . . . . . . . . . . . . . . . . . . . . . . . . . . 23
Setting additional functions of the air conditioner. . .. . .. .. . .. .. . .. .. . .. .. . .. . . . .. . . . .. . . . .. . . . .. . . . .. . .. .. . .. .. . .. .. . .. 24
Setting timer function . . .. .. . .. .. . .. . . . .. . . . .. . . . .. . . . .. . . . .. . . . .. . .. .. . .. .. . .. .. . .. .. . .. . . . .. . . . .. . . . .. . . . .. . . . .. . .. .. 24
Setting air conditioner information. . . . .. . . . .. . . . .. . . . .. . . . .. . .. .. . .. .. . .. .. . .. .. . .. . . . .. . . . .. . . . .. . . . .. . . . .. . .. .. . .. .. . 25
Accessing Out-of-home. .. . .. .. . .. .. . .. .. . .. . . . .. . . . .. . . . .. . . . .. . . . .. . .. .. . .. .. . .. .. . .. .. . .. .. . .. . . . .. . . . .. . . . .. . . . .. . . 26
Trouble shooting . . .. . .. .. . . . .. . . . .. .. . .. .. . . . .. .. . .. .. . .. .. . . . .. .. . .. .. . .. .. . . . .. .. . .. .. . .. .. . . . .. .. . .. .. . .. .. . . 27
Open Source Announcement . . . . . .. .. . .. .. . .. .. . . . .. .. . .. .. . .. .. . . . .. .. . .. .. . .. .. . . . .. .. . .. .. . . . .. . . . .. .. . .. .. . . 28
Reference . . .. .. . .. .. . . . .. .. . .. .. . .. .. . . . .. .. . .. .. . . . .. .. . .. .. . .. .. . . . .. .. . .. .. . .. .. . . . .. .. . .. .. . .. .. . . . .. .. . .. .. 35
CAC WiFi Kit APP_03384A(1).indd 2 2012-10-12 오후 3:37:08
3
Safety precautions
This installation manual explains how to install Wi-Fi kit that connects to indoor unit of Samsung system air conditioner.
Read the installation manual thoroughly before installing the Wi-Fi kit.
(Refer to the appropriate manual for installing product or other optional parts.)
WARNING
Hazards or unsafe practices that may result in severe personal injury or death.
CAUTION
Hazards or unsafe practices that may result in minor personal injury or property damage.
WARNING
f Contact service center for installation.
- There is a risk of product malfunction, water leakage, electric shock or fire.
f Install the Wi-Fi kit firmly on the place that can withstand the weight of the product.
- If the installation location is not strong enough, remote controller may fall and get damaged.
f Connect the power with rated voltage when installing.
- If not, there is risk of fire or damage to the Wi-Fi kit.
f Do not attempt to move or re-install the Wi-Fi kit that is already installed.
- There is risk of electric shock and fire.
f Do not attempt to modify or repair the Wi-Fi kit on your own.
- There is potential risk of product damage, electric shock or fire. When repair is needed, consult service center.
f Check if the installation was done properly according to the installation manual.
- If the Wi-Fi kit is installed incorrectly, there is risk of electric shock or fire.
f Make sure that all wiring work is done by qualified person complying regional standards and instructions in this manual.
- If the installation is done by unqualified person, there is risk of product malfunction, electric shock or fire caused by
incorrect installation.
f Contact the service center if you need to dispose the Wi-Fi kit.
CAUTION
f Do not install the product in a place where it is or might be exposed to inflammable gas leakage.
- There is risk of fire or explosion.
f Do not install the product in a place where it will be exposed to oil or vapor etc.
- If the product is used in a place where it is exposed to oil, vapor or sulphur dioxide, parts of the product may get
damaged or product may function abnormally.
f Make sure that water does not get into the Wi-Fi kit.
- There is risk of electric shock and fire.
f Make sure there is no tension to the cable during installation.
- Cable may get cut and cause fire.
f Install the product in a place with temperature between 0°C~39°C with no direct sunlight.
- If not, there is risk of electric shock or abnormal operation.
f Do not install the product in a place where special spray or acid/alkali solution is used.
- There is risk of electric shock or abnormal operation.
f Do not press the button with sharp object.
- There is risk of electric shock or damaging the parts.
f Do not connect the power cable to the communication cable terminal.
- There is risk of fire.
f When installing the product in hospitals or other places, make sure that the product does not interrupt with other
products.
- Abnormal operation may occur.
CAC WiFi Kit APP_03384A(1).indd 3 2012-10-12 오후 3:37:08
4
Check before installing Wi-Fi kit
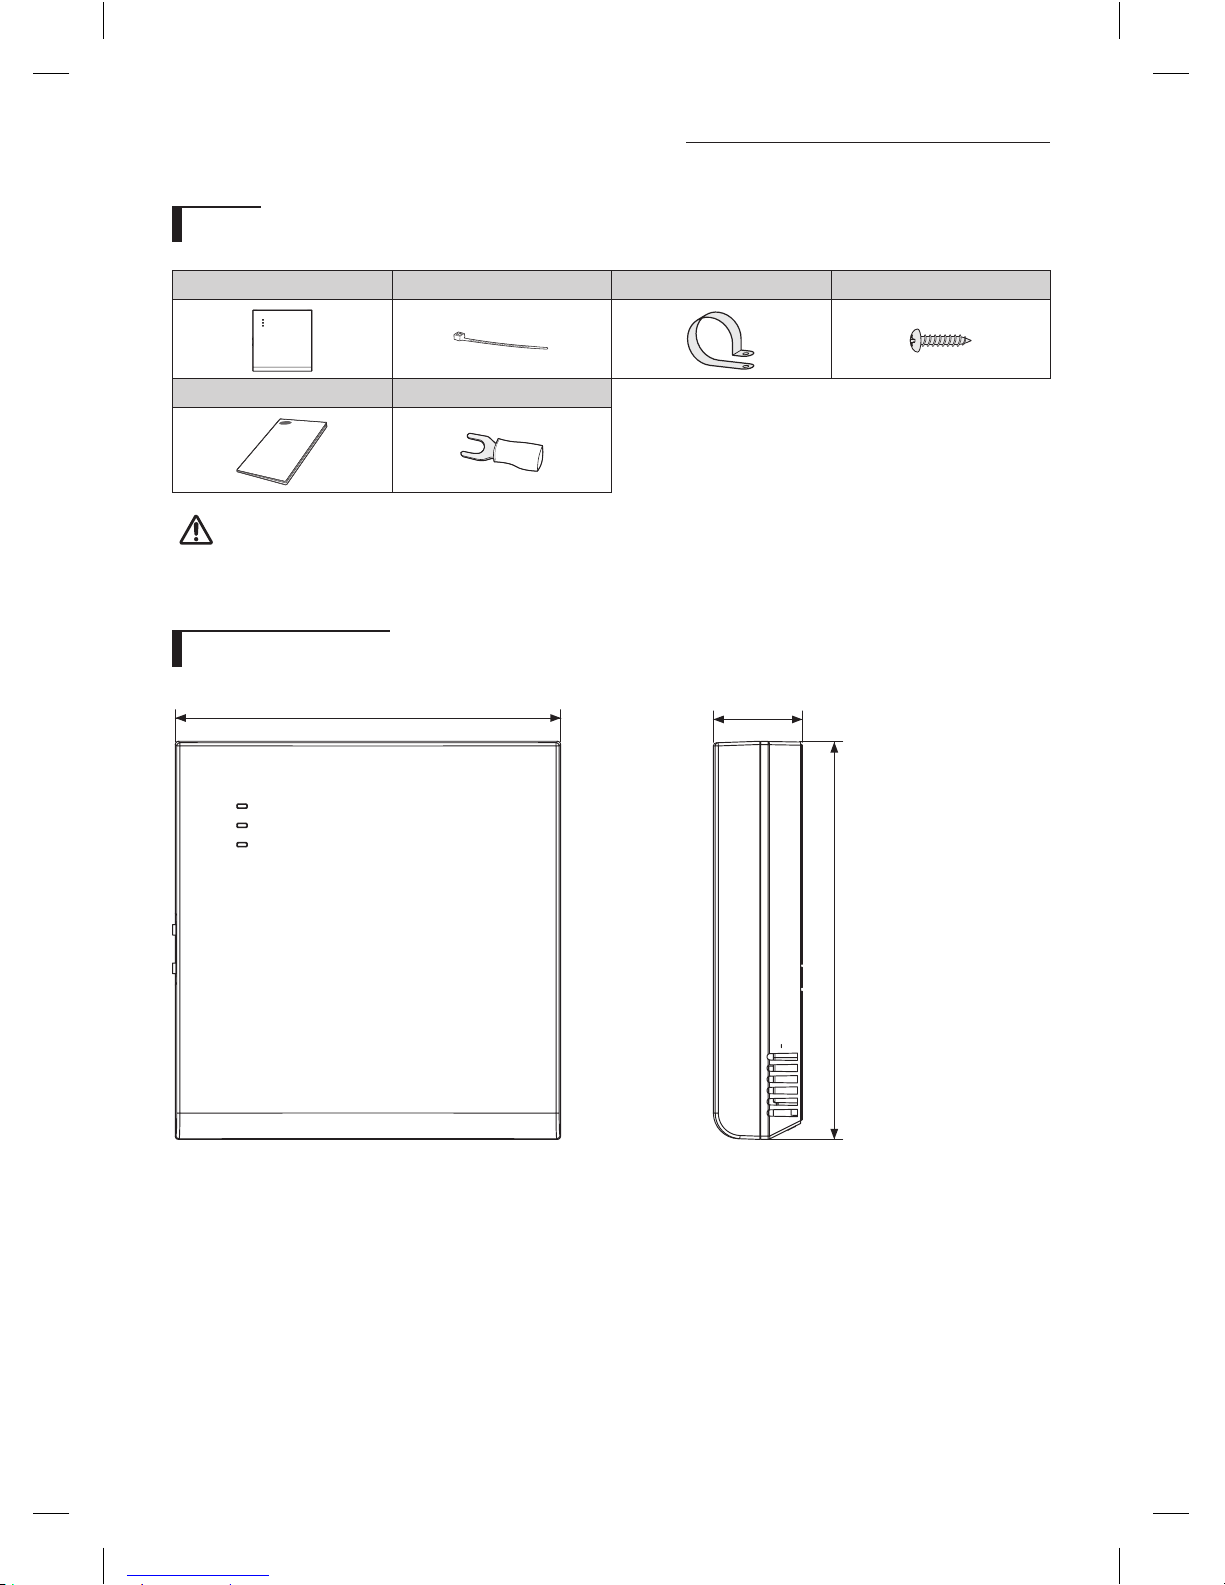
Parts
Assy Wi-Fi kit Cable tie (2) Cable clamp (3) M4×16 screw (5)
User & Installation manual U- terminal (6)
• Wi-Fi kit should be installed by a certified installer.
• Before installing a Wi-Fi kit, you should check whether the power of the kit is turned off.
• The wire of Wi-Fi kit should be installed in accordance with electric wiring regulation and should also be installed
inside the wall so that it cannot be touched by users.
Exterior dimension
120
124
27.7
(Unit : mm)
CAUTION
CAC WiFi Kit APP_03384A(1).indd 4 2012-10-12 오후 3:37:08
5
How to install Wi-Fi kit
Wi-Fi kit installation
• For smooth operation, install the Wi-Fi kit and the wireless router in open space with no obstacles between them.
Operation may not be possible if the distance between the Wi-Fi kit and the wireless router is too far or if there's any
obstacle between them.
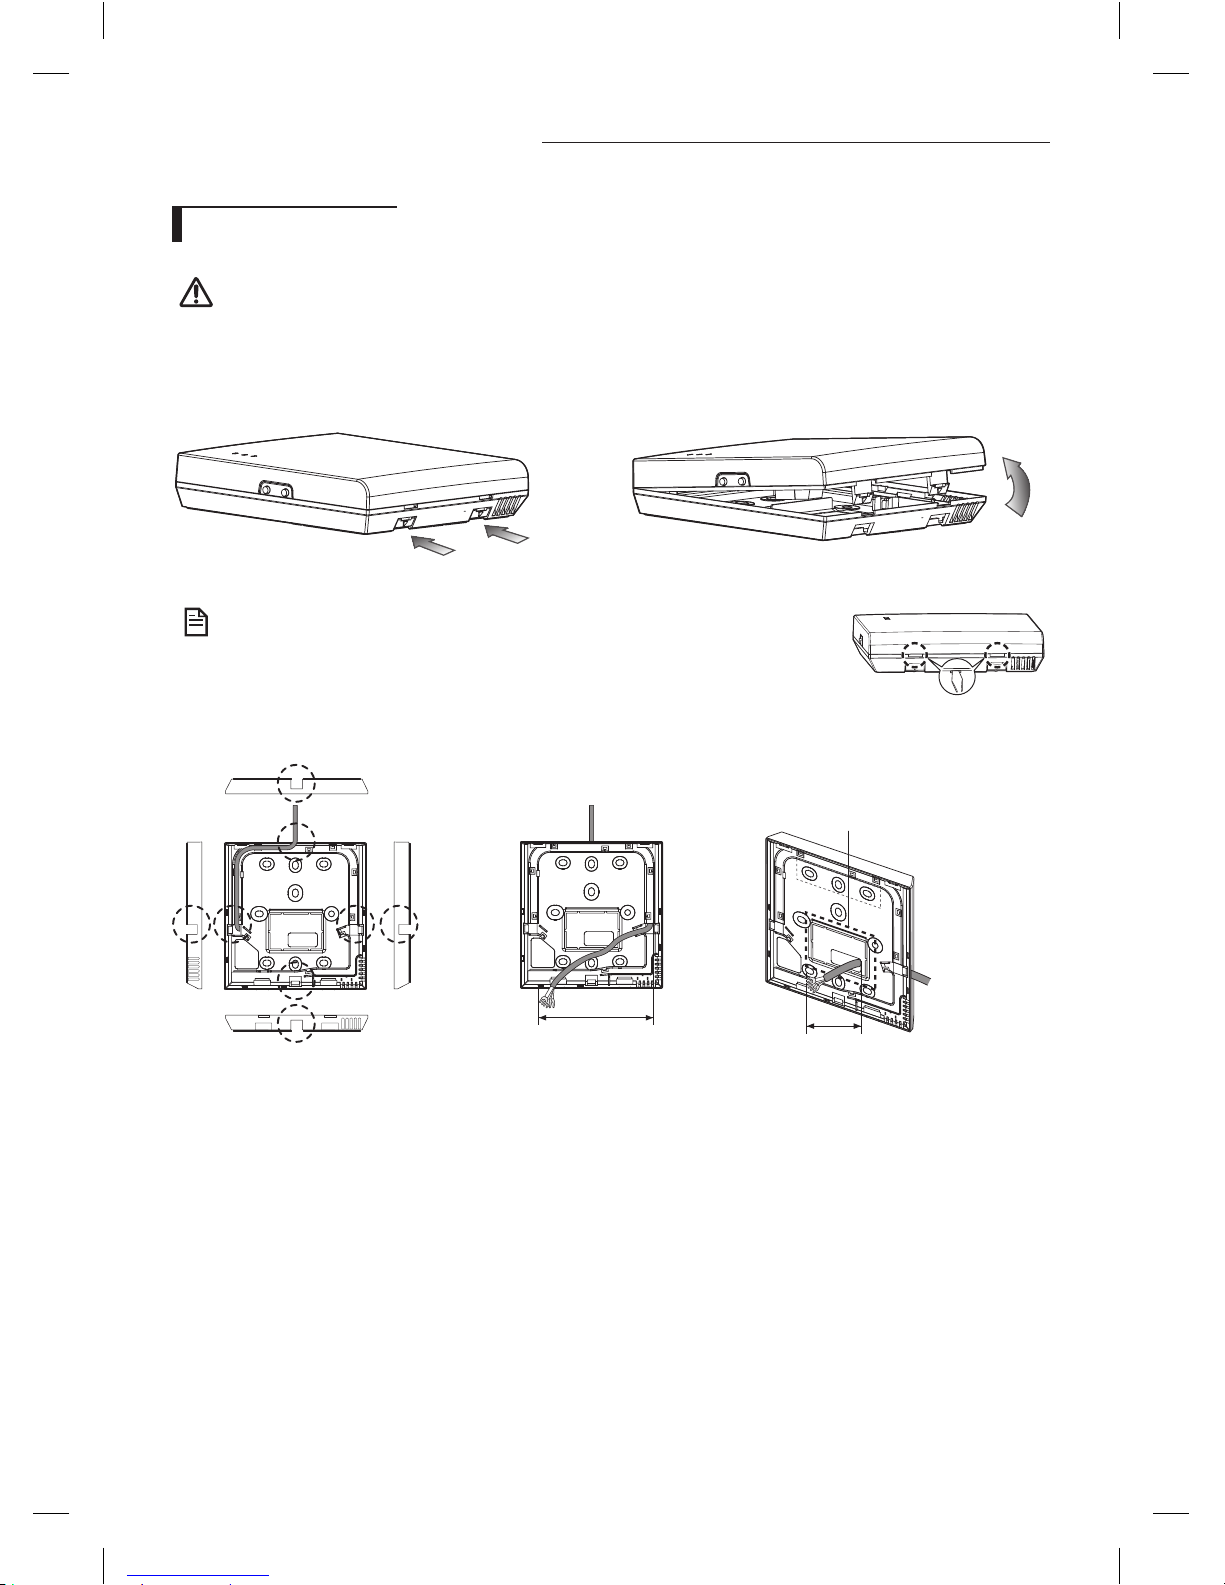
1. After pushing the two hooks on the bottom of the Wi-Fi kit at the same time, lift the front cover up and then detach if
from the rear cover.
❋ Push the two hooks at the same time.
• It might be easier to disassemble the Wi-Fi kit if you put a flat-head screw driver
into the square hole above the fixing hook.
2. Place the power wire and communication wire to fittings in the rear cover.
<When the cover is not buried> <When the cover is buried>
15cm
10cm
It can be detached if you need
more space.
CAUTION
NOTE
CAC WiFi Kit APP_03384A(1).indd 5 2012-10-12 오후 3:37:09

6
How to install Wi-Fi kit
3. After fixing the rear cover of a Wi-Fi kit firmly into the wall with two or more screws, connect the power wire(V1, V2) and
communication wire(F1, F2) to the terminal at the back side of the front cover with proper length.
• Centralized controller and the Wi-Fi kit cannot be used together.
10mm or
more
10mm or more
50mm or more
10mm or more
Screw
fixing
hole
Rear cover
❋ Before fixing the rear cover, allow
10mm or more space for upper,
left, and right sides and 50mm
space for bottom side.
❋ You should fix the screws into the
screw fixing holes.
❋ Do not tighten the PCB terminal with
too much force.
V1 V2 F1 F2
Wi-Fi kit
PCB terninal
4. Reassemble the Wi-Fi kit.
• Put the front cover of the kit into the upper grooves first and then fit it as shown in the picture. After
assembling the Wi-Fi kit, please check if there is any gap because of the connection cable between front
cover and rear cover.
• When installing a Wi-Fi kit with 10m or more wire, the communication wire and power wire of a Wi-Fi kit should be
installed separately. (The Wi-Fi kit will malfunction because of electrical fault. )
• When installing a Wi-Fi kit on the wall, select proper thickness of wires in the consideration of the hole size for wire
on the wall.
• Wire for Wi-Fi kit PCB connection
- When installing a Wi-Fi kit in a buried way, install the kit in accordance with U-terminal wiring regulation.
- When installing a Wi-Fi kit with 4-line PVC wires, peel 30cm of the sheath for the PVC wire and use only 4-line
wires. (Recommnendation: AWG21)
• Specification of compressed U-terminal for connecting Wi-Fi kit PCB
W
t
G
E
F
L
Stud
D
Wire range for
connection
Rated
size
Stud
size
Basic size(mm)
AWG mm2mm2mm t ΦD G E F W L
22~16
0.25~
1.65
1.5 3 0.7 3.8 10.0 4.5 6.5 6.0 21.2
The maximum distance for connection between communication wire and power wire: 50m
• Tighten the fixing screws for a PCB terminal with less than 6Nm torque. When the screws are tightened with more
than 6Nm torque, the screw thread will be damaged.
NOTE
NOTE
CAUTION
CAC WiFi Kit APP_03384A(1).indd 6 2012-10-12 오후 3:37:10
7
5. Setting an indoor unit installation option
f Wi-Fi kit is an optional item, therefore Wi-Fi kit usage option(SEG5) is set to 'Disable' as factory default setting.If you install
the Wi-Fi kit separately, you must set the Wi-Fi kit usage option(SEG5) as shown in the below table to use it normally.
f Input the setting option more than twice.
f For proper operation, reset the power after inputting the option.
❋ Be aware of the fact that Wi-Fi kit will not operate properly if you only install the Wi-Fi kit but don't set the model option.
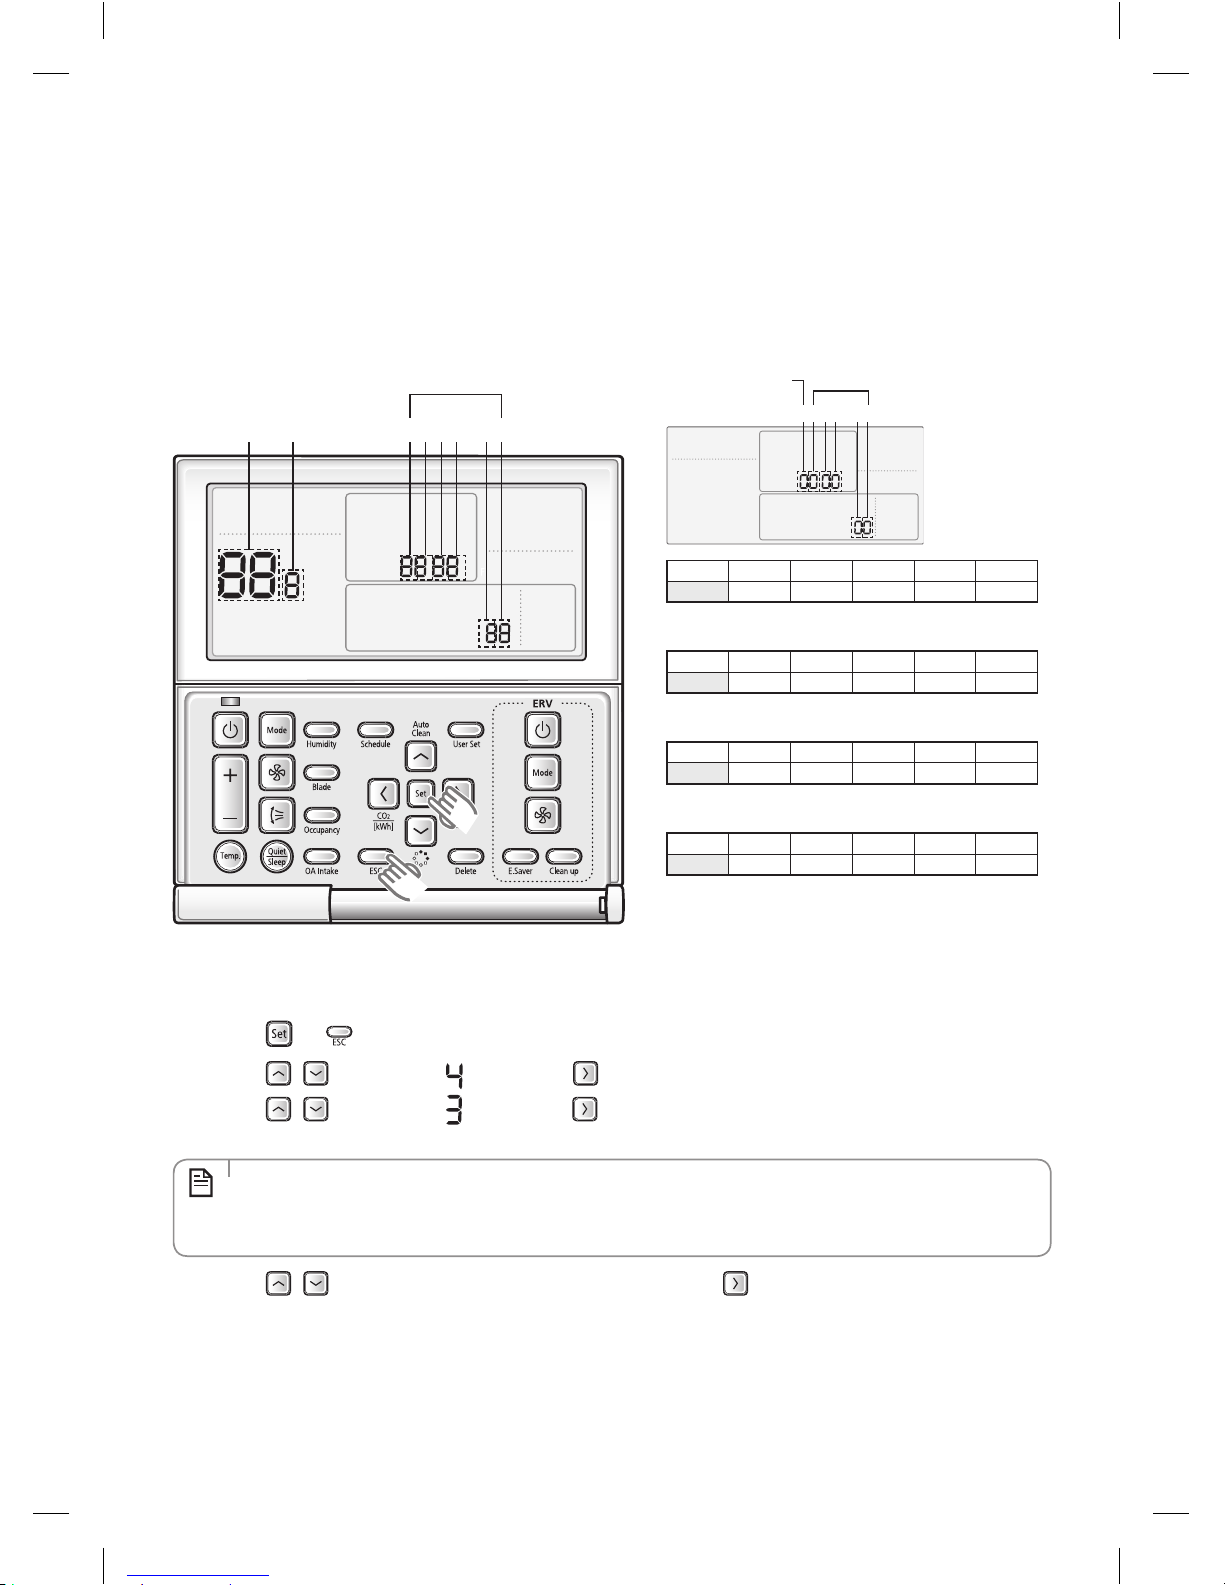
1) Set the indoor unit installation option by wired remote controller.
Main Menu
Sub-menu
1 2 3 54 6
Data bit
1 2 3 4 5 6
Option CodePage number
SEG1 SEG2 SEG3 SEG4 SEG5 SEG6
0
Page number
SEG7 SEG8 SEG9 SEG10 SEG11 SEG12
1
Page number
SEG13 SEG14 SEG15 SEG16 SEG17 SEG18
2
Page number
SEG19 SEG20 SEG21 SEG22 SEG23 SEG24
3
Page number
In order to check and set the indoor unit installation option code use the wired remote controller and follow the directions
below.
1. Press the and buttons at the same time for more than 3 seconds and then a Main menu will be displayed.
2. Press the / button to select and then press button to enter a Sub-menu setting screen.
3. Press the / button to select and then press button to enter a Indoor unit installation option code setting
screen.
• The first digit represents the page number and the remaining five digits are installation option.
• The total option codes are 24 digits. You can set six digits at a time and it is distinguished by page number (0, 1,
2, 3).
NOTE
4. Press the / button to set the installation option code in order. Press button to go to the next page.
CAC WiFi Kit APP_03384A(1).indd 7 2012-10-12 오후 3:37:11
8
How to install Wi-Fi kit
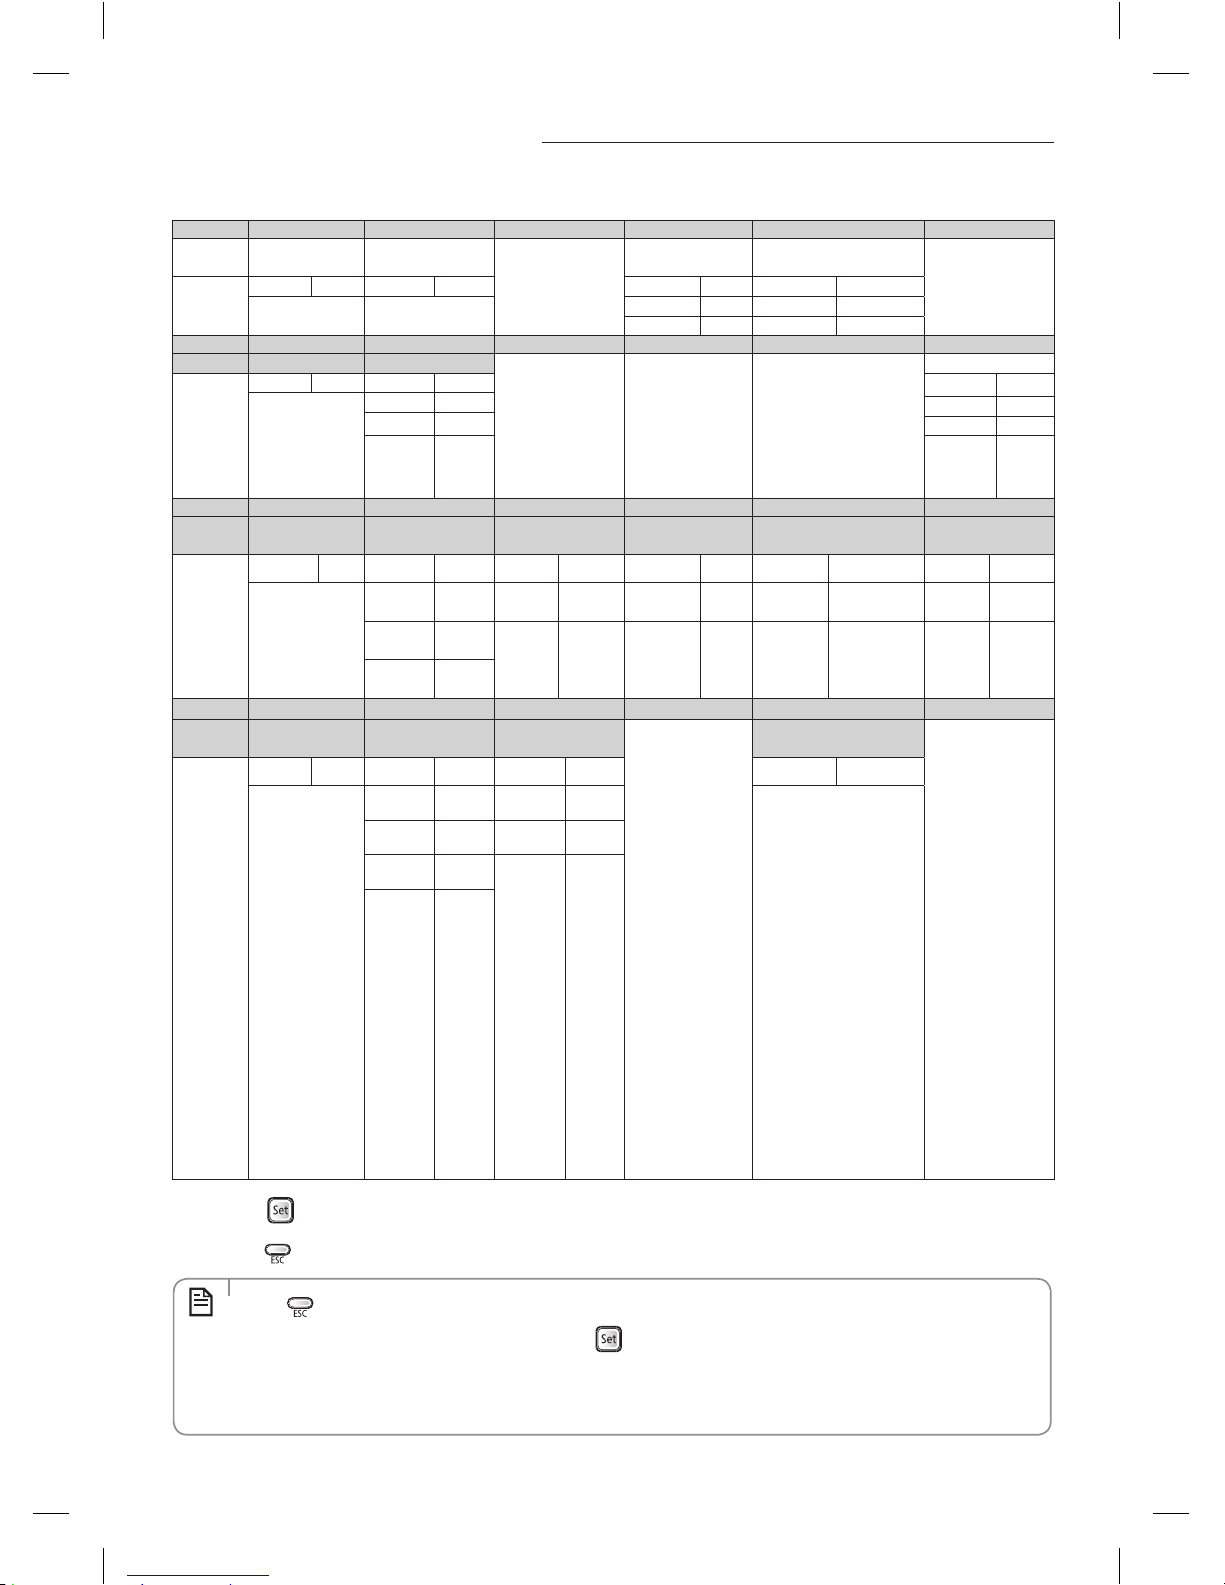
Option No. : 02XXXX-1XXXXX-2XXXXX-3XXXXX
Option SEG1 SEG2 SEG3 SEG4 SEG5 SEG6
Explanation PAGE MODE
RESERVED
Use of external
temperature sensor
Use of central control or
Wi-Fi kit
RESERVED
Indication
and Details
Indication Details Indication Details Indication Details Indication Details
0 2
0 Disuse 0 Disuse
1 Use 1 Use
Option SEG7 SEG8 SEG9 SEG10 SEG11 SEG12
Explanation PAGE Use of drain pump
RESERVED RESERVED RESERVED
Master / Slave
Indication
and Details
Indication Details Indication Details
Indication Details
1
0 Disuse
0 slave
1 Use
1 master
2
Use +
3minute
delay
- -
Option SEG13 SEG14 SEG15 SEG16 SEG17 SEG18
Explanation PAGE
Use of external
control
Setting the output of
external control
S-Plasma ion Buzzer control
Number of hours
using filter
Indication
and Details
Indication Details Indication Details Indication Details Indication Details Indication Details Indication Details
2
0 Disuse 0
Thermo
on
0 Disuse 0 Use of buzzer 2 1000 Hour
1
ON/OFF
Control
1
Operation
on
1
Use 1
Non use of
buzzer
6 2000 Hour
2
OFF
Control
Option SEG19 SEG20 SEG21 SEG22 SEG23 SEG24
Explanation PAGE
control of a remote
controller
Heating setting
compensation
RESERVED
Motion detect sensor
RESERVED
Indication
and Details
Indication Details Indication Details Indication Details Indication Details
3
0 or 1 Indoor 1 0 Disuse
0. No Use (Factory Setting)
1. Standard Mode/Auto
Set OFF30 Min.
2. Standard Mode/Auto
Set OFF60 Min.
3. Standard Mode/Auto
Set OFF 120 Min.
4. Standard Mode/Auto
Set OFF 180 Min.
5. Premium Mode/
Auto Set OFF30 Min.
6. Premium Mode/
Auto Set OFF60 Min.
7. Premium Mode/Auto
Set OFF 120 Min.
8. Premium Mode/Auto
Set OFF 180 Min.-
2 Indoor 2 1 2°C
3 Indoor 3
2 5°C
4 Indoor 4
5.
Press the button to save and complete the option setting.
6. Press the button to exit to normal mode.
• Press button anytime during setup to exit without setting.
• Option code will not be applied if you don't press
button.
• Setting Installation option code is available only with a master wired remote controller.
• Setting Installation option code is available when there is one on one connection between a wired remote
controller and an indoor unit.
NOTE
CAC WiFi Kit APP_03384A(1).indd 8 2012-10-12 오후 3:37:11
9
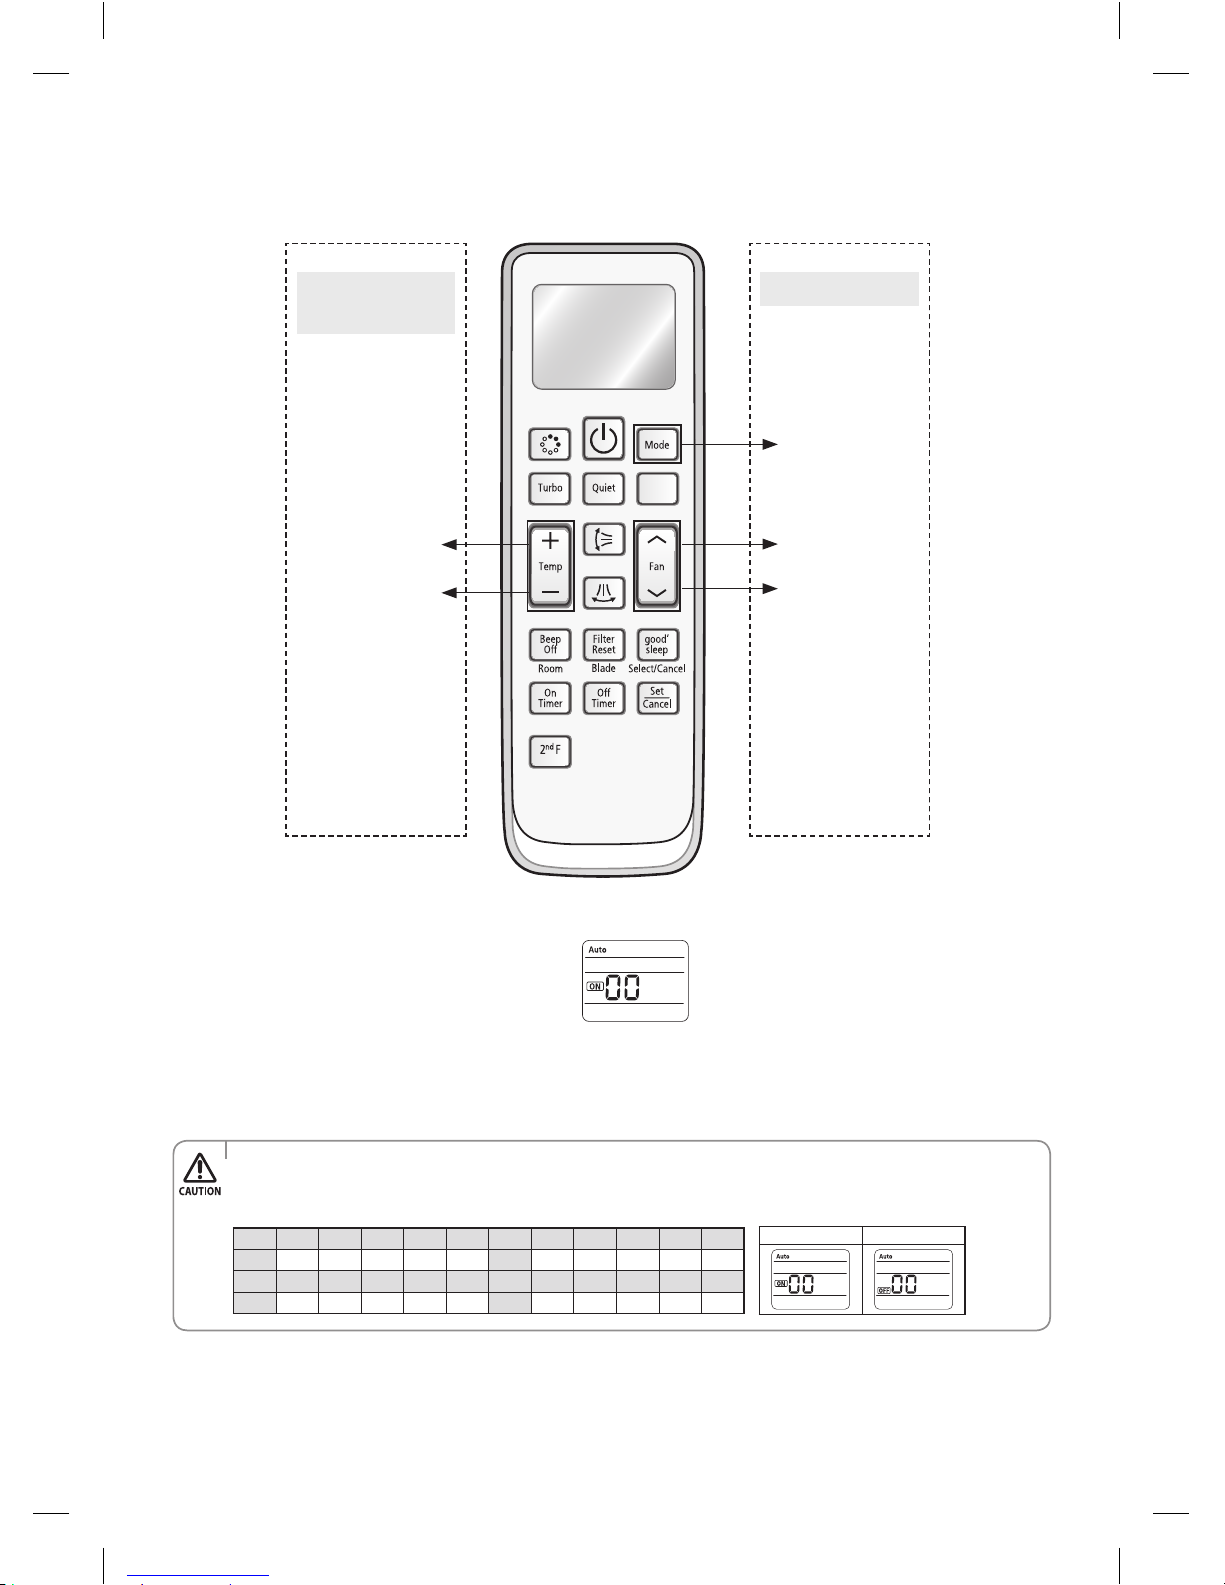
2) In order to check and set the indoor unit installation option code use the wireless remote controller
High Temp Button
High Fan Button
Mode change
Low Temp Button
Low Fan Button
Entering mode for
option setting
Option setting mode
1. Remove batteries from the remote controller.
2. Insert batteries and while you press [+ Temperature] and
[- Temperature] button at the same time.
3. Check if you have entered the option setting status.
4. After entering the option setting status, select the option as listed below.
Step 2. The procedure of option setting
After entering the option setting status, select the option as listed below.
Option setting is available from SEG1 to SEG 24
• SEG1,SEG7,SEG13,SEG19arenotsetaspageoption.
• SettheSEG2~SEG6,SEG8~SEG12asONstatusandSEG14~18,SEG20~24asOFFstatus.
SEG1 SEG2 SEG3 SEG4 SEG5 SEG6 SEG7 SEG8 SEG9 SEG10 SEG11 SEG12
0 X X X X X 1 X X X X X
SEG13 SEG14 SEG15 SEG16 SEG17 SEG18 SEG19 SEG20 SEG21 SEG22 SEG23 SEG24
2 X X X X X 3 X X X X X
On(SEG1~12) O(SEG13~24)
CAC WiFi Kit APP_03384A(1).indd 9 2012-10-12 오후 3:37:12

10
How to install Wi-Fi kit
The procedure of setting option
Operation Indication
* Step 1
1. Remove the batteries from the remote controller.
2. Insert batteries while pressing High Temp Button and Low Temp Button.
* Step 2
1. Press LowFan Button to enter SEG2 value.
2. Press High Fan Button to enter SEG3 value.
* Step 3
PressModeButtontobechangetoCoolmodeintheONstatus.
1. Press Low Fan Button to enter SEG4 value.
2. Press High Fan Button to enter SEG5 value.
* Step 4
PressModeButtontobechangedtoDRYmodeintheONstatus.
1. Press Low Fan Button to enter SEG6.
2.PressHighFanButtontoenterSEG8.
* Step 5
PressModeButtontobechangedtoFANmodeintheONstatus.
1.PressLowFanButtontoenterSEG9value.
2.PressHighFanButtontoenterSEG10value.
* Step 6
PressModeButtontobechangedtoHEATmodeintheONstatus.
1. Press Low Fan Button to enter SEG11 value.
2. Press High Fan Button to enter SEG12value
*Step7
Press Mode Button to be changed to AUTO mode in the OFF status.
1. Press Fan button to enter SEG14 value.
2. Press High Fan Button to enter SEG15 value.
*Step8
Press Mode Button to be changed to Cool mode in the OFF status.
1. Press Low Fan Button to enter SEG16 value.
2.PressHighFanButtontoenterSEG17value.
*Step9
Press Mode Button to be changed to DRY mode in the OFF status.
1.PressLowFanButtontoenterSEG18value.
2.PressHighFanButtontoenterSEG20value.
*Step10
PressModeButtontobechangedtoFANmodeinOFFstatus
1. Press Low Fan Button to enter SEG21 value.
2. Press High Fan Button to enter SEG22 value.
*Step10
Press Mode button to be changed to HEAT mode in the OFF status
1. Press Low Fan Button to enter SEG23 value.
2. Press High Fan Button to enter SEG24 value.
* Step 11
Press operation button to enter option.
CAC WiFi Kit APP_03384A(1).indd 10 2012-10-12 오후 3:37:12
 Loading...