

Samsung M575 User Manual
Samsung M575

PORTABLE
MOBILE PHONE
User Manual
Please read this manual before operating your
phone, and keep it for future reference.

Intellectual Property
All Intellectual Property, as defined below, owned by or which is otherwise the property of Samsung or its respective
suppliers relating to the SAMSUNG Phone, including but not limited to, accessories, parts, or software relating there
to (the “Phone System”), is proprietary to Samsung and protected under federal laws, state laws, and international
treaty provisions. Intellectual Property includes, but is not limited to, inventions (patentable or unpatentable),
patents, trade secrets, copyrights, software, computer programs, and related documentation and other works of
authorship. You may not infringe or otherwise violate the rights secured by the Intellectual Property. Moreover, you
agree that you will not (and will not attempt to) modify, prepare derivative works of, reverse engineer, decompile,
disassemble, or otherwise attempt to create source code from the software. No title to or ownership in the
Intellectual Property is transferred to you. All applicable rights of the Intellectual Property shall remain with
SAMSUNG and its suppliers.
Samsung Telecommunications America (STA), LLC
Headquarters:
1301 E. Lookout Drive
Richardson, TX 75082
Toll Free Tel:
Internet Address:
©
http://www.samsung.com
Customer Care Center:
1000 Klein Rd.
Plano, TX 75074
1.888.987.HELP (4357)
2011 Samsung Telecommunications America, LLC. Samsung is a registered trademark of Samsung Electronics
Co., Ltd.
Do you have questions about your Samsung Mobile Phone?
For 24 hour information and assistance, we offer a new FAQ/ARS System (Automated Response System) at:
http://www.samsung.com/us/support
GH68-33645B
Printed in XXXX
SPH-M575_EF28_CH_090611_F5

VIRGIN® and the Virgin signature log are registered trademarks of Virgin Enterprises Limited and are used under
license. payLo™ and the payLo logo are trademarks of Virgin Mobile USA, L.P.
Nuance®, VSuite™, T9® Text Input, and the Nuance logo are trademarks or registered trademarks of Nuance
Communications, Inc., or its affiliates in the United States and/or other countries.
®
The Bluetooth
word mark, figure mark (stylized “B Design”), and combination mark (Bluetooth word mark and “B
Design”) are registered trademarks and are wholly owned by the Bluetooth SIG.
microSD™ and the microSD logo are Trademarks of the SD Card Association.
Openwave
®
is a registered Trademark of Openwave, Inc.
Yahoo!®Mail is a registered Trademark of Yahoo!, Inc.
Hotmail®is a registered Trademark of Microsoft Corporation
Gmail® is a registered Trademark of Google, Inc.
AOL® Mail is a registered Trademark of America Online, Inc.
Dynamic Noise Suppression from Audience
Your phone is equipped with an advanced voice processing chip that delivers clear mobile calls by suppressing
background noise, intermittent sounds (like a siren or nearby conversation), and echoes, allowing you to hear and
be heard nearly anywhere.
How Does It Work?
Based on the intelligence of the human hearing system, the technology:
•
Captures, evaluates and distinguishes all the sound signals surrounding your phone, and the person you're speaking with.
•
Then isolates the primary voice in conversation and filters out the background noise - so the person you're calling hears only
your voice, without disturbing background noise.
•
Dynamically equalizes and adjusts voice volume to optimize your calling experience, so you can hear clearly and don't need to
speak louder to overcome surrounding noise.
The noise suppression technology is built-in and already enabled in your new mobile phone. So it's ready to
provide unsurpassed voice clarity with every call.
Open Source Software
Some software components of this product incorporate source code covered under GNU General Public License
(GPL), GNU Lesser General Public License (LGPL), OpenSSL License, BSD License and other open source licenses.
To obtain the source code covered under the open source licenses, please visit:
http://opensource.samsungmobile.com/index.jsp
.

Disclaimer of Warranties; Exclusion of Liability
EXCEPT AS SET FORTH IN THE EXPRESS WARRANTY CONTAINED ON THE WARRANTY PAGE ENCLOSED WITH THE
PRODUCT, THE PURCHASER TAKES THE PRODUCT "AS IS", AND SAMSUNG MAKES NO EXPRESS OR IMPLIED
WARRANTY OF ANY KIND WHATSOEVER WITH RESPECT TO THE PRODUCT, INCLUDING BUT NOT LIMITED TO THE
MERCHANTABILITY OF THE PRODUCT OR ITS FITNESS FOR ANY PARTICULAR PURPOSE OR USE; THE DESIGN,
CONDITION OR QUALITY OF THE PRODUCT; THE PERFORMANCE OF THE PRODUCT; THE WORKMANSHIP OF THE
PRODUCT OR THE COMPONENTS CONTAINED THEREIN; OR COMPLIANCE OF THE PRODUCT WITH THE
REQUIREMENTS OF ANY LAW, RULE, SPECIFICATION OR CONTRACT PERTAINING THERETO. NOTHING CONTAINED IN
THE INSTRUCTION MANUAL SHALL BE CONSTRUED TO CREATE AN EXPRESS OR IMPLIED WARRANTY OF ANY KIND
WHATSOEVER WITH RESPECT TO THE PRODUCT. IN ADDITION, SAMSUNG SHALL NOT BE LIABLE FOR ANY
DAMAGES OF ANY KIND RESULTING FROM THE PURCHASE OR USE OF THE PRODUCT OR ARISING FROM THE
BREACH OF THE EXPRESS WARRANTY, INCLUDING INCIDENTAL, SPECIAL OR CONSEQUENTIAL DAMAGES, OR LOSS
OF ANTICIPATED PROFITS OR BENEFITS.

Table of Contents
Section 1: Getting Started ................4
Setting Up Your Device . . . . . . . . . . . . . . . . . . 4
Your Device’s microSD Card and Adapter . . . . 6
Section 2: Understanding Your Phone 9
Understanding Your Phone . . . . . . . . . . . . . . . 9
Features of Your Phone . . . . . . . . . . . . . . . . . 9
Your Device . . . . . . . . . . . . . . . . . . . . . . . . . . 9
Key Functions . . . . . . . . . . . . . . . . . . . . . . . . . 9
Viewing the Display Screen . . . . . . . . . . . . . 12
Turning the Phone On . . . . . . . . . . . . . . . . . . 15
Activating Your payLo by Virgin Mobile
Phone Account . . . . . . . . . . . . . . . . . . . . . 16
Navigating Through the Menus . . . . . . . . . . . 17
Displaying Your Phone Number . . . . . . . . . . 17
Using the Application Manager . . . . . . . . . . . 17
Section 3: microSD Card .................19
microSD Adapter . . . . . . . . . . . . . . . . . . . . . 19
microSD Card Folders . . . . . . . . . . . . . . . . . . 20
Connecting Your Phone to Your Computer . . 20
Section 4: Call Functions ................22
Displaying Your Phone Number . . . . . . . . . . 22
Making Calls . . . . . . . . . . . . . . . . . . . . . . . . 22
Answering Calls . . . . . . . . . . . . . . . . . . . . . . 22
Ending a Call . . . . . . . . . . . . . . . . . . . . . . . . 23
Missed Call Notification . . . . . . . . . . . . . . . . 23
Calling Emergency Numbers . . . . . . . . . . . . . 23
Enhanced 911 (E911) Information . . . . . . . . . 23
In-Call Options . . . . . . . . . . . . . . . . . . . . . . . 24
Using the Speakerphone . . . . . . . . . . . . . . . . 24
End-of-Call Options . . . . . . . . . . . . . . . . . . . 24
Dialing and Saving Phone Numbers
with Pauses . . . . . . . . . . . . . . . . . . . . . . . 25
Abbreviated Dialing . . . . . . . . . . . . . . . . . . . 25
Dialing From the Contacts List . . . . . . . . . . . 26
Speed Dialing . . . . . . . . . . . . . . . . . . . . . . . . 26
Plus (+) Code Dialing . . . . . . . . . . . . . . . . . . 27
Voice Dialing . . . . . . . . . . . . . . . . . . . . . . . . 27
Making a Call From History . . . . . . . . . . . . . . 27
Saving a Number From History . . . . . . . . . . . 27
Section 5: Contacts .........................29
Creating a New Contacts Entry . . . . . . . . . . . 29
Saving a Phone Number . . . . . . . . . . . . . . . . 29
Contacts Entry Options . . . . . . . . . . . . . . . . . 30
Editing a Contacts Entry . . . . . . . . . . . . . . . . 30
Deleting a Contact . . . . . . . . . . . . . . . . . . . . 31
Secret Contacts Entries . . . . . . . . . . . . . . . . 31
Selecting an Entry Ringtone Type . . . . . . . . . 31
Assigning a Picture to an Entry . . . . . . . . . . . 31
Adding a New Group . . . . . . . . . . . . . . . . . . . 32
Assigning Speed Dial Numbers . . . . . . . . . . . 32
Contact History . . . . . . . . . . . . . . . . . . . . . . . 33
Saving a Number From History . . . . . . . . . . . 34
Erasing History . . . . . . . . . . . . . . . . . . . . . . . 35
Section 6: Entering Text .................36
Selecting a Text Input Mode . . . . . . . . . . . . . 36
Selecting a Text Message Option . . . . . . . . . 36
Entering Text Using Predictive Text . . . . . . . . 37
ABC Mode . . . . . . . . . . . . . . . . . . . . . . . . . . 37
Entering Numbers, Symbols, Smileys and
Preset Messages . . . . . . . . . . . . . . . . . . . 38
Setting Text Options . . . . . . . . . . . . . . . . . . . 39
Entering Characters In Dual Language . . . . . 39
Entering Text in Landscape Mode . . . . . . . . . 39
Navigation Key in Landscape Mode . . . . . . . 40

Entering Text Using the Keyboard . . . . . . . . . .40
Using the Keyboard . . . . . . . . . . . . . . . . . . . .41
Section 7: Messaging .....................43
Types of Messages . . . . . . . . . . . . . . . . . . . .43
Voicemail . . . . . . . . . . . . . . . . . . . . . . . . . . . .43
Messaging Settings . . . . . . . . . . . . . . . . . . . .44
Text and Picture Messaging . . . . . . . . . . . . . .45
Virgin Alert Messages . . . . . . . . . . . . . . . . . .47
Email and Instant Messages . . . . . . . . . . . . . .47
Instant Messages (IM) . . . . . . . . . . . . . . . . . .48
Section 8: Media ............................. 49
Taking Pictures . . . . . . . . . . . . . . . . . . . . . . . 49
Recording Videos . . . . . . . . . . . . . . . . . . . . . .51
Storing Pictures and Videos . . . . . . . . . . . . . .52
Sending Pictures and Videos . . . . . . . . . . . . .53
Printing Pictures From Your Phone . . . . . . . . .55
Media Player . . . . . . . . . . . . . . . . . . . . . . . . .55
Downloading Games, Ringtones,
and More . . . . . . . . . . . . . . . . . . . . . . . . . .57
Downloading Graphics . . . . . . . . . . . . . . . . . .57
Downloading Applications . . . . . . . . . . . . . . .57
Section 9: GPS Services .................58
GPS Services . . . . . . . . . . . . . . . . . . . . . . . . .58
Maps . . . . . . . . . . . . . . . . . . . . . . . . . . . . . . .58
Section 10: Connections and
Section 11: Tools ............................ 62
Alarm Clock . . . . . . . . . . . . . . . . . . . . . . . . . .62
Calendar . . . . . . . . . . . . . . . . . . . . . . . . . . . .62
Using the Task List . . . . . . . . . . . . . . . . . . . . .64
Using the Countdown . . . . . . . . . . . . . . . . . . .64
Using the Memo Pad . . . . . . . . . . . . . . . . . . .64
Creating a Voice Memo . . . . . . . . . . . . . . . . .64
Bluetooth . . . . . . . . . . . . . . . . . . . . . . . . . . . .66
Mass Storage . . . . . . . . . . . . . . . . . . . . . . . . .66
Voice Services . . . . . . . . . . . . . . . . . . . . . . . .66
Using the Calculator . . . . . . . . . . . . . . . . . . . .66
World Time . . . . . . . . . . . . . . . . . . . . . . . . . .66
Section 12: Settings ....................... 67
Display Settings . . . . . . . . . . . . . . . . . . . . . . .67
Adjusting the Phone’s Volume Settings . . . . . .68
Ringtone Types . . . . . . . . . . . . . . . . . . . . . . .69
Auto Keyguard Settings . . . . . . . . . . . . . . . . .69
Text Entry Settings . . . . . . . . . . . . . . . . . . . . .69
Phone Information . . . . . . . . . . . . . . . . . . . . .70
Locking the Phone . . . . . . . . . . . . . . . . . . . . .70
Location Settings . . . . . . . . . . . . . . . . . . . . . .70
Parental Controls . . . . . . . . . . . . . . . . . . . . . .71
Others . . . . . . . . . . . . . . . . . . . . . . . . . . . . . .73
Accessibility Settings . . . . . . . . . . . . . . . . . . .73
Section 13: Health and Safety
Social Networking ........................ 59
Web Browsing . . . . . . . . . . . . . . . . . . . . . . . .59
Web Options . . . . . . . . . . . . . . . . . . . . . . . . .59
About Bluetooth . . . . . . . . . . . . . . . . . . . . . . .60
Using the Bluetooth Settings Menu . . . . . . . . .60
Pairing Bluetooth Devices . . . . . . . . . . . . . . . .60
Sending Items via Bluetooth . . . . . . . . . . . . . .61
Social Networking . . . . . . . . . . . . . . . . . . . . .61
Information ................................... 77
Exposure to Radio Frequency (RF) Signals . . .77
Specific Absorption Rate (SAR) Certification
Information . . . . . . . . . . . . . . . . . . . . . . . .81
Smart Practices While Driving . . . . . . . . . . . .82
Battery Use and Safety . . . . . . . . . . . . . . . . . .83
Samsung Mobile Products and Recycling . . . .84
UL Certified Travel Charger . . . . . . . . . . . . . .85
Display / Touch-Screen . . . . . . . . . . . . . . . . .85

GPS & AGPS . . . . . . . . . . . . . . . . . . . . . . . . . 86
Emergency Calls . . . . . . . . . . . . . . . . . . . . . . 86
Care and Maintenance . . . . . . . . . . . . . . . . . 87
Responsible Listening . . . . . . . . . . . . . . . . . . 88
Operating Environment . . . . . . . . . . . . . . . . . 89
FCC Hearing Aid Compatibility (HAC)
Regulations for Wireless Devices . . . . . . . 91
Restricting Children's Access to Your
Mobile Device . . . . . . . . . . . . . . . . . . . . . 92
FCC Notice and Cautions . . . . . . . . . . . . . . . 92
Other Important Safety Information . . . . . . . . 93
Section 14: Warranty Information ..94
Standard Limited Warranty . . . . . . . . . . . . . . 94
End User License Agreement for Software . . 97
Index ...............................................103
Section 1: Getting Started
This section describes information about managing
your device, maximizing its performance.
Setting Up Your Device
Installing the Battery
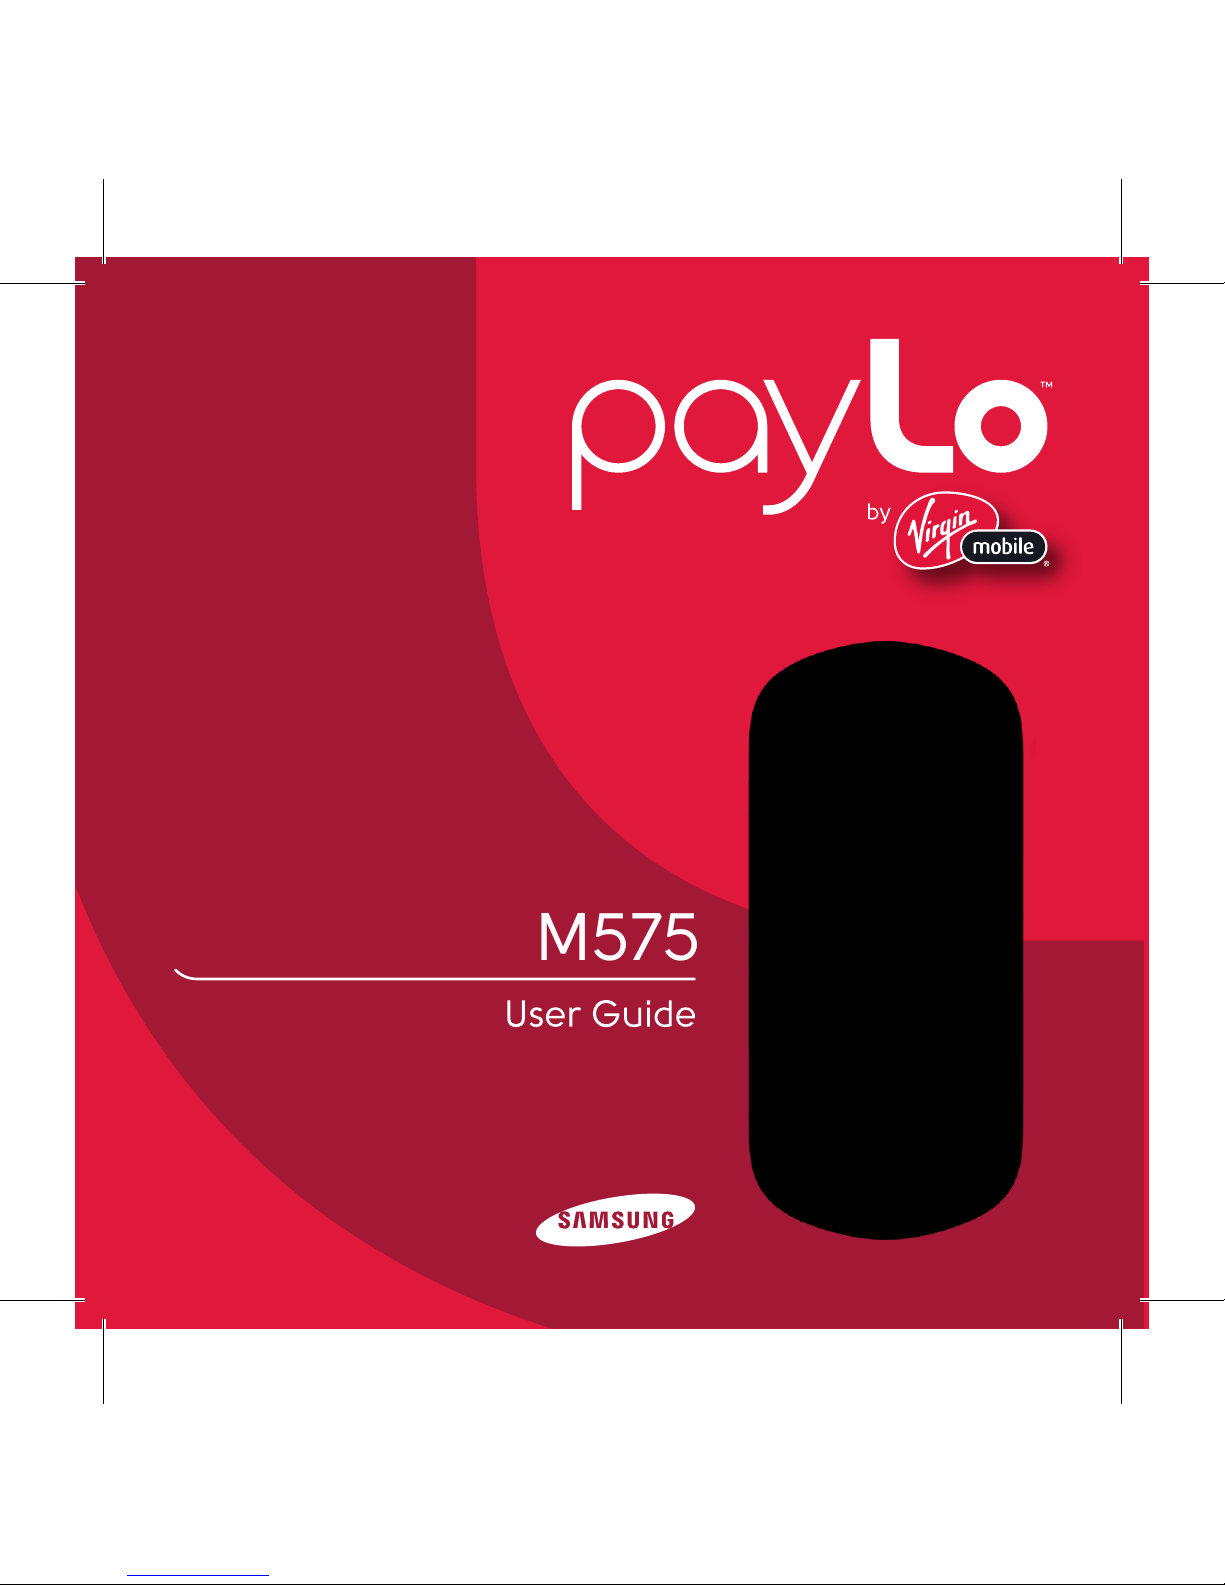
1. Remove the battery from its packaging.
2. Place your fingernail in the battery cover and
firmly “pop” the cover off the device (as
shown).
3. Insert the battery into the opening in the back
of the phone (3), making sure the connectors
align. Gently press down to secure the
battery (4).
4. Position the battery cover over the battery
compartment and press down until you hear a
click.
5. Press to turn the phone on.
•
If your phone is activated, it turns on, searches for
service, and enters standby mode.
4

Correct
Incorrect
Removing the Battery
1. Make sure the power is off so that you don’t
lose any stored numbers or messages.
2. Place your fingernail in the battery cover and
firmly “pop” the cover off the device.
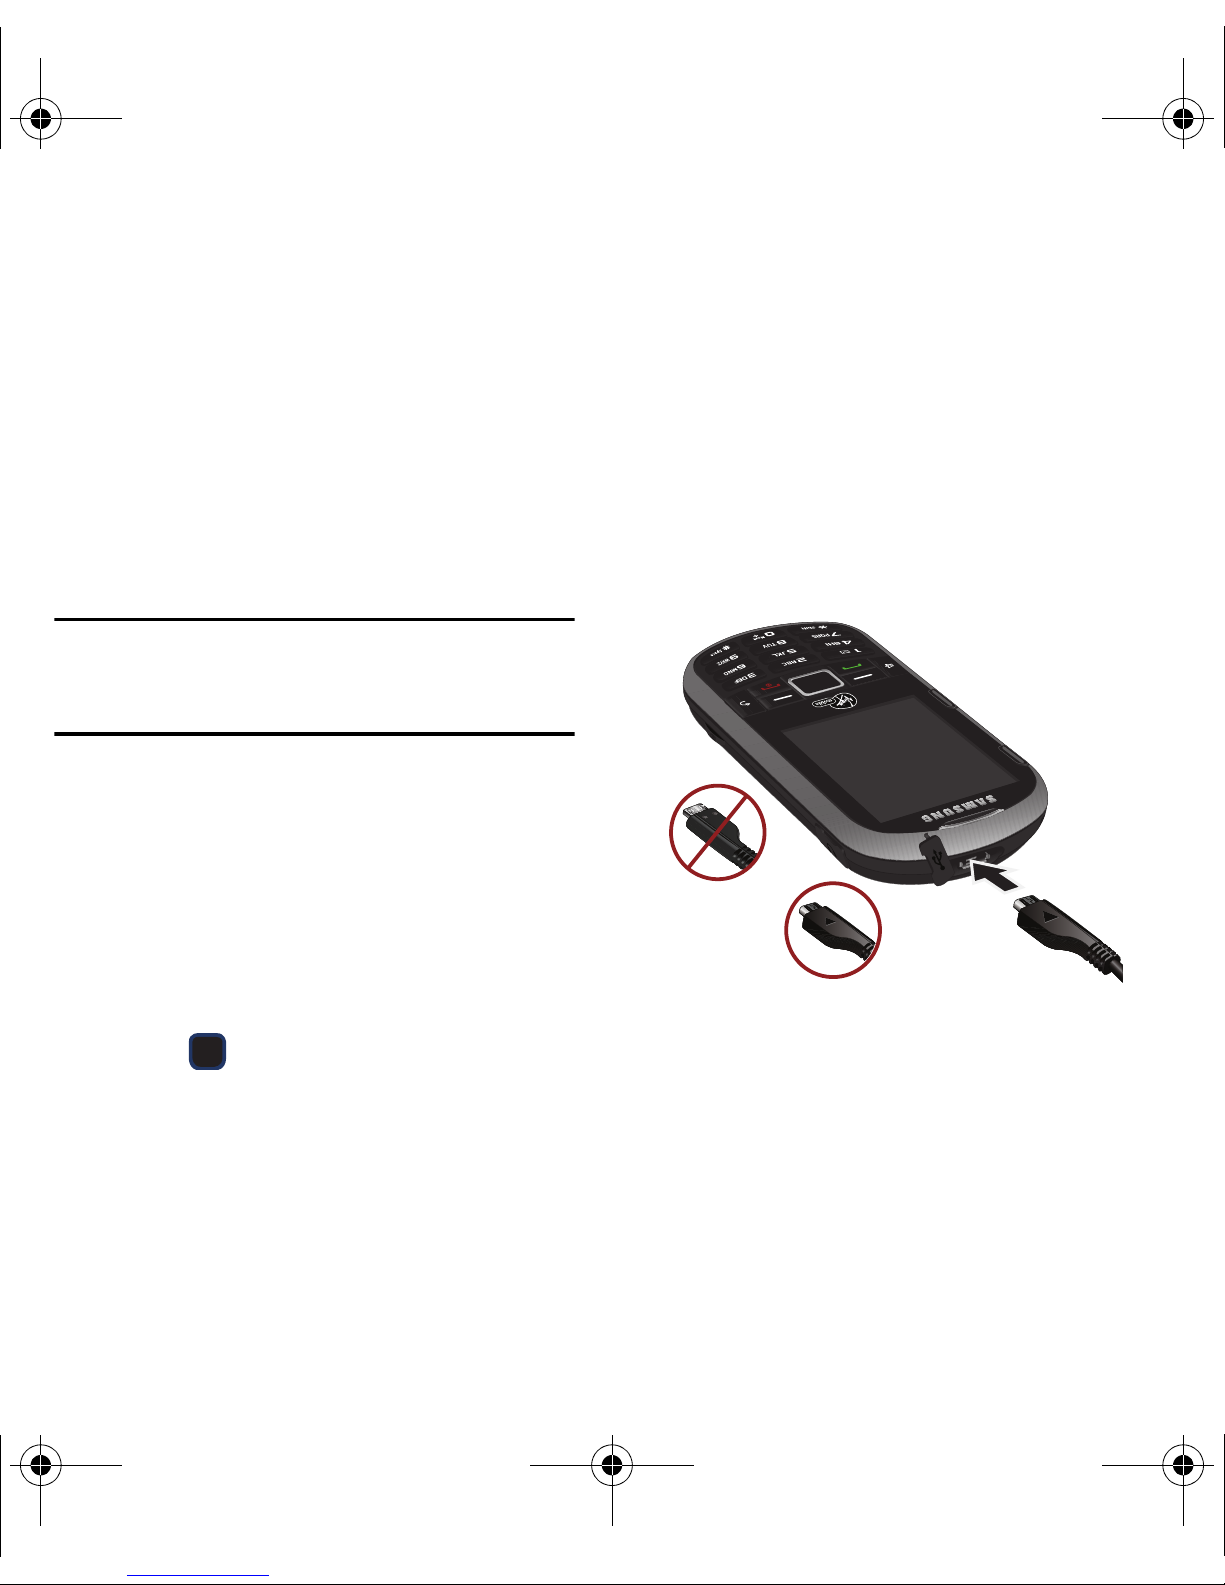
Charging the Batter y
Keeping track of your battery’s charge is important. If
the battery level becomes too low, the device
automatically turns off, and you lose any information
you were working on.
Note:
Although the battery comes partially charged, it is
recommended you fully charge the battery before using
your device for the first time.
䊳
Plug the flat end of the cable into the device’s
charger/accessory jack and the other end into
an electrical outlet. The device turns on with
the screen locked and indicates both its charge
state and percent of charge.
With the Virgin Mobile-approved Li-Ion battery, you
can recharge the battery before it completely runs
down.
Battery and Charger
Virgin Mobile-approved or Samsung-approved
batteries and accessories can be found at stores or
through Samsung; or call 1-866-866-7509 to order.
They’re also available at
www.virginmobileusa.com
.
Warning!:
Use only Virgin Mobile-approved or Samsung
approved batteries and chargers with your device.
The failure to use a Virgin Mobile-approved or
Samsung-approved battery and charger may
increase the risk that your device will overheat,
catch fire, or explode, resulting in serious bodily
injury, death, or property damage.
Getting Started 5

Battery Capacity
This device is equipped with a Lithium Ion (Li-Ion)
battery. You can recharge the battery before it is fully
drained. The battery provides up to 6.0 hours of talk
time.
At 3% of charge capacity, there are only a few
minutes of talk time left, the device sounds an audible
alert, displays a critical charge icon ( ), and
then turns off.
Note:
Long backlight settings, searching for service, vibrate
mode, browser use, and other variables may reduce the
battery’s talk and standby times.
Extending Your Battery Life
Watch your device’s battery level indicator and charge
the battery before it runs out of power.
Active applications, light levels, Bluetooth usage, and
GPS functionality all act to drain your battery. The
following is a list of helpful tips that can help conserve
your battery power:
Your Device’s microSD Card and
Adapter
The microSD Card
An optional memory card will expand your phone’s
digital space. A memory card allows you to store
images, videos, and music in your phone.
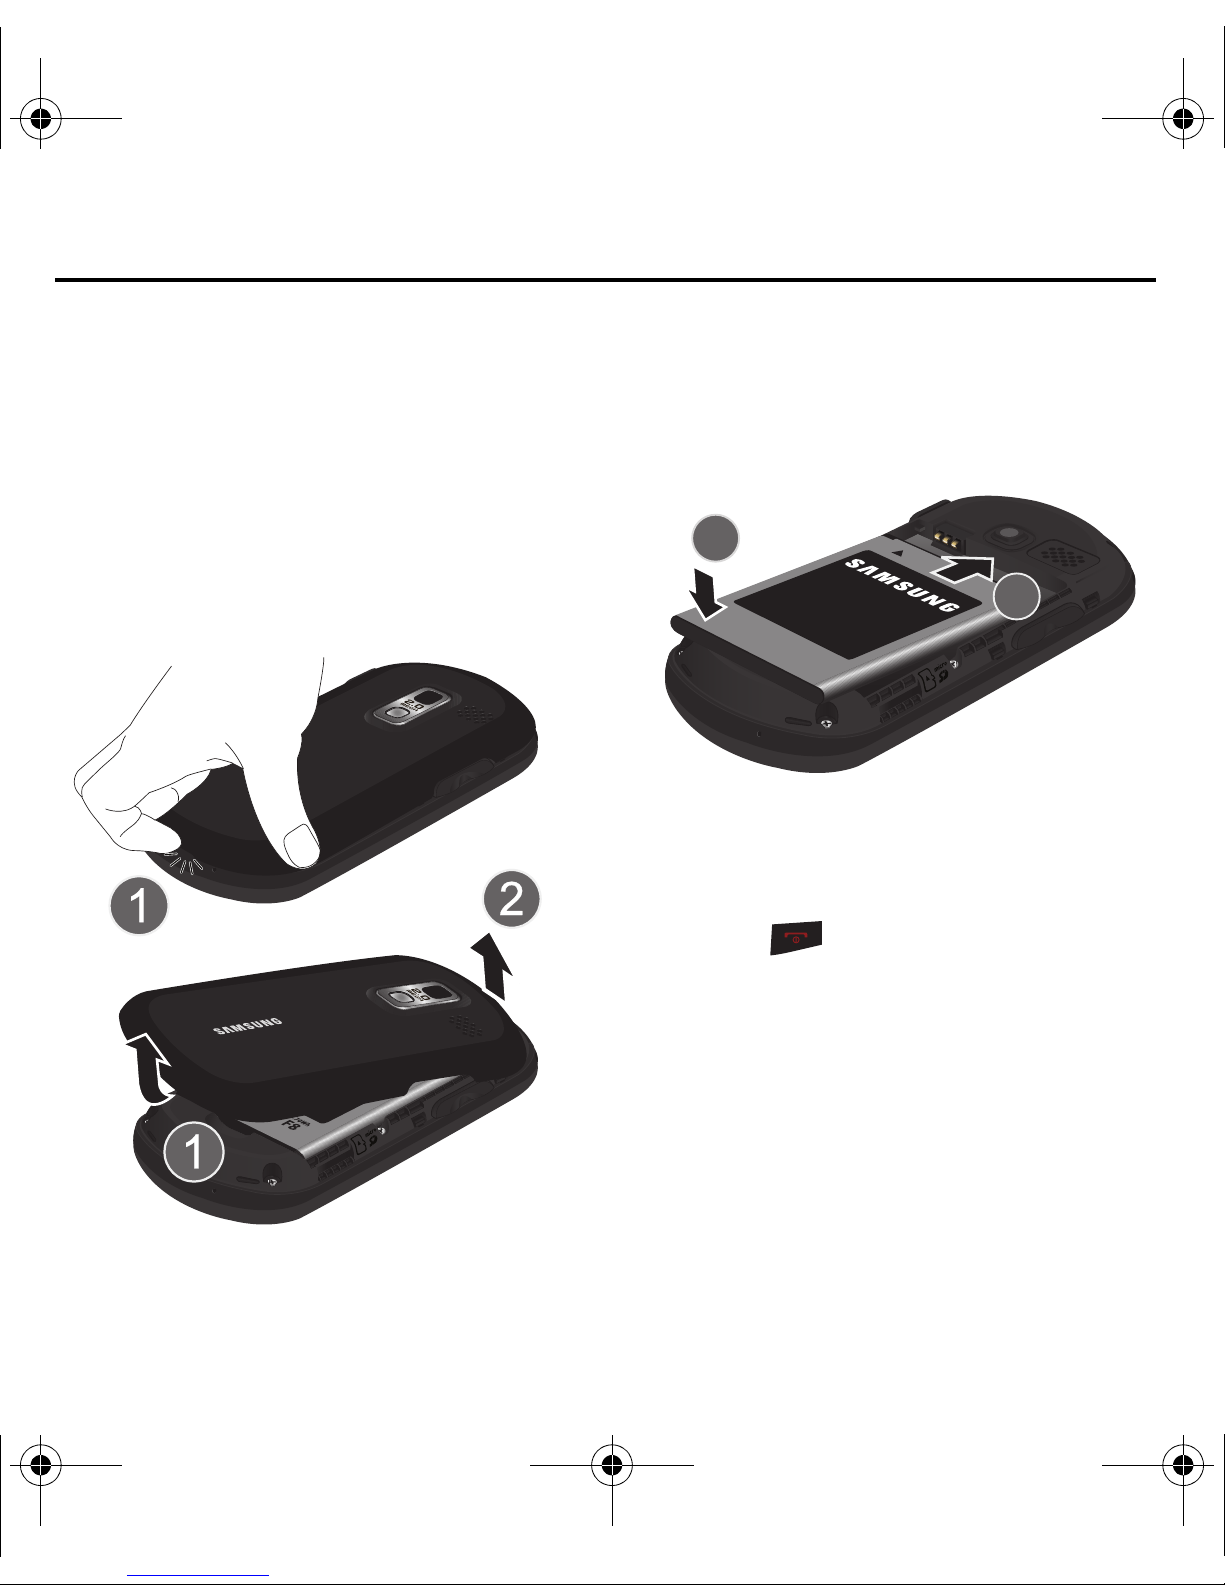
Caution!:
Inserting the microSD Card
Caution!:
Make sure your battery is fully charged before using
the memory card. Your data may become damaged or
unusable if the battery runs out while using the
microSD card.
It is easy to damage the microSD card and it’s adapter
with improper handling. Please be careful when
inserting, removing, or handling the microSD card.
1. To remove the battery cover (located on the
back of the phone), place your fingernail in the
battery cover and firmly “pop” the cover off the
device (similar to a soda can).
•
Reduce the backlight time.
•
Turn off Bluetooth when not in use.
•
Check the Running Services and close any unnecessary
applications.
•
Do not wait until your battery is completely depleted
before charging the device. Repeating this process of a
complete discharge and recharge can over time reduce
the storage capacity of any battery.
6
4. Replace the cover by lining up the tabs and
then firmly pressing the cover down until it
snaps into place. Ensure that the battery is still
2.
Locate the microSD card slot along the side of
the device.
3. With the gold contact pins facing downward,
carefully insert the microSD card into the
opening and firmly push it in until you hear a
click indicating the card is securely
installed.
Caution!:
properly installed before turning on the phone.
It is easy to damage the microSD card and it’s
adapter with improper handling. Please be careful
when inserting, removing, or handling the microSD
card.
Getting Started 7
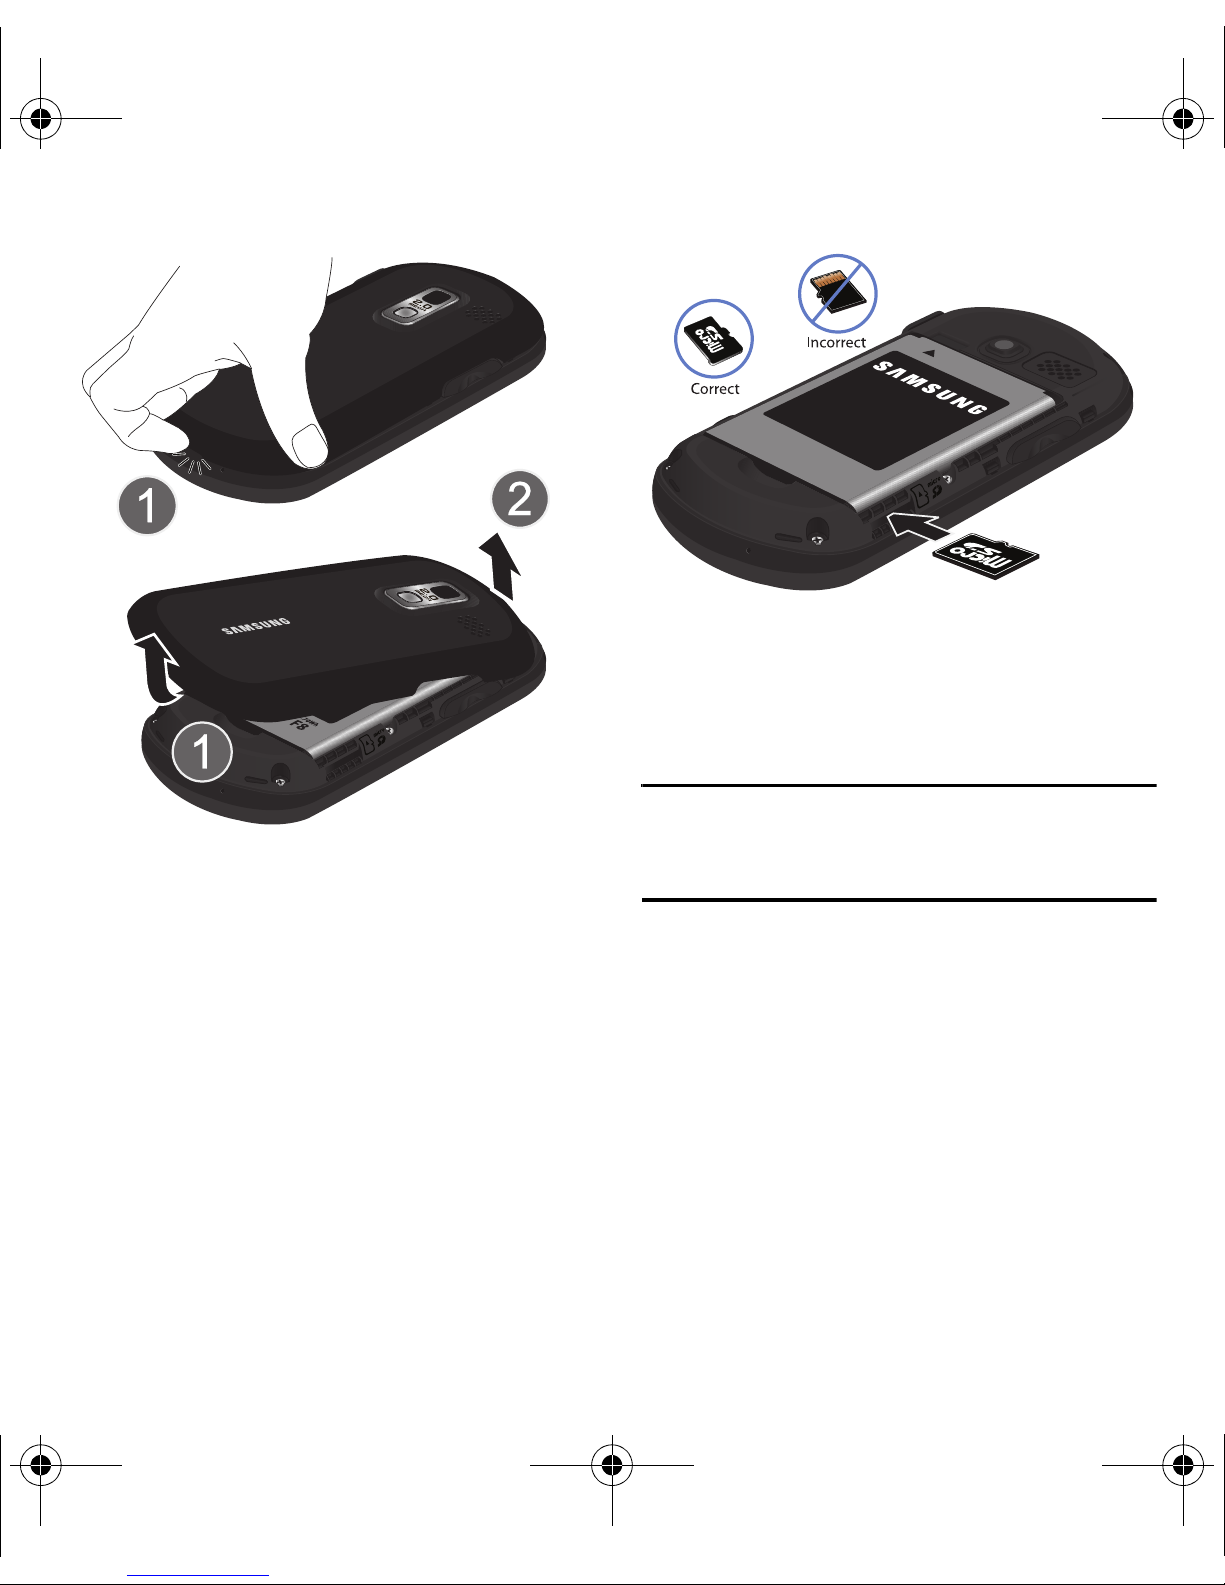
Removing the microSD Card
1. Locate the microSD card slot along the side of
the device.
Caution!:
DO NOT remove a microSD card while files are being
accessed or transferred. Doing so will result in loss or
damage of data.
2. Firmly press the card into the slot and release
(it should pop partially out of the slot).
3. Remove the card from the slot.
4. Replace the cover by lining up the tabs and
then firmly pressing the cover down until it
snaps into place.
5. Ensure the battery is still properly installed
before turning on the phone.
8
7
8
9
11
10
4
3
2
1
13
5
6
12
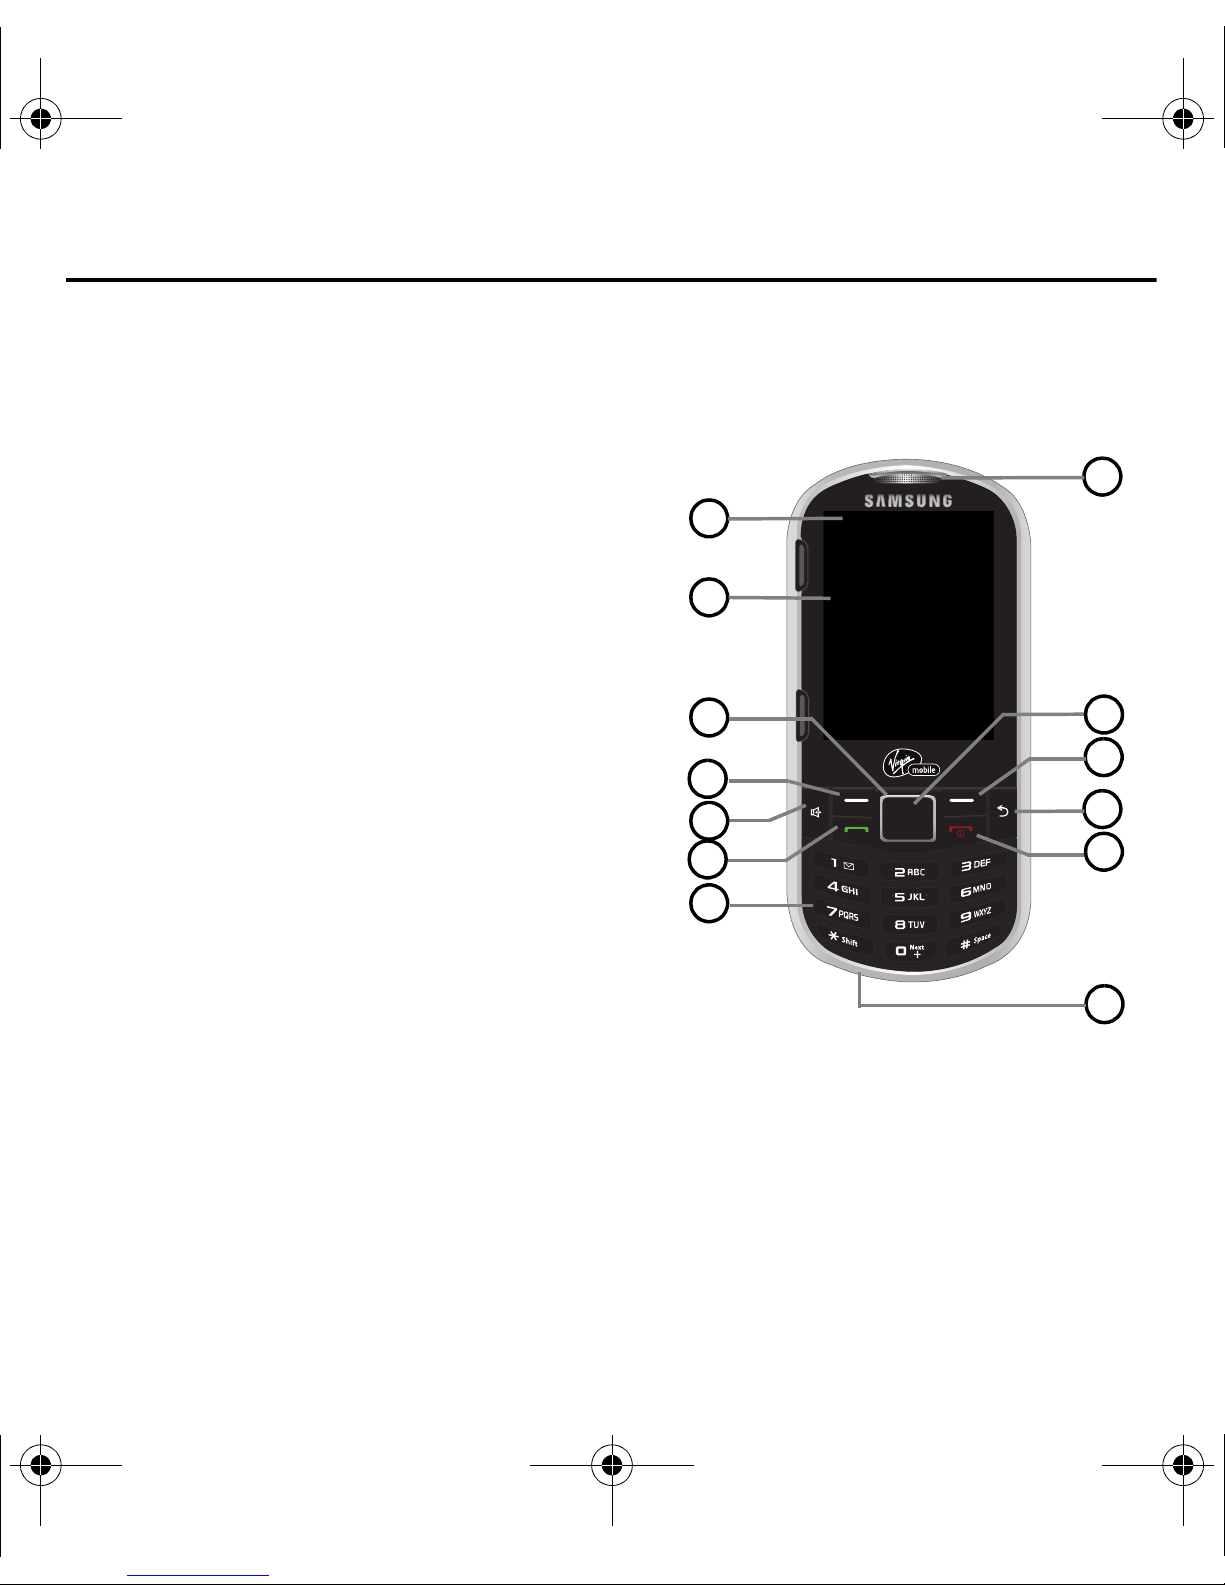
Section 2: Understanding Your Phone
Understanding Your Phone
This section outlines key features of your phone. It
also describes the phone’s keys, screen and the
icons that display when the phone is in use.
Features of Your Phone
The following list outlines a few of the features
included in your Samsung M575.
•
Large 2.4” display
•
Slide out, full 4-row QWERTY keyboard makes texting,
e-mailing, networking and instant messaging easy
•
Easy navigation
•
Synchronize calendar, e-mail and contacts
•
Dedicated keys for quick access to popular applications
•
Enhanced multimedia featuring built-in music player and
2.0 MP Camera
•
Pre-loaded games and applications
Your Device
Front View of the Phone
Key Functions
1.
Status Bar Icons
phone’s status and options, such as signal
strength, ringtone settings, messaging, and
battery charge.
provide information about your
Understanding Your Phone 9

2.
Display Screen
displays all the information
9.
END/POWER Key
turns the phone on or off, ends
needed to operate your phone, such as the call
status, the Contacts list, and the date and time.
3.
Navigation Key
- Up
displays the MY ACCOUNT screen.
- Down
- Left
- Right
displays the MISSED ALERTS screen.
displays the TOOLS + SETTING screen.
displays the MESSAGING screen.
from idle mode:
When navigating, this key displays the previous
selection or menu when accessing other menus
or features.
4.
Left Option Key
in Idle mode, selects the MENU.
Or, allows you select left option key actions or
menu items corresponding to the bottom left
line on the Display Screen when the phone is in
portrait mode.
a call, or returns to standby mode. While in the
main menu, it returns the phone to standby
mode and cancels your input. When you
receive an incoming call, press to enter silent
mode and mute the ringtone.
10.
BACK/Clear Key
deletes characters from the
display in text entry mode. When in a menu,
pressing the Back key returns you to the
previous menu. This key also allows you to
return to the previous screen in a data session.
11.
Right Option Key
in Idle mode, displays the
CONTACTS list. Or, lets you select left and right
option key actions or menu items
corresponding to the bottom left and bottom
right lines on the Display Screen when the
10
5.
Speaker Key
in standby mode, displays recent
History events. During a call, this key activates
the speakerphone feature.
6.
TALK Key
allows you to place or receive calls,
answer Call Waiting, or activate Voice Dial.
7.
Keypad
lets you enter numbers, letters, and
characters, and navigate within menus. Press
and hold keys for speed dialing.
8.
Microphone
allows other callers to hear you
clearly when you are speaking to them.
phone is in portrait mode.
12.
MENU/OK
lets you access the phone’s menus
and selects the highlighted choice when
navigating through a menu.
13.
Earpiece
lets you hear the caller and automated
prompts.
2
1
1
2
1
3
4
5
6
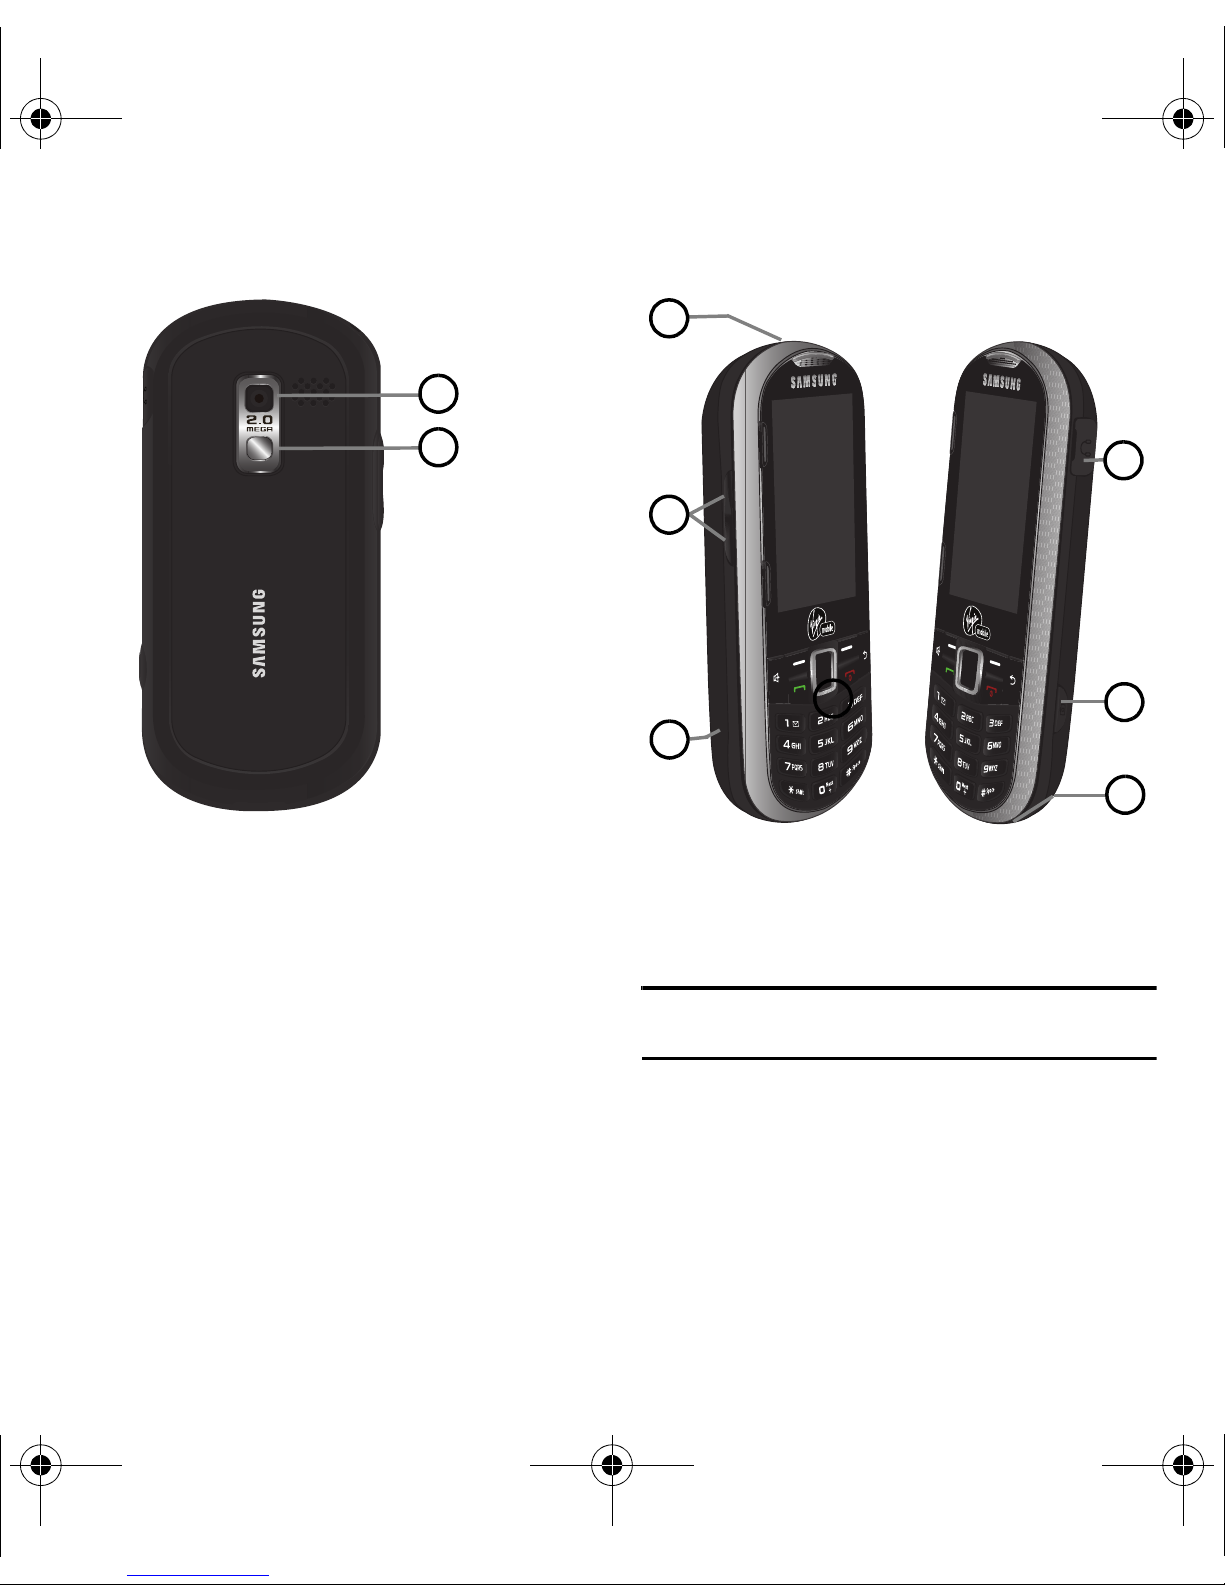
Camera View of the Phone
Side Views of the Phone
1.
Camera lens
contains the hardware enabling
1.
Charger/Accessories Jack
allows you to
you to capture pictures.
connect the phone charger or an optional USB
2.
Mirror
as part of the built-in camera, lets you
cable.
see yourself when taking a self-portrait
picture.
Caution!:
Inserting an accessory into the incorrect jack may
damage the phone.
Understanding Your Phone 11
2.
Volume Button
allows you to adjust the ringtone
Viewing the Display Screen
volume in standby mode (with the phone open)
or adjust the voice volume during a call. The
volume button can also be used to scroll up or
down to navigate through the different menu
options.
3.
microSD Card (internal)
allows you use a
microSD card to expand the memory of your
phone. To gain access to this slot, you must
first remove the battery cover.
4.
Cover Release Latch
allows you remove the
battery cover and expose both the internal
battery compartment and internal microSD
card slot.
5.
Camera Button
allows you activate the camera
and camcorder and take pictures and videos.
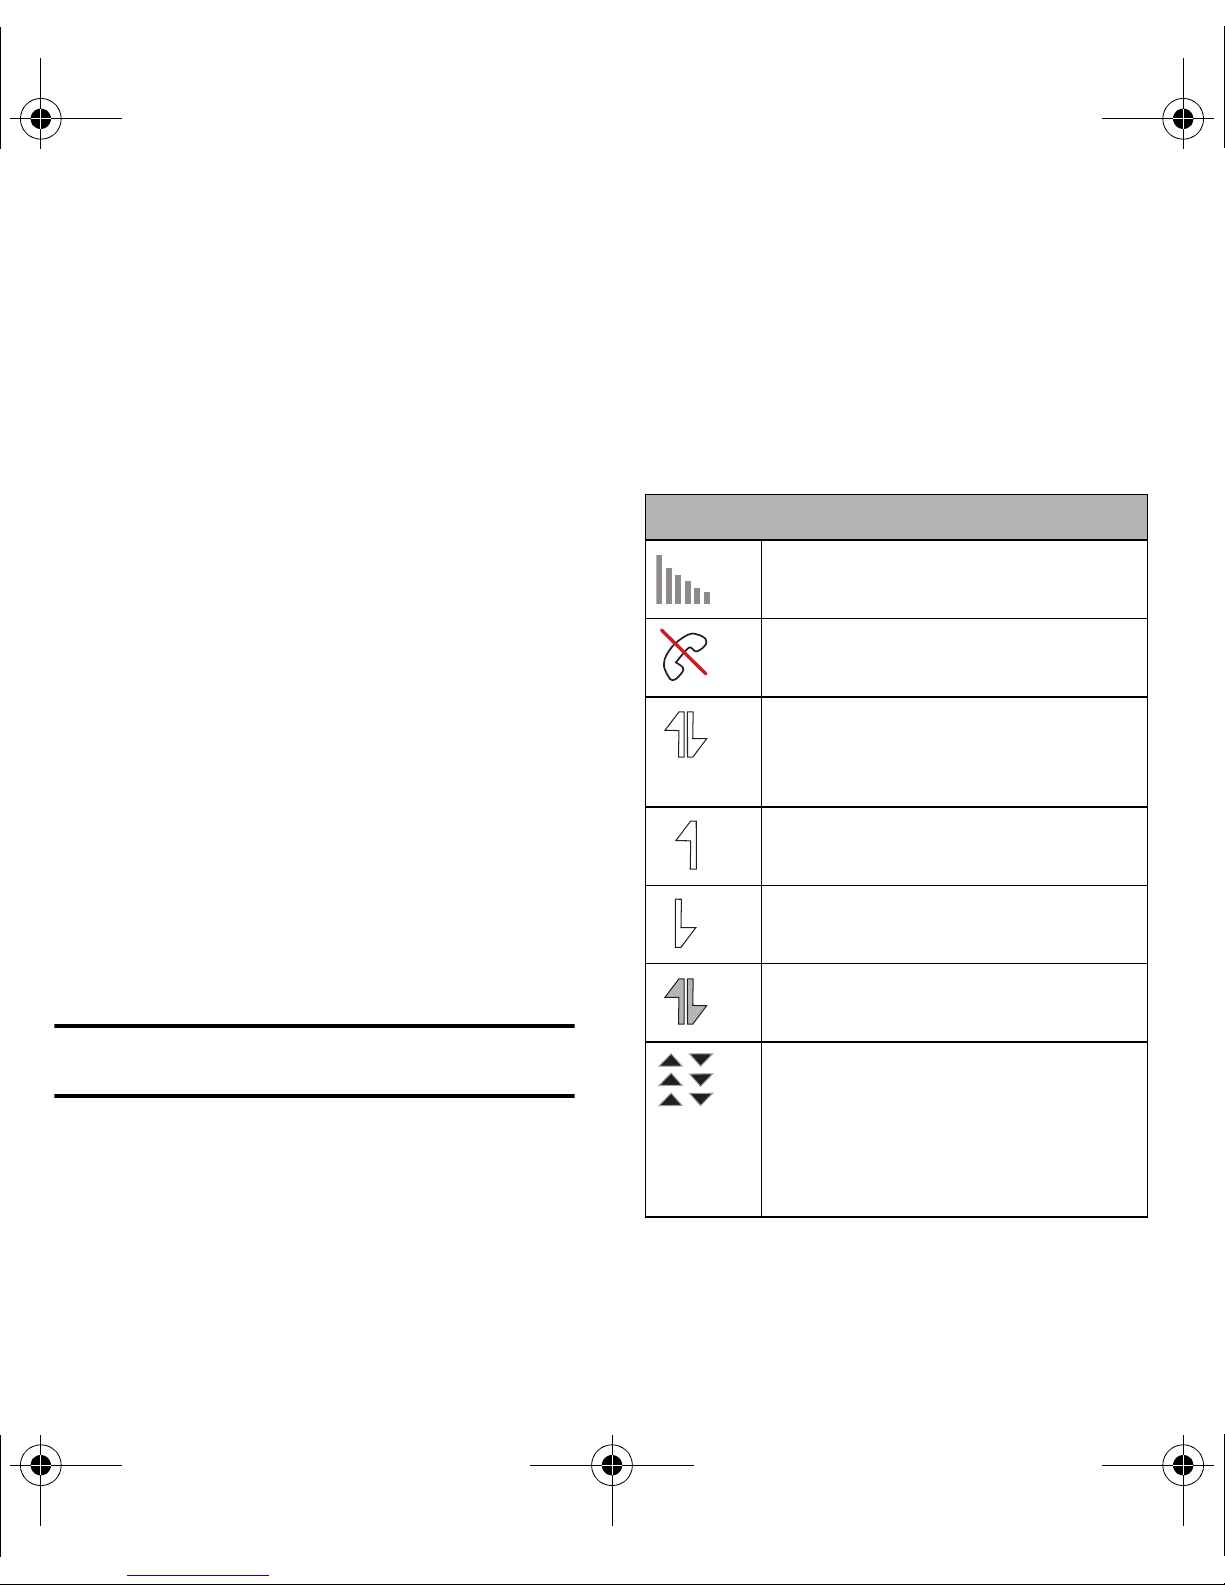
Icon Glossary
Your device’s display screen provides information
about your device’s status and options. This list
identifies the symbols you will see on your device’s
display screen:
Status Bar - Service Icons
Signal Strength
– Your current signal
strength. (More bars = stronger signal.)
No Service
– Your phone cannot find a
usable signal.
Data Status
– 1xRTT data service is
available. When active, the icon is
animated.
Data Sending
– 1xRTT data service is
transmitting data.
6.
Caution!:
12
Headset Jack
allows you to plug in either a
stereo headset or an optional headset for
convenient, hands-free conversations.
CAUTION! Inserting an accessory into the incorrect
jack may damage the phone.
Data Receiving
– 1xRTT data service is
receiving data.
Data Dormant
– Data service is currently
dormant.
EVDO Data Service Available
–payLo™ by
Virgin Mobile mobile broadband data
service (EVDO) is available. When active
and communicating, the icon is
animated.
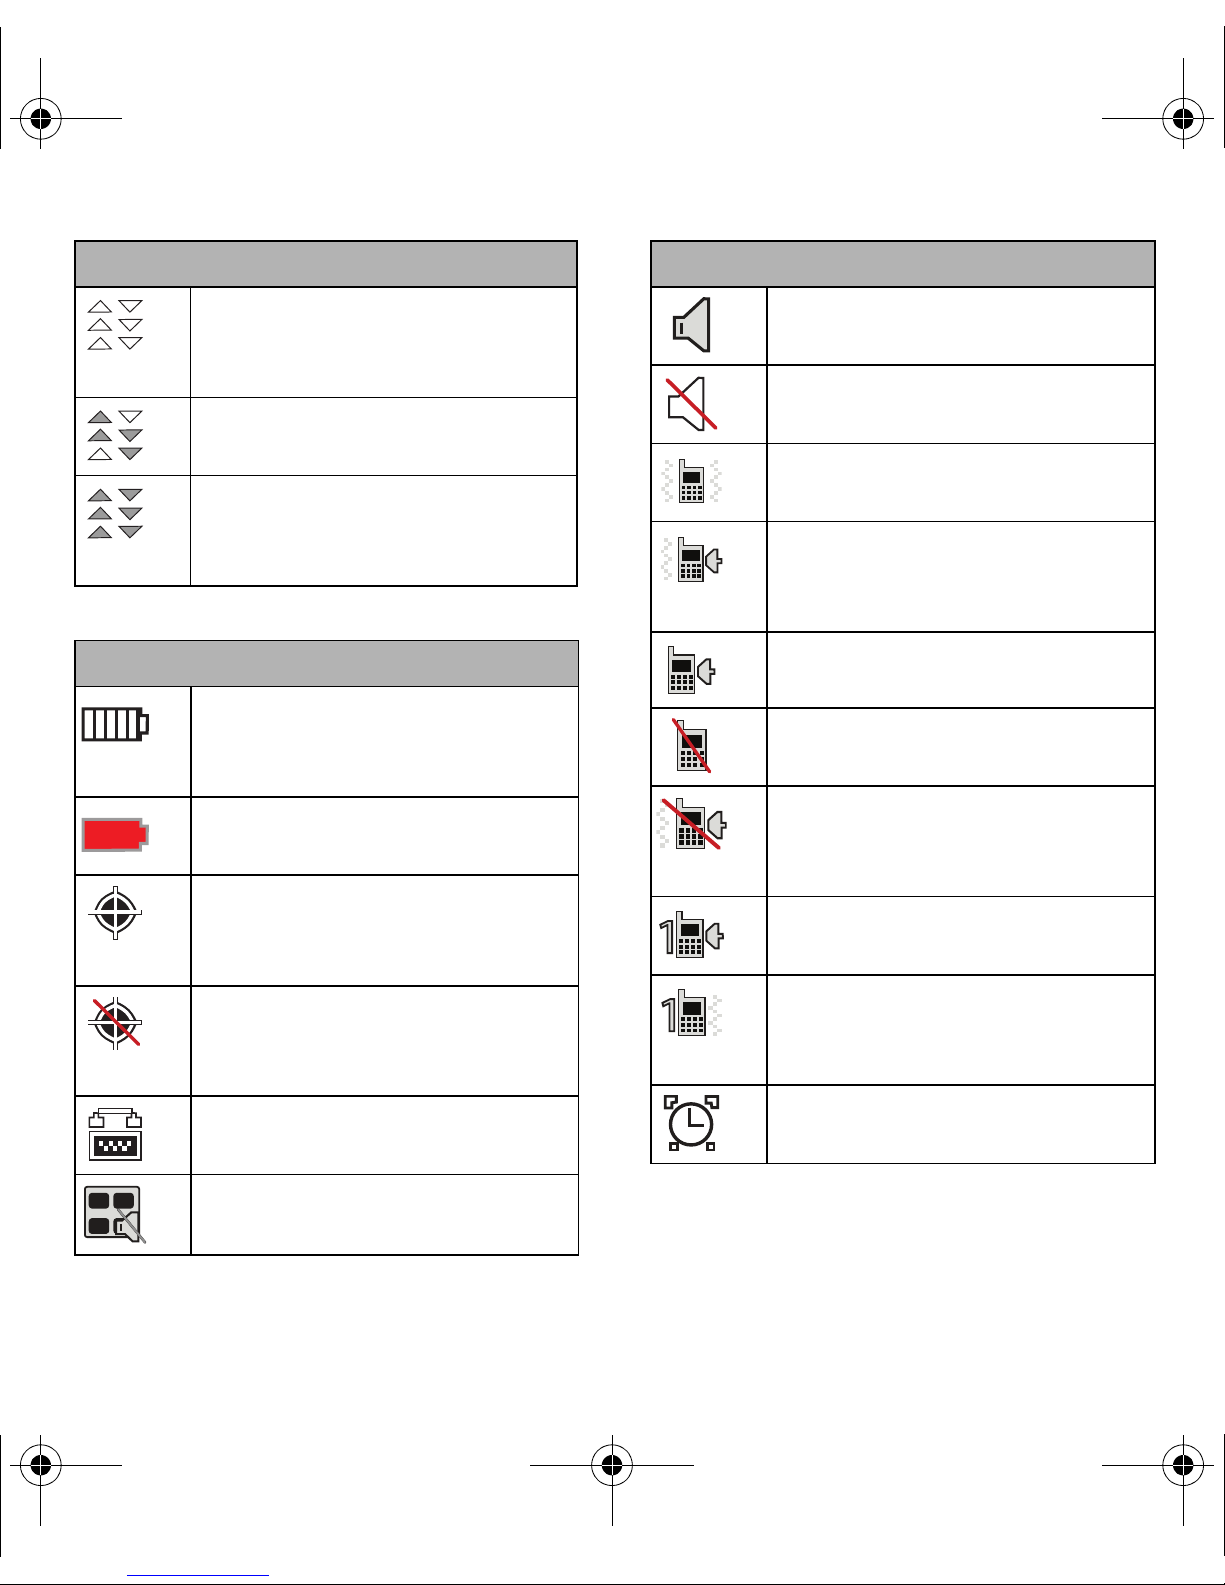
Status Bar - Service Icons
EVDO Data Service Status
of the payLo™ by Virgin Mobile mobile
broadband data service.
EVDO Data Service Active
broadband data service (EVDO) is active.
EVDO Data Service Dormant
broadband data service (EVDO) is
dormant.
Status Bar – Status Icons
Battery Strength
charge level. (Icon shown is fully
charged.)
Low battery
– Your current battery charge
level is low.
Location On
feature is on and available for locationbased services such as GPS Navigation.
– Current status
– mobile
– mobile
– Your current battery
– Your phone’s location
Status Bar – Status Icons
Speakerphone Enabled
speakerphone feature is enabled.
Silence All
– All incoming sounds are
turned off.
Vibr ate On ly
only.
Ring and Vibrate
ringtone volume set and the vibrate option
checked (enabled).
Ringtone
– The phone is set to ring only.
Ringtone Off
and vibrate mode is disabled.
Ringtone Off and Vibrate
the ringtone deactivated and the vibrate
option checked (enabled).
1 Beep
– Your phone is set to beep when
an incoming call is received.
– Your phone’s
– The ringtone is set to vibrate
– Your phone has the
– The ringtone is turned off
– Your phone has
Location Off
– Your phone’s location
feature is off. Your location is available
only for 911.
TTY
– Your phone is operating in TTY
mode.
Keytones Muted
– Your phone’s key tones
are muted.
1 Beep and Vibrate
– Your phone is set to
beep and vibrate when an incoming call is
received.
Alarm
– An alarm has been set on your
phone.
Understanding Your Phone 13
AWB
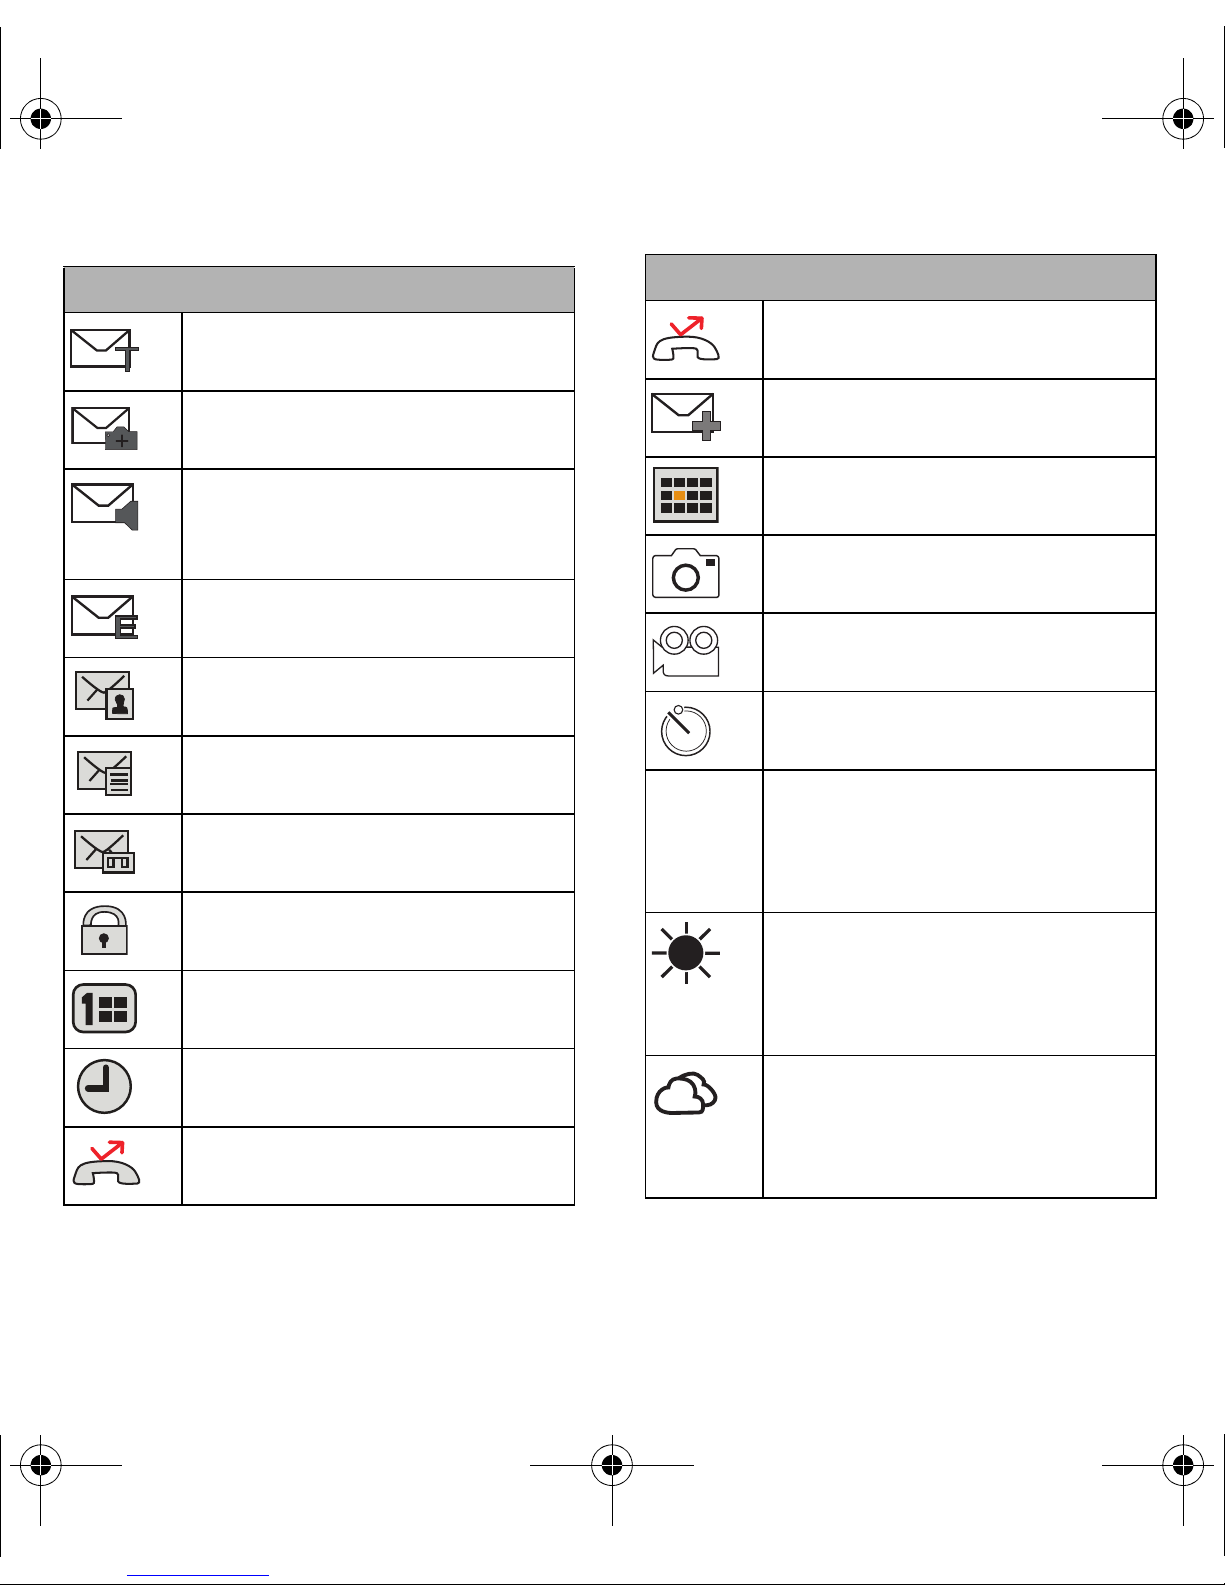
Status Bar - Message Icons
Text Message
messages.
Picture Mail Message
picture mail messages.
Voicemail
messages. Press and hold to call your
voicemail box.
E-mail Message
messages.
Missed Picture Mail Message
new Picture mail message.
Missed Text/E-mail Message
new unread text or e-mail messages.
Missed Voicemail Message
unheard vociemail messages.
Locked Message
messages.
Missed Scheduler
scheduled event.
– You have new text
– You have new voicemail
– You have new
– You have new e-mail
– You have a
– You have
– You have new
– You have new text
– You have missed a
Status Bar - Other Icons
Missed Call Alert
alert.
Multiple Alerts
messages.
Calendar Event
scheduled.
Camera Mode
you are in Camera Mode.
Camcorder Mode
enabled and you are in Camcorder Mode.
Self Timer
enabled.
White Balance (Auto)
has been set to Automatic. This is used for
taking pictures indoors or outdoors using
automatic white balance settings.
White Balance (Daylight)
balance has been set to Sunny. This is
used for taking pictures or movies
outdoors on bright sunny days.
– You have missed a call
– You have multiple alert
– You have a pending event
– The camera is enabled and
– The camcorder is
– The self-timer function is
– The white balance
– The white
Missed Alarm
event.
Missed Call
incoming call.
14
– You have missed an alarm
– You have missed an
White Balance (Cloudy)
balance has been set to Cloudy. This is
used for taking pictures or movies
outdoors under cloudy conditions.
– The white
Status Bar - Other Icons
White Balance (Incandescent)
balance has been set to Tungsten. This is
used for taking pictures or movies indoors
under normal lighting conditions.
White Balance (Fluorescent)
balance has been set to Fluorescent. This
is used for taking pictures or movies
indoors under fluorescent lighting
conditions.
White Balance (Manual)
balance has been set to Manual. This is
used for taking pictures indoors or
outdoors using your own custom settings.
Recording
currently being recorded.
Paused
– A voice memo or video has been
paused.
Play
– A a voice memo or video is playing.
– The white
– The white
– The white
– A video or voice memo is
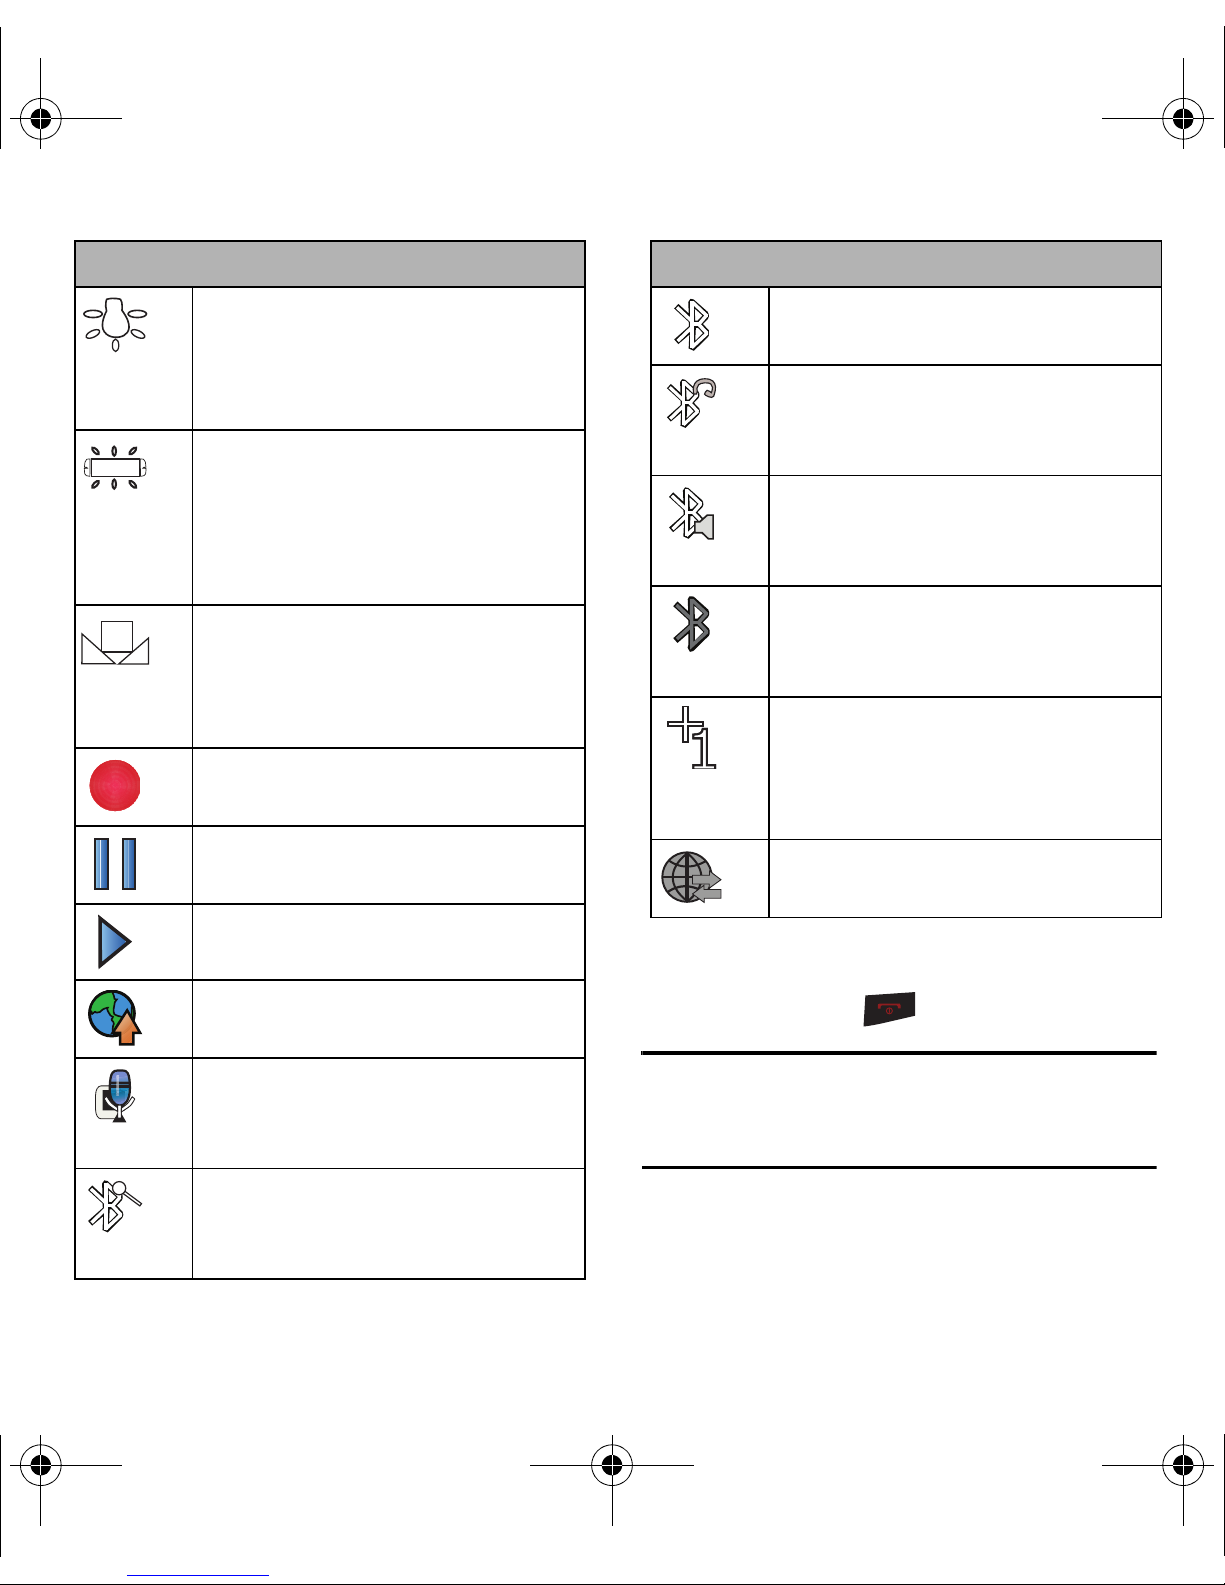
Status Bar - Other Icons
Bluetooth (Connected)
device is connected.
Bluetooth (Headset Connected)
Bluetooth Headset is connected and
visible.
Bluetooth (Stereo Connected)
Bluetooth stereo device is connected and
visible.
Bluetooth (Hidden)
to other Bluetooth devices and not
transmitting its information.
Background Application +1
that more than one application is currently
running and one has been minimized and
placed in the background.
Wireless Backup
backup session is in progress.
– The Bluetooth
– The
– The
– The device is hidden
– Indicates
– A current wireless
Media – Files have been uploaded to an
online album or folder.
Voice Caption
– Voice captioning is
enabled and that audio is currently being
recorded.
Bluetooth (Enabled/Active)
– The
Bluetooth technology is active and
enabled.
Turning the Phone On
䊳
Press and hold to power on the phone.
Tip:
If the Password screen displays, use your keypad to enter
your four-digit password to unlock the phone. By default,
the password is the last four digits of the current phone
number.
Understanding Your Phone 15

Activating Your payLo by Virgin Mobile
Phone Account
Prior to using your Samsung M575 for talking,
messaging, or surfing the Web, you must first activate
your service on this phone with payLo™ by Virgin
Mobile. You need your phone's serial number (MSID)
to activate your Phone.
Create your account and pick your plan
1. From your computer, visit
www.virginmobileusa.com
2. When promoted, enter the
printed on the sticker located on the back of
your phone.
3. Follow the remaining instructions to choose
your plan and select a payment method.
4. You must follow the
instructions (below) after creating your plan in
order to start using your phone.
Activating the Phone
1. From the Main screen, press
2. Press
Yes
at the prompt. The phone connects to
and click on
Activate
serial number (MEID)
Activating the Phone
ACTIVATE
.
.
Managing Your Account
1. From the Main screen, press
➔
Account
Balance+Usage
Menu
➔
My
. Your balance and
important account information display
on-screen.
2. From your computer, log in with your phone
number and Account PIN at
www.virginmobileusa.com
where you can do
everything previously mentioned and a lot
more.
Top-Up Your Account
Buy Top-Up cards at thousands of retailers. Or, make
it real easy by registering your credit/debit card or
PayPal account.
Auto Top-Up
Auto Top-Up is the easiest way to keep your service
working. Set it to Top-Up your account once a month
so you can keep emailing, instant messaging (IM),
Tweeting with Twitter, surfing, and talking. No
interruptions, no sweat. Activate Auto Top-Up and
adjust your settings anytime by logging in at
www.virginmobileusa.com
.
the network.
3. Follow the prompts or text on the screen to
complete activation.
16

Manual Top-Ups
1. From Your Computer, if you don't want to set
Auto Top-Up, you can still log in at
www.virginmobileusa.com
whenever you need a
quick Top-Up.
2. From Your Phone, dial *729 on your phone or
just select
Menu
➔
My Account
.
Navigating Through the Menus
Menu navigation can be accomplished using the
navigation keys on the keypad, or using the
directional keys on the QWERTY keyboard.
The navigation key on your phone lets you scroll
through and select on-screen items. Many menus
feature a scroll bar on the right to help you keep track
of your position in the menu.
Selecting Menu Items Using the Navigation Key
For example, to view your messages:
1. From standby mode, press
MENU
to access the
main menu.
2. Highlight
Messaging
➔
Messages
and press
to display your available messages.
Displaying the Previous Menu
To display the previous menu:
䊳
Press the
Left Navigation
key.
To return to standby mode:
䊳
Press .
Displaying Your Phone Number
䊳
Highlight and press
➔
Settings
➔
Number/User ID
Your phone number and other phone
MENU
➔
Tools + Settings
Phone Information
.
➔
Phone
Use the navigation key to scroll through the phone’s
menu options and provide a shortcut to phone
functions from standby mode.
Selecting Menu Items Using the Arrow Keys
As you navigate through a menu, options highlight.
Select any option by pressing a directional arrow
from the QWERTY keyboard and moving the onscreen selection, highlighting it and pressing ENTER.
If the option is numbered, press the corresponding
number on the phone’s keypad to select it.
information displays.
Using the Application Manager
The application manager functions similarly to the
Task Manager on your PC.
When you use one of the applications such as Email,
Instant Messenger, Google Maps, or payLo™ by
Virgin Mobile Navigator, you can use the application
manager to:
•
bring your application to the foreground
•
exit the application
•
exit all applications running in the background
•
launch a new application
Understanding Your Phone 17

1.
Press
MENU
➔
My Stuff
➔
Application Manager
2. Select an application that is running and press
Options
3. Select one of the options associated with your
.
.
particular application.
18

Section 3: microSD Card
Your phone can use an optional memory card
(microSD™) to expand the phone’s available memory
space. The memory card allows you to store images,
videos, and music in your phone.
Refer to page 6, “Inserting the microSD card”, for
instructions on how to insert the microSD card.
microSD Adapter
The optional microSD adapter allows you to use
microSD cards in other SD-compatible devices, like
computers, cameras, and printers. Before using the
microSD card with an SD-compatible device, you will
need to insert the microSD card into the microSD
adapter.
To insert the microSD card into the microSD adapter:
䊳
With the label side of the microSD card facing
up, insert the card into the supplied microSD
adapter, and gently slide the card until it is fully
inserted.
To remove the microSD card from the microSD adapter:
䊳
Hold the front edge of the microSD card, and
gently pull it out to remove it from the adapter.
Slide the Write Protection lock tab down into the
“Lock” position to prevent overwriting data. To add or
remove data from the microSD card, slide the Write
Protection lock tab up into the normal position.
microSD Card Settings
Creating Folders in the microSD Card
The following steps allow your phone to create
default folders for storing files in your microSD card.
䊳
With an optional, memory card inserted, press
MENU
➔
Storage
OPTIONS
Tools + Settings
➔
File Manager
➔
Create Folder
➔
Tools
➔
Memory Card
.
➔
Mass
➔
With a formatted microSD card, there are no default
folders created. When you first access the Camera,
the phone creates a Graphic folder. The first time you
access the Music Player, the phone creates and
displays the Music/Tone folders.
The phone creates the microSD’s default folders.
Viewing Memory in the microSD Card
䊳
With an optional memory card inserted,
highlight and press
MENU
➔
Tools
➔
Mass
Write Protection
The microSD adapter has a built-in Write Protection
lock to prevent accidental overwriting or removal of
your data when the microSD card and adapter are
inserted in another device.
Storage
➔
Memory Info
➔
Card
.
The used and available memory space
displays.
microSD Card 19
Correct
Incorrect
Formatting the microSD Card
Formatting a microSD card permanently removes all
files stored on the card.
1. With an optional memory card inserted,
highlight and press
Tools
➔
Mass Storage
2. Enter your lock code.
3. Press
FORMAT
MENU ➔Tools + Settings
➔
Format Memory Card
.
A warning displays.
Note:
The formatting procedure erases all the data on the
microSD card, after which the files CANNOT be retrieved.
To prevent the loss of important data, please check the
contents before you format the card.
microSD Card Folders
Displaying the microSD Card Folders
➔
.
Connecting Your Phone to Your
Computer
Before using your phone’s mass storage capabilities,
you need to prepare your phone’s data services to
synchronize with your desktop or laptop computer.
Once you connect the phone to the computer, you can
transfer your data to or from the microSD card.
1. With the phone turned on, plug one end of a
compatible USB cable into the phone's
Charger/Accessories Jack.
All the files stored in your microSD are accessible
through your microSD card folders.
1. Insert an optional, memory card, then highlight
and press
Mass Storage
2. Press or press the appropriate option key
MENU
➔
➔
Tools + Settings
➔
Tools
File Manager ➔ Memory Card
to view or play a file.
20
➔
.
2. Connect the other end of the cable to your
computer and turn on the phone.
3. With the optional memory card inserted, press
MENU
➔
Tools + Settings
Mass Storage
➔
Connect to PC
➔
Tools
.
➔

Locate the newly created Drive letter on your
4.
computer. You can begin using the memory
card as a storage device.
Note:
During this connection using the USB port, you are
unable to use your phone to make or receive calls.
To remove the connection when you finish
transferring data
1. Click the USB device icon on your computer’s
taskbar, and follow the on-screen instructions
to safely unplug the USB cable.
2. Press
DISCONNECT
➔
DISCONNECT
.
Important Connection Information
No driver installation is required. The USB drivers are
built into the phone and initiate during the connection
process.
•
During this connection using the USB port, you are unable
to use your phone to make or receive calls.
•
If you connect a mass storage device to a peripheral
device, your device may not work properly.
•
To avoid loss of data, DO NOT remove the USB cable, the
microSD card, or the battery while files are accessed or
transferred.
•
DO NOT use your computer to change or edit folder or file
names on the microSD card, and do not attempt to
transfer large amounts of data from the computer to the
microSD card. Doing so may cause the microSD card to
fail.
•
DO NOT turn off or restart your computer, or put it into
standby mode, while using a mass storage device. Doing
so will result in loss or damage of data.
microSD Card 21
Section 4: Call Functions
This section describes features and functionality
associated with making or answering calls, and the
Contacts list, which is used to store contact
information.
Displaying Your Phone Number
䊳
Press
MENU
➔
Tools + Settings
Phone Information
➔
Phone Number/User ID
➔
Settings
(Your phone number and other information
about your phone as well as your account
information displays.)
Making Calls
1. Enter a phone number from standby mode.
2. Press
3. Press when you are finished.
Tip:
Press twice to redial your last outgoing call.
Press , highlight a number, and press
redial other recent numbers.
again to
➔
.
Dialing Options
When you enter numbers in standby mode, you will
see a variety of dialing options displayed as option
keys on the phone’s screen.
䊳
Press
SEND MESSAGE
to send a message to the
number.
– or –
Press
OPTIONS
, then press the corresponding
option key to initiate an option.
• Save contact
• Hard Pause
: saves this number to Contacts.
: enters a hard pause in the phone
number string.
•2-Sec Pause
: enters a 2-second pause in the phone
number string.
Answering Calls
1. Make sure your phone is on. (If your phone is
off, incoming calls are directed to voicemail.)
2. Press to answer an incoming call.
You can also place calls from your phone by speed
dialing numbers from your Contacts list.
22
The phone notifies you of incoming calls in the
following ways:
•
The phone rings or vibrates.
•
The indicator light flashes.
•
The backlight illuminates.
•
The screen displays an incoming call message.

If the incoming call is from a number stored in your
Contacts, the entry’s name is displayed. You may also
see the caller’s phone number, if available.
Ending a Call
䊳
Press
Missed Call Notification
When you do not answer an incoming call, your
screen displays the Missed Alerts Call log.
To display the Missed Call entry from the notification
screen:
䊳
Highlight the entry and press .
Tip:
Press to dial the phone number.
To display a Missed Call entry from standby mode:
1. Press ➔
2. Highlight an entry and press .
Missed alert
.
Calling Emergency Numbers
Dial 9 1 1 to dial this emergency service, even if your
phone is locked or your account is restricted.
Emergency Calling Options
䊳
During an emergency call, press
OPTIONS
to
display your options. Highlight an option and
press .
•Speaker On: activates speakerphone mode. (If you
are in speakerphone mode, the option displays as
Speaker Off to deactivate.)
• Unlock Phone: unlocks your phone (displays only if
the phone is locked).
• Close Menu
: closes the pop-up menu (displays only
if the phone is unlocked).
Tip:
Press My Phone # to display your phone number during an
emergency call.
To exit Emergency mode
䊳
Press * # until Emergency the phone exists
:
Emergency mode.
Enhanced 911 (E911) Information
This phone features an embedded Global Positioning
System (GPS) chip necessary for utilizing E911
emergency location services where available.
Note:
When you place an emergency call, your phone
automatically enters Emergency mode.
When you place an emergency 911 call, the GPS
feature of your phone seeks information to calculate
your approximate location. Depending on several
variables, including availability and access to satellite
signals, it may take up to 30 seconds or more to
determine and report your approximate location.
Call Functions 23

Important!:
Always report your location to the 911 operator
when placing an emergency call. Some designated
emergency call takers, known as Public Safety
Answering Points (PSAPs) may not be equipped to
receive GPS location information from your phone.
In-Call Options
1. During a call, press
available in-call features.
2. Press the corresponding keypad number or
highlight the option and press to select
an option.
The following options may be available through
the Options menu:
•Save
: saves this number to the Contacts list if this
number is a new entry.
•Contacts
• Voice Memo
: displays your Contacts list.
: allows you to record incoming audio
from your conversation.
OPTIONS
to display a list of
• Tools
3. Press
accesses the Tools menu options.
–
Calendar
–
Bluetooth
–
Memo Pad
–
Alarm
–
Calculator
- your calendar entries.
- a list of current Bluetooth devices.
- on-screen memo pad.
- your Alarm events and menu.
- on-screen calculator.
MUTE
during a call to mute the
microphone.
4. Press
UNMUTE
to unmute the microphone.
Using the Speakerphone
To use your phone handsfree or to share a call with
other people:
1. Press the Speaker key until “entering speaker
mode” displays on the screen to activate
Speaker mode.
Caution!:
Because of higher volume levels, do not place the
phone near your ear during speakerphone use.
24
• Phone Info
–
Phone Number
–
Icon Glossary
–
Version
–
Advanced
• Key Mute/Unmute
: displays the following menu options:
- your phone number.
- a list of currently available icons.
- phone software version.
- additional technical information.
: allows you to mute the key tones
from being heard by the caller.
• Messaging
• Recent History
: accesses the Message menu options.
: checks your call log for Recent calls.
You can also erase the logs from this menu.
2. Press the Speaker key until “Exit speaker
mode” displays on the screen to disable
Speaker Mode.
End-of-Call Options
After you receive a call from or make a call to a phone
number that is not in your Contacts, the phone
displays the phone number and the duration of the
call.
䊳
Press
OPTIONS
to your Contacts.
➔
Save
to add the new number

After you receive a call from or make a call to a
phone number that is already in your Contacts list,
the phone displays the entry name, phone number,
and the duration of the call.
䊳
Press
OPTIONS
➔
Contact Details
to view the
Contacts listing for the number.
Note:
The End-of-Call options do not display for calls identified
as No ID or Restricted.
Dialing and Saving Phone Numbers
with Pauses
You can dial or save phone numbers with pauses for
use with automated systems, such as voicemail or
credit card billing numbers.
There are two types of pauses available on your
phone:
•
Hard Pause
press .
•
2-Second Pause
numbers after two seconds. (This is indicated with a t
within the number sequence.)
: sends the next set of numbers when you
automatically sends the next set of
4. Press to dial the number.
– or –
Press
OPTIONS
➔
Save Contact
to save the
number in your Contacts.
Note:
When dialing a number with a hard pause, press
SEND TONES
to send the next set of numbers.
Abbreviated Dialing
Abbreviated Dialing is similar to speed dialing. You
can use either of the following abbreviated dialing
features.
•
Contacts Match
Contacts by entering the last four digits of the number.
Press to dial the retrieved number.
•
Prepend/Abbreviated Dialing
six digits (for example, the area code and prefix) to any
four or five digits you enter. Press
resulting number.
To place a call using Contacts Match Abbreviated
Dialing:
1. Enter the last four to six digits of a Contacts
– Retrieve any number saved in your
– Prepend the first five or
to dial the
Note:
You can use multiple pauses in a phone number and
combine two-second and hard pauses.
To dial or save phone numbers with pauses:
1. Enter the phone number.
2. Press
3. Enter additional numbers.
OPTIONS
➔ Hard Pause or 2-Sec Pause.
entry’s phone number.
2. Press to call the displayed number. (If
there is more than one matched number in
your Contacts, your phone displays the
Dial
list.
3. Highlight a contact name and press to
Abbrev.
place a call.)
Call Functions 25
 Loading...