


LE23R3
Table of contents
 Loading...
LCD TV
LE23R3
Contact SAMSUNG WORLD-WIDE
If you have any questions or comments relating to Samsung products,
please contact the SAMSUNG customer care centre.
Kontakt SAMSUNG
Om du har några frågor eller synpunkter om Samsungs produkter,
är du välkommen att kontakta Samsung Support.
Kontakt SAMSUNG
Hvis du har spørgsmål eller kommentarer vedrørende Samsung produkter,
venligst kontakte Samsung Support.
Kontakt SAMSUNG
Om du har spørsmål eller synspunkter om Samsungs produkter,
er du velkommen å kontakte Samsung Support.
Ota yhteyttä Samsungiin
Jos sinulla on kysymyksiä tai kommentteja koskien Samsung tuotteita
voitte ottaa yhtyettä Samsung tukeen.
Dünyanın her yerinden SAMSUNG’a ula
flfl
ın
Samsung ürünleri ile ilgili sorularınız ya da yorumlarınız varsa lütfen SAMSUNG
mü
fl
teri hizmetleri merkezi ile temasa geçin.
Country
BELGIUM
CZECH REPUBLIC
DENMARK
FINLAND
FRANCE
GERMANY
HUNGARY
ITALIA
LUXEMBURG
NETHERLANDS
NORWAY
POLAND
PORTUGAL
RUSSIA
SLOVAKIA
SPAIN
SWEDEN
U.K
UKRAINE
Customer Care Centre
02 201 2418
844 000 844
38 322 887
09 693 79 554
08 25 08 65 65 (€ 0,15/min)
01805 - 121213 (€ 0,12/min)
06 40 985 985
199 153 153
02 261 03 710
0900 20 200 88 (€ 0.10/min)
231 627 22
0 801 801 881
80 8 200 128
8-800-200-0400
0850 123 989
902 10 11 30
08 585 367 87
0870 242 0303
8-800-502-0000
☎
www.samsung.com/be
www.samsung.com/cz
www.samsung.com/dk
www.samsung.com/fi
www.samsung.com/fr
www.samsung.de
www.samsung.com/hu
www.samsung.com/it
www.samsung.lu
www.samsung.com/nl
www.samsung.com/no
www.samsung.com/pl
www.samsung.com/pt
www.samsung.ru
www.samsung.com/sk
www.samsung.com/es
www.samsung.com/se
www.samsung.com/uk
www.samsung.com/ur
Web Site
BN68-00927P-00
LE26R3
Owner’s Instructions
Before operating the unit,
please read this manual thoroughly,
and retain it for future reference.
ON-SCREEN MENUS
PC DISPLAY
PICTURE IN PICTURE (PIP)
TELETEXT
Register your product at www.samsung.com/global/register

Precautions When Displaying a Still Image
A still image may cause permanent damage to the TV screen.
• Do not display a still image on the LCD panel for more than 2 hours as it can cause screen image retention.
This image retention is also known as "screen burn".
To avoid such image retention, reduce the degree of brightness and contrast of the screen when displaying a still image.
• Watching the LCD TV in 4:3 format for a long period of time may leave traces of borders displayed on the left, right and center of
• Displaying still images from Video games and PC for longer than a certain period of time may produce partial after-images.
To prevent this effect, reduce the ‘brightness’ and ‘contrast’ when displaying still images.
Att tänka på vid visning av stillbild
Stillbilden kan orsaka permanenta skador på bildskärmen.
• Visa inte en stillbild på skärmen i mer än två timmar, eftersom det kan leda till att bilden ligger kvar på skärmen.
Att bilden på skärmen behålls kallas även “bildskärmsbränning”.
Du kan undvika att bilden behålls genom att minska på ljusstyrkan och kontrasten på bildskärmen när du visar stillbilder.
• Användning av LCD TV:n i 4:3-format under en längre tid kan lämna spår av kanterna till vänster, höger och mitt på skärmen
• Visning av stillbilder från tv-spel och datorer längre stunder kan skapa delvisa efterbilder.
För att förhindra detta ska du minska på ljusstyrka och kontrast vid visning av stillbilder.
Forholdsregler for visning af et stillbillede
Et stillbillede kan medføre permanent beskadigelse af tv-skærmen.
• Vis ikke et stillbillede på LCD-panelet i mere end to timer, da det kan medføre billedindbrænding.
Denne billedindbrænding kaldes også “screen burn”.
For at undgå dette skal lysstyrken og kontrasten ved visning af et stillbillede reduceres.
• Hvis du ser LCD-tv i 4:3-format i lang tid, kan der opstå kanter, der vises til venstre, højre og på midten af skærmen.
• Visning af stillbilleder fra videospil og pc i længere end en bestemt tid kan medføre delvise after-billeder.
For at forhindre dette kan du reducere ‘lysstyrke’ og ‘kontrast’, når du afspiller stillbilleder i længere tid.
Forholdsregler ved visning av et stillbilde
Et stillbilde kan forårsake permanent skade på TV-skjermen.
• La ikke et stillbilde vises på LCD-panelet i mer enn 2 timer, da det kan forårsake et ekkobilde.
Denne effekten er også kjent som “screen burn”, det vil si at skjermbildet brenner seg fast.
Du kan unngå dette ved å redusere lysstyrken og kontrastnivået på skjermen når du viser stillbilder.
• Dersom LCD-skjermen brukes til visning i 4:3-format over lengre tid, kan dette føre til at det oppstår linjer til høyre, venstre og i midten
• Dersom spill og annet settes på pause i en lengre periode enn det som er anbefalt, kan dette gi en etterbildeeffekt.
Denne virkningen kan forebygges ved at ‘lysstyrke’ og ‘kontrast’ reduseres ved visning av stillbilder.
the screen caused by the difference of light emission on the screen. Playing a DVD or a game console may cause a similar effect
to the screen. Damages caused by the above effect are not covered by the Warranty.
vilket orsakas av skillnaden i ljusstrålning i skärmen. Uppspelning av en DVD eller tv-spel kan orsaka samma effekter på skärmen.
Skador som orsakas av det som beskrivs ovan täcks inte av garantin.
Dette skyldes den forskellige lyspåvirkning af skærmen. Afspilning af dvd eller brug af en spillekonsol kan medføre en tilsvarende
effekt på skærmen. Beskadigelse forårsaget af ovenstående dækkes ikke af forsikringen.
av skjermen. Dette på grunn av forskjeller mellom lysstrålingen på de forskjellige stedene på skjermen. Dersom skjermen brukes til
videospill og visning av DVDer kan dette gi liknende resultater. Skader forårsaket av effekten ovenfor, dekkes ikke av garantien.
Varoituksia pysäytyskuvan käytöstä
Pysäytyskuva voi vaurioittaa television kuvaruutua pysyvästi.
• Älä pidä nestekidetelevision kuvaruudussa pysäytyskuvaa 2 tuntia kauempaa, koska tällöin kuva voi jäädä ruutuun pysyväksi jäännöskuvaksi.
Jäännöskuvaa kuvataan myös “kuvan palamiseksi kuvaruutuun”.
Kun kuvaruudussa on pysäytyskuva, vähennä kirkkautta ja kontrastia, jottei jäännöskuvaa pääsisi muodostumaan.
• LCD-television pitkäaikainen katselu 4:3 kuvasuhteella saattaa jättää kuvaruudulle reunuksia, jotka johtuvat valon säteilyn
• Videopelien ja pc:n still-kuvien määrätyn ajan ylittävä näyttö saattaa aiheuttaa osittaisia jälkikuvia.
Voit estää tämän ilmiön vähentämällä kuvaruudun kirkkautta ja kontrastia, jos katselet pitkään pysäytyskuvia.
Sabit Görüntünün Gösterilmesiyle ilgili Önlemler
Sabit görüntü TV ekranında kalıcı hasara neden olabilir.
• LCD ekran panelinde sabit bir görüntüyü 2 saatten fazla tutmay›n.
Bu, ekran görüntüsünde takılmaya neden olabilir. Bu görüntü takılmasına, “ekran yanması” da denir.
Bu tür bir kalıcı görüntüyü önlemek için hareketsiz bir görüntü ekrandayken parlaklık ve kontrast değerlerini düflük bir seviyeye ayarlayınız.
• LCD televizyonu uzun süre 4:3 formatında izlemek, farklı ıflık emisyonundan dolayı ekranın solunda, sağında ve ortasında çizgi
• Video oyunlarından ve bilgisayardan uzun süre durağan resimlerin görüntülenmesi kısmi görüntü izi oluflturabilir.
Bu etkiyi önlemek için, durağan görüntüleri ekranda tutarken ‘parlaklık’ ve ‘kontrast’ derecelerini azaltın.
eroavuudesta kuvaruudulla. DVD:n tai pelin toisto saattaa aiheuttaa samanlaisen vaikutuksen näytöllä.
Takuu ei kata tästä syystä syntyneitä vaurioita.
fleklinde izler bırakabilir. DVD ya da oyun konsolunu oynatmak da benzer etkiye yol açabilir. Yukarıdaki etkilerin neden olduğu
hasarlar Garanti kapsamında değildir.
© 2006 Samsung Electronics Co., Ltd. All rights reserved.

Contents
English
CONNECTING AND PREPARING YOUR TV
List of Parts .............................................................. 2
Installing the Stand .................................................. 2
Installing the Wall Mount Kit ................................ 2
Viewing the Control Panel ........................................ 3
Viewing the Connection Panel.................................. 4
Viewing the Remote Control .................................... 5
Installing Batteries in the Remote Control................ 6
Switching On and Off................................................ 6
Placing Your Television in Standby Mode ................ 6
Plug & Play .............................................................. 6
SETTING THE CHANNELS
Storing Channels Automatically................................ 7
Storing Channels Manually ...................................... 8
Editing the Channels ................................................ 8
SETTING THE PICTURE
Changing the Picture Standard ................................ 9
Adjusting the Custom Picture .................................. 9
Changing the Colour Tone........................................ 10
Resetting the Picture Settings to the
Factory Defaults........................................................ 10
Changing the Picture Size........................................10
Digital Noise Reduction / Dynamic Contrast ............11
Viewing the Picture In Picture (PIP) ........................ 11
Freezing the Picture ................................................12
SETTING THE OTHERS
Choosing Your Language .................................... 15
Using the Game Mode ........................................ 16
Using the Energy Saving Feature ........................16
Setting the Blue Screen Mode /
Selecting the Melody ..........................................16
Selecting the Source ............................................17
Editing the Input Source Names ..........................17
USING THE TELETEXT FEATURE
Teletext Decoder ..................................................17
Displaying the Teletext Information ......................18
Selecting a Specific Teletext Page ......................18
Using Fastext to Select a Teletext Page ..............19
SETTING THE PC
Setting up Your PC Software
(Based on Windows XP) ......................................19
Display Modes ......................................................19
Setting the PC ......................................................20
RECOMMENDATIONS FOR USE
Troubleshooting:
Before Contacting Service Personnel ..................21
Technical and Environmental Specifications ......21
SETTING THE SOUND
Changing the Sound Standard ............................ 12
Adjusting the Sound Settings ..............................12
Adjusting the Volume Automatically ....................13
Listening to the Sound of the Sub Picture............13
Resetting the Sound Settings to the
Factory defaults ....................................................13
Selecting the Sound mode ..................................13
SETTING THE TIME
Setting and Displaying the Current Time..............14
Setting the Sleep Timer........................................ 14
Switching the Television
On and Off Automatically......................................15
Symbol Press Important Note One-Touch
English-1
Button
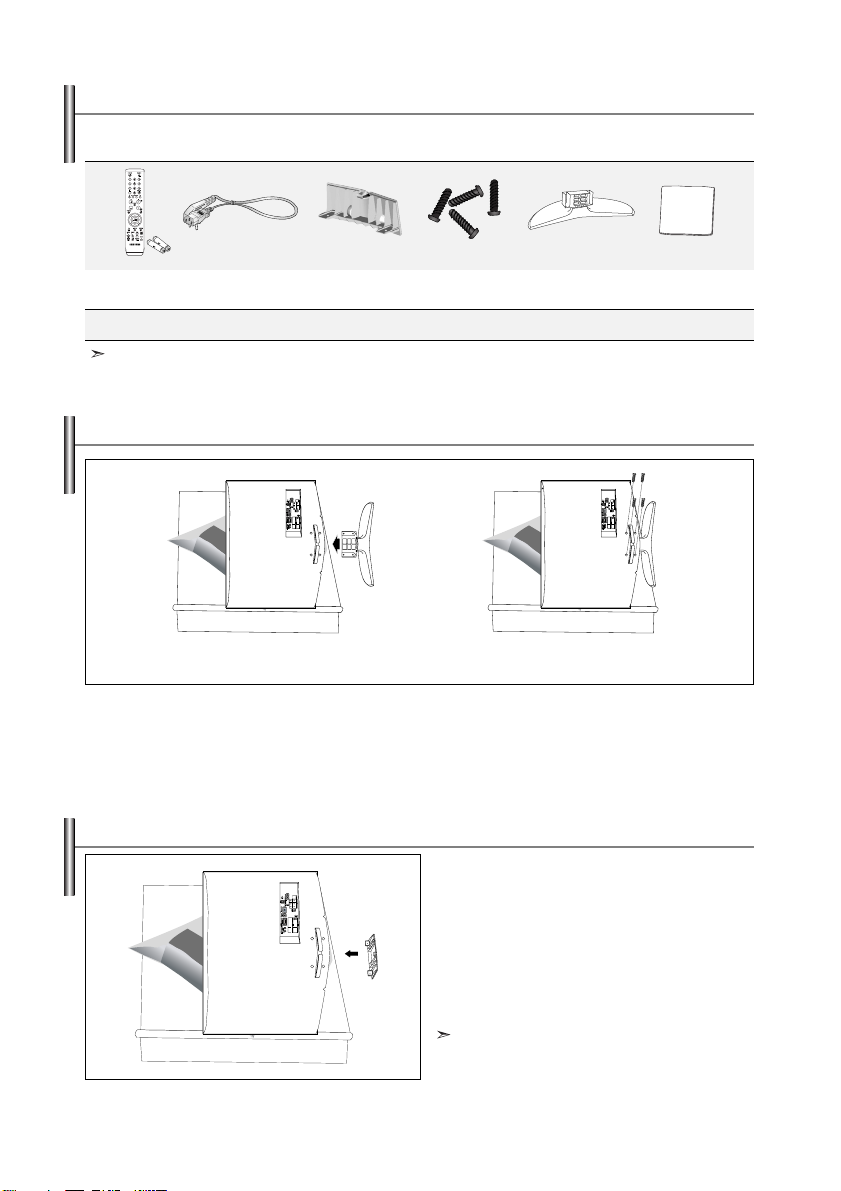
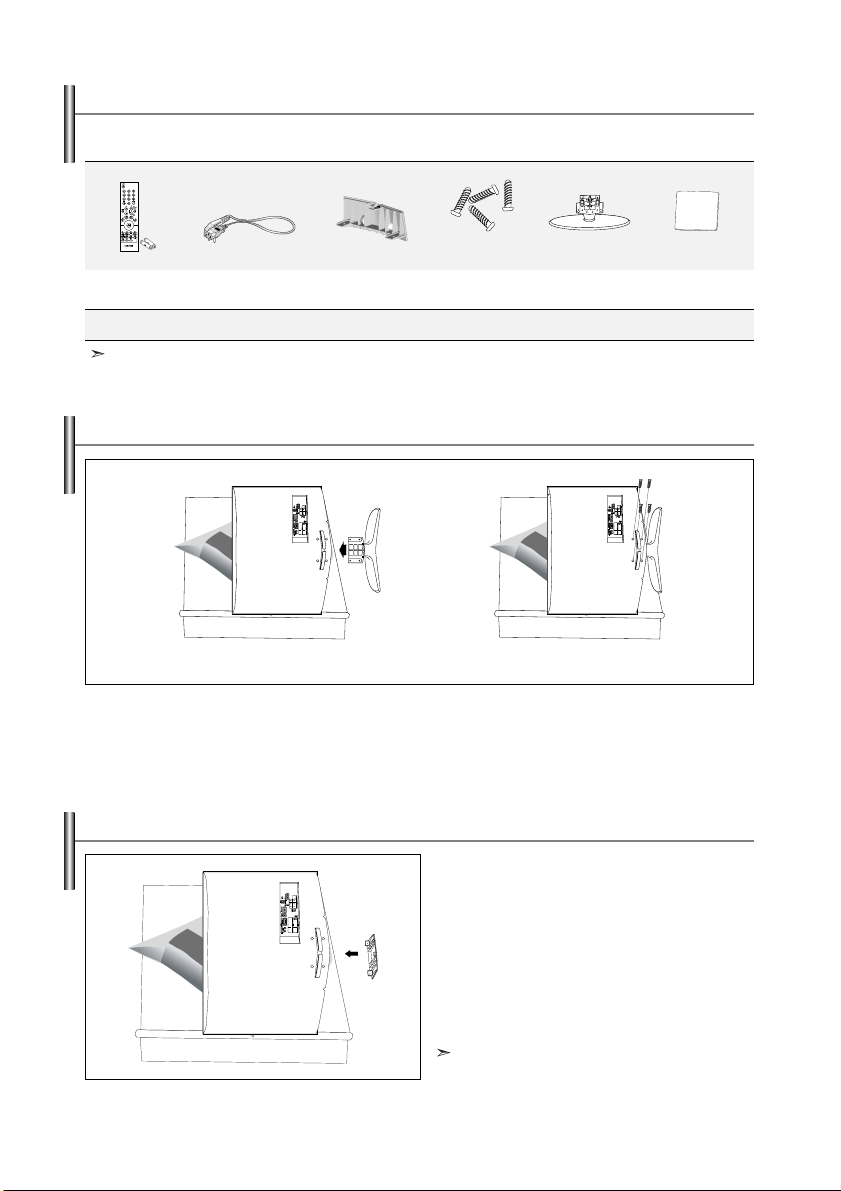
List of Parts
Please make sure the following items are included with your LCD TV.
If any items are missing, contact your dealer.
M4 X L16
Remote Control &
Batteries (AAA x 2)
Owner’s Instructions
Warranty card / Safety Guide / Registration Cards (Not available in all locations)
Power Cord Cover-Bottom Stand Screw X 4 Stand Cleaning Cloth
Warranty card Safety Guide Registration Cards
Installing the Stand
< 2 >< 3 >
1. Place the TV faced down on a soft cloth or cushion on a table.
2. Put the stand into the hole at the bottom of the TV.
3. Insert screw into the hole indicated and tighten.
Installing the Wall Mount Kit
Wall mount items (sold separately) allow you to
mount the TV on the wall. For detailed information
on installing the wall mount, see the instructions
provided with the Wall Mount items.
Contact a technician for assistance when installing
the wall mounted bracket.
Samsung Electronics is not responsible for any
damage to the product or injury to yourself or
others if you elect to install the TV on your own.
Remove the stand and cover the bottom hole
with a cap and fasten with two screws.
English-2
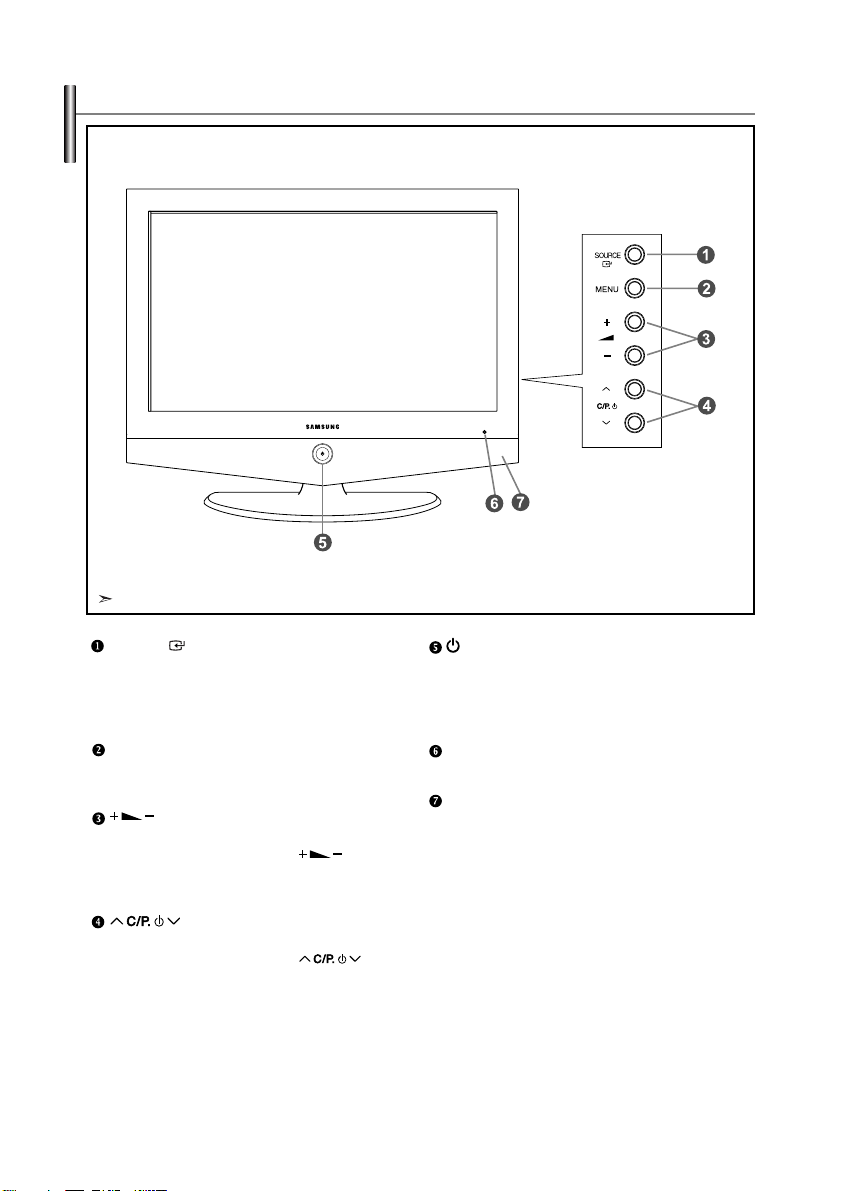
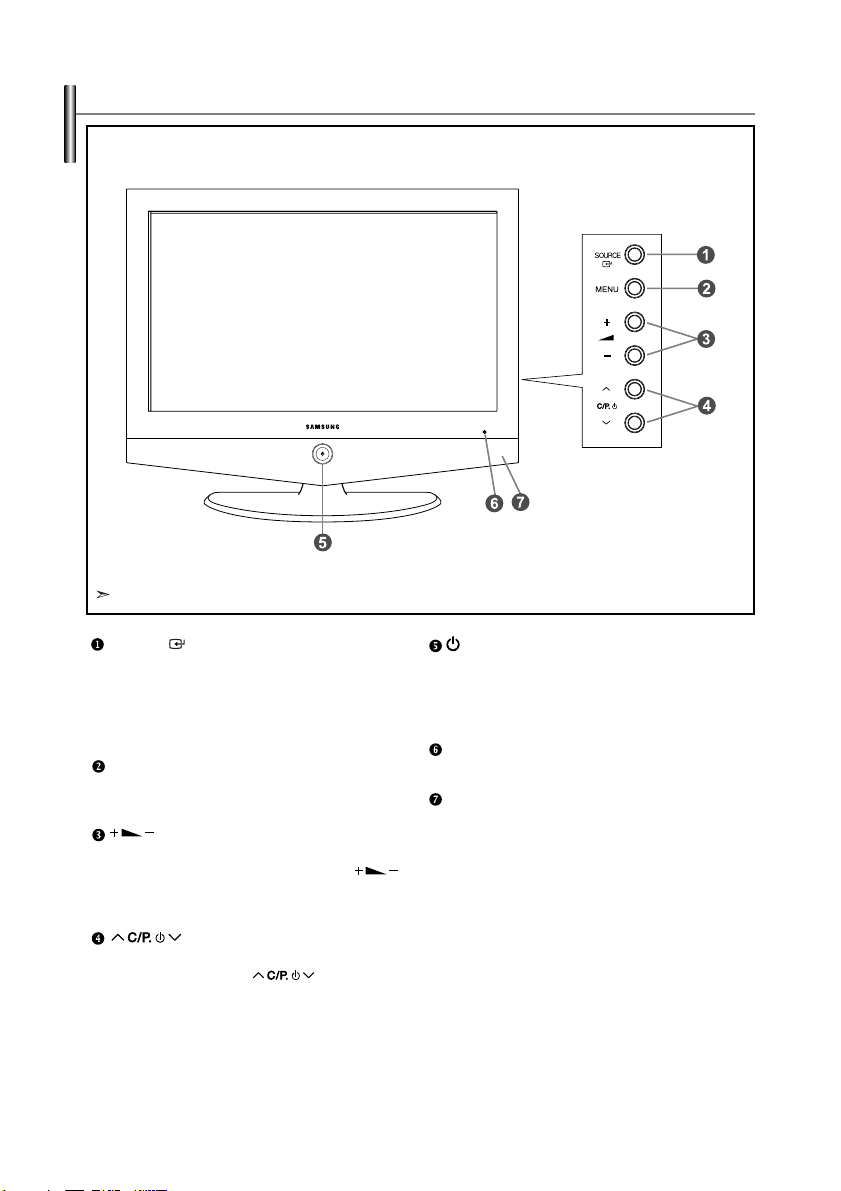
Viewing the Control Panel
The product colour and shape may vary depending on the model.
SOURCE
Toggles between all the available input sources
(TV, Ext.1, Ext.2, AV, S-Video, Component, PC,
HDMI). In the on-screen menu, use this button as
you use the
MENU
Press to see an on-screen menu of
your TV’s features.
Press to increase or decrease the volume.
In the on-screen menu, use the buttons
as you use the
control.
Press to change channels.
In the on-screen menu, use the buttons
as you use the
control. (Without the Remote Control, You can turn
on TV by using the Channel buttons.)
ENTER button on the remote control.
and buttons on the remote
and buttons on the remote
English-3
(Power)
Press to turn the TV on and off.
Power Indicator
Blinks and turns off when the power is on and lights
up in stand-by mode.
Remote Control Sensor
Aim the remote control towards this spot on the TV.
Speakers
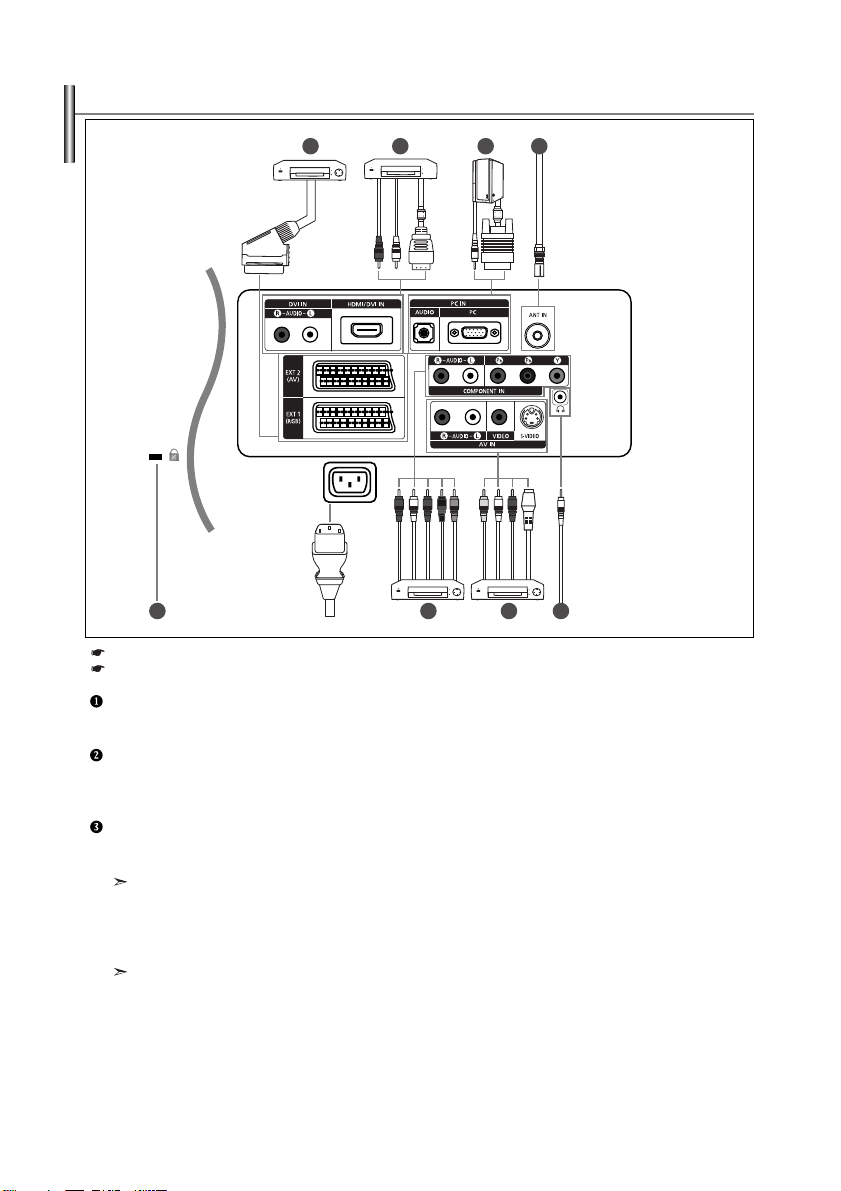
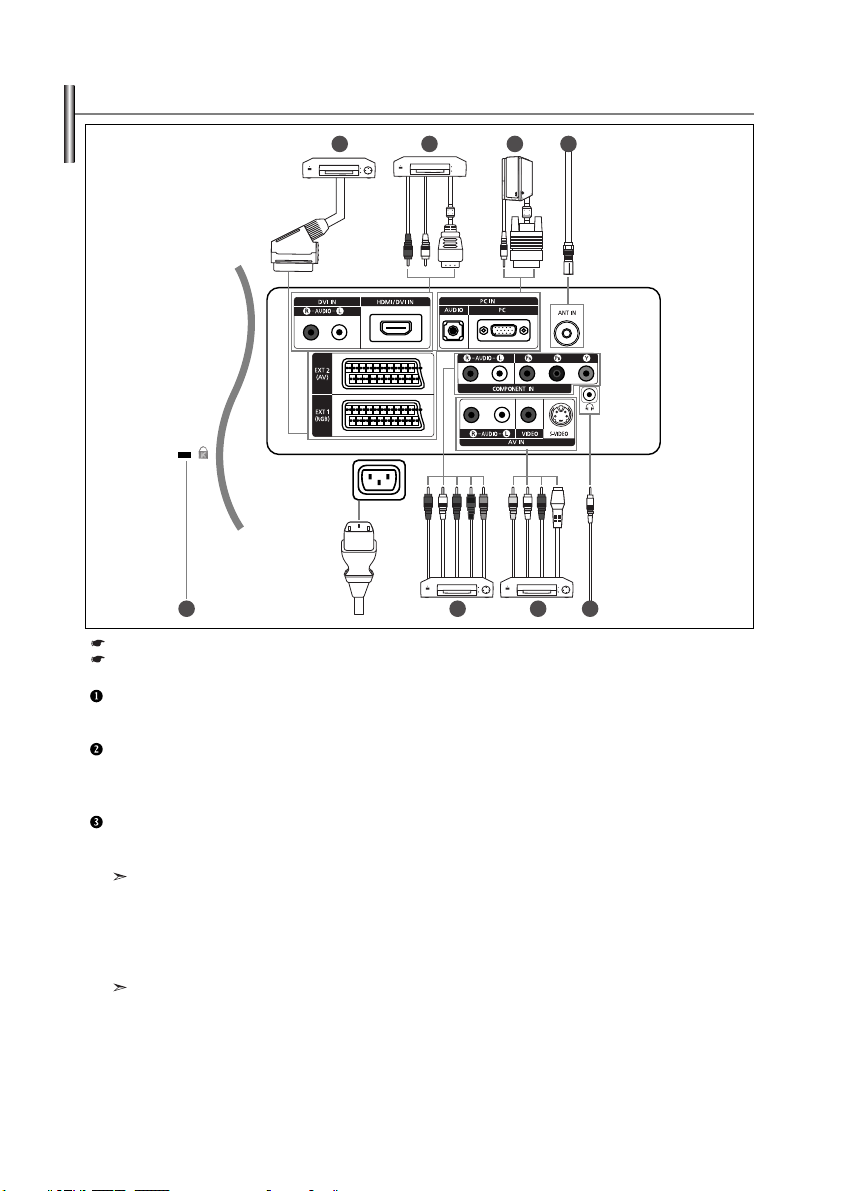
Viewing the Connection Panel
1234
5678
Power Input
Whenever you connect an external device to your TV, make sure that power on the unit is turned off.
When connecting an external device, match the colour of the connection terminal to the cable.
Connecting an Aerial or Cable Television Network
To view television channels correctly, a signal must be received by the set from one of the following sources:
- An outdoor aerial / A cable television network / A satellite network
Connecting Computer
-
Connect the D- Sub cable (optional) to “PC (PC IN)” on the rear of your set and the other end to the Video Card of your computer.
- Connect the stereo audio cable (optional) to “AUDIO (PC IN)” on the rear of your set and the other end to “Audio Out” of the
sound card on your computer.
Connecting HDMI/DVI
- Supports connections between HDMI-connection-enabled AV devices (Set-Top Boxes, DVD players, AV receivers and digital TVs).
- No additional Audio connection is needed for an HDMI to HDMI connection.
What is HDMI?
-
“High Definition Multimedia interface” allows the transmission of high definition digital video data and multiple channels of digital audio ( 5.1 channels).
- The HDMI/DVI terminal supports DVI connection to an extended device with the appropriate cable (not supplied).
The difference between HDMI and DVI is that the HDMI device is smaller in size, has the HDCP
(High Bandwidth Digital Copy Protection) coding feature installed, and supports multi - channel digital audio.
You should use the DVI-to-HDMI cable or DVI-HDMI Adapter for the connection, and the “R - AUDIO - L” terminal onDVI for sound output.
- When connecting this product via HDMI or DVI to a Set Top Box, DVD Player or Games Console etc, make sure that it has been
set to a compatible video output mode as shown in the table below.
Failure to observe this may result in picture distortion, image breakup or no picture.
- Do not attempt to connect the HDMI/DVI connector to a PC or Laptop Graphics Card.
(This will result in a blank screen being displayed)
out connectors on the A/V device.
English-4
Connecting Set-Top Box, VCR or DVD
- Connect the VCR or DVD SCART cable (optional) to the SCART connector of the VCR or DVD.
Connecting External A/V Devices
-
Connect RCA (optional) or S-VIDEO cable (optional) to an appropriate external A/V device such as VCR, DVD or Camcorder.
- Connect RCA audio cables (optional) to “R - AUDIO - L” on the rear of your set and the other ends to corresponding audio
out connectors on the A/V device.
- Headphone may be connected to the headphone output ( ) on the rear of your set. While the headphone is connected,
the sound from the built-in speakers will be disabled.
Connecting Component Devices (DTV/DVD)
- Connect component video cables (optional) to component connector (“PR”, “PB”, “Y”) on the rear of your set and the other
ends to corresponding component video out connectors on the DTV or DVD.
- If you wish to connect both the Set-Top Box and DTV (or DVD), you should connect the Set-Top Box to the DTV (or DVD)
and connect the DTV (or DVD) to component connector (“PR”, “PB”, “Y”) on your set.
-
The PR, PB and Y connectors on your component devices (DTV or DVD) are sometimes labeled Y, B-Y and R-Y or Y, Cb and Cr.
- Connect RCA audio cables (optional) to “R - AUDIO - L” on the rear of your set and the other ends to corresponding audio
out connectors on the DTV or DVD.
Kensington Lock
- The Kensington lock (optional) is a device used to physically fix the system when used in a public place.
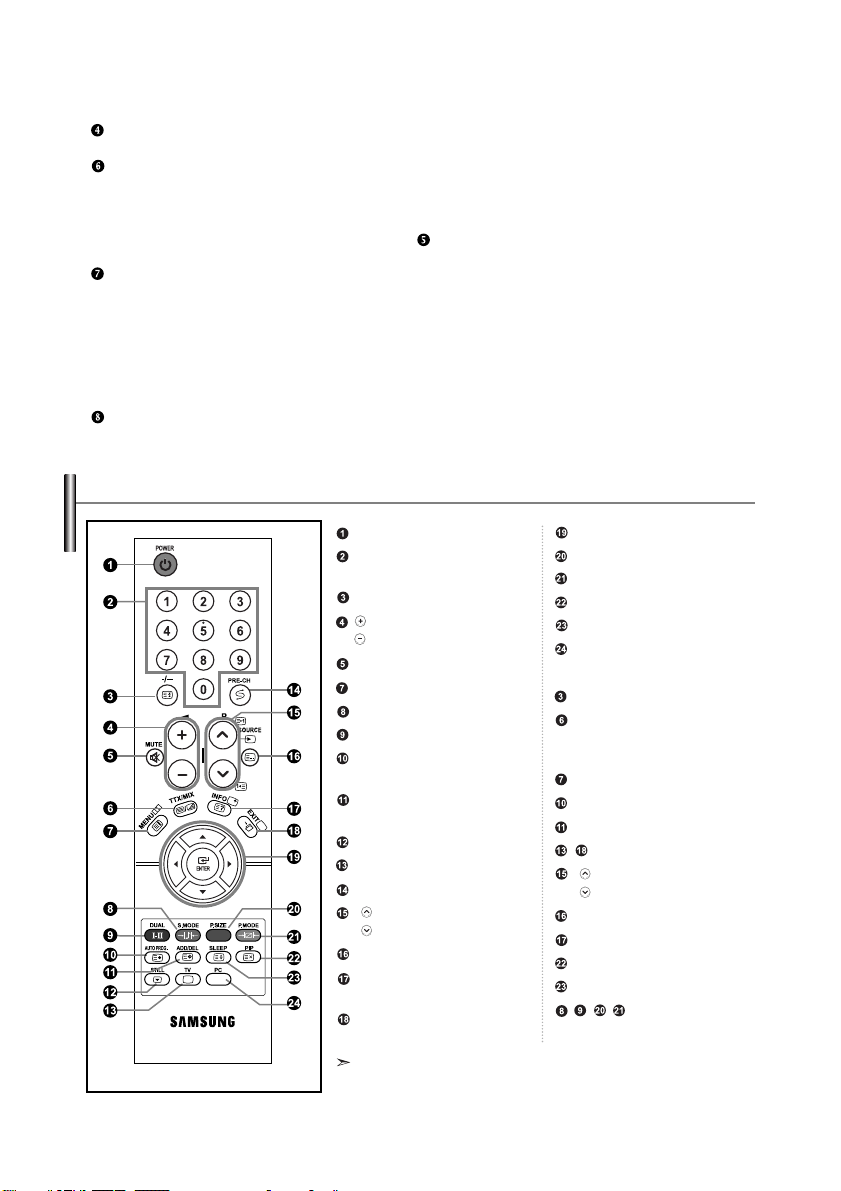
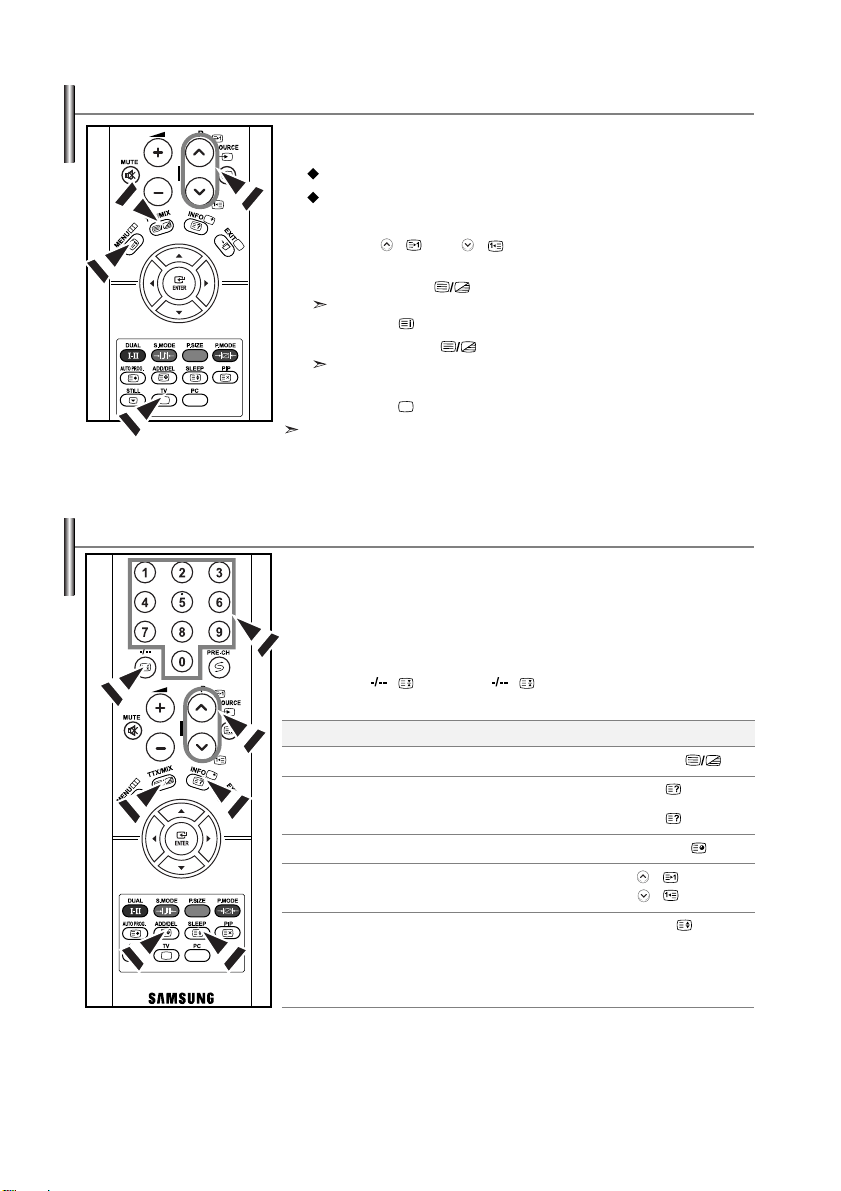
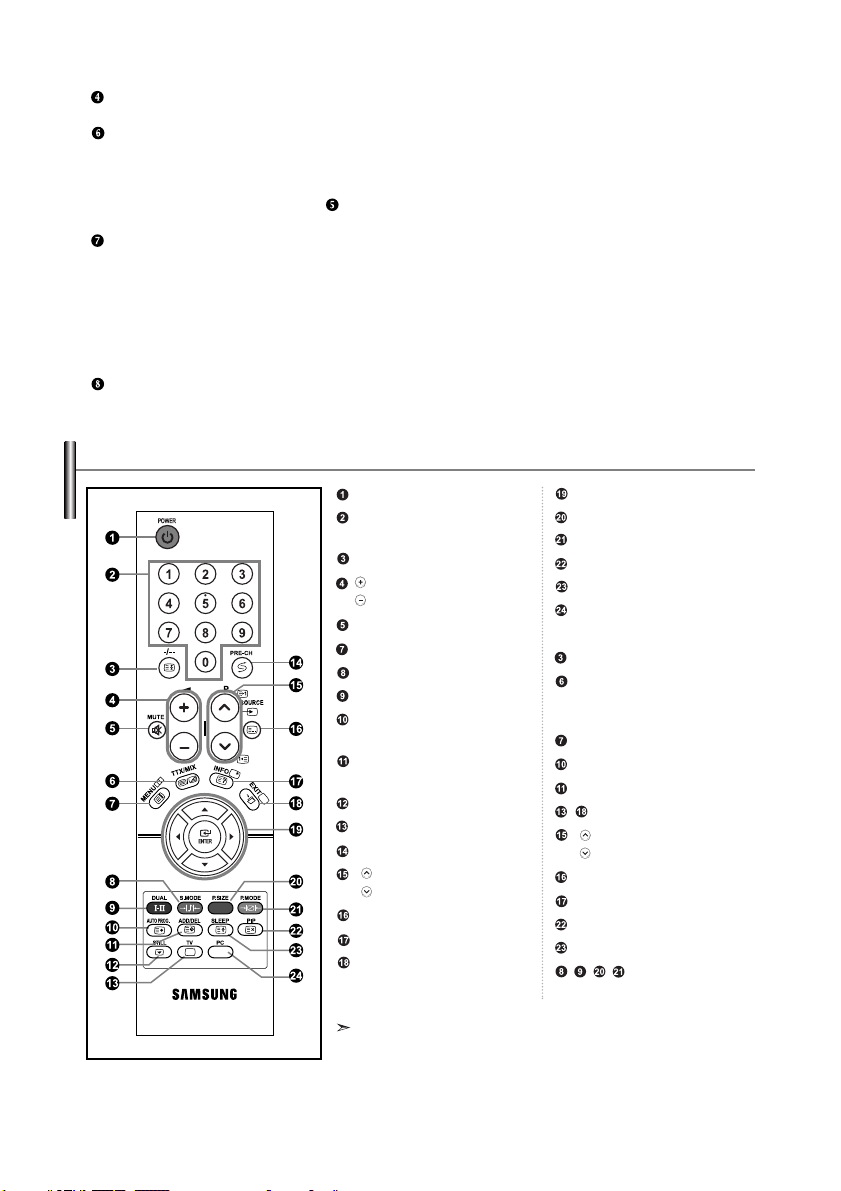
Viewing the Remote Control
Television Standby button
Number buttons for direct
channel access
One/Two-digit channel selection
Volume increase
Volume decrease
Temporary sound switch-off
Displays the main on-screen menu
Sound mode selection
Sound effect selection
Press to automatically store
selected TV/cable channels
Use to store and delete
channels to/from memory
Picture freeze
Selects the TV mode directly
Previous channel
P: Next channel
P: Previous channel
Available source selection
Use to see information on the
current broadcast
Exit the on-screen menu
The performance of the remote control may be affected by bright light.
Control the cursor in the menu
Picture size selection
Picture effect selection
Picture-In-Picture On/Off
Automatic Power-off
Selects the PC mode directly
Teletext Functions
Teletext hold
Teletext display/mix both
Teletext information and the
normal broadcast
Teletext index
Teletext store
Teletext sub page
Exit from the Teletext display
P: Teletext next page
P: Teletext previous page
Teletext mode selection (LIST/FLOF)
Teletext reveal
Teletext cancel
Teletext size selection
Fastext topic selection
English-5
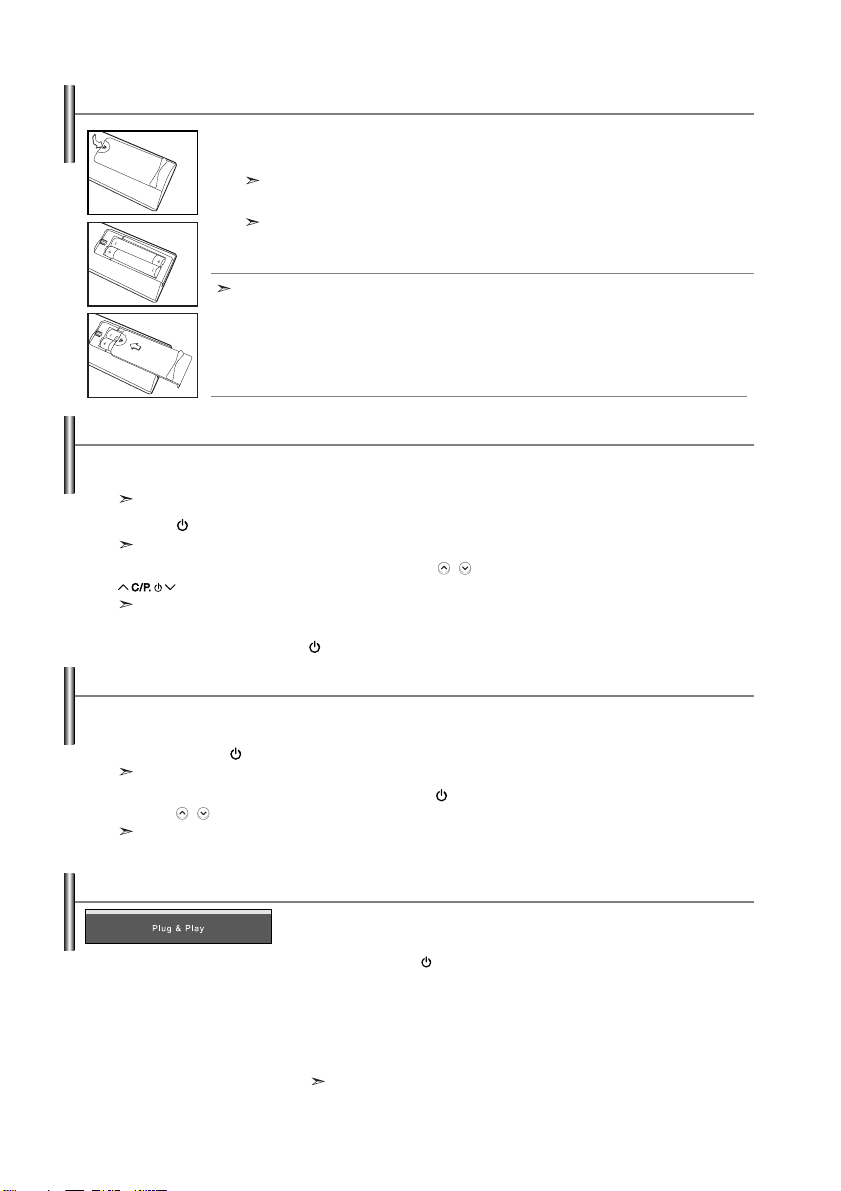
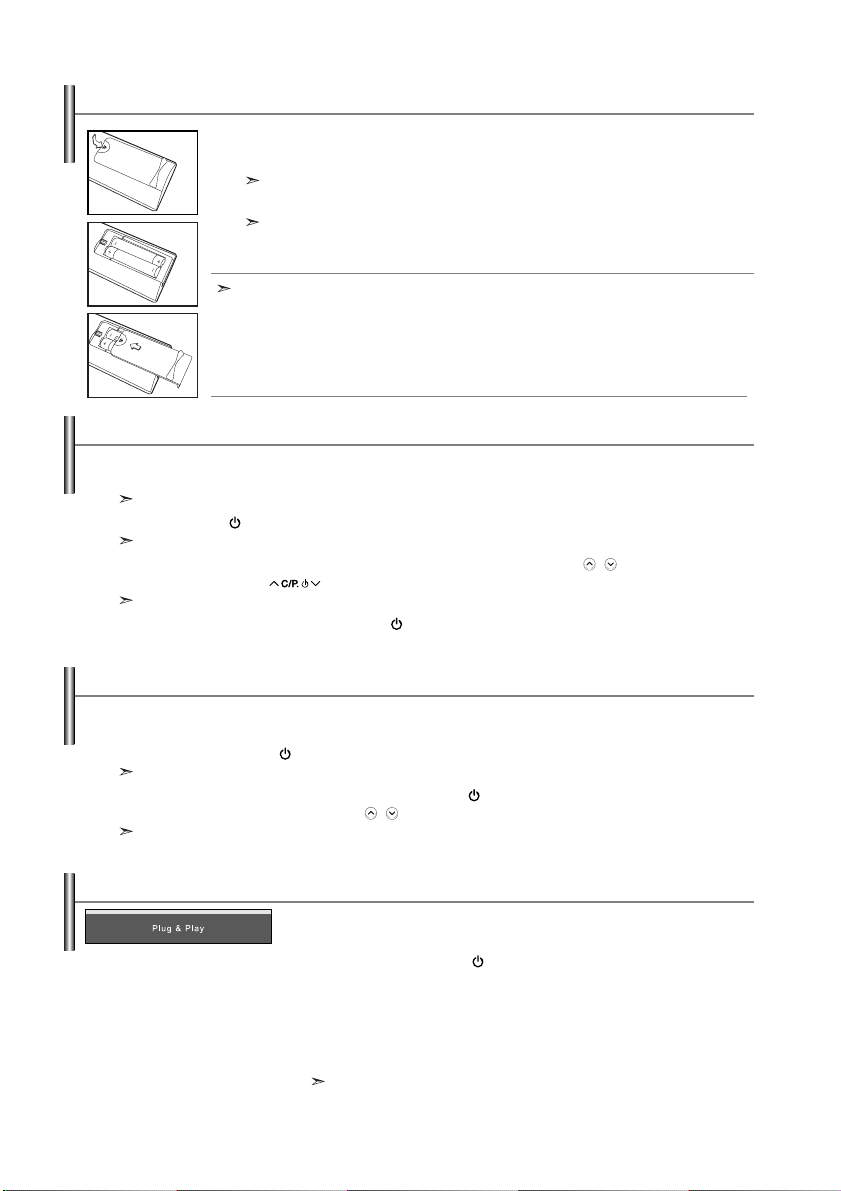
Installing Batteries in the Remote Control
1. Slide the cover out completely.
2. Install two AAA size batteries.
Make sure to match the “+” and “–” ends of the batteries with the diagram inside the compartment.
3. Replace the cover.
Remove the batteries and store them in a cool, dry place if you won’t be using the
remote control for a long time. The remote control can be used up to about 23 feet from
the TV. (Assuming typical TV usage, the batteries last for about one year.)
If the remote control doesn’t work, check the following:
1. Is the TV power on?
2. Are the plus and minus ends of the batteries reversed?
3. Are the batteries drained?
4. Is there a power outage, or is the power cord unplugged?
5. Is there a special fluorescent light or neon sign nearby?
Switching On and Off
The mains lead is attached to the rear of your set.
1. Plug the mains lead into an appropriate socket.
The standby indicator lights up on the front of the set.
2. Press the button on the front of the set.
The programme that you were watching last is reselected automatically.
3. Press the numeric buttons (0~9) or channel up/down ( / ) buttons on the remote control or
buttons on the right side of the set.
When you switch the set on for the very first time, you will be asked to choose language in which the menus
are to be displayed.
4. To switch your set off, press the button again.
Placing Your Television in Standby Mode
Your set can be placed in standby mode in order to reduce the power consumption. The standby mode
can be useful when you wish to interrupt viewing temporarily (during a meal, for example).
1. Press the POWER button on the remote control.
The screen is turned off and a red standby indicator appears on the front of your set.
2. To switch your set back on, simply press the POWER button, numeric buttons (0~9) or channel
up/down ( / ) buttons again.
Do not leave your set in standby mode for long periods of time (when you are away on holiday, for example).
It is best to unplug the set from the mains and aerial.
Plug & Play
When the TV is initially powered on, several basic settings proceed
automatically and subsequently. The following settings are available.
1. Press the POWER button on the remote control.
The message “Plug & Play” is displayed.
2. Select the appropriate language by pressing the or button.
Press the
ENTER button to confirm your choice.
3. The message “Check antenna input.” is displayed with “OK” selected.
Press the
ENTER button.
Please check that the antenna cable is connected correctly.
English-6
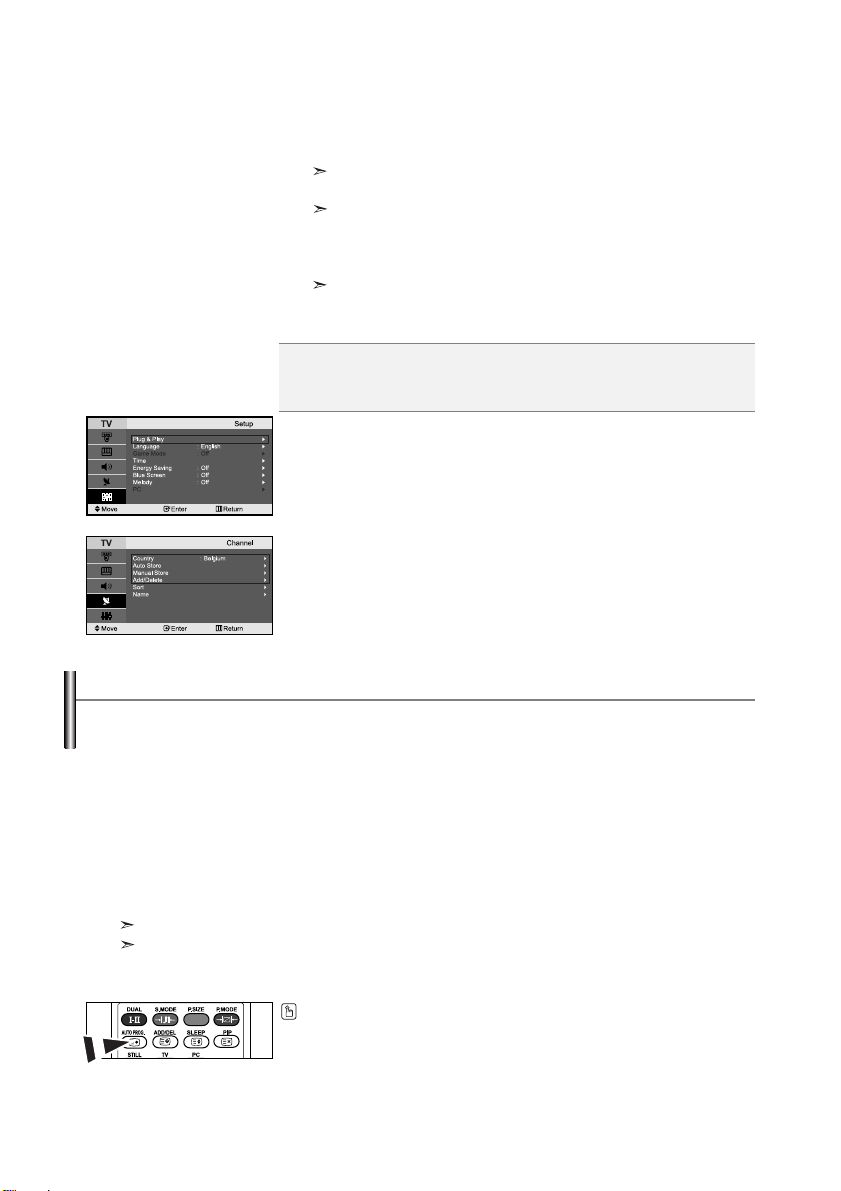
4. Select the appropriate country by pressing the or button.
Press the
ENTER button to confirm your choice.
5. The “Auto Store” menu is displayed with the “Start” selected.
Press the
ENTER button.
The channel search will start and end automatically.
After all the available channels are stored, the “Clock Set” menu appears.
Press the ENTER button at any time to interrupt the memorization process.
6. Press the ENTER button.
Select the “Hour” or “Minute” by pressing the
Set the “Hour” or “Minute” by pressing the
You can also set the hour and minute by pressing the number buttons on the
remote control.
or
or
button.
button.
7. Press the ENTER button to confirm your setting.
Language: Select your language.
Country: Select your country.
Auto Store: Automatically scans for and stores channels available in the local area.
Clock Set: Sets the current time for the TV clock.
If you want to reset this feature...
1. Press the MENU button to display the menu.
Press the or
button
to select “Setup”, then press the ENTER button.
2. Press the ENTER button again, to select “Plug & Play”.
3. This will change or reset the settings.
- Storing Channels Automatically
- Storing Channels Manually (Refer to page 8)
- Editing the Channels (Refer to page 8)
Storing Channels Automatically
You can scan for the frequency ranges available to you (and availability depends on your country).
Automatically allocated programme numbers may not correspond to actual or desired programme
numbers. However, you can sort numbers manually and clear any channels you do not wish to watch.
1. Press the MENU button to display the menu.
Press the
2. Press the ENTER button to select “Country”.
3. Select the appropriate country by pressing the or button.
Press the
4. Press the or button to select “Auto Store”, then press the ENTER button.
5. Press the ENTER button.
6. After all the available channels are stored, the “Sort” menu appears.
or button to select “Channel”, then press the ENTER button.
ENTER button to confirm your choice.
The TV will begin memorizing all of the available channels.
Press the ENTER button at any time to interrupt the memorization process and return to the “Channel” menu.
Channels can be stored automatically by simply pressing the AUTO PROG. button on
the remote control.
English-7
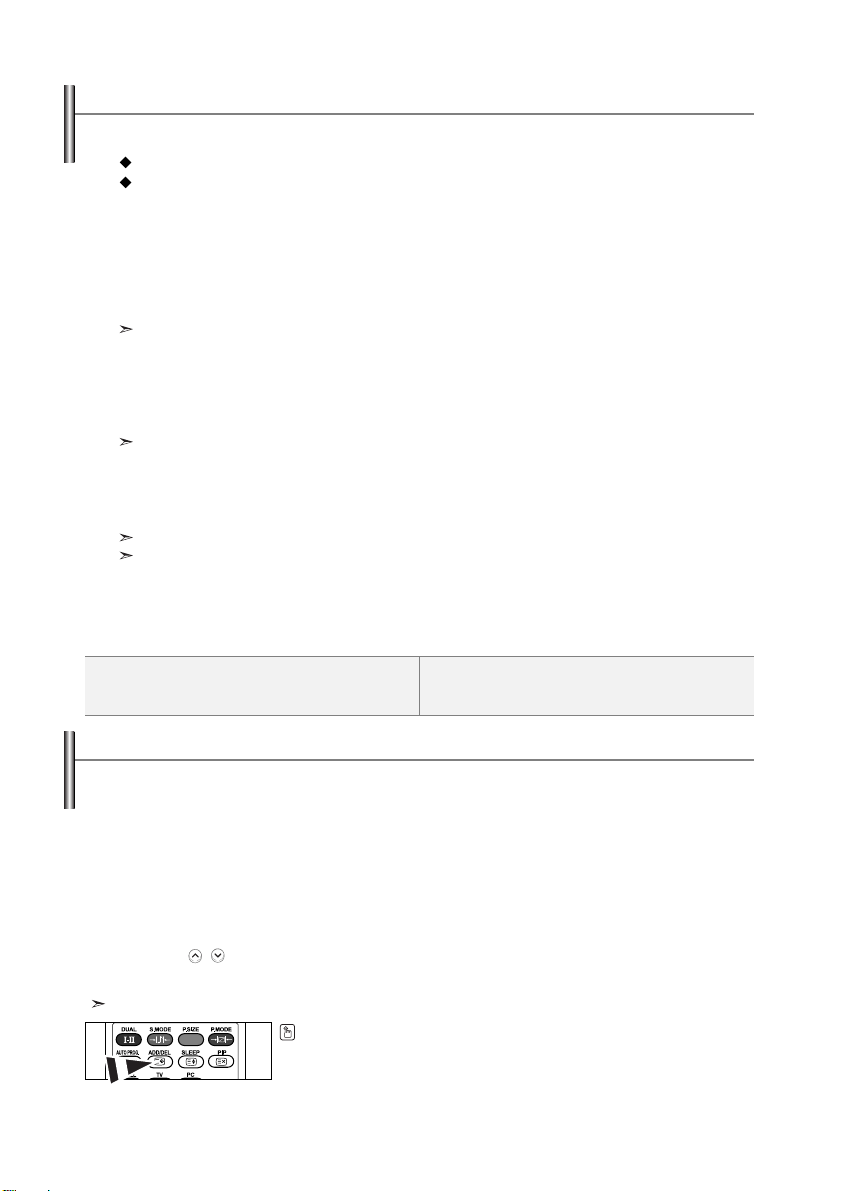
Storing Channels Manually
You can store up to 100 channels, including those received via cable networks.
When storing channels manually, you can choose:
Whether or not to store each of the channels found.
The programme number of each stored channel which you wish to identify.
1. Press the MENU button to display the menu.
Press the
2. Press the or button to select “Manual Store”, then press the ENTER button.
3. Press the ENTER button to select “Programme”.
4. To assign a programme number to a channel, find the correct number by pressing the or button
and then press the
5. Press the or button to select “Colour System”, then press the ENTER button.
6. Select the colour standard required by pressing the or button then, press the ENTER button.
7. Press the or button to select “Sound System”, then press the ENTER button.
8. Select the sound standard required by pressing the or button, then press the ENTER button.
9. If you know the number of the channel to be stored, press the or button to select “Channel”.
Press the
Press the
press the
10. If you do not know the channel numbers, press the or button to select “Search”. Press the
ENTER button. Search by pressing the or button and then press the ENTER button.
11. Press the or button to select “Store”. Press the ENTER button to select “OK”.
12. Repeat steps 3 to 11 for each channel to be stored.
Programme: Selects a program number for the channel.
Colour System: Sets the colour supporting system.
Sound System: Sets the sound supporting system.
or button to select “Channel”, then press the ENTER button.
ENTER button.
You can also set a programme number by pressing number buttons on the remote control.
If there is an abnormal sound or no sound, re-select the sound system required.
ENTER button. Select C (Air channel) or S (Cable channel) by pressing the or button.
button to select channel. Select the required number by pressing the or button and then
ENTER button.
Channel mode: P (Programme mode), C (Air channel mode), S (Cable channel mode)
You can also set a channel number by pressing the number buttons on the remote control.
Channel: Selects a channel.
Search: Scans for the frequency value for the channel.
Store: Saves your settings.
Editing the Channels
You can exclude the channels you chose from the channels you scanned. When you scan through
the stored channels, those you have chosen to skip are not displayed.
All channels that you do not specifically choose to skip are displayed during scanning.
1. Use the number buttons to directly select the channel that will be added or deleted.
2. Press the MENU button to display the menu.
Press the
3. Press the or button to select “Add/Delete”, then press the ENTER button.
4. Repeatedly pressing the ENTER button will alternate between add channel and delete channel.
5. Press the P/ buttons to switch to the appropriate channel, then repeat above.
6. Press the EXIT button to exit.
You can view any channel (including an erased channel) by using the number buttons on the remote control.
or button to select “Channel”, then press the ENTER button.
You can also add or delete channel by simply pressing the ADD/DEL button on the
remote control.
English-8
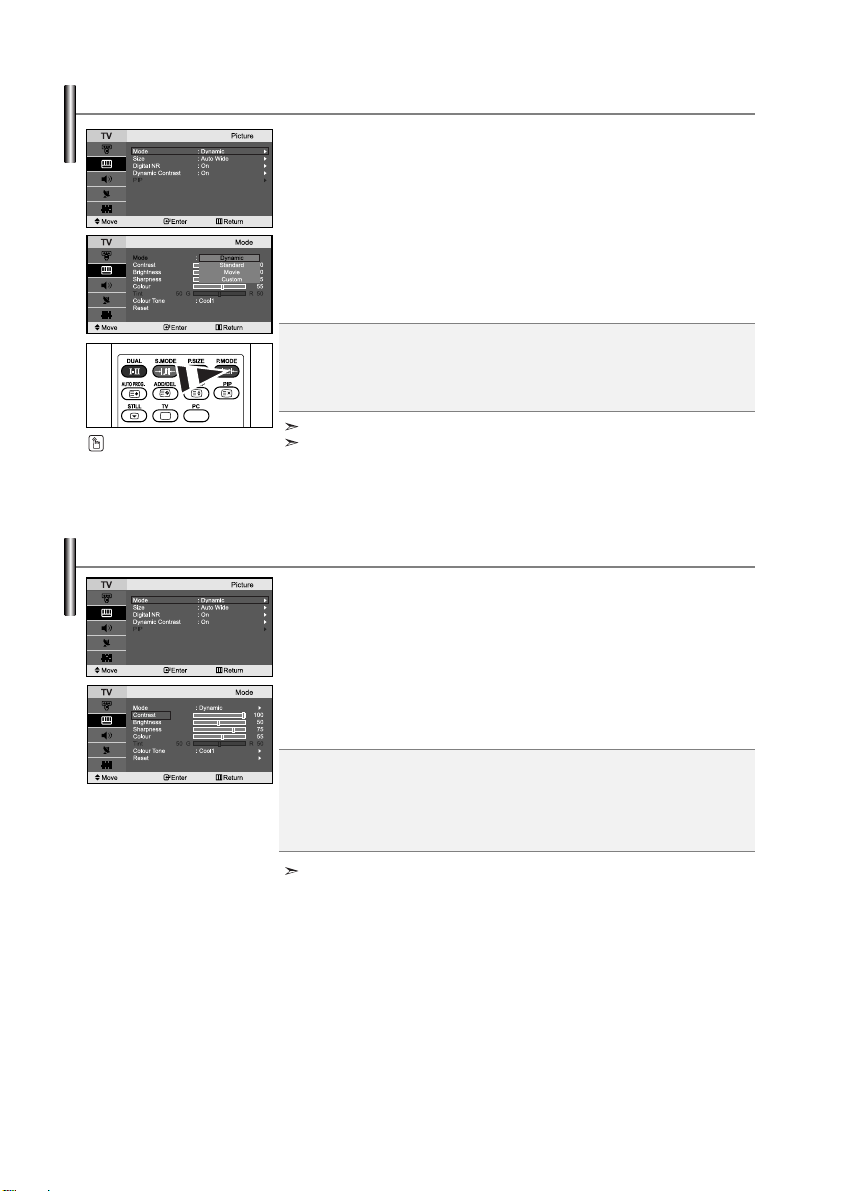
Changing the Picture Standard
You can select the type of picture which best corresponds to your
viewing requirements.
1. Press the MENU button to display the menu. Press the or
button to select “Picture”, then press the ENTER button.
2.
Press the ENTER button again, to select “Mode”, then press the
ENTER button again.
3.
Press the
Press the
4.
Press the EXIT button to exit.
Dynamic: Selects the picture for high-definition in a bright room.
Standard: Selects the picture for optimum display in a normal environment.
Movie: Selects the picture for comfortable display in a dark room.
Custom: Select to view your favorite display settings.
You can also press the
P.MODE button on the remote
control to select one of the
picture settings.
The Picture mode must be adjusted separately for each input source.
You can return to the factory defaults picture settings by selecting the “Reset”.
(Refer to “Resetting the Picture Settings to the Factory Defaults” on page 10)
Adjusting the Custom Picture
Your set has several settings which allow you to control picture quality.
1. To select the desired picture effect, follow the
“Changing the Picture Standard” instructions number 1 to 3.
2.
Press the
Press the
3.
Press the
particular item, then
4.
Press the EXIT button to exit.
Contrast: Adjusts the lightness and darkness between objects and the background.
Brightness: Adjusts the brightness of the whole screen.
Sharpness: Adjusts the outline of objects to either sharpen them or make them more dull.
Colour: Adjusts the colours, making them lighter or darker.
Tint (NTSC only): Adjusts the colour of objects, making them more red or green for a more
The adjusted values are stored according to the selected Picture mode.
or
button to select the desired picture effect.
ENTER
button.
(Refer to “Adjusting the Custom Picture”)
or button
ENTER
or button
to select a particular item.
button.
to decrease or increase the value of a
press the ENTER button.
natural look.
English-9
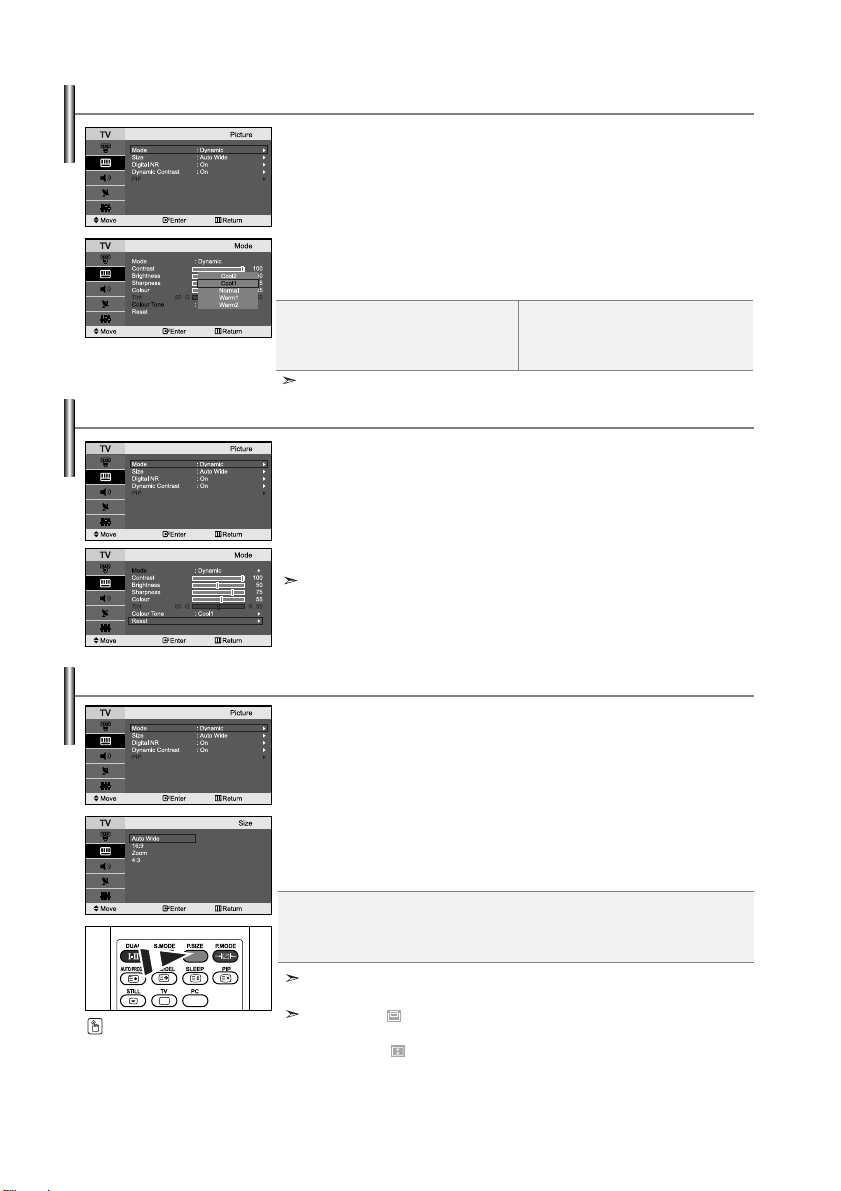
Changing the Colour Tone
You can select the most comfortable colour tone to your eyes.
1. To select the desired picture effect, follow the
“Changing the Picture Standard” instructions number 1 to 3 on page 9.
2. Press the or button to select “Colour Tone”, then press the
ENTER button.
3.
Press the
Press the
4.
Press the EXIT button to exit.
Cool2: Makes the colour temperature
Cool1: Makes whites bluish.
Normal: Keeps whites white.
The adjusted values are stored according to the selected Picture mode.
or button
ENTER
button.
bluer than “Cool1” menu.
to select the desired colour tone setting.
Resetting the Picture Settings to the Factory Defaults
You can return to the factory defaults picture settings.
1. To select the desired picture effect, follow the
“Changing the Picture Standard” instructions number 1 to 3 on page 9.
2. Press the or button to select “Reset”, then press the
ENTER button.
3.
Press the EXIT button to exit.
The “Reset” will be set for each picture mode.
Warm1: Makes whites reddish.
Warm2: Makes the colour temperature
redder than “Warm1” menu.
Changing the Picture Size
You can select the picture size which best corresponds to your
viewing requirements.
1. Press the MENU button to display the menu. Press the or button to
2. Press the or button to select “Size”, then press the
3. Select the required option by pressing the or button.
4.
Auto Wide: Automatically adjusts the picture size to the "16:9" aspect ratio.
16:9: Adjusts the picture size to 16:9 appropriate for DVDs or wide broadcasting.
Zoom: Magnifies the 16:9 wide picture (in the vertical direction) to fit the screen size.
4:3: This is the default setting for a video movie or normal broadcasting.
You can select these options
by simply pressing the
button on the remote control.
P.SIZE
select “Picture”, then press the
ENTER button.
ENTER button.
P
ress the
ENTER
button.
Press the EXIT button to exit.
In PC, Component and HDMI Mode, only “16:9” and “4:3” mode can be adjusted.
(
The “Zoom” mode is not supported.)
Zoom: Select by pressing the
Use the or button to move the picture up and down.
After selecting , use the or button to magnify or reduce the picture size in
the vertical direction.
English-10
or button.
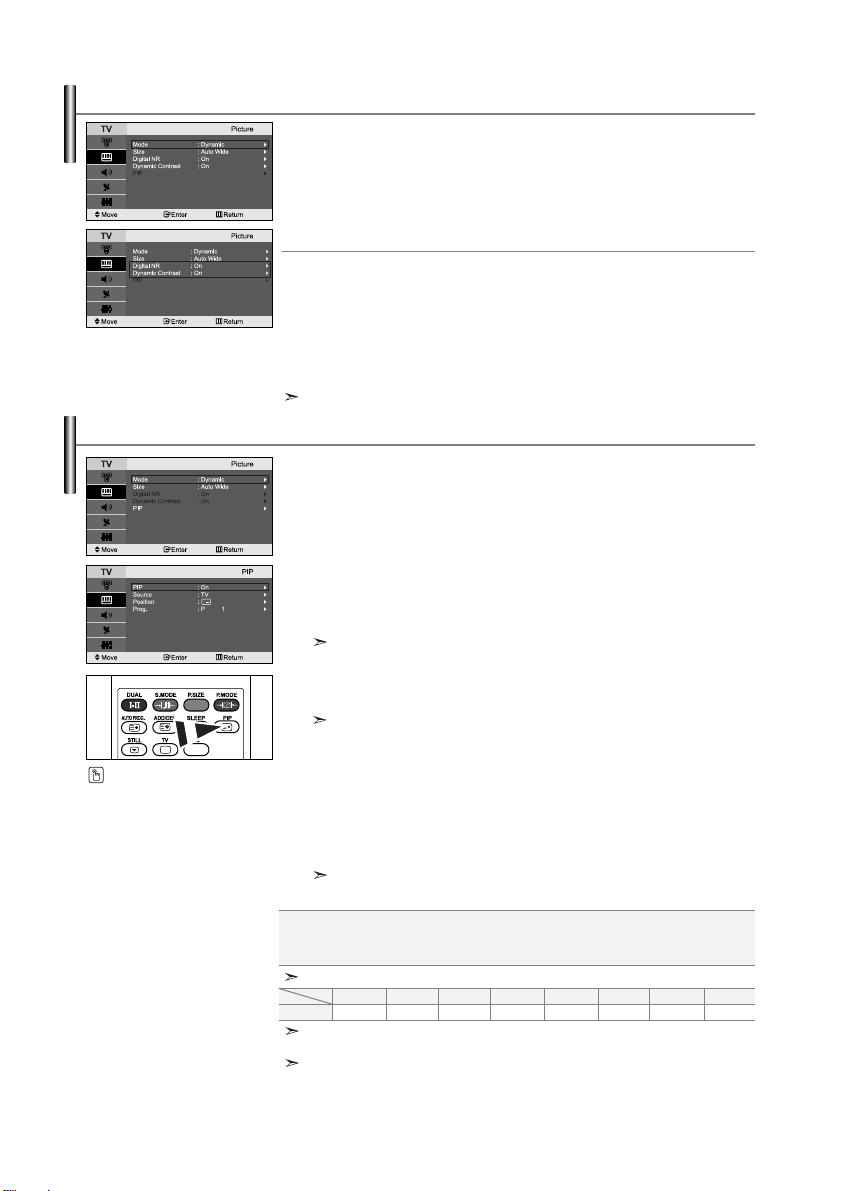
Digital Noise Reduction / Dynamic Contrast
Digital NR:
If the broadcast signal received by your TV is weak, you can activate the
Digital Noise Reduction feature to help reduce any static and ghosting
that may appear on the screen.
Dynamic Contrast:
Dynamic Contrast detects the visual signal input and adjusts to create
optimum contrast.
1. Press the MENU button to display the menu. Press the or button to
select “Picture”, then press the
2. Press the or button to select “Digital NR” or
“Dynamic Contrast”, then press the
3.
Press the or button to select “On” or “Off”. Press the ENTER button.
4. Press the EXIT button to exit.
These functions don’t work in PC mode.
Viewing the Picture In Picture (PIP)
You can display a sub picture within the main picture of set
programme or video input. In this way, you can watch the picture of set
programme or video input from any connected equipment while watching
the main picture.
1. Press the MENU button to display the menu. Press the or button to
select “Picture”, then press the
2.
Press the or button to select “PIP”, then press the ENTER button.
3. Press the ENTER button again.
Press the PIP button on the
remote control repeatedly to
activate or deactivate the “PIP”.
Press the
4. Press the or button to select “Source”, then press ENTER button.
Select a source of the sub picture by pressing the
press the
5. Press the or button to select “Position”, then press the ENTER
button. Select the position of the sub picture by pressing the or
button and then press the ENTER button.
6. Press the or button to select “Prog.” and then press the ENTER
button. You can select the channel that you want to view through sub
picture by pressing the
7. Press the EXIT button to exit.
Source:
Position: Used to move the sub picture.
Prog.: Used to Change the sub picture.
PIP Settings
Main
PC
When the main picture is PC, the sub picture only supports “TV”, “Ext.1”, “Ext.2”, “AV”
and “S-Video”. The sub picture does not support other input sources in this case.
You may notice that the picture in the PIP window becomes slightly unnatural
when you use the main screen to view a game or karaoke.
or button to select “On”, then press ENTER button.
PIP is available only in PC mode and will be unavailable for other modes.
ENTER button.
The sub picture can serve different source selections based on what the main
picture is set to.
The “Prog.” can be active when the sub picture is set to TV.
Selecting a signal source (external A/V) for PIP.
Sub
(O: PIP operates, X: PIP doesn’t operate)
TVOExt.1OExt.2OAVOS-Video
English-11
ENTER button.
ENTER button.
ENTER button.
or button and
or button. Press the ENTER button.
Component
O
PCXHDMI
X
X
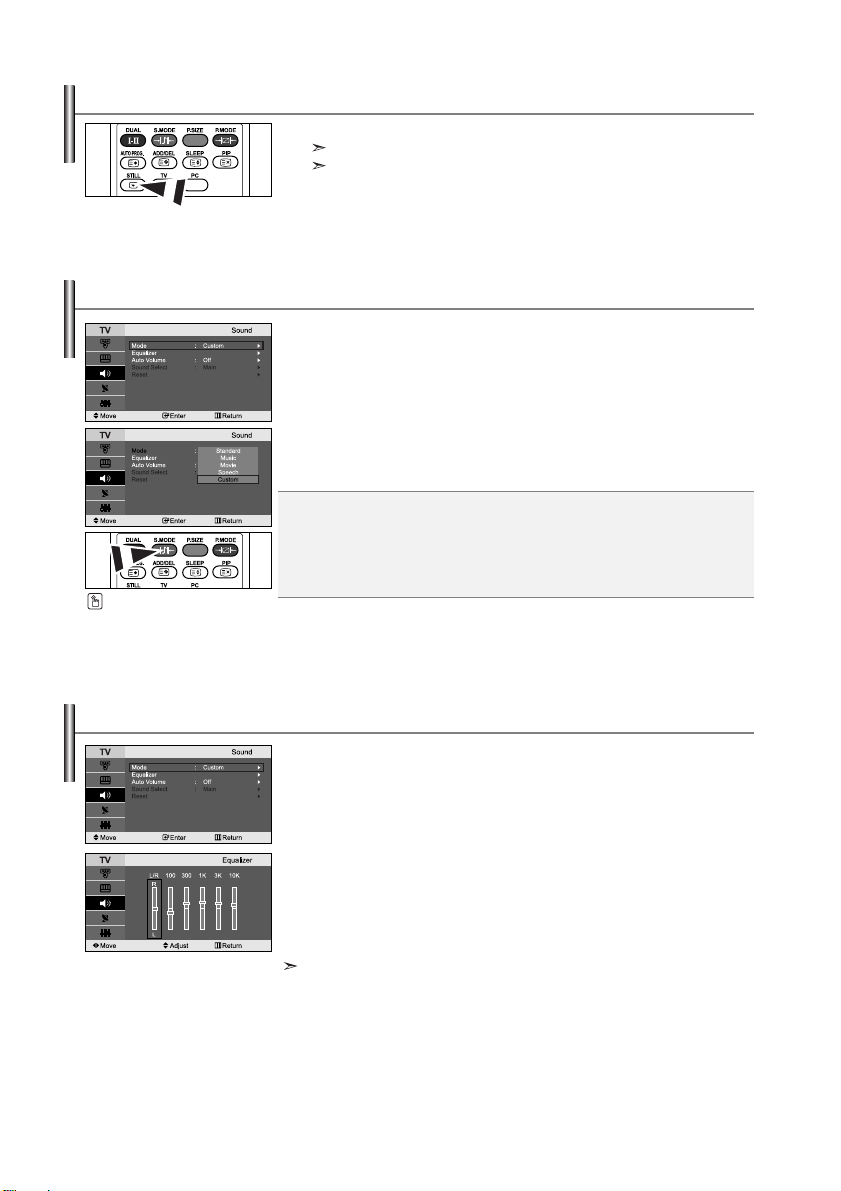
Freezing the Picture
1. Press the STILL button to freeze a moving picture.
Changing the Sound Standard
You can select the type of the special sound effect to be used when
watching a given broadcast.
1. Press the MENU button to display the menu. Press the or button to
select “Sound”, then press the
2. Press the ENTER button again, to select “Mode”.
3. Select the required sound effect by pressing the or button repeatedly
and then press the
4. Press the EXIT button to exit.
Standard: Selects the normal sound mode.
Music: Emphasizes music over voices.
Movie: Provides live and full sound for movies.
Speech: Emphasizes voices over other sounds.
Custom: Selects your custom sound settings.
You can also select these
options by simply pressing the
S.MODE button on the remote
control.
Normal sound will still be heard. Press again to cancel.
This function doesn’t work when the input Source is PC.
ENTER button.
ENTER button.
(Refer to “Adjusting the Sound Settings”)
Adjusting the Sound Settings
The sound settings can be adjusted to suit your personal preferences.
1. Press the MENU button to display the menu. Press the or button to
select “Sound”, then press the
2. Press the or button to select “Equalizer”, then press the
ENTER button.
3.
Press the
Press the ENTER button.
4. Press the or button to reach the required setting.
Press the
5. Press the EXIT button to exit.
If you make any changes to these settings, the Sound Mode is automatically
switched to “Custom”.
or button
ENTER button.
English-12
ENTER button.
to select a particular item.
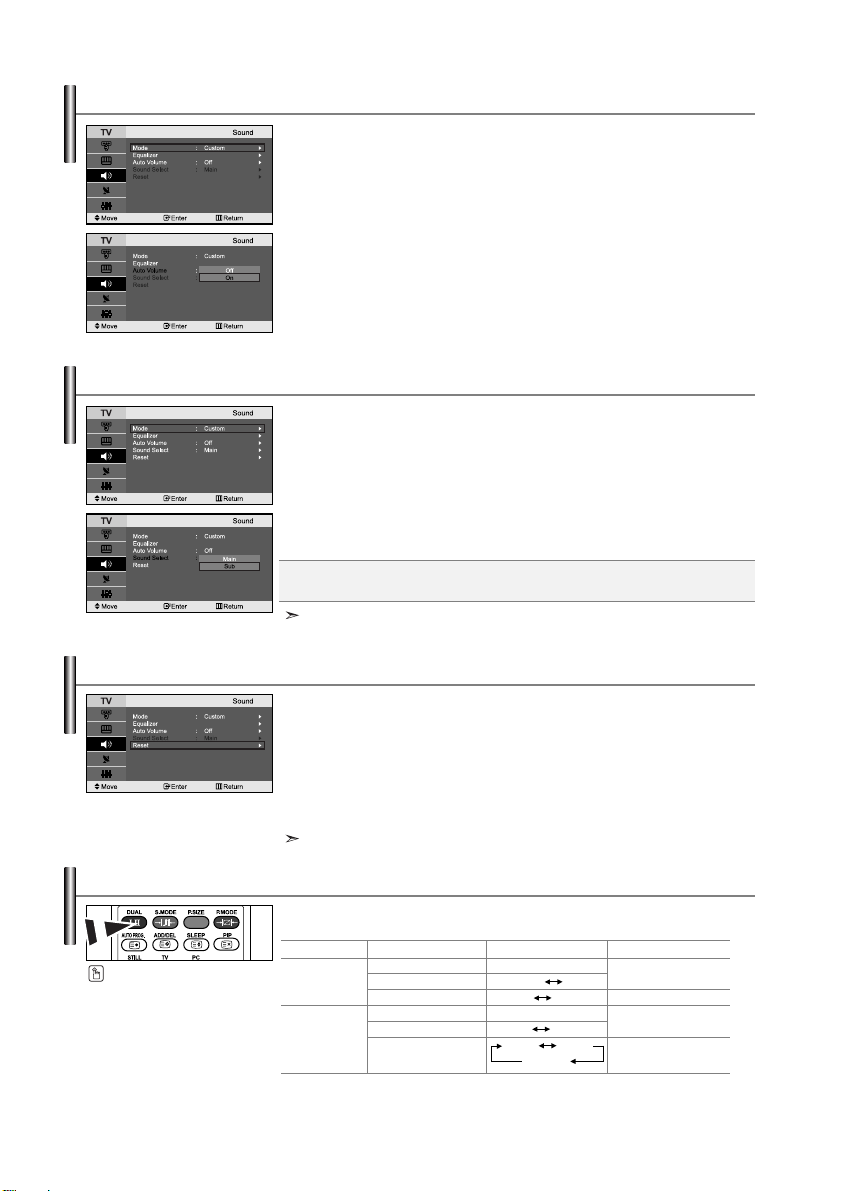
Adjusting the Volume Automatically
Each broadcasting station has its own signal conditions, and so it is not
easy for you to adjust the volume every time the channel is changed.
This feature let you automatically adjust the volume of the desired
channel by lowering the sound output when the modulation signal is
high or by raising the sound output when the modulation signal is low.
1. Press the MENU button to display the menu. Press the or button to
select “Sound”, then press the
ENTER button.
2. Press the or button to select “Auto Volume”, then press the
ENTER button.
3.
Press the or button to select “On” or “Off”, then press the ENTER button.
4. Press the EXIT button to exit.
Listening to the Sound of the Sub Picture
During the PIP feature is activating, you can listen to the sound of the
sub picture.
1. Press the MENU button to display the menu. Press the or button to
select “Sound”, then press the
2. Press the or button to select “Sound Select”, then press the
ENTER button.
ENTER button.
3. Press the or button to select “Sub”, then press the ENTER button.
4. Press the EXIT button to exit.
Main: Used to listen to the sound of the main picture.
Sub: Used to listen to the sound of the sub picture.
You can select this option when the “PIP” is set to “On”.
Resetting the Sound Settings to the Factory defaults
If Game Mode is On, the Reset Sound function is activated. Selecting
the Reset function after setting the equalizer resets the equalizer
setting to the factory defaults.
1. Press the MENU button to display the menu. Press the or button to
select “Sound”, then press the
2. Press the or button to select “Reset”,then press the ENTER button.
3. Press the EXIT button to exit.
You can select this option when the “Game Mode” is set to “On”.
ENTER button.
Selecting the Sound mode
You can set the sound mode by pressing the “DUAL” button.
When you press it, the current sound mode is displayed on the screen.
You can also set these options
simply by pressing the
DUAL button on remote control.
FM
Stereo
NICAM
Stereo
Audio Type
Mono
Stereo
Dual
Mono
Stereo
Dual
English-13
DUAL 1/2
MONO
STEREO MONO
DUAL1 DUAL 2
MONO
MONO STEREO
MONO DUAL1
DUAL 2
Default
Automatic
change
DUAL 1
Automatic
change
DUAL 1
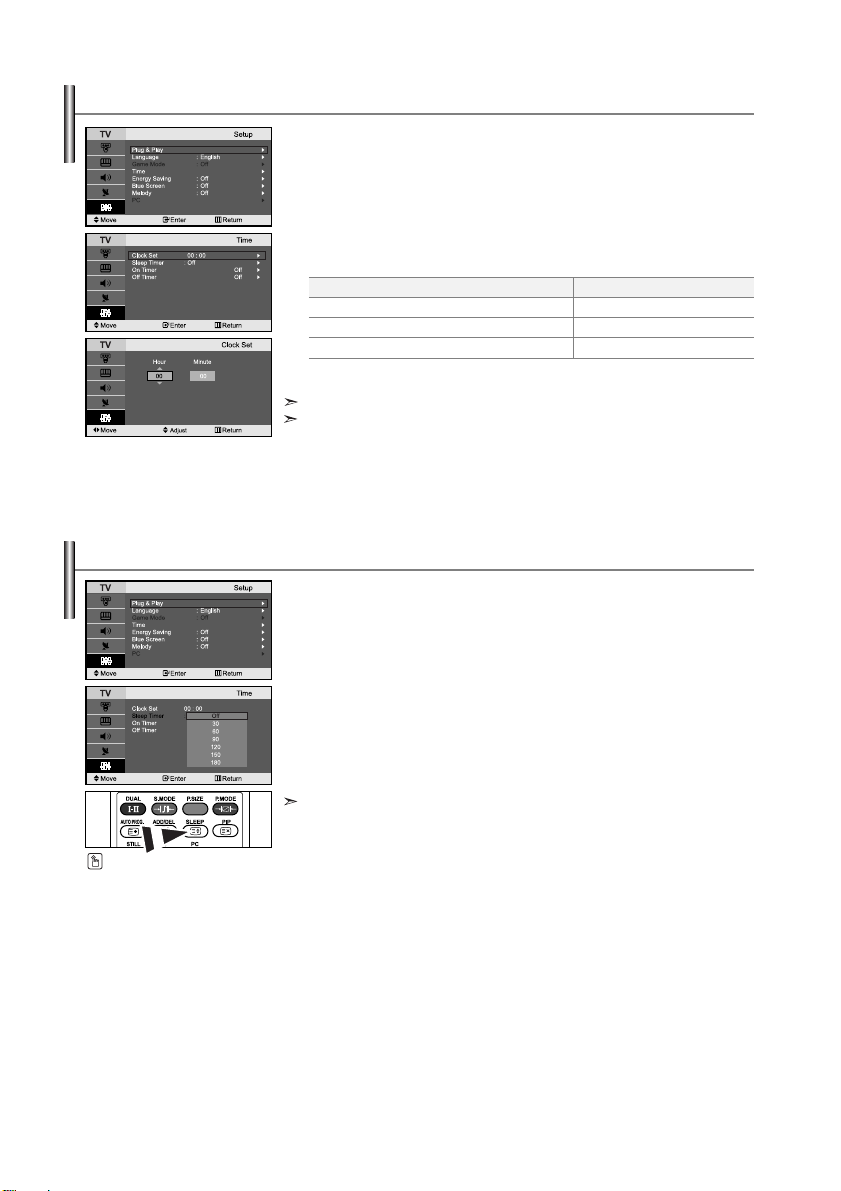
Setting and Displaying the Current Time
You can set the TV’s clock so that the current time is displayed when
you press the INFO button. You must also set the time if you wish to
use the automatic On/Off timers.
1. Press the MENU button to display the menu. Press the or button to
select “Setup”, then press the
2.
Press the or button to select “Time”, then press the ENTER button.
3. Press the ENTER button to select “Clock Set”.
4.
To...
Move to “Hour” or “Minute”
Set the “Hour” or “Minute”
Press the
ENTER button.
Press the EXIT button to exit.
5.
If you disconnect the power cord, you have to set the clock again.
You can also set hour and minute by pressing the number buttons on the remote control.
Setting the Sleep Timer
You can select a time period of between 30 and 180 minutes after which
the television automatically switches to standby mode.
1. Press the MENU button to display the menu. Press the or button to
select “Setup”, then press the
2.
Press the or button to select “Time”, then press the ENTER button.
3. Press the or button to select “Sleep Timer”, then press the
ENTER button.
4. Press the or button repeatedly until the desired time appears
(Off, 30, 60, 90, 120, 150, 180). Press the
5. Press the EXIT button to exit.
The TV automatically switches to standby mode when the timer reaches 0.
ENTER button.
ENTER button.
ENTER
Press the...
or button.
or button.
button.
Press the SLEEP button on
the remote control repeatedly
until the appropriate time
interval appears.
English-14
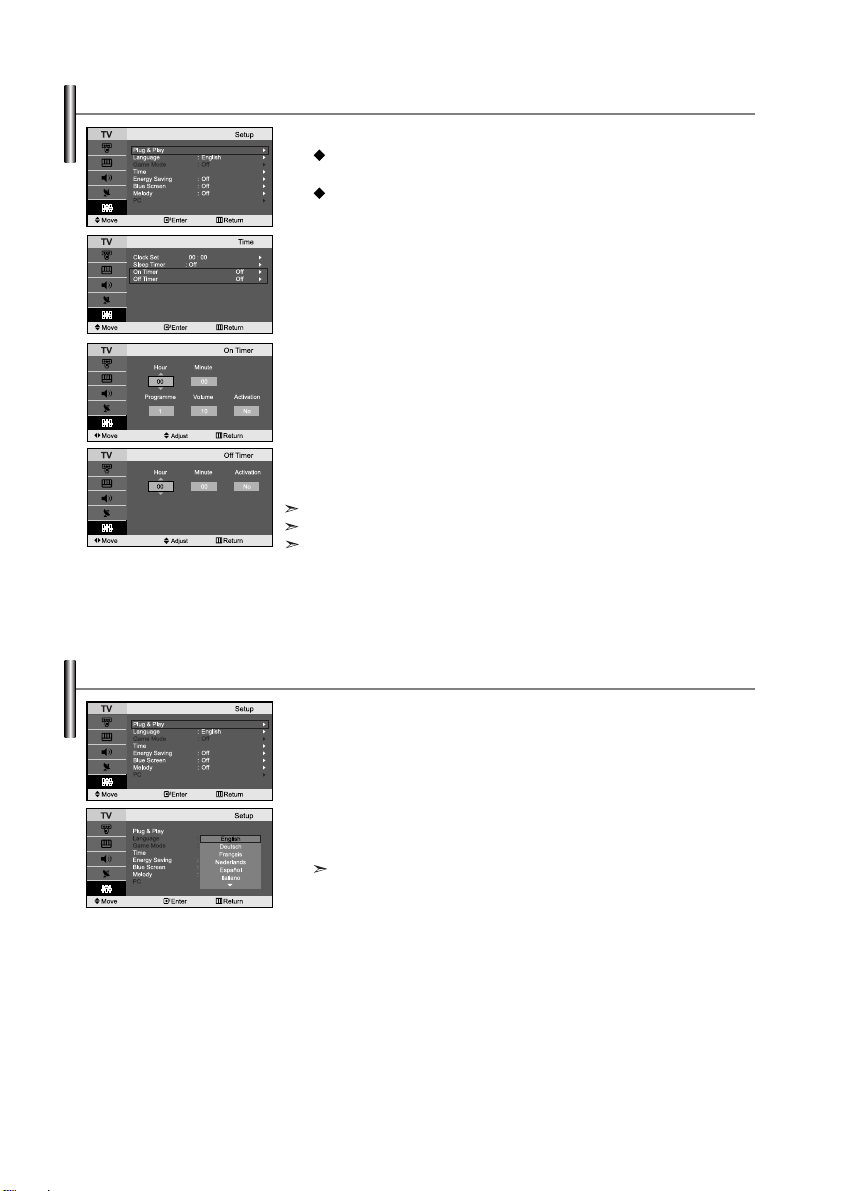
Switching the Television On and Off Automatically
You can set the On/Off timers so that the set will:
Switch on automatically and tune to the channel of your choice at
the time you select.
Switch off automatically at the time you select.
1. Press the MENU button to display the menu. Press the or button to
select “Setup”, then press the
ENTER button.
2. Press the or button to select “Time”, then press the ENTER button.
3. Press the or button to select “On Timer”, then press the
ENTER button.
4. Press the or button to adjust “Hour”, then press the button to
move to the next step. Set other items using the same method as above.
When finished, press the
ENTER button to return.
5. Press the or button to select “Off Timer”, then press the ENTER
button.
6. Press the or button to adjust “Hour”, then press the button to
move to the next step. Set other items using the same method as above.
When finished, press the
ENTER button to return.
7. Press the EXIT button to exit.
The first step is to set the television’s clock.
You can also set hour and minute by pressing the number buttons on the remote control.
The "Activation" setting must be set to "Yes" in order for the timers to work.
Choosing Your Language
When you start using your set for the first time, you must select the
language which will be used for displaying menus and indications.
1. Press the MENU button to display the on-screen menu.
Press the
or button to select “Setup”, then press the ENTER button.
2. Press the or button to select “Language”, then press the ENTER
button.
3. Select a particular language by pressing the or button repeatedly.
Press the
ENTER button.
You can choose one of 21 languages.
4. Press the EXIT button to exit.
English-15
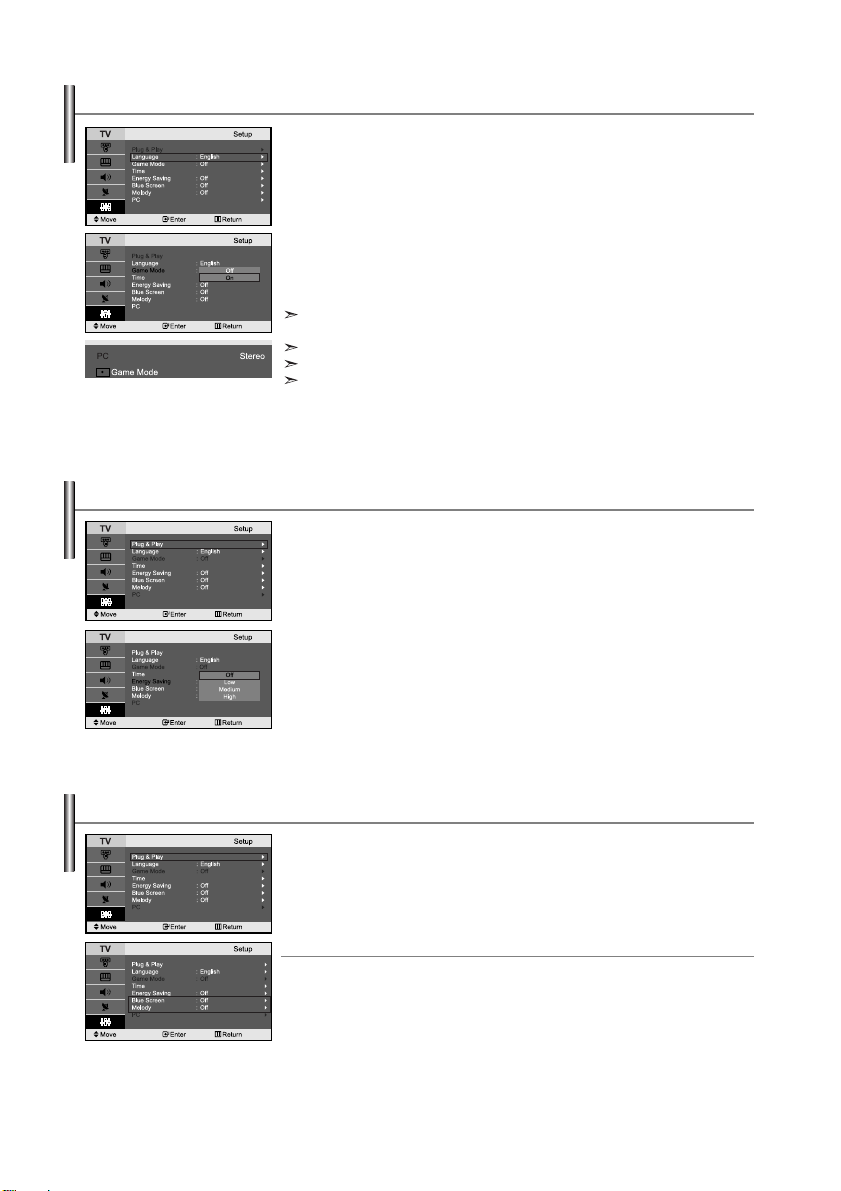
Using the Game Mode
When connecting to a game console such as PlayStation
you can enjoy a more realistic gaming experience by selecting Game Mode.
1. Press the MENU button to display the menu. Press the or button to
select “Setup”, then press the
2. Press the or button to select “Game Mode”, then press the
ENTER button.
3. Press the or button to select “On” or “Off”, then press the
ENTER button.
4. Press the EXIT button to exit.
To disconnect the game console and connect another external device, set Game to
Off in the setup menu.
If you display the TV menu in Game Mode, the screen shakes slightly.
Game Mode is not available in TV mode.
If Game Mode is On:
• Picture Mode and Sound Mode are automatically changed to Custom and users can
not change the mode.
• Adjust the sound using the equalizer.
• The Reset Sound function is activated. Selecting the Reset function after setting the
equalizer resets the equalizer setting to the factory defaults.
Using the Energy Saving Feature
This feature adjusts the brightness of TV so as to reduce the power
consumption. When you watching TV at night, set the "Energy Saving "
mode option to "High" so as to reduce the dazzling of your eyes as well
as the power consumption.
1. Press the MENU button to display the on-screen menu.
Press the
ENTER button.
2. Press the or button to select “Energy Saving”,
then press the
3. Select the required option (Off, Low, Medium, High) by pressing
or button.
the
Press the
4. Press the EXIT button to exit.
TM
or Xbox TM,
ENTER button.
or button to select “Setup”, then press the
ENTER button.
ENTER button.
Setting the Blue Screen Mode / Selecting the Melody
Blue Screen:
If no signal is being received or the signal is very weak, a blue screen
automatically replaces the noisy picture background. If you wish to
continue viewing the poor picture, you must set the "Blue Screen"
mode to "Off".
Melody:
You can hear melody sound when the television is powered on or off.
1. Press the MENU button to display the menu. Press the or button to
select “Setup”, then press the
2. Press the or button to select “Blue Screen” or “Melody”, then press
the
ENTER button.
3.
Press the or button to select “On” or “Off”, then press the ENTER button.
4. Press the EXIT button to exit.
English-16
ENTER button.
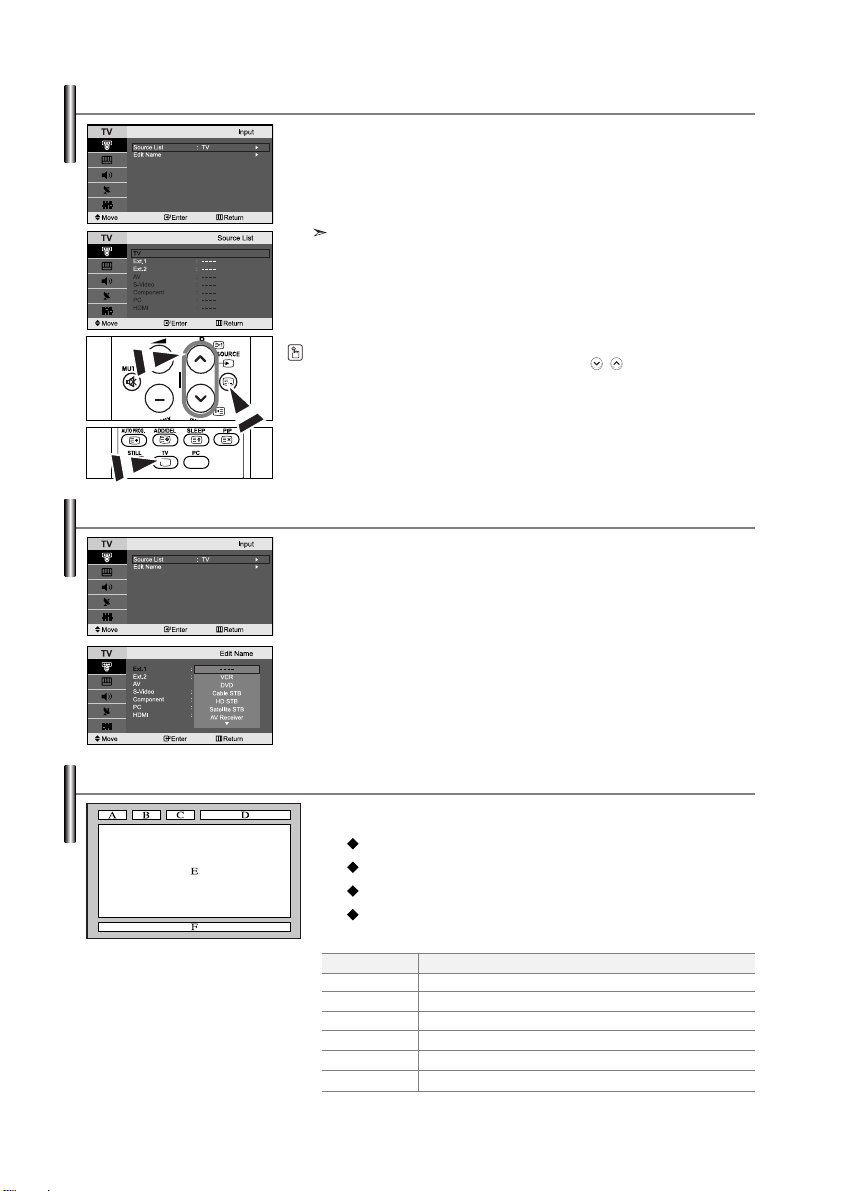
Selecting the Source
You can select among external sources connected to
your TV’s input jacks.
1. Press the MENU button to display the menu.
Press the
2. Press the ENTER button again, to select “Source List”.
When no external device is connected to your set, only “TV”, “Ext.1”, “Ext.2”
are activated in the “Source List”. “AV”, “S-Video”, “Component”, “PC”, “HDMI”
are activated only when they are connected to your set.
3. Select the required device by pressing the or button.
Press the
Press the SOURCE button on the remote control to toggel between all the available
source.
remote control but you cannot select it by pressing the
Editing the Input Source Names
Name the device connected to the input jacks to make your input
source selection easier.
1. Press the MENU button to display the menu.
Press the
2. Press the or button to select “Edit Name”, then press the ENTER
button.
3. Press the or button to select the device that you wish to edit.
Press the
4. Press the or button to select the required device.
Press the
5. Press the EXIT button to exit.
Teletext Decoder
Most set channels carry “ Teletext ”, pages of written
information that provide information such as:
The Teletext pages are organized according to six categories:
ENTER button, to select “Input”.
ENTER button.
TV mode can be selected by pressing
the
TV or P / button
ENTER button, to select “Input”.
ENTER button.
ENTER button.
Television programme times.
News bulletins and Weather forecasts.
Sports results.
Subtitles for the hard of hearing.
Part
A
B
C
D
E
F
Contents
Selected page number.
Broadcasting station identity.
Current page number or search status.
Date and time.
Text.
Status information.
English-17
SOURCE button.
on the
Displaying the Teletext Information
You can display Teletext information at any time, but signal reception
must be good. Otherwise:
Information may be missing.
Some pages may not be displayed.
To activate the Teletext mode and display the contents page:
1.
Using the P () or P () button, select the channel providing the
Teletext service.
2.
Press the TTX/MIX () button to activate the Teletext mode.
The contents page is displayed. It can be redisplayed at any time by pressing
the MENU () button.
3. Press the TTX/MIX () button again.
The actual broadcast will be displayed simultaneously with the Teletext page
on the screen.
4. Press the TV() button again to exit from the Text display.
If any broken character appears while Text is being viewed, make sure that the
Text language is identical with the language in the “Setup” menu mode. If both languages
are different, select the same language with the Text language on the “Setup” menu.
Selecting a Specific Teletext Page
Press the number buttons on the remote control to enter the page
number directly:
1.
Enter the three-digit page number listed in the contents by pressing the
corresponding numeric buttons.
2.
If the selected page is linked with several secondary pages, the secondary
pages are displayed in sequence. To freeze the display on a given page,
press the
3. Using the various display options:
To display...
Both Teletext information and the normal broadcast
Hidden text (answers to quiz games, for example)
The normal screen
A secondary page, by entering its 4-digit number
The next page
The previous page
Double-size letters in the:
Upper half of the screen
Lower half of the screen
Normal screen
()
. Press the
()
button again to resume.
Press the...
TTX/MIX ( )
INFO ( )
INFO ( )
ADD/DEL ( )
()
P
P
()
SLEEP
()
Once
Twice
Three times
English-18
Using Fastext to Select a Teletext Page
The various topics included in the Teletext pages are colour-coded, and can
be selected by pressing the coloured buttons on the remote control.
1.
Display the Teletext contents page by pressing the
TTX/MIX ()
button.
2. Press the coloured button corresponding to the topic that you wish to
select (The available topics are listed on the status information line).
3. Press the Red button to display the previous page.
Press the Green button to display the next page.
4. Press the TV() button again to exit from the Text display.
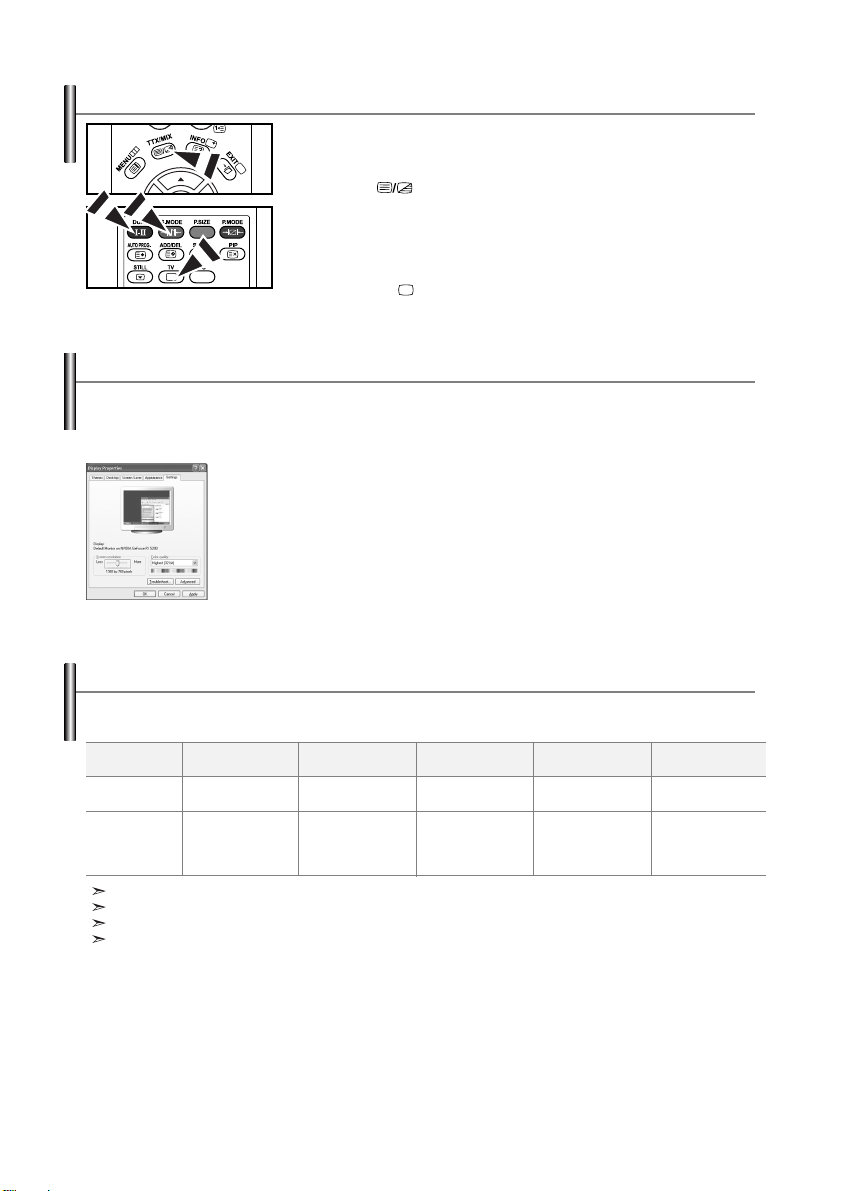
Setting up Your PC Software (Based on Windows XP)
The Windows display-settings for a typical computer are shown below. The actual screens on your PC
may be different depending upon your particular version of Windows and your particular video card.
Even if your actual screens look different, the same, basic set-up information will apply in almost all
cases. (If not, contact your computer manufacturer or Samsung Dealer.)
1. First, click on “Control Panel” on the Windows start menu.
2. When the control panel window appears, click on “Appearance and Themes” and a
display dialog-box will appear.
3. When the control panel window appears, click on “Display” and a display
dialog-box will appear.
4. Navigate to the “Settings” tab on the display dialog-box.
The correct size setting (resolution): Optimum- 1360 X 768
If a vertical-frequency option exists on your display settings dialog box, the correct
value is “60” or “60 Hz”. Otherwise, just click “OK” and exit the dialog box.
Display Modes
Both screen position and size will vary depending on the type of PC monitor and its resolution.
The resolutions in the table are recommended. (All resolutions between the supported limits are supported)
Mode
IBM
VESA
The interlace mode is not supported.
The set might operate abnormally if a non-standard video format is selected.
HDMI/DVI does not support PC function.
Separate and Composite modes are supported. SOG is not supported.
Resolution
640 x 480
720 x 400
800 x 600
1024 x 768
1024 x 768
1360 x 768
Horizontal
Frequency (kHz)
31.469
31.469
37.879
48.364
56.476
47.712
Frequency (Hz)
English-19
Vertical
59.940
70.087
60.317
60.000
70.069
60.015
Pixel Clock
Frequency (MHz)
25.175
28.322
49.500
65.000
75.000
85.800
Sync Polarity
(H/V)
- / -
- / +
+ /+
- / -
- / + /+
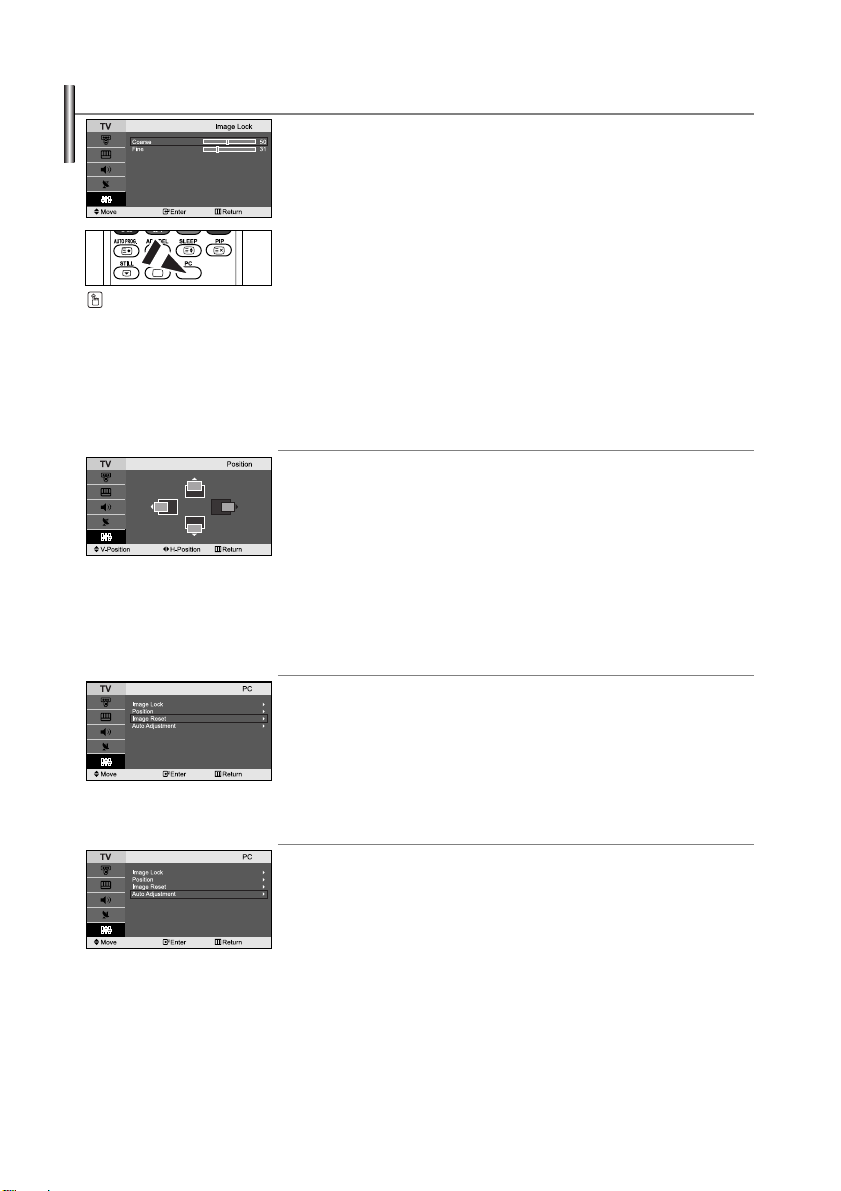
Setting the PC
Press the PC button on the
remote control to select the
PC mode.
Coarse and Fine Tuning of the Image (Image Lock):
The purpose of picture quality adjustment is to remove or reduce picture noise.
If the noise is not removed by Fine-tuning alone, then adjust the
frequency as best as possible (coarse) and Fine-tune again. After the noise has
been reduced, re-adjust the picture so that it is aligned on the center of screen.
1. Preset: Press the PC button to select PC mode.
2. Press the MENU button to display the menu.
Press the
or button to select “Setup”, then press the ENTER button.
3. Press the or button to select “PC”, then press the ENTER button.
4. Press the ENTER button to select “Image Lock”.
5. Press the or button to select “Coarse” or “Fine”, then press the
ENTER button.
6. Press the or button to adjust the screen quality.
Press the
ENTER button.
7. Press the EXIT button to exit.
Changing the Image Position (Position):
Adjust the PC’s screen positioning if it does not fit the TV screen.
1. Follow the “Coarse and Fine Tuning of the Image (Image Lock)”
instructions number 1 to 3.
2. Press the or button to select “Position”, then press the ENTER
button.
3. Press the or button to adjusting the Vertical-Position.
Press the
Press the
or button to adjust the Horizontal-Position.
ENTER button.
4. Press the EXIT button to exit.
Initializing the Image Settings (Image Reset):
You can replace all image settings with the factory default values.
1. Follow the “Coarse and Fine Tuning of the Image (Image Lock)”
instructions number 1 to 3.
2. Press the or button to select “Image Reset”, then press the
ENTER button.
3. Press the EXIT button to exit.
Adjusting the PC Screen Automatically (Auto Adjustment):
Auto adjustment allows the PC screen of set to self-adjust to the
incoming PC video signal. The values of fine, coarse and position are
adjusted automatically.
1. Follow the “Coarse and Fine Tuning of the Image (Image Lock)”
instructions number 1 to 3.
2. Press the or button to select “Auto Adjustment”, then press the
ENTER button.
3. Press the EXIT button to exit.
English-20
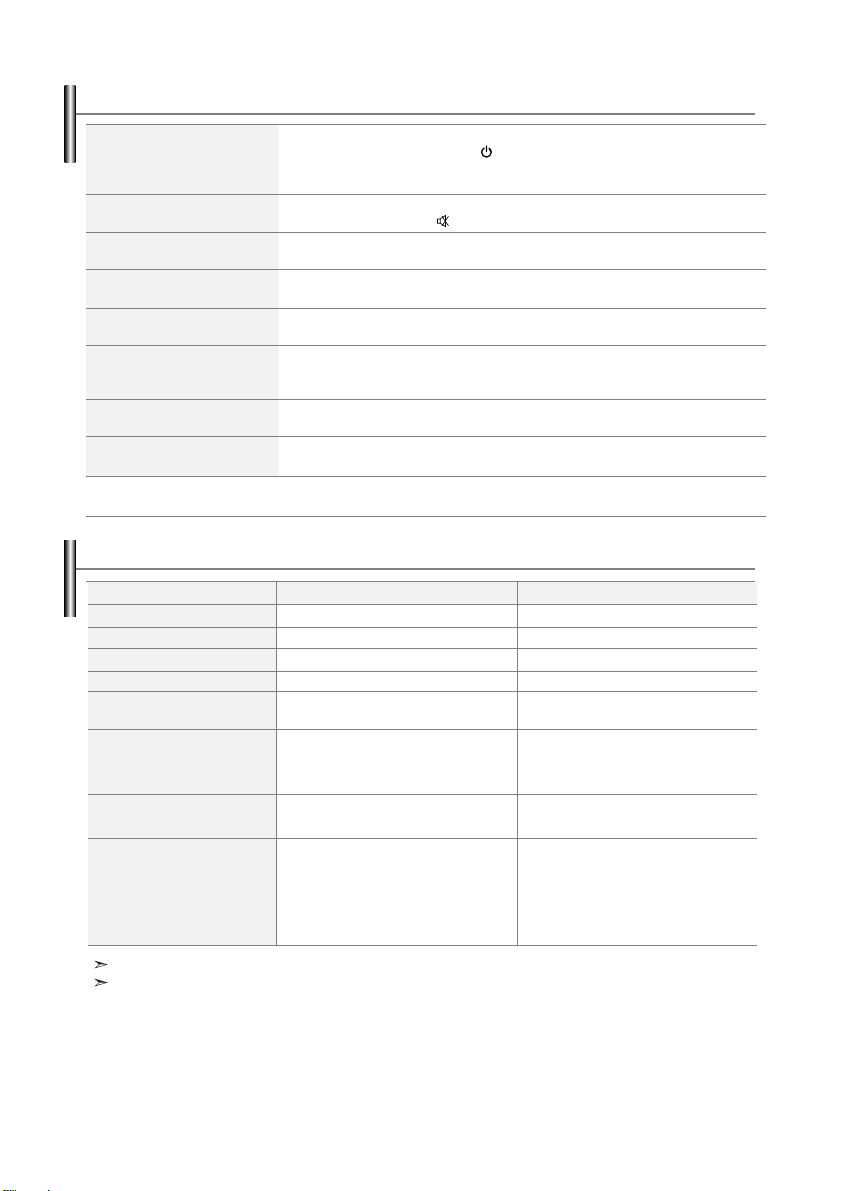
Troubleshooting: Before Contacting Service Personnel
No sound or picture
Normal picture but no sound
No picture or black and white picture
Sound and picture interference
Blurred or snowy picture,
distorted sound
Remote control malfunctions
“Check signal cable.”
message is displayed.
On PC mode, “Mode Not Supported.”
message is displayed.
The TFT LCD panel uses a panel consisting of sub pixels (3,133,440) which require sophisticated technology to produce.
However, there may be few bright or dark pixels on the screen. These pixels will have no impact on the performance of the product.
Check that the mains lead has been connected to a wall socket.
Check that you have pressed the buttons on the front of the set.
Check the picture contrast and brightness settings.
Check the volume.
Check the volume.
Check whether the MUTE button has been pressed on the remote control.
Adjust the colour settings.
Check that the broadcast system selected is correct.
Try to identify the electrical appliance that is affecting the set and move it further away.
Plug your set into a different mains socket.
Check the direction, location and connections of your aerial.
This interference is often due to the use of an indoor aerial.
Replace the remote control batteries.
Clean the upper edge of the remote control (transmission window).
Check the battery terminals.
Check that the signal cable is firmly connected to the PC or video sources.
Check that the PC or video sources are turned on.
Check the maximum resolution and the frequency of the video adaptor.
Compare these values with the data in the Display Modes.
Technical and Environmental Specifications
Model name
Screen Size (Diagonal)
Power Supply
Power Consumption
PC resolution
Sound
Output
Dimension (WxDxH)
Body
With stand
Weight
With stand
Environmental Considerations
Operating Temperature
Operating Humidity
Storage Temperature
Storage Humidity
Design and specifications are subject to change without prior notice.
This device is a Class B digital apparatus.
10 °C to 40 °C (50 °F to 104 °F)
-20 °C to 45 °C (-4 °F to 113 °F)
LE23R3
23 inch
AC 220-240 V, 50 Hz
100 W
1360 x 768 @ 60 Hz
3 W x 2
583 x 90 x 443 mm
583 x 206 x 485 mm
8.6 kg
10 % to 80 %, non-condensing
5 % to 95 %, non-condensing
LE26R3
26 inch
AC 220-240 V, 50 Hz
120 W
1360 x 768 @ 60 Hz
5 W x 2
662 x 94 x 498 mm
662 x 206 x 539 mm
11.3 kg
10 °C to 40 °C (50 °F to 104 °F)
10 % to 80 %, non-condensing
-20 °C to 45 °C (-4 °F to 113 °F)
5 % to 95 %, non-condensing
English-21
Innehåll
ANSLUTA OCH FÖRBEREDA DIN TV
Lista över delar ........................................................ 2
Installera stativet ...................................................... 2
Installera väggfästessatsen ...................................... 2
Översikt ver kontrollpanelen .................................... 3
Översikt ver anslutningspanelen .............................. 4
Översikt ver fjärrkontrollen........................................ 5
Sätta i batterierna i fjärrkontrollen ............................ 6
Sätta på och stänga av TVn .................................... 6
Sätta tv i vänteläge .................................................. 6
Plug & Play .............................................................. 6
STÄLLA IN KANALERNA
Lagra kanaler automatiskt ........................................ 7
Lagra kanaler manuellt ............................................ 8
Redigera kanaler ...................................................... 8
STÄLLA IN BILDEN
Ändra bildstandard.................................................... 9
Ändra bildinställningarna .......................................... 9
Ändra Färgton .......................................................... 10
Återställa bildinställningarna till
fabriksinställningarna ..............................................10
Välja bildstorlek ........................................................10
Använda funktionen Brusreducer. /
Dynamisk kontrast .................................................. 11
Visa bild-i-bilden (BIB) .............................................. 11
Frysa bilden ..............................................................12
STÄLLA IN ÖVRIGA
Välja språk................................................................15
Använda Spelläge ................................................16
Att använda energisparfunktionen............................ 16
Ställa in läget blå bakrund / Välja Melodi ................ 16
Välja källa ................................................................ 17
Redigera ingångskällornas namn ............................17
ANVÄNDA TEXT-TV-FUNKTIONEN
Text-tv-dekoder ........................................................ 17
Visa text-tv-information ............................................ 18
Välj en specifik text-tv-sida ...................................... 18
Använda Fastext (Snabbtext)
för att välja en text-tv-sida ........................................19
STÄLLA IN PATORN
Installera programvaran (baserad på XP) ................19
Visningsläge ............................................................19
Ställa in datorn.......................................................... 20
REKOMMENDATIONER FÖR ANVÄNDNING
Felsökning: Innan du kontaktar servicepersonal ......21
Tekniska och miljömässiga specifikationer ..............21
Svenska
STÄLLA IN LJUDET
Ändra ljudstandard....................................................12
Justera ljudinställningar ............................................12
Justera volymen automatiskt .................................. 13
Lyssna på underbildens ljud .................................... 13
Återställa ljudinställningarna till fabriksstandard ...... 13
Välja ljudläge ............................................................13
STÄLLA IN TIDEN
Ställa in och visa aktuell tid ......................................14
Ställa in sovtimern ....................................................14
Slå på och stänga av tv:n automatiskt .................... 15
Symboler Tryck Viktigt Obs!
Svenska-1
Entrycksknapp
Lista över delar
Försäkra dig om att följande delar följer med din LCD TV.
Kontakta din återförsäljare om det saknas något.
M4 X L16
Fjärrkontroll och
batterier (AAA x 2)
Nätsladd Nedre kåpa Stativskruvar X 4 Sockel Rengöringstrasa
Användarhandbok Garantikort Säkerhetsguide Registreringskort
Garantikort / Säkerhetsguide / Registreringskort (Finns ej på alla platser)
Installera stativet
< 2 >< 3 >
1. Placera TV:n med rutan neråt på ett mjukt tyg eller en kudde på ett bord.
2. För in stativet i hålet i TV:ns botten.
3. Sätt i skruven i hålet enligt anvisning och dra åt.
Installera väggfästessatsen
Väggmonteringsdetaljer (säljs separat) gör att du
kan montera TV:n på väggen.
För detaljerad information om installation av
väggfästet skall du titta i instruktionerna som
medföljer väggmonteringsdetaljerna.
Kontakta en tekniker för att få hjälp vid installation
av väggfästet.
Samsung Electronics är inte ansvariga för skador
på produkten eller personlig skada på dig själv
eller andra om du väljer att montera TV:n själv.
Avlägsna ställningen, täck det nedre hålet med
ett lock och spänn fast med två skruvar.
Svenska-2
Översikt ver kontrollpanelen
Produktens färg och form kan variera beroende på model.
SOURCE
Växlar mellan alla tillgängliga ingångskällor
(TV, Ext.1, Ext.2, AV, S-Video, Component,
PC, HDMI). Använd den här knappen på
skärmmenyn när du använder knappen
på fjärrkontrollen.
MENU
Tryck här om du vill se en skärmmeny med TV:ns
funktioner.
Tryck för att sänka eller höja volymen.
På skärmmenyn använder du knapparna
när du använder knapparna
fjärrkontrollen.
Tryck här när du vill byta kanal. På skärmmenyn
använder du knapparna när du
använder knapparna
(Om du inte använder fjärrkontrollen kan du koppla
på TV:n med hjälp av kanalknapparna.)
och på
och på fjärrkontrollen.
ENTER
Svenska-3
(Ström)
Tryck här när du ska slå på och stänga av TV:n.
Strömindikator
Blinkar och stängs av när strömmen är på och
tänds i viloläge.
Mottagare för fjärrkontrollen
Rikta fjärrkontrollen mot den här punkten på TV:n.
Högtalare
Översikt ver anslutningspanelen
1234
5678
Strömingång
När du vill ansluta en extern enhet till din TV skall du se till att enheten är avstängd.
Vid anslutning till en extern enhet är det viktigt att kablarnas färger överensstämmer.
Ansluta en antenn eller ett kabel-TV-nät
För att TV-kanaler ska visas på rätt sätt måste enheten ta emot en signal från någon av följande källor:
- En utomhusantenn / Ett kabel-TV-nätverk / Ett satellitnätverk.
Ansluta en dator
- Anslut D-Sub-kabeln (tillval) till "PC (PC IN)" på baksidan av din enhet och den andra till grafikkortet på din dator.
- Anslut stereo-audiokabeln (tillval) till "AUDIO (PC IN)" på baksidan av din enhet och den andra änden till "Audio Out" till
ljudkortet på din dator.
Ansluta HDMI/DVI
-
Stöder anslutningar mellan AV-enheter som är aktiverade för HDMI-anslutning (digital-tv-boxar, DVD-spelare, AV-mottagare och digital-TV).
- Ingen ytterligare ljudanslutning krävs för en HDMI till HDMI-anslutning.
Vad är HDMI?
- “High Definition Multimedia interface” gör det möjligt att överföra digital bildinformation av högdefinitionstyp och flera kanaler
med digitalt ljud (5.1 kanaler).
- HDMI/DVI-terminalen stöder DVI-anslutning till en extra enhet med lämplig kabel (medföljer ej).
Skillnaden mellan HDMI och DVI är att HDMI-enheten är mindre, har kodningsfunktionen HDCP
(High Bandwidth Digital Copy Protection) installerad och att den stödjer digitalt ljud för flera kanaler.
Du bör använda DVI-till-HDMI-kabeln eller DVI-HDMI-förlängaren för anslutningen och “R - AUDIO - L” -terminalen på
DVI för ljudutgången.
-
Vi anslutning av den här produkten via HDMI eller DVI till en digital-TV-box, DVD-spelare eller spelkonsol etc,
ska du säkerställa att den har ställts in för att vara kompatibel med det videoutgångsläge som visas i tabellen nedan.
Om du inte följer anvisningarna nedan kan det leda till att bilden förvrids, att bilden splittras eller att det inte visas någon bild.
- Försök inte ansluta HDMI/DVI-enheten till en PC eller ett grafikkort för en bärbar dator.
(Det kommer att leda till att en tom skärm visas)
Svenska-4
Ansluta digital-tv-box, videobandspelare eller DVD
- Anslut DTV-, VCR- eller DVD SCART-kabeln (tillval) till SCART-uttaget på videobandspelaren eller DVD-spelaren.
Ansluta externa A/V-enheter
-
Anslut RCA- eller S-videokabeln (tillval) till lämplig extern A/V-enhet som t.ex. videobandspelare, DVD-spelare eller videokamera.
- Anslut RCA-ljudkablarna (tillval) till "R - AUDIO L" på apparatens baksida och de andra ändarna till motsvarande
ljudutgångar på A/V-enheten.
- Hörlurar kan anslutas till hörlursuttaget ( ) baktill på anläggningen. När hörlurar är inkopplade hörs inget ljud från de
inbyggda högtalarna.
Ansluta komponentenheter (DTV/DVD)
- Anslut videokablarna (tillval) till komponentanslutningen (“PR”, “PB”, “Y”) på TV:ns baksida och de andra ändarna till
motsvarande videoutgång på DTV:n eller DVD:n.
- Om du vill ansluta både en digital-TV-box och en DTV-spelare (eller DVD-spelare) ska du ansluta digital-TV-boxen till
DTV-spelaren (eller DVD-spelaren) och sedan ansluta denna till komponentanslutningen (“PR”, “PB”, “Y”) på TV:n.
-Y, PR och PB-anslutningarna på komponentenheterna (DTV eller DVD) är ibland märkta Y, B-Y och R-Y eller Y, Cb och Cr.
- Anslut RCA-ljudkablarna (tillval) till “R - AUDIO - L” på apparatens baksida och de andra ändarna till motsvarande
ljudutgångar på DTV- eller DVD-spelaren.
Kensingtonlå
- Kensingtonlåset (tillval) är en enhet som används för att fysiskt låsa systemet när det används på en allmän plats.
- Om du vill använda en låsenhet skall du kontakta återförsäljaren där du köpte TV:n.
Översikt ver fjärrkontrollen
Tv:ns väntlägesknapp
Sifferknappar för direktåtkomst
till kanaler
Kanalval för en-/två-siffriga kanaler
Öka volymen
Minska volymen
Stänga av ljudet tillfälligt
Visar menyn för skärmmenyn
Välja ljudläge
Välja ljudeffekt
Tryck för att automatiskt lagra valda
TV/kabel-kanaler
Använd för att lagra och ta bort
kanaler i minnet.
Frysa bilden
Öppnar läget (TV) direkt
Föregående kanal
P: Nästa kanal
P: Föregående kanal
Välja tillgängliga källor
Visa inställningsinformation
Avsluta skärmmenyn
Fjärrkontrollens funktion kan påverkas av starkt ljus.
Styra menymarkören
Välja bildformat
Välja bildeffekt
Bild-I-Bild På/Avv
Automatisk avstängning
Öppnar läget (PC) direkt
Text-TV-funktioner
Text-tv håll
Text-tv visning/blanda både
text-tv-information och normalt
tv-program
Index för text-tv
Text-tv lagra
Underordnad Text-tv-sida
Lämna text-tv-visning
P: Text-tv nästa sida
P: Text-tv föregående sida
Lägesval för text-tv (LIST/FLOF)
Text-tv visa
Avbryta text-TV
Text-tv välja storlek
Text-tv ämnesval
Svenska-5
Sätta i batterierna i fjärrkontrollen
1. Skjut undan locket helt.
2. Sätt i två stycken AAA-batterier.
Kontrollera att "+" och "-" på batterierna stämmer med bilden inuti facket.
3. Sätt tillbaka locket.
Om du inte ska använda fjärrkontrollen under en längre tid kan du ta ur batterierna och
förvara dem på en sval och torr plats.Fjärrkontrollen kan användas på ett avstånd av
upp till 23 meter från TV:n.(Vid normal användning räcker batterierna i ungefär ett år.)
Kontrollera följande om fjärrkontrollen inte fungerar:
1. Är TV-strömmen på?
2. Är batteriernas plus-och minuspoler felvända?
3. Är batterierna uttjänta?
4. Är det strömavbrott eller är nätsladden utdragen?
5. Finns det något fluorescerande ljus eller en neonskylt i närheten?
Sätta på och stänga av TVn
Strömkabeln är ansluten baktill på din anläggning.
1. Anslut strömkabeln till lämpligt uttag.
Indikatorn för vänteläge på enhetens framsida tänds.
2. Tryck på knappen på apparatens framsida.
Det program du senast tittade på väljs automatiskt igen.
3. Tryck på de numeriska knapparna (0~9) eller på en kanalväljarknapp upp/ner ( / ) på fjärrkontrollen
eller på eller på knappen på apparatens högersida.
När du slår på TV-apparaten för första gången ombeds du välja vilket språk som du vill att menyerna ska visas på.
4. När du vill stänga av apparaten trycker du på igen.
Sätta tv i vänteläge
Du kan försätta anläggningen i standby-läge för att spara ström. Standby-läget är användbart när du vill
sluta titta en kortare stund (tex för att äta middag).
1. Tryck på knappen POWER på apparatens framsida.
Bildskärmen släcks och en röd standby-lampa tänds på apparatens framsida.
2. När du vill koppla på TV:n igen trycker du bara på POWER ,
en siffra
(0~9 ) eller en kanalväljarknapp ( / ).
Lämna inte anläggningen i standby-läge under längre perioder (tex när du åker bort på semester).
Det är bäst att koppla ur strömsladd och antenn från enheten.
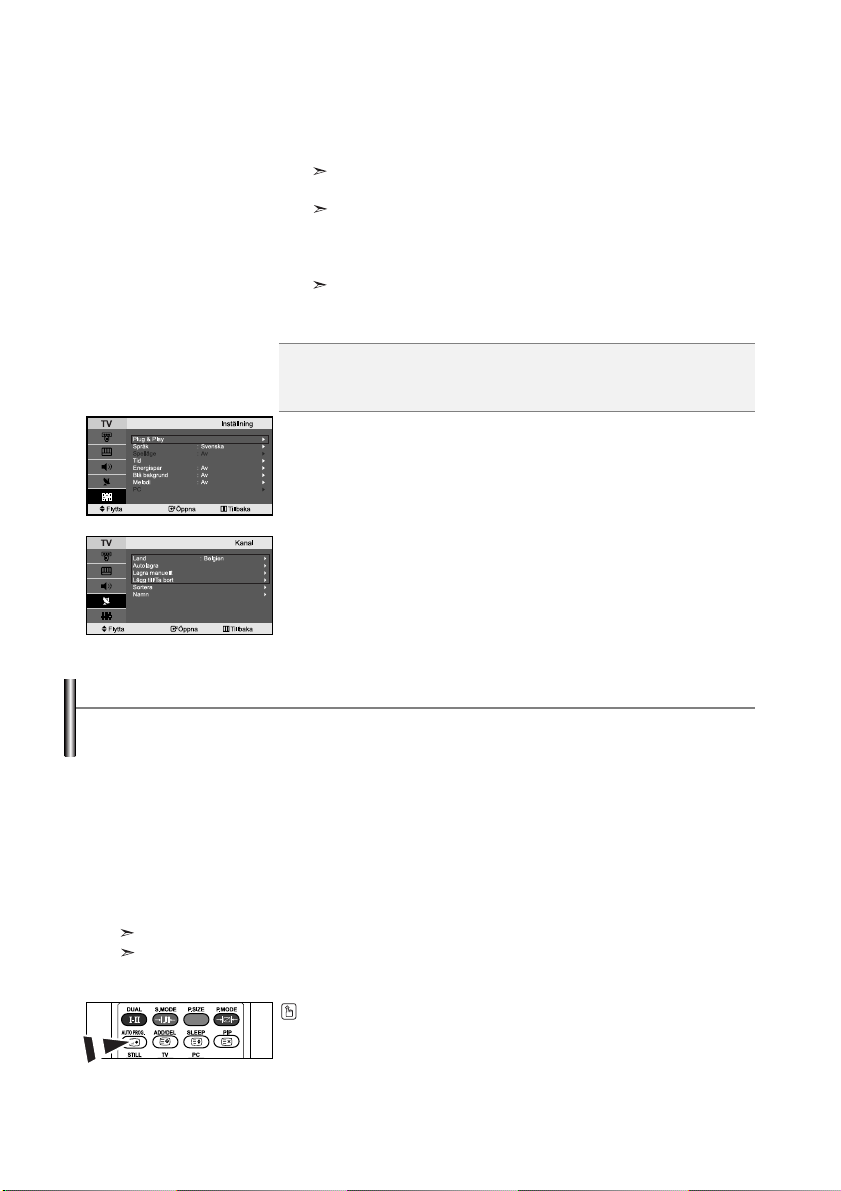
Plug & Play
När TV:n sätts på för första gången startar flera inställningar automatiskt och
kontinuerligt. Följande inställningar finns:
1. Tryck på knappen POWER på apparatens framsida.
Meddelandet “Plug & Play”.
2. Välj språk genom att trycka på knappen eller .
Tryck på knappen
ENTER för att bekräfta valet.
3. Meddelandet “Kontr. antenningång.” visas och “OK” är markerat.
Tryck på knappen
Kontrollera att antennkabeln är riktigt ansluten.
ENTER.
Svenska-6
4. Välj land genom att trycka på knappen eller .
Tryck på knappen
ENTER för att bekräfta valet.
5. Menyn “Autolagra” visas med alternativet “Start” markerat.
Tryck på knappen
Kanalsökningen börjar och avslutas automatiskt.
När alla tillgängliga kanaler är lagrade visas menyn "Ställ klockan".
Tryck på knappen
ENTER.
ENTER när som helst för att avbryta memoriseringsprocessen.
6. Tryck på knappen ENTER.
eller
Välj “Tim” eller “Minut” genom att trycka på knappen
Ställ in “Tim” eller “Minut” genom att trycka på knappen
Du kan också ställa in timmar och minuter genom att trycka på fjärrkontrollens
sifferknappar.
.
eller
.
7. Tryck på knappen ENTER för att bekräfta.
Språk: Välj ditt språk.
Land: Välj ditt land.
Autolagra: Skannar automatiskt och lagrar de kanaler som är tillgängliga i ditt område.
Ställ klockan: Ställer in aktuell tid för TV-klockan.
Om du vill återställa denna funktion ...
1. Tryck på knappen MENU för att visa menyn.
Tryck på knappen eller för att välja “Inställning” och tryck på ENTER.
2. Tryck på knappen ENTER igen för att välja "Plug & Play".
3. Detta ändrar eller återställer inställningar.
- Lagra kanaler automatiskt
- Lagra kanaler manuellt (Se sidan 8)
- Redigera kanaler (Se sidan 8)
Lagra kanaler automatiskt
Du kan söka efter tillgängliga frekvenser (tillgängligheten beror på vilket land du befinner dig i).
Automatiskt tilldelade programnumer matchar inte alltid faktiska eller önskade programnummer.
Du kan dock ordna numren manuellt och ta bort alla oönskade kanaler.
1. Tryck på knappen MENU för att visa menyn.
Tryck på knappen
2. Tryck på knappen ENTERigen för att välja "Land".
3. Välj land genom att trycka på knappen eller .
Tryck på knappen
4. Tryck på knappen eller för att välja “Autolagra” och tryck på ENTER.
5. Tryck på knappen ENTER.
TV:n påbörjar memorisering av alla tillgängliga kanaler.
Tryck på knappen
6. Efter att de tillgängliga kanalerna är lagrade visas menyn "Sortera".
eller för att välja “Kanal” och tryck på ENTER.
ENTER för att bekräfta valet.
ENTER när som helst för att avbryta memoriseringen och återgå till menyn "Kanal".
Kanaler kan lagras automatiskt genom att du trycker på knappen AUTO PROG. på
fjärrkontrollen.
Svenska-7
Loading...