


Samsung J1255AV, J1055AC, J1455AV, J1455AC, J855AV User Manual
...Washing Machine
Owner’s Instructions
J1455A(V/S/C)
J1255A(V/S/C)
J1055A(V/S/C)
J855A(V/S/C)
Register your product at www.samsung.com/global/register Code No.: DC68-02253U_EN


Features
1. Silver Wash - Silver Nano Health System
Samsung’ssilverNanofeatureusessilvernanoparticlestosanitizeanddisinfectyourlaundryand yourmachine’sdrum.Delicatesaswellassmellysockswillgetodor-freefromhumansweatat temperatureaslowas30 ˚C.Thatsavesenergyandprotectscolorandshapeofyourclothes.
2. Child Lock
TheChildLockfunctionkeepscuriouslittlehandsoutofthewasher.Thissafetyfeatureensures, thatchildrendonottoywiththeoperationofthewasher.Italsoalertsyouwhenitisactivated.
3. Handwash
Clothessusceptibletodamage,suchasthosemadeoflinenorsilk,canbewashedjustasifthey werebeingwashedbyhand.
4. Delay Start
Thisfunctionenablesusestodelaythewashingmachine’sstartingtimeforupto24hours.
5. Memory Function (My Favorites)
Youcanprogramyourwashcycletobestsuityourneeds.Thememoryfunctionallowsyouto selectrinsecycles,watertemperatures,andspincyclesforeachandeveryload.Youcansave yourpreferences,retrievethemanothertime…pressandgo!It’stailor-madewashing…onlyby Samsung!
SAMSUNG WashingMachineOwner’sInstructions

Safety Precautions
CongratulationsonyourpurchaseofthisSamsungwashingmachine.TheseOwner’sInstructionscontain valuableinformationontheinstallation,use,andcareofthisappliance.Pleasetakethetimetoreadthese instructionssothatyoucantakefulladvantageofthewashingmachine’sfeaturesandenjoythisappliance formanyyearstocome.
Beforeusingtheappliance
•Packingmaterialscanbedangeroustochildren;keepallpackingmaterial(plasticbags,polystyrene, etc.)welloutofthereachofchildren.
•Theapplianceisdesignedforhomeuseonly.
•Makesurethatwaterandelectricalconnectionsaremadebyqualifiedtechnicians,observingthe manufacturer’sinstructions(see“InstallingtheWashingMachine”)andlocalsafetyregulations.
•Allpackagingandshippingboltsmustberemovedbeforetheapplianceisused.Seriousdamagemay occuriftheyarenotremoved.See“Removingtheshippingbolts”.
•Beforewashingclothesforthefirsttime,youmustrunacompletecyclewithoutclothes. See“Washingforthefirsttime”.
Safetyinstructions
•Beforecleaningorcarryingoutmaintenance,unplugtheappliancefromtheelectricaloutletorsetthe  (On/O )buttontoO .
•Makesurethatthepocketsofallclothingtobewashedareempty.Hard,sharpobjects,suchascoins, safetypins,nails,screws,orstonescancauseextensivedamagetotheappliance.
•Alwaysunplugtheapplianceandturno thewaterafteruse.
•Beforeyouopenthedooroftheappliance,checkthatthewaterhasdrained.Donotopenthedoorif youcanstillseewater.
•Petsandsmallchildrenmayclimbintotheappliance.Checktheappliancebeforeeachuse.
•Theglassdoorbecomesveryhotduringthewashingcycle.Keepchildrenawayfromtheappliance whileitisinuse.
•Donotattempttorepairtheapplianceyourself.Repairsmadebyinexperiencedorunqualifiedpersons maycauseinjuryand/ormakemoreseriousrepairstotheappliancenecessary.
•Iftheplug(powersupplycord)isdamaged,itmustbereplacedbythemanufactureroritsservice agentorasimilarlyqualifiedpersoninordertoavoidahazard.
•Thisapplianceshouldonlybeservicedbyanauthorizedservicecenter,andonlygenuinespareparts shouldbeused.
•Thisapplianceisnotintendedforusebyyoungchildrenorinfirmpersonsunlesstheyhavebeen adequatelysupervisedbyaresponsiblepersontoensurethattheycanusetheappliancesafely. Youngchildrenshouldbesupervisedtoensurethattheydonotplaywiththeappliance.
•Ifthisapplianceissuppliedfromacordextensionsetoranelectricalportableoutletdevice,the cordextensionsetorelectricalportableoutletdevicemustbepositionedsothatitisnotsubjectto
splashingoringressofmoisture.Additionally,thecordextensionsetorelectricalportableoutletdevice mustbeofacurrentratingsuitablefortheappliance.
•Thisappliancehastobeconnectedtotheplugendurabletoproperpowerconsumption.
•Thisappliancehastobepositionedsothattheplugisaccessibleafterinstallation.
•Donotuseprocessedwatercontainingoil,creamorlotion,whichisusuallyfoundinskin-careshopsor massageclinics.
-Otherwisethiswillcausethepackingtobedeformed,whichcausesamalfunctionorwaterleak.
•Astainlesswashingtubedoesnotusuallyrust.Howeverifsomemetalsuchasahairpinisleftinthe tubeforanextendedtime,thetubecouldrust.
-Donotleavewaterorbleachcontainingchlorineinthetubeforanextendedperiodoftime.
-Donotregularlyuseorleavewatercontainingironinthetubeforanextendedperiodoftime.
Ifruststartsappearingonthesurfaceofthetube,applyacleansingagent(neutral)tothesurfaceand useaspongeorsoftclothtocleanit.(Undernocircumstancesuseametalbrush)
•Forwashingmachineswithventilationopeningsinthebase,thatacarpetmustnotobstructthe openings.
•Usethenewhose-setsandoldhose-setsshouldnotbereused.
SAVETHESEINSTRUCTIONS

|
Table of Contents |
Safety Precautions . . . . . . . . . . . . . |
. . . . . . . . . . . . . . . insidecover |
Installing the Washing Machine . |
. . . . . . . . . . . . . . . . . . . . . . . . 2 |
Unpacking the Washing Machine. . . . . . . . . . . . . . . . . . . . . . . . . . . . . . . . . . . . . 2 Overview of the washing machine . . . . . . . . . . . . . . . . . . . . . . . . . . . . . . . . . . . . 2 Selecting a location . . . . . . . . . . . . . . . . . . . . . . . . . . . . . . . . . . . . . . . . . . . . . . . . . . 3 Adjusting the leveling feet . . . . . . . . . . . . . . . . . . . . . . . . . . . . . . . . . . . . . . . . . . . 3 Removing the shipping bolts . . . . . . . . . . . . . . . . . . . . . . . . . . . . . . . . . . . . . . . . . 3 Connecting the water supply hose(Option) . . . . . . . . . . . . . . . . . . . . . . . . . . . 3 Connecting the water supply hose. . . . . . . . . . . . . . . . . . . . . . . . . . . . . . . . . . . . 4 Positioning the drain hose. . . . . . . . . . . . . . . . . . . . . . . . . . . . . . . . . . . . . . . . . . . . 4 Plugging in the machine . . . . . . . . . . . . . . . . . . . . . . . . . . . . . . . . . . . . . . . . . . . . . 5
Washing a Load of Laundry . . . . . . . . . . . . . . . . . . . . . . . . . . . . . . 6
Overview of the control panel . . . . . . . . . . . . . . . . . . . . . . . . . . . . . . . . . . . . . . . . 6 Washing for the first time. . . . . . . . . . . . . . . . . . . . . . . . . . . . . . . . . . . . . . . . . . . . . 8 Putting detergent in the washing machine. . . . . . . . . . . . . . . . . . . . . . . . . . . . 8 Washing clothes using Fuzzy Logic . . . . . . . . . . . . . . . . . . . . . . . . . . . . . . . . . . . 9 Washing clothes manually. . . . . . . . . . . . . . . . . . . . . . . . . . . . . . . . . . . . . . . . . . .10 Using Delay Start . . . . . . . . . . . . . . . . . . . . . . . . . . . . . . . . . . . . . . . . . . . . . . . . . . .10 Washing tips and hints . . . . . . . . . . . . . . . . . . . . . . . . . . . . . . . . . . . . . . . . . . . . . .11
Maintaining the Washing Machine. . . . . . . . . . . . . . . . . . . . . . . 12
Draining the washing machine in an emergency . . . . . . . . . . . . . . . . . . . . .12 Repairing a frozen washing machine. . . . . . . . . . . . . . . . . . . . . . . . . . . . . . . . .12 Cleaning the exterior. . . . . . . . . . . . . . . . . . . . . . . . . . . . . . . . . . . . . . . . . . . . . . . .12 Cleaning the detergent drawer and recess . . . . . . . . . . . . . . . . . . . . . . . . . . .13 Cleaning the debris filter . . . . . . . . . . . . . . . . . . . . . . . . . . . . . . . . . . . . . . . . . . . .13 Cleaning the water hose mesh filter. . . . . . . . . . . . . . . . . . . . . . . . . . . . . . . . . .14
Troubleshooting . . . . . . . . . . . . . . . . . . . . . . . . . . . . . . . . . . . . . . . 15
Problems and solutions . . . . . . . . . . . . . . . . . . . . . . . . . . . . . . . . . . . . . . . . . . . . .15 Understanding error messages . . . . . . . . . . . . . . . . . . . . . . . . . . . . . . . . . . . . . .15
Programme Chart . . . . . . . . . . . . . . . . . . . . . . . . . . . . . . . . . . . . . . 16
Appendix . . . . . . . . . . . . . . . . . . . . . . . . . . . . . . . . . . . . . . . . . . . . . . 18
Fabric care chart . . . . . . . . . . . . . . . . . . . . . . . . . . . . . . . . . . . . . . . . . . . . . . . . . . . .18 Electrical warnings . . . . . . . . . . . . . . . . . . . . . . . . . . . . . . . . . . . . . . . . . . . . . . . . . .18 Protecting the environment . . . . . . . . . . . . . . . . . . . . . . . . . . . . . . . . . . . . . . . . .19 Declaration of conformity . . . . . . . . . . . . . . . . . . . . . . . . . . . . . . . . . . . . . . . . . . .19 Specification. . . . . . . . . . . . . . . . . . . . . . . . . . . . . . . . . . . . . . . . . . . . . . . . . . . . . . . .19
SAMSUNG Washing Machine Owner’s Instructions 1

Installing the Washing Machine
Unpacking the Washing Machine
Unpack your washing machine and inspect it for shipping damage. Also make sure that you have received all of the items shown below. If the washing machine was damaged during shipping or you do not have all of the items, contact your Samsung dealer immediately.
Overview of the washing machine
|
|
Worktop |
Detergent |
|
|
drawer |
|
|
Control panel |
|
Drain Hose |
|
|
|
|
Door |
Plug |
|
|
|
Base cover |
|
|
Adjustable feet |
|
Debris filter |
|
|
|
|
|
Emergency drain tube |
|
|
Filter-cover |
|
|
Cold Water |
|
|
supply hose |
Wrench |
|
|
|
Drain hose |
|
Hose guide |
|
Bolt hole |
|
covers |
|
|
|
2 SAMSUNG Washing Machine Owner’s Instructions

Installing the Washing Machine
Selecting a location
Before you install the washing machine, select a location with the following characteristics:
A hard, level surface (if the surface is uneven, see "Adjusting the leveling feet," below)
Away from direct sunlight.
Adequate ventilation
Room temperature that will not fall below 0 ˚C
Away from sources of heat such as coal or gas
Make sure that the washing machine does not stand on its power cord.
Ventilation openings must not be obstructed by carpeting when the washing machine is installed on a carpeted floor.
Adjusting the leveling feet
If the floor is uneven, adjust the feet (do not insert pieces of wood or any other objects under the feet):
1. Loosen the leg bolt by turning it with your hand until it is at the desired height. 2. Tighten the locking nut by turning it with the supplied wrench.
Place the washer on a sturdy, flat surface.
If the washer is placed on an uneven or weak surface, noise or vibration occurs. (Only a l degrees angle is allowed.)
Removing the shipping bolts
Before using the washing machine, you must remove the five shipping bolts from the back of the unit. To remove the bolts:
|
2 |
1 |
3 |
|
1. Loosen all bolts with the supplied wrench before removing them.
2. Take each bolt head and pull it through the wide part of the hole. Repeat for each bolt. 3. Fill the holes with the supplied plastic covers.
4. Keep the shipping bolts for future use.
Connecting the water supply hose(Option)
1.Removetheadaptorfromthe |
|
|
4.Connectthewatersupplyhosetotheadaptor. Pull |
watersupplyhose. |
|
|
down part (c) of the water supply hose. When you |
|
|
c |
release part (c) the hose automatically connects to |
|
|
|
theadaptormakinga’click’sound. |
2.First, using a“+” type screw driver, loosen the four |
|
|
5.Connect the other end of the water supply hose to |
screws on the adaptor. Next, take the adaptor and |
|
|
theinletwatervalveatthetopofthewasher. Screw |
turn part(b) following the arrow until there is a 5mm |
|
|
thehoseclockwiseallthewayin. |
gap. |
|
|
|
3.Connect adaptor to the water tap by tightening the |
|
|
Ifthewatertaphasascrewtypefaucet,connectthe |
screwsfirmly. |
a |
|
watersupplyhosetothetapasshown. |
Then, turn part (b) following the arrow and put(a) and |
b |
|
|
|
|
||
(b)together. |
|
|
|
NOTICE After completingconnection,ifwaterleaksfrom thehose,thenrepeat the same steps. Usethe mostconventional type of faucetforwatersupply. In case the faucetissquare
or too big, removethe spacing ringbefore insertingthe faucetintothe adaptor.
SAMSUNG Washing Machine Owner’s Instructions 3
Installing the Washing Machine
Connecting the water supply hose
The water supply hose must be connected to the washing machine at one end and to the water faucet at the other. Do not stretch the water supply hose. If the hose is too short and you do not wish to move the water faucet, replace the hose with a longer, high pressure hose.
To connect the water supply hose:
1. Take the L-shaped arm fitting for the cold water supply hose and connect to the cold water supply intake on the back of the machine. Tighten by hand.
2.Connect the other end of the cold water supply hose to your sink's cold water faucet and tighten it by hand. If necessary, you can reposition the water supply hose at the washing machine end by loosening the fitting, rotating the hose, and retightening the fitting.
Option:
1.Take the red L-shaped arm fitting for the hot water supply hose and connect to the red hot water supply intake on the back of the machine. Tighten by hand.
2.Connect the other end of the hot water supply hose to your sink's hot water faucet and tighten it by hand.
3.Use a Y-piece if you only want to use cold water.
Note: The appliance is to be connected to the water mains using new hose-sets and that old hose-sets should not be used.
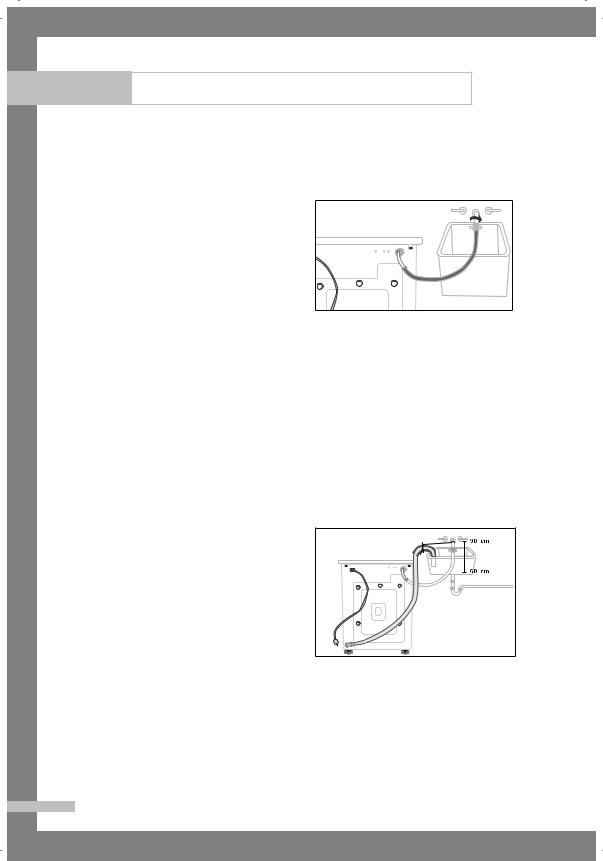
Positioning the drain hose
The end of the drain hose may be positioned in three ways:
Overtheedgeofasink
Thedrainhosemustbeplacedataheightof
between60and90cm. Tokeepthedrainhose spoutbent,usethesuppliedplastichoseguide.
Securetheguidetothewallwithahookortothe faucetwithapieceofstringtopreventthedrain hosefrommoving.
lnasinkdrainpipebranch
Thedrainpipebranchmustbeabovethesink siphonsothattheendofthehoseisatleast 60cmabovetheground.
lnadrainpipe
Samsungrecommendsthatyouusea65cmhighverticalpipe;itmustbenoshorterthan60cm andnolongerthan90cm.
4 SAMSUNG Washing Machine Owner’s Instructions
 Loading...