

Samsung DW60M9990AP User Manual
Dishwasher
User manual
DW60M9990AP
DW9900M_DD68-00196B-01_EN.indd 1 2017-09-04 12:05:16

Contents
Contents
Safety information 4
What you need to know about the safety instructions 4
Important safety symbols 4
Before using your dishwasher 7
Before you start 8
Dishwasher at a glance 8
Basic use of racks 10
Loading precautions 12
Detergent guidelines 18
Operations 22
Control panel 22
Simple steps to start 25
Touchpad responsiveness 26
Cycle overview 26
Settings 28
Care and Maintenance 30
Cleaning 30
Long-term care 34
Troubleshooting 35
Checkpoints 35
Information codes 40
English2
DW9900M_DD68-00196B-01_EN.indd 2 2017-09-04 12:05:16

Cycle chart 41
Appendix 42
Helping the environment 42
Specications 42
Warranty and Service 43
Getting help 43
Warranty 43
Contents
English 3
DW9900M_DD68-00196B-01_EN.indd 3 2017-09-04 12:05:16

SAVE THESE INSTRUCTIONS
Safety information
Congratulations on your new Samsung dishwasher. This manual contains important
information on the installation, use and care of your appliance. Please take time to read
this manual to take full advantage of your dishwasher’s many benets and features.
Safety information
What you need to know about the safety instructions
Warnings and Important Safety Instructions in this manual do not cover all possible
conditions and situations that may occur. It is your responsibility to use common sense,
caution, and care when installing, maintaining, and operating your dishwasher.
Important safety symbols
What the icons and signs in this user manual mean:
WARNING
Hazards or unsafe practices that may result in severe personal injury or death.
To reduce the risk of re, explosion, electric shock, or personal injury when using your
dishwasher, follow these basic safety precautions:
CAUTION
Hazards or unsafe practices that may result in minor personal injury or property damage.
These warning signs are here to prevent injury to you and others.
Please follow them explicitly.
After reading this section, keep it in a safe place for future reference.
English4
DW9900M_DD68-00196B-01_EN.indd 4 2017-09-04 12:05:16

SAVE THESE INSTRUCTIONS
WARNING
State of California Proposition 65 Warning (US only)
This product contains chemicals known to the State of California to cause cancer and birth
defects or other reproductive harm.
WARNING
When using your dishwasher, follow basic precautions, including the following:
1. Read all instructions before using the dishwasher.
2. Use the dishwasher only for its intended function.
3. Use only detergents or wetting agents recommended for use in a dishwasher and keep
them out of the reach of children.
4. When loading items to be washed:
- locate sharp items so that they are not likely to damage the door seal, and
- load sharp knives with the handles up to reduce the risk of cut-type injuries.
5. Do not wash plastic items unless they are marked "dishwasher safe" or the equivalent.
For plastic items not so marked, check the manufacturer’s recommendations.
6. Do not touch the HEATING ELEMENT during or immediately after use.
7. Do not operate your dishwasher unless all ENCLOSURE panels are properly in place.
8. Do not tamper with controls.
9. Do not abuse, sit on, or stand on the door or dish rack of the dishwasher.
10. To reduce the risk of injury, do not allow children to play in or on a dishwasher.
11. Under certain conditions, hydrogen gas may be produced in a hot-water system that
has not been used for two weeks or more. HYDROGEN GAS IS EXPLOSIVE. If the hotwater system has not been used for such a period, before using the dishwasher turn
on all hot-water faucets and let the water ow from each for several minutes. This will
release any accumulated hydrogen gas. As the gas is ammable, do not smoke or use
an open ame during this time.
12. Remove the door to the washing compartment when removing an old dishwasher from
service or discarding it.
CAUTION
• After unpacking the dishwasher, keep the packaging out of the reach of children.
• The dishwasher is extremely heavy. Do not attempt to move or carry the dishwasher
by yourself. Two or more people are needed to move a dishwasher and avoid potential
injuries.
Safety information
English 5
DW9900M_DD68-00196B-01_EN.indd 5 2017-09-04 12:05:16

Safety information
SAVE THESE INSTRUCTIONS
• As with any equipment using electricity, water, and moving parts, potential hazards
exist.
• Do not install the dishwasher near electrical components. Keep the dishwasher away
Safety information
from open ames.
• Install and level your dishwasher on an uncarpeted oor that can support its weight.
• Your dishwasher must be properly grounded. Never connect it to an ungrounded outlet.
See page 7 for more information on grounding your dishwasher.
• Connect the ground wire to the green ground connector in the terminal box.
• After the dishwasher is installed, check that the drain hose is properly connected and
that there is no leakage from the hose connectors. If the drain hose is loose, it may
cause property damage.
• The water supply line is susceptible to breakage. As time goes by, it becomes less
exible. Check the line periodically. If it is swollen, torn, cut, or there is a water leak,
replace it immediately.
• To safely operate this appliance, familiarize yourself with its operations and exercise
care when using it.
• Do not put gasoline, solvents, or other flammable materials inside the dishwasher. Do
not wash dishes exposed to these materials.
• Keep your dishwasher detergent out of the reach of children. Detergent has an adverse
effect on human organs. It contains elements for polishing and is corrosive. Avoid
letting the detergent come into contact with your skin and eyes.
• Do not push or place pressure on the door when it is open, as this may damage the
dishwasher or cause harm.
• Do not allow children to play in or on the dishwasher. They may harm themselves or
damage the dishwasher.
• Disconnect the power cable (or set the circuit breaker to off) before servicing your
dishwasher.
• Do not repair, replace, or service any part of your dishwasher yourself. Disassembly,
repairs, and modications are permitted by authorized service technicians only. Work
done by an unauthorized person may void your warranty.
• Before disposing of your dishwasher, remove the door of the washing compartment or
the door latch so that children or small animals cannot get trapped inside.
• If the dishwasher is left unused for an extended period of time, turn off the water
supply.
• This dishwasher is intended for residential use only.
English6
DW9900M_DD68-00196B-01_EN.indd 6 2017-09-04 12:05:16

SAVE THESE INSTRUCTIONS
Before using your dishwasher
WARNING
Tip-Over Hazard
• Do not use the dishwasher until it is correctly installed.
• Do not push down on an open door.
• Do not place excessive weight on the open door.
Electric Shock Hazard
Failure to follow these instructions can result in death, re, or electric
shock:
• Electrically ground the dishwasher
• Connect the ground wire to the green ground connector in the junction
box.
• Do not use an extension cord.
Safety information
English 7
DW9900M_DD68-00196B-01_EN.indd 7 2017-09-04 12:05:17
Before you start
Follow these instructions carefully to ensure proper installation of the dishwasher.
• Carefully unpack the product package and check for any damage. If the dishwasher
has been damaged, make note of it on the waybill and keep a copy. Do not install the
dishwasher, and contact a local Samsung customer center.
• If there is no damage to the product, you can proceed with the installation. If you are
going to install the dishwasher yourself, make sure to read through the Installation
Manual and follow the instructions.
• Keep the packaging material out of children’s reach to ensure their safety.
Before you start
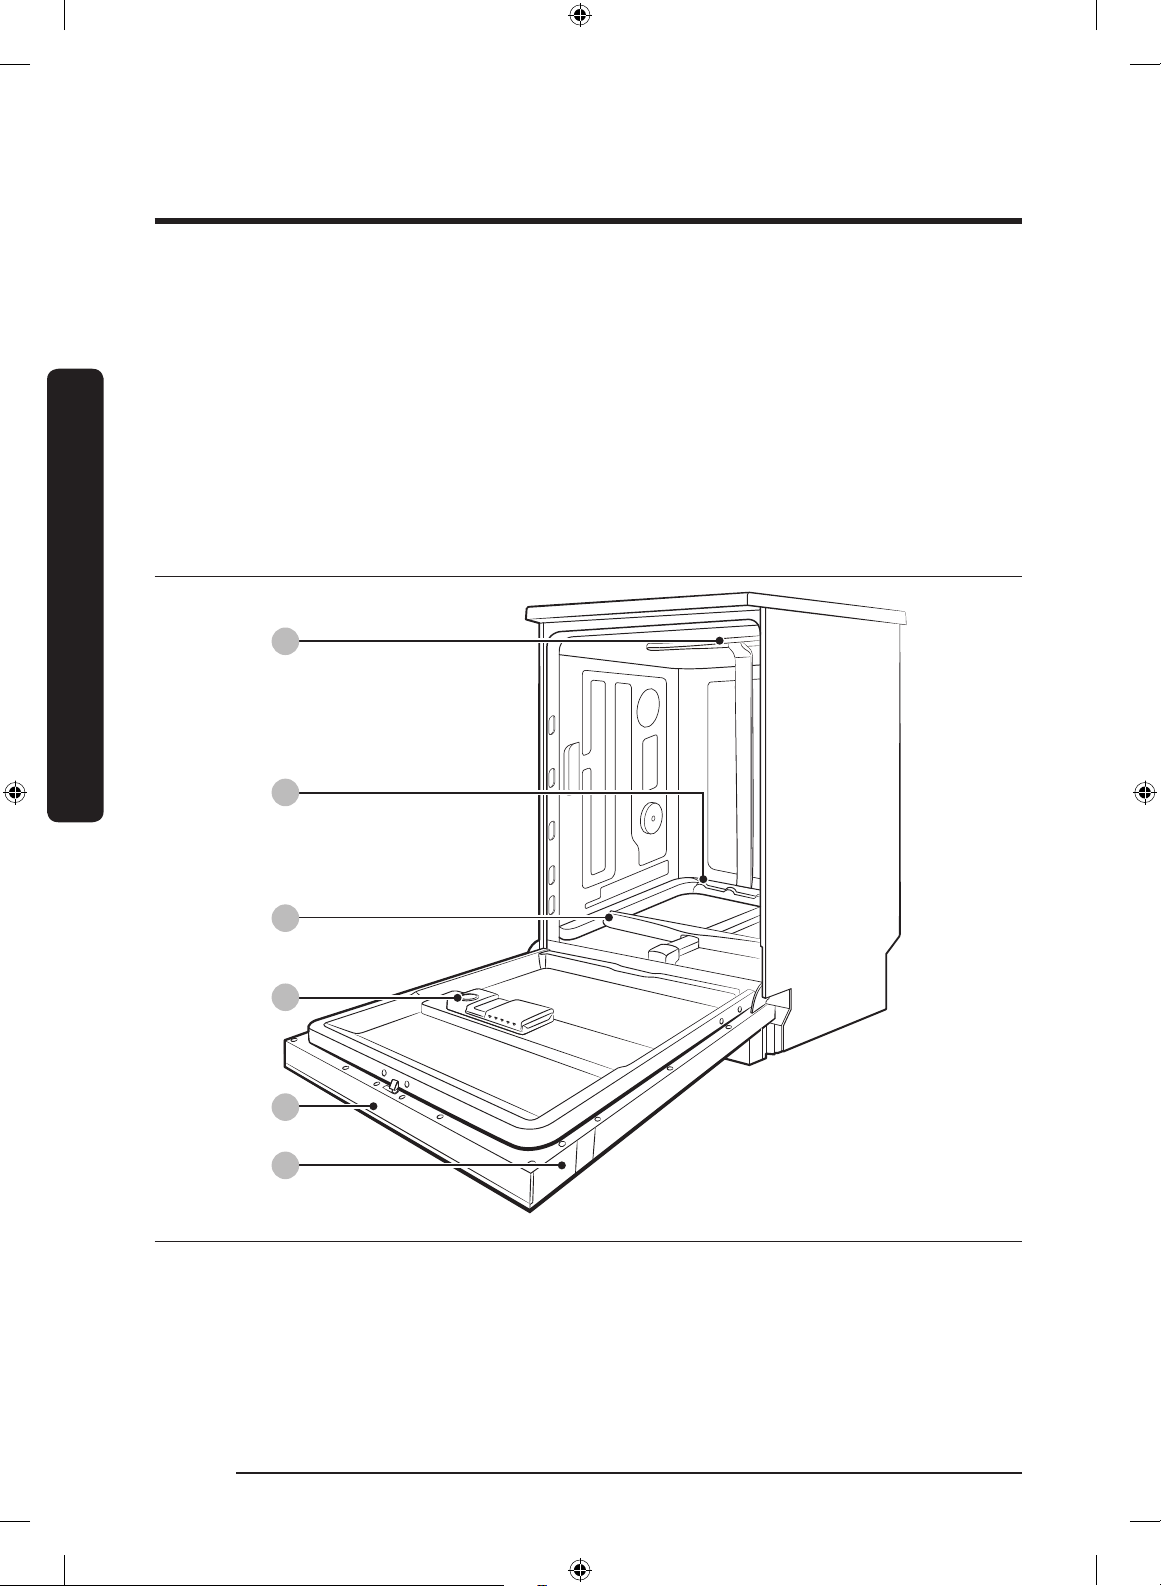
Dishwasher at a glance
01
02
03
04
05
06
01 Top nozzle 02 Lower nozzle 03 Water reector
04 Dispenser 05 Control panel 06 Door
English8
DW9900M_DD68-00196B-01_EN.indd 8 2017-09-04 12:05:17
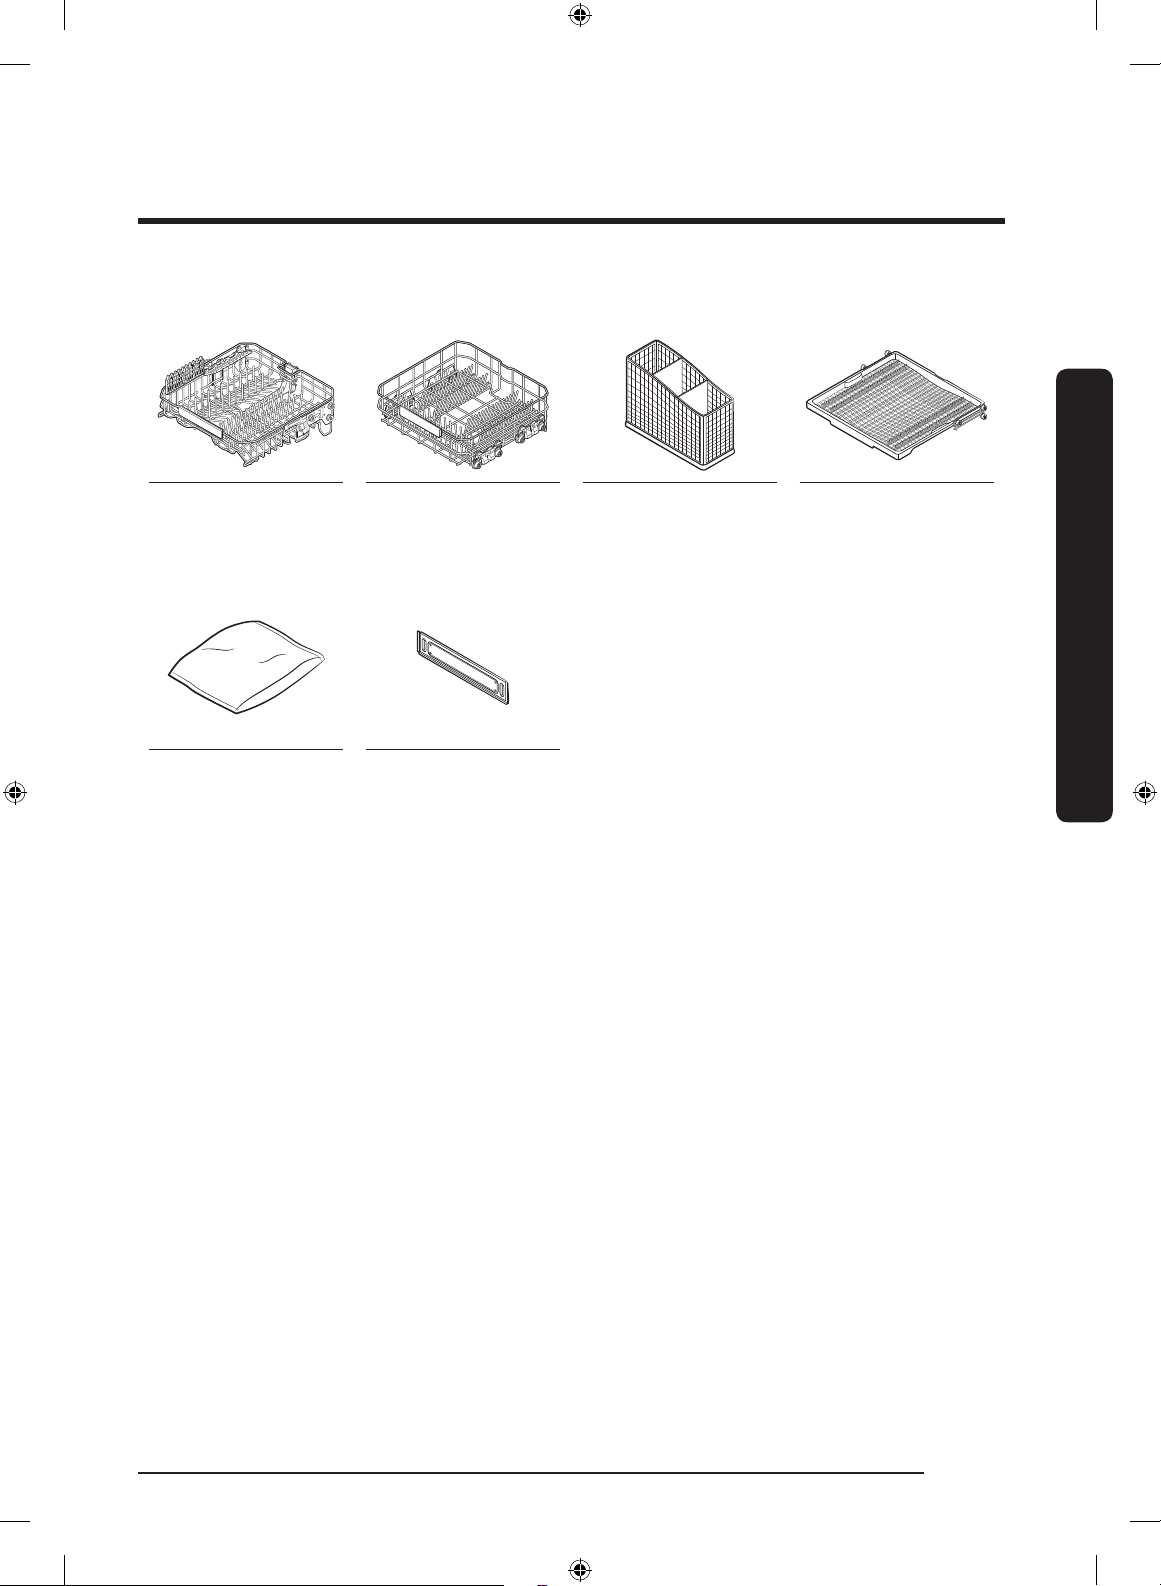
Accessories
Upper rack Lower rack Cutlery rack 3rd rack
Others
Installation kit
(User/Installation
manual included)
Kick plate
Before you start
English 9
DW9900M_DD68-00196B-01_EN.indd 9 2017-09-04 12:05:17
Before you start
Basic use of racks
Height adjustment
You can adjust the height of the upper rack so that the lower rack can accommodate
larger sized dishes. Depending on the height of the upper rack, the lower rack can
accommodate plates up to 12 inches (30 cm) in diameter, and the upper rack can
accommodate plates up to 8 inches (20 cm) in diameter.
Before you start
To raise the upper rack
Pull the upper rack upwards. The
adjustable handle will latch, and the upper
rack will raise.
To lower the upper rack
Hold both the adjustable handles located
at the left and right sides of the upper
rack, and then evenly press down.
CAUTION
• Adjust the height of the upper rack
before loading dishes into the rack.
Adjusting the rack after loading the
dishes may damage the dishes.
• Make sure to hold both handles when
adjusting, or the dishwasher door may
not close properly.
English10
DW9900M_DD68-00196B-01_EN.indd 10 2017-09-04 12:05:18
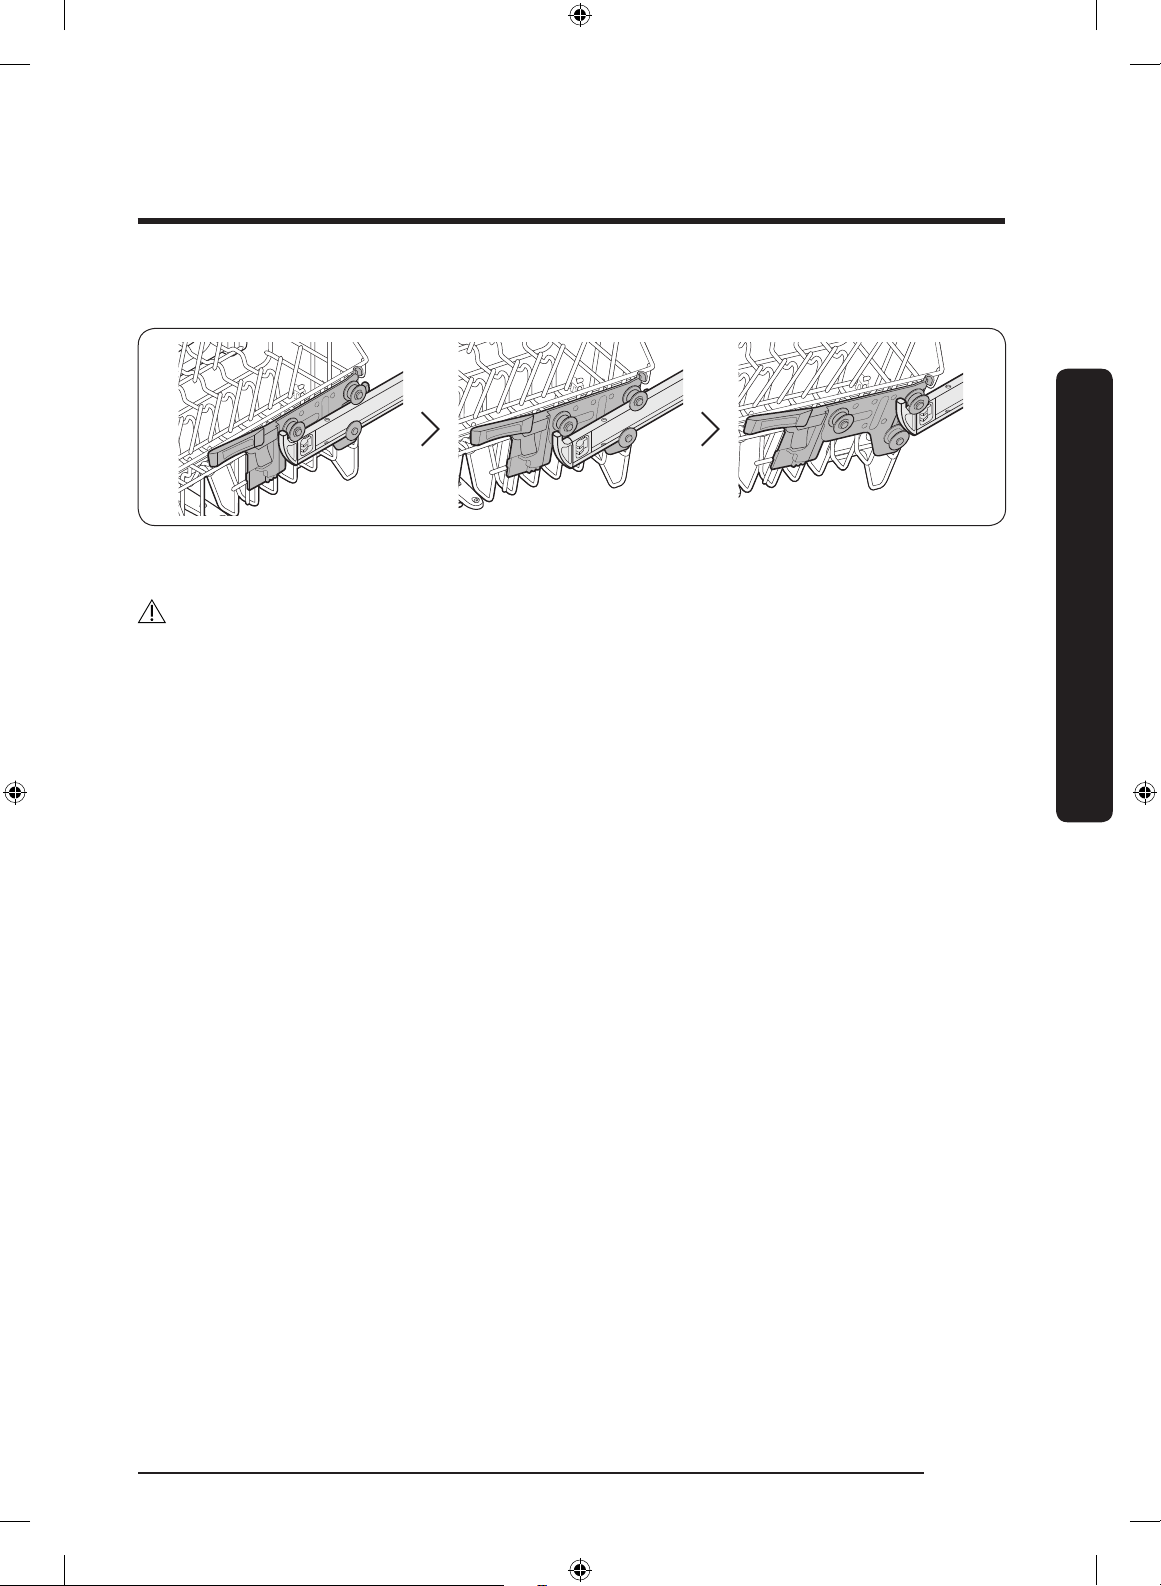
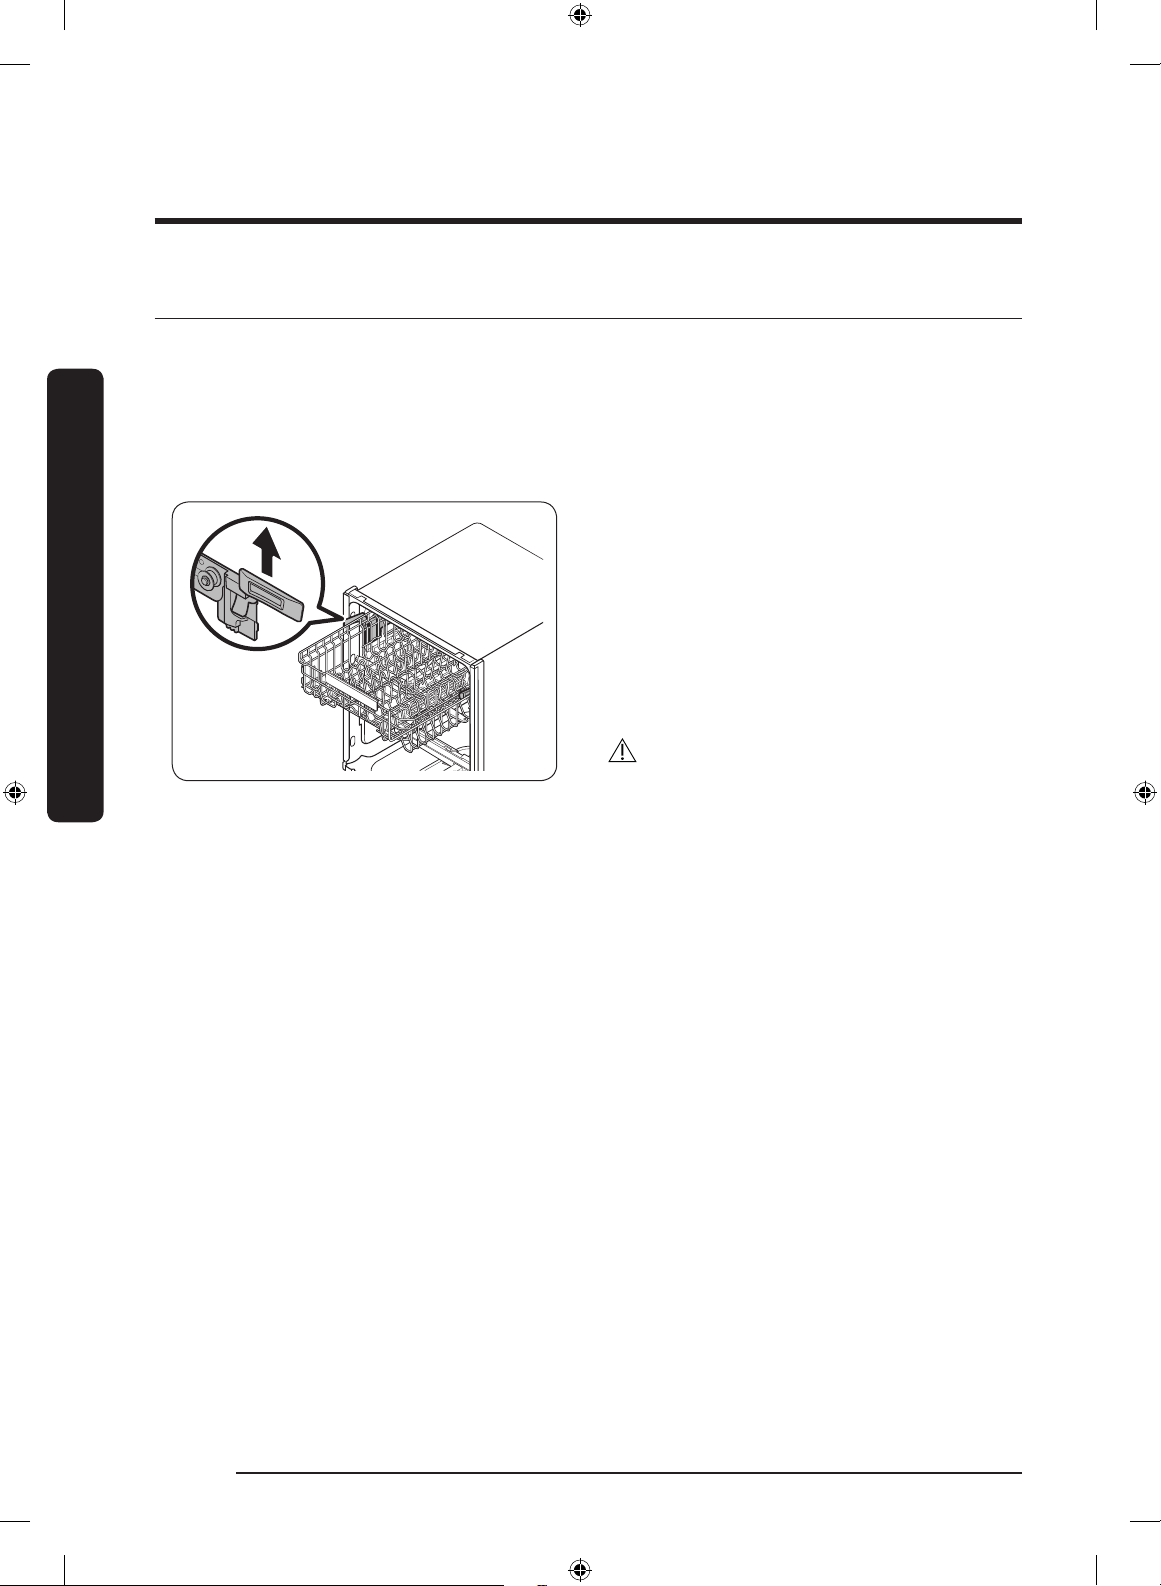
To remove the upper rack
To remove the upper rack, pull the upper rack to the front until it is fully extended, and
then lift it slightly to remove. See the gures above for the illustrated steps.
CAUTION
• Do not operate the dishwasher without the upper rack. Otherwise, noises occur and the
dishwasher does not operate properly.
• Since the upper rack is removable, insert the upper rack properly to ensure the
dishwasher operates normally.
Before you start
English 11
DW9900M_DD68-00196B-01_EN.indd 11 2017-09-04 12:05:18

Before you start
Loading precautions
Unsuitable items for the dishwasher
Wash only items such as glass, porcelain, and cutlery which the manufacturer declares as
dishwasher safe. Do not wash aluminium (e.g. grease lters). The dishwasher may damage
aluminium, or in extreme cases, cause a severe chemical reaction.
Do not wash the following items in the dishwasher.
Before you start
• Acrylic or aluminum items: These can discolor dishes with printed gold-rim decoration
and mar other items.
• Dishes treated with adhesive: Treated plastics can come apart. Wood, ivory, copper,
and tin glued to dishes can come loose.
• Plastics with a temperature tolerance less than 194 °F (90 °C): Thin plastics wash and
dry poorly, and may be damaged due to elevated wash temperatures.
• Tin: Tin items must be washed by hand and dried immediately. Otherwise, it can rust.
• Wooden utensils: Wooden items can crack.
CAUTION
• Do not wash items that are covered with ash, sand, wax, lubricating grease or paint.
• These materials will damage the dishwasher. Ash does not dissolve and will spread
inside the dishwasher.
• Remove food remains such as bones, fruit seeds, etc. and waste such as toothpicks,
paper napkins, etc. from your dishes. Food remains and waste can make noise, cause
the dishwasher to malfunction, and damage your dishes and dishwasher.
English12
DW9900M_DD68-00196B-01_EN.indd 12 2017-09-04 12:05:18
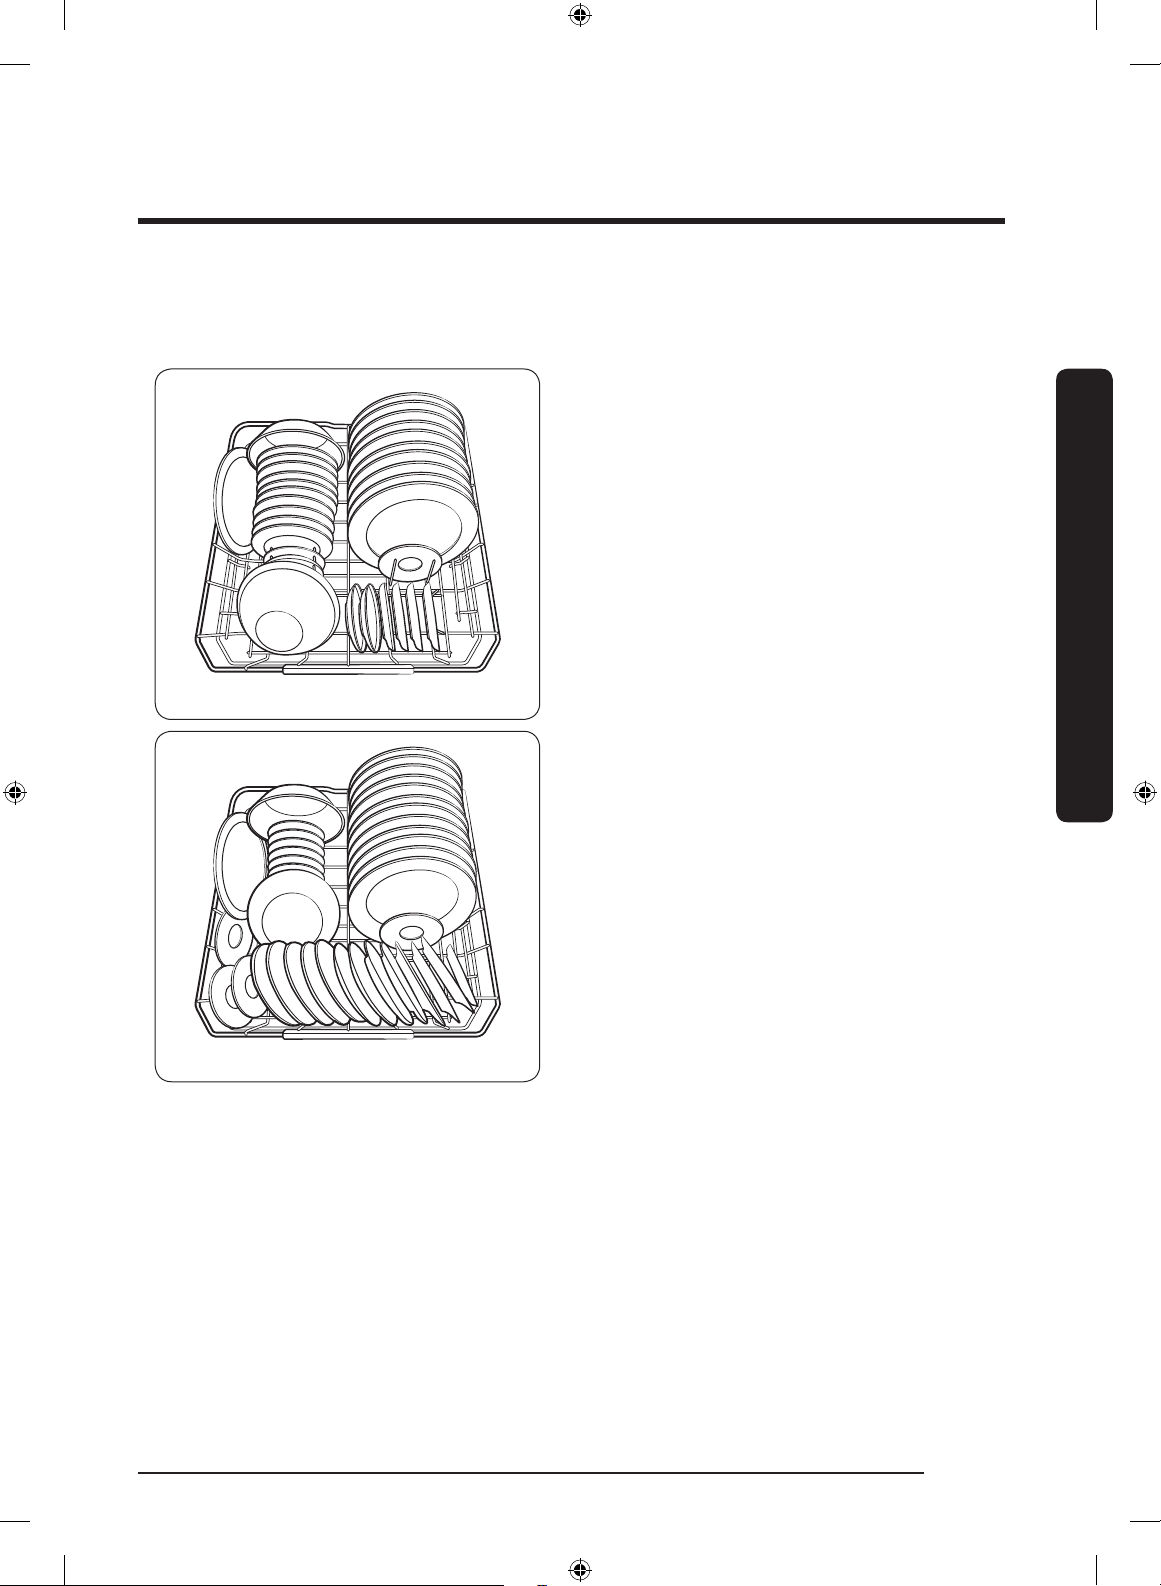
Loading dishes
Into the lower rack
10 place setting
Load cookware (pots, pans, etc.) up to
12 inches (30 cm) in diameter into the
lower rack. The lower rack is specially
designed for dinner dishes, soup bowls,
plates, pots, lids, and casserole dishes.
Load plates into the centre column of the
rack so that the top of a plate faces the
bottom of the next plate. Load large items
such as pans and pots into the dishwasher
so their inner cavities face downwards. We
recommend loading cups, stemware, and
small plates into the upper rack. See the
recommended loading cases below.
Before you start
12 place setting
English 13
DW9900M_DD68-00196B-01_EN.indd 13 2017-09-04 12:05:18
Before you start
Into the Zone Booster area (to use the Chef cycle and Zone Booster option)
Before you start
To use the Chef cycle and the Zone Booster
option, load heavily soiled items into
the left side of the lower rack-the Zone
Booster area. With the Chef cycle, you
can clean stubborn items that were used
with your oven. The Zone Booster function
supplies more powerful water jets to the
Zone Booster area. Make sure pot handles
and other items do not interfere with
the rotation of the nozzles and the water
reector.
NOTE
You can load lightly soiled items in other
areas or racks while using the Chef cycle.
English14
DW9900M_DD68-00196B-01_EN.indd 14 2017-09-04 12:05:18
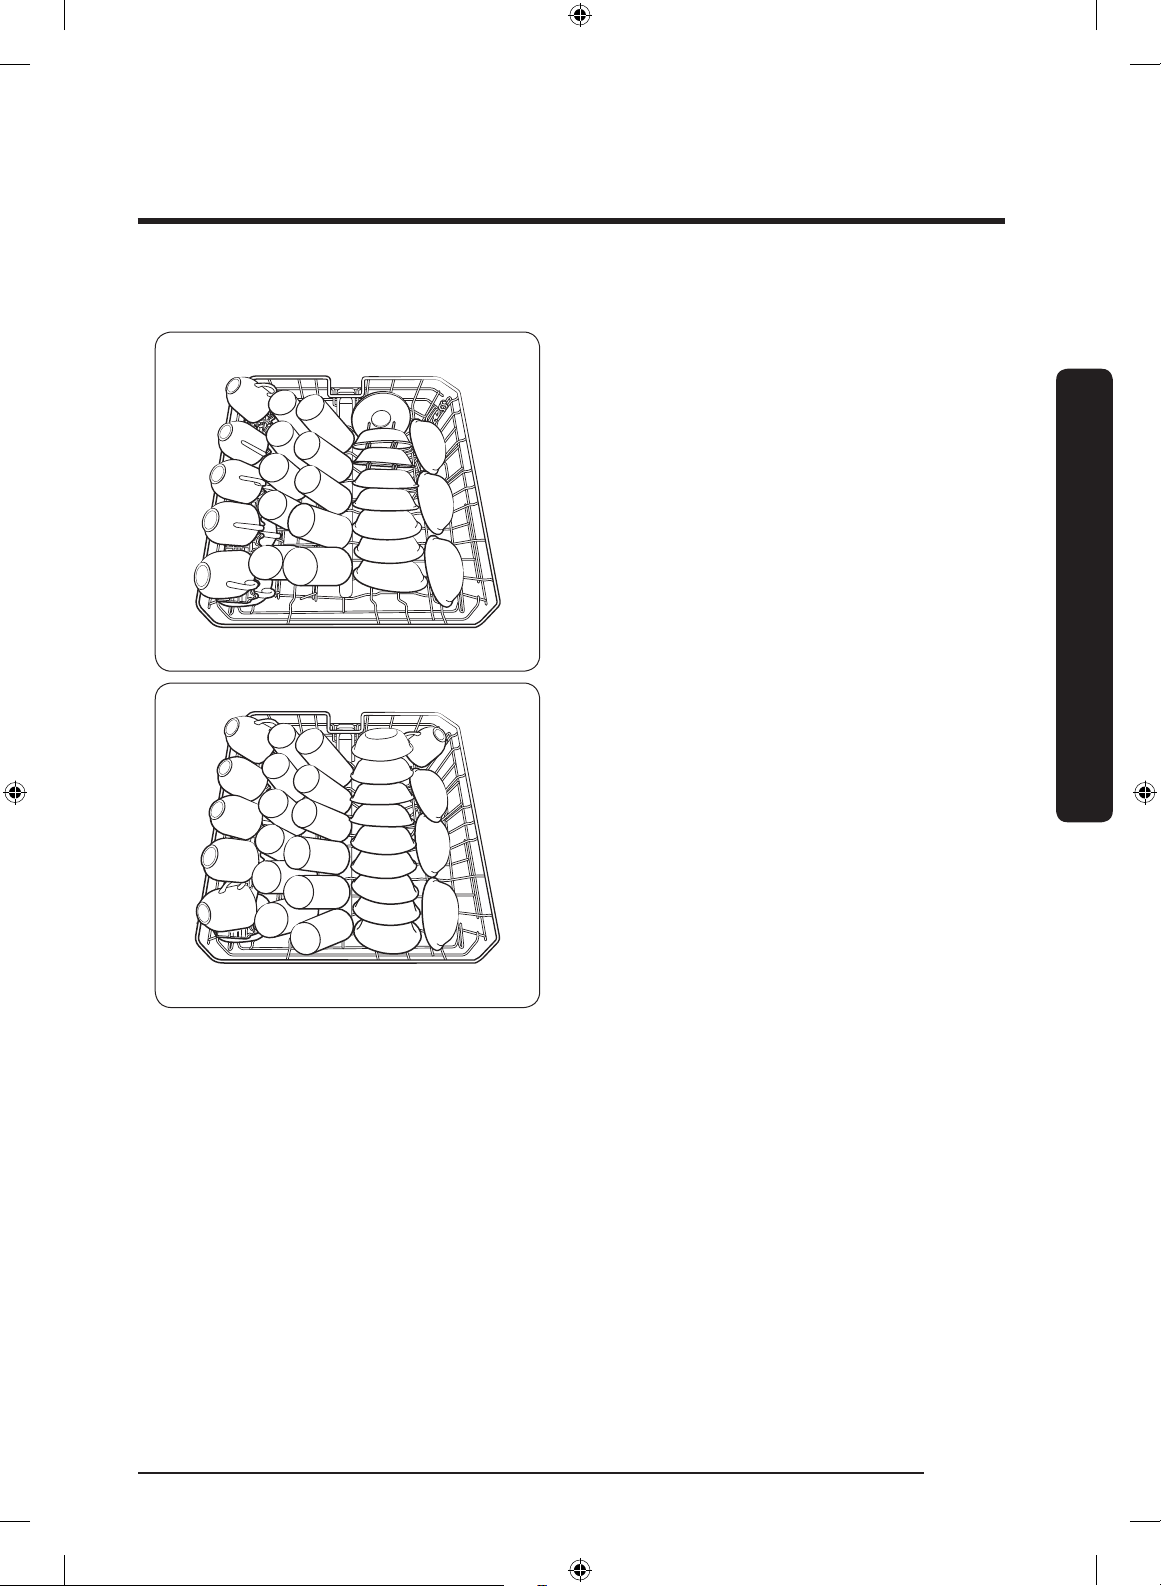
Into the upper rack
10 place setting
The upper rack is for small plates, mugs,
glasses, and plastic items. Make sure the
loaded dishes do not interfere with the
rotation of the nozzle which is located at
the bottom of the upper rack. (Check this
by rotating the nozzle by hand.)
When loading dishes, pull the upper rack
out so you can load it without striking the
counter above.
Before you start
12 place setting
English 15
DW9900M_DD68-00196B-01_EN.indd 15 2017-09-04 12:05:19
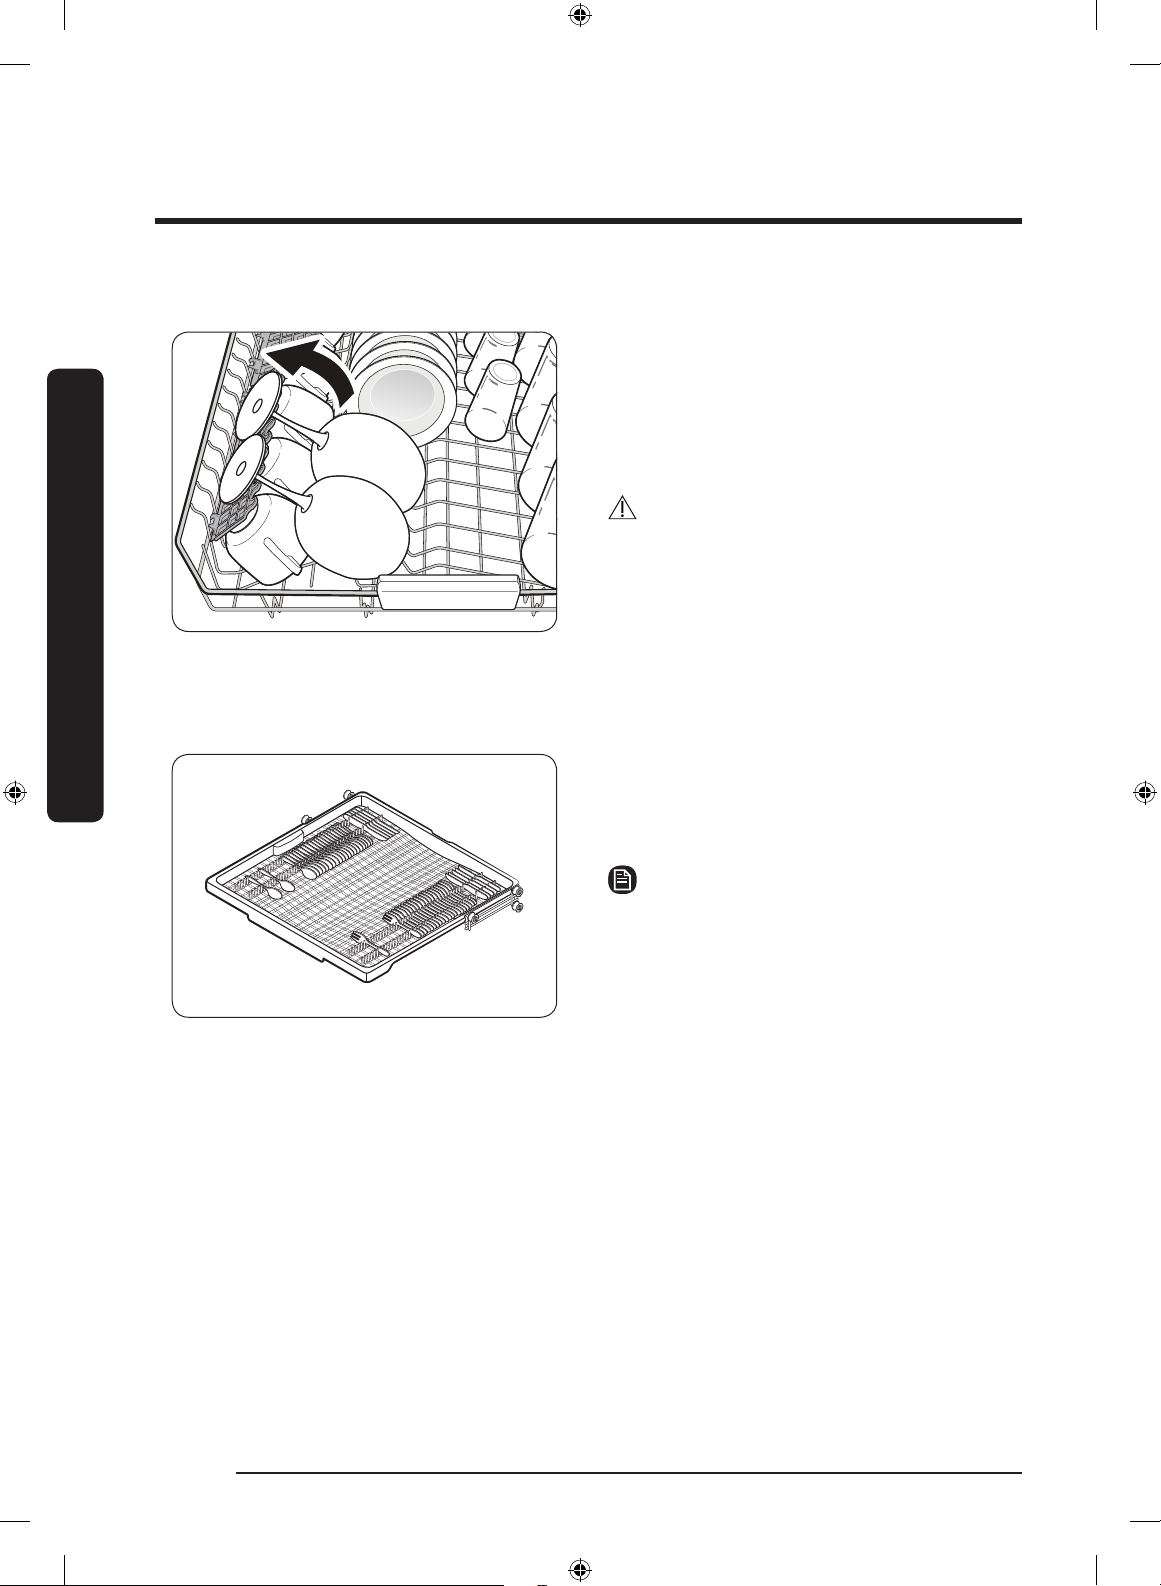
Before you start
Using the glass support
Before you start
Cutlery rack
The glass support is used for cups, small
items, and long cookware, and especially
suited for wine glasses. Hang wine glasses
onto the pegs of the cup shelves. Fold the
glass support back when it is not being
used.
CAUTION
Do not adjust the level of the upper rack
with the glass support propped up. This
will make it impossible to push the glass
support in the upper rack.
The cutlery rack is best for atware
and cooking or serving utensils. Use
the cutlery rack to organize atware or
utensils.
NOTE
• For best results, place heavily soiled
items in the standard cutlery rack.
• The cutlery rack can be removed if you
need more space on the upper rack to
clean larger items.
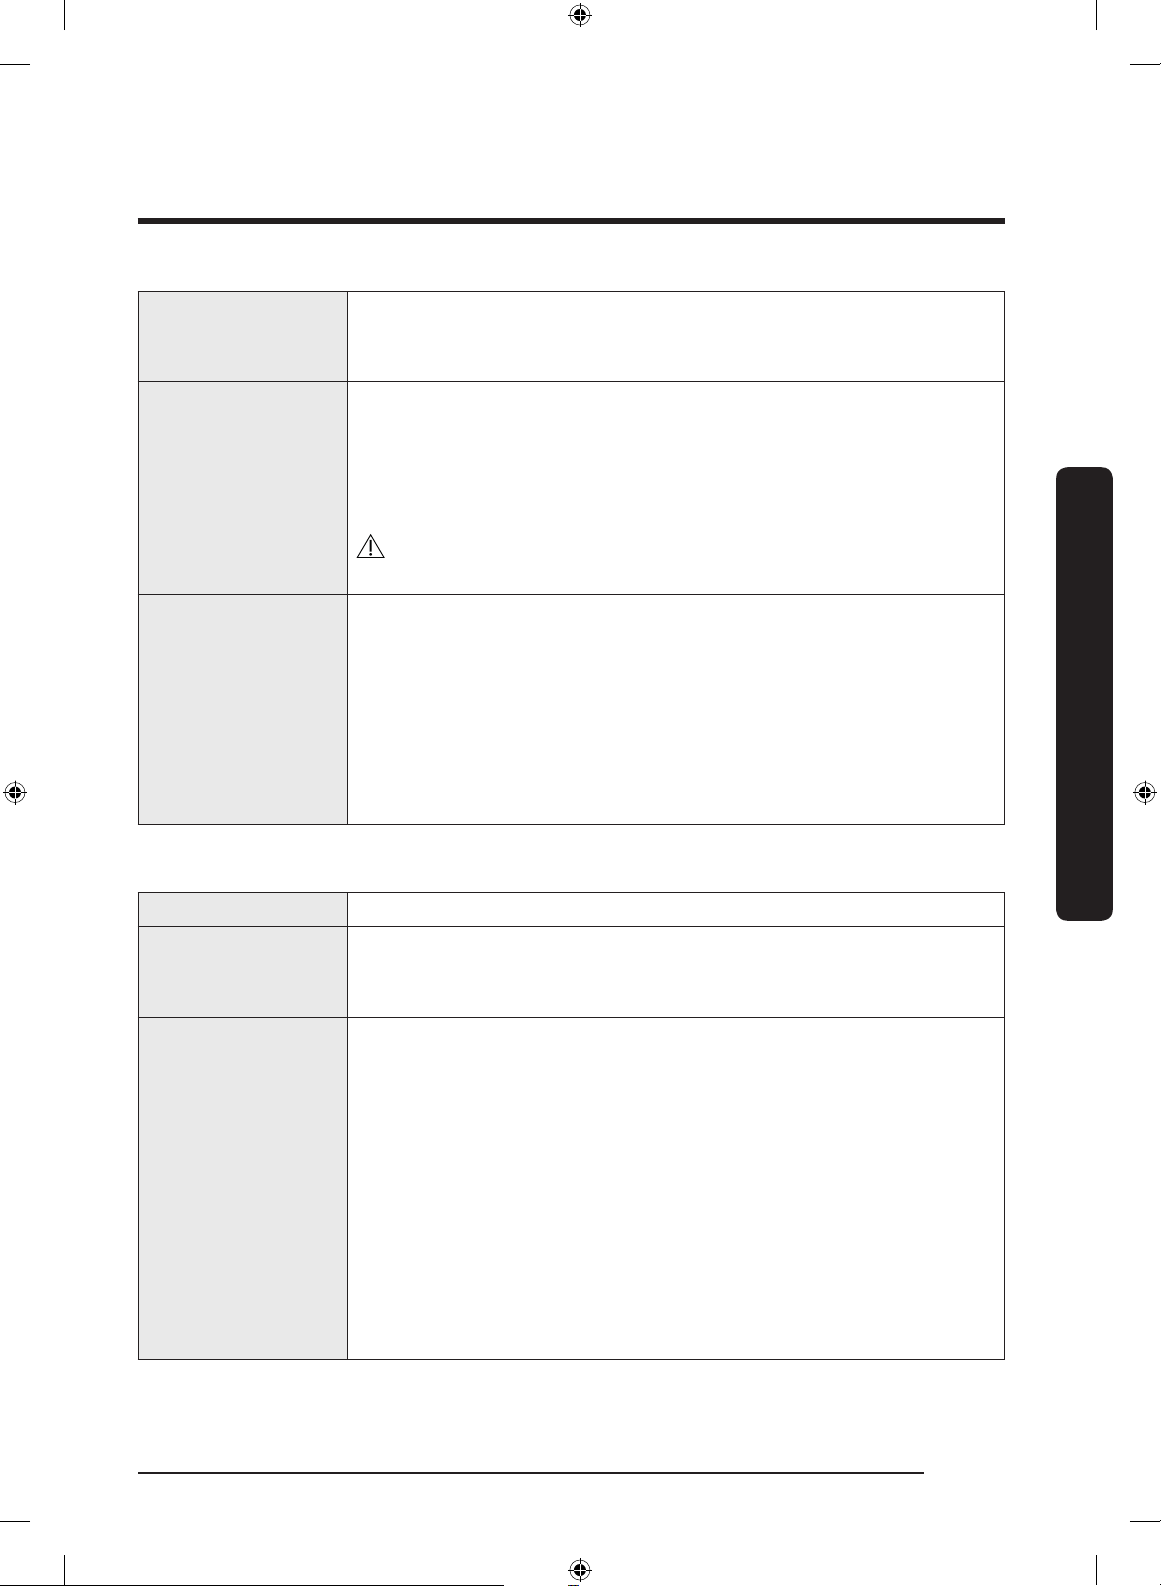
The rack will stand if items are placed as suggested above. Refer to the gures below and
match the numbers on the left with the numbers on the right.
English16
DW9900M_DD68-00196B-01_EN.indd 16 2017-09-04 12:05:19
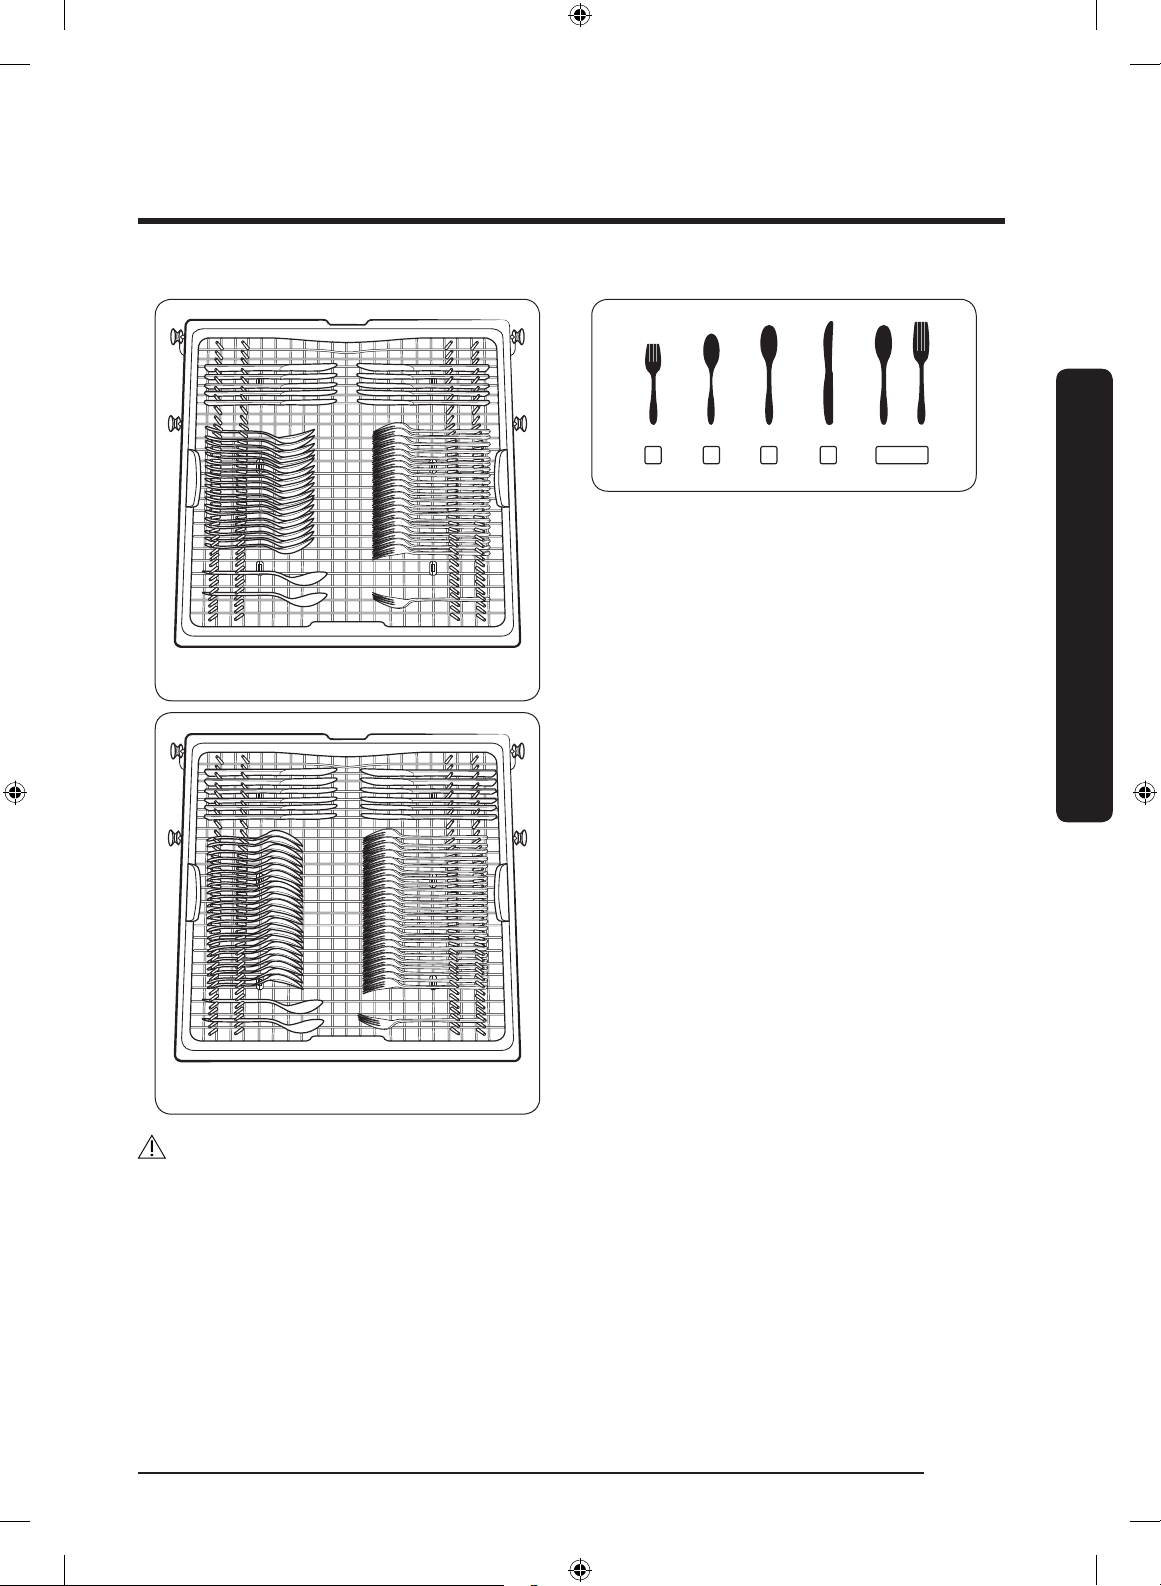
1 3 42 5
10 place setting
12 place setting
1. Fork
2. Tea spoon
3. Dessert spoon
4. Knife
5. Serving spoon and fork
Before you start
CAUTION
Do not allow items to be spread out in the bottom of the rack.
English 17
DW9900M_DD68-00196B-01_EN.indd 17 2017-09-04 12:05:19

Before you start
Detergent guidelines
All dishwasher cycles require detergent in the detergent compartment. Apply detergent as
appropriate for the selected cycle to ensure best performance.
WARNING
• Do not consume dishwasher detergent. Avoid breathing in detergent fumes.
Dishwasher detergent contains irritants and caustic chemicals that can induce
Before you start
respiratory conditions. If you have consumed dishwasher detergent or inhaled
detergent fumes, seek medical attention immediately.
• Keep dishwasher detergent out of children’s reach.
CAUTION
Use dishwasher detergent only. Other types of detergent produce excessive foam, which
may decrease the dishwasher’s performance or cause it to malfunction.
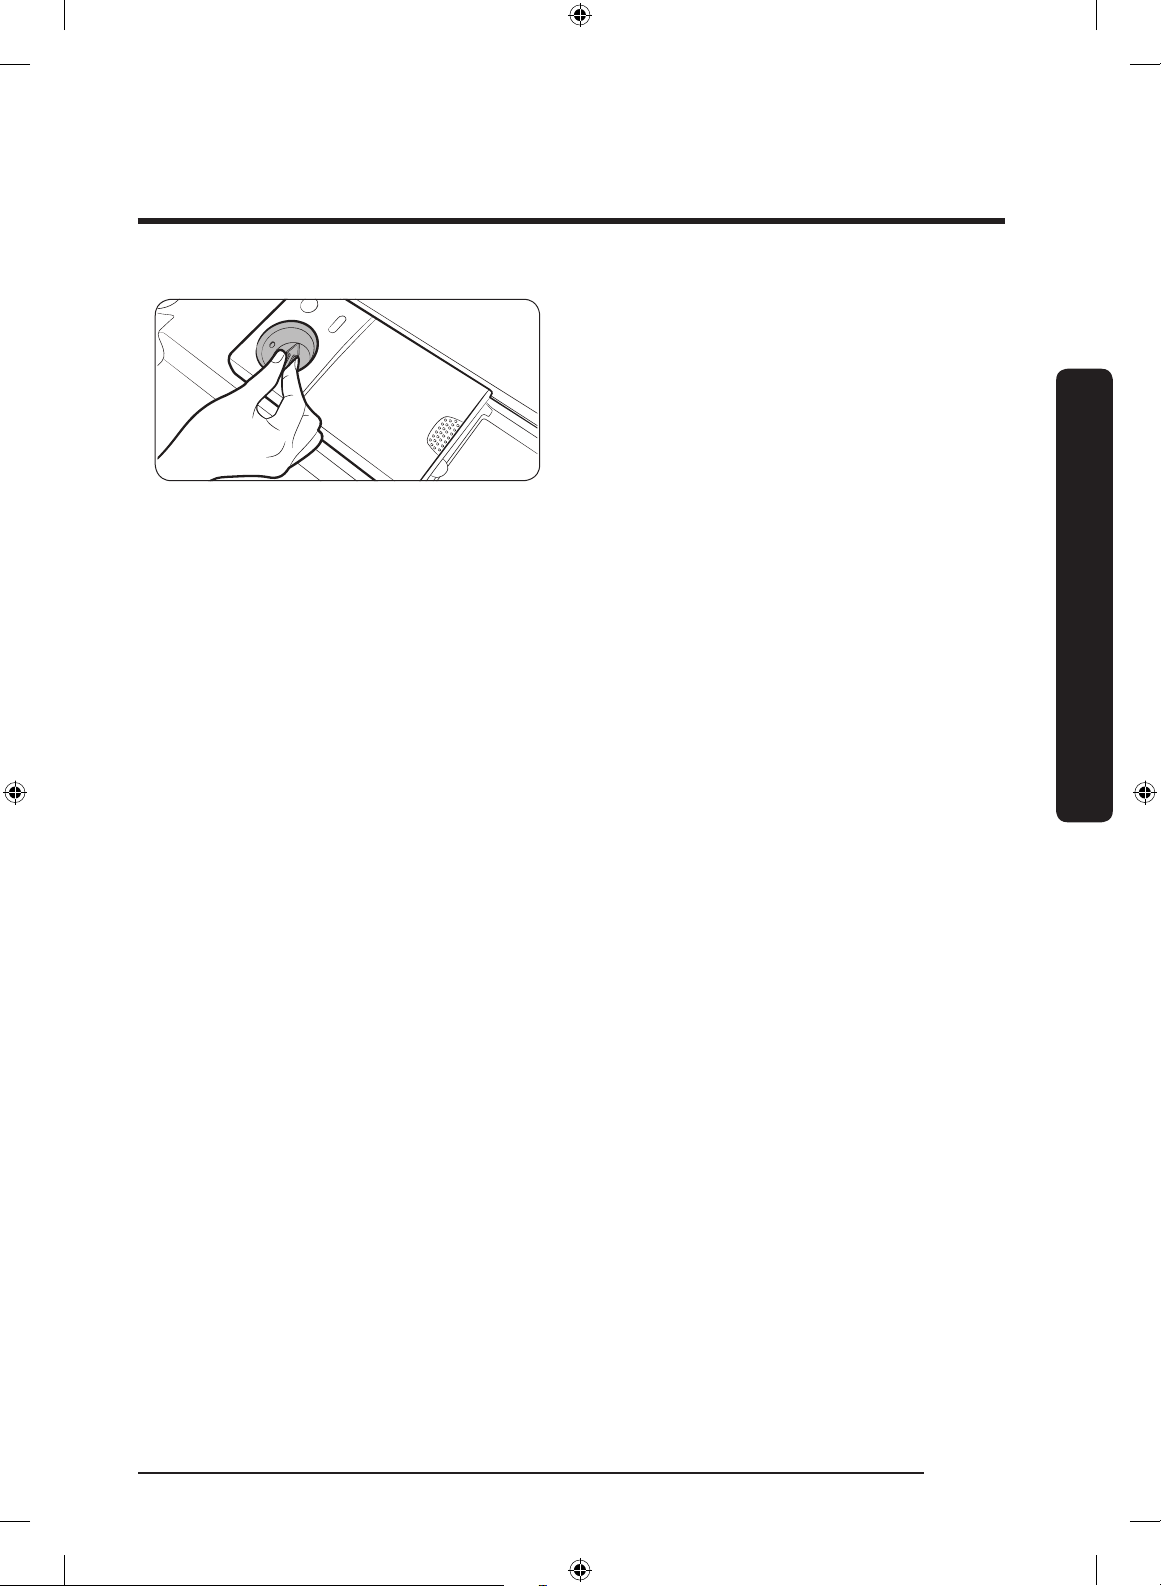
1. Gently press the dispenser ap to
unlock, and then slide it open. Note that
the dispenser ap opens at the end of
each cycle.
English18
DW9900M_DD68-00196B-01_EN.indd 18 2017-09-04 12:05:20
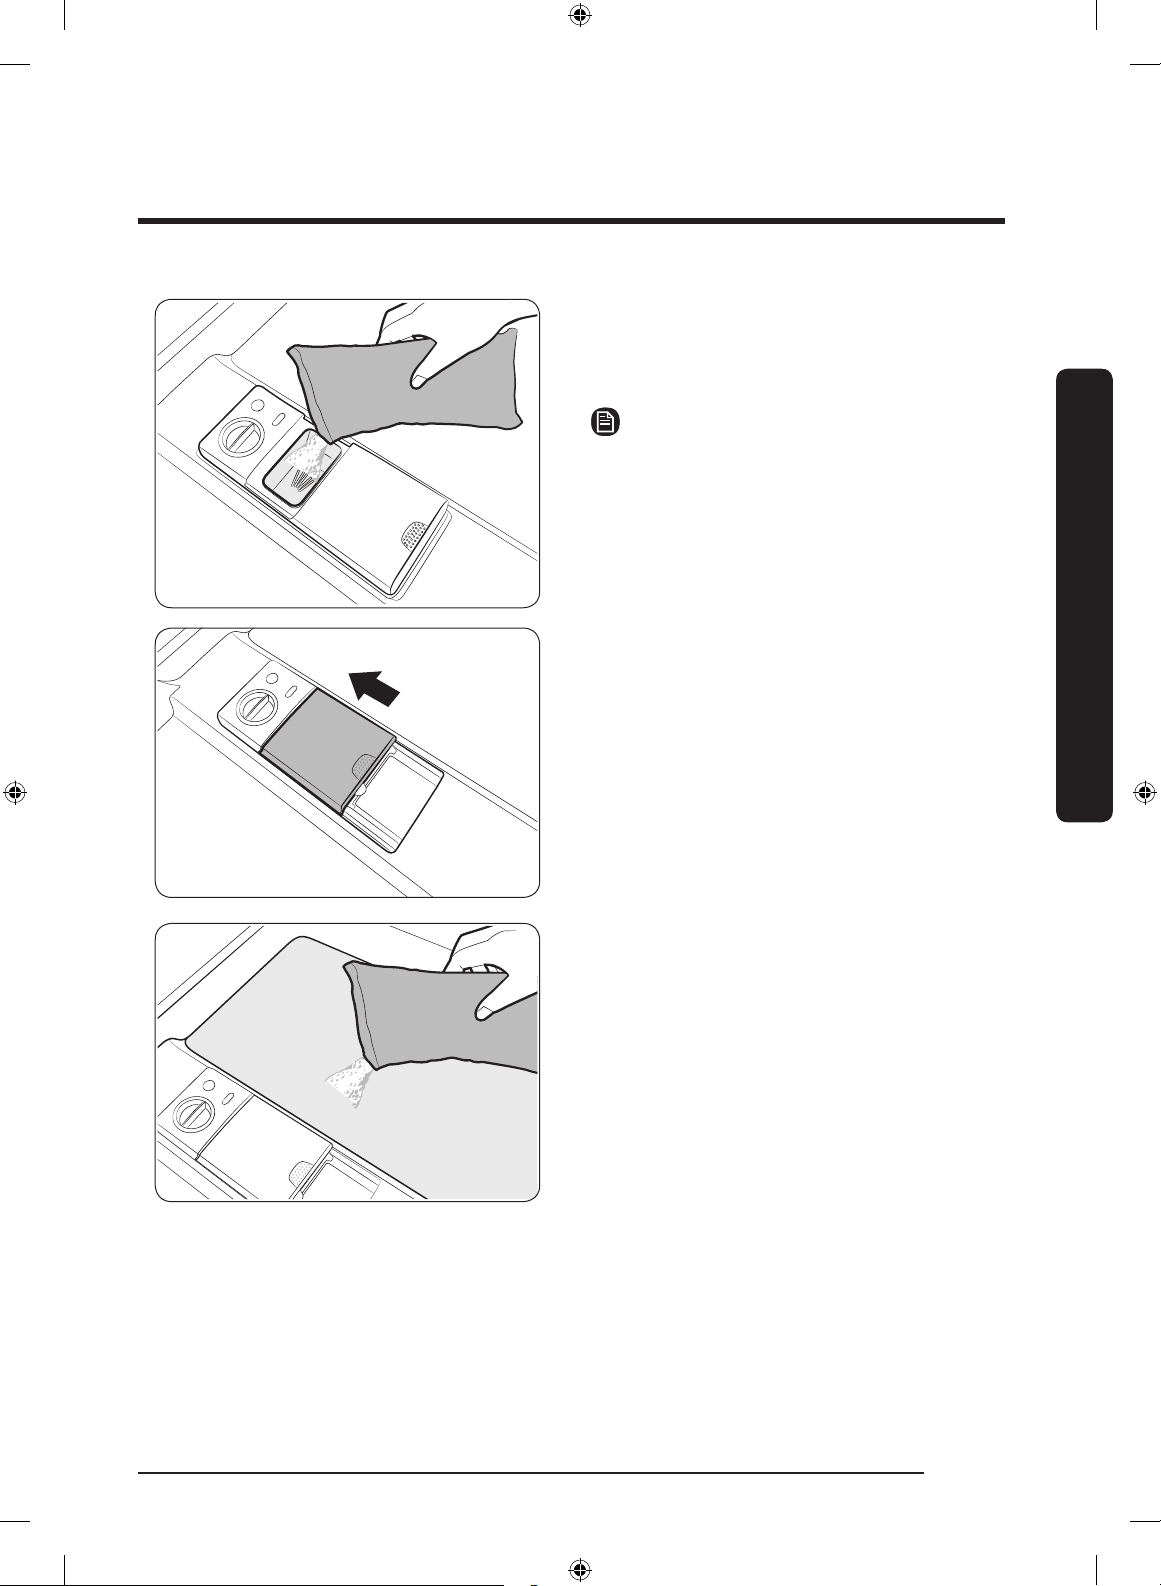
2. Apply the recommended amount of
detergent to the main compartment.
3. Close the ap, and then press down to
lock.
NOTE
This dishwasher has no separate
compartment for tablet detergent.
Before you start
4. For best results, apply a small amount
(half an ounce or about 15 g) of
detergent onto the door. The additional
detergent will activate during the prewash process.
English 19
DW9900M_DD68-00196B-01_EN.indd 19 2017-09-04 12:05:20
Before you start
Recommended amounts
Heavy, Express 60, Chef 1 oz (30 g) ⁄ oz (15 g)
Before you start
Rinse aid
Rinse aid improves the drying performance of the dishwasher. When the Rinse Rell
indicator lights up on the control panel, rell with rinse aid. Only use liquid rinse aid.
Powdered rinse aid will clog the compartment opening and cause the dishwasher to
malfunction.
CAUTION
• Do not apply any type of detergent to the rinse aid compartment.
• Do not excessively ll the compartment. Excessive rinse aid may overow during a
cycle.
Cycle
Amount of detergent
Main wash dispenser Onto the door for pre-wash
Auto, Normal ⁄ oz (20 g) ⁄ oz (10 g)
Delicate ⁄ oz (20 g) ⁄ oz (5 g)
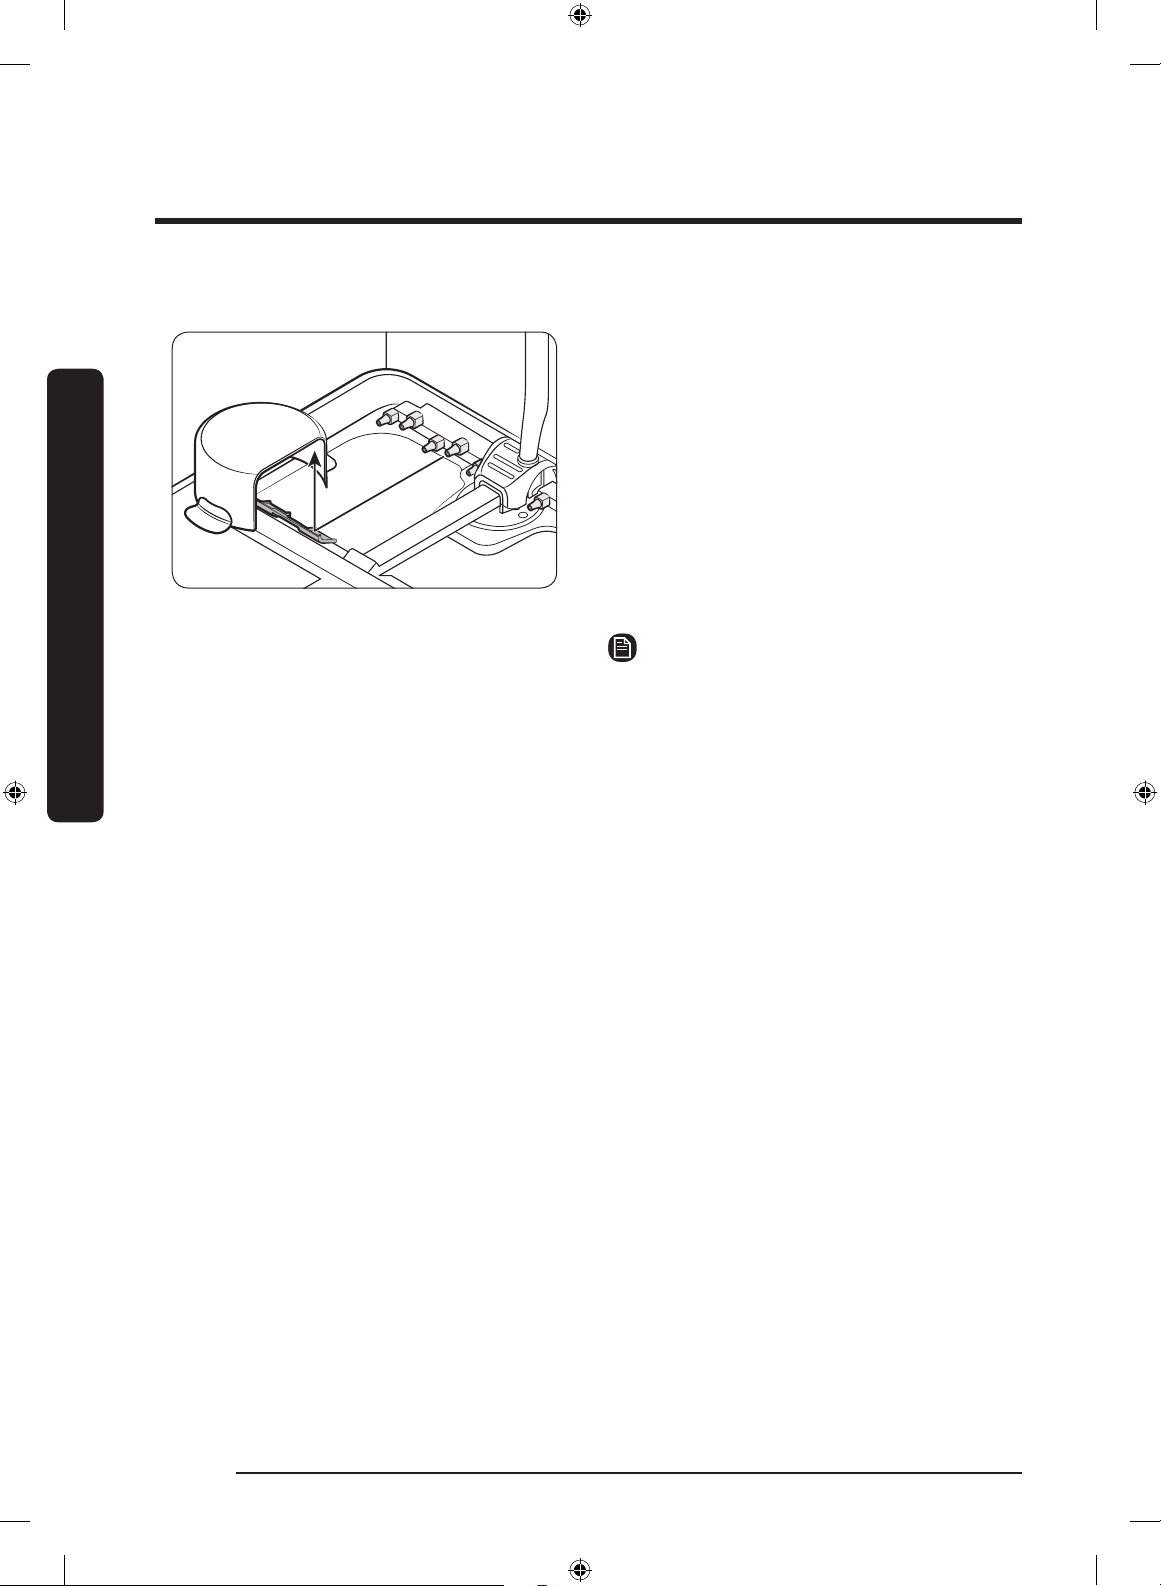
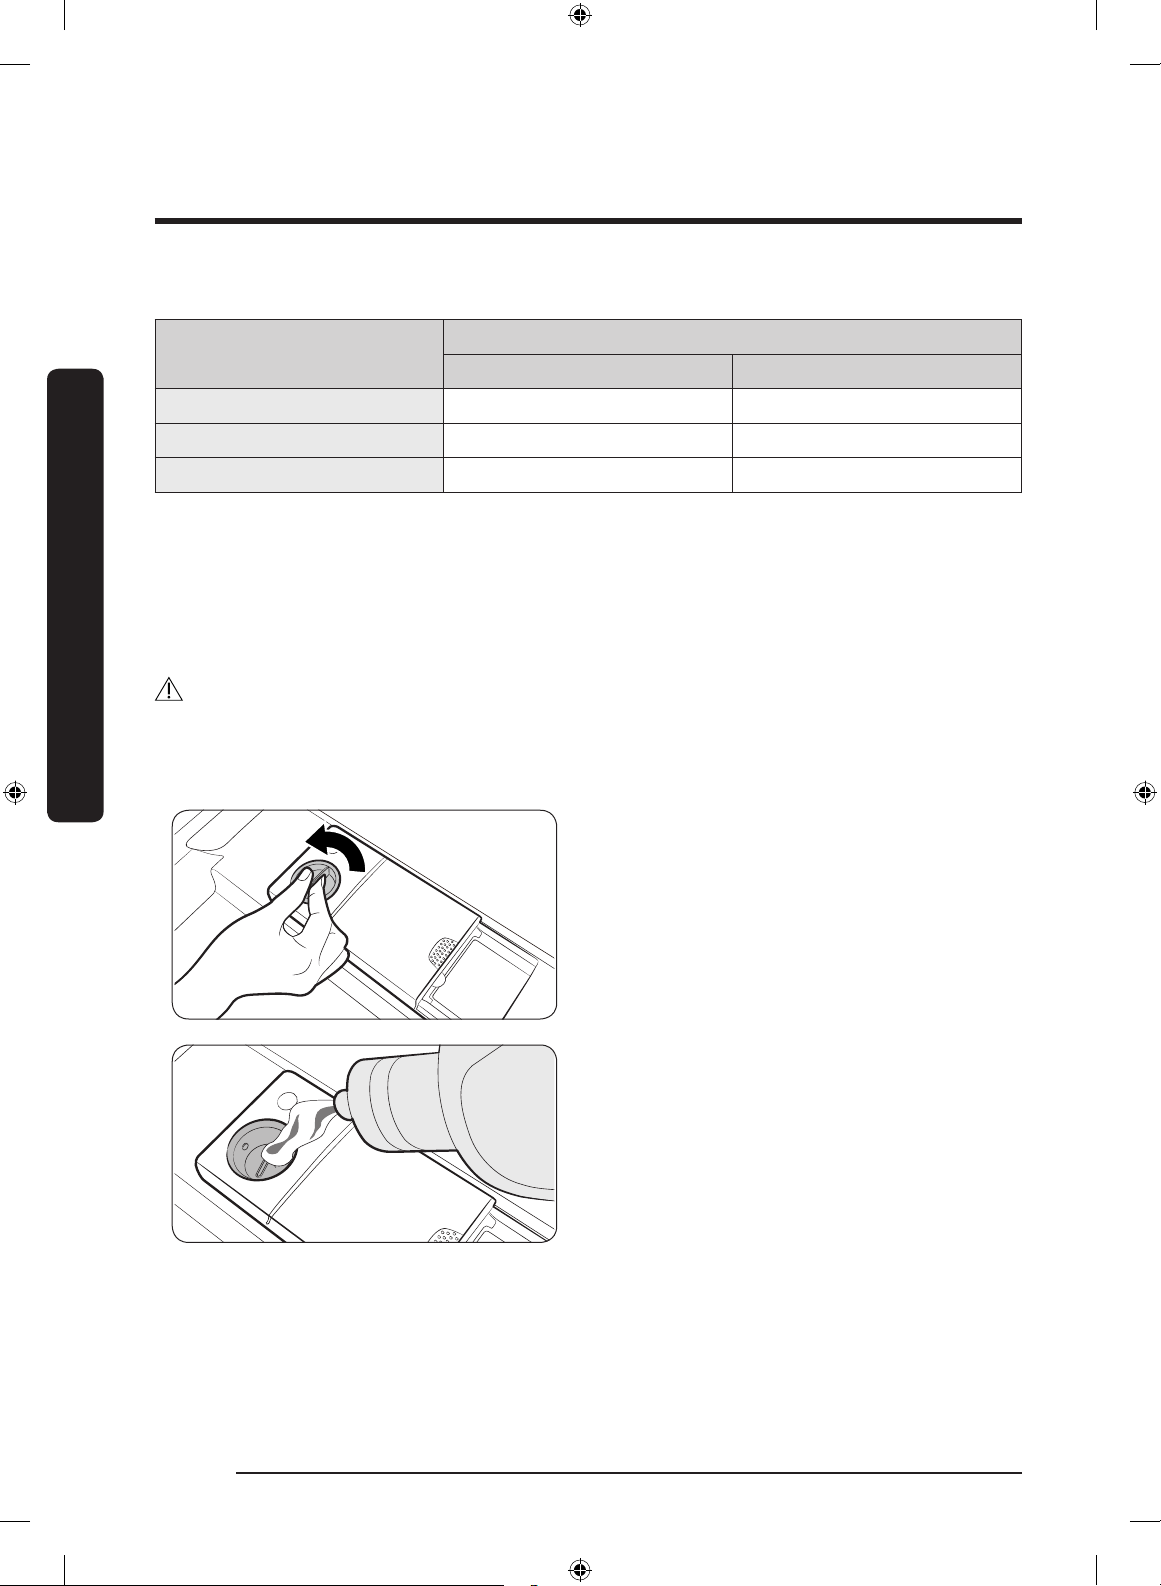
1. Turn the cap counter clockwise to
remove.
2. Fill the compartment with rinse aid as
specied by the rinse aid manufacturer.
English20
DW9900M_DD68-00196B-01_EN.indd 20 2017-09-04 12:05:20
1
2
3
4
5
6
3. Turn the rinse aid dial to select a rinse
aid level between 1 and 6.
• The higher the number, the more rinse
aid the dishwasher uses.
• To improve the drying performance,
select a higher level.
• If there is discoloring on the dishes,
switch to a lower level.
4. Turn the cap clockwise to close.
Water reector
The water reector automatically detects obstacles inside the dishwasher that can
interfere with the reector’s signal. If an obstacle is detected at the end of a cycle, "0"
blinks for several minutes. The dishwasher chimes for several minutes. If this happens,
remove the obstacle.
Before you start
English 21
DW9900M_DD68-00196B-01_EN.indd 21 2017-09-04 12:05:20
Operations
01 02 03 04 05 07 08
06 09
Control panel
01 POWER
Operations
02 Cycle Selector
03 Lower Rack
Press to turn the dishwasher on or off. When a cycle is complete,
all other indicators turn off with “0” on the display. Then, the
dishwasher turns off automatically.
Press to select a cycle according to the soil level of your dishes.
The corresponding cycle indicator turns on. The default cycle is
Normal.
Lower Rack only: If this option is selected, only the lower rack
nozzle is activated to reduce both the cycle time and power
consumption. Use this cycle to wash a small load of dishes or
glasses in the lower rack. To wash heavily soiled items, add the
Zone Booster option.
Zone Booster: Select this option to improve the cleaning
performance. A powerful jet is activated and directed at items
in the left side of the lower rack. This option can increase power
consumption slightly.
04 Speed Booster
05 Hi-Temp Wash
English22
NOTE
If you use the lower rack only, the upper nozzle will be disabled.
So do not load items in the upper rack. However, the Zone Booster
option is available regardless of availability of the upper nozzle.
Select this option to reduce the cycle time. This is available only
with the Auto, Normal, Heavy, and Delicate cycles.
Select this option to increase the main-wash temperature to
improve the cleaning performance for loads containing stubborn,
baked-on food. This is available only with the Auto, Normal, Heavy
and Express 60 cycles.
DW9900M_DD68-00196B-01_EN.indd 22 2017-09-04 12:05:20

06 Sanitize
(Control Lock)
07 Display
With this selected, the water temperature increases to 163 °F
(73 °C) in the nal rinse for high temperature sanitization. For
more information, see the Options section on page 27.
Control Lock: Control Lock allows you to lock the buttons on the
control panel except for the POWER button. For more information,
see the Control Lock section on page 29.
Displays information of the current cycle including the cycle
name/time, remaining time, and settings as well as an information
code if found.
08 Delay Start
09 START (Cancel &
Drain)
You can delay the cycle starting time. For more information, see
the Delay Start section on page 29.
Press START to start operation. Make sure the door is closed.
*Cancel & Drain: To cancel the current cycle and drain the
dishwasher, press and hold START for 3 seconds.
Operations
English 23
DW9900M_DD68-00196B-01_EN.indd 23 2017-09-04 12:05:20
Operations
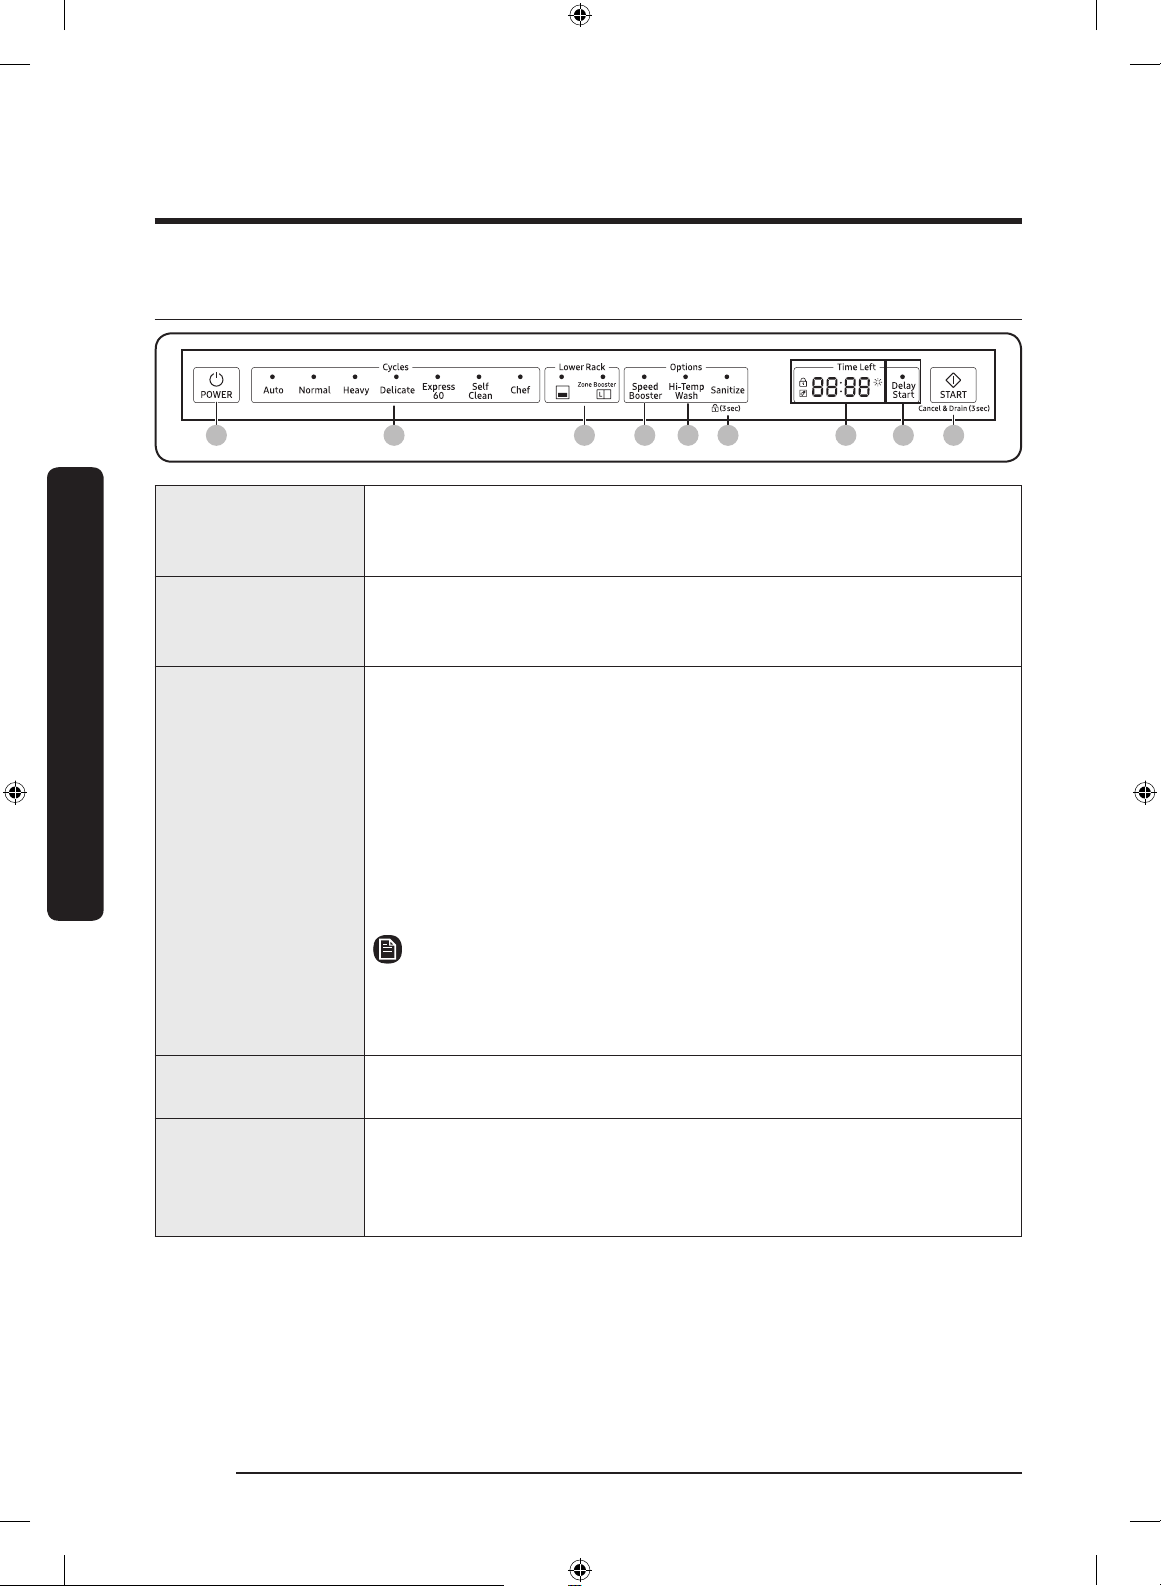
Indicators
Control Lock
indicator
Operations
Self Clean indicator
Rinse Rell
indicator
All indicators light up when the dishwasher enters Standby mode or is stopped. However,
they all turn off when the dishwasher is operating.
Lights up if Control Lock is activated, and blinks for
several seconds if any button except for the POWER
button is pressed.
Lights up if Self Clean is activated, and blinks for
5 seconds every 20-22 cycles. The cycle counter
disappears when the Self Clean cycle is complete, or the
dishwasher reaches the 23rd cycle.
Lights up if the dishwasher runs out of rinse aid.
NOTE
English24
DW9900M_DD68-00196B-01_EN.indd 24 2017-09-04 12:05:21

Simple steps to start
1. Open the door, and then load the dishwasher. Make sure dishes are empty.
2. If applicable, put the dishes in the lower rack. If adding the Zone Booster option, put
the dishes in the left side of the lower rack.
3. Apply detergent to the detergent dispenser. For better results, add rinse aids.
4. Press POWER, and then select a cycle with necessary options (Speed Booster, Sanitize,
etc). Availability of cycles depends on the model.
5. Press START, and then close the door. The dishwasher starts the cycle after draining for
a few seconds.
NOTE
• To change the cycle after it has started, press and hold START for 3 seconds to cancel
the cycle. Then, select a new cycle.
• The default cycle is Normal.
• To resume after you open the door to stop the dishwasher while operating, simply
close the door.
Operations
English 25
DW9900M_DD68-00196B-01_EN.indd 25 2017-09-04 12:05:21
Operations
01 02 03 04 05 06 07
Touchpad responsiveness
To prevent the touch-enabled controls from losing responsiveness, follow these
instructions.
Operations
Cycle overview
• Touch the center of each button with
one nger.
• Do not touch more than one button at a
time, except as directed.
• Clean the surface of the control panel
regularly with a soft, damp cloth.
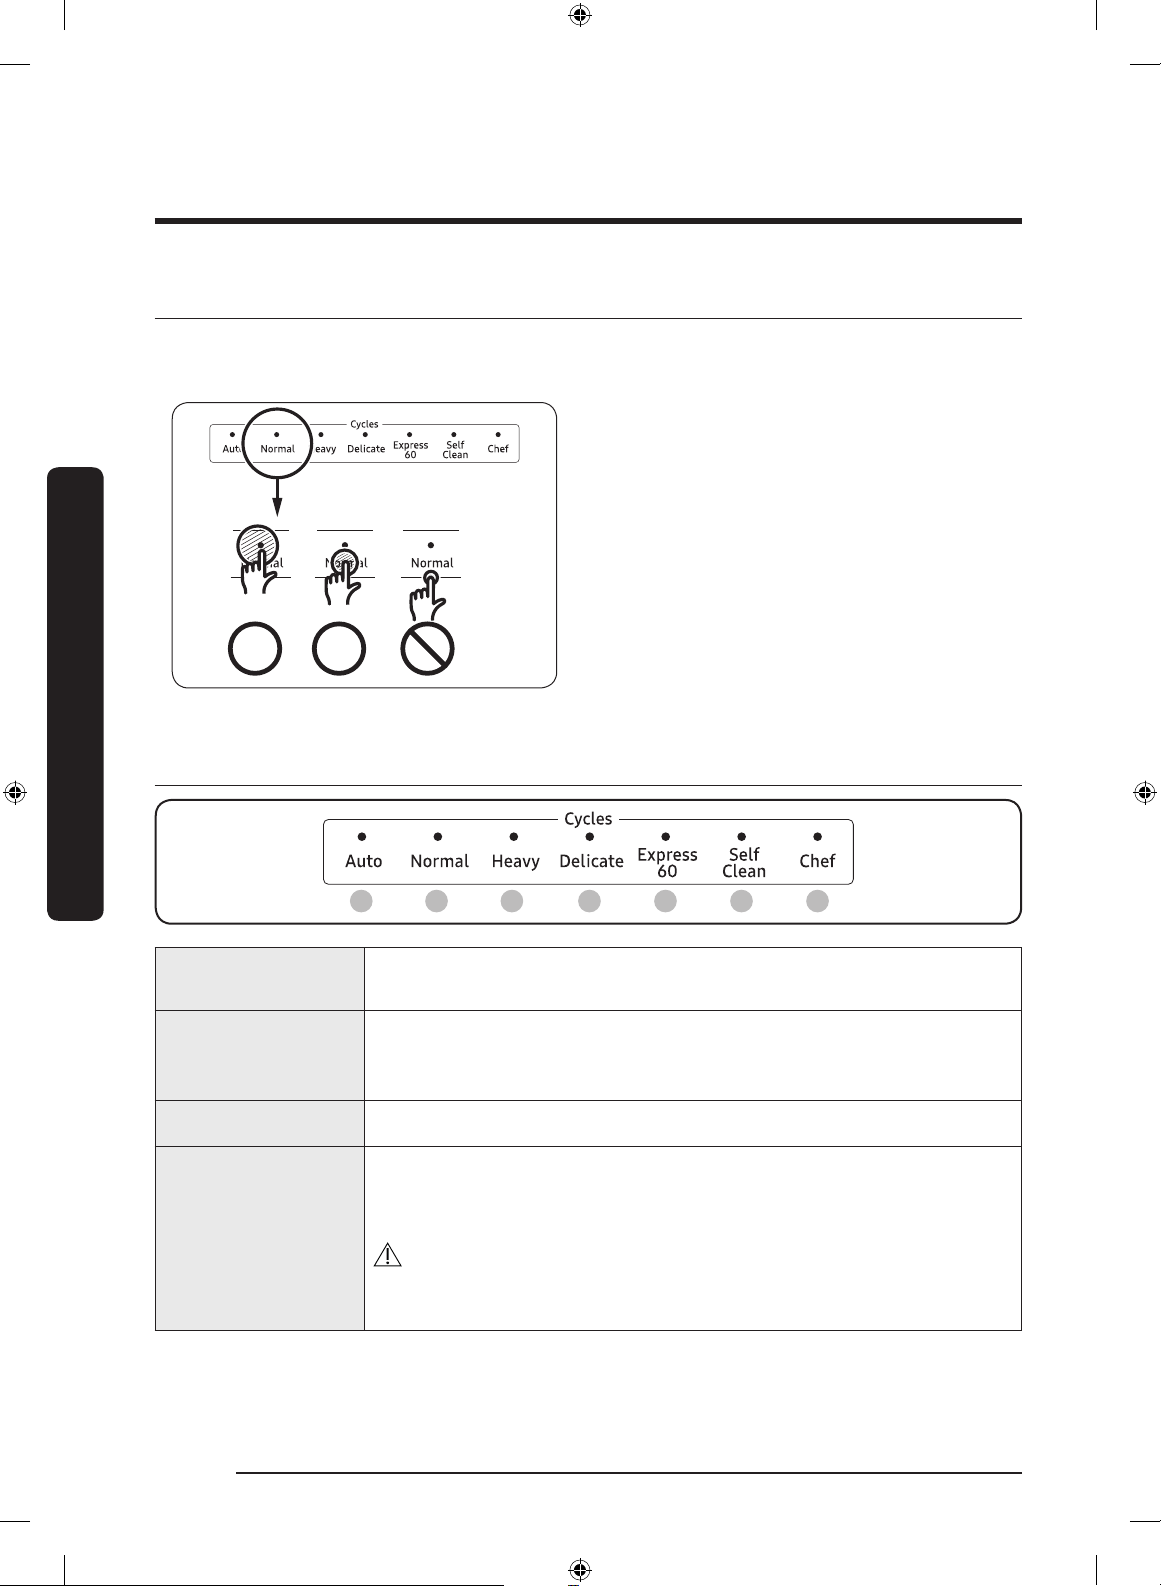
01 Auto
02 Normal
03 Heavy Select this cycle for heavily soiled items.
04 Delicate
English26
This cycle detects the level of soil and automatically initiates the
optimal cycle, which is appropriate for all levels of soiled items.
This cycle reduces power and water consumption, which is
appropriate for normally soiled items. To reduce the cycle time,
select the Speed Booster option.
Select this cycle for lightly soiled, fragile items such as ne,
crystal, and wine glasses. With this selected, the Zone Booster and
Sanitize options will be disabled.
CAUTION
Do not use this cycle for other glassware. Clouding or etching may
occur.
DW9900M_DD68-00196B-01_EN.indd 26 2017-09-04 12:05:21
05 Express 60
06 Self Clean
Select this cycle to clean lightly soiled items within about 1 hour.
With this selected, the Speed booster and Zone Booster options
will be disabled.
Use this cycle to clean the dishwasher’s tub. Make sure the
dishwasher is empty. If the dishwasher needs self cleaning, the
Self Clean indicator blinks for 5 seconds after the dishwasher
turns on. If you start the dishwasher when the indicator is
blinking, the indicator will turn off automatically.
CAUTION
Do not use this cycle to clean dishes.
Use this cycle to clean both stubborn and lightly soiled items
simultaneously. Load heavily soiled items in the Zone Booster area
and lightly soiled items in other areas. Make sure stubborn items
07 Chef
are loaded in the Zone Booster area. Otherwise, they will not be
cleaned well. For optimal performance, connect the dishwasher
to a hot water source. Use caution when loading light-weighted
items in the Zone Booster area. They can be turned over easily in
the process.
Options
Speed Booster Select this option to reduce the cycle time.
Select this option to increase the main-wash temperature to
Hi-Temp Wash
Sanitize
improve the cleaning performance for loads containing stubborn,
baked-on food.
With this selected, the water temperature increases to 163 °F
(73 °C) in the nal rinse for high temperature sanitization. The
corresponding indicator blinks when the water temperature
reaches the sanitary temperature (over 155 °F / 68 °C), and then
stays solid until the sanitizing process is complete.
• The Sanitize function complies with NSF/ANSI Standard 184 for
residential dishwashers. Certied residential dishwashers are
not intended for licensed food establishments. Your dishwasher
is NSF Certied.
• Only the Heavy cycle with the Sanitize option has been
designed to meet the requirements for soil removal and
sanitization efcacy in NSF 184.
Operations
English 27
DW9900M_DD68-00196B-01_EN.indd 27 2017-09-04 12:05:21
Operations
Settings
You can change the sound settings or display brightness to your preference. To change
the settings, press Delay Start and Sanitize simultaneously for 3 seconds. Press Sanitize to
navigate through sub menus, and press Delay Start to conrm your changes.
Sound
Press Sanitize until ‘U1’ or ‘U0’ is displayed. To mute the dishwasher, select ‘U0’, and then
press Delay Start. To unmute, select ‘U1’, and then press Delay Start.
Operations
Auto Release™ Dry
Sound
U1/U0
Auto Release™ Dry
A1/A0
The Auto Release™ Dry function is
designed to improve drying performance.
It automatically opens the dishwasher's
door 5 to 15 minutes before a cycle ends.
You can use 2 methods to activate or
deactivate this function.
English28
DW9900M_DD68-00196B-01_EN.indd 28 2017-09-04 12:05:21

In Setting mode
1. Press and hold Delay Start and Sanitize simultaneously for 3 seconds to enter Setting
mode.
2. Keep pressing Sanitize until ‘A1’ or ‘A0’ is displayed. Select one between ‘A1’ (enabled)
and ‘A0’ (disabled). For better results, select ‘A1’ (default).
3. Press Delay Start to conrm your changes.
On the control panel
• To activate the Auto Release™ Dry function, press and hold Lower Rack and Hi-Temp
Wash simultaneously for 3 seconds. ‘A1’ will be displayed.
• To deactivate, press and hold the buttons again for 3 seconds. ‘A0’ will be displayed.
NOTE
Once the door opens to let steams out, it cannot be closed manually for the next
2 minutes. This is normal and not a product defect.
Delay Start
You can delay the cycle starting time up to 24 hours in 1-hour increments. To increase
the delay time, press Delay Start ( ). The hour displayed indicates the time at which the
cycle will start.
1. Open the door, and then load the dishwasher.
2. Press Delay Start ( ), and then press or hold Delay Start ( ) to change the time in
1-hour increments.
3. Close the door, and then press START.
Operations
NOTE
To change the delay time once the dishwasher has started, press POWER and restart the
dishwasher.
Control Lock
To prevent children from playing with the dishwasher, Control Lock locks all button
controls except for POWER.
• To activate Control Lock, press and hold Sanitize for 3 seconds. With Control Lock
activated, you cannot select a cycle or option, or start an operation.
• To deactivate Control Lock, press and hold Sanitize again for 3 seconds
• Control Lock remains active after the dishwasher restarts. To cancel Control Lock, you
must deactivate it rst.
• To add detergent or more items while Control Lock is active, you must deactivate
Control Lock rst.
English 29
DW9900M_DD68-00196B-01_EN.indd 29 2017-09-04 12:05:21
Care and Maintenance
Cleaning
Keep the dishwasher clean to improve performance, reduce unnecessary repairs, and
lengthen the lifecycle.
Exterior
Clean spills on the surface of the dishwasher as they occur. Use a soft, damp cloth on the
control panel to gently wipe away spills and dust.
CAUTION
• Do not use benzene, wax, thinner, chlorine bleach, alcohol, or other chemical
substances. These materials may discolour the surface of the dishwasher and cause
stains.
• The dishwasher has electric parts inside. Do not sprinkle water directly onto the
dishwasher. Protect electrical components from coming in contact with water.
Care and Maintenance
• For a stainless-steel door panel, use a stainless steel cleaner for home appliances and a
clean, soft cloth.
Interior
Clean the interior of the dishwasher on a regular basis to remove any dirt or food
particles. Wipe inside the dishwasher and inside the door with a wet dishcloth. We
recommend lling the detergent dispenser with dishwasher soap, and then running the
Self Clean cycle with an empty dishwasher.
To keep the cutlery pad clean, turn it over after using it. To remove white spots and
odours from the cutlery pad, run the Self Clean cycle with an empty dishwasher and no
detergent until the cutlery pad ushes. Then, stop the cycle and apply an 8-ounce cup of
white vinegar into the lower basket. Close the door and resume the cycle.
CAUTION
Do not remove the front seal (the long rubber seal enclosing the opening of the
dishwasher). The seal keeps the inner side of the dishwasher sealed.
Use a damp cloth to remove lime scale
or grease deposits inside the dishwasher.
Alternatively, apply some detergent, and
then run an empty cycle using the highest
rinse temperature.
CAUTION
To avoid damaging the motor, use caution
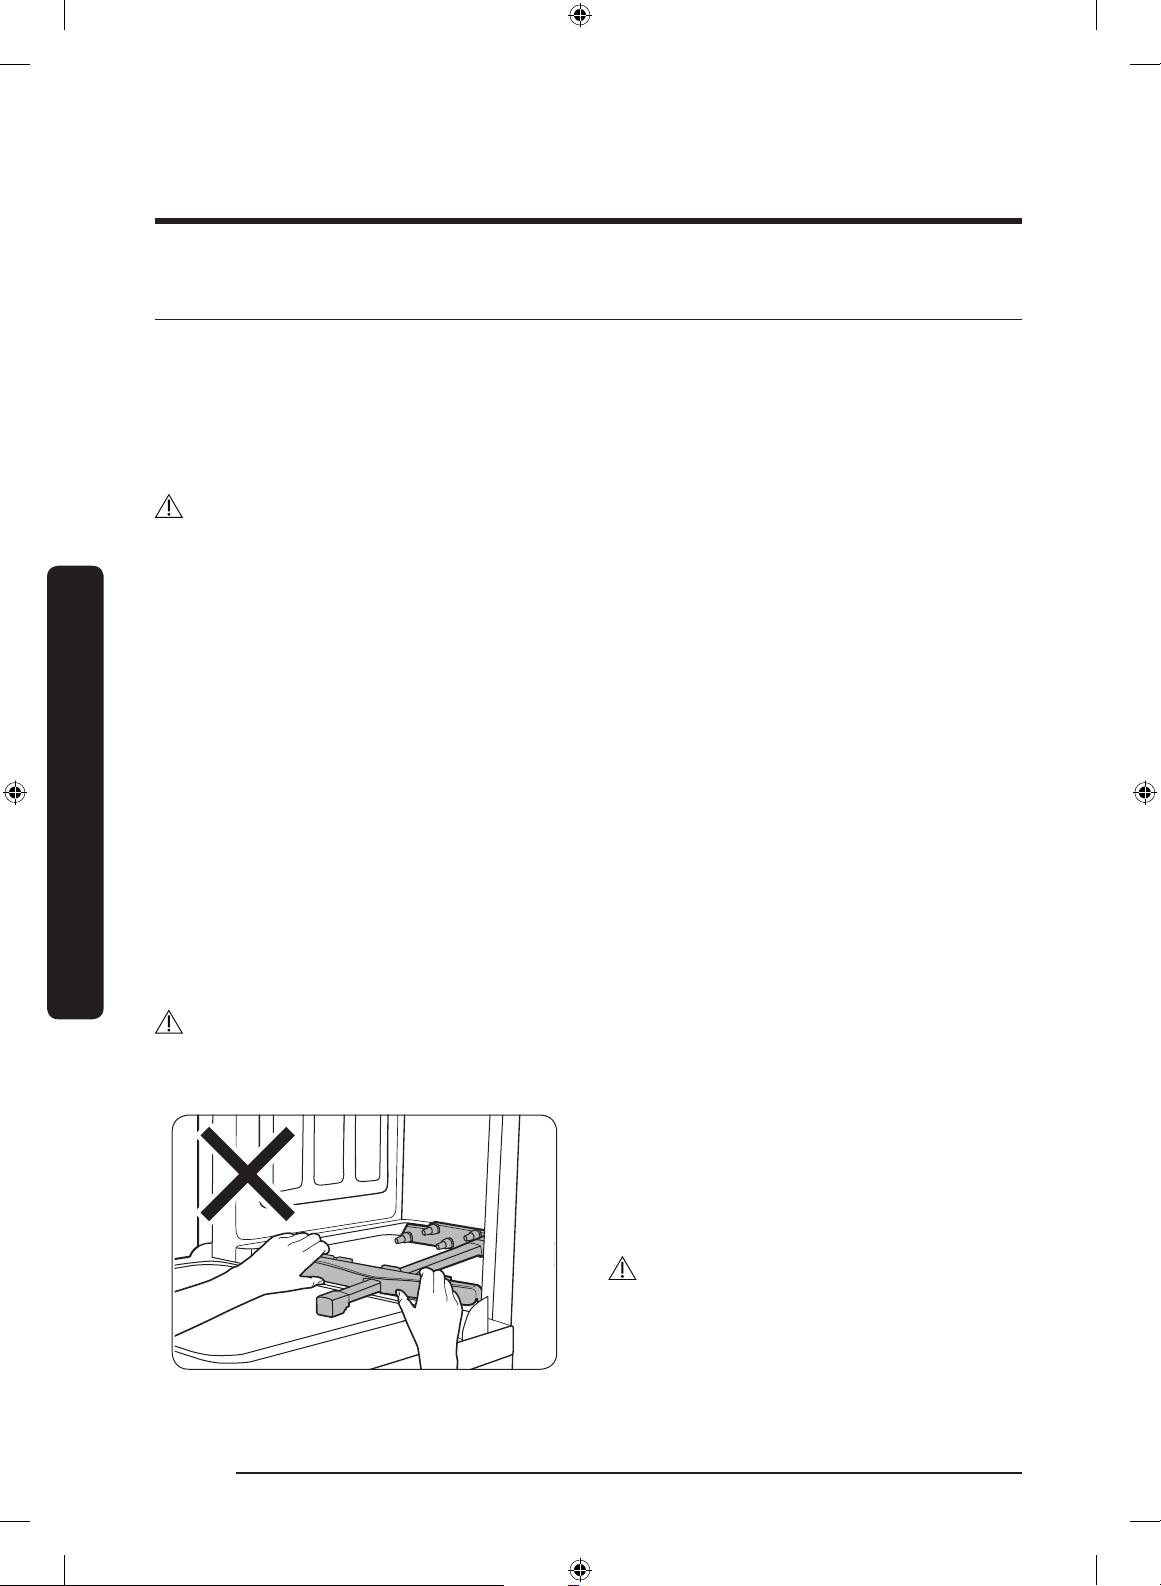
when manually moving the water reector.
English30
DW9900M_DD68-00196B-01_EN.indd 30 2017-09-04 12:05:22
 Loading...