

Samsung DW60H6050FS User Manual
Dishwasher
user manual
DW60H6050FW
DW60H6050FS
imagine the possibilities
Thank you for purchasing this Samsung product.
DD81-01651H_EN_150130.indd 1DD81-01651H_EN_150130.indd 1 2015-01-30 3:11:282015-01-30 3:11:28
Safety information
Please read this User Information carefully and keep it to refer to at a later date.
Pass it on to any subsequent owner of the appliance.
This manual contains sections of Safety Instructions, Part and Features,
Installation your dishwasher and Troubleshooting etc.
Carefully reading it before using the dishwasher will help you to use and maintain
the dishwasher properly.
The manufacturer, following a policy of constant development and up-dating of the product, may make
modifications without giving prior notice.
WARNING: When using your dishwasher, follow the below basic precautions including the following:
PROPER USE
• Do not abuse, sit on, or stand on the door or dish rack of the dishwasher.
• Do not operate your dishwasher unless all enclosure panels are properly in place. Open the door very
carefully if the dishwasher is operating. There is a risk of water squirting out.
• Do not place any heavy objects of stand on the door when it is open. The appliance could tip forward.
• When loading items to be washed:
- Locate sharp items so that they are not likely to damage the door seal;
- Load sharp knives with the handles up to reduce the risk of cut-type injuries;
• Warning : knives and other utensils with sharp points must be loaded in the basket with their points
down or placed in a horizontal position.
• Check that the detergent receptacle is empty after completion of the wash cycle.
• Do not wash plastic items unless they are marked dishwasher safe or the equivalent. For plastic items
not so marked, check the manufacturer’s recommendations.
• Use only detergent and rinse additives designed for an automatic dishwasher. Never use soap, laundry
detergent, or hand washing detergent in your dishwasher.
• Other means for disconnection from the supply must be incorporated in the fixed wiring with at least 3
mm contact separation in all poles.
• Keep children away from detergent and rinse aid, keep children away from the open door of the
dishwasher, there could still be some detergent left inside.
• Young children should be supervised to ensure that they do not play with the appliance.
• The appliance is not intended for use by young children or infirm persons without supervision.
• Dishwasher detergents are strongly alkaline. They can be extremely dangerous if swallowed. Avoid
contact with skin and eyes and keep children away from the dishwasher when the door is open.
• The door should not be left in the open position since this could present a tripping hazard.
• If the supply cord is damaged, it must be replaced by the manufacturer or its service agent or a similarly
qualified person in order to avoid a hazard.
• Please dispose of packing materials properly.
• Use the dishwasher only for its intended function.
• During installation, the power supply must not be excessively or dangerously bent or flattened.
• Do not tamper with controls.
• The appliance is to be connected to the water mains using new hose sets and the old hose-sets should
not be reused.
READ AND FOLLOW THIS SAFETY INFORMATION
CAREFULLY SAVE THESE INSTRUCTIONS
2_ Safety information
DD81-01651H_EN_150130.indd 2DD81-01651H_EN_150130.indd 2 2015-01-30 3:11:502015-01-30 3:11:50

DISPOSAL
Dispose of the dishwasher packaging material correctly.
All packaging materials can be recycled.
Plastic parts are marked with the standard international abbreviations:
PE for polyethylene, e.g. sheet wrapping material
PS for polystyrene, e.g. padding material
POM polyoxymethylene, e.g. plastic clips
ABS Acrylonitrile Butadiene Styrene, e.g. Control Panel.
WARNING: Packaging material could be dangerous for children!
For disposing of package and the appliance please go to a recycling centre. Therefore cut o the
power supply cable and make the door closing device unusable.
Cardboard packaging is manufactured from recycled paper and should be disposed in the waste
paper collection for recycling.
By ensuring this product is disposed of correctly, you will help prevent potential negative
consequences for the environment and human health, which could otherwise be caused by
inappropriate waste handling of this product.
For more detailed information about recycling of this product, please contact your local city oce and
your household waste disposal service.
READ AND FOLLOW THIS SAFETY INFORMATION
CAREFULLY SAVE THESE INSTRUCTIONS
Safety information _3
DD81-01651H_EN_150130.indd 3DD81-01651H_EN_150130.indd 3 2015-01-30 3:11:502015-01-30 3:11:50

Contents
PART AND FEATURES
5
INSTALLING YOUR DISHWASHER
8
USING THE DETERGENT
11
LOADING THE DISHWASHER RACKS
16
WASHING PROGRAMMES
21
5 Dishwasher features
6 Control panel
7 Displays
8 Water supply and drain
10 Connection of drain hoses
10 Position the appliance
10 Start of dishwasher
11 Fill the rinse aid dispenser
13 Function of detergent
15 How to use the Multi in 1 option
16 Loading the upper basket
17 Loading the lower basket
18 Folding back the cup shelves
18 Folding spikes of lower basket
19 Cutlery(silverware) basket
20 For washing in the dishwasher the following
cutlery/dishes
21 Turning on the appliance
21 Change the program...
22 At the end of the wash cycle
22 Wash cycle table
CLEANING AND CARE
24
TROUBLESHOOTING
24 Cleaning the filters
25 Cleaning the spray arms
25 Cleaning the door
25 Caring for the dishwasher
25 Protect against freezing
26 How to keep your dishwasher in shape
27 Before calling for service
30 Error codes
27
APPENDIX
31 Specifications
31 Product dimension
31
4_ Contents
DD81-01651H_EN_150130.indd 4DD81-01651H_EN_150130.indd 4 2015-01-30 3:11:502015-01-30 3:11:50
Part and features
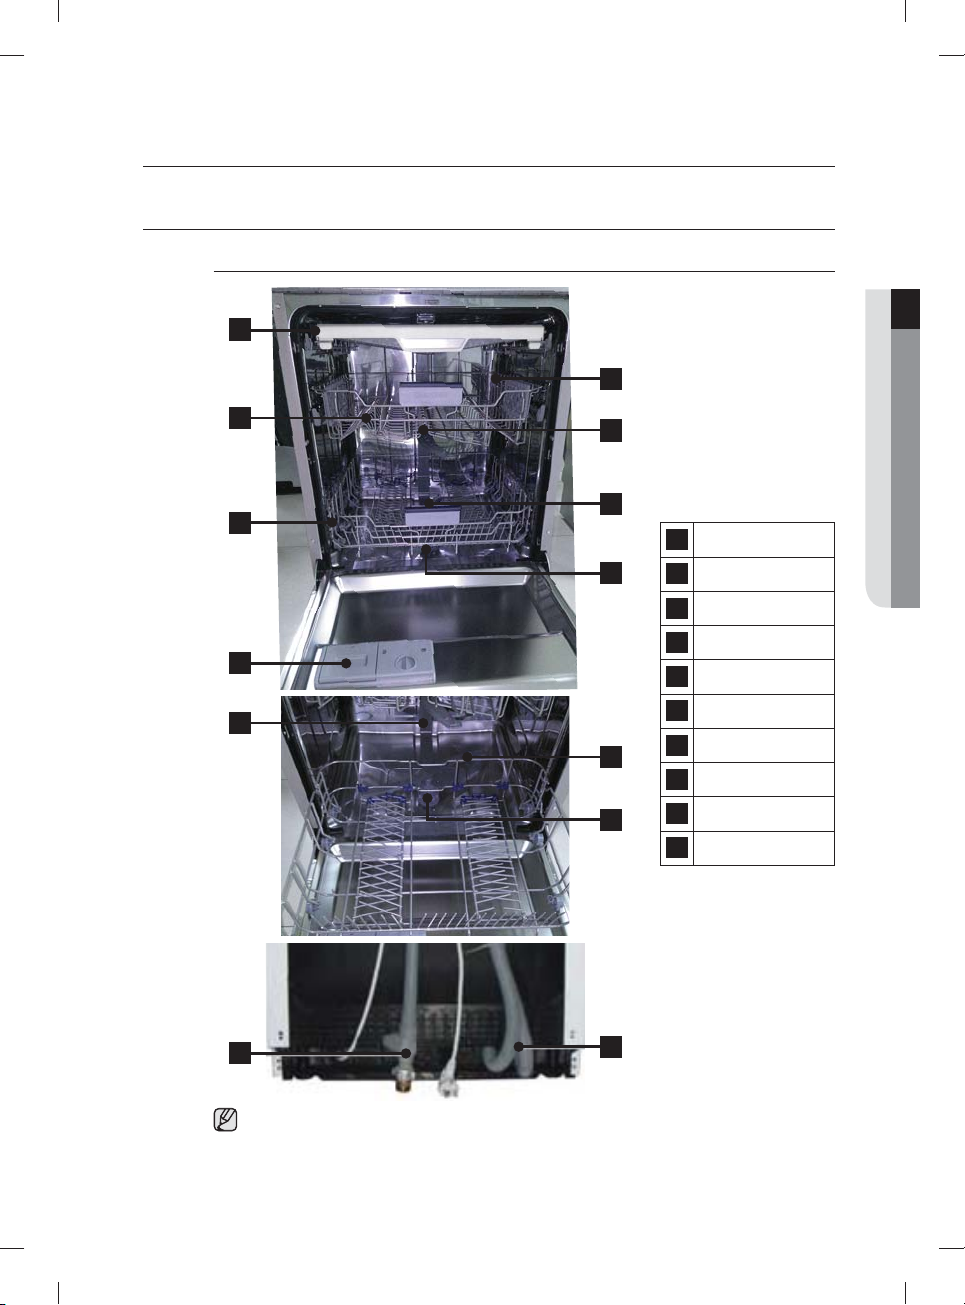
DISHWASHER FEATURES
Front & Rear view
1
01 PART AND FEATURES
6
2
3
5
4
4
7
1 3rd Rack
8
7
8
2 Upper Basket
3 Lower Basket
4 Duct Nozzle
5 Dispenser
6 Cup Shelf
7 Spray arms
8 Filter assembly
9 Inlet hose
10 Drain hose
9
Accessory parts - User manual, cutlery basket.
DD81-01651H_EN_150130.indd 5DD81-01651H_EN_150130.indd 5 2015-01-30 3:11:502015-01-30 3:11:50
10
Part and features _5
Part and features
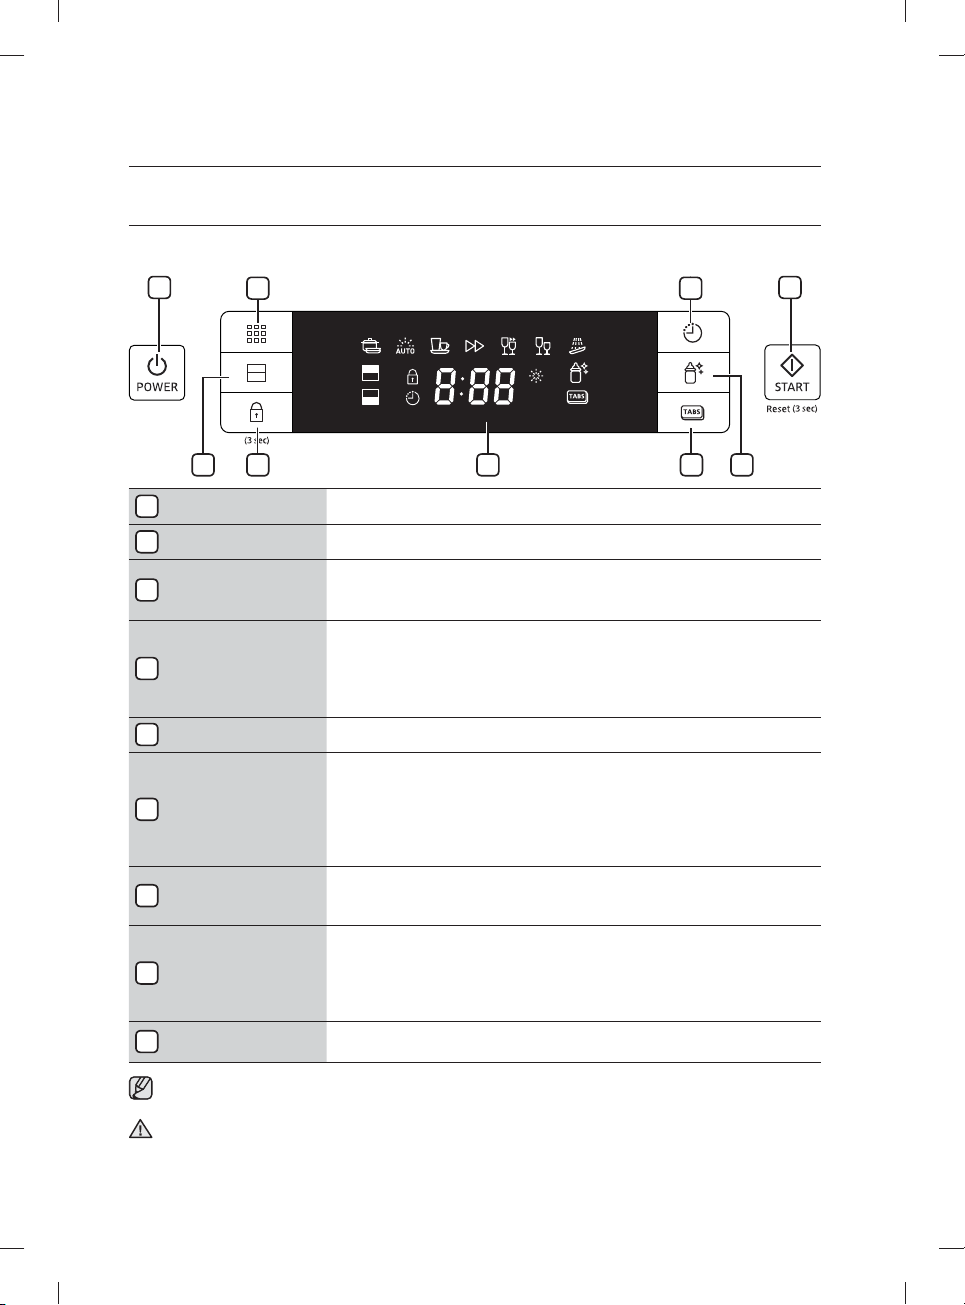
CONTROL PANEL
1 6
1 POWER BUTTON Press this button to turn on your dishwasher: the screen lights up.
2 PROGRAM BUTTON To select washing program press this button.
HALF LOAD
3
BUTTON
CHILD LOCK
4
BUTTON
5 DISPLAY WINDOW Running indicator, delay time, error codes and etc.
6 START BUTTON
DELAY START
7
BUTTON
8 HYGIENE BUTTON
9 MULTI IN 1 BUTTON
• When the door is open only the POWER button will operate.
• You can select options (Multi in 1, Delay start and/or Half load) before starting a cycle.
IMPORTANT: To get the best performance from your dishwasher, read all the operating instructions
before using it for the first time.
2 7
3 4
For small amount of loading items, use either the upper or lower basket
only to save energy.
Press the Half load button to select the upper or lower basket.
This option allows you to lock the buttons on the control panel so children
cannot accidentally start the dishwasher by pressing the buttons on the
panel.
To lock and unlock the buttons on the control panel, hold down both the
Child lock buttons for three (3) seconds.
In Power on condition, close the dishwasher door and select the cycle and
desired options. Press the START button to begin the cycle. When you
want to pause the dishwasher while running, press the START button and
make sure to open the door slowly and carefully.
You can reset the machine by pressing the START button for 3 seconds
during washing. After reset, the dishwasher goes to the initial state.
Press this button to set the delayed hours for washing. You can delay the
start of washing up to 24 hours. One press on this button delays the start
of washing by one hour.
Push the Hygiene button for the best possible hygiene in your dishwasher.
At the final rinse it heat up to 67 °C and hold this temperature for a several
minutes.
This function is available with all program except Pre Wash, Delicate and
Quick Wash.
To select Multi in 1 option which needs rinse aid but a Multi in 1 tablet. This
option can be selected on Intensive, Auto or Normal program only.
5
9
8
6_ Part and features
DD81-01651H_EN_150130.indd 6DD81-01651H_EN_150130.indd 6 2015-01-30 3:11:522015-01-30 3:11:52
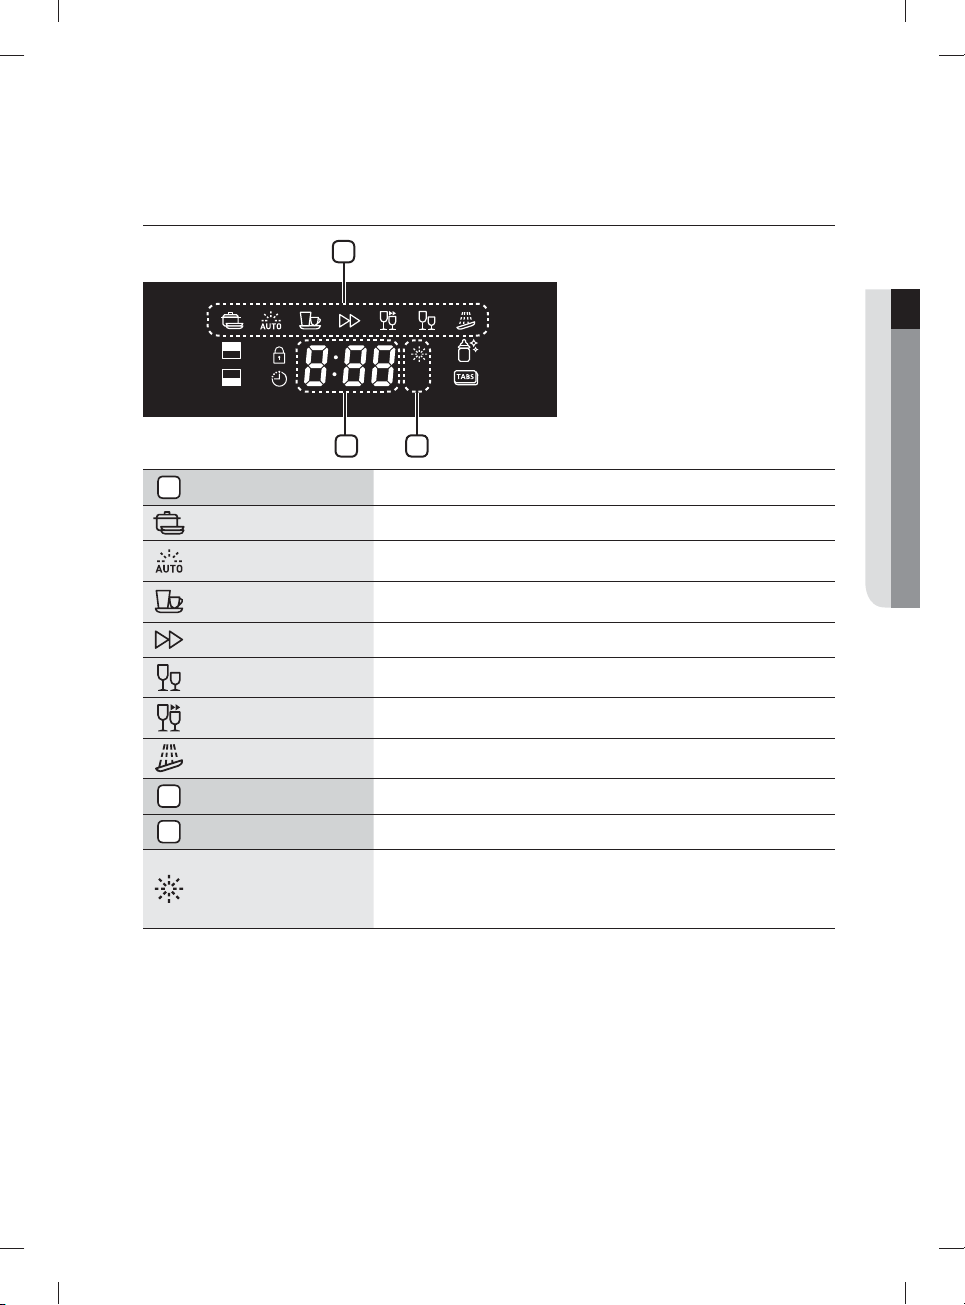
DISPLAYS
1
2 3
1 PROGRAM ICONS When press the Program button, each program is selected.
INTENSIVE Heavily soiled items include pots and pans
AUTO WASH
NORMAL
EXPRESS Common soiled daily using items, with short cycle time.
DELICATE Lightly soiled delicate items.
QUICK WASH Lightly soiled with very short cycle time.
PRE WASH
2 3*8 SEGMENT Display the remaining time, error code, or delay time.
Lightly to heavily soiled daily using items, automatic detection of the
amount of soils.
Normally soiled daily using items, with reduced energy and water
consumptions.
Cold rinse for remove only dirt on dishes stored for a long time or
soaking dishes which are dried up before other programme running.
01 PART AND FEATURES
3 REFILL INDICATORS If Rinse indicator is lit, it means rinse is needed to refill.
If the “Rinse Refill” indicator is lit, it means the dishwasher is low on
RINSE REFILL
INDICATOR
dishwasher rinse aid and requires a refill.
To refill the rinse reservior, refer to the “When to refill the rinse aid
dispenser” section on page 11.
Part and features _7
DD81-01651H_EN_150130.indd 7DD81-01651H_EN_150130.indd 7 2015-01-30 3:11:522015-01-30 3:11:52
Installing your dishwasher
WARNING : Electrical shock hazard
Disconnect electrical power before installing dishwasher.
Failure to do so could result in death or electrical shock.
ATTENTION: The installation of the pipes and electrical equipments should be done by professionals.
About electricity connecting
CAUTION, for personal safety:
DO NOT USE AN EXTENSION CORD OR AN ADAPTER PLUG WITH THIS APPLIANCE.
DO NOT, UNDER ANY CIRCUMSTANCES, CUT OR REMOVE THE THIRD GROUNDING
PRONG FROM THE POWER CORD.
Electrical requirements
• An AC 220-240 V / 50 Hz fuse or a circuit breaker.
• An individual branch circuit serving your dishwasher.
Grounding instructions
Insure proper ground exists before use
This appliance must be grounded. In the event of a malfunction or breakdown, grounding
will reduce the risk of electric shock by providing a path of least resistance of electric
current. This appliance is equipped with a cord having an equipment-grounding conductor
and a grounding plug. The plug must be plugged into an appropriate outlet that is installed
and grounded in accordance with all local codes and ordinances.
WARNING: Improper connection of the equipment grounding conductor can result in the
risk of an electric shock. Check with a qualified electrician or service representative if you
are in doubt whether the appliance is properly grounded. Do not modify the plug provided
with the appliance.
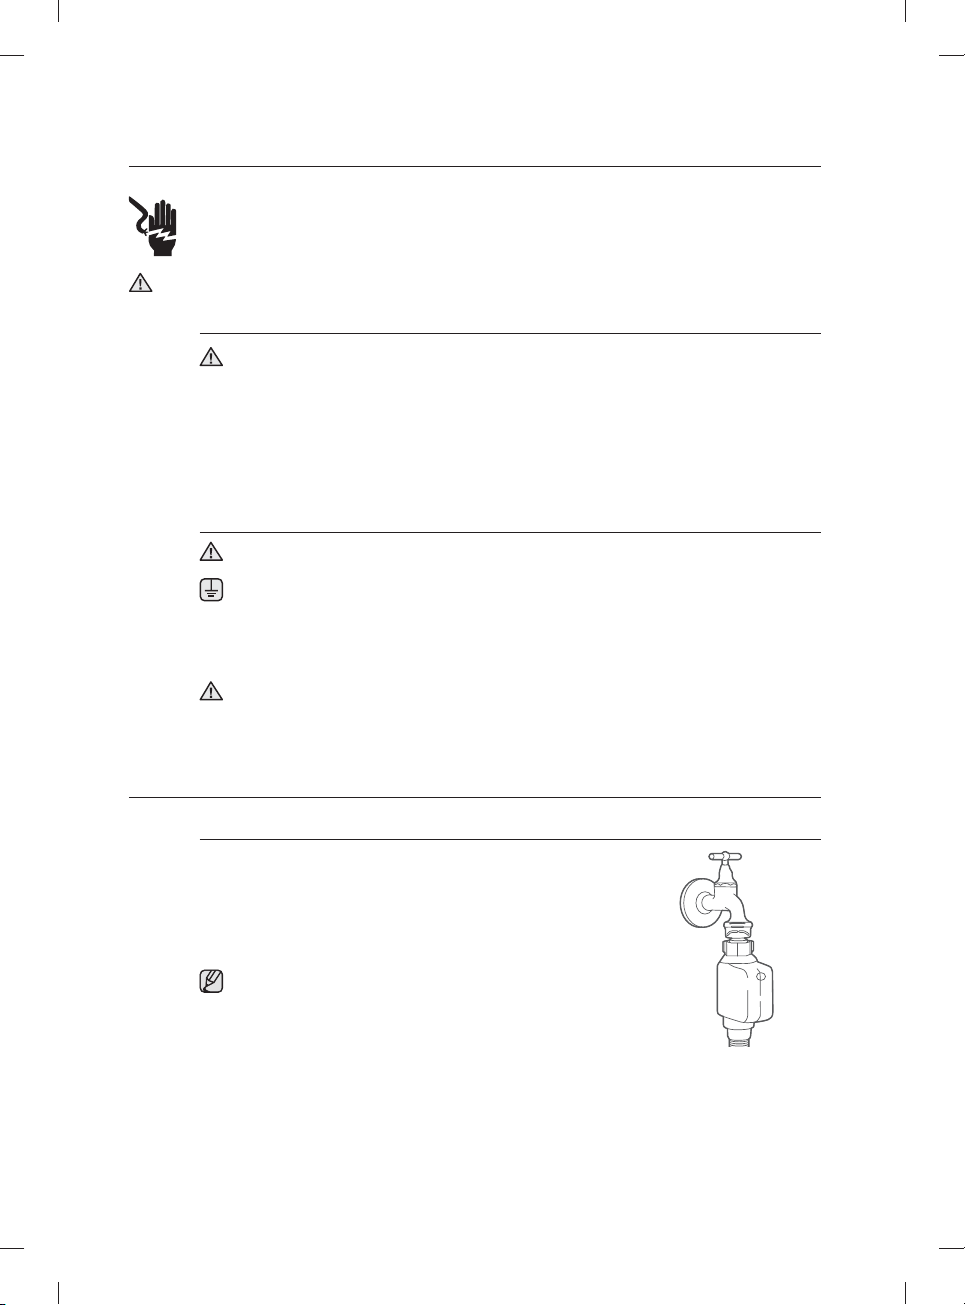
WATER SUPPLY AND DRAIN
Cold water connection
Connect the cold water supply hose to a threaded 3/4 (inch)
connector and make sure that it is fastened tightly in place.
If the water pipes are new or have not been used for an extended
period of time, let the water run to make sure that the water is
clear. This precaution is needed to avoid the risk of the water inlet
to be blocked and damage the appliance.
Provided water supply hose has the aqua-safe system. Ensure
that water supply hose’s aqua-safe pipe is connected to the
faucet.
8_ Installing your dishwasher
DD81-01651H_EN_150130.indd 8DD81-01651H_EN_150130.indd 8 2015-01-30 3:11:532015-01-30 3:11:53
Hot water connection
The water supply to the appliance can also be connected to the house hot water line (centralized
system, heating system), as long as it does not exceed a temperature of 60 °C. In this case, the
wash cycle time will be shortened by about 15 minutes and the wash eciency slightly reduced.
The connection must be made to the hot water line following the same procedures as those for
the connection to the cold water line.
Positioning the appliance
Position the appliance in the desired location. The back should rest against the wall behind
it, and the sides, along the adjacent cabinets or wall. The dishwasher is equipped with
water supply and drain hoses that can be positioned to the right or the left to facilitate
proper installation.
How to drain excess water from hoses
If the sink is 1000 mm higher from the floor, the excess water in hoses cannot be drained
directly into the sink. It will be necessary to drain excess water from hoses into a bowl or suitable
container that is held outside and lower than the sink.
Water outlet
Connect the water drain hose. The drain hose must be correctly fitted to avoid water leaks.
Ensure that the water inlet hose is not kinked or squashed.
Extension hose
If you need a drain hose extension, Use a similar size and quality drain hose.
It must be no longer than 4 metres; otherwise the cleaning eect of the dishwasher could be
reduced.
Syphon connection
The waste connection must be at a height of between 40 cm (minimum) and 100 cm (maximum)
from the bottom of the dishwasher. The water drain hose should be fixed by a hose clip.
Aqua-safe
The Aqua-safe System is a safety valve system, preventing water leaks. If the water inlet hose
starts to leak anytime, the safety valve cuts o the running water. If the water inlet hose or the
safety valve is damaged, remove and replace it.
Do not enlarge or shorten the inlet hose.
02 INSTALLING
Installing your dishwasher _9
DD81-01651H_EN_150130.indd 9DD81-01651H_EN_150130.indd 9 2015-01-30 3:11:532015-01-30 3:11:53
Installing your dishwasher
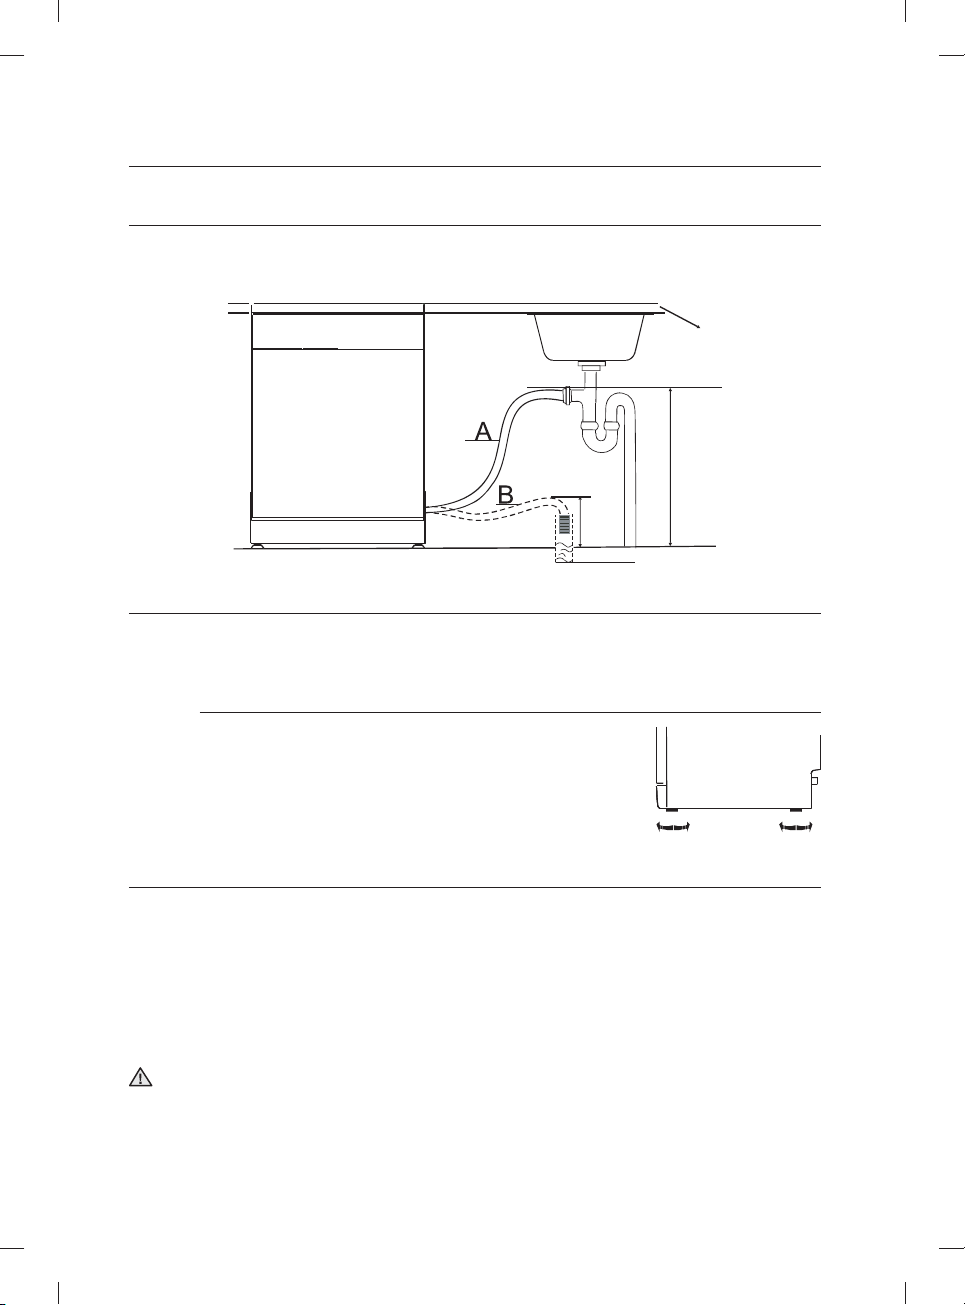
CONNECTION OF DRAIN HOSES
Insert the drain hose into a drain pipe with a minimum diameter of 4 cm, or let it run into the sink, making
sure to avoid bending or crimping it. The top of the hose must be at a height between 40 and 100 cm. The
free end of the hose must not be immersed in water to avoid the back flow of it.
Counter
NOTE
The top of the hose must
be at a height between 40
and 100cm.
The free end of the hose
must not be immersed in
water.
Drain pipe
Min. 400 mm
40 mm
Max 1000 mm
POSITION THE APPLIANCE
Position the appliance in the desired location. The back should rest against the wall behind it, and the sides,
along the adjacent cabinets or walls. The dishwasher is equipped with water supply and drain hoses that
can be positioned either to the right or the left sides to facilitate proper installation.
Levelling the Appliance
Once the appliance is positioned for levelling, the height of the
dishwasher may be altered via adjustment of the screwing level of the
feet. In any case, the appliance should not be inclined more than 2°.
START OF DISHWASHER
The followings should be checked before starting the dishwasher.
1. the dishwasher is level and fi xed.
2. the inlet valve is opened.
3. there leakage at the connections of the conducts.
4. the wires are tightly connected.
5. the power is switched on.
6. the inlet and drain hoses are not knotted.
7. All packing materials and printings should be taken out from the dishwasher.
ATTENTION: After installation please put this manual in a safe place. The contents of this manual can
be useful to users.
10_ Installing your dishwasher
DD81-01651H_EN_150130.indd 10DD81-01651H_EN_150130.indd 10 2015-01-30 3:11:532015-01-30 3:11:53
Using the detergent
FILL THE RINSE AID DISPENSER
Function of rinse aid
Rinse aid is automatically added during the last rinse, ensuring thorough rinsing, and spot and
streak free drying.
ATTENTION: Only use branded rinse aid for dishwasher. Never fill the rinse aid dispenser
with any other substances (e.g. dishwasher cleaning agent, liquid detergent). This would
damage the appliance.
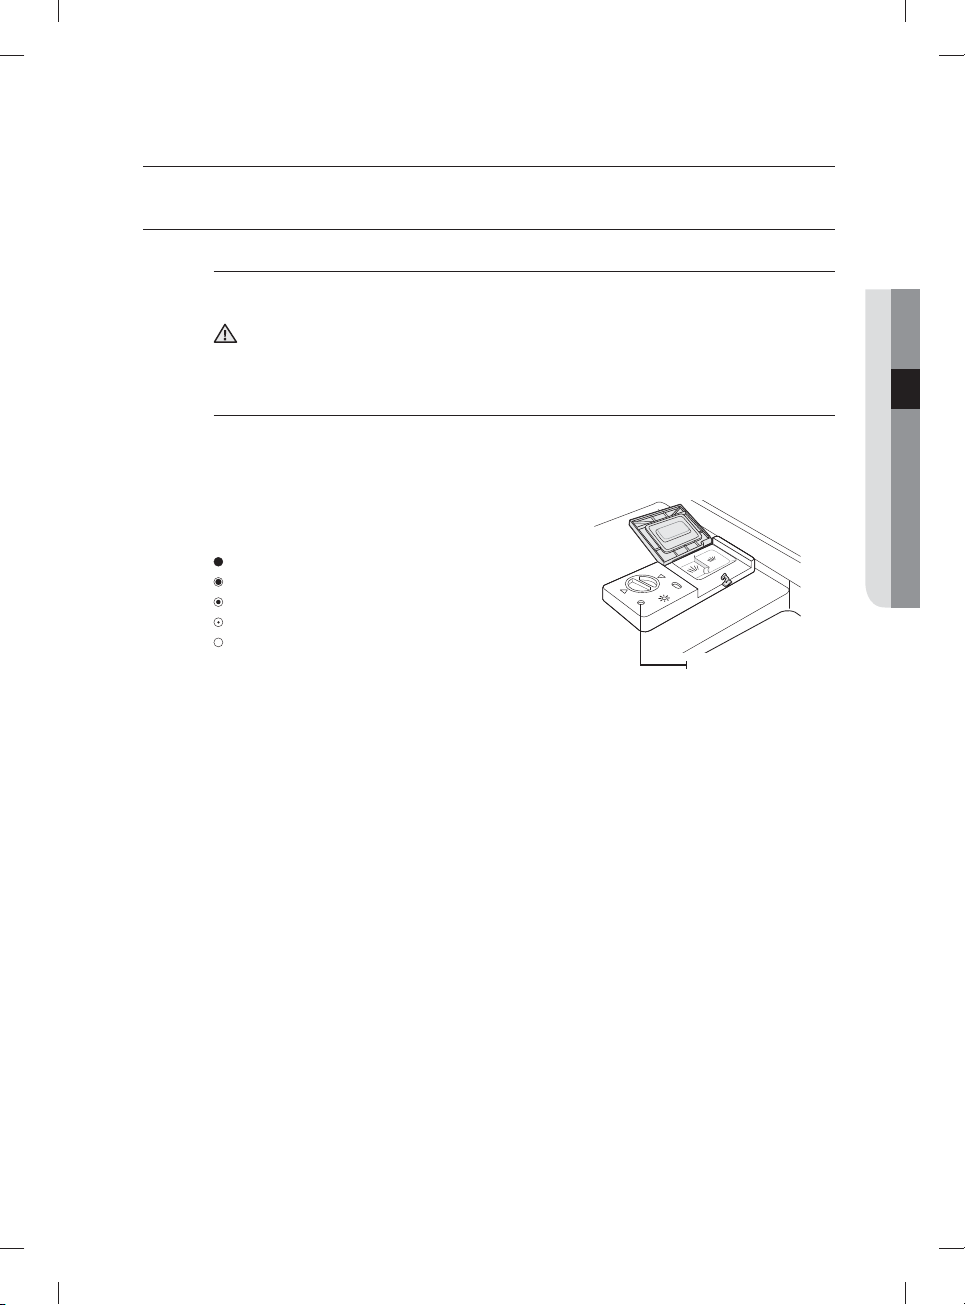
When to refill the rinse aid dispenser
If there is no rinse-aid warning light in the control panel, you can judge the amount of rinse-aid by
the Colour of the optical level indicator “D” located next to the cap. When the rinse-aid container
is full, the whole indicator will be dark. As the rinse-aid diminishes, the size of the dark dot
decreases. You should never let the rinse aid get below 1/4 full.
As the rinse aid diminishes, the size of the black dot
on the rinse aid level indicator changes, as illustrated
below.
Full
3/4 full
1/2 full
1/4 full : Should refill to eliminate spotting
Empty
03 DETERGENT
D (Rinse-Aid indicator)
Using the detergent _11
DD81-01651H_EN_150130.indd 11DD81-01651H_EN_150130.indd 11 2015-01-30 3:11:532015-01-30 3:11:53
 Loading...