

Samsung DV409SEL, DV409SEL/XAC, DV419AEW/XAA Service Manual
CLOTHES DRYER
Basic Model : DV419AEW/XAA
(ACE-PROJECT)
Model Name : DV409SEL
Model Code : DV409SEL/XAC
SERVICE
CLOTHES DRYER CONTENTS
(ACE-PROJECT)
Manual
DV409A*
1. Safety Instructions
2. Features and Specification
3. Disassembly and Reassembl
4. Troubleshootin
5. Exploded views and Parts list
6. PCB diagra
7. Wiring diagra
8. Schematic diagr
g
m
m
am
s
y
Refer to the service manual in the GSPN (see the rear cover) for the more information.

CONTENTS
1. Safety Instructions . . . . . . . . . . . . . . . . . . . . . . . . . . . . . . . . . . . . . . . . . . . . . . . . . . . . . . . . . . . . . . . . . . .1
1-1. Caution for safety during servicing . . . . . . . . . . . . . . . . . . . . . . . . . . . . . . . . . . . . . . . . . . . . . . . . . . . .
1-2. Important safety information . . . . . . . . . . . . . . . . . . . . . . . . . . . . . . . . . . . . . . . . . . . . . . . . . . . . . . . . .
1
2
2. Features and Specifications
2-1. Features . . . . . . . . . . . . . . . . . . . . . . . . . . . . . . . . . . . . . . . . . . . . . . . . . . . . . . . . . . . . . . . . . . . . . . . .
2-2. Specifications . . . . . . . . . . . . . . . . . . . . . . . . . . . . . . . . . . . . . . . . . . . . . . . . . . . . . . . . . . . . . . . . . . . .
2-3. Comparing specifications with existing models
2-4. Options specifications
3. Disassembly and Reassembly
3-1. Tools for disassembly and reassembly . . . . . . . . . . . . . . . . . . . . . . . . . . . . . . . . . . . . . . . . . . . . . . . .
3-2. Standard disassembly drawings
4. Troubleshooting . . . . . . . . . . . . . . . . . . . . . . . . . . . . . . . . . . . . . . . . . . . . . . . . . . . . . . . . . . . . . . . . . . . .
4-1. Error items and diagnostic codes . . . . . . . . . . . . . . . . . . . . . . . . . . . . . . . . . . . . . . . . . . . . . . . . . . . .
4-2. Test mode . . . . . . . . . . . . . . . . . . . . . . . . . . . . . . . . . . . . . . . . . . . . . . . . . . . . . . . . . . . . . . . . . . . . . .
4-3. Trouble diagnosis . . . . . . . . . . . . . . . . . . . . . . . . . . . . . . . . . . . . . . . . . . . . . . . . . . . . . . . . . . . . . . . .
4-4. Symptoms, diagnoses and actions
4-5. Component testing procedures
5. Exploded views and Parts list . . . . . . . . . . . . . . . . . . . . . . . . . . . . . . . . . . . . . . . . . . . . . . . . . . . . . . . . .
5-1. MAIN
5-2. FRAME FRONT & DOOR
5-3. ASS’Y PANEL CONTROL
5-4. ASS’Y DRUM . . . . . . . . . . . . . . . . . . . . . . . . . . . . . . . . . . . . . . . . . . . . . . . . . . . . . . . . . . . . . . . . . . .
5-5. ASS’Y MOTOR . . . . . . . . . . . . . . . . . . . . . . . . . . . . . . . . . . . . . . . . . . . . . . . . . . . . . . . . . . . . . . . . . .
5-6. ASS’Y DUCT HEATER . . . . . . . . . . . . . . . . . . . . . . . . . . . . . . . . . . . . . . . . . . . . . . . . . . . . . . . . . . . .
5-7. SMALL PARTS . . . . . . . . . . . . . . . . . . . . . . . . . . . . . . . . . . . . . . . . . . . . . . . . . . . . . . . . . . . . . . . . . . 52
5-8. PARTS LIST (SA/SC OTHERS) . . . . . . . . . . . . . . . . . . . . . . . . . . . . . . . . . . . . . . . . . . . . . . . . . . . . .
5-9. PARTS LIST (SCREW TYPE)
. . . . . . . . . . . . . . . . . . . . . . . . . . . . . . . . . . . . . . . . . . . . . . . . . . . . . . . . . . . . . . . . . . . . . . . . .38
. . . . . . . . . . . . . . . . . . . . . . . . . . . . . . . . . . . . . . . . . . . . . . . . . . . . . . . . . . .5
. . . . . . . . . . . . . . . . . . . . . . . . . . . . . . . . . . . . . . . . . .7
. . . . . . . . . . . . . . . . . . . . . . . . . . . . . . . . . . . . . . . . . . . . . . . . . . . . . . . . . . . . .8
. . . . . . . . . . . . . . . . . . . . . . . . . . . . . . . . . . . . . . . . . . . . . . . . . . . . . . . . .9
. . . . . . . . . . . . . . . . . . . . . . . . . . . . . . . . . . . . . . . . . . . . . . . . . . . .10
. . . . . . . . . . . . . . . . . . . . . . . . . . . . . . . . . . . . . . . . . . . . . . . . . .28
. . . . . . . . . . . . . . . . . . . . . . . . . . . . . . . . . . . . . . . . . . . . . . . . . . . . .33
. . . . . . . . . . . . . . . . . . . . . . . . . . . . . . . . . . . . . . . . . . . . . . . . . . . . . . . . .40
. . . . . . . . . . . . . . . . . . . . . . . . . . . . . . . . . . . . . . . . . . . . . . . . . . . . . . . . .42
. . . . . . . . . . . . . . . . . . . . . . . . . . . . . . . . . . . . . . . . . . . . . . . . . . . . . .54
5
6
9
24
24
25
26
37
44
48
50
53
6. Pcb Diagram . . . . . . . . . . . . . . . . . . . . . . . . . . . . . . . . . . . . . . . . . . . . . . . . . . . . . . . . . . . . . . . . . . . . . . .
6-1. Main PCB . . . . . . . . . . . . . . . . . . . . . . . . . . . . . . . . . . . . . . . . . . . . . . . . . . . . . . . . . . . . . . . . . . . . . .
6-2. Detailed descriptions of contact terminals (main pcb)
6-3. Sub PCB
6-4. Detailed descriptions of contact terminals (sub pcb)
7. Wiring Diagram . . . . . . . . . . . . . . . . . . . . . . . . . . . . . . . . . . . . . . . . . . . . . . . . . . . . . . . . . . . . . . . . . . . . .
7-1. Wiring diagram . . . . . . . . . . . . . . . . . . . . . . . . . . . . . . . . . . . . . . . . . . . . . . . . . . . . . . . . . . . . . . . . . .
8. Schematic Diagram
8-1. Main control
8-2. Sub control . . . . . . . . . . . . . . . . . . . . . . . . . . . . . . . . . . . . . . . . . . . . . . . . . . . . . . . . . . . . . . . . . . . . .
. . . . . . . . . . . . . . . . . . . . . . . . . . . . . . . . . . . . . . . . . . . . . . . . . . . . . . . . . . . . . . . . . . . . . .57
. . . . . . . . . . . . . . . . . . . . . . . . . . . . . . . . . . . . . . . . . . . . . . . . . . . . . . . . . . . . . . . . .60
. . . . . . . . . . . . . . . . . . . . . . . . . . . . . . . . . . . . . . . . . . . . . . . . . . . . . . . . . . . . . . . . . . . .60
. . . . . . . . . . . . . . . . . . . . . . . . . . . . . . . . . . . .56
. . . . . . . . . . . . . . . . . . . . . . . . . . . . . . . . . . . . .58
55
55
59
59
61

1. SAFETY INSTRUCTIONS
1-1. CAUTION FOR SAFETY DURING SERVICING
1. Do not allow the customer to repair the product.
✔ The person may be injured or the product life may be shortened.
2. Execute A/S after unplugging the power supply unit.
✔ Be careful of the electric shocks.
3. Do not plug several plugs in the same outlet.
✔ It may cause a fire due to overheat.
4. Check for damage, pinching or burning of the power plug the outlet.
✔ Replace it promptly if it has a problem.(It may cause the electric shocks or fire)
5. Do not clean the main body with water.
✔ It may cause electric shocks and fire and shorten the product life)
6. The wiring harness shall be free from moisture and tightened during serving.
✔ It shall not be deviated by certain impact.
7. Remove any dust or dirt on the housing section,wiring section,connection section during servicing.
✔ Protect from possible cause of fire such as the tracking,shortage etc.
8. Check for any marks of moisture on the electrical parts, harness section etc.
✔ Replace the parts or remove the moisture.
9. Check the assembly status of the parts after servicing.
✔ Maintain the status before servicing.
10. Pull out the power cord by holding the plug.
✔ Be careful of electric shocks and when the cord is damaged.
11. Unplug the power plug from the outlet when the dryer is not used.
✔ Be careful of electric shocks and fire due to the strike of lightning.
12. Do not use or store sprays or flammable materials(including gasoline,alcohol etc.) around the dryer.
✔ Be careful of explosions or fire due to electric sparks.
13. Do not put bowls of water or wet laundry on the dryer.
✔ If water has penetrated into the dryer, this may cause electric shocks or fire.
14. Do not install the dryer outside exposed to moisture.
✔ It may cause electric shocks and fire and shorten the product life.
15. Do not push the control buttons with an awl,pin, or sharp materials.
✔ It may cause electric shocks and damage.
16. Check the dryer is leveled horizontally and installed properly on the floor.
✔ The vibration may shorten the product life.
Safety Instructions _ 1

1-2. IMPORTANT SAFETY INFORMATION
To avoid risk of fire, electric shock, serious injury, or death when using your dryer, follow these basic precautions:
1. Read all instructions before using the dryer.
2. Install dryer according to Installation Instructions. Refer to the Grounding Instructions in the Installation Instructions
for proper grounding of the dryer.
3. Do not dry articles that have been cleaned in, washed in, soaked in, or spotted with gasoline, drycleaning solvents, or
other flammable or explosive substances. Vapors could ignite or explode.
4. Do not use the dryer to dry clothes which have traces of any flammable substance, such as vegetable oil, cooking oil,
machine oil, flammable chemicals, thinner, etc., or anything containing wax or chemicals, such as mops and cleaning
cloths. Flammable substances may cause the fabric to catch fire by itself.
5. Do not store or use gasoline or other flammable vapors and liquids near this or any other appliance.
6. Do not allow children to play on or in dryer. Close supervision of children is necessary when the dryer is used near
children, a safety rule for all appliances.
7. Before the dryer is removed for service or is discarded, remove doors to drying compartment.
8. Do not reach into the dryer if cylinder is rotating.
9. Do not install or store the dryer where it will be exposed to water and/or weather.
10. Do not tamper with dryer controls.
11. Do not repair or replace any part of the dryer or attempt any service, unless specifically recommended in usermaintenance instructions or in published user-repair instructions that you understand and have skills to carry out, if
you are a consumer.
12. To reduce risk of electric shock or fire, do not use extension cords or adapters to connect the dryer to electrical power
source.
13. Use the dryer only for its intended purpose, drying clothes.
14. Always disconnect the dryer from electrical supply before attempting any service. Disconnect the power cord by
holding the plug, not the cord.
15. Do not use heat to dry articles containing foam rubber or similarly textured rubberlike materials.
16. Always clean the lint filter after every load. A layer of lint in the filter reduces drying efficiency and pro longs drying
time.
17. Use only fabric softeners or products to eliminate static that are appropriate for automatic dryers.
18. Keep your dryer in good condition. Bumping or dropping the dryer can damage safety features. If damage occurs,
have the dryer checked by a qualified service technician.
19. Replace worn power cords and/or loose plugs.
20. Do not tumble fiberglass curtains and draperies unless the label says it can be done. If they are dried, wipe out the
cylinder with a damp cloth to remove particles of fiberglass.
21. Always read and follow manufacturers instructions on packages for laundry aids. Heed all warnings or precautions.
To reduce risk of poisoning or chemical burns, keep products away from children at all times, preferably, in a locked
cabinet.
2 _ Safety Instructions
22. Never operate the dryer with the guards and/or the panels removed.
23. Do not operate the dryer with missing or broken parts.
24. Do not bypass safety devices.
25. Keep area around the exhaust opening and adjacent surrounding areas free from accumulation of lint, dust, and dirt.
26. Interior of dryer and exhaust duct should be cleaned periodically by qualified service personnel.
27. The dryer will not operate with loading door open. DO NOT bypass the door safety switch by permitting the dryer to
operate with door open. The dryer will stop tumbling when the door is opened. Do not use the dryer if it does not stop
tumbling when door is opened or starts tumbling without pressing or turning the START mechanism. Stop using the
dryer and contact a qualified service technician.
28. Remove laundry immediately after the dryer stops.
29. ALWAYS follow the fabric care instructions supplied by the garment manufacturer.
■ Electrical service information
Electrical Dryers 240 VAC, 60 Hz, 30 Amps, 3-wire or 4-wire installations
Gas Dryers 120 VAC, 60 Hz, 15 Amps, 3-wire installations
WARNING
To reduce the risk of fire, electric shock, serious injury or death, all wiring and grounding must conform with the latest
edition of the National Electric Code, or the Canadian Electrical Code, and such local regulations as might apply. It is
the customers responsibility to have the wiring and fuses checked by a qualified electrician to make sure your home
has adequate electrical power to operate the dryer.
WARNING
To avoid risk of personal injury or death due to electrical shock:
- Observe all local codes and ordinances.
- Disconnect the electrical power to the unit before servicing.
- Ground the appliance properly.
- Check with a qualified electrician if you are not sure this appliance is properly grounded.
- DO NOT ground to a gas line.
- DO NOT ground to a cold water pipe if pipe is interrupted by plastic, nonmetallic gaskets, or other insulating
(nonconducting) materials.
- DO NOT modify the plug on the power cord. If plug does not fit electrical outlet, have proper outlet installed by
qualified electrician.
- DO NOT have a fuse in the neutral or ground circuit. A fuse in the neutral or ground circuit could result in an
electrical shock.
- DO NOT use an extension cord with this appliance.
- DO NOT use an adapter plug with this appliance.
- DO NOT pinch the power cord.
WARNING
To reduce the risk of fire and exposure to combustion gases, the dryer MUST be exhausted to the outdoors.
DO NOT exhaust dryer air into a window well, gas vent, chimney or enclosed, unventilated area, such as an attic, wall,
ceiling, crawl space under a building or concealed space of a building.
Safety Instructions _ 3

■ Gas dryer power supply
This equipment MUST be grounded. In the event of an electrical short circuit, grounding reduces the risk of electric shock
by providing an escape wire for the electrical current. This unit is equipped with a cord having a grounding wire with a
grounding plug. The plug must be plugged into an outlet that is properly installed and grounded.
Consult a qualified electrician or servicer if grounding instructions are not completely understood, or if doubt exists as to
whether the equipment is properly grounded.
Do not use an extension cord. If the product power cord is too short, have a qualified electrician install a three slot
receptacle. This unit should be plugged into a separate 60 hertz circuit with the electrical rating as shown on the serial
plate.
■ Proper grounding and polarization for 120 volts wall outlets
For the safety of our customers and the service technician ALL gas
dryers have a three-prong power cord and MUST be connected to a
properly polarized and grounded wall outlet. This information was written
for those who do not understand grounding and polarization of a wall
outlet. A 120 VAC wall outlet must always be wired as shown right.
Polarization - This means that the larger slot must be neutral and the
small slot must be hot (live).
Mispolarized - The outlet is miswired so that the larger slot is hot (live)
and the smaller slot is neutral.
Grounded - This means the round hole connection is connected to
ground through a connection to the main power panel.
Ungrounded - The round hole connection is not connected to a ground
and/or the main power panel.
Neutral side
Round grounding
prong
115±15
V.A.C.
L1
Ground
115±12
V.A.C.
Neutral
0
V.A.C.
WARNING
To avoid death, personal injury or property damage, from fire or explosion, information in this manual must be followed
exactly.
Do not store or use gasoline or other flammable vapors and liquids in the vicinity of this or any other appliance.
WHAT TO DO IF YOU SMELL GAS
- Do not try to light any appliance.
- Do not touch any electrical switch; do not use any phone in your building.
- Immediately call your gas supplier from a neighbor’s phone. Follow the gas supplier’s instructions.
- If you cannot reach your gas supplier, call the fire department. Installation and service must be performed by a
qualified installer, service agency or the gas supplier.
WARNING
To reduce the risk of fire and exposure to combustion gases, the dryer MUST be exhausted to the outdoors.
DO NOT exhaust dryer air into a window well, gas vent, chimney or enclosed, unventilated area, such as an attic, wall,
ceiling, crawl space under a building or concealed space of a building.
4 _ Safety Instructions
2. FEATURES AND SPECIFICATIONS
2-1. FEATURES
Features Description
Extra Large Capacity Ultra drying capabilitlites are at your fingertips! Now you can dry extra-large loads.
Our ultralarge 7.4 cu.ft. capacity dryer circulates more air through your clothes getting
them dry faster, for a wrinkle-free result.
Various Drying Cycles &
Fuzzy Logic Algorithm
Freshen Up (Refresh) Want to freshen up a garment that doesn’t need washing, but could use a little help
Time Saving Our cycles are designed with you in mind. All our dryers are designed to dry your
Energy Saving Samsung dryers are super energy efficient, that you can dry up to 3.01 pounds of
Easy Reversible Door Our dryers will fit just about anywhere and without a door conflict. The direction of our
Pedestal with Storage
Drawers
Simply turn the Jog Dial to select one of the 11 automatic drying cycles, including
normal, heavy duty and towels, or let the Fuzzy Logic Control measure the degree
of dampness and automatically set the drying time. Precision drying has never been
easier than with Samsung.
after last night’s party. Our Freshen Up Cycle removes odors, adding that extra
freshness to give more mileage to your clothes.
clothes in less time... just 44 minutes! Giving you time for more important things in life.
laundry with 1kWh. Also, both the large capacity and Fuzzy Logic Control save energy
by automatically drying your clothes the most efficient way.
easy reversible door can be changed with just four screws.
An optional 15” pedestal is available to raise the washer for easier loading and
unloading. It also offers a built-in storage drawer that can hold a 100 oz. bottle of
detergent
Stacking Samsung’s Washer and Dryer can be stacked to maximize usable space.
The Dryer legs need to be removed to stack the Washer and Dryer. An optional
stacking kit is available for purchase from your Samsung retailer.
Steam cycle This cycle sprays steam using little water, removes bad odors from clothing that ARE
difficult to remove when washing with water, and removes wrinkles from clothing such
as shirts that need to be ironed.
Sanitize course This course allows you to sanitize garments by permeating high temperature heat
deep into the fabric during the drying cycle. Use this course to keep your bedding and
curtains clean through sanitization.
4-way Vent
(electric model only)
You can install the exhaust vent in the following four (4) positions: back, either side,
bottom.
Features and Specifi cations _ 5
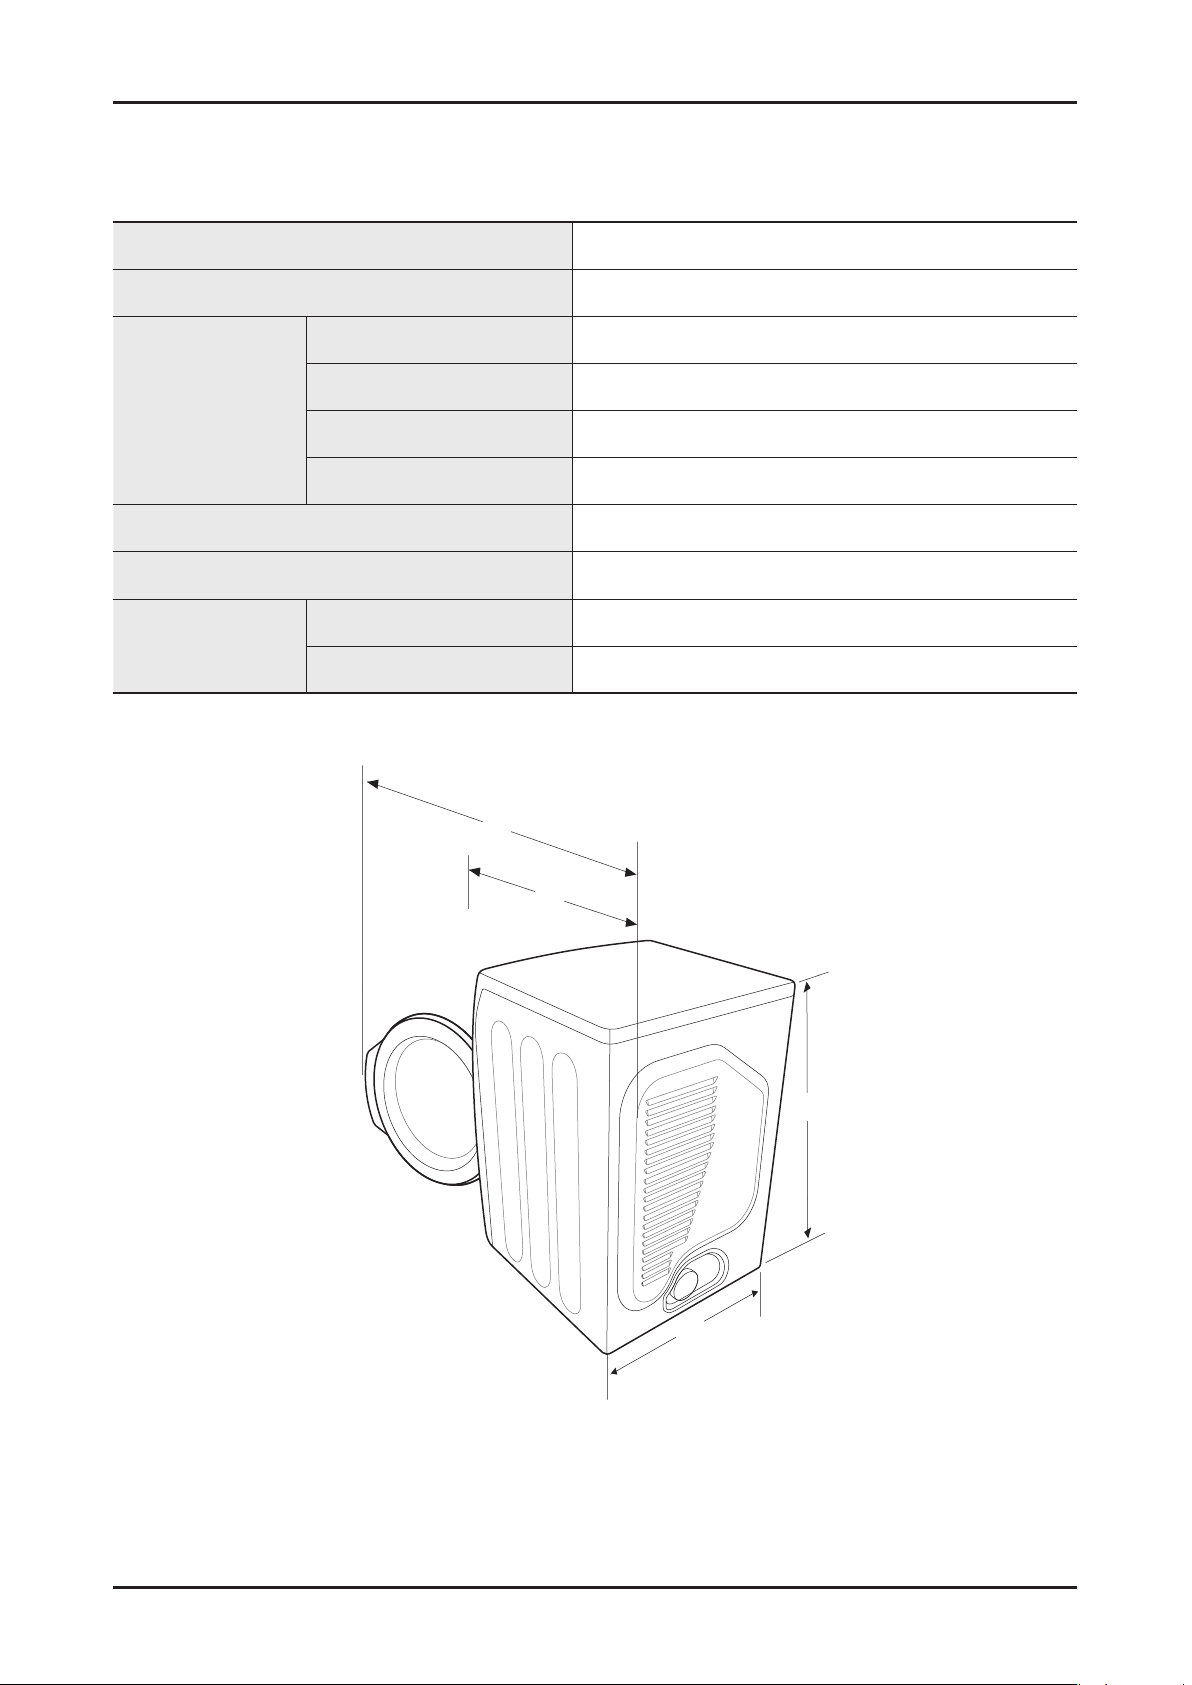
2-2. SPECIFICATIONS
Model name DV409
Type
A: High
B: Width
Dimension
C: Depth with door open 90°
D. Depth
Weight
Heater rating 5300 W
No heat 268 W
Power consumption
Heating 5445 W
Front loading dryer
39” (99.1 cm)
27” (68.6 cm)
50.9” (129.4cm)
31.2” (79.3cm)
55.16 kg
C
D
A
B
6 _ Features and Specifi cations
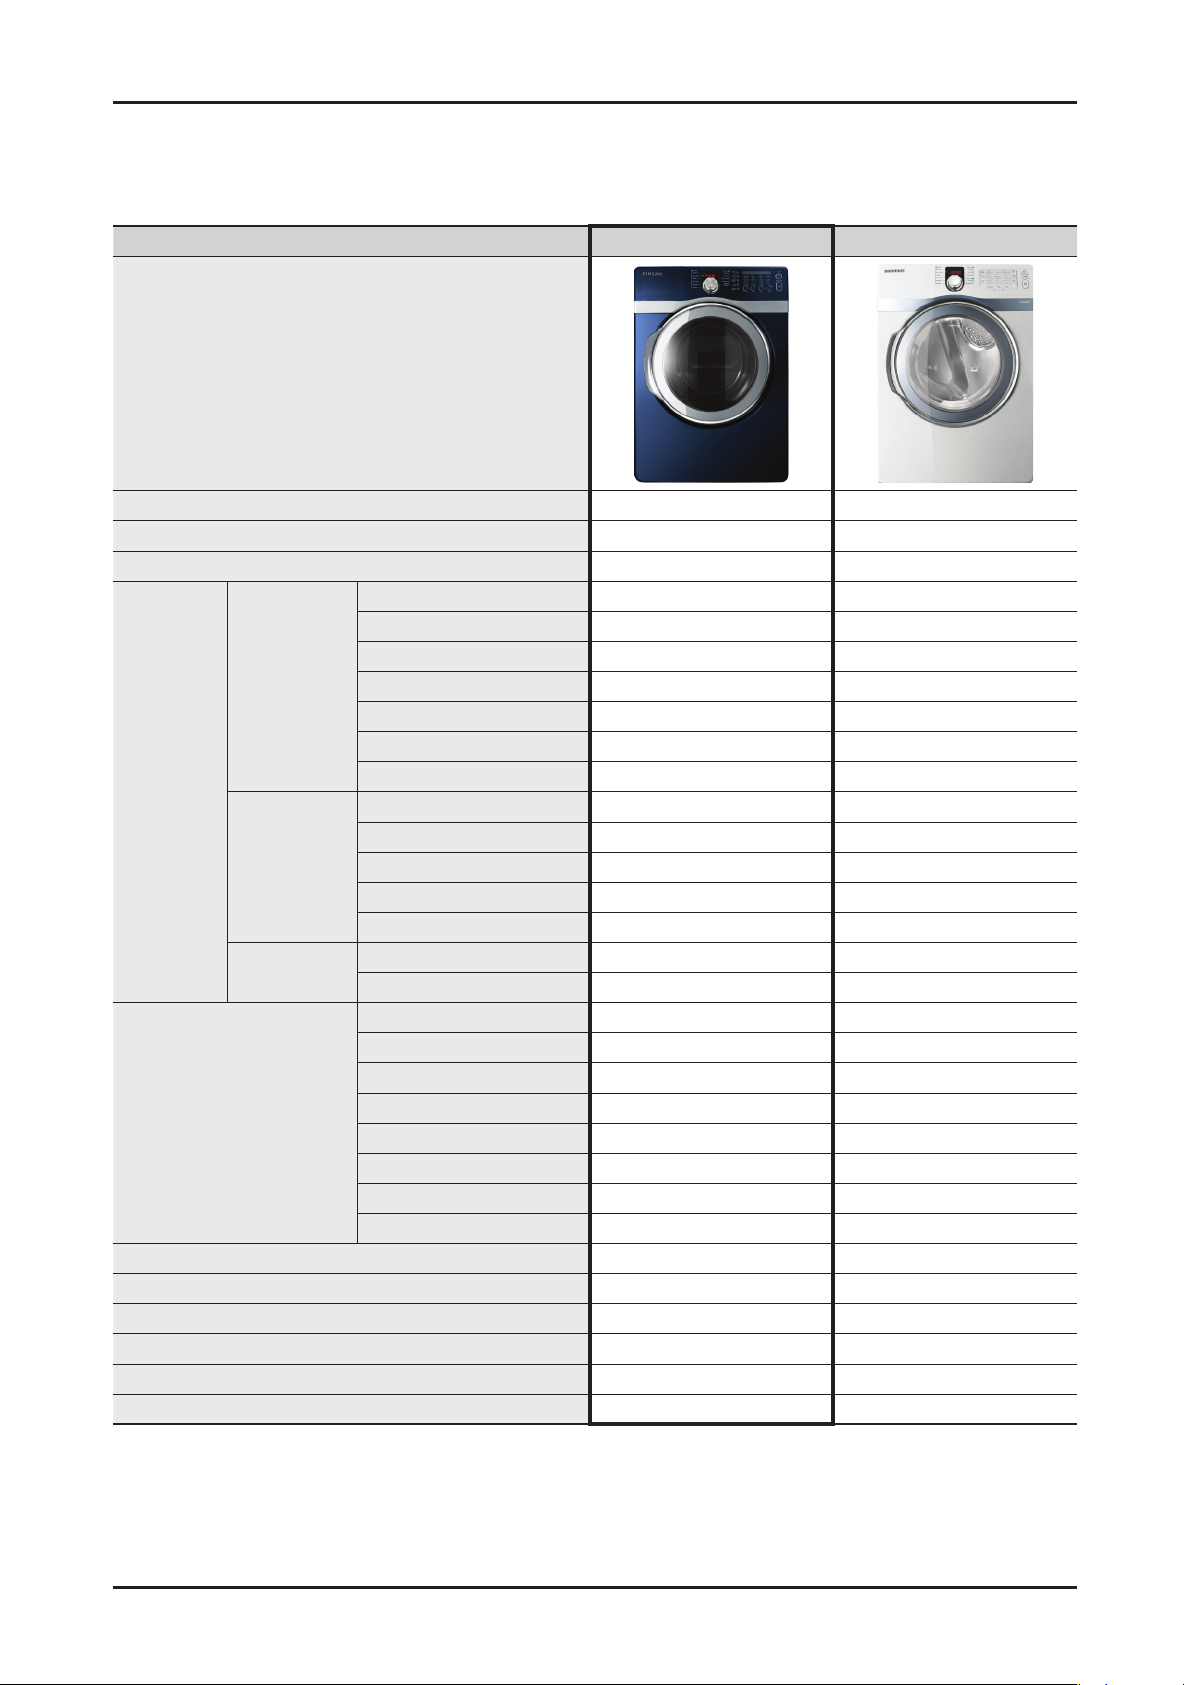
2-3. COMPARING SPECIFICATIONS WITH EXISTING MODELS
Model name DV409 DV419
Image
Capacity 7.4 cu.ft 7.4 cu.ft
Dryer Type
Matching Washer
Number of Drying Cycle 11 11
Normal Yes Yes
Heavy Duty Yes Yes
Sensor Dry
Cycle
Selection
Manual Dry
Steam Cycles
Option Selection
Control Type
Drum Material STS Steel STS Steel
Drum Light Yes Yes
Door Type Glass Transparent Glass Transparent
Reversible Door Yes Yes
Vent Exhaust
Towels Yes Yes
Perm Press Yes Yes
Delicates Yes Yes
Sanitize Yes Yes
Time Dry Yes Yes
Air Fluff Yes Yes
Quick Dry Yes Yes
Freshen Up No No
Wrinkle Release No No
Refresh Yes Yes
Wrinkel-Care Yes Yes
Number of Option 5 5
Adjust Time
My Cycle Yes Yes
Rack Dry Yes Yes
Wrinkle Prevent Yes Yes
# of Temp Level
# of Dryness Level 5 5
Sound Level 3 3
Electric/Gas Electric/Gas
WF409 WF419
Up/Down Up/Down
5 5
Electric/Dial Electric/Dial
4-way(Elec) 4-way(Elec)
Features and Specifi cations _ 7
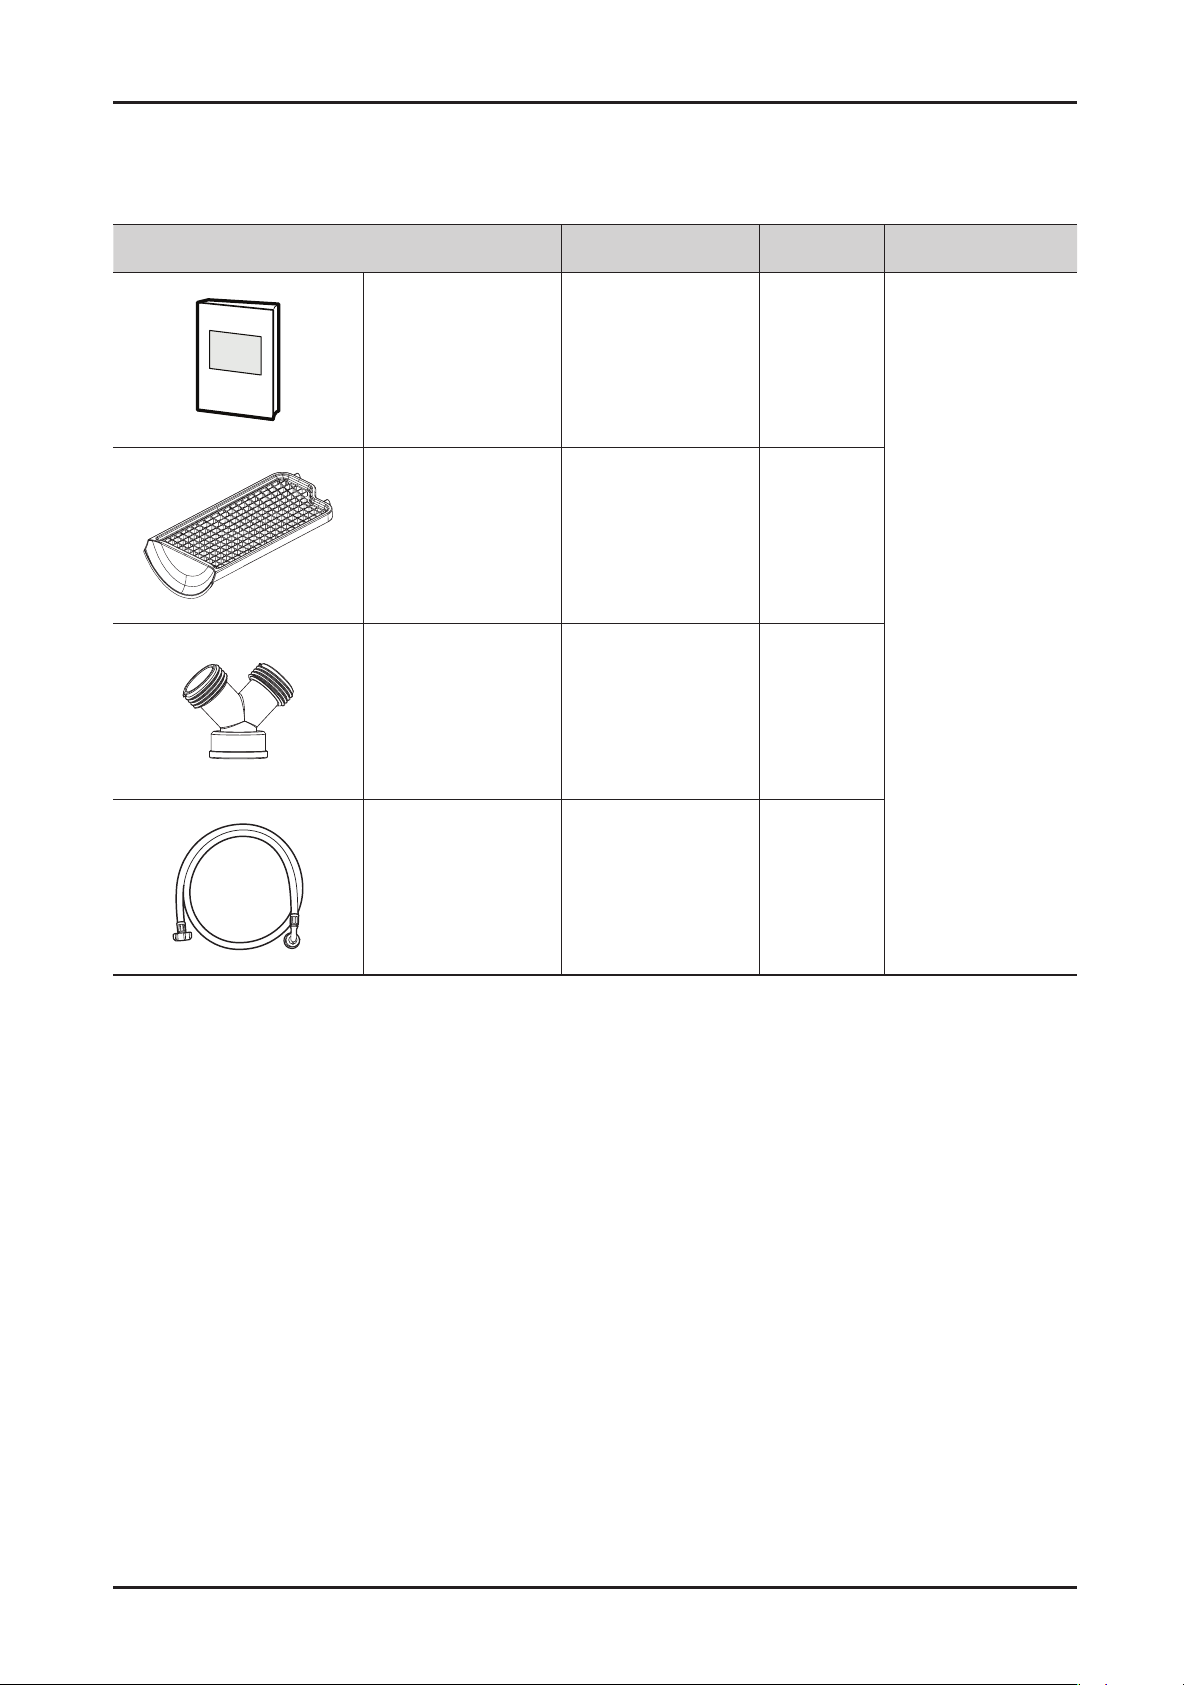
2-4. OPTIONS SPECIFICATIONS
Item Code QTY Remarks
MANUAL-BOOK DC68-02709A 11
DIE-RACK DRY DC61-01522A 1
ASSY CONNECTOR DC97-15103A 1
All
ASSY HOSE WATER DC97-15692A 1
8 _ Features and Specifi cations
3. DISASSEMBLY AND REASSEMBLY
14 mm
17 mm
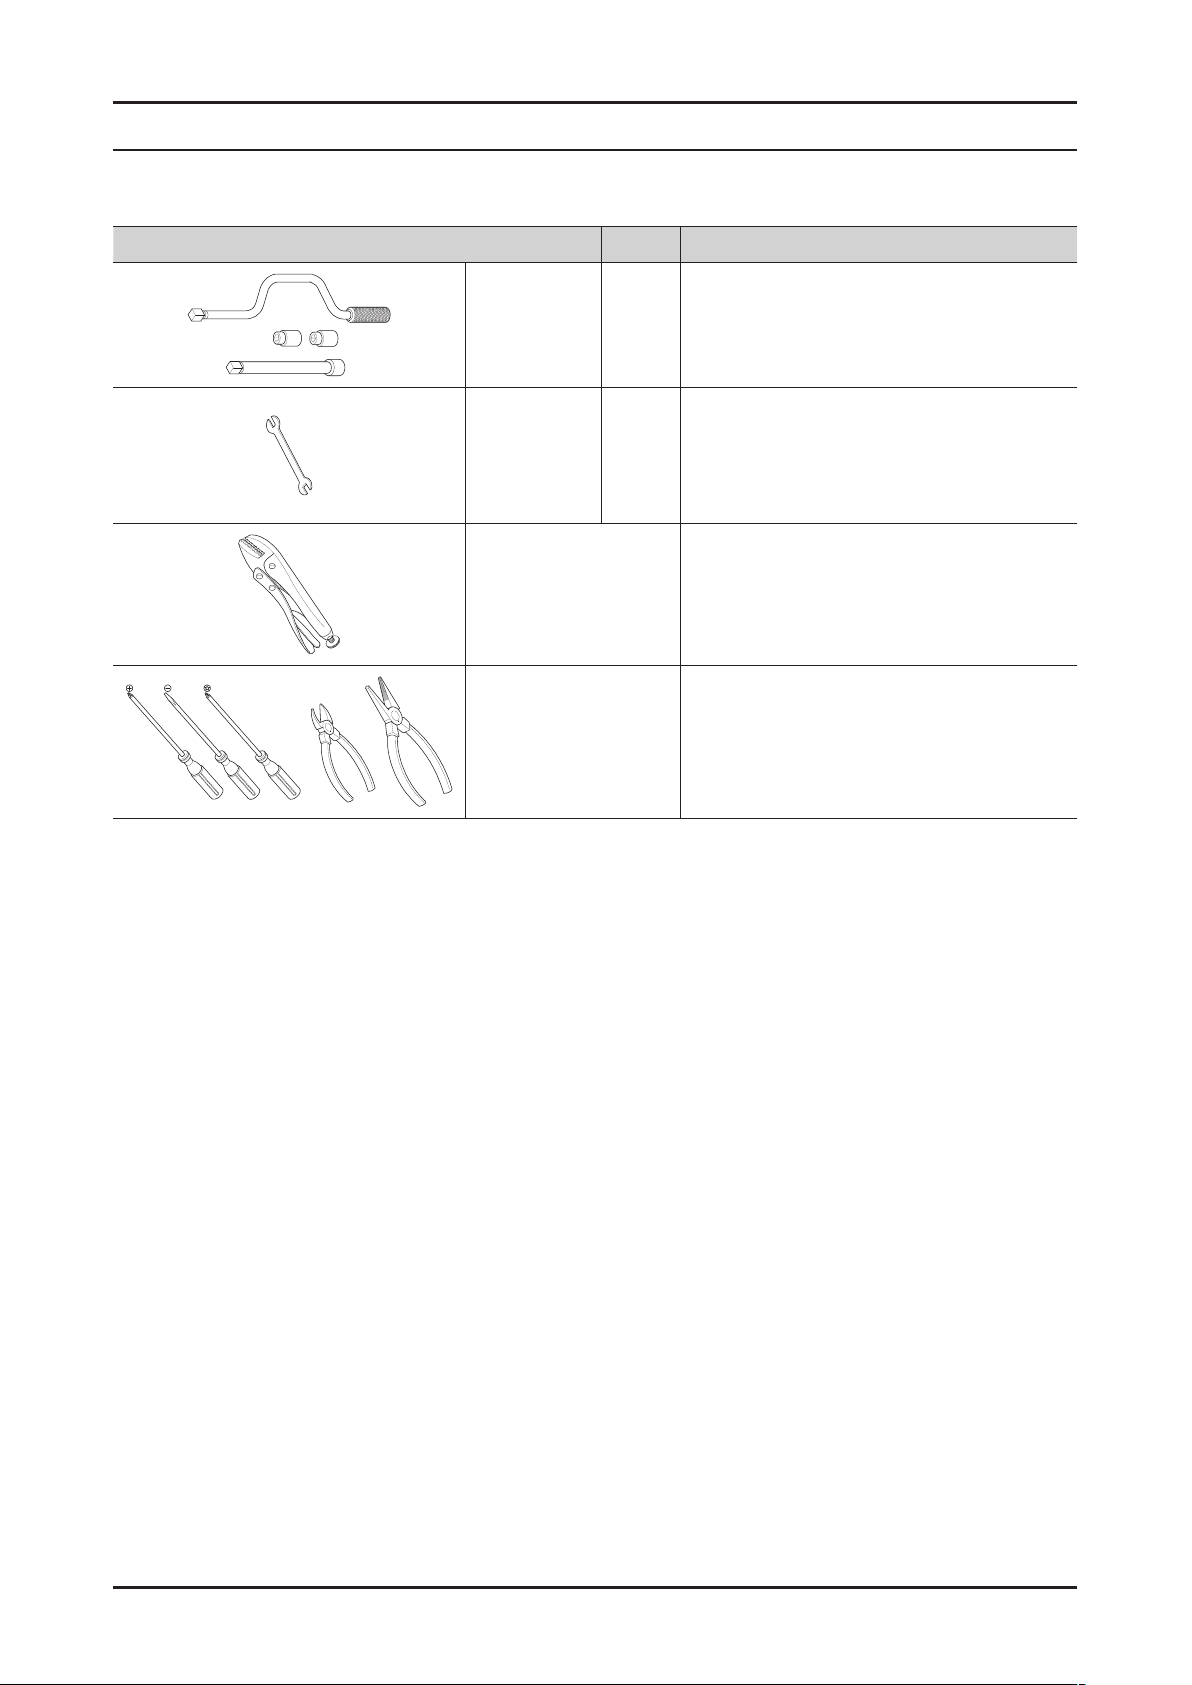
3-1. TOOLS FOR DISASSEMBLY AND REASSEMBLY
Tool Type Remarks
Socket set with
6” extention
14 mm
17 mm
Fan (1)
Roller Shaft (4)
Wrench 8 mm Tool to fix the Roller Shaft on removing the nuts.
Vice pliers
Tool to protect the idle and abrasion of the bolt
for the box driver.
Other
(Driver, Diagonal Cutter,
General tools for the after service.
Long Nose Pliers)
Removal and Reassembly _ 9
3-2. STANDARD DISASSEMBLY DRAWINGS
To avoid risk of electrical shock, personal injury or death, disconnect the power to the Clothes Dryer.
► This is a standard disassembly diagram and may differ from the actual product.
Use this material as a reference when disassembling and reassembling the product.
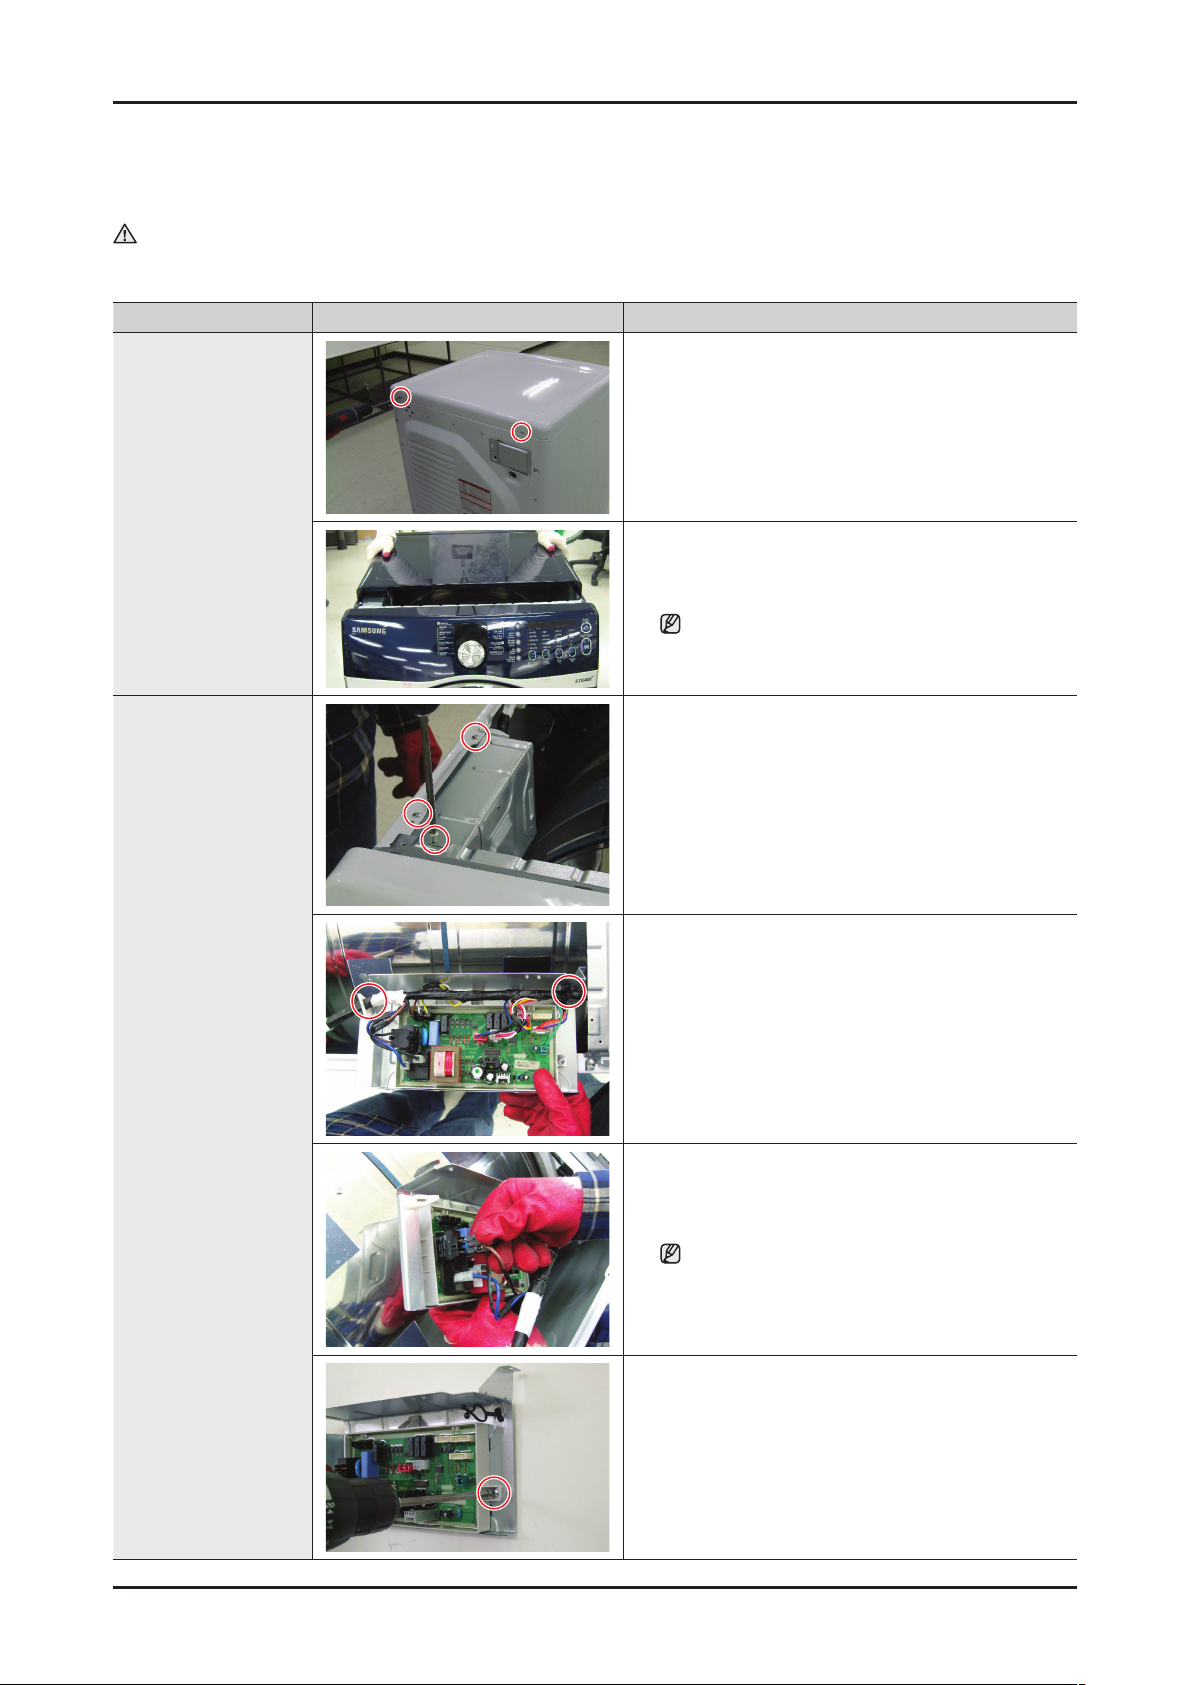
Part Figure Description
1. Disconnect the power supply and to the unit
2. Remove 2 screws from the Top- Cover
Top Cover Removal
3. Slide Top Cover towards the rear and lift from the
unit.
Scratch and impact to the top cover is
prohibited.
Main PCB Removal
1. Disconnect the power supply and to the unit
2. Remove the Top Cover
3. Remove 3 screws from the frame+plate
4. Remove the Wire holder
5. Remove the Housings
Shaking the heater terminal side ways to pull it
out is prohibited.
10 _ Removal and Reassembly
6. Remove 1 from the Holder PCB
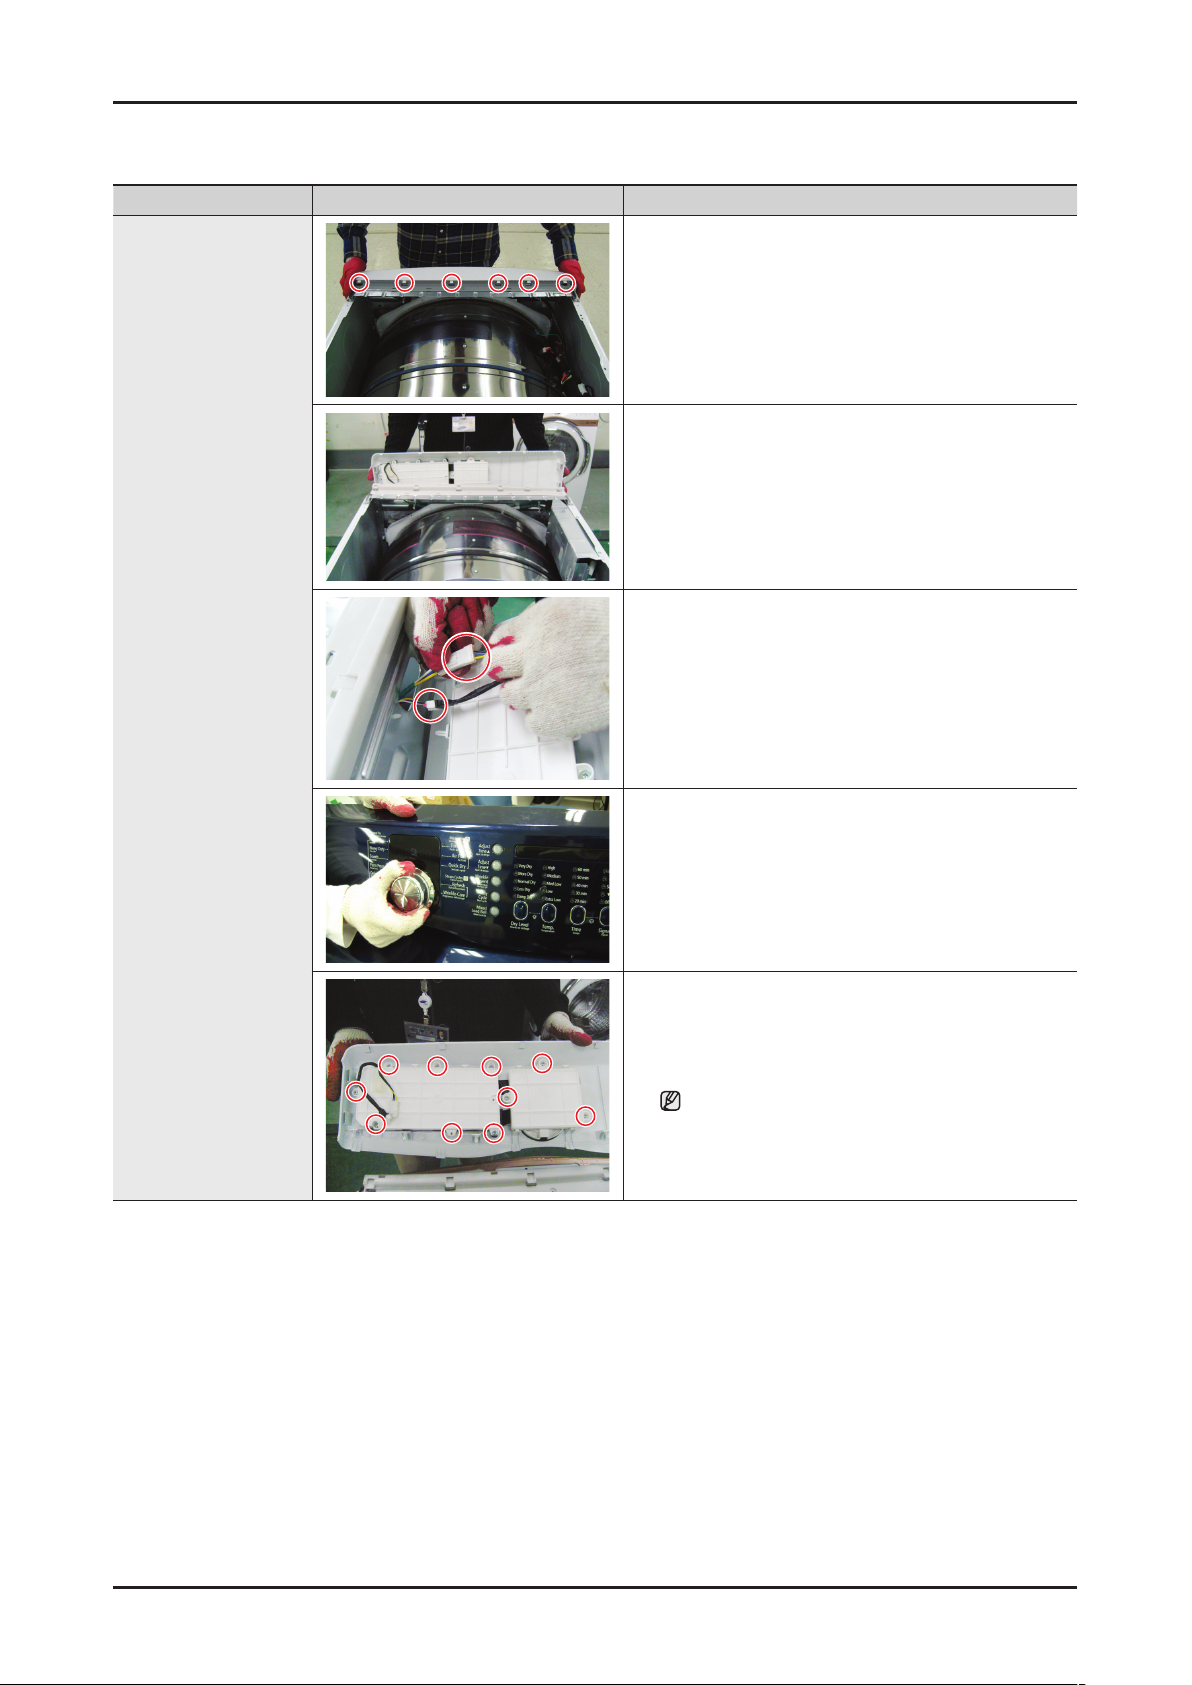
Part Figure Description
1. Disconnect the power supply to the unit
2. Remove the top cover, and the main PCB
3. Separate 6 Hook from Guide Panel
4. Remove Console
Console Removal
5. Remove Each Housing
6. Remove the Knob
7. Remove 10 screw from the Holder PCB
Be careful of external scratch on the console.
Removal and Reassembly _ 11
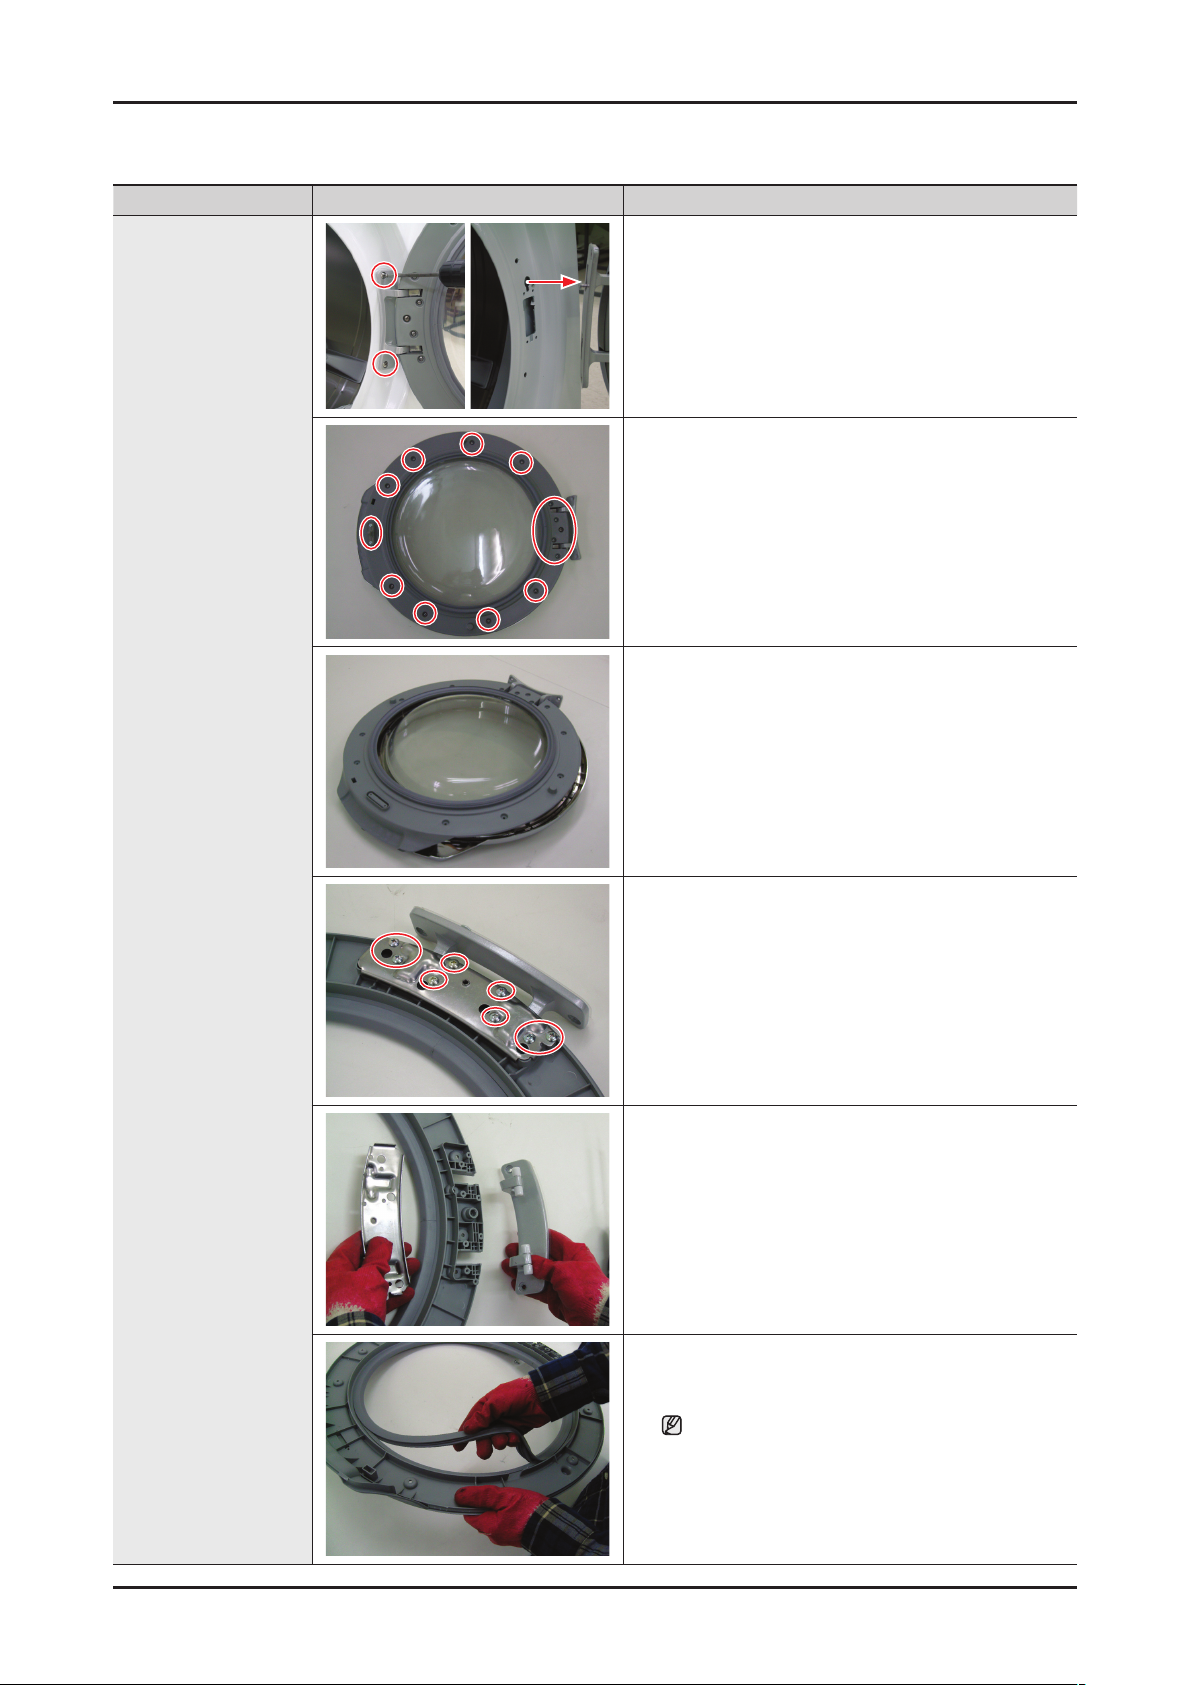
Part Figure Description
1. Door Opening
2. Remove 2 Screw from the Frame panel
3. Separate the temporary fixation part of the
assembly door.
4. Remove 15 screw from the Holder Glass
5. Remove the Door cover
Door Removal
6. Remove 8 screw from the Support-Hinge
7. Remove the Support-Hinge, Hinge
8. Remove the Door Seal
A. Be careful not to scratch the door cover.
B. Be careful of the damage to the door glass.
C. Check the door seal condition after the
assembly.
12 _ Removal and Reassembly
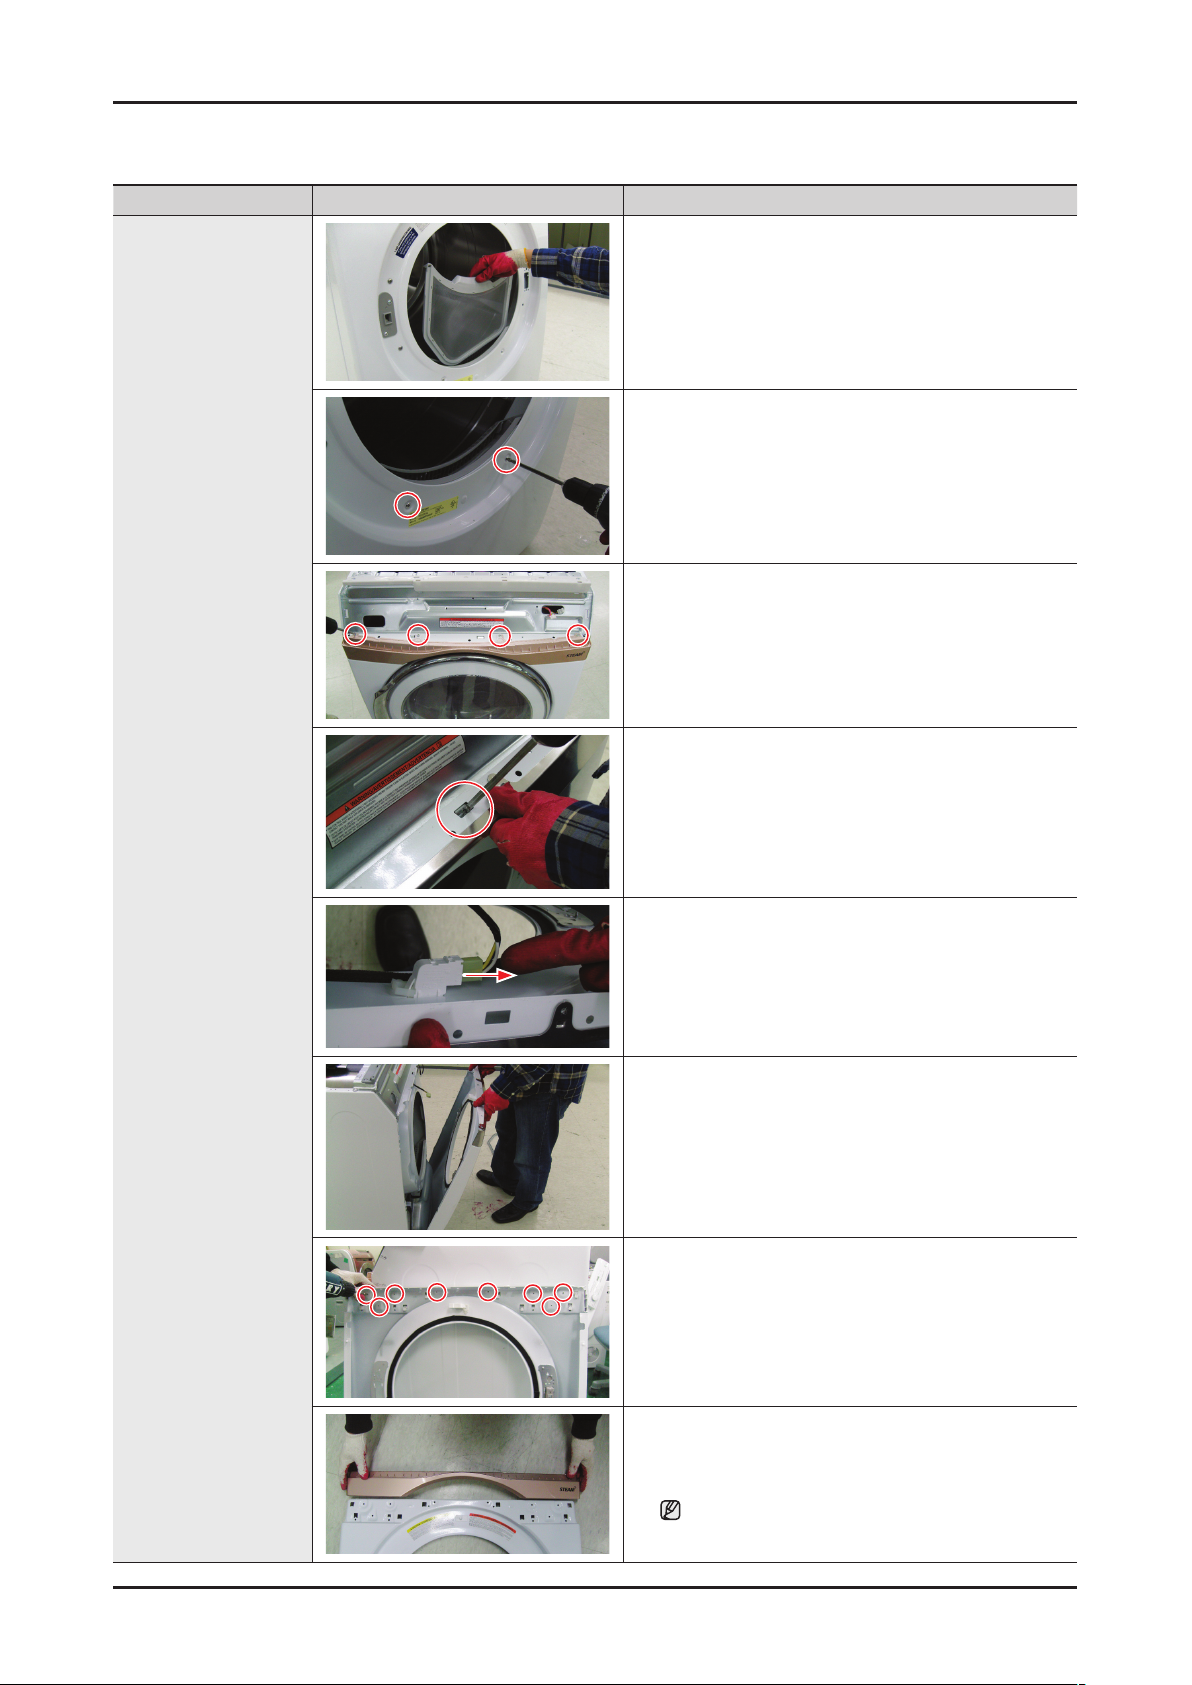
Part Figure Description
1. Disconnect the power supply to the unit
2. Remove the Top Cover, and the Console
3. Remove the filter
4. Remove 2 Screw from the Frame front
5. Remove 4 Screw from the Plate (u)
Frame Panel
Removal
6. Push the flange
7. Remove the Door switch Housing
8. Lift the Front Panel off the three tabs across the
bottom and remove
9. Remove 4 Screw from the Frame Panel
10. Remove the Decoration-Front from the Frame
Panel
Always wear the protective gloves.
Removal and Reassembly _ 13

Part Figure Description
Plate Removal
1. Disconnect the power supply to the unit
2. Remove the Top Cover, the console, and the front
panel
3. Remove 4 Screw from the Plate (u)
4. Separate the Wire in the Wire Holder
14 _ Removal and Reassembly
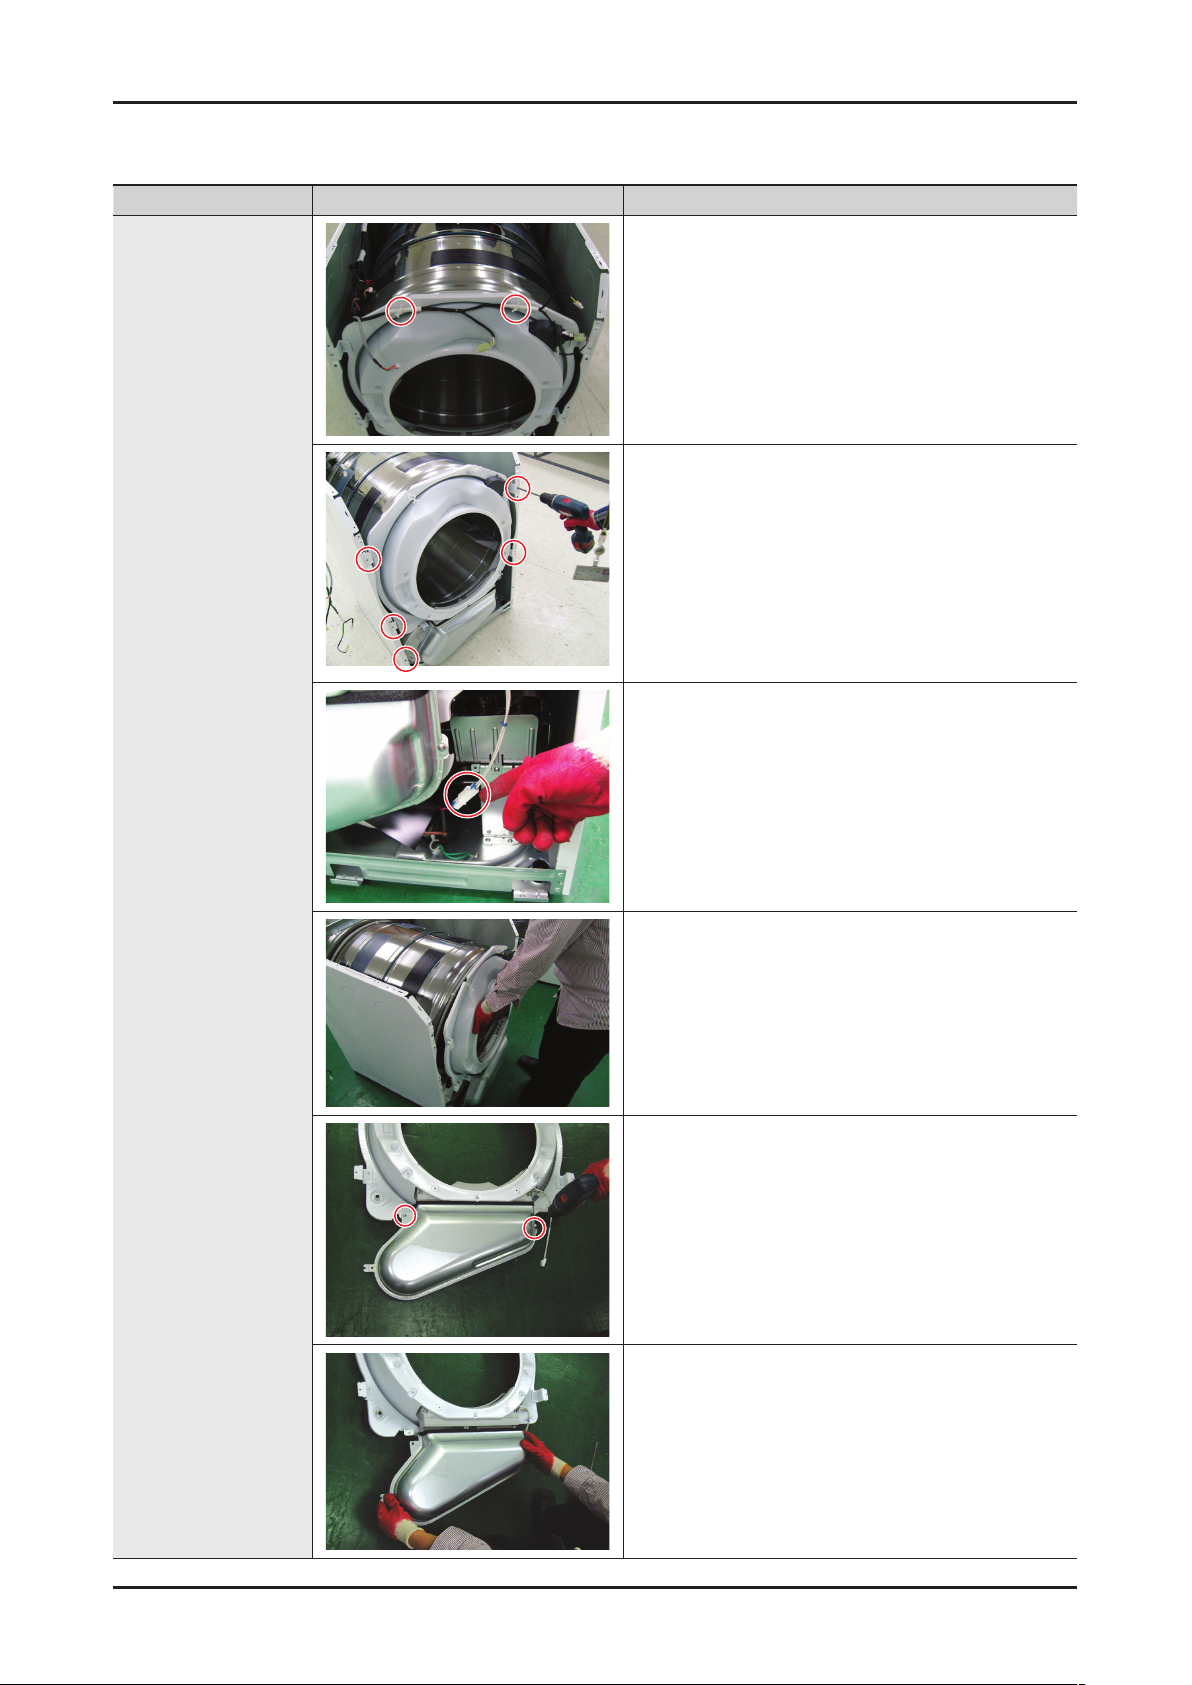
Part Figure Description
1. Disconnect the power supply to the unit
2. Remove the Top Cover, the Console, the front
panel and the Plate(u)
3. Separate the wire in the wire Holder (2EA)
4. Disconnect Interior Light wiring Harness
5. Remove the four bulkhead retaining 5 screws.
Front Bulkhead
Removal
6. Disconnect the moisture Sensor wiring Harness
7. Lift Bulkhead from the cabinet then remove it.
8. Remove 2 screw from the Duct Outlet
9. Remove the Duct Outlet
Removal and Reassembly _ 15
Part Figure Description
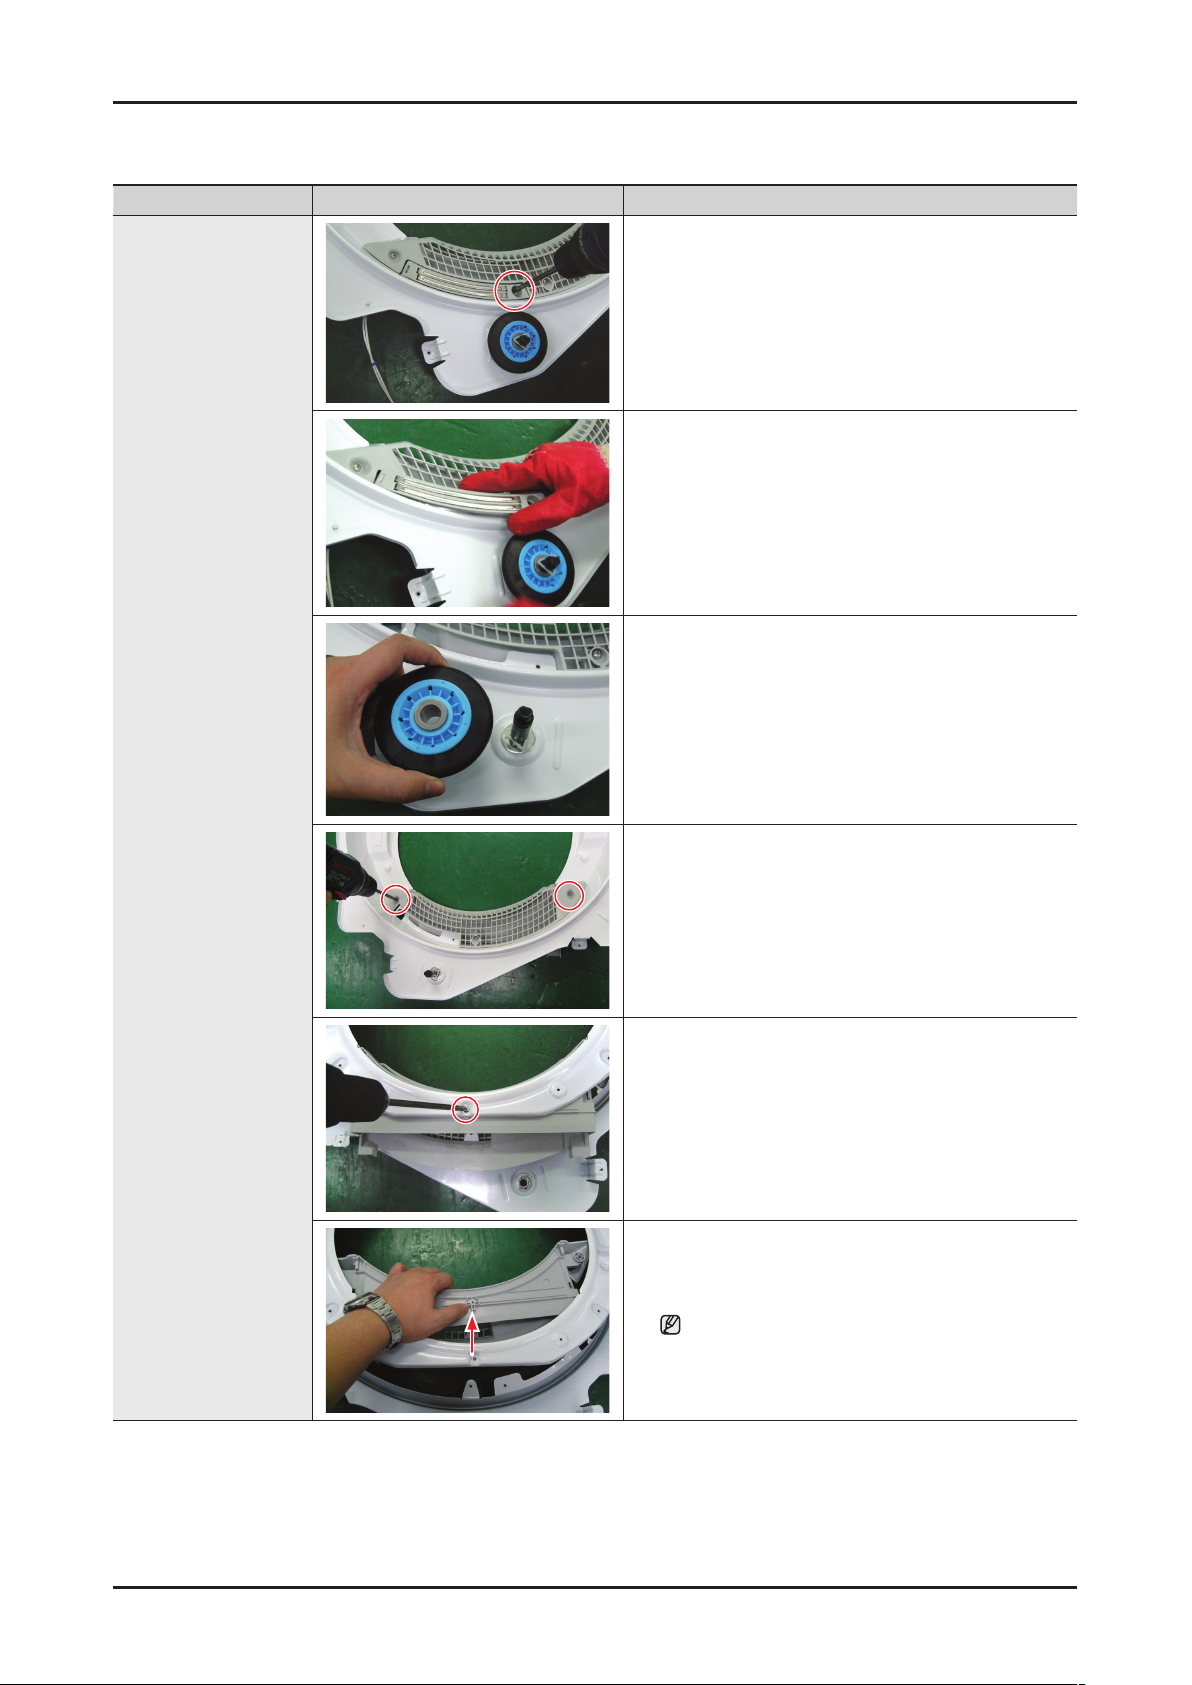
10. Remove 1 screw from the Touch Sensor
11. Remove the Touch Sensor
12. Remove the Roller
Front Bulkhead
Removal (Continued)
13. Remove 2 Screw from the Case Filter (B)
14. Remove 1 Screw from the Case Filter (F)
15. Remove the Case Filter (B/F)
Make sure the Filter does not get damaged by
the roller.
16 _ Removal and Reassembly
Part Figure Description
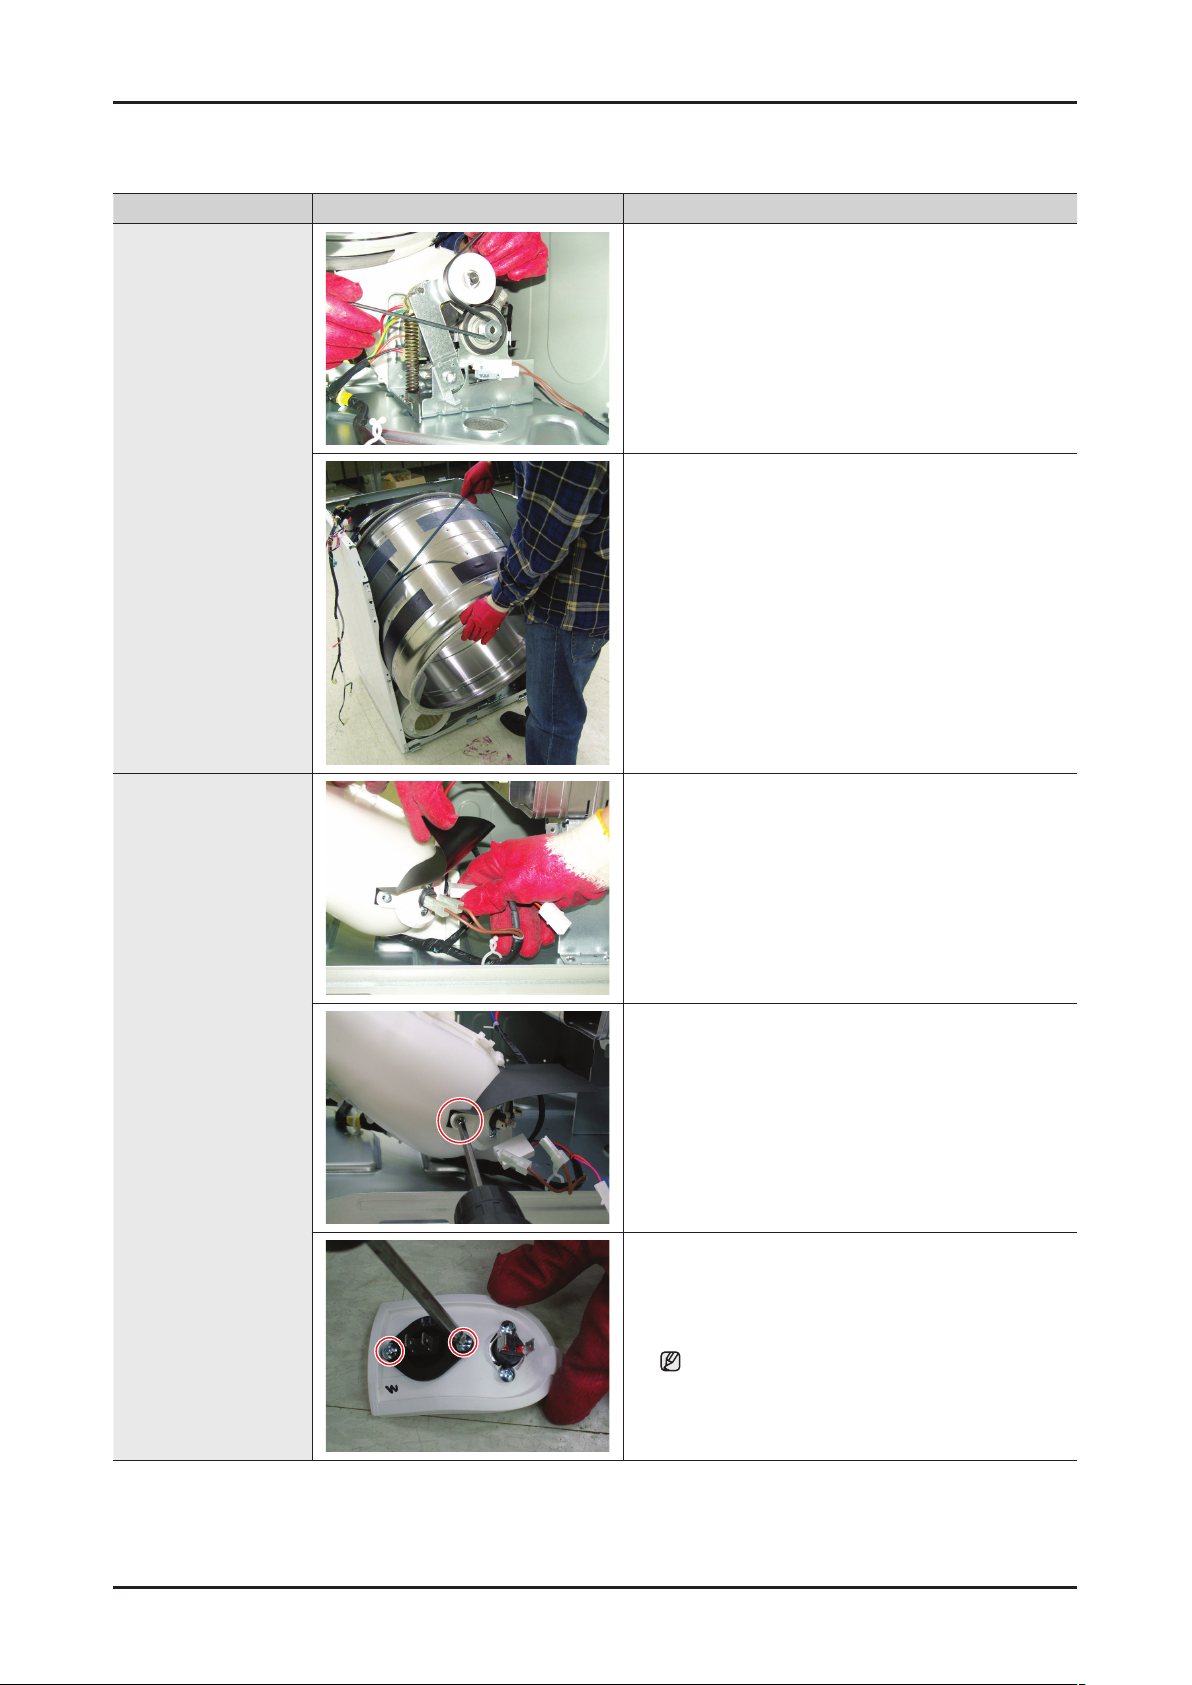
Drum Removal
1. Disconnect the power supply to the unit
2. Remove the Top Cover, the console, the Front
panel, the Plate(u), and the Front Bulkhead
3. Remove Belt
4. Remove the Drum
Sensor
(Thermistor,
Thermostat)
Removal
1. Disconnect the power supply to the unit
2. Remove the Top Cover, the console, and the Front
panel
3. Remove 2 Housing Sensor
4. Remove the Sensor Cover
5. Remove the Sensor
Do not apply excessive force to the terminal.
Removal and Reassembly _ 17
Part Figure Description
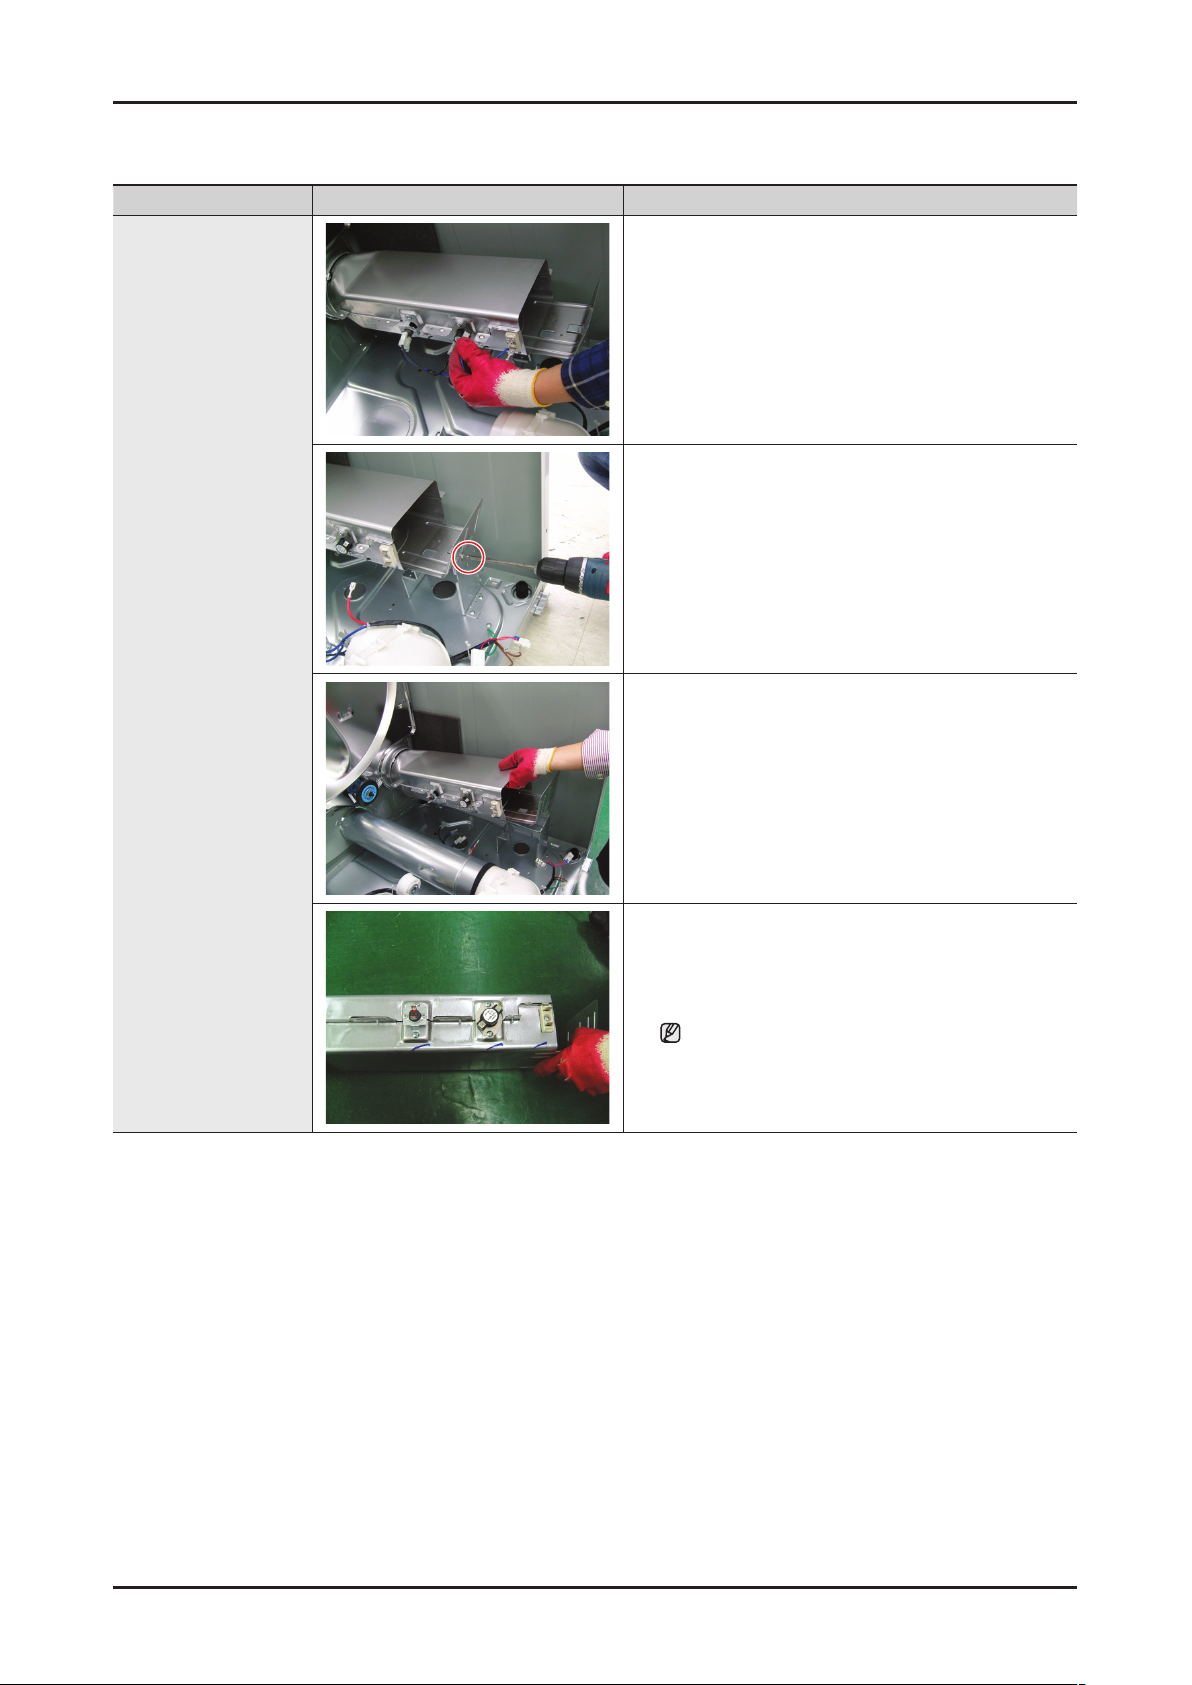
Heater Removal
1. Disconnect the power supply to the unit
2. Remove the Top Cover, the console, and the Front
panel
3. Removal 6 Housing Heater-Terminals
4. Remove 1 screw from the Heater
5. Separate the Heater from the Drum-back
6. Remove 4 screw from the thermostats
Do not apply excessive force to the terminal.
18 _ Removal and Reassembly
 Loading...