

Samsung D10, DIRECTV D10-200 Owner's Manual

Owner’s Manual
................................................................................................................
.............
D10-200
DIRECTV®Receiver User’s Guide
DIRECTV, Inc.
2230E Imperial Hwy
El Segundo, CA 90245
Telephone: 1 800 DIRECTV (347-3288)
MF68-00333A-01
32
Important Safety Information
1) Read these instructions.
2) Keep these instructions.
3) Heed all warnings.
4) Follow all instructions.
5) Do not use this apparatus near water.
6) Clean only with dry cloth.
7) Do not block any ventilation openings. Install in accordance with the manufacturer’s instructions.
8) Do not install near any heat sources such as radiators, heat registers, or other apparatus
(including amplifiers) that produce heat.
9) Do not defeat the safety purpose of the polarized or grounding-type plug. A polarized plug has
two blades with one wider than the other. A grounding type plug has two blades and a third
grounding prong. The wide blade or the third prong are provided for your safety. If the provided
plug does not fit into your outlet, consult an elec trician for replacement of the obsolete outlet.
10) Protect the power cord from being walked on or pinched particu larly at plugs, convenience
receptacles, and the point where they exit from the apparatus.
11) Only use attachments/accessories specified by the manufacturer.
12) Use only with cart, stand, tripod, bracket, or table specified by
the manufacturer, or sold with the apparatus. When used, caution
when moving the cart/apparatus combination to avoid injury from
tip-over.
13) Unplug this apparatus during lightning storms or when unused
for long periods of time.
14) Refer all servicing to qualified service personnel. Servicing is
required when the apparatus has been damaged in any way,
such as power-supply cord or plug is damaged, liquid has been
spilled or objects have fallen into the apparatus, the apparatus has
been exposed to rain or moisture, does not operate normally, or has
been dropped.
This device complies with part 15 of the FCC Rules.
Operation is subject to the following two conditions:
(1) This device may not cause harmful interference, and
(2) This device must accept any interference that may cause undesired operation.
This satellite receiver provides display of television closed captioning in accordance with
§15.119 of the FCC rules.
Note you should use the Telephone line cord which is supplied with the machine. If you are
replacing it with the other vendor's part, it should be minimum AWG #26 or larger gage.
®
Receiver.
CAUTION
This symbol indicates high voltage is
present inside. It is dangerous to make
any kind of contact with any inside
part of this product.
This symbol alerts you that important
literature concerning operation and
maintenance have been included with
this product.

54
®
Pay Per View
®
Receiver
Program Recording Restrictions
All other taping is expressly prohibited. Some programming may not be taped.
An additional taping fee may be applied. Call your program provider for details.
Owner's Record
The model number, serial numbers and Receiver ID are located on the rear panel of the
DIRECTV
®
Receiver. The number for the Access Card is on the back of the card and on
the carton label. Record these numbers for reference when calling your sales or service
representative regarding this product.
Model Number: ____________________________________
Serial Number: ____________________________________
Access Card Number: _______________________________
Receiver ID: ________________________________________
Customer Support
For DIRECTV®Programming
For subscription information, or to resolve problems related to programming, call:
DIRECTV at 1-800-DIRECTV (1-800-347-3288) or visit the DIRECTV Web site
(DIRECTV.com).
For Installation
To arrange for the installation of your DIRECTV
®
Receiver, call the dealer from whom
you purchased your system.
For Hardware
To resolve problems related to this DIRECTV
®
Receiver, call DIRECTV customer support
at 1-800-347-3288.

76
®
Receiver (Model Number: D10-200) and any included
®
RECEIVER AS A GIFT FROM THE ORIGINAL
®
Receiver will be repaired or
• Reception transmission problems caused by signal conditions, telephone line, or cable or
antenna systems outside the unit.
• A product that has been modified or adapted to enable it to operate in any country other
than the country for which it was designed, manufactured, approved and/or authorized,
or repair of products damaged by these modifications.
• A product used for commercial or institutional purposes.
• DIRECTV makes no warranty that the access connection will be a local (not long
distance) phone call.
• The continued provisioning of any of the programming and other services delivered
through the Receiver including but not limited to television programming, show
information, program guide data, and scheduling information.
MAKE SURE YOU KEEP...
Please keep your sales receipt or other document showing proof of purchase. Attach it to
this User Guide and keep both nearby. Also keep the original box and packing material in
case you need to return your product.
BEFORE REQUESTING REPAIR SERVICE...
Please check the troubleshooting section of this guide. This may save you a call to DIRECTV
Customer Care.
TO GET WARRANTY SERVICE...
Warranty service will be provided by DIRECTV. If you believe you need service for your
Receiver, contact DIRECTV at 1-800-DIRECTV (347-3288). A representative will go through
a diagnostic checklist with you. If it is determined that the product needs to be returned for
service or exchanged, you will receive a return authorization number. The representative
will give you complete shipping details.
TO GET OUT-OF-WARRANTY SERVICE...
To obtain out-of-warranty service contact DIRECTV at 1-800-DIRECTV (347-3288) for
information on the possibility of and any costs for repair or replacement of out-of-warranty
products.
REMEMBER...
Record the model and serial numbers found on the product below.
MODEL # _____________________________________________
SERIAL # _____________________________________________

98
®
RECEIVER. DIRECTV
®
RECEIVER.
®
Receiver
®
Receiver complies with the limits for a
®
Receiver.
®
Receiver is connected.
• Consult the dealer or an experienced radio/TV technician for help. The user may find the
following booklet, prepared by the Federal Communications Commission, helpful: “How
to Identify and Resolve Radio and TV Interference Problems.” This booklet is available
from the U.S. Government Printing Office, Washington, DC. To meet FCC requirement,
only peripherals (computer input/output devices, terminals, printers, etc.) certified to
comply with Class B limits may be attached to this device. Operation with non-certified
peripherals is likely to result in interference to radio and TV reception. To meet FCC
requirements, shielded cables are required to connect the device to a personal computer,
peripheral, or other Class B certified device. This equipment complies with Part 68 of the
FCC Rules and the requirements adopted by ACTA. On the back of this equipment is a
label that contains a product identifier in the format US:AAAEQ##TXXXX. If requested,
this information must be provided to your telephone company. A plug and jack used to
connect this equipment to the premises wiring and telephone network must comply with
the applicable FCC Part 68 rules and requirements adopted by ACTA. A compliant
telephone cord and modular plug is provided with this product. It is designed to be
connected to a compatible modular jack that is also compliant. See installation
instructions for details. The REN is used to determine the number of devices that may
connect to a telephone line. Excessive RENs on a telephone line may result in the devices
not ringing in response to an incoming call. In most but not all areas, the sum of the
RENs should not exceed five (5.0). To be certain of the number of devices that may be
connected to a line, as determined by the total RENs, contact your local telephone
company. The REN for this product is part of the product identifier that has the format
US:AAAEQ##TXXXX. The digits represented by ## are the REN without the decimal
point (e.g., 03 is a REN of 0.3). If this DIRECTV
®
Receiver causes harm to the telephone
network, the telephone company will notify you in advance that temporary
discontinuance of service may be required. But if advance notice isn’t practical, the
telephone company will notify the customer as soon as possible. Also, you will be
advised of your right to file a complaint with the FCC if you believe it is necessary.
The telephone company may make changes in its facilities, equipment, operations or
procedures that could affect the proper functioning of your equipment. If they do, you
will be notified in advance in order for you to make necessary modifications to maintain
uninterrupted service. If trouble is experienced with this unit, for repair or warranty
information, please contact DIRECTV Customer Care at the address and phone number
listed below. If the equipment is causing harm to the network, the telephone company
may request that you disconnect the equipment until the problem is resolved.
DIRECTV, Inc.
2230 E. Imperial Hwy
El Segundo, CA 90245
1-800-DIRECTV (347-3288)
DO NOT DISASSEMBLE THIS EQUIPMENT. It does not contain any user-serviceable
components. We recommend the installation of an AC surge arrester in the AC outlet to
which this equipment is connected. Telephone companies report that electrical surges,
typically lightning transients, are very destructive to customer terminal equipment
connected to AC power sources.

1110
®
System with the DIRECTV PROTECTION PLAN. For a low monthly
®
entertainment.
®
DVR, DIRECTV HD Receivers, or
SIGN UP FOR THE DIRECTV PROTECTION PLAN TODAY
If you have standard DIRECTV Receiver(s), visit DIRECTV.com and SIGN IN using the
simple steps below or call 1-800-DIRECTV.
1. SIGN IN with your user name and password, or click on the “Register now” link and
go through the easy steps, then continue with Step 2.
2. SELECT Option B, and then click the “Next” button at the bottom of the page.
3. SCROLL down to Step 3 (Add Additional Services) and SELECT “DIRECTV PROTECTION
PLAN,” then CLICK on the “Next” button.
4. REVIEW your change and CLICK on the “Accept These Changes” button.
If you have a DIRECTV
®
DVR, DIRECTV HD Receiver, or DIRECTV Receiver with UltimateTV
Service, please call 1-800-DIRECTV to sign up.
The DIRECTV PROTECTION PLAN is offered by AIG Warranty Guard and underwritten by
New Hampshire Insurance Company on behalf of DIRECTV where authorized by law.
Certain limitations apply. Full terms and conditions will be mailed to you prior to service
billing and are available at DIRECTV.com.
*A fee of $49 for standard IRD equipment, $249 for DIRECTV DVR or Ultimate TV
equipment, or $400 for HD equipment will be charged to your DIRECTV bill if the defective
equipment that we are replacing for you is not returned within 30 calendar days. The plan
will provide a return box for the defective equipment and even pick up the shipping costs.
You'll receive replacement equipment in about 72 hours.

1312
Box contents . . . . . . . . . . . . . . . . . . . . . . . . . . . . . . . . . . . . . . . . .14
Front panel controls and lights . . . . . . . . . . . . . . . . . . . . . . . . . . . .15
Back of the DIRECTV®Receiver . . . . . . . . . . . . . . . . . . . . . . . . . . . .16
Installing the batteries in the remote control . . . . . . . . . . . . . . . . . . .17
Inserting the Access Card . . . . . . . . . . . . . . . . . . . . . . . . . . . . . . .18
Before making connections . . . . . . . . . . . . . . . . . . . . . . . . . . . . . .19
Jacks and cables . . . . . . . . . . . . . . . . . . . . . . . . . . . . . . . . . . . . . .20
Connecting your DIRECTV®Receiver . . . . . . . . . . . . . . . . . . . . . . . .22
Tur ning on the DIRECTV
®
Receiver for the first time . . . . . . . . . . . . . .32
Memorizing Channels . . . . . . . . . . . . . . . . . . . . . . . . . . . . . . . . . .32
Acquiring the correct dish pointing angles . . . . . . . . . . . . . . . . . . . .33
Checking the satellite signal strength . . . . . . . . . . . . . . . . . . . . . . . .34
Setting the dish type . . . . . . . . . . . . . . . . . . . . . . . . . . . . . . . . . . .35
Using Auto Detection to set the dish type . . . . . . . . . . . . . . . . . . . . .36
Testing the DIRECTV
®
Receiver . . . . . . . . . . . . . . . . . . . . . . . . . . . .37
Testing the Signal Strength . . . . . . . . . . . . . . . . . . . . . . . . . . . . . . .38
Activating your DIRECTV account . . . . . . . . . . . . . . . . . . . . . . . . . .39
Upgrades . . . . . . . . . . . . . . . . . . . . . . . . . . . . . . . . . . . . . . . . . . .39
Remote control overview . . . . . . . . . . . . . . . . . . . . . . . . . . . . . . . .40
Changing channels . . . . . . . . . . . . . . . . . . . . . . . . . . . . . . . . . . . .42
Adjusting the volume . . . . . . . . . . . . . . . . . . . . . . . . . . . . . . . . . . .42
Getting information on the TV program you are watching . . . . . . . .42
Finding out what’s on: the Guide . . . . . . . . . . . . . . . . . . . . . . . . . .45
Searching for programs . . . . . . . . . . . . . . . . . . . . . . . . . . . . . . . . .48
Choosing an alternate audio format for a program . . . . . . . . . . . . .50
Pay per view programs . . . . . . . . . . . . . . . . . . . . . . . . . . . . . . . . .51
Scheduling program reminders . . . . . . . . . . . . . . . . . . . . . . . . . . .56
Reviewing and modifying reminders . . . . . . . . . . . . . . . . . . . . . . . .57
TABLE OF C ONTENTS
Chapter 5: User profiles . . . . . . . . . . . . . . . . . . . . . . . . . . . . . . . . . . . . . . . . . . . . . . . . . . . . . 58
User profiles basics . . . . . . . . . . . . . . . . . . . . . . . . . . . . . . . . . . . .58
Editing user profile names . . . . . . . . . . . . . . . . . . . . . . . . . . . . . . .59
Editing channel lists . . . . . . . . . . . . . . . . . . . . . . . . . . . . . . . . . . . .60
Setting ratings limits . . . . . . . . . . . . . . . . . . . . . . . . . . . . . . . . . . . .61
Allowing or blocking pay per view purchases . . . . . . . . . . . . . . . . .65
Setting a pay per view spending limit . . . . . . . . . . . . . . . . . . . . . . .66
Setting the screen color and translucency . . . . . . . . . . . . . . . . . . . .67
Setting the current user profile . . . . . . . . . . . . . . . . . . . . . . . . . . . .67
Locking and unlocking your DIRECTV
®
System . . . . . . . . . . . . . . . . .68
Chapter 6: Settings, preferences, and upgrades . . . . . . . . . . . . . . . . . . . . . . . . . . . . . . . . . . . 69
Reading your mail . . . . . . . . . . . . . . . . . . . . . . . . . . . . . . . . . . . . .69
Setting system preferences . . . . . . . . . . . . . . . . . . . . . . . . . . . . . . .70
Reviewing and controlling Caller ID . . . . . . . . . . . . . . . . . . . . . . . .73
Setting the Local Time options . . . . . . . . . . . . . . . . . . . . . . . . . . . . .75
Installing a new Access Card . . . . . . . . . . . . . . . . . . . . . . . . . . . . .76
Viewing important information and a list of features
supported by your DIRECTV
®
Receiver . . . . . . . . . . . . . . . . . . . . . .77
Viewing information on automatic system upgrades . . . . . . . . . . . .77
Testing the DIRECTV
®
Receiver . . . . . . . . . . . . . . . . . . . . . . . . . . . .77
Chapter 7: Programming the remote control . . . . . . . . . . . . . . . . . . . . . . . . . . . . . . . . . . . . . .78
Programming the remote control . . . . . . . . . . . . . . . . . . . . . . . . . . .78
Operating a device with your programmed remote control . . . . . . .81
Code lists . . . . . . . . . . . . . . . . . . . . . . . . . . . . . . . . . . . . . . . . . . .82
Appendix: Troubleshooting and specifications . . . . . . . . . . . . . . . . . . . . . . . . . . . . . . . . . . . . . 88
Troubleshooting . . . . . . . . . . . . . . . . . . . . . . . . . . . . . . . . . . . . . .88
Specifications . . . . . . . . . . . . . . . . . . . . . . . . . . . . . . . . . . . . . . . .90
15
CHAPTER 1
Getting started
1
1
®
Receiver. It includes information on:
®
Receiver
®
Receiver is to unpack the box and
< DIRECTV®Receiver >
AA
batteries
RJ-11
Telephone cord
Access Card
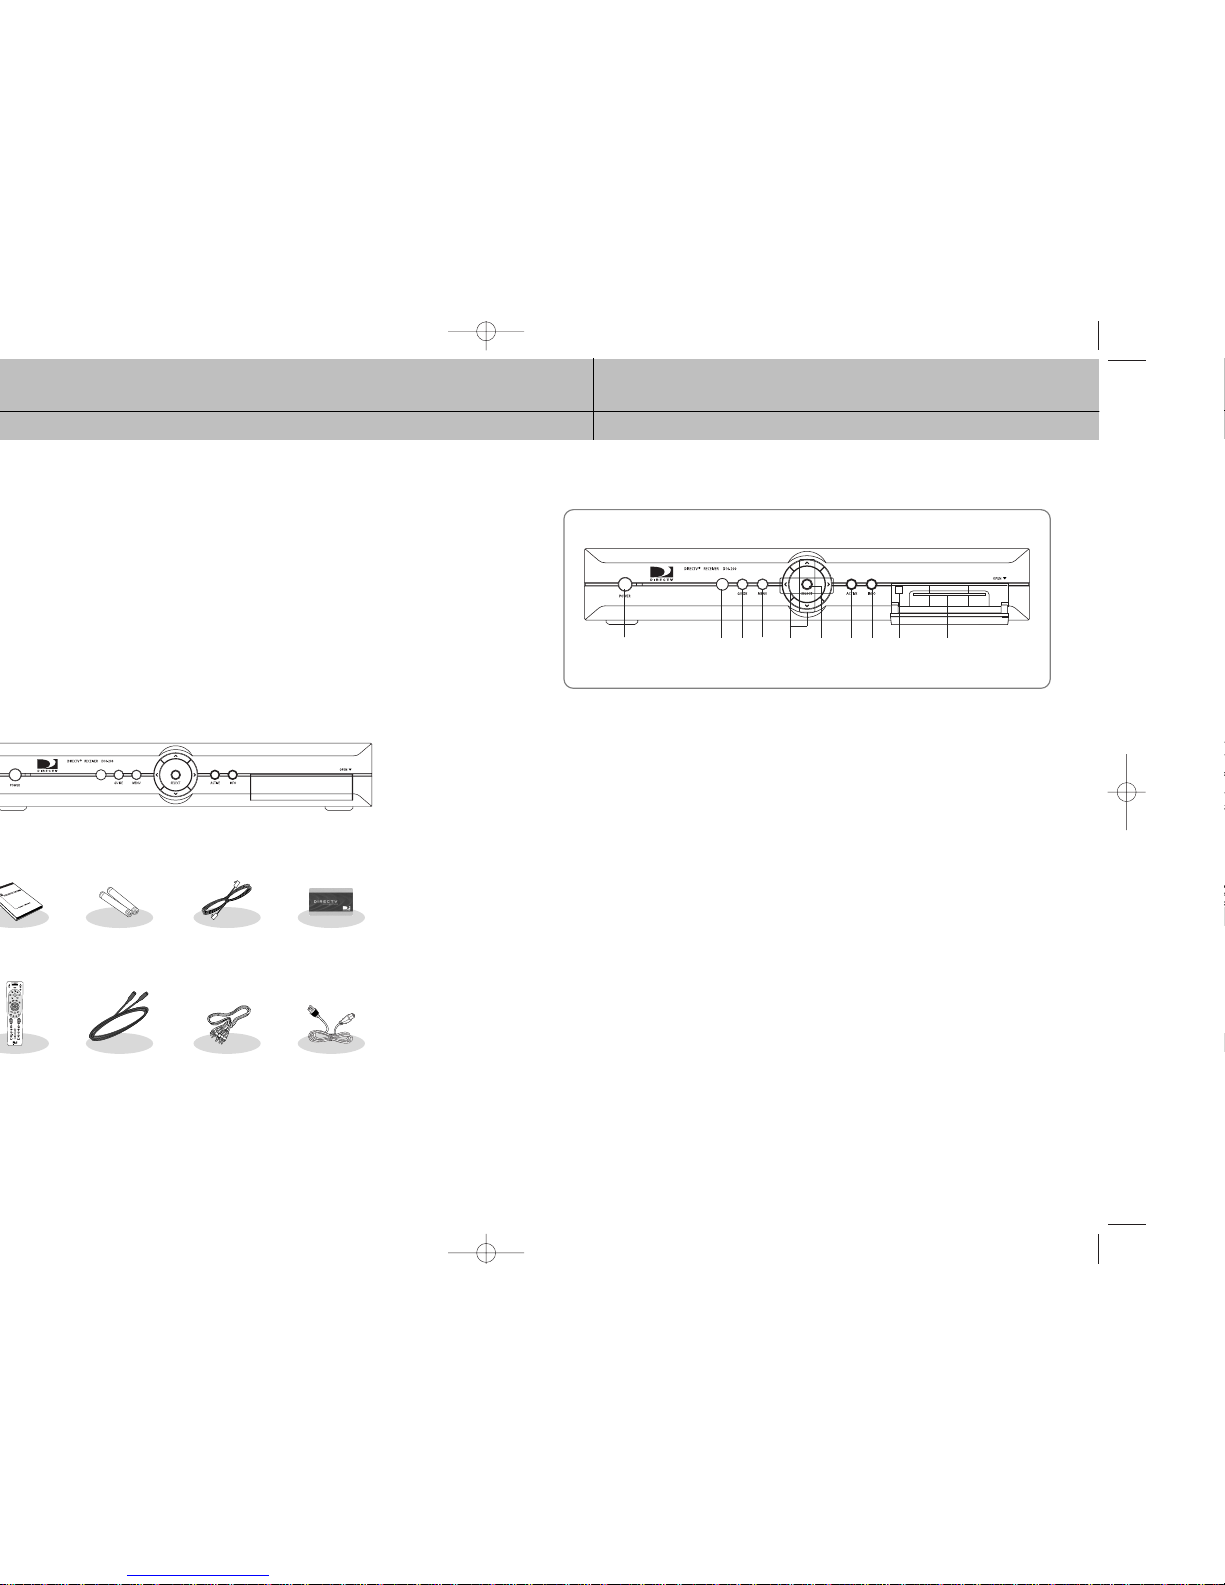
ΠPOWER
Turns your receiver on and Standby.
´ Remote Control Sensor
Point your remote control at this sensor when operating your receiver.
ˇ GUIDE
Displays the on-screen Program Guide.
¨ MENU
Displays the Main Menu.
ˆ UP/DOWN, LEFT/RIGHT
These buttons navigate left, right, up, or down in the on-screen Guide and menu system.
Ø SELECT
Selects a highlighted item in the on-screen Guide and menu system.
∏ ACTIVE
Push this button to search for a program.
” INFO
Displays TV program information.
’ RESET
Resets your Receiver.
˝ Access Card slot
This slot holds the Access Card (which allows you to view DIRECTV®programming).
Front panel controls and lights
´ˆ
ˇ ¨ ∏ ” ’ ˝ØŒ
17
CHAPTER 1
Getting started
1
1
®
Receiver
Installing the batteries in the remote control
You’ve unpacked the receiver and reviewed its front and back panels. Now it’s time to
start setting up. The first step is to install the batteries in your remote control.
1
Unlatch the battery compartment cover on the back
of remote control.
2
Insert 2 AA batteries as shown, making sure the + and –
ends of each battery line up with the corresponding
marks in the battery compartment.
3
Snap the cover back onto the remote control.
´ˆ
ˇ ¨ ∏ ” ’ ˝ØŒ
19
CHAPTER 2
Setting up and connecting
2
2
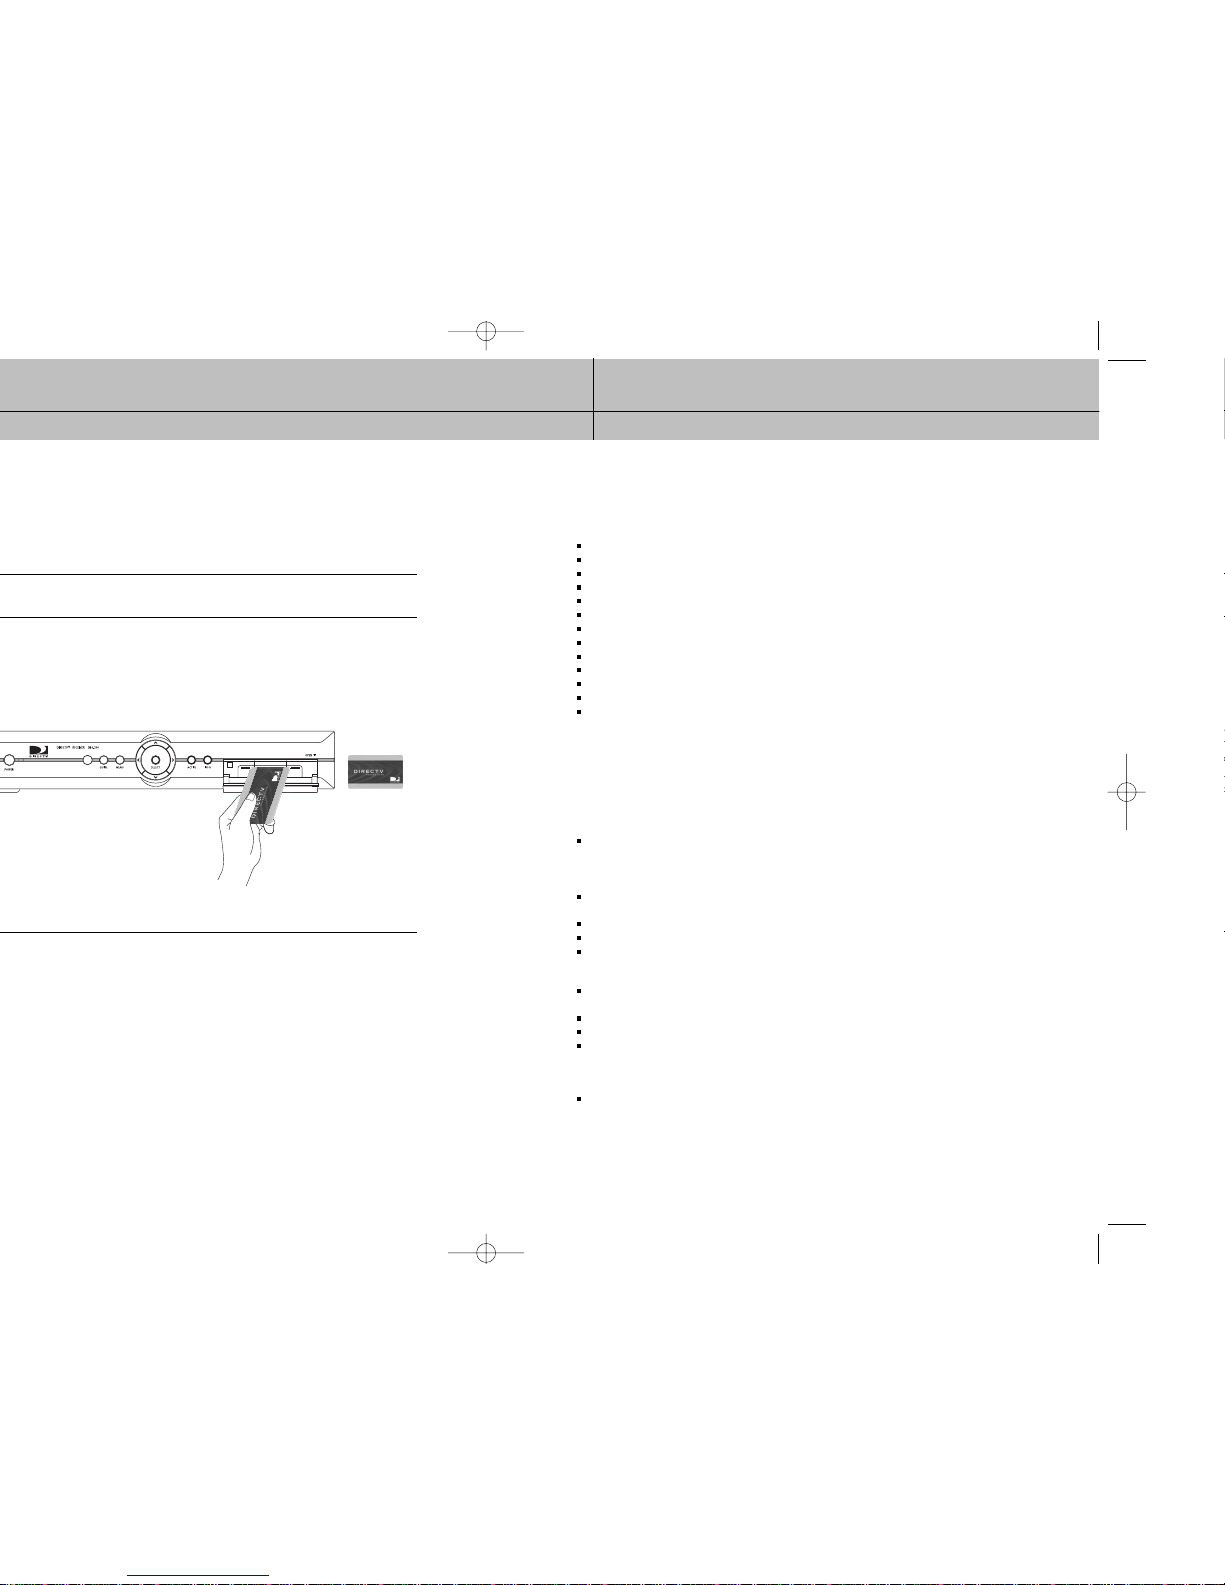
programming unless the Access Card is properly inserted into the DIRECTV
®
®
Receiver.
Access Card
(Top view)
Chapter 2: Setting up and connecting
This chapter explains how to setup and start using your DIRECTV®Receiver. Contents
include:
Before making connections
Jacks and cables
Connecting your DIRECTV
®
Receiver
Turning on the DIRECTV
®
Receiver for the first time
Memorizing Channels
Acquiring the correct dish pointing angles
Checking the satellite signal strength
Setting the dish type
Using Auto Detection to set the dish type
Testing the DIRECTV
®
Receiver
Testing the Signal Strength
Activating your DIRECTV account
Upgrades
Before making connections
The next step is to make the necessary connections. Before you begin, please note the
following important safety and setup tips.
Protect your components from power surges
Always turn off and unplug your DIRECTV®Receiver, TV, and any other components before connecting or disconnecting any of the
cables.
Position all cables correctly to avoid audio hum or interference
After connecting the components, please run the audio/video cables along the side of the TV set, rather than straight down the back
of the TV.
Make sure that all cables are plugged or screwed tightly into their jacks.
Please make sure that all antennas and cables are properly grounded.
Whenever possible, route audio and video cables away from power cords.
Protect your components from overheating
Do not block ventilation holes in the top of the DIRECTV®Receiver, or any other components. Make sure to position the components so
that air can circulate freely.
If you are positioning the components in a stand or rack, make sure to allow for proper ventilation.
Do not stack components.
If you have a stereo amplifier or receiver as a system component, please place it on the top shelf or top rack so that hot air rising from
it will not flow around other components.
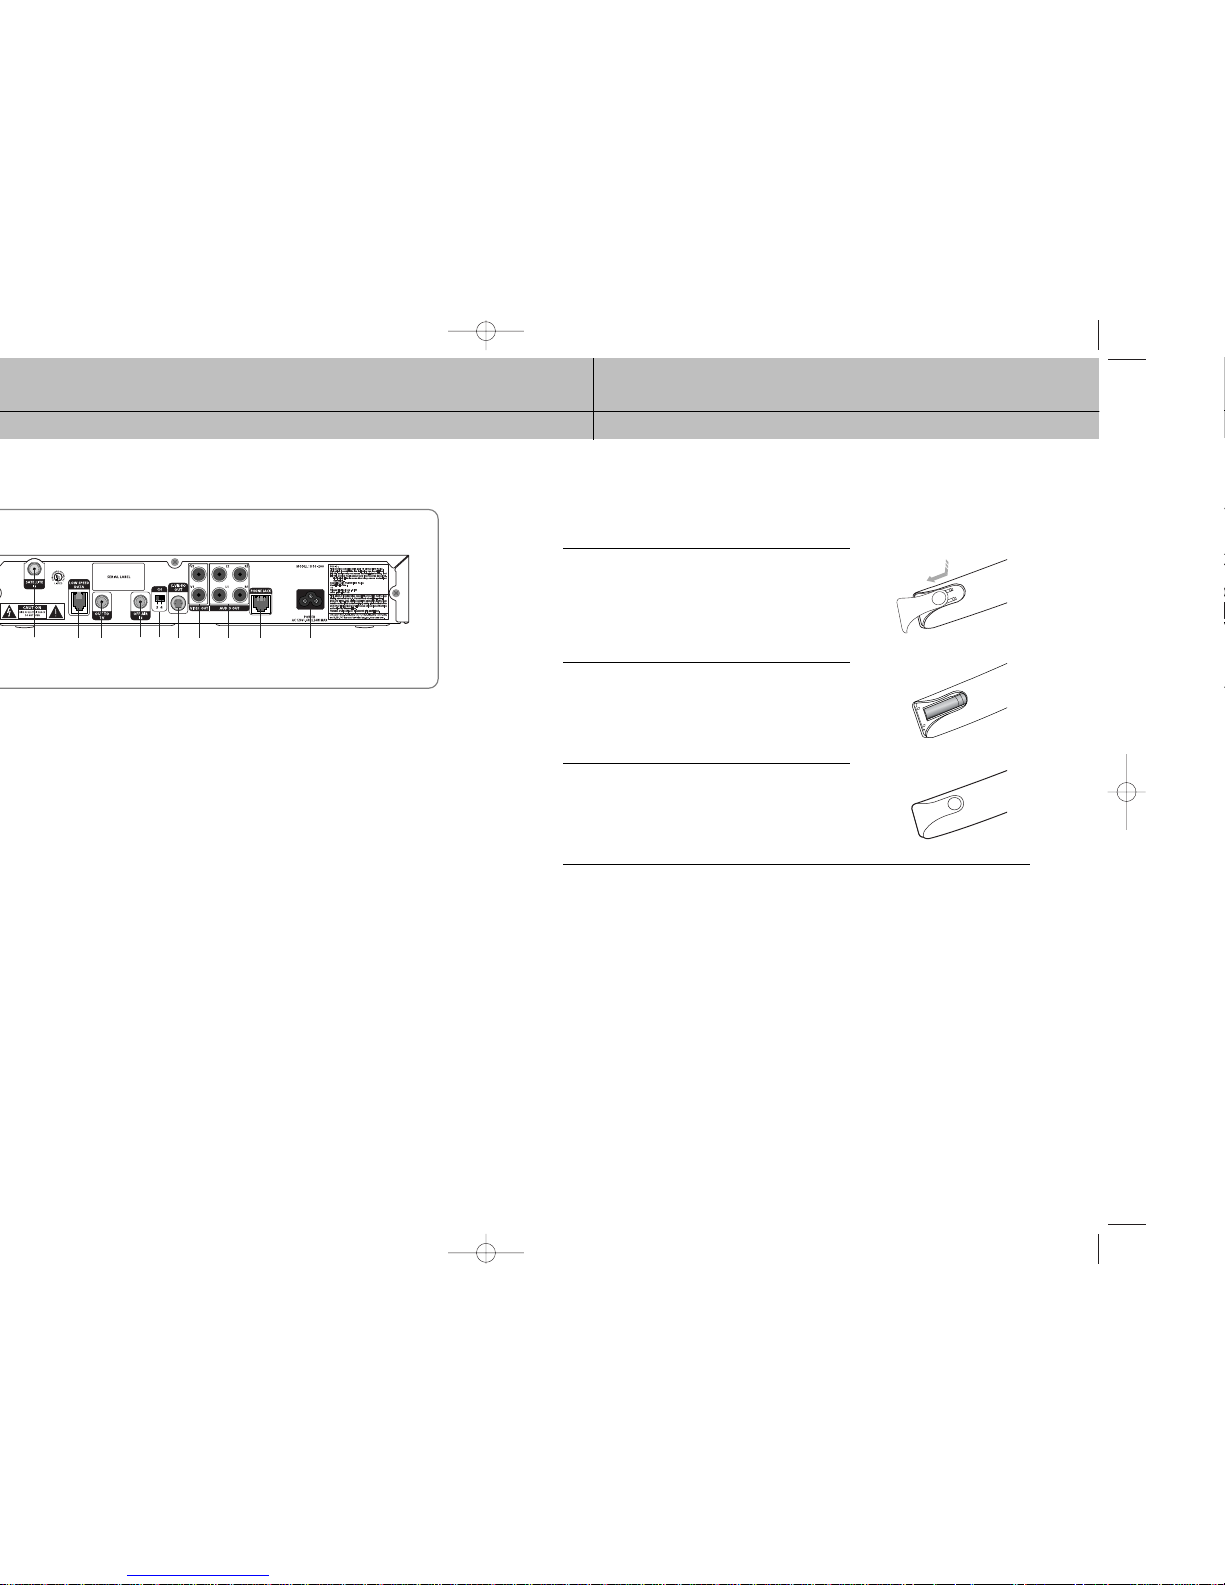
Make strong connections
Make sure you securely connect cables when making connections. When a tight fit makes a secure connection difficult, you can
sometimes make it easier by gently twisting the cable-end while pushing it onto the jack. (Important: never twist S-Video — it has
specially shaped ends that must be correctly oriented before connecting.)
21
CHAPTER 2
Setting up and connecting
2
2
®
Receiver.
®
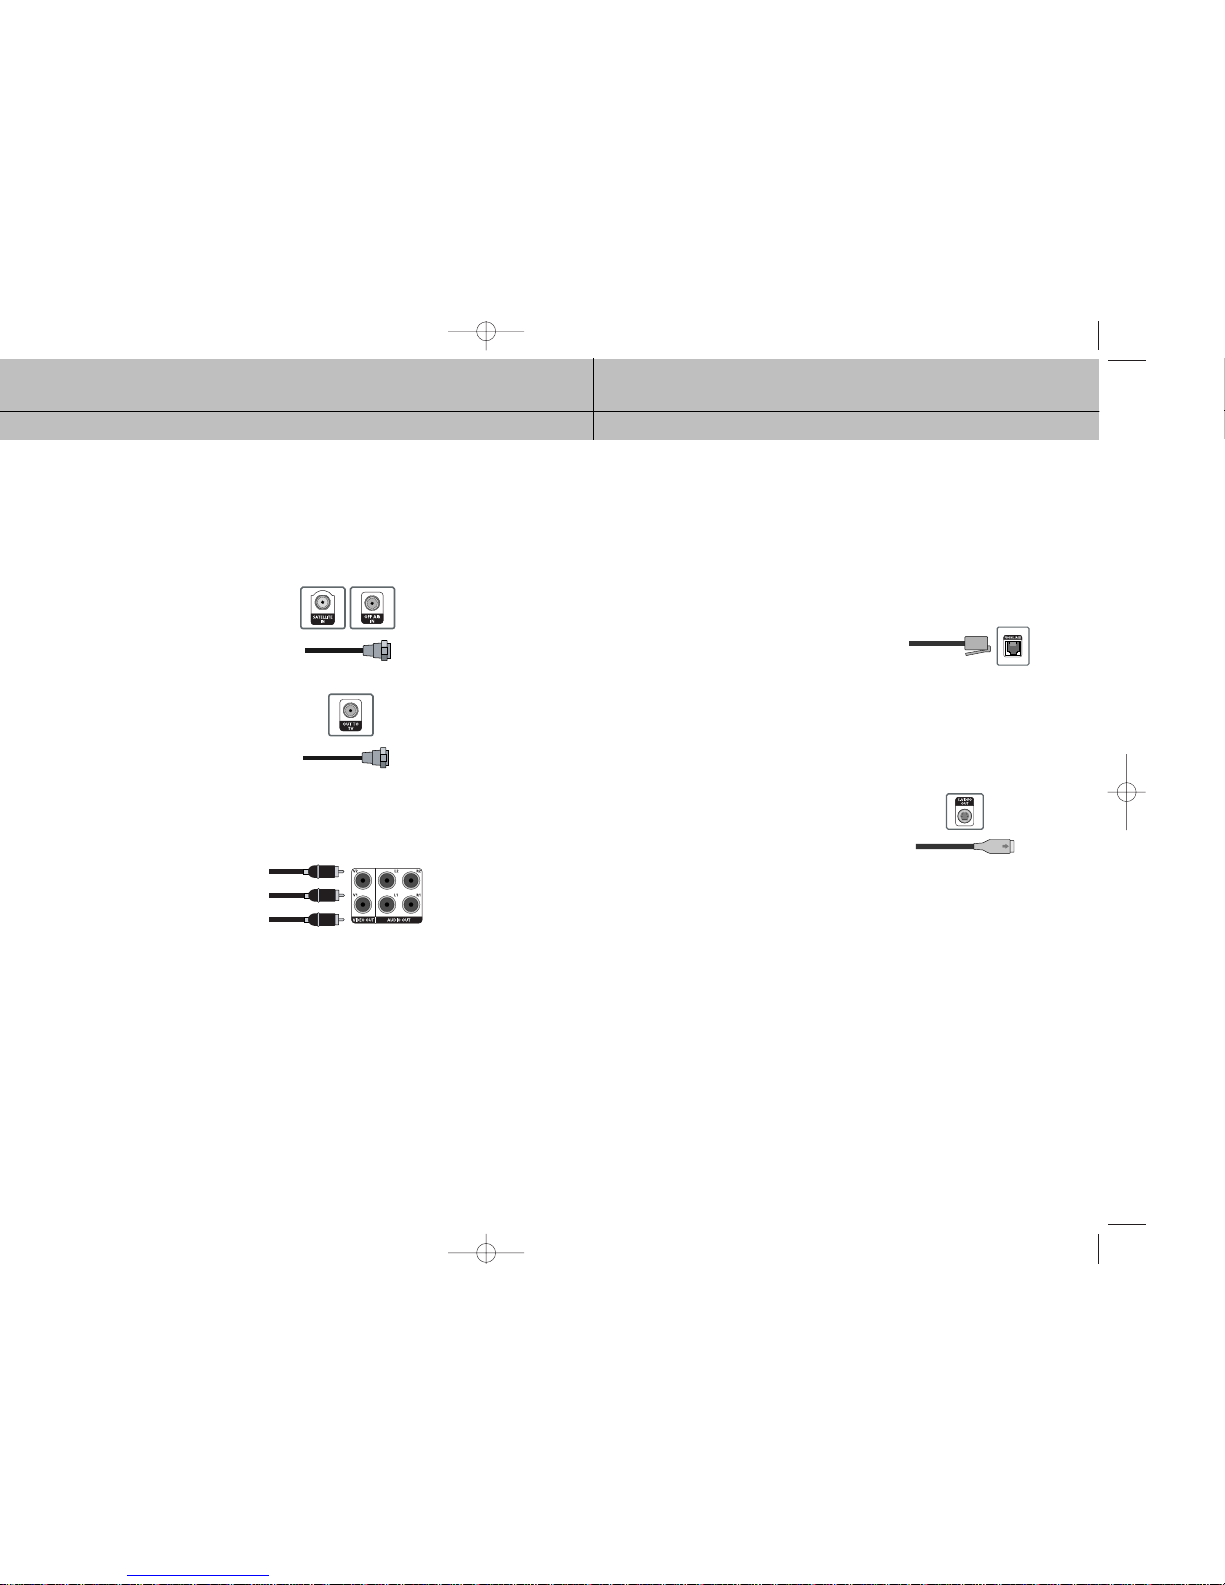
Telephone jack and cord
The Phone Line jack and the included telephone cord connect
your DIRECTV®Receiver to a phone line. If your home does
not have RJ-11 type phone jacks, please contact your phone
company to get one installed. A continuous land-based
phone line connection is required for DIRECTV
®
Pay Per View
functionality and DIRECTV subscriptions. Any calls generated
by the DIRECTV
®
Receiver are toll-free. These calls are typically
made in the middle of the night; your phone is in use for
approximately 30 seconds.
S-Video jack and cable
S-Video cables and jacks are used to connect to TVs, VCRs,
and other video devices equipped with S-Video input jacks.
S-Video connections provide a high-quality TV picture (better
than RCA-type A/V jacks and cables). S-Video connectors
must be correctly aligned before you can plug in the cable.
Maximum resolution via this jack is 480i. (This cable carries
the video signal only; use with audio cables for the audio
signal.)
23
CHAPTER 2
Setting up and connecting
2
2
®
Receiver
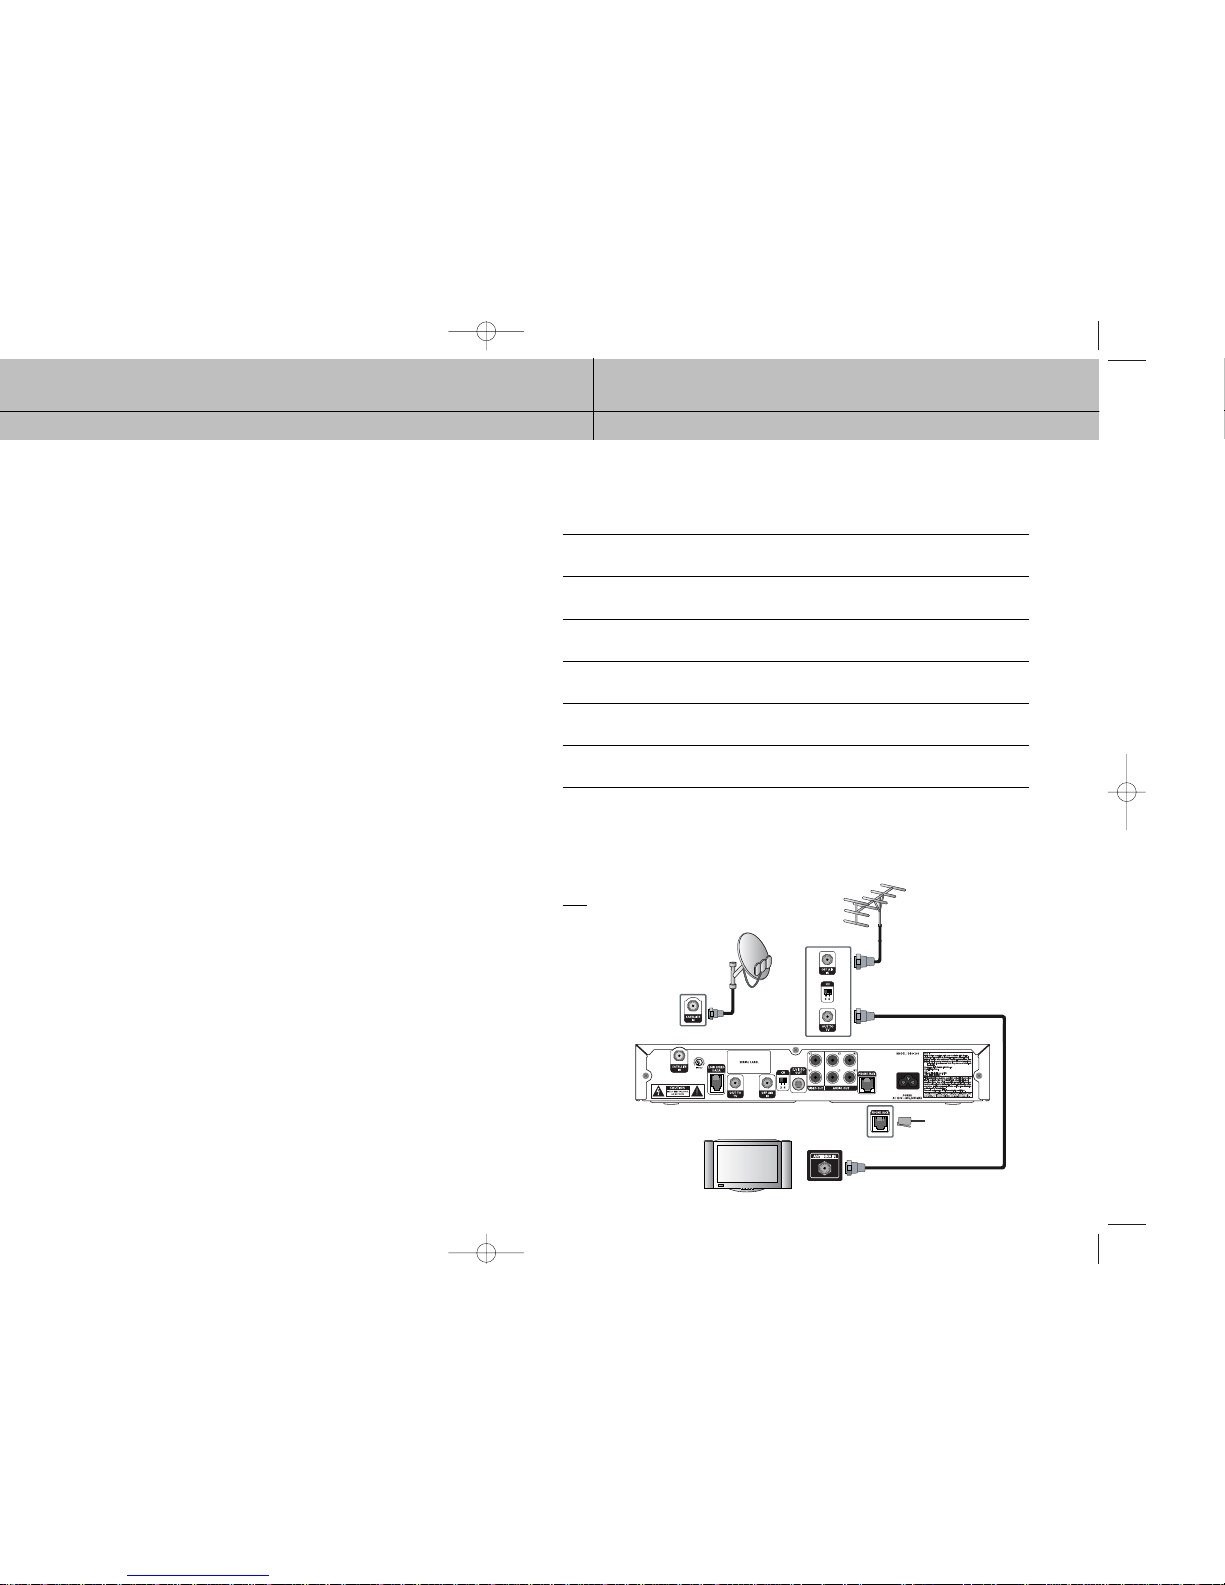
Connection option A:
DIRECTV Receiver to TV with RF cable only
If connection option A best matches your needs, follow these steps:
1
Make sure your TV and DIRECTV Receiver are turned off and unplugged.
2
Connect the RG-6 coaxial cable running from your satellite dish to the SATELLITE IN jack
on the back of your DIRECTV Receiver.
3
Connect the coaxial cable running from your cable TV system or off-air TV antenna to the
OFF-AIR IN jack on the back of the DIRECTV Receiver.
4
Connect the supplied phone cord to a telephone wall jack and to the Phone Line jack on the
back of the DIRECTV Receiver.
5
(Optional) Connect the coaxial cable to the Antenna In jack on your TV and to the TV OUT
jack on the back of the DIRECTV Receiver.
6
Plug in the power cords for your DIRECTV Receiver and TV.
To w atch DIRECTV®programming
To watch DIRECTV®programming, tune your TV to channel 3 or 4 (depending on the
position of the CH 3/4 switch on the back of your DIRECTV Receiver). Channel 3 is the
default setting.
NOTE
DIRECTV Receiver : Turned ON
Ant signal : Turned OFF (STBY)
DIRECTV Receiver
TV
25
CHAPTER 2
Setting up and connecting
2
2
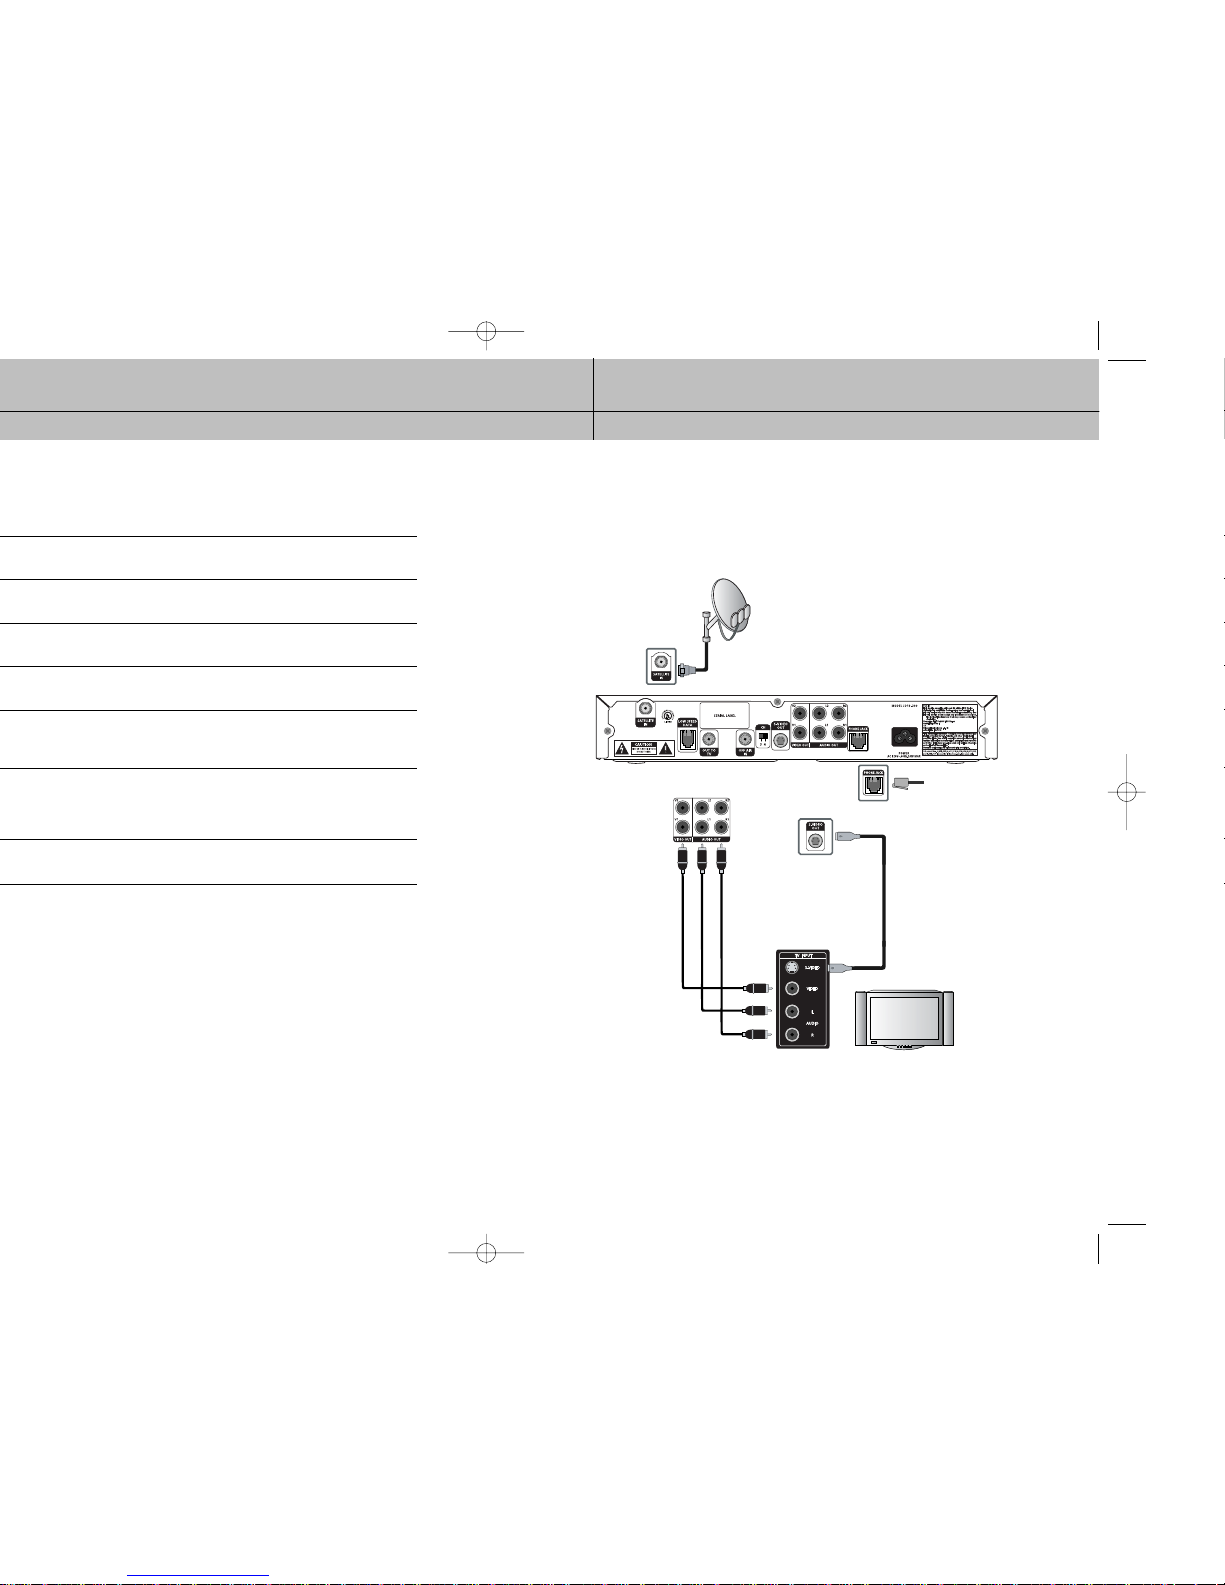
To w atch DIRECTV®programming
Set your TV to the appropriate input mode. This is a setting on your TV usually controlled
by a Video, Input, or Mode button. See the manual for your TV for instructions.
DIRECTV Receiver
TV
27
CHAPTER 2
Setting up and connecting
2
2
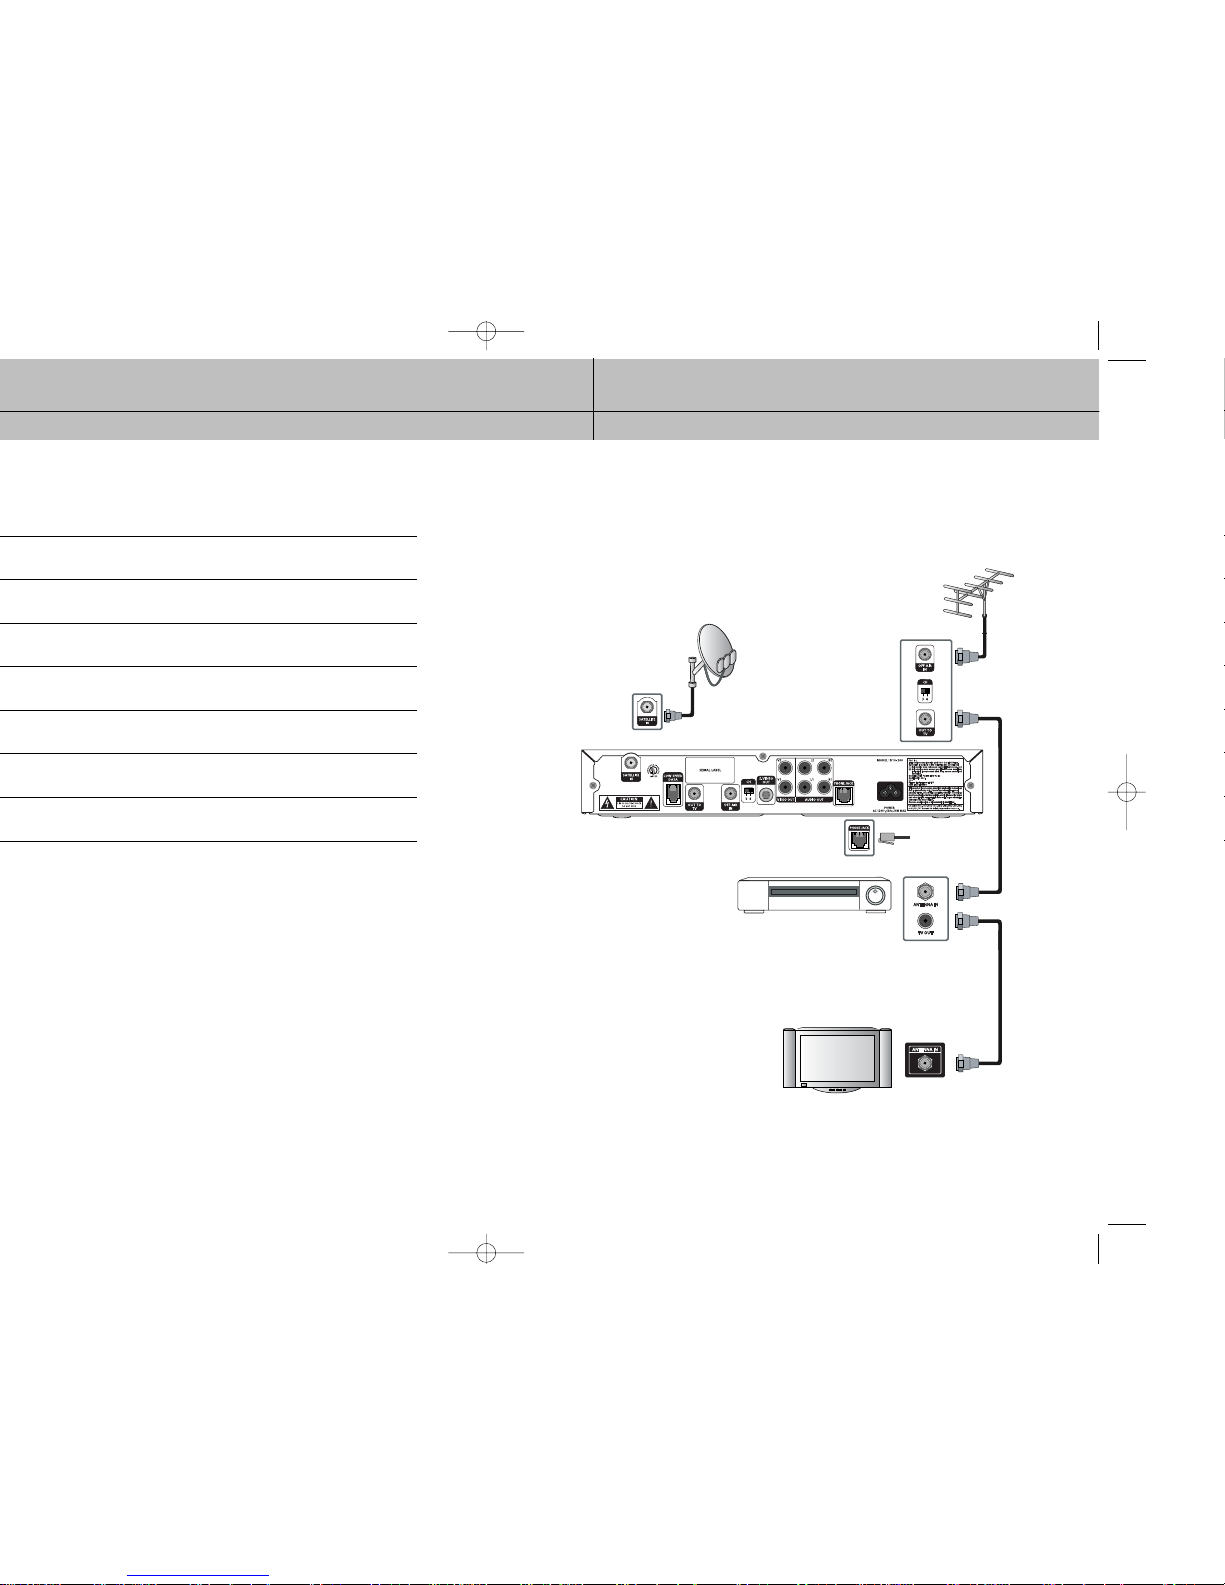
To w atch DIRECTV®programming
With your VCR in TV mode or powered off, tune your TV to channel 3 or 4 (depending
on the position of the CH 3/4 switch on the back of your DIRECTV Receiver). Channel 3
is the default setting. The position of the CH 3/4 switch on your DIRECTV Receiver should
match the setting of the similar CH 3/4 switch on your VCR.
TV
DIRECTV Receiver
VCR
 Loading...