


C61RAAST
Table of contents
 Loading...
Installation and Operating Instructions
Ceramic Glass Hob
C61RAAST / C61RABAL / C61RACN / C61RADST
To avoid the risk of accidents or damage to the hob, read all instructions before installing or
using the appliance. Keep this manual for future reference.


1
EN
Contents
Using This Manual . . . . . . . . . . . . . . . . . . . . . . . . . . . . . . . . . . . . . . . . . . . . . . . . . . . . . . . 2
Safety . . . . . . . . . . . . . . . . . . . . . . . . . . . . . . . . . . . . . . . . . . . . . . . . . . . . . . . . . . . . . . . . . . 3
Electrical safety . . . . . . . . . . . . . . . . . . . . . . . . . . . . . . . . . . . . . . . . . . . . . . . . . . . . . . . . . 3
Child safety . . . . . . . . . . . . . . . . . . . . . . . . . . . . . . . . . . . . . . . . . . . . . . . . . . . . . . . . . . . . 3
Safety during use . . . . . . . . . . . . . . . . . . . . . . . . . . . . . . . . . . . . . . . . . . . . . . . . . . . . . . . 4
Safety when cleaning . . . . . . . . . . . . . . . . . . . . . . . . . . . . . . . . . . . . . . . . . . . . . . . . . . . . 4
Disposal Instructions . . . . . . . . . . . . . . . . . . . . . . . . . . . . . . . . . . . . . . . . . . . . . . . . . . . . . 4
Installing the Hob . . . . . . . . . . . . . . . . . . . . . . . . . . . . . . . . . . . . . . . . . . . . . . . . . . . . . . . . 5
Regulations and compliance . . . . . . . . . . . . . . . . . . . . . . . . . . . . . . . . . . . . . . . . . . . . . . . 5
Safety instructions for the installer . . . . . . . . . . . . . . . . . . . . . . . . . . . . . . . . . . . . . . . . . . 5
Connecting to the mains power supply . . . . . . . . . . . . . . . . . . . . . . . . . . . . . . . . . . . . . . . 6
Installing into the countertop . . . . . . . . . . . . . . . . . . . . . . . . . . . . . . . . . . . . . . . . . . . . . . . 7
Parts and Features . . . . . . . . . . . . . . . . . . . . . . . . . . . . . . . . . . . . . . . . . . . . . . . . . . . . . . 10
Cooking zones and control panel . . . . . . . . . . . . . . . . . . . . . . . . . . . . . . . . . . . . . . . . . . 10
Components . . . . . . . . . . . . . . . . . . . . . . . . . . . . . . . . . . . . . . . . . . . . . . . . . . . . . . . . . . 11
The key features of your appliance . . . . . . . . . . . . . . . . . . . . . . . . . . . . . . . . . . . . . . . . . 12
Safety shutoff . . . . . . . . . . . . . . . . . . . . . . . . . . . . . . . . . . . . . . . . . . . . . . . . . . . . . . . . . 13
Residual heat indicator . . . . . . . . . . . . . . . . . . . . . . . . . . . . . . . . . . . . . . . . . . . . . . . . . . 13
Before You Begin
Initial cleaning . . . . . . . . . . . . . . . . . . . . . . . . . . . . . . . . . . . . . . . . . . . . . . . . . . . . . . . . . 14
Hob Use . . . . . . . . . . . . . . . . . . . . . . . . . . . . . . . . . . . . . . . . . . . . . . . . . . . . . . . . . . . . . . . 14
Using suitable cookware . . . . . . . . . . . . . . . . . . . . . . . . . . . . . . . . . . . . . . . . . . . . . . . . . 14
Using the touch control sensors . . . . . . . . . . . . . . . . . . . . . . . . . . . . . . . . . . . . . . . . . . . 15
Switching the appliance on . . . . . . . . . . . . . . . . . . . . . . . . . . . . . . . . . . . . . . . . . . . . . . . 16
Temperature control . . . . . . . . . . . . . . . . . . . . . . . . . . . . . . . . . . . . . . . . . . . . . . . . . . . . 16
Switching the appliance off . . . . . . . . . . . . . . . . . . . . . . . . . . . . . . . . . . . . . . . . . . . . . . . 17
Switching a cooking zone off . . . . . . . . . . . . . . . . . . . . . . . . . . . . . . . . . . . . . . . . . . . . . . 17
Using the child safety lock . . . . . . . . . . . . . . . . . . . . . . . . . . . . . . . . . . . . . . . . . . . . . . . . 18
Locking and unlocking the control panel . . . . . . . . . . . . . . . . . . . . . . . . . . . . . . . . . . . . . 20
Suggested settings for cooking specific foods . . . . . . . . . . . . . . . . . . . . . . . . . . . . . . . . 20
Cleaning and Care . . . . . . . . . . . . . . . . . . . . . . . . . . . . . . . . . . . . . . . . . . . . . . . . . . . . . . 21
Hob . . . . . . . . . . . . . . . . . . . . . . . . . . . . . . . . . . . . . . . . . . . . . . . . . . . . . . . . . . . . . . . . . 21
Hob Frame (C61RAAST, C61RABAL, C61RADST) . . . . . . . . . . . . . . . . . . . . . . . . . . . . 22
To avoid damaging your appliance . . . . . . . . . . . . . . . . . . . . . . . . . . . . . . . . . . . . . . . . . 22
Warranty and Service . . . . . . . . . . . . . . . . . . . . . . . . . . . . . . . . . . . . . . . . . . . . . . . . . . . .
FAQs and troubleshooting . . . . . . . . . . . . . . . . . . . . . . . . . . . . . . . . . . . . . . . . . . . . . . . . 23
Service . . . . . . . . . . . . . . . . . . . . . . . . . . . . . . . . . . . . . . . . . . . . . . . . . . . . . . . . . . . . . . 24
Technical Data
. . . . . . . . . . . . . . . . . . . . . . . . . . . . . . . . . . . . . . . . . . . . . . . . . . . . . . . 14
. . . . . . . . . . . . . . . . . . . . . . . . . . . . . . . . . . . . . . . . . . . . . . . . . . . . . . . . . 25
23
Using This Manual
Please take the time to read this owner’s manual, paying particular attention to the safety
EN
information contained in the following section, before using your appliance. Keep this manual
for future reference. If transferring ownership of the appliance, please remember to pass the
manual on to the new owner.
The following symbols are used in the text
This is the safety alert symbol.
Warning indicates information concerning your personal safety.
Important indicates information on avoiding damage to the appliance.
This symbol indicates useful information and practical tips.
This symbol refers to measures that can be taken to help protect the environment.
1. Numbers like these indicate step - by - step instructions for using the appliance.
2. ...
3. ...
This manual contains information on steps you can take yourself to diagnose and resolve
problems that may arise. Refer to the section “Troubleshooting.”
2

3
EN
Safety
The safety aspects of this appliance comply with accepted technical standards and
the German Appliance Safety Law. However, as manufacturers we also believe it is
our responsibility to familiarise you with the following safety instructions.
Electrical safety
• Be sure the appliance is properly installed and grounded by a qualified technician.
• The appliance should be serviced only by qualified service personnel. Repairs carried out
by unqualified individuals may cause injury or serious malfunction. If your appliance is in
need of repair, contact your local service centre. Failure to follow these instructions may
result in damage and void the warranty.
• Flush - mounted appliances may be operated only after they have been installed in
cabinets and workplaces that conform to the relevant standards. This ensures sufficient
protection against contact for electrical units as required by the VDE [Association of German Electrical Engineers].
• If your appliance malfunctions or if fractures, cracks or splits appear:
- switch off all cooking zones;
- disconnect the hob from the mains supply; and
- contact your local service centre.
• If the cooktop cracks, turn the appliance off to avoid the possibility of electric shock. Do not
use your hob until the glass surface has been replaced.
• Do not use the hob to heat aluminium foil, products wrapped in aluminium foil or frozen
foods packaged in aluminium cookware.
• This appliance is not intended for use by persons (including children) with reduced physi
cal, sensory or mental capabilities, or lack of experience and knowledge, unless they
have been given supervision or instruction concerning use of the appliance by a person
responsible for their safety.
-
Warning: Accessible parts may become hot during use. To avoid burns young chil
dren should be kept away.
Child safety
This appliance is not intended for use by young children or infirm persons without
the adequate supervision of a responsible adult.
Young children should be supervised to ensure that they do not play with the appliance.
The cooking zones will become hot when you cook. Always keep small children
away from the appliance.
-

Safety (continued)
Safety during use
EN
• This appliance is to be used only for normal cooking and frying in the home. It is not designed for commercial or industrial use.
• Never use the hob for heating the room.
• Take care when plugging electrical appliances into mains sockets near the hob. Mains
leads must not come into contact with the cooktop.
• Overheated fat and oil can catch fire quickly. Never leave surface units unattended when
preparing foods in fat or oil, for example, when cooking chips.
• Turn the cooking zones off after use.
• Always keep the control panels clean and dry.
• Never place combustible items on the hob. It may cause fire.
Safety when cleaning
• Always turn the appliance off before cleaning.
• For safety reasons do not clean the appliance with a steam jet or high - pressure cleaner.
• Clean the hob in accordance with the cleaning and care instructions contained in this
manual.
Disposal Instructions
Disposing of the packaging material
• All materials used to package the appliance are fully recyclable. Sheet and hard foam
parts are appropriately marked. Please dispose of packaging materials and old appliances
with due regard to safety and the environment.
Proper disposal of your old appliance
Warning: Before disposing of your old appliance, make it inoperable so that it can-
To do this, have a qualified technician disconnect the appliance from the mains sup-
not be a source of danger.
ply and remove the mains lead.
• The appliance may not be disposed of in the household rubbish.
• Information about collection dates and public refuse disposal sites is available from your
local refuse department or council.
4
5
EN
Installing the Hob
Important: Be sure the new appliance is installed and grounded only by qualified
Please observe this instruction. The warranty will not cover any damage that may
Technical data is provided at the end of this manual.
personnel.
occur as a result of improper installation.
Regulations and compliance
This appliance meets the following standards:
• EN 60 335 - 1 and EN 60 335 - 2 - 6, relating to the safety of electrical appliances for house
hold use and similar purposes;
• EN 60350, or DIN 44546 / 44547 / 44548, relating to the operating features of electric cook
ers, hobs, ovens, and grills for household use;
• EN 55014 - 2;
• EN 55014;
• EN 61000 - 3 - 2; and
• EN 61000 - 3 - 3, relating to basic requirements for electromagnetic compatibility (EMC).
This appliance complies with the following EU Directives:
• 73 / 23 / EWG dated 19.02.1973 (Low Voltage Directive);
• 89 / 336 / EWG dated 03.05.1989 (EMC Directive including Amending Directive 92
/ 31 / EWG); and
• 93 / 68 / EWG CE Labeling Directive.
-
Safety instructions for the installer
• A device must be provided in the electrical installation that allows the appliance to be discon-
nected from the mains at all poles with a contact opening width of at least 3 mm. Suitable
isolation devices include line protecting cut - outs, fuses (screw type fuses are to be removed
from the holder), earth leakage trips and contactors.
• With respect to fire protection, this appliance corresponds to EN 60 335 - 2 - 6. This type of
appliance may be installed with a high cupboard or wall on one side.
• Drawers may not be fitted underneath the hob.
• The installation must guarantee shock protection.
• The kitchen unit in which the appliance is fitted must satisfy the stability requirements of DIN
68930.
• For protection against moisture, all cut surfaces are to be sealed with a suitable sealant.
• On tiled work surfaces, the joints in the area where the hob sits must be completely filled with
grout.
• On natural, artificial stone, or ceramic tops, the snap action springs must be bonded in place
with a suitable artificial resin or mixed adhesive.
• Ensure that the seal is correctly seated against the work surface without any gaps. Additional
silicon sealant must not be applied; this would make removal more difficult when servicing.
• The hob must be pressed out from below when removed.
-
Installing the Hob (Continued)
Connecting to the mains power supply
EN
Before connecting, check that the nominal voltage of the appliance, that is, the voltage stated on the rating
plate, corresponds to the available supply voltage. The rating plate is located on the lower casing of the
hob.
Shut off power to circuit before connecting wires to circuit.
The heating element voltage is AC230 V~. The appliance also works perfectly on older networks with
AC220 V~.
The hob is to be connected to the mains using a device that allows the appliance to be disconnected from
the mains at all poles with a contact opening width of at least 3 mm, eg. automatic line protecting cut - out,
earth leakage trips or fuse.
A type H05SS - F (180°C) cable or one of a higher grade must be used as the mains connecting cable.
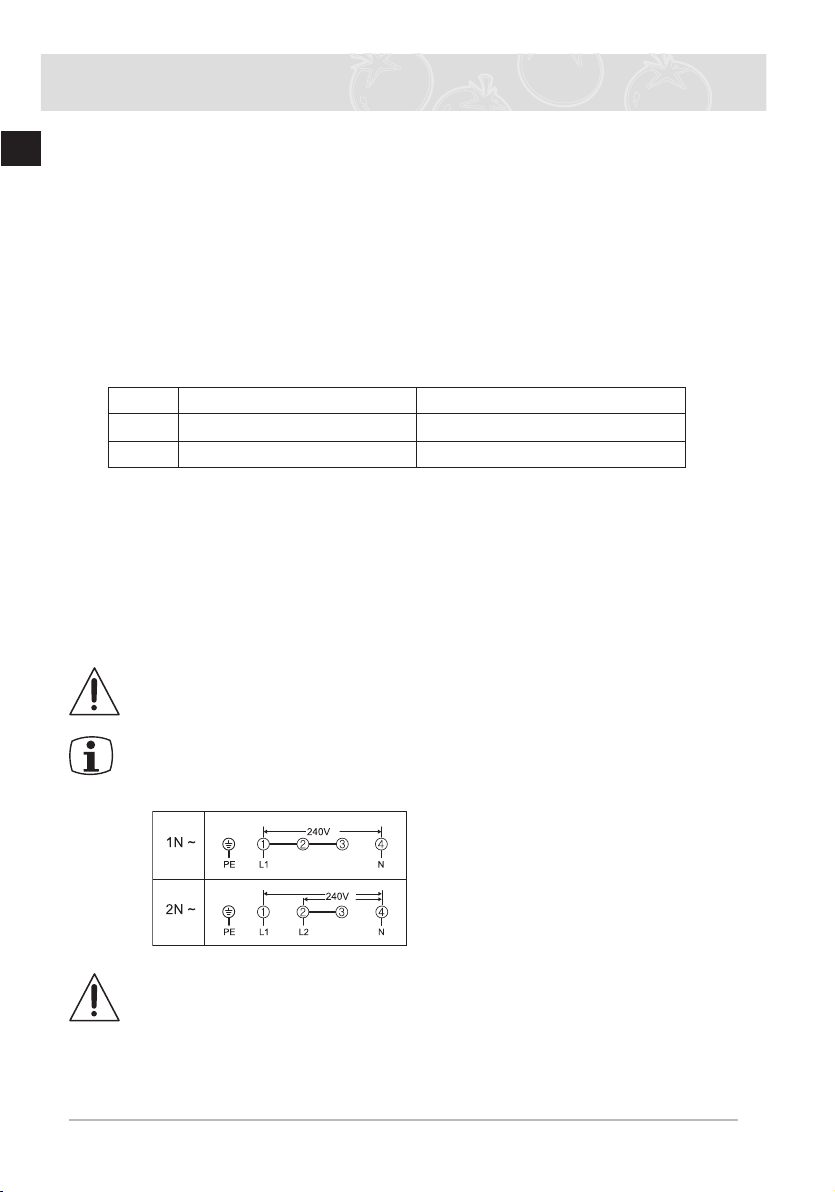
Rated current of appliance (A) Nominal cross-sectional area (mm2)
1N~
2N~ > 10 and ≤ 16 > 1.5 and < 2.5
The connection must be carried out as shown in the diagram. The connecting links should be fitted according to the appropriate connection diagram.
The earth lead is connected to terminal. The earth lead must be longer than leads carrying electric current.
The cable connections must be made in accordance with regulations and the terminal screws tightened
securely.
The connecting cable is to be secured with the mains cable cleat and the covering closed by pressing firmly
(locking into place). Before switching on for the first time, any protective foil or stickers must be removed
from the ceramic glass surface.
Once the hob is connected to the mains supply, check that all cooking zones are
ready for use by briefly switching each on in turn at the maximum setting.
> 25 and ≤ 32 > 4 and < 6
When the hob is powered on for the first time, all displays light and the child safety
lock is activated.
< IN ~ >
L: Brown
N: Blue
PE: Green
Warning
: Pay attention (conformity) to phase and neutral allocation of house connection and appliance (connection schemes); otherwise, components can be damaged.
Warranty does not cover damage resulting from improper installation.
6
7
EN
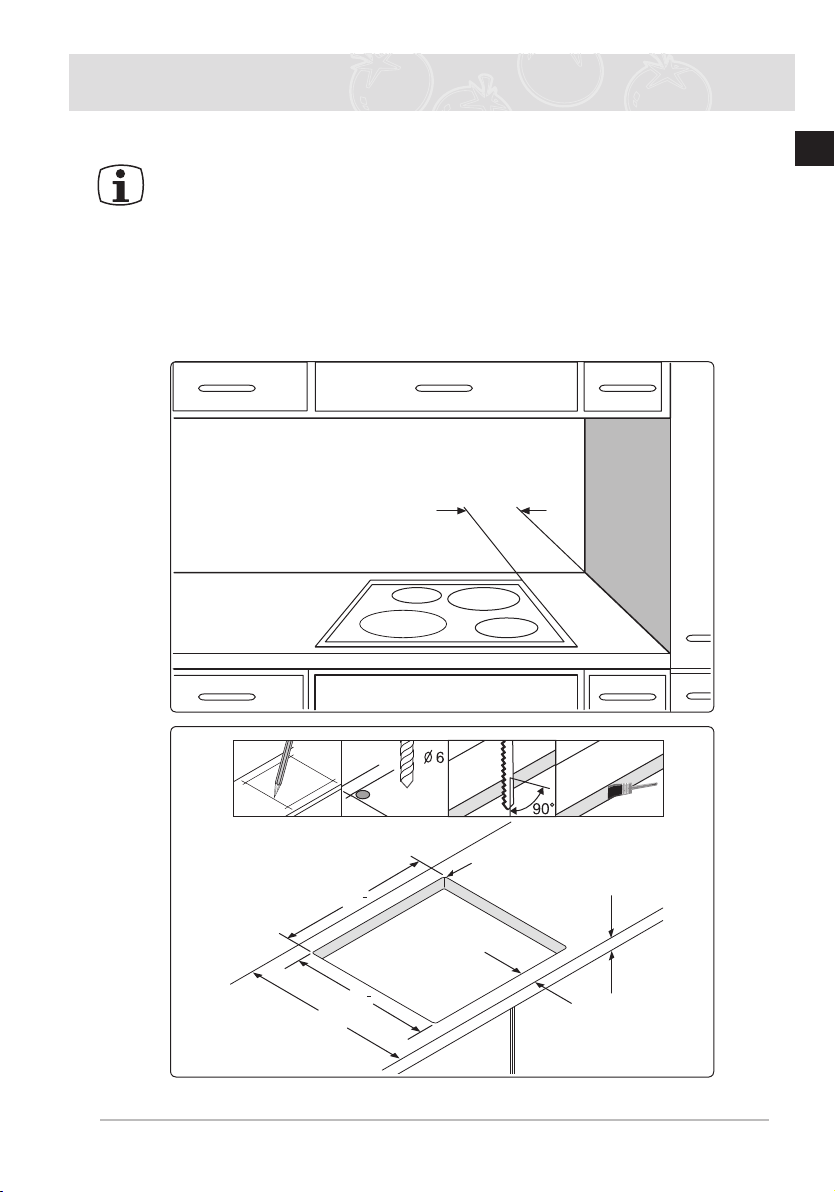
Installing the Hob (Continued)
Min. 50mm
560
min. 20
600
50
+1
R3
490
+1
x4
Installing into the countertop
Make a note of the serial number on the appliance rating plate prior to installation.
Pay special attention to the minimum space and clearance requirements.
Secure the brackets at both sides with the provided screws before mounting the hob
When installing this cook top, a board shall be fitted which will limit acess to the
cook top base enclosure
This number will be required in the case of requests for service and is no longer accessible after installation, as it is on the original rating plate on the underside of the
appliance.
onto the brackets.
Loading...