

Samsung BD-FM59, BD-FM59C User Manual

imagine the possibilities
Thank you for purchasing this Samsung product.
To receive more complete service,
please register your product at
www.samsung.com/register
Blu-ray
™
Disc Player
user manual
BD-FM59
BD-FM59C
Downloaded From Disc-Player.com Samsung Manuals
Safety Information
|
2 English
WARNING
• To reduce the risk of fire or electric shock, do
not expose this appliance to rain or moisture.
FCC NOTE (for U.S.A)
This equipment has been tested and found to
comply with the limits for a Class B digital device,
pursuant to Part 15 of the FCC rules. These limits are
designed to provide reasonable protection against
harmful interference in a residential installation. This
equipment generates, uses and can radiate radio
frequency energy and, if not installed and used in
accordance with the instructions, may cause harmful
interference to radio or television reception, which can
be determined by turning the equipment off and on.
The user is encouraged to try to correct the
interference by one or more of the following measures.
• Reorient or relocate the receiving antenna.
• Increase the separation between the equipment
and receiver.
• Connect this equipment into an outlet on a
circuit different from that to which the receiver is
connected.
• Consult the dealer or an experienced radio/TV
technician for help.
• This class B digital product meets all
requirements of the Canadian Interference Causing Equipment Regulations.
Note to CATV system installer
This reminder is provided to call CATV system
installer's attention to Article 820-40 of the
National Electrical Code (Section 54 of Canadian
Electrical Code, Part I) that provides guidelines
for proper grounding and, in particular, specifies
that the cable ground shall be connected to the
grounding system of the building as close to the
point of cable entry as practical.
Warning
TO REDUCE THE RISK OF ELECTRIC SHOCK, DO NOT REMOVE THE COVER (OR BACK).
NO USER-SERVICEABLE PARTS ARE INSIDE. REFER SERVICING TO QUALIFIED SERVICE PERSONNEL.
CAUTION
RISK OF ELECTRIC SHOCK
DO NOT OPEN
The lighting flash and Arrowhead within the
triangle is a warning sign alerting you to
dangerous voltage inside the product.
CAUTION:
TO REDUCE THE RISK OF ELECTRIC
SHOCK, DO NOT REMOVE COVER (OR BACK).
NO USER SERVICEABLE PARTS INSIDE. REFER
SERVICING TO QUALIFIED SERVICE PERSONNEL.
The exclamation point within the triangle
is a warning sign alerting you to important
instructions accompanying the product.
CLASS 1 LASER PRODUCT
This Compact Disc player is classified as a CLASS
1 LASER product. Use of controls, adjustments
or performance of procedures other than those
specified herein may result in hazardous radiation
exposure.
Complies with 21CFR 1040.10 except for
deviations pursuant to Laser Notice No. 50, dated
June 24, 2007.
DANGER :
• VISIBLE AND INVISIBLE LASER RADIATION
WHEN OPEN. AVOID DIRECT EXPOSURE TO
BEAM. (FDA 21 CFR)
CAUTION :
• CLASS 3B VISIBLE AND INVISIBLE LASER
RADIATION WHEN OPEN. AVOID EXPOSURE
TO THE BEAM. (IEC 60825-1)
• THIS PRODUCT UTILIZES A LASER.
USE OF CONTROLS OR ADJUSTMENTS
OR PERFORMANCE OF PROCEDURES
OTHER THAN THOSE SPECIFIED HEREIN
MAY RESULT IN HAZARDOUS RADIATION
EXPOSURE. DO NOT OPEN COVER AND DO
NOT REPAIR YOURSELF. REFER SERVICING
TO QUALIFIED PERSONNEL.
CLASS 1 LASER PRODUCT
KLASSE 1 LASER PRODUKT
LUOKAN 1 LASER LAITE
KLASS 1 LASER APPARAT
PRODUCTO LÁSER CLASE 1
| NOTES |
\If the Region number of a Blu-ray Disc/DVDs does not
correspond to the Region number of this player, the player
cannot play the disc.
Downloaded From Disc-Player.com Samsung Manuals
01 Safety Information
Precautions
Important Safety Instructions
Read these operating instructions carefully before
using the unit. Follow all the safety instructions
listed below.
Keep these operating instructions handy for future
reference.
1. Read these instructions.
2. Keep these instructions.
3. Heed all warnings.
4. Follow all instructions.
5. Do not use this apparatus near water.
6. Clean only with a dry cloth.
7. Do not block any ventilation openings. Install
in accordance with the manufacturer's
instructions.
8. Do not install near any heat sources such
as radiators, heat registers, stoves, or other
apparatus (including AV receivers) that
produce heat.
9. Do not defeat the safety purpose of the
polarized or grounding-type plug. A polarized
plug has two blades with one wider than the
other. A grounding type plug has two blades
and a third grounding prong. The wide blade
or the third prong are provided for your safety.
If the provided plug does not fit into your
outlet, consult an electrician for replacement
of the obsolete outlet.
10. Protect the power cord from being walked on
or pinched particularly at plugs, convenience
receptacles, and the point where it exits the
apparatus.
11. Only use attachments/accessories specified
by the manufacturer.
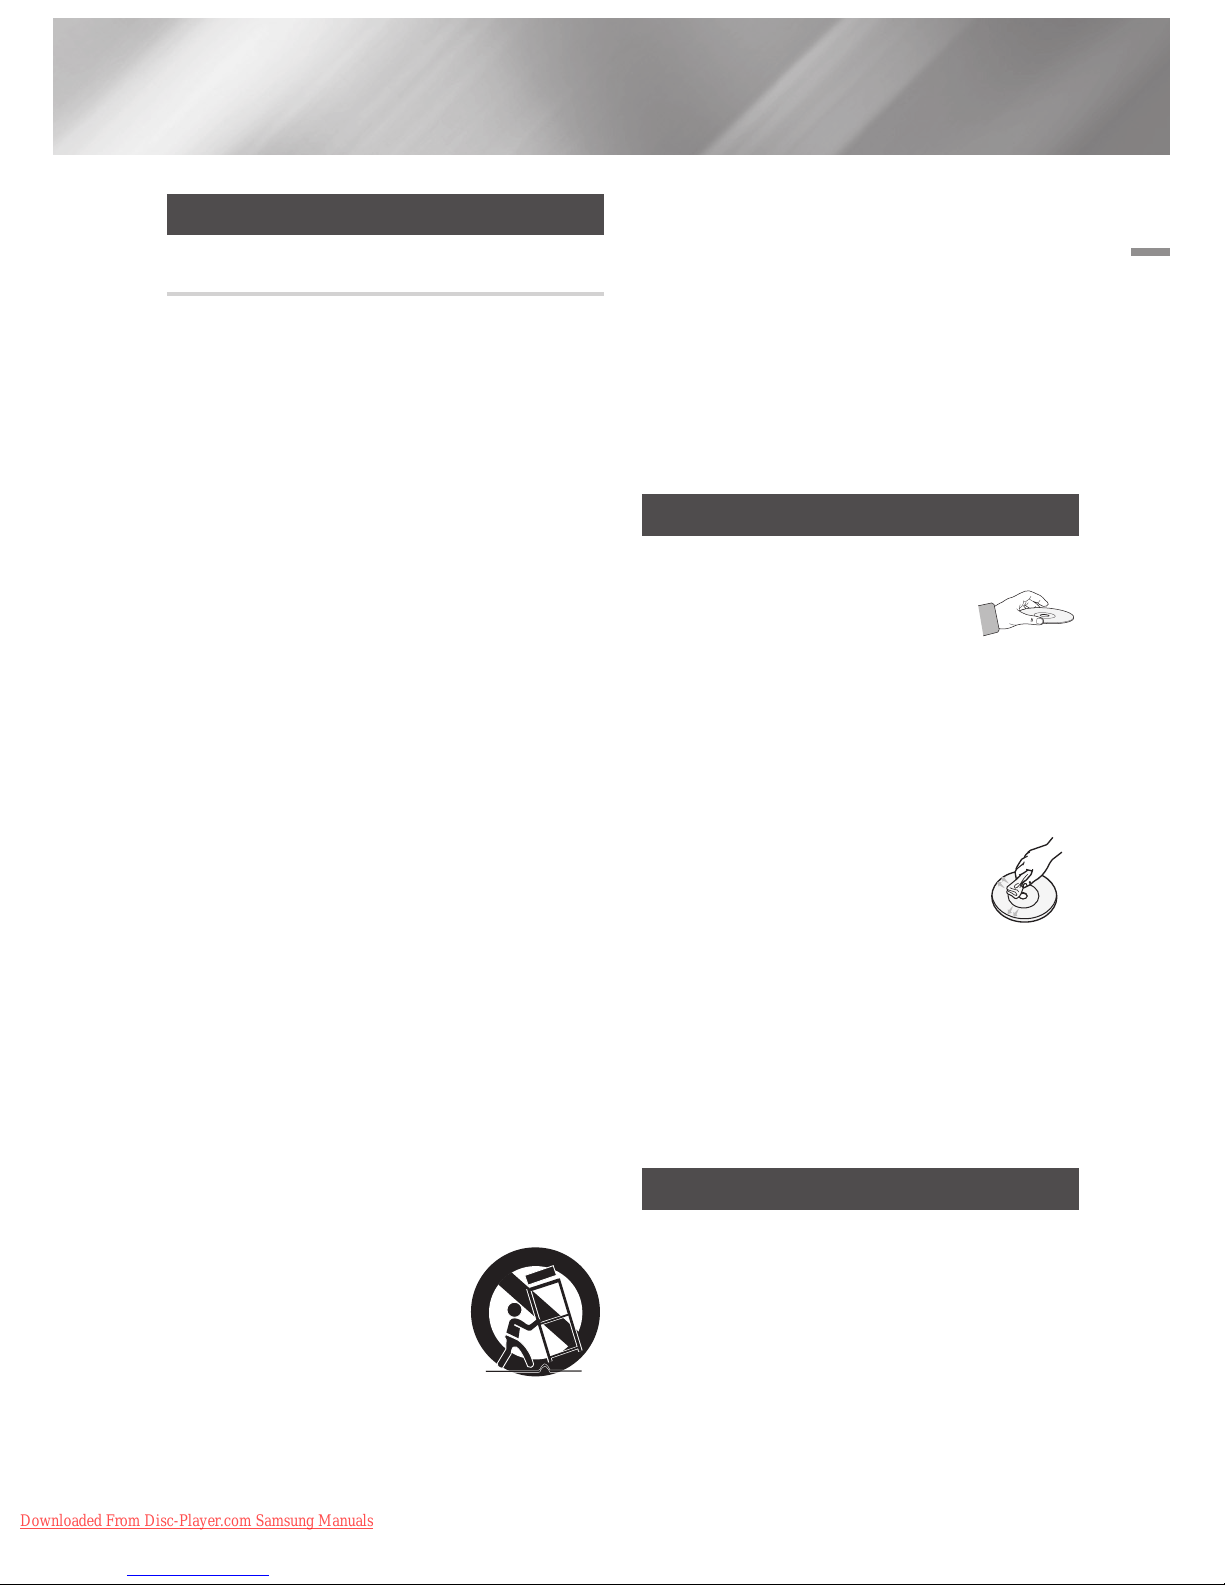
12. Use only with the cart,
stand, tripod, bracket,
or table specified by the
manufacturer, or sold with
the apparatus. When a cart
is used, use caution when
moving the cart/apparatus combination to
avoid injury from tip-over.
13. Unplug this apparatus during lightning storms
or when unused for long periods of time.
14. Refer all servicing to qualified service
personnel. Servicing is required when the
apparatus has been damaged in any way,
such as when the power-supply cord or plug
is damaged, liquid has been spilled or objects
have fallen into the apparatus, the apparatus
has been exposed to rain or moisture, does
not operate normally, or has been dropped.
Disc Storage & Management
• Holding Discs
- Fingerprints or scratches on
a disc may reduce sound and
picture quality or cause skipping.
- Avoid touching the surface of a disc where
data has been recorded.
- Hold the disc by the edges so that fingerprints
will not get on the surface.
- Do not stick paper or tape on the disc.
• Cleaning Discs
- If you get fingerprints or dirt on a
disc, clean it with a mild detergent
diluted in water and wipe with a
soft cloth.
- When cleaning, wipe gently from the inside to
the outside of the disc.
• Disc Storage
`Do not keep in direct sunlight.
`Keep in a cool ventilated area.
`Keep in a clean protection jacket and store
vertically.
Handling Cautions
• Do not expose this apparatus to dripping or
splashing. Do not put objects filled with liquids,
such as vases on the apparatus.
• To turn this apparatus off completely, you must
pull the power plug out of the wall socket.
Consequently, the power plug must be easily
and readily accessible at all times.
English 3
|
Downloaded From Disc-Player.com Samsung Manuals

Safety Information
• Do not plug multiple electric devices into the
same wall socket. Overloading a socket can
cause it to overheat, resulting in a fire.
• Before connecting other components to this
player, be sure to turn them off.
• If you move your player suddenly from a cold
place to a warm place, condensation may occur
on the operating parts and lens and cause
abnormal disc playback. If this occurs, unplug
the player, wait for two hours, and then connect
the plug to the power outlet.
Then, insert the disc, and try to play back again.
• If the product makes an abnormal noise or
produces a burning smell or smoke, turn off
the power switch immediately and disconnect
the power plug from the wall outlet. Then,
contact the nearest customer service center for
technical assistance. Do not use the product.
Using the product as it is may cause a fire or an
electric shock.
Using the 3D function
IMPORTANT HEALTH AND SAFETY
INFORMATION FOR 3D PICTURES.
Read and understand the following safety
information before using the 3D function.
• Some viewers may experience discomfort while
viewing 3D TV such as dizziness, nausea, and
headaches.
If you experience any such symptom, stop
viewing 3D TV, remove the 3D Active Glasses,
and rest.
• Watching 3D images for an extended period of
time may cause eye strain. If you feel eye strain,
stop viewing 3D TV, remove your 3D Active
Glasses, and rest.
• A responsible adult should frequently check on
children who are using the 3D function.
If there are any reports of tired eyes, headaches,
dizziness, or nausea, have the child stop viewing
3D TV and rest.
• Do not use the 3D Active Glasses for other
purposes (Such as general eyeglasses,
sunglasses, protective goggles, etc.).
• Do not use the 3D function or 3D Active Glasses
while walking or moving around. Using the 3D
function or 3D Active Glasses while moving
around may cause you to bump into objects,
trip, and/or fall, and cause serious injury.
• If you want to enjoy 3D content, connect a 3D
device (3D compliant AV receiver or TV) to the
player's HDMI OUT port using a high-speed
HDMI cable. Put on 3D glasses before playing
the 3D content.
• The player outputs 3D signals only through
HDMI cable connected to the HDMI OUT port.
• As the video resolution in 3D play mode is fixed
according to the resolution of the original 3D
video, you can not change the resolution to your
preference.
• Some functions such as BD Wise, screen size
adjustment, and resolution adjustment may not
operate properly in 3D play mode.
• You must use a high-speed HDMI cable for
proper output of the 3D signal.
• Stay at least three times the width of the screen
from the TV when watching 3D images. For
example, if you have a 46-inch screen, stay 138
inches (11.5 feet) from the screen.
• Place the 3D video screen at eye level for the
best 3D picture.
• When the player is connected to some 3D
devices, the 3D effect may not function properly.
• This player does not convert 2D content into
3D.
• "Blu-ray 3D" and "Blu-ray 3D" logo are
trademarks of the Blu-ray Disc Association.
Copyright
© 2013 Samsung Electronics Co.,Ltd.
All rights reserved; No part or whole of this user's
manual may be reproduced or copied without the
prior written permission of Samsung Electronics
Co.,Ltd.
|
4 English
Downloaded From Disc-Player.com Samsung Manuals

Contents
Contents
English 5
|
SAFETY INFORMATION
2 Warning
3 Precautions
3 Important Safety Instructions
3 Disc Storage & Management
3 Handling Cautions
4 Using the 3D function
4 Copyright
GETTING STARTED
7 Disc and Format Compatibility
7 Disc types and contents your player can
play
7 Disc types your player cannot play
8 Region Code
8 Logos of Discs the player can play
9 Supported Formats
12 Accessories
13 Front Panel
13 Rear Panel
14 Remote Control
14 Tour of the Remote Control
CONNECTIONS
15 Connecting to a TV
16 Connecting to an Audio System
16 Method 1 Connecting to an HDMI
supported AV receiver
16 Method 2 Connecting to an AV receiver
with Dolby Digital or DTS decoder
17 Connecting to a Network Router
17 Wired Network
17 Wireless Network
SETTINGS
18 The Initial Settings Procedure
18 The Home Screen
19 Accessing the Settings Screen
19 Buttons on the Remote Control Used for
the Settings Menu
20 Settings Menu Functions
26 Networks and the Internet
26 Configuring Your Network Connection
29 Wi-Fi Direct
30 Upgrading Software
30 Update Now
31 Auto Update
MEDIA PLAY
32 The AllShare Play Screen
32 Accessing the AllShare Play Screen
32 Playing Commercial Discs
32 Playing Files on a USB Device
33 Playing a Disc with User Recorded
Content
34 Using the Allshare Network Function
34 To Download the Allshare Software
35 Playing Content Located on Your PC or
Allshare Device through the Blu-ray Disc
Player
35 Controlling the Playback of Content
Located on Your PC with Your Smart
Phone
36 Controlling Video Playback
36 Buttons on the Remote Control used for
Video Playback
36 Using the Tools Menu
38 Using the View & Options Menus
Downloaded From Disc-Player.com Samsung Manuals

|
6 English
39 Controlling Music Playback
39 Buttons on the Remote Control used for
Music Playback
39 Using the View & Options Menus
40 Repeating Tracks on an Audio CD
40 Shuffling Tracks on an Audio CD
40 Creating a Playlist from an Audio CD
41 Ripping
41 Playing Photo Contents
41 Using the Tools Menu
42 Using the View & Options Menus
43 Using the Send Function
NETWORK SERVICES
44 Logging In to Your Samsung Account
44 Before Using Movies & TV Shows or
Apps
45 Using Movies & TV Shows
46 Using Apps
46 The Apps Screen at a Glance
46 Downloading Applications
47 Starting an Application
47 Using the Downloaded Screen
47 Sorting the Apps
47 Using the Edit Menu Functions
51 Screen Mirroring
51 Using the Web Browser
51 Link Browsing and Pointer Browsing
52 The Control Panel at a Glance
53 Using the Setting Menu
54 Linking Your Internet Service Accounts
to the Player
55 BD-LIVE™
APPENDIX
56 Compliance and Compatibility Notice
57 Copy Protection
57 Network Service Disclaimer
58 License
59 Additional Information
59 Notes
61 Resolution according to the contents type
62 Digital Output Selection
63 Troubleshooting
65 Repairs
66 Specifications
Downloaded From Disc-Player.com Samsung Manuals

02 Getting Started
Getting Started
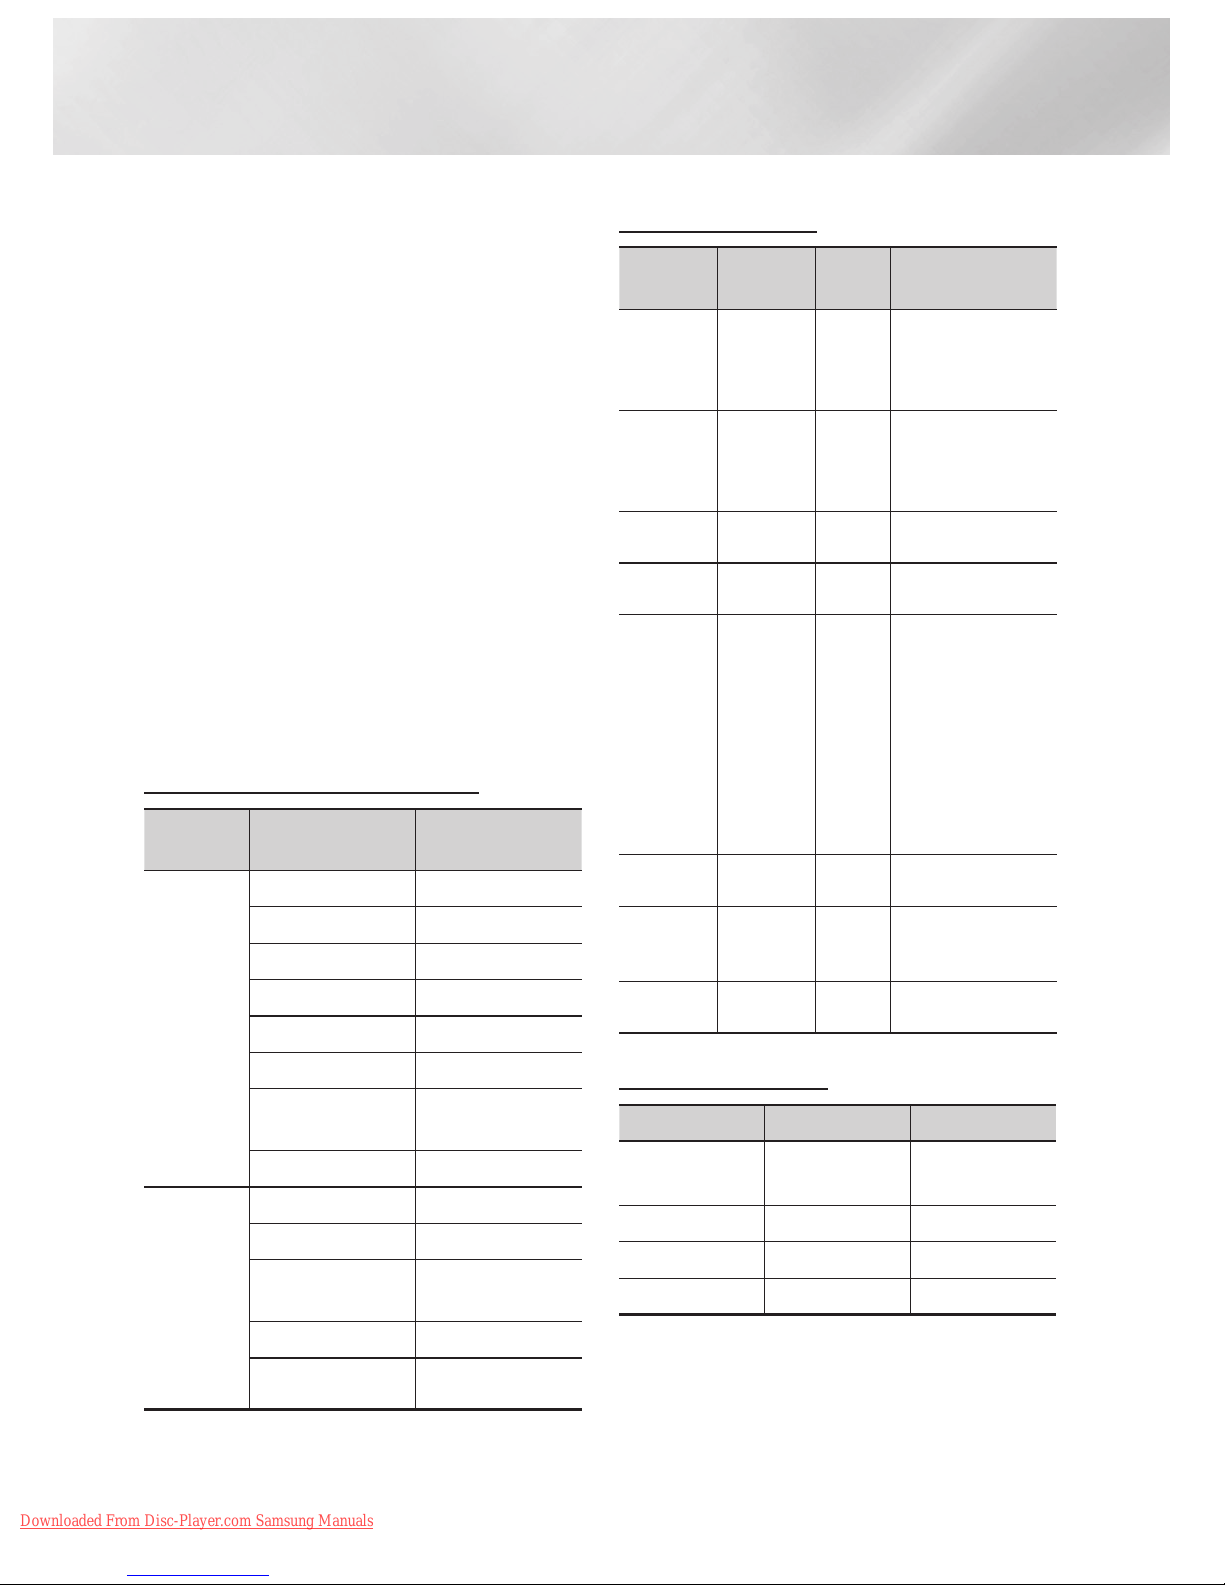
Disc and Format Compatibility
Disc types and contents your player can play
Media Disc Type Details
VIDEO
Blu-ray Disc
3D Blu-ray Disc
BD-ROM or BD-RE/-R recorded in the BD-RE format.
DVD-VIDEO
DVD-RW
DVD-R
DVD+RW
DVD+R
DVD-VIDEO, recorded DVD+RW/DVD-RW(V)/DVD-R/+R that have been recorded and
finalized, or a USB storage media containing MKV, MP4 contents.
MUSIC
CD-RW/-R,
DVD-RW/-R,
BD-RE/-R
Music recorded on CD-RW/-R, DVD-RW/-R, BD-RE/-R or a USB storage media
containing MP3 or WMA contents.
PHOTO
CD-RW/-R,
DVD-RW/-R,
BD-RE/-R
Photos recorded on CD-RW/-R, DVD-RW/-R, BD-RE/-R or a USB storage media
containing JPEG contents.
| NOTES |
\The player may not play certain CD-RW/-R and DVD-R because of the disc type or recording conditions.
\If a DVD-RW/-R has not been recorded properly in DVD video format, it will not be playable.
\Your player will not play content that has been recorded on a DVD-R at a bit-rate that exceeds 10 Mbps.
\Your player will not play content that has been recorded on a BD-R or USB device at a bitrate that exceeds 25 Mbps.
\Playback may not work for some types of discs, or when you use specific functions, such as angle change and aspect ratio
adjustment. Information about the discs is written in detail on the disc box. Please refer to this if necessary.
\When you play a BD-J title, loading may take longer than a normal title or some functions may perform slowly.
Disc types your player cannot play
• HD DVD
• DVD-ROM/PD/
MV, etc
• DVD-RAM
• Super Audio CD
(except CD layer)
• DVD-RW (VR mode)
• CVD/CD-ROM/CDV/
CD-G/CD-I/LD
(CD-Gs play audio only,
not graphics.)
• 3.9 GB DVD-R for
Authoring.
English 7
|
Downloaded From Disc-Player.com Samsung Manuals

Getting Started
Region Code
Both players and discs are coded by region.
These regional codes must match for a disc to
play. If the codes do not match, the disc will not
play.
The Region Number for this player is displayed on
the rear panel of the player.
Disc Type
Region
Code
Area
Blu-ray Disc
A
North America, Central America,
South America, Korea, Japan,
Taiwan, Hong Kong and South
East Asia.
B
Europe, Greenland, French
territories, Middle East, Africa,
Australia and New Zealand.
C
India, China, Russia, Central and
South Asia.
DVD-VIDEO
1
The U.S., U.S. territories and
Canada
2
Europe, Japan, the Middle East,
Egypt, Africa, Greenland
3
Taiwan, Korea, the Philippines,
Indonesia, Hong Kong
4
Mexico, South America,
Central America, Australia,
New Zealand, Pacific Islands,
Caribbean
5
Russia, Eastern Europe, India,
North Korea, Mongolia
6
China
Logos of Discs the player can play
Blu-ray Disc 3D Blu-ray Disc
BD-LIVE
NTSC broadcast system in
U.S.A, Canada, Korea, Japan
|
8 English
Downloaded From Disc-Player.com Samsung Manuals

02 Getting Started
Supported Formats
Video File Support
File Extension Container Video Codec Resolution
Frame rate
(fps)
Bitrate (Mbps) Audio Codec
*.avi
*.mkv
*.asf
*.wmv
*.mp4
*.3gp
*.vro
*.mpg
*.mpeg
*.ts
*.tp
*.trp
*.mov
*.flv
*.vob
*.svi
*.m2ts
*.mts
AVI
MKV
ASF
MP4
3GP
MOV
FLV
VRO
VOB
PS
TS
SVAF
MPEG4 SP/ASP
1920x1080
(WMV v7,v8,
MSMPEG4 v3 :
1280x720)
6~30 30
Dolby Digital
LPCM
ADPCM(IMA, MS)
AAC
HE-AAC
WMA
Dolby Digital Plus
MPEG(MP3)
DTS (Core)
H.264 BP/
MP/HP
Motion JPEG
Microsoft
MPEG-4 v3
Window Media
Video v7,v8,v9
MPEG2
MPEG1
VP6 640x480
4
MVC
24/25/30 60
*.webm
WebM VP8 1920x1080
6~30 20 Vorbis
`Limitations
- Even when the file is encoded by a supported codec listed above, a file might not be played if its
content is defective or corrupted.
- Normal playback is not guaranteed if the file’s container information is wrong or the file itself is
corrupted.
- Files having higher bit or frame rates than indicated in the table above may stutter when played back.
- The Seek (Jump) function is not available if the file’s index table is damaged.
- When you playback a file remotely through a network connection, video playback may stutter
depending on the network speed.
- Some USB/Digital camera devices may not be compatible with the product.
`Video decoder
- Supports up to H.264 Level 4.1. (Does not support FMO/ASO/RS)
- Does not support VC1/AP/L4.
English 9
|
Downloaded From Disc-Player.com Samsung Manuals
Getting Started
- CODECs except for WMVv7, v8, MSMPEG4 v3,
MVC, VP6
1) Below 1280 x 720 : 60 frames max.
2) Above 1280 x 720 : 30 frames max.
- Does not support GMC 2 or higher.
- Supports SVAF (Top/Bottom, Side by Side).
- Supports BD MVC Spec.
`Audio decoder
- Supports WMA 10 PRO (Up to 5.1).
- Does not support WMA lossless audio.
- Supports ADPCM IMA,MS.
- Does not support ADPCM(A-Law, μ-Law).
- Does not support QCELP/AMR NB/WB.
- Supports vorbis (Up to 2ch).
- Supports DD+ (Up to 7.1ch)
| NOTES |
\Playback of some MKV or MP4 file may not be supported
depending on their video resolution and frame rate.
Supported Subtitle File Formats
Name
File
Extension
External
MPEG-4 Timed text
.ttxt
SAMI
.smi
SubRip
.srt
SubViewer
.sub
Micro DVD
.sub or.txt
SubStation Alpha
.ssa
Advanced SubStation
Alpha
.ass
Powerdivx
.psb
Internal
Xsub
AVI
SubStation Alpha
MKV
Advanced SubStation
Alpha
MKV
SubRip
MKV
MPEG-4 Timed text
MP4
Music File Support
File
Extension
Type Codec Support Range
*.mp3
MPEG
MPEG1
Audio
Layer 3
-
*.m4a
*.mpa
*.aac
MPEG4
AAC -
*.flac
FLAC
FLAC Supports up to 2ch
*.ogg
OGG
Vorbis Supports up to 2ch
*.wma
WMA
WMA
Supports WMA 10
Pro (Up to 5.1).
Does not support
WMA lossless audio.
Supports up to M2
profile.
Does not support
LBR mode.
*.wav
wav
wav -
*.mid
*.midi
midi
midi type 0 and type 1
*.ape
ape
ape
Picture File Support
File Extension Type Resolution
*.jpg
*.jpeg
JPEG
15360x8640
*.png
PNG
4096x4096
*.bmp
BMP
4096x4096
*.mpo
MPO
15360x8640
|
10 English
Downloaded From Disc-Player.com Samsung Manuals

02 Getting Started
Notes on the USB connection
• Your player supports USB storage media, MP3
players, digital cameras, and USB card readers.
• Some USB/digital camera devices may not be
compatible with the player.
• Your player supports the FAT16, FAT32, and
NTFS files systems.
• Connect USB devices directly to the player's
USB port. Connecting through a USB cable
may cause compatibility problems.
• Inserting more than one memory device into
a multi-card reader may cause the reader to
operate improperly.
• The player does not support the PTP protocol.
• Do not disconnect a USB device during a
"loading" process.
• The bigger the image resolution, the longer the
image takes to display.
• This player cannot play MP3 files with DRM
(Digital Rights Management) downloaded from
commercial sites.
• Your player only supports video that is under
30fps (frame rate).
• Your player only supports USB Mass Storage
Class (MSC) devices such as thumb drives and
USB HDD. (HUB is not supported.)
• Certain USB HDD Devices, multi-card readers
and thumb drives may not be compatible with
this player.
• If some USB devices require excessive power,
they may be limited by the circuit safety device.
• If playback from a USB HDD is unstable, provide
additional power by plugging the HDD into a
wall socket.
If the problem continues, contact the USB HDD
manufacturer.
• SAMSUNG is not responsible for any data file
damage or data loss.
•
Your player does not support NTFS compressed,
sparse, or encrypted files.
- You can repair or format a USB device on
your Desktop PC. (MS-Windows OS only)
AVCHD (Advanced Video Codec High
Definition)
• This player can play back AVCHD format discs.
These discs are normally recorded and used in
camcorders.
• The AVCHD format is a high definition digital
video camera format.
• The MPEG-4 AVC/H.264 format compresses
images with greater efficiency than the
conventional image compressing format.
• Some AVCHD discs use the "x.v.Color" format.
This player can play back AVCHD discs that use
"x.v.Color" format.
• "x.v.Color" is a trademark of Sony Corporation.
• "AVCHD" and the AVCHD logo are trademarks
of Matsushita Electronic Industrial Co., Ltd. and
Sony Corporation.
| NOTES |
\Some AVCHD format discs may not play, depending on
the recording conditions.
AVCHD format discs need to be finalized.
\"x.v.Color" offers a wider color range than normal DVD
camcorder discs.
English 11
|
Downloaded From Disc-Player.com Samsung Manuals
Getting Started
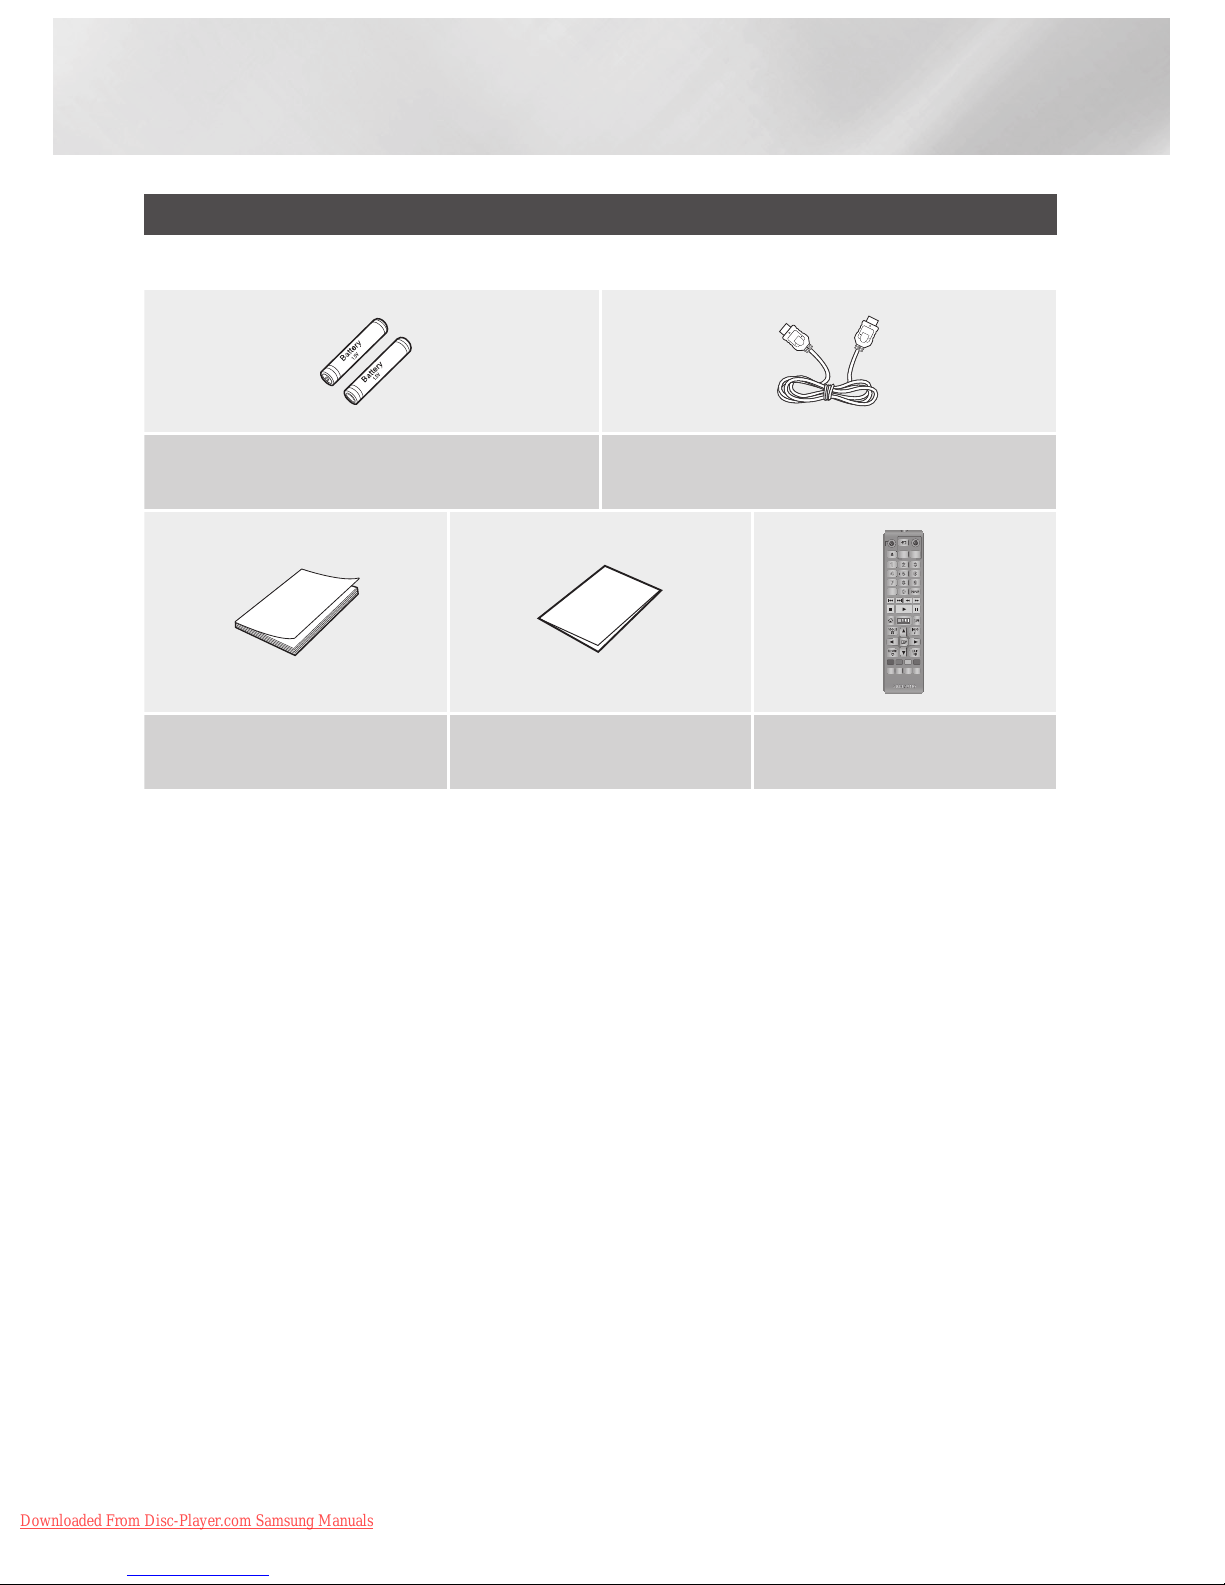
Accessories
Check for the supplied accessories shown below.
Batteries for Remote Control (AAA Size)
(4301-000121)
HDMI cable (BD-FM59C only)
(GL39-00121A)
APPS
PANDORA
DIGITAL
SUBTITLE
INPUT
HOME
1
4
7
VOL
+
2
5
8
0
VOL
–
3
6
9
SOURCE
DISC MENU
HOME
TITLE MENU
VOL VOL
POPUP
A B C D
SEARCH FULLSUBTITLE
SCREEN
SAMSUNG TV
– +
INFOTOOLS
RETURN
EXIT
AUDIO
SMART
HUB
User Manual
(AK68-02355A)
Quick Setup Guide
(AK68-02232U)
Remote Control
(AK59-00166A)
|
12 English
Downloaded From Disc-Player.com Samsung Manuals
02 Getting Started
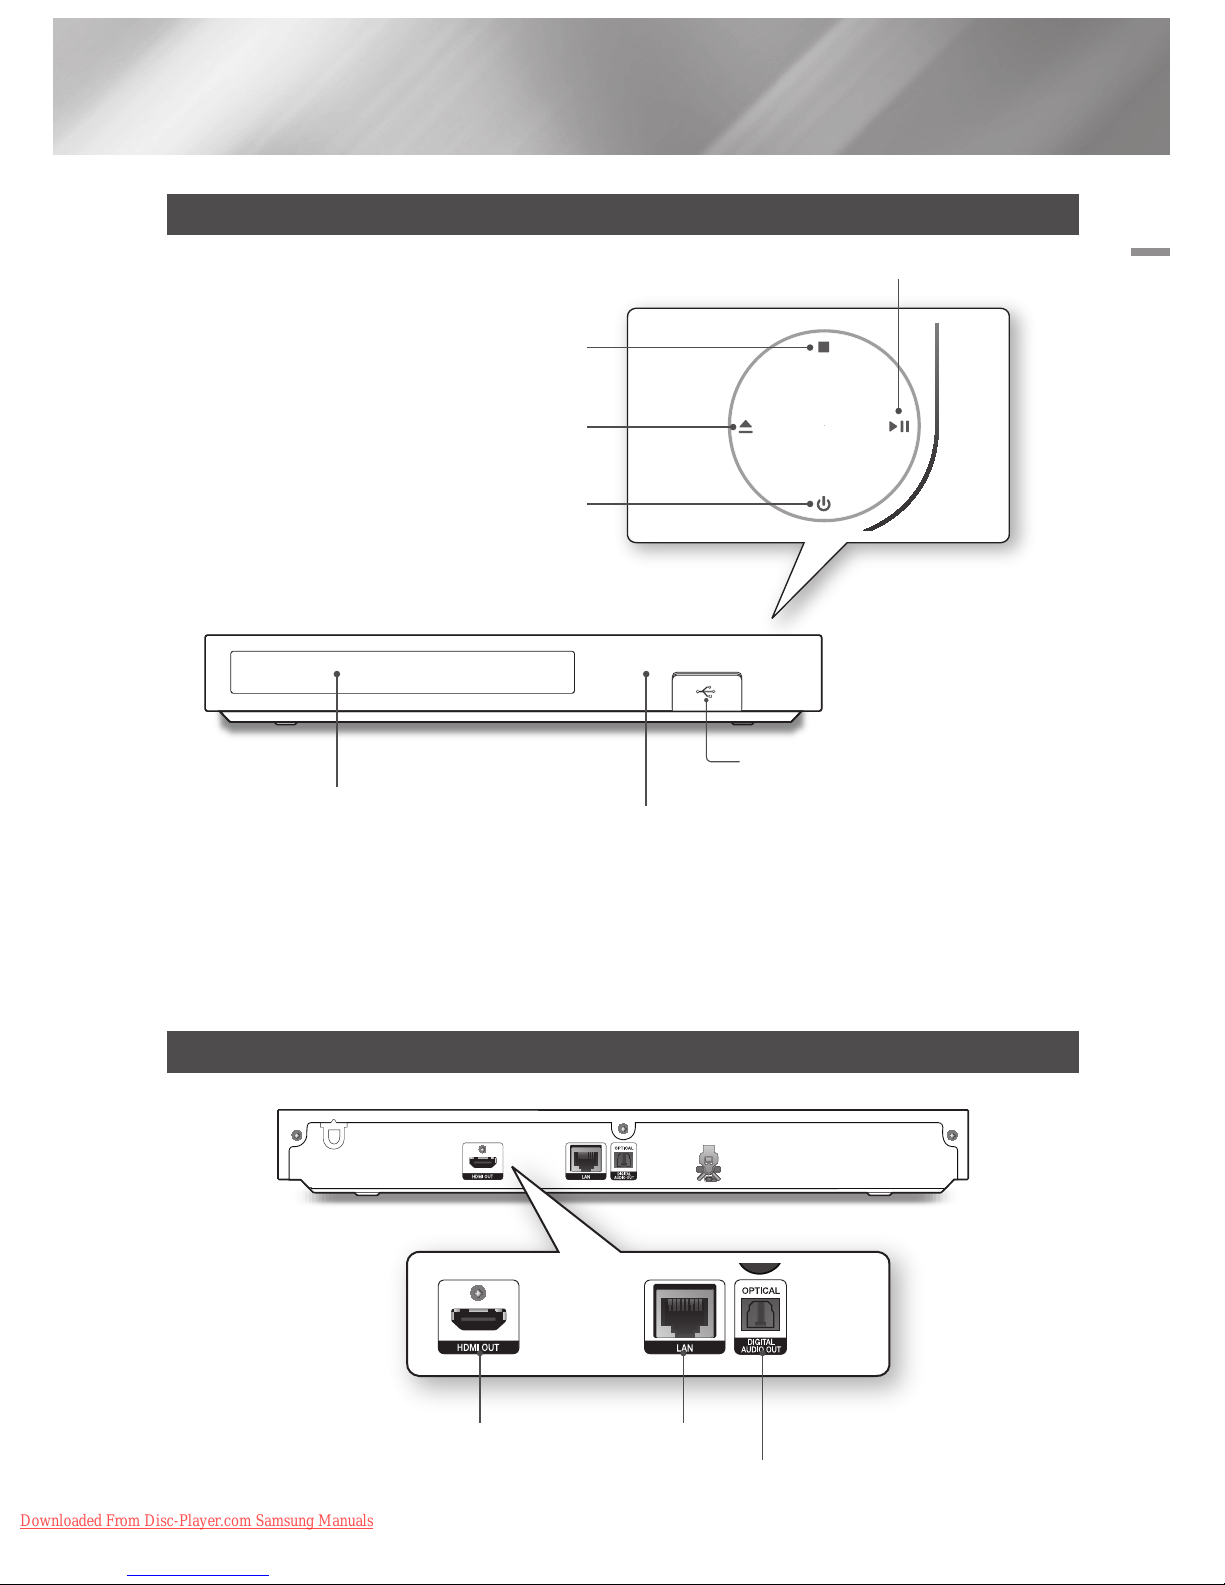
Front Panel
| NOTES |
\To upgrade the player's software through the USB Host jack, you must use a USB memory stick.
\When the player displays the Blu-ray Disc menu, you cannot start the movie by pressing the Play button on the player or the
remote control. To play the movie, you must select Play Movie or Start in the disc menu, and then press the v button on
the remote control.
Rear Panel
PLAY/PAUSE BUTTON
USB HOST
REMOTE CONTROL SENSOR
DISC TRAY
STOP BUTTON
POWER BUTTON
OPEN/CLOSE BUTTON
HDMI OUT LAN
DIGITAL AUDIO OUT
English 13
|
Downloaded From Disc-Player.com Samsung Manuals
Getting Started
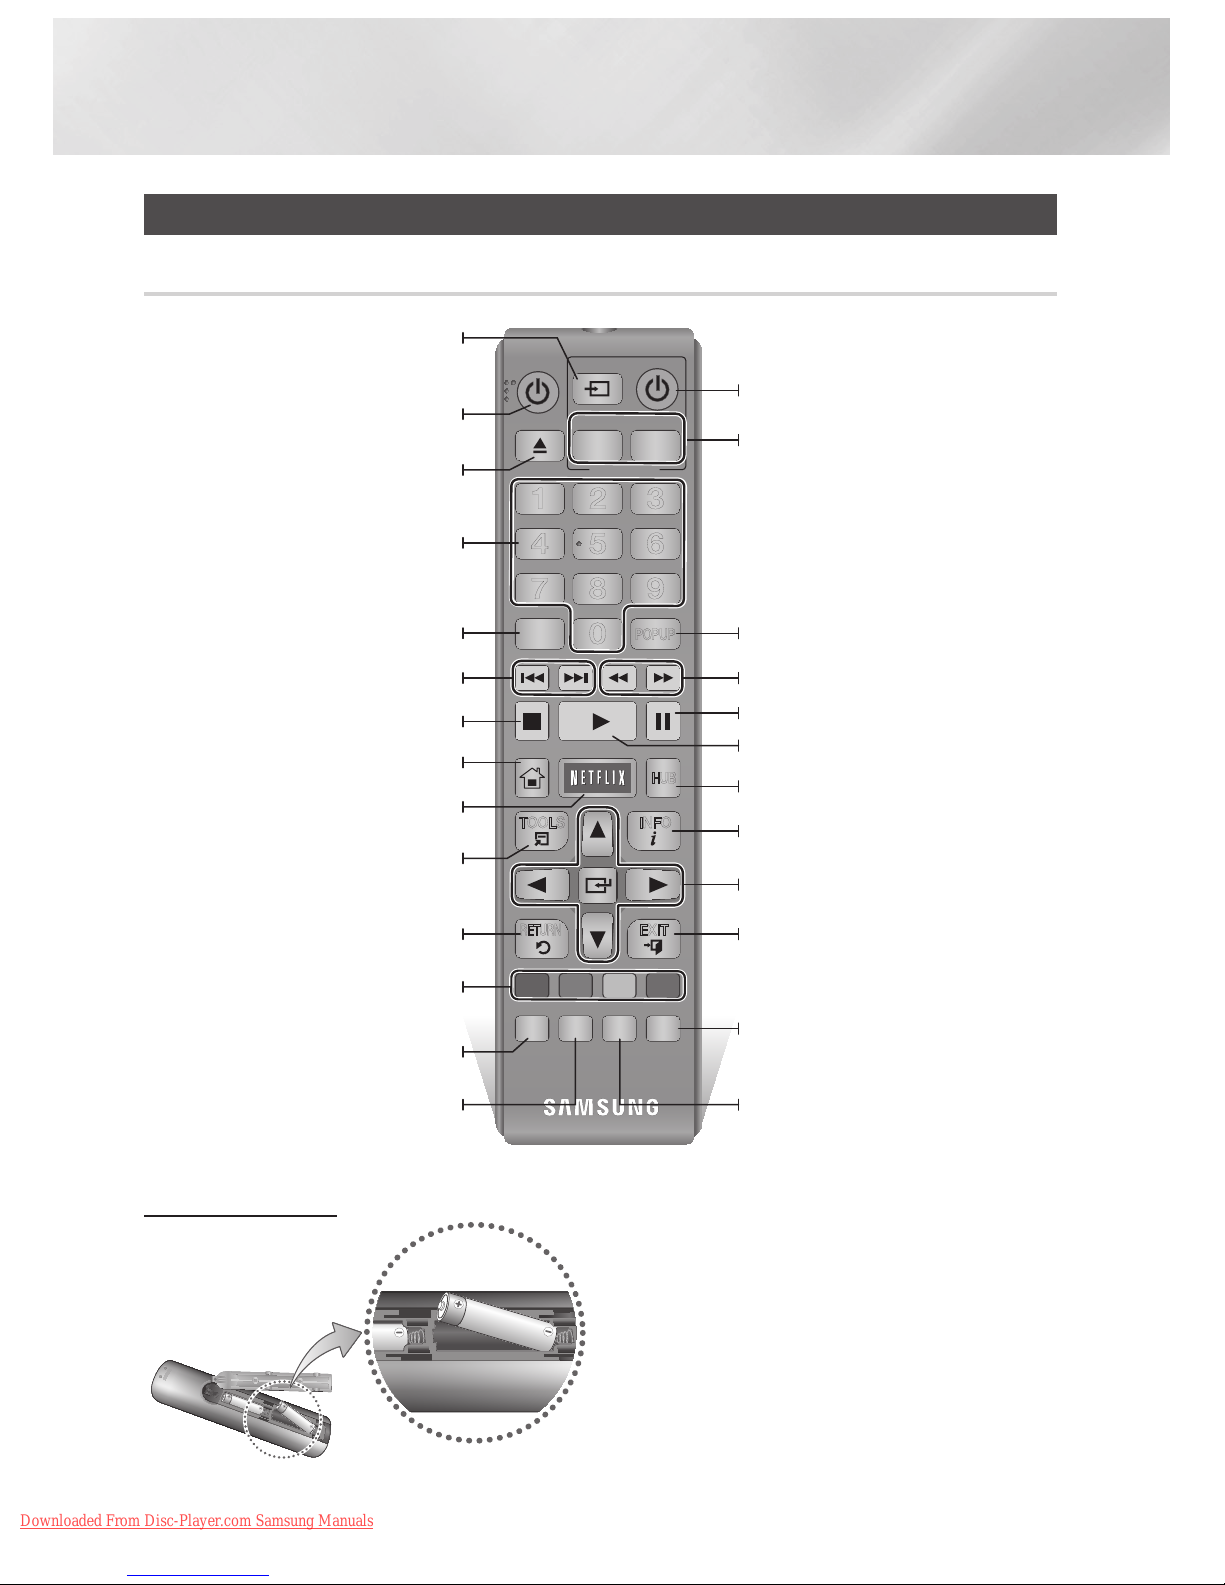
Remote Control
Tour of the Remote Control
Installing batteries
| NOTES |
\If the remote control does not operate properly:
- Check the polarity +/– of the batteries.
- Check if the batteries are drained.
- Check if the remote sensor is blocked by obstacles.
- Check if there is any fluorescent lighting nearby.
| CAUTION |
\Dispose of batteries according to local environmental
regulations. Do not put them in the household trash.
APPS
PANDORA
DIGITAL
SUBTITLE
INPUT
HOME
1
4
7
VOL
+
2
5
8
0
VOL
–
3
6
9
SOURCE
DISC MENU
HOME
TITLE MENU
VOL VOL
POPUP
A B C D
SEARCH FULLSUBTITLE
SCREEN
SAMSUNG TV
– +
INFOTOOLS
RETURN
EXIT
AUDIO
SMART
HUB
Press to open and close the disc tray.
After setup, allows you to set the input
source on your TV.
(This button is only available in Samsung TV.)
Turn the player on and off.
Return to the previous menu.
These buttons are used both for menus
on the player and also several Blu-ray Disc
functions.
Press the number buttons to operate
options.
Use to enter the disc menu.
Press to skip backwards or forwards.
Press to search backwards or forwards.
Use to access various audio functions on a
disc.
Press to move to the Home screen.
Press to stop a disc.
Press to use Netflix.
Turn the TV on and off.
(This button is only available for Samsung
TVs.)
TV volume adjustment.
(This button is only available for Samsung TVs.)
Press to pause a disc.
Press to play a disc.
Press to switch the Blu-ray Disc/DVD's
subtitle language.
Press to use the Tools menu.
Use to display the playback information.
Use to select menu items and change
menu values.
Press to exit the menu.
Use to enter the Popup menu/Title menu.
Press to use Apps.
Press to search contents.
Press to use full screen function.
During the Blu-ray Disc/DVDs playback,
this button does not operate.
|
14 English
Downloaded From Disc-Player.com Samsung Manuals
03 Connections
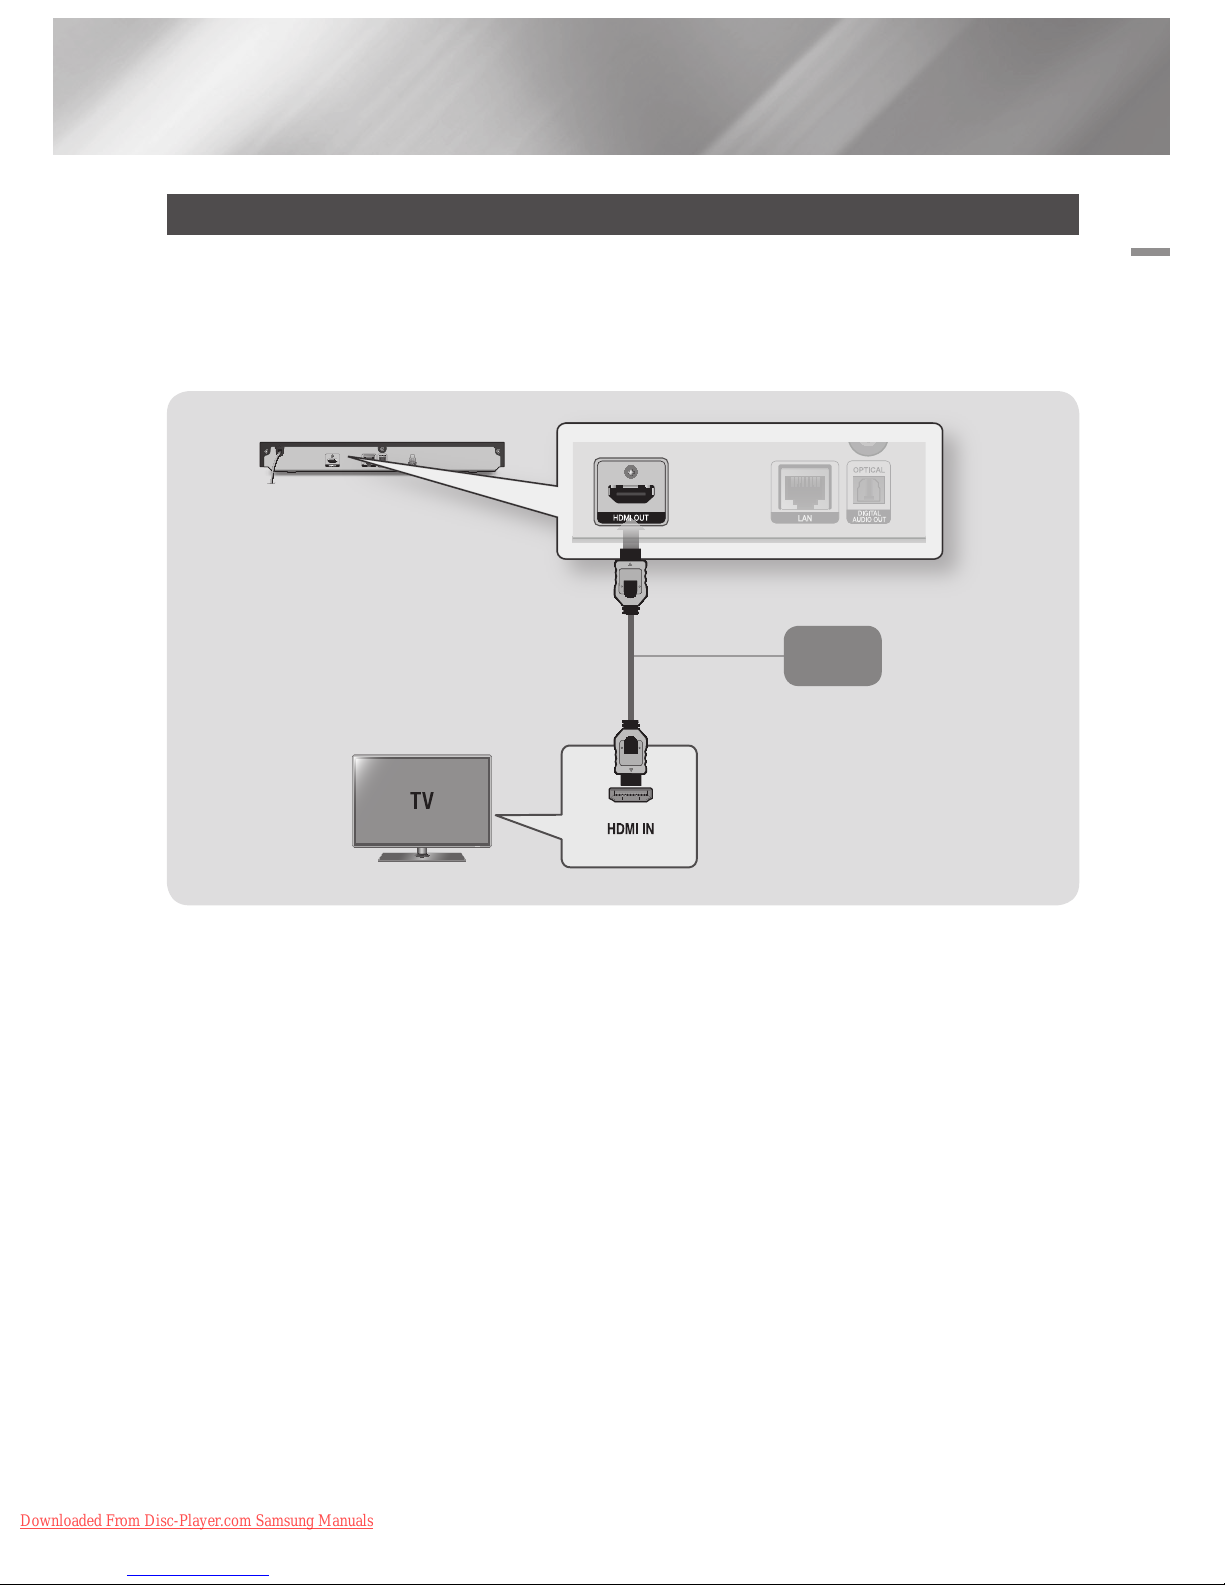
Connections
Connecting to a TV
Connect an HDMI cable (not supplied) from the HDMI OUT jack on the back of the product to the HDMI
IN jack on your TV.
- Do not connect the power cord to the wall outlet until you have made all the other connections.
- When you change the connections, turn off all devices before you start.
| NOTES |
\If you use an HDMI-to-DVI cable to connect to your display device, you must also connect the Digital Audio Out on the player
to an audio system to hear audio.
\An HDMI cable outputs digital video and audio, so you don't need to connect an audio cable.
\Depending on your TV, certain HDMI output resolutions may not work. Please refer to the user manual of your TV.
\When you connect the player to your TV using the HDMI cable or to a new TV, and then turn it on for the first time, the player
automatically sets the HDMI output resolution to the highest supported by the TV.
\A long HDMI cable may cause screen noise. If this occurs, set HDMI Deep Color to Off in the menu.
\To view video in the HDMI 720p, 1080i, or 1080p output mode, you must use a High speed (category 2) HDMI cable.
\HDMI outputs only a pure digital signal to the TV.
If your TV does not support HDCP (High-bandwidth Digital Content Protection), random noise appears on the screen.
Audio
Video
English 15
|
Downloaded From Disc-Player.com Samsung Manuals
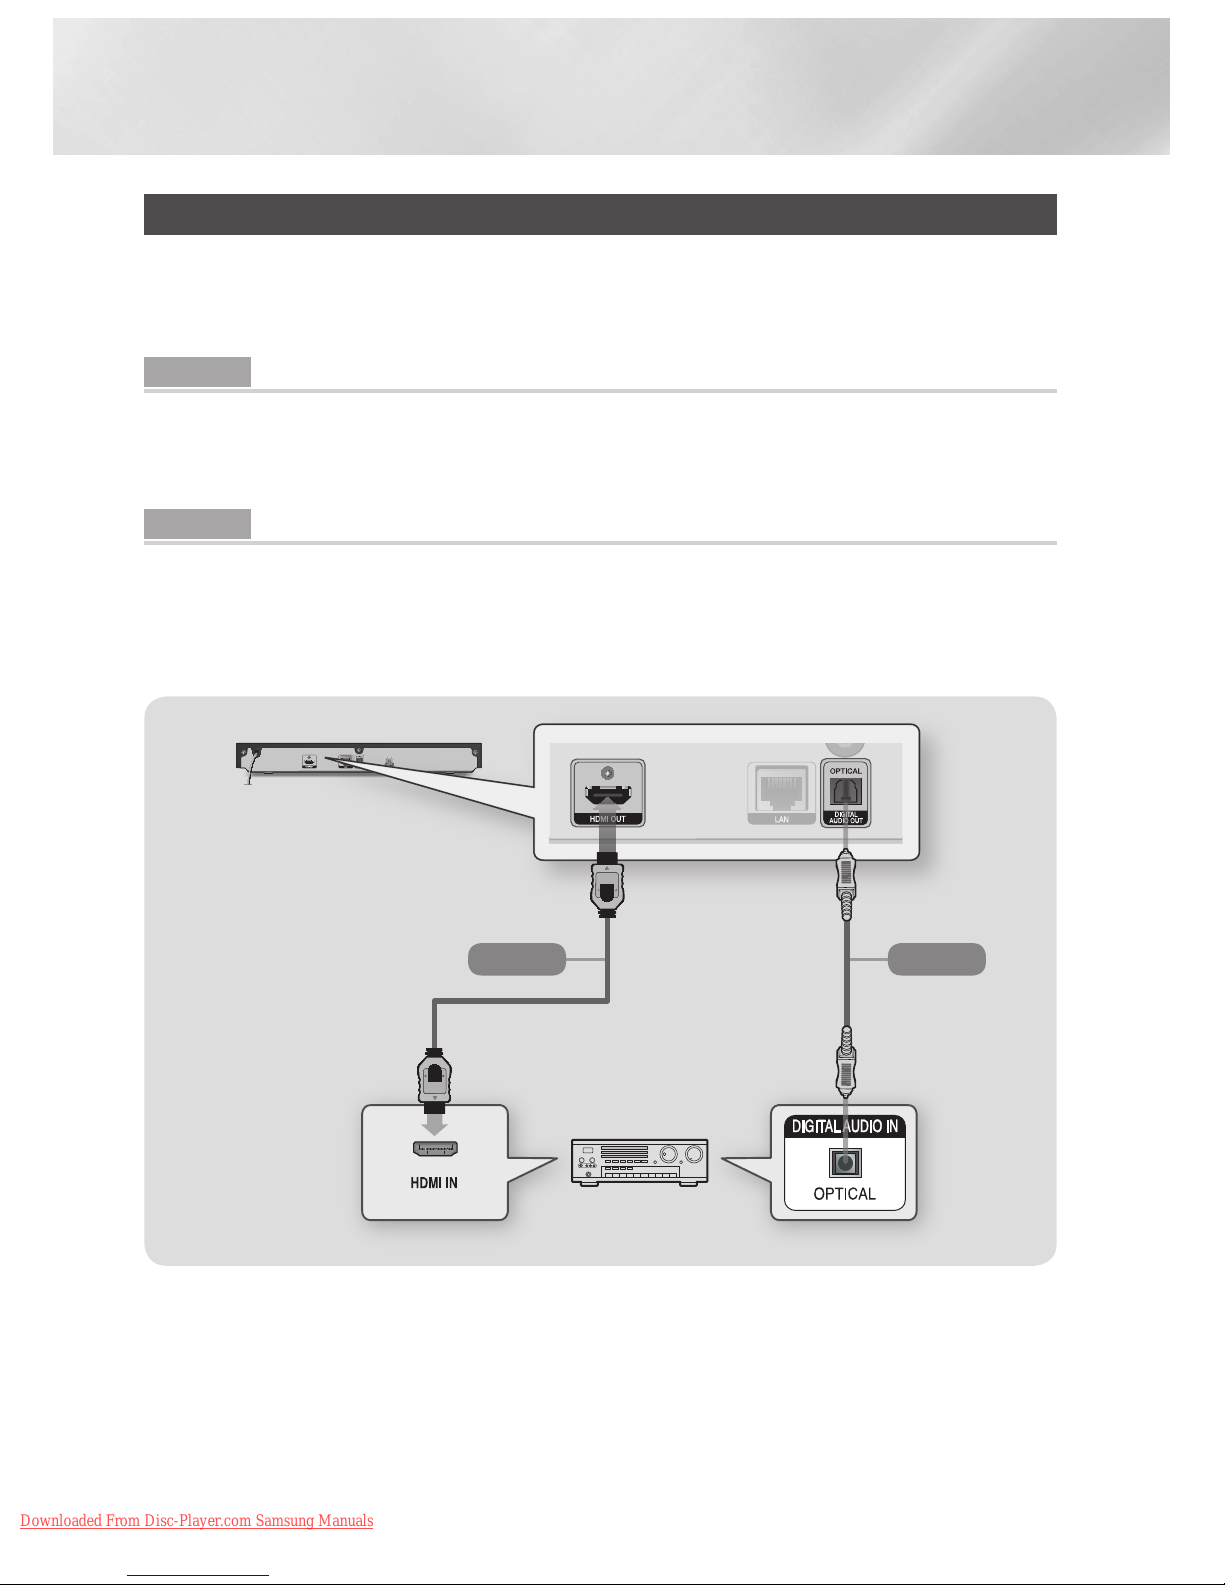
Connections
Connecting to an Audio System
You can connect the Blu-ray player to the audio system using the methods illustrated below.
- Do not connect the power cord to the wall outlet until you have made all the other connections.
- When you change the connections, turn off all devices before you start.
Method 1 Connecting to an HDMI supported AV receiver
• Connect an HDMI cable (not supplied) from the HDMI OUT jack on the back of the product to the
HDMI IN jack on your receiver.
• Best quality (Recommended)
Method 2 Connecting to an AV receiver with Dolby Digital or DTS decoder
• Using a digital Optical cable (not supplied), connect the Optical Digital Audio Out jack on the product to
the Digital Optical In jack of the receiver.
• Good quality
• You will hear sound only through the front two speakers with Digital Output set to PCM.
AudioAudio
Method 2Method 1
|
16 English
Downloaded From Disc-Player.com Samsung Manuals

03 Connections
Connecting to a Network Router
You can connect your player to your network
router using one of the methods illustrated below.
To use the AllShare network functionality, you
must connect your PC to your network as shown
in the illustrations.
The connection can be wired or wireless.
Wired Network
| NOTES |
\Your router or your Internet Service Provider's policies
may prevent the player from accessing Samsung's
software update server. If this occurs, contact your
Internet Service Provider (ISP) for more information.
\DSL users, please use a router to make a network
connection.
Wireless Network
| NOTES |
\If your wireless router supports DHCP, this player can use
a DHCP or static IP address to connect to the wireless
network.
\Set your wireless router to Infrastructure mode. Ad-hoc
mode is not supported.
\The player supports only the following wireless security
key protocols:
- WEP (OPEN/SHARED), WPA-PSK (TKIP/AES),
WPA2-PSK (TKIP/AES)
\Select a channel on the wireless router that is not
currently being used. If the channel set for the wireless
router is currently being used by another device nearby, it
will result in interference and communication failure.
\If you select the Pure High-throughput (Greenfield)
802.11n mode and set the Encryption type on your router
to WEP, TKIP or TKIP-AES (WPS2Mixed), the player will
not support a connection in compliance with new Wi-Fi
certification specifications.
\Wireless LAN, by its nature, may cause interference,
depending on the operating conditions (router
performance, distance, obstacles, interference by other
radio devices, etc).
Broadband
service
Broadband
service
Broadband modem
(with integrated router)
Broadband
modem
Router
Or
Broadband
service
Wireless Router
English 17
|
Downloaded From Disc-Player.com Samsung Manuals
Settings
The Initial Settings Procedure
• The Home screen will not appear if you do not
configure the initial settings.
• The OSD (On Screen Display) may change in this
player after you upgrade the software version.
• The access steps may differ depending on the menu
you selected.
After you have connected the player to your TV,
turn on the TV and player. When you turn on the
player the first time, the player's Initial Settings
screen appears on the TV. The Initial Setting
procedure lets you set the On Screen Display
(OSD) and menu languages, the aspect ratio
(screen size), the network type, and connect
the player to your network. For complete Initial
Settings instructions, see the Quick Setup Guide.
| NOTES |
\If you skip Network Setup during the Initial Settings
procedure, you can configure your network settings later.
See "Configuring Your Network Connection" on pages
26~29 for instructions.
\If you want to display the Initial Settings screen again and
make changes, select Settings > System > Setup in
the Home screen or select the Reset option. (See pages
22 or 25)
\If you want to use an Anynet+(HDMI-CEC) function,
please follow the instructions below.
1) Connect the player to an Anynet+(HDMI-CEC)compliant Samsung TV using HDMI Cable.
2) Set the Anynet+(HDMI-CEC) feature to On in both the
TV and the player.
3) Set the TV to the Initial Settings Procedure.
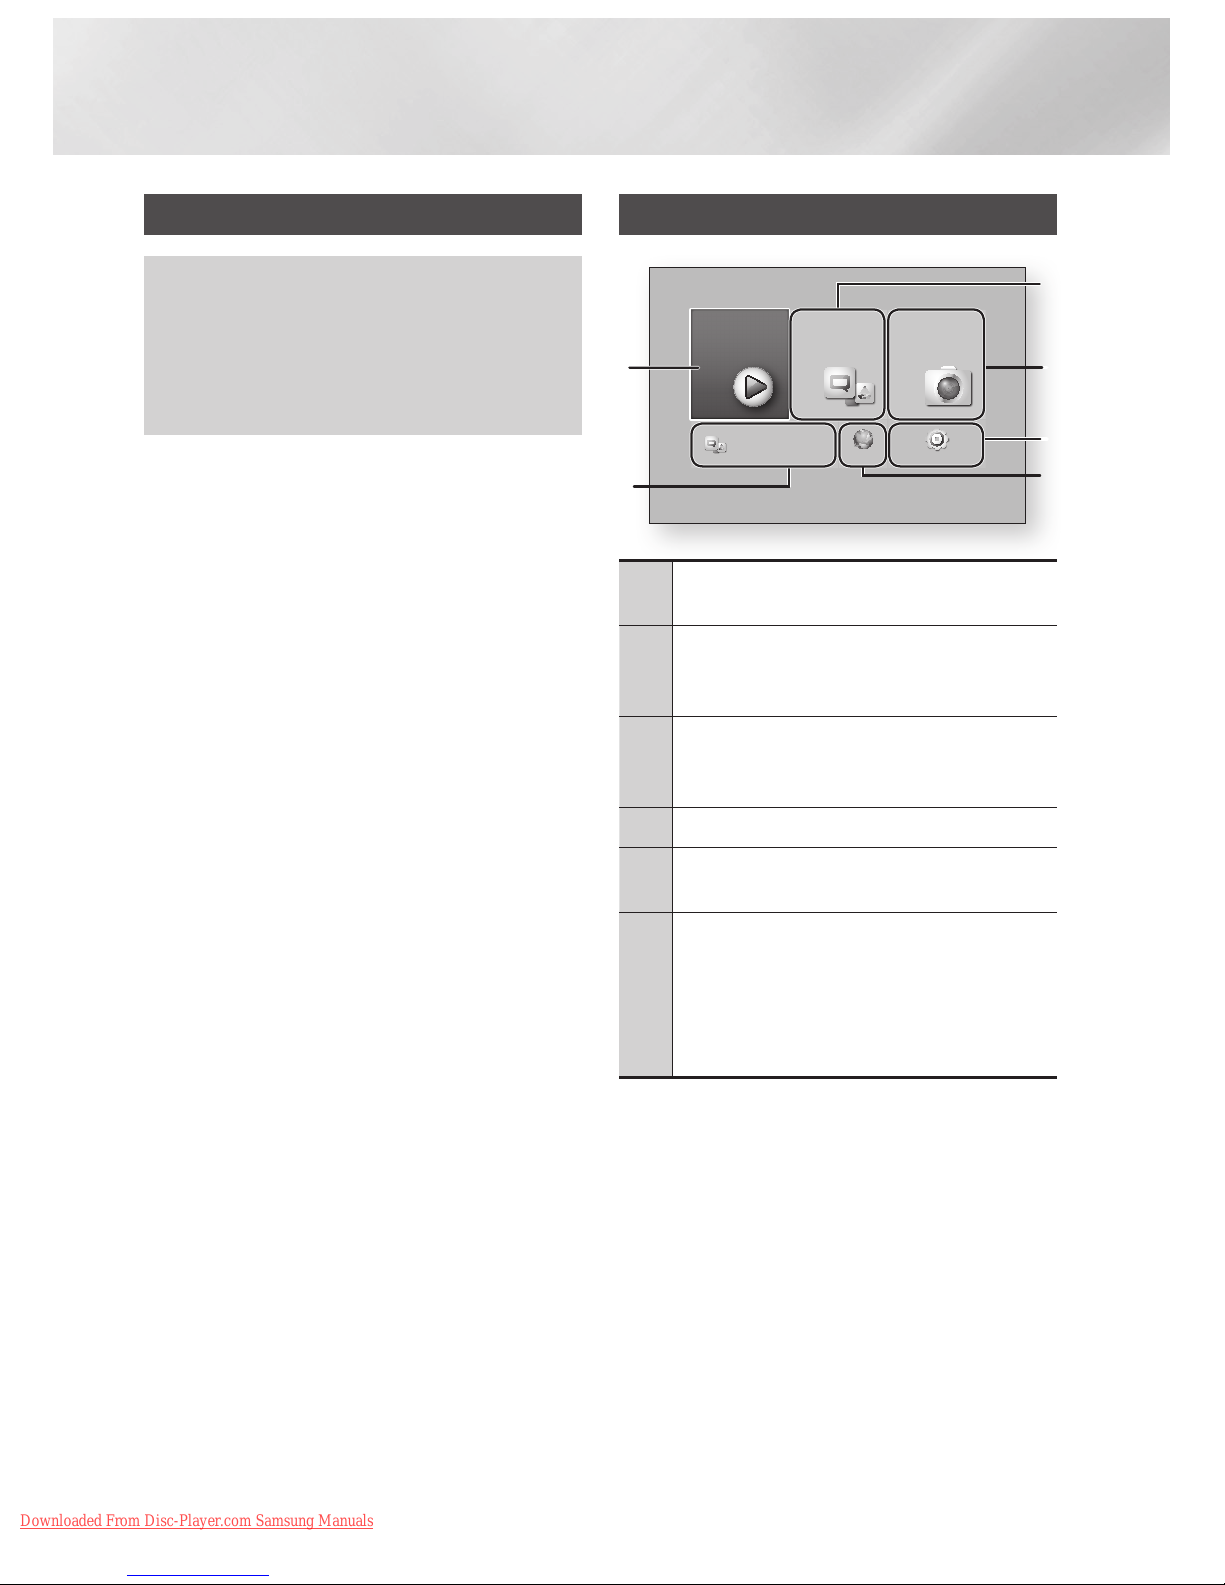
The Home Screen
1
Apps : Gives you access to various for pay or freeof-charge applications you can download.
2
Photos, Videos & Music : Lets you play photos,
videos or music content from Disc, USB, PC or
mobile devices.
3
Settings : Opens the player's menu where you
can set various functions to suit your personal
preferences.
4
Web Browser : Provides access to the Internet.
5
Recommended Apps : Gives you direct access to
recommended applications.
6
Movies & TV Shows : Lets you download movies
and TV Shows from the Internet.
| NOTES |
\Depending on your country, this menu function
may not be supported.
| NOTES |
\
If you leave the player in the stop mode for more than
5 minutes without using it, a screen saver will appear on
your TV. If the player is left in the screen saver mode for
more than 20 minutes, the power will automatically turn off.
Movies & TV
Shows
Apps Photos,
Videos &
Music
Web Browser Settings
a
Samsung Account d Screen Mirroring
6
1
5
3
2
4
Go to Apps and connect to the network
to get recommended apps.
|
18 English
Downloaded From Disc-Player.com Samsung Manuals
04 Settings
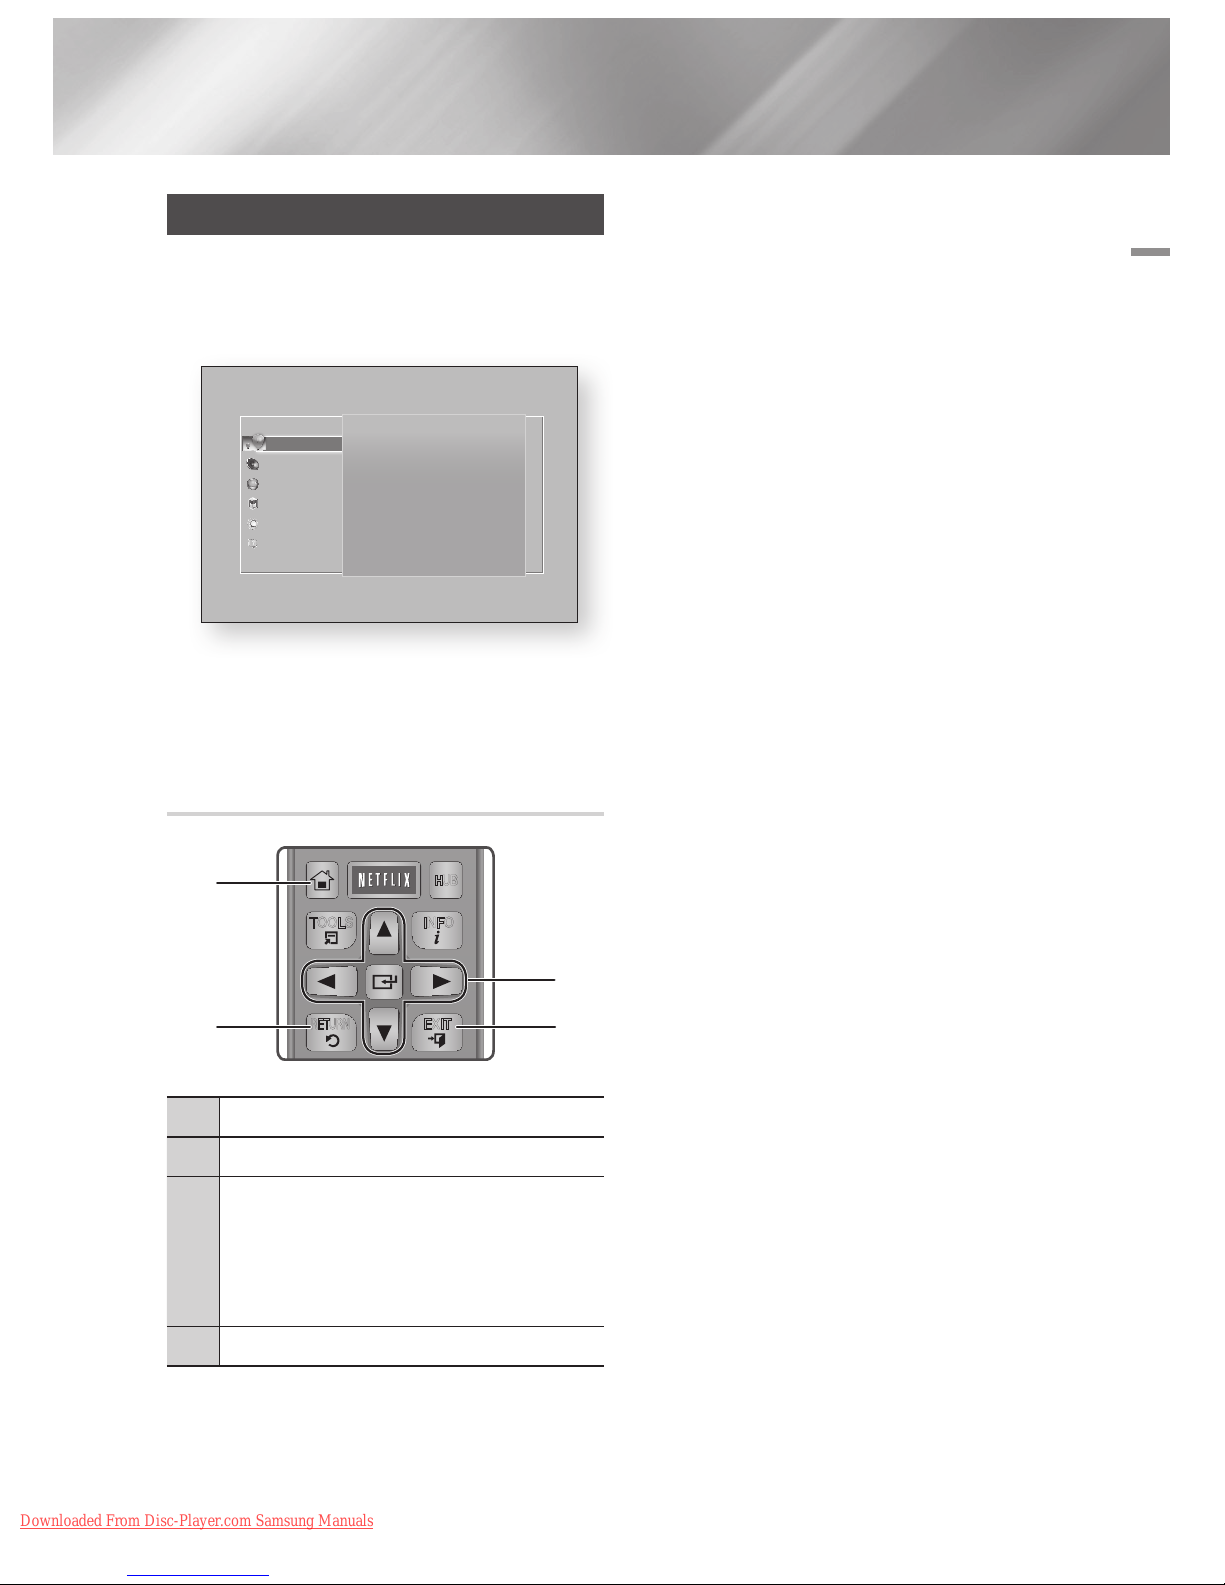
Accessing the Settings Screen
1. Select Settings on the Home screen, and
then press v button. The Settings screen
appears.
2. To access the menus, sub-menus, and
options on the Settings screen, please refer
to the remote control illustration below.
Buttons on the Remote Control Used
for the Settings Menu
1
HOME Button : Press to move to the Home screen.
2
RETURN Button : Return to the previous menu.
3
v
(Enter) / DIRECTION Buttons :
• Press ▲▼◄► to move the cursor or select an
item.
• Press the v button to activate the currently
selected item or confirm a setting.
4
EXIT Button : Press to exit the current menu.
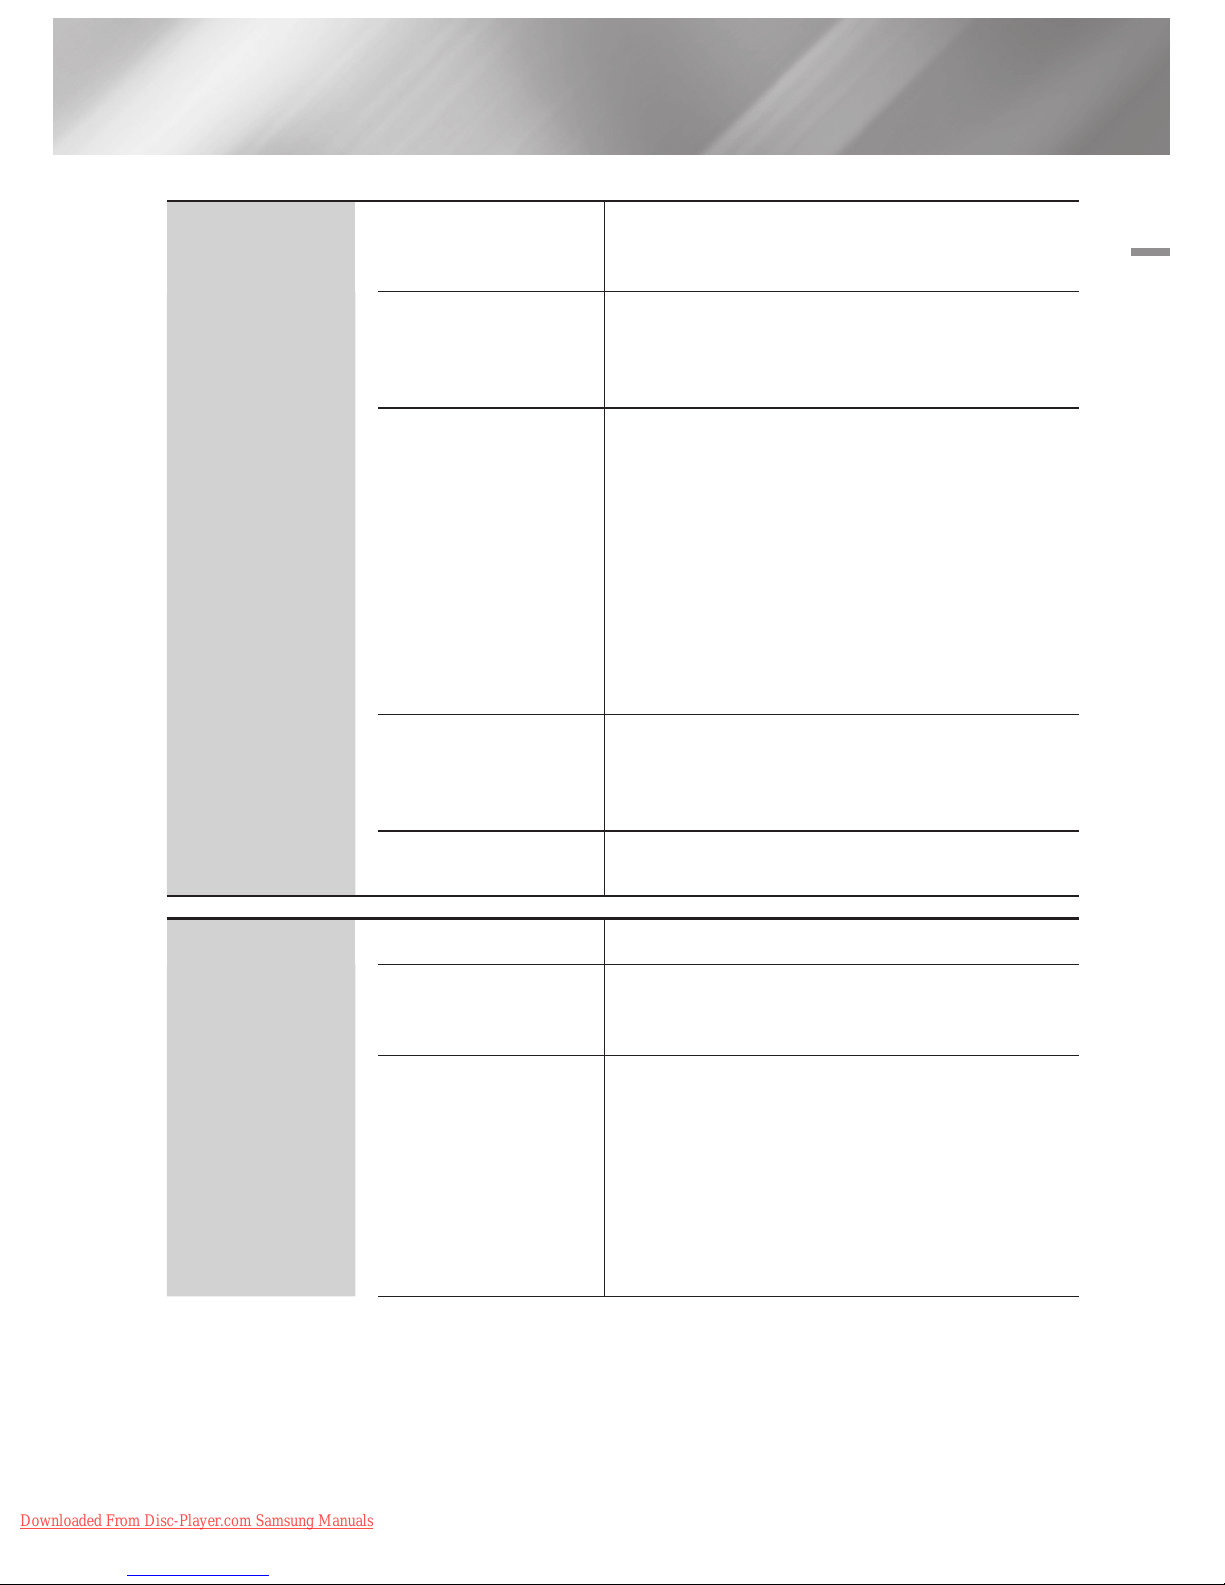
Detailed Function Information
Each Settings function, menu item, and individual
option is explained in detail on-screen. To view an
explanation, use the ▲▼◄► buttons to select the
function, menu item, or option. The explanation
will usually appear on the right side of the screen.
A short description of each Settings function
starts on the next page. Additional information on
some of the functions is also in the Appendix of
this manual.
Display
3D Settings
TV Aspect Ratio
16:9 Original
BD Wise Off
Resolution Auto
Movie Frame (24Fs) Auto
DVD 24fps Conversion Off
Smart Hub Screen Size Size 3
Display
Audio
Network
Smart Features
System
Support
Settings
APPS
HOME
1
4
7
VOL
+
2
5
8
0
VOL
–
3
6
9
SOURCE
DISC MENU
HOME
TITLE MENU
VOL VOL
POPUP
SAMSUNG TV
– +
INFOTOOLS
RETURN
EXIT
SMART
HUB
1
2
4
3
English 19
|
Downloaded From Disc-Player.com Samsung Manuals

Settings
Settings Menu Functions
Display
3D Settings
Select whether to play a Blu-ray Disc with 3D contents
in 3D Mode.
•
If you move to the Home or Smart Hub Home
screen while in 3D mode, the player will switch to 2D
automatically.
TV Aspect Ratio
Lets you adjust the output of the player to the screen
size and screen format of your TV.
BD Wise
BD Wise is Samsung's latest inter-connectivity feature.
When you connect a Samsung player and a Samsung
TV with BD Wise to each other via HDMI, and BD Wise
is on in both the player and TV, the player outputs video
at the video resolution and frame rate of the Blu-ray
Disc/DVD.
Resolution
Set the output resolution of the HDMI video signal to BD
Wise, Auto, 1080p, 1080i, 720p or 480p.
The number indicates the number of lines of video per
frame.
The i and p indicate interlaced and progressive scan,
respectively. Generally, the more lines, the higher quality.
Movie Frame (24Fs)
If the player is connected to a 24Fs compatible TV,
setting the Movie Frame (24Fs) feature to Auto lets the
player adjust its HDMI output to 24 frames per second
automatically for improved picture quality.
•
You can enjoy the Movie Frame (24Fs) feature only on
a TV supporting this frame rate.
•
Movie Frame is only available when the player is in the
HDMI 1080i or 1080p output resolution modes.
DVD 24Fs Conversion
Converts DVD playback to 24 frames per second and
outputs it via HDMI. This option is only available when
Movie Frame (24Fs) is set to on.
Smart Hub Screen Size
Lets you select the optimal size for the Smart Hub
Screen.
HDMI Color Format
Lets you set the color space format for the HDMI output
so that it matches the capabilities of the connected
device (TV, monitor, etc). The screen goes black
momentarily after you have selected a format.
HDMI Deep Color
Lets you set the product to output HDMI video with
Deep Color. Deep Color provides more accurate color
reproduction with greater color depth.
Progressive Mode Lets you improve picture quality when viewing DVDs.
|
20 English
Downloaded From Disc-Player.com Samsung Manuals
04 Settings
Audio
Digital Output
Lets you select the digital audio output format that is
suitable for your TV or AV Receiver. For more details,
see the digital output selection table on page 62.
PCM Downsampling
Lets you choose to have 96Khz PCM signals
downsampled to 48Khz before they are outputted to an
amplifier. Choose On if your amplifier or receiver is not
compatible with a 96Khz signal.
Dynamic Range Control
Lets you apply dynamic range control to Dolby Digital,
Dolby Digital Plus, and Dolby TrueHD audio.
Auto : Automatically controls the dynamic range of
Dolby TrueHD audio, based on information in the
Dolby TrueHD soundtrack. Also turns dynamic range
control on for Dolby Digital and Dolby Digital Plus.
Off : Leaves the dynamic range uncompressed,
letting you hear the original sound.
On : Turns dynamic range control on for all three
Dolby formats. Quieter sounds are made louder and
the volume of loud sounds is reduced.
Downmixing Mode
Lets you select the multi-channel downmix method that
is compatible with your stereo system. You can choose
to have the player downmix to normal stereo or to
surround compatible stereo.
DTS Neo:6 Mode
You can enjoy multichannel sound via HDMI output from
a 2 channel audio source.
Network
Network Status Lets you check the current network and Internet status.
Network Settings
Configure the network connection so you can enjoy
various features such as Internet services or AllShare
Wi-Fi functionality, and perform Software Updates.
Wi-Fi Direct
Lets you connect a Wi-Fi Direct device to the player
using a peer-to-pear network, without the need for a
wireless router.
Note that if the player is connected to a wireless network,
it may be disconnected when you use Wi-Fi Direct.
| NOTES |
\Text files, such as files with a .TXT or .DOC extension, will not
display when you are using the Wi-Fi Direct function.
English 21
|
Downloaded From Disc-Player.com Samsung Manuals
 Loading...