

Samsung 8500 Series, UN4688500, UN5588500 User Manual
DTV
user
imagine
manuaL,
the
possibilities
Thank you for purchasing this Samsung product.
To
receive more complete service, please
register your product at
www.samsung.com/register
Model Serial
No.
_
.J Important Warranty Information Regarding Television Format Viewing
{)
See
the
warranty
Wide
screen
format
format
full-motion video.
fill
the
screenIfyour
on
screen.
more
Additionally
or
computer graphics
exceed
the
patterns
On
Be
and
suchasthe
than5%of
Viewing
the
above guidelines
LED
picture.Toavoid
or
dark
LED
models that offer picture
carefulinthe
use.aswellasburned-in
• U.S.A Only
The
product unit accompanying
In
particular.
5,539829,5,606618 5530,655 5.777.992.6289.308,5.610,985.5481.643,5,544.247. 5,960.037 6023.490.5878.080.
and
underUSPublished Patent ApplicationNo2001-44
ThiS
licenseislimitedtepnvate non-commercial
commercial
any
unlicensed product unitorprocess conformingtoISOIIEC
this product
ISOIIEC
11172-3orISOIIEC 13818-3Norights
conformtothe
• Other countries
The
product unit accompanying
This
licenseislimitedtoprivate non-commercia:
commercial
any
unlicensed product unitorprocess conformingtoISO/IEC
this
product
ISO/IEC
conformtothe
• SAMSUNG ELECTRONICS
Subjecttothe
Electronics (SAMSUNG) products
will
additionally provide Warranty Repair Serviceinthe
In
CanadaonSAMSUNG
Original Purchaser
The
above described warranty repairs mustbeperformedbya
Statement,
Service Center Transportationtoand
Conditions covered
normal
useofthe
Excluded.
repair timcs. exchanges
For
the
lecation of a SAMSUNG Authorized Service Center please
Z'
In the United
~.
In
Canada: 1-800-SAMSUNG
card
for
more informationonwarranty
LED
Displays
The
model
(16:9,
the
aspect ratioofthe
images displayedonthem
offers
this
feature
and
dark sidebarsonnonexpanded standard format television video
the
total
television viewing
other stationary
and
patterns,
can
cause uneven agingofLED
this.
vary
shouldbelimitedasdescribed above
the
per
images
and
programming
week.
text
bars.
siZing
selection
and
duration of television formats
Images
thiS
productislicensed under
use
The
license
does
unit.
The
license
only
ISOIIEC
use
unit.
The
The
11172-3
license
license
does
only
features.
are
thiS
user
not
covers
or ISOIIEC 13818-3
thiS
user
f10t
covers
use
not
coveredbyyour
manualISlicensed under certain Intellectual property rights of certain
the
cover
any
the
manualislicensed
cover
any
the
11172-3orISOIIEC 13818-3Norights
ISOIIEC
requirements. conditions.
11172-3orISOI!EC 13818-3
NORTH
AMERICAN LIMITED WARRANTY
exclUSions
and
the
reqLllrements.
products purchasedinthe
only.
the
Original
are
Limited
Warranty Statement
from
the
limited
onlytomanufacturing defectsinmaterial or workmanship.
product.
but
not
limited
to.
are
any
originally specified
or
replacements, accessories. options, upgrades.orconsumables
States:
1-800-SAMSUNG (1-800-726-7864)
terms.
screen
widthtoheight)
should
the
images
suchasstock
primarily
are
beInthe
constantly moving. Displaying stationary graphics
market reports, video game displays station logos.
for
all
televisions. Displaying stationary images that
Displays that leave subtle,
and
images.
these
and
primarily display
controlstoview different formatsasa
used
for
Viewing.
Uneven
Samsung limited warranty
followingUSpatents 5,991,715, 5,740,317,4,972.484 5,214.678, 5.323.396,
713-A.1
usebyend-user consumers
product unit other
use
of this product unittoencode andlor decode audio files conformingtothe
are
granted under this license
than
thiS
product
11172-3
undel
or ISO/IEC 13818-3
certain Intellectual property rights of certain third parties.
usebyend-user consumers
product unit other
than
this
product
11172-3orISOIIEC 13818-3
useofthis
product unittoencode andlor decode audio
are
granted under
this
license
STATEMENT
and
limitationsofthe
original Limited Warranty supplied
conditions. exclusions
United StatesonSAMSUNG
United States.
andadated
Service Centeristhe
prOVisions
for
the
warranty period originally specified.
SAMSUNG
Authorized Service Center
BillofSaleasProofofPurchase mustbepresentedtothe
responsibility of
for,
in-homeoron-site services, minimum or maximum
cal!
toll-iree:
are
primarily designedtoview
wide
screen
16:9
ratio
format.orexpanded
and
programming.
but
permanent burned-in ghost images
full
screen
full
LED
agingasa resultofformat selection
for
licensed contents.Norights
unit
and
the
shouldbelimitedtono
movin\) images.
screen picture.
license
does
not
are
not
usedorsoldincombination
for
product features01functions thatdonot
for
licensed contents.Norights
unit
and
the
license
does
are
not
usedorsoldincombination
files
for
product featuresorfunctions thatdonot
conformingtothe
With
and
limitations contained herein, SAMSUNG
products purchasedinCanada,
Along
with
the
purchaser
and
only
those
encountered
wide
screen
and
images
web
stationary
third
parties.
granted
extend
granted
extend
Samsung
and
andtothe
this
In
to
sites
in
for
to
with
for
to
with
J Precautions When Displaying a Still Image
A
still
image
may
cause permanent damagetotheTVscreen
•
Do
not
display a stillirnageonthe
retentionisalso
screen
when
• Watchlllg
• Displaying still images
prevent
thiS
• Contains mercury. Dispose according to Local. State
©
2009
Samsung
knownasscreen
displaying a still image
left
right
and
a game console
coveredbythe
from
effect. reduce
the
ElectroniCsCoLtd.
the
LED
burn.Toavoid
LEDTVIn
center of
may
Warranty
Video
games awlPCfor
brightness'
All
fights reserved
panel
fer
more
than
2
hOUiS
such
image retention,
4:3format
the
screen causedbythe
foralong
periodoftime
causeCIsimilar effecttothe
longer
than
and
'contrast'
when
displaying still images
or
Federal Laws.
asItcan
reduce
cause
screen
image retention.
the
degree of brightness
may
leave tracesofborders displayedonthe
and
ThiS
contrast of
Image
difference of light emissiononthe.,creen Playing a
screen
a certain
Damages causedbythe
penodoftime
may
above effect
produCf~
partial after-linages.
are
not
the
DVD
or
To
CONTENTS
SETIINGUPYOUR
•
ListofFeatures
•
Accessories
•
Viewing
•
Viewing
•
Pairing
•
Finding
•
Mini
Remote
•
Installing
•
Viewing
•
Placing
•
Plug&Play
CONNECTIONS
•
Connecting
•
Connecting
•
Viewing
CHANNEL
•
Channel
•
Managing
PICTURE
•
Configuring
•
Viewing
•
Using
•
SettinguptheTVwith
SOUND
•
Configuring
SETUP
•
Configuring
•
Setting
•
Network
•
Setting
INPUTISUPPORT
•
Input
•
Support
MEDIA
•
ConnectingaUSB
•
Media
•
Sorting
•
Photo
•
ViewingaPhotoorSlide
•
Slide
•
Sorting
•
Music
•
Playing
•
Music
•
Sorting
....
..
the
Control
the
the
the
Batteriesinthe
the
Your
the
Menu
Picture-in-Picture
YourTVasaComputer
the
Connection
the
Menu
Menu
PLAY
Play
the
List
Show
the
List
Music
Play
the
Panel
Remote
Control
Remote
Control
Remote
Control..
Control
..
menus
..
TelevisioninStandby
Feature
..
VHF
and
CableTV.....
Connection
..
Channels
..
the
Picture
the
Sound
the
Setup
Time..
Network
..
..
....
(USB&DLNA)
Device..
Function
Photo
List
Option
Menu
Option
Menu
Music
List
Option
Menu..
Option
Menu..
Movie
List
TV
..
..
Remote
UHF
Antennas
Panel
Menu
..
yourPC..
Menu
Menu
Show...
..
....
(PC)
.
Control
Mode
..
Display
•
Movie
List
Option
•
....
2
.......
2
...
.
..
..
..
....... 7
. 8
....
..
............ 6
............ 6
..
3
4
5
5
8
. 9
....10
.
....
.
.
.
.
........
.
11
.
14
15
17
21
.
22
23
24
26
29
31
34
.
37
37
.
.
..
.
.
PlayingaMovie
•
Movie
Play
•
Using
the
MEDIA
•
Setting
Installing
Using
•
Using
the
the
the
•
•
ANYNET+
•
Connecting
•
SettingUpAnynet+.
•
Switching
•
Recording...
Listening
•
•
Troubleshooting
CONTENT
•
Using
the
•
Using
theTVMemory
•
Using
the
INTERNET@TV
•
Getting
•
Editing
•
Using
the
•
Using
the
•
Using
the
•
Using
the
•
Using
the
•
Using
the
•
Troubleshooting
•
Help
Website
HOME
•
Home
Network
•
SettingUpthe
•
Using
the
•
Using
the
Menu
File... ...52
Option
Menu
Menu
..
..
.
Setup
PLAY·DLNA
DLNA
Network
Application
Function
Devices
Anynet+
. .
for
Anynet+
..
..
....
Devices
..
..
...
(Home
..
Theater)
.
....
the
DLNAApplication
DLNA
DLNA
Anynet+
between
throughaReceiver
LIBRARY
Content
Library..
Content
Management..
Started
with
Snippetsinthe
Profile
Widget..
Yahoo!®
Widget
Yahoo!®
Weather
Yahoo!®
News
Yahoo!®
Flickr
Yahoo!®
Finance
for
Internet@TV
NETWORK
Center
Home
Message
Function
Media
Function..
Contents...
Internet@TV...
Dock
CENTER
..
Network
. .
.
. .
Gallery
Widget..
Widget
Widget..
Widget..
Center
.
.
.
.
.
.
.
.
.
.
............
.
.
.
52
55
56
57
58
59
61
62
63
63
64
64
65
66
67
68
69
72
72
74
75
75
76
77
77
77
78
79
80
81
RECOMMENDATIONS
•
.
40
41
.
43
44
.
45
46
48
49
50
.
51
51
Troubleshooting..
•
Installing
•
•
•
•
•
•
•
•
•
the
Disconnecting
Assembling
Wall
Mount
Preparing
Anti-Theft
Securing
Securing
Specifications
Dimensions
before
Kensington
the
theTVtoaWallorCabinet
Stand..
the
the
Kit
Specifications
Installation
Stand..
Cables
installing
Lock
.
.
. .
the
Space
(VESA)
Wall-Mount
..
82
83
83
.
.
84
85
86
86
86
87
88
89
o
License
SRSCe)
t
Mill'
1·11
i
OIGITAL
[I]
,I.':
DOLBY.
DIGITAL I
TruSurround
!.)
technologyisincorporated
Manufactured
trademarks of
DivX®
Certifiedtoplay
~
o
Symbol
Press
HD,
under
Dolby
SRS
and
under
license
Laboratories.
DivX®
Note
ce)
symbol
from
video,
English
license
Dolby
including
are
trademarksofSRS
from
SRS
Labs,
Laboratories.
premium
One-Touch
-1
Dolby
content.
Inc.
and
Button
Labs,
the
Inc.
TruSurround
double-D
symbol
TOOLS
HD
are
~
Button

SETTING
To
use
your
III
Figures
Product
UP
TV,
you
first
and
illustrationsinthis
design
and
I List of Features
YOUR
havetosetituptosuit your environment.
specifications
TV
User
Manual
maybechanged
are
provided
without
for
reference
noticeinordertoenhance
only
and
may
differ
from
actual product appearance.
product performance.
• Adjustable picture settings
• Automatic timertoturn
• A
special
sleep
timer.
• Excellent Digital Interface & Networking:
no
Cable
Box/Satellite receiver
•
HDMI/DVI
• Excellent
SRS
•
•
Media
• Internet@TV:
• Home Network Center:
connection of yourPCto
Picture
Quality
TruSurroundHDprovides a virtual surround
Play:
Allows
You
theTVon
youtoplay
can
use
Allows
that
various internet services
I Accessories
.'
./
Remote
Control (BN59-00849A) &
Batteries
(AAAx2)
canbestoredinthe
and
off.
With
a built-inHDdigital
(Set-Top
music
youtoconfigure a
this
TV.
files,
Box)
pictures,
needed.
TV's
memory.
system.
and
movies
and
view
mobile
message
Mini
Remote
Lithium battery
(BN59-00802A)
tuner,
savedona
useful
serverora
Control &
(3V)
nonsubscriptionHDbroadcasts
USBorDLNA
information
and
DLNA
device.
entertaining
media
render.
canbeviewed
content.
Cover-Bottom
(BN63-05654A)
with
III
III
Please
The
items
Warranty
Safety Guide
TV-Holder &
(BN96-10788B)
Holder-Ring
(BN61-05280A)
make
sure
color
Card
Screw(X1)
(4ea)
the
following
and
shape
I
items
are
included
may
vary
dependingonthe
Holder-Wire
(BN61-05491A)
Cleaning
(BN63-01798B)
Holder-Wire
(BN61-05373A)
with
your
model.
LED
stand
Cloth
(3ea)
TV.Ifany
items
are
missing,
Program
(BN59-00726D)
Holder-Wire
(BN61-05596A)
Owner's Instructions
contact
your
CD
Cable
dealer.
E,ngllsh
• 2 .

I
Viewing
(Ig
(Ig
The
The
the
product
front
Control
color
panel
Panel
and
shape
may
vary
buttons
canbeactivatedbytouching
dependingonthe
them
model.
with
your
finger.
o
REMOTE
e 0
(POWER):
o V CH
A:
buttonsonthe
o -VOL +:
...
and~buttonsonthe
o
MENU:
Presstoseeanon-screen
o
SOURCE
ENTER
[3l
o
SPEAKERS
~
I
-
CONTROL
Presstochange
Presstoincreaseordecrease
[3l:
buttononthe
SENSOR:
Presstoturn
remote
control.
Toggles
between
Aim
theTVon
channels.Inthe
remote
control.
menuofyour
all
remote
control.
the
the
0
/
remote
and
off.
the
available
SIlMSUNG
~
SOURCE
G'
0 4
control
towards
on-screen
volume.Inthe
TV's
features.
input
sources.Inthe
menu,
MENU
t
this
use
the
on-screen
"'"
f)
"\
-
VOL
+
l~
4
spotonthe
V CH A
menu,
use
on-screen
1·_>
I
I
I \
v
CH
)
4
TV.
buttonsasyou
the
- VOL+
menu,
use
-
A
this
-
would
use
buttonsasyou
buttonasyou
the'"
would
use
the
and
use
...
the
I Viewing the Remote Control
®
The
product
color
and
shape
may
vary
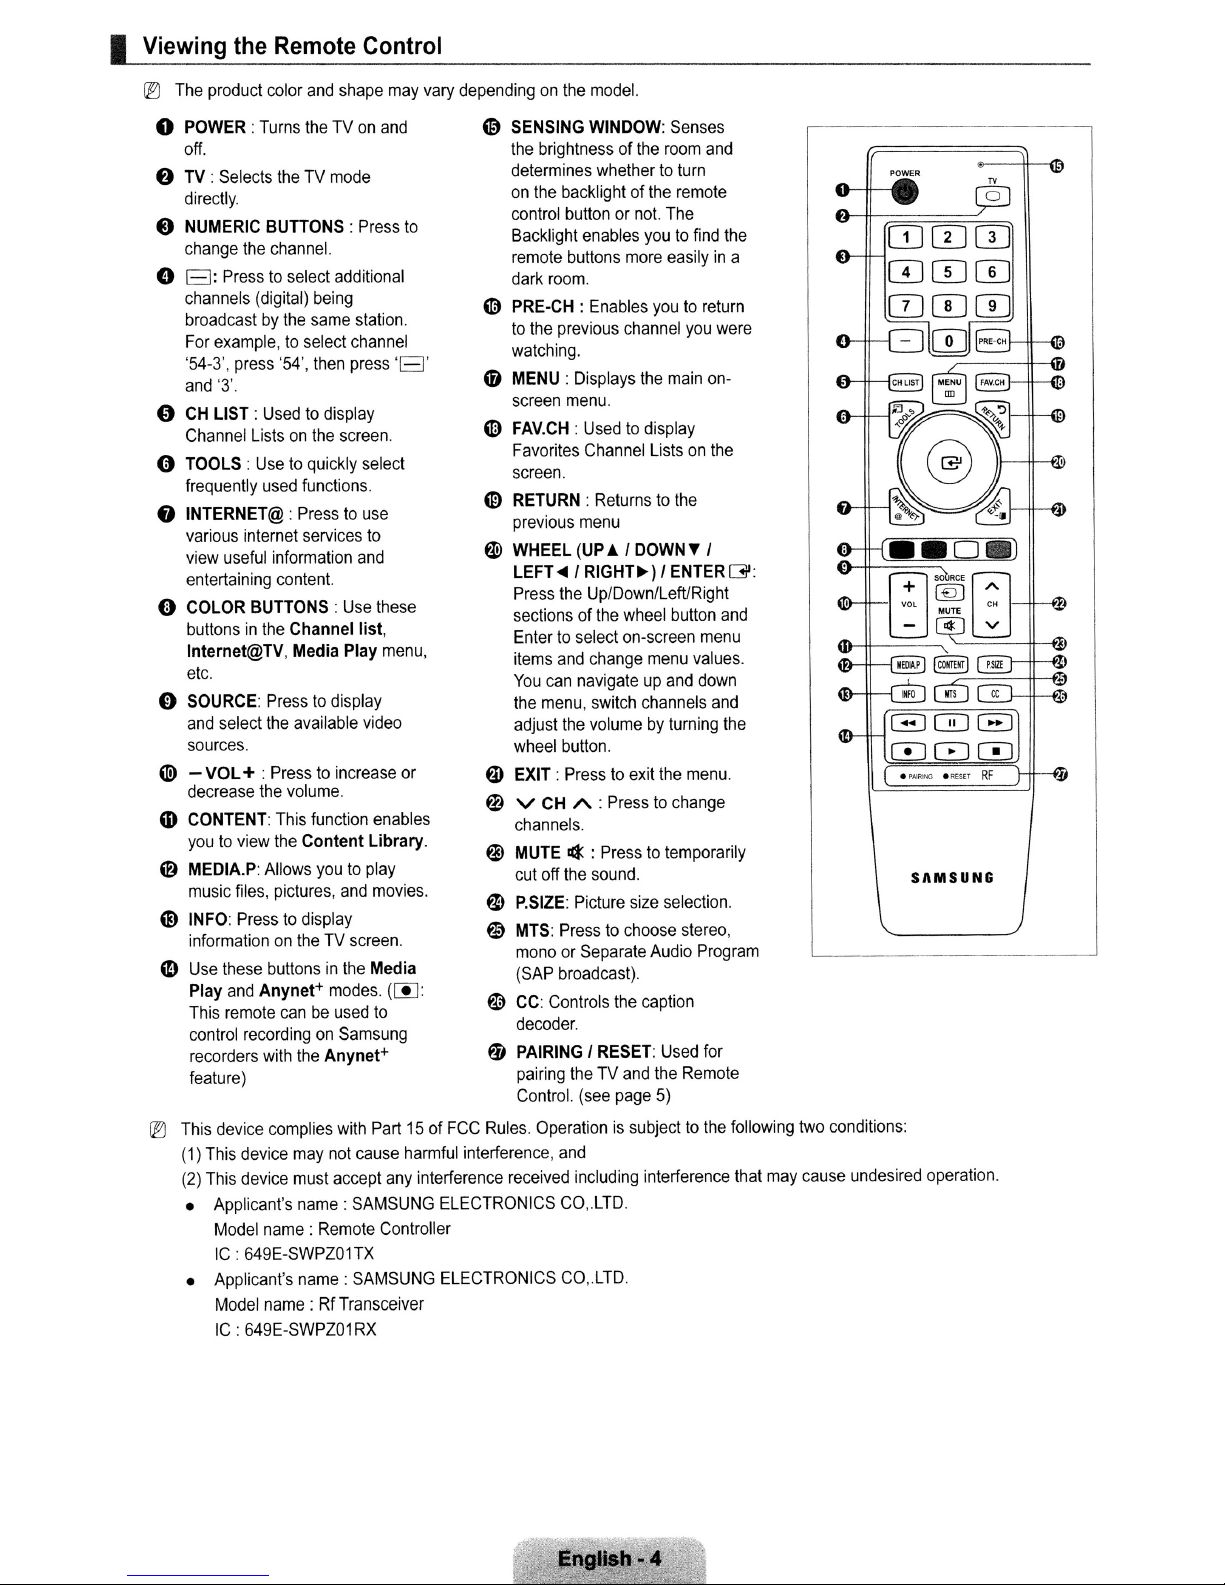
o POWER:
off.
o TV:
directly.
e
NUMERIC
change
o
B:
channels
broadcastbythe
For
'54-3',
and
4:')
CH
Channel
(:) TOOLS:
frequently
f)
INTERNET@:
various
view
entertaining
o
COLOR
buttonsinthe
Internet@TV, Media Play
etc.
o
SOURCE:
and
sources.
(til - VOL+ :
decrease
(D
CONTENT:
youtoview
@
MEDIA.P:
music
CD
INFO:
informationontheTVscreen.
eD
Use
Play
This
control
recorders
feature)
®
This
(1)
(2)
• Applicant's name:
• Applicant's name:
Turns
theTVon
Selects
theTVmode
BUnONS:Press
the
channel.
Presstoselect
(digital)
example,toselect
press
'3'.
LIST:
Usedtodisplay
Listsonthe
Usetoquickly
used
internet
useful
information
BUnONS:Use
Presstodisplay
select
the
Presstoincrease
the
the
Allows
files,
pictures,
Presstodisplay
these
buttonsinthe
and
Anynet+
remote
recordingonSamsung
with
device
complies
This
device
This
device
Model
name:
IC
:649E-SWPZOnx
Model
name:RfTransceiver
IC:649E-SWPZ01RX
additional
being
same
'54',
then
functions.
Presstouse
services
content.
Channel list,
available
volume.
This
function
Content Library.
youtoplay
modes.
canbeused
the
Anynet+
with
may
not
must
accept
Remote
and
station.
channel
press
'B'
screen.
select
to
and
these
menu,
video
enables
and
movies.
Media
([j]:
to
Part15of
cause
any
SAMSUNG
Controller
SAMSUNG
to
or
harmful
interference
dependingonthe
@
SENSING
the
brightnessofthe
determines
on
the
control
Backlight
remote
dark
~
PRE·CH:
to
the
watching.
o MENU:
screen
~
FAV.CH:
Favorites
screen.
o RETURN:
previous
W
WHEEL
LEFT
Press
sectionsofthe
Entertoselect
items
You
the
adjust
wheel
a.
EXIT:
~
V
channels.
~
MUTE
cut
~
P.SIZE:
o
MTS:
monoorSeparate
(SAP
~
CC:
decoder.
fIj
PAIRINGIRESET:
pairing
Control.
FCC
Rules.
Operationissubjecttothe
interference,
received
ELECTRONICS
ELECTRONICS
model.
WINDOW:
whethertoturn
backlightofthe
buttonornot.
enables
buttons
more
room.
Enables
previous
....
the
and
can
menu,
the
button.
Presstoexit
CH
off
the
Presstochoose
broadcast).
Controls
and
CO,.LTD.
CO,.LTD.
channel
Displays
menu.
Usedtodisplay
Channel
Returnstothe
menu
(UP.l I
I
RIGHT~)
Up/Down/LeftlRight
wheel
on-screen
change
navigateupand
switch
volumebyturning
A :
Presstochange
¢ :
Presstotemporarily
sound.
Picture
the
theTVand
(see
page
including
Senses
room
remote
The
youtofind
easilyina
youtoreturn
the
main
Listsonthe
DOWN
I
ENTER
button
menu
channels
the
size
selection.
stereo,
Audio
caption
Used
the
Remote
5)
interference
and
you
were
on-
T I
and
menu
values.
down
and
menu.
Program
for
the
G:
the
following
that
may
,-------------
two
conditions:
cause
0]00
0CDCD
0CIJITJ
-0
SAMSUNG
undesired
operation.
I
A
process
only.
Pairing
that
the
enables
o Auto Pairing
A
method
that
IlJ
If
Auto
Pairing
Remote
two-way
completes
does
Control
communication
the
automatic
not
work,
between
pairingoftheTVand
refertothe
'Manual
theTVand
the
Pairing'.
the
remote
remote
control.
control.
This
enables
the
remotetocontrol
this
TV
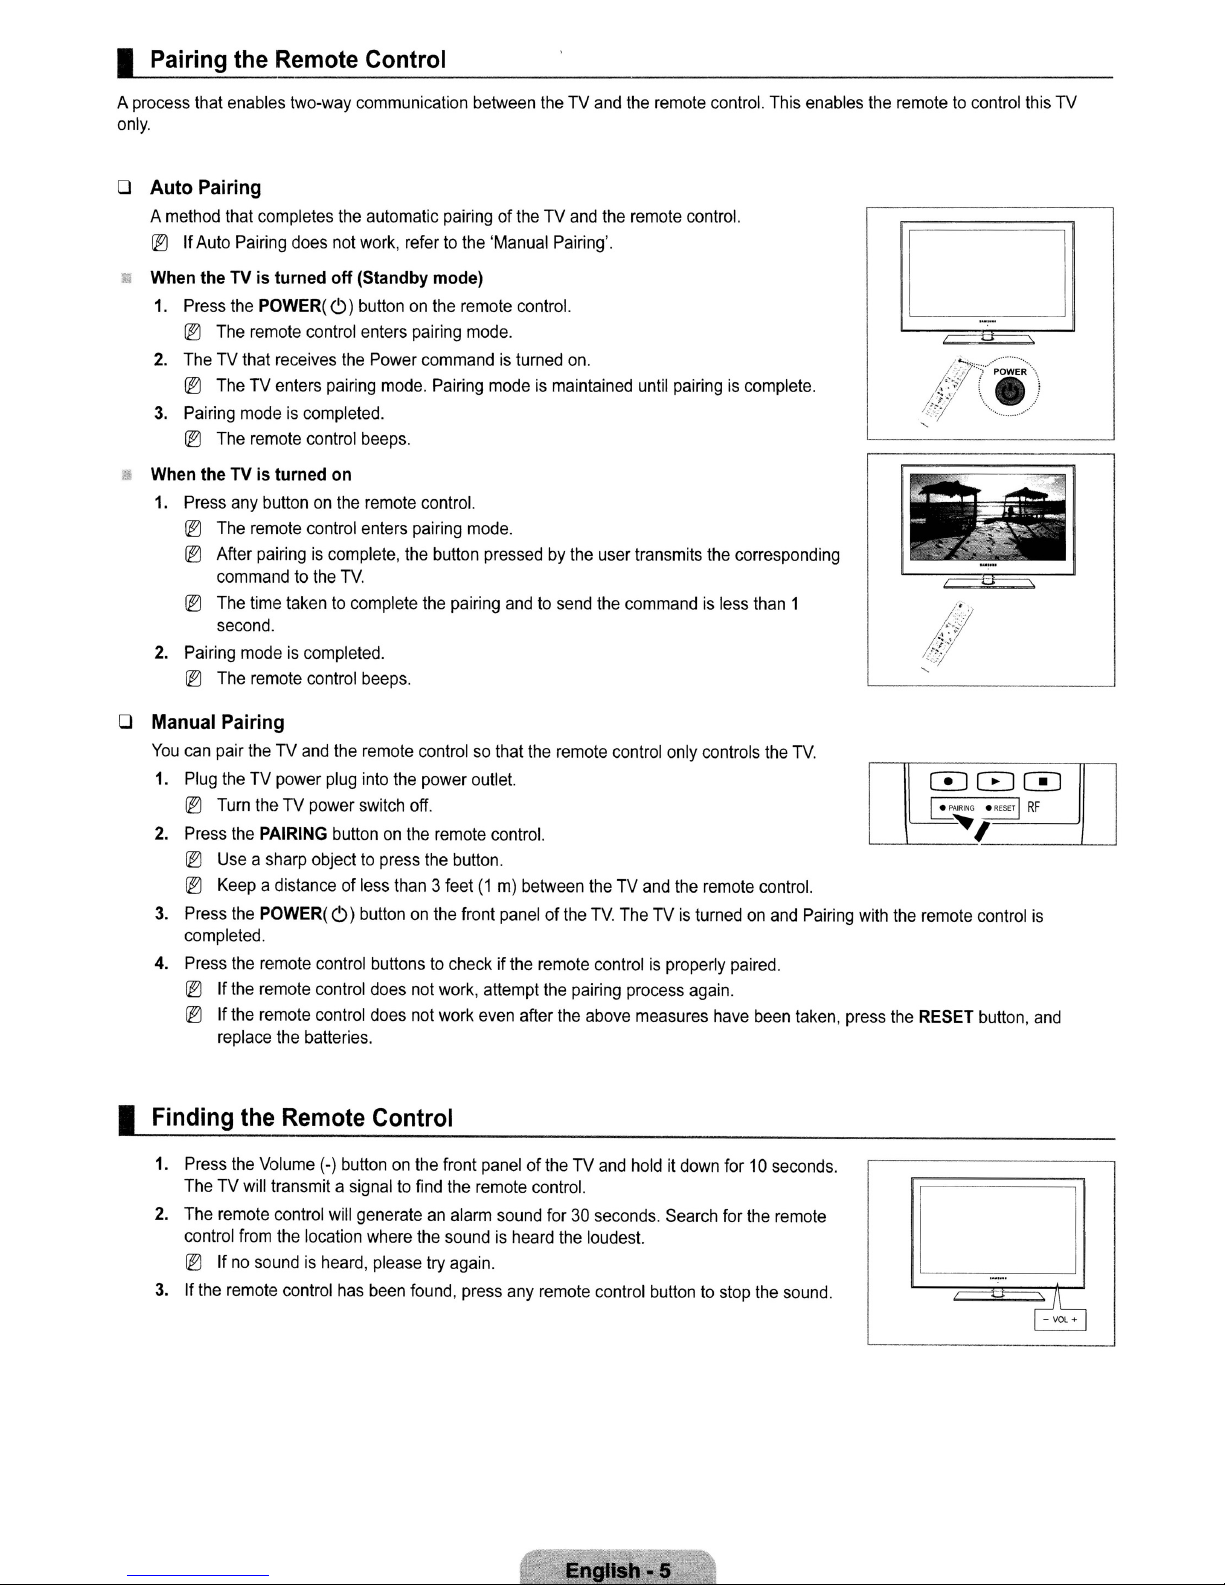
!!i When the
1.
2.
3.
When theTVis turned on
1.
2.
TV
Press
the
IlJ
The
remote
TheTVthat
IlJ
TheTVenters
Pairing
modeiscompleted.
IlJ
The
remote
Press
any
IlJ
The
remote
IlJ
After
commandtothe
IlJ
The
time
second.
Pairing
modeiscompleted.
IlJ
The
remote
is turned
POWER(
buttononthe
pairingiscomplete,
o Manual Pairing
You
can
pair
theTVand
1.
Plug
theTVpower
IlJ
Turn
theTVpower
2.
Press
the
PAIRING
IlJ
Useasharp
IlJ
Keep
a distance of
3.
Press
the
POWER(
completed.
4.
Press
the
remote
IlJ
If
the
remote
IlJ
If
the
remote
replace
off
(Standby mode)
('))
buttononthe
control
enters
receives
the
the
Power
pairing
control
beeps.
remote
control
enters
TV
takentocomplete
control
beeps.
the
remote
plug
into
switch
buttononthe
objecttopress
less
('))
buttononthe
control
buttonstocheckifthe
control
does
control
does
batteries.
remote
pairing
mode.
commandisturned
mode.
Pairing
control.
pairing
mode.
the
button
the
pairing
controlsothat
the
power
outlet.
off.
remote
the
button.
than3feet(1m)
front
not
work,
not
work
control.
on.
modeismaintained
pressedbythe
andtosend
the
control.
between
paneloftheTVTheTVis
attempt
even
after
remote
remote
the
pairing
the
theTVand
above
user
the
commandisless
control
controlisproperly
process
until
pairingiscomplete.
transmits
measures
the
only
controls
the
remote
turnedonand
again.
have
corresponding
than
1
the
TV
control.
Pairing
paired.
been
taken,
with
press
000
~~RING~
'-----'-~
the
the
remote
RESET
I
control
button,
RF
is
and
I
Finding
1.
2.
3.Ifthe
the
Remote
Press
the
Volume
TheTVwill
The
control
IlJ
transmit a
remote
control
from
the
Ifnosoundisheard,
remote
control
Control
(-)
buttononthe
signaltofind
will
generateanalarm
location
has
where
please
been
found,
front
the
remote
the
soundisheard
try
again.
press
paneloftheTVand
control.
sound
for30seconds.
the
loudest.
any
remote
control
holditdown
Search
buttontostop
for10seconds.
for
the
remote
the
sound.
I
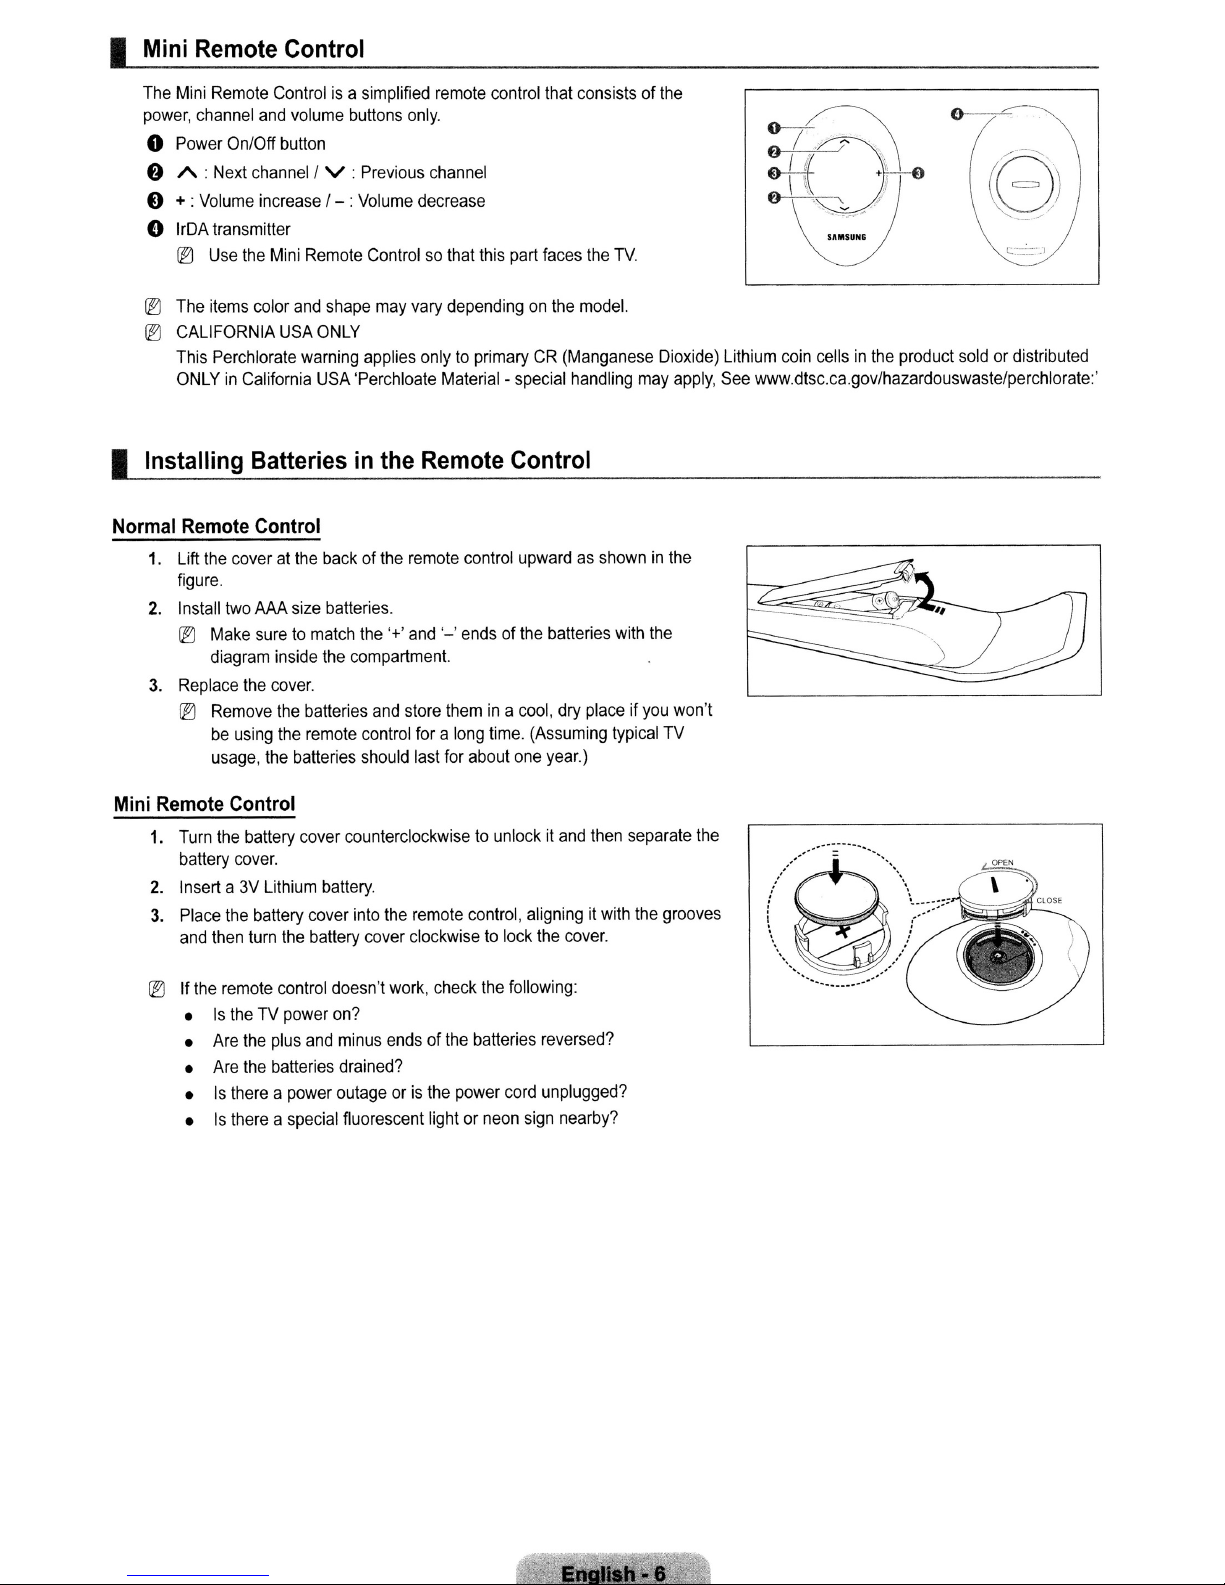
Mini
The
power,
o
6
E)
o
@:)
@:)
I
Installing
Remote
Mini
Remote
channel
Power
A:
Next
+:
Volume
IrDA
transmitter
@:)
Use
The
items
CALIFORNIA
This
Perchlorate
ONLYinCalifornia
On/Off
channel
increase
the
color
Control
Controlisa
and
volume
button
Mini
and
USA
Batteriesinthe
/ V :
/ - :
Remote
shape
ONLY
warning
USA
simplified
buttons
only.
Previous
Volume
decrease
Controlsothat
may
vary
applies
onlytoprimaryCR(Manganese
'Perchloate
Remote
remote
control
channel
this
part
dependingonthe
Material-special
Control
that
consistsofthe
faces
the
model.
handling
TV.
Dioxide)
may
apply,
Lithium
coin
cellsinthe
See
www.dtsc.ca.gov/hazardouswaste/perchlorate:.
product
soldordistributed
Normal
1.
2.
3.
Mini
Remote
1.
2.
3.
@:)Ifthe
Remote
Lift
the
coveratthe
figure.
Install
two
@:)
Make
diagram
Replace
@:)
Remove
be
using
usage,
Control
Turn
the
battery
cover.
Inserta3V
Place
the
and
then
remote
•
Is
theTVpower
•
Are
•
Are
•
Is
thereapower
•
Is
thereaspecial
Control
AAA
size
suretomatch
inside
the
cover.
the
batteries
the
remote
the
batteries
battery
cover
Lithium
battery
cover
turn
the
battery
control
the
plus
and
the
batteries
backofthe
batteries.
the
counterclockwisetounlockitand
battery.
doesn't
on?
minus
drained?
outageoris
fluorescent lightorneon
remote
the
'+'
and
compartment.
and
store
control
foralong
should
last
into
the
remote
cover
clockwisetolock
work,
check
endsofthe
the
control
'-'
endsofthe
themina
for
about
control,
the
batteries
power
upwardasshowninthe
cool,
time.
one
following:
cord
sign
batteries
dry
placeifyou
(Assuming
year.)
then
aligningitwith
the
cover.
reversed?
unplugged?
nearby?
with
typical
separate
the
the
won't
TV
the
grooves
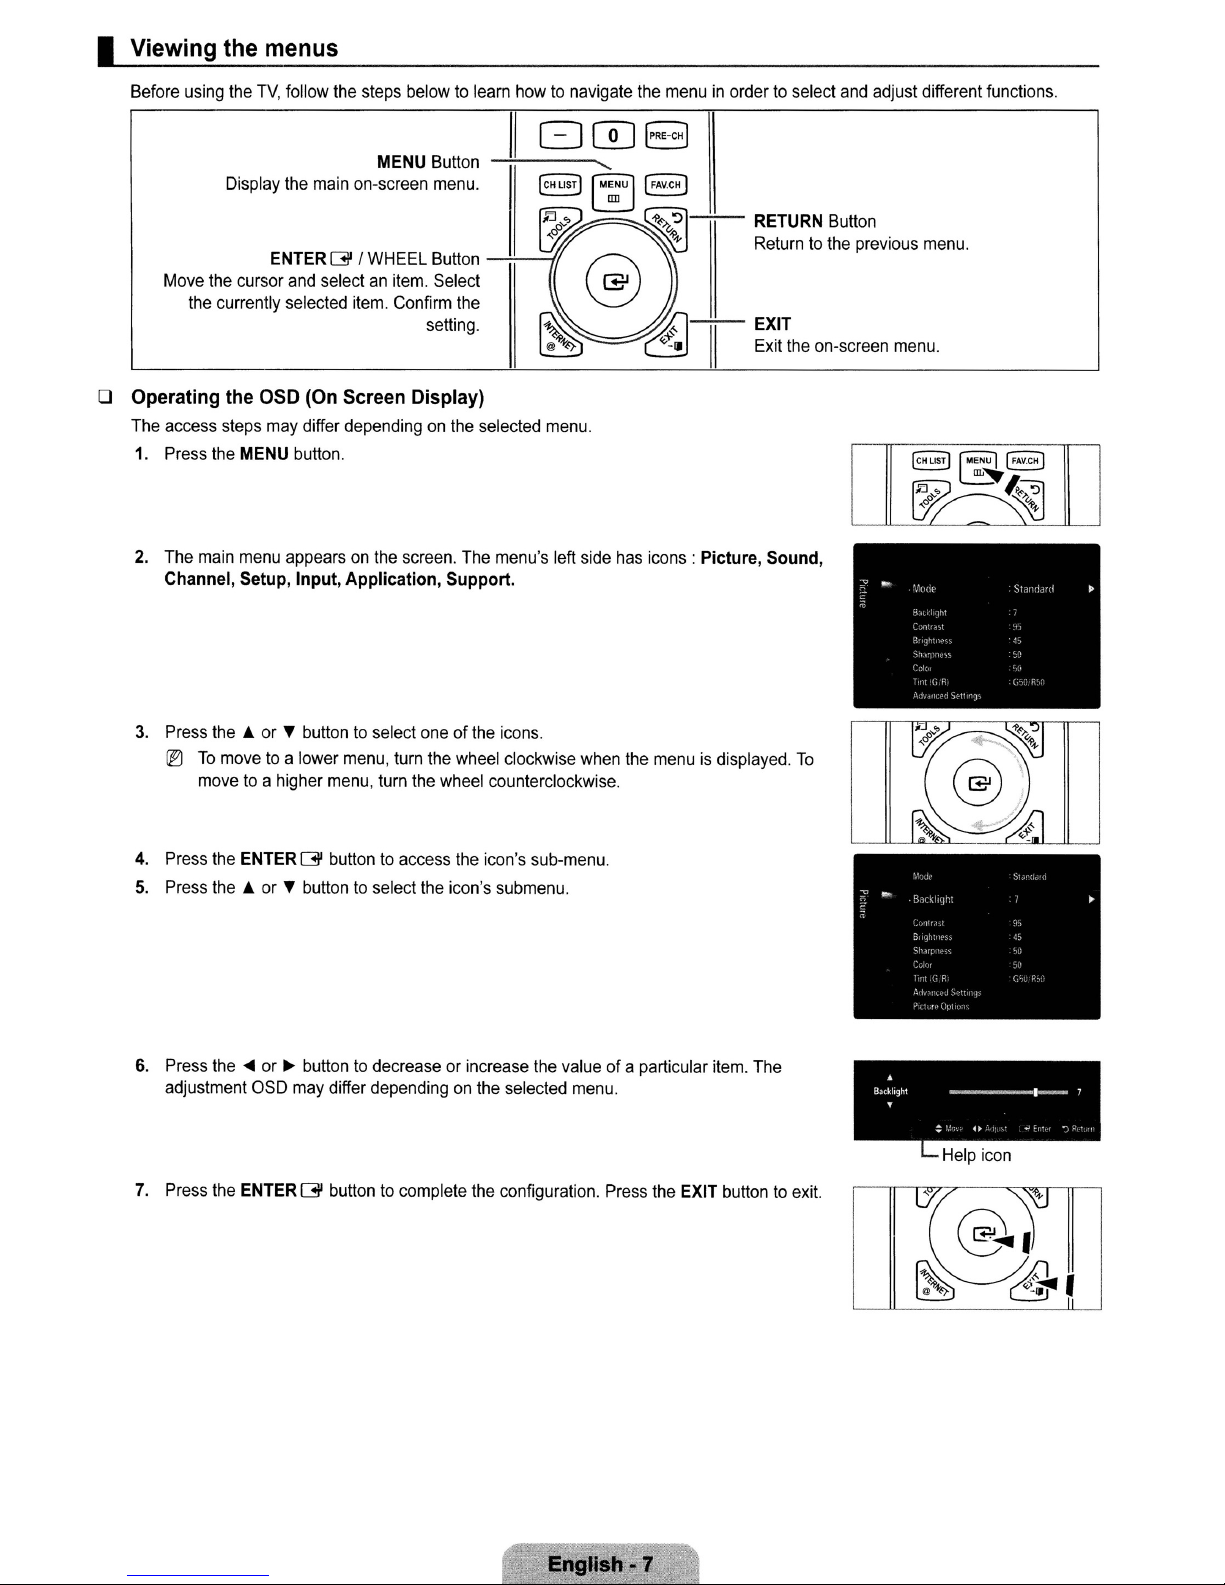
I Viewing the menus
Before using the
Move the cursor and selectanitem. Select
the currently selected item. Confirm the
o Operating the
The access steps may differ dependingonthe selected menu.
1. Press the MENU button.
2.
The main menu appearsonthe screen. The menu's left side has icons: Picture,
Channel, Setup, Input,
TV,
follow the steps belowtolearn how to navigate the menuinordertoselect and adjust different functions.
MENU Button
Display the main on-screen menu.
ENTER G / WHEEL Button
setting.
OSD
(On Screen Display)
Application,
Support.
II
808
(eHlIST)
[M~U]
~
~
~
@'i'..""
"-
(FAveH)
~--
~-II
"'':11
RETURN Button
R,wmtoth,
EXIT
Exit the on-screen menu.
Sound,
pro,;o", moo'.
[CH
....
W
LIST)
[MENU
1
(FAV.CH)
IlL"
0
(;~1-
~
3.
Press
the'"
or " buttontoselect oneofthe icons.
IB
To
movetoa lower menu, turn the wheel clockwise when the menuisdisplayed.
movetoa higher menu, turn the wheel counterclockwise.
4. Press the ENTERG button to access the icon's sub-menu.
5.
Press
the'"
or " button to select the icon's submenu.
6.
Press the~or~button to decrease or increase the value of a particular item. The
adjustment OSD may differ depending
7. Press the ENTER G button to complete the configuration. Press the EXIT button
on
the selected menu.
To
A
Backlight
.
to
exit.
_1_
:'
4.
Help Icon
~,
7
..."")'"
I Placing Your Television in Standby Mode
Your set canbeplacedinstandby modeinorder to reduce power consumption. The standby mode canbeuseful when you wish to
interrupt viewing temporarily (during a meal, for example).
1.
Press the POWERC)button on the remote control.
~
The screenisturned off and a standby indicator appears on your set.
2.Toswitch your set back on. simply press the POWERC)button again.
~
Do not leave your setinstandby mode for long periods of time (when you are awayonholiday, for example). It is best to
unplug the set from the AC outlet and antenna.
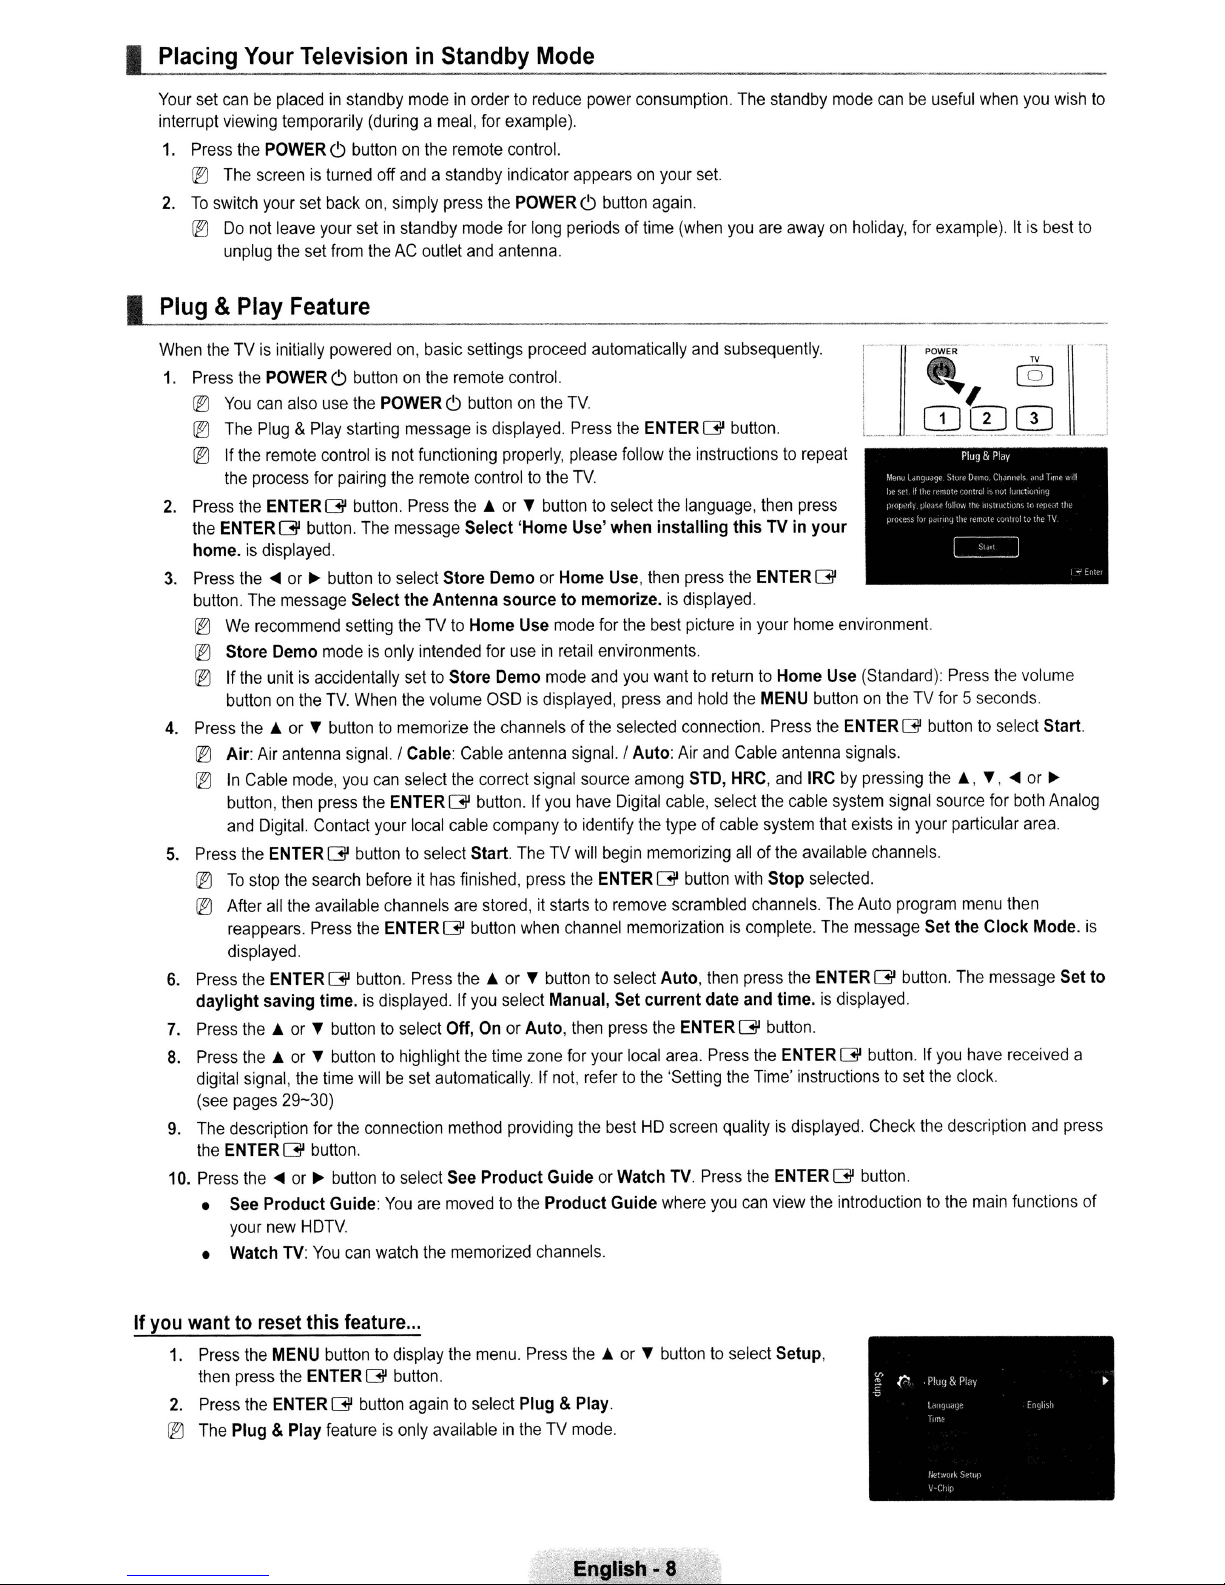
Plug &Play Feature
When the TV is initially powered on, basic settings proceed automatically and subsequently.
1.
Press the POWERC)button on the remote control.
~
You
can also use the POWERC)button on the
~
The Plug & Play starting messageisdisplayed. Press the ENTERG'button.
~
If the remote control is not functioning properly, please follow the instructions to repeat
the process for pairing the remote control to the
2.
Press the ENTERG'button. Press
the ENTER
home.isdisplayed.
3.
Press
button. The message Select
~
~
G'
button. The message Select
the'"
or~button to select Store Demo or
We
recommend setting the TVtoHome
Store Demo modeisonly intended for useinretail environments.
the
the;'or,.
Antenna
sourcetomemorize. is displayed.
® If the unit is accidentally set to Store Demo mode and you want to return to
on
button
4.
Press
~
Air: Air antenna signal. I Cable: Cable antenna signal. I Auto: Air and Cable antenna signals.
In
button, then press the ENTERG'button. If you have Digital cable, select the cable system signal source for both Analog
and Digital. Contact your local cable company to identify the type of cable system that exists
5.
Press the ENTERG'button to select Start. TheTVwill begin memorizing allofthe available channels.
~
To
~
After
reappears. Press the ENTER
displayed.
6.
Press the ENTERG'button. Press
daylight
7.
Press
8.
Press
digital signal, the time will
(see pages
9.
The description for the connection method providing the bestHDscreen qualityisdisplayed. Check the description and press
ENTERG'
the
10. Press
• See
your new
• Watch TV:
theTVWhen the volume
the;'or,.
Cable mode, you can select the correct signal source among STD, HRC, and IRC by pressing
stop the search before it has finished, press the ENTERG'button with
all
saving
the;'or,.
the;'or,.
the'"
Product
button to memorize the channelsofthe selected connection. Press the ENTER G button to select
the available channels are stored,itstarts to remove scrambled channels. The Auto program menu then
time. is displayed. If you select Manual, Set
button to select Off, On or Auto, then press the ENTERG'button.
button to highlight the time zone for your local area. Press the ENTERG'button. If you have received a
be
set automatically. If not, refer to the 'Setting the Time' instructions to set the clock.
29-30)
button.
or~buttontoselect See
Guide:
You
are moved to the
HDTV
You
can watch the memorized channels.
aSD
G'
button when channel memorization is complete. The message Set
the;'or,.
Product
TV
TV
buttontoselect the language, then press
'Home
Use' when
Home
Use mode for the best pictureinyour home environment.
is displayed, press and hold the MENU buttononthe TV for 5 seconds.
buttontoselect Auto, then press the ENTERG'button. The message Set
Guide
or Watch TV. Press the
Product
installing
Use, then press the ENTER
current
Guide
where you can view the introduction to the main functions of
this
TV in
Home
Stop
date and time.isdisplayed.
ENTERG'
,-
!
I
I
your
G'
Use (Standard): Press the volume
selected.
button.
~
I
OJ
CD CD
the;.,
",
in
your particular area.
the
Clock
...
TV
@]
or
Mode.
Start
~
is
to
Ifyou want to reset this feature
1.
Press the MENU button to display the menu. Press
then press the ENTER
2.
Press the ENTERG'button again to select Plug & Play.
~
The Plug & Play featureisonly availableinthe TV mode.
G'
...
button.
the;'or,.
English - 8
buttontoselect Setup,
CONNECTIONS
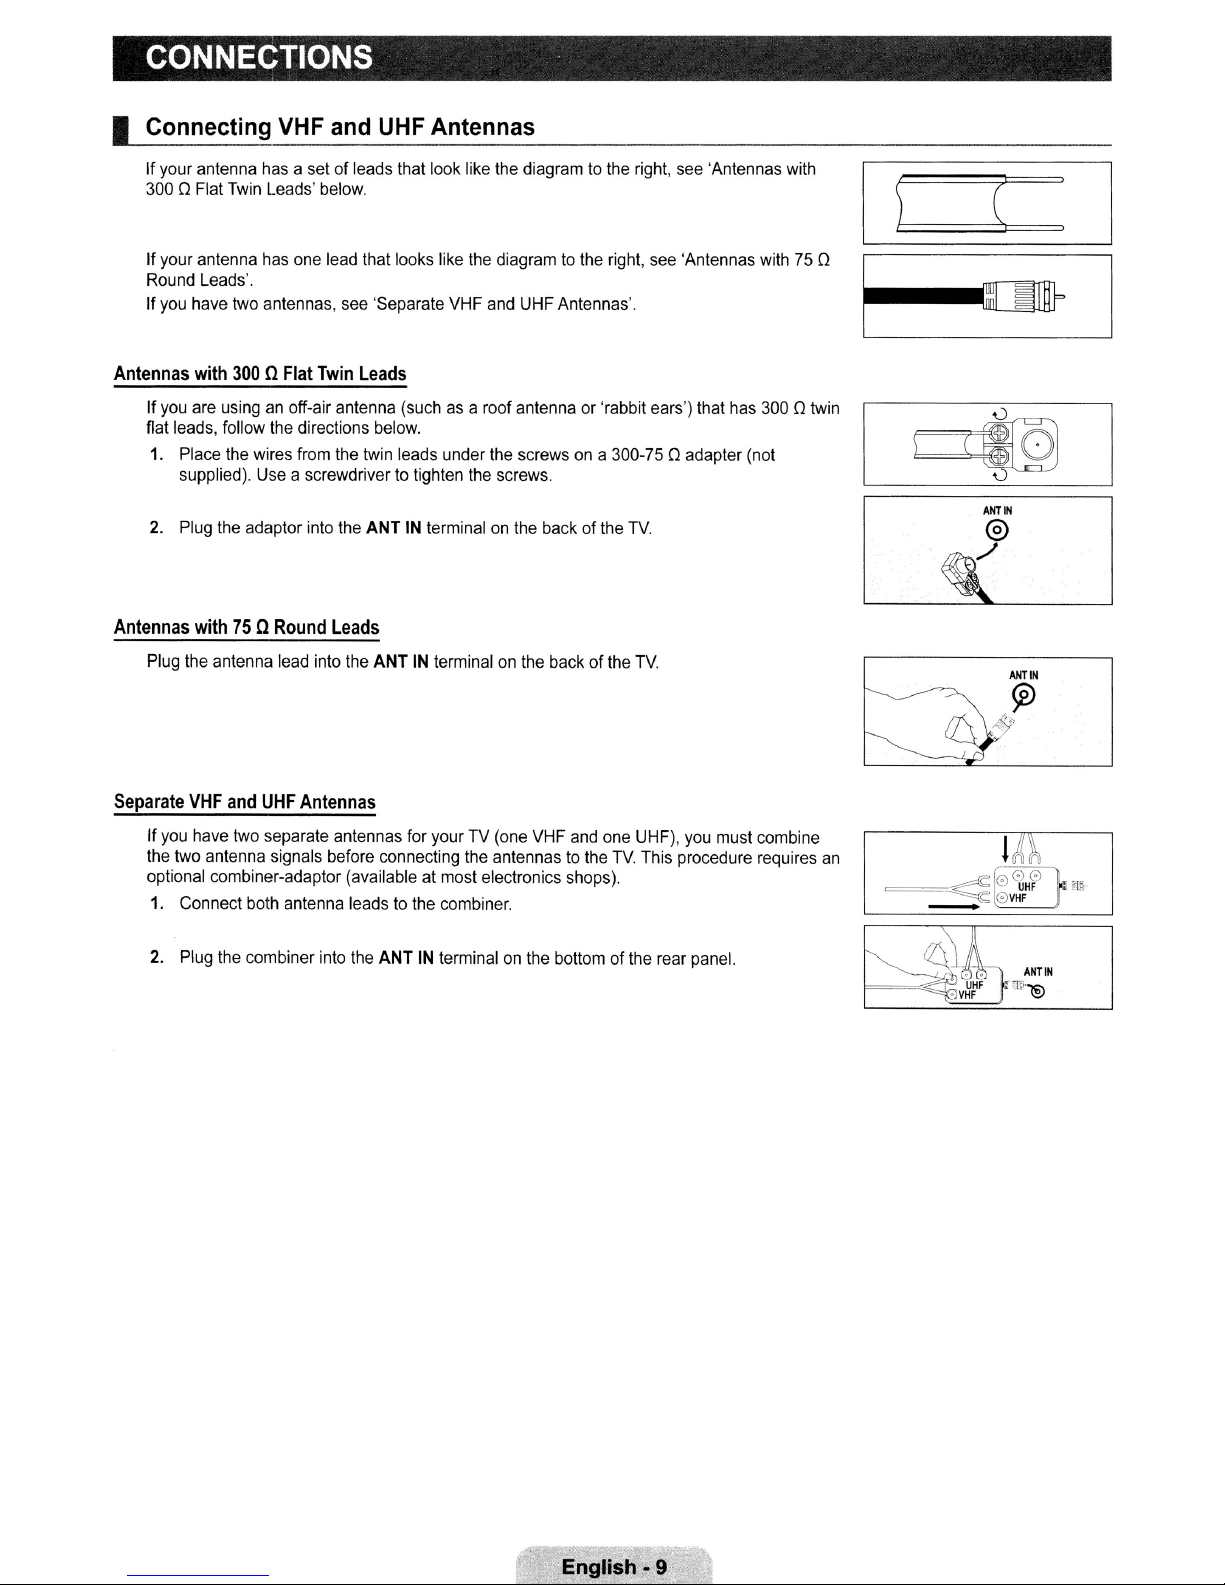
I Connecting VHF and UHF Antennas
If your antenna has a set of leads that look like the diagram to the right, see 'Antennas with
[)
Flat Twin Leads' below.
300
(
If your antenna has one lead that looks like the diagram
Round Leads'.
If you have two antennas, see 'Separate VHF and UHF Antennas'.
Antennas
Antennas
Separate
with
300QFlat
If
you are usinganoff-air antenna (such as a roof antenna or 'rabbit ears') that has 300[)twin
flat leads, follow the directions below.
1. Place the wires from the twin leads under the screws on a 300-75
supplied). Use a screwdriver to tighten the screws.
2.
Plug the adaptor into the ANTINterminal on the back of the
with
75QRound
Plug the antenna lead into the ANTINterminal on the back of the
VHF
and
If
you have two separate antennas for your TV (one VHF and one UHF), you must combine
the two antenna signals before connecting the antennas to the
optional combiner-adaptor (available at most electronics shops).
1.
Connect both antenna leadstothe combiner.
UHF
Twin
Leads
Leads
Antennas
to
the right, see 'Antennas with 75
[)
adapter (not
TV.
TV.
TV.
This procedure requires
[)
~
~?
an
-
AHliN
@
------
lIh
.~'
4[~0l0l
,;:
0lVHF
UHF
"!
;;[~
2.
Plug the combiner into the
ANT
IN
terminal on the bottomofthe rear panel.
~-
~IIJ
~
••
~_.v~rF~"li~'"@
ANllN
English·9
I
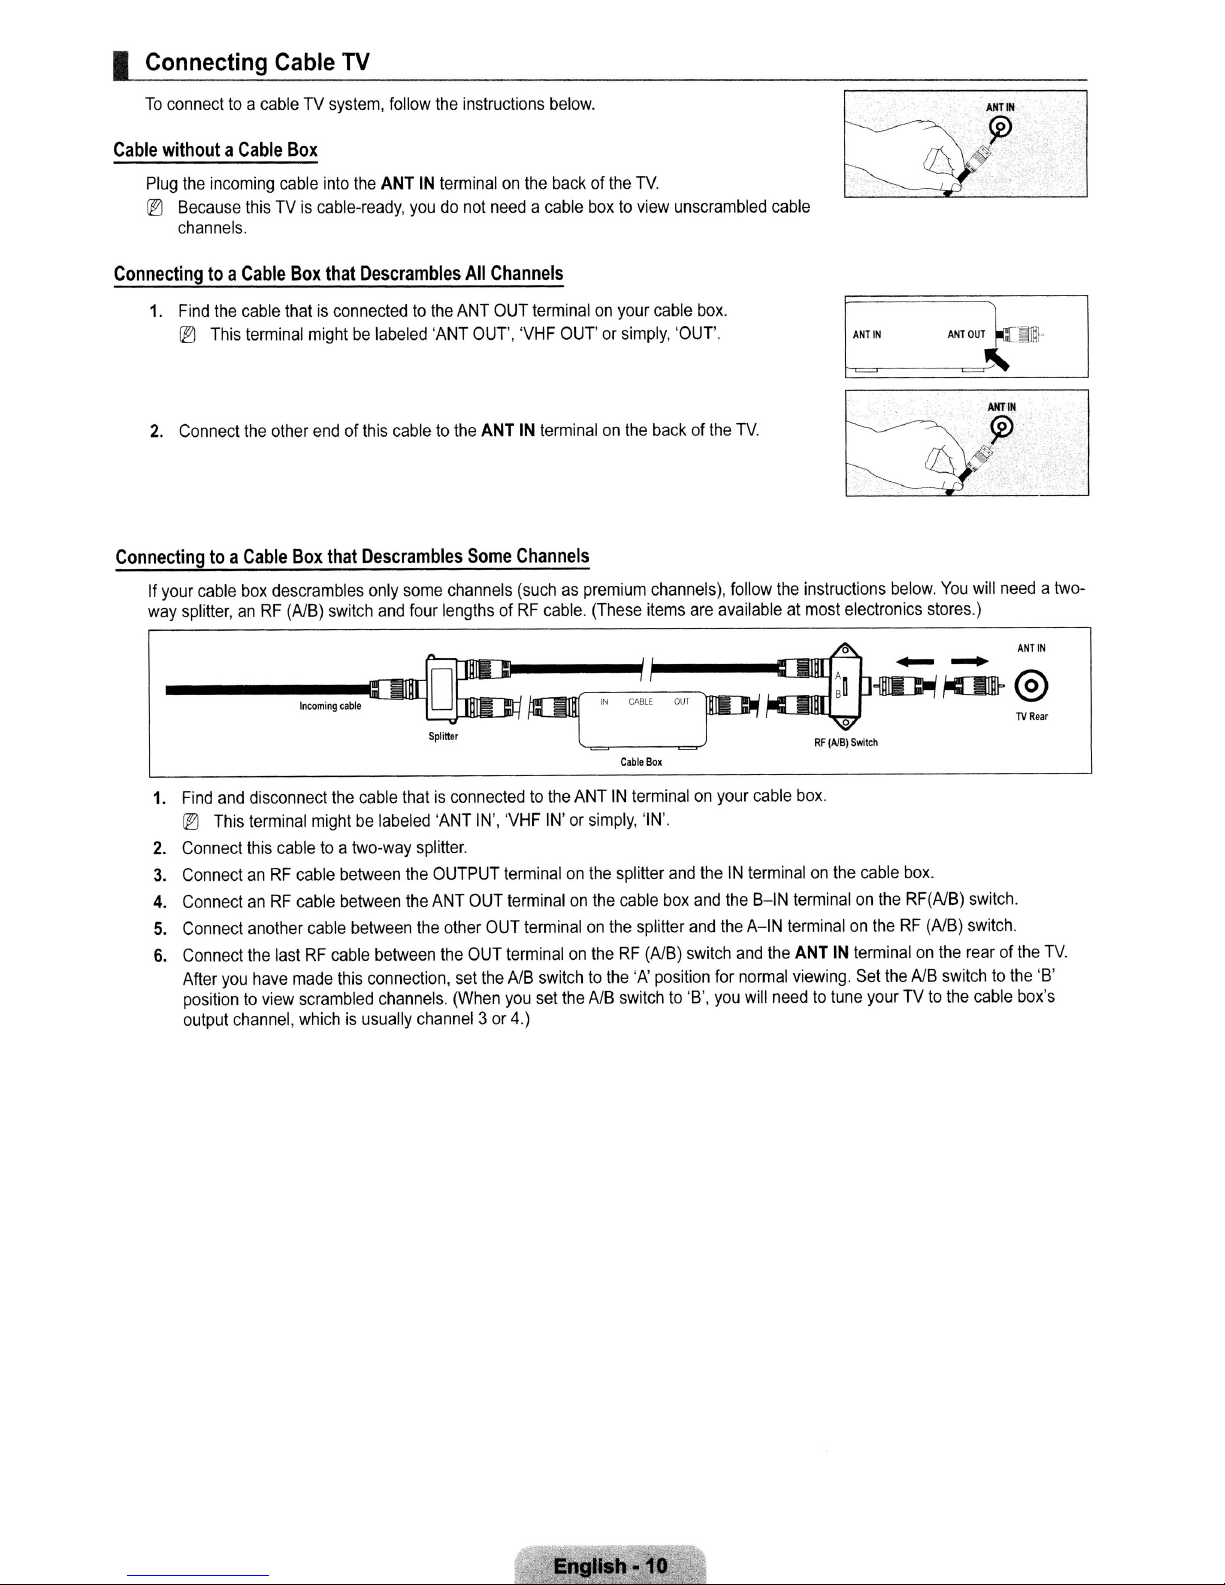
Connecting
To
connecttoa
Cable
withoutaCable
Plug
the
IB
Because
channels.
cableTVsystem,
incoming
thisTVis
Cable
Box
cable
cable-ready,
into
TV
the
follow
ANT
youdonot
the
instructions
IN
terminalonthe
needacable
below.
backofthe
boxtoview
TV.
unscrambled
cable
Connectingtoa
1.
Find
the
IB
This
2.
Connect
Connectingtoa
If
your
cable
way
splitter,anRF
1.
Find
and
IB
This
2.
Connect
3.
ConnectanRF
4.
ConnectanRF
5.
Connect
6.
Connect
After
you
positiontoview
output
Cable
Box
that
cable
thatisconnectedtothe
terminal
the
Cable
box
mightbelabeled
other
endofthis
Box
that
descrambles
(AlB)
switch
-".~~
disconnect
terminal
this
another
the
channel,
cabletoa
cable
cable
cable
lastRFcable
have
made
scrambled
whichisusually
mightbelabeled
Descrambles
cabletothe
Descrambles
only
and
the
cable
two-way
between
between
between
between
this
connection,
channels.
All
Channels
ANT
OUT
terminalonyour
'ANT
OUT',
'VHF
ANT
IN
terminalonthe
Some
Channels
some
channels
four
lengthsofRF
thatisconnectedtothe
'ANT
splitter.
the
OUTPUT
the
ANT
the
other
the
set
(When
channel3or
(suchaspremium
cable.
IN',
'VHF
IN'orsimply,
terminalonthe
OUT
terminalonthe
OUT
terminalonthe
OUT
terminalontheRF(AlB)
the
AlB
switchtothe
you
set
4.)
cable
box.
OUT'orsimply,
(These
'OUT'.
backofthe
channels),
items
are
I
IN
ANTINterminalonyour
the
AlB
OUI
CAlll'
CableBoJ
'IN'.
splitter
and
cable
box
splitter
switch
'A'
position
switchto'B',
~lCl
theINterminalonthe
and
and
TV.
follow
the
instructions
availableatmost
.Inl
.101
cable
box.
the
B-IN
terminalonthe
the
A-IN
terminalontheRF(AlB)
and
the
ANT
for
normal
viewing.
you
will
needtotune
ANT
IN
electronics stores.)
.&
:~
O~,IOID-
below.
~ ~
ANT
You
"W
RF
(AlB)
Switch
cable
box.
RF(AlB)
IN
terminalonthe
Set
the
AlB
switchtothe
yourTVto
the
OUT
elm·
~
will
needatwo-
ANT
@
TV
switch.
switch.
rearofthe
cable
box's
IN
Rear
TV.
'B'
Engllsb
·10
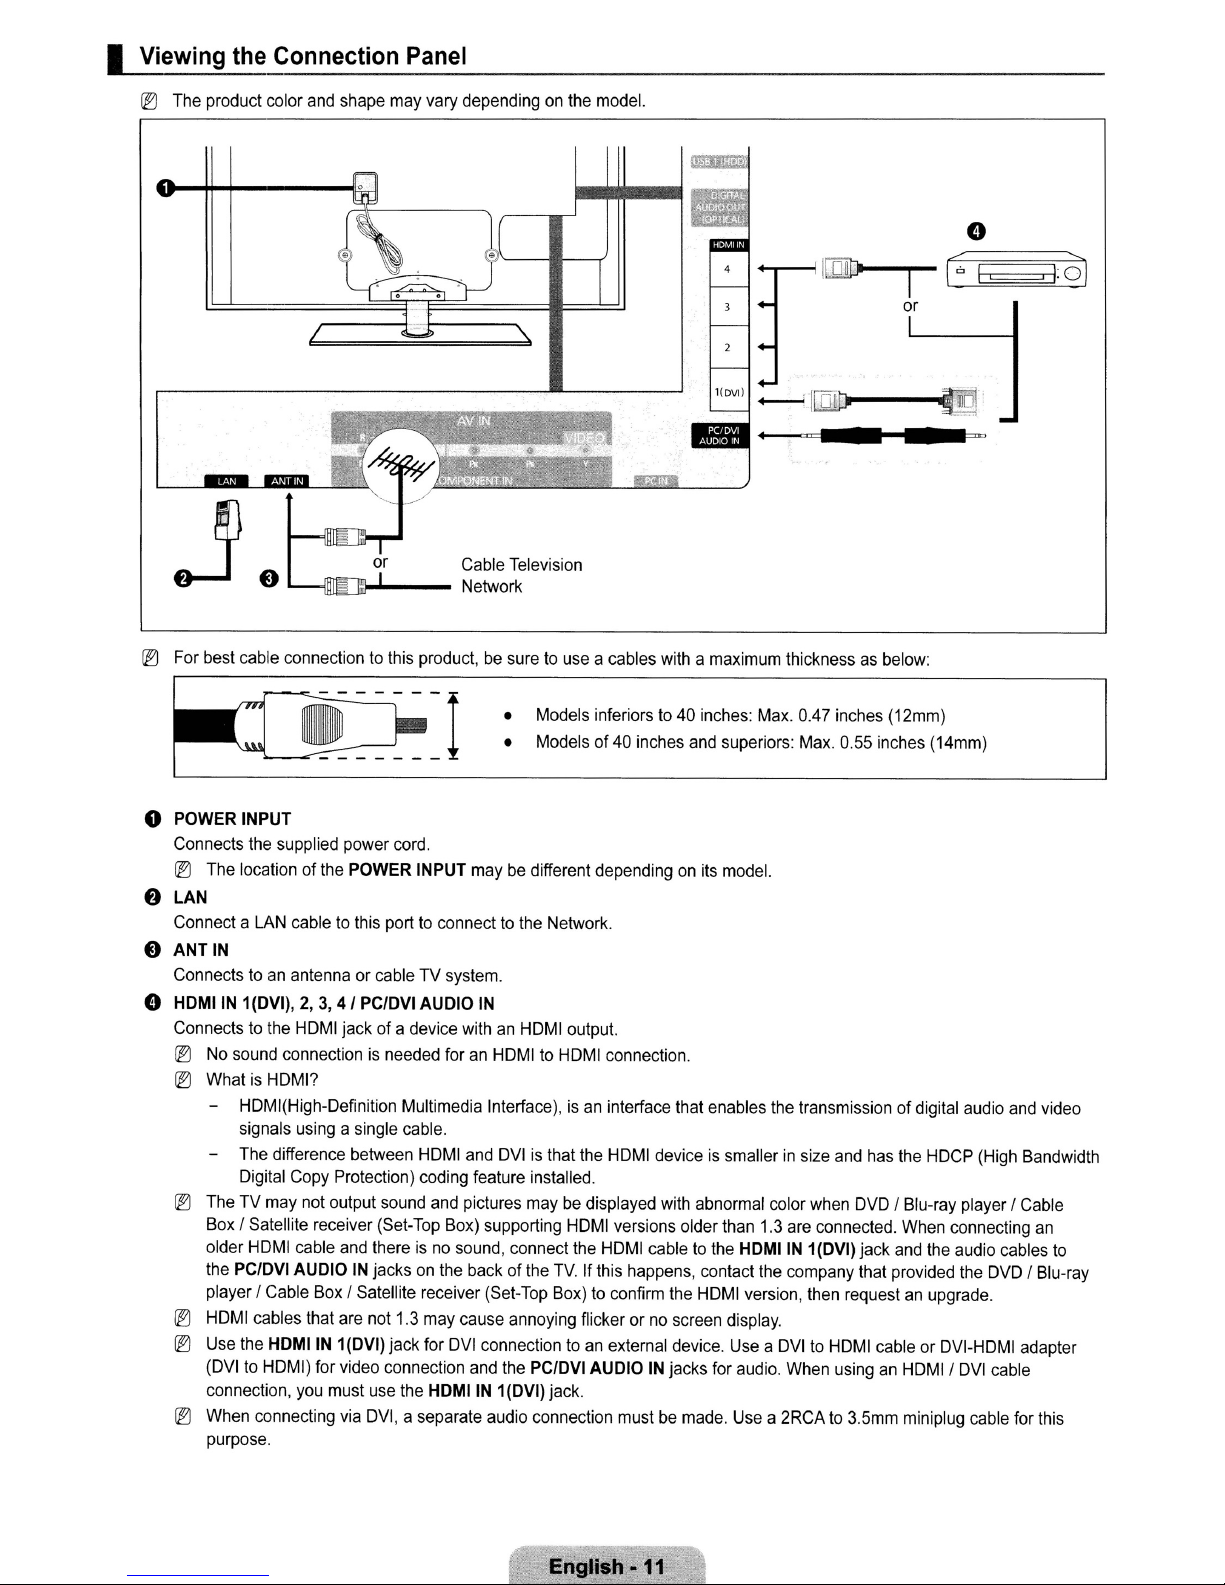
I Viewing the Connection Panel
@)
The
product
color
and
shape
may
vary
dependingonthe
Cable
Television
Network
model.
l(OVl)
-I
::J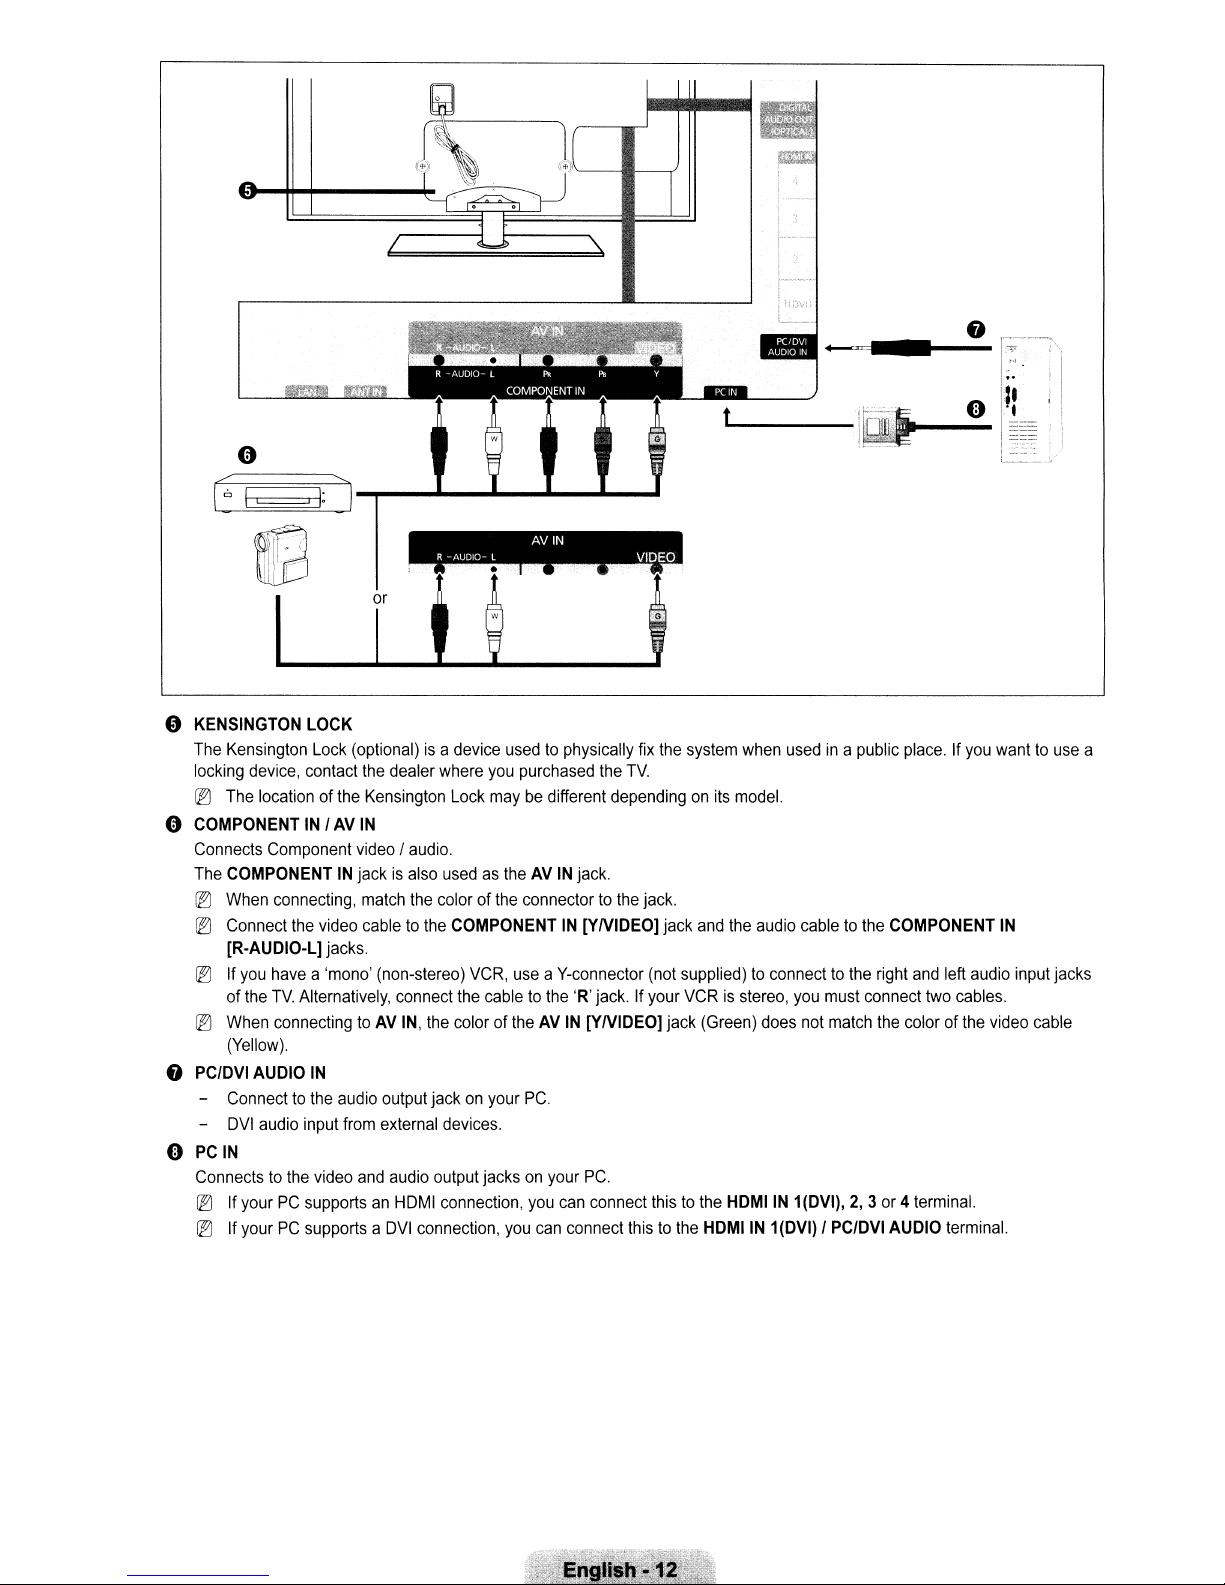
o
I~
I=
I:
J-,------------
_____
o
KENSINGTON
The
Kensington
locking
device,
~
The
locationofthe
(1)
COMPONENTINIAVIN
Connects
The
~
~
~
~
8
PC/DVI
-
-
(1)
PCIN
Connectstothe
~
~
Component
COMPONENTINjackisalso
When
connecting,
Connect
[R-AUDIO-L]
If
of
When
(Yellow).
Connecttothe
DVI
If
If
the
you
havea'mono'
the
TV.
Alternatively,
connectingtoAV
AUDIO
audio
input
yourPCsupportsanHDMI
yourPCsupportsaDVI
LOCK
Lock
contact
video
jacks.
IN
audio
video
R
-AUDIO-
AVIN
L
u_~
(optional)isa
the
dealer
Kensington
video/audio.
match
cabletothe
(non-stereo)
output
from
external
and
audio
device
usedtophysically
where
you
purchased
Lock
maybedifferent
usedastheAVIN
the
colorofthe
COMPONENTIN[YNIDEO]
connect
the
IN,
the
coloroftheAVIN
jackonyour
devices.
output
connection,
connection,
connectortothe
VCR,
useaV-connector
cabletothe
PC.
jacksonyour
you
you
VIDEO
__
jack.
'R'
[YNIDEO]
PC.
can
can
connect
t
fix
the
TV.
dependingonits
jack.
(not
jack.Ifyour
connect
thistothe
the
system
when
usedina
model.
jack
and
the
audio
supplied)toconnecttothe
VCRisstereo,
jack
(Green)
thistothe
HDMIIN 1
HDMIIN
you
does
1(DVI),2,3or4
(DVI)IPC/DVI
public
cabletothe
must
connect
not
match
place.Ifyou
COMPONENT
right
and
left
two
cables.
the
colorofthe
terminal.
AUDIO
terminal.
wanttouse
IN
audio
video
input
cable
a
jacks
o
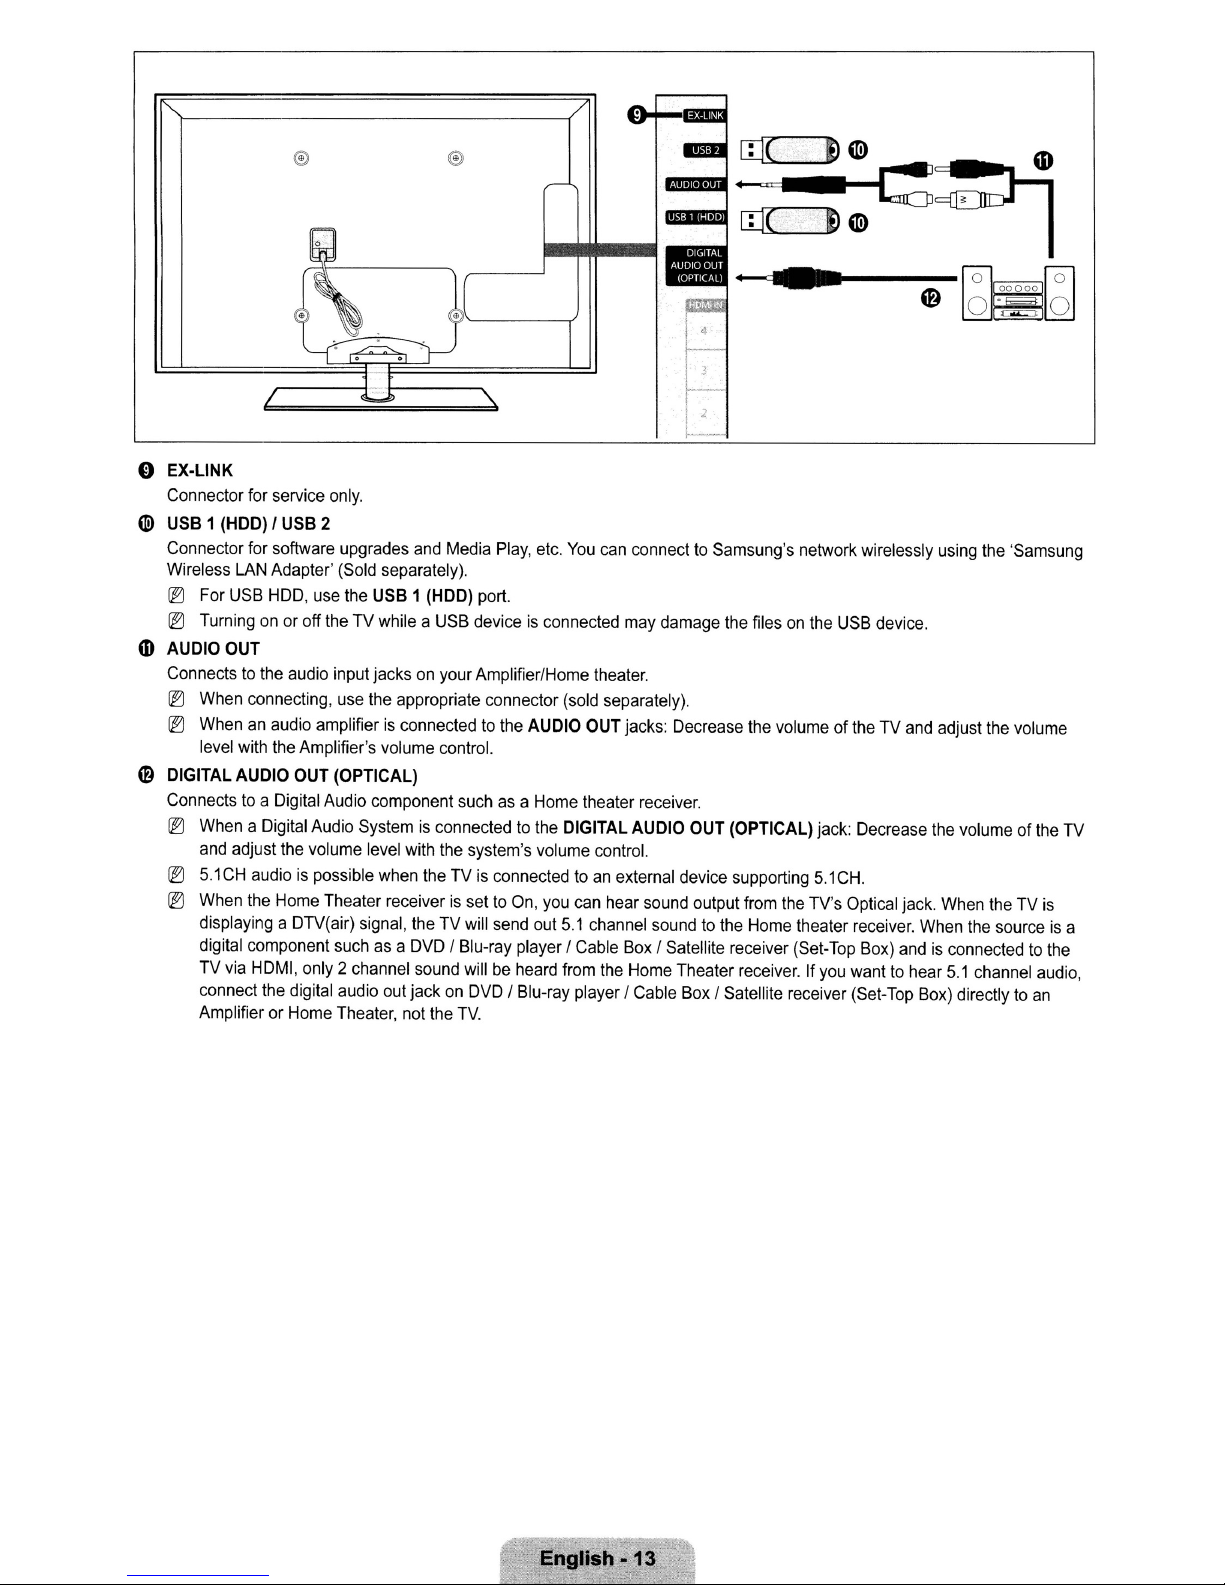
EX-LINK
Connector
6l)
USB1(HDD)IUSB
Connector
Wireless
@)
@)
m
AUDIO
Connectstothe
@)
@)
o
DIGITAL
Connectstoa Digital
@)
@)
@)
LAN
For
USB
Turningonor
OUT
When
Whenanaudio
level
with
AUDIO
WhenaDigital
and
adjust
5.1CHaudioispossible
When
displaying a DTV(air)
digital component
TV
via
connect
AmplifierorHome
for
service
only.
2
for
software upgrades
Adapter'
HOD,
connecting,
the
the
Home
HDMI,
the
(Sold
use
the
USB1(HDD)
off
theTVwhileaUSB
audio input jacksonyour
use
the
amplifierisconnectedtothe
Amplifier's
OUT
(OPTICAL)
Audio
component
Audio
Systemisconnectedtothe
the
volume
level
Theater receiverissettoOn,
signal,
suchasa
only2channel
digital
audio
Theater,
and
Media
Play,
separately).
port.
deviceisconnected
Amplifier/Home
appropriate connector
volume
control.
suchasa
with
the
system's
when
theTVis
theTVwill
DVD
sound
out
jackonDVD/Blu-ray
not
the
connectedtoan
send
/ Blu-ray player I
willbeheard
TV.
etc.
(sold
AUDIO
Home
DIGITAL
volume
you
out
5.1
from
You
theater.
OUT
theater
control.
can
channel
Cable
player /
I 4
r-,
i 2
f·
can
connecttoSamsung's
may
damage
separately).
jacks:
Decrease
receiver.
AUDIO
OUT
external
hear
the
device
sound
output
soundtothe
Box
I Satellite receiver
Home
Theater
Cable
Box
•
network wirelessly
the
filesonthe
the
volumeoftheTVand
(OPTICAL)
supporting
from
Home
receiver.Ifyou
/ Satellite receiver
jack:
5.1
the
TV's
theater
(Set-Top
USB
device.
Decrease
CH.
Optical
jack.
receiver.
Box)
andisconnectedtothe
wanttohear
(Set-Top
using
adjust
the
When
When
5.1
Box)
the
'Samsung
the
volume
volumeofthe
theTVis
the
sourceisa
channel
directlytoan
audio,
TV
~nglish
-13

CHANNEL
You
can configure various settings for your TV channels with features suchasAuto Program, Favorite Channels, and Signal
Strength.
I
Channel
Menu
o Antenna -->
Before your television can begin memorizing the available channels, you must specify the type
of signal source that
~
Press the TOOLS button to display the Tools menu
selecting Tools->SwitchtoCable (or
Air
I Cable
is
connected to the TV (i.e.anAir or a Cable system).
You
can also set the Antenna
SwitchtoAir).
o Auto Program
Air:
Air
antenna signal. I Cable: Cable antenna signal. I
signals,
@?]
When selecting Cable, the cable system must also be selected. STD, HRC and IRC identify various typesofcable TV
systems. Contact your local cable company to identify the type
the signal source has been selected.
@?]
After
all
the available channels are stored, it starts to remove scrambled channels (Removing scrambled channel). The Auto
program menu then reappears.
@?]
If you want to stop Auto Programming, press the ENTERG'button. The
Select Yes
by
pressing
the'"
or~button, then press the ENTERG'button.
Auto:
Air
and Cable antenna
of
cable system that existsinyour particular area. At this point
Stop
o Clear Scrambled Channel (digital channels only)
This functionisused to filler out scrambled channels after
minutes.
@?]
To
stop searching scrambled channels: Press the ENTERG'button to select Stop. Press
press the ENTER
@?]
This functionisonly availableinCable mode.
G'
button.
Auto
Programiscompleted. This process may take up to 20-30
Auto
by
Program?
message willbedisplayed
the'"
button to select Yes, then
o Channel List
For detailed proceduresonusing the Channel List, refer to the 'Managing Channels' instructions. (see pages 15-16)
lEJ
You
can select these optionsbysimply pressing the CH LIST buttononthe remote control.
o Fine Tune (analog channels only)
Use fine tuning to manually adjust a particular channel for optimal reception.
@?]
If you do not store the fine-tuned channelinmemory, adjustments are not saved.
@?]
'"
will appear next to the name of fine-tuned channels.
@?]
To
reset the fine tuning setting, press
the"
button to select Reset, then press the ENTERG'button.
English
·14
I
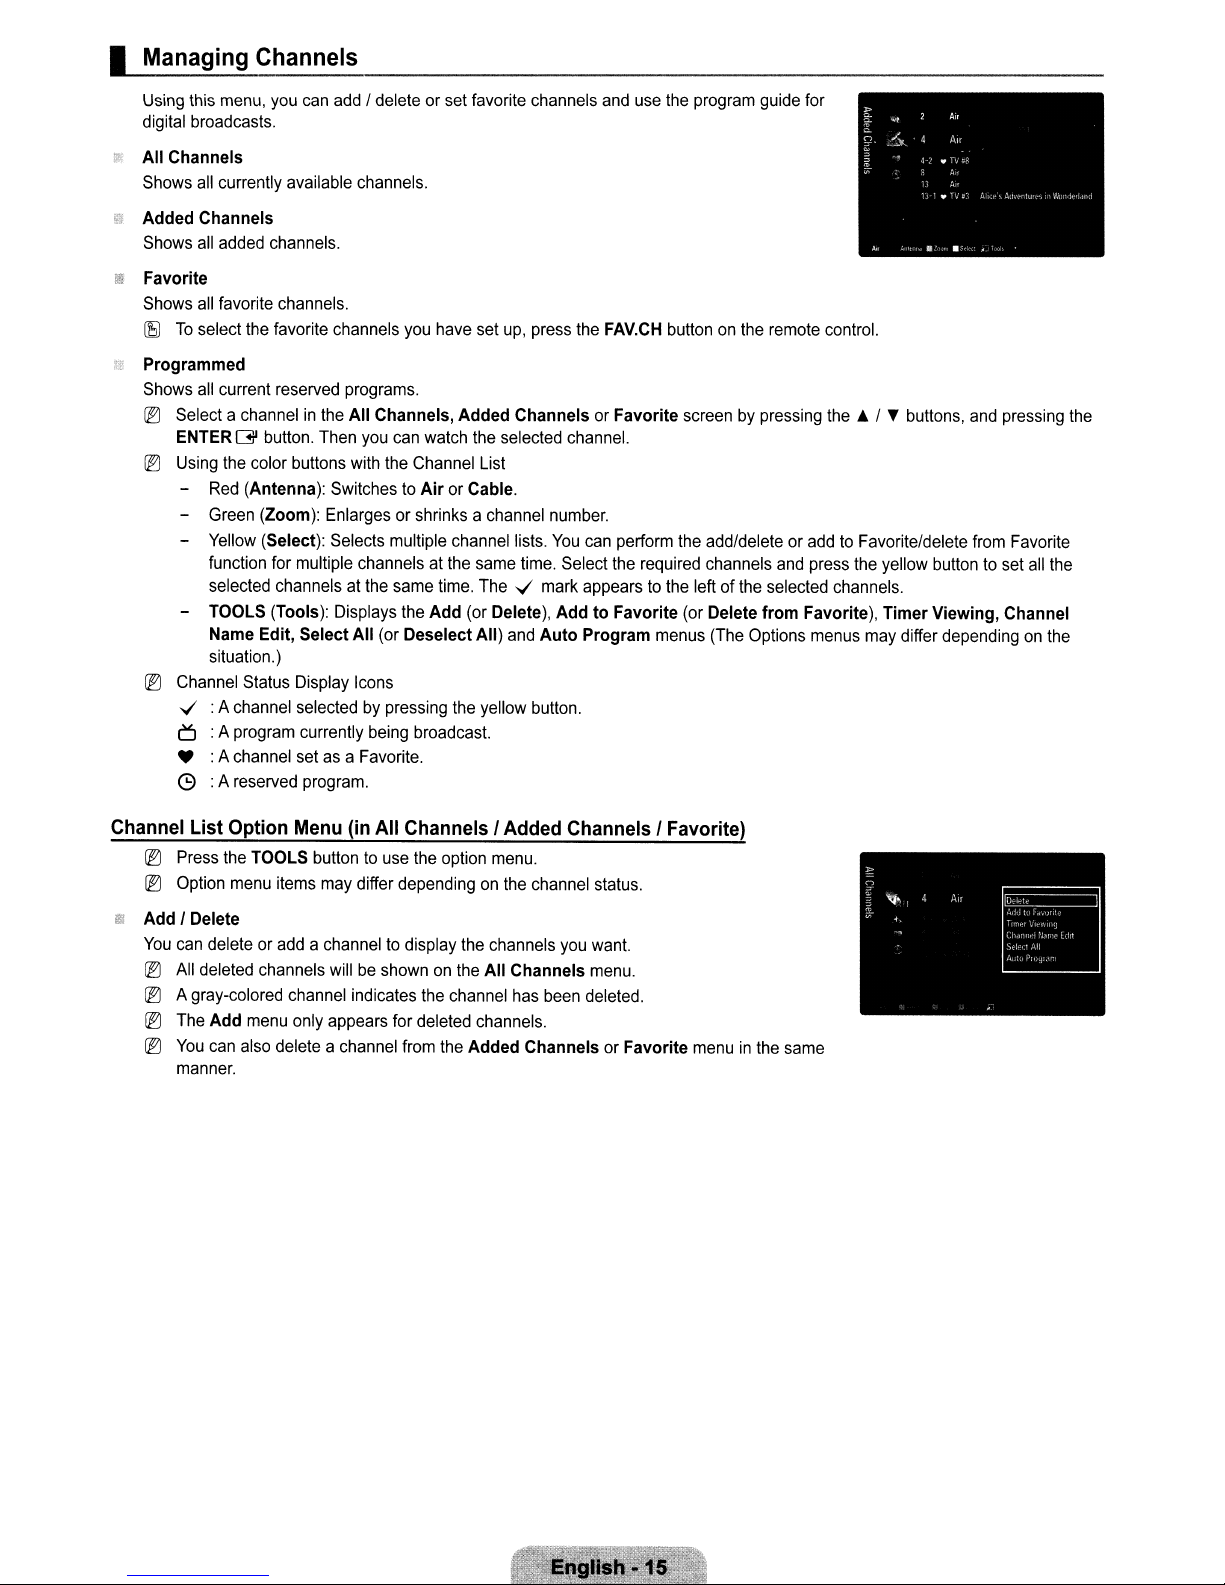
Managing
Using this menu, you can add / delete or set favorite channels and use the program guide for
digital broadcasts.
All
Channels
Shows all currently available channels.
Added
Shows all added channels.
•
Favorite
Shows all favorite channels.
(f5)
To
Programmed
Shows all current reserved programs.
rEJ
Select a channelinthe
ENTERGIbutton. Then you can watch the selected channel.
r:®
Using the color buttons with the Channel List
- Red (Antenna): Switches to
- Green (Zoom): Enlarges or shrinks a channel number.
- Yellow (Select): Selects multiple channel lists.
- TOOLS (Tools): Displays the
rEJ
Channel Status Display Icons
.../ : A channel selected by pressing the yellow button.
Channels
Channels
select the favorite channels you have set up, press the FAV.CH buttononthe remote control.
All
Channels,
function for multiple channels at the same time. Select the required channels and press the yellow button to set all the
selected channels at the same time. The .../ mark appears to the leftofthe selected channels.
Name Edit,
situation.)
Select
All
(or
Air
or Cable.
Add
Deselect
Added
ChannelsorFavorite
(or Delete),
All)
and
Auto
screen by pressing
You
can perform the add/delete or add to Favorite/delete from Favorite
AddtoFavorite
Program
(or Delete
menus (The Options menus may differ depending on the
6 :A program currently being broadcast.
• :A channel set as a Favorite.
C9
:A reserved program.
from
the.
Favorite),
/ T buttons, and pressing the
Timer
Viewing,
Channel
Channel List Option Menu (in All Channels I Added Channels I Favorite)
rEJ
Press the TOOLS buttontouse the option menu.
rEJ
Option menu items may differ dependingonthe channel status.
~
Add
I Delete
You
can delete or add a channel to display the channels you want.
rEJ
All deleted channels will be shown on the
rEJ
A gray-colored channel indicates the channel has been deleted.
rEJ
The
Add
menu only appears for deleted channels.
rEJ
You
can also delete a channel from the
manner.
All
Channels
Added
ChannelsorFavorite
menu.
menuinthe same
Add to Favorite I Delete from Favorite
You
can
set
~
@)
@)
Press
---+
The
All
channels
the
Add to Favorite
'.'
symbol
favorite
you
TOOLS
willbedisplayed
channels
watch
frequentlyasFavorite.
buttontodisplay
(or
Delete from Favorite).
willbeshownonFavorite
Timer Viewing
If
you
reserveaprogram
even
when
you
@)
Only
memorized
@)
You
can
set
@)
Reservingaprogram
@)
Digital
Program
Whenadigital
a
program
are
the
accordingtothe
you
wanttowatch,
watching
channel,
channels
another
canbereserved.
day,
month,
willbeshowninthe
Guide
and
Viewing
channelisselected,
procedures
the
Tools
menu.
You
can
also
and
the
channel
willbesetasa
menu.
the
channelisautomatically
channel.Toreserveaprogram,
year,
hour
and
minute
directlybypressing
Programmed
menu.
Reservation
and
you
press
the~button,
described
above.
set
the
favorite.
switchedtothe
set
the
current
the
Program
addto(or
time
the
Guide
delete
reserved
first.
number
for
the
from)
Favoritesbyselecting
channelinthe
buttonsonthe
channel
appears.
Channel
remote
You
control.
can
Tools
List;
reserve
Channel
Channels
@)
Select
• Select All:
• Deselect All:
@)
Name
Edit (analog channels only)
canbelabeledsothat
The
names
of digital
Alii
Deselect All
You
You
You
can
only
select
broadcasting
can
select
can
Deselect All
their
all
deselect
call
letters
channels
the
channelsinthe
all
the
selected
when
thereisa
Auto Program
@)
For
detailed
proceduresonusing
the
Auto Program,
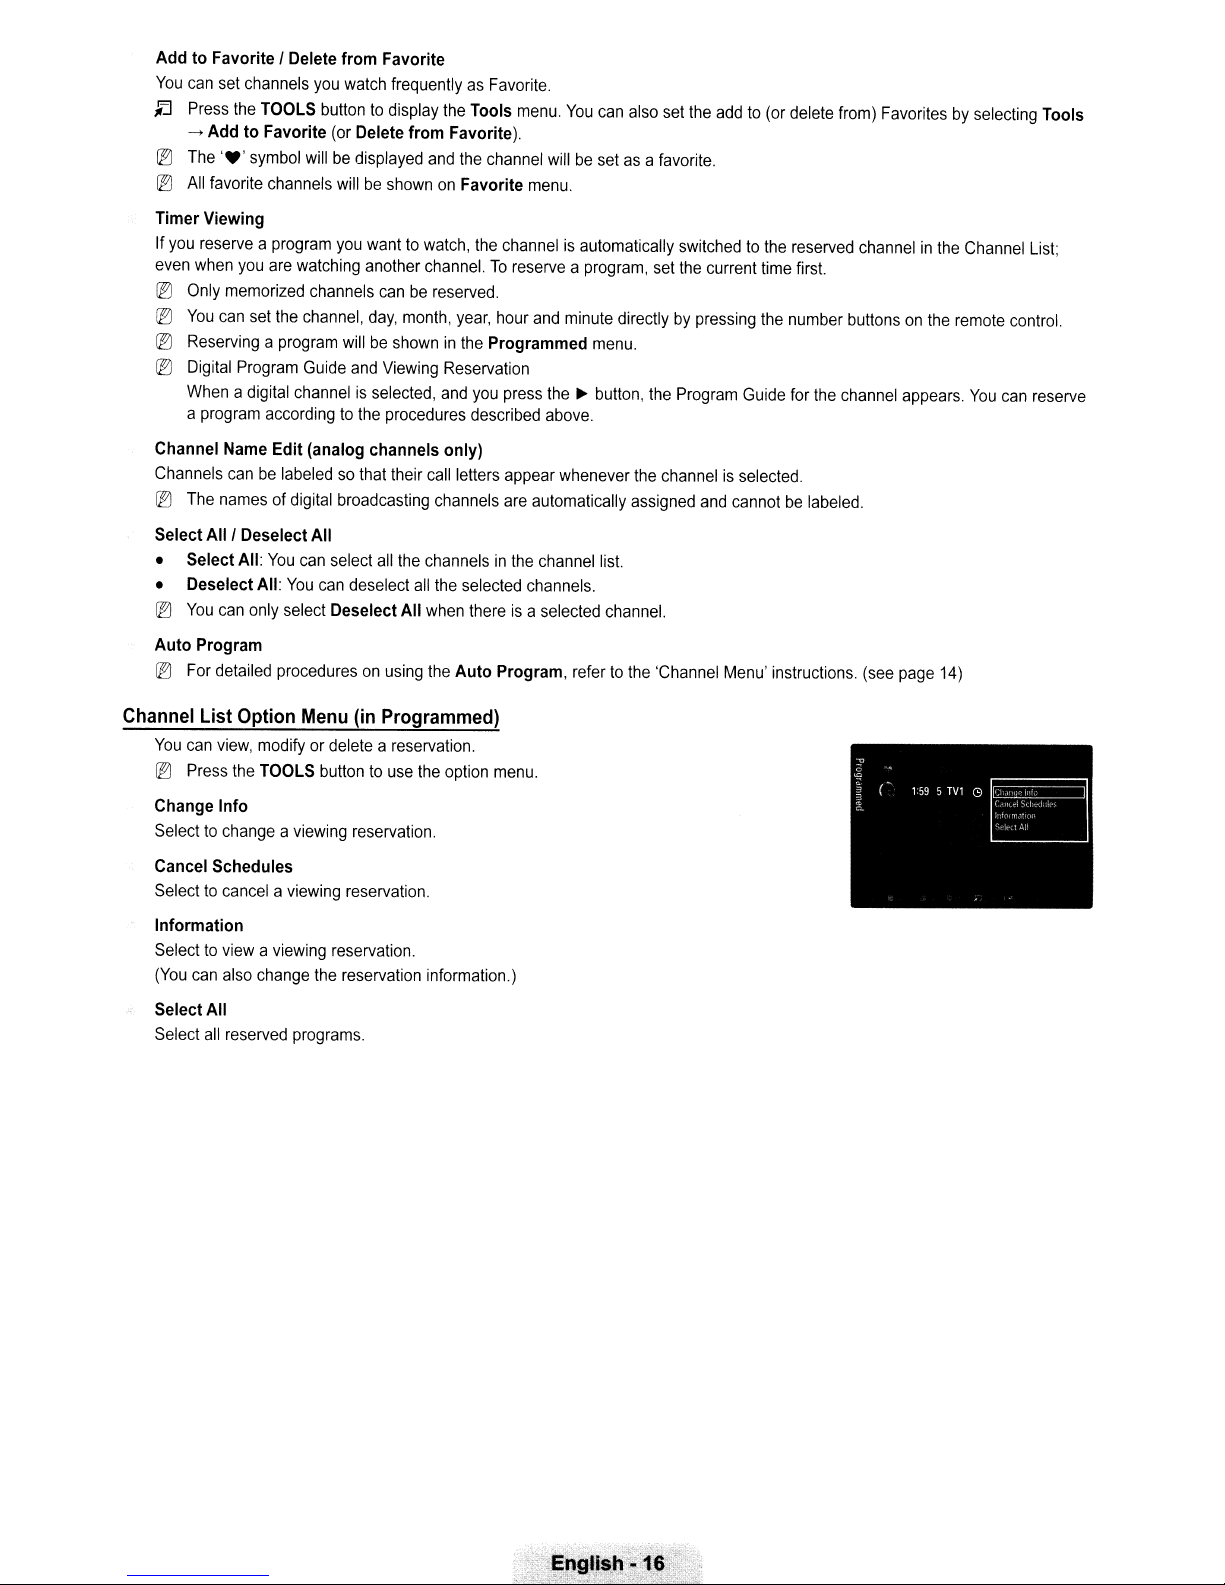
Channel List Option Menu (in Programmed)
You
can
view,
modifyordeleteareservation.
@)
Press
the
TOOLS
Change Info
Selecttochangeaviewing
Cancel Schedules
Selecttocancelaviewing
Information
Selecttoviewaviewing
(You
can
also
change
Select All
Select
all
reserved
buttontouse
reservation.
reservation.
the
reservation
programs.
the
reservation.
option
information.)
appear
are
automatically
channels.
menu.
whenever
channel
selected
refertothe
the
assigned
lis!.
channel.
channelisselected.
and
cannotbelabeled.
'Channel
Menu'
instructions.
(see
page
14)
,e:n9IJSIt~:16
·,~~"':---~E
-.
_-'0
'.:
§
~-.;
PICTURE
You
can
configure
various
picture
options
I Configuring the Picture Menu
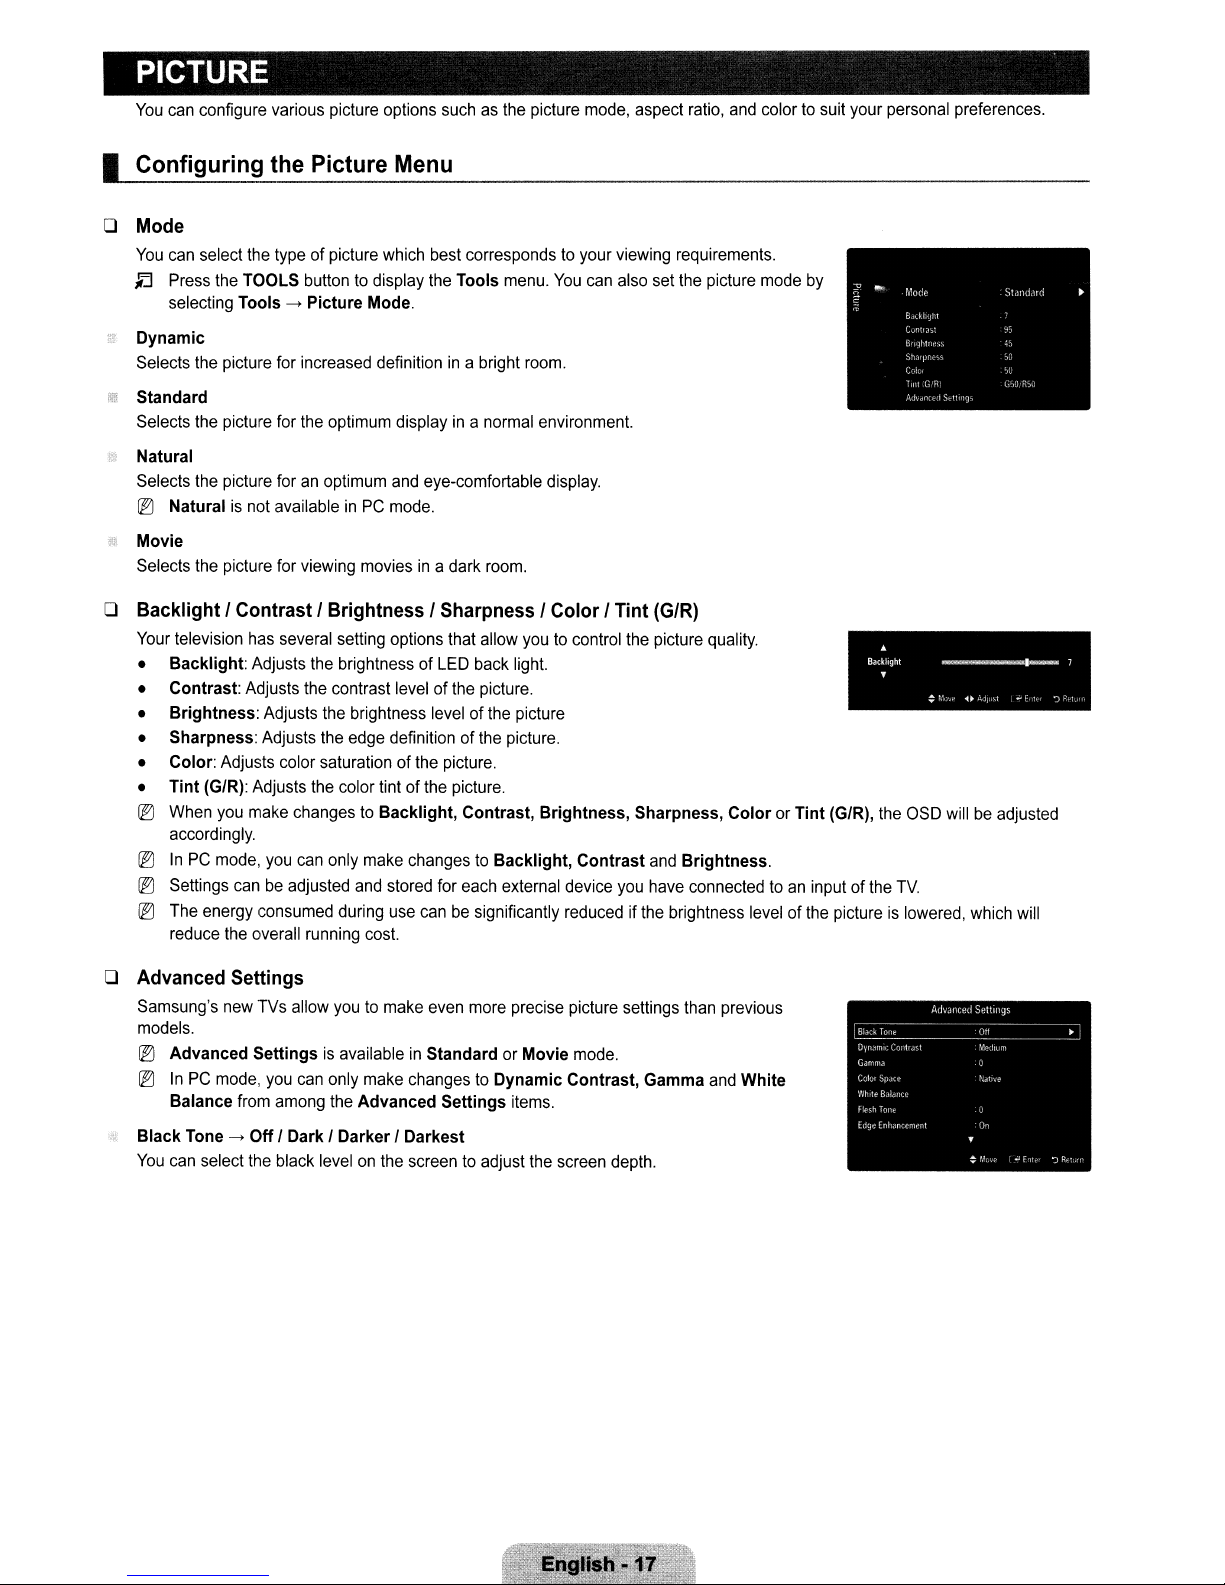
o Mode
You
can
select
the
~
Press
selecting
Dynamic
Selects
Standard
Selects
Natural
Selects
III
Naturalisnot
Movie
Selects
the
TOOLS
Tools->Picture
the
picture
the
picture
the
picture
the
picture
typeofpicture
buttontodisplay
for
increased
for
the
foranoptimum
availableinPC
for
viewing
Mode.
optimum
moviesina
which
best
the
definitionina
displayina
and
eye-comfortable
mode.
suchasthe
correspondstoyour
Tools
dark
menu.
bright
normal
room.
picture
room.
environment.
mode,
You
can
display.
aspect
viewing
also
set
ratio,
and
requirements.
the
picture
colortosuit
mode
by
your
personal
preferences.
o Backlight I Contrast I Brightness I Sharpness I Color I Tint
Your
television
• Backlight:
• Contrast:
• Brightness:
• Sharpness:
• Color:
• Tint (GIRl:
III
When
accordingly.
III
InPCmode,
III
Settings
l®
The
reduce
o Advanced Settings
Samsung's
models.
III
Advanced SettingsisavailableinStandardorMovie
III
InPCmode,
Balance
Black
Tone->OffI Dark I Darker I Darkest
You
can
has
Adjusts
Adjusts
Adjusts
Adjusts
Adjusts
Adjusts
you
make
canbeadjusted
energy
consumed
the
overall
new
TVs
from
select
the
several
setting
options
that
allow
youtocontrol
the
brightnessofLED
the
contrast
the
the
color
saturationofthe
the
changestoBacklight, Contrast, Brightness, Sharpness, ColororTint (GIRl,
you
can
only
running
allow
youtomake
you
can
only
among
the
black
levelonthe
levelofthe
brightness
edge
definition of
color
tintofthe
make
changestoBacklight, Contrast
and
stored
during
use
cost.
make
changestoDynamic Contrast,
Advanced Settings
screentoadjust
back
light.
picture.
levelofthe
picture.
picture.
for
canbesignificantly
even
the
each
more
picture
picture.
external
precise
items.
the
reducedifthe
screen
device
picture
mode.
the
you
settings
depth.
(G/R)
picture
and
Brightness.
have
connectedtoan
brightness
than
Gamma
quality.
previous
and
White
inputofthe
levelofthe
~
Backlight
.
the
pictureislowered,
~1_7
~ r')
OSD
TV.
willbeadjusted
<t~
...
:.1
which
I
~,
~
It"
will
Dynamic Contrast->OffI Low I Medium I High
You
can
adjust
the
screen
Gamma
You
can
adjust
the
Color Space
Color
spaceisa
natural
color.
• Auto:
• Native:
• Custom:
l®
l®
White Balance
You
can
• R-Offset:
• G-Offset:
• B-Offset: Adjusts
• R-Gain:
• G-Gain:
• B-Gain:
• Reset:
Auto
color
Native
Adjusts
Changing
Settings
you
haveaDVD
DVD
player.
Color:
l®
l®
l®
Red:
Green:
Blue: Adjusts
Reset:
adjust
the
Adjusts
Adjusts
Adjusts
Adjusts
Adjusts
The
color
canbeadjusted
Colorisavailable
In
To
previously
contrastsothat
primary
color
(red,
matrix
composedofred,
space
automatically
color
space
offers
the
color
rangetosuit
the
adjustment
and
player
connectedtoHDMI1anditis
Red,
Green, Blue, Yellow, CyanorMagenta
Color,
you
can
reset
the
adjusted
Adjusts
the
red
Adjusts
the
green
the
blue
Resets
the
color
color
temperature
the
red
color
the
green
color
the
blue
color
the
red
color
the
green
color
the
blue
color
adjusted
the
optimal
green,
blue)
adjuststothe
deep
and
your
value
will
refresh
stored
for
when
Color SpaceissettoCustom.
adjust
the
RGB
RGB
value,
saturation
saturation
darkness.
brightness.
brightness.
white
levelofthe
saturation
spacetothe
for
more
darkness.
darkness.
brightness
balance
levelofthe
natural
contrastisprovided.
intensity.
green
and
blue
most
rich
color
tone.
preference.
the
adjusted
each
external
values
for
select
Reset.
selected
levelofthe
selected
default
values.
picture
willberesettothe
colors.
natural
screen.
device
currently
the
selected
color.
selected
color.
colors.
Select
color
you
selected,
color.
factory
your
favorite
tone
basedonprogram
have
connectedtoan
settings
color.
defaults.
color
spacetoexperience
sources.
inputoftheTVFor
and
adjustments
the
example,
willbesaved
most
for
if
the
Flesh
Tone
You
can
emphasize
~
Changing
Edge
Enhancement->Off I
You
can
emphasize
xvYCC->OffI
Setting
the
xvYCC
connectedtothe
~
xvYCCisavailable
l®
This
function
LED
Motion plus->OffI
Removes
drag
the
pink
'flesh
tone'inthe
the
adjustment
object
On
modetoon
HDMIorComponentINjacks.
may
from
fast
value
will
On
boundariesinthe
increases
when
the
picture
notbesupported
On
scenes
withalotofmovementtoprovide
picture.
refresh
the
adjusted
picture.
detail
and
color
modeissettoMovie,
dependingonyour
screen.
space
external
when
and
a clearer
watching
the
external
device.
movies
fromanexternal
inputissettoHDMIorComponent
picture.
device
(ie.
DVD
mode.
player)
o Picture Options
~
In
PC mode, you can only make changes to the
among the itemsinPicture
Color
Tone-.Cool/
~
Warm1, Warm2 or Warm3isonly activated when the picture mode is Movie.
lEI
Settings can be adjusted and stored for each external device you have connected to
input of the
Normal/
TV.
Options.
Warm 1 /
Warm2/
Size
Occasionally, you may wanttochange the sizeofthe imageonyour screen. Your TV comes
with several screen size options, each designed to work best with specific types of video input. Your cable box/satellite receiver
may have its own setofscreen sizesaswell.Ingeneral, though, you should view theTVin
~
Alternately, you can press the P.SIZE button on the remote control repeatedly to change the picture size.
•
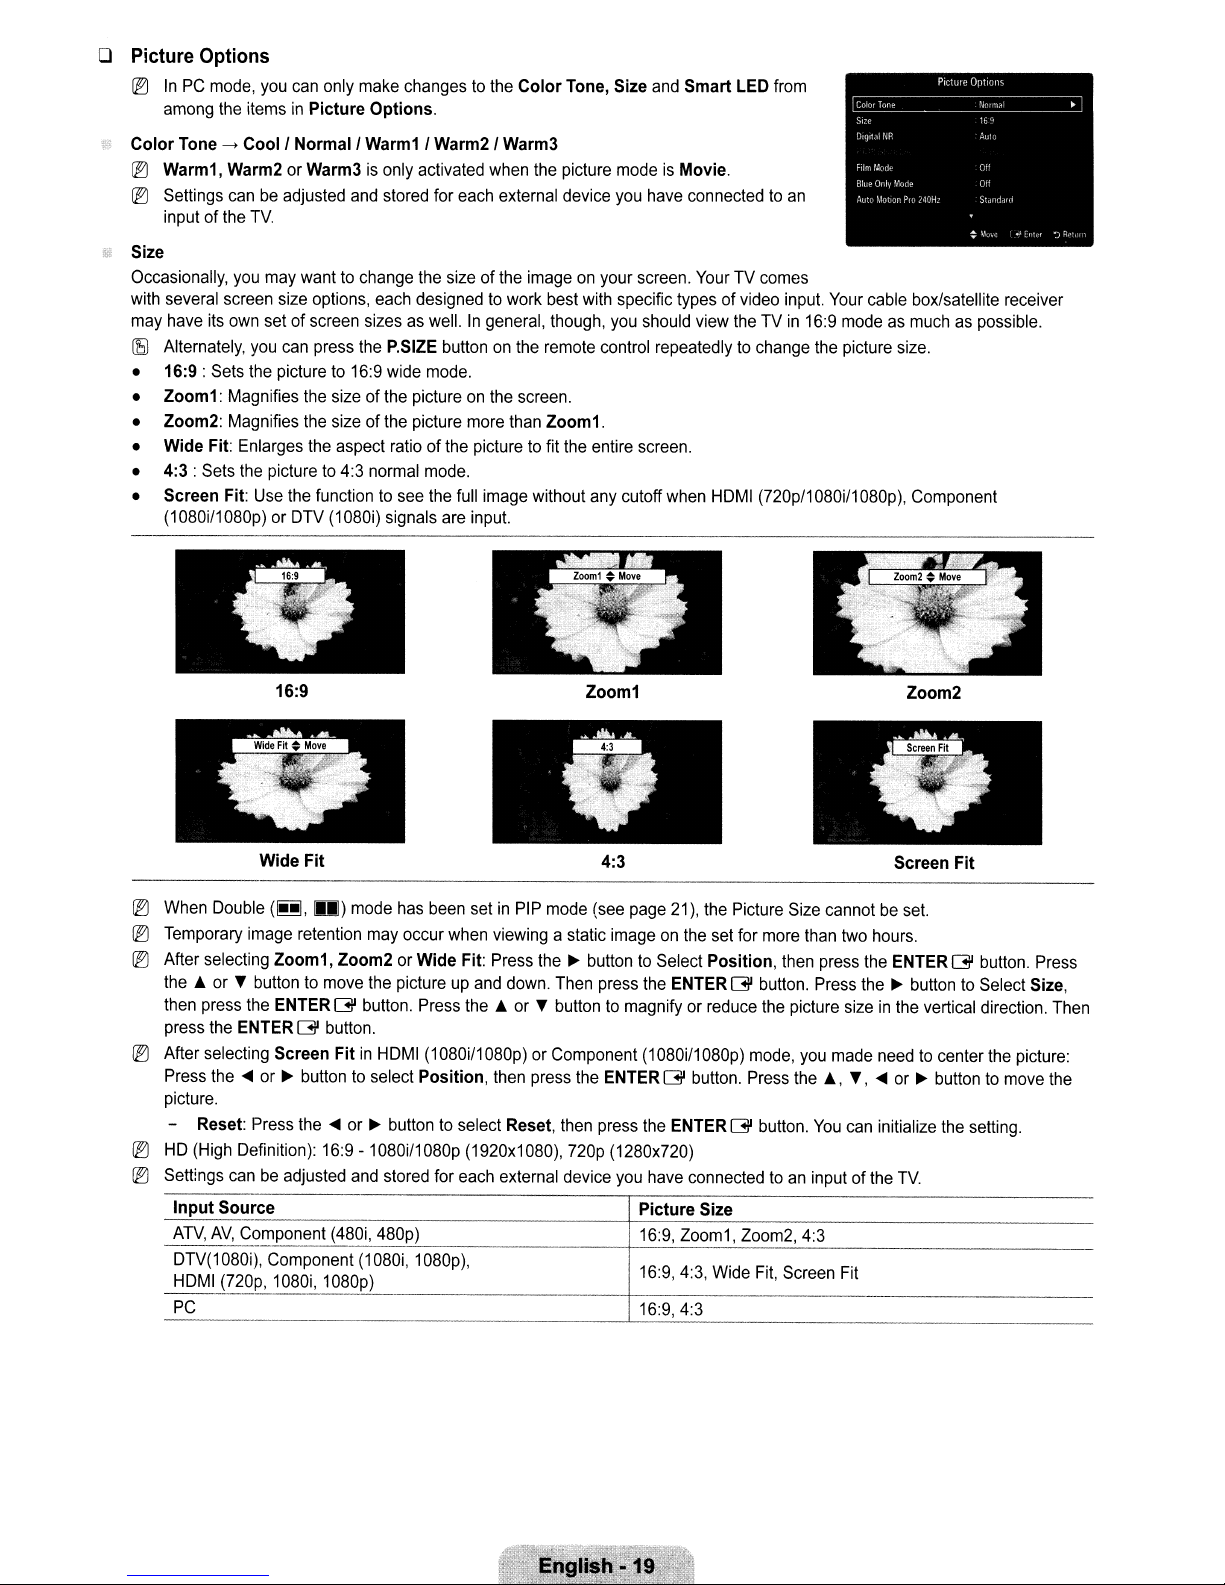
16:9:
Sets the picture to 16:9 wide mode.
• Zoom1: Magnifies the sizeofthe picture on the screen.
• Zoom2: Magnifies the sizeofthe picture more than Zoom1.
• Wide Fit: Enlarges the aspect ratioofthe picturetofit the entire screen.
•
4:3:
Sets the picture to 4:3 normal mode.
• Screen Fit: Use the function to see the full image without any cutoff when HDMI (720p/1 080i/1080p), Component
(1080i/1080p) or DTV (1080i) signals are input.
Color
Warm3
Tone, Size and
Smart
LED from
an
16:9 mode as much as possible.
16:9
Wide
Fit
~
When Double
~
Temporary image retention may occur when viewing a static imageonthe set for more than two hours.
~
After selecting Zoom1,
the.
then press the ENTERGIbutton. Press
(~,
U)
mode has been setinPIP mode (see page 21), the Picture Size cannot be set.
Zoom2orWide
Fit: Press the~button to Select
or~button to move the picture up and down. Then press the ENTERGIbutton. Press the~button to Select Size,
the.
or~button to magnify or reduce the picture sizeinthe vertical direction. Then
Zoom1
4:3
Position,
then press the ENTERGIbutton. Press
press the ENTERGIbutton.
~
After selecting Screen
Press the
<lIII
or~button to select
FitinHDMI (1080i/1080p) or Component (1080i/1080p) mode, you made needtocenter the picture:
Position,
then press the ENTERGIbutton. Press
the.,
picture.
- Reset: Press the
~
HD (High Definition): 16:9 -1080i/1080p (1920x1080), 720p (1280x720)
~
Settings can be adjusted and stored for each external device you have connected toaninputofthe
Input
Source
ATV,
AV,
g!?~ponent
DTV(1080i), Component (1080i, 1080p),
HDMI (720p, 1080i, 1080p)
PC
<lIII
or~button to select Reset, then press the ENTERGIbutton.
Picture
(4~~i,
480p) 16:9, Zoom1 ,-'
116:9,4:3,
Size
Z_0_0_m_2,-,
Wide Fit, Screen Fit
16:9,4:3
You
4_:3
Zoom2
Screen
Fit
~,
<lIII
or~button to move the
can initialize the setting.
TV.
_

Digital
If
the
and
ghosting
(EJ
When
HDMI
You
iE)
broadcast
can
This
be
NR
-->
Off'
signal
that
may
the
signalisweak,
Black Level -->
select
the
black
functionisactive
compatible
with
Low'
Medium'
receivedbyyourTVis
appearonthe
select
Normal'
Low
levelonthe
only
whenanexternal
all
external
devices.
High'
Auto
weak,
screen.
oneofthe
other
screentoadjust
you
can
options
the
screen
activate
until
the
depth.
the
Digital
Noise
best
pictureisdisplayed.
deviceisconnectedtotheTVvia
Reduction
HOM!.
The
HDMI
featuretohelp
Black Level
reduce
function
any
static
may
not
Film Mode -->
Off'
Auto1 , Auto2
TheTVcanbesettoautomatically
(EJ
Film
ModeissupportedinTV,
• Off:
• Auto1: Automatically
• Auto2: Automatically
Blue Only
This
signals
as
the
additional
iE)
Auto Motion Pro
Removes
(EJ
iE)
• Off:
• Clear:
• Standard:
• Smooth:
• Custom:
Turns
the
Film
Mode
adjusts
optimizes
Mode
Off'
On
functionisforAVdevice
from
the
video
DVD
signal
players,
levelofeach
Blue
signalsoastoprovideaBlue
Home
Theaters,
video
Filter.
Blue Only Modeisavailable
240Hz
-->
drag
from
fast
scenes
If
you
enable
Auto Motion Pro
When
Smart
LEDissettoDemo,
Switches
Sets
Auto
Auto
Sets
Sets
Adjusts
Auto
Auto
Motion
Motion
Motion
Motion
the
blur
function
measurement
device
Off'
Pro
Pro
Pro
and
- Blur Reduction: Adjusts
- Judder Reduction:
-
Reset:
Reset
•
Demo:
Displays
(EJ
Self diagnosisisnot
Adjusts
the
custom
the
difference
availableindemo
sense
and
process
Video,
Component
off.
the
picture
for
the
the
video
textonthe
experts.
etc.
Using
this
function,
using
the
Red
when
the
picture
Clear'
Standard' Smooth /
with
a lot of
movementtoprovide
240Hz,
noise
the
Demo
240Hz
off.
240Hztominimum.
Pro
240Hztomedium.
240Hztomaximum.
judder
reduction
the
blur
reduction
the
judder
reduction
settings.
between
Auto
mode.
film
signals
from
all
sources
(480i
'1080i)
and
HDMI
(480i
best
quality
when
watchingafilm.
screen
(not
This
function
Filter
you
/ Green'
including
displays
effect
thatisusedtoadjust
can
adjust
Blue/Cyan/Magenta/Yellow
the
the
closed
blue
color
modeissettoMovieorStandard.
may
appearonthe
option
for
leveltosuit
level
Motion
Custom'
Auto Motion Pro
your
from
video
level
from
Pro
240Hzonand
Demo
a clearer
screen.Ifthis
preference.
sources.
video
picture.
240Hz
sources
off
modes.
and
adjust
'1080i).
captions)
signal
onlybyremoving
the
color
and
Tinttopreferred
occurs,
set
will
notbeavailable.
when
playing
the
picture
when
watchingafilm.
and
Tintofvideo
values
color
Bar
Patterns,
Auto Motion Pro
films.
for
the
optimum
quality.
red
and
equipment
appropriate
without
using
240HztoOff.
green
such
to
an
Smart
LED
-->
Controls
iE)
• Off:
•
•
LED
When
Auto Motion Pro
Switches
On:
Switchesonthe
Demo:
Displays
left.
o Picture Reset
Resets
all
picture
iE)
Reset Picture
Off'On, Demo
backlighttomaximize
picture
240HzissettoDemo,
off
the
Smart
LED
mode.
Smart
LED
mode.
the
difference
->
Reset Picture Mode I Cancel
settingstothe
Mode:
Current
between
default
picture
clarity.
Smart
values.
values
the
Demo
LEDonand
returntodefault
option
off
settings.
for
modes.
Smart
The
LED
screen
will
notbeavailable.
after
applying
Smart
LED
appearsonthe
I Viewing Picture-in-Picture
You
can
use
the
PIP
featuretosimultaneously
source.
This
product
has
one
built-in
mode.
Please
see
'PIP
Settings'
,LI
Press
the
TOOLS
settingsbyselecting
IEJ
If
you
select
(see
page
IEJ
PIP
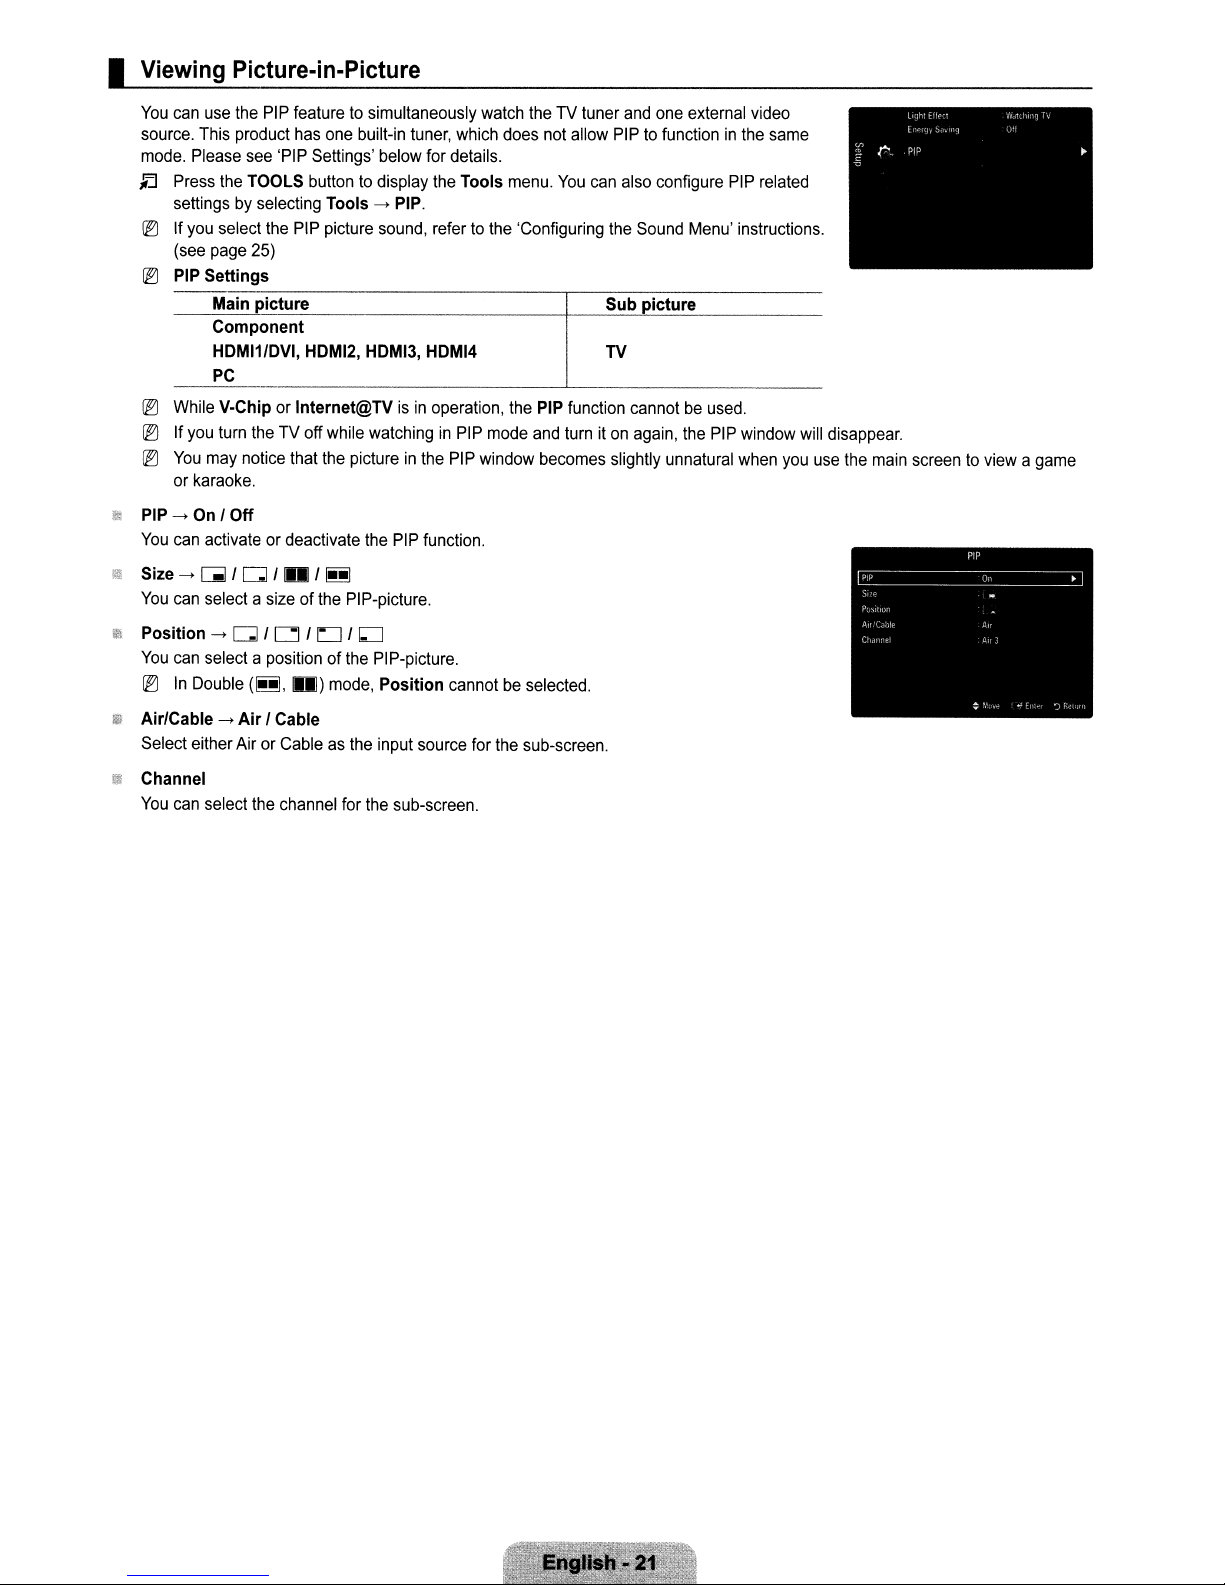
Settings
--_.-,---------------,--...,.----------
Main picture Sub picture
Component
HDMI1/DVI,
PC
IEJ
While
V·ChiporInternet@TVisin
[EJ
If
you
turn
IEJ
You
may
notice
or
karaoke.
PIP
--->
On
I Off
You
can
activateordeactivate
Size
--->
UIl/ Q I • /
You
can
select a
--->
can
In
Q /
select a
Double
Position
You
IEJ
buttontodisplay
the
PIP
25)
HDMI2, HDMI3,
theTVoff
that
sizeofthe
0/
LJ
positionofthe
(~,
.)
below
Tools
--->
PIP.
picture
sound,
while
watchinginPIP
the
pictureinthe
the
PIP
~
PIP-picture.
/
~
PIP-picture.
mode,
Position cannotbeselected.
tuner,
for
details.
the
refertothe
HDMI4
operation,
PIP
function.
which
Tools
window
watch
does
menu.
the
mode
theTVtuner
not
allow
You
'Configuring
PIP
function
and
turniton
becomes
and
one
external
PIPtofunctioninthe
can
also
configure
the
Sound
Menu'
TV
cannotbeused.
again,
the
slightly
unnatural
video
PIP
instructions.
PIP
window
when
same
related
you
will
disappear.
use
the
main
screentoviewagame
Air/Cable
Select either Air
Channel
You
can
--->
select
Air / Cable
or
Cableasthe
the
channel
for
input
the
sub-screen.
source
for
the
sub-screen.
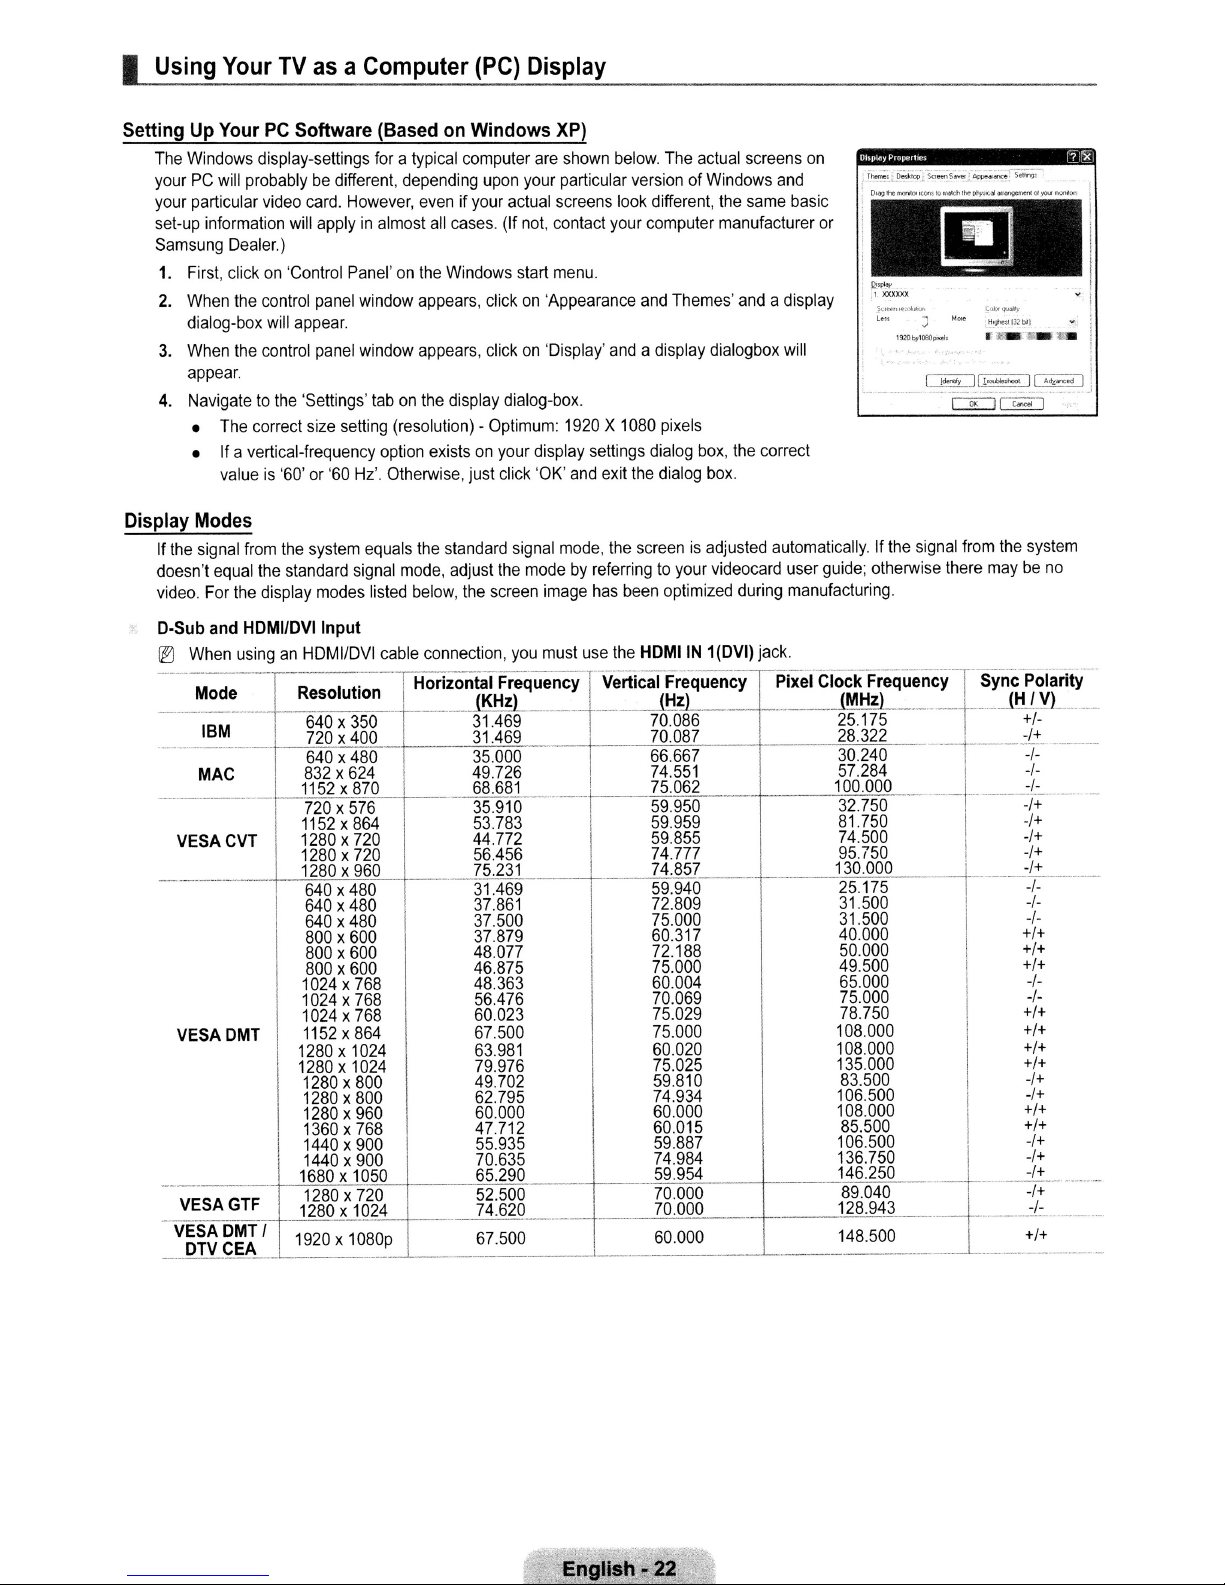
I
Using
YourTVasaComputer
(PC)
Display
SettingUpYourPCSoftware
The
Windows display-settings
yourPCwill
your particular video
set-up information
Samsung
1.
2.
3.
4. Navigate
Display
If
the
doesn't
video.
D-Sub
II:)
-
----
..
--
--"----
VESACVT
-----
VESADMT
VESAGTF
VESADMT I
DTV
probablybedifferent, depending
card.
However,
will
applyinalmost
Dealer.)
First, clickon'Control Panel'onthe
When
the
control
panel
will
the
control
to
the
correct
appear.
panel
'Settings'
size
setting (resolution) - Optimum:
'60
Hz'.
dialog-box
When
appear.
The
•
• If a vertical-frequency option exists
valueis'60' or
Modes
signal
from
the
system equals
equal
the
standard
For
the
display modes listed
and HDMIIDVllnput
When
usinganHDMIIDVI cable connection,
Mode
IBM
---
MAC
I
I
CEA
1920
signal
Resoluf
640x350
720x400
640x480
832x624
1152x870
720x576
1152x864
1280x720
1280x720
1280 x
960
640
x 480 31.469
640x480
640x480
800x600
800x600
800x600
1024x768
1024x768
1024x768
1152x864
1280x1024
1280x1024
1280x800
1280x800
1280x960
1360x768
1440x900
1440x900
1680x1050
1280x720
1280x1024
x 1080p
(BasedonWindows
for
a typical computer
upon
even
if your
all
cases.
Windows start
window appears, clickon'Appearance
window appears, clickon'Display'
tabonthe
Otherwise, just click 'OK'
on~zontar
I
display dialog-box.
the
standard
mode,
adjust
below,
the
I
on
screen
(KHz)
31.469'-
31.469 70.087 28.322
35.000
49.726
68.681
35.910 59.950 32.750
53.783
44.772 59855
56.456
75.231
37.861
37.500
37879 60.317
48.077 72.188
46.875 75.000
48.363 60.004 65000
56.476
60.023
67.500 75.000 108.000
63.981
79.976
49.702 59810 83.500
62.795
60000
47.712 60.015
55.935
70635
65.290
52.500
74.620 70.000
67.500
XP)
are
shown
your particular version of Windows
actual
screens
(If
not,
contact your computer manufacturer
menu
and
1920X1080
your display settings dialog
and
exit
signal
mode,
the
the
modebyreferringtoyour videocard user guide; otherwise there
image
has
you
must
use
Frequency
Vertical
_
r-'
below.
The
actual
screens
look
different,
and
a display dialogbox
the
dialog
screenisadjusted automatically. If
been
the
HDMIIN 1(DVI) jack.
(Hz)
70.086
66.667 30.240
74.551
75.062
59.959
74.777
74.857
59.940
72.809
75.000 31.500
70.069 75.000
75.029 78.750
60.020
75.025 135.000
74.934 106.500
60.000
59.887
74.984
59.954
.
70.000
60.000 148.500
the
same
Themes'
pixels
optimized during manufacturing.
Frequency
box,
box.
and
the
and
basic
a display
will
correct
Pixel
_.
on
or
------
Clock
,t-,
D"'II"-_O:
Frequen
(MHz)
25.175
57.284
100.000
81.750
74.500
95.750
130.000
25.175
31.500
40.000
50.000
49.500
108000
108.000
85.500
106.500
136.750
146.250
89.040
128.943
0esb:Jp
S<:J-.S_~.......
.....
IO--"""'~.~(II)l'OUI
the
signal
c~S.
--
'-r-:0'-..
.
---J+
1
-+
i~_~;;i
SetlftT
__
from
the
system
maybeno
ync
Polarity
.
.JH
IV)
+1-
-1-
-1-
-I-
I
i,
I
,
I
I
I
I
I
-1+
-1+
~/~
---..
-/-
-/-
+/+
+1+
+1+
t
+/+
+/+
+/+
~f:
-/+
+/+
+/+
_/+
I
!-----
I
...-:;:.
,
__
-
....
English·22
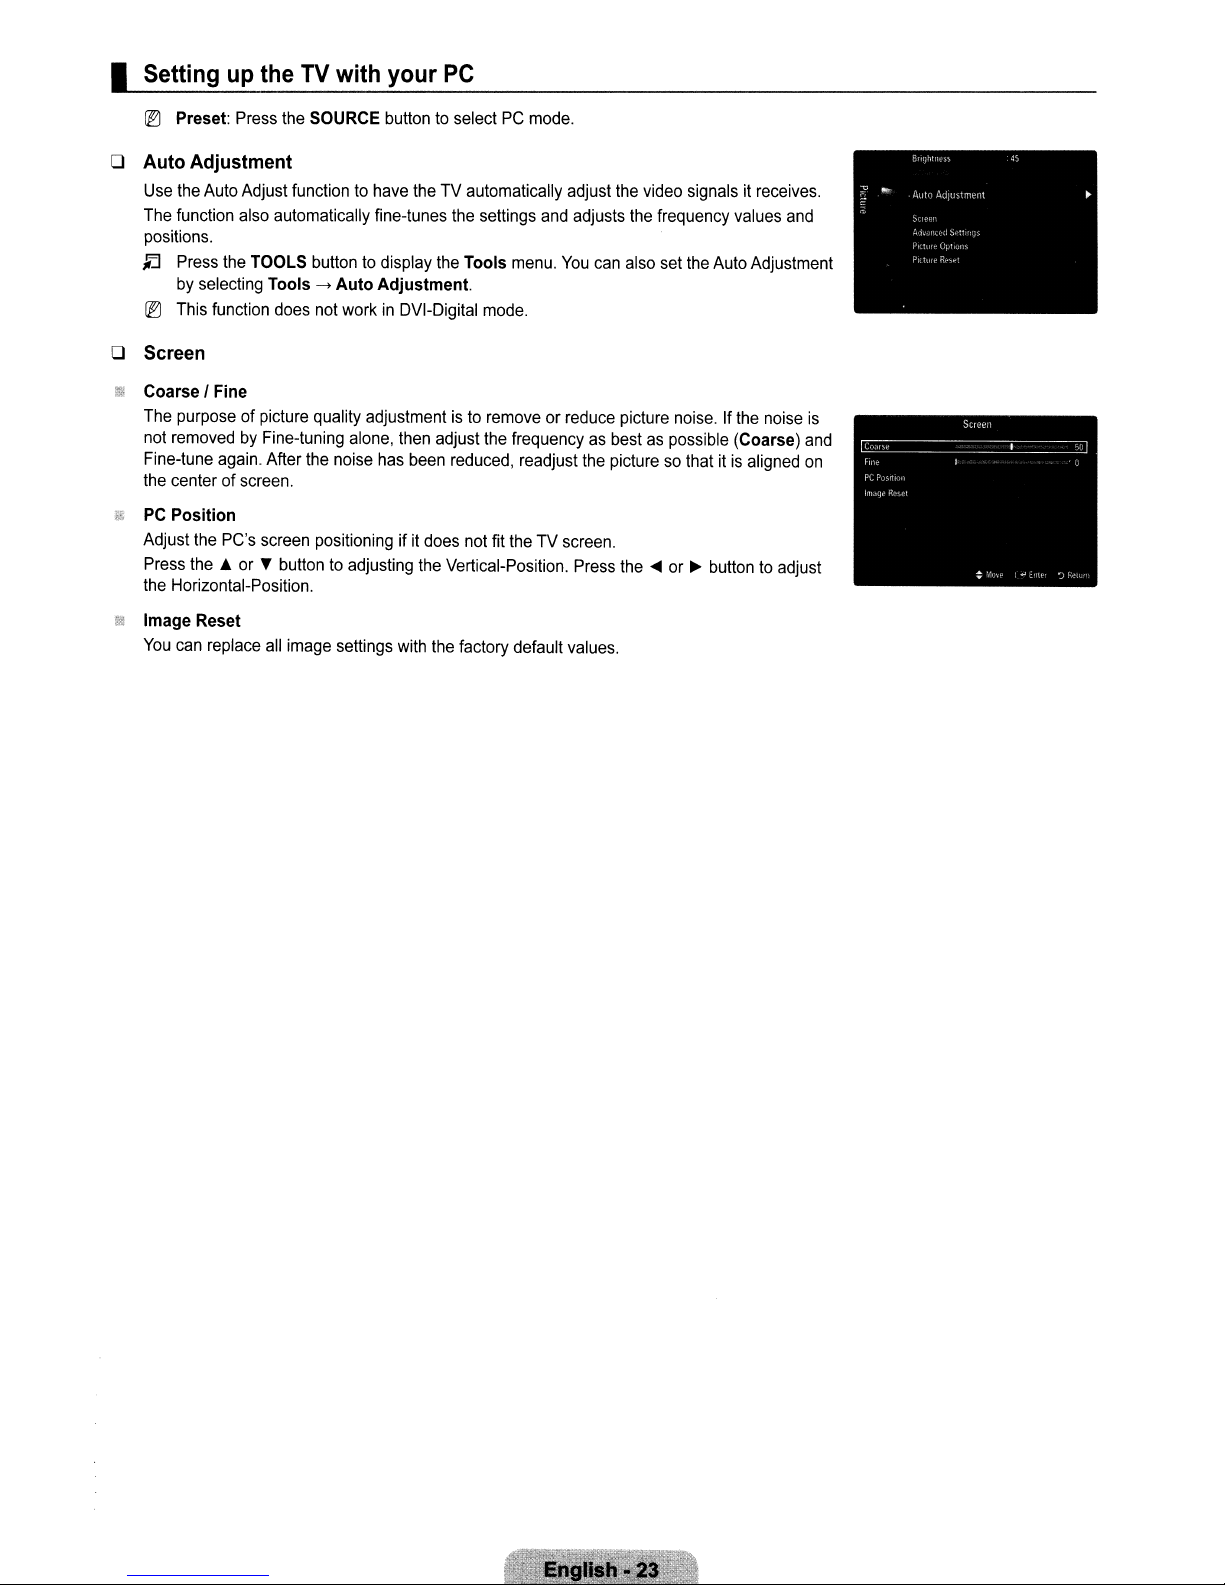
I
Settingupthe
~
Preset:
o
Auto
Adjustment
Use
the
Auto
The
function
positions.
tl
Press
by
selecting
~
This
o
Screen
CoarseIFine
The
purposeofpicture
not
removedbyFine-tuning
Fine-tune
the
centerofscreen.
PC
Position
Adjust
the
Press
the.or,.
the
Horizontal-Position.
Image
Reset
You
can
replace
Press
Adjust
also
the
TOOLS
function
again.
PC's
TV
with
the
SOURCE
functiontohave
automatically
buttontodisplay
Tools
---->
Auto
does
not
workinDVI-Digital
quality adjustmentisto
alone,
After
the
noise
screen
positioningifit
buttontoadjusting
all
image
settings
your
PC
buttontoselectPCmode.
theTVautomatically
fine-tunes
Adjustment.
has
the
the
then
adjust
been
reduced,
does
the
Vertical-Position.
with
the
settings
Tools
menu.
mode.
removeorreduce
the
frequencyasbestaspossible
readjust
not
fit
theTVscreen.
factory
default
and
adjust
the
adjusts
You
can
also
picture
the
picturesothatitis
Press
the
values.
video
signalsitreceives.
the
frequency
set
the
Auto
noise.Ifthe
....
or~buttontoadjust
values
Adjustment
noise
(Coarse)
aligned
and
is
and
on
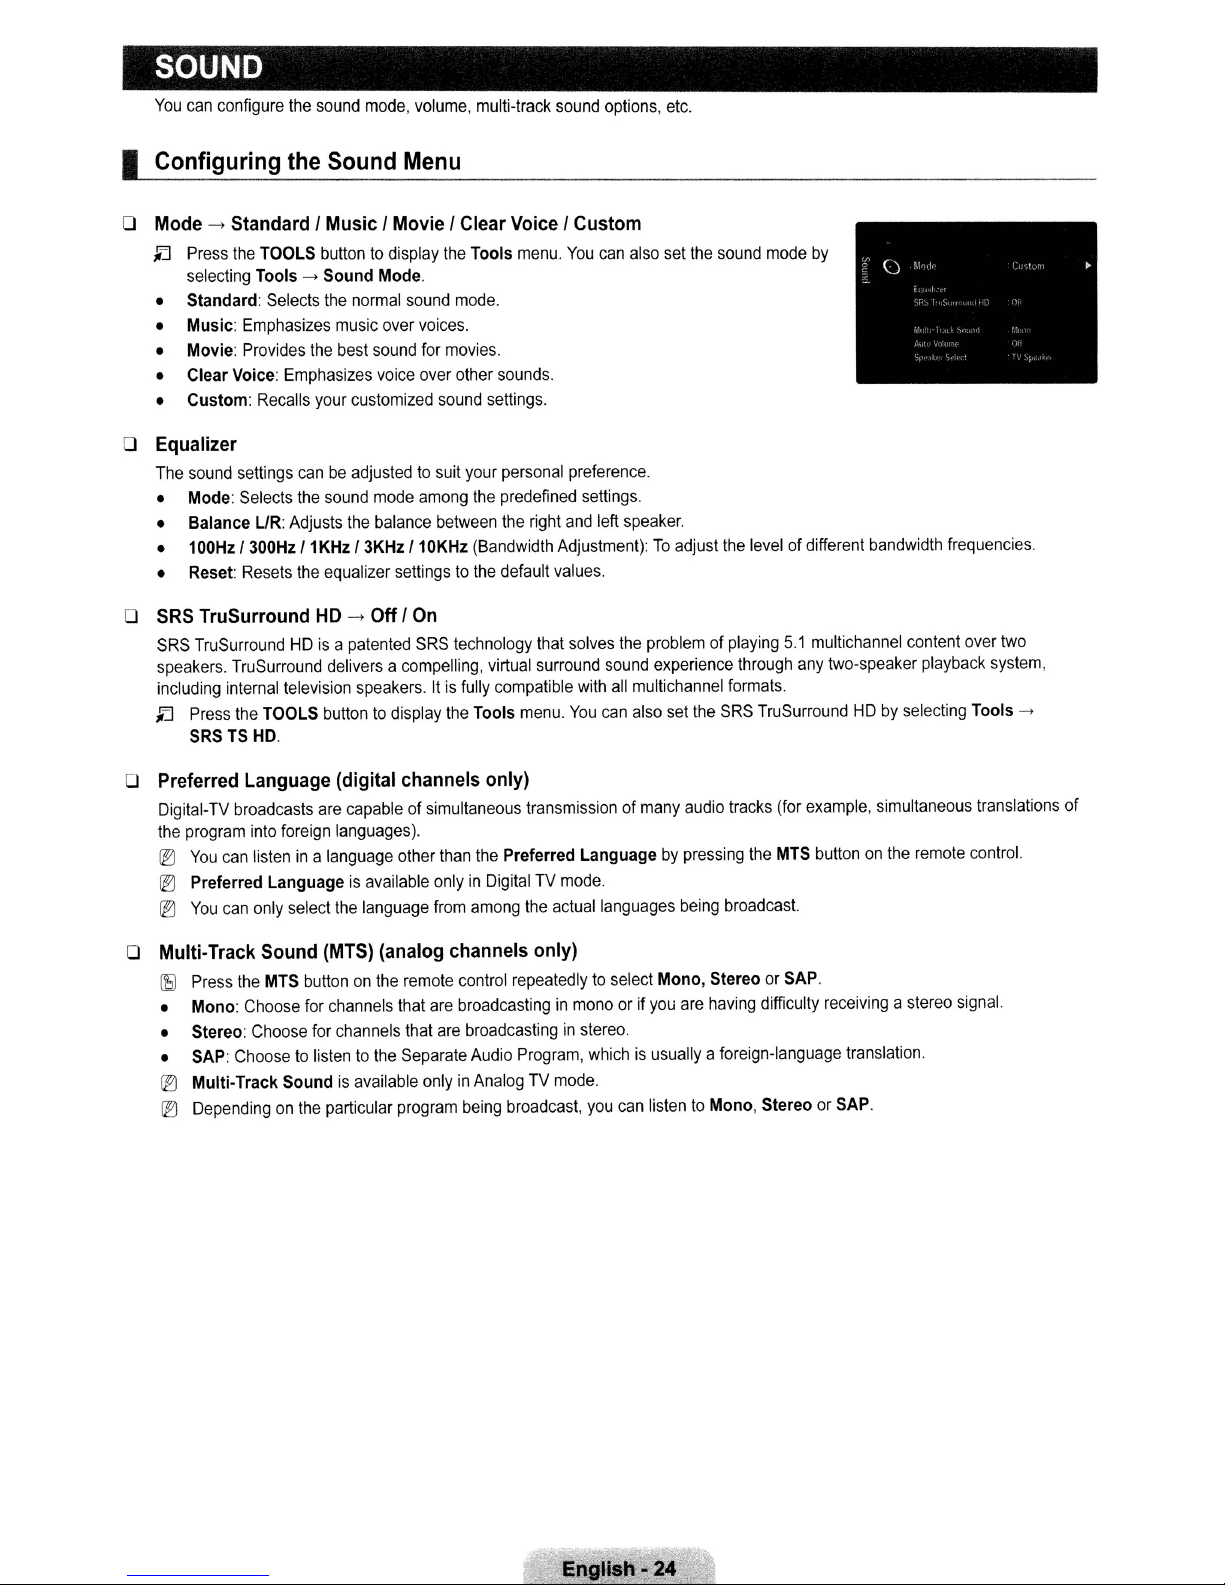
SOUND
You
can configure the sound mode, volume, multi-track sound options, etc.
I
Configuring
the
Sound
Menu
o Mode
->
Standard I Music I Movie I Clear Voice I Custom
~
Press the TOOLS button to display the Tools menu.
selecting Tools
• Standard: Selects the normal sound mode.
• Music: Emphasizes music over voices.
• Movie: Provides the best sound for movies.
• Clear Voice: Emphasizes voice over other sounds.
• Custom: Recalls your customized sound settings.
->
Sound
Mode.
You
can also set the sound mode by
o Equalizer
The sound settings canbeadjusted to suit your personal preference.
• Mode: Selects the sound mode among the predefined settings.
• Balance LlR: Adjusts the balance between the right and left speaker.
• 100Hz 1300Hz 11KHz13KHz 110KHz (Bandwidth Adjustment):
• Reset: Resets the equalizer settings to the default values.
o
SRS
TruSurround
SRS TruSurroundHDis
speakers. TruSurround delivers a compelling, virtual surround sound experience through any two-speaker playback system,
including internal television speakers.
~
Press the TOOLS buttontodisplay the Tools menu.
SRS TS
HD.
HD
->
Off I
On
a patented SRS technology that solves the problem of playing
Itisfully compatible with
You
o Preferred Language (digital channels only)
Digital-TV broadcasts are capable of simultaneous transmissionofmany audio tracks (for example, simultaneous translations of
the program into foreign languages).
iEl
You
can listenina language other than the Preferred Language by pressing the MTS button on the remote control.
iEl
Preferred Languageisavailable onlyinDigital TV mode.
iEl
You
can only select the language from among the actual languages being broadcast.
To
adjust the levelofdifferent bandwidth frequencies.
5.1
multichannel content over two
all
multichannel formats.
can also set the SRS TruSurroundHDby
selecting Tools
->
o Multi-Track Sound (MTS) (analog channels only)
(S)
Press the MTS buttononthe remote control repeatedly to select Mono, Stereo or SAP.
• Mono: Choose for channels that are broadcasting
• Stereo: Choose for channels that are broadcasting
• SAP: Choose to listen to the Separate Audio Program, which
iEl
Multi-Track
iEl
Depending on the particular program being broadcast, you can listen to Mono, Stereo or SAP.
Soundisavailable onlyinAnalog TV mode.
in
mono or if you are having difficulty receiving a stereo signal.
in
stereo.
is
usually a foreign-language translation.
English.24

o Auto Volume
Each broadcasting station has its own signal conditions, andsoit
changed. This feature lets you automatically adjust the volume of the desired channel by lowering the sound output when the
modulation signal
->
OffI
On
is not easy to adjust the volume every time the channel
is
high orbyraising the sound output when the modulation signal is
low.
o Speaker Select
When you watch TV withitconnecting to a Home theater, turn the TV speakers off so you can listen to sound from the Home
theater's (external) speakers.
to
• External Speaker: Used
• TV Speaker: Used
IB
The volume and MUTE buttons do not operate when the Speaker Select is set to
on your Home theater.
IB
If you select External Speakerinthe
TV
External Speaker Mute
Video
Speaker
No
Signal
to
listen to the sound of the External (Home Theater) Speakers.
listen to the sound of the TV Speakers.
Speaker
RF
/
Select
menu, the sound settings will be limited
TV's Internal Speakers
AV
/ Component /PC/ HDMI
Sound Output
Mute
External
Audio Out (Optical,
RF
Speaker. Please set the volume
/
AV
/ Component / PC / HDMI
Sound Output
Sound Output
UR
Out) to Sound System
Mute
is
o Sound Select
When the PIP featureisactivated, you can listentothe sound of the sub (PIP) picture.
IB
You
JEJ
Press the TOOLS buttontodisplay the Tools menu.
->
Sound
o Sound Reset --> Reset
You
can restore the Sound settingstothe factory defaults.
IB
Reset
->
Main I Sub
can select this option when PIP is settoOn.
Select.
AliI
Reset Sound Mode I Cancel
Sound
Mode: Current sound values return to default settings.
You
can also set the sound of the sub picturebyselecting Tools->PIP
English.
25

SETUP
You
can
setupadditional
I
Configuring
o Language
You
can
set
o Time
For
detailed
(see
pages
functions.
the
Setup
the
menu
language.
proceduresonsettingupoptions,
Menu
29-30)
refertothe
'Setting
the
Time'
instructions.
o Game Mode
When
connectingtoa
selecting
@')
Restrictionsongame
-
-Ifyou
@')
Game
@')
While
@')Ifthe
connect
@')IfGame
-
-
-
o
SO
Wise-.Off
Provides
enjoyaricher
@')
Connect
@')
When
@')BOWiseisavailableinHOMI
-.
Off
game
menu.
To
disconnect
display
Modeisnot
PIPisin
pictureispoor
Picture
Sound
The
settingstothe
operation,
external
ModeisOn:
modeisautomatically
modeisautomatically
Reset
Sound
IOn
the
optimal
picture
SAMSUNG
theBOWise
I On
game
console
mode
(Caution)
the
game
console
theTVmenuinGame
availableinregularTVandPCmode.
the
when
external
devices.
functionisactivated.
factory
defaults.
picture
quality
when
using
them
products
settoOn,
o Network Type I Network Setup
For
detailed
proceduresonsettingupoptions,
suchasPlayStation™or
and
connect
Mode,
the
Game
Mode
function
deviceisconnectedtoTV,
changedtoStandard
changedtoCustom
Selecting
for
SAMSUNG
connectedtothis
that
haveBOWise
the
picture
mode.
OVO,
modeisautomatically
refertothe
Xbox
another
external
screen
shakes
cannotbeused.
checkifGame
and
cannotbechanged.
and
cannotbechanged.
the
Reset
Blu-ray
and
Samsung
usinganHOMI
'Setting
TV.
the
TM,
you
can
device,
slightly.
function
changedtothe
Home
cable.
Network'
after
Theater
enjoyamore
set
Game
ModetoOffinthe
ModeisOn.
Adjust
setting
the
products
optimal
instructions
realistic
Set
the
sound
equalizer
which
resolution.
(see
gaming
experience
setup
Game
ModetoOff
using
the
resets
the
supportBOWise.
pages
34-36)
menu.
equalizer.
equalizer
You
by
and
can
o V-Chip
The
V-Chip
feature
automatically
(personal10number)
@')
V-Chip
functionisnot
@')
The
default
@')
Allow all:
Change
The
the
memorized.
@')Ifyou
PIN
Change
Confirm
(Off)->MUTE->8->2->4->POWER
PIN
New
forget
before
PIN
number
Presstounlock
screen
will
PIN
screen
the
PIN,
locks
anyofthe
availableinHOMI,
of a
newTVset
allTVratings.
appear.
appears.
press
the
out
programs
V-Chip
restrictions
ComponentorPC
is
0-0-0-0.
I Block all:
Choose
any4digits
Re-enter
remote-control
(On).
that
are
Presstolock
for
the
same4digits.
buttonsinthe
Engllsh·26
deemed
are
your
setupor
mode.
PIN
When
following
inappropriate
changed.
allTVratings.
and
enter
them.Assoonasthe
the
Confirm
sequence,
for
screen
which
children.
resets
The
user
4 digits
disappears,
the
pin
must
your
to
0-0-0-0 :
enteraPIN
are
entered,
PIN
has
been
POWER

V-Chip Lock-+Off I
You
can
block
ratedTVPrograms.
TV
Parental Guidelines
You
can
blockTVprograms
your
children
•
TV-Y:
Parental
• ALL:
Adult
~
The
are
watching.
Young
children/TV-Y7:
guidance/TV-14:
Lock
allTVratings./FV:
Language
V-Chip
will
example,ifyou
if
you
block
the
blocked
(TV-G,
similarly.
~
The
V-chip
will
PG,
then
the
L sub-ratingsinTV-14
MPAA
Rating
You
can
block
movies
America(MPAA)
advance
•
G:
General
PG:
•
•
PG-13:
•
R:
Restricted.
•
NC-17:Nochildren
•
X:
Adults
•
NR:
~
The
R,
NC-17
has
informationonwhich
audience
Parental
guidance
Parents
only.
Not
rated.
V-Chip
will
andXwill
On
dependingontheir
Children7and
Viewers14and
Fantasy violence /V:Violence/S:
/ 0:
Sexually
automatically
block
TV-G
TV-PG,
automatically
Suggestive
block
TV-Ycategory,
category,
TV-14
and
block
dependingontheir
implementedarating
films
(no
restrictions).
suggested.
strongly
Children
automatically
cautioned.
under17shouldbeaccompaniedbyan
under
age
block
automaticallybeblocked
certain
then
TV-MA).
certain
are
appropriate
17.
any
rating.
over /
Dialog
categories
then
TV-Y7will
all
the
categoriesinthe
The
categories
and
TV-MA
MPAA
system
category
This
over /
function
TV-G:
TV-MA:
allows
General
Mature
audience
Sexual
that
are
more
automaticallybeblocked.
young
sub-ratings (0,L,S,V)work
that
are
'More
will
automaticallybeblocked.
rating.
The
Motion
Picture
that
for
provides
children.
parentsorguardians
adult.
thatis'More
restrictive'.
also.
youtocontrol
audience/TV-PG:
situation
restrictive.
/
For
Similarly,
adult
group
will
be
together
restrictive'.
Association
For
of
with
For
example,ifyou
what
L:
example,ifyou
block
block
L sub-ratinginTV-
the
PG·13
category,
then
Canadian English
•
C:
Programming
•
C8+:
Programming
•
G:
General
•
PG:
•
14+:
•
18+:
~
The
and
programming,
Parental
Programming
Adult
programming.
V-Chip
18+
will
Canadian French
•
G:
General
• 8 ans+:
•
13
•
16
•
18
~
The
Programming
ans+:
Programming
ans+:
Programmingisnot
ans+:
Programming
V-Chip
ans+,16ans+
intended
for
generally
children
considered
suitable
Guidance.
contains
will
automatically
themesorcontent
block
automaticallybeblocked
generally
may
considered
notbesuitable
suitable
restrictedtoadults.
will
automatically
and18ans+
block
will
automaticallybeblocked
for
any
any
under
acceptable
all
audiences.
category
also.
for
children
category
age
8.
which
thatis'More
acceptable
for
children
under
thatis'More
for
children8years
may
notbesuitable
restrictive'.
for
children8years
under
the
the
ageof16.
also.
ageof13.
restrictive'.
and
overtowatchontheir
for
viewers
For
and
For
under
example,ifyou
overtowatchontheir
example,ifyou
own.
the
ageof14.
blockGcategory,
own.
block
8 ans+
then
category,
PG,
then
14+
13
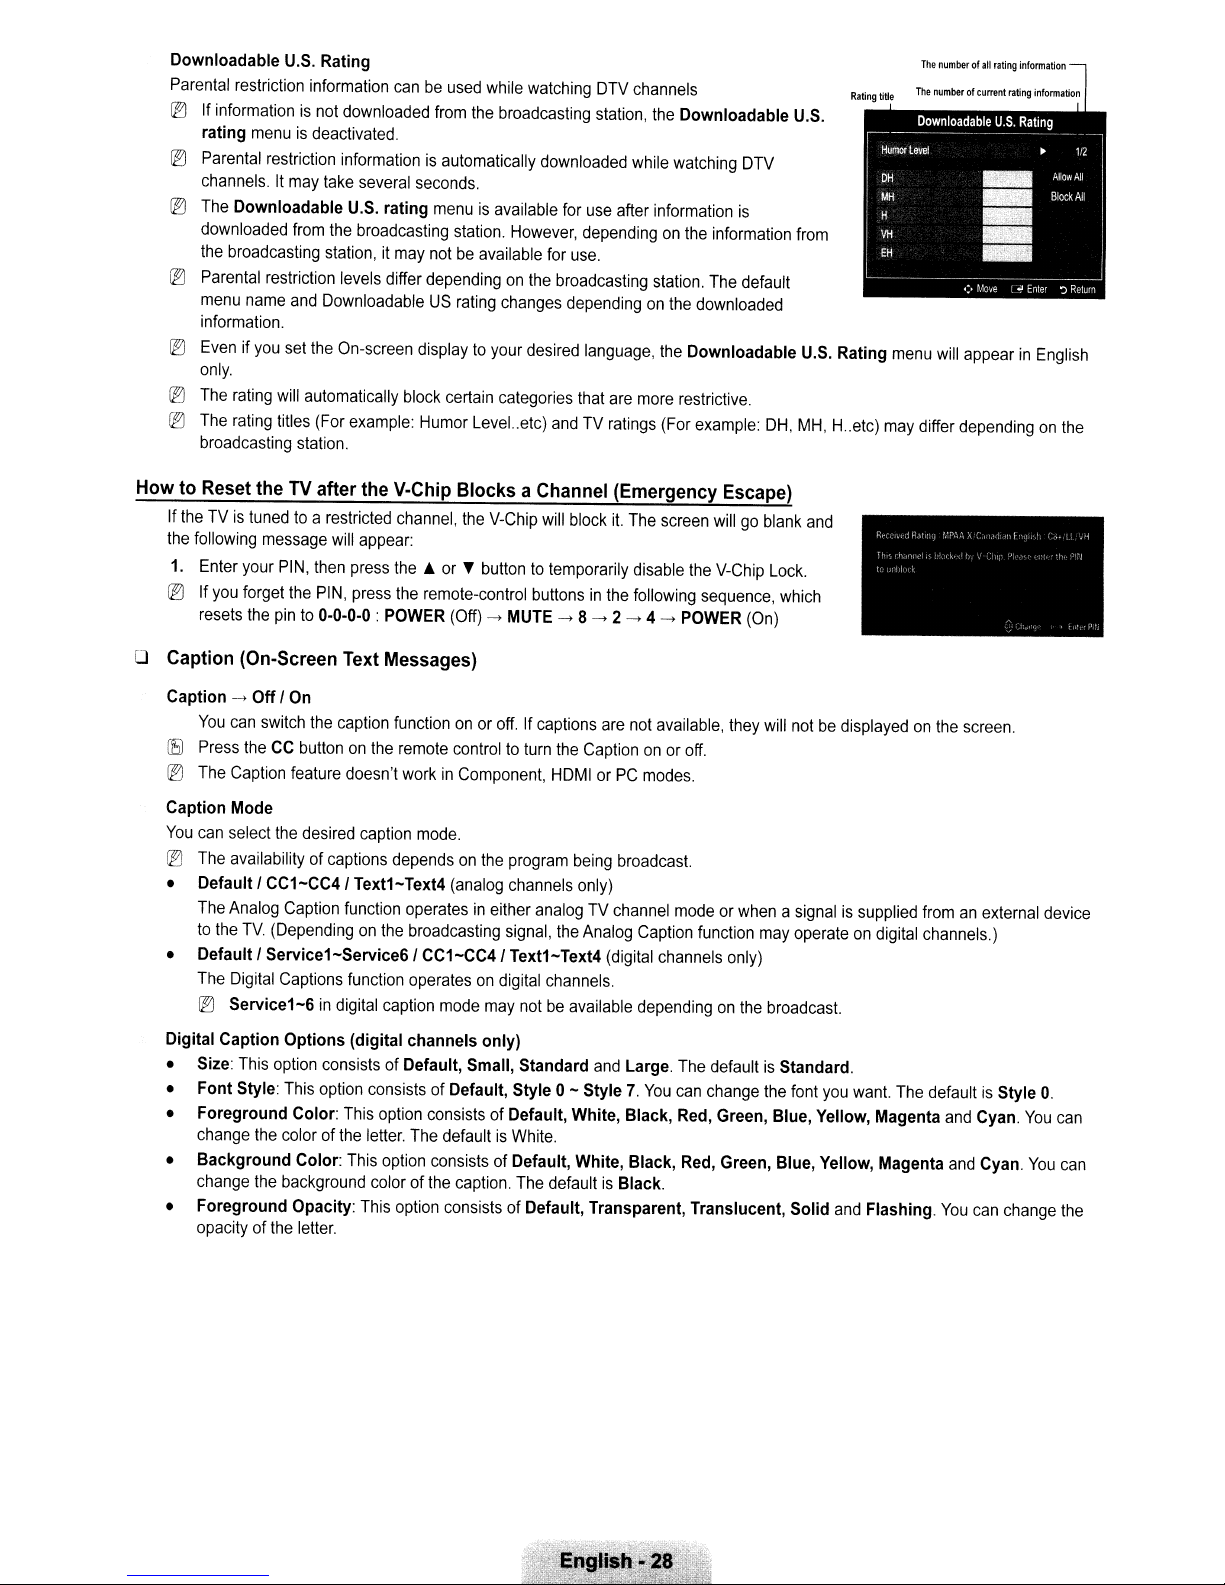
Downloadable
Parental
@]
If
informationisnot
rating
@')
Parental
channels.Itmay
@]
The
downloaded
the
@]
Parental
menu
information.
@]
Evenifyou
only.
@Il
The
@]
The
broadcasting
U.S.
Rating Thenumberof.lltatioginfonn.tion
restriction
Downloadable
broadcasting
name
rating
rating
information
menuisdeactivated.
restriction
take
from
the
station,itmay
restriction
and
DownloadableUSrating
set
the
will
automatically
titles
(For
station.
canbeused
downloaded
informationisautomatically
several
seconds.
U.S.
rating
broadcasting
levels differ
On-screen
example:
displaytoyour
block
Humor
while
from
the
broadcasting
menuisavailable
station.
However,
notbeavailable
dependingonthe
changes
certain
categories
Level..etc)
watching
downloaded
for
use
dependingonthe
for
use.
broadcasting
dependingonthe
desired
language,
that
andTVratings
DTV
station,
after
are
channels
the
Downloadable
while
watching
information
station.
the
more
(For
DTV
is
information
The
default
downloaded
Downloadable
restrictive.
example:
DH,
HowtoReset theTVafter the V-Chip Blocks a Channel (Emergency Escape)
If
theTVis
the
1.
@')
following
Enter
If
you
resets
tunedtoa
message
your
forget
the
restricted
will
appear:
PIN,
then
press
the
PIN,
press
pinto0-0-0-0:POWER
channel,
the.
the
the
V-Chip
will
block
it.
or~buttontotemporarily
remote-control
(Off)->MUTE->8->2->4->POWER
buttonsinthe
The
screen
disable
following
willgoblank
the
V-Chip
sequence,
Lock.
(On)
U.S.
from
U.S.
MH,H..
which
and
Rating
etc)
menu
may
will
appearinEnglish
differ
dependingonthe
o Caption (On-Screen Text Messages)
Caption->Off /
You
~
Press
@]
The
Caption Mode
You
can
@]
The
• Default / CC1-CC4/ Text1-Text4
The
to
the
• Default / Service1-Service6/ CC1-CC4/ Text1-Text4
The
@')
Digital Caption Options (digital channels only)
•
Size:
• Font Style:
• Foreground Color:
change
• Background Color:
change
• Foreground Opacity:
opacityofthe
On
can
switch
the
caption
theCCbuttononthe
Caption
select
Analog
feature
doesn't
the
desired
caption
availabilityofcaptions
Caption
TV.
(Dependingonthe
Digital
Captions
Service1-6indigital
This
option
the
colorofthe
the
background
This
function
function
consists
option
This
This
This
letter.
functiononor
remote
workinComponent,
mode.
dependsonthe
operatesineither
broadcasting
operatesondigital
caption
of Default, Small, Standard
consists
letter.
colorofthe
of Default, Style 0- Style7.You
option
consists
The
option
consists
option
off.Ifcaptions
controltoturn
program
(analog
mode
defaultisWhite.
consists
channels
signal,
may
of Default, White, Black,
of Default, White, Black,
caption.
of Default, Transparent, Translucent, Solid
are
the
Captiononor
HDMIorPC
being
only)
analogTVchannel
the
Analog
(digital
channels.
notbeavailable
and
The
defaultisBlack.
not
available,
modes.
broadcast.
Caption
channels
dependingonthe
Large.
they
will
off.
modeorwhenasignalissupplied
function
The
can
Red,
Red,
may
only)
broadcast.
defaultisStandard.
change
the
Green, Blue, Yellow, Magenta
Green, Blue, Yellow, Magenta
notbedisplayedonthe
fromanexternal
operateondigital
font
you
want.
and
The
Flashing.
channels.)
defaultisStyle
screen.
and
and
You
Cyan.
Cyan.
can
You
You
change
device
O.
can
can
the
 Loading...