

Samsung 8340, 6340 User Manual
USER GUIDE
_
HD TERMINAL
HD PVR

2
For further information, visit videotron.com/terminal-support.
CONTENTS
Set-Up ........................................................................................................................................................... 3
Activation ............................................................................................................................................... 4
Overview of Your Terminal ..................................................................................................................5
Connect Your Terminal ......................................................................................................................... 7
Your Remote Control ..........................................................................................................................12
Program Your Remote Control .........................................................................................................13
Equipment Settings ............................................................................................................................16
Help Portal ...........................................................................................................................................17
How to Use illico TV new generation ....................................................................................................18
Main Menu and Menu Shortcuts .......................................................................................................18
Interactive Program Guide ...............................................................................................................19
Modify and Customize Displayed Channels .....................................................................................20
How to Create and View Your List of Favourite Channels ............................................................20
Search ..................................................................................................................................................21
Widgets ................................................................................................................................................22
3D ..........................................................................................................................................................22
illico On Demand .......................................................................................................................................23
Movie or TV Show Rental ...................................................................................................................24
Resume Viewing ..................................................................................................................................25
Pay-Per-View (PPV) Services.................................................................................................................27
HD PVR ........................................................................................................................................................29
Main menu ............................................................................................................................................29
Control Live TV ....................................................................................................................................31
Record a Program ..............................................................................................................................32
Manage Your Recordings...................................................................................................................34
Manage Your Hard Drive ....................................................................................................................36
Settings ......................................................................................................................................................37
General Settings .................................................................................................................................37
Controls and Limits ............................................................................................................................38
Parental Control .................................................................................................................................39
Application Preferences ....................................................................................................................40
Accessibility. ........................................................................................................................................42
FAQ ..............................................................................................................................................................43
Customer Service and Technical Support ...........................................................................................45
List of Remote Control Programming Codes ......................................................................................46
Security ......................................................................................................................................................50

3
For further information, visit videotron.com/terminal-support.
SET-UP
CoNGRATULATIoNS oN yoUR pURCHASE of THIS HD TERMINAL oR
HD pVR, yoUR GATEwAy To THE ILLICo TV NEw GENERATIoN ExpERIENCE.
Now you can:
• Enjoy a new, customized TV experience that’s faster, more powerful and easier to use
• Easily manage your recordings with the HD PVR
• Gain access to a personalized interactive 15-day Program Guide
• Use handy apps like the Miniguide and a variety of widgets (i.e. weather forecasts, lottery
results, illico news, etc.)
• Fully immerse yourself in the HD experience thanks to exceptional image quality and menus
adapted to HD TVs
• Benefit from a Dolby Digital 5.1™ output, for unbeatable sound adapted to home theatre systems
• Gain exclusive access to illico On Demand, which offers thousands of movies and shows,
2,000 of which you can watch for free
• Watch illico TV online at illicoweb.tv or on your Videotron mobile phone
4
For further information, visit videotron.com/terminal-support.
ACTIVATION
If you bought your HD terminal or HD PVR from one of our authorized dealers (rather than in
a Videotron store), please follow these steps:
1. Connect your terminal by referring to the Connect Your Terminal section.
2. When your terminal is connected, call the following number to activate it:
1-877-226-6385 (toll-free)
Monday to Friday: 7:30 a.m. to 10 p.m.
Saturday: 8 a.m. to 8 p.m.
Sunday: 9 a.m. to 8 p.m.
If you received your terminal via Canada Post, please follow these steps:
1. Connect your terminal by referring to the Connect Your Terminal section.
2. When your terminal is connected, call 514-380-7834 or 1-866-380-2134 to activate it.
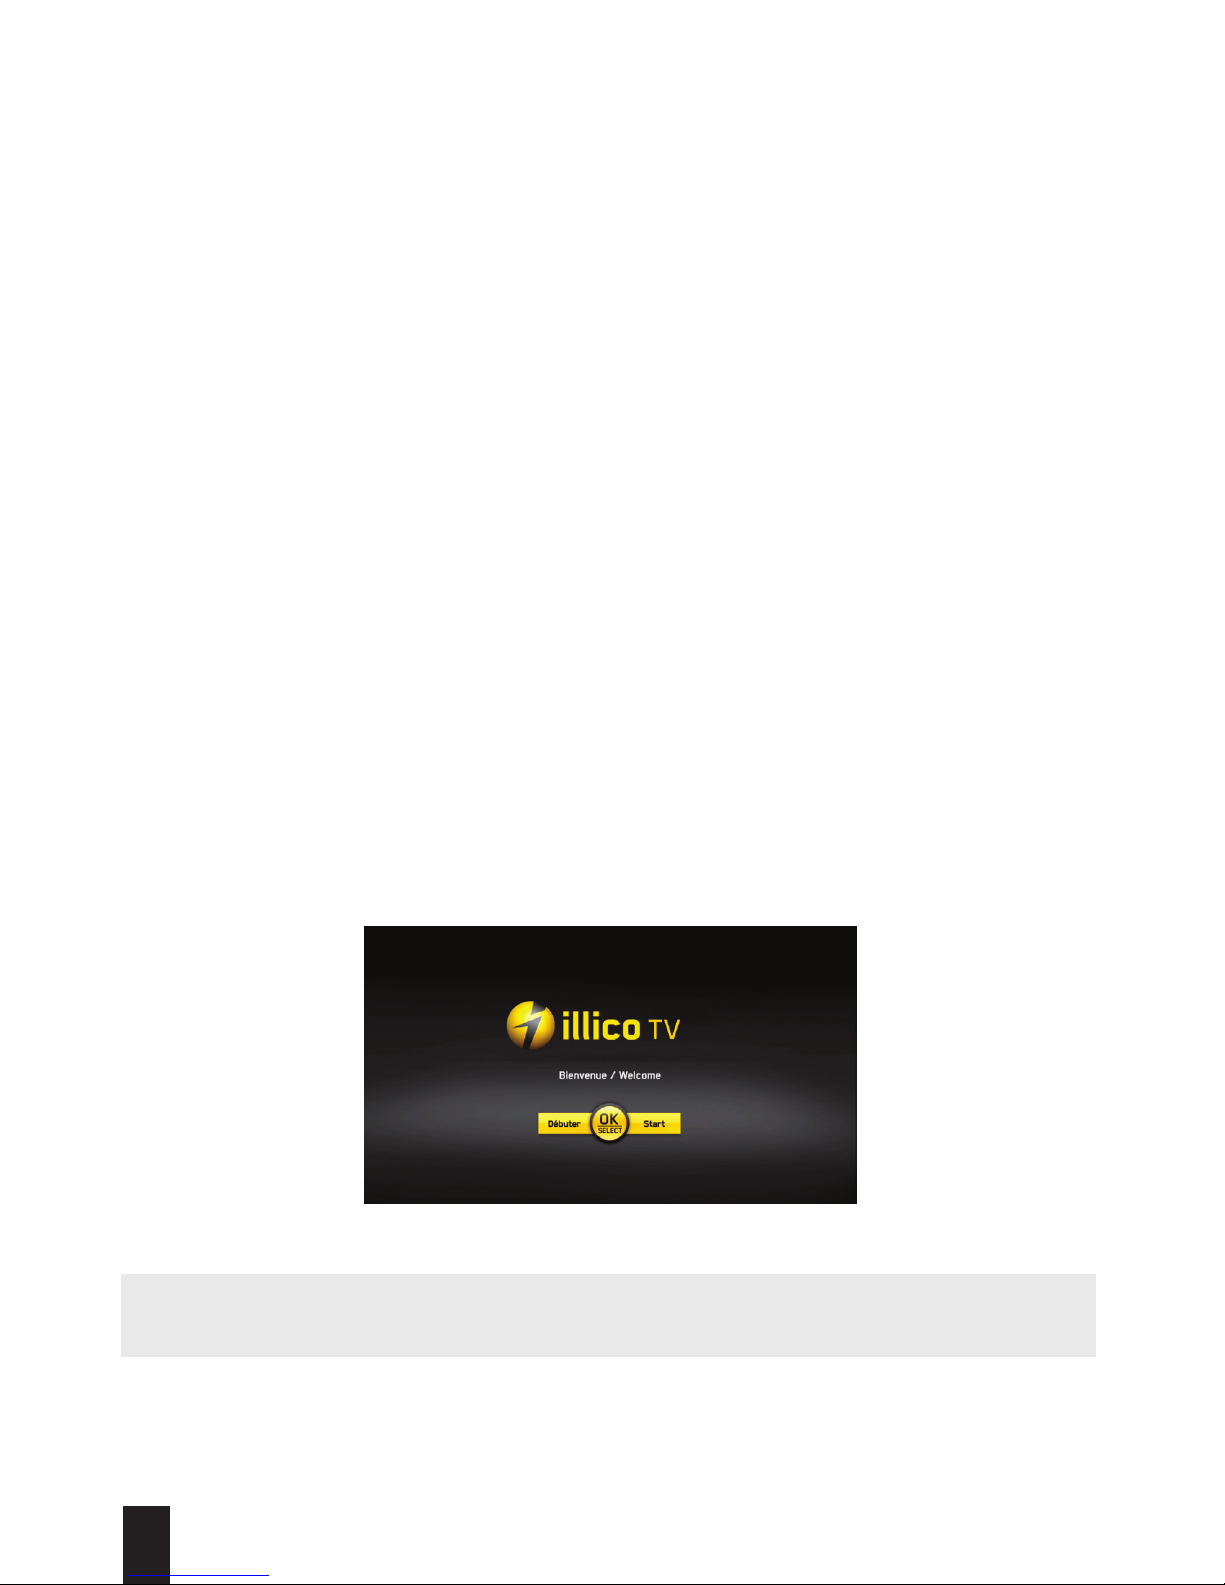
3. We strongly recommend that you follow the Quick-Start Wizard that will automatically pop up
when you turn on your terminal for the first time.
The Quick-Start Wizard shows you how to:
i. Set the display language of your terminal.
ii. Activate the Administrator PIN to manage certain functions of the terminal and order on-
demand content. Administrator PIN: _________________
iii. Activate and configure Parental Control.
4. Create an Order PIN for access to content permitted by Parental Control.
5. Order PIN: _________________
WARNING: If you see “WIZ 502” (error message) on your screen, please contact Technical
Support (see page 45) immediately as certain applications will not work.
5
For further information, visit videotron.com/terminal-support.
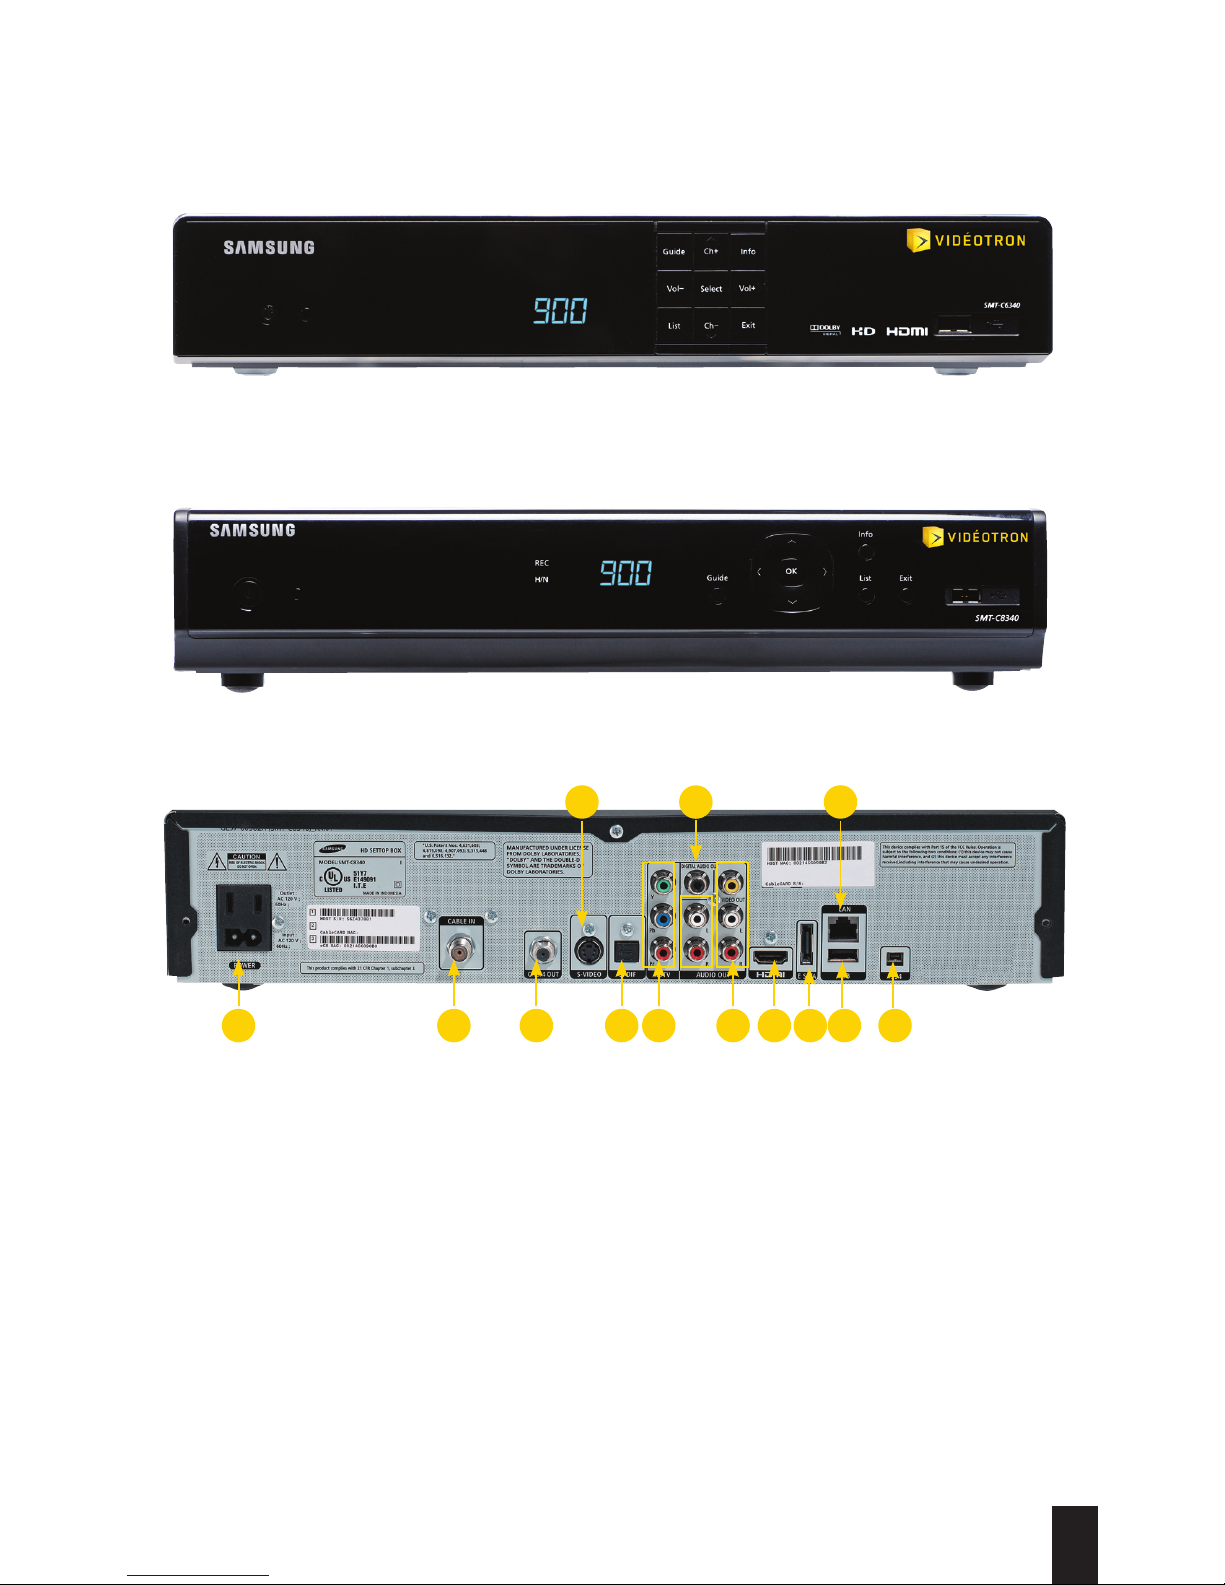
OVERVIEW OF YOUR TERMINAL
SAMSUNG 6340 HD TERMINAL
SAMSUNG 8340 HD pVR
bACk of THE TERMINAL
*
8 HDMI audio/video output
9 USB port
(currently unavailable)
10 eSATA port
(only available on the HD PVR)
11 FireWire port (currently unavailable)
12 Ethernet port (currently unavailable)
13 Power supply
113 4
12
2 36
7
5
8 10 9 11
*NOTE: Photo for illustration purposes only
1 Coaxial audio/video input
2 Component video output
3 RCA audio/video output
4 Coaxial audio/video output
5 Digital coaxial audio output
6 Optical audio output
7 S-video output

6
For further information, visit videotron.com/terminal-support.
CISCo 8642 HD pVR
8 Coaxial audio/video output
9 HDMI audio/video output
10 USB port
(currently unavailable)
11 eSATA port
(only available on the HD PVR)
12 FireWire port (currently unavailable)
13 Ethernet port (currently unavailable)
14 Power supply
1
5
7423 11 12 13 141098
6
CISCo 4642 HD TERMINAL
bACk of THE TERMINAL
*
*NOTE: Photo for illustration purposes only
1 Coaxial audio/video input
2 Component video output
3 RCA audio/video output
4 RCA audio output
5 Digital coaxial audio output
6 Optical audio output
7 S-video output
7
For further information, visit videotron.com/terminal-support.
CONNECT YOUR TERMINAL
The terminal can be connected in various ways. To get the most out of your terminal, please
connect it in the way recommended for your system. To watch a demo of how to connect your
terminal, visit support.videotron.com/residential.
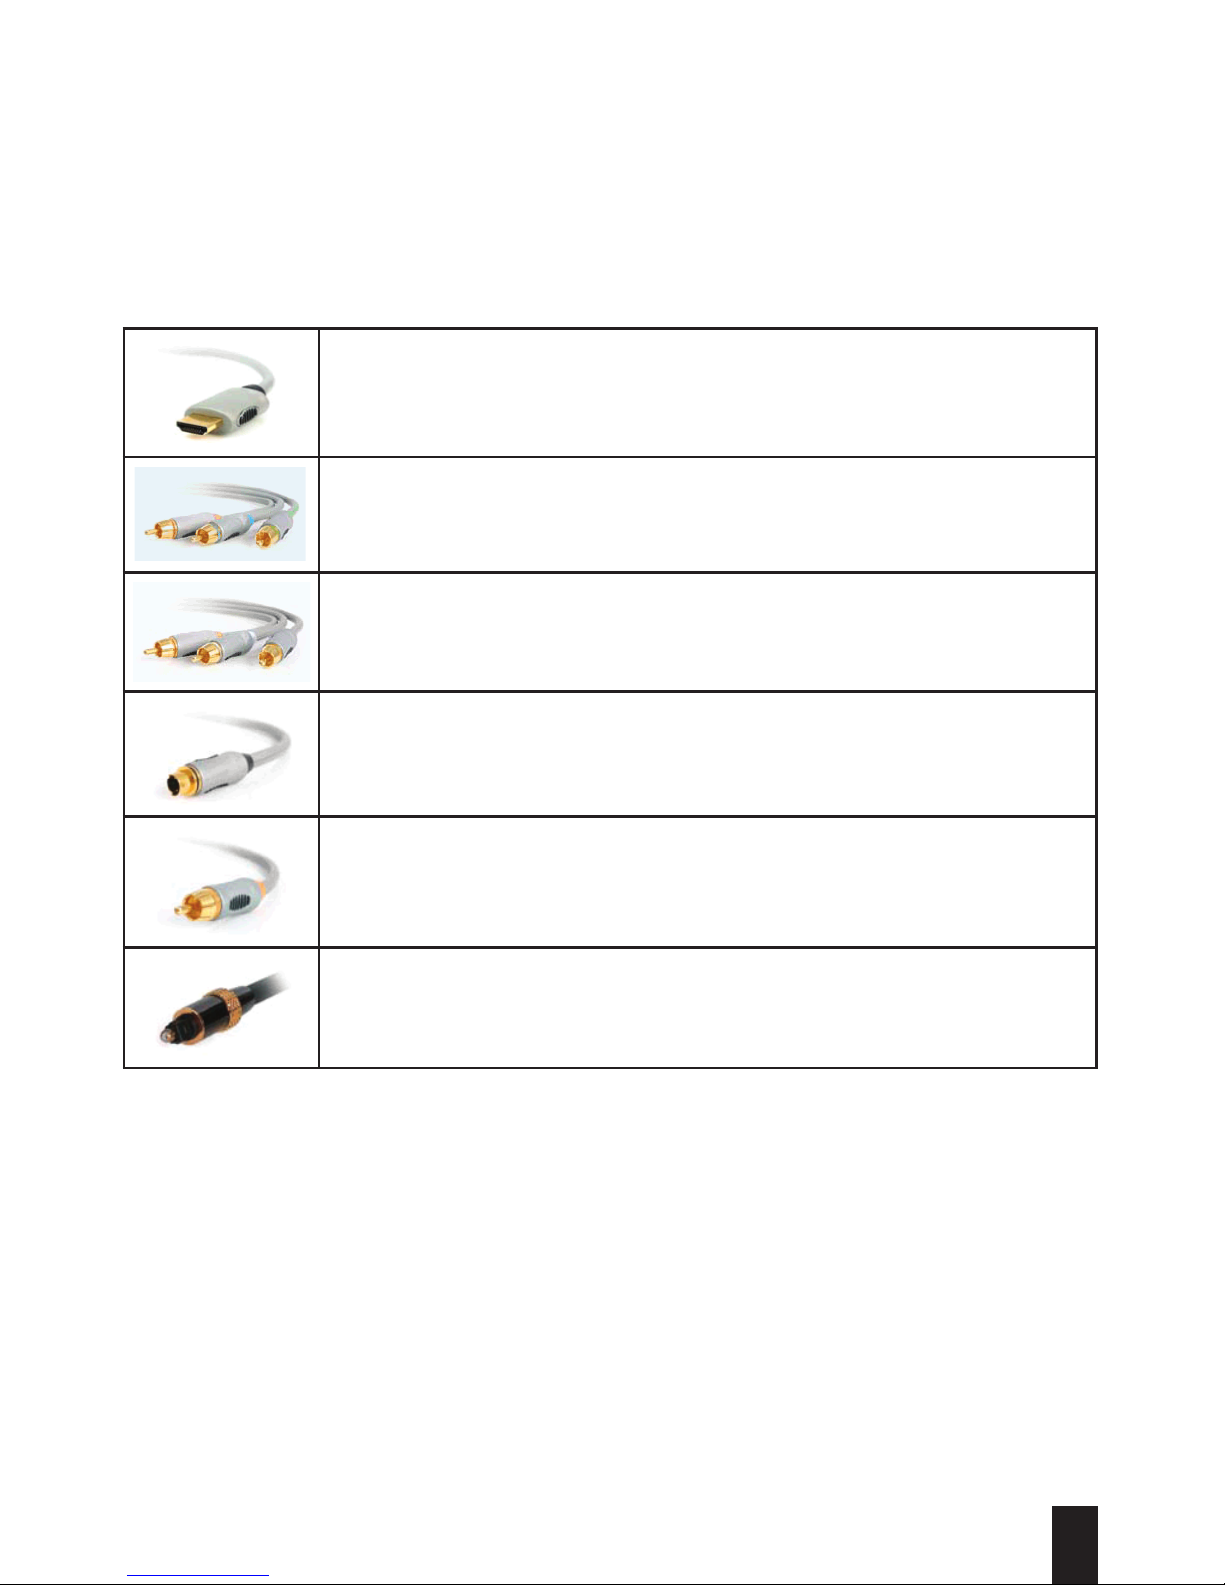
MoST fREqUENTLy USED VIDEo AND AUDIo CAbLES
HDMI cable – An HDMI cable transmits high-definition (up to 1080p) video to
your TV, as well as Dolby 5.1™ audio, with just one cable.
Component cable — The component video cable (red, blue, green)
transmits 1080i high-definition video to your TV.
RCA component and stereo cables – The yellow component or RCA cable
transmits standard-definition video, where as the red and white cable
transmits stereo sound.
S-video cable – The S-video cable transmits standard-definition video
(standard-definition TV only).
Coaxial digital audio cable – The coaxial digital audio cable transports
Dolby 5.1™ digital sound to a home theatre system.
Optical audio cable – The optical audio cable transports Dolby 5.1™ digital
sound to a home theatre system.
8
For further information, visit videotron.com/terminal-support.
1. Connect your equipment by following the diagram above.
2. Turn on the terminal by pressing on your remote control.
3. Turn on your TV and select the corresponding Audio/Video input (input 1/2/3 or
component 1/2/3) to display content on-screen.
4. Program your remote control to your TV by following the instructions on page 13.
5. Use the remote control that came with the terminal to switch to the channel or service of
your choice.
NOTE: We strongly recommend that you follow the Quick-Start Wizard that will automatically
pop up when you turn on your terminal for the first time.
WARNING: If you see “WIZ 502” (error message) on your screen, please contact Technical
Support (see page 45) immediately as certain applications will not work.
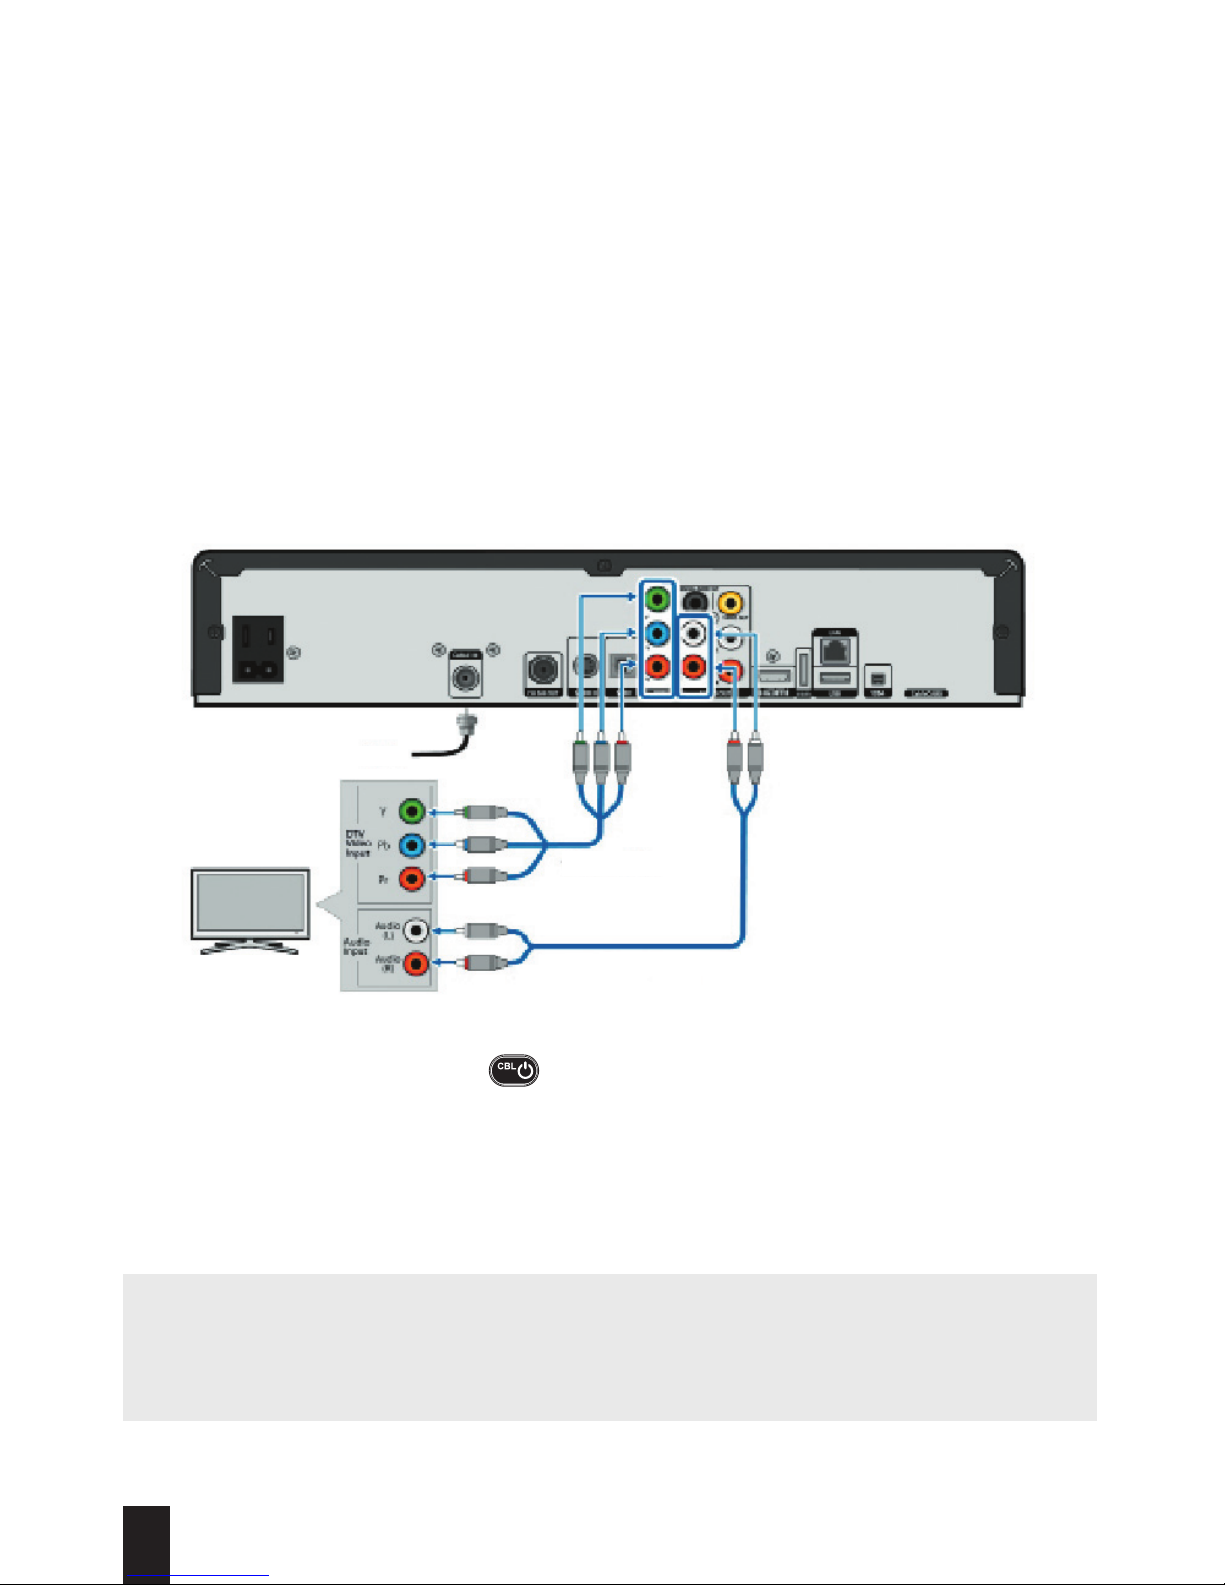
CoNNECT yoUR HD TERMINAL oR HD pVR To AN HD TV
If you would like to connect your terminal to an HD TV, you can choose between two types of
video connection: HDMI or Component.
• Component – The component cable (red, blue, green) transmits video in high definition to
your TV, with a resolution of up to 1080i.
• HDMI – The HDMI cable transmits high-definition digital video and audio to your TV, with a
resolution of up to 1080i.
RECoMMENDED CoNNECTIoN pRoCEDURE
Use this configuration if you are connecting your terminal with the cables that came with it:
• Component cable (red, blue, green) for video
• RCA cable (red and white) for audio
Cable
Video cable
Audio cable
TV
9
For further information, visit videotron.com/terminal-support.
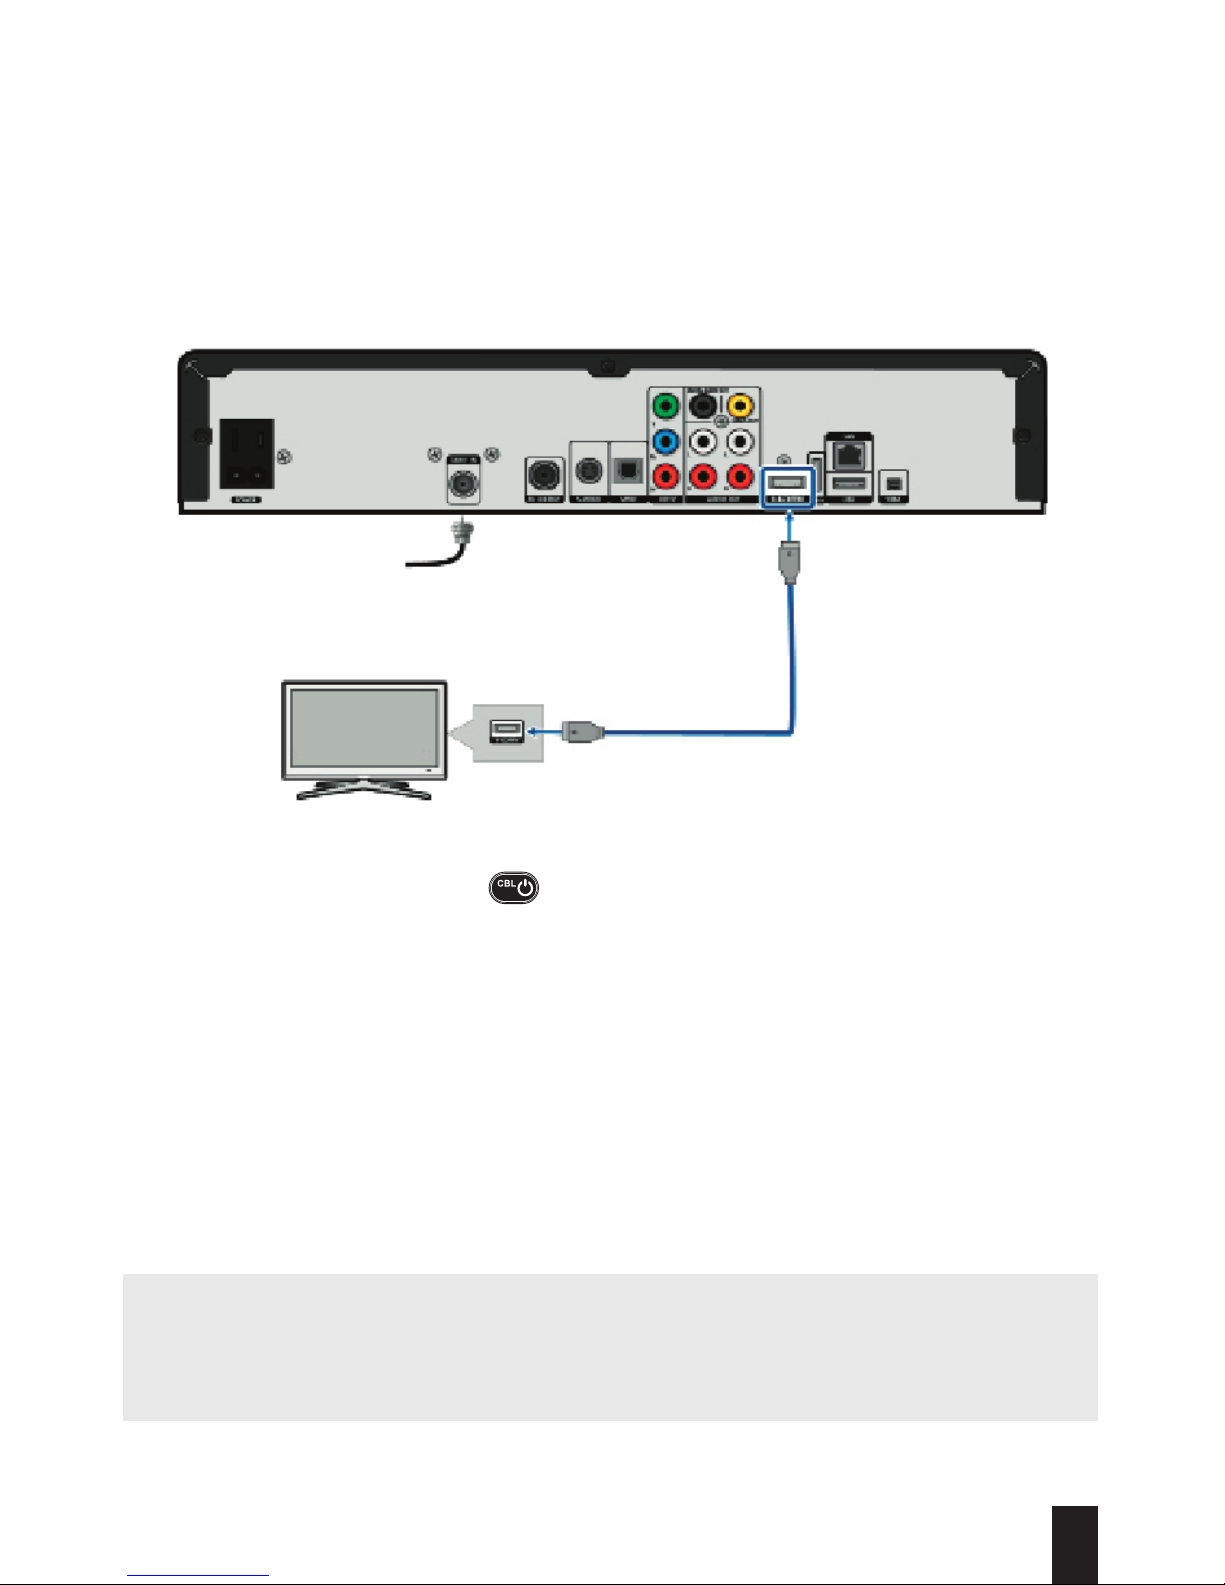
oTHER CoNNECTIoN pRoCEDURE
Use this configuration if you are connecting your terminal with an HDMI cable (HDMI cable
not included).
For optimal sound quality, this type of connection does not allow you to control the volume
on your terminal. You must therefore program your remote to your TV by following the
instructions on page 13.
NOTE: We strongly recommend that you follow the Quick-Start Wizard that will automatically
pop up when you turn on your terminal for the first time.
WARNING: If you see “WIZ 502” (error message) on your screen, please contact Technical
Support (see page 45) immediately as certain applications will not work.
1. Connect your equipment by following the diagram above.
2. Turn on the terminal by pressing on your remote control.
3. Turn on your TV and select the corresponding AUDIO/VIDEO input (Input 1/2/3 or
HDMI 1/2/3) to display content on-screen.
4. Program your remote to your TV by following the instructions on page 13.
5. Use the remote control that came with your terminal to switch to the channel or service of
your choice.
Cable
HDMI
TV
10
For further information, visit videotron.com/terminal-support.
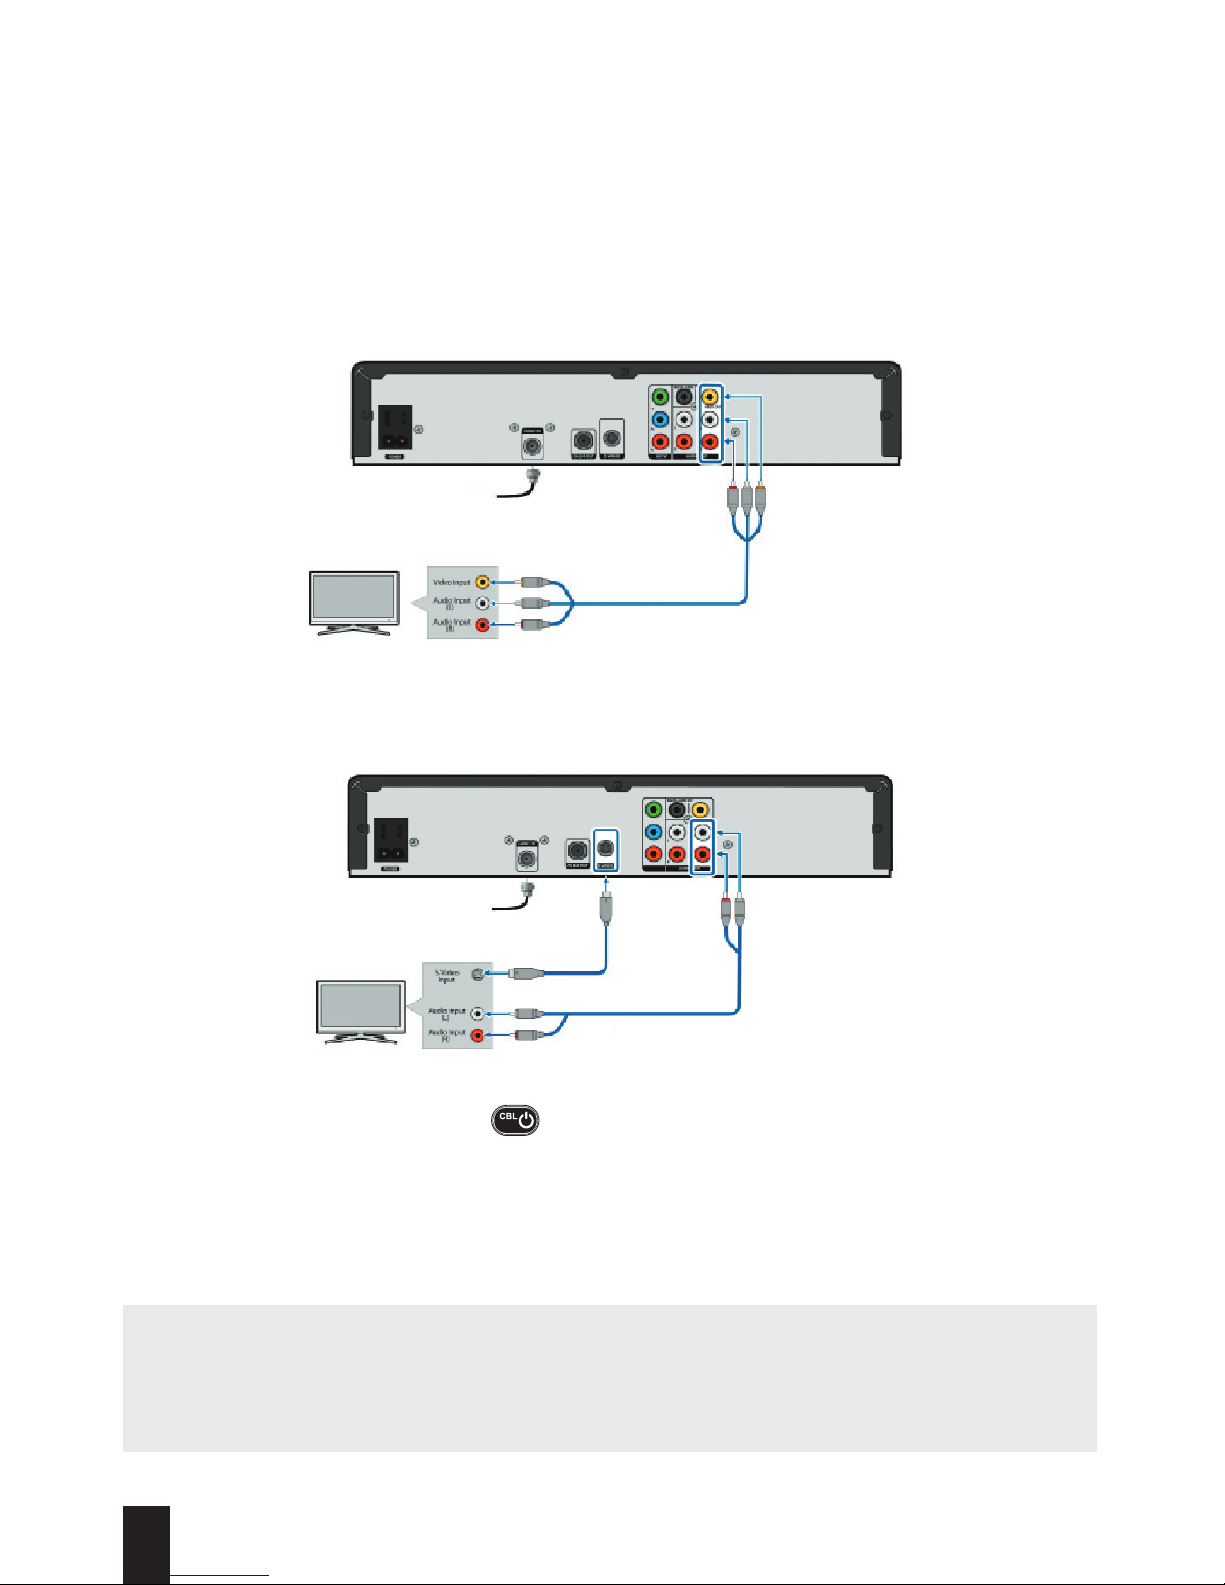
oTHER CoNNECTIoN pRoCEDURE
Use this configuration if you are connecting your terminal with an S-video cable for video and
a red and white RCA cable for audio.
HD TERMINAL oR HD pVR wITH STANDARD TV
Even though illico TV new generation was designed for an HD TV, it is still possible to connect
the terminal to a standard TV by referring to one of the following diagrams. However, you will
not benefit from the most optimal TV experience.
poSSIbLE CoNNECTIoN pRoCEDURE
Use this configuration if you are connecting your terminal with red and white RCA cables for
audio, and yellow cables for video.
1. Connect your equipment by following the diagram above.
2. Turn on the terminal by pressing on your remote control.
3. Turn on your TV and select the corresponding AUDIO/VIDEO input (Input 1/2/3 or
HDMI 1/2/3) to display content on-screen.
4. Program your remote to your TV by following the instructions on page 13.
5. Use the remote control that came with your terminal to switch to the channel or service of
your choice.
NOTE: We strongly recommend that you follow the Quick-Start Wizard that will automatically
pop up when you turn on your terminal for the first time.
WARNING: If you see “WIZ 502” (error message) on your screen, please contact Technical
Support (see page 45) immediately as certain applications will not work.
Cable
TV
RCA audio-video cables
Cable
TV
S-video cable
RCA audio cable
11
For further information, visit videotron.com/terminal-support.
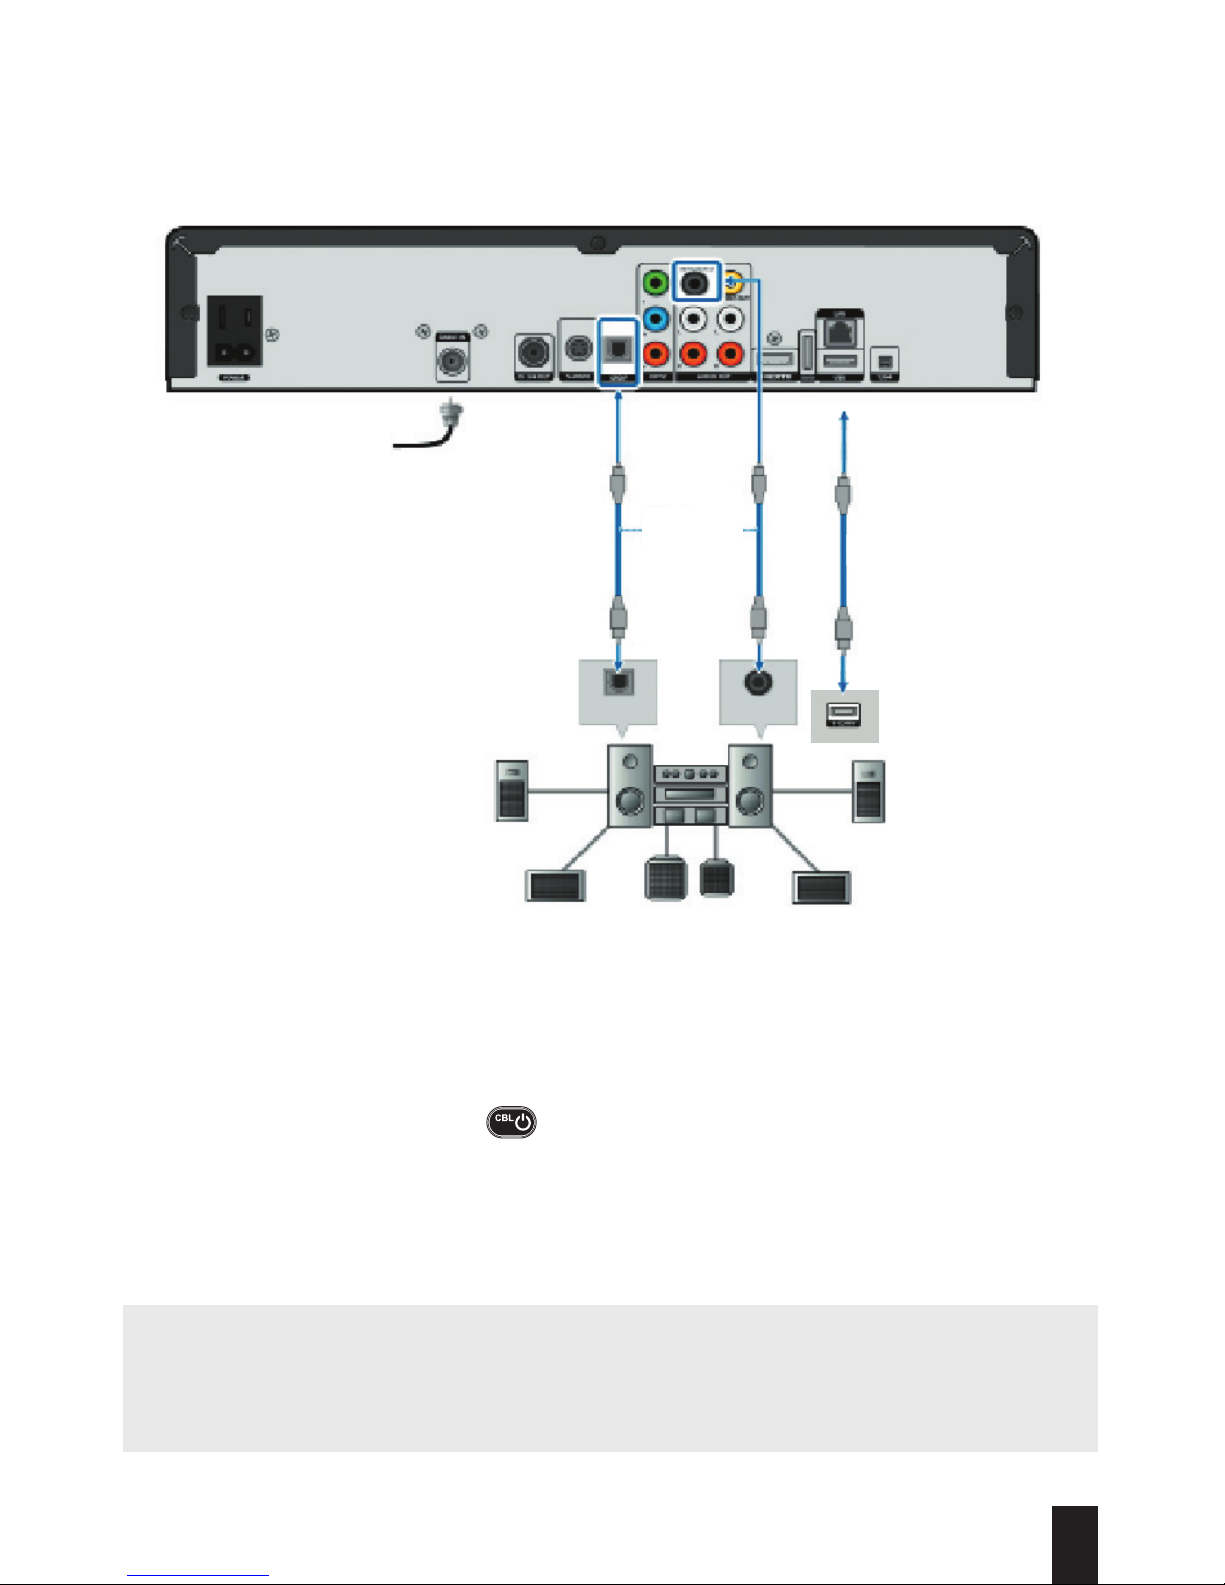
HD TERMINAL AND HD pVR wITH HoME THEATRE SySTEM
RECoMMENDED CoNNECTIoN pRoCEDURE
Use this configuration if you are connecting your terminal to a 5.1 home theatre system.
NOTE: For further information on connecting your audio system, please refer to your home
theatre user guide.
WARNING: If you see “WIZ 502” (error message) on your screen, please contact Technical
Support (see page 45) immediately as certain applications will not work.
1. Refer to the diagram above and choose a connection type.
i. If you’re connecting your terminal to the audio system with an HDMI cable, your audio
system must also be linked to your TV through the HDMI input.
ii. If you’re connecting your terminal to the audio system with an optical audio cable or
coaxial digital cable, please refer to the previous pages for the video connection.
2. Turn on the terminal by pressing on your remote control.
3. Program your remote control to your TV by following the instructions on page 13.
4. Turn on your sound system and select the corresponding audio input.
Cable
Choose one
or the other
HDMI
Digital Audio
Input
SPDF

12
For further information, visit videotron.com/terminal-support.
YOUR REMOTE CONTROL
Turn on your TV
Display the Interactive
Program Guide
Make a selection
on-screen
Return to screen or
to previous channel
Choice of on-screen options
Adjust the volume
Change page
(up/down)
Mute
Skip back (PVR, IOD)
Rewind (PVR, IOD)
Stop (PVR, IOD)
Play (PVR, IOD)
Search
Activate/disable function
Go to Picture-in-Picture
(PiP) mode — PVR
Select your TV’s video input
Turn on/turn off
your terminal
Get information on the
channel or IOD
Browse menus
on-screen
Close interactive screens
or return to live TV
Access illico
On Demand
Change channel
(up/down)
Switch to your
favourite channels
List of recorded
shows (PVR)
Skip forward (PVR, IOD)
Fast-forward (PVR, IOD)
Pause (PVR, IOD)
Record (PVR)
Enter a channel
or your PIN
Zoom in/out
Widgets
Unavailable
function
LEGEND:
PVR: HD PVR
IOD: illico On Demand
13
For further information, visit videotron.com/terminal-support.
pRoGRAM yoUR REMoTE CoNTRoL
To get the most out of your new terminal, we recommend that you read the next few pages to
ensure that you properly program your remote to your TV.
There are three ways to program your remote control:
1. Quick programming: for your TV only.
2. Programming using automatic search: for your TV or audio system.
3. Programming by code: for your TV or audio system.
qUICk pRoGRAMMING of yoUR REMoTE CoNTRoL
If your TV brand is not among the 10 brands listed below, please use the Automatic Search
Programming Method described on the next page.
1. Turn on your TV.
2. Hold down and at the same time until the red light under blinks twice, then
release both buttons.
3. Press once. The red light will stay lit.
4. Point the remote control at the TV. Refer to the table below and enter the number
corresponding to the brand of your TV (e.g. 2 for LG). The red light will blink twice and the
TV will turn off.
5. Press to lock the code.
6. Turn your TV back on. If this programming procedure did not work, repeat steps 2 to 5 or use
the Automatic Programming procedure described on the next page.
7. When your remote control has been programmed, we strongly recommend that you change
the volume control on the TV via the Equipment Settings (see the Equipment Settings section
on page 16).
NUMBER HD TV BRANDS NUMBER HD TV BRANDS
1 INSIGNIA 6 SAMSUNG
2 LG 7 SHARP
3 MITSUBISHI 8 SONY
4 PANASONIC 9 TOSHIBA
5 PHILIPS/MAGNAVOX 0 VIZIO

14
For further information, visit videotron.com/terminal-support.
pRoGRAMMING yoUR REMoTE CoNTRoL USING THE AUToMATIC
SEARCH METHoD
If the Quick Programming procedure did not work, follow the instructions below. This remote
control programming method allows you to control your TV and your audio system.
NOTE: When you have programmed the remote control to your audio system, you will no
longer be able to adjust the volume on your TV, only on your audio system. However, this
setting can be modified by following the instructions on page 16 (see the Change How Your
Remote Control Is Programmed section).
1. Turn on your TV and audio system. Program your TV first.
2. Hold down
and until the red light under blinks twice, then release
both buttons.
3. Press 9–9–1 on the remote control. The red light will blink twice.
4. Then press 1 if you are looking for a TV code or 3 if you are looking for an audio system code.
5. Point the remote control at your TV or audio system, then press and release the CH+ button
until the device that you are programming turns off. You may need to press CH+ several
times in order to make this happen.
6. When the device turns off, press to lock the code. The red light will blink twice. If this
programming procedure did not work, repeat steps 2 to 5.
7. To program your audio system, repeat steps 2 to 5.
8. When your remote control has been programmed, we strongly recommend that you change
the volume control on your TV via the Equipment Settings (see the Equipment Settings
section on page 16).

15
For further information, visit videotron.com/terminal-support.
pRoGRAMMING yoUR REMoTE CoNTRoL wITH A CoDE
Follow the instructions below if you would like to program the remote control to your TV and
audio system.
1. Turn on your TV or audio system. Program your TV first.
2. Find the code corresponding to the brand of your device in the list at the back of this guide.
The brands are listed in alphabetical order.
3. Hold down and until the red light under blinks twice, then release both buttons.
4. Enter the first five-digit code on your device. If you have done it correctly, the backlight
will blink twice.
NOTE: If the button blinks once and remains lit for a long time, this means the code you have
entered is invalid. Repeat steps 3 and 4 using the same code or another code, if possible.
5. Point the remote control at your device and press . The device should turn off. If nothing
happens, repeat steps 2 to 5.
6. To program your audio device, repeat steps 2 to 5.
7. When your remote control has been programmed, we strongly recommend that you select
its model and volume control in order to ensure that it works properly (see the Equipment
Settings section on page 16).
Your TV code: _________________
Your audio system code: _________________
NOTE: When you have programmed the remote control to your audio system, you will no
longer be able to adjust the volume on your TV, only on your audio system. However, this
setting can be modified by following the instructions on page 16 (see the Change How Your
Remote Control Is Programmed section).

16
For further information, visit videotron.com/terminal-support.
CHANGE How yoUR REMoTE CoNTRoL IS pRoGRAMMED
Changing the volume button:
When you program your remote control to your TV and audio system, the volume button will
work with the device that you programmed last. To control the volume via your TV or audio
system, please refer to the following instructions.
To control the volume via your TV:
1. Hold down and until the red light beneath blinks twice, then release both
buttons.
2. Press 9-9-3, The red light will blink twice.
3. Press 2.
To control the volume via your audio system:
1. Hold down and until the red light beneath blinks twice, then release both
buttons.
2. Press9-9-3. The red light will blink twice.
3. Press 3.
RESETTING yoUR REMoTE CoNTRoL
If you would like to reprogram your remote control to other devices or if you are having
problems getting it to work, you can reset it by following these steps:
1. Hold down and until the red light beneath blinks twice, then release both buttons.
2. Press 9-7-7 on your remote control. The red light will blink four times to confirm that the
remote control has been reset.
EqUIpEMENT SETTINGS
This section will help you to configure your video and audio preferences so that you can get
the most out of your HD TV and new terminal.
Accessing your terminal preferences:
1. Press to go to the main menu.
2. Using , select Settings thenEquipment Settings, then press .
 Loading...