

Samsung 650 Series, HL72A650C1F User Manual
Thank you for purchasing this Samsung product.
To receive more complete service, please
register your product at
www.samsung.com/global/register
Model Serial No. _
.',
"
;;:>:
the
possibilities
A
GuidetoDigital
•
WhatisDigital
Digital
television
transmit
more
broadcast.
high
definitionTV(HDTV)
than
one
TV
Television?
(DTV)isa
programonthe
new
wayoftransmitting
images,
sameTVchannel)
Dolby
high
digital
and
datacasting.
quality
surround
video
and
audiotoyourTVset.
audio,
and
Severalofthese
new
services
services
Using
DTV,
broadcasters
suchasmulticasting
canbecombined
(transmitting
intoasingle
can
digital
Digital
•
•
•
Television
Digital
DTV
Definition
SDTV
a
programs
HDTV
broadcastinwidescreen,
programs
digital
Picture
Television
program
versionofour
are
program
Quality
are
transmittedintwo
(HDTV).
formats
broadcastinwidescreen
formats
Services
include
current
480-line
analogTVprograms,
include
1080-line
and
offer
different
much
U.S.AOnly
The
product
unit
accompanying
particular,
5,991,715,5,740,317,4,972,484,5,214,678,
5,481,643, 5,544,247,
This
commercial
unlicensed
product
11172-3orISO/IEC
ISOIIEC
this
productislicensed
5,960,037,
licenseislimitedtoprivate
use.
The
license
product
unitorprocess
unit.
The
license
11172-3orISO/IEC
13818-3.Norights
only
does
covers
13818-3.
this
user
manualislicensed
under
the
6,023,490,
non-commercial
not
cover
conformingtoISO/IEC
the
useofthis
are
formats.
interlaced
and
are
interlaced
higher
followingUSpatents:
5,323,396, 5,539,829, 5,606,618,
5,878,080,
usebyend-user
any
product
granted
The
firstisStandard
(480i)
and
while
comparabletoprogressive-scan
(1080i)
picture
and
unit
product
under
this
480-line
the
480p
format
and
consumers
other
license
720-line
than
certain
than
for
quality
under
underUSPublished
11172-3orISO/IEC
unittoencode
progressive
SDTV.
intellectual
this
product
and/or
product
Definition
offers
progressive
5,530,655,
for
licensed
13818-3
Television
(480p)
improved
DVD
moviesinimage
(720p).
property
5,777,992,
Patent
Application
contents.Norights
unit
and
usedorsoldincombination
decode
audio
featuresorfunctions
(SDTV)
video.
480i
image
detail
Both
HDTV
rightsofcertain
6,289,308,
No.
2001-44713-A
the
license
does
files
conformingtothe
thatdonot
and
the
programs
over
480i.
quality.
formats
third
are
not
secondisHigh
are
essentially
Some
480p
are
always
parties.
5,610,985,
1.
granted
for
extendtoany
with
this
ISOIIEC
conformtothe
In
Other
countries
The
product
unit
accompanying
licenseislimitedtoprivate
use.
The
license
does
not
product
unitorprocess
license
only
covers
13818-3.Norights
ISO/IEC
13818-3.
SAMSUNG
Subjecttothe
Electronics
additionally
SAMSUNG
The
above
the
Original
Transportationtoand
Conditions
of
the
product.
Excluded,
times,
For
In
but
exchangesorreplacements,
the
locationofa
the
United
the
are
ELECTRONICS
requirements,
(SAMSUNG)
provide
Warranty
products
described
Limited
covered
not
limited
States:
Warranty
are
purchasedinthe
warranty
from
SAMSUNG
1-800-SAMSUNG
this
user
manualislicensed
non-commercial
cover
any
product
conformingtoISOIIEC
useofthis
granted
products,
limited
to,
product
under
this
license
NORTH
conditions,
Repair
repairs
Statement
the
Service
onlytomanufacturing
are
any
Authorized
AMERICAN
exclusions
and
the
Serviceinthe
United
mustbeperformedbya
andadated
Centeristhe
originally
accessories,
(1-800-726-7864)
unittoencode
usebyend-user
unit other
than
11172-3orISO/IEC
for
product
LIMITED
and
limitationsofthe
requirements,
United
States,
for
the
BillofSaleasProof of
responsibility of
defectsinmaterialorworkmanship,
specified
Service
provisions
options,
Center,
under
certain
intellectual
consumers
this
and/or
featuresorfunctions
conditions,
StatesonSAMSUNG
warranty
SAMSUNG
upgrades,orconsumables.
please
for
product
unit
13818-3
decode
audio
WARRANTY
original
exclusions
period
Authorized
the
purchaser.
for,
in-homeoron-site
call
toll-free:
licensed
and
the
usedorsoldincombination
files
thatdonot
STATEMENT
Limited
and
products
originally
Purchase
property
contents.Norights
license
conformingtothe
limitations
rightsofcertain
does
not
extendtoany
ISO/IEC
conformtothe
Warranty
purchasedinCanada,
specified,
Service
mustbepresentedtothe
and
services,
In
supplied
contained
andtothe
Center.
Along
only
those
minimumormaximum
Canada:
1-800-SAMSUNG
third
parties.
are
granted
for
commercial
unlicensed
with
this
product
unit.
11172-3orISO/IEC
ISO/IEC
with
herein,
Original
with
encounteredinnormal
11172-3
Samsung
SAMSUNG
andinCanada
Purchaser
this
Statement,
Service
Center.
repair
This
The
or
will
on
only.
use
}>
See
the
warranty
©
2008
Samsung
card
for
Electronics
more
informationonwarranty
Co.,
ltd.
All
rights
terms.
reserved.
Q&A
1.
Is the antenna I use
Over-the-air
However,
broadcasts
If
your
true
You
com,
2.
How difficult isitto receive
This
tower.
Once
qualityitwas
Thisisa
3.
How can I connectanantenna in my townhouse, co-operative apartment, condominium,
or
apartment?
The
condominiums,
signalsaslongasthose
Residentsofrental
DTV
antenna
4.
Can
CableTVsystems
top
receivers.Soyou
The
free,
sharp
(OTA)
DTV
broadcast
areonVHF
DTV
channels
for
VHF
DTV
reception.
can
find
out
the
www.10000watts.com,
dependsonwhether
DTV
receiversdonot
the
DTV
signal
originally
big
advantage
Federal
Communications
townhouse,ormembersofneighborhood
broadcasts.Itis
systemtoeach
I connect my
good
newsisthat
unlike
subscription
widescreen
for
existing
digitalTVbroadcasting
channel
(channels
areonUHF
latest
Note
DTV
and
assignments
2-13)orUHF
and
you
thatinsome
channel
www.fcc.gov.
DTV
your
local
DTV
requireasmuch
level
exceedsacertain
encoded
units
possible
use
adifferent
will
you
images
for
for
DTV
antennas
(apartments,
apartment.
DTV
still
won't
satelliteTVor
and
broadcast.
over
analogTV-
Commission's
are
etc.)
that
the
set-top receiver to my cableTVservice?
method
needtouseanoutdoororindoor
havetopayamonthlyorper-program
high-quality
TV
reception good enough
uses
the
same
channelsasanalogTVand
are
(channels
already
markets,
assignments
different
get
than
analog
14-69)toseeifyou
good
UHF
reception,
both
VHF
for
your
areabybrowsing
and
signals indoors?
stations
not
landlordofan
premium
are
running
full
powerornot
signalasanalogTVreceiverstoproduce
thresholdatthe
thereisno
OTARD
locatedincommon
are
not
coveredbythe
for
transmitting
cable
audio.
receiver,
noise,
Rule
(partofthe
associationstoputupoutside
areas
apartment
digitalTVprograms
TV.
All
you
the
ghosting,
Telecommunications
and
OTARD
complex
antennatoreceive
needisan
for
channels.
UHF
digital
arenomore
can
chargetowatch
You
need
your
present
channels
selected
and
how
video
static,orscratchy
rules
and
provide
thatiscurrently
OTA
antenna
DTV?
works
should
adifferent
antenna
are
used
Internet
close
high-quality
and
audio
Actof1996)
antennas
than
12'inheight.
will
havetouse
broadcast
broadcast
OTA
andaDTV
well
with
many
find
out
whether
antenna.
may
work
for
DTV
broadcasts.
web
sites
your
locationisto
images
dataisdecodedatthe
audio.
allows
for
receptionofbroadcast
indoor
DTV
signals
incompatible
DTV
programs.
DTV
and
HDTV
set-top
receivertoenjoy
existingTVantennas.
your
local
DTV
fine.
The
same
holds
suchaswww.titantv.
the
transmission
and
sound.
same
residents
antennastoreceive
viaamaster
with
broadcast
programs.
of
TV
TV
DTV
They're
clear,
set-
•
Contents
I
Contents
General
•
Viewing
ListofFeatures
•
Checking
•
•
Viewing
Viewing
•
Remote
•
Installing
•
Information
Position
Parts
the
Control
Panel.
the
Connection
Control
Batteriesinthe
Connections
•
Connecting
•
Connecting
•
ConnectingaDVD
(Set-Top
•
ConnectingaDVD
(Set-Top
•
ConnectingaDVD
(Set-Top
•
ConnectingaCamcorder
•
ConnectingaVCR
•
ConnectingaDigital
•
ConnectinganAmplifier/DVD
•
ConnectingaPC
Box)
Box)
Box)
VHF
Cable
via
via
via
and
TV
PlayerorCable
HDMI
PlayerorCable
DVI
PlayerorCable
Component
Audio
UHF
Panel
Remote
Antennas
System
Control.
Box/Satellite
Box/Satellite
Box/Satellite
cables
Home
Theater
receiver
receiver
receiver
10
10
12
12
13
13
14
11
15
15
16
Channel
•
Managing
•
Clearing
•
5
5
6
6
8
9
Fine
•
Checking
PC
•
Using
•
Display
•
SettinguptheTVwith
Control
Channels
Scrambled
Tuning
Analog
the
Digital-Signal
Display
YourTVasaComputer
Modes
Channels-Digital
Channels
Strength
(PC)
your
PC
Display
39
45
45
46
47
47
48
Time Setting
•
Setting
the
Function
•
SelectingaMenu
•
Using
the
•
Viewing
Closed
•
Viewing
Closed
•
Adjusting
•
Setting
the
•
Upgrading
Time
Description
Language
V-Chip
Captions
Captions
theTVOn/Off
Entertainment
the
Software
(On-Screen
(On-Screen
Melody
Sound
mode
Text
Messages)-Digital
Text
Messages)-Analog
50
54
55
63
64
65
66
67
WISELINK
Operation
•
Turning
theTVOn
•
Plug&Play
•
Changing
•
Adjusting
•
Viewing
•
Viewing
•
Using
•
Memorizing
•
To
Select
•
To
Edit
Picture
•
Changing
•
Customizing
•
Adjusting
•
Configuring
•
Using
•
Resetting
Sound
•
Using
•
Customizing
•
Setting
•
Choosing
•
ChoosingaMulti-Channel
•
Automatic
•
Setting
•
Resetting
Feature
Channels
the
Volume
the
Display
the
Menus
the
TOOLS
the
Channels
the
Source
the
Input
Control
the
Picture
the
the
Detailed
Picture
the3DFunction
the
Picture
Control
Automatic
the
the
TruSurround
Preferred
Volume
theTVSpeakers
the
Sound
and
Off
Button
Source
Standard
Picture
Settings
Settings
Options
Settingstothe
Sound
Settings
Sound
Language
Control
Settingstothe
Name
XT
Sound
On/Off...
Factory
(MTS)
Factory
Defaults
Track-Analog
Defaults
20
16
17
19
20
20
21
21
23
23
24
24
25
27
32
33
34
34
35
36
36
37
37
38
•
Using
the
WISELINK
•
Using
the
Photo
•
ViewingaPhotoorSlide
•
Using
the
Music
•
PlayingaMusic
•
Using
the
Setup
About
•
•
•
•
•
•
•
Anynet+
WhatisAnynet+?
Connecting
SettingUpAnynet+
Scanning
Recording
Listening
Troubleshooting
Anynet+
and
Switching
throughaReceiver
Appendix
•
Troubleshooting
•
Replacing
•
Cleaning
•
Using
•
Technical
the
Lamp
and
Maintaining
YourTVin
Specifications
!
-
Press
Important
List...
List...
File
Menu
Devices
for
Anynet+
Another
c
..
function
Show
between
Your
Country
Symbols
Anynet+
(Home
TV
theater)
»-
Note
Devices
68
70
75
79
83
85
86
86
87
87
88
89
89
90
91
92
92
93
~
One-Touch
Button

•
General
Information
I
Viewing
To
optimize your viewing comfort, please follow the guidelines below for viewing distance.
If
viewing
< Top view>
»
When
from
purposes.
the
shortened
Position
foranextended periodoftime,
,
,
72" screen
At least 8.4 feet
installing
the
internal
the
product,
wall
(more
Poor
component
than
ventilation
temperatureofthe
life
make
10cmI4inches)
may
and
degraded
sitasfar back from the screenaspossible.
<Side view>
suretokeepitaway
for
causeanincrease
product,
ventilation
in
resultingina
performance.
72" screen
At least 8.4 feet
List
of
Features
YourTVis designed and engineered using the latest technology. It is a full·featured, high-performance unit that exceeds
industry standards. In addition, it has these special features:
•
Easy-to-operate
•
Dynamic
•
Easy-to-use
•
Automatic
•
Adjustable
•
Automatic
• A
special
•
Fine
tuning
• A
built-in
•
Built-in,
dual
• A
special
•
WidescreenTVwith
•
Life-like
clear
•
Detailed
•
HDMIIDVI
•
Digital
Input
Digital
•
•
•
•
•
•
Audio
Easy-to-use
WISELINK
AV
network
3D
Effect
Some
users
normal
production
remote
control
menus
and
Navigating
on-screen
timertoturn
picture
channel
filtertoreduceoreliminate
control
multi-channel
channel
sleep
images
settings
connectionofyourPCto
jack
Output
channel
enables
system
Gaming
might
menu
theTVon
and
sound
tuning
for
the
sound
speakers
timer
adjustable
providedbyDNle
modetocorrespond
(OPTICAL)
list
youtoview
(Anynet+)
Function
observe
variations
menusbyusing
system
settings
forupto
sharpest
decoder
image
jack
menu.
and
that
small
anddonot
you
and
offatany
and
181
channels
reception
picture
for
size
technology
with
this
TV
play
enables
brightness
diminish
the
menu
can
access
from
time
you
the
abilitytomemorize
problems
possible
stereo
and
bilingual
your
color
preference
photo
(JPEG)
and
youtoeasily
variationsinlocalized
the
TVs
map
the
choose
audio
control
viewing
side
panelorremote
your
favorite
listening
files
(MP3)
Sam
sung
areas
experience.
control
settings
through
audio-video(AV)
when
the
very
brightordark
TV's
devices
WISELINK
from
signals
this
jack.
TV.
are
applied.
These
are
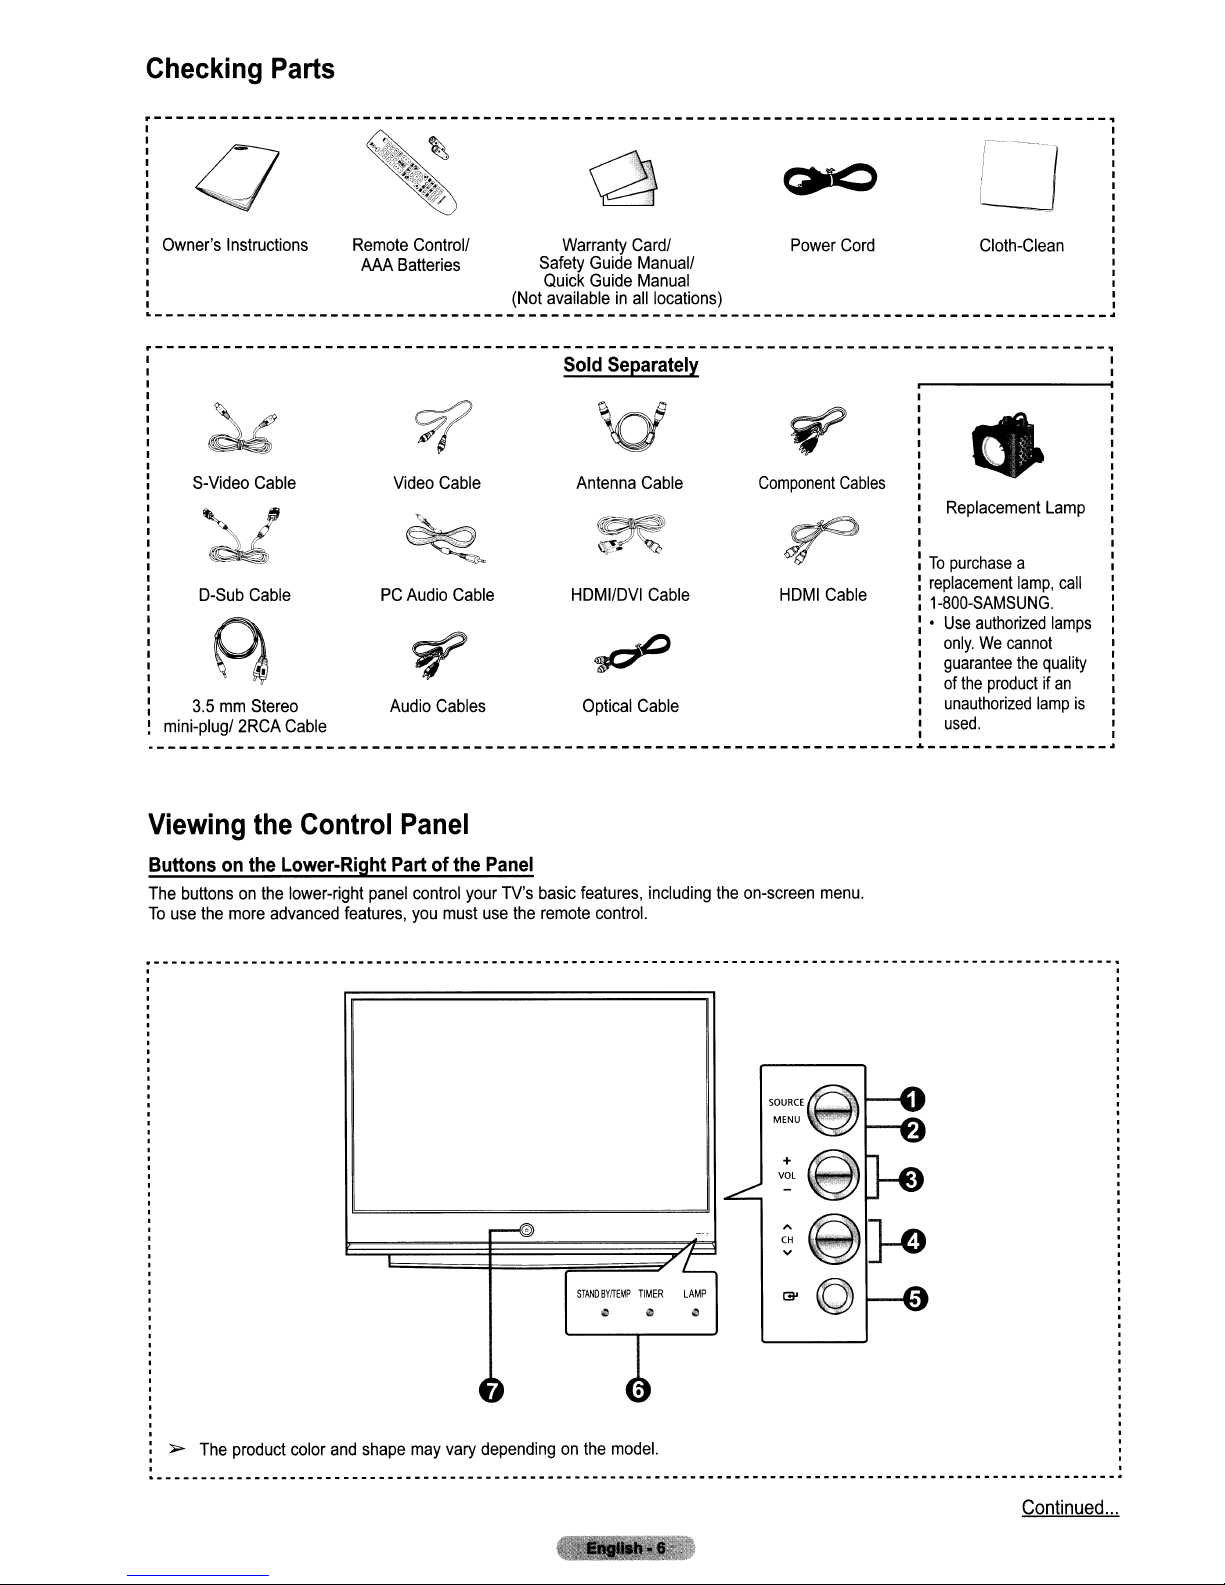
Checking
Parts
--------------------------------------------------------------------------------------,
~
..••.•....•.......
Q
~
u
Owner's
------------------------------------------------------------------------------------,
mini-plug/
------------------------------------------------------
Instructions
~
S-Video
Cable
'd1
O-Sub
Cable
R
3.5mmStereo
2RCA
Cable
Remote
AM
Video
PC
Audio
Control/
Batteries
?l
Cable
~
Audio
~
Cables
Cable
Warranty
Safety
Quick
(Not
availableinall
Sold
Card/
Guide
Guide
Separately
'of
Antenna
~
HOMI/OVI
~
Optical
Manual/
Manual
locations)
Cable
Cable
Cable
Power
Cord
Cloth-Clean
~
Component
Cables
~
HOMI
Cable
-------------~----------------
It
Replacement
To
purchase
replacement
1-800-SAMSUNG.
•
Use
authorized
only.Wecannot
guarantee
of
the
unauthorized
used.
Lamp
a
lamp,
the
quality
productifan
lamp
call
lamps
is
Viewing
Buttonsonthe
The
buttonsonthe
To
use
the
the
more
Control
Lower-Right
lower-right
advanced
features,
Panel
Partofthe
panel
control
you
must
your
4
Panel
TV's
use
the
~
~
basic
remote
features,
control.
STAND
BYITEMP
;:I
including
TIMER
II
~
rc..
LAMP
.,
the
on-screen
SOURCE
MENU
+
VOL
CH
v
menu.
>
The
product
color
and
shape
may
vary
dependingonthe
model.
Continued
...
o
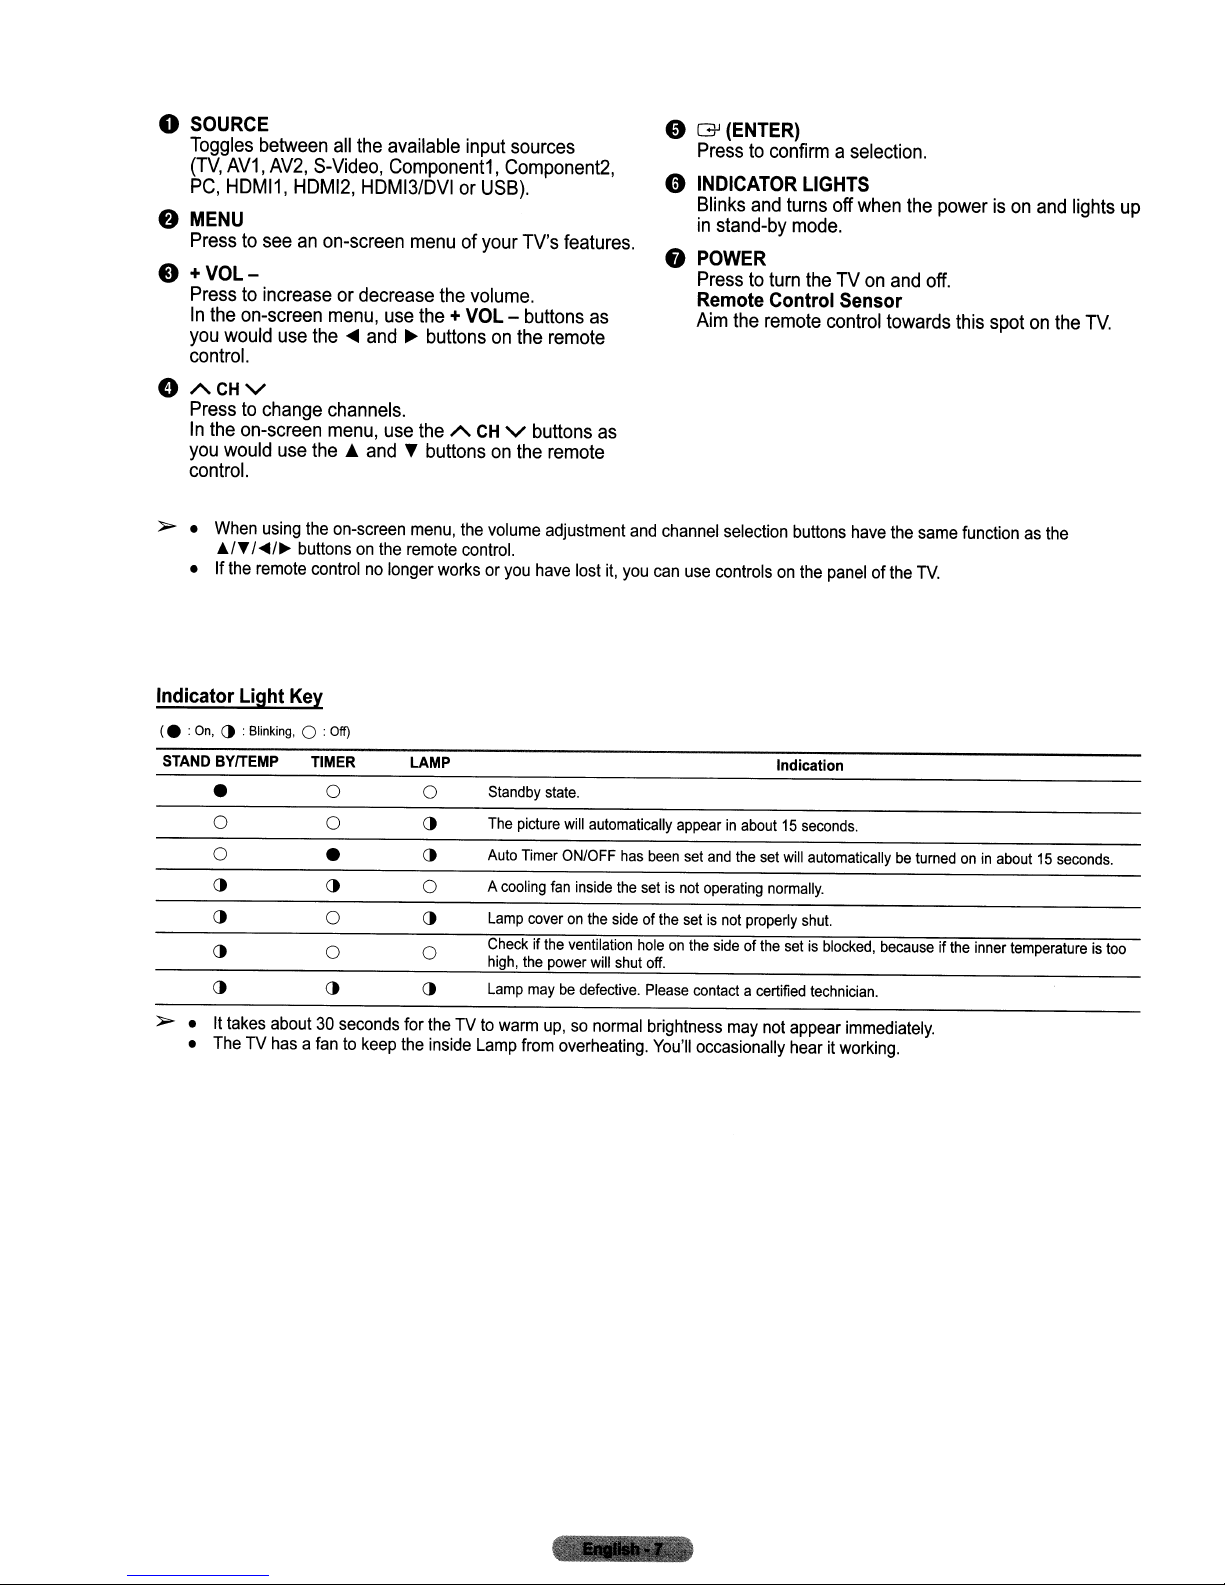
SOURCE
f)
Toggles
(TV,
PC,
MENU
between
AV1, AV2,
all
S-Video,
HDMI1, HDMI2,
Presstoseeanon-screen
e
+VOL-
Presstoincreaseordecrease
In
the
you
on-screen
would
use
menu,
the
...
control.
e
ACHY
Presstochange
In
the
on-screen
you
would
channels.
menu,
use
the..andTbuttonsonthe
control.
» •
When
using
the
on-screen
AfT
f"f~
• If
the
buttonsonthe
remote
controlnolonger
the
available
input
sources
Component1, Component2,
HDMI3/DVIorUSB).
menuofyour
the
use
the
+ VOL -
TV's
volume.
buttons
and~buttonsonthe
use
the
A
CH
Y
buttons
menu,
the
volume
remote
control.
worksoryou
features.
as
remote
remote
adjustment
have
lost
as
o
[3J
(ENTER)
Presstoconfirmaselection.
e
INDICATOR
Blinks
in
stand-by
•
POWER
Presstoturn
and
LIGHTS
turns
mode.
theTVon
off
when
the
and
powerison
off.
and
lights
up
Remote Control Sensor
Aim
the
remote
and
channel
it,
you
can
selection
use
controlsonthe
control
buttons
panelofthe
have
towards
the
same
TV.
this
spotonthe
functionasthe
TV.
Indicator Light
(.:On,(): Blinking, 0 :
STAND
BYfTEMP
Key
•
0 0
0
()
()
()
() ()
» •
It
takes
about30seconds
•
TheTVhasafantokeep
Off)
TIMER
0
•
()
0
0 0
LAMP
0
()
()
0
()
()
for
the
theTVto
inside
Lamp
Standby
state.
The
picture
Auto
Timer
A
cooling
Lamp
coveronthe
Checkifthe
high,
the
power
Lamp
maybedefective.
warm
up,sonormal
from
will
automatically
ON/OFF
fan
inside
sideofthe
ventilation
will
overheating.
has
been
the
setisnot
holeonthe
shut
off.
Please
brightness
Indication
appearinabout15seconds.
set
and
the
set
will
operating
setisnot
contactacertified
You'll
occasionally
properly
sideofthe
may
not
normally.
setisblocked,
appear
hearitworking.
automaticallybeturnedonin
shut.
becauseifthe
technician.
immediately.
about15seconds
inner
temperatureistoo
.
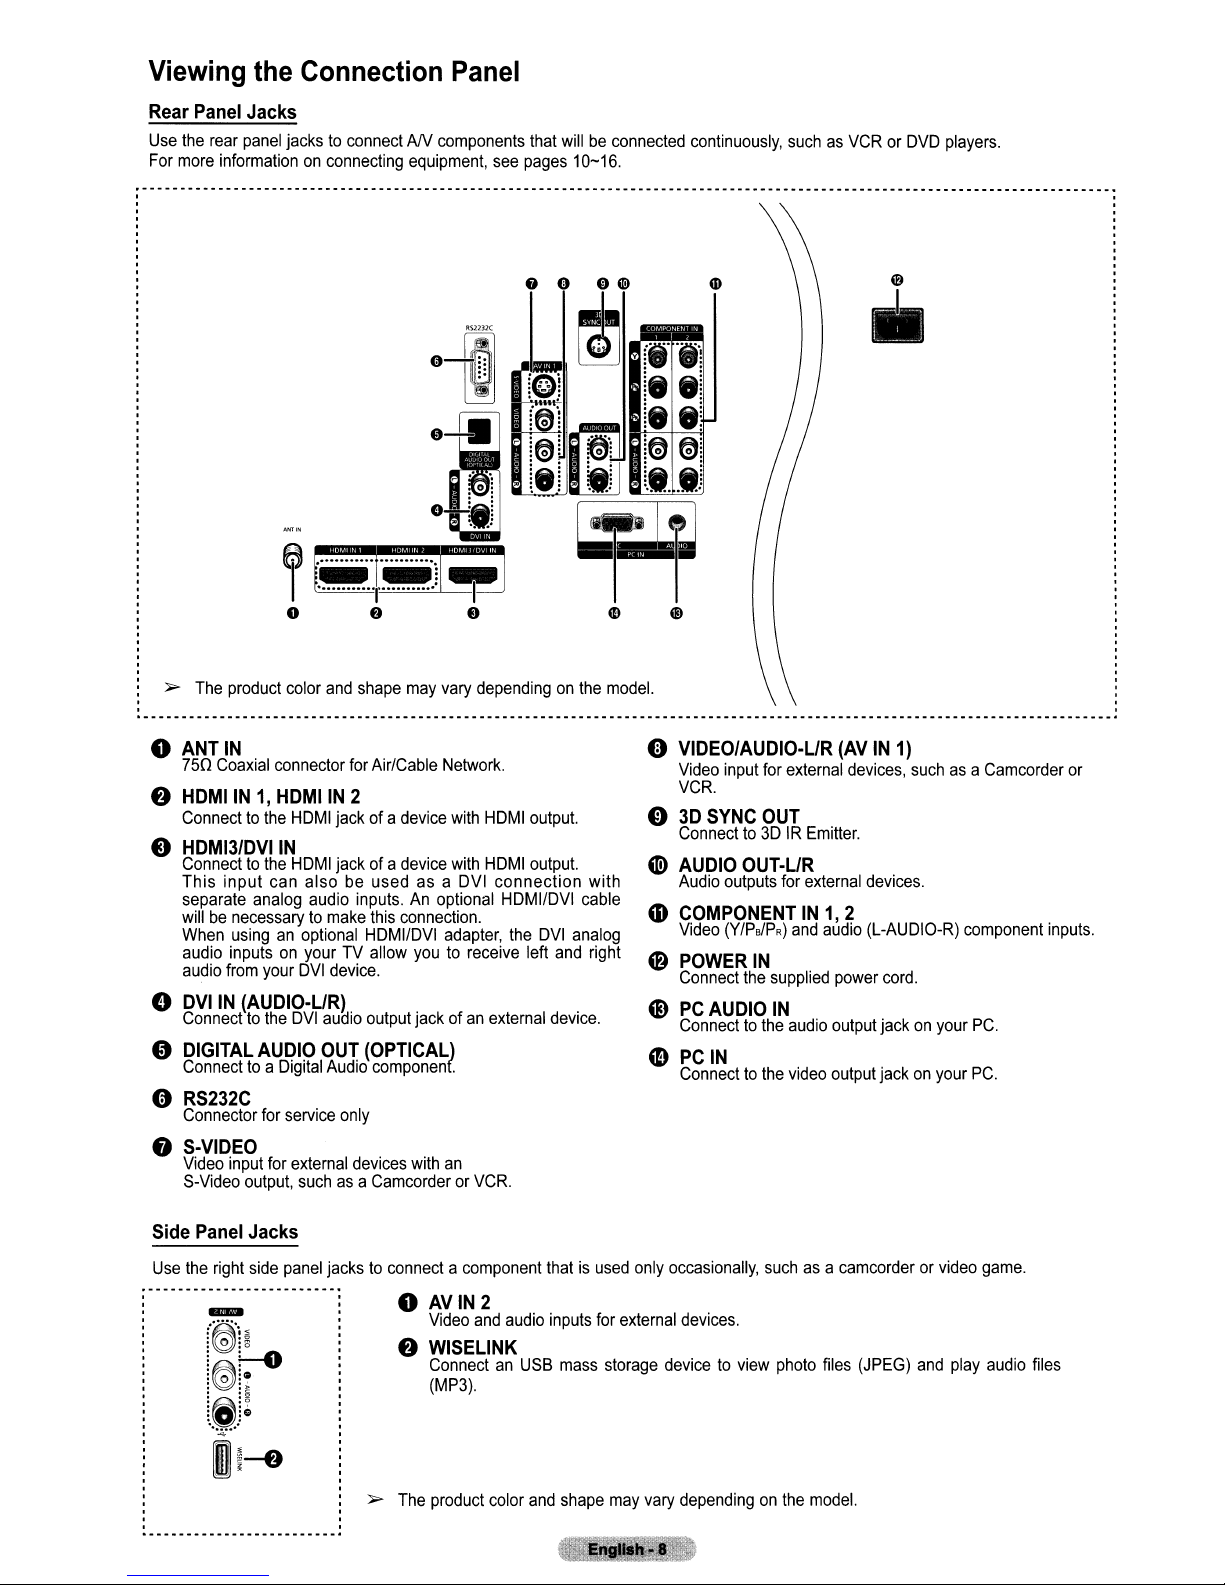
Viewing
Rear
Panel
Use
the
For
rear
more
informationonconnecting
the
Connection
Jacks
panel
jackstoconnectNVcomponents
equipment,
Panel
see
that
willbeconnected
pages
10-16.
continuously,
suchasVCRorDVD
o
•
players.
~
The
product
color
o
ANT
IN
750
Coaxial
connector
f)
HDMIIN1,HDMIIN 2
Connecttothe
e
HDMI3/DVIIN
Connecttothe
This input
separate
willbenecessarytomake
When
audio
audio
e DVIIN
Connecttothe
o
DIGITAL
Connecttoa
e
RS232C
Connector
8
S·VIDEO
Video
S-Video
Side
Panel
Use
the
can
analog
usinganoptional
inputsonyourTVallow
from
your
(AUDIO·UR)
AUDIO
Digital
for
service
input
for
output,
Jacks
right
side
panel
and
shape
may
vary
for
Air/Cable
HDMI
jackofa
HDMI
jackofa
alsobeusedasa
audio
inputs.Anoptional
this
HDMIIDVI
DVI
device.
DVI
auaio
output
OUT
(OPTICAL)
Audio
componenf
only
external
devices
suchasa
CamcorderorVCR.
jackstoconnectacomponent
Network.
device
with
device
with
DVI
connection.
adapter,
youtoreceive
jackofan
with
an
dependingonthe
HDMI
output.
HDMI
output.
connection with
HDMIIDVI
the
external
DVI
analog
left
and
device.
thatisused
cable
right
model.
only
o
VIDEO/AUDIO·L1R
Video
input
SYNC
OUT·UR
outputs
(Y/P./PR)
the
AUDIO
IN
for
OUT
for
IN
supplied
IN
suchasa
VCR.
o
3D
Connectto3DIREmitter.
G>
AUDIO
Audio
4D
COMPONENTIN1,
Video
o
POWER
Connect
0)
PC
Connecttothe
4D
PC
Connecttothe
occasionally,
(AVIN1)
external
devices,
external
2
and
audio
power
audio
output
video
output
camcorderorvideo
suchasa
devices.
(L-AUDIO-R)
cord.
jackonyour
jackonyour
Camcorder
component
PC.
PC.
game.
or
inputs.
o AVIN2
f)
~
The
Video
and
audio
WISELINK
ConnectanUSB
(MP3).
product
color
and
inputs
mass
shape
for
external
storage
may
devices.
devicetoview
vary
dependingonthe
photo
files
model.
(JPEG)
and
play
audio
files
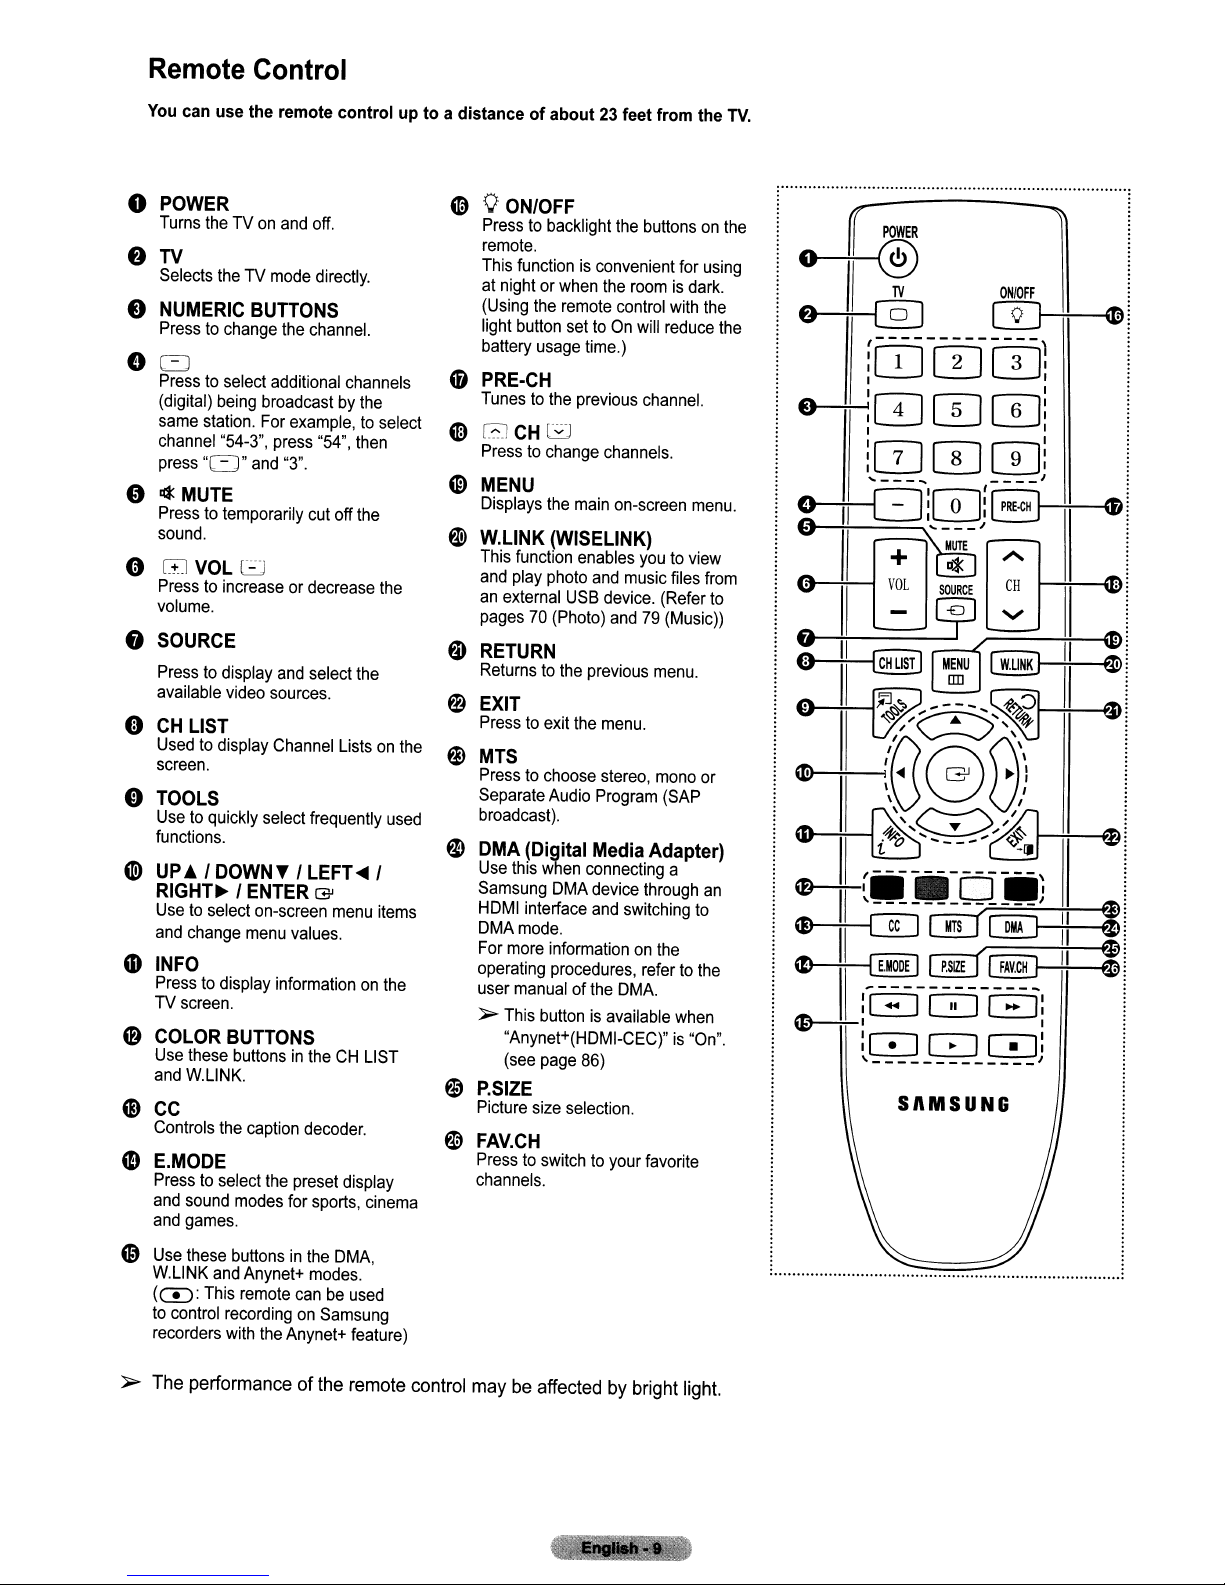
Remote Control
You
can use the remote control up to a distanceofabout23feet from the
~
o
POWER
Turns
theTVon
and
eTV
Selects
theTVmode
•
NUMERIC
Presstochange
00
Presstoselect
(digital)
same
channel
press
"
.¢
MUTE
Presstotemporarily
sound.
e GJ
Presstoincreaseordecrease
volume.
f)
SOURCE
Presstodisplay
available
9
CH
Usedtodisplay
screen.
o
TOOLS
Usetoquickly
functions.
Q)
UP./
RIGHT~
Usetoselect
and
m
INFO
Presstodisplay
TV
screen.
f)
COLOR
Use
and
6)
CC
Controls
CD
E.MODE
Presstoselect
and
and
BUnONS
the
additional
being
broadcastbythe
station.
For
"54-3",
"0"
VOL
video
example,toselect
press
and
"3".
c:J
and
sources.
LIST
Channel
select
DOWN"
/
ENTER
on-screen
change
menu
informationonthe
BUTTONS
these
buttonsintheCHLIST
W.L1NK.
the
caption
the
sound
modes
games.
off.
directly.
channel.
channels
"54",
cut
off
select
Listsonthe
frequently
/
LEFT~
G'
menu
values.
decoder.
preset
for
sports,
then
the
the
the
used
/
items
display
cinema
VON/OFF
Presstobacklight
remote.
This
functionisconvenient
at
nightorwhen
(Using
the
remote
light
button
settoOn
battery
usage
'9
PRE-CH
Tunestothe
()
RCHG
Presstochange
~
MENU
Displays
~
W.lINK (WISELINK)
This
and
an
pages70(Photo)
f»
RETURN
Returnstothe
~
EXIT
Presstoexit
@)
MTS
Presstochoose
Separate
broadcast).
f)
DMA
Use
Samsung
HDMI
DMAmode.
For
operating
user
>-
~
P.SIZE
Picture
~
FAV.CH
Presstoswitchtoyour
channels.
the
function
play
photo
external
Audio
(Digital Media Adapter)
this
when
DMA
interface
more
informationonthe
procedures,
manualofthe
This
buttonisavailable
"Anynet+(HDMI-CEC)"is"On".
(see
page
size
time.)
previous
main
enables
and
USB
previous
the
connecting
86)
selection.
the
buttonsonthe
for
the
roomisdark.
control
with
will
reduce
channel.
channels.
on-screen
youtoview
music
files
device.
(Refer
and79(Music))
menu.
menu.
stereo,
mono
Program
device
and
(SAP
a
through
switching
refertothe
DMA.
favorite
TV.
using
the
the
menu.
from
to
or
an
to
when
SAMSUNG
@
Use
these
W.L1NK
(C!:):
to
recorders
>-
The
buttonsinthe
and
Anynet+
This
remote
control
recordingonSamsung
with
the
performance of
DMA,
modes.
canbeused
Anynet+
the
remote
feature)
control
maybeaffectedbybright
light.
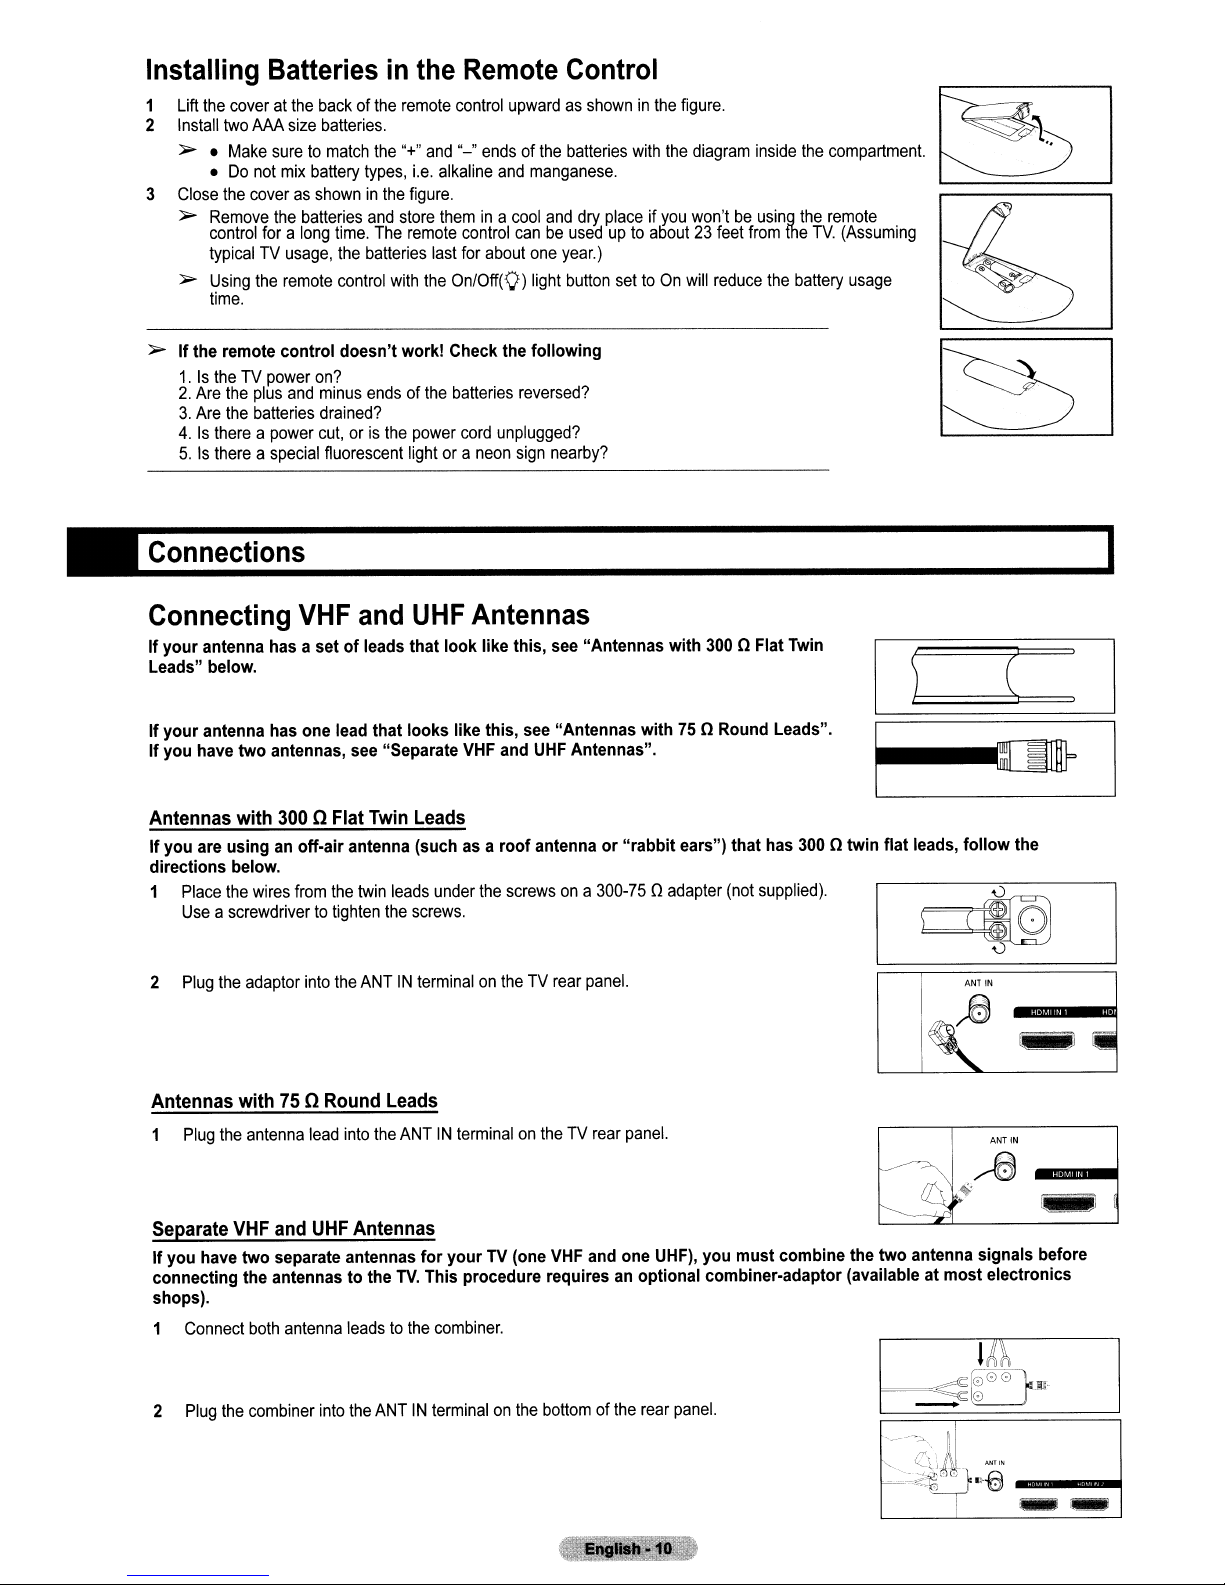
Installing Batteries in the Remote Control
1
Lift
the cover at the backofthe remote control upwardasshowninthe figure.
2 Install two AAA size batteries.
> • Make sure
•Donot mix battery types,
3 Close the coverasshowninthe figure.
> Remove the batteries and store them
control for a long time. The remote control can be usedupto
typical TV usage, the batteries last for about one year.)
> Using the remote control with the On/Off(O) light button set
time.
>
If
the
remote
control
1.
Is the TV power on?
2.
Are the plus
3.
Are the batteries drained?
4.Isthere a power cut, oristhe power cord unplugged?
5.Isthere a special fluorescent light or a neon sign nearby?
and
• Connections
to
match the "+" and
doesn't
minus ends of the batteries reversed?
"-"
Le.
work! Check the
endsofthe batteries with the diagram inside the compartment.
alkaline
and
in
a cool and dry place if
manganese.
following
you
won'tbeusing the remote
aDout23feet from the
toOnwill reduce the battery usage
TV.
(Assuming
··1
..
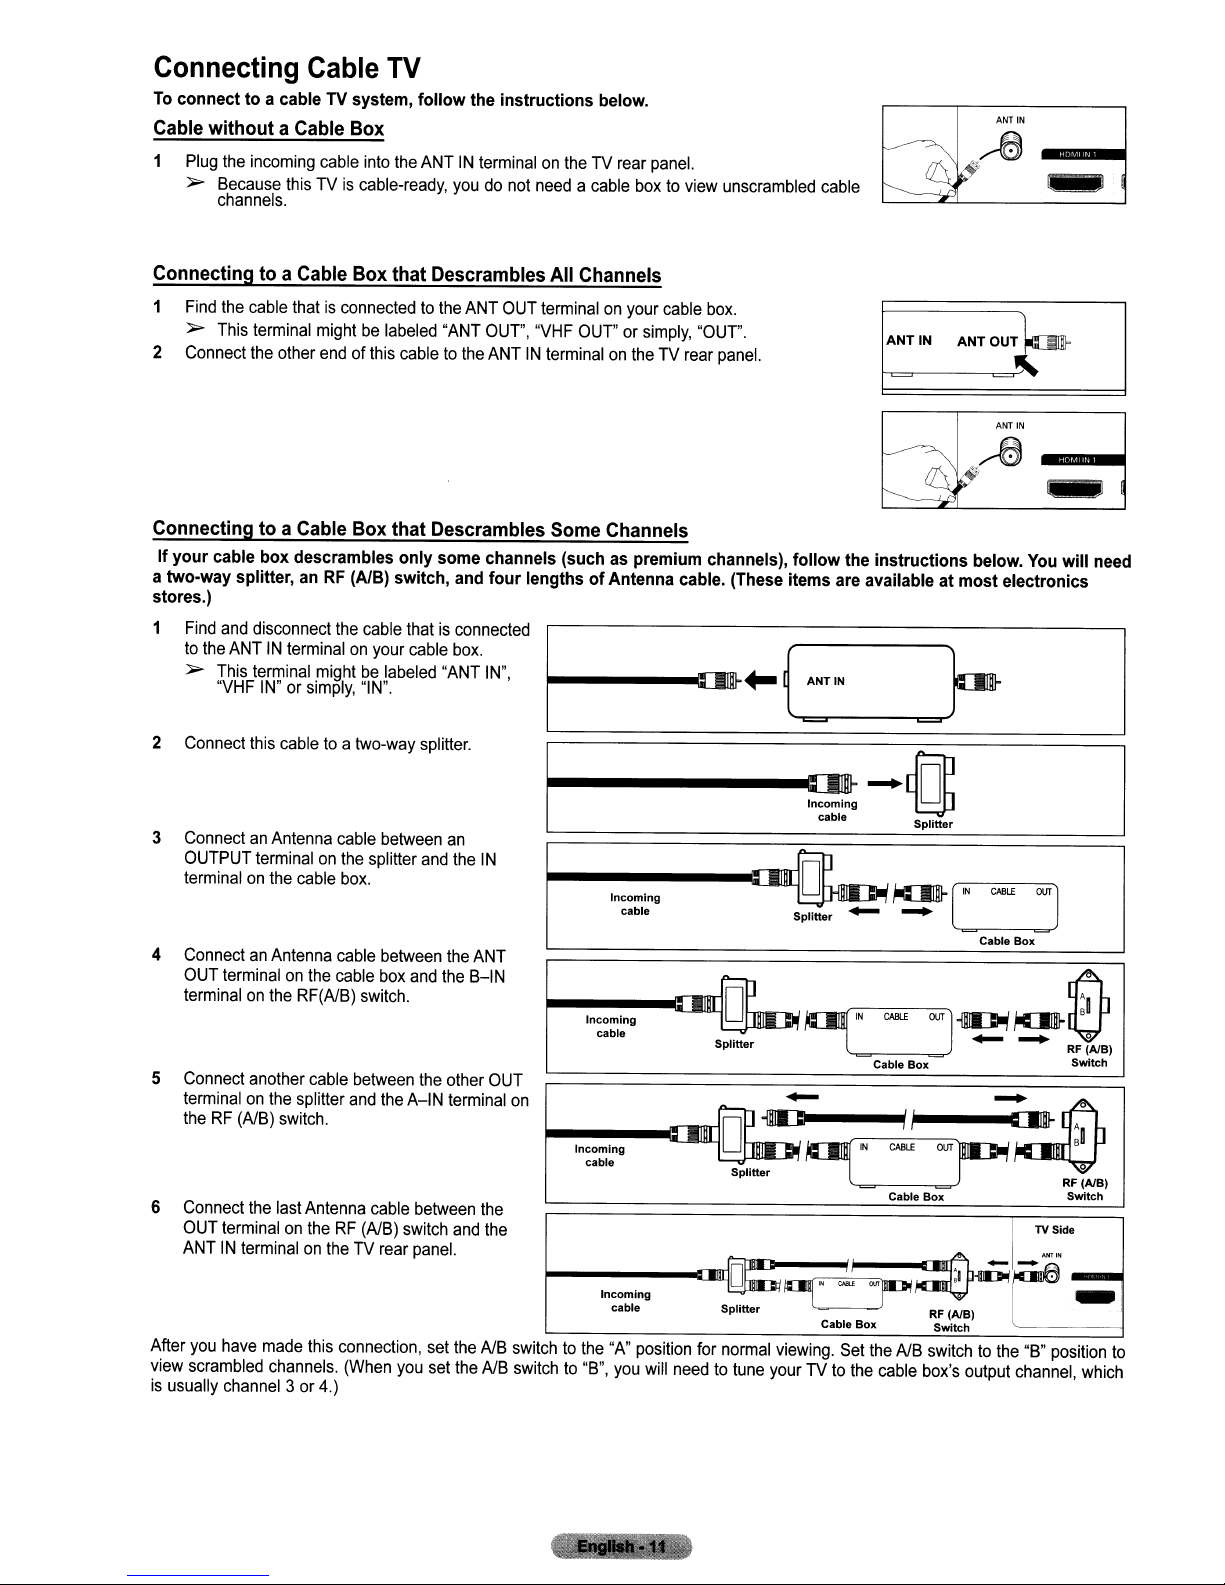
Connecting
If
your
antenna has a setofleads
Leads" below.
If
your
antenna has one lead
If
you
have
two
Antennas with
If
you
are
using
directions
1 Place the wires from the twin leads under the screwsona 300-75 0 adapter (not supplied).
2
Antennas with
below.
Use a screwdrivertotighten the screws.
Plug the adaptor into the ANTINterminalonthe TV rear panel.
Plug the antenna lead into the ANTINterminalonthe TV rear panel.
VHF
antennas, see "Separate VHF and UHF Antennas".
300
an off-air antenna (such as a
75
and
UHF
that
that
looks
0 Flat Twin Leads
0 Round Leads
Antennas
look
like this, see
like this, see
roof
"Antennas
"Antennas
antennaor"rabbit
with
with 300 nFlat Twin
75 nRound Leads".
ears")
that
has 300 n
(
--lmlJ=
twin
flat
leads,
follow
the
ANT
IN
Separate VHF and
If
you
have
two
connecting
shops).
1 Connect both antenna leads to the combiner.
2 Plug the combiner into the ANTINterminalonthe bottom of the rear panel.
the antennastothe
UHF
Antennas
separate antennas
TV.
for
your
TV (one VHF and one UHF),
This procedure requires an optional combiner-adaptor (availableatmost
you
must
combine the
two
antenna signals before
electronics
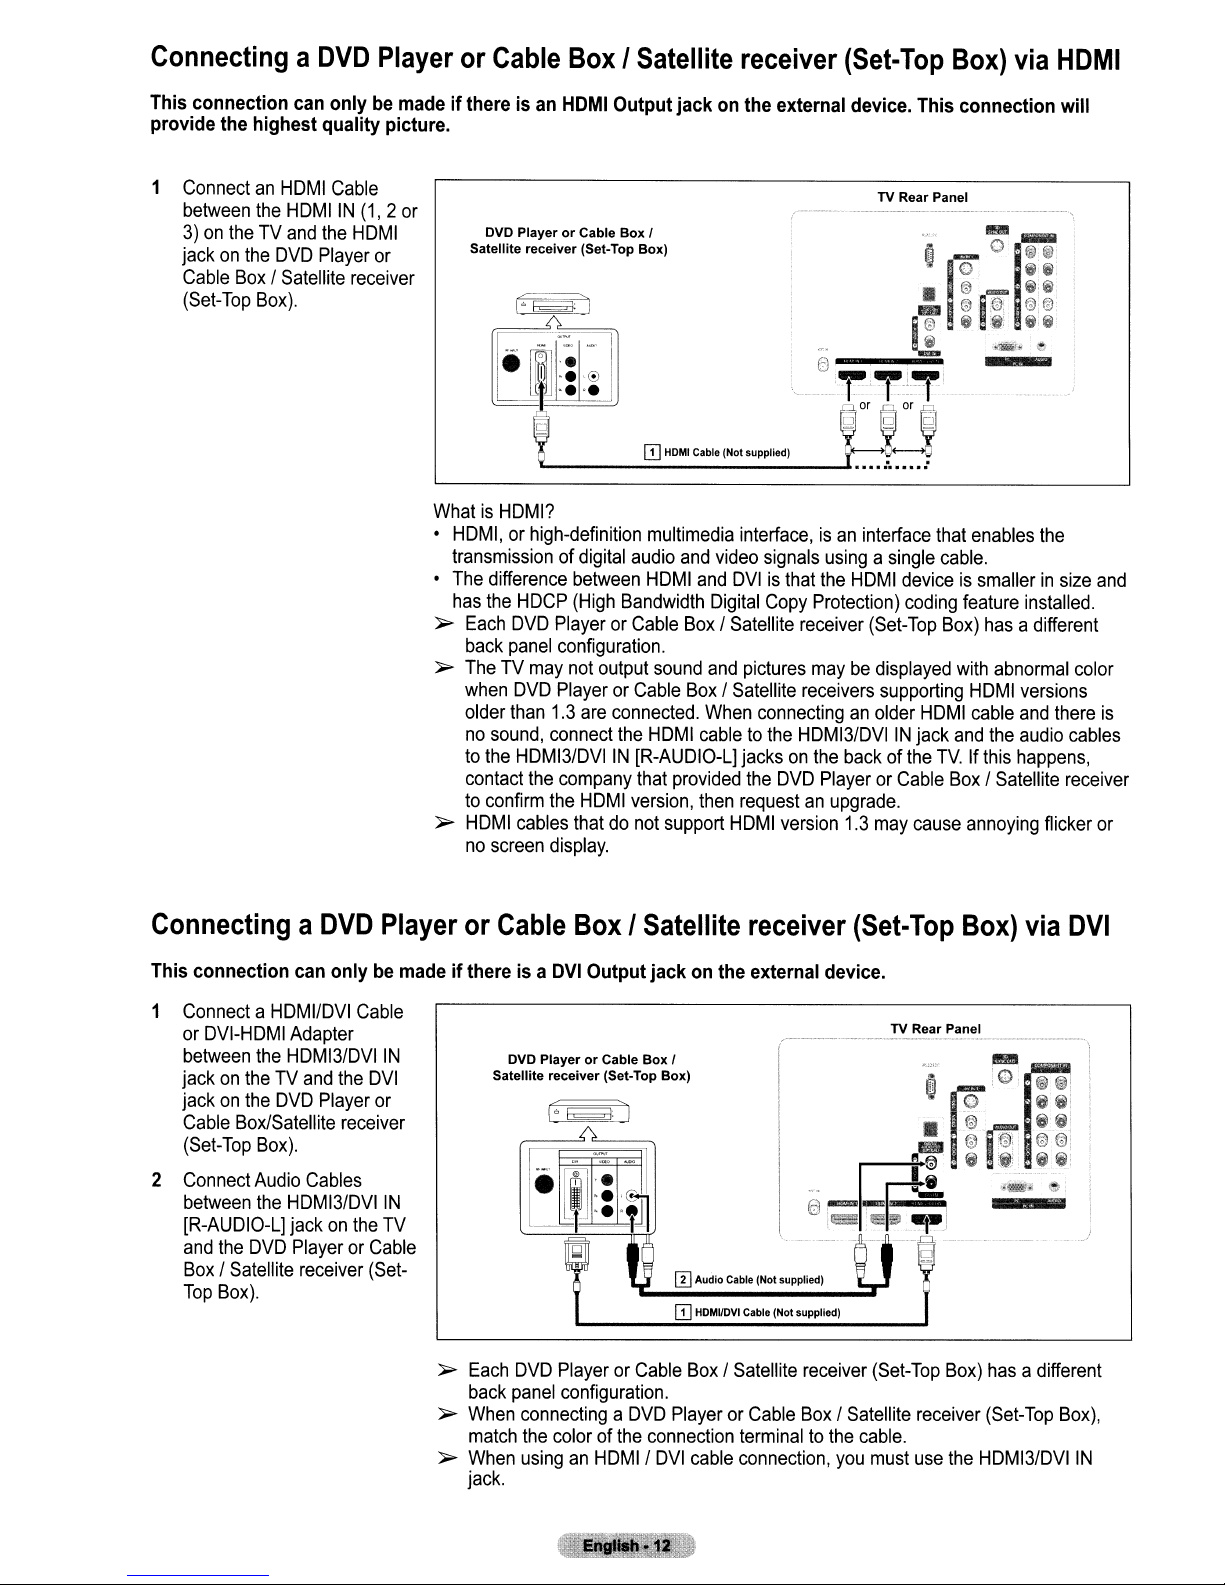
Connecting Cable TV
To
connect to a cableTVsystem, follow the instructions below.
Cable without a Cable Box
Plug
the
incoming
)0>
Because
channels.
Connectingtoa Cable Box that Descrambles All Channels
1
Find
the
cable
)0>
This
terminal
2
Connect
the
Connectingtoa Cable Box that Descrambles Some Channels
If your cable box descrambles only some channels (suchaspremium channels), follow the instructions below.
a two-way splitter,anRF
stores.)
1
Find
and
disconnect
to
the
ANTINterminalonyour
)0>
This
terminal
"VHF
cable
into
thisTVis
thatisconnectedtothe
other
IN"orsimply,
cable-ready,
mightbelabeled
endofthis
(AlB) switch,
the
cable
mightbelabeled
"IN".
the
ANTINterminalontheTVrear
youdonot
ANT
"ANT
cabletothe
and
thatisconnected
cable
box.
"ANT
needacable
OUT
terminalonyour
OUT",
"VHF
OUT"orsimply,
ANTINterminalontheTVrear
four lengthsofAntenna cable.
IN",
panel.
boxtoview
cable
"OUT".
unscrambled
box.
panel.
(These
cable
ANT
IN
ANT OUT
items are available at most electronics
You
will
need
2
Connect
ConnectanAntenna
3
OUTPUT
terminalonthe
4
ConnectanAntenna
OUT
terminalonthe
Connect
5
terminalonthe
theRF(AlB)
6
Connect
OUT
ANTINterminalontheTVrear
After
view
is
usually
this
cabletoa
terminalonthe
cable
terminalonthe
RF(AlB)
another
the
terminalontheRF(AlB)
you
have
scrambled
channel3or
cable
splitter
switch.
last
Antenna
made
this
channels.
4.)
two-way
cable
between
splitter
box.
cable
between
cable
box
switch.
between
and
the
cable
connection,
(When
you
splitter.
and
and
the
A-IN
between
switch
panel.
set
set
an
the
the
ANT
the
B-IN
other
terminal
and
the
the
IN
OUT
on
the
the
AlB
switchtothe
AlB
switchto"B",
------~-c
Incoming
cable
~-I·n~·~;·I~·ng-·[JImS'-PI~itt,J-er~~
Incoming
cable
Incoming
cable
"A"
you
position
will
~
Splitter
Splitter
for
normal
needtotune
cable
Splitter
I
or,.."
.....
"'_~/,~f
I ,i;:D'
l....,.~__
Splitter
~['N
'-=~-~~
Cable Box
~~~:CABLE::~:OUT=)
Cable Box
~
~~SFWl:;.tcBh)
---:0
IN
CABLE
OUT
~=r'J
Cable
Box
~
I
B
RF
(AlB)
Switch
TV
Side
~.~~-~'"
RF
AlB
switchtothe
box's
(AlB)
output
"B"
position
channel,
Cable Box Switch
viewing.
yourTVto
Set
the
the
cable
to
which
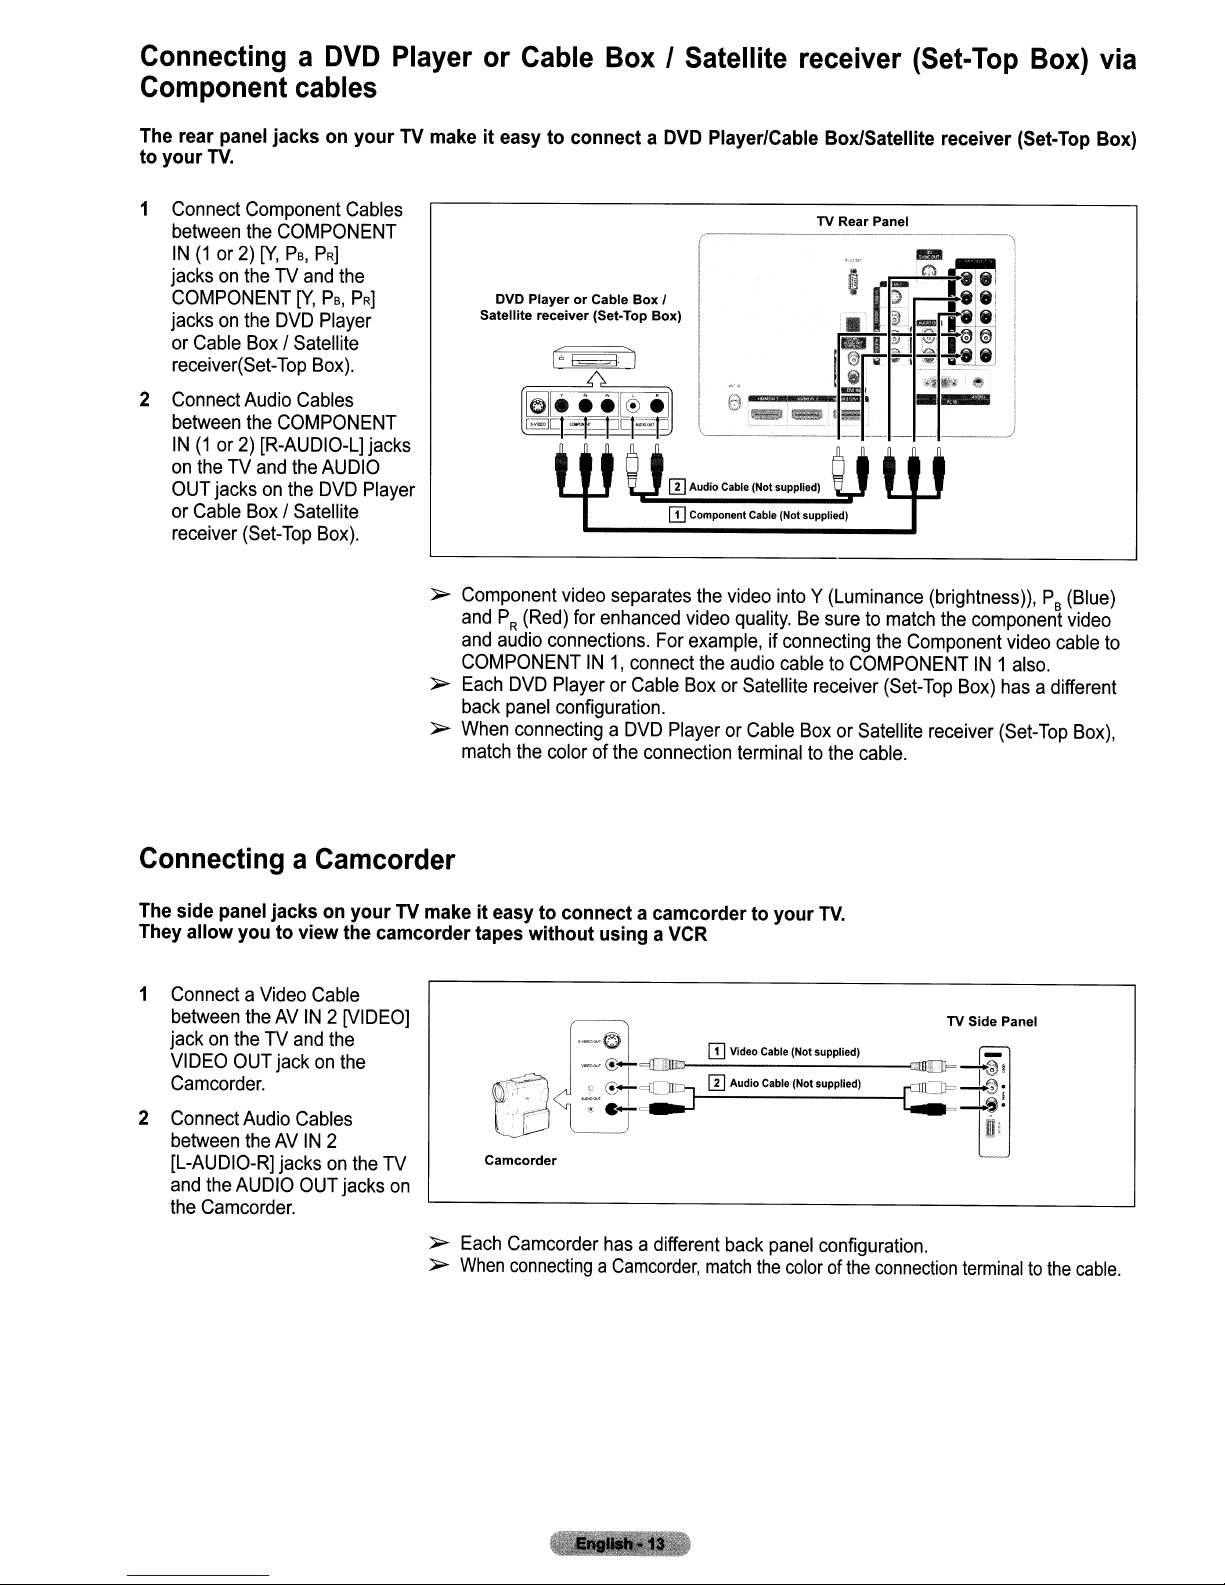
ConnectingaOVO
This
connection
provide
1
the
ConnectanHOMI
between
3)ontheTVand
jackonthe
Cable
(Set-Top
can
highest
the
quality
HOMIIN (1,2
the
OVO
Player
BoxISatellite
Box).
onlybemadeifthereisan
Cable
HOMI
receiver
PlayerorCable
picture.
or
or
DVD Player
Satellite receiver (Set-Top
WhatisHOMI?
•
HOMI,orhigh-definition
transmissionofdigital
The
difference
•
has
the
HOCP
);>
Each
OVO
back
panel
);>
TheTVmay
when
OVO
older
than
no
sound,
to
the
HOMI3/0VIIN[R-AUOIO-L]
);>
contact
to
HOMI
no
the
confirm
cables
screen
BoxISatellite
HOMI
Output
or
Cable
between
(High
PlayerorCable
configuration.
not
output
PlayerorCable
1.3
are
connected.
connect
company
the
HOMI
thatdonot
display.
jackonthe
Box
I
Box)
OJ
HOMI
multimedia
audio
and
HOMI
Bandwidth
sound
the
HOMI
that
provided
version,
support
BoxISatellite
receiver
external
Cable (Notsupplied)
interface,isan
video
signals
and
OVIisthat
Digital
Copy
and
pictures
BoxISatellite
When
connectinganolder
cabletothe
jacksonthe
the
OVO
then
requestanupgrade.
HOMI
(Set-Top
device.
TV Rear Panel
interface
usingasingle
the
HOMI
Protection)
receiver
receivers
HOMI3/0VIIN jack
version
(Set-Top
maybedisplayed
supporting
backofthe
PlayerorCable
1.3
may
Box)
This
that
cable
via
connection
enables
the
.
HOMI
will
deviceissmallerinsize
coding
feature
Box)
with
HOMI
and
TV.Ifthis
BoxISatellite
cause
has
a different
abnormal
HOMI
versions
cable
and
the
audio
happens,
annoying
installed.
color
there
cables
receiver
flicker
and
is
or
ConnectingaOVD
This
connection
1
ConnectaHOMI/OVI
or
DVI-HOMI
between
jackontheTVand
jackonthe
Cable
(Set-Top
2
Connect
between
[R-AUOIO-L]
and
the
BoxISatellite
Top
Box).
can
Adapter
the
HDMI3/DVI
OVO
Box/Satellite
Box).
Audio
Cables
the
HDMI3/0VIIN
jackonthe
OVO
PlayerorCable
receiver
onlybemadeifthereisa
Cable
the
Player
receiver
PlayerorCable
IN
DVI
or
TV
(Set-
);>
);>
);>
DVD PlayerorCable
Satellite receiver (Set-Top Box)
Each
DVD
back
panel
When
connectingaDVD
match
the
When
usinganHDMII
jack.
BoxISatellite
OVI
Output
PlayerorCable
configuration.
colorofthe
jackonthe
Box
I
IT]
OJ
PlayerorCable
connection
DVI
receiver
external
Audio
CablelNot
supplied)
HOMIIDVI Cable (Not supplied)
BoxISatellite
terminaltothe
cable
connection,
receiver
BoxISatellite
(Set-Top
device.
(Set-Top
cable.
you
must
Box)
TV Rear Panel
Box)
receiver
use
the
via
DVI
has
a different
(Set-Top
Box),
HDMI3/DVIIN
Connecting a
DVD
Component cables
Player or Cable Box I Satellite receiver (Set-Top Box) via
The rear panel jacks on
your
to
1
TV.
Connect
between
IN(1or
Component
the
COMPONENT
2)
[Y,
PB,
PRJ
jacksontheTVand
COMPONENT
jacksonthe
or
Cable
receiver(Set-Top
2
Connect
between
[Y,
DVD
Box
/ Satellite
Box).
Audio
Cables
the
COMPONENT
PB,
Player
IN(1or2)[R-AUDIO-L]
on
theTVand
OUT
jacksonthe
or
Cable
receiver
the
Box
/ Satellite
(Set-Top
AUDIO
DVD
Box).
yourTVmakeiteasytoconnect a
Cables
the
PRJ
DVD PlayerorCable
Satellite
receiver
(Set-Top
jacks
Player
~
Component
andPR(Red)
and
audio
video
for
enhanced
connections.
COMPONENTIN1,
~
Each
DVD
PlayerorCable
back
panel
configuration.
~
When
connectingaDVD
match
the
colorofthe
DVD
Box
I
Box)
[I]
OJ
separates
For
connect
PlayerorCable
connection
Player/Cable Box/Satellite receiver (Set-Top Box)
(
TV Rear Panel
I
I
component
video
also.
Box)
has
(Set-Top
(Blue)
video
cable
a different
Audio
Cable
(Not supplied)
Component
Cable
(Not supplied)
the
video
intoY(Luminance
video
quality.Besuretomatch
example,ifconnecting
the
audio
cabletoCOMPONENTIN1
BoxorSatellite
receiver
BoxorSatellite
terminaltothe
the
(Set-Top
cable.
I---J
(brightness)), PB
the
Component
receiver
to
Box),
Connecting a Camcorder
The side panel jacks on yourTVmakeiteasy to connect a camcordertoyour
They allow youtoview the camcorder tapes without using a
1
ConnectaVideo
between
theAVIN2[VIDEO]
jackontheTVand
VIDEO
OUT
Camcorder.
2
Connect
Audio
between
[L-AUDIO-R]
and
the
AUDIO
the
Camcorder.
theAVIN
Cable
the
jackonthe
Cables
2
jacksonthe
OUT
jacks
TV
on
~
~
•.
_.
ee
- -
.
~
" -
ra
Camcorder
Each
Camcorder
When
connectingaCamcorder,
has
VCR
OJ
Video
Cable
(Not supplied)
~[I]_A_u_dio_c_ab_le
adifferent
back
match
(_No_t
panel
the
colorofthe
TV.
l
s_UP_PI_ied_
--I
configuration.
connection
TV Side Panel
GIlIIJP
-
-,
®I
-,
®i
-~.
Ii
terminaltothe
cable.
ConnectingaVCR
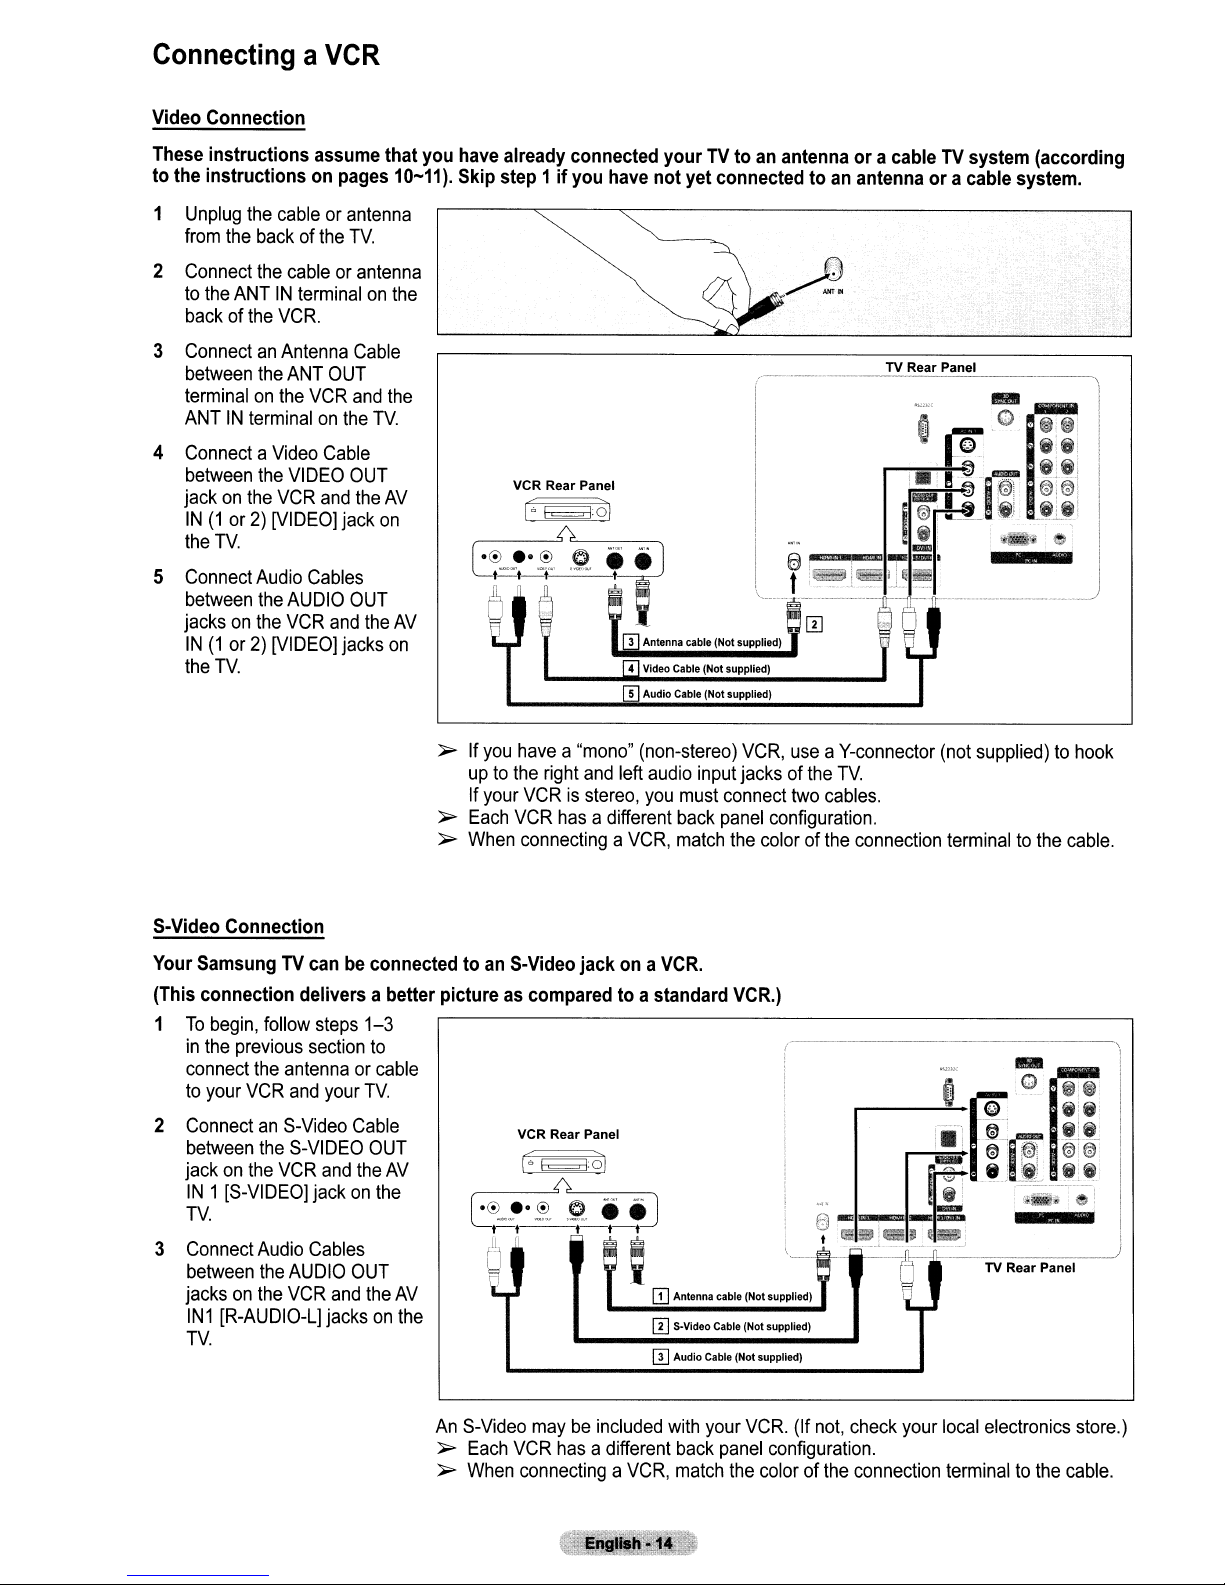
Video Connection
These instructions assume that you have already connected your
to the instructions on pages
1
Unplug
from
2
Connect
to
backofthe
3
ConnectanAntenna
between
terminalonthe
ANTINterminalonthe
4
ConnectaVideo
between
jackonthe
the
5
Connect
between
jacksonthe
the
the
cableorantenna
the
backofthe
the
cableorantenna
the
ANTINterminalonthe
VCR.
the
ANT
VCR
Cable
the
VIDEO
VCR
and
IN(1or2)[VIDEO]
TV
Audio
Cables
the
AUDIO
VCR
IN(1or2)[VIDEO]
TV
OUT
and
10-11). Skip step 1
TV.
Cable
and
the
TV
OUT
the
AV
jack
on
OUT
the
AV
jacks
on
if
you have
VCR Rear Panel
not
TVtoan
yet connected toanantennaora cable system.
antennaora cableTVsystem (according
TV Rear Panel
» If
you
havea"mono"
uptothe
If
your
»
Each
»
When
S-Video Connection
Your SamsungTVcan be connected toanS-Video jack on a
(This connection delivers a better picture as compared to a standard VCR.)
1
To
begin,
follow
steps
1-3
in
the
previous
connect
to
your
VCR
2
ConnectanS-Video
between
jackonthe
IN1[S-VIDEO]
TV.
3
Connect
between
jacksonthe
IN1
[R-AUDIO-L]
TV.
section
the
antennaorcable
and
your
the
S-VIDEO
VCR
and
jackonthe
Audio
Cables
the
AUDIO
VCR
and
jacksonthe
to
TV.
Cable
OUT
the
OUT
the
AV
,----
[®_e·2
AV
right
VCRisstereo,
VCR
hasadifferent
connectingaVCR,
VCR Rear Panel
('~ol
__
-"0"--
.~•~
rt-t-t-i
and
__
(non-stereo)
left
audio
input
you
must
connect
back
panel
match
VCR.
~
[!J
Antenna cable (Not supplied)
mS·Video Cable (Not supplied)
[!]
Audio Cable (Not supplied)
VCR,
jacksofthe
the
colorofthe
useaV-connector
TV.
two
cables.
configuration.
connection
(not
supplied)tohook
terminaltothe
TV Rear Panel
cable.
An
»
»
S-Video
Each
When
maybeincluded
VCR
connectingaVCR,
hasadifferent
with
back
match
your
panel
VCR.
configuration.
the
colorofthe
(If
not,
check
your
local
connection
electronics
terminaltothe
store.)
cable.
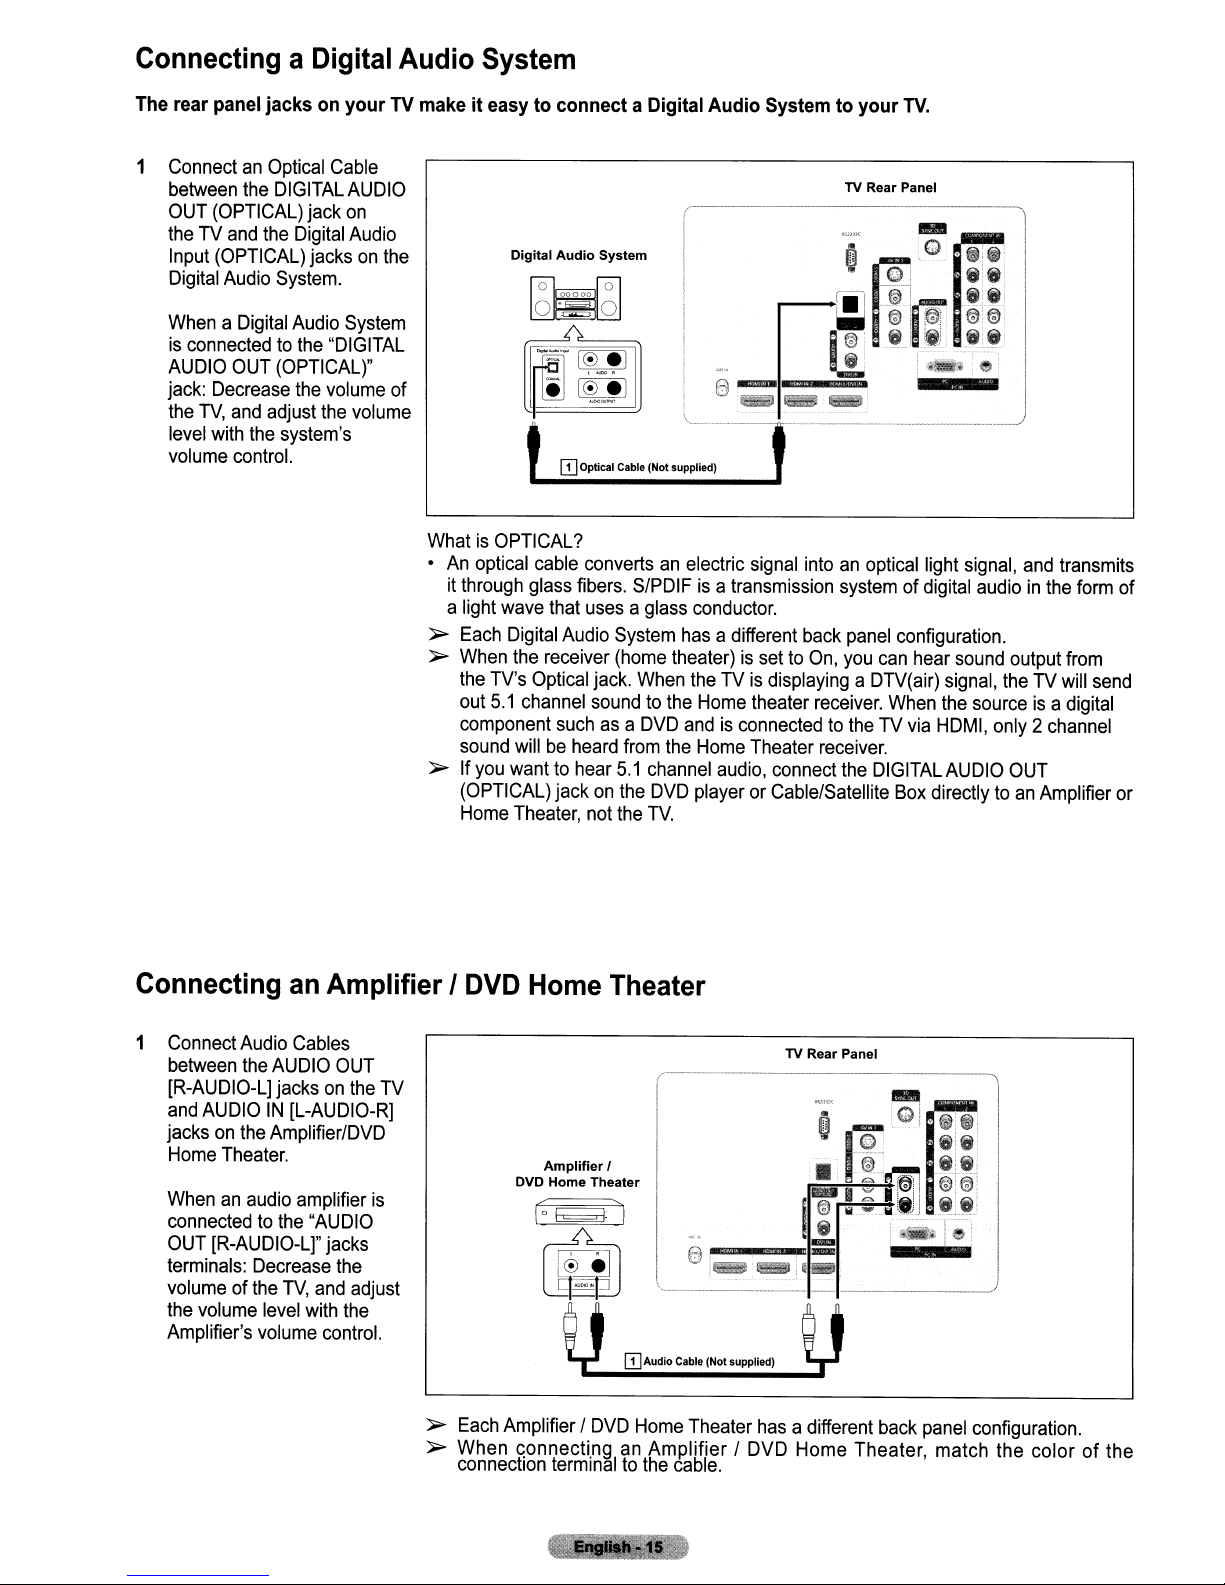
ConnectingaDigital
Audio
System
The rear panel jacks on
1
ConnectanOptical
between
OUT
theTVand
Input
Digital
WhenaDigital
is
AUDIO
jack:
the
level
volume
the
DIGITALAUDIO
(OPTICAL)
the
Digital
(OPTICAL)
Audio
System.
Audio
connectedtothe
OUT
(OPTICAL)"
Decrease
TV,
and
with
control.
adjust
the
the
system's
jack
jacksonthe
the
yourTVmakeiteasytoconnect a Digital Audio Systemtoyour
Cable
on
Audio
Digital
Audio
System
TV Rear Panel
~fOl
optical
wave
Digital
the
TV's
5.1
channel
willbeheard
you
wanttohear
Theater,
~lQj
IT]Optical Cable (Not supplied)
cable
convertsanelectric
glass
fibers.
S/PDIFisa
that
usesaglass
Audio
System
receiver
Optical
(home
jack.
soundtothe
suchasa
from
5.1
jackonthe
not
the
When
signal
intoanoptical
transmission
conductor.
has
a different
theater)issettoOn,
theTVis
Home
DVD
andisconnectedtotheTVvia
the
Home
channel
DVD
TV.
audio,
playerorCable/Satellite
back
displayingaDTV(air)
theater
Theater
receiver.
receiver.
connect
systemofdigital
you
the
System
"DIGITAL
volume
volume
of
WhatisOPTICAL?
•
An
it
through
a light
}>
Each
}>
When
the
out
component
sound
}>
If
(OPTICAL)
Home
panel
can
DIGITAL
TV.
light
signal,
configuration.
hear
sound
signal,
When
the
HDMI,
AUDIO
Box
directlytoan
and
audiointhe
output
theTVwill
sourceisa
only2channel
OUT
Amplifier
transmits
form
from
send
digital
or
of
Connecting
1
Connect
between
[R-AUDIO-L]
and
AUDIOIN[L-AUDIO-R]
jacksonthe
Home
Theater.
Whenanaudio
connectedtothe
OUT
[R-AUDIO-L]"
terminals:
volumeofthe
the
volume
Amplifier's
an
Audio
Cables
the
AUDIO
jacksonthe
Amplifier/DVD
amplifier
"AUDIO
Decrease
TV,
level
with
volume
Amplifier I
OUT
TV
is
jacks
the
and
adjust
the
control.
DVD
}>
Each
}>
When
connection
Home
Amplifier
DVD Home Theater
Theater
(
I
e-~--
'------1
IT]
Audio
Cable (Not supplied)
Amplifier /
connectinganAmplifier /
DVD
Home
terminaltothe
Theater
cable.
TV Rear Panel
has
DVD
..
I
a different
Home
Theater, match the color of the
back
panel
I
configuration.
Connecting a
PC
Using the D-Sub Cable
1
ConnectaD-Sub
betweenPCIN
theTVand
jackonyour
2
ConnectaPC
between
jackontheTVand
Out
your
Using the HDMIIDVI Cable
1
ConnectaHDMI/DVI
between
jackontheTVand
output
2
Connecta3.5mmStereo
mini-plug/2RCA
cable
[R-AUDIO-L]
and
sound
thePCIN
jackofthe
computer.
the
jackonyour
between
the
Audio
cardonyour
Cable
[PC]
jack
thePCoutput
computer.
Audio
Cable
[AUDIO]
the
sound
HDMI3/DVIIN
the
computer.
Cable
the
DVI
jackonthe
Out
jackofthe
computer.
Audio
card
cable
PC
IN
TV
on
Using the D-Sub Cable
on
Using the HDMI/DVI Cable
III
PC
Audio Cable (Not supplied)
IT]
D·Sub Cable (Notsupplied)
PC
TV Rear Panel
PC
TV Rear Panel
G 0
c;;)
@
• 0 _
® ;\21:
e
-mlIII
....
1:-
--
.~------i)--fr--c!-,------~j
1'-.j
@:@
-
~;~,
~l~
""'.~
....
®:@
~~'
• Operation
Turning the
Press the POWER button on the remote control.
You
can also use the POWER button on the
»
It
may
takeawhile
TV
On
before
and
you
III
3.5
mm Stereo minl-plug/2RCA Cable (Not supplied)
IT]
HDMUDVI
»
EachPChasadifferent
»
When
connectingaPC,
»
Whe.n
usinganHDMI/DVI
terminal.
Off
TV.
seeafull
picture.
Cable (Not supplied)
back
match
panel
the
cable
configuration.
colorofthe
connection,
connection
you
must
POWER
@
@]
terminaltothe
use
the
TV
~,
cable.
HDMI3/DVI
ON/OFF
CD
IN
I
Plug&Play
The
first
time you turn on
of
day
time
memory
change channels.
When the
using
will
allow youtoscan the stored channels rather than have to enter their
TV
is initially powered on, basic settings proceed automatically:
Feature
your
the
plug
new
TV,
choose
your
basic settings
and play feature. TheTVwill
for
language,
input
source and channels, and
store these settings in memory. Storing the channels in
digits
each time you want
to
1 Press the POWER button
on
the remote control.
The message Menu Language, Store Demo, Channels and Time will be set.
is
automatically displayed.
2 Press the ENTER button
Press
the.
or T buttontoselect language, then press the ENTER button.
The message Select 'Home Use' when installing this
to
enter the language.
TVinyour
home.
automatically displayed.
....
3 Press the
or~buttontoselect Store Demo or Home Use, then press the
ENTER button.
~
The default selectionisHome Use.
~
We
recommend setting theTVto
Home Use for the best pictureinyour
home environment.
~
Store Demo modeisonly intended for useinretail environments.
~
If the unitisaccidentally settoStore Demo mode
to
Home Use (Standard): Press the Volume buttononthe
volume OSD
is
displayed, press
and
hold the MENU buttonontheTVfor 5
and
you wanttoreturn
TV.
When the
seconds.
4 Press
the.
or T buttontomemorize the channels of the selected connection,
then press the ENTER button.
~
Air:
Air
antenna signal.
Cable: Cable antenna signal.
Auto:
Air
and
Cable antenna signals.
~
In
Cable mode,
STD, HRC,
you
can
select the correct analog signal source among
and
IRCbypressing the
....
or~button, then press the ENTER
button. If you have Digital cable, select the signal source for both Analog
and
Digital. Contact your local cable companytoidentify the type of cable
system that existsinyour particular area.
is
Continued
...
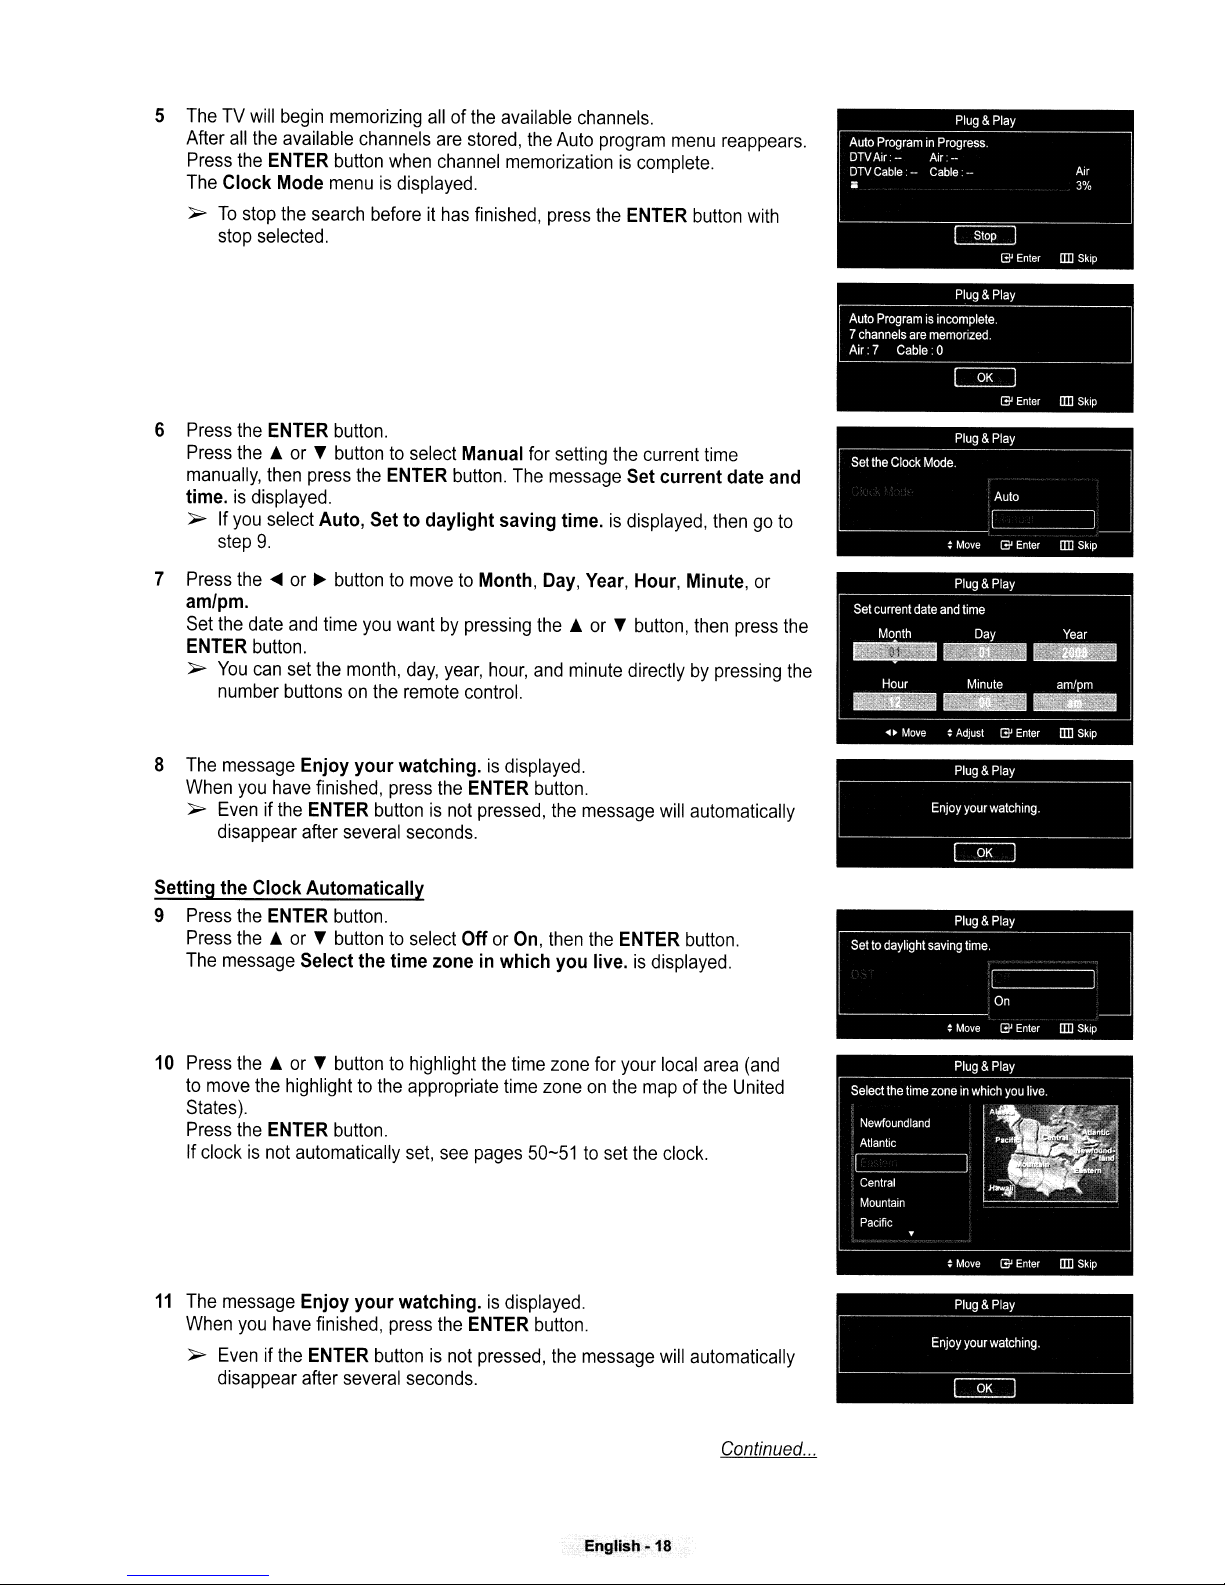
5 The TV will begin memorizing all of the available channels.
After
all
the available channels are stored, the Auto program menu reappears.
Press the ENTER button when channel memorization is complete.
The Clock Mode menu
}>
To
stop the search before it has finished, press the ENTER button with
stop selected.
6 Press the ENTER button.
Press the • or T button
manually, then press the ENTER button. The message Set
time. is displayed.
}>
If you select Auto, Settodaylight
step
9.
is
displayed.
to
select Manual for setting the current time
saving time. is displayed, then go
current
date and
to
7 Press the
am/pm.
Set the date and time you want
ENTER button.
}>
8 The message
When you have finished, press the ENTER button.
}>
Setting the
9 Press the ENTER button.
Press
The message Select
10 Press
to
move the highlighttothe appropriate time zoneonthe map of the United
States).
Press the ENTER button.
If clock
.....
or~buttontomovetoMonth, Day, Year, Hour, Minute, or
by
pressing
You
can
set the month,
number buttons
Enjoy
Even if the ENTER buttonisnot pressed, the message will automatically
disappear after several seconds.
Clock
Automatically
the.
or T buttontoselect
the.
or T buttontohighlight the time zone for your local area (and
is
not automatically set, see pages 50-51toset the clock.
day,
year, hour,
on
the remote control.
your
watching. is displayed.
Off
the
time zone in
the.
or T button, then press the
and
minute directly by pressing the
or On, then the ENTER button.
which
you
live. is displayed.
Plug&Play
~~
c=2O
11
The message Enjoy
When you have finished, press the ENTER button.
}>
Even if the ENTER button is not pressed, the message will automatically
disappear after several seconds.
your
watching.isdisplayed.
English
-18
Continued
Plug&Play
c=2O
...
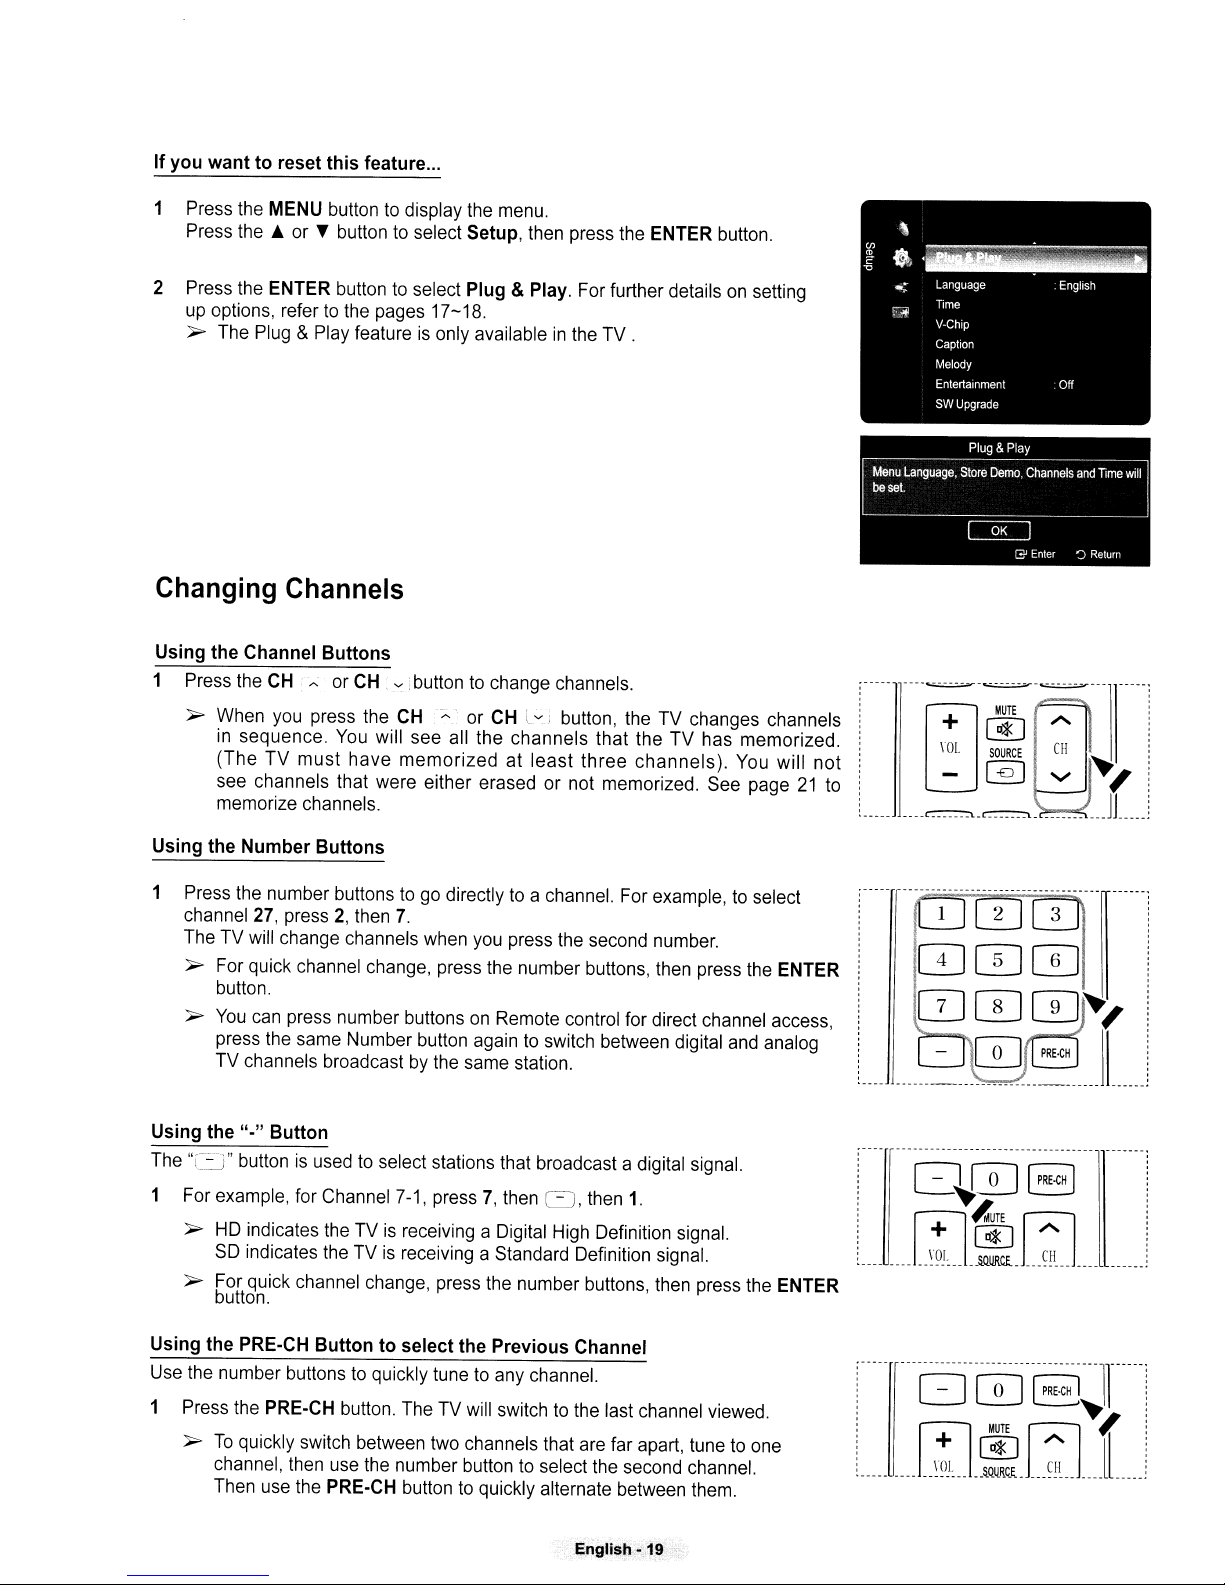
If you want to reset this feature
1 Press the MENU buttontodisplay the menu.
Press the A or T button
...
to
select Setup, then press the ENTER button.
2 Press the
up options, refer
~
ENTER button to select Plug &Play. For further details
to
the pages 17-18.
The Plug & Play featureisonly availableinthe TV .
Changing Channels
Using the Channel Buttons
1 Press the
~
Using the Number Buttons
CH
~
or
CH
When
you
press the
in
sequence.
(The TV
see channels that were either erased or not memorized. See page
memorize channels.
must
You
will see all the channels that the TV has memorized.
have
~
.button to change channels.
CH
.:,....orCH
memorizedatleast
Lvjbutton, the TV changes channels
three
channels).
on
setting
You will not
21
MUTE
[at]
SOURCE
~
~
'"
CH
...,
... .
~,
__
.J1....
+
IOL
to
-
~
....
=.=
1 Press the number buttons togodirectly to a channel. For example,toselect
2,
then
channel 27, press
The TV will change channels when you press the second number.
~
For quick channel change, press the number buttons, then press the ENTER
button.
~
You
can press number buttonsonRemote control for direct channel access,
press the same Number button again to switch between digital and analog
TV channels broadcast
Using the
The
1 For example, for Channel
Using the PRE·CH Button to select the Previous Channel
Use the number buttons to quickly tune to any channel.
1 Press the
"."
Button
"C::J"
buttonisusedtoselect stations that broadcast a digital signal.
~
HD
indicates the TVisreceiving a Digital High Definition signal.
SO
indicates the TVisreceiving a Standard Definition signal.
~
For quick channel change, press the number buttons, then press the ENTER
button.
PRE·CH button. The TV will switch to the last channel viewed.
~
To
quickly switch between two channels that are far apart, tune to one
channel, then use the number button to select the second channel.
Then use the
PRE-CH button
7.
by
the same station.
7-1,
press7,then
to
0,
then
1.
quickly alternate between them.
--
..~..
----
....
--.--...
----
--._.----.
--·1------
o
CD
~
[l
__________
~9!-
__.__
..
----
--.--...--..----..--
DCD~
[PRE~HJ
TE
'Au
[;J
[
at
I
~QURC.E..
•.
__~~__
• ••
--.
--.----11--"--
__
~
.r;.l.~Jln;lL
English
-19
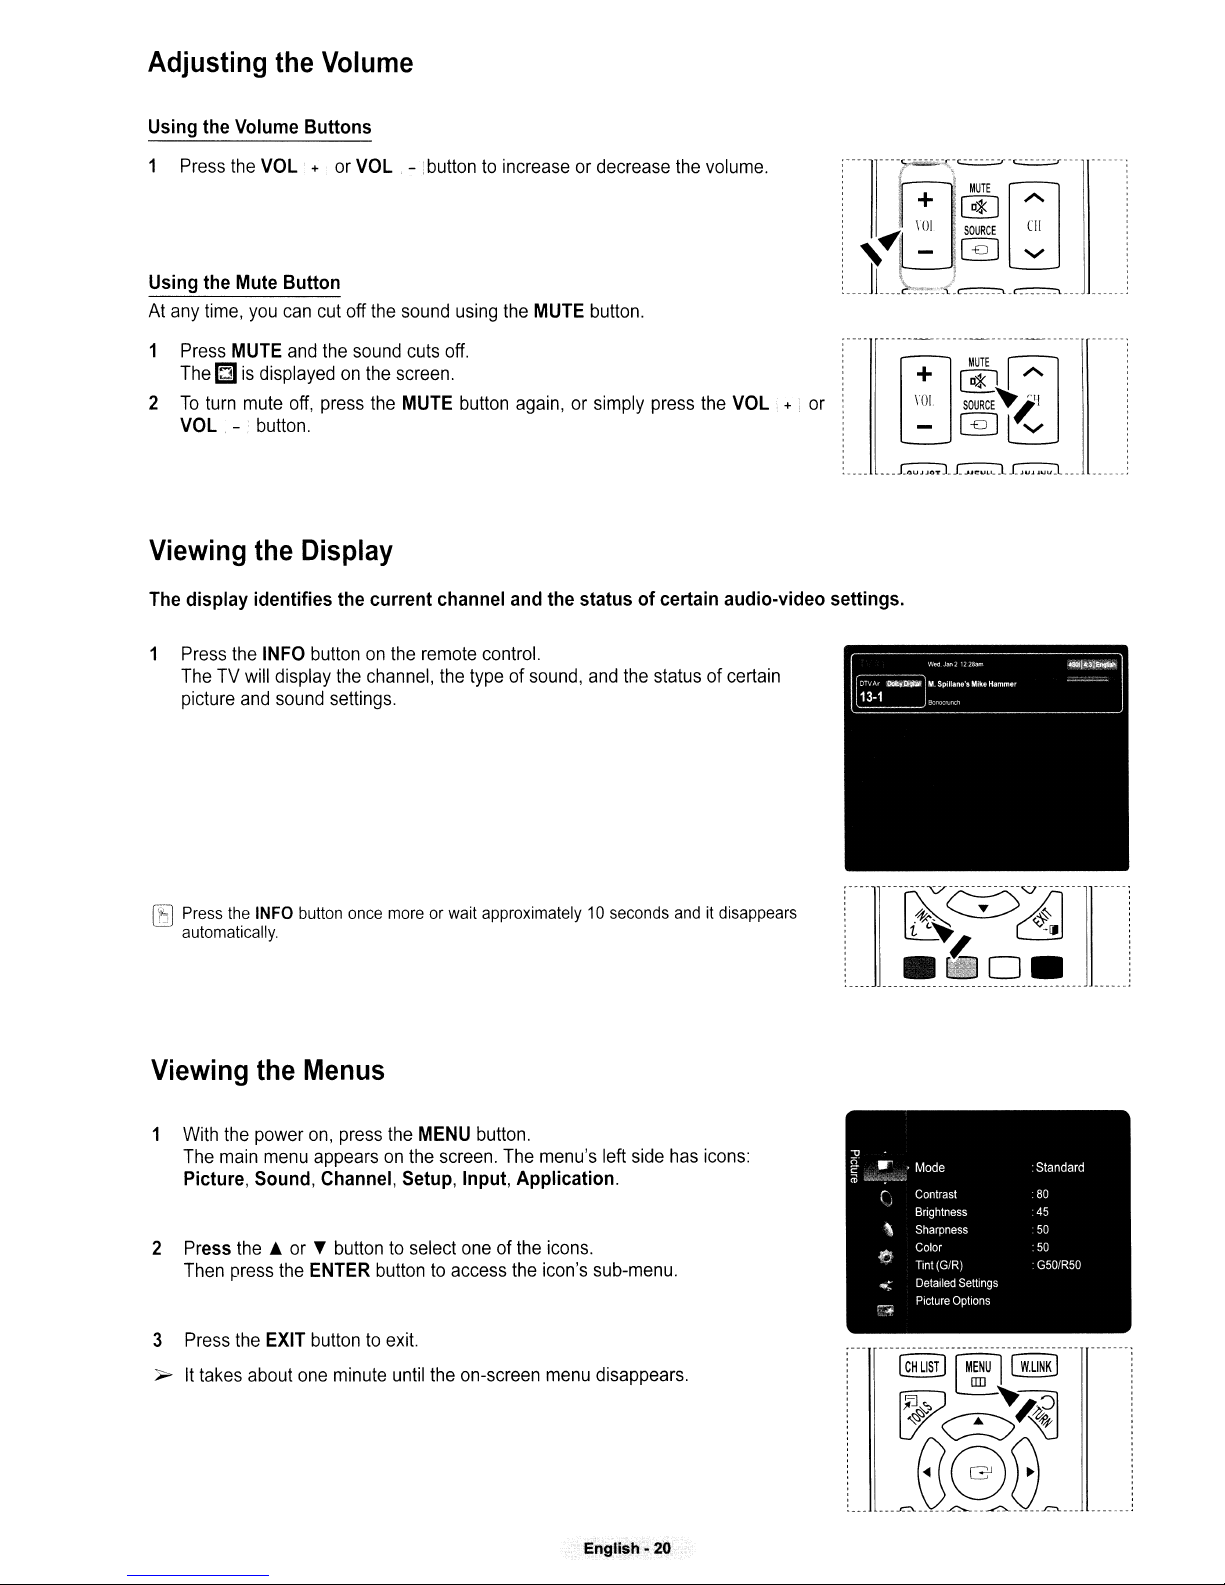
Adjusting
Using
the
Volume
Press
the
Using
the
Mute
At
any
time,
you
1
Press
MUTE
The~is
2
To
turn
mute
VOL
-
the
Volume
Buttons
VOL
+
or
VOL. -
Button
can
cut
off
and
the
sound
displayedonthe
off,
press
button.
!buttontoincreaseordecrease
the
sound
using
the
MUTE
cuts
off.
screen.
the
MUTE
button
again,orsimply
button.
the
press
volume.
the
VOL
+
;----
----
or
----GJr-"\~-~=---
+ '[D*] A
~
\01:.•...
,
I f
jj
----~-:.:':,:<-=-=---
SOURCE
-.@]
CII
v
Viewing
The
display
1
Press
the
TheTVwill
picture
IE]
Press
the
automatically.
Viewing
the
identifies
INFO
display
and
sound
INFO
the
Display
the
current
buttononthe
the
channel,
settings.
button
once
Menus
channel
remote
the
moreorwait
and
the
statusofcertain
control.
typeofsound,
approximately10seconds
and
the
audio-video
statusofcertain
anditdisappears
settings.
1
With
the
power
on,
press
the
The
main
menu
appearsonthe
Picture,
2
Press
Then
3
Press
~
It
Sound,
Channel,
the•orTbuttontoselect
press
the
ENTER
the
EXIT
buttontoexit.
takes
about
one
minute
Setup,
buttontoaccess
until
MENU
screen.
the
button.
The
Input,
Application.
oneofthe
the
on-screen
menu's
icons.
icon's
menu
left
side
sub-menu.
disappears.
En9li~h
- 20
has
icons:
'tl
•
&
ro
Mode
Contrast
r,
Brightness
Sharpness
\
Color
.tJ
Tint(GiR) G50lR50
.,
Detailed Seltlngs
Picture Options
q
:Standard
.80
:45
50
.50
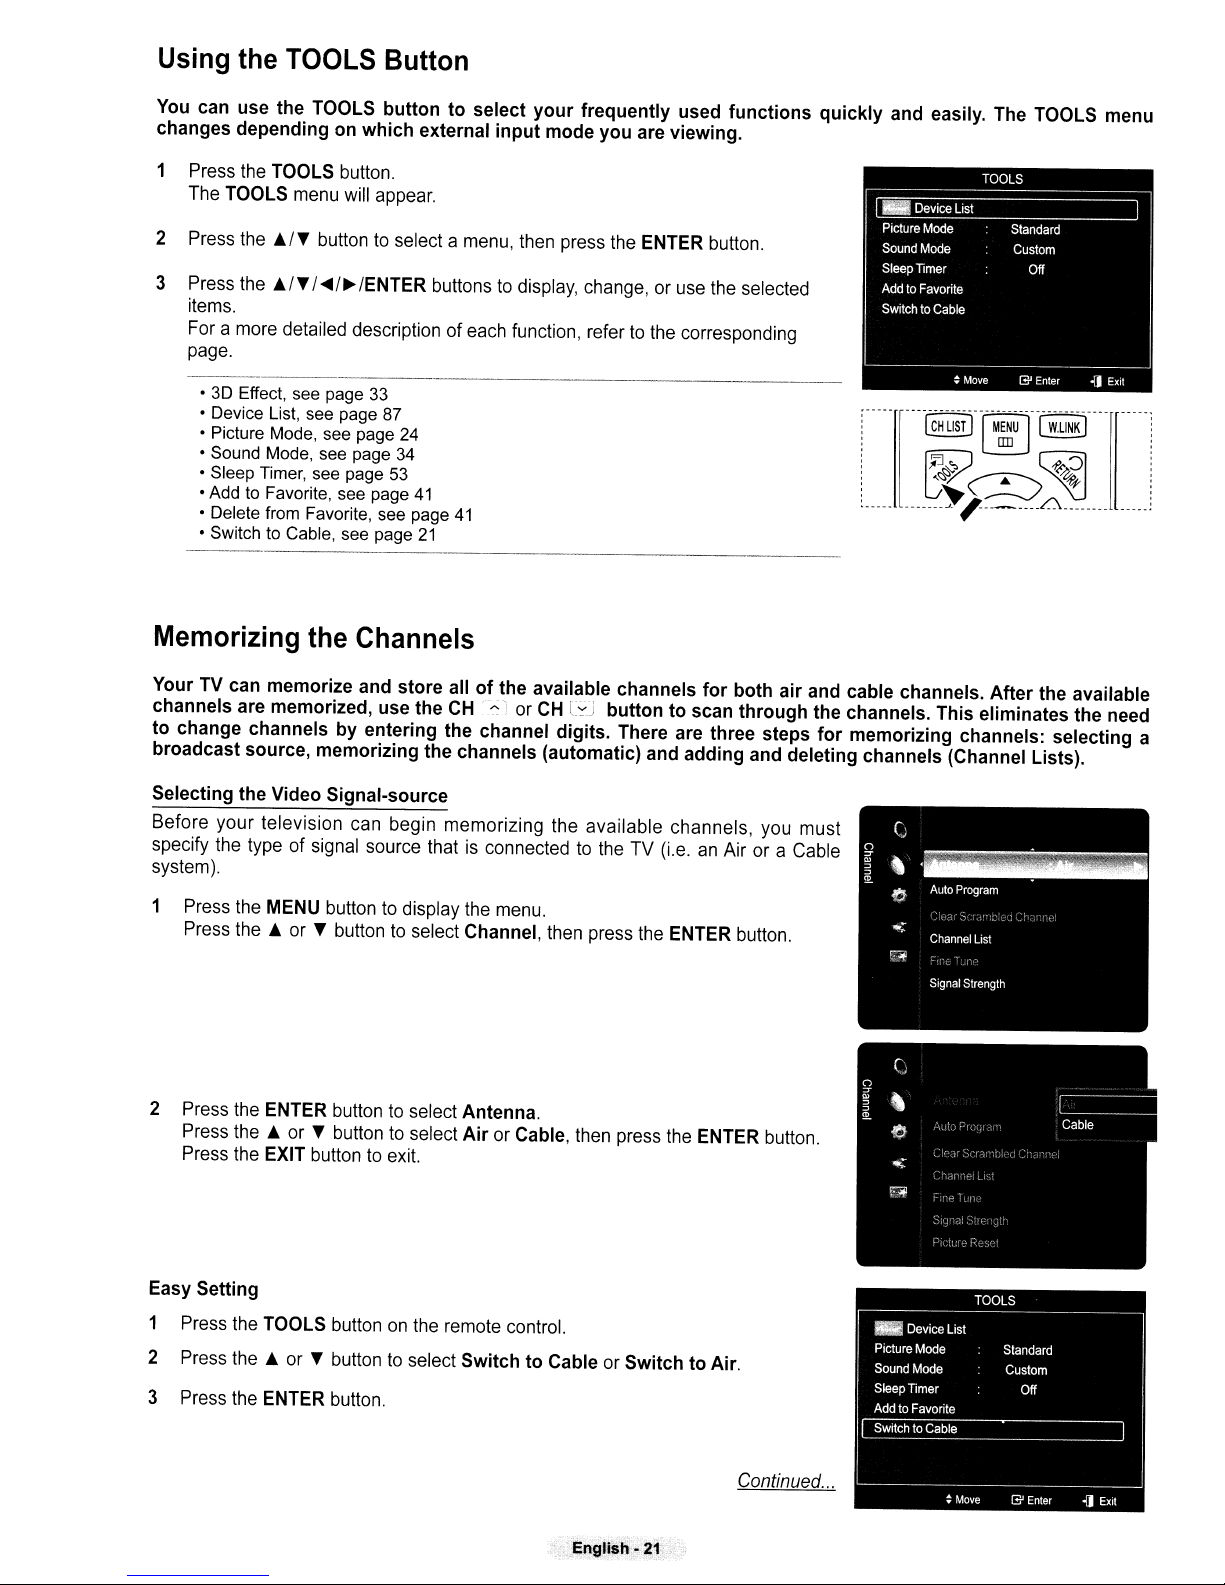
Using
You
changes depending
1 Press the TOOLS button.
the
TOOLS
can use the TOOLS button to select your frequently used functions quickly and easily. The TOOLS menu
The TOOLS menu will appear.
Button
on
which external input mode you are viewing.
2 Press the it./T button
3 Press the
items.
For a more detailed description of each function, refer to the corresponding
page.
•3DEffect, see page 33
• Device List, see page 87
• Picture Mode, see page
• Sound Mode, see page 34
• Sleep Timer, see page 53
• Add to Favorite, see page
• Delete from Favorite, see page
• Switch to Cable, see page
Memorizing
Your TV can memorize and store all of the available channels for both air
channels are memorized, use the
to change channels
broadcast source, memorizing the channels (automatic) and adding and deleting channels (Channel Lists).
Selecting the Video Signal-source
Before your television can begin memorizing the available channels, you must
specify the type of signal source that is connected to the TV (i.e.anAir or a Cable
system).
it.
IT
I
the
to
select a menu, then press the ENTER button.
....
/~
IENTER buttonstodisplay, change, or use the selected
---
rc~
~;ST)
-r
-~~u
24
41
21
41
~~~
~o/
_______J.,
-)-'[
Channels
and
cable channels. After the available
CH
..;,orCH
by
entering the channel digits. There are three steps for memorizing channels: selecting a
l"'J button to scan through the channels. This eliminates the need
W,~iNKJ
~
L:\
%>
-
--
__
1 Press the MENU button to display the menu.
Press the
2 Press the ENTER button to select Antenna.
Press the
Press the EXIT button
Easy Setting
1 Press the TOOLS button
2 Press the
3 Press the ENTER button.
it.
or T buttontoselect Channel, then press the ENTER button.
it.
or T button to select AirorCable, then press the ENTER button.
to
exit.
on
the remote control.
it.
or T buttontoselect Switch to CableorSwitchtoAir.
Continued
...
English -
21
Storing
Channels in
Memory
(Automatic
Press the MENU button to display the menu.
the.
Press
or T button to select Channel, then press the ENTER button.
Method)
2 Press
the.
or T buttontoselect
Auto
Program, then press the ENTER
button.
the.
3 Press
or T buttontoselectanantenna connection, then press the
ENTER button.
p.
Air:
Air
antenna signal.
Cable: Cable antenna signal.
Auto:
Air
and Cable antenna signals.
4 When selecting the Cable TV system:
to
Press the ENTER button
Press the
~or~
to select the correct analog signal cable system source
start the auto program.
among STD, HRC, and IRC, then press the ENTER button. If you have Digital
TV,
cable
,..
select the cable system signal source for both Analog and Digital.
STD, HRC, and IRC identify various types of cable TV systems. Contact
your local cable company to identify the type of cable system that exists
your particular area. At this point the signal source has been selected.
5 The TV begins memorizing all available stations.
p.
After
all
the available channels are stored, it startstoremove scrambled
channels (see page 45). The Auto program menu then reappears.
in
p.
If you want to stop Auto Programming, press the ENTER button.
Stop
Auto
The
ing the
~or~
Program? message willbedisplayed. Select Yesbypressbutton, then press the ENTER button.
Press the EXIT button to exit.
English·
22

To
Select
the
Source
UsetoselectTVor
Box)
connectedtothe
1 Press the MENU buttontodisplay the menu.
Press the A or T button to select Input, then press the ENTER button.
2 Press the ENTER buttontoselect Source List.
Press the A or T button
button.
~
Available signal sources:
Component2,
~
You
can
the Source List, connected inputs willbehighlighted
Inputs that are not connected will
~
Using the
•
Red
•
TOOLS
other
external
TV.
Usetoselect
PC,
HDMI1, HDMI2, HDMI3IDVI, USB.
choose only those external devices that are connectedtothe
Color
buttonsonthe remote
(Refresh): Refreshes
(Option): Displays
input
sources
the
to
select the signal source, then press the ENTER
TV,
AV1, AV2,
be
the
connecting external
the
Edit
such
as DVD playersorCable Box/Satellite receivers (Set-Top
input
sourceofyour
S-Video, Component1,
and
sorted to the bottom.
with
the Source list.
devices
Name
and
Information
choice.
TV.
sortedtothe top.
.
menus.
In
U5J
You
can
also
press
the
signal
source.
To
Edit
the
Input
You can name
source
1 Press the MENU button to display the menu.
2 Press the A or T button to select AV1,
selection easier.
Press the A or T button
Press the A or T button
Component2,
ENTER button.
the
device
PC,
SOURCE
Source
connectedtothe
to
to
HDMI1, HDMI2, or HDMI3/DVI input jack, then press the
buttononthe
Name
select Input, then press the ENTER button.
select
Edit
Name, then press the ENTER button.
AV2,
remote
controltoviewanexternal
input
jackstomake
S-Video, Component1,
your
input
. ,
+
m
8IB~;J
..............................
MUTE
[a~)
SOU~CE
I:l
[ .
A
, .
3 Press the A or T buttontoselect VCR, DVD, Cable STB, Satellite STB, PVR
STB, AV Receiver, Game, Camcorder,
Digital Media
Press the EXIT button to exit.
~
When aPCwith a resolution of 1920 x 1080@60Hzisconnectedtothe
HDMI3IDVI port, you should set the HDMI3/DVI mode toPCin
Name of the
Adapter
input source, then press the ENTER button.
Input
mode.
PC,
TV,
IPTV, Blu-Ray,HDDVD or
english
- 23
the
Edit

•
Picture
Control
Changing
You can select the typeofpicture which best correspondstoyour
requirements.
1 Press the MENU button
Press
2 Press
Press the
Press the ENTER button.
• Dynamic: Select the picture for high-definitionina bright room.
• Standard: Select the picture for the optimum display
• Movie: Select the picture for viewing movies
3 Press
Easy Setting
1 Press the TOOLS button
the
Picture
the
ENTER buttontoselect Picture.
the
ENTER buttontoselect Mode.
..orT buttontoselect Dynamic, Standard,orMovie.
the
EXIT buttontoexit.
Standard
to
display the menu.
on
the remote control.
in
a dark room.
in
the normal environment.
viewing
2 Press the..or
3 Press the
Customizing
Your television has several setting
1
To
select the desired picture mode, follow
instructions number 1
2 Press the..or T buttontoselect Contrast, Brightness, Sharpness, Color, or
Tint
(G/R),
3 Press the
Press
the
Press the EXIT button
?-
• When
Tint
• When
• Each adjusted setting will
T buttontoselect Picture Mode.
....
or~buttontoselect the required option.
the
Picture
to
2.
then press the ENTER button.
....
or~buttontodecrease or increase the value of a particular item.
ENTER button.
to
exit.
you
make changestoContrast, Brightness, Sharpness, Color,
(G/R)
the OSD willbeadjusted accordingly.
inPCmode, Tint(G/R), Sharpness
Settings
options
be
stored separately accordingtoits input mode.
that
allow
youtocontrol the picture quality.
the
"Changing the Picture Standard"
and
Color
are
not available.
or
:
Move..Adjust 8
Enter
~
'".)
Return
• Contrast: Adjusts the contrast levelofthe picture.
Brightness:
•
• Sharpness: Adjusts the edge definition
• Color: Adjusts color saturation of the picture.
• Tint(G/R): Adjusts the color tint of the picturebycompensating the
Adjusts the brightness levelofthe picture.
green color.
of
the picture.
English - 24
red
and
Adjusting the Detailed Settings
Samsung's new TVs allow youtomake even more precise picture settings than previous models.
adjust detailed picture settings.
Activating Detailed Settings
1 Press the
Press
2 Press the ENTER button
Press
button.
~
3 Press the • or
button.
~
Activating Black adjust
You
can
4 Press
MENU
the
ENTER buttontoselect Picture.
the
Detailed SettingsisavailableinStandardorMovie mode.
In
PC
and
White Balance from among the Detailed Settings items.
select the black levelonthe screentoadjust the screen depth.
the.
buttontodisplay the menu.
to
select Mode.
• or
...
buttontoselect Standard or Movie,
...
buttontoselect Detailed Settings,
mode,
you
can
only make changestoDynamic Contrast, Gamma
or
" buttontoselect Black adjust,
then
then
then
press the ENTER button.
press
press
the
the
ENTER
ENTER
See
below
to
S Press
Activating Dynamic Contrast
You
6 Press the • or
7 Press
o Off: Turns off the dynamic contrast adjustment function.
o Low: Sets the dynamic contrast to
o Medium: Sets the dynamic contrast to medium.
o High: Sets the dynamic contrast to high.
the.
or
" buttontoselect Off, Low, MediumorHigh.
Press the ENTER button.
o Off: Turns off the black adjustment function.
o Low: Sets the black color depth to
o Medium: Sets the black color depth to medium.
o High: Sets the black color depth to high.
can
adjust the screen contrastsothat the optimal contrastisprovided.
...
buttontoselect Dynamic Contrast,
ENTER button.
the.
or
...
buttontoselect Off, Low, MediumorHigh.
the
Press
ENTER button.
low.
low.
then
..
press the
..
English·
25
Continued
...
Activating
You
can
adjust
8
Press
9
Press
Press
Gamma
the
Primary
the•or~buttontoselect
Color
(Red,
Gamma,
the~or~buttontodecrease
the
ENTER
button.
Green,
or increase
Blue)
then
Intensity.
press
the
the
value.
(-3-+3)
ENTER
button.
~~
Gamma
-0
AdjustGJEnter")Return
Activating
You
can
10
Press
button.
11
Press
(-10-+10)
Press
~
Changing
Flesh
Tone
You
can
12
Press
13
Press
Press
~
Changing
White
Balance
adjust
the
color
temperature
the.
or~buttontoselect
the~or~buttontodecrease or
the
ENTER
emphasize
the.
button.
the
adjustment
the
pink
flesh
or~buttontoselect
for
more
White
value
will
toneinthe
Flesh
natural
Balance,
increase
refresh
picture.
Tone,
the~or~buttontodecreaseorincrease
the
ENTER
the
button.
adjustment
value
will
refresh
the
picture
colors.
then
press
the
valueofa particular
the
adjusted
then
press
the
value.
adjusted
screen.
the
screen.
the
ENTER
ENTER
item.
button.
Black
Dynamic
Gamma
White
Flesh
Edge
xvVCC
Adjust
Contrast
Balance
Tone
Enhancement
~
White
<0
Adjust
Detailed
Move
Balance
(3l
Settings
-
Off
Low
.
+1
.0
:0
:On
Off
G'
Enter
Enter")Return
")
Return
I
I
I
~
]
Activating
You
14
15
Edge
can
emphasize object
Press
the.
ENTER
Press
button.
the.
Enhancement
boundariesinthe
or~buttontoselect
or~buttontoselect
picture.
Edge
Enhancement,
Off
or
On.
Press
English - 26
the
then
ENTER
press
button.
the
Continued
Flesh
Tone
c=.~
<0
Adjust
Detailed
Settings
BlackAdjust Off
Dynamic
Contrast
Gamma
I
White
Balance
Edge
Enhancement
xvVCC
l~~t
...
.
:On
:
Move
:
MoveGJEnter")Return
(3i
Enter")Return
Low
+1
0
0
Off
G'
Enter
~
~
Retum
Activating
xvYCC
Setting the xvYCC mode
an
movies from
Component
16 Press
17
Press
external device (ie.
IN
jacks.
the"
or,.buttontoselect xvYCC, then press the ENTER button.
the"
or,.button to select
Press the ENTER button.
}>
xvYCCisavailable when the picture modeisset to Movie, and the
external input
is
toOnincreases detail
OVO
player) connected to the
Off
settoHOMI or
Component
or On.
and
color space when watching
HOMI
mode.
Detailed
or
Black
Dynamic
Gamma
White
Flesh
Edge
xvVCC
Adjust
Contrast
Balance
Tone
Enhancement
Settings
Off
Low
+1
:0
·0
:On
Off
: Move G' Enter
~
".) Return
Configuring Picture Options
Activating
1 Press the MENU buttontodisplay the menu.
Press the ENTER button
2 Press the
button.
3 Press the..or,.buttontoselect a particular item. Press the ENTER button.
}>
Picture
When
}>
InPCmode, you
Size and
Options
to
select Picture.
..or,.
button to select
you
are satisfied with your setting, press the ENTER button.
can
Color
Gamut
Picture
only make changestothe
Options, then press the ENTER
Color
from among the itemsinPicture Options.
Tone, Position,
C==~
: MoveGJEnter ".) Return
Adjusting
1 Follow the
2 Press
3 Press
the
Color
Tone
Activating
the"
or,.button to select
the"
or,.buttontoselect Cool2, Cool1, Normal, Warm1 or Warm2.
Picture
Press the ENTER button.
}>
Warm1 or Warm2isonly activated when the picture modeisMovie.
}>
Settings
canbeadjusted and stored for each external device
you have connected to
Options
Color
an
input of the
instructions numbers 1
and
2.
Tone, then press the ENTER button.
TV.
Continued.
English
- 27
..
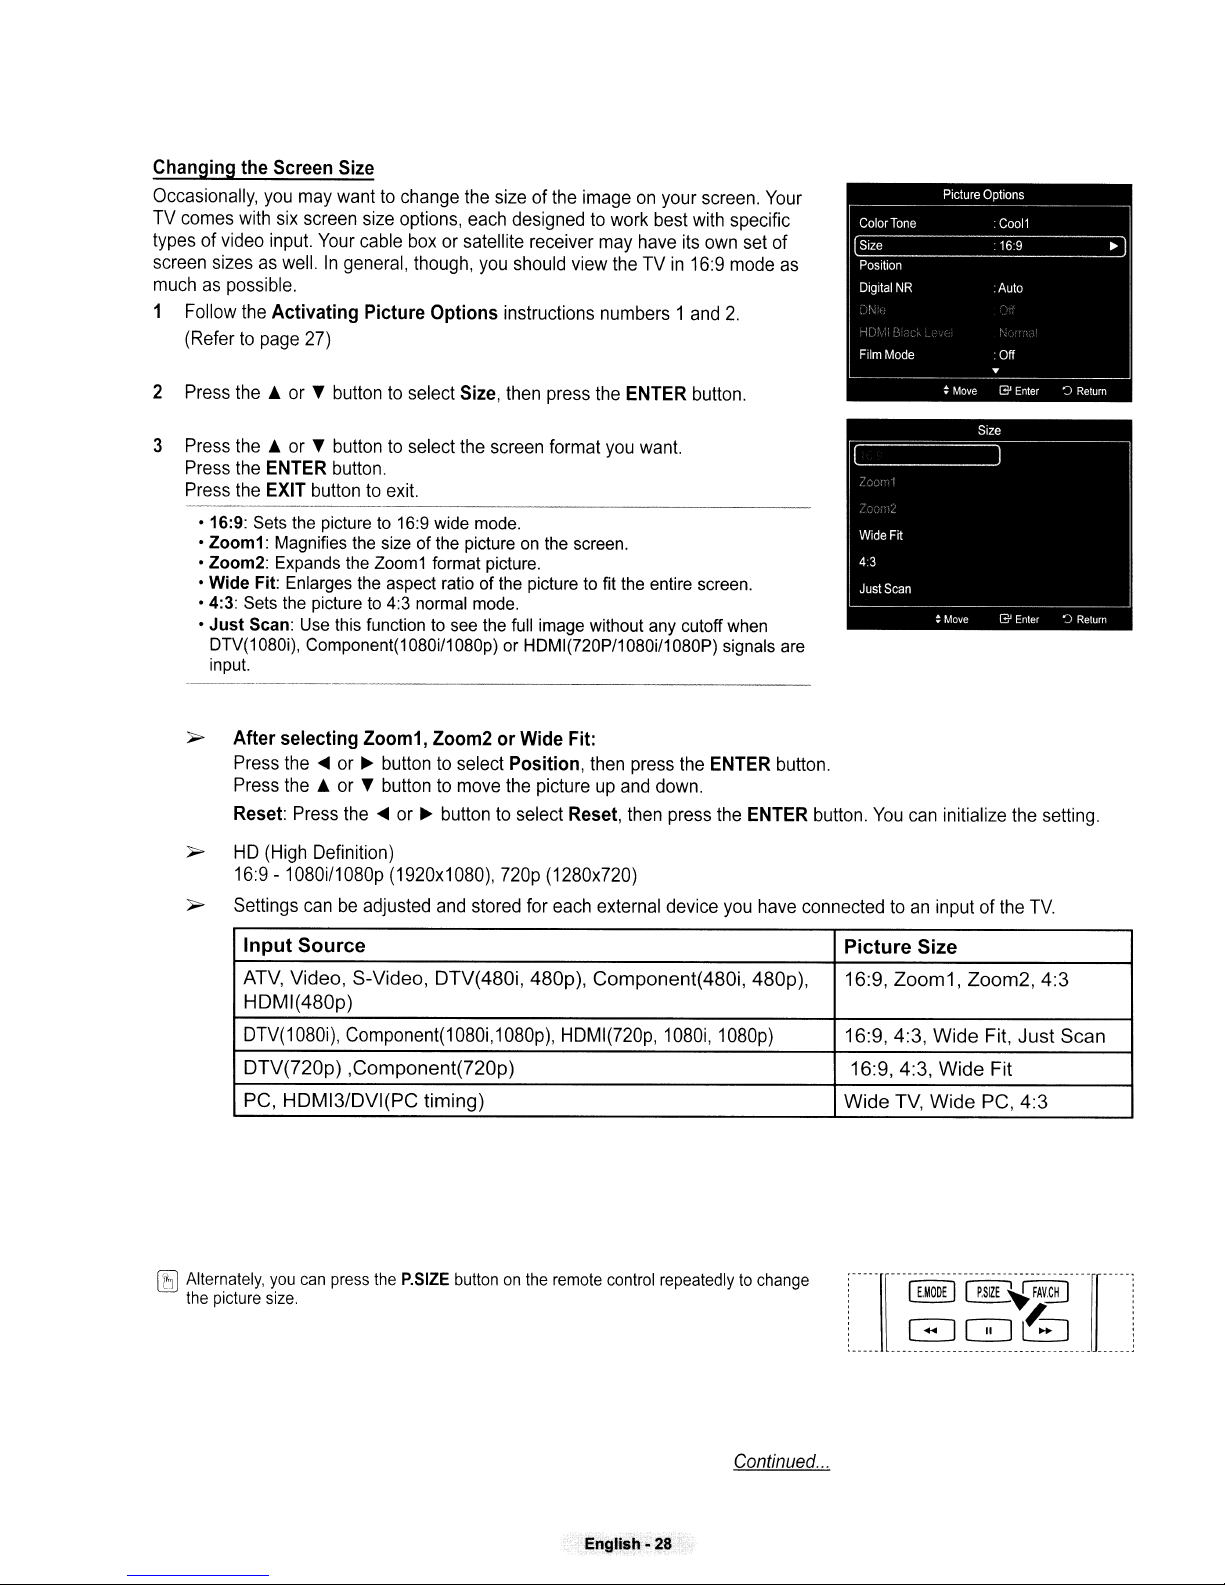
Changing
Occasionally, you may want to change the size of the image
TV comes with six screen size options, each designed to work best with specific
types of video input. Your cable box or satellite receiver may have its own set of
screen sizes as well.
much
1 Follow the
the
Screen Size
as
possible.
Activating
(Refer to page 27)
on
your screen. Your
In
general, though, you should view the TVin16:9 mode as
Picture
Options
instructions numbers 1 and
2.
2 Press the
3 Press the
Press the ENTER button.
Press the EXIT button to exit.
------------------------------
• 16:9:
• Zoom1: Magnifies
• Zoom2: Expands
• Wide Fit: Enlarges
• 4:3:
•
~
~
~
~
or T button to select Size, then press the ENTER button.
~
or T buttontoselect the screen format you want.
Sets
the
pictureto16:9 wide
the
size of the pictureonthe
the
Zoom1
the
aspect ratio of
Sets
the
pictureto4:3
Just
Scan:
Use
this
DTV(1080i), Component(1080i/1080p)orHDMI(720P/1080i/1080P) signals
input.
After
selecting
Press the
Press the
Reset: Press the
HD (High Definition)
16:9 - 1080i/1080p (1920x1080), 720p (1280x720)
Settings can be adjusted and stored for each external device you have connectedtoan
Input
Source
ATV,
Video,
HDMI(480p)
DTV(1080i), Component(1 080i, 1080p), HDMI(720p, 1080i, 1080p)
DTV(720p)
PC,
HDMI3IDVI(PC
functiontosee
Zoom1,
....
or~button to select
~
or T button to move the picture up and down.
....
or~button to select Reset, then press the ENTER button.
S-Video,
,Component(720p)
mode.
format picture.
the
normal
mode.
the
full
Zoom2orWide
Position,
DTV(480i,
timing)
screen.
picturetofit
image without
Fit:
then press the ENTER button.
480p),
Component(480i,
the
entire
any
screen.
cutoff
when
are
480p),
You
Picture
16:9,
Zoom1,
16:9,4:3,
16:9,4:3,
Wide
TV,
can initialize the setting.
input of the
Size
Zoom2,
Wide
Wide
Wide
Fit,
Fit
PC,
TV.
Just
4:3
4:3
Scan
(bJ
Alternately,
the
picture
you
size.
can
press
the
P.SIZE
buttononthe
remote
~nglish
control
repeatedlytochange
·28
Continued
..---
---
----
----
-----
------..-
[
EMCCE1[P.SIZE~fA@
GJGQ~
......
--------------------..-
-----------r--
'-
....
---
--.
------
...

16:9
Sets the pictureto16:9
wide mode.
./
Zoom1
The screen size when
Wide screenisvertically
enlarged.
Zoom2
The screen size when
the Zoom1 screen is
vertically enlarged.
Wide
Fit
Enlarges the aspect ratio
of
the picture to fit the
entire screen.
Adjusting
You
1 Follow the
2 Press the
the
Screen
Position
can adjust the horizontal and vertical position of the screen.
Activating
(Refer to page
27)
~
or
T button to select
4:3
Sets the pictureto4:3
normal mode.
Picture
Options
instructions numbers 1 and
Posion,
then press the ENTER button.
Just
Scan
Use this function to see the full
image without any cutoff when
HOMI (720p/1 080i/1 080p) or
OTV(1080i),Component(1080i/
1080p) signals are input.
2.
Digital
Noise
Reduction
If the broadcast signal received by yourTVis weak, you can activate the Digital
Noise Reduction feature to help reduce any static and ghosting that may appear
on the screen.
1 Followthe
(Refer to page
2 Press the
3 Press the
Activating
Picture
27)
~
or T button to select Digital NR, then press the ENTER button.
~
or T button to select Off, Low,
Press the ENTER button.
• Off: Turns the screen noise reduction function off.
• Low: Reduces screen noise
•
Medium:
Reduces screen noise at a medium level.
• High: Reduces screen noise at a high level.
•
Auto:
Automatically recognizes and reduces screen noise.
Press the EXIT button to exit.
Options
atalow
instructions numbers 1 and
Medium,
level.
,
English-
HighorAuto.
29
2.
Continued
...
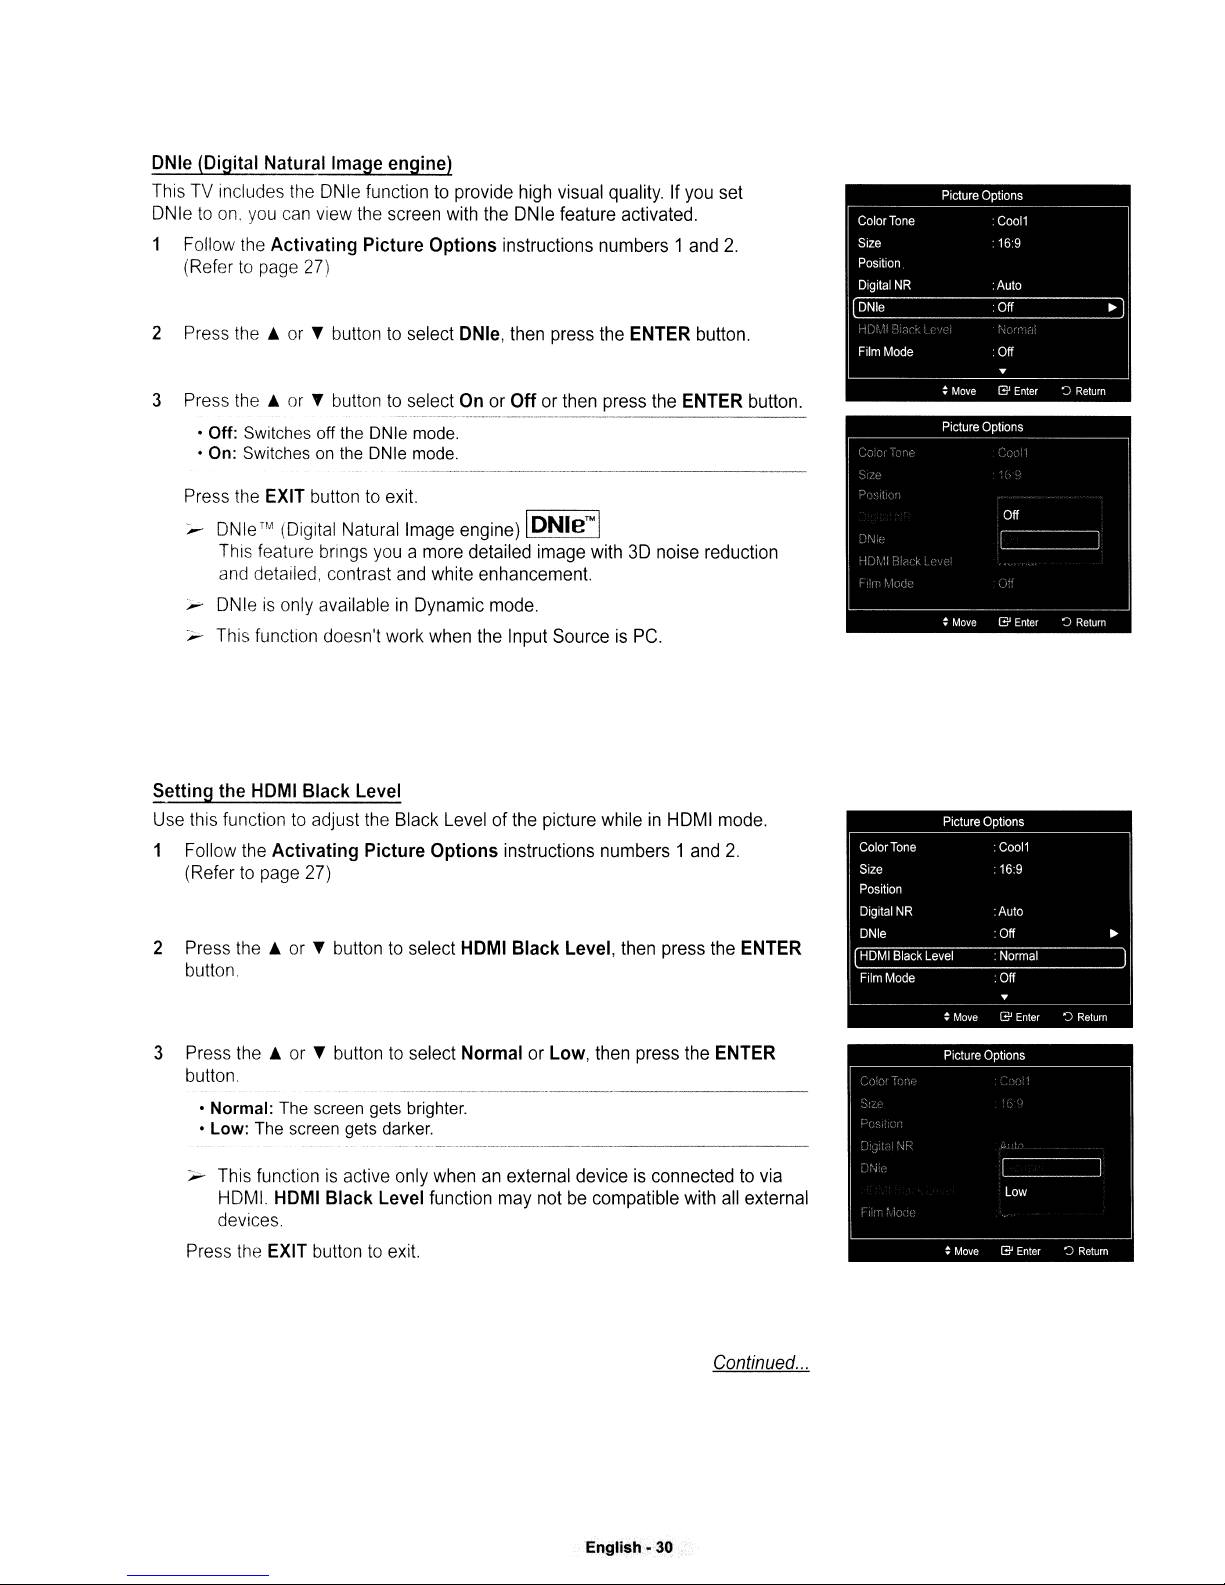
ONle (Digital Natural Image engine)
This TV includes the DNle function
to
on.
you
DNle
1 Follow the
can view the screen with the DNle feature activated.
Activating
Picture
to
Options
(Refertopage 27)
provide high visual quality. If you set
instructions numbers 1 and
2.
2 Press
3 Press
the.
or
...
button to select ONle, then press the ENTER button.
the.
or
...
button to select On or
• Off: Switches off
theONIe
• On: Switchesonthe
ONle
~
- - - - -
mode.
mode
-_._
..
--_._-----
.
...................... _
Off
or then press the ENTER button.
..
...
_
.....--.....
_--._-_
Press the EXIT button to exit.
,...
DNle™
(Digital Natural Image engine) I
ON
I
e'"
I
This feature brings you a more detailed image with3Dnoise reduction
and detailed, contrast and white enhancement.
is
,... DNle
,...
Setting
This function doesn't work when the Input Source is PC.
the
only availableinDynamic mode.
HOMI
Black
Level
Use this function to adjust the Black Level of the picture while
1 Follow the
Activating
Picture
Options
instructions numbers 1 and
(Refertopage 27)
...
_._----
in
HDMI mode.
2.
2 Press
the.
or
...
buttontoselect HOMI
Black
Level, then press the ENTER
button.
...
3 Press the • or
button to select Normal or Low, then press the ENTER
button.
The
• Normal:
The
• Low:
screen gets brighter.
screen gets
darker.
- This functionisactive only whenanexternal device is connected to via
HDM!. HOMI
Black
Level function may not be compatible with all external
deVices.
Press the EXIT button
to
exit.
Continued
...
English-30
 Loading...