

Samsung 6000 Series, 6050 Series, UN32D6000, UN40D6000, UN46D6000 User Manual
...
LED TV
SERIES~
6000
6050
user
manual
E-MANUAL
f
or
pu
at
the
ha
rc
comp
imagine
you
ank
Th
eive more
ec
r
To
product
ur
yo
www.samsung.
M
ode
l _
__
_
possibilities
ng
su
m
Sa
s
thi
g
sin
ease
, pl
ce
i
rv
se
te
le
com/register
__
al No.
ri
Se
produc
s
regi
_ _
te
t.
r
Figures
and
illustrations
Product design
and
specifications
Important Warranty Information Regarding Television Format Viewing
~
See
the warranty card for more information
Wide
screen
format
LED
to
view
wide
screen
format
ratio
format, or
stationary graphics
and
programming,
Additionally,
si
tes or computer graphics a
for
more
in
ghost images
images,
different formats
Be
careful
format
selection
•
SAM
Subject
Electronics
SAMSUNG
in
Canada,
specified,
The
Statement, the
the
are
product.
Excluded, but
repair
For the locati
-
In
-
In
expanded
and
should
viewing
than 5% of total
not stationary patterns or
about the
SUNG
to
above described warranty
Service
limited
times,
the United
Canada:
other stationary
in
the
LED
as
a
full
television
and
use,
ELECTRONICS
the
requirements,
(SAMSUNG)
will
additionally
and
in
Canada
and
to
the
Original
Center.
Transportation to
only
to manufacturi
not
limited
exc
hang
on
of a
States:
1-800-SAMSUNG
in
this
User
Manual
may
Displays
to
images
viewing
screen
as
Original
es
SAMSUNG
(with
full-motion
fill
the
screen
on
the
be
limited
to
images
nd
patterns,
time
picture.
1-800-SAMSUNG
To
dark
picture.
formats
well
as
burned
NORTH
conditions,
products,
provide
on
SAMSUNG
Purchaser
repairs
Limited
Warr
ng
to,
are
any
or
replacements,
Authorized
defects
are
provided for
be
changed
on
16
:9
aspect
video.
The
if
your
model
screen,
such
no
more
than
and
text
should
be
can
cause
avoid
this,
bars.
On
LED
you
select
in
images
AMERICAN
excl
us
and
the
requirements
Warranty
products purchased
only.
must
be
anty
Statement
and
from
in
material
originally
accessori
Service
(1
-800-726-7864)
without notice.
warranty terms.
ratios,
the
images
displayed
offers
as
the
dark
5% of the total
such
as
limited
as
uneve
n
aging
vary
the
programming
models that
and
t
he
length of time
,
are
not
LIMITED
ions
and
limitati
, conditions,
Repa
ir
Service
performed
and
the
Service
or
workmanship,
specifi
ed
provisions
es,
options, upgrades, or cons
Center,
reference
ratio of the
on
them
this
feature
side
bars
telev
stock market
described
of
your
LED
offer
picture
covered
WARRANTY
by
a dated
Center
ons
in
the
in
the
a
SAMSUNG
Bill
please
by
of
United
is
for,
ca
only
and
screen
should
with
the
on
non-expanded
i
sion
viewing
crawls,
above
for
display
and
images,
sizing
you
view
your
Samsung
STATEMENT
the
o
rigin
exclusions
States
United
Authorized
of
Sa
le
the
responsibility
and
only
in-home
ll
toll-free:
may
differ
from
width to
them.
States,
as
heig
primarily
images
video
all
and
and
features
al
and
on
P
roof
those
or on-site
be
constantly
standard
per
week.
game
televi
sions
leave
primarily
,
Uneven
limit
ed
Limited
Warr
limitati
SAMSUNG
for the warranty period
Serv
of
Pur
of
the
encountered
services,
umabl
es
actual product
ht)
are
primarily
in the wide
in
motion.
format
displays,
.
Disp
laying
s
ub
t
le,
but
display
use
these
controls
LED
aging
war
ranty.
anty supplied
ons
contained
products
i
ce
Center.
chase
mu
purchaser.
in
minimum
.
appearance.
designed
screen
Disp
televis
station
logos
stationary
permanent
full
screen
to
as
a
result
with
herein,
purchased
originall
Along
with
st
be
presented
Conditions
normal
use
or
16:9
lay
ing
ion
v
ideo
, web
images
burnedmoving
v
iew
of
Samsung
y
this
to
covered
of the
maximum
Avoid
displ
ay
ing
at
the sc
reen
bottom
can
ca
use
im
age
recommendations
•
Avoid
displaying
•
Always
try to display
•
•
Reduce
Use
brightness
a
ll
TV
f
eat
s
till
burn
below:
ur
im
ages
etc.)
, or programs
-
in
on
the
same
any
and
es
d
es
(such
the
LED
TV
image
contrast
igned
as
jpeg
scree
channe
in
to
to
reduce
picture
in
panorama
n,
l for
full
screen
avo
Still image warning
fil
es),
still
image
or
4:3
image
which
will
affect
image
long
periods.
.
Use
t
he
TV
set's
id
the
appear
ance
of after-
im
age
retenti
on
and
sc
elements
format
q
ualit
picture
ima
re
en
burn
on
y.
fo
ges
(
such
the
To
rmat
.
.
Refer
as
sc
r
ee
reduce
m
enu
to
TV
channel
n.
ri
sk
for the best possible
thee
Constan
of
this
-
Manu
l
ogos,
tly displaying
effect,
al
for
stock
please
details.
or
new
still
follow
match.
s bars
p
ic
tures
the
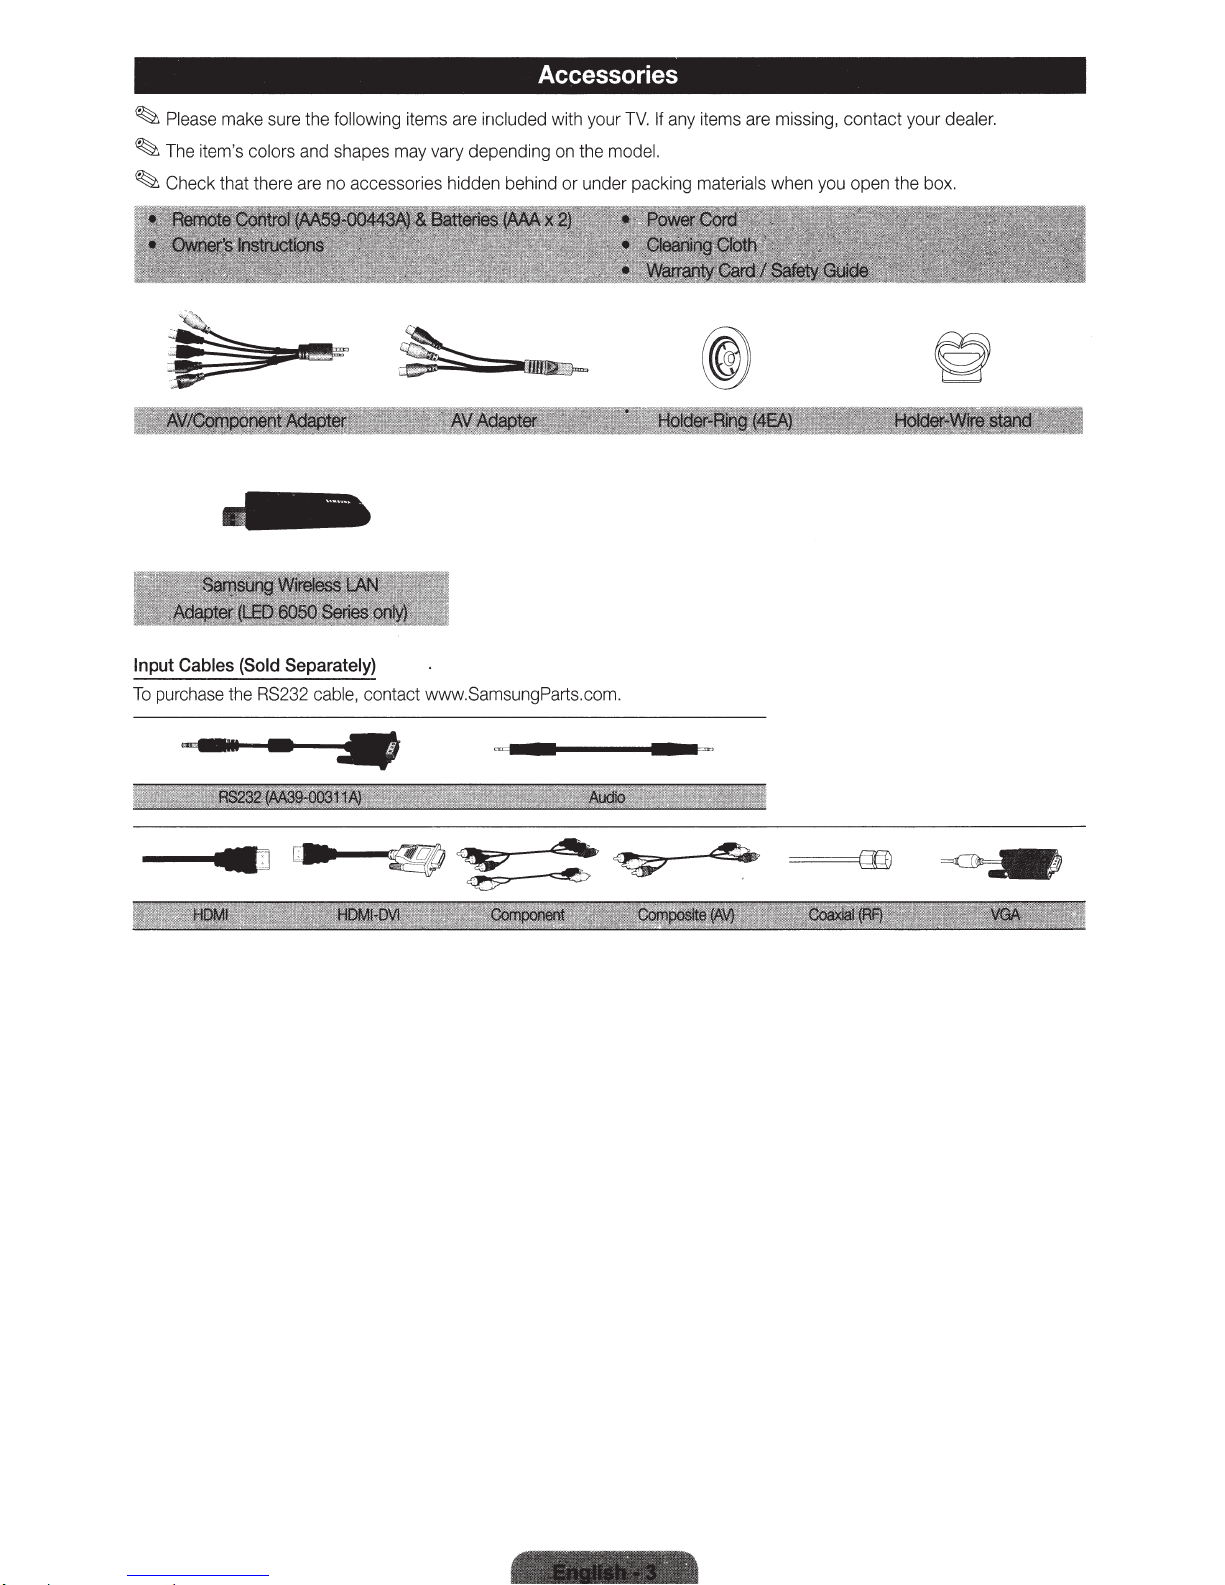
Accessories
~
Please make sure the following items are includ ed with your
~
The item's colors and shapes may vary depending on the model.
~
Check that there are no accessories hidden behind or under packing materials when you open the box.
TV.
If any items are missing, cont
act
your dealer.
Input
Cables
To purchase th e RS232 cabl
.....,.
(Sold
Separately)
••
illt-1
---4-----
e, cont
act www.SamsungParts.com .
~
The
product
color
1
.
hdica1tO'p
and shape
?ri
1j~g~!i!~1i
1
rHsfC
"(;,"i;
,
,:
W
··
1
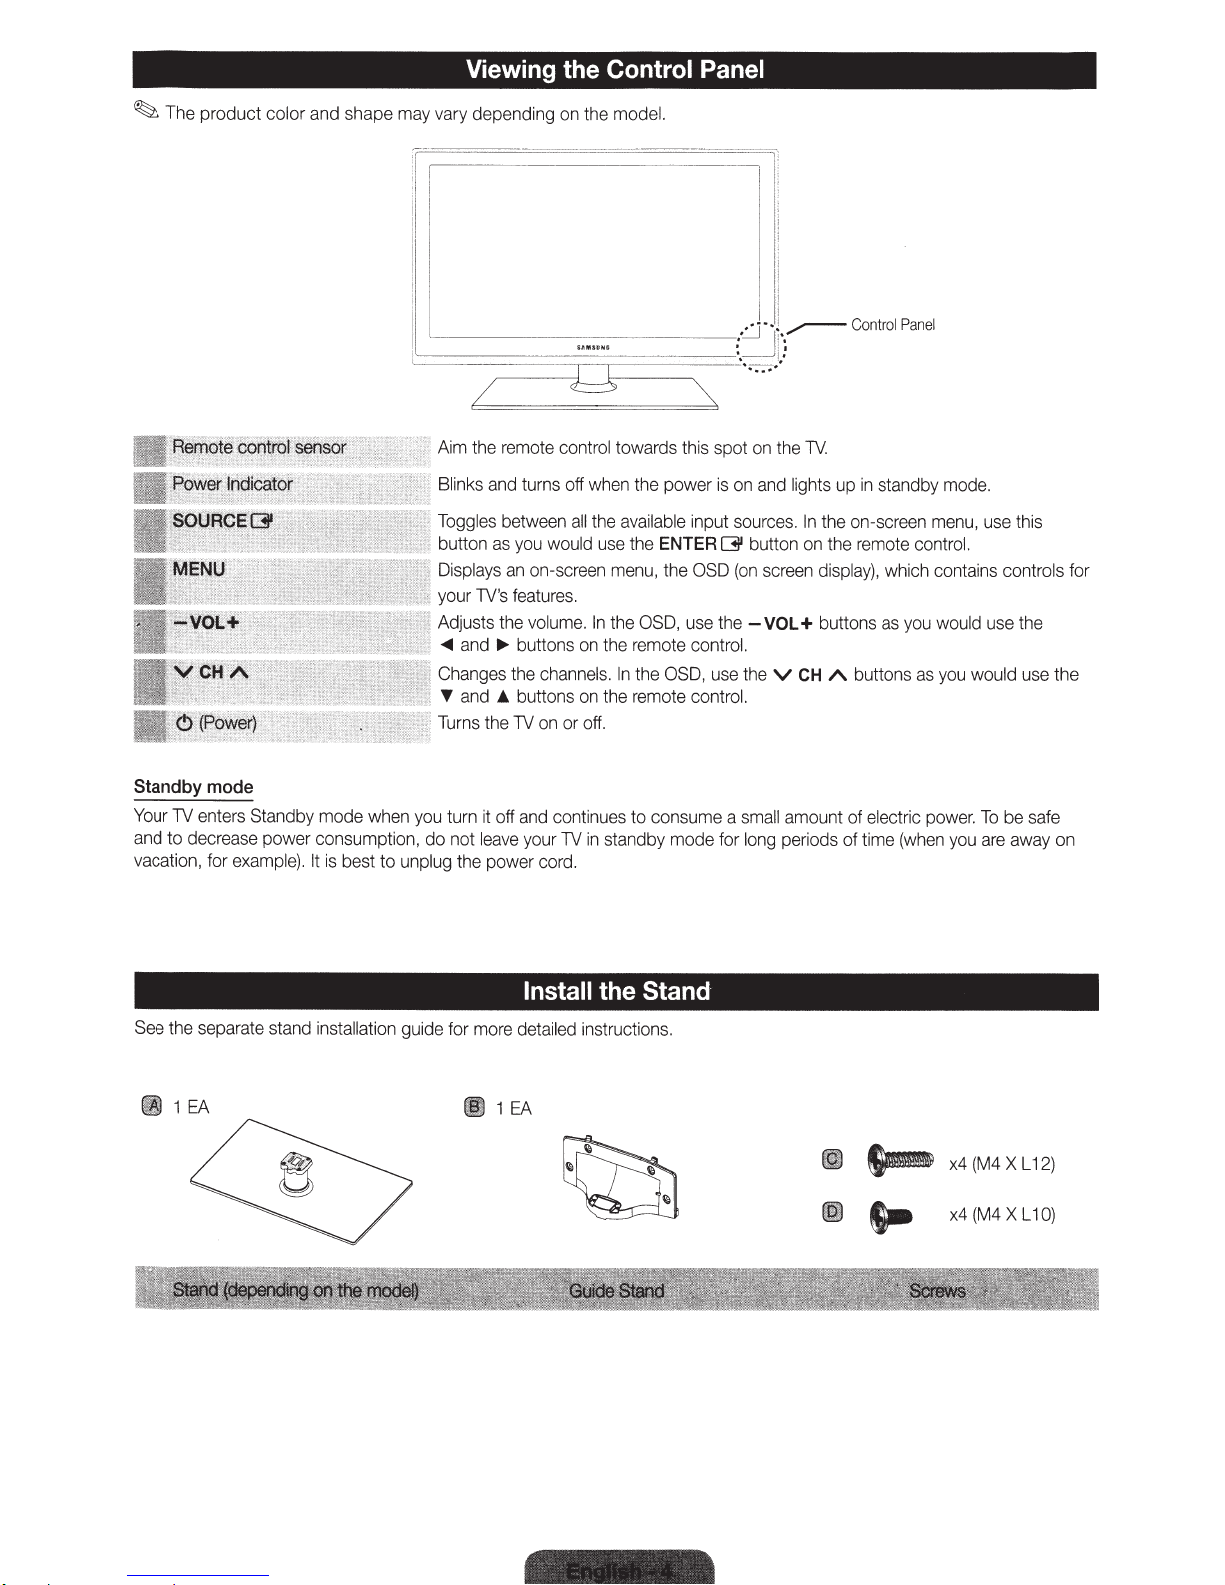
Viewing the Control Panel
may
vary
depending
I
I
l
/
~
UCJ
Aim
the
remote
~~i~1;:·~
Blinks
and
on
the
model.
T
'
L
-----J
turns
L___
~
control
towards this spot
off
when
~
~
the power
is
on
on
and
the
1V.
lights
up
in
standby
mode
.
Standby
Your
1V
and
to
decrease
vacation,
See
the
Toggles
button
Displays
your
·;·~~f;;[~~~ni~!ijiHtf:•:;;,~'Jil~!~~
Adjusts
~
Changes
T
Turns
1V's
and
and
between
as
you
an
features.
the
""
the
•
the
1V
would
on-screen
volume.
buttons
cha
nnels
buttons
on
or
all
on
on
off.
the
use
menu,
In
the
the
.
the
In
available
the
ENTER
the
OSD,
remote
the
OSD,
remote
input
[31
OSD
use
the
control.
use
control.
sources
button
(on
screen
-VOL+
the
v
.
CH
In
on
the
on-screen
the
remote
display
buttons
A
buttons
),
mode
enters
Standby
for
example).
separate
mode when
power consumption,
It
is
best to
unplug
stand
installation
guide
you
do
turn
not
for
it
off
and
l
eave
your
th
e power cord.
Install
more
detailed
continues to consume a
1V
in
standby mode for
the
Stand
instru
ctio
ns.
small
amount
long
periods of time
of
electric
which
as
you
(when
menu,
control.
contains
would
as
you
power.
you
use
con
use
would
To
be
are
this
trols
t
he
use
safe
away
for
the
on
181EA
fB
~
~
c-
x4(M4XL12)
x4(M4XL10)
0
II)
~
(M4XL12)
Ill
•.
.
0 SideView
x4
· ·
T \
~<
Front
•
a,~::®@~~
I I
t
l C
:~·:
__
ATIENTION
00
NOT USE
HEMICAlS
(Correct
Top
View
:_:
___
DO
NOTUSE
00
GREASE OIL
assembly)
NOT
1
;
USE
~
1
~
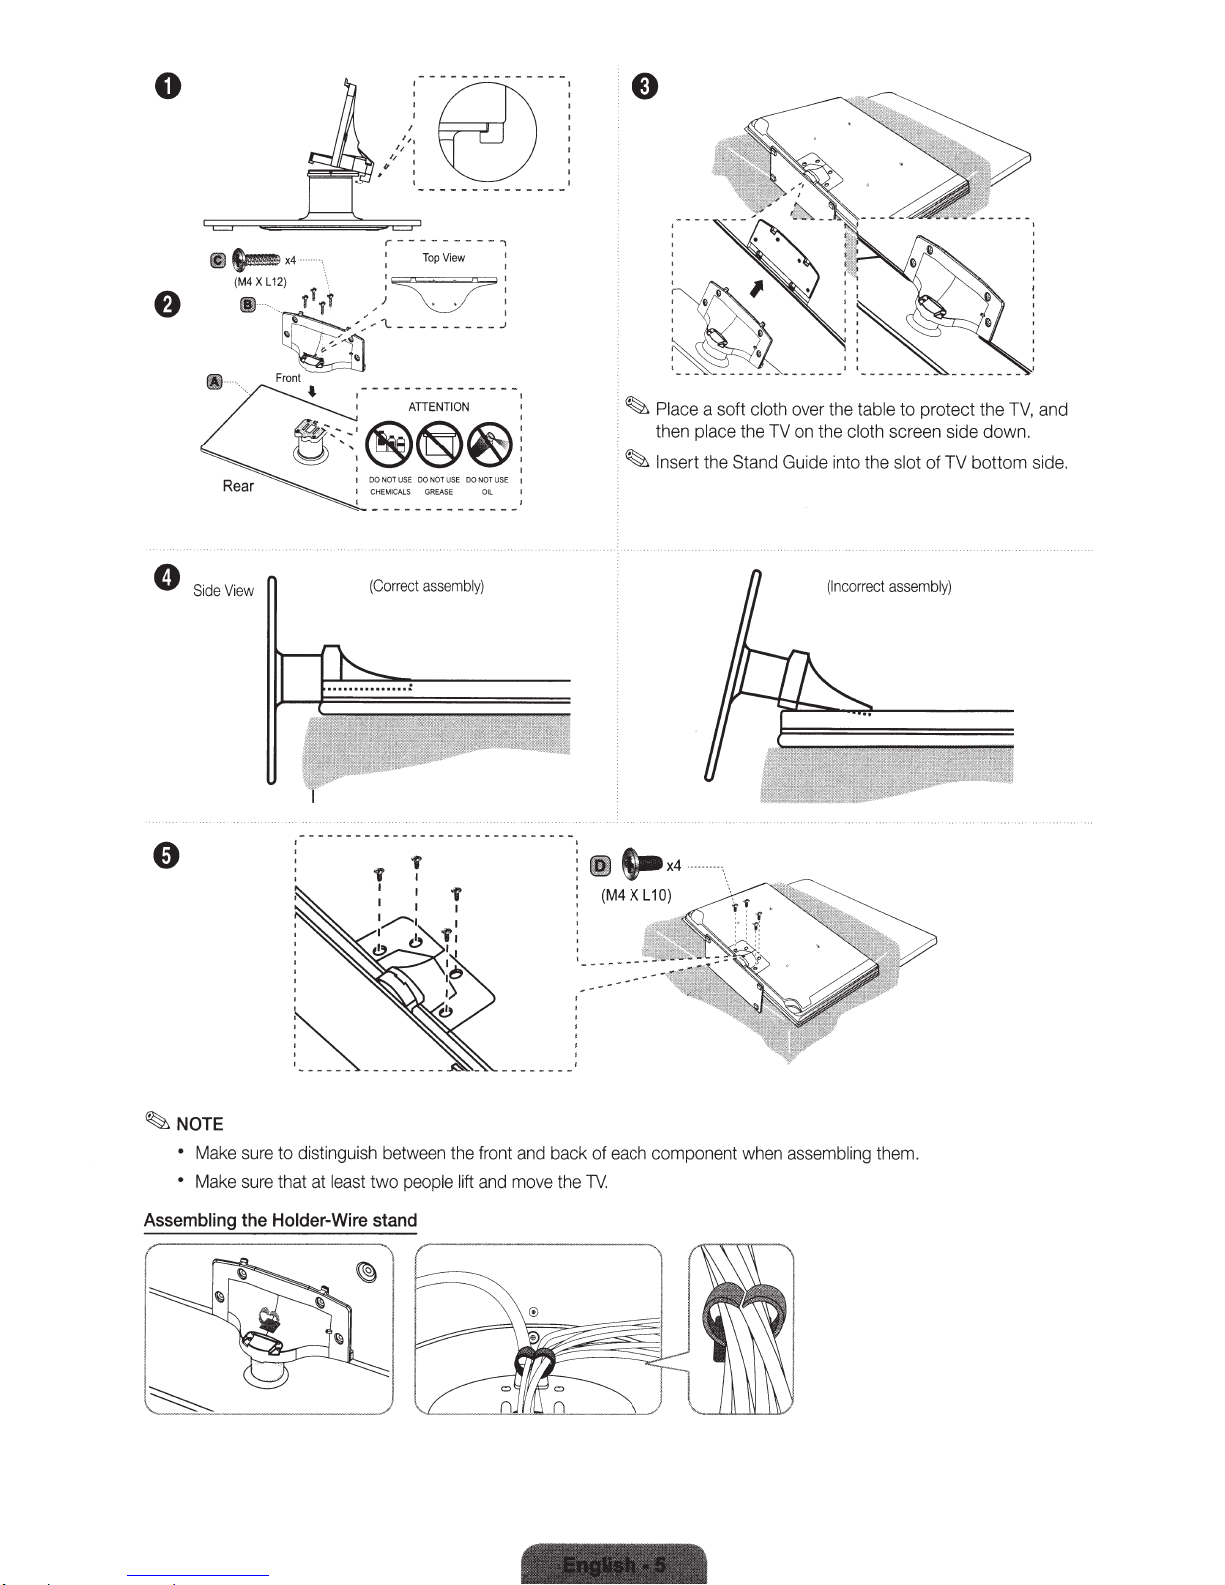
Place
a soft cloth
then place the
Insert
the
Stand
over
the table to protect the
TV
on
the cloth screen side down.
Guide
into t
he
slot
(Incorrect
assembly)
of
TV
bottom si
TV,
and
de.
~
NOTE
•
• Make
Make sure
sure
'f
'f
I
~---
to
distinguish be
that at leas
t two
'f
--
-
---
twe
en
the
fro
nt
and
people
lift and move the
bac
R
c-x4
(M4
XL
---
k of
each comp
TV.
10)
onent wh
en
assembling them.
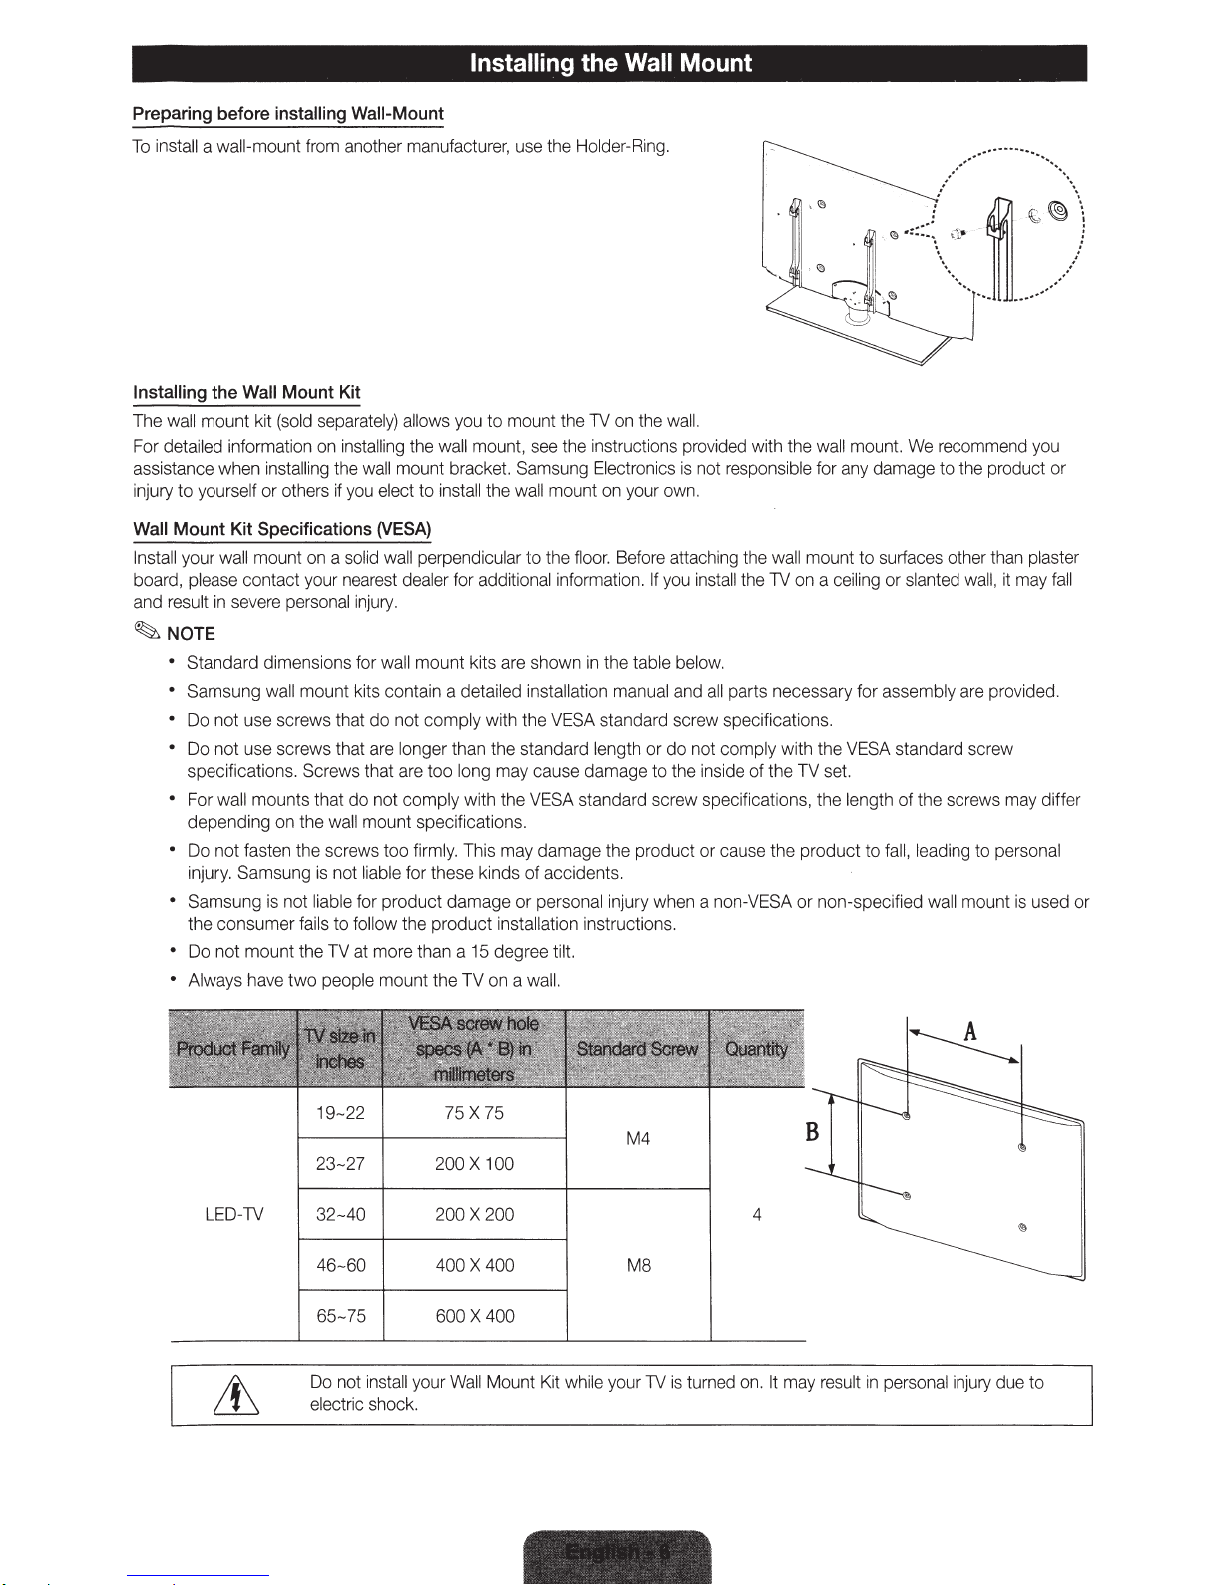
Installing
the
Wall Mount
Preparing
To
install
Installing
The
For
assistance when
injury
Wall
Insta
board,
and
~
before
installing
a wall-mount
the
Wall
wall
mount kit
detailed information
to yourself or
Mount
Kit
ll your wall mou
please
contact
result
in seve
NOTE
• Standa
•
• Do not u
•
•
• Do
• Samsung is not
• Do not mount the
• Always h
rd
Sa
msung wa
Do
not use screws that
specific
For wall mount
depending on
no
t fasten the screws too
injury. Samsung is not liable for th
the cons
from
Mount
(sold
separatel
on
installing
others
Specifications
nt
on a soli
your
re
personal
dim
ens
ll
mou
se
scre
ws that do not comply with the VESA standard scr
ations.
Screws that are too long may cau
s that do not comply with the
th
e wa
liable
umer
fails
ave
two people mount the
Wall-Mount
anoth
er
manufacturer,
Kit
y)
allows
you
installing
the
if y
nearest
ions for
nt kits conta
to
TV
the
wall
wall
mount bracket.
ou elect to
(VESA)
d w
inju
are
ll
mount spec
for product dama
follow the product installation instructions.
at more t
install the
all perpendicu
dealer
for additional
ry.
wall
mount kits are shown in the table below.
in
a detailed installat
longer than the standard length or do not comply with the
ifi
firml
y. This m
ese
han
use the
to mount the
mount, see t
Samsung
wall
mount
lar to the floor. B
information.
se
VES
A standard screw spec
cations.
ay damag
kinds of accidents.
ge
or per
son
a 15 degr
TV
ee
on a wall.
til
t.
Holder-Ring.
TV
he
instructions p
Electronics
ion m
damage to the insi
e the product or cause
al
on
the
wall.
rov
ided
with the
is
not responsible for any damage
on
your ow
injury when a non-VESA
n.
efo
re attaching the wa
If
anua
you insta
l a
ll
nd
all parts necessary for assembly
ew
specifications.
de
the
of the
ifications,
wall mou
ll moun
t to su
TV
on
a c
eiling
VES
A standard sc
TV
set.
the length of the
the product to fa
or non-specified wa
...
..
·
·····
,..
c;s ....
.,••
......
• I
.....
1• :
/
I
. .
. .
. .
.
\··......
..
...... • ......
nt.
We
recomm
to
the prod
rfaces oth
or
slanted
ll, leading
er
wall,
are
rew
scre
ws m
to
ll
mount is used or
······
---
.....
~
~
~
... # ...
...
end you
uct or
than
plaster
it
may f
provided.
ay
differ
persona
..
.
\
'
.........
/
all
l
1
9-22
23-27
LED-
TV
32-40
46- 60
65- 75 600 X 400
Do
not insta
electric shoc
ll
k.
75 X 75
M4
200 X 100
200 X 200 4
400 X 400 M8
your Wall
Mount
Kit whil
e your
TV
is turned on. It may result
in
pers
ona
l injury due to
~
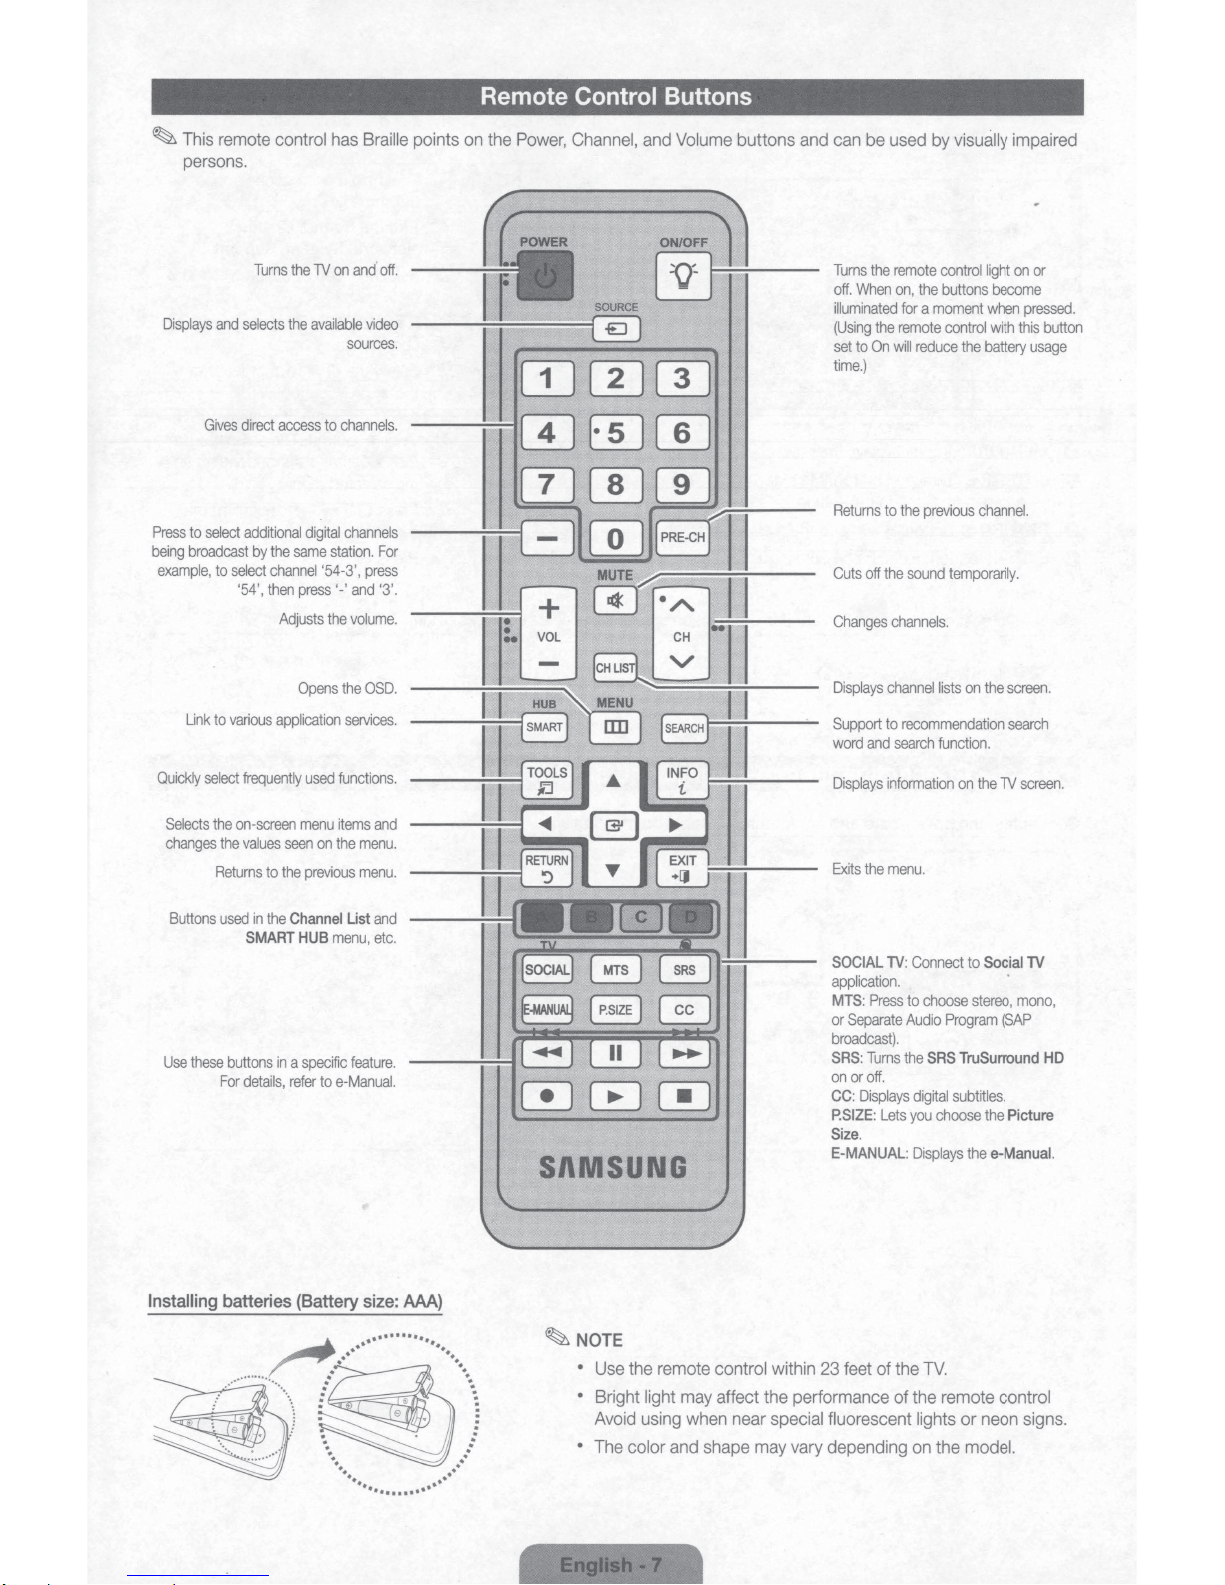
This
persons.
Displays
Press
to
being
broadcast
example,
remote
and
Gives
select
to
select
control
Turns
selects
direct
access
additional
by
the
channel
'54',
then
Adjusts
the
the
available
digital
sarne
press'-'
has
1V
on
and
sources.
to
channels.
channels
station. For
'54-3',
and
the
volume
Braille
off.
video
press
'3'.
.
points
Remote Control Buttons
on
the
Power,
Channel,
and
Volume
buttons
and
can
be
used
Turns
the
off.
When
illuminated
(Using
the
set
to
On
time.)
Returns
to
Cuts
off
the
Changes
channels.
by
visually
remote
control
on,
the
buttons
for a moment
remote
control
will
reduce
the
previous
sound
temporarily.
light
when
the
battery
channel.
impaired
on
become
pressed.
with
this
or
button
usage
Link
Quickly
Selects
changes
Buttons
Use
these
to
various
select
the
the
Returns
used
buttons
For
application
frequently
on-screen
values
seen
to
the
in
the
Channel
SMART
in a specific
details,
refer
Opens
used
menu
on
previous
HUB
menu,
to
e-Manual.
the
OSD.
services.
functions.
items
and
the
menu
menu
List
and
etc.
feature
Displays
channel
lists
on
the
screen.
Support
to
and
information
the
menu.
TV:
Press
Separate
Turns
or
off.
Displays
Lets
.
recommendation
search
function.
Connect
.
to
choose
Audio
Program
the
SRS
digital
you
choose
Displays
word
Displays
.
.
.
SAM
SUNG
Exits
SOCIAL
application
MTS:
or
broadcast).
SRS:
on
CC:
P.SIZE:
Size
E-MANUAL:
search
on
the
1V
screen.
to
Social
stereo,
mono,
(SAP
TruSurround
subtitles
.
the
Picture
the
e-Manual.
TV
HD
Installing
batteries
.........
r
(Battery
~
size:
AAA)
··············
,...~-······
) ( :
·.
·..
··..
·····I
....
_.'
.
...
...
··
···
...
..·
.·
)
~NOTE
•
Use
the
• Bright
Avoid
•
The
color
remote
light
using
may
when
and
control
affect
near
shape
within
the
performance
special
may
vary
23
feet
of
the
TV.
of
the
remote
fluorescent lights or
depending
on
the
control
neon
model.
signs.
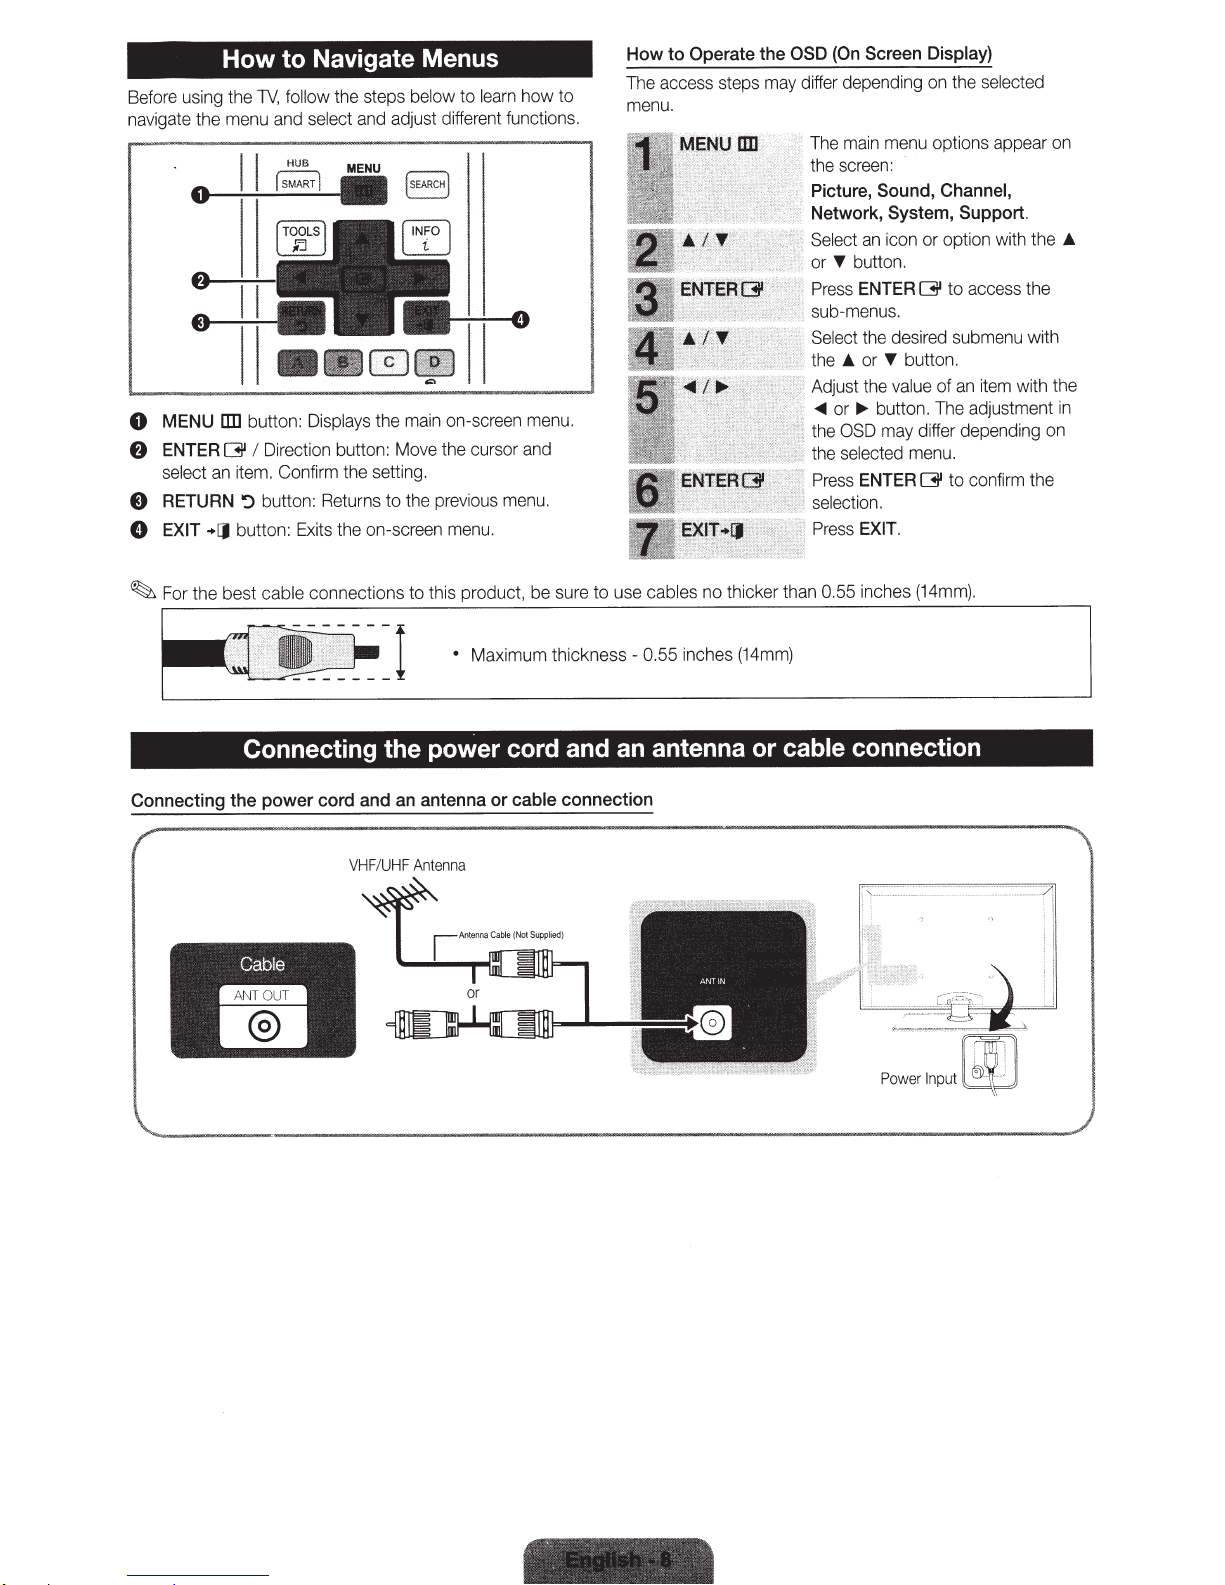
to Navigate Menus
How
follow
Before using the
navigate the menu and
1V,
II
HUB
~
button:
ITD
MENU
0
Direction button: Move the cursor and
I
f)
8
0
ENTER
select
RETURN
EXIT
G
an item.
button: Returns
~
button: Exits
+[J
Confirm the setting.
to
the steps
select
MENU
Displays
the
below
and adjust different functions.
the main on-screen menu.
the previous menu.
to
on-screen menu.
learn
how
to
Operate
to
How
The access steps may differ depending on the
menu.
the
The main menu options appear on
the screen:
Picture,
Network,
an icon or option
Select
bu
T
or
''·
,,
''·' .
'''
ENTER
Press
sub-menus.
the desired submenu with
Select
or
A
the
Adjust the value
or~
-<11
OSD
the
selected menu.
the
ENTER
Press
selection.
EXIT.
ess
Pr
Screen
(On
OSD
Display)
Sound,
tt
button. The adjustment
Channel,
System,
on.
T
may differ depending on
Support.
to
G
button.
an item with the
of
to
G
selected
th the
wi
access the
confirm the
A
in
Connecting
ckness - 0.55 inches (14mm)
Maximum t
•
hi
Connecting the power cord and an antenna or
the
C
power
able
cord
and
VHF
UH
/
antenna
an
Ant
F
or
a
nn
e
connection
cable
...
-
cable
connection

When
you
the
TV,
press
~
Plug
~To
return
~
Before
turn
the
&
Play
turning
to
the
the
TV
POWER
is
on
for
the
C)
butto
available
previous step
on
the
only
TV,
· '; .
first
time,
n.
when
in
the
make
you
Pr
ess
w
hen
Set
up
you
do
select
refer
requirements
manual
Network
When
Next
upgrade.
"Software
~
This
Press
Select
Plug
a
sequence
the
Source
Plug
&
Play
have
con
nec
the
A
or
~
done
.
your network
not
know
Skip.
We
suggest
to
"Wired!VVireless
and
(Page
15)
menu
.
network
to
the
the
upgrade
If
you
Upgrade"
may
take
A
or
Home
connection
want
~
&
Play (Initial
of
on-screen
is
set
to
TV.
sequence,
ted
the
TV
button to
connection.
your
ne
twork
you
Network
instructions,
.
You
can
set
settings
TV
software.
to
upgrade
(Preference
some
time,
button to
Use
select
mode.
Setup)
prompts
select
Previous
to
an
antenna or cable connection
select
a
language.
Press
t
he
set
up
information
skip
network connection
Connecti
and
the
Ne
up
the
ne
twork connection
are
compl
Your
TV
will
later,
se
l
ect
Features__.
depending
Home
Store
Demo
will
assist
,
and
Press
ENTER
on"
two
auto
on
Use,
mode
Oil
or
in
the
rk
Connection
ete,
Software
mat
ica
the
Skip.
Support
network status.
and
then
is
for
in
configuri
then
press
ENTER
button
want
to
se
tup
e-Manual
late
Upg
lly
upg
rade,
For
more
Menu)
press
reta
il
environments.
ng
basic
ENTER
(Page
Oil
tw
ice
to
start.
set
to it
later,
now
and
for
set
up
sec
t
io
n
of
r
usi
ng
the
rade
is
if your
informa
in
thee-Manual.
the
ENTER
settings.
Oil.
8).
If
this
available.
TV
need
tion,
refer
Oil
To
turn
on
Select
a software
to
button twice.
,:
".'
}
;_
Press
the
~
If
you
or
DST,
button to
ENTER
done,
~
If
you
and
then
set
the date
done setting
Press
the
appea
rs
on
check both
~
If
you
button to
button
ENTER
both
~
When
The
channe
For
more
~
Pre
ss
If
you
want to
If
you
want to e
i
nformation,
A
se
press
se
A
your
if
se
to
the
done,
l
inf
ormat
the
or
~
l
ec
ted
and
select
Oil,
l
ec
t
ed
press
or
~
you
l
ec
t
ed
se
se
G.
Most
Digital
sea
r
ENTER
watch
njo
refer
button to
Auto,
then
then
ENTERO!l
Manual,
ENTER
or
time.
the
button
select
h
ave
Cable, you'll
lect
lect
se
l
ec
ch
wil
i
on,
y
Smart
to "
select
you'll
go to
p
ress
ENTER
you
r
zone,
select whether to turn
.
you'll
Oil.
Use
the
Date
and
Time,
to
select
io
n.
Select
both
con
Digital
or
Analog
the
correct cable s
cab
le
systems
and
Analog
t
Next,
and
l
start
auto
refer
to
Channel
Oil
button
a
broadcast
Hub,
Smart
Hub"
Auto
th
Oil.
and
then
go to
Then
,
~
or
select
Air
or
Next, a
nected.
go to the
use
systems.
the p
ma
ti
ca
at
a
ny
program,
select
in
thee-M
or
Manual,
e
Time
Zone
On
the
Time
press
ENTER
DST
the
Date
use
the
number buttons or
~
button to
Next,
Cable,
nd
th
en
Cable
,
and
then
ignal
fo
rm
STD.
Select
ress
ENTER
ll
y. T
his
can
-->
Auto
Program
time
to
int
select
Smart
Hub.
an
ual
and
then
and
DST
Zone
Oil.
(Daylight
and
Time
mov
e between entry
and
then
and
then
pre
press
th
e
System
press.
at
er
Close
.
screen
ENTER
-
STD,
the
correct
G.
t
ake
up to
in
rupt the memori
.
Smart
p
re
screen.
screen,
On
the
Sa
vin
gs
screen
press
ss
ENTER
ENTER
HRC
30
the
e-
Hub
w
ss
ENTER
use
DST
Time)
.
Select
the
ENTER
Oil
.
Us
e the
G.
Us
,
or
IRC
cab
le
minutes.
Manual.
za
il
l
sta
rt.
Oil
twi
ce
Select
Time Zone
the
_.
or~
screen,
_.
or
on
or off.
Date
~
fields.
press,
or
bu
tton to
When
Oil.
Oil.
A
check
button.
You
_.
or
~
e the
A
or
-
and
then
signal
format for
tion process.
For
more
.
When
Time,
can
~
press
detai
led
If
You
Want
to
Rerun
Plug
&
Play
...
(8
MENU
-.
System
~
NOTE
•
To
ch
ange
the
When
you
see
TV
the
-.
Plug
&
Play
's
sett
in
g
from
Store
vo
lu
me
bar
on
-->
ENTER
Oil
Demo
to
Home
Use
when
not
in
Plug
&
Play,
press
the
vo
lum
e
button
on
the
TV.
th
e
sc
reen
,
press
a
nd
hold
the
MENU
button
on
the
TV
for
5
sec
.
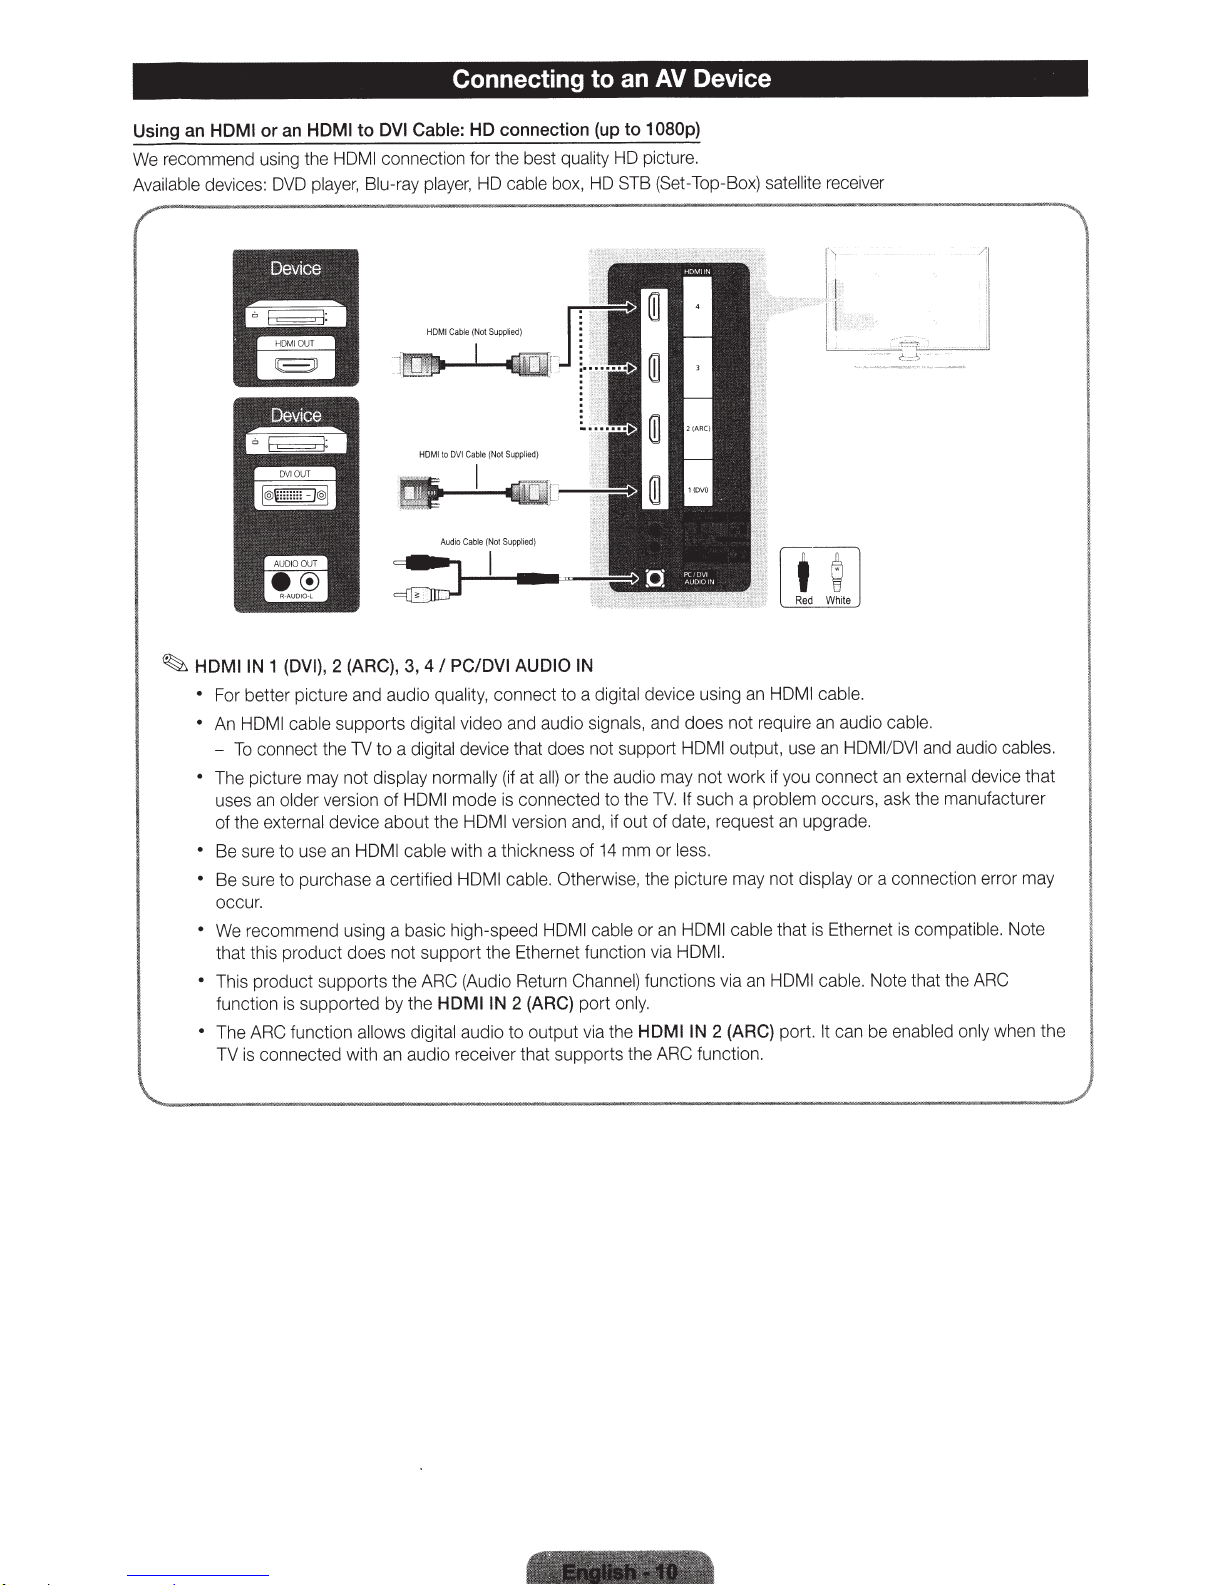
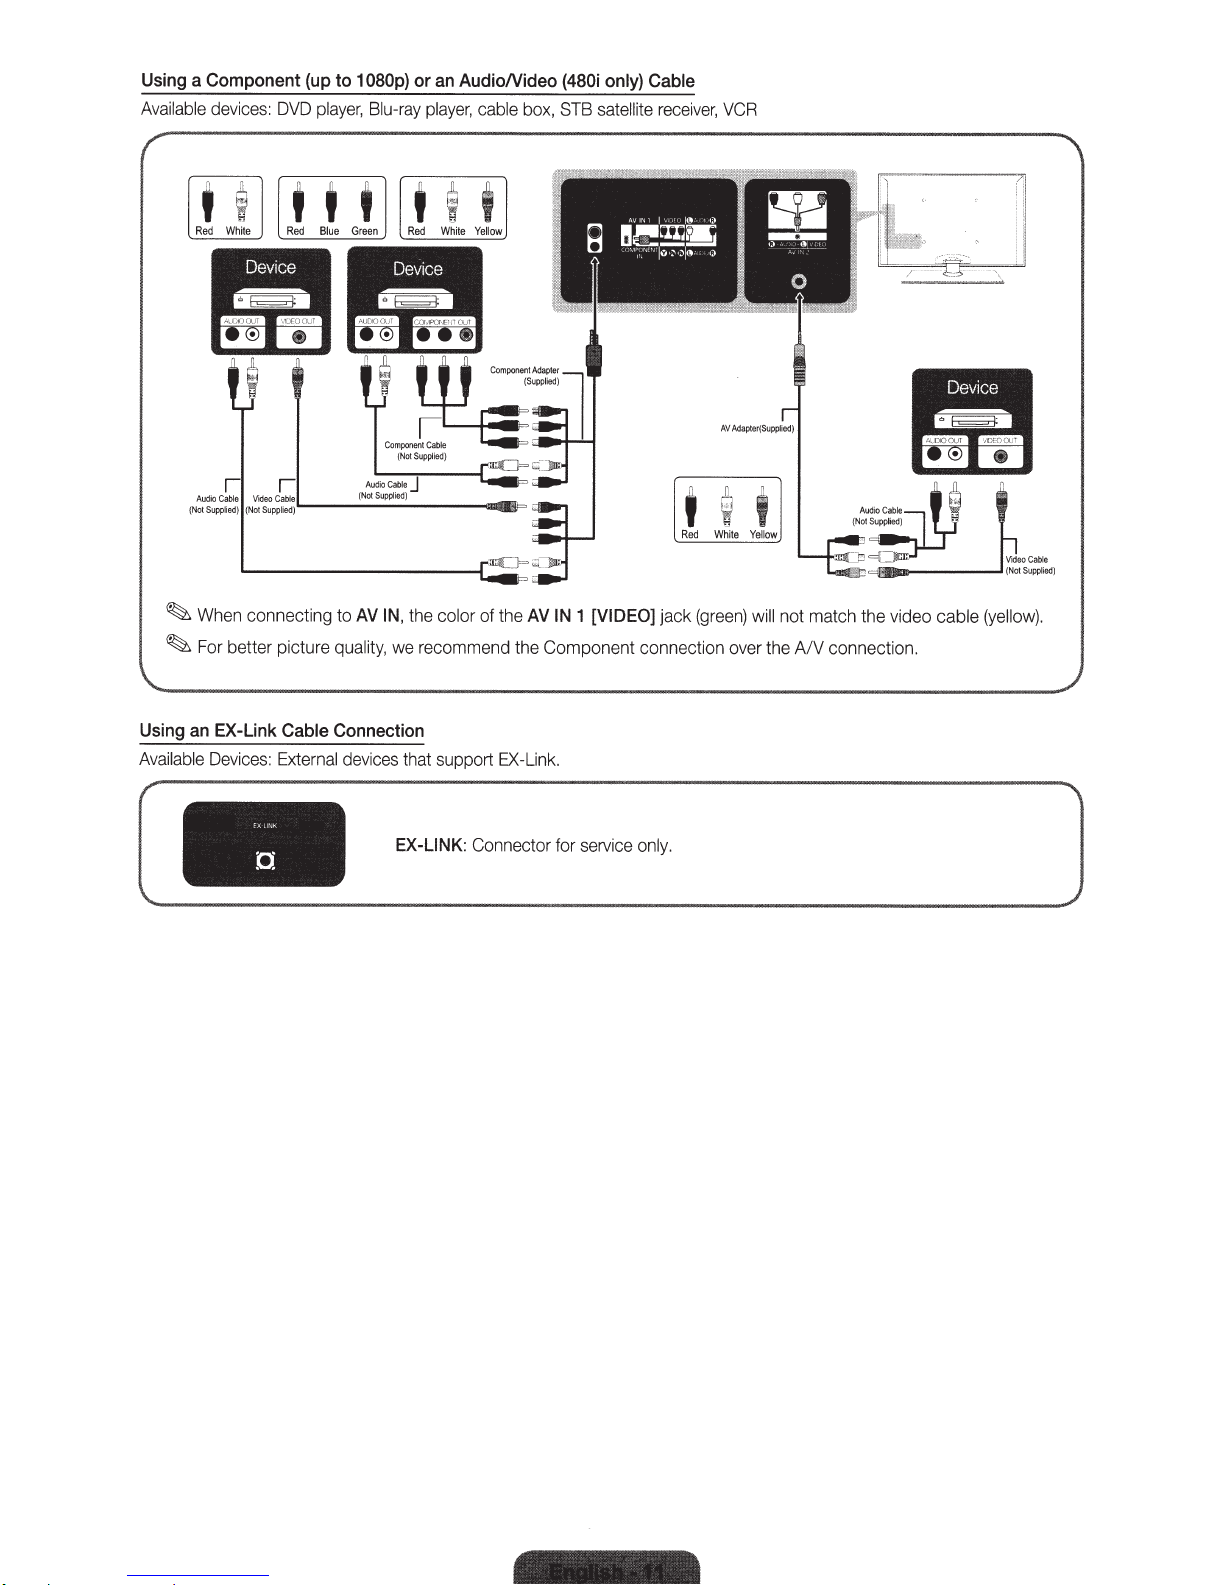
Using an
We recommend using the HOM
Available
HDMI
devices:
player, Blu-ray player,
DVD
to DVI Cable: HD connection
HDMI
an
or
Connecting
connection for the best
I
cable
HD
quality
box,
an
to
to 1 080p)
(up
HD picture.
STB
HD
Device
AV
op-Box) satellite
t-T
(Se
Red
receiver
e
hit
W
PC/DVI AUDIO IN
~
HDMIIN
•
•
•
•
•
•
•
•
1
For better picture and audio
supports
An HOM
The picture may not display normally
uses an
of the
Be sure to use an
Be sure to purchase a certified HOM
occur.
We recommend using a basic high-speed HOM
that this product does not support the Ethernet function via HOM
This product
function
The ARC function
TV is conn e
I cable
connect the TV
To
older
external
supported by the
is
ct
version of HOM
device about the
HDMI cab le
supports
a
ed with an audio receiver that supports the ARC function.
2 (ARC), 3,
(DVI),
4/
quality, connect
video and audio signals,
digital
device that does not support HOM
digital
a
to
mode is connected to the
I
HDMI
with a thickness
I cable.
the ARC (Audio Return Channe
IN
HDMI
audio
digital
ows
ll
to a digital
or the audio may not
all)
(if at
version and, if out
Otherwise, the picture may not
2 (ARC)
output via the
to
of
I cable
port
device using an HOM
and does not require an audio
output, use an
I
if you connect an
work
problem
14
mm
or
If such a
TV.
date, request an upgrade.
of
less.
or
an HOM I cable
I.
functions via an
l)
only.
I IN
HDM
HDMI
2 (ARC)
le.
cab
I
e.
cabl
and audio
DVI
/
MI
HD
external
occurs, ask the manufacturer
a connection error may
or
display
that is Ethernet is
le.
cab
can
It
port.
compatible.
Note that the ARC
enabled only
be
cables.
device that
Note
the
when
Using
a
Available
Component
devices:
DVO
(up
player,
to
1
080p)
Blu-ray
or
an
player,
AudioNideo
cable
box,
(480i
STB
only)
satellite
Cable
receiver,
VCR
Red
~When
~
For
Using
an
Available
White
connecting to
better picture
EX-Link
Devices:
Cable
External
t t t
Red
Blue
Green
Audio
(
Not
AV
quality,
Connection
devices
Red
White
Yellow
Cable
J
Supp
l
ied)
IN,
the
color
of the
AV
IN
1
[VIDEO]
we
recommend the Component connection
that
support
EX-Link.
Red
jack
t
Wh
(green)
AV
A
dapter(Supplied)
ite
Yellow
will
not match the video
over
the
A/V connection.
cable
(yellow).
EX-LINK:
Connector
for
service
only.
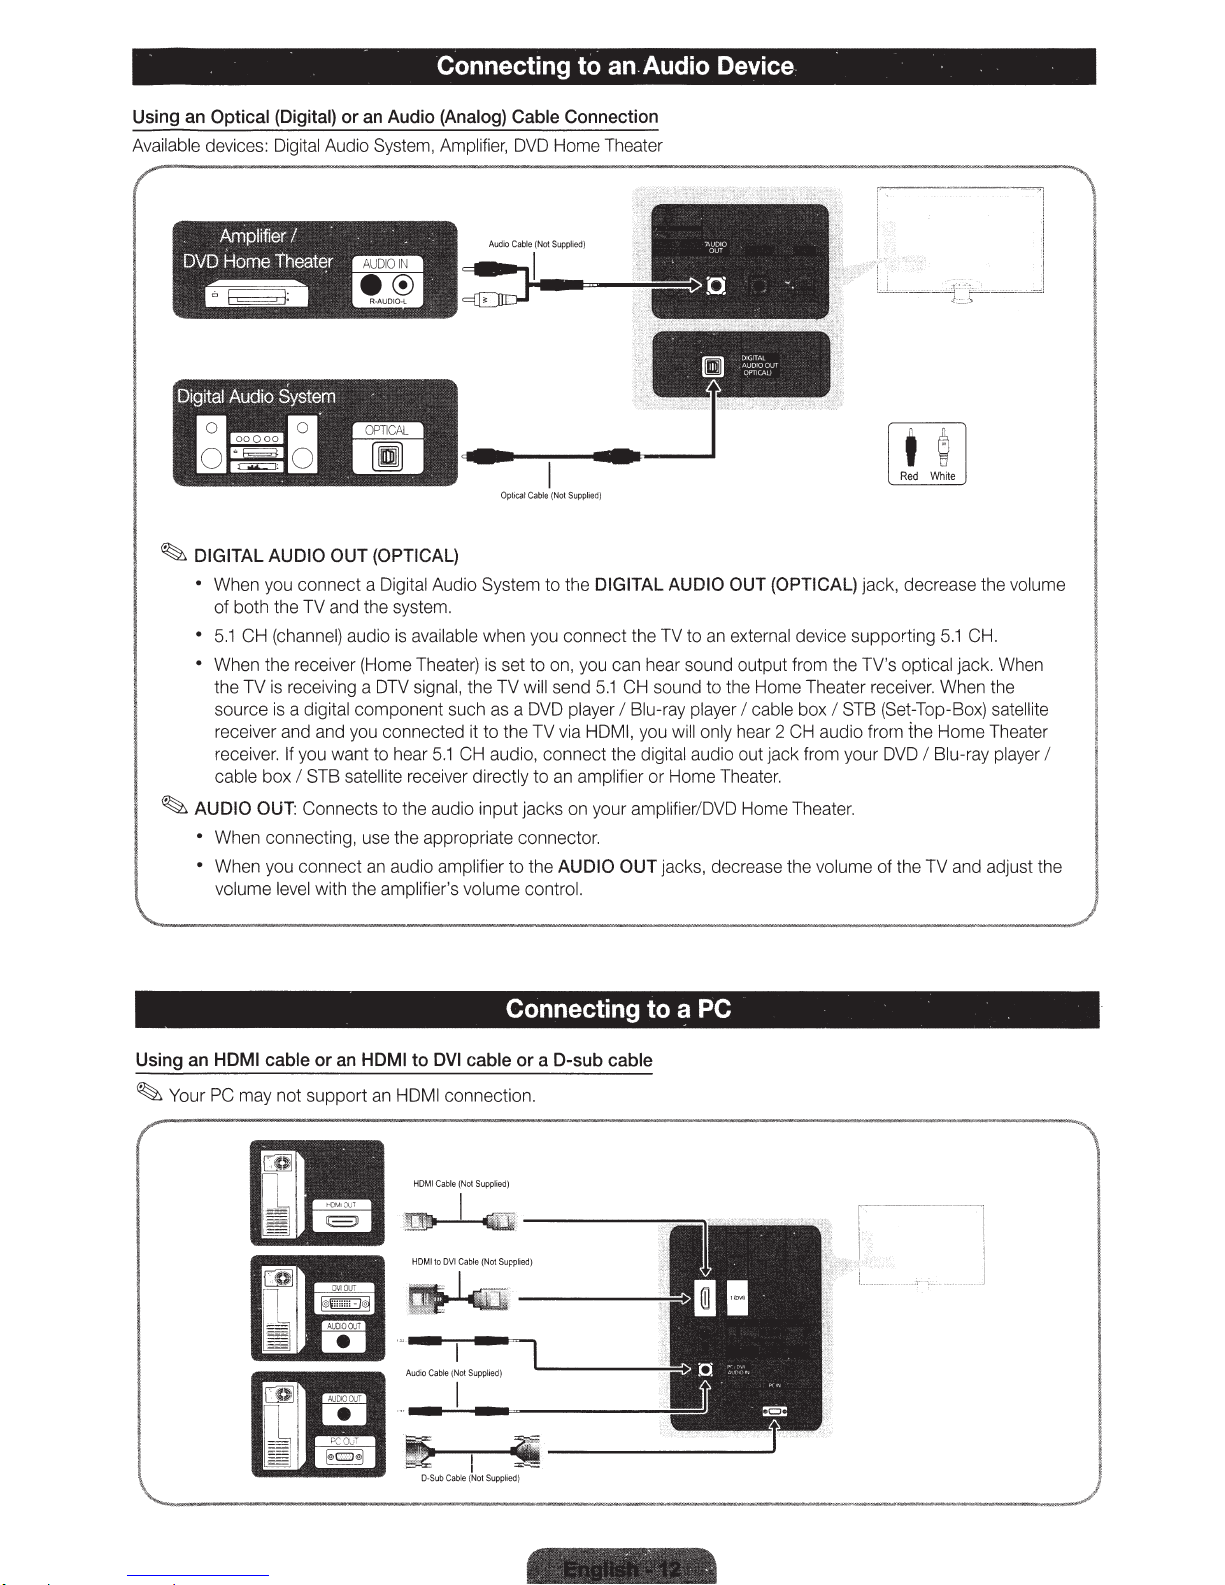
- Connecting to an Audio Device
Using
an
Optical
Available devices: Digital Audio System, Amplifier, DVD Home Theater
~
DIGITAL
o When you connect a Digital Audio System to the
of
o
5.1
o When the receiver (Home Theater) is set
the
source is a digital component such as a DVD player
receiv
receiver. If you want
cable box I STB satellite receiver directly
~
AUDIO
o When connecting, use the appropriate connector.
o
Wh
(Digital)
AUDIO
or
OUT
an
Audio
(OPTICAL)
(Analog)
Cable
Opttear
Connection
Cab
le {
Not Supplied)
DIGITAL
both the TV and the system.
CH (channel) audio is available when you connect the TV to
to
on, you can hear sound output from the TV's optical jack. When
TV
is receiving a DTV signal, the TV will send
5.1
CH sound to the Home Theater receiver. When the
I Blu-
er
and and you connected it
to
hear
OUT:
Connects
to
the audio input jacks on your amplifieri
en you connec t an audio amplifier
volume level with the amplifier's volume control.
to
the
TV
via HDMI, you will only hear 2 CH audio from the Home Theater
5.1
CH audio, connect the digital audio out jack from your DVD I Blu-ray player I
to
an amplifier or Home Theater.
to
the
AUDIO
OUT jacks, decrease the volume of the TV and adjust the
AUDIO
ray
OUT
an
external device supporting
player I cable box I STB
DVD
Home Theater.
(OPTICAL)
Red
White
jack, decrease the volume
5.1
CH.
(Se
t-Top -Box) satellite
Using
an
HDMI cable or
~
Your PC may not support an HDMI connection.
an
HDMI
Connecting
to
DVI
cable or a D-sub cable
HOM I Cab
le I Not Su
pplied
)
to
a PC

PC
Display
Op
t
imal
column.
PC
The
IBM
MAC
VESA
Modes
re
solution
TV
will
DMT
(D-Sub
is
1
and
920
automaticall
640
720
640
832
11
52
640
640
640
800
800
800
1024
1024
1024
11
52
1280x
1280
1280
1280
1280
1360
1440
1440
1680
an
HDMI
to
DVIInput)
X 1
080
@
60
Hz.
You
can
al
so
se
lect
o
ne
of t
he
s
tandard
y
adjust
to
the
resoluti
on
y
ou
choose.
X
350
X
400
X
480 35.000
X
624
X
870
X
480
X
480
X
480 37.500 75.000 31 500
X
600
X
600
X
600
X
768 48.363
X
768 56.4
X
768
X
864
1024
X
1024
X
800
X
800
X
960 60.
X
768 47.712
X
900
X
900 70.635
X
1050
31.469
31.469
49.726
68.
68
1
3
1.
469
37.
861
37.879
48.077
46.875
76
60.023
67.500 75.000 108.000
63.
981
79.976
49.702
62.795 74.934 106.500
00
0
55.935 59.887
65.290 59.954 146.250
70.086
70.087
66.667
74.
551
75.062
59.940 25.175
72.809 31.500
60.317
72
.1
88
75.000 49.500
60.004 65.000
70 069 75.000
75.029
60.020 108.000
75.025 135.000
59.810 83.500
60.000 108 000
60.015 85.500
74.984 1
reso
l
utions
25.175
28.322
30.240
57.284
100.000
40.000
50.000
78.750
106.500
36
.750
li
sted
in
t
he
Resolution
+1-
-I+
-I-
-1-
-I-
-1-
-I-
-1+I+
+I+
+I+
-I-
-1+I+
+I+
+I+
+I+
-1+
-
1+
+I+
+I+
-I+
-I+
-I+
~
NOTE
• For
•
•
•
HDMII
Th
e
inte
rl
ace
Th
e set m
ay
Sepa
rate and Composi
DVI
c
ab
le
connection,
mod
e is not supported.
ope
rate
ab
norma
te
modes
ll
y if
yo
u must u
yo
u
are
support
se
lect
se
ed.
th
a n
e
HDMIIN
on
-stan
SOG
da
rd video for
(Sy
nc On
1
(DVI)
Gree
jack.
ma
n) is n
t.
ot
supported.
 Loading...