

Samsung 5500 Series, UN32D5500RF, UN37D5500RF, UN40D5500RF, UN46D5500RF User Manual

LED TV
SERIES~
5500
User
._~
#
,
0
1
~
~-.
Manual
'
~
....
,
#
0
imagine
Thank
To
your
www.samsung.com/register
Model
you
receive
product
for
purchasing
more
complete
at
the
Serial
possibilities
this
Samsung
service,
No.
please
product.
register
_
For more information about how to use e-Manual
(P.
14)
Figures
Product
and
illustrations in this User Manual are
design
and
specifications
maybechanged
provided
Important Warranty Information Regarding Television Format Viewing
~
See
the
warranty
card
for
more
Wide
screen
format
LED
The
images
the
television
Additionally,
and
agingofLED
primarily
view
Be
burned-in
displayedonthem
images
are
constantly
video
viewing
pat1erns,
carefulinthe
shouldbelimitedasdescribed
Displays
display
different
formatsasa
images,
SAMSUNG
Subjecttothe
products,
in
warranty
The
Warranty
Centeristhe
encounteredinnormal
Excluded,
replacements,
For
-Inthe United States: 1-800-SAMSUNG (1-800-726-7864)
-
and
the
United
period
above
Statement
the
locationofa
In
Canada: 1-800-SAMSUNG
Displays
and
full
described
but
moving.
programming,
other
stationary
that
leave
screen
selection
full
and
are
not
coveredbyyour
ELECTRONICS
requirements,
the
requirements,
StatesonSAMSUNG
originally
warranty
andadated
responsibilityofthe
not
limited
accessories,
SAMSUNG
informationonwarranty
(16:9,
the
should
primarilybein
Displaying
shouldbelimitedtono
images
subtle,
moving
screen
useofthe
but
images,
picture.
durationoftelevision
NORTH
AMERICAN
conditions,
conditions,
specified,
to,
products
andtothe
repairs
BillofSaleasProofofPurchase
purchaser.
product.
are
any
originally
options,
upgrades,orconsumables.
Authorized
aspect
ratioofthe
the
stationary
and
above
permanent
not
Samsung
exclusions
mustbeperformedbya
wide
graphics
more
text
suchasstock
for
all
televisions.
burned-in
stationary
pat1ernsordark
formats
you
limited
LIMITED
and
exclusions
purchasedInCanada,
Original
Purchaser
Conditions
specified
Service
Center,
for reference only
without
terms.
screen
widthtoheight)
screen
16:9
and
imagesonscreen,
than5%of
market
Displaying
ghost
imagesinthe
use
for
warranty.
limitationsofthe
and
covered
provisions
viewing.
WARRANTY
limitations
andinCanadaonSAMSUNG
only.
SAMSUNG
mustbepresentedtothe
are
limited
for,
please
call
notice.
are
ratio
format,orexpandedtofill
the
total
reports,
bars.OnLED
STATEMENT
original
contained
in-homeoron-site
toll-free:
primarily
suchasthe
television
video
game
stationary
Uneven
Authorized
onlytomanufacturing
images
LED
picture.Toavoid
models
LED
Limited
herein,
Service
and
may differ from actual
designedtoview
the
screenifyour
dark
viewing
agingasa
Warranty
SAMSUNG
services,
sidebarsonnon-
per
week.
displays,
station
tha
exceed
the
that
Service
this,
offer
picture
resultofformat
supplied
will
additionally
products
Center.
Along
Center.
defectsinmaterialorworkmanship,
minimumormaximum
product
wide
screen
format
model
offers
expanded
logos,
web
guidelines
the
programming
features,
selection
Samsung
provide
this
Statement,
sitesorcomputer
use
and
Electronics
Warranty
United
repair
above
vary
sizing
with
purchasedinthe
with
Transportationtoand
appearance.
full-motion
this
feature
standard
can
cause
and
images,
these
controls
use,aswell
(SAMSUNG)
Repair
States,
the
Original
from
the
and
times,
exchanges
video.
and
format
graphics
uneven
and
to
as
Service
for
the
Limited
Service
only
those
or
Avoid
displaying
programsinpanoramaor4:3
image
quality.Toreduce
Avoid
Always
Reduce
speedupthe
Frequently
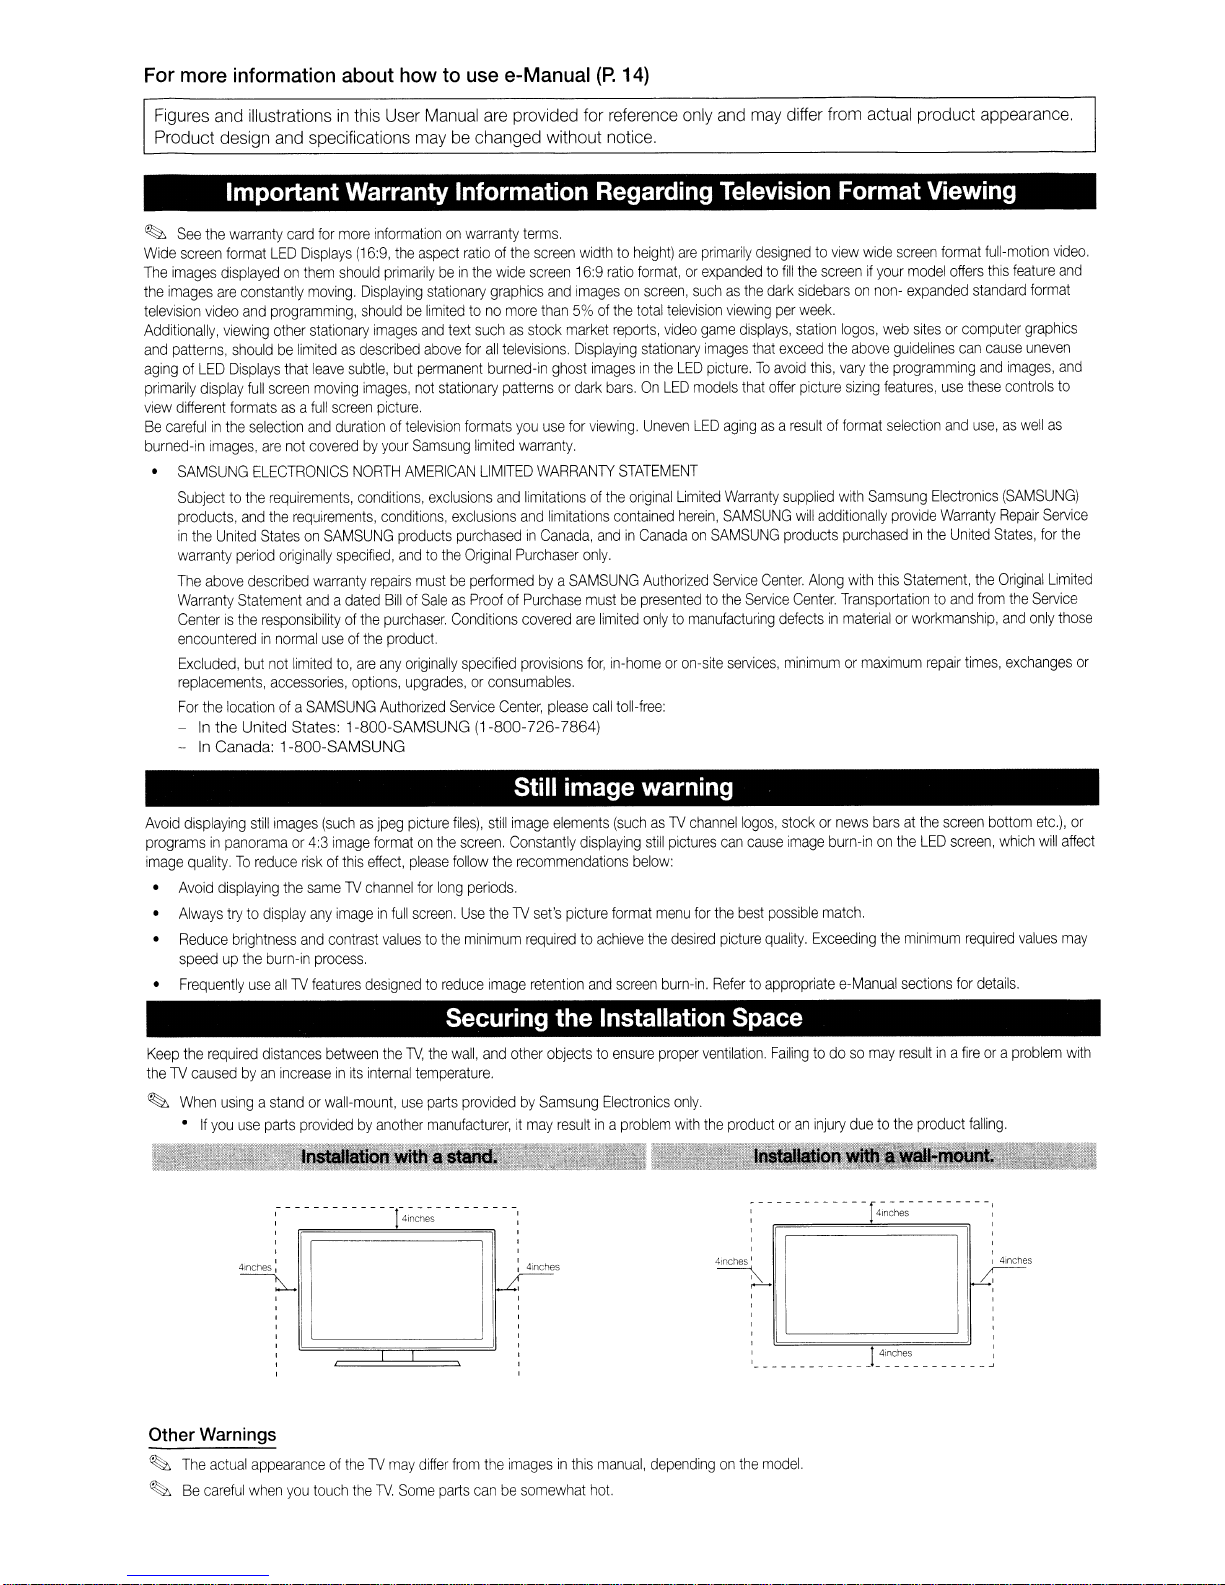
Keep
the
the1Vcausedbyan
~
When
•Ifyou
still
images
riskofthis
displaying
required
usingastandorwall-mount,
the
trytodisplay
brightness
burn-in
use
all1V
distances
increaseinits
use
parts
same1Vchannel
any
and
features
providedbyanother
J~t8tion
,
,
,
,
4inches
I
~
Ii
(suchasjpeg
image
effect,
imageinfull
contrast
process.
designedtoreduce
between
internal
picture
formatonthe
please
for
long
screen.
valuestothe
the
1V,
the
temperature.
use
parts
manufacturer,itmay
With
a~;
Still image warning
files),
still
image
screen.
follow
periods.
Use
minimum
elements
Constantly
the
recommendations
the1Vset's
requiredtoachieve
Image
retention
displaying
picture
and
(suchas1V
still
below:
format
menu
the
screen
burn-in.
channel
pictures
can
for
the
desired
picture
Refertoappropriate
logos,
cause
best
quality.
stockornews
image
possible
Securing the Installation Space
wall,
and
other
objectstoensure
providedbySam
sung
resultina
Electronics
problem
proper
only.
with
ventilation.
the
productoran
Failingtodosomay
_/:~~"~<~:r,,
:------------r
,
,
,
~
,
,
,
,
,
,
,
,
,
, ,
, ,
, ,
4!f'!Ches
I I 41nches
~
,......... 0--'--.,
burn-inonthe
match.
Exceeding
e-Manual
injury
duetothe
barsatthe
LED
the
minimum
sections
resultina
product
4~n~~
- - - - - - - - - :
screen
screen,
required
for
fireora
falling.
bot1om
which
details.
~
etc.),
will
values
problem
or
affect
may
with
Other Warnings
~
The
actual
appearanceofthe1Vmay
~
Be
careful
when
you
touch
the
1V.
Some
differ
from
parts
the
imagesinthis
canbesomewhat
manual,
hot.
dependingonthe
model.
Accessories
~
Please make sure the following items are included with your
~
The item's colors and shapes may vary depending on the models.
TV.Ifany items are missing, contact your dealer.
• .RemoteControl (AA59-00444A)
•. Owner's Instructions
Card!
• Warranty
Input
Cables
To
purchase the RS232 cable, contact www.SamsungParts.com.
RS232
Component
Safety Guide
(Sold Separately)
(AA39-00311A)
•
&Batteries (AAA x
HOMI
.
Composite
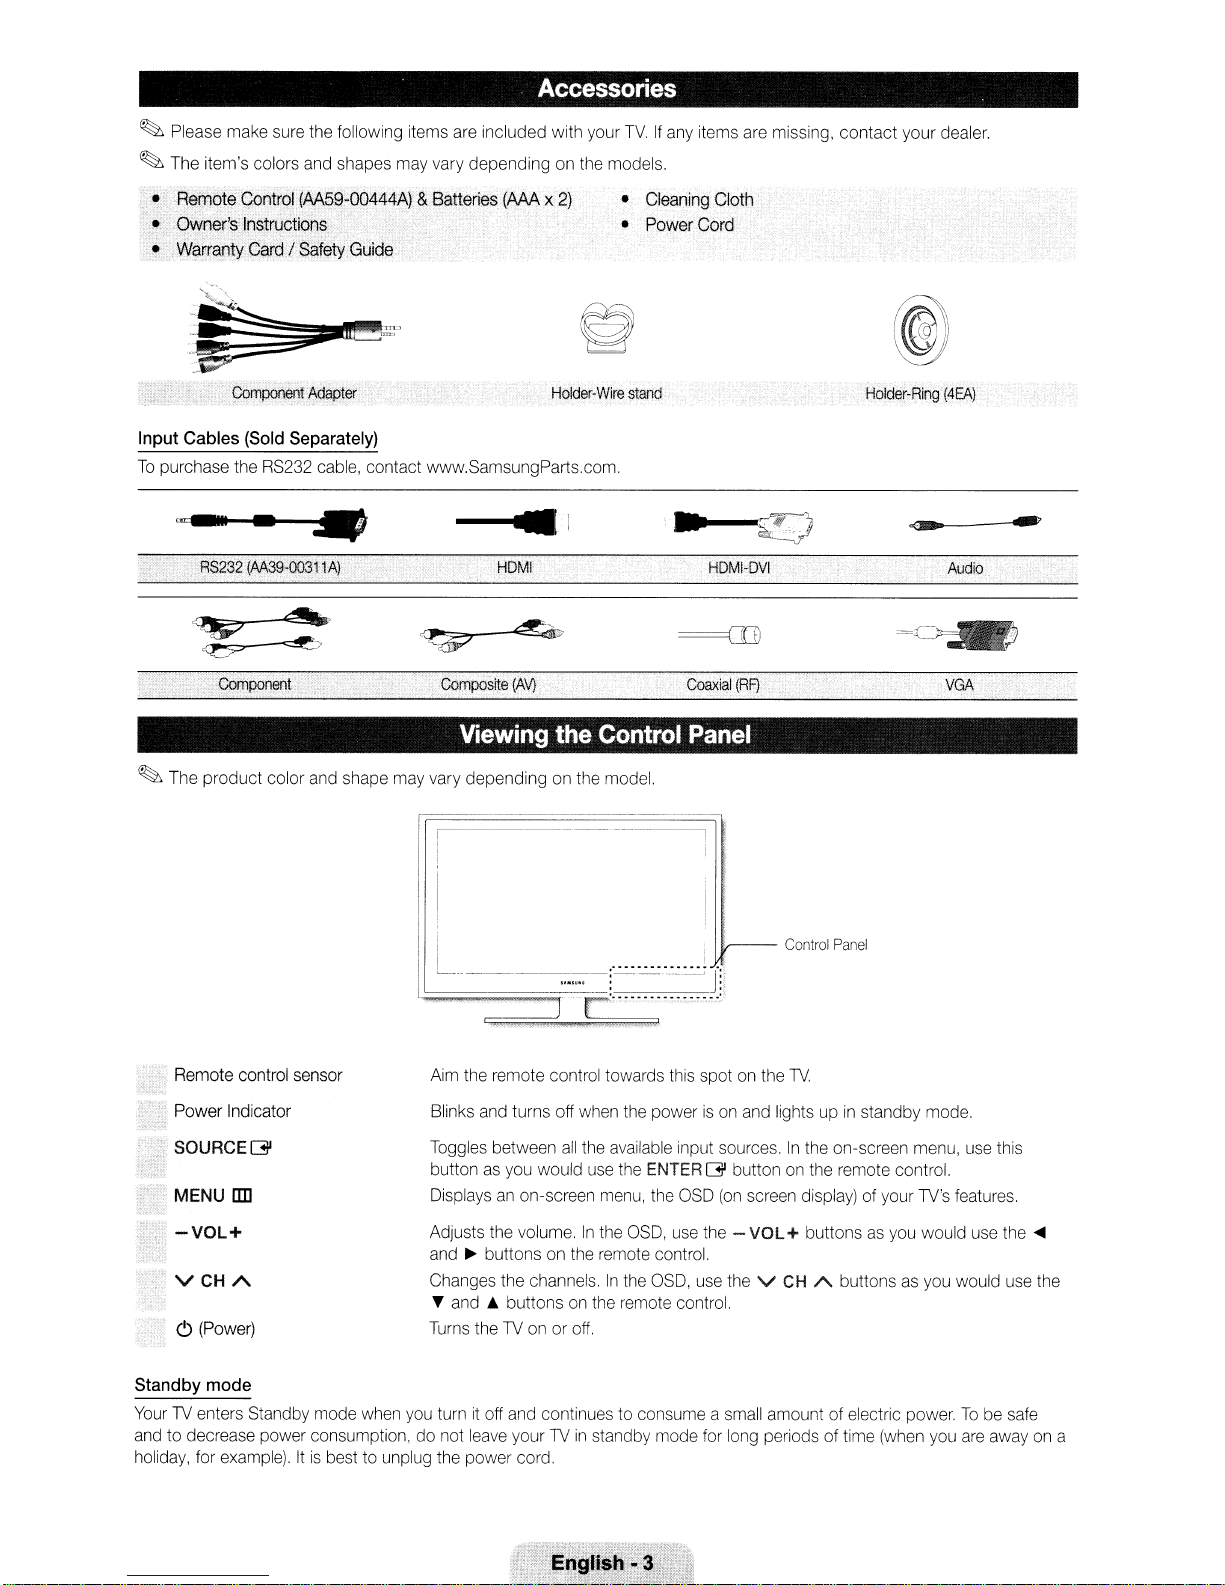
Viewing
~
The product color and shape may vary depending on the model.
2)
Holder-Wire
(AV)
the
• Cleaning Cloth
• Power
stand
Coaxial
Control
Panel
Cord'
(RF)
Holder-Ring
=~
(4EA)
Audio
VGA
Control
Panel
Remote control sensor
Power Indicator
SOURCEG
MENU
lID
-VOL+
VCHA
C)
(Power)
Standby
Your TV enters Standby mode when you turnitoff and continues to consume a small amount of electric power.Tobe safe
and to decrease power consumption, do not leave your TV
holiday, for example).
mode
Itisbest to unplug the power cord.
Aim the remote control towards this spot on the
Blinks and turns off when the powerison and lights upinstandby mode.
Toggles between
button as you would use the ENTER
Displaysanon-screen menu, the OSD
Adjusts the volume.
and~buttons on the remote control.
Changes the channels.
...
T and
Turns the TV onoroff.
all
the available input sources.Inthe on-screen menu, use this
G button on the remote control.
In
the OSD, use the - VOL+ buttonsasyou would use the
In
the OSD, use the V
buttons on the remote control.
in
standby mode for long periods of time (when you are away on a
(on
TV.
screen display) of your TV's features.
CH
A buttons as you would use the
....
I
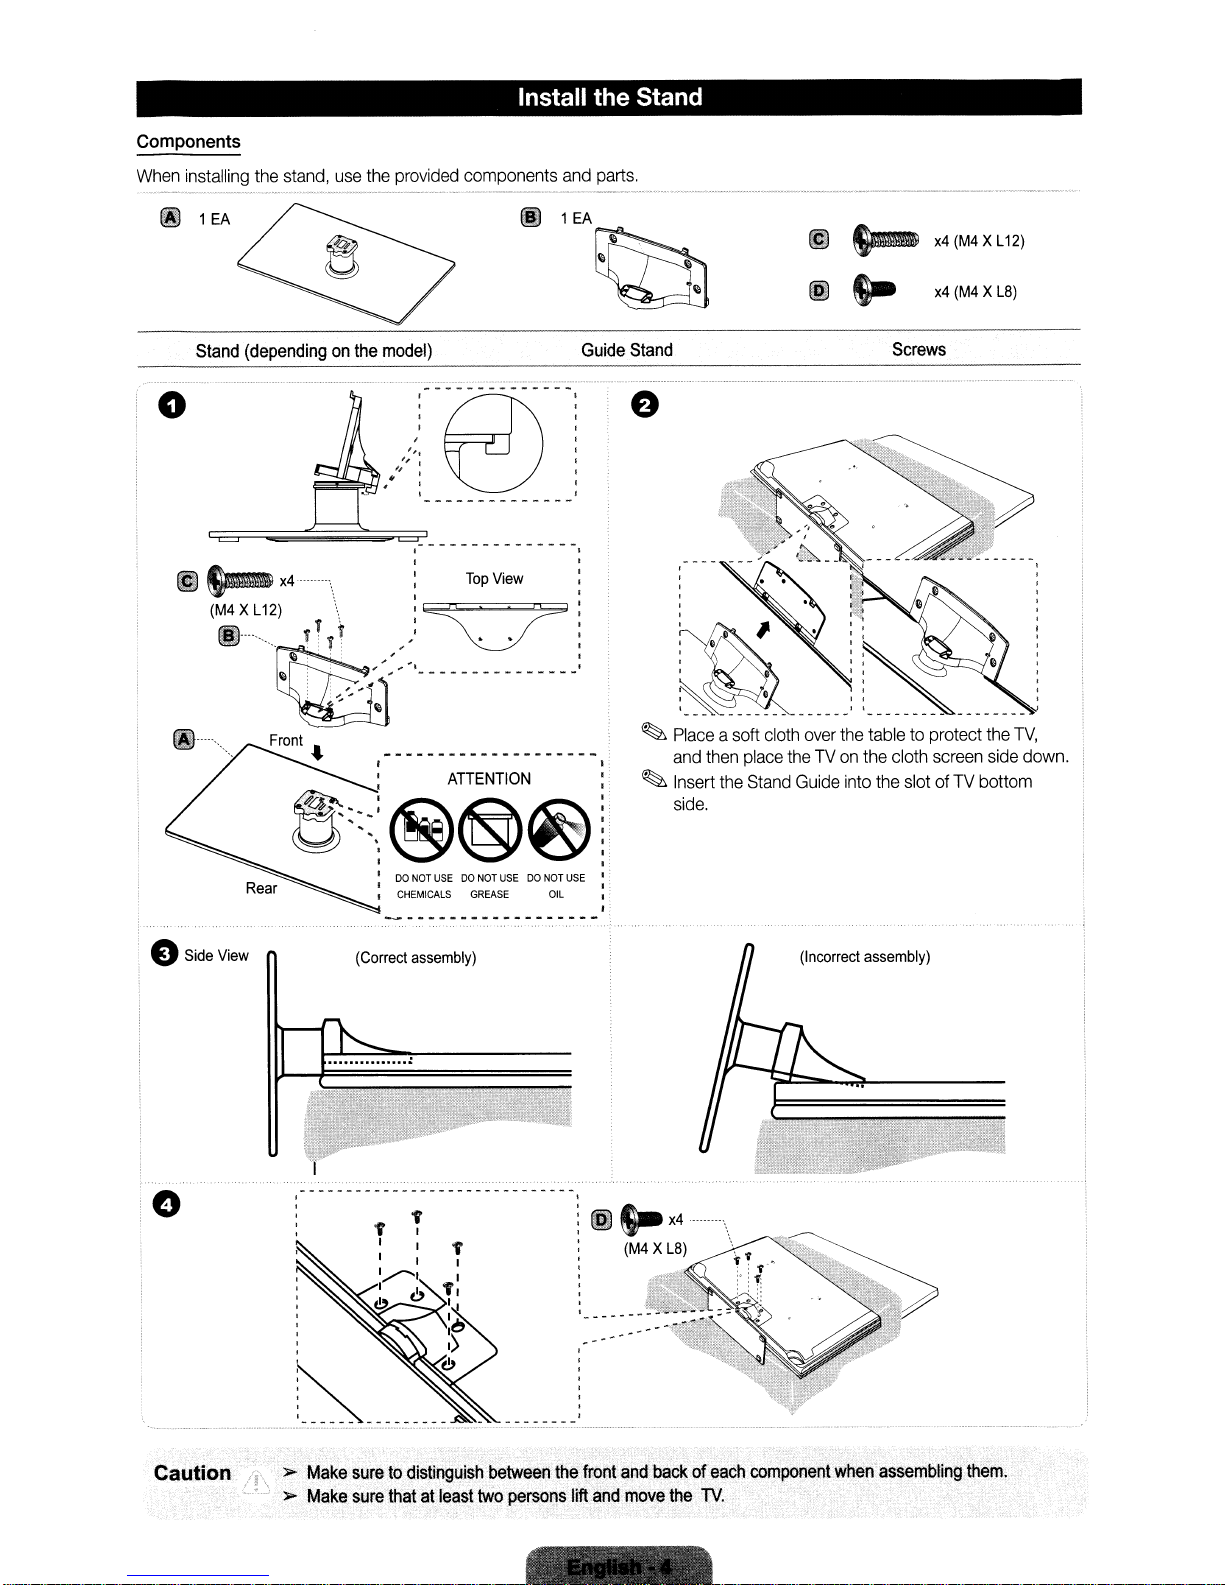
Components
When
installing
@
1EA
Stand
o
~~~~~_._-------------
@
~X4
(M4.XL12) \
@........
the
stand,
use
(dependingonthe
~~tI·
'f
. I I
T. Yr "
...
~~:
:'
:
:,,,-1
:
~...
Install the Stand
the
provided
components
~
and
1EA
parts.
~
Guide
model)
I
,
I
I
I
'"
'I
,
'I
. '
:
Top
View
Stand
:~':
.•
'
'-::.,--------------_:
.
@
@
~
S-
x4(M4XL12)
x4
Screws
(M4X
LB)
o
@----
Side
View
:DONOT
I CHEMICALS
(Correct
USEDONOT
assembly)
USEDONOT USE
GREASE
~
Place
asoft
cloth
over
the
tabletoprotect
and
then
place
theTVon
~
Insert
the
Stand
Guide
side.
OIL
(Incorrect
@s.-X4
(M4
XL8)
the cloth
into
assembly)
the
slotofTV
screen
the
TV,
side
bottom
down.
. >
Make
sure
to.
sure
distinguish
thatatleast
Cauti.on
,..
Make
--------
between
two
persons
the
lift
front
and
and.
backofeach
move
the
componentwhen~assembling
lV.
them.
Installing
the
Wall
Mount
WallorCeiling
The
product
.
mounted,
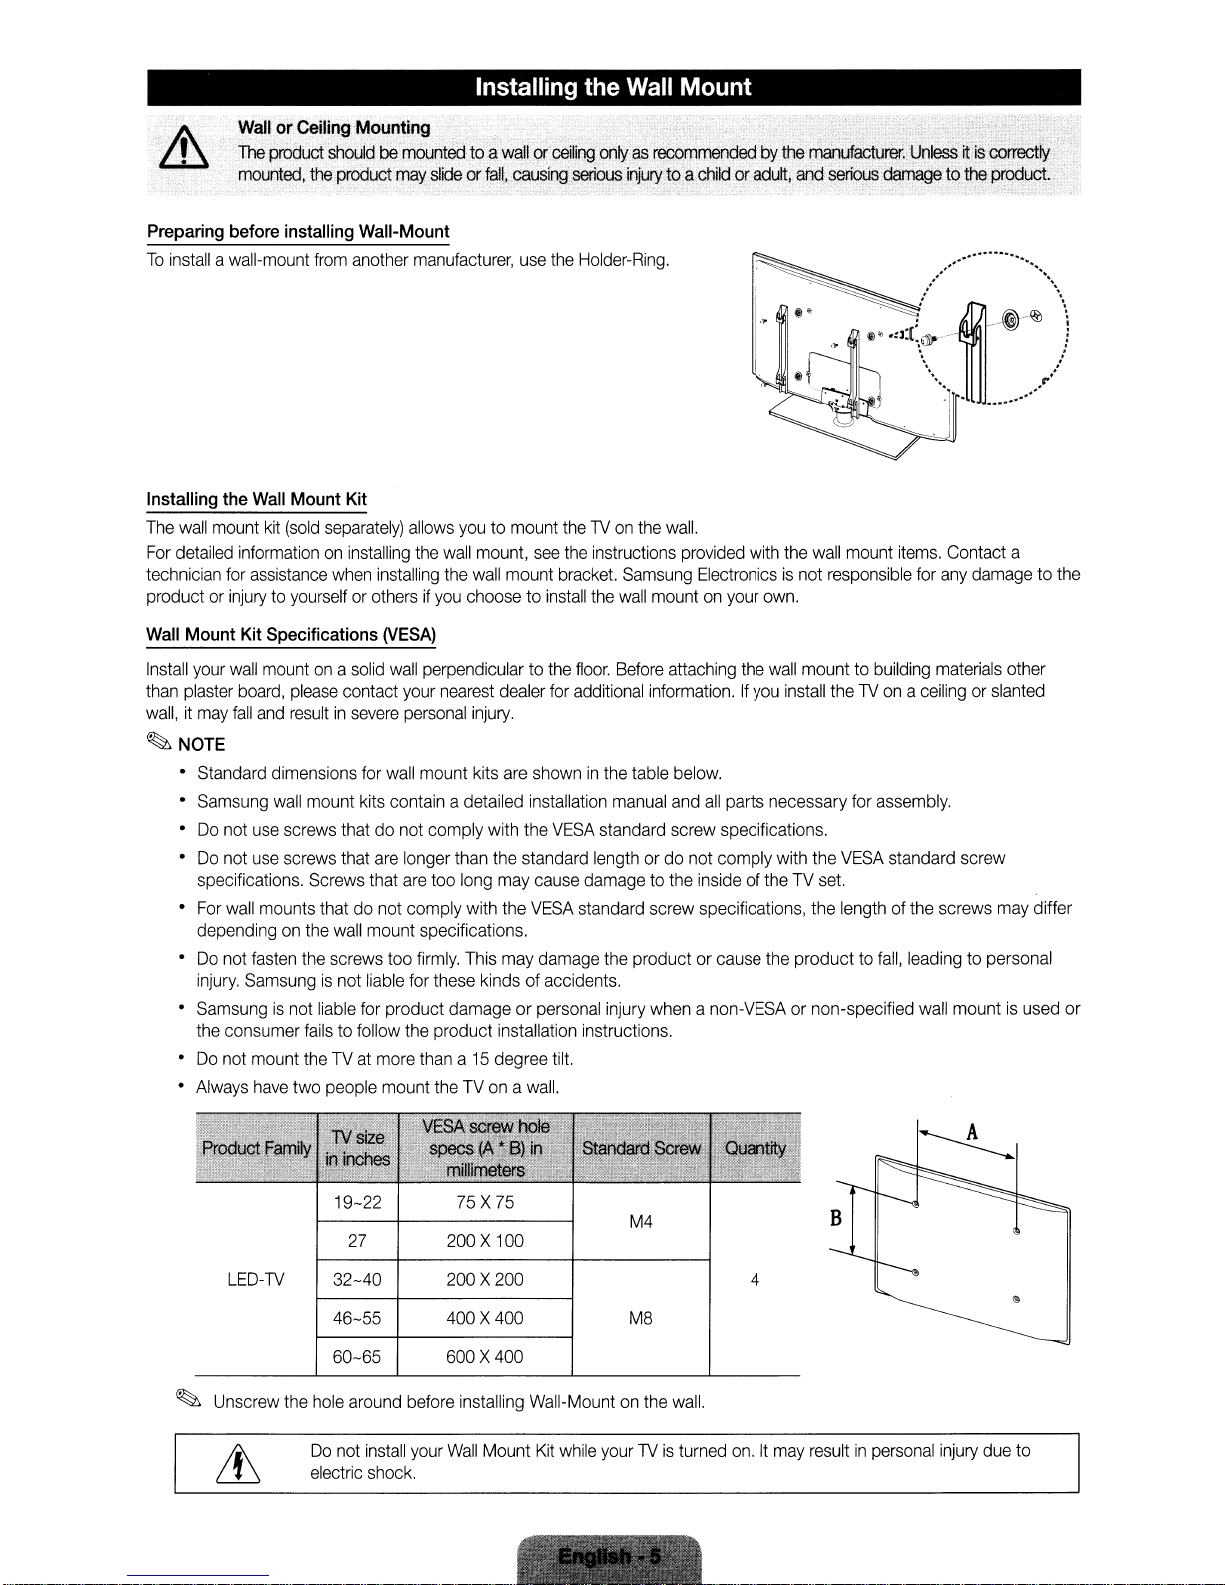
Preparing
To
Installing
The
For
technician
productorinjurytoyourselforothersifyou
Wall
Install
than
wall,itmay
before
installing
installawall-mount
the
Wall
Mount
wall
mount
kit
(sold
detailed
informationoninstalling
for
assistance
Mount
Kit
Specifications
your
wall
mountona
plaster
board,
fall
and
please
resultinsevere
Mounting
shouldbemOuntedtoa
the
product
may
slideorfall,
Wall-Mount
from
another
Kit
separately)
when
solid
contact
manufacturer,
allows
the
wall
installing
(VESA)
wall
perpendiculartothe
your
nearest
personal
the
~NOTE
•
Standard
•
Samsung
•Donot
•Donot
specifications.
•
For
dependingonthe
•Donot
injury.
•
Samsungisnot
the
•Donot
•
Always
dimensions
wall
use
screws
use
screws
wall
mounts
fasten
the
Samsungisnot
consumer
mount
theTVat
have
two
for
wall
mount
kits
contain
thatdonot comply
that
are
longer
Screws
failstofollow
that
are
thatdonot comply
wall
mount specifications.
screws
too
liable
for
liable
for
product damage or
the
more
people
mount
mount
too
firmly.
these
product installation instructions.
thana15
theTVonawall.
wallorceiling
causing
use
youtomount
mount,
see
wall
mount
choosetoinstall
dealer
injury.
kits
are
showninthe
adetailed
than
long
with
This
installation
with
the
the
standard
may
cause
the
VESA
may
damage
kindsofaccidents.
personal
degree
. . .
onlyasreCommendedbythe
serious
injury
toa
childoradult,
the
Holder-Ring.
theTVon
the
bracket.
floor.
for
additional
VESA
standard
tilt.
the
wall.
instructions
the
wall
Before
manual
standard screw specifications.
lengthordo
damagetothe
the
injury
provided
Samsung
table
productorcause
Electronicsisnot
mountonyour
attaching
information.Ifyou
below.
and
all
not comply
insideoftheTVset.
screw
specifications,
whenanon-VESAornon-specified
manufacturer.
and
serious
with
the
wall
responsible
own.
the
wall
mount to
install
parts necessary
with
the
the
the
producttofall,
UnleSS~is
damage,to
coirect~
th&product;
...........................
/
@)
••
:J:[~\ll>'
mount
items.
building
theTVonaceilingorslanted
for
assembly.
VESA
standard screw
lengthofthe
~-t)-~
- ]
. .
. ,
\" ,./
'1'
I
Contact a
for
any
materials
screws
leadingtopersonal
wall
mountisused
.....
..........
damagetothe
other
may
..
\.
\
differ
or
19-22
27
LED-TV
~
Unscrew
the
32-40
46-55
60-65
hole
Do
not
electric
around
install
shock.
before
your
75X75
200X100
200X200
400X400
600X400
installing Wall-Mountonthe
Wall
Mount
Kit
while
yourTVis
M4
M8
wall.
turned
4
on.Itmay
B
resultinpersonal
injury
due
to
Remote Control Buttons
~
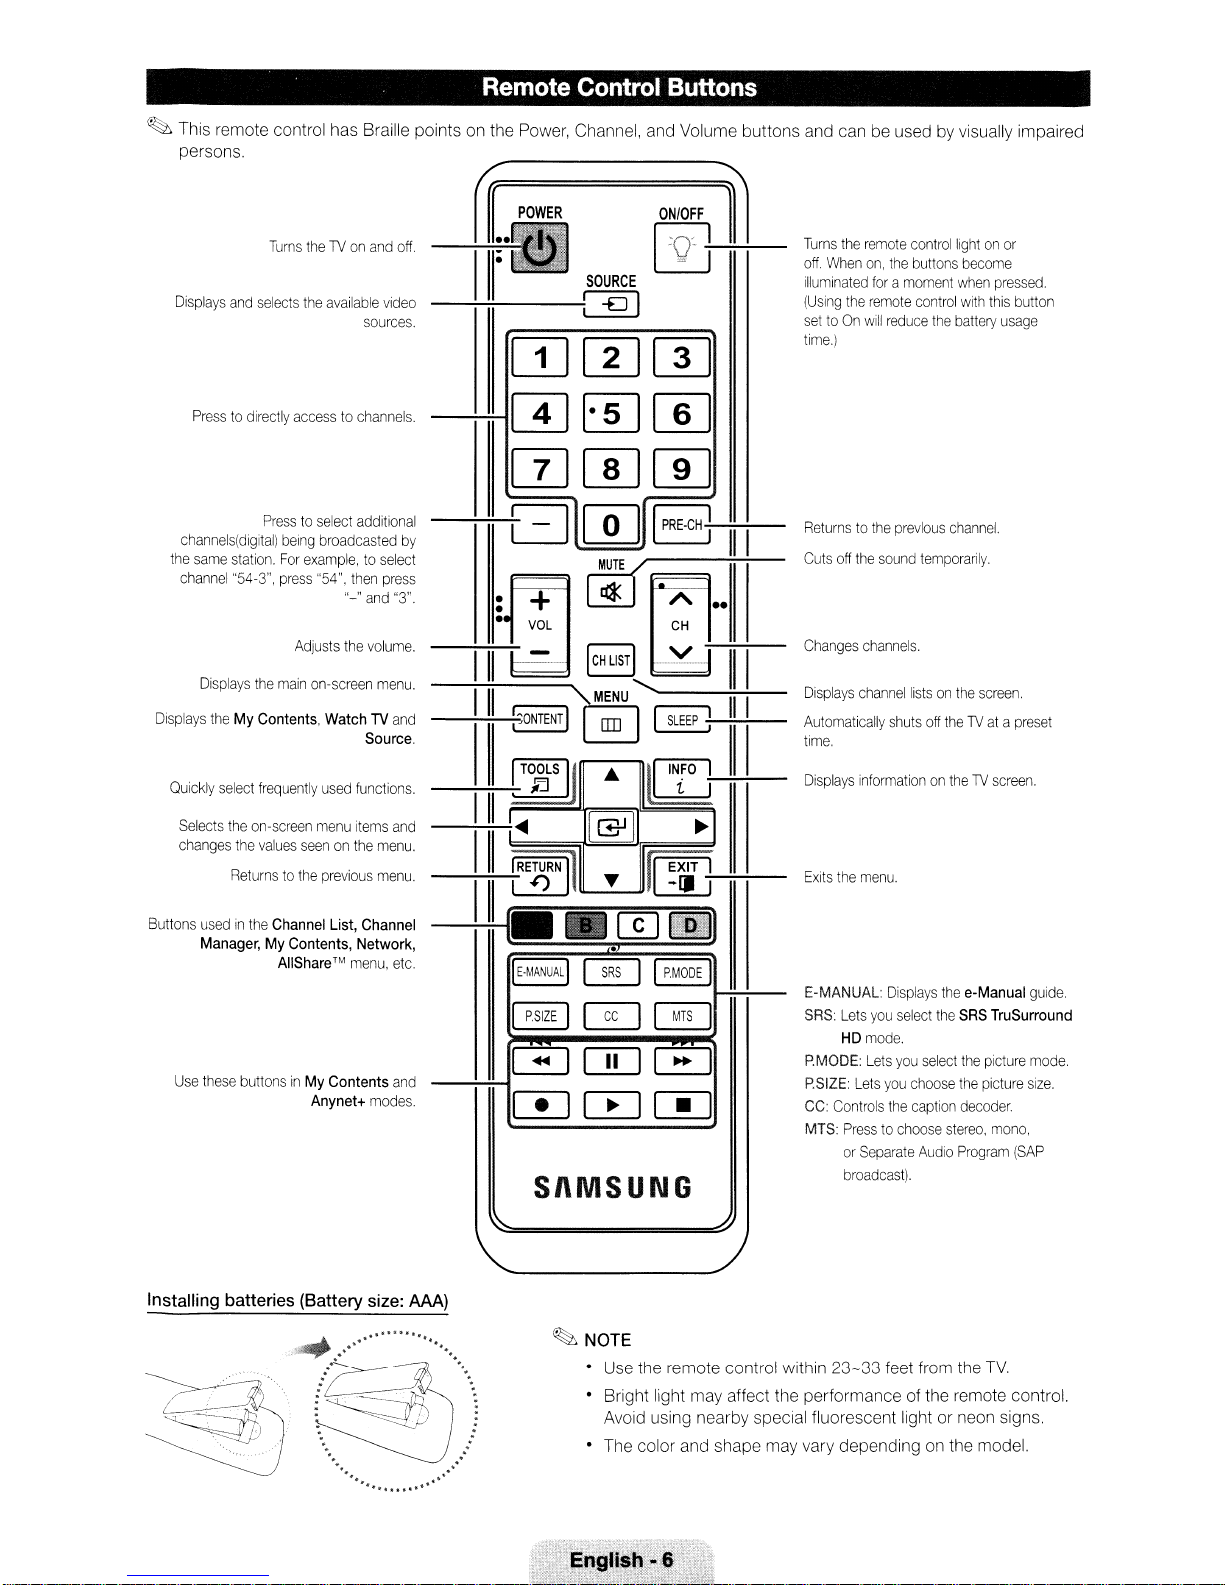
This remote control has Braille points on the Power, Channel, and Volume buttons and can be used by visually impaired
persons.
Turns
the
remote
control
buttons
control
the
lightonor
become
when
with
this
battery
pressed.
usage
Displays
and
Turns
selects
theTVon
the
available
and
off.
Video
sources.
SOURCE
[Q)
off.
When
illuminated
(Using
the
settoOn
time.)
on,
the
foramoment
remote
will
reduce
[JJ[I][TI
button
Presstodirectly
channels(digital)
the
sarne
station.
channel
"54-3",
Displays
Displays
theMyContents,
Quickly
select
Selects
the
changes
Returnstothe
Buttons
usedinthe
Manager,MyContents, Network,
Use
these
accesstochannels.
Presstoselect
being
For
press
Adjusts
the
main
frequently
on-screen
the
values
Channel
AIiShare™menu,
buttonsinMy
additional
broadcasted
example,toselect
"54",
then
press
"-"
and
the
volume.
on-screen
seenonthe
Anynet+
menu.
WatchTVand
Source.
used
functions.
menu
Items
menu.
previous
menu.
List,
Channel
Contents
modes.
and
and
mmW
[Z]WW
by
"3".
-...;....;;-~II
~17.--:11,~
~III
~111:
etc.
GICQJI8
•
•
•
III
[]
III
!;ONTENTI
!
TOOLS
~I
••
@j
+
VOL
-
8,,1]
M;U
IJ
@]
~
m.
SI\MSUNG
III
A
••
CH
III
II
'I
~
INFO
i
1-
~
1,1,1
7
II~~
1
7--
Returnstothe
Cuts
Changes
Displays
Automatically
time.
Displays
Exits
E-MANUAL:
SRS:
P.MODE:
P.SIZE:
CC:
Controls
MTS:
previous
off
the
sound
channels.
channel
shuts
informationontheTVscreen.
the
menu.
Displays
Lets
you
select
HD
mode.
Lets
you
Lets
you
the
Presstochoose
or
Separate
broadcast).
channel.
temporarily.
listsonthe
off
theTVatapreset
the
e-Manual
the
SRS
select
the
choose
the
caption
decoder.
stereo.
Audio
Program
screen.
guide.
TruSurround
picture
mode.
picture
size.
mono.
(SAP
Installing batteries (Battery size:
.........
MA)
. .
-?;~~~.\
~:::==tJj
....
~NOTE
• Use the remote control within
• Bright light may affect the performance of the remote control.
Avoid using nearby special fluorescent light or neon signs.
• The color and shape may vary depending on the model.
23-33
feet from the
TV.
Before
using
the
TV,
follow
the
steps
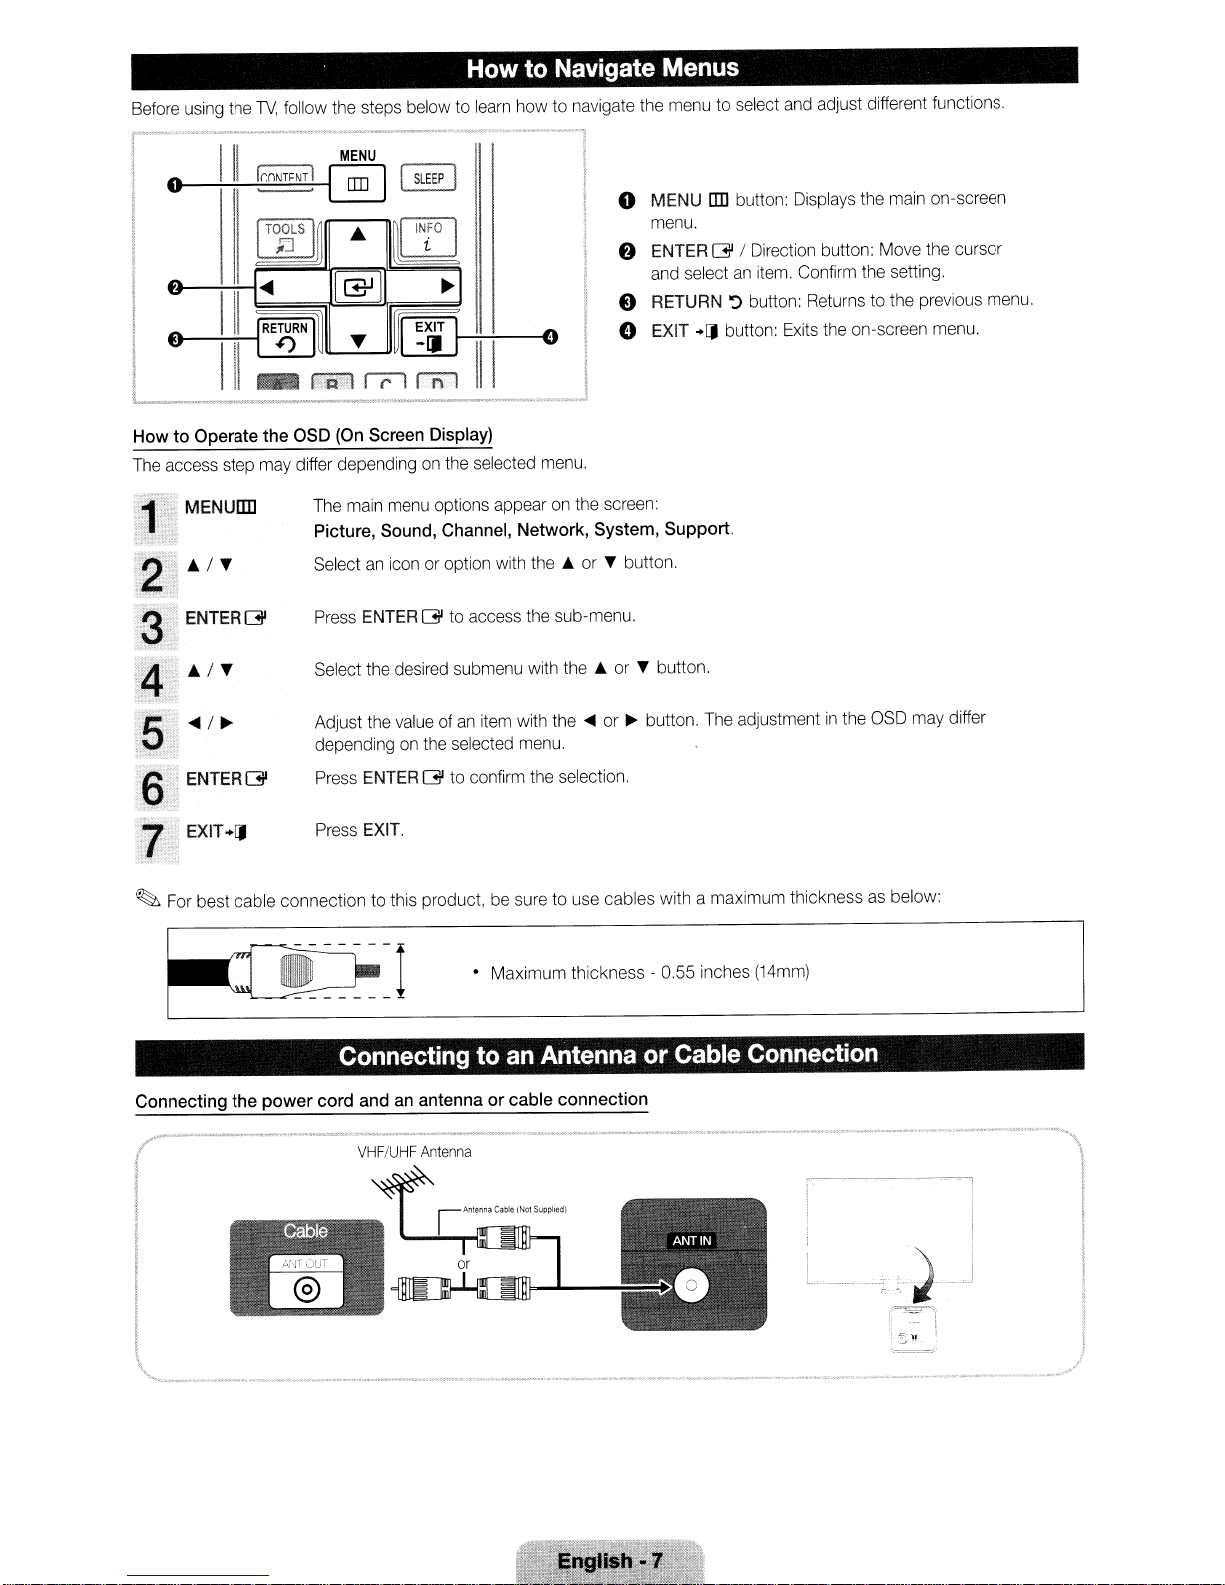
Howto Navigate Menus
belowtolearn
howtonavigate
the
menutoselect
and
adjust
different
functions
~
e
III
III
HowtoOperate
The
access
step
,'.'
~;
MENuan
~'I"~
2
ENTERG
:3
4
.
is
ENTERG'
6
EXIT..[J
rr:
~
[T£JLS
I~
~I
(IIJ
...
I~I
IGII
...
11(Zl
IIPil
- rii20"
the
OSD
(On
Screen
may
differ
dependingonthe
The
main
Picture,
Selectaniconoroption
Press
Select
Adjust
dependingonthe
Press
Press
Sound,
ENTER
the
the
ENTER
EXIT.
~I
[XHH----o
rnl
11
Display)
selected
menu
options
appearonthe
Channel,
G
to
desired
submenu
valueofan
selected
G
to
with
access
item
confirm
Network,
the
the
with
with
menu.
the
!
o MENU
!
,
I
I
I
menu.
f)
ENTER
and
e
RETURN
e EXIT"[J
1
menu.
screen:
System,
.A.orT button.
sub-menu.
the
.A.
or
T button.
the~or~button.
selection.
an
G /
selectanitem.
~
button:
Support.
The
button:
Displays
Direction
button:
adjustmentinthe
button:
Confirm
Returnstothe
Exits
the
the
main
Move
the
setting.
on-screen
OSD
may
on-screen
the
cursor
previous
menu.
differ
menu.
~
For
best cable connectiontothis
product,besuretouse
• Maximum thickness - 0.55
cables with a
maximum
inches
thicknessasbelow:
(14mm)
Connecting to an Antenna or Cable Connection
Connecting
('
__
the
power
cord
andanantennaorcable
-_._
•
."';;~;;;~;~;;;_.--..
connection
_'
'_.
__>0••~__.~__.~__
~
••••
"_".
_~
.._.__
...__••__•
'.''''.
I I
1 I
I I
!
!
i
1\
"
'-.._-
-'-"
_.
_.
_
.....
"._
.....
_."
_._.,-_
..
_._._--_.-
...
-.
__
.
...
....
---_
..
_~.-
-,
...
--
. _.....-
'--
,-'-..)_
r-··,
t
~--r
1~;
~~
:i
,
!.l
!
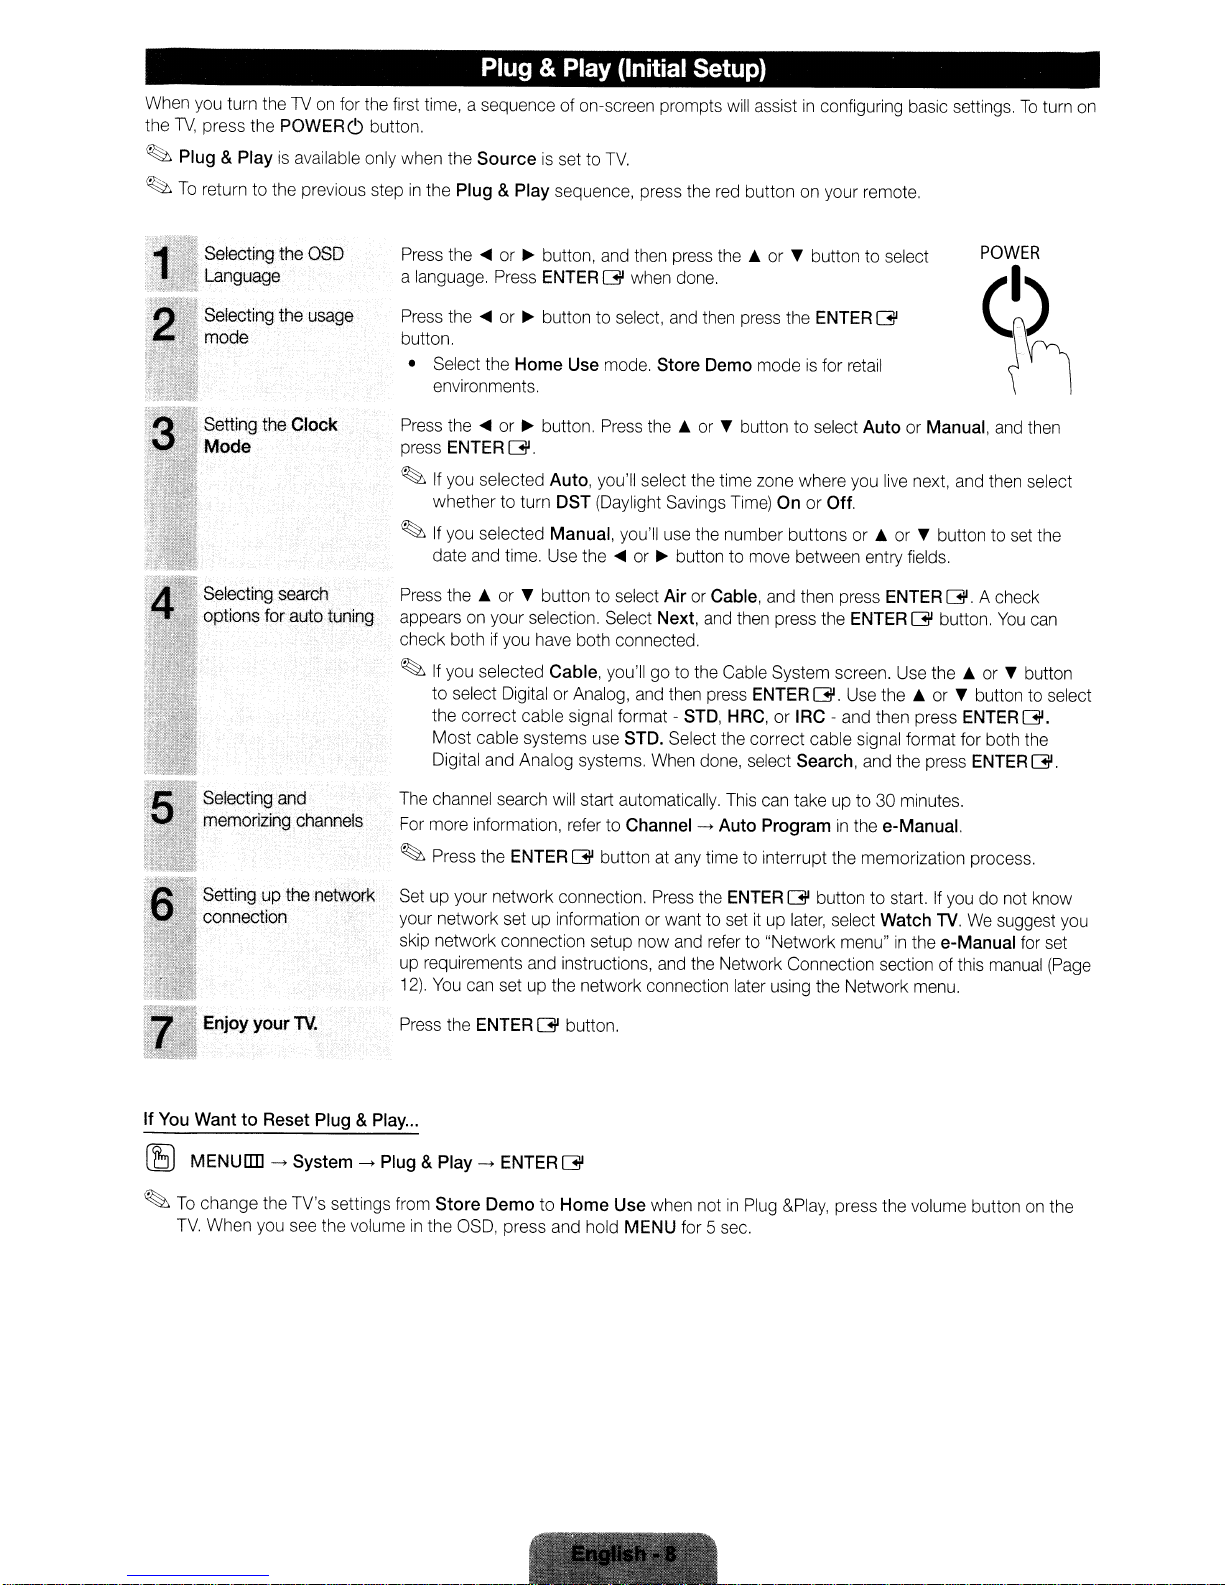
Plug & Play (Initial Setup)
When you turn theTVon
the
TV,
press the POWERC) button,
~
Plug & Playisavailable only when the
~
To
return to the previous stepinthe Plug & Play sequence, press the red button on your remote.
Selecting the OSD
Language
for the first time, a sequence of on-screen prompts
Sourceisset to
....
Press the
a language. Press ENTER
Press the
button.
• Select the
environments.
Press the
press ENTER
~
If
whether to turn DST (Daylight Savings
~
If
date and time. Use the
Press
appears on your selection. Select Next, and then press the ENTER G button,
check both
~
If
to
the correct cable signal format - STD, HRC, or IRC - and then press ENTER
Most cable systems use STD. Select the correct cable signal format for both the
Digital and Analog systems, When done, select Search, and the press ENTER
or~button, and then press
....
or~button to select, and then press the ENTER
Home
....
or~button. Press
G.
you selected Auto, you'll select the time zone where you live next, and then select
you selected Manual, you'll use the number buttons or
the'"or,.
you selected Cable, you'll go to the Cable System screen. Use
select Digital or Analog, and then press ENTERG.Use
button to select
if
you have both connected.
TV.
GJ
when done.
Use mode. Store Demo modeisfor retail
the'"or,.
....
or~button to move between entry fields.
Air
or Cable, and then press ENTER GJ. A check
will
assistinconfiguring basic settings,Toturn on
the'"or,.
button to select
Time)Onor Off.
button to select
GJ
Auto
or Manual, and then
...or,.
the'"or,.
POWER
~
button to set the
You
can
the'"or,.
button
button to select
[3i.
G.
Selecting and
memorizing channels
.,Setting
"~
If
You
WanttoReset Plug & Play...
[S
MENU!ID->System->Plug & Play->ENTER G
~
To
TV.
up
the network
connection
Enjoy
your
TV.
change the TV's settings from
When you see the volumeinthe OSD, press and hold MENU for 5 sec.
The channel search will start automatically. This can take up to 30 minutes.
For more information, refer to Channel
~
Press the ENTER G button at any time to interrupt the memorization process .
Set up your network connection. Press the ENTER G button to start.
your network set up information or want to set
skip network connection setup now and refer to "Network menu"
up requirements and instructions, and the Network Connection section of this manual (Page
12).
You
Press the ENTERG button,
Store
->
Auto Programinthe e-Manual.
If
ituplater,
can set up the network connection later using the Network menu.
DemotoHome
Use when notinPlug
select Watch
&Play,
press the volume buttononthe
TV.Wesuggest you
in
the e-Manual for set
you do not know
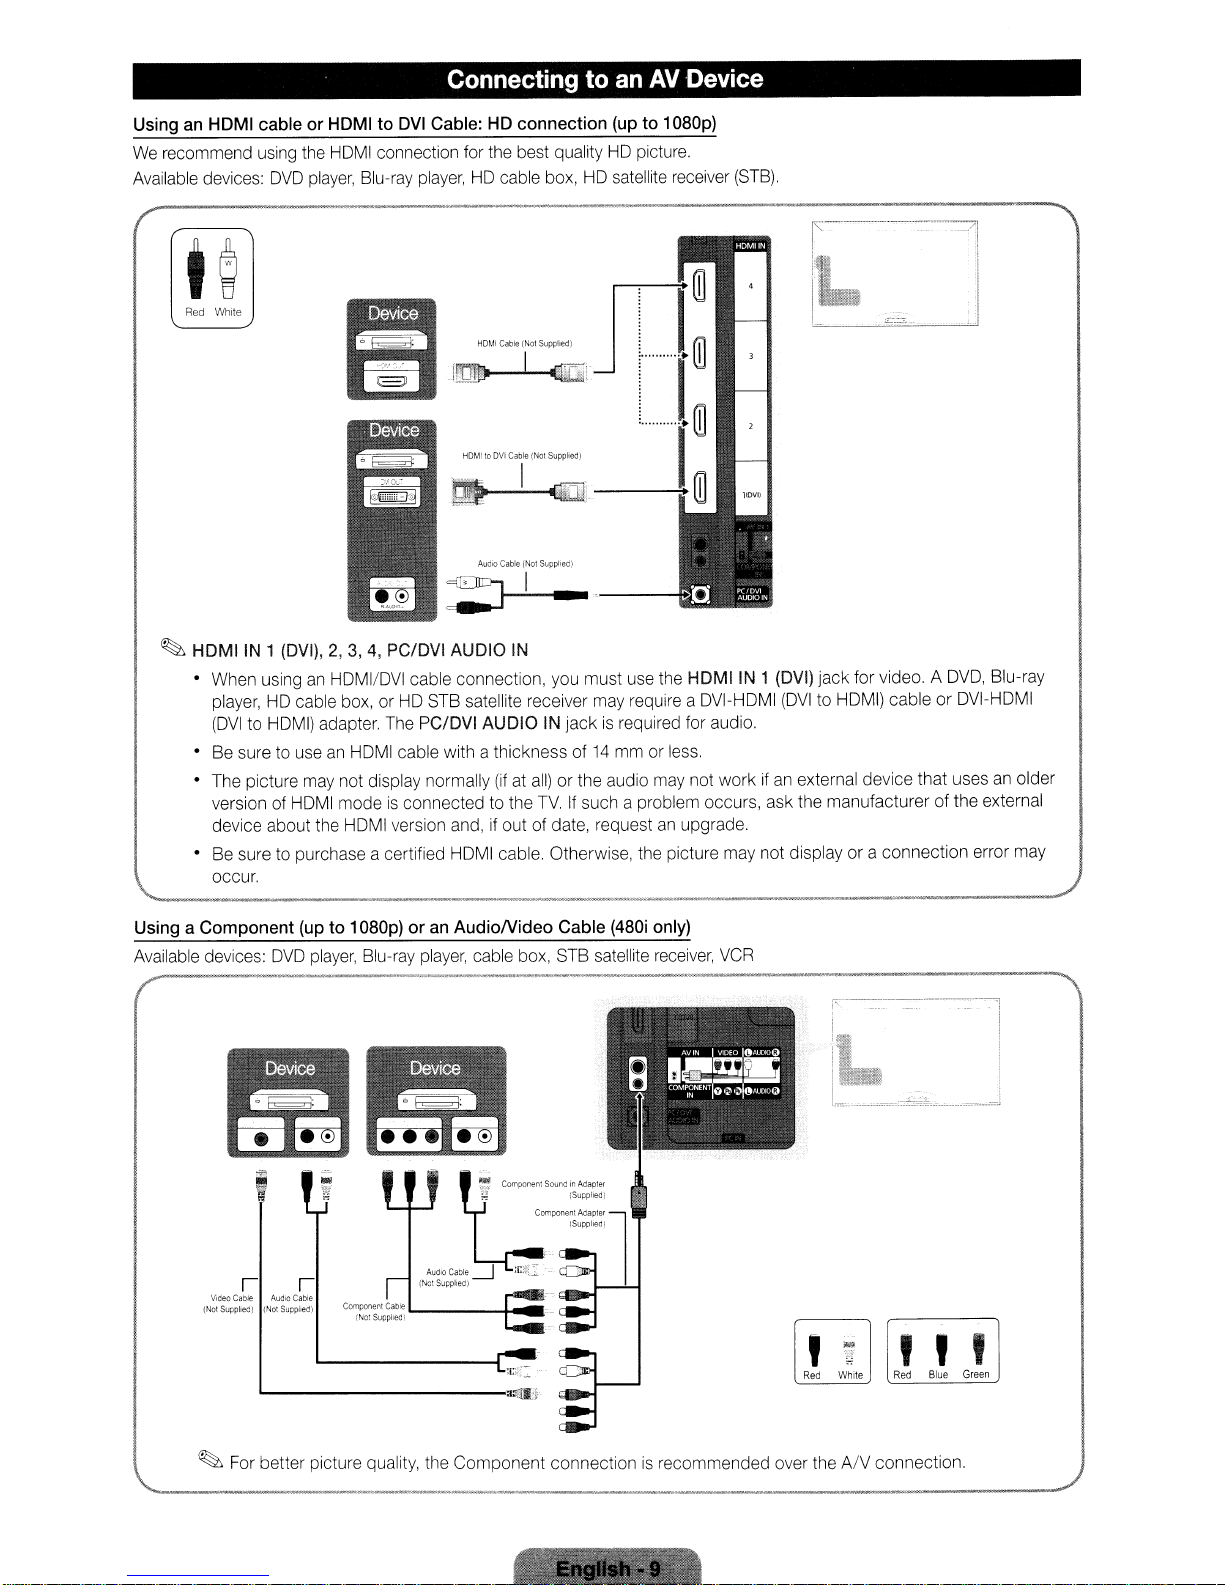
Connecting to an
AV
Device
Using an
We recommend using the HOMI connection for the best qualityHOpicture.
Available devices:
Red
HDMI
cable or HDMI to
OVO
White
DVI
Cable:HDconnection
player, Blu-ray player,HOcable box,HOsatellite receiver
(up
to 1
D8Dp)
•
ill
HOMltoDVI
Cable
(Not
Supplied)
-I.
~,"~
.~.~
-'.
~
AulllO
~------s:
~
HDMIIN
1 (DVI),
When usinganHOMI/OVI cable connection, you must use the
HO
player,
(OVI
to HOMI) adapter. The PC/DVI AUDIO IN
Be sure to use
The picture may not display normally
version of HOMI mode
device about the HOMI version and, if out of date, request an upgrade.
Be sure
occur.
2,3,4,
PC/DVI AUDIO
cable box, orHOSTB satellite receiver may require a OVI-HOMI
an
HOMI cable with a thickness of14mm or less.
(ifatall)orthe audio may not workifan external device that uses an older
is
connected to the
to
purchase a certified HOMI cable. Otherwise, the picture may not displayora connection error may
Cable
";.---~
(Not
SUpPI'e<lj
IN
jackisrequired for audio.
TV.
If such a problem occurs, ask the manufacturerofthe external
HDMIIN
(STB).
~--
---...
I - i
•.•.
1 (DVI) jack for video. A
(OVI
to HOMI) cableorOVI-HOMI
__
---.
._--
OVO,
-/i
•.
1
Blu-ray
Using a Component
Available devices:
Video
(Not
~
..........
_-----
OVO
--_._-_
I"
Cable
Audio
SupplreG)
(Not
L.-----------·~IJ
For better picture quality, the
(up
to 1
D8Dp)oran
player,
Blu-ray player, cable box. STB satellite receiver, VCR
....
_-_._._--_._---_
AudioNideo
'f
AudiO
Cable
I"
Cable
5uoplie<ll
,---~-_._-_
(NotSupphee:)
Component
Cable
(48Di
only)
..
_---,.--
..
_-_.
----------
f.~--------
, I
..-.--
-~
I
;.:
~.e"'s.Md;,Ad,P.t"
~;r.!
..
(Supplied,
Component
Adapter
l
!Supphe<1)
~
.-
. -
,,,
...
,
While
Red
Red
connectionisrecommended over theANconnection .
Blue
Green

Connecting to an Audio Device
Using an
Available devices: Digital Audio System, Amplifier, Home Theater
Optical
(Digital)orAudio
(Analog) Cable
Connection
,r--
I
Opllcal
AuclO
CableMlSuoOlled,
Ca!lle
(Not
Suppl,eal
•
~
DIGITAL AUDIO
• When a Digital Audio System
of both the
•
5.1
CH (channel) audioisavailable when the TVisconnected to an external device supporting
• When the receiver (Home Theater)
the TV
source is a digital component such
and
is
connected to the TV via HDMI, only 2 CH audio will be heard from the Home Theater receiver.Ifyou
want to hear
satellite receiver directly to
~
AUDIO OUT: Connects to the audio input jacks on your amplifier/Home Theater.
• When connecting, use the appropriate connector.
• When
an
volume level with the amplifier's volume control.
OUT
(OPTICAL)
is
connected to the DIGITAL AUDIO OUT (OPTICAL) jack, decrease the volume
TV
and the system.
is
set to on, you can hear sound output from the TV's optical jack. When
is
receiving a
audio amplifierisconnected to the AUDIO OUT jacks: Decrease the volume of the TV and adjust the
DTV
signal, the TV will send
asaDVD
5.1
CH audio, connect the digital audio out jack from your
an
amplifier or Home Theater.
5.1
/ Blu-ray player / cable box / STB (Set-Top-Box) satellite receiver
~n
;,
I
Red
5.1
CH.
CH sound to the Home Theater receiver. When the
DVD
/ Blu-ray player / cable box / STB
! I
White
Using an HDMI
~
Your PC may not supportanHDMI connection.
cableorHDMItoDVI
HOMICable
~-----
'~.
All(lJo
O·Sub
~
cableora
(Not
Supplied)
Cable
(NOl
SUpplied)
I
Cable
rNo!
I
Connecting to a PC
D-sub
cable
Suapl,ea}
.;
---'
PC
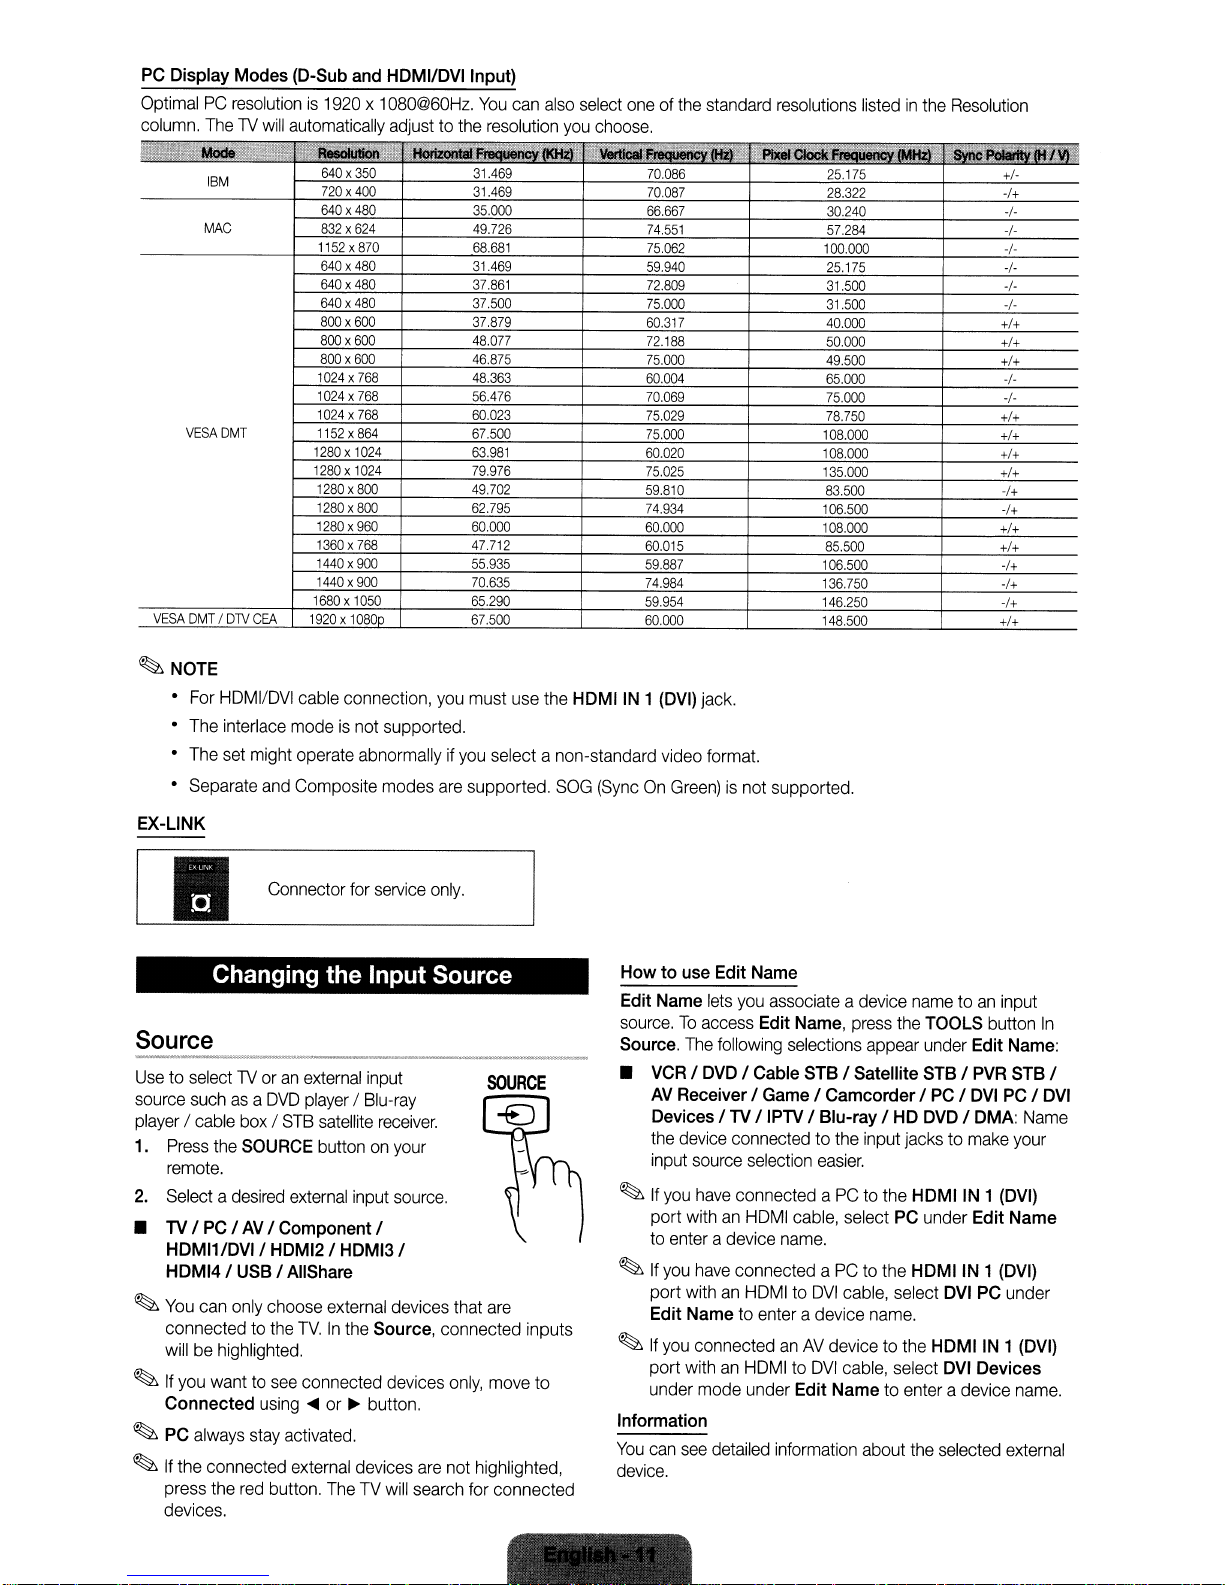
Display Modes (D-Sub
and
HDMI/DVI Input)
OptimalPCresolutionis1920x1080@60Hz.
column.
•
The1Vwill
:'~",i8C,;;'t'·
IBM
MAC
VESADMT
VESA
DMTfDTV
CEA
automatically
AeIoIutlon
640x350
720x400
640x480
832x624
1152x870
640x480
640x480
640x480
800x600
800x600
800x600
1024x768
1024x768
1024x768
1152x864
1280x1024
1280x1024
1280x800
1280x800
1280x960
1360x768
1440x900
1440x900
1680x1050
1920x10800
adjusttothe
"~
You
can
resolution
31.469
31.469
35.000
49.726
68.681
31.469
37.861
37.500
37.879
48.077
46.875
48,363
56.476
60,023
67,500
63.981
79.976
49.702
62.795
60.000
47,712
55.935
70.635
65.290
67.500
also
you
•
select
choose
","
VertIc:8I
oneofthe
.
70.086
70.087
66.667
74,551
75,062
59.940
72.809
75.000
60.317
72.188
75.000
60.004
70.069
75.029
75,000
60020
75.025
59.810
74.934
60.000
60.015
59.887
74.984
59.954
60.000
standard
','~CtoCk
resolutions
25.175
28.322
30.240
57.284
100.000
25.175
31.500
31.500
40.000
50.000
49.500
65.000
75,000
78.750
108,000
108,000
135,000
83.500
106.500
108.000
85.500
106.500
136,750
146.250
148.500
listedinthe
Resolution
I,
+f+
+f+
+f+
+f+
+f+
+f+
+f+
-f+
-f+
+f+
+f+
-f+
-f+
-f+
+f+
IVI"
+f-
-f+
-f-
-f-
-f-
-f-
-f-
-f-
-f-
-f-
~NOTE
•
For
•
The
•
The
•
Separate
HOMI/OVI
interlace
set
cable
modeisnot supported.
might
operate
and
Composite modes
EX-LINK
Connector
II
Changing the Input Source
Source
Usetoselect1Voranexternal
source
suchasa
player/cable
1.
Press
rernote.
2.
Selectadesired
•
TVIPCIAV
HDMI1/DVII HDMI21
HDMI4 I
~
You
can
connectedtothe
willbehighlighted.
~
If
you
Connected
~
PC
always
~
If
the
connected
press
devices.
OVO
boxISTB
the
SOURCE
I Component I
USBIAIIShare
only
choose
wanttosee
using
stay
activated.
the
red
button.
playerIBlu-ray
satellite
buttononyour
external
HDMI3
external
TV.Inthe
connected
.....
or
external
TheTVwill
connection,
abnormallyifyou
for
service
you
must
select a non-standard
are
supported.
only.
input
receiver.
input
source.
I
devices
that
are
Source, connected inputs
~
button.
devices
devices
are
not
search
only,
move
highlighted,
for
connected
use
the
SOG
to
HDMIIN 1
(DVI)
video
jack.
format.
(SyncOnGreen)isnot supported.
How to
Edit
source.Toaccess
Source.
•
~
~
~
use
Edit
Name
Name
lets
you
The
following
VCRIDVD
AV
Receiver I
Devices I
the
device
input
If
you
port
to
enter
If
you
port
Edit Name
If
you
port
under
I Cable
TVIIPTV
connected to
source
selection
have
connected aPCto
withanHOMI
a device
have
connected aPCto
withanHOMItoOVI
to
connectedanAV
withanHOMItoOVI
mode
under Edit Nametoenter a device
associateadevice
Edit
Game
name.
enter
Information
You
can
see
detailed
information
device.
nametoan
Name,
press
the
TOOLS
selections
STB
appear
I Satellite
under
STBIPVR
I CamcorderIPCI
I Blu-ray I
the
HD
input
jackstomake
DVDIDMA:
easier.
the HDMIIN 1
cable,
selectPCunder Edit Name
the
HDMIIN1
cable,
select
a device
name.
devicetothe
cable,
select
about
the
input
button
Edit
Name:
DVI
PCIDVI
(DVI)
(DVI)
DVIPCunder
HDMIIN 1
DVI
Devices
selected
external
STB
Narne
your
(DVI)
name.
In
I
Network
You
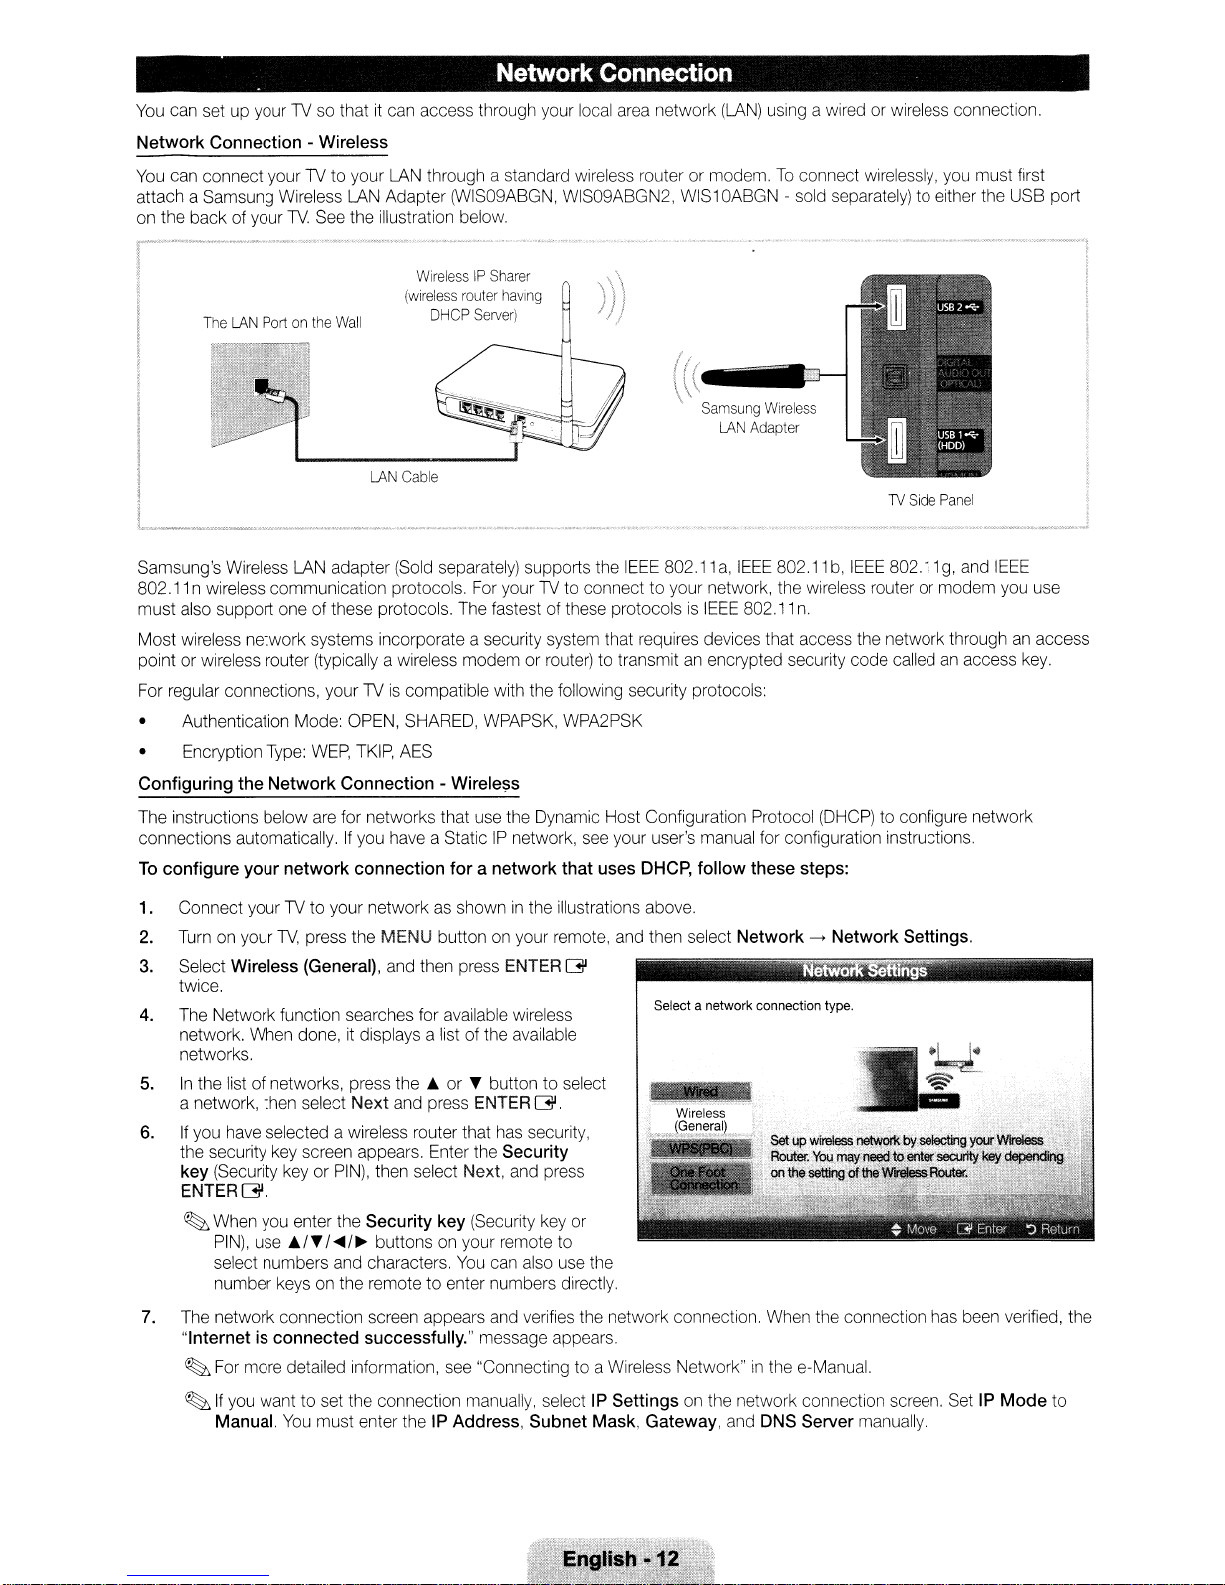
can set up yourTVso that it can access through your local area network
Network
You
attach a Samsung Wireless LAN Adapter (WIS09ABGN, WIS09ABGN2,
on the back of your
Connection
can connect yourTVto your
The
LAN
- Wireless
TV.
See the illustration below.
Portonthe
Wall
LAN
through a standard wireless router or modem.Toconnect wirelessly,
WirelessIPSharer
(wireless
router
having
Server)
LAN
DHCP
Cable
Connection
WIS1
(LAN)
using a wired or wireless connection.
OABGN
- sold separately) to either the USB port
TV
Side
you
Panel
must first
Samsung's Wireless LAN adapter (Sold separately) supports the
802.11 n wireless communication protocols. For yourTVto connect to your network, the wireless router or modem you use
must also support one of these protocols. The fastest of these protocols
Most wireless network systems incorporate a security system that requires devices that access the network throughanaccess
point or wireless router (typically a wireless modem or router) to transmit
For regular connections, yourTVis
• Authentication Mode: OPEN, SHARED, WPAPSK, WPA2PSK
Type:
• Encryption
Configuring
The instructions below are for networks that use the Dynamic Host Configuration Protocol
connections automatically.
To
configure
1. Connect your
2.
3.
4. The Network function searches for available wireless
5.
6.
7. The network connection screen appears and verifies the network connection. When the connection has been verified, the
the
your
Turnonyour
Select Wireless (General), and then press ENTERG
twice.
network. When done,
networks.
In
the list of networks, press the A or T button to select
a network, then select
If
you have selected a wireless router that has security,
the security key screen appears. Enter the Security
key (Security key or
ENTERG.
~
When you enter the
PIN),
select numbers and characters.
number keys on the remote to enter numbers directly.
"Internet is
~
For more detailed information, see "Connecting to a Wireless Network"inthe e-Manual.
~
If
you
Manual.
WEP,
Network
TV,
use
connected
want to set the connection manually, select IP
Connection
If
network
TV
to your networkasshowninthe illustrations above.
press the MENU button on your remote, and then select
PIN),
A/T
I
~/~
You
must enter the IP Address,
compatible with the following security protocols:
TKIP,
AES
- Wirele:;;s
you have a StaticIPnetwork,
connection
it
displays a list of the available
Next
then select Next, and press
Security
buttons on your remote to
successfully." message appears.
foranetwork
and press ENTER
key (Security key or
You
can also use the
that
G.
Subnet
IEEE
80211a,IEEE
is
IEEE
an
encrypted security code calledanaccess
see
your user's manual for configuration instructions.
uses DHCP,
Settings
Mask, Gateway, and DNS Server manually.
follow
Select a network connection type.
JI
fl.
on the network connection screen. Set IP
80211b,IEEE
802.11
n.
(DHCP)
these steps:
Network->Network
to configure network
802.11g,and
Settings.
IEEE
Mode
key.
to
Network
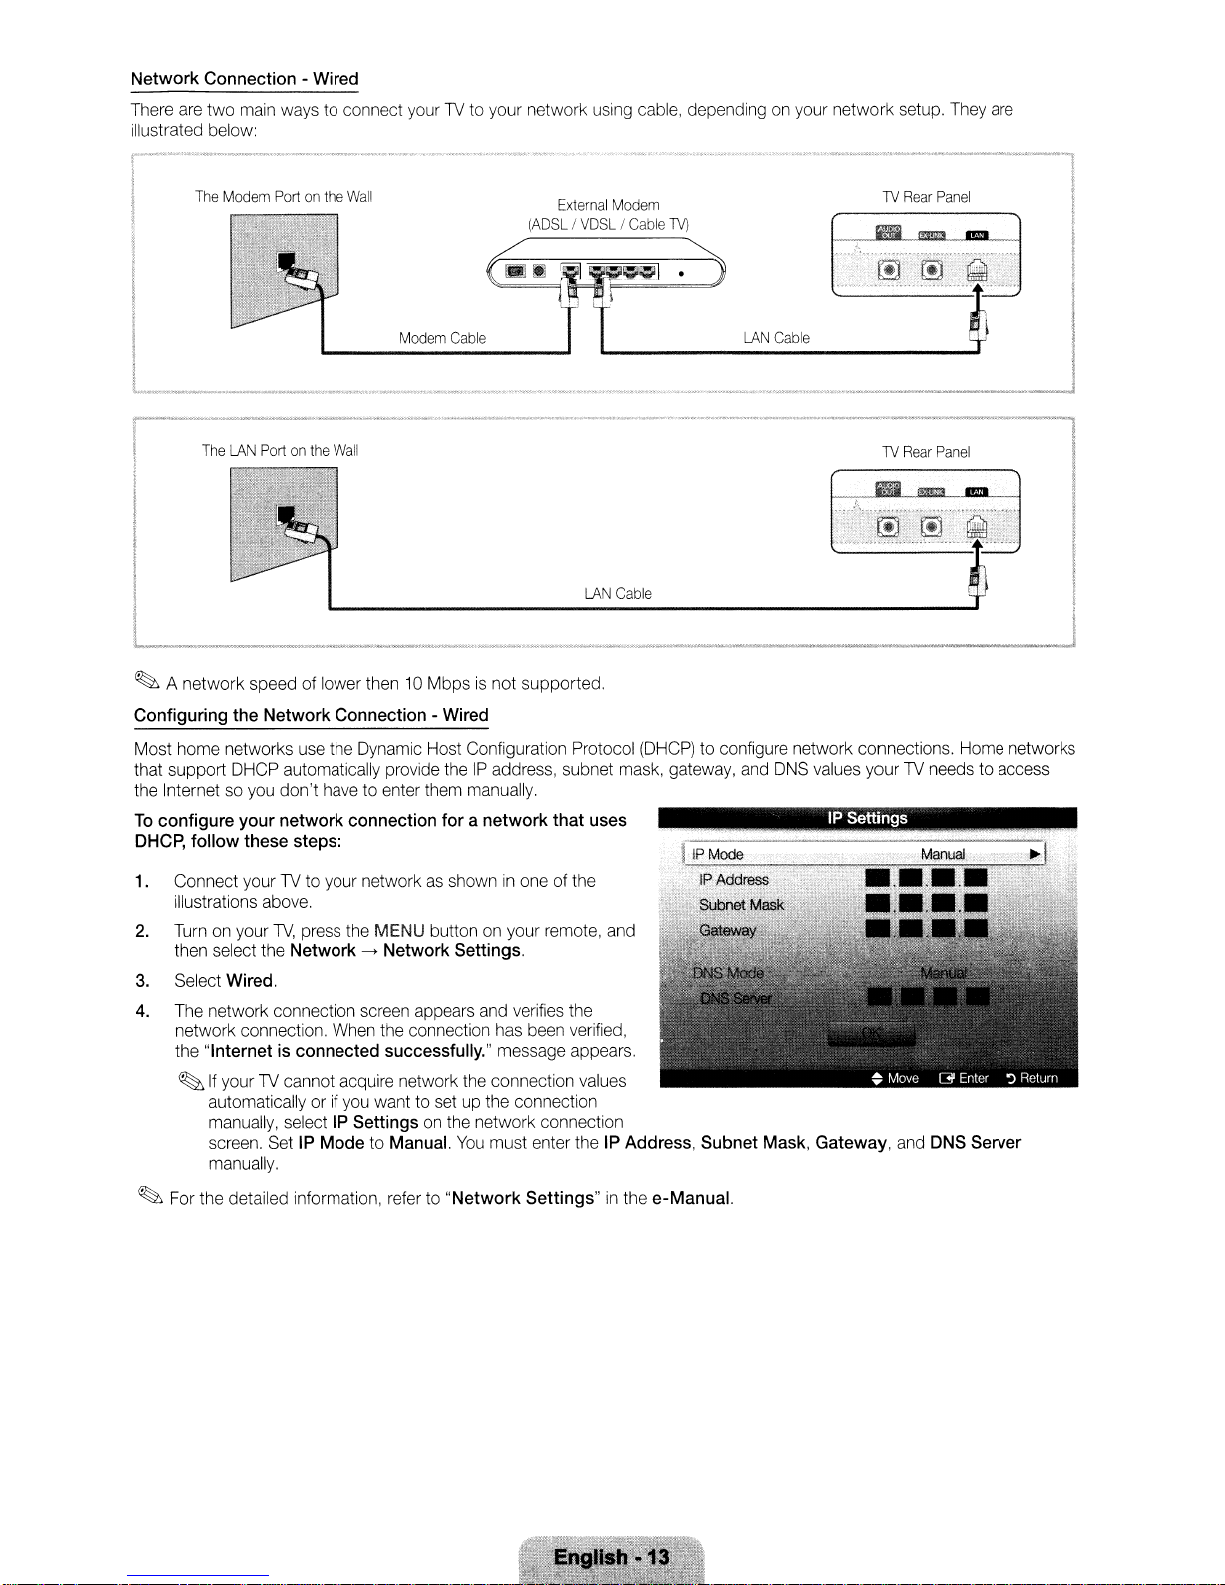
There are
illustrated below:
Connection-Wired
two
main ways to connect yourTVto your network using cable, depending on your network setup. They
The
Modem
The
LAN
Portonthe
Portonthe
Wall
.....
Wall
Modem
_---------
Cable
External
LAN
Modem
=i;li;11
Cable
TV)
.?:J
(ADSLIVDSLICable
~
'?fY~
LAN
Cable
1V
1V
Rear
Rear
are
Panel
Panel
~
A
network
Configuring
Most home networks use the Dynamic Host Configuration Protocol (DHCP) to configure network connections. Home networks
that support DHCP automatically provide the
the Internet so you
To
configure
DHCP,
1.
Connect your TV to your network as showninone of the
illustrations above.
2.
Turn
then select the
3.
Select
4.
The network connection screen appears and verifies the
network connection. When the connection has been verified,
the
~
~
For the detailed information, refer to
speed of lower then10Mbpsisnot
the
Network
your
follow
these
on your
TV,
Wired.
"Internetisconnected
If
your TV cannot acquire network the connection values
automatically or
manually, select
screen. Set
manually.
Connection-Wired
don't
have to enter them manually.
network
connection
steps:
press the
Network->Network
IP
MENU
button on your remote, and
successfully."
if
you want to set up the connection
IP
Settings
ModetoManual.
on the network connection
foranetwork
Settings.
You
"Network
supported.
IP
address, subnet mask, gateway, and DNS values yourTVneeds to access
message appears.
must enter the
Settings"
that
uses
IP
Address,
in
the e-Manual.
Subnet
Mask,
IP
Settings
Gateway, and
DNS
Server
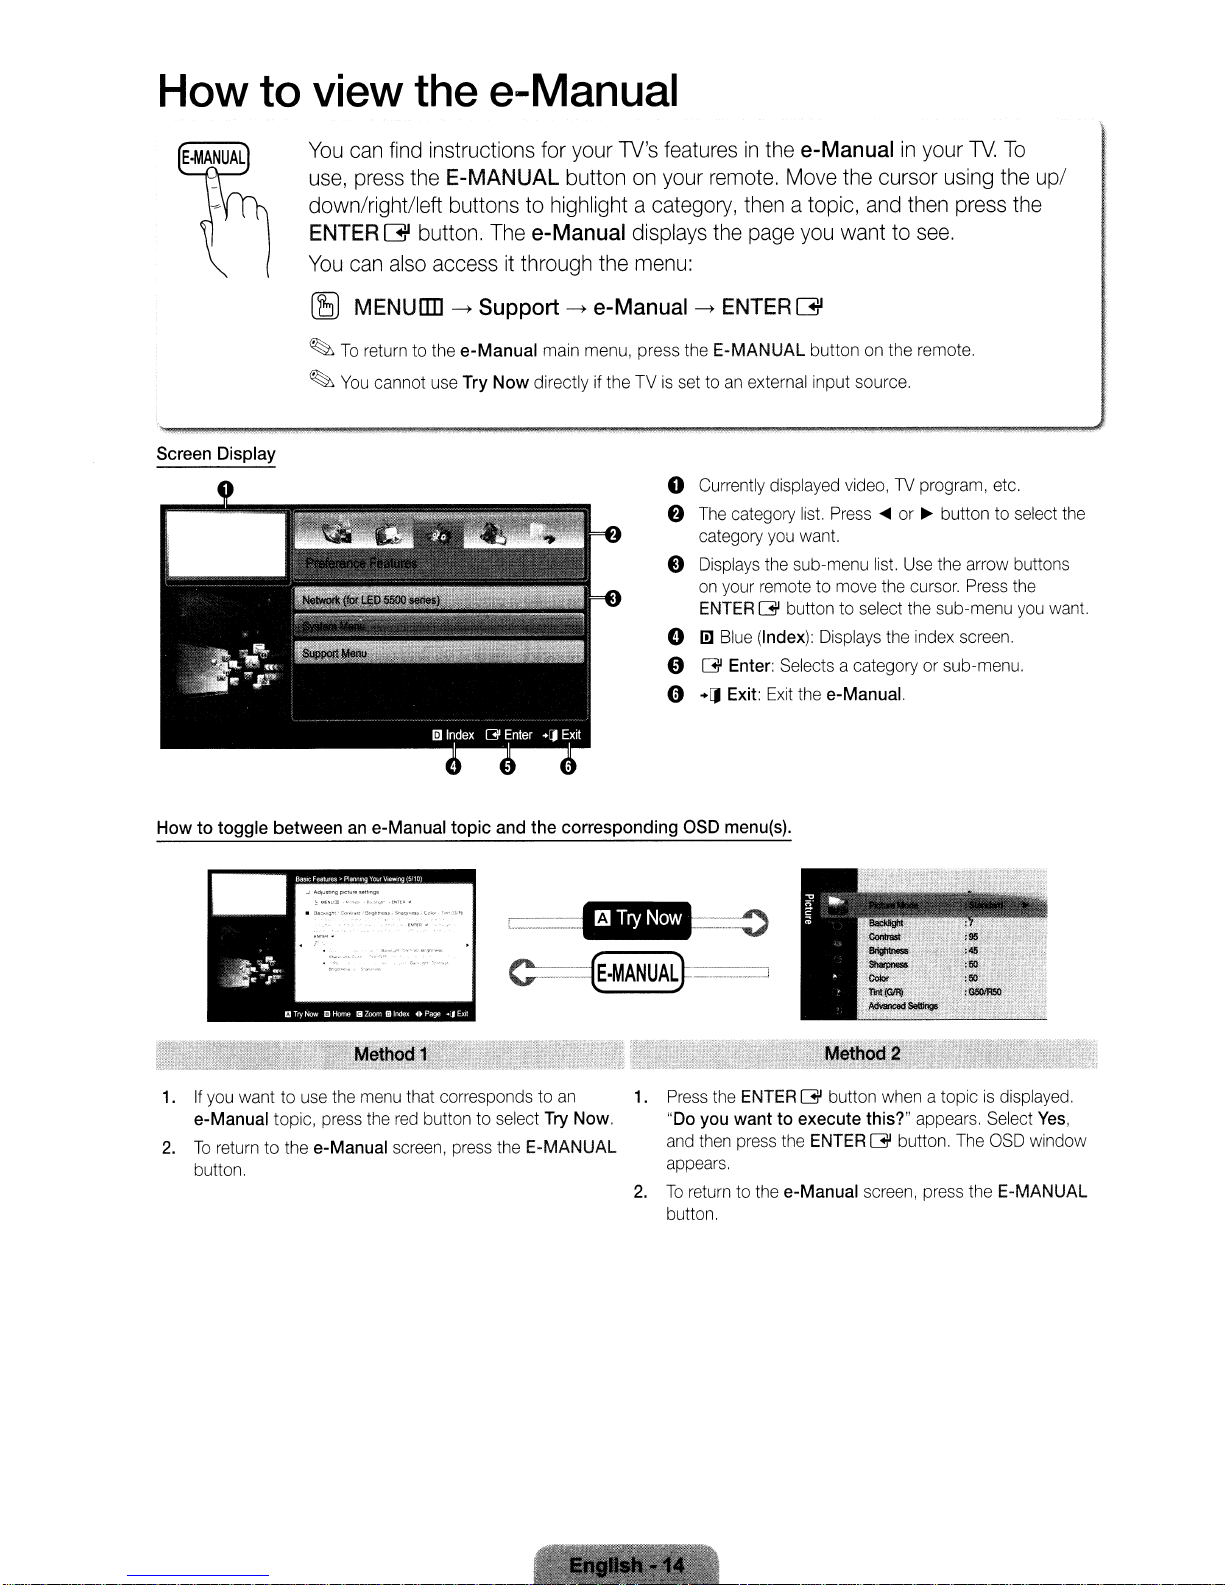
How to view the e-Manual
You
can
find
instructions
use,
press
the
E-MANUAL button
down/right/left buttons
ENTER
You
can
Gl
button.
also
accessitthrough
to
The
for
your
highlight a
e-Manual
the
TV's
on
category,
displays
menu:
featuresinthe
your
remote.
then
the
page
e-Manual
Move
the
atopic,
you
wanttosee.
cursor
and
in
then
your
using
TV.
press
To
the
up/
the
Screen Display
Howtotoggle
(B MENUIIIl
~
To
~
You
between
an e-Manual
->
return to the
cannot use Try
topic
Support->e-Manual->ENTER G
e-Manual
main menu, press the E-MANUAL button on the remote.
Now
directly if the TVisset toanexternal input source.
o Currently displayed video,
8 The category list. Press
category
e Displays the sub-menu list. Use the arrow buttons
on
your remote to move the cursor. Press the
ENTER
o
1!1
Blue (Index): Displays the index screen.
o
~
Enter: Selects a category or sub-menu.
o
+[J
Exit:
and
the
corresponding
OSD menu(s).
TV
program, etc.
....
or~button to select the
you
want.
~
button to select the sub-menu
Exit
the e-Manual.
you
want.
1.Ifyou
2.
want to use the menu that corresponds to
e-Manual topic, press the
To
return to the e-Manual screen, press the E-MANUAL
button.
red
button to select Try Now.
-.~
l
.....__...
--.---~
e=---=(E.MANUALf===--.J
Press
an
1.
2.
the ENTER~button when a topicisdisplayed.
"Do you want
and then press the ENTER~button. The OSD window
appears.
To
return to the e-Manual screen, press the E-MANUAL
button.
to
execute this?" appears. Select
Yes,

Viewing
the
Contents
o Contents Area: Contains the topic contents,
selected a sub-menu.
next page, press the
f)
Try Now: Displays the OSD menu that corresponds
to the topic.
the
E-MANUAL
f)
Home Moves to the e-Manual home screen.
To
o Zoom: Magnifies a screen.
magnified screen by using • /
€»
0 (Page): Moves to previous or next page.
To
move to the previous or
....
/~button.
return to the e-Manual screen, press
button.
You
can scroll through the
...
buttons.
if
you
Using the
:J
• Backlight I Contrast I Brightness I Sharpness I Color I Tint (G/R)
Howtosearch
Zoom
mode
Adjusting
iB
Your teleVISion has several opltOns 'or adJuSllng picture quality Select an
uSIng
keystoadjust the option 'Jalueorselect an opliOn seltlf"lg When
ENTEAG
iE'I
picture
settings
MENU
IlII-.Picture·--., Backllgh1 _.., ENTER
il"'\€upand
down
arrOIA
keys.
NOTE
• When
yOll
make changes [0
Sharpness,
Color
Or
~
Tlnl (G/R), the OSO will be adlusted accordingly.
foratopiconthe
[:31
and
then press ENTERG.Use the
Backlight,
Contrast,
B
~
index
done.
Brightness.
C
~
Move
page
option
ar~ow
oress
':)
Return
Press the
You
• or
~
[!:J
(yellow) button to magnify the contents
can scroll through the magnified screen by using the
...
buttons.
To
return to the screen to normal size. press the
RETURN button.
area.
1.Tosearch for a topic, press the left or right arrow button to select a letter, and then press ENTERG.The Index displays
a list of topics and keywords that begin with the letter you selected.
2.
Press the up or down arrow buttontoselect a topic or keyword, and then press the ENTER G button.
3.
The e-Manual page with the topic appears.
~
To
close the Index screen, press the RETURN button.
If
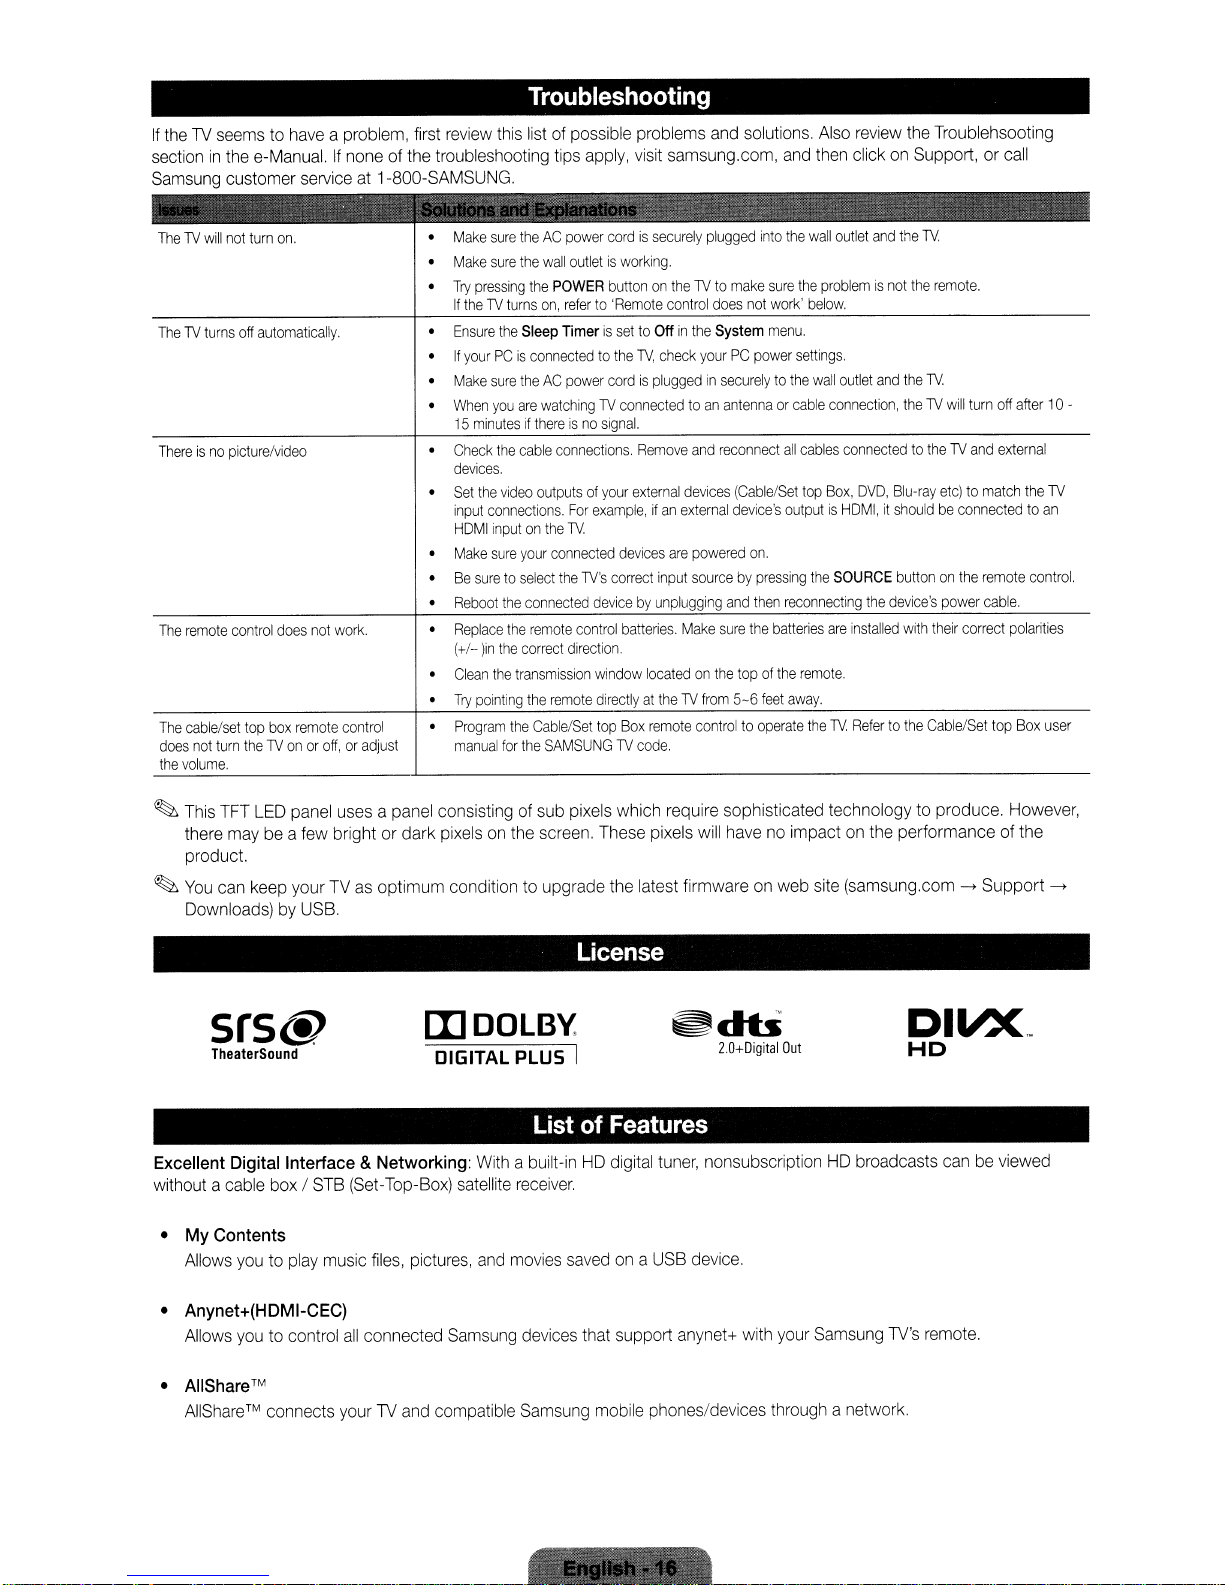
theTVseemstohave
sectioninthe
Samsung
TheTVturns
Thereisno
The
remote
The
cable/set
does
not
the
volume.
e-Manual.Ifnoneofthe
customer
off
automatically.
picture/video
control
does
top
box
turn
theTVonoroff,oradjust
a problem,
first
review
troubleshooting tips
serviceat1-800-SAMSUNG.
Make
Make
•
Try
pressing
If
theTVturns
Ensure
If
yourPCis
Make
•
When
15
minutesifthereisno
•
Check
devices.
•
Set
the
input
HOMI
Make
Be
suretoselect
Reboot
•
•
Replace
(+/-
lin
Clean
Try
pointing
Program
manual
not
remote
work.
control
Troubleshooting
this
listofpossible
apply,
sure
theACpower
surehewall
the
on,
the
Sleep
connectedtothe
sure
theACpower
you
are
watchingTVconnectedtoan
the
cable
video
outputsofyour
connections.
inputonthe
sure
your
the
connected
the
remote
the
correct
the
transmission
the
the
Cable/Set
for
the
SAMSUNGTVcode.
cordissecurely
outletisworking.
POWER
buttonontheTVto
referto'Remote
TimerissettoOffinthe
cordispluggedinsecurelytothe
signal.
connections.
For
example,ifan
TV.
connected
the
TV's
correct
devicebyunplugging
control
direction.
window
remote
directlyattheTVfrom
top
problems
visit
TV,
check
Remove
external
devices
input
batteries
locatedonthe
Box
remote
and
solutions.
samsung.com,
plugged
intohewall
control
are
make
does
not
System
yourPCpower
antennaorcable
and
reconnect
devices
(Cable/Set
external
device's
powered
on.
sourcebypressing
and
then
Make
sure
the
topofthe
5-6
controltooperate
Also
review
the
Troublehsooting
and
then
clickonSupport,orcall
outlet
and
the
TV.
sure
the
problemisnot
work'
below.
menu.
settings.
wall
outlet
connection,
all
cables
connectedtotheTVand
top
Box,
outputisHOMI,itshouldbeconnectedtoan
the
SOURCE
reconnecting
batteries
are
remote.
feet
away.
the
TV.
and
the
theTVwill
OVO,
Blu-ray
buttononthe
the
device's
installed
with
Refertothe
the
remote.
TV.
etc)tomatch
power
their
Cable/Set
turn
remote
cable.
correct
top
off
after10-
external
the
control.
polarities
Box
TV
user
~
This
TFT
LED
panel
there
maybea
usesapanel
few
brightordark
consistingofsub
pixelsonthe
product.
~
You
can
keep
yourTVas
optimum conditiontoupgrade
Downloads)byUSB.
srs@
TheaterSound
[IJDOlBY
DIGITAL PLUS I
Excellent Digital Interface & Networking:
without a
cable
box/STB
(Set-Top-Box)
• My Contents
Allows
youtoplay
music
files,
pictures,
• Anynet+(HDMI-CEC)
Allows
•
AIiShare™
AllShare
youtocontrol
™ connects
all
connected
yourTVand
Samsung
compatible
With
a built-inHDdigital
satellite
and
receiver.
movies
devices
Samsung
pixels
which require sophisticated technologytoproduce.
screen.
These
pixels
the
latest firmwareonweb
License
~db
ListofFeatures
tuner,
savedona
that support
mobile
USB
anynet+
phones/devices
will
havenoimpactonthe
site
(samsung.com->Support
20+Digitai
Out
nonsubscriptionHDbroadcasts
device.
with
your
Samsung
TV's
throughanetwork.
performance of
DIVX,.
HD
canbeviewed
remote.
However,
the
->
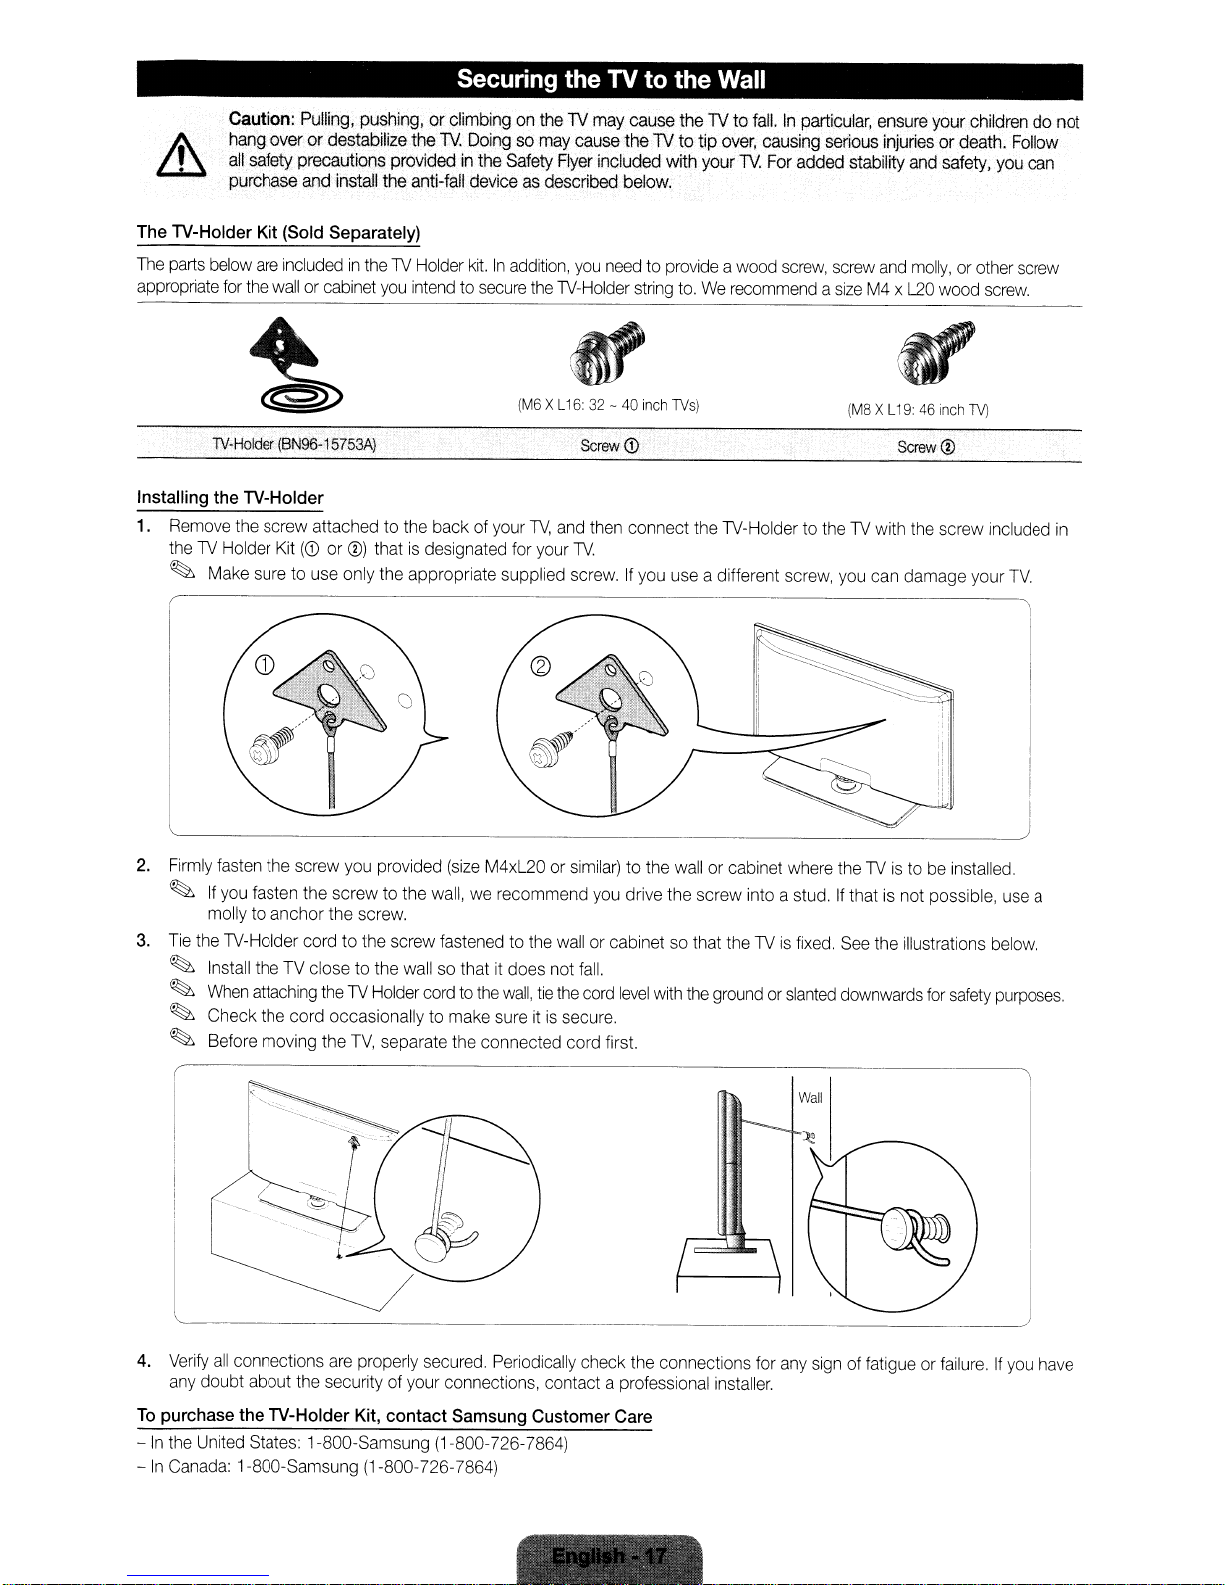
Securing the TV to the Wall
Caution:
hang
all
purchase
The TV-Holder Kit (Sold Separately)
The
parts
below
appropriate
Installing the TV-Holder
1.
for
TV-Holder
Remove
theTVHolder
~
the
Make
Pulling,
pushing,orclimbingontheTVmay
overordestabilize
safety
precautions
and
install
are
includedintheTVHolder
the
wallorcabinet
(BN96-15753A)
screw
attachedtothe
Kit
(j)
or®)thatisdesignated
suretouse
only
providedinthe
the
you
the
the
TV.
Doingsomay
Safety
anti-fall
deviceasdescribed
kit.Inaddition,
intendtosecure
backofyour
appropriate supplied
the
(M6XL16:32-40inch
TV,
for
your
cause
cause
theTVto tip
Flyer
included with your
below.
you
needtoprovideawood
TV-Holder
and
TV.
screw.Ifyou
Screw
then
string
(j)
connect
theTVto
to.WerecommendasizeM4x
1Vs)
use
fall.Inparticular,
over,
causing
TV.
the
TV-HoldertotheTVwith
a different
For
screw,
serious
added
screw,
stability
screw
(M8XL19:46inch
you
can
ensure
your
childrendonot
injuriesordeath.
and
safety,
and
molly,orother
L20
wood
TV)
Screw®
the
screw
damage your
Follow
you
screw
screw
included
TV.
can
in
2.
Firmly
fasten
the
screw
you
provided
~
If
you
fasten
the
screwtothe
mollytoanchor
3.
Tie
the
TV-Holder
~
Install
theTVclosetothe
~
When
attaching
~
Check
the
~
Before
moving
the
screw.
cordtothe
theTVHolder
cord occasionallytomake
the
TV,
separate
(size
M4xL20orsimilar)tothe
wall,werecommend
screw
fastenedtothe
wallsothatitdoes
cordtothe
sureitis
the
connected cord
wallorcabinetsothat
not
fall.
wall,
tie
the
cord
secure.
r
I
I
l
4.
Verify
all
connections
any
doubt
about
To
purchase the TV-Holder Kit, contact Samsung Customer Care
-Inthe
-
In
Canada:
United
States:
1-800-Samsung (1-800-726-7864)
are
properly
the
securityofyour
1-800-Samsung (1-800-726-7864)
secured.
connections,
Periodically
check
contact a
wallorcabinet
you
drive the screw into a
level
with
the
first.
~_·:·~·
the
connections
professional
where
stud.Ifthatisnot
theTVis
groundorslanted
fixed.
Wall
__
for
any
signoffatigueorfailure.Ifyou
installer.
theTVistobe
See
the
illustrations
downwards
for
installed.
possible,
safety
use
a
below.
purposes.
,
have
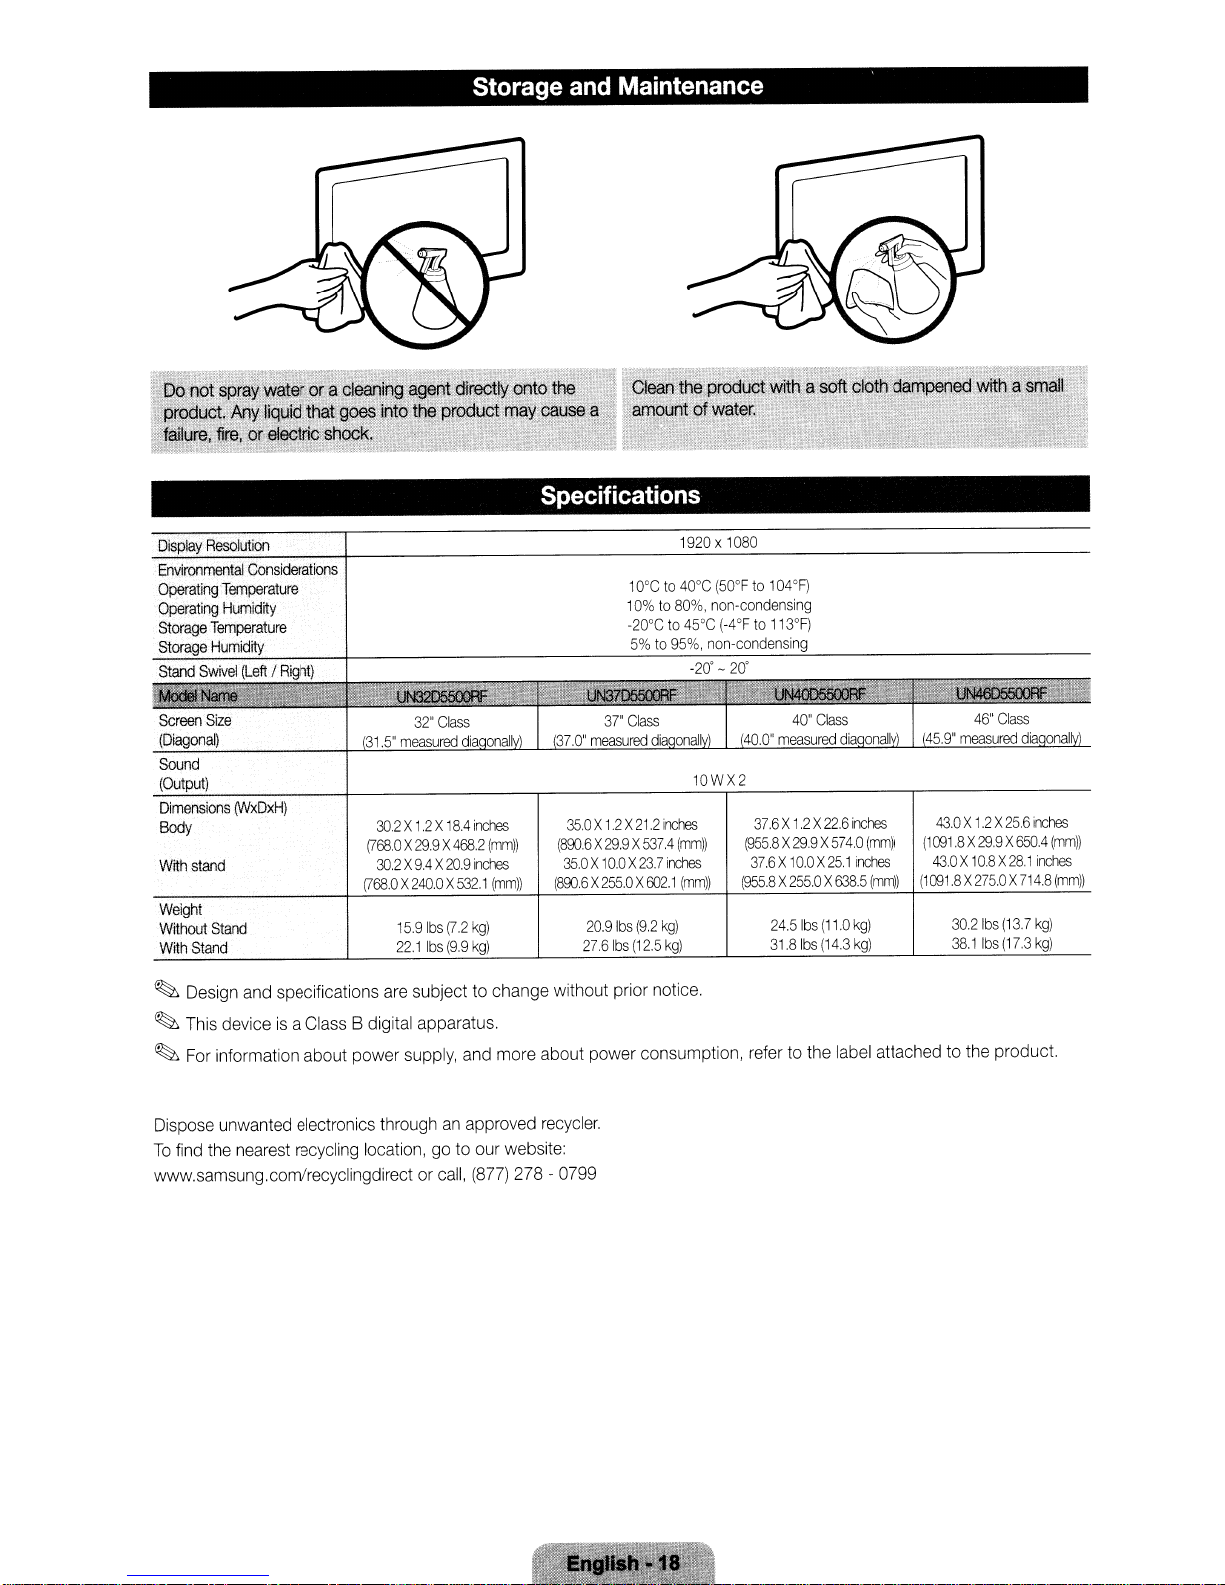
Storage and Maintenance
'Do
not
spr~y
water
ora
~hprodlJCt.
1ailttre,
Display
Environmental
Operating
Operating
Storage
Storage
Stand
Screen
(Diagonal)
Sound
(Output)
Dimensions
Body
Withstand
Weight
Without
WithStand
Any
liquid
thafgoesinfg
ffre,orelectiic.shock.
Resolution
Considerations
Temperature
Humidity
Temperature
Humidity
Swivel
(Left/Right)
~-
Size
(WxDxH)
Stand
~~,,<,
cleaning~agent
directly
the
product
..
"""~'__~'.·"7"a-"":".':"__.~'""'_~'''
onto
,may
.~.~:z
the"
caUSe
.:
a
Specifications
37.0"
measured
302X1.2X18,4
(768.0X29.9X4682
30.2X9,4X20.9
(768.0X240.0X5321
15.9
22.1
Ibs
Ibs
(72
(99
inches
(mm))
inches
(mm))
g)
kg)
35.0X12X212
(8906X29.9X537,4
35.0X10.0X23.7
(8906X255.0XEm1(mm))
20.9
27.61bs
1Q°Cto40°C
10%to80%.
-20°Cto45°C
5%to95%.
37"
Class
dia
Ibs
(92
(12.5
1920x1080
-20'-20'
anal
10WX2
inches
(mm))
inches
kg)
kg)
(50°Fto104°F)
non-condensing
(-4°Fto113°F)
non-condensing
37.6
X12X
(955.8X29.9X574.0
37.6X10.0X25.1
(955.8X255.0X638.5
24.5
31.8lbs
Ibs
22.6
(11.0
(14.3
inches
(mm))
inches
(mm))
kg)
kg)
43.0X12X25.6
(1001.8X29.9X650,4
43.0X10.8X28.1
(1OO1.8X275.OX
302
381
Ibs
Ibs
714.8
(13.7
(17.3
inches
(mm))
inches
(mm))
kg)
kg)
~
Design
and
~
This
~
For
Dispose
To
find
specifications
deviceisa
Class
information about power
unwanted
the
nearest
electronics
recycling
are
B digital apparatus.
supply,
throughanapproved
location,goto
www.samsung.com/recyclingdirectorcall,
subject to change without prior
and
more
about power consumption,
recycler.
our
website:
(877)
278-0799
notice.
refertothe
label
attachedtothe
product.
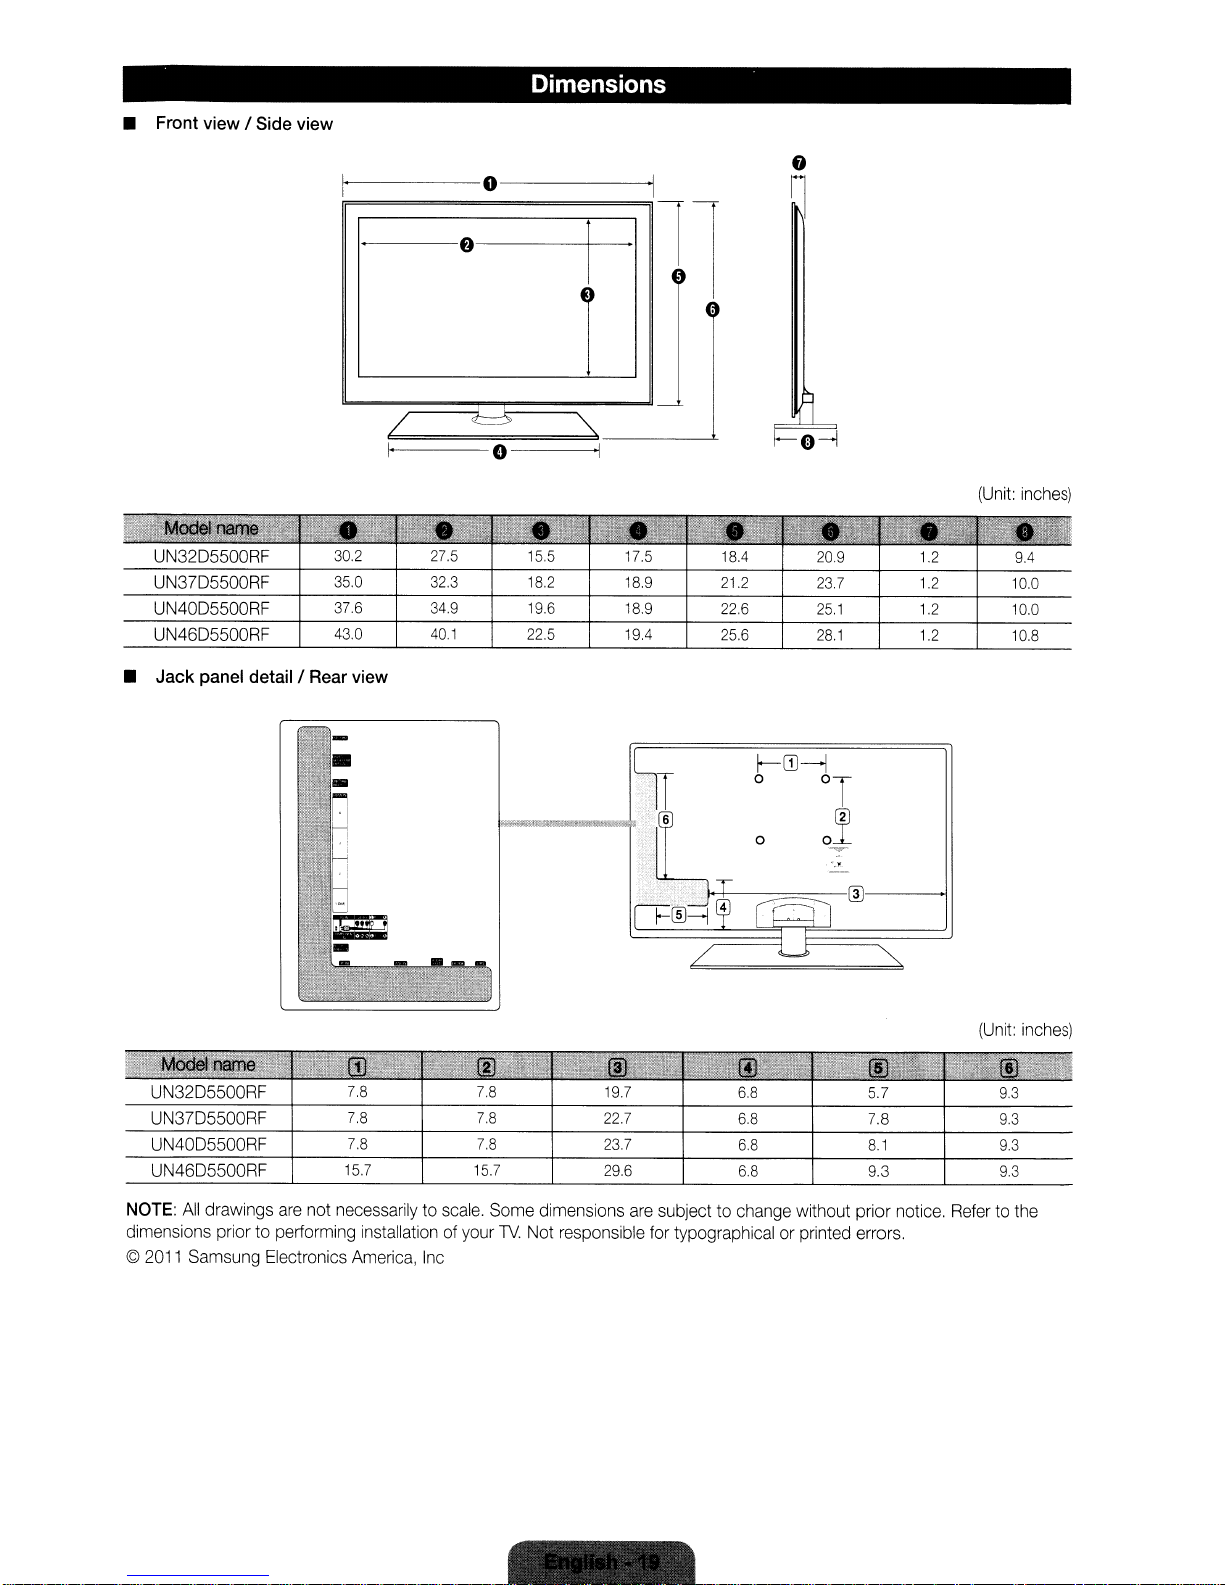
Front view / Side view
•
Dimensions
0
f)
I
~
1-
UN32D5500RF
UN37D5500RF
UN40D5500RF
UN46D5500RF
Jack panel
•
detail/Rear
30.2
35.0
37.6
43.0
view
r--
4)
4·
1
/
I·
27.5
32.3
34.9
40.1
0
15.5 17.5 18.4
18.2
19.6
22.5
'"
I
18.9
18.9
19.4
212
22.6
25.6
0-1
I--GJ-j
o 0
o
209
23.7
25.1
28.1
(Unit:
inches)
1.2
1.2
1.2
1.2
'.'
9.4
10.0
10.0
10.8
UN32D5500RF
UN37D5500RF
UN40D5500RF
UN46D5500RF
NOTE:
All
drawings
dimensions prior to
©
2011
Samsung
are
not
performing
Electronics
necessarilytoscale.
installationofyour
America,
Inc
7.8
7.8
7.8
15.7
Some
TV.
dimensions
Not
responsible
19.7
22.7
23.7
29.6
are
subjecttochange
for
6.8
6.8
6.8
6.8
without prior notice.
typographical or printed errors.
57
7.8
8.1
9.3
(Unit:
93
9.3
9.3
9.3
Refertothe
inches)

This
page
is
intentionally
left
blank.
Contact
If
you
have
SAMSUNG
any
WORLDWIDE
questionsorcomments
relatingtoSamsung
products,
please
contact
the
SAMSUNG
customer
care
center.
CANADA
U.S.A
1-800-SAMSUNG
1-800-SAMSUNG
(726-7864)
(726-7864)
www.samsung.com
www.samsung.com
Sam
sung
Electronics
Service55Standish
482
Canada
Samsung
Road
Electronics
Ridgefield
Park,NJ07660-2112
Canada
Court
America,
Inc.,
Customer
Mississauga,
Inc.85Challenger
Ontario
L5R
©
2011
Samsung
Electronics
Co.,
Ltd.
All
rights
reserved.
11111111111111111111111111111111111
8N68-03431
1II111I1
A-03
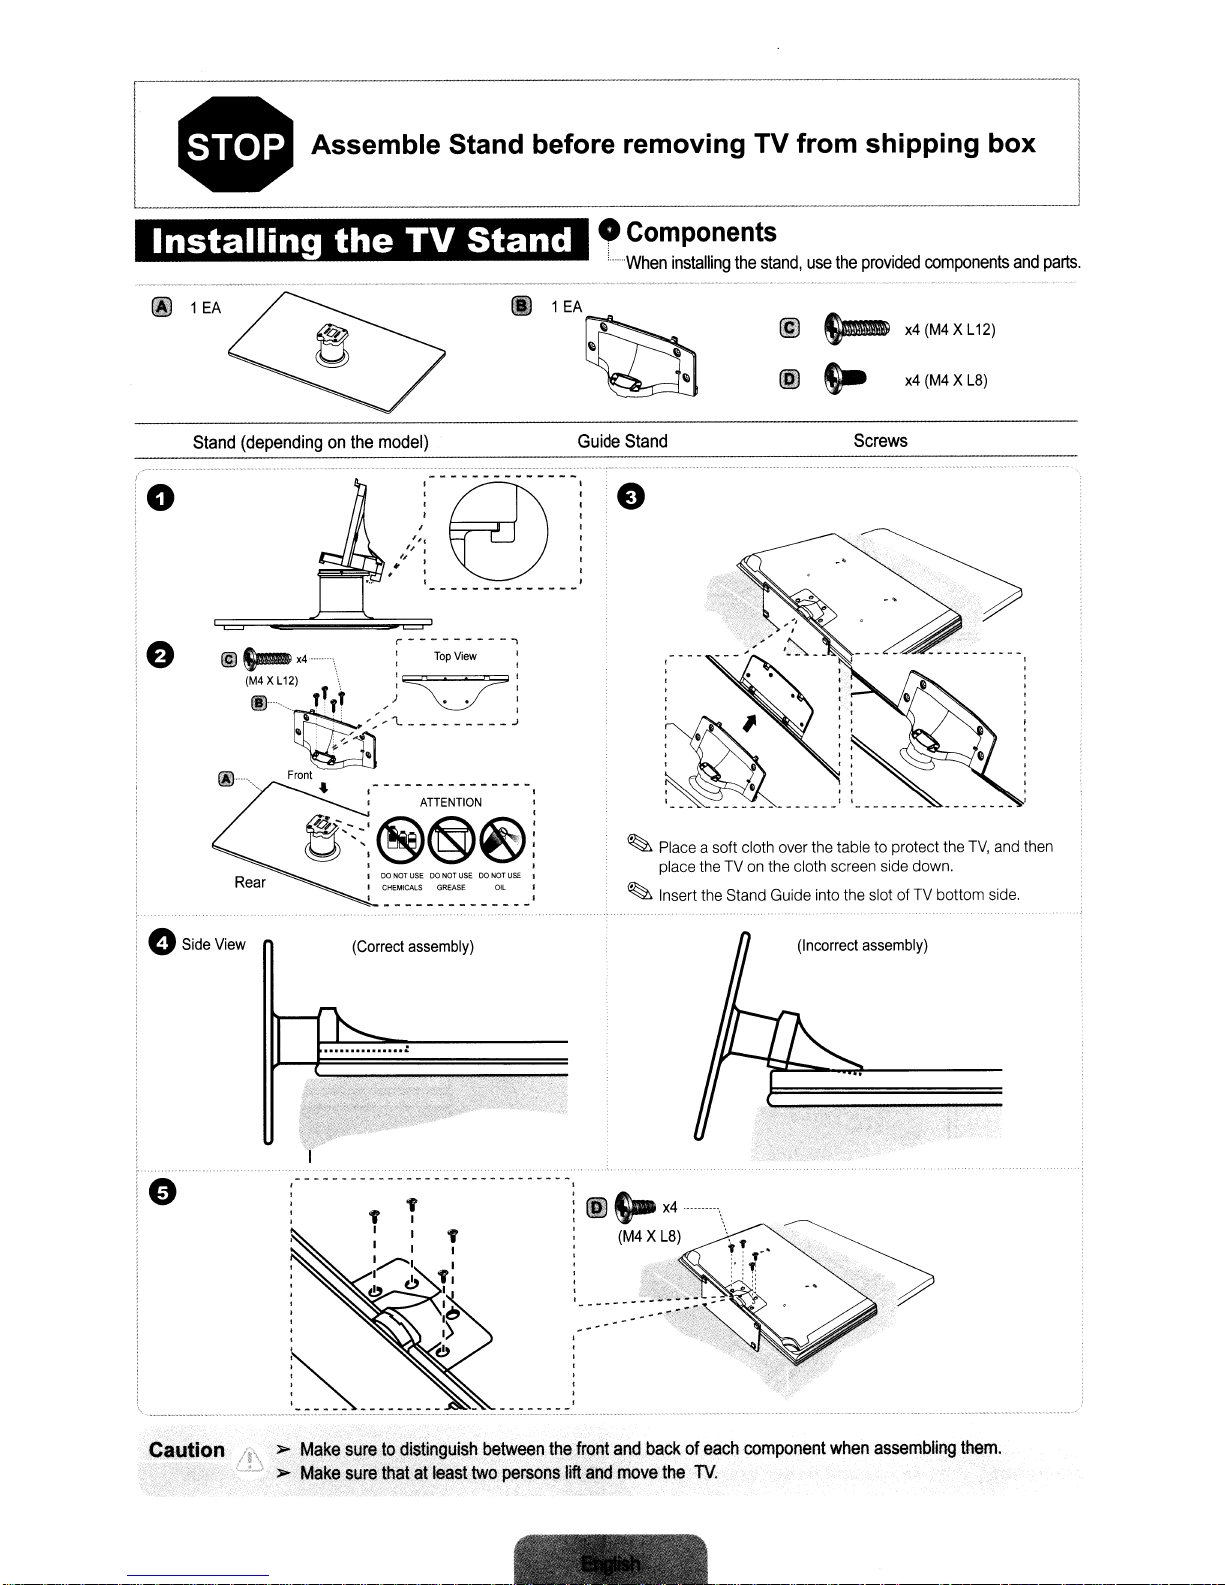
• Assemble Stand before removing TV
o
Components
---------,-,--,.
@
lEA
_
..
_-,----------
~
"When
1
EA
installing
~
Guide
Stand
(dependingonthe
model)
Stand
the
stand,
@
@
from
use
the
~
s.-
shipping
provided
Screws
components
x4
(M4X
x4
(M4XL8)
L12)
box
and
parts.
o
o
Side
@
s-m-
(
M4XL12)
oo~<
Front
View
I
I
'"
" ,
~
I
F~~'
"
:
r---------..,
X4·······\
\
T'
e'~::®@~!
, ,
(Correct
Top
"~'
'~
:
ATTENTION
DO
NOT
USE00NOT
CHEMICAlS GREASE
assembly)
View
_:
USE00NOT
:
,
;
~
Place
USE
I
OIL
I
I
place the
~
Insert the Stand Guide into the slotofTV
a soft cloth
over
the
TVonthe cloth screen side down.
table to protect
(Incorrect
assembly)
the
bottom
TV,
and
side.
then
"
>-
Make
Caution
suretodistinguish
MakeslJrethat
@9-
between
~tleasttwopersons
thefrQht
liftandmovathe
X4
(M4X
L8)
",nd
backofeach
........
TV.
\
'.
component
when
assembling
them.

1111111111111111111111111111111111111111111
BN68-03388A-02

E-MANUAL
imagine the possibilities
Thank you for purchasing this Samsung product.
To receive more complete service, please register
your product at
www.samsung.com/register
Model _____________ Serial No. _____________

Contents
Channel Setting
•
Using the Channel menu (Watch TV) 1
• Memorizing Channels 17
• Other Features 21
Basic Features
•
Picture Menu 23
• Sound Menu 40
Preference Features
•
Network
for LED 5500 Series
48
•
System Menu 80
• Support Menu 113
Advanced Features
•
My Contents 124
• Anynet+ 154
• AllShare™
for LED 5500 Series
166
Other Information
• Troubleshooting 173
•
Anti-theft Kensington Lock 191
• License 193
▶
English
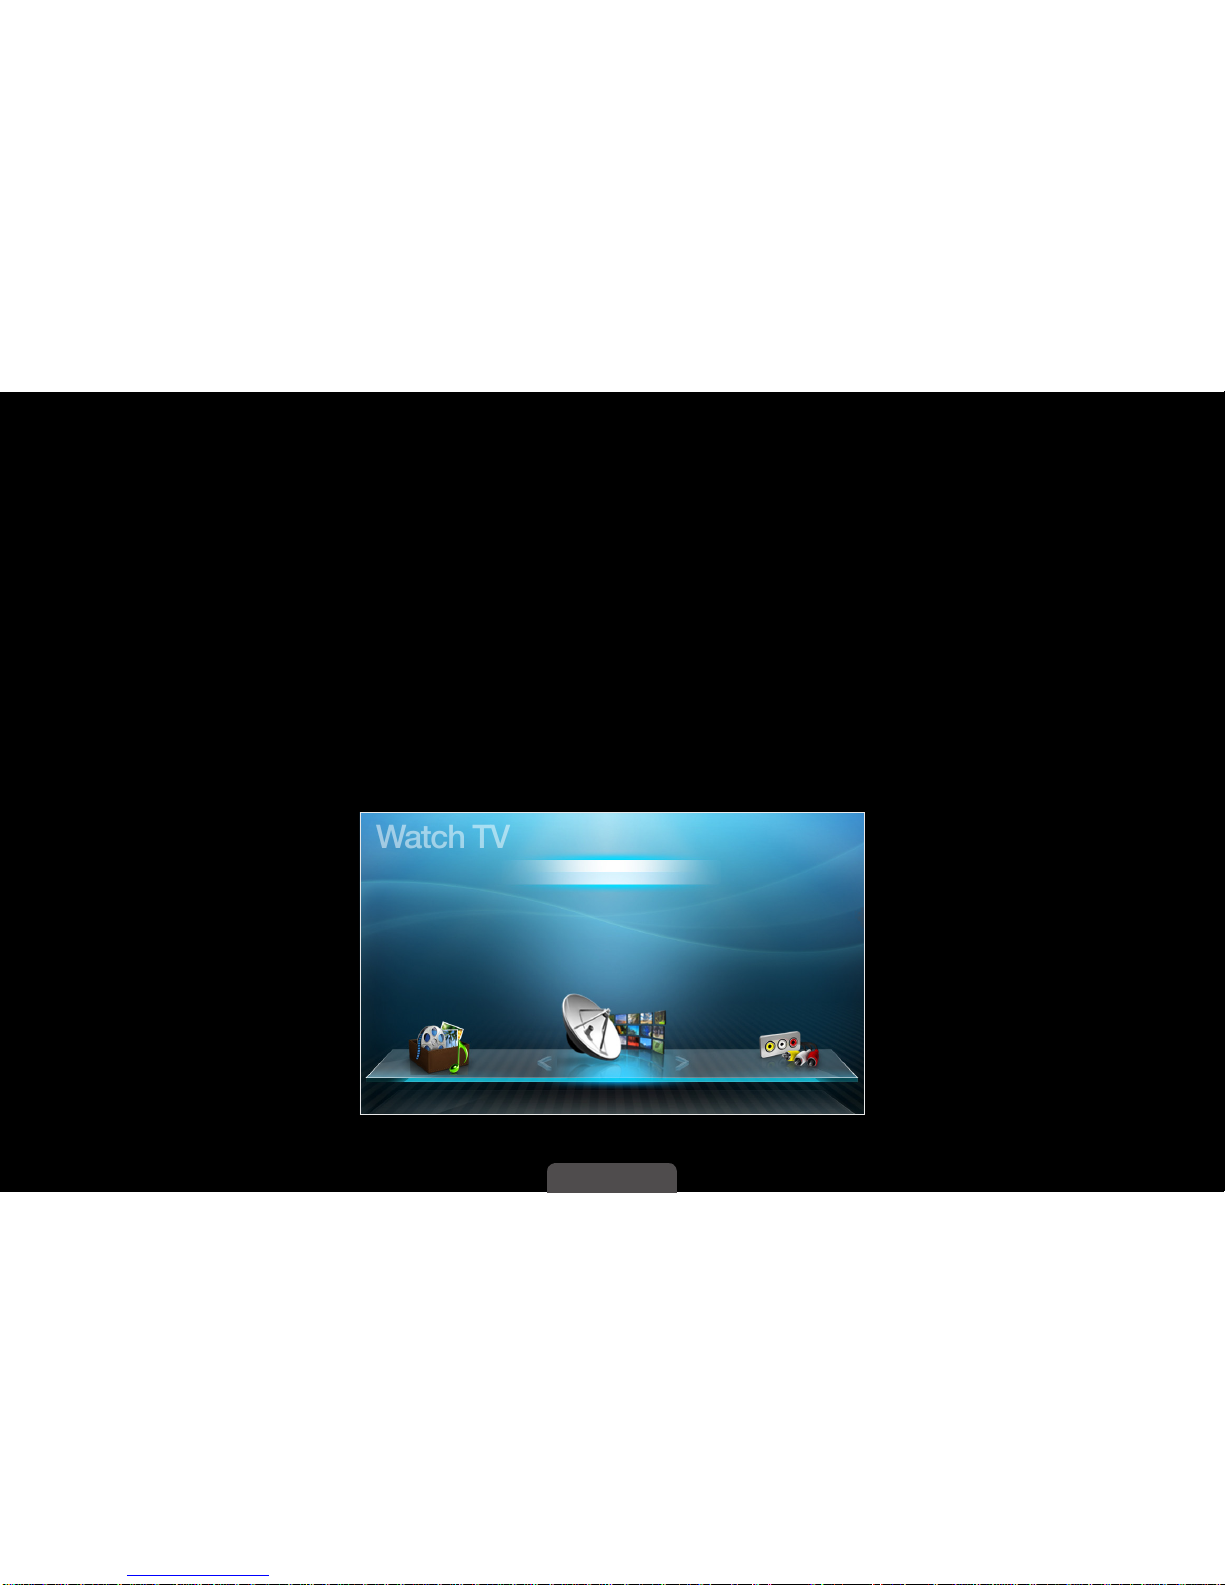
❑Using the Channel menu (Watch TV)
Press the CONTENT button to select Watch TV, and then select the desired
menu item. Choose from Schedule Manager, Channel List, and Channel
Manager.
■Schedule Manager
CONTENT → Watch TV → Schedule Manager → ENTER
E
Select the Schedule menu item to access the Timer Viewing function. Timer
Viewing let you display the channel you want at the time of your choice.
Schedule Manager
Channel List
Channel Manager
My Contents
Watch TV
Source

◀ ▶
English
Using Timer Viewing
You can set the TV to display a desired channel automatically on a day and at a
time of your choice.
You must set the current time first using the Time → Clock function in the
System menu to use this function.
To use Timer Viewing, follow these steps:
1. Press the ENTER
E
button on the Schedule Manager screen.
2. Press the ENTER
E
button to add a scheduled viewing.
3. Press the
◄/►/▲/▼
buttons to set Antenna, Channel, Repeat, Date, and
Start Time.
●
Antenna: Select Air or Cable.
●
Channel: Select the desired channel.

◀ ▶
English
●
Repeat: Select Once, Manual, Sat~Sun, Mon~Fri or Everyday. If you
select Manual, you can set the day you want.
A check (c) mark indicates a day you selected.
●
Date: You can set a desired date.
Date is available only when you select Once in Repeat.
●
Start Time: You can set the start time you want.
If you want to edit or cancel a scheduled viewing, select the scheduled
viewing on the Schedule List, and then select Edit or Cancel Schedules.

◀ ▶
English
■Channel List
CONTENT → Watch TV → Channel List → ENTER
E
The Channel List contains the channels your TV displays (added channels) when
you press the Channel button on your remote control. On the Channel List,
you can view Added Channels, channel information, Favorites, and manage
channels.
When you press the CH LIST
button on the remote control, the
Channel List screen is displayed
at once.
●
Added Channels: Show all added
(memorized) channels.
●
Favorites 1-5: Show all favorite
channels, arranged in up to five groups. Each group has a separate screen.
Air
AC B D
Antenna
AC B D
Program View CH Mode E Watch k Page
Channel List
Added Channels
6-1 TV#6
7-1 TV#7
a
3 Air
23 TV#23
33 TV#33
32 TV#32
a
9 Air
a
11 Air

◀ ▶
English
The TV displays Favorites only if you have added favorites using Add to
Favorites.
If you want to view the list of favorite channels quickly, press the CH LIST
button, and then press the ► (CH Mode) button to display Favorites
1-5. If you have favorites in more than one Favorite Group, press the ►
(CH Mode) to view the other groups. Press the ◄ (CH Mode) button to
return to the Added Channels.
Using the colored and function buttons with the Channel List.
●
●
AC B D
Red (Antenna): Switches the mode and display between Air or Cable.
●
●
ACB D
●Yellow (Program View / Channel View):
For digital channels, switches the display between Program View and
Channel View. When you select a digital channel in Channel View, press
once to display a list of programs on that channel. Press again to redisplay the Added Channels.
 Loading...