

Samsung 460I-S User Manual

uVending Solution
User Manual
Training Manual
Service Manual
460I-S
Thank you for purchasing this Samsung product.
To receive more complete service, please register
your product at
www.samsung.com/global/register
Model Serial No.
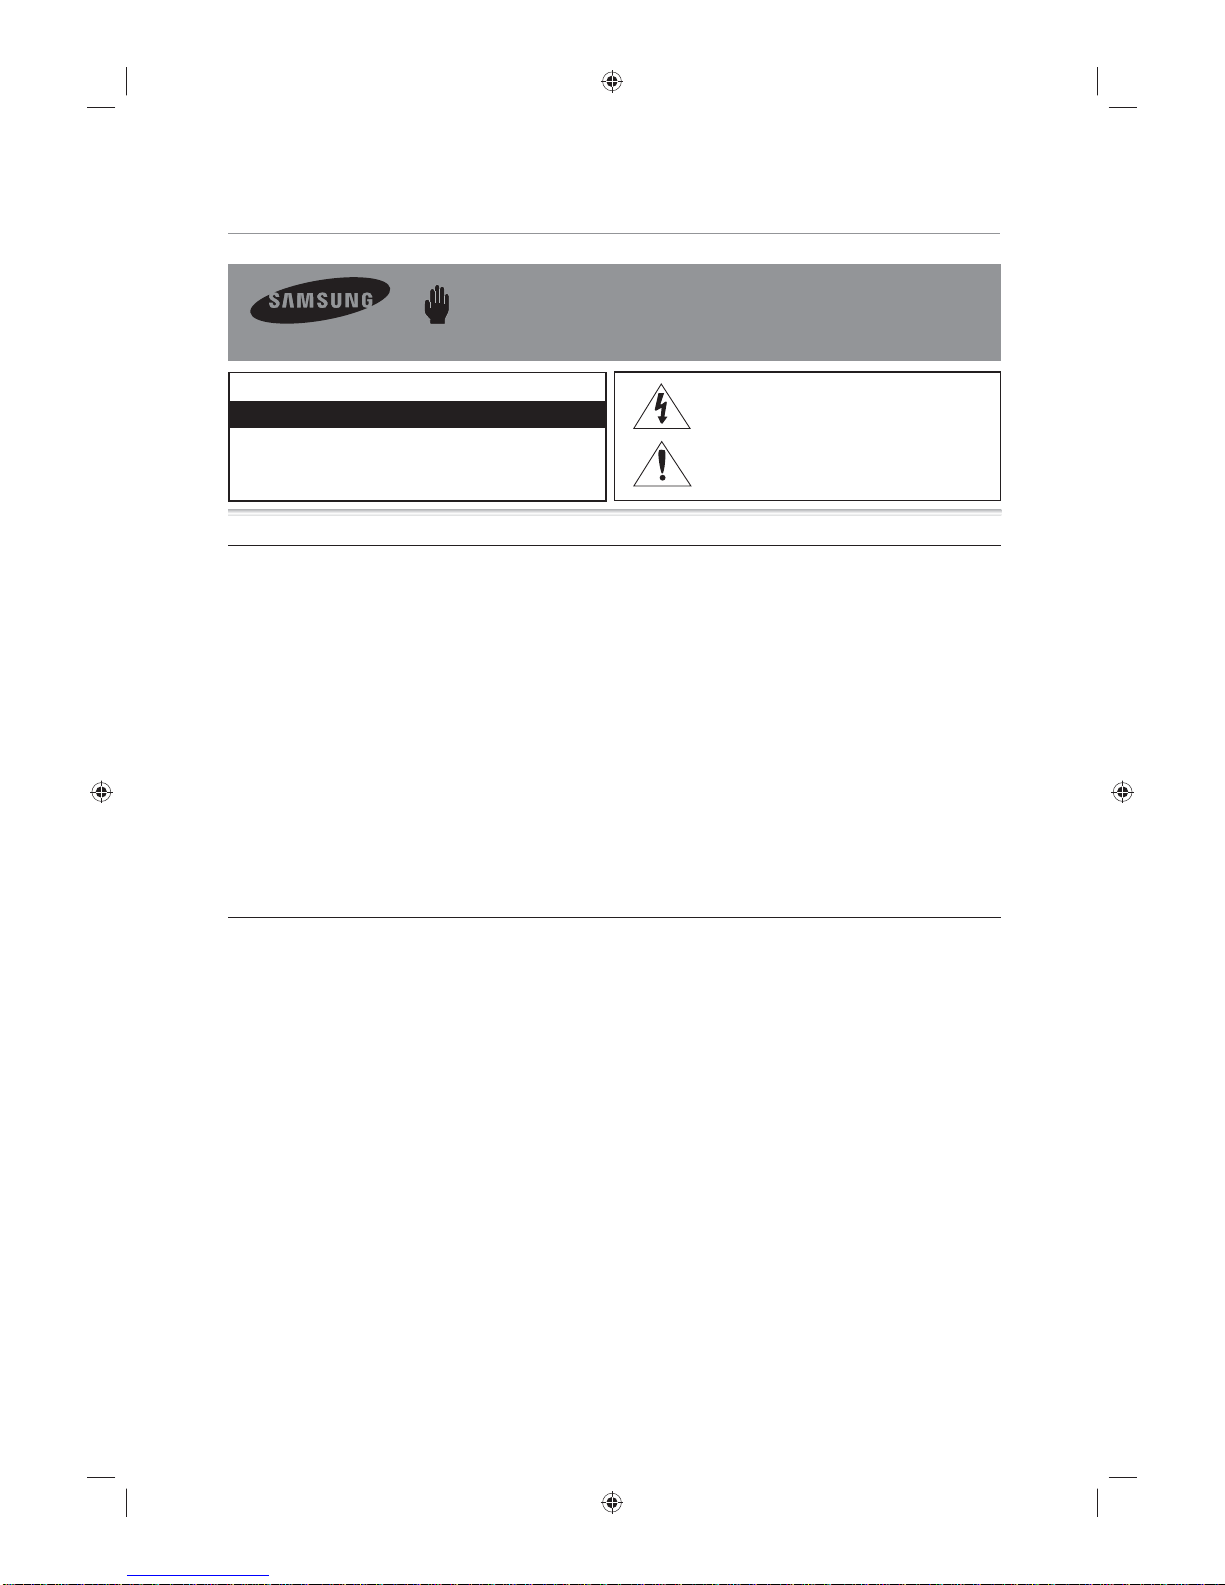
Safety Precautions
Warning! Important Safety Instructions
(Please read the appropriate section that corresponds to the marking on your Samsung product before attempting to install the product.)
CAUTION
RISK OF ELECTRIC SHOCK DO NOT OPEN
CAUTION: TO REDUCE THE RISK OF ELECTRIC SHOCK, DO
NOT REMOVE COVER (OR BACK). THERE ARE NO USER
SERVICEABLE PAR TS INSIDE. REFER ALL SERVICING T O
QUALIFIED PERSONNEL.
Power Precautions
Insert the power plug fi rmly and correctly. An unstable connection may cause fi re. y
Do not use a damaged power cord or plug, or a loose power outlet. This may result in electric shock or fi re. y
Do not touch the power plug with wet hands when connecting or disconnecting it from the outlet. This may y
result in an electric shock.
Do not bend or pull out the power plug by force and do not place any heavy objects onto it. Otherwise, it y
may damage the cord and result in fi re.
There is a high voltage inside the product. Make sure that users do not disassemble, repair or modify the product y
arbitrarily. This may result in electric shock or fi re. If you require repairs, contact a service center.
Use a dry cloth when cleaning the pins of the power plug or cleaning dust from the power outlet. Failing to y
do so may result in fi re.
Make sure to disconnect the power cord while fi rmly holding the plug. Failing to do so may result in electric y
shock or fi re.
Make sure to connect the power cord to a grounded power outlet. Failing to do may result in electric shock y
or personal injury.
Only use the power cord provided with the product. Do not use a power cord from another product. This y
may result in fi re or electric shock.
Installation Precautions
Ensure that at least two persons lift and move the product. Failing to do so, may result in the product being y
dropped and damaged, as well as personal injury.
When the product has been dropped or the case is broken, turn the power off and disconnect the power y
cord. Contact a service center. Failing to do so, may result in electric shock or fi re.
Do not insert metal objects, such as chopsticks, coins or pins, or infl ammable objects such as matches or y
paper into the product (into the vents, the input and output terminals, etc). If water or any foreign material
enters the product, disconnect the power cord and contact a service center. Failing to do so may result in
electric shock or fi re.
If you detect a strange smell or hear a strange sound or there is smoke coming from the product, y
disconnect the power plug immediately and contact a service center. Failing to do so may result in electric
shock or fi re.
Place the product down gently. Failing to do so may result in personal injury and damage to the product. y
Do not place the front of the product on the fl oor. This may result in damage to the screen. y
When an image remains on the screen for too long time, an afterimage or stain may occur. When not using y
the product for a long period of time, put it into sleep mode or activate a moving screensaver.
When cleaning the product, make sure to disconnect the power cord Failing to do so may result in electric y
shock or fi re.
When cleaning the product, do not allow water to come into contact with the main body of the product. y
Ensure that water does not enter the product and that it is not wet. Failing to do so may result in electric
shock or fi re.
When cleaning the product, disconnect the power cord and clean it with a soft, dry cloth. Do not use any y
chemicals such as wax, benzene, alcohol, thinner, mosquito repellant, or lubricant.
These may alter the product surface and peel the indicator items off the product.
This symbol indicates that high voltage is present
inside. It is dangerous to make any kind of contact
with any internal part of this product.
This symbol alerts you that important literature
concerning operation and maintenance has been
included with this product.

Contents
uVending machine 01 Hardware
Connecting02
Connecting and Using External Devices ............................................................3
Ferrite Core .......................................................................................................4
Parts and Assembling of Parts03
What is uVending Management Software? ...................................................... 4
Disassembly ......................................................................................................5
uVending management04 Software
What is uVending Management Software? ...................................................... 15
Main Functions of uVending Management Software .......................................15
Compatibility ..................................................................................................... 16
System Requirements........................................................................................16
Genera05 l
Interaction ......................................................................................................... 17
Screen ...............................................................................................................18
Logi06 n
How to Login ....................................................................................................19
Change Password .............................................................................................20
Hom07 e
LFD Manage08 r
LFD Manager ...................................................................................................23
Display ..............................................................................................................24
Sounds ..............................................................................................................25
Plan-O-Gram Manage09 r
Plan-O-Gram.....................................................................................................27
Template Library ................................................................................................32
Cart Discount Setup ..........................................................................................38
Related Product Discount Setup........................................................................42
uVending
English
3
uVending
machine Hardware
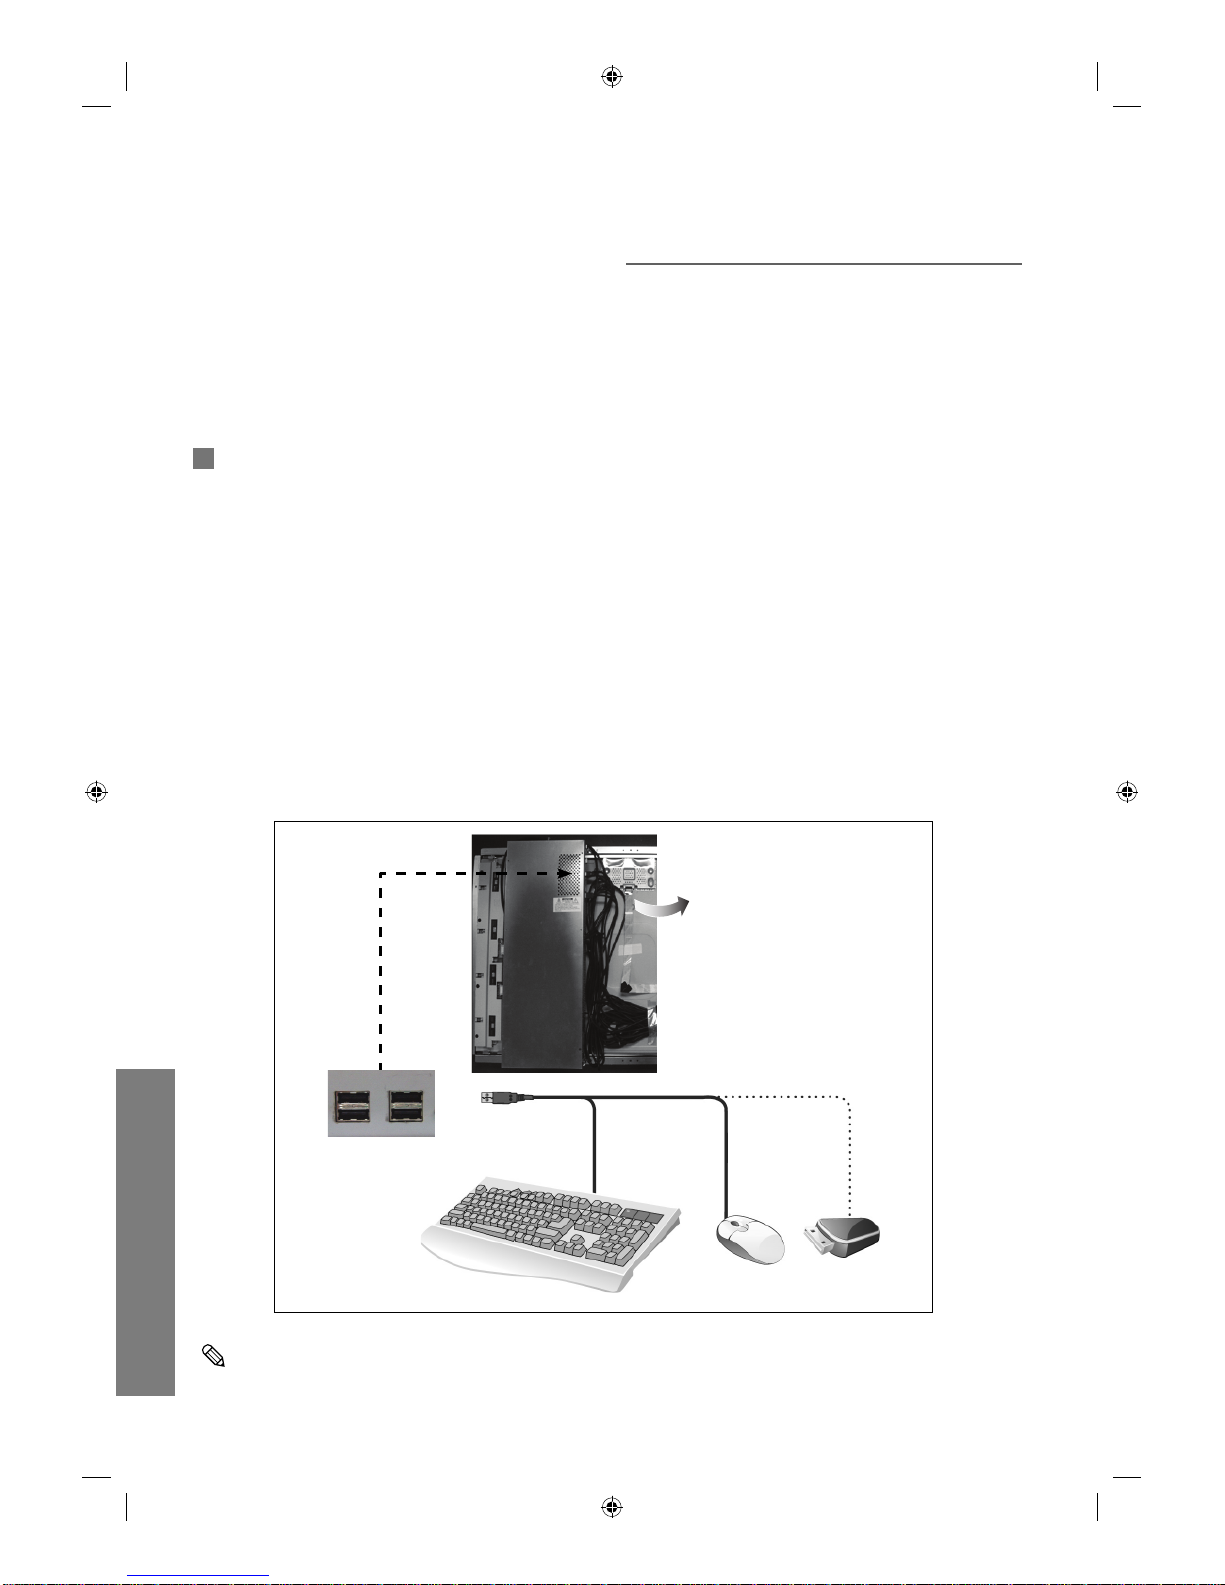
Connecting and Using External Devices
You can use the software upgrade function and additional functions conveniently by connecting
an external device to your vending machine and touching the LCD screen with your finger.
You can connect a keyboard, mouse, or USB memory device to your vending machine.
①
To connect a USB device, open the door of your vending machine. Wait until the Administrator
Program is loaded and displayed on the screen.
②
Connect the USB device.
USB Mouse
USB Keyboard
USB
②
①
Connecting
The appearance, color, and specifications of the product are subject to change for
enhancements without prior notice.
uVending
English
4
Parts and Assembling of Parts
The product appearance may differ depending on the product model. The product specifications
are subject to change for product enhancement purposes without prior notice.
Product Features >
- An SPVA response time of 8ms has been adopted
- The Sound function has been reinforced by adopting SRS TruSurround
- Speaker out
- 10W x 2 speaker
Specifications >
Model Name 460I-S
Panel AMLCD 46”(LTI460HA03)
Optimum Resolution 1920 x 1080 Wide (UXGA) 60Hz
Display Size (H X V) 46” (16 x 9)
Brightness 616 cd/m2
Contrast Ratio 2000 : 1
Response Time 8 ms
Viewing Angle Left/Right/Up/Down : 89” / 89” / 89” /89”
Power Consumption
(on mode)
TYP : 365 watts
MAX : less than 425 watts
DPMS 5 W
Sound Output Max. 10 W x 2
Size (W X H X D) SET Unpackaged : 1114 x 664 x 157 mm(W x H x D)
Packaged : 1252 x 803 x 367 mm (W x H x D)
weight Unpackaged : 37 kg
Packaged : 45 kg
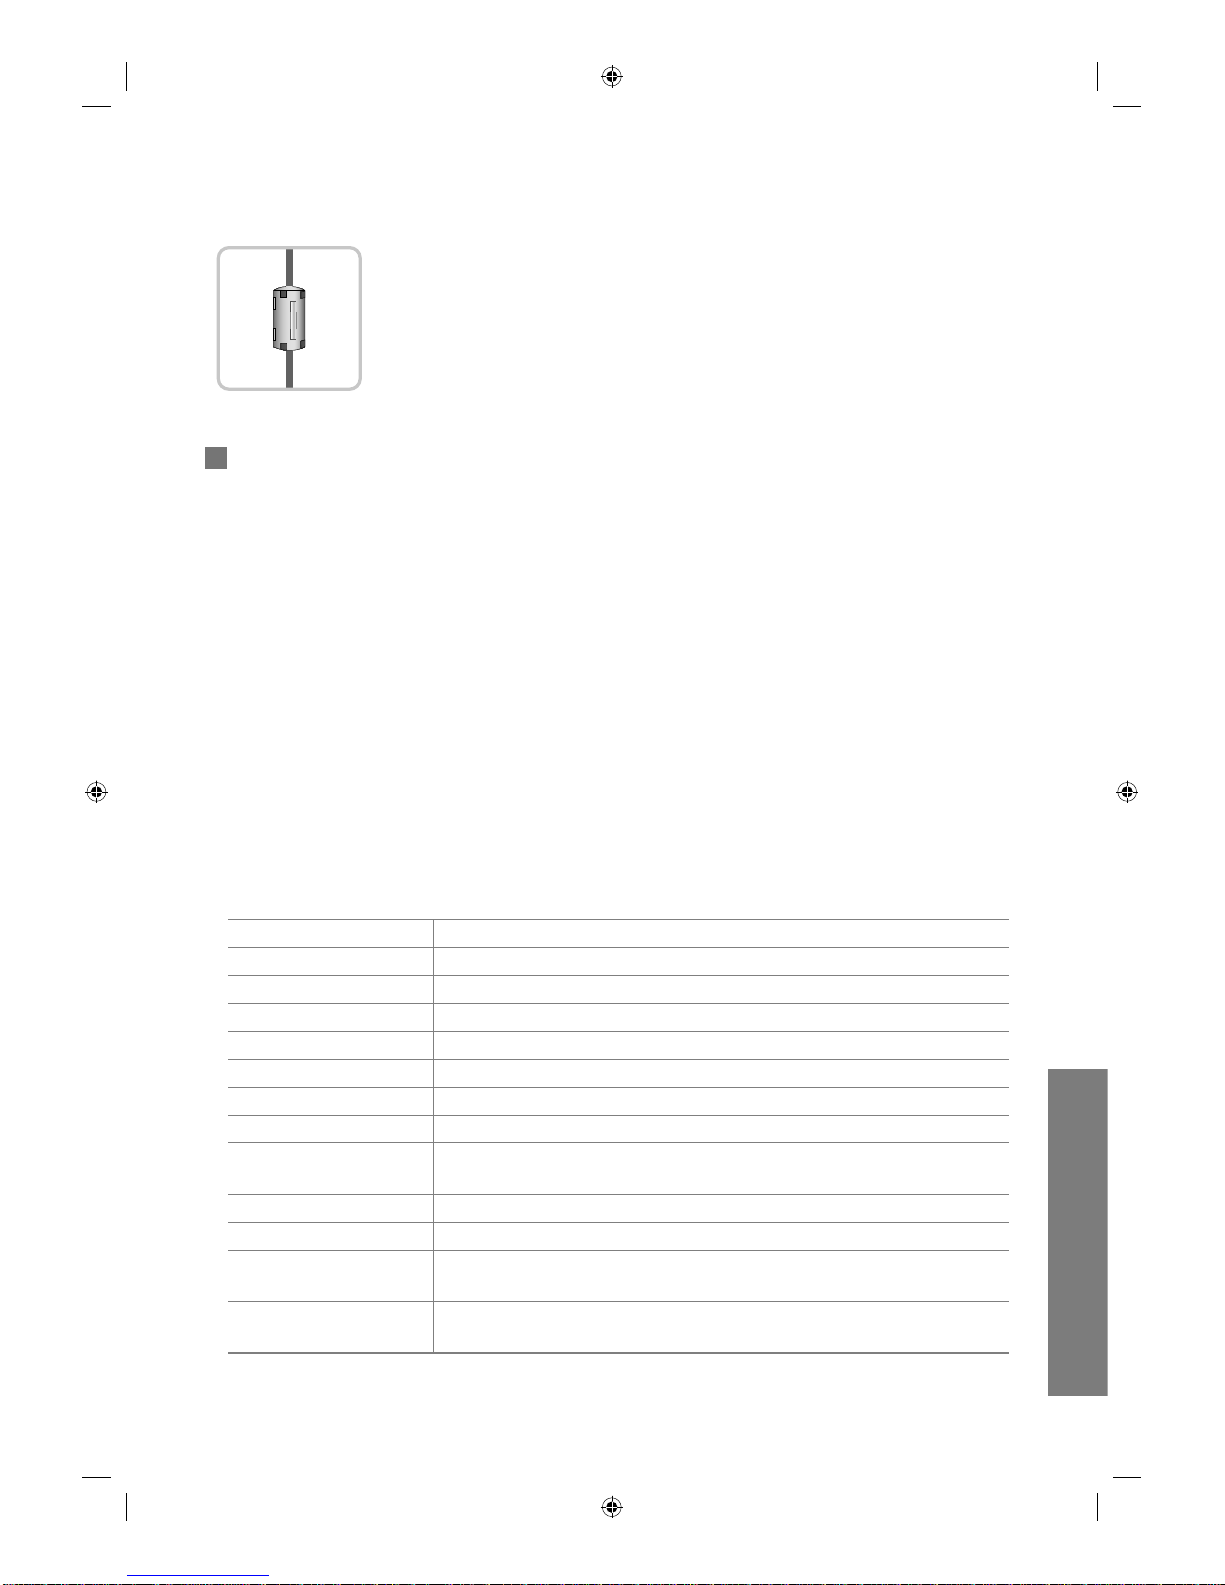
Ferrite Core
• The ferrite cores are used to shield the cables from interference.
• When connecting a cable, open the ferrite core and clip it around
the cable near the plug.
Parts and Assembling of Parts
uVending
English
5
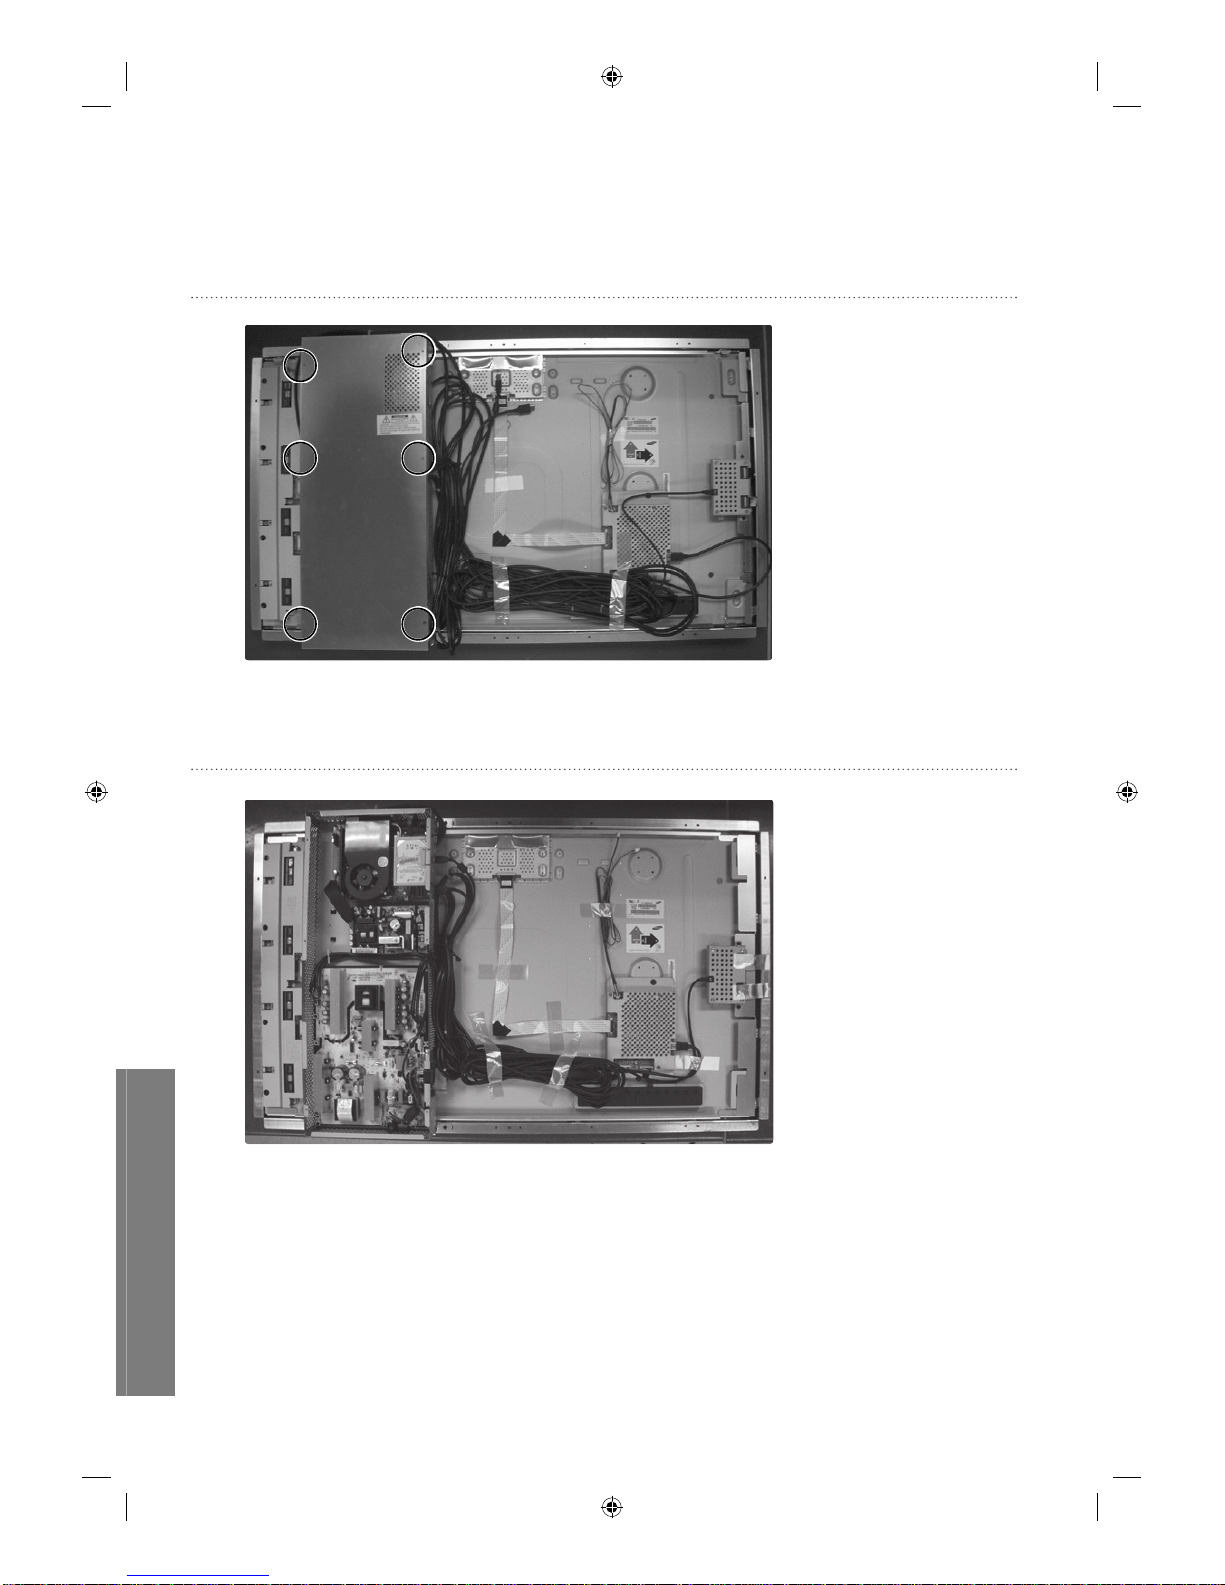
Disassembly
Remove 6 screws from the rear cover
Lift up the shield cover.
uVending
English
6
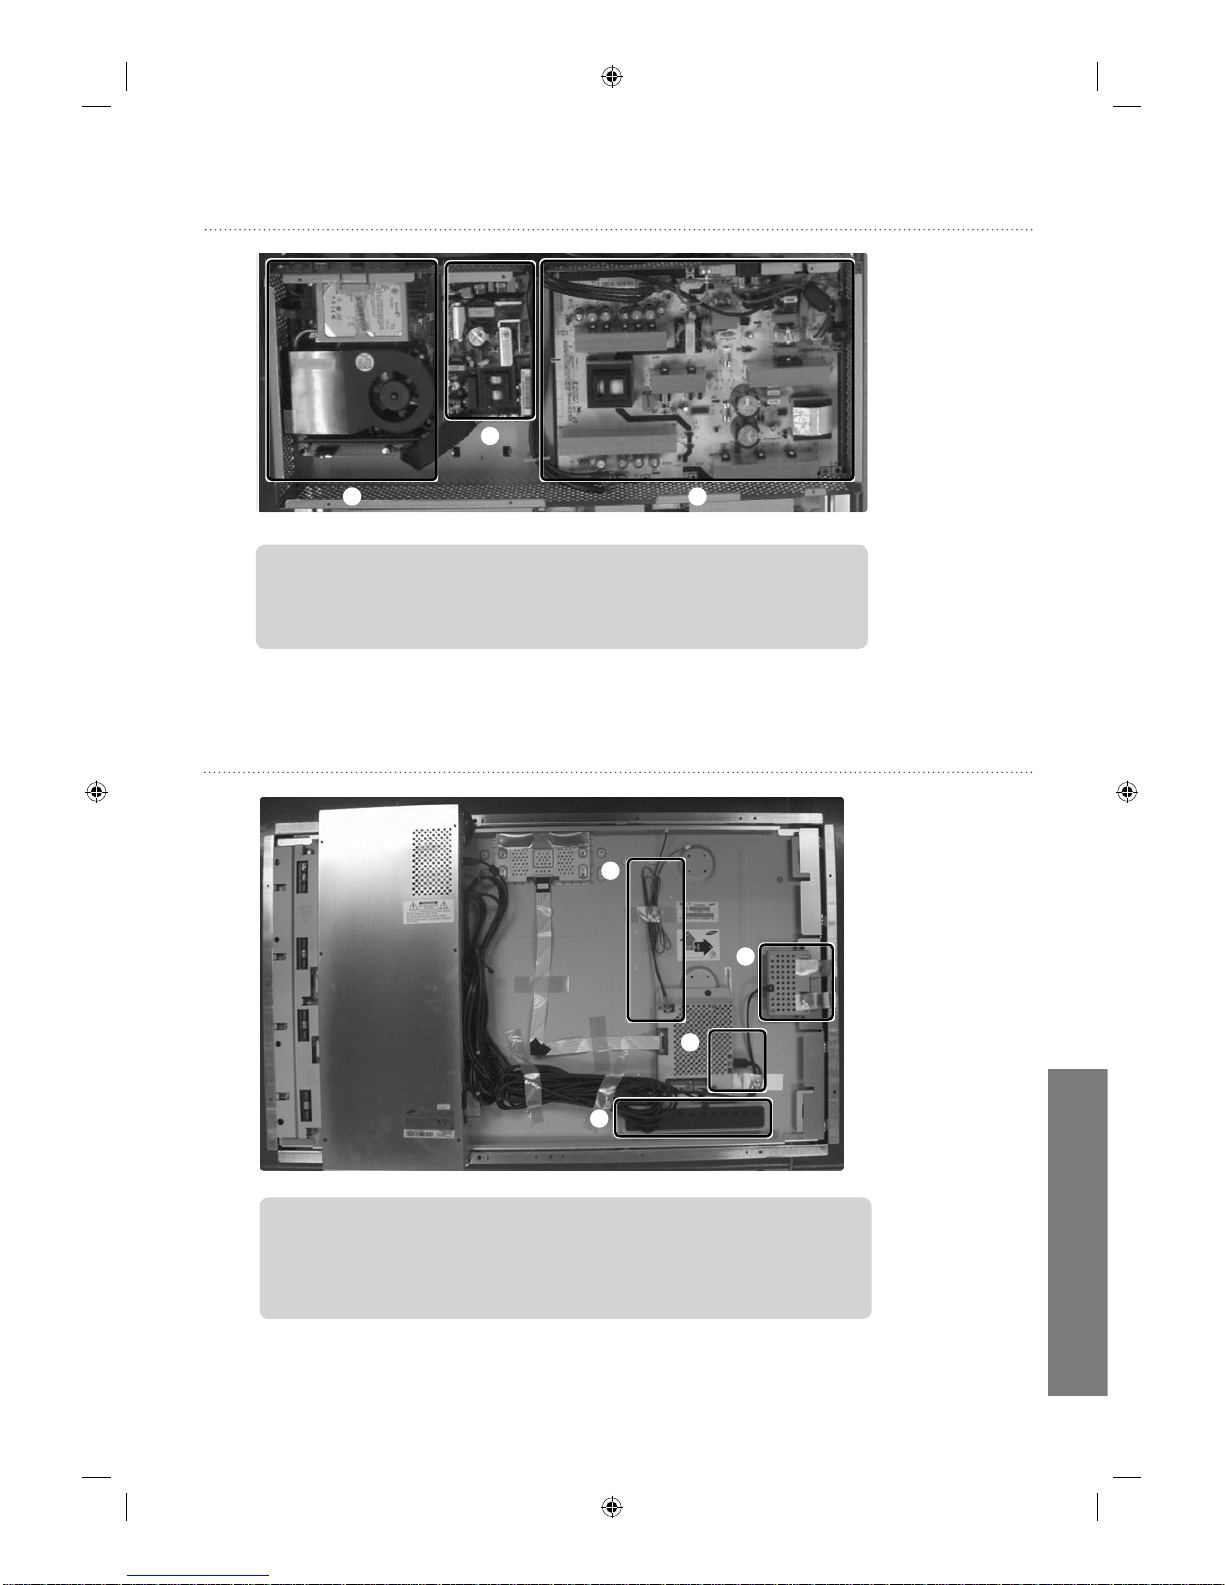
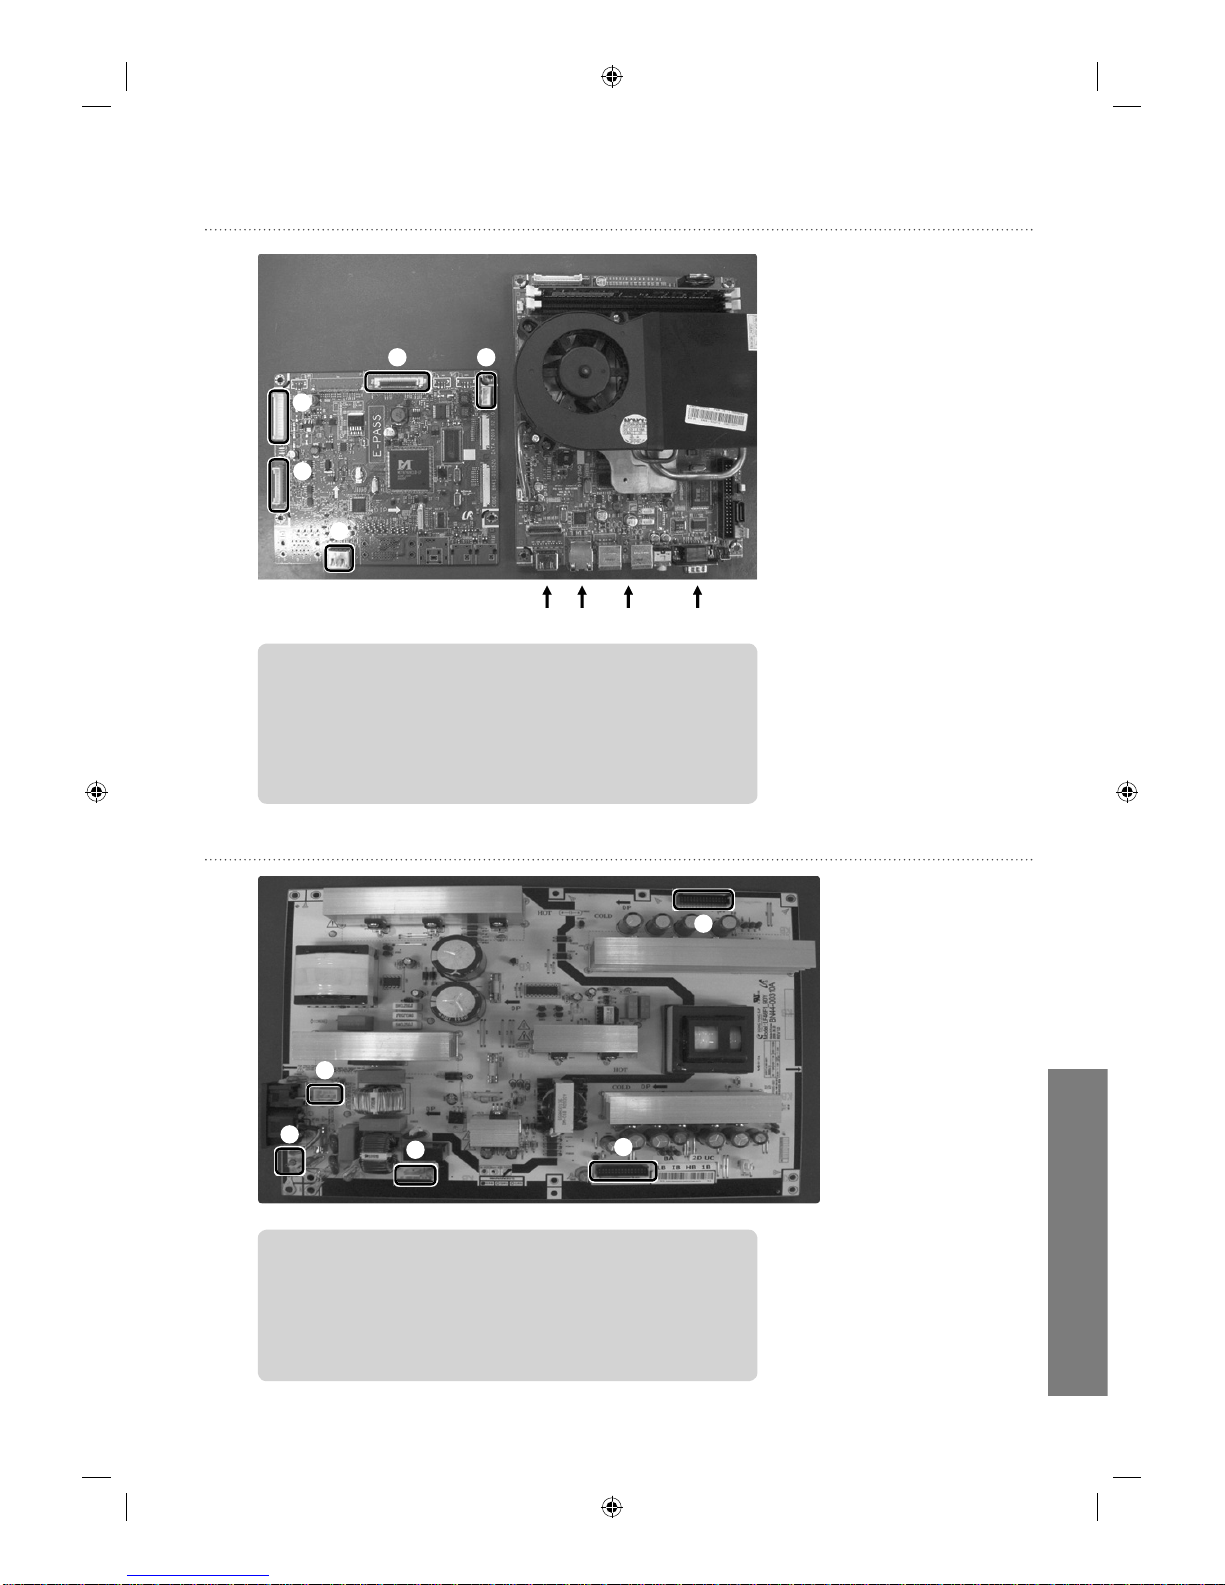
Internal View
②
① ③
①
Network Board : CPU and Video decoder are used to process video and audio
②
Sub SMPS : Network board power supply
③
SMPS : MAIN PBA and PANEL power supply
Assembly Method
②
①
③
④
①
Touch Module controller
②
HDMI cable
③
Speaker wire connector (L R)
④
Control button

uVending
English
7
Assembly Method - Touch module connection
USB Cable
Assembly Method - Speaker connection
Left side (Yellow)
Right side (Green)
uVending
English
8
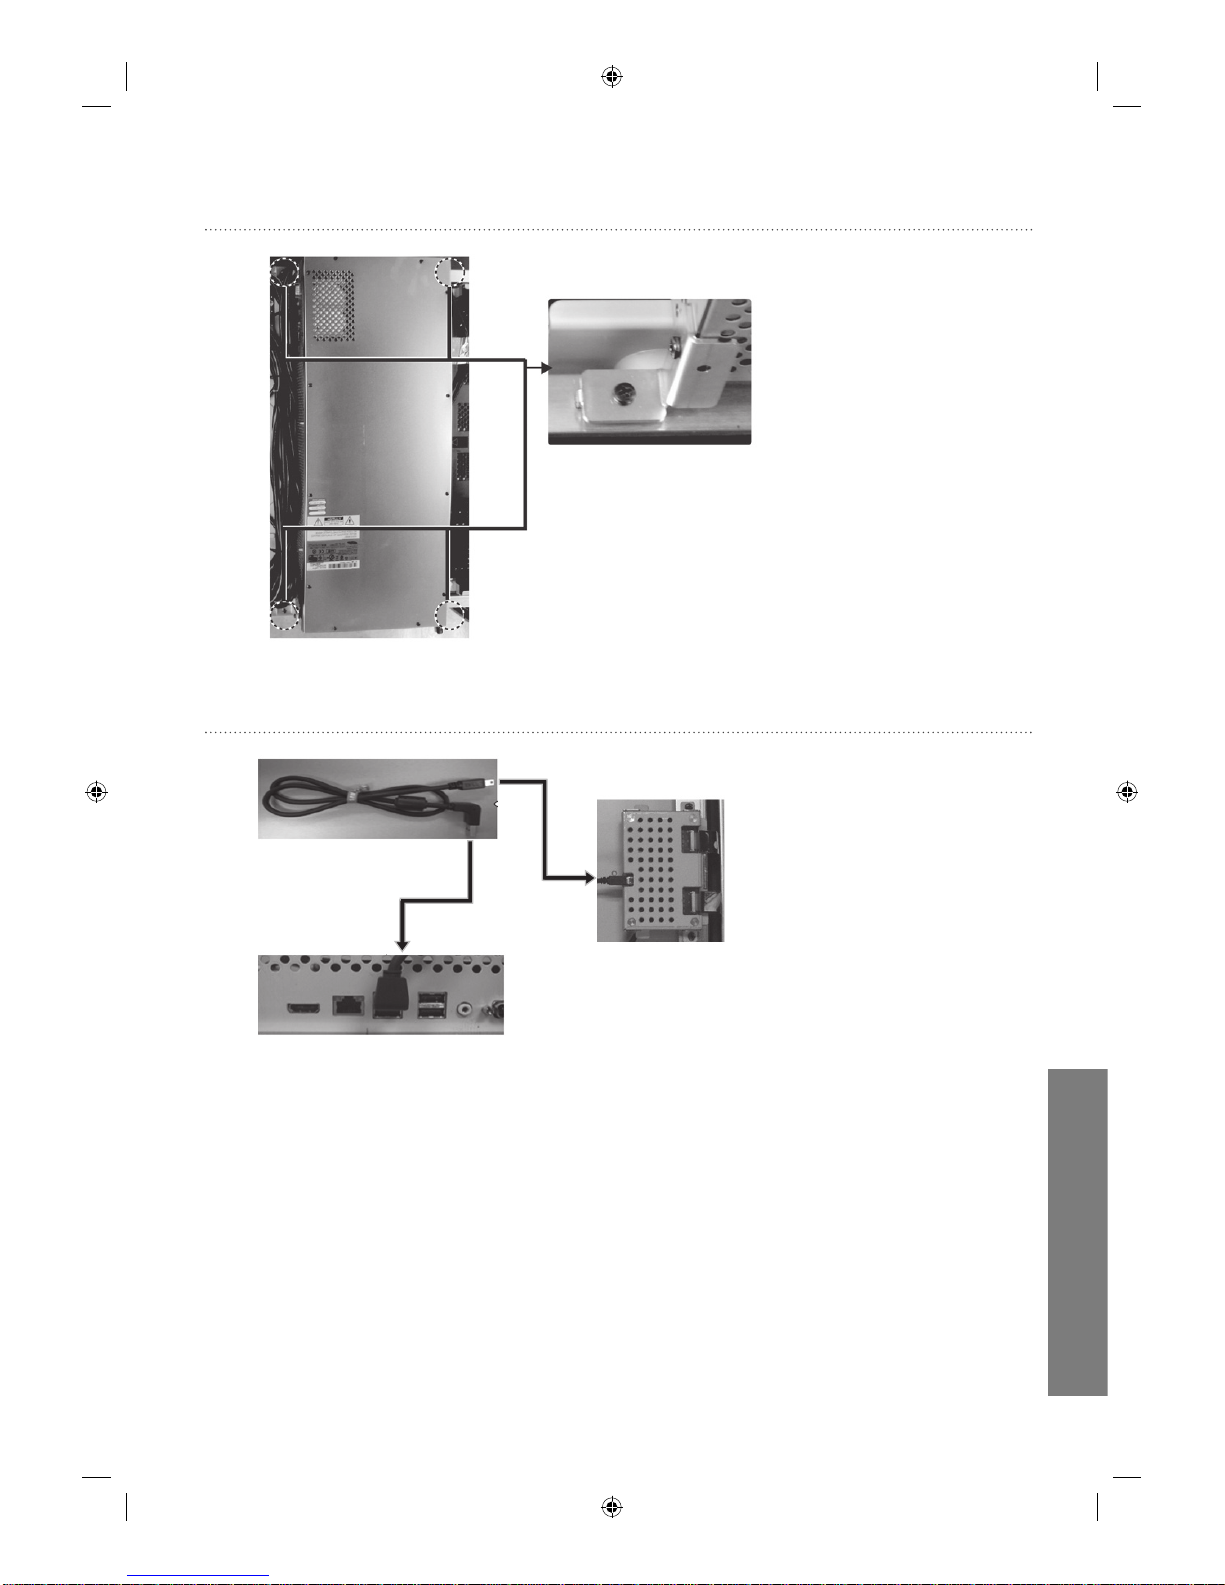
Assembly Method – Method that use PC Box
unscrew 3 bolts; take the
cover off; repeat this for 4
corners and then use PC Box
Assembly Method – Touch module connection
USB Cable
PC Box
Touch module
controller
Mini USB
connector
uVending
English
9
HDMI Cable
PC Box
HDMI cable
HDMI cable
Assembly Method - HDMI cable connection
Assembly Method – Speaker connection
Left side (Yellow)
Right side (Green)
Speaker Wire
uVending
English
10
Assembly Method - Power on/off switch connection
Assembly Method - Wi-Fi / BT / Camera/ Shock sensor connection
PC Box
USB cable
Wi-Fi/BT/Shock sensor/ Camera
Wi-Fi
Bluetooth
USB cable
Shock sensor
Camera
Unscrew 2 bolts ; take the cover off ;
and connect camera cable
② ①
②②
①①
①
Power Button : Power on/off button.
②
LED : Green – Normal condition. / Yellow – Power off condition.

uVending
English
11
Block Diagram
uVending
English
12
Board Connections - Main Board
USBLAN RS-232CHDMI
①
④③
②
⑤
①
Power Connector : connecting to SMPS
②
Function Connector : Connecting to Function Board
③
LVDS Connector : connecting to PANEL
④
Speaker Connector : connecting to speaker
⑤
HDMI Connector : connecting to Network Board
Board Connections - SMPS Board
①
④
③
②
⑤
①
Lamp connector : Connection to Panel Inverter, 30P
②
Power connector : Connection to Main PBA, 30P
③
AC Power connector : Connection to Sub SMPS
④
Connection to AC socket
⑤
Power GND
uVending
English
13
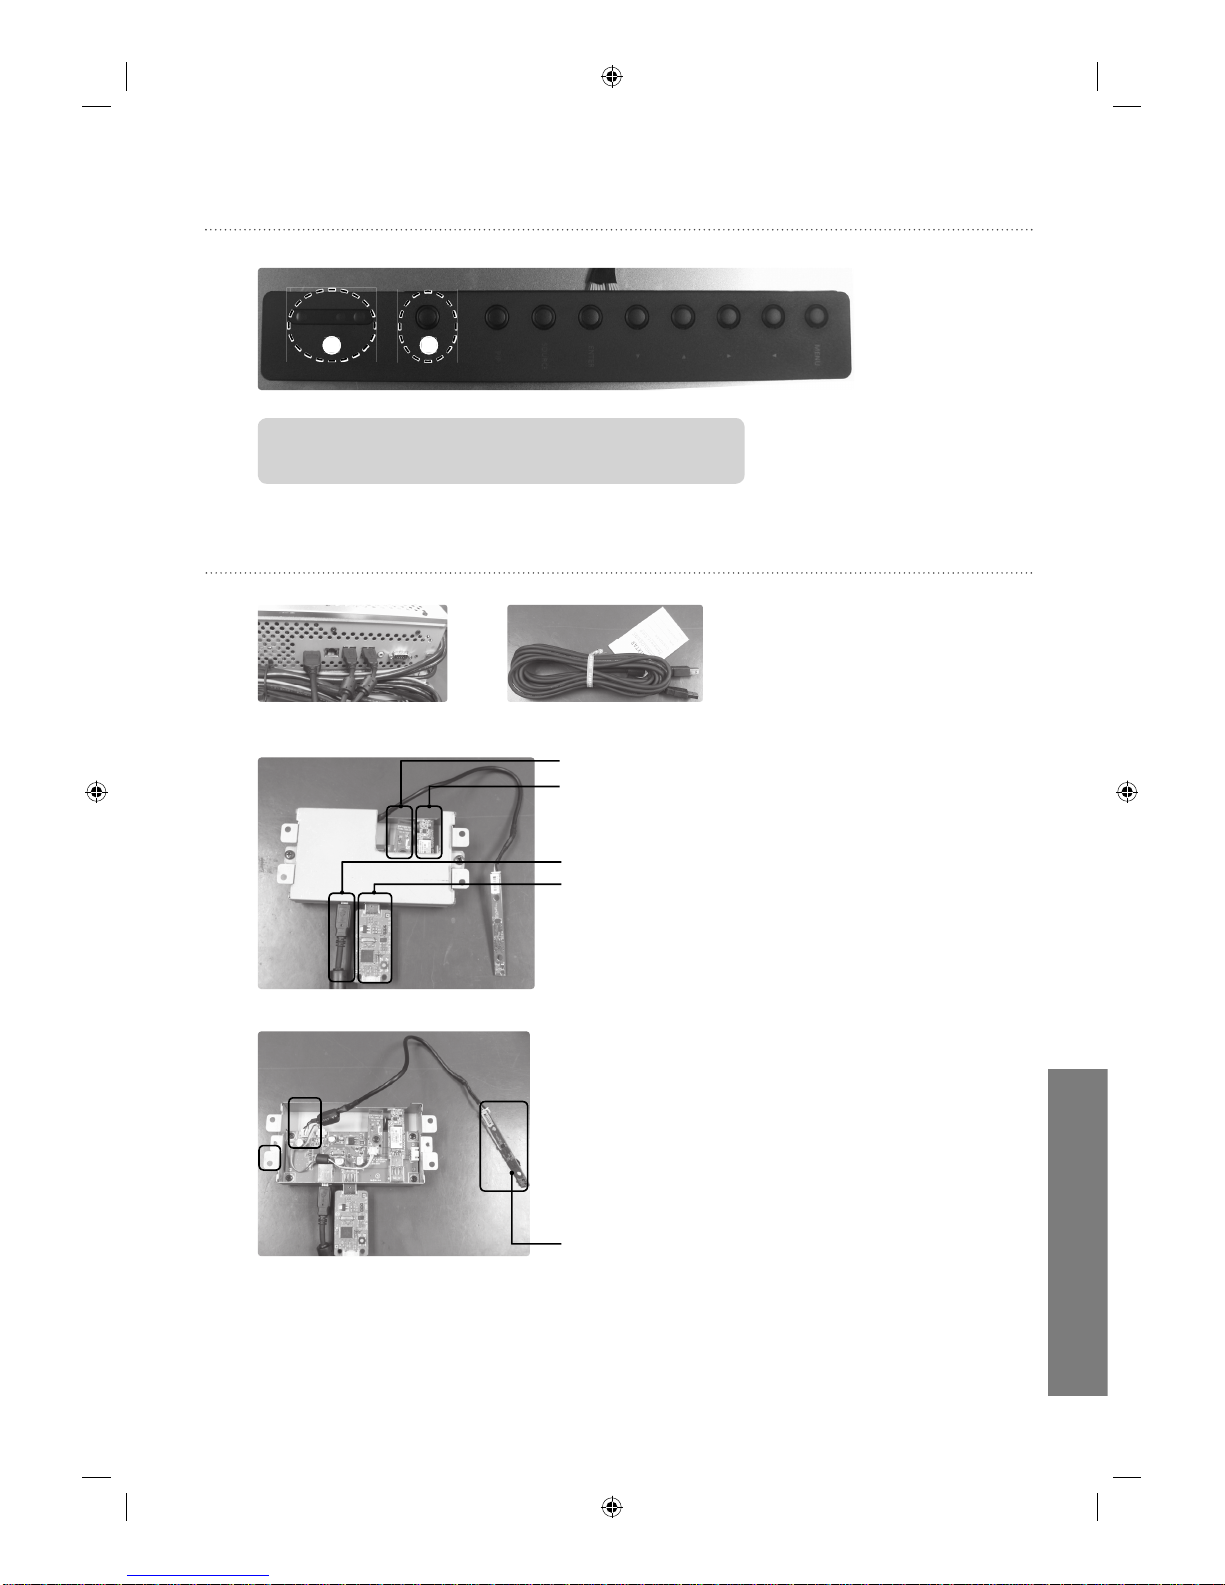
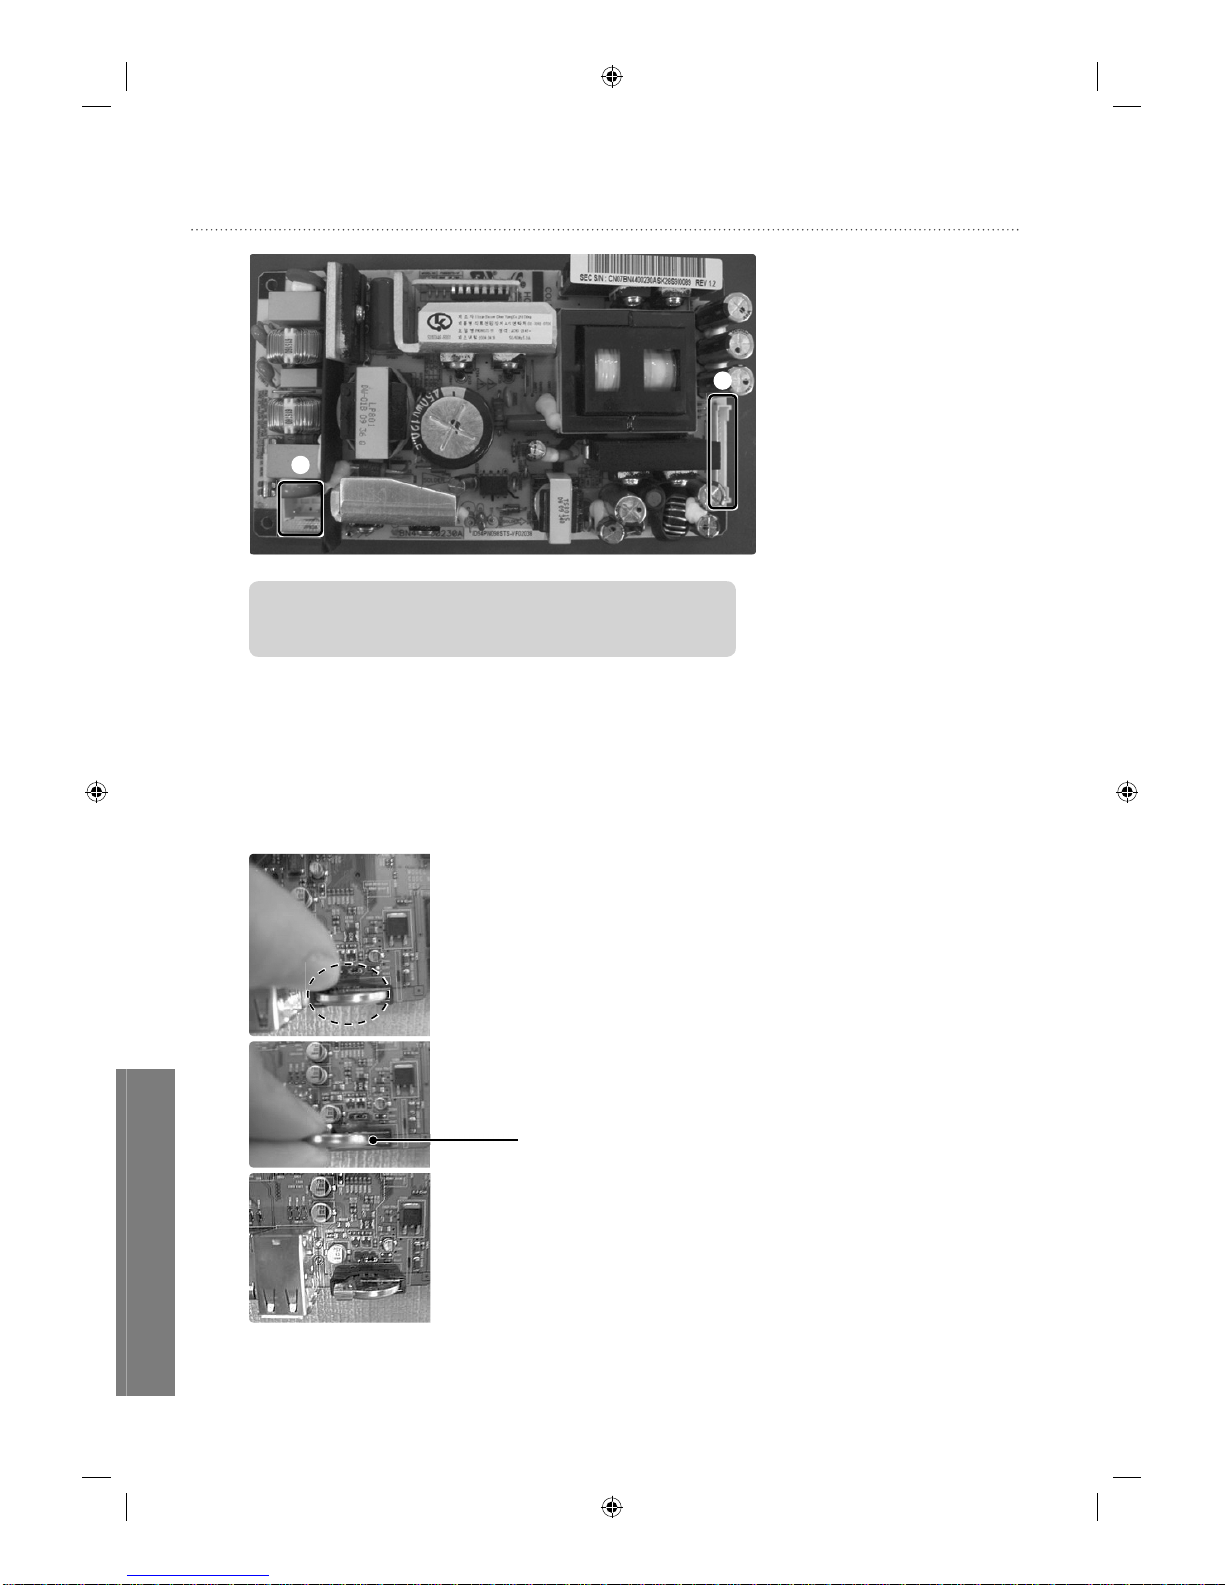
Board Connections - Network Power Board
①
②
①
AC Power Connector : Connecting to SMPS Board
②
Network Connector : Connecting to Network Board
Network Board: Battery Replacement >
Battery Replacement*
You may replace the battery in the same or similar cases as followings:
- EX1) The required information is not properly stored when the FDM
and BIOS are updated.
Battery (4301-000108)
uVending
English
14
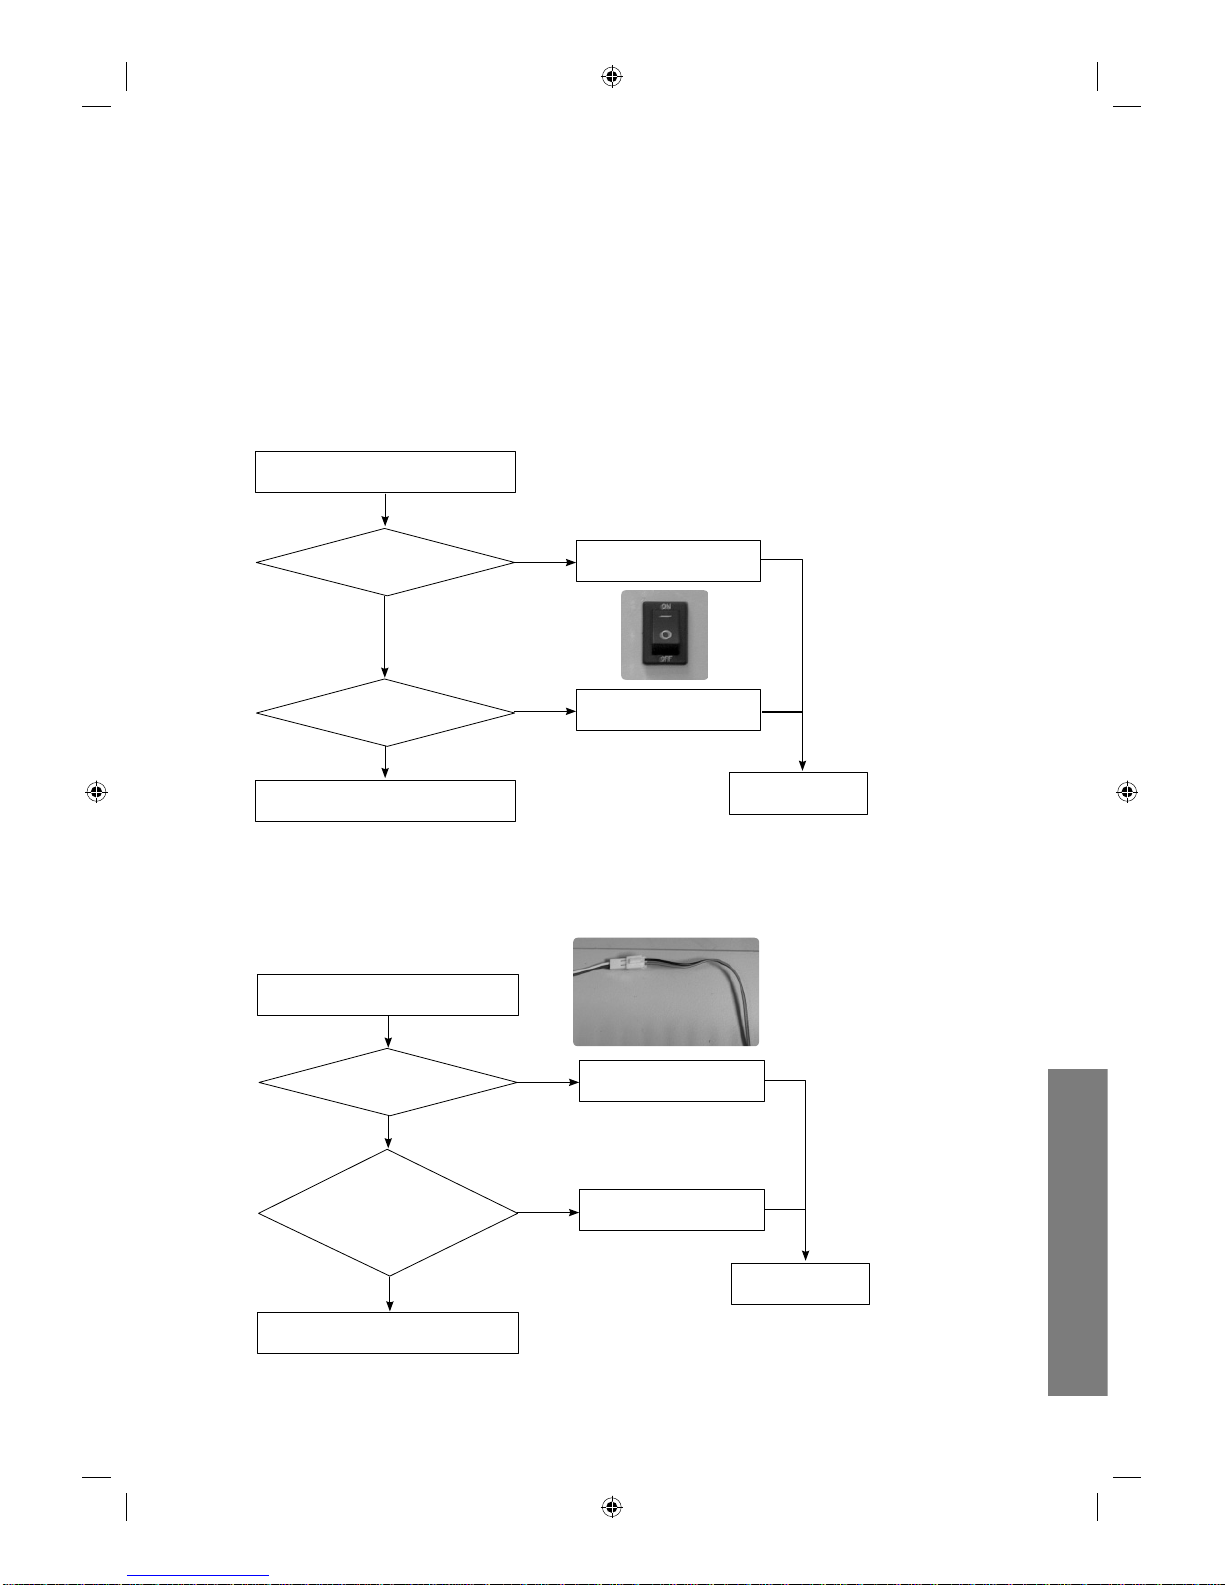
Disassemble as the picture (refer to the Set disassembly diagram) and remove the *
current battery from BAT1, then insert the new battery.
- Pull back the holder on the left of the battery
- Hold both sides and remove the battery
- Replace with the new battery
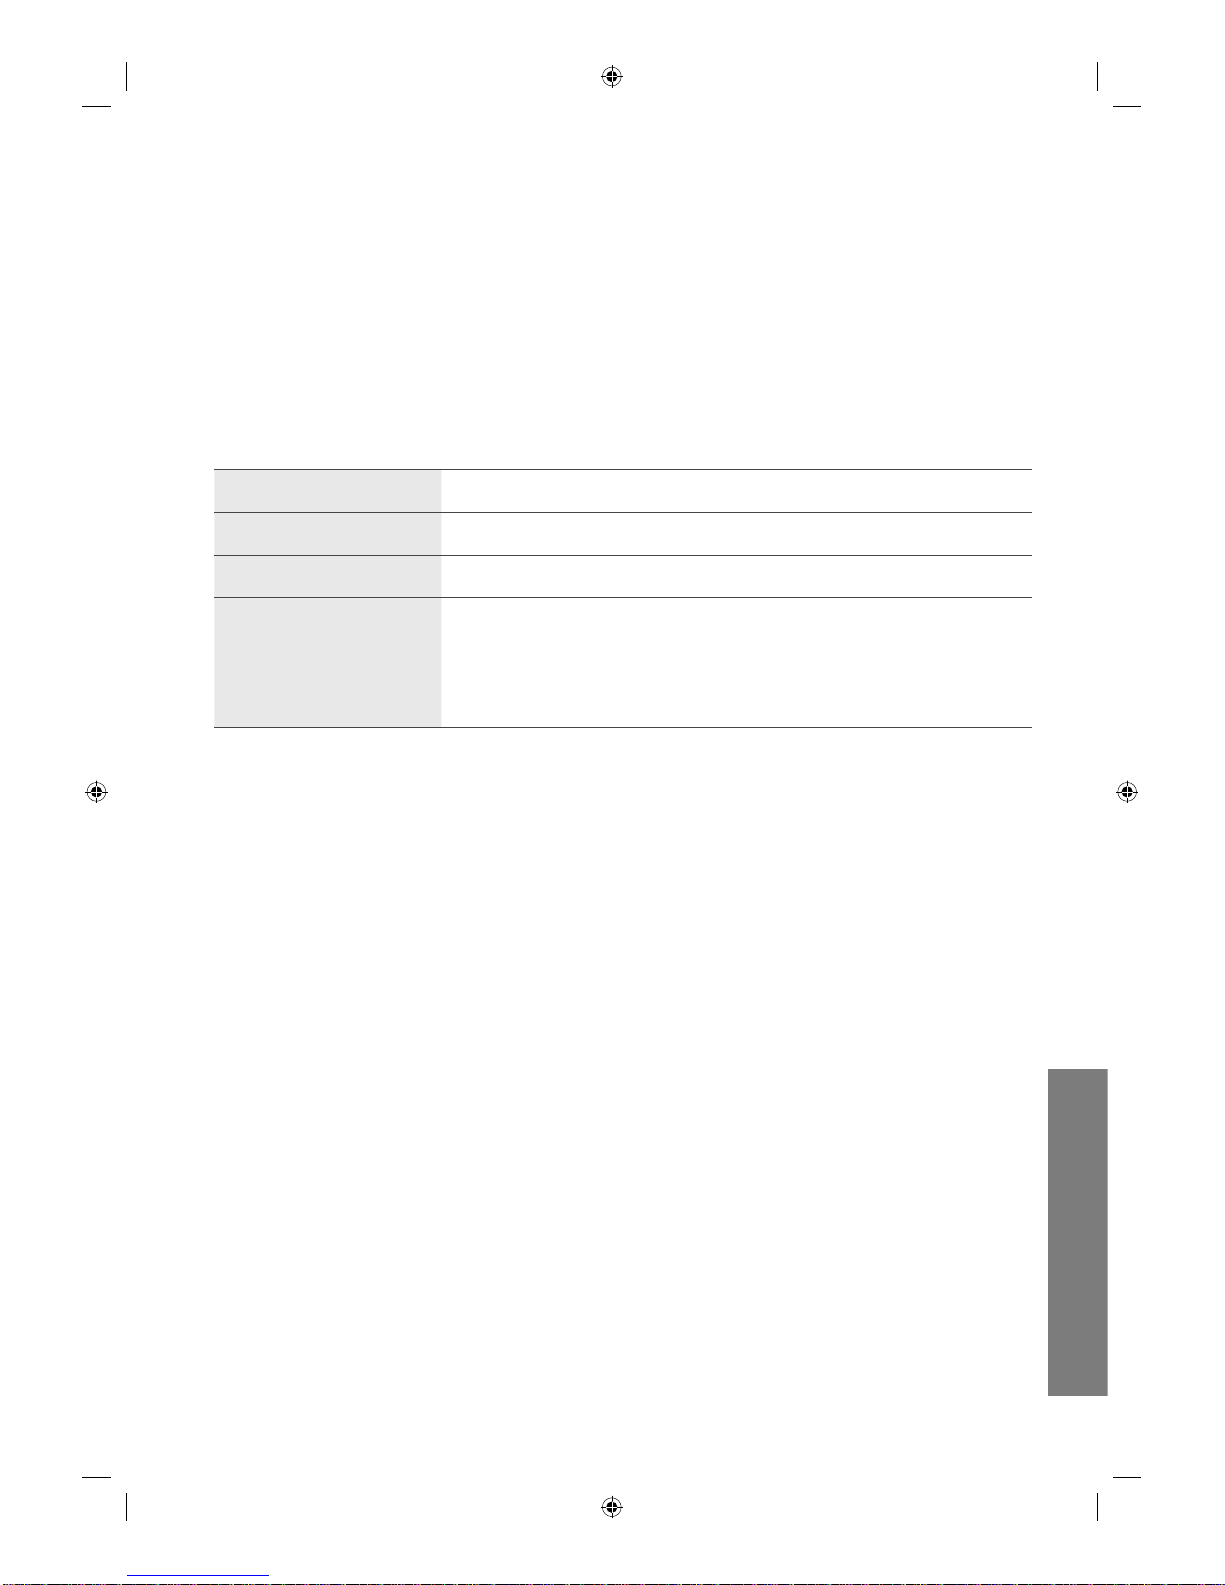
no-power >
NO-POWER
Is the power cord connected?
Ye s
Is the Power switch turned on?
Ye s
Check the u-Vending internals.
(Contact a service center.)
No
Connect the power cord.
No
Turn on the Power Switch
Complete
No - Sound >
No - Sound
Is the speaker cable
connected?
Ye s
Is the volume
level normal?
(Refer to uVending
management Software.)
Ye s
Check the u-Vending internals.
(Contact a service center.)
No
Connect the speaker cable.
No
Increase the volume.
Complete

uVending
English
15
What is uVending Management Software?
uVending Management Software is a program which sets the information, screen Template
(Theme) and discount functions used when products are sold by the Samsung uVending
machine. It also controls the display and sounds of the Samsung uVending machine. uVending
Management Software comprises an LFD display and Plan-O-Gram. The LFD display controls
Samsung uVending machine’s environment, such as the display and sounds, while the Plan-OGram controls products, the Template and discount functions.
For further details on Template and Theme, refer to the uVending Template Builder manual.
Main Functions of uVending Management Software
LFD Manager*
Sets Samsung uVending machine’s environment, including the display and sounds.
Plan-O-Gram*
Displays and modifies product display information and Template items.
Template Library *
Provides an interface which allows imported Template and Theme items to be used in the uVending
device.
Discount Function Setting*
Settings can be changed to apply a discount to each purchased product when the total price of items
in the shopping cart has reached a set amount, or apply a discount to related products at the time of
purchase.
For further details on Template and Theme, refer to the uVending Template Builder manual.
uVending
management Software
uVending
English
16
Compatibility
Compatible only with the Samsung uVending machine *
This program is only compatible with the Samsung uVending machine. It operates only with the
Samsung uVending machine.
System Requirements
> CPU
Intel Pentium 4 1.8GHz or higher
> Memory
1024MB or higher
> HDD
10GB or higher
> OS
Windows XP/2000
IE 7.0 or higher
DirectX 9.0 or higher
Adobe Flash Player 9.0 or higher
uVending
English
17
General
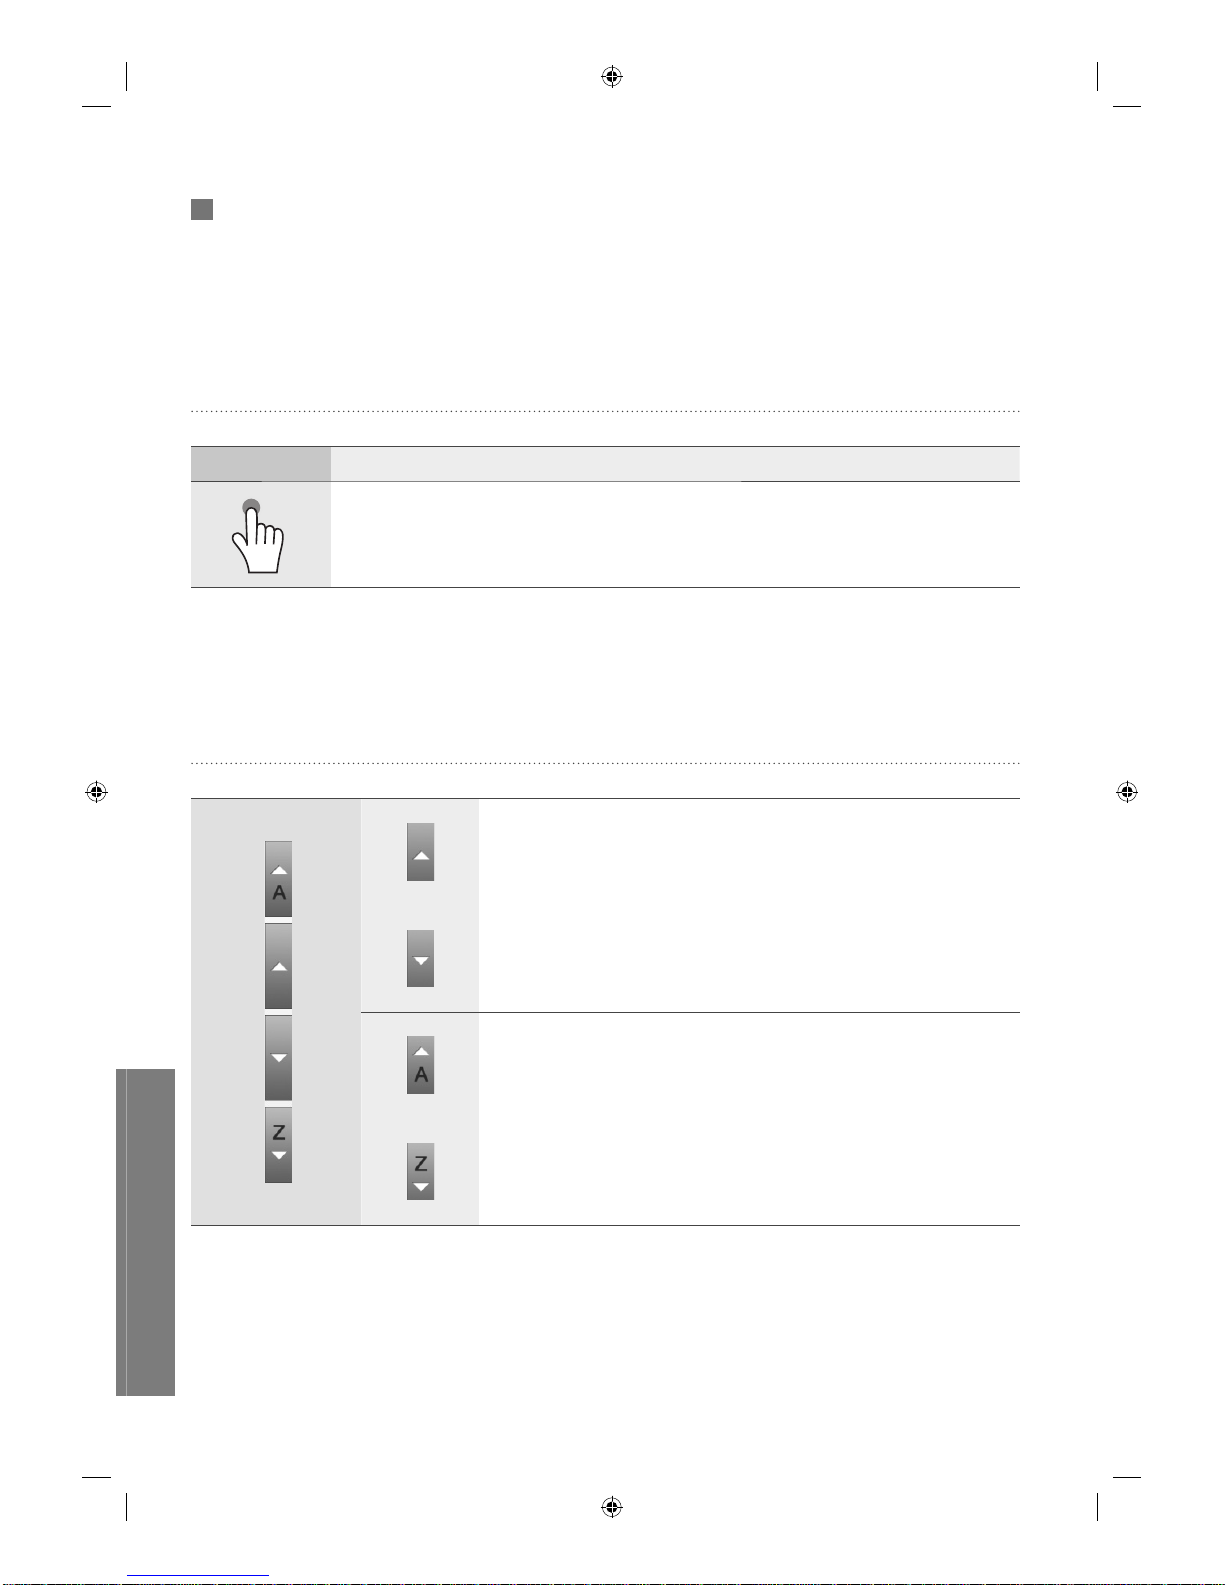
Interaction
Touch Motion
Indication Behavior
Touch
Lightly press the screen once with one finger.
Scroll Buttons & Indicator
Single touch : The screen is scrolled by one unit.
Long touch : The screen is continuously scrolled down at a uniform
speed.
Moves to the first or last page when touched.
uVending
English
18
Screen
The screen is divided largely into the title, navigation and content sections.
Title
Displays the current location and channel.
Menu Bar
Displays the navigation buttons. Additional buttons, such as Save and Add Item,
are displayed when available.
Contents
Displays the content items of the current location.
uVending
English
19
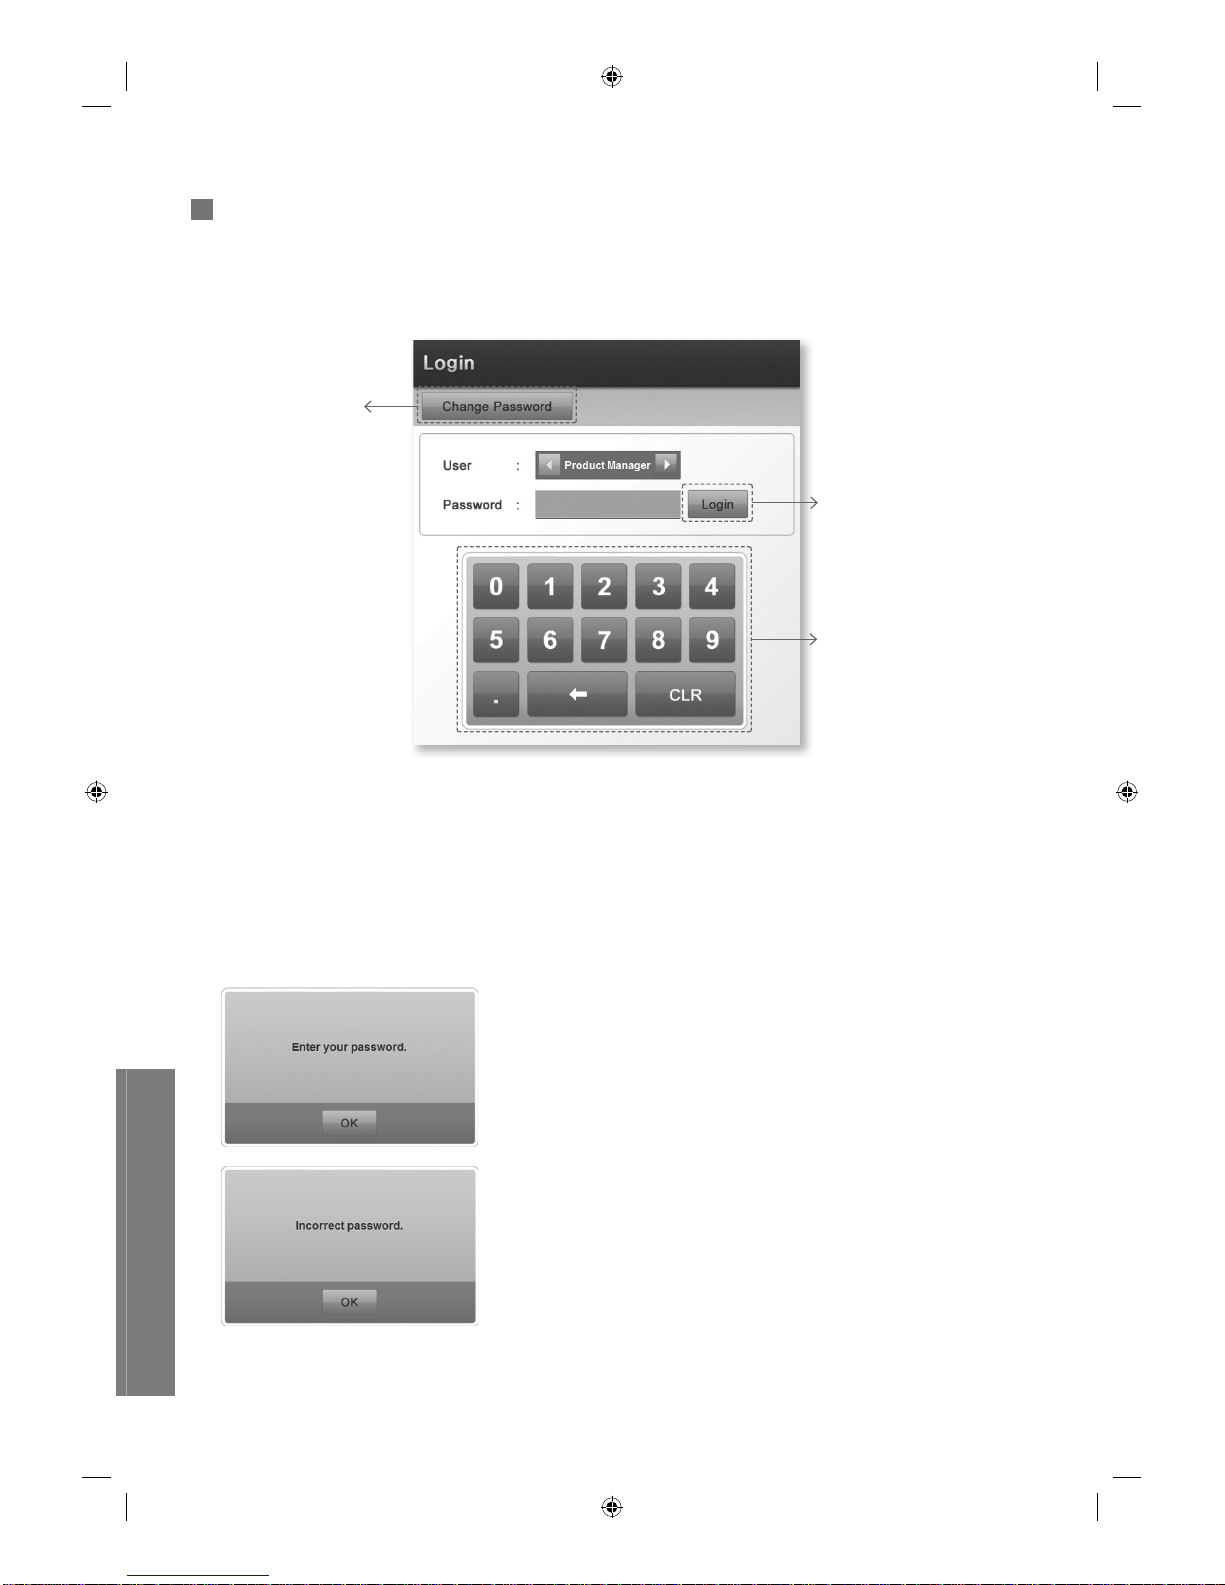
Login
How to Login
1 In the User field, use ◀▶ to select a user.
2 Enter the Password using the numeric keypad. (Entered password is displayed as *.)
3 Touch the Login button.
The Home screen is displayed when the correct Password is entered.
This warning screen is displayed when no Password is
entered.
This warning screen is displayed when an incorrect Password
is entered.
Login Button
Numeric Keypad
Touch the numbers you
want.
Change Password
Use to change the
password.
uVending
English
20
2
The initial Password for every User is ‘00000.’
Product Manager, Vending Manager or System Manager can be selected in the User field, and
the access level of each user varies depending on the model.
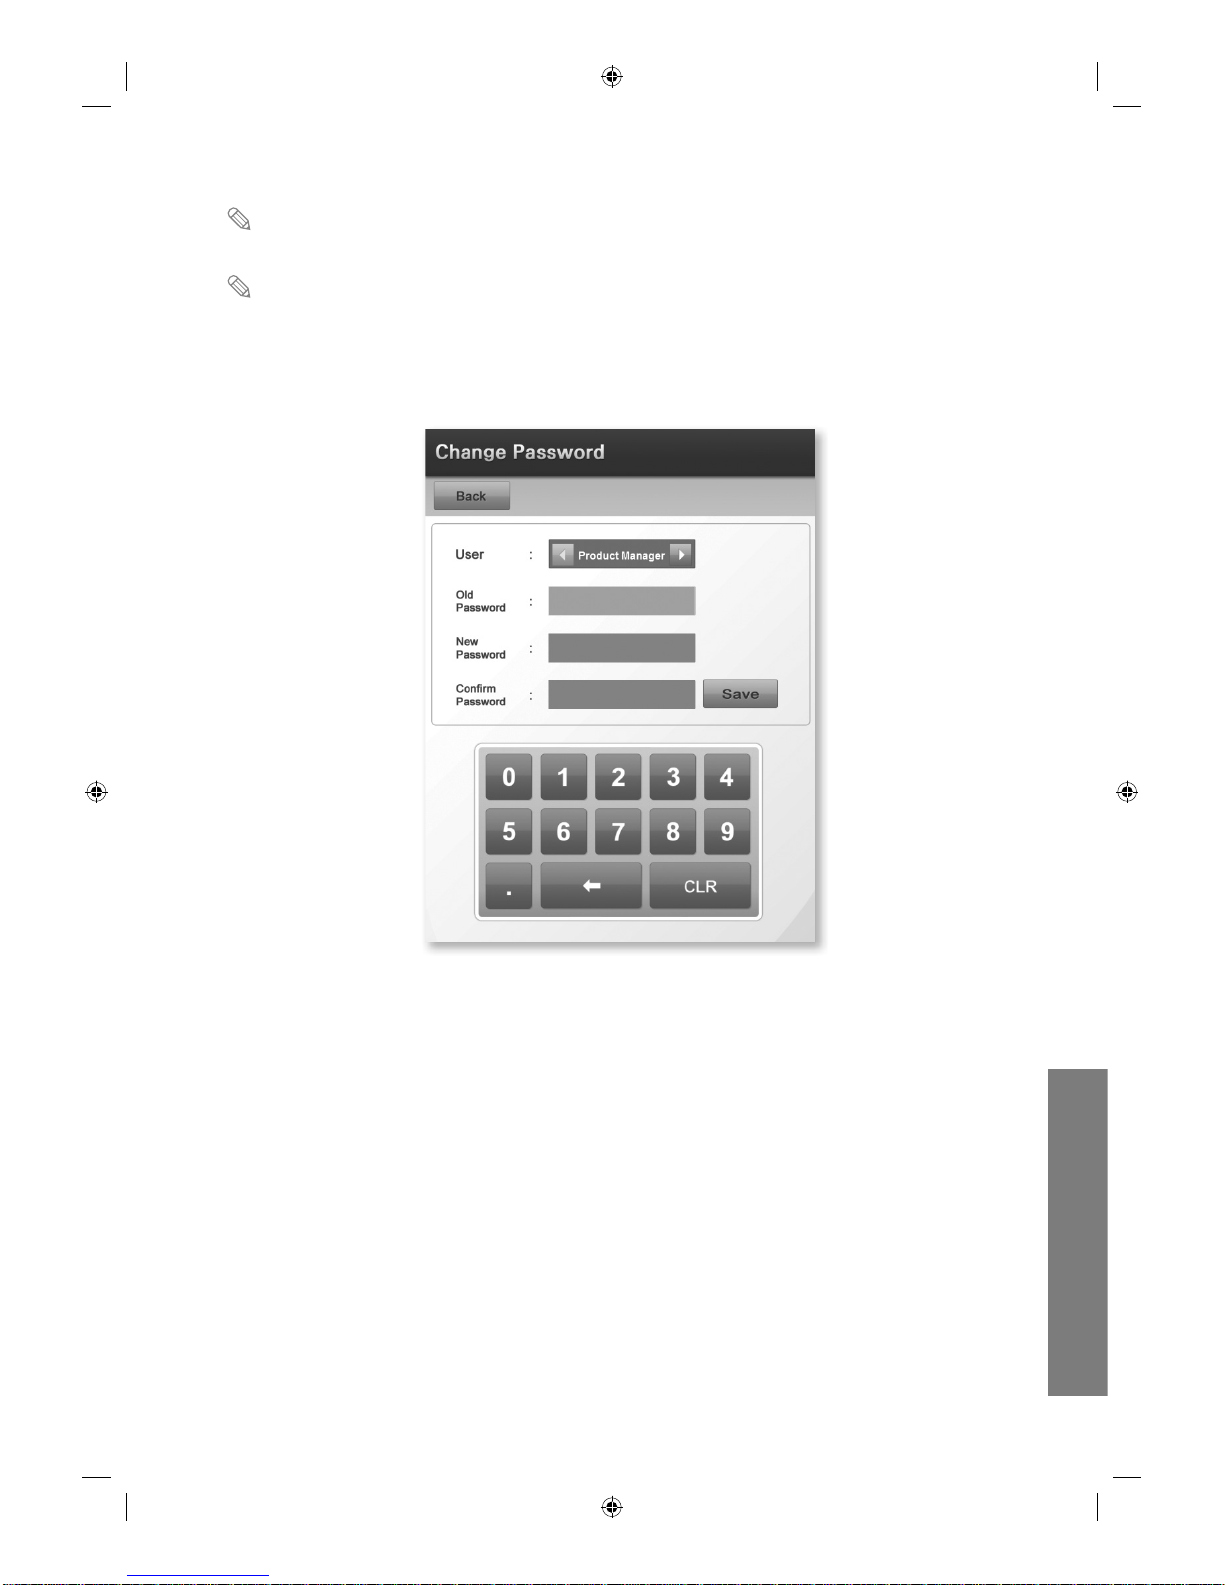
Change Password
1 Touch Change Password on the Login screen.
2 In the User field, select the user name you want to change the Password for.
3 Enter the old password in the Old Password field using the numeric keypad.
4 Enter the new password in the New Password field using the numeric keypad.
5 Enter the new password in the Confirm Password field using the numeric keypad.
6 Touch Save to change the password and return to the Login screen.
uVending
English
21
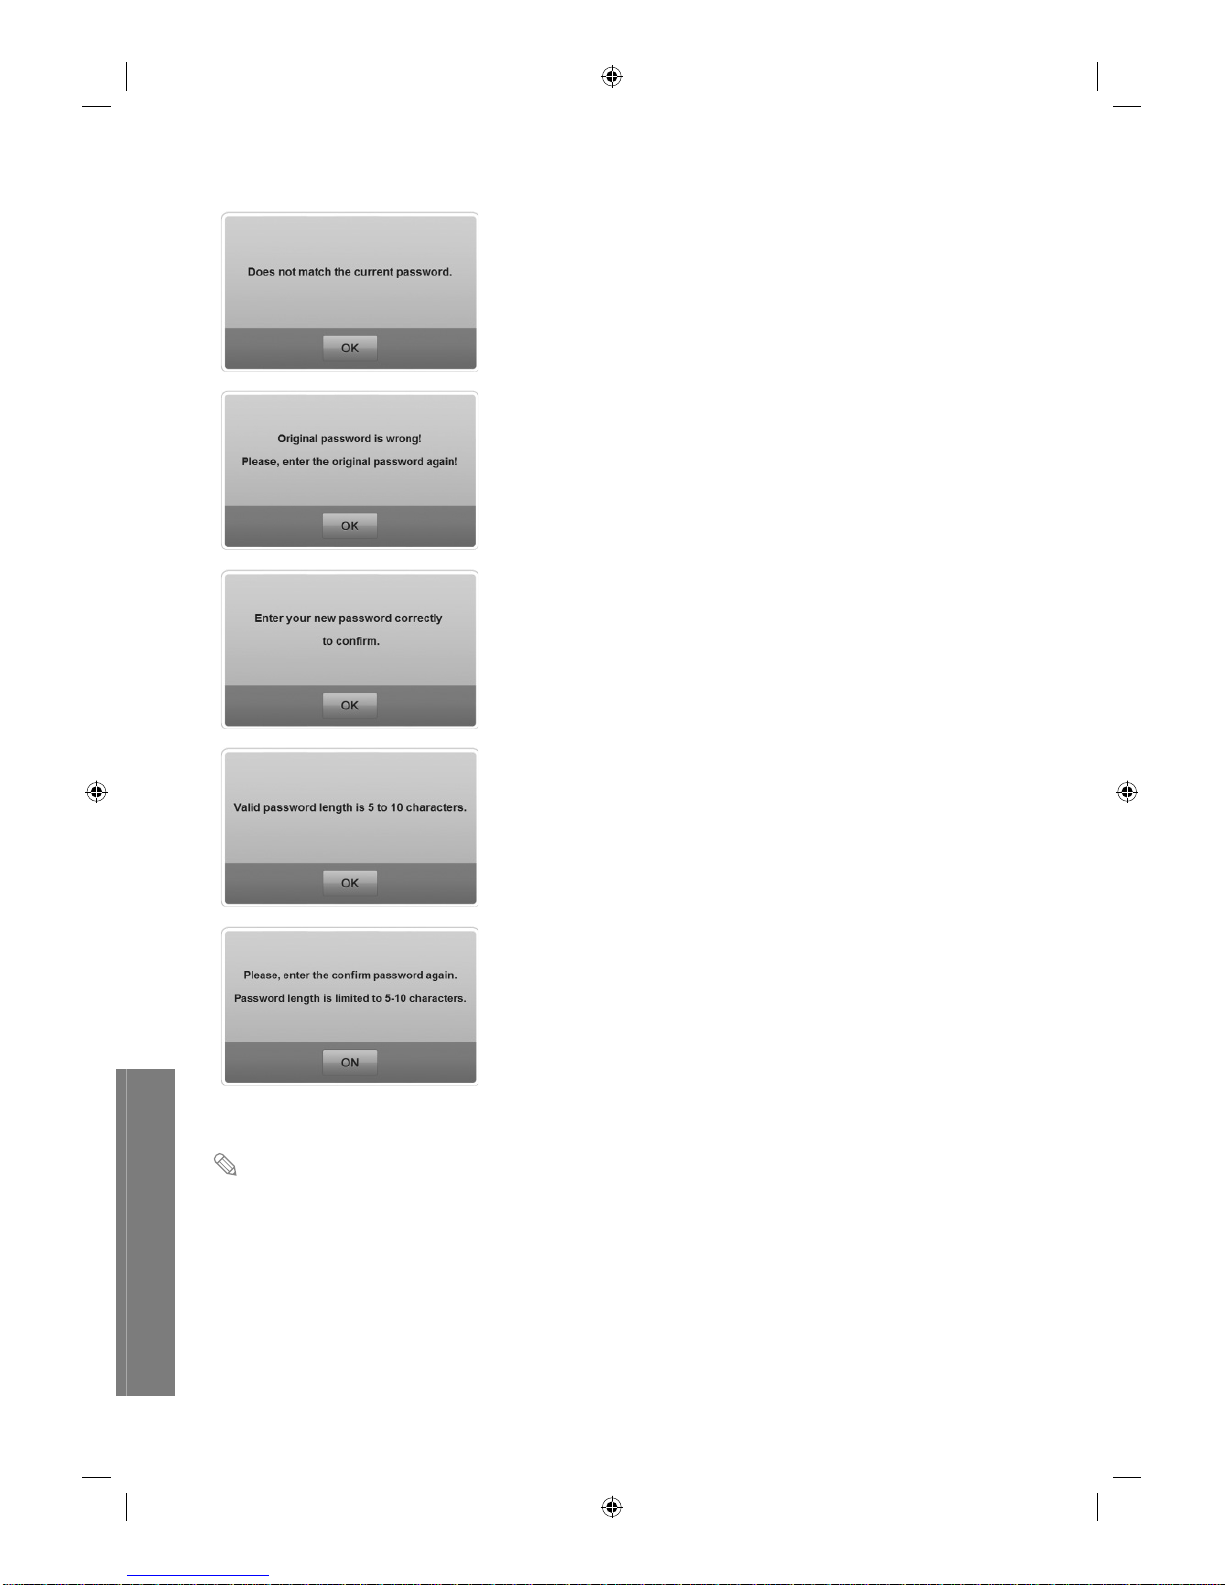
This warning screen is displayed if Save is touched without
entering the Old Password.
This warning screen is displayed if the Original Password is
entered incorrectly.
This warning screen is displayed if the passwords entered
in the New Password and Confirm Password fields do not
match.
This warning screen is displayed if the New Password field is
not filled in.
This warning screen is displayed if the Confirm Password
field is not filled in.
The Password must be between 5 and 10 digits made up of numbers between 1 and 9.
uVending
English
22
2
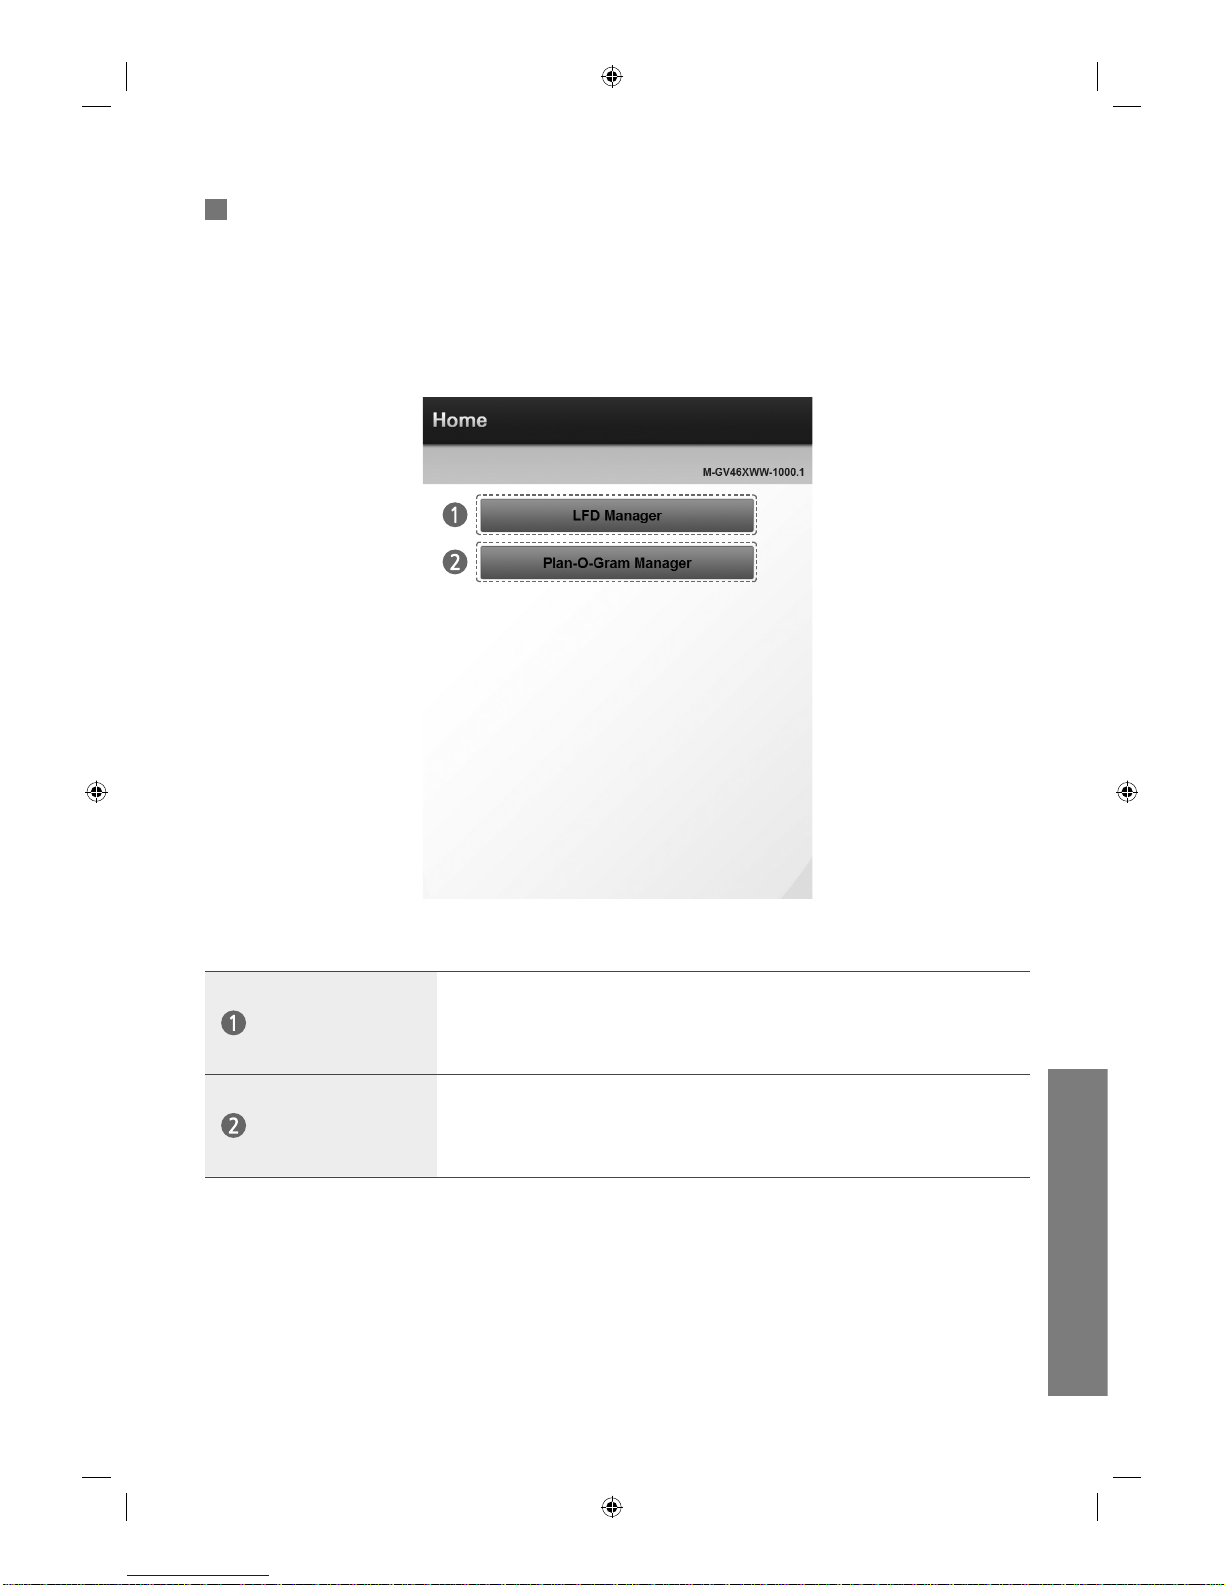
Home
The screen below is displayed after log-in.
LFD Manager or Plan-O-Gram Manager can be selected.
LFD Manager
Sets Samsung uVending machine’s environment, including the display and
sounds.
Comprises the Display and Sounds options.
Plan-O-Gram
Manager
Adds products, Template items and discount functions.
Comprises the Plan-O-Gram, Template Library, Cart Discount Setup and
Related Product Discount Setup menus.
uVending
English
23
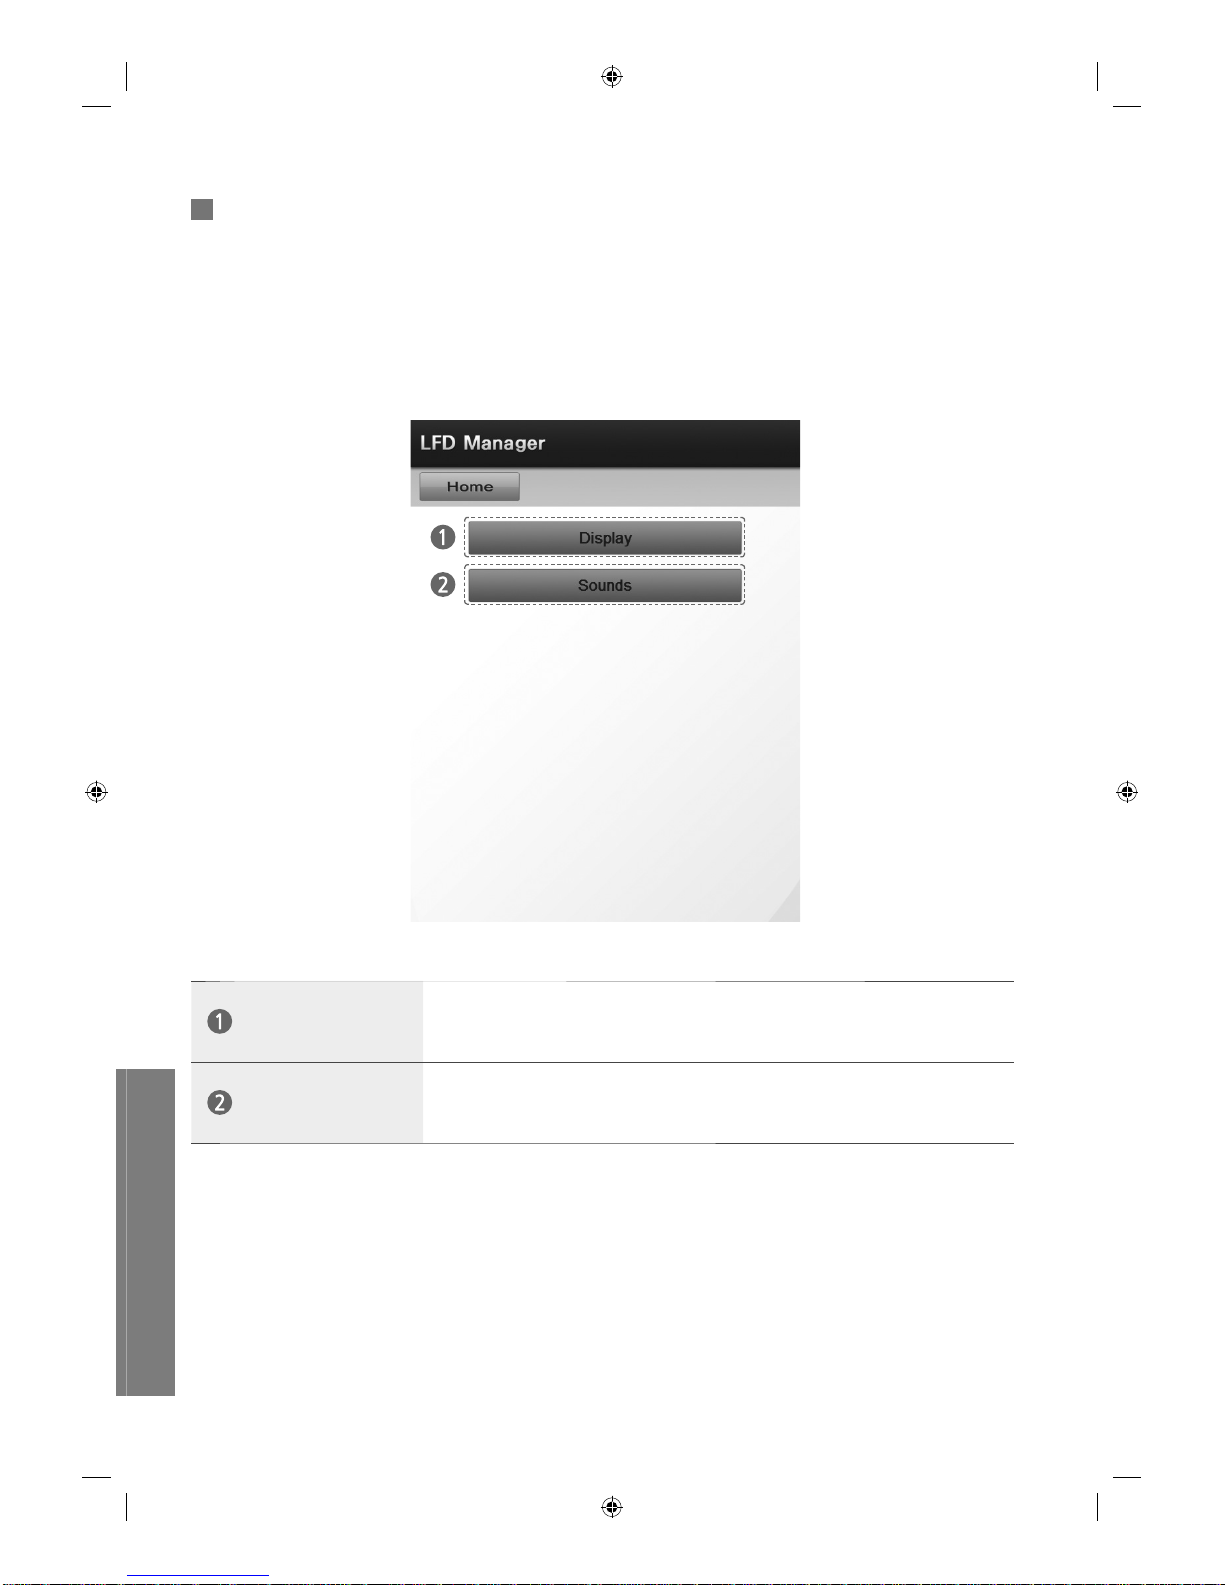
LFD Manager
LFD Manager
The LFD Manager controls the display and sounds for the Samsung uVending machine.
Display
Changes the screen Contrast, Brightness and Color Tone settings. You can
also preview the changes before they are applied.
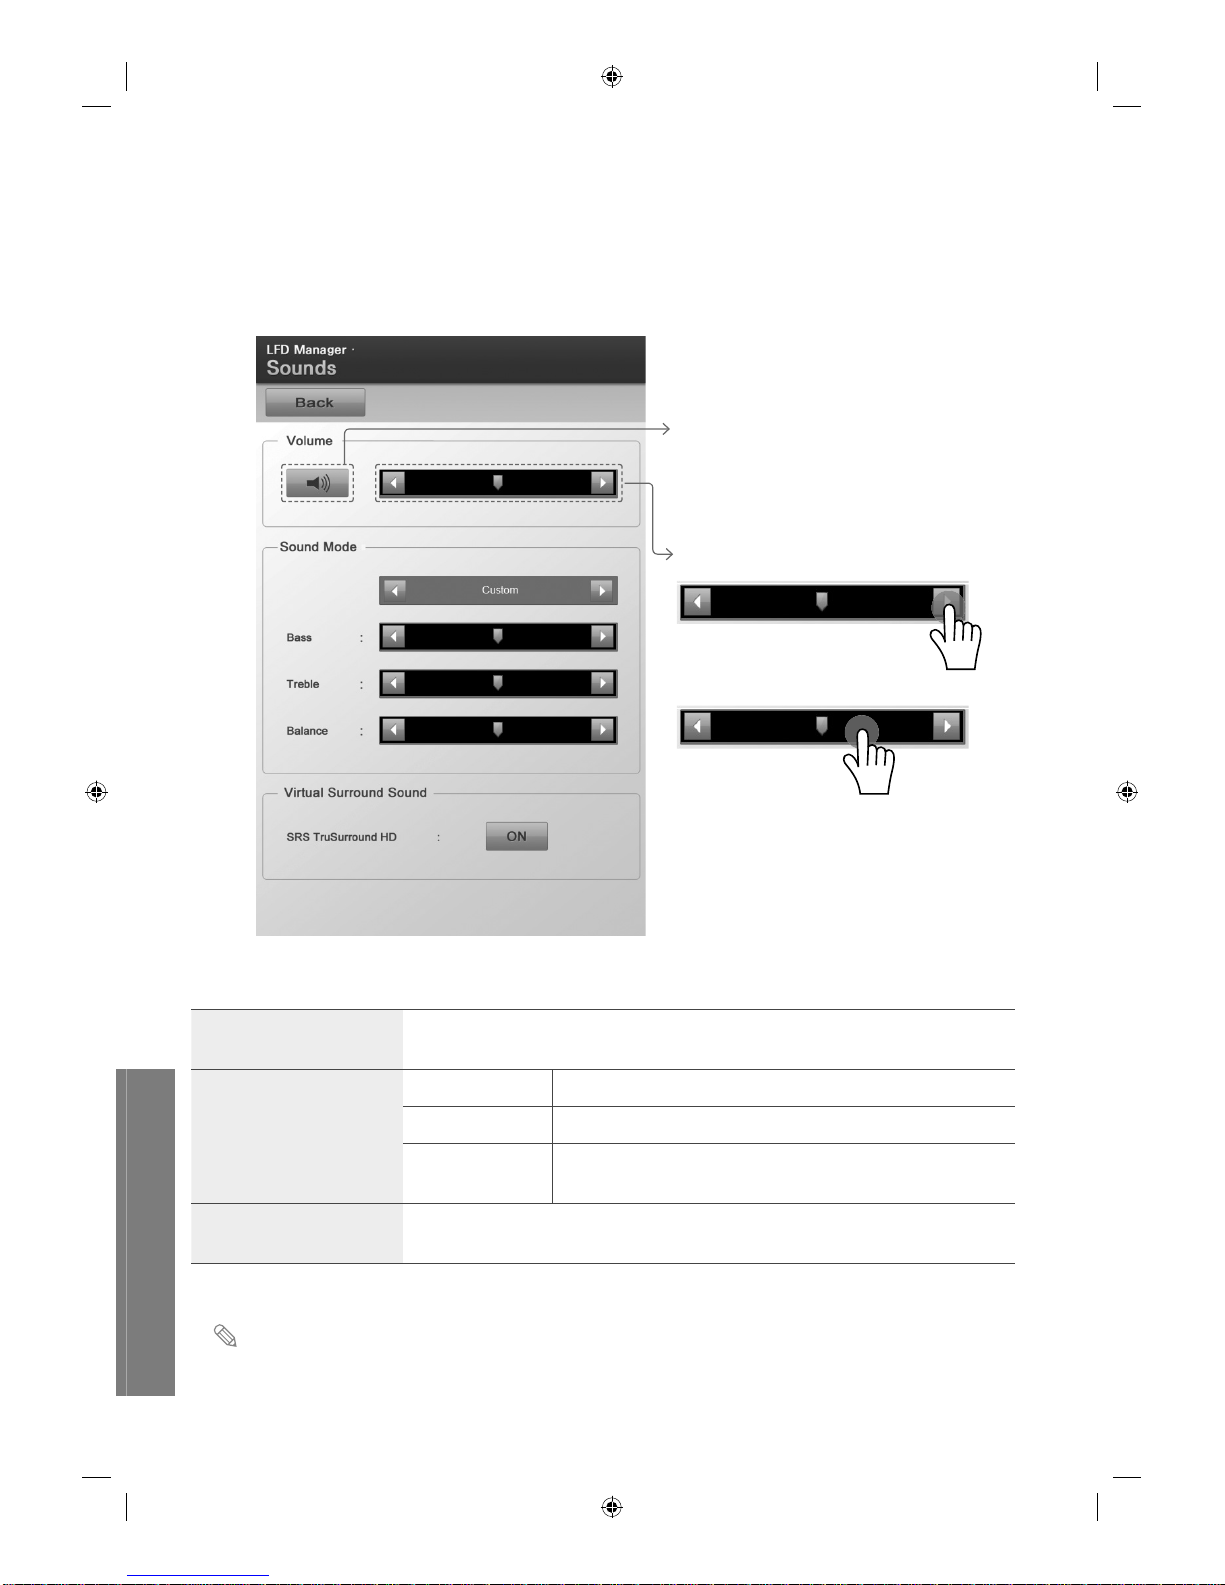
Sounds
Changes the Volume, Sound Mode and Virtual Surround Sound settings.
You can also preview the changes before they are applied.
uVending
English
24
2
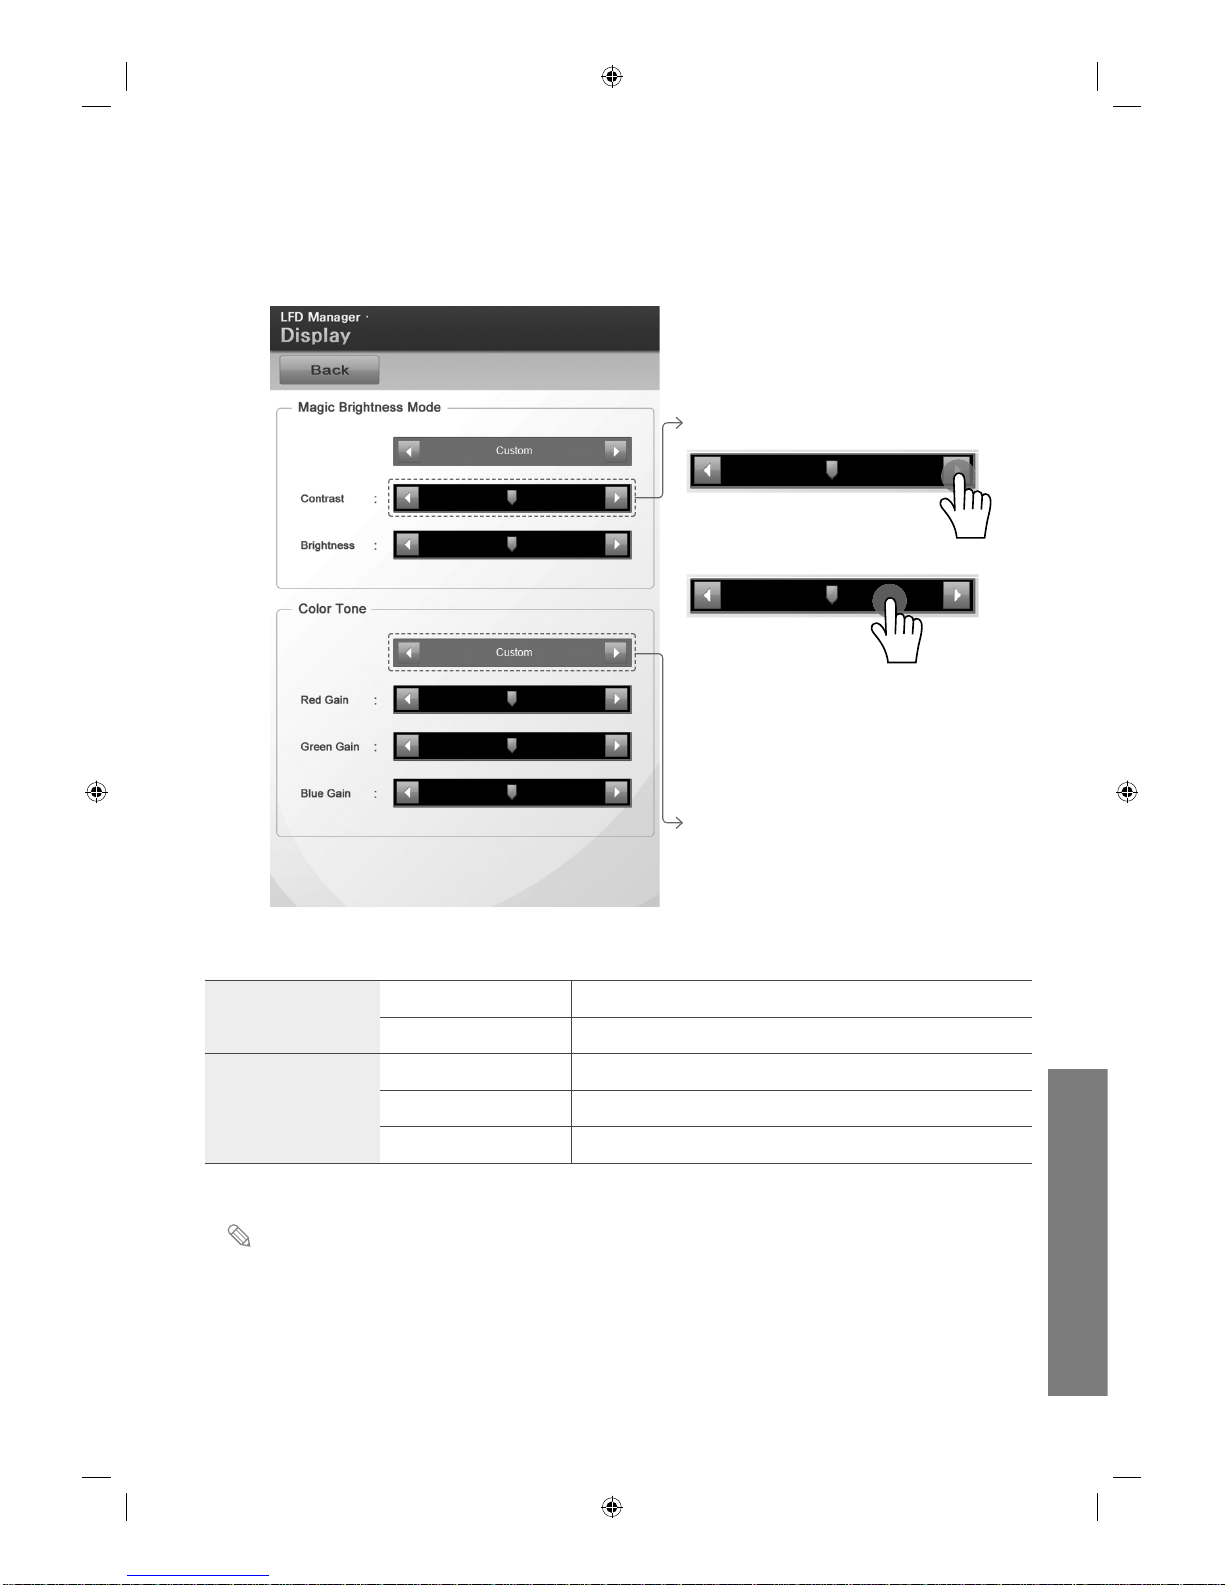
Display
The Display screen controls the display.
Magic Brightness
Mode
Contrast Adjusts the screen contrast.
Brightness Adjusts the screen brightness.
Color Tone
Red Gain Adjusts the level of red gain on the screen.
Green Gain Adjusts the level of green gain on the screen.
Blue Gain Adjusts the level of blue gain on the screen.
Options can only be changed if the Option field is set to Custom.
To make an adjustment,
Option
touch ◀ or ▶
Touch and move the slide bar in the
desired direction.
(Touch the ◀ or ▶ button to move
1 unit or touch the slide bar to move
10 units.)
uVending
English
25
Sounds
The Sounds screen controls the sounds.
Music is played when the Sounds screen is opened. Changes to options are applied immediately.
Volume
Adjusts the volume.
Sound Mode
Bass Adjusts the bass level.
Treble Adjusts the treble level.
Balance
Adjusts the volume of each speaker to achieve balance in
sound.
Virtual Surround Sound
The deep and vivid sound of 5.1 channel speakers can be enjoyed with two
speakers.
SRS TruSurround HD is ON by default.
To make an adjustment,
Sound ON/OFF
touch ◀ or ▶
Touch and move the slide bar in the
desired direction.
(Touch the ◀ or ▶ button to move 1
unit or touch the slide bar to move 10
units.)
uVending
English
26
2
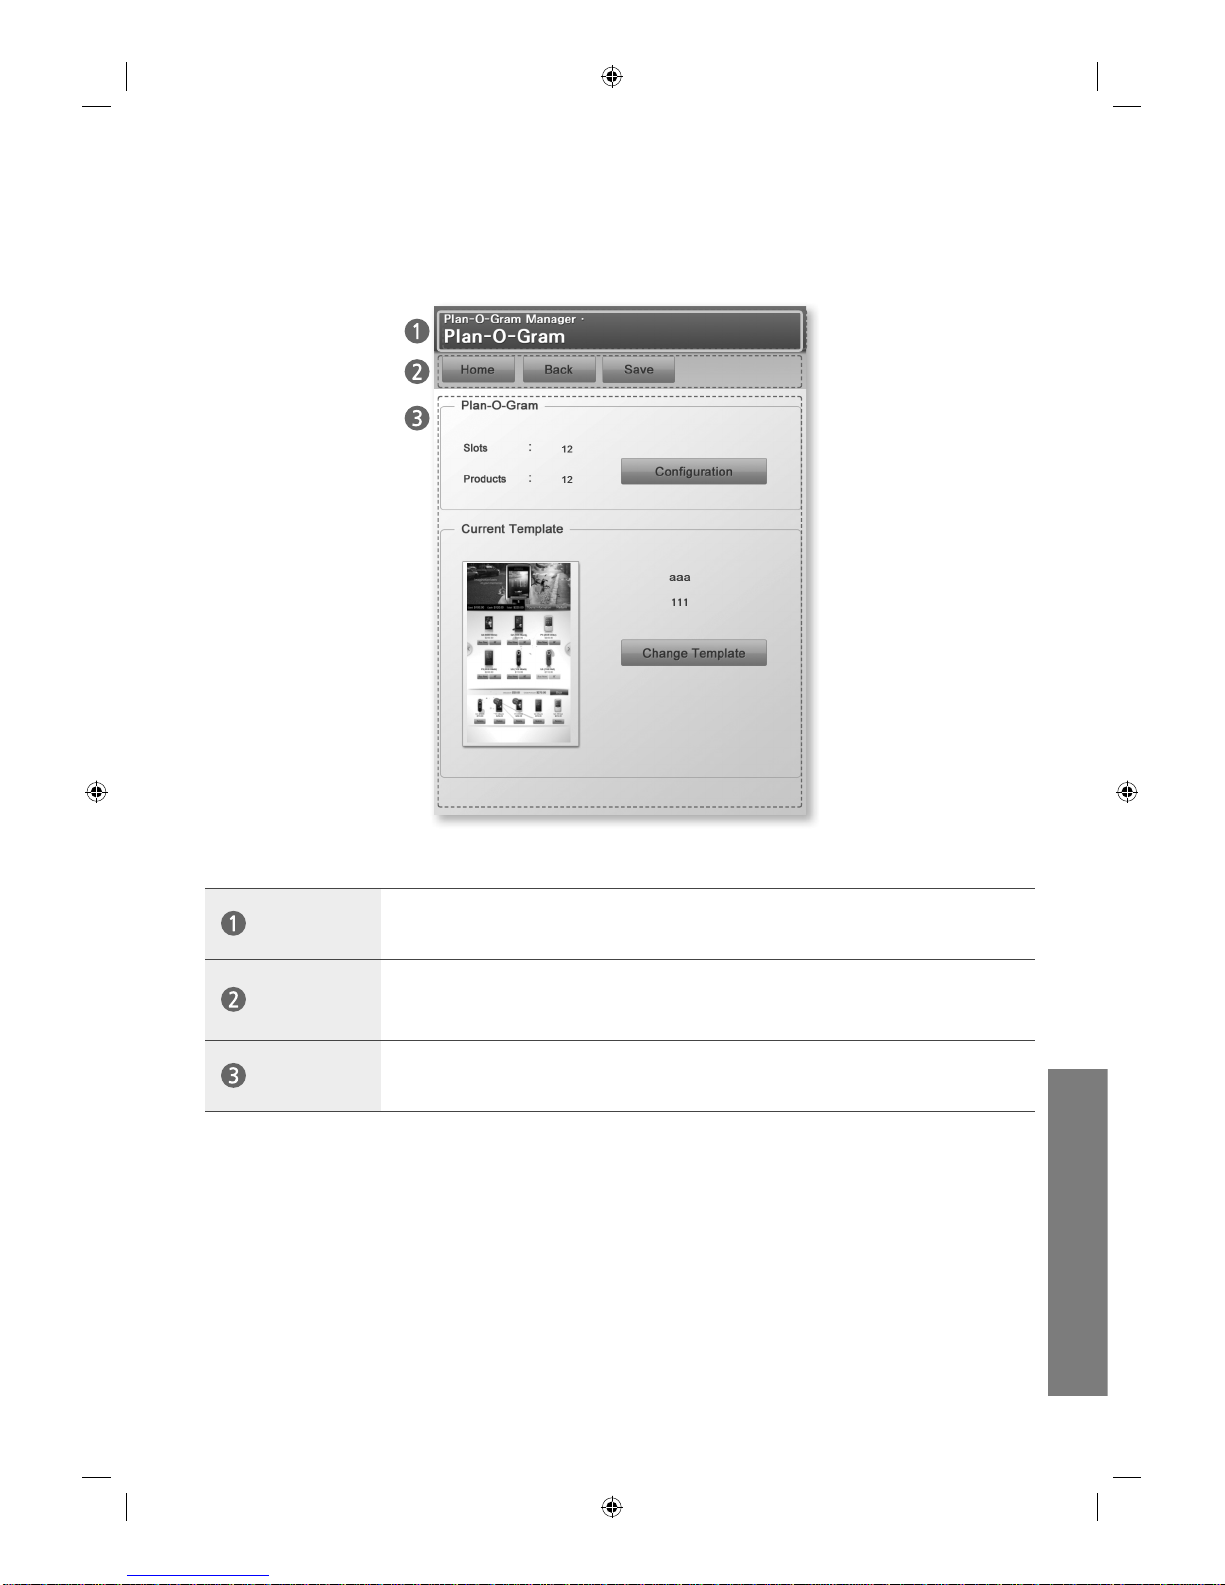
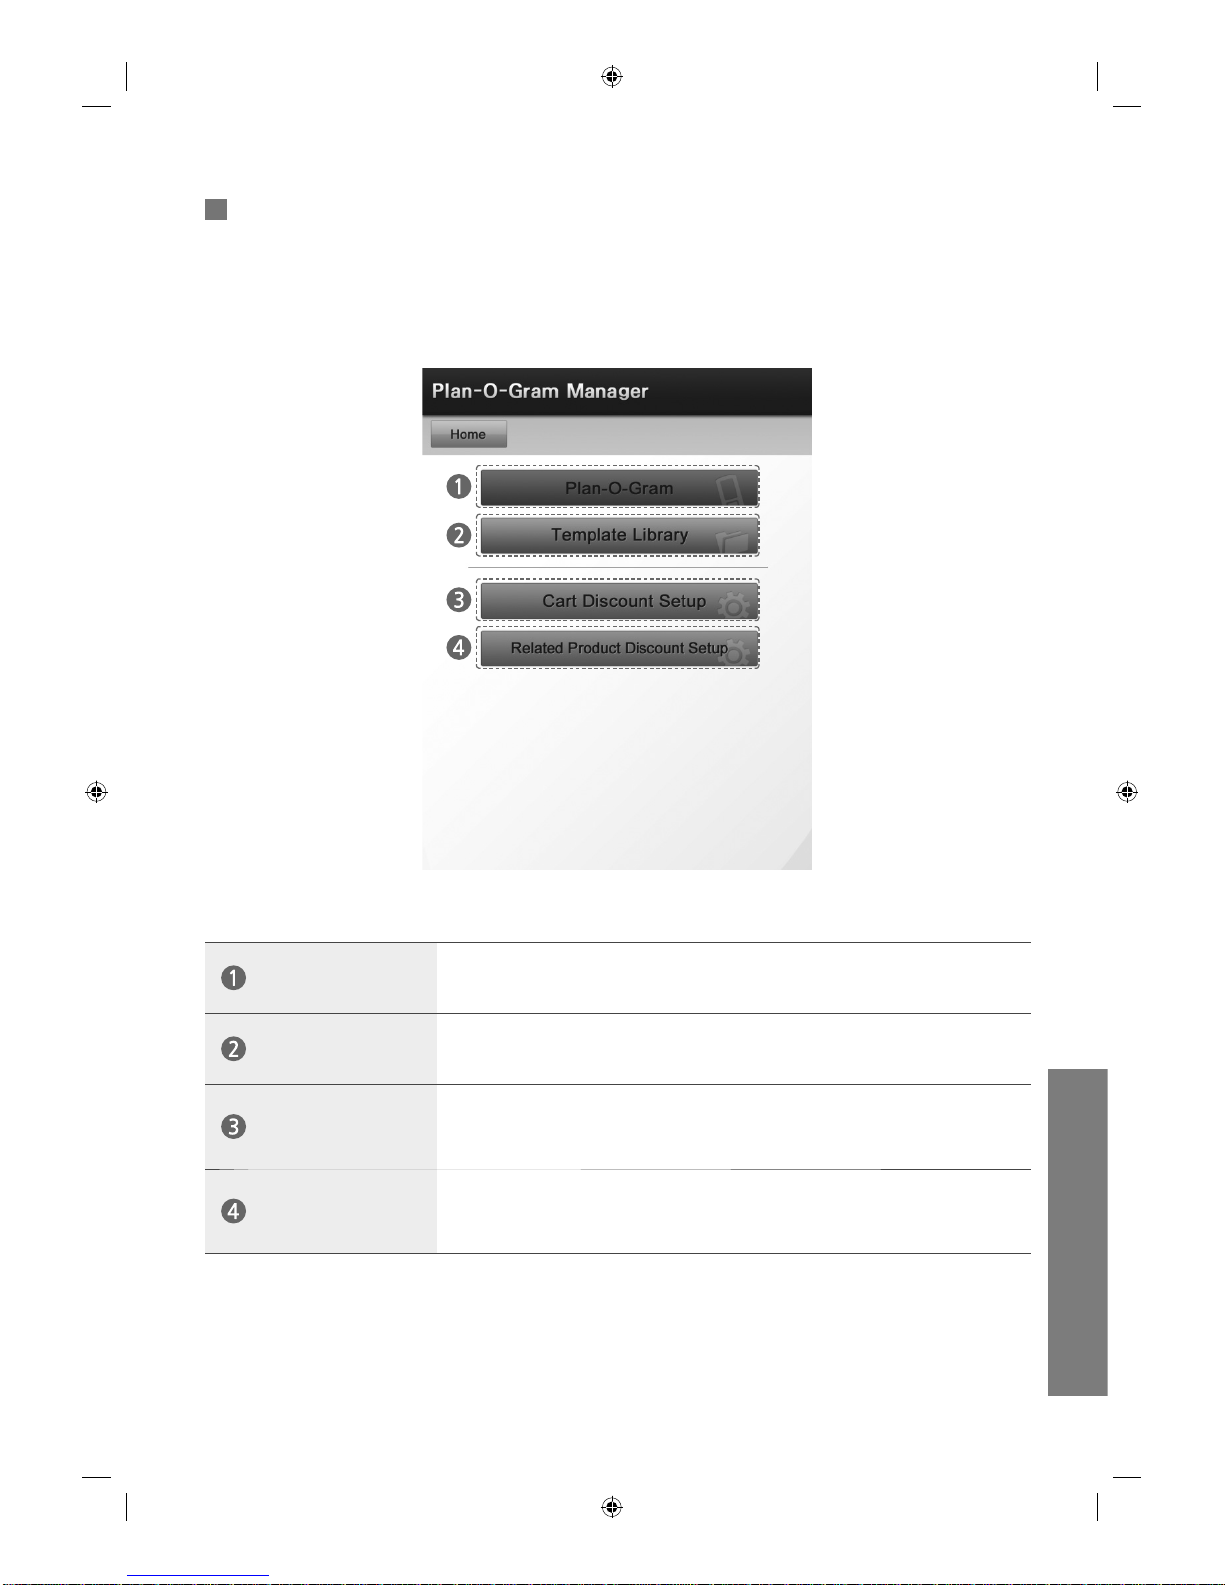
Plan-O-Gram Manager
The Plan-O-Gram Manager manages products, Template items and discount functions.
Plan-O-Gram
Displays product display information.
Template Library
Manages (adds/deletes) a Template.
Cart Discount
Setup
Sets the function which applies a discount to each purchased product
when the value of the items in the shopping cart reaches a certain level.
Related Product
Discount Setup
Sets the function which applies a discount to related products at the time
of purchase.

uVending
English
27
Plan-O-Gram
Plan-O-Gram displays and modifies product display information and Template items.
Slots
The number of spaces where products can be displayed.
Products
The number of products displayed in the Slot of the current Samsung
uVending machine.
Configuration
Sets product display.
Change Template
Changes the current Template and Theme.
 Loading...